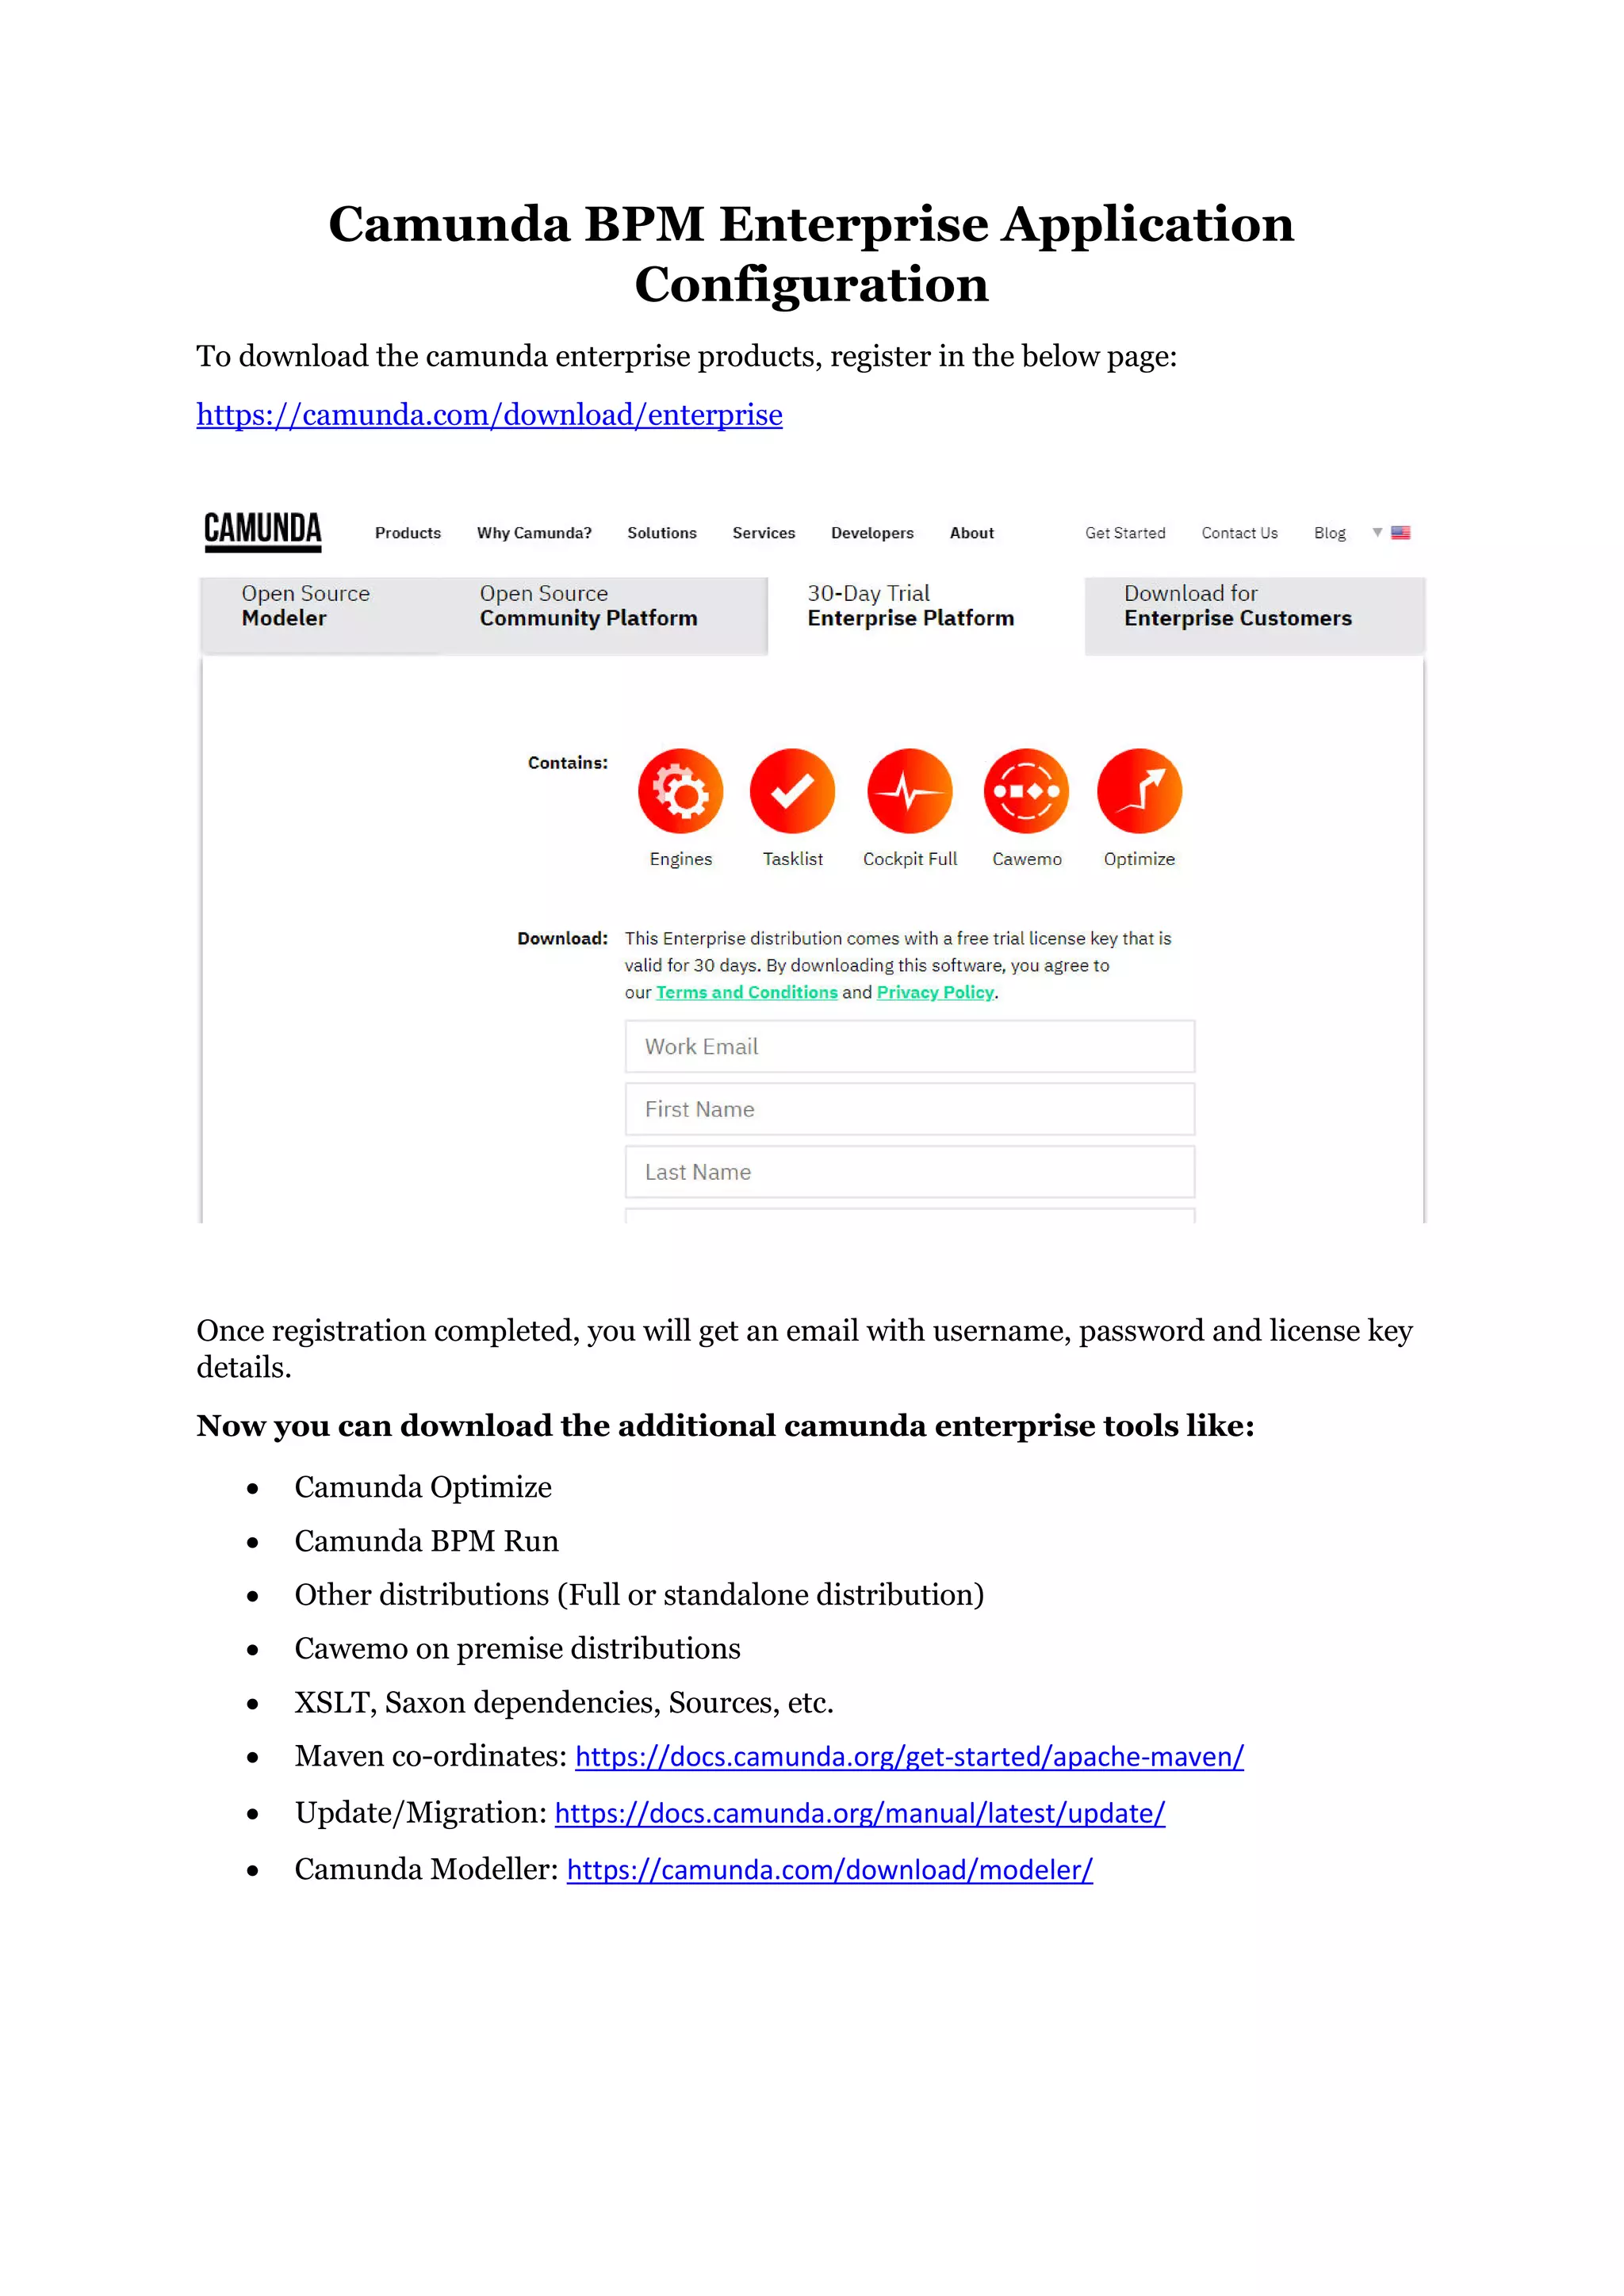
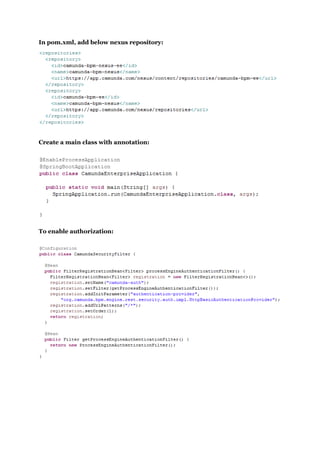
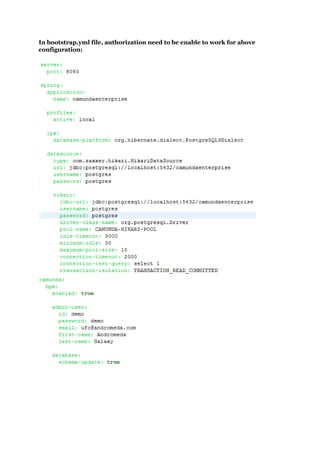
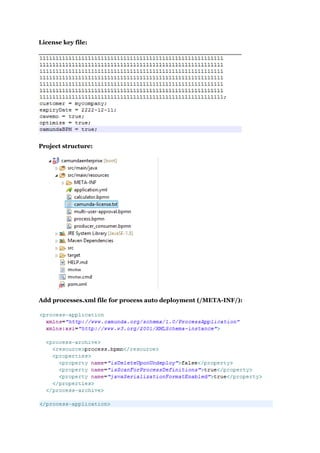
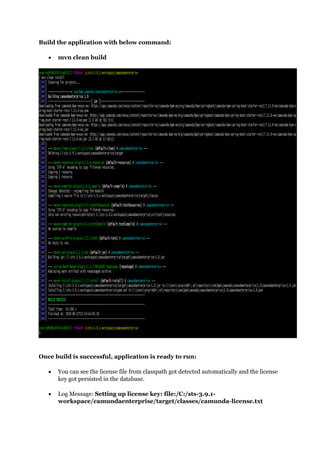
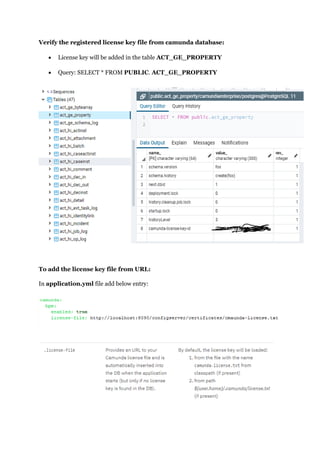
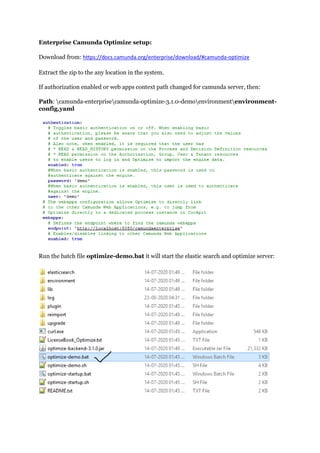
Camunda BPM Enterprise Application
Configuration
To download the camunda enterprise products, register in the below page:
https://camunda.com/download/enterprise
Once registration completed, you will get an email with username, password and license key
details.
Now you can download the additional camunda enterprise tools like:
 Camunda Optimize
 Camunda BPM Run
 Other distributions (Full or standalone distribution)
 Cawemo on premise distributions
 XSLT, Saxon dependencies, Sources, etc.
 Maven co-ordinates: https://docs.camunda.org/get-started/apache-maven/
 Update/Migration: https://docs.camunda.org/manual/latest/update/
 Camunda Modeller: https://camunda.com/download/modeler/
Camunda Enterprise Application Development:
Open STS > Window > Preferences > Maven > User Settings, then configure the
credentials in settings.xml to access camunda nexus repo.
In Settings.xml, configure like below:
Create New Spring Starter project from STS, select type as Maven, Packaging as Jar and
provide other details, then apply.
In pom.xml, add below dependencies:
In pom.xml, add below nexus repository:
Create a main class with annotation:
To enable authorization:
In bootstrap.yml file, authorization need to be enable to work for above
configuration:
To Enable CORS filter:
License key file should present in the classpath:
/src/main/resources/camunda-license.txt
License key file:
Project structure:
Add processes.xml file for process auto deployment (/META-INF/):
Build the application with below command:
 mvn clean build
Once build is successful, application is ready to run:
 You can see the license file from classpath got detected automatically and the license
key got persisted in the database.
 Log Message: Setting up license key: file:/C:/sts-3.9.1-
workspace/camundaenterprise/target/classes/camunda-license.txt
Verify the registered license key file from camunda database:
 License key will be added in the table ACT_GE_PROPERTY
 Query: SELECT * FROM PUBLIC. ACT_GE_PROPERTY
To add the license key file from URL:
In application.yml file add below entry:
Login to the camunda nexus server with credentials:
https://app.camunda.com/nexus/
Run the application as Spring Boot App:
Login to the Cockpit:
http://localhost:8080/{webAppContextpath}
Heat Map (Historical View):
Process Instance Migration:
Enterprise Camunda Optimize setup:
Download from: https://docs.camunda.org/enterprise/download/#camunda-optimize
Extract the zip to the any location in the system.
If authorization enabled or web apps context path changed for camunda server, then:
Path: camunda-enterprisecamunda-optimize-3.1.0-demoenvironmentenvironment-
config.yaml
Run the batch file optimize-demo.bat it will start the elastic search and optimize server:
Camunda Optimize Console logs:
Verify Elastic search server status:
Optimize and Elastic search logs can be found in the path:
 Log file path: camunda-enterprisecamunda-optimize-3.1.0-demolog
Login to Camunda Optimize with cockpit credentials and enter the license key.
 Cawemo Login URL: http://localhost:8090/
Create dashboards and reports in Camunda Optimize:
Create reports in Camunda Optimize like below:
That’s all folks. Enterprise Camunda spring boot and Camunda Optimize was
been configured successfully!!!

Camunda BPM Enterprise Application Configuration

  • 1.
    Camunda BPM EnterpriseApplication Configuration To download the camunda enterprise products, register in the below page: https://camunda.com/download/enterprise Once registration completed, you will get an email with username, password and license key details. Now you can download the additional camunda enterprise tools like:  Camunda Optimize  Camunda BPM Run  Other distributions (Full or standalone distribution)  Cawemo on premise distributions  XSLT, Saxon dependencies, Sources, etc.  Maven co-ordinates: https://docs.camunda.org/get-started/apache-maven/  Update/Migration: https://docs.camunda.org/manual/latest/update/  Camunda Modeller: https://camunda.com/download/modeler/
  • 2.
    Camunda Enterprise ApplicationDevelopment: Open STS > Window > Preferences > Maven > User Settings, then configure the credentials in settings.xml to access camunda nexus repo. In Settings.xml, configure like below: Create New Spring Starter project from STS, select type as Maven, Packaging as Jar and provide other details, then apply. In pom.xml, add below dependencies:
  • 3.
    In pom.xml, addbelow nexus repository: Create a main class with annotation: To enable authorization:
  • 4.
    In bootstrap.yml file,authorization need to be enable to work for above configuration:
  • 5.
    To Enable CORSfilter: License key file should present in the classpath: /src/main/resources/camunda-license.txt
  • 6.
    License key file: Projectstructure: Add processes.xml file for process auto deployment (/META-INF/):
  • 7.
    Build the applicationwith below command:  mvn clean build Once build is successful, application is ready to run:  You can see the license file from classpath got detected automatically and the license key got persisted in the database.  Log Message: Setting up license key: file:/C:/sts-3.9.1- workspace/camundaenterprise/target/classes/camunda-license.txt
  • 8.
    Verify the registeredlicense key file from camunda database:  License key will be added in the table ACT_GE_PROPERTY  Query: SELECT * FROM PUBLIC. ACT_GE_PROPERTY To add the license key file from URL: In application.yml file add below entry:
  • 9.
    Login to thecamunda nexus server with credentials: https://app.camunda.com/nexus/ Run the application as Spring Boot App: Login to the Cockpit: http://localhost:8080/{webAppContextpath}
  • 10.
    Heat Map (HistoricalView): Process Instance Migration:
  • 11.
    Enterprise Camunda Optimizesetup: Download from: https://docs.camunda.org/enterprise/download/#camunda-optimize Extract the zip to the any location in the system. If authorization enabled or web apps context path changed for camunda server, then: Path: camunda-enterprisecamunda-optimize-3.1.0-demoenvironmentenvironment- config.yaml Run the batch file optimize-demo.bat it will start the elastic search and optimize server:
  • 12.
    Camunda Optimize Consolelogs: Verify Elastic search server status: Optimize and Elastic search logs can be found in the path:  Log file path: camunda-enterprisecamunda-optimize-3.1.0-demolog
  • 13.
    Login to CamundaOptimize with cockpit credentials and enter the license key.  Cawemo Login URL: http://localhost:8090/ Create dashboards and reports in Camunda Optimize: Create reports in Camunda Optimize like below: That’s all folks. Enterprise Camunda spring boot and Camunda Optimize was been configured successfully!!!