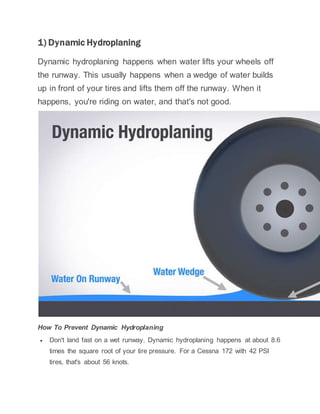
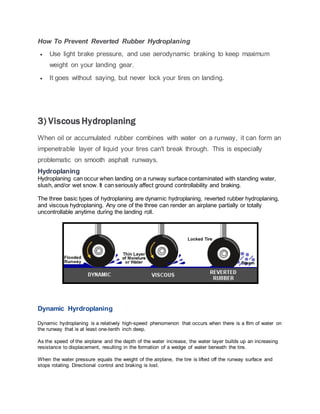
2 SECOND RULE
The safe and correct following distances are difficult to establish. For this reason, the 2
second rule is used to gain a safe following distance at any speed and is also an easy
method for all drivers to remember.
The rule is very simple and easy to understand by using the description and
diagram below. Remaining at least 2 seconds from the vehicle in front will
provide a distance of one car length per 5 mph, at which ever speed you drive.
This distance is of course extended for the 2 seconds the faster you travel. Using
the 2 second rule helps to significantly reduce accidents or reduce collision
damage if one occurs.
Using the 2 second rule provides not only a general safer way of driving, but can also
help to save fuel, brake wear and paint damage as a result of stone chips occurring due to
driving too close to the car in-front. See how to save petrol for further information.
The 2 second rule should also be utilised by the learner driver as the driving test examiner
will most certainly fail your driving test for driving too close to a vehicle (tailgating), or
remaining close to the vehicle for too long.
The simple and effective 2 second rule only applies to dry weather conditions and should
be extended depending on the weather. Generally if the conditions are wet, the 2 seconds
should be double to 4 seconds to allow for longer braking distances due to slippery roads.
For frosty or icy conditions, this needs to be extended further.
2 Second Rule Explained
2 SECOND RULE EXPLAINED
Let’s suppose you are driving along a relatively straight road at 30 mph as an example.
To estimate the minimum and safe following distance, allow the car in front (the red car)
to pass a fixed object.
This can be any object that is easy to distinguish such as a road marking, lamp post,
although in this case in the diagram, it’s a road sign. As the rear of the car in front
roughly lines up with your chosen reference marker, count to 2 seconds. If before you
have reached 2 seconds your vehicle has passed the same reference marker, you will need
to increase your following distance and try again.
The 2 second rule isn’t just for the car in-front however. If a car is driving too close
behind you (tailgating), you will also need to take their thinking distance into account by
leaving a sufficient and safe distance between yourself and the car in-front.
By following the 2 second rule, if the car in front of you brakes sharply, you will be able
to slow down in good time, but also allow plenty of time for the car behind you to slow
down. It’s also essential to learn safe braking techniques such as progressive braking.
Progressive braking once learned allows for safer driving and less wear and tear on your
vehicle.
1) Dynamic Hydroplaning
Dynamic hydroplaning happens when water lifts your wheels off
the runway. This usually happens when a wedge of water builds
up in front of your tires and lifts them off the runway. When it
happens, you're riding on water, and that's not good.
How To Prevent Dynamic Hydroplaning
 Don't land fast on a wet runway. Dynamic hydroplaning happens at about 8.6
times the square root of your tire pressure. For a Cessna 172 with 42 PSI
tires, that's about 56 knots.
 Keep your tires inflated - under-inflated tires hydroplane easier than properly
inflated ones.
 Use back pressure and aerodynamic braking to slow down - the more weight
you have on your tires, the better.
2) Reverted Rubber Hydroplaning
Reverted rubber hydroplaning happens when your tires lock up, the rubber
begins to melt, and trapped water under the tire turns into steam. When it
happens, you're riding on steam, and melting your tires in the process.
How To Prevent Reverted Rubber Hydroplaning
 Use light brake pressure, and use aerodynamic braking to keep maximum
weight on your landing gear.
 It goes without saying, but never lock your tires on landing.
3) Viscous Hydroplaning
When oil or accumulated rubber combines with water on a runway, it can form an
impenetrable layer of liquid your tires can't break through. This is especially
problematic on smooth asphalt runways.
Hydroplaning
Hydroplaning can occur when landing on a runway surface contaminated with standing water,
slush, and/or wet snow. It can seriously affect ground controllability and braking.
The three basic types of hydroplaning are dynamic hydroplaning, reverted rubber hydroplaning,
and viscous hydroplaning. Any one of the three can render an airplane partially or totally
uncontrollable anytime during the landing roll.
Dynamic Hyrdroplaning
Dynamic hydroplaning is a relatively high-speed phenomenon that occurs when there is a film of water on
the runway that is at least one-tenth inch deep.
As the speed of the airplane and the depth of the water increase, the water layer builds up an increasing
resistance to displacement, resulting in the formation of a wedge of water beneath the tire.
When the water pressure equals the weight of the airplane, the tire is lifted off the runway surface and
stops rotating. Directional control and braking is lost.
Dynamic hydroplaning is often affected by tire inflation pressure.
Once hydroplaning has started, it may persist to a significantly slower speed depending on the type being
experienced.
It can happen on takeoff as well as landing.
Reverted Rubber Hydroplaning
Reverted rubber (steam) hydroplaning occurs during heavy braking that results in a prolonged
locked-wheel skid. Only a thin film of water on the runway is required to facilitate this type of
hydroplaning.
The tire skidding generates enough heat to cause the rubber in contact with the runway to revert
to its original uncured state (think ‘melting’). The reverted rubber acts as a seal between the tire
and the runway, and delays water exit from the tire footprint area. The water heats and is
converted to steam which supports the tire off the runway.
Reverted rubberhydroplaning damaged tire.
Close-up of reverted rubbertire damage.
Reverted rubber hydroplaning frequently follows dynamic hydroplaning, during which time the
pilot may have the brakes locked in an attempt to slow the airplane. Eventually the airplane
slows enough to where the tires make contact with the runway surface and the airplane begins
to skid.
The remedy for this type of hydroplane is for the pilot to release the brakes and allow the wheels to spin
up and apply moderate braking.
Reverted rubber hydroplaning is insidious in that the pilot may not know when it begins, and it can persist
to very slow groundspeeds (20 knots or less).
Viscous Hydroplaning
Viscous hydroplaning is due to the viscous properties of water. A thin film of fluid no more than
one thousandth of an inch in depth is all that is needed.
The tire cannot penetrate the fluid and the tire rolls on top of the film. This can occur at a much
lower speed than dynamic hydroplane, but requires a smooth or smooth acting surface such as
asphalt or a touchdown area coated with the accumulated rubber of past landings. Such a
surface can have the same friction coefficient as wet ice.
And although this kind of hydroplaning may seem as ‘vicious’ as a mad dog when you
encounter it, please remember it is pronounced like “vis-kus”.
Avoiding Hydroplaning
It is best to land on a grooved runway if available.
Touchdown speed should be as slow as safely possible.
After the nosewheel is lowered to the runway, moderate braking should be applied.
If hydroplaning is suspected, the nose should be raised and aerodynamic drag used to decelerate to
a point where the brakes do become effective.
Proper braking technique is essential. The brakes should be applied firmly until reaching a point just short
of a skid. At the first sign of a skid, the pilot should release brake pressure and allow the wheels to spin
up.
Directional control should be maintained as far as possible with the rudder.
Remember: In a crosswind, if hydroplaning should occur, the crosswind will cause the airplane to
simultaneously weathervane into the wind as well asslide downwind.
How To Prevent Viscous Hydroplaning
 Land on a grooved runway, if possible.
 Don't land fast.
 Keep your tires inflated - under-inflated tires hydroplane easier than properly
inflated ones.
 Use back pressure and aerodynamic braking to slow down.

Braking

  • 1.
    2 SECOND RULE Thesafe and correct following distances are difficult to establish. For this reason, the 2 second rule is used to gain a safe following distance at any speed and is also an easy method for all drivers to remember. The rule is very simple and easy to understand by using the description and diagram below. Remaining at least 2 seconds from the vehicle in front will provide a distance of one car length per 5 mph, at which ever speed you drive. This distance is of course extended for the 2 seconds the faster you travel. Using the 2 second rule helps to significantly reduce accidents or reduce collision damage if one occurs. Using the 2 second rule provides not only a general safer way of driving, but can also help to save fuel, brake wear and paint damage as a result of stone chips occurring due to driving too close to the car in-front. See how to save petrol for further information. The 2 second rule should also be utilised by the learner driver as the driving test examiner will most certainly fail your driving test for driving too close to a vehicle (tailgating), or remaining close to the vehicle for too long. The simple and effective 2 second rule only applies to dry weather conditions and should be extended depending on the weather. Generally if the conditions are wet, the 2 seconds should be double to 4 seconds to allow for longer braking distances due to slippery roads. For frosty or icy conditions, this needs to be extended further.
  • 2.
    2 Second RuleExplained 2 SECOND RULE EXPLAINED Let’s suppose you are driving along a relatively straight road at 30 mph as an example. To estimate the minimum and safe following distance, allow the car in front (the red car) to pass a fixed object. This can be any object that is easy to distinguish such as a road marking, lamp post, although in this case in the diagram, it’s a road sign. As the rear of the car in front roughly lines up with your chosen reference marker, count to 2 seconds. If before you have reached 2 seconds your vehicle has passed the same reference marker, you will need to increase your following distance and try again. The 2 second rule isn’t just for the car in-front however. If a car is driving too close behind you (tailgating), you will also need to take their thinking distance into account by leaving a sufficient and safe distance between yourself and the car in-front. By following the 2 second rule, if the car in front of you brakes sharply, you will be able to slow down in good time, but also allow plenty of time for the car behind you to slow down. It’s also essential to learn safe braking techniques such as progressive braking. Progressive braking once learned allows for safer driving and less wear and tear on your vehicle.
  • 3.
    1) Dynamic Hydroplaning Dynamichydroplaning happens when water lifts your wheels off the runway. This usually happens when a wedge of water builds up in front of your tires and lifts them off the runway. When it happens, you're riding on water, and that's not good. How To Prevent Dynamic Hydroplaning  Don't land fast on a wet runway. Dynamic hydroplaning happens at about 8.6 times the square root of your tire pressure. For a Cessna 172 with 42 PSI tires, that's about 56 knots.
  • 4.
     Keep yourtires inflated - under-inflated tires hydroplane easier than properly inflated ones.  Use back pressure and aerodynamic braking to slow down - the more weight you have on your tires, the better. 2) Reverted Rubber Hydroplaning Reverted rubber hydroplaning happens when your tires lock up, the rubber begins to melt, and trapped water under the tire turns into steam. When it happens, you're riding on steam, and melting your tires in the process.
  • 5.
    How To PreventReverted Rubber Hydroplaning  Use light brake pressure, and use aerodynamic braking to keep maximum weight on your landing gear.  It goes without saying, but never lock your tires on landing. 3) Viscous Hydroplaning When oil or accumulated rubber combines with water on a runway, it can form an impenetrable layer of liquid your tires can't break through. This is especially problematic on smooth asphalt runways. Hydroplaning Hydroplaning can occur when landing on a runway surface contaminated with standing water, slush, and/or wet snow. It can seriously affect ground controllability and braking. The three basic types of hydroplaning are dynamic hydroplaning, reverted rubber hydroplaning, and viscous hydroplaning. Any one of the three can render an airplane partially or totally uncontrollable anytime during the landing roll. Dynamic Hyrdroplaning Dynamic hydroplaning is a relatively high-speed phenomenon that occurs when there is a film of water on the runway that is at least one-tenth inch deep. As the speed of the airplane and the depth of the water increase, the water layer builds up an increasing resistance to displacement, resulting in the formation of a wedge of water beneath the tire. When the water pressure equals the weight of the airplane, the tire is lifted off the runway surface and stops rotating. Directional control and braking is lost.
  • 6.
    Dynamic hydroplaning isoften affected by tire inflation pressure. Once hydroplaning has started, it may persist to a significantly slower speed depending on the type being experienced. It can happen on takeoff as well as landing. Reverted Rubber Hydroplaning Reverted rubber (steam) hydroplaning occurs during heavy braking that results in a prolonged locked-wheel skid. Only a thin film of water on the runway is required to facilitate this type of hydroplaning. The tire skidding generates enough heat to cause the rubber in contact with the runway to revert to its original uncured state (think ‘melting’). The reverted rubber acts as a seal between the tire and the runway, and delays water exit from the tire footprint area. The water heats and is converted to steam which supports the tire off the runway. Reverted rubberhydroplaning damaged tire.
  • 7.
    Close-up of revertedrubbertire damage. Reverted rubber hydroplaning frequently follows dynamic hydroplaning, during which time the pilot may have the brakes locked in an attempt to slow the airplane. Eventually the airplane slows enough to where the tires make contact with the runway surface and the airplane begins to skid. The remedy for this type of hydroplane is for the pilot to release the brakes and allow the wheels to spin up and apply moderate braking. Reverted rubber hydroplaning is insidious in that the pilot may not know when it begins, and it can persist to very slow groundspeeds (20 knots or less). Viscous Hydroplaning Viscous hydroplaning is due to the viscous properties of water. A thin film of fluid no more than one thousandth of an inch in depth is all that is needed. The tire cannot penetrate the fluid and the tire rolls on top of the film. This can occur at a much lower speed than dynamic hydroplane, but requires a smooth or smooth acting surface such as asphalt or a touchdown area coated with the accumulated rubber of past landings. Such a surface can have the same friction coefficient as wet ice. And although this kind of hydroplaning may seem as ‘vicious’ as a mad dog when you encounter it, please remember it is pronounced like “vis-kus”. Avoiding Hydroplaning It is best to land on a grooved runway if available. Touchdown speed should be as slow as safely possible.
  • 8.
    After the nosewheelis lowered to the runway, moderate braking should be applied. If hydroplaning is suspected, the nose should be raised and aerodynamic drag used to decelerate to a point where the brakes do become effective. Proper braking technique is essential. The brakes should be applied firmly until reaching a point just short of a skid. At the first sign of a skid, the pilot should release brake pressure and allow the wheels to spin up. Directional control should be maintained as far as possible with the rudder. Remember: In a crosswind, if hydroplaning should occur, the crosswind will cause the airplane to simultaneously weathervane into the wind as well asslide downwind. How To Prevent Viscous Hydroplaning  Land on a grooved runway, if possible.  Don't land fast.
  • 9.
     Keep yourtires inflated - under-inflated tires hydroplane easier than properly inflated ones.  Use back pressure and aerodynamic braking to slow down.