SlideShare a Scribd company logo
1 Fitting the Brackets
The brackets can be fitted in three different ways:
Face Fix Top Fix Side Fix
Face Fix Top Fix
Blinds with a larger width come supplied with center support brackets. These need to be aligned with the top of the box (side) brackets. Install
them with the bigger flap situated at the top and space them equally along the width of the blind making sure they are clear of any cords
coming out of the headrail. They can be both face-fixed or top-fixed.
Installation Guide for Wooden Blinds
2 Installing the Blind
Open the gate of the box brackets,
lift the blind up and slide the headrail
into the open brackets. Swing the
hinged section of the bracket down
and press firmly until it is locked.
3 Installing the Valance
Screw one end of the valance return clip onto the valance using one of the screws
provided. Next align the edge of the valance return with the valance and screw the
other end of the valance clip onto the valance return.
Handy Tip
If you pull on the cords to tilt/rotate the wooden slats and they do not move:
• Firstly, make sure the slats are in the fully open position and the two tilt cords are the same length.
• Next, pull the blind all the way up to the top, lock it off and remove the blind from the brackets.
• Now check inside the headrail and make sure the long metal rod is pushed fully into the tilting
mechanism (as illustrated).
Installation Guide for Wooden Blinds
Screw the valance clips onto the
back side of the valance with the
screws provided.
Hook the valance clip with the
valance attached onto the top
of the headrail.
4 Child Safety
Drop of Blind *Distance between
cord cleats
(center to center)
1 - 1000mm
1001 - 2000mm
2001 - 3000mm
100mm
150mm
300mm
Breakaway Cord Condenser
A breakaway cord condenser comes pre-fitted
to the lift cords, so when a horizontal force is
applied to the cords entering the condenser, it
will safely break apart thereby eliminating any
hazardous loops.
If the cord condenser becomes separated:
Firstly, untwist and untangle the cords.
If the blind features 2 cords: press
the cord condenser together until it
is fully closed.
If the blind features 3 cords: Place the
loose cord into the opening in one half
of the cord condenser and press the cord
condenser together until it is fully closed.
If the blind features 4 cords: Place one of
the loose cords into the opening of one
half of the condenser, next place the
remaining loose cord into the opening
in the other half, then press the cord
condenser together until it is fully closed.
Cord Safety Cleat
The safety cleat needs to be installed as close as possible to the headrail and in all cases not less than 1500mm from the floor. The
cords must be fully wrapped around the safety cleat(s) when the blind is not in use. Refer to the table below to determine the
distance required between the cleats to fully accumulate the cords when the blind is completely raised up.
*Distance between
cord cleats
(center to center)
Place the safety cleat in the
desired position on the wall
and mark the positions of
the holes with a pencil.
With the hole positions marked,
drill as required and use the
screws provided to attach the
safety cleat to the wall.
Wrap the cords around the
cord cleats in a figure of 8.
When the cords are fully
accumulated, ensure they
are secure so that when any
cord is pulled, no excess
cord is released.
Installation Guide for Wooden Blinds
Lift
Cord
Tilt
Cords
5 Operation Instructions
To tilt the blind: Pull on the required tilt cord tassel to tilt slats to the desired position.
Make sure to tilt the slats to the horizontal (open) position before raising or lowering to extend the life of the blind.
To lower the blind: Move the lift cord towards middle of the blind, pulling down gently until the cord lock releases.
To raise the blind: Pull the lift cord downward until the blind reaches the desired height.
To lock the cords: Pull the lift cord towards the outside of the blind and release. The cord will lock automatically.
Installation Guide for Wooden Blinds
6 Recommended Care
1. When opening or closing the blind, only raise or lower it when the slats are in the horizontal (open) position.
Larger blinds must be raised or lowered in stages. Raising or lowering in one singular motion will place excessive
stress on the mechanism, strings and brackets. Do not force the cord when tilting the blinds, this may cause the
mechanism to break.
2. It is not recommended for real wood blinds to be fitted in damp or wet environments as warpage may occur
over time.
3. If the blind does become damp or wet, wipe it down immediately. The slats should be in the horizontal (open)
position and the blind released and lowered completely. Allow to dry by removing the blinds from the brackets
and lay down on a hard surface. Do not place the blind in direct sunlight as excessive heat may cause the slats to
warp. If the blinds are excessively wet, do not place the blinds onto a surface that may absorb any stain from the
wood.
4. Dust the blinds regularly.
© 2023 English Blinds. All rights reserved.

More Related Content

Similar to How to Fit Wooden Blinds

IMPORTANCE OF BANDAGES IN FIRST AID .pptx
IMPORTANCE OF BANDAGES IN FIRST AID .pptxIMPORTANCE OF BANDAGES IN FIRST AID .pptx
IMPORTANCE OF BANDAGES IN FIRST AID .pptx
CHIRANTANMONDAL2
 
Ms200 Install Concrete
Ms200 Install ConcreteMs200 Install Concrete
Ms200 Install Concrete
dteich
 
How to install window blinds
How to install window blindsHow to install window blinds
How to install window blinds
Apollo Blinds
 
Instruction Manual C-MORE Scout | Optics Trade
Instruction Manual C-MORE Scout | Optics TradeInstruction Manual C-MORE Scout | Optics Trade
Instruction Manual C-MORE Scout | Optics Trade
Optics-Trade
 
Gate keeper 1935 series
Gate keeper 1935 seriesGate keeper 1935 series
Gate keeper 1935 series
Western Shelter Systems
 
Posturematic classic-manual
Posturematic classic-manualPosturematic classic-manual
Posturematic classic-manual
Sealy
 
Famili 4-in-1 Transformer Cot Installation
Famili 4-in-1 Transformer Cot InstallationFamili 4-in-1 Transformer Cot Installation
Famili 4-in-1 Transformer Cot Installation
e-mart
 
Hunky Dory Repair iPhone 4s Tear Down and Repair Guide
Hunky Dory Repair iPhone 4s Tear Down and Repair GuideHunky Dory Repair iPhone 4s Tear Down and Repair Guide
Hunky Dory Repair iPhone 4s Tear Down and Repair Guide
Marc Mourning
 
Odl tube training
Odl tube trainingOdl tube training
Odl tube trainingguest77936b
 
ZipView Dual Monitor Arm - Assembly
ZipView Dual Monitor Arm - AssemblyZipView Dual Monitor Arm - Assembly
ZipView Dual Monitor Arm - Assembly
iMovR
 
Ridge Vent Installation Instructions for Hip Roofs
Ridge Vent Installation Instructions for Hip RoofsRidge Vent Installation Instructions for Hip Roofs
Ridge Vent Installation Instructions for Hip Roofs
Quarrix
 
How to Assemble JLL D100 Folding Treadmill
How to Assemble JLL D100 Folding TreadmillHow to Assemble JLL D100 Folding Treadmill
How to Assemble JLL D100 Folding Treadmill
JLL Fitness
 
Instruction Manual C-MORE Serendipity | Optics Trade
Instruction Manual C-MORE Serendipity | Optics TradeInstruction Manual C-MORE Serendipity | Optics Trade
Instruction Manual C-MORE Serendipity | Optics Trade
Optics-Trade
 
Basic Electrical Splicing
Basic Electrical SplicingBasic Electrical Splicing
Basic Electrical Splicing
Raymar Baquilar
 
howtospliceelectricalwires-160915075216.pdf
howtospliceelectricalwires-160915075216.pdfhowtospliceelectricalwires-160915075216.pdf
howtospliceelectricalwires-160915075216.pdf
JhoanaTamondong
 
Instruction manual | Hawke XB30 Pro | Optics Trade
Instruction manual | Hawke XB30 Pro | Optics TradeInstruction manual | Hawke XB30 Pro | Optics Trade
Instruction manual | Hawke XB30 Pro | Optics Trade
Optics-Trade
 
F-F-Fiddle Assembly Instructions
F-F-Fiddle Assembly InstructionsF-F-Fiddle Assembly Instructions
F-F-Fiddle Assembly Instructions
dsp39
 
Posturematic deluxe-manual
Posturematic deluxe-manualPosturematic deluxe-manual
Posturematic deluxe-manual
Sealy
 

Similar to How to Fit Wooden Blinds (20)

IMPORTANCE OF BANDAGES IN FIRST AID .pptx
IMPORTANCE OF BANDAGES IN FIRST AID .pptxIMPORTANCE OF BANDAGES IN FIRST AID .pptx
IMPORTANCE OF BANDAGES IN FIRST AID .pptx
 
Ms200 Install Concrete
Ms200 Install ConcreteMs200 Install Concrete
Ms200 Install Concrete
 
How to install window blinds
How to install window blindsHow to install window blinds
How to install window blinds
 
Instruction Manual C-MORE Scout | Optics Trade
Instruction Manual C-MORE Scout | Optics TradeInstruction Manual C-MORE Scout | Optics Trade
Instruction Manual C-MORE Scout | Optics Trade
 
Gate keeper 1935 series
Gate keeper 1935 seriesGate keeper 1935 series
Gate keeper 1935 series
 
Posturematic classic-manual
Posturematic classic-manualPosturematic classic-manual
Posturematic classic-manual
 
Famili 4-in-1 Transformer Cot Installation
Famili 4-in-1 Transformer Cot InstallationFamili 4-in-1 Transformer Cot Installation
Famili 4-in-1 Transformer Cot Installation
 
Hunky Dory Repair iPhone 4s Tear Down and Repair Guide
Hunky Dory Repair iPhone 4s Tear Down and Repair GuideHunky Dory Repair iPhone 4s Tear Down and Repair Guide
Hunky Dory Repair iPhone 4s Tear Down and Repair Guide
 
Forsus
ForsusForsus
Forsus
 
Odl tube training
Odl tube trainingOdl tube training
Odl tube training
 
ZipView Dual Monitor Arm - Assembly
ZipView Dual Monitor Arm - AssemblyZipView Dual Monitor Arm - Assembly
ZipView Dual Monitor Arm - Assembly
 
Ridge Vent Installation Instructions for Hip Roofs
Ridge Vent Installation Instructions for Hip RoofsRidge Vent Installation Instructions for Hip Roofs
Ridge Vent Installation Instructions for Hip Roofs
 
How to Assemble JLL D100 Folding Treadmill
How to Assemble JLL D100 Folding TreadmillHow to Assemble JLL D100 Folding Treadmill
How to Assemble JLL D100 Folding Treadmill
 
Instruction Manual C-MORE Serendipity | Optics Trade
Instruction Manual C-MORE Serendipity | Optics TradeInstruction Manual C-MORE Serendipity | Optics Trade
Instruction Manual C-MORE Serendipity | Optics Trade
 
Basic Electrical Splicing
Basic Electrical SplicingBasic Electrical Splicing
Basic Electrical Splicing
 
howtospliceelectricalwires-160915075216.pdf
howtospliceelectricalwires-160915075216.pdfhowtospliceelectricalwires-160915075216.pdf
howtospliceelectricalwires-160915075216.pdf
 
Instruction manual | Hawke XB30 Pro | Optics Trade
Instruction manual | Hawke XB30 Pro | Optics TradeInstruction manual | Hawke XB30 Pro | Optics Trade
Instruction manual | Hawke XB30 Pro | Optics Trade
 
Jointer
JointerJointer
Jointer
 
F-F-Fiddle Assembly Instructions
F-F-Fiddle Assembly InstructionsF-F-Fiddle Assembly Instructions
F-F-Fiddle Assembly Instructions
 
Posturematic deluxe-manual
Posturematic deluxe-manualPosturematic deluxe-manual
Posturematic deluxe-manual
 

Recently uploaded

Torun Center Residences Istanbul - Listing Turkey
Torun Center Residences Istanbul - Listing TurkeyTorun Center Residences Istanbul - Listing Turkey
Torun Center Residences Istanbul - Listing Turkey
Listing Turkey
 
Sense Levent Kagithane Catalog - Listing Turkey
Sense Levent Kagithane Catalog - Listing TurkeySense Levent Kagithane Catalog - Listing Turkey
Sense Levent Kagithane Catalog - Listing Turkey
Listing Turkey
 
Total Environment Tangled Up In The Green - Residential Plots Where Nature an...
Total Environment Tangled Up In The Green - Residential Plots Where Nature an...Total Environment Tangled Up In The Green - Residential Plots Where Nature an...
Total Environment Tangled Up In The Green - Residential Plots Where Nature an...
JagadishKR1
 
Simpolo Company Profile & Corporate Logo
Simpolo Company Profile & Corporate LogoSimpolo Company Profile & Corporate Logo
Simpolo Company Profile & Corporate Logo
simpolosparkteam
 
The KA Housing - Catalogue - Listing Turkey
The KA Housing - Catalogue - Listing TurkeyThe KA Housing - Catalogue - Listing Turkey
The KA Housing - Catalogue - Listing Turkey
Listing Turkey
 
Hawthorn Module 1 Coverted to Slide Show - 04.06.2024.docx
Hawthorn Module 1 Coverted to Slide Show - 04.06.2024.docxHawthorn Module 1 Coverted to Slide Show - 04.06.2024.docx
Hawthorn Module 1 Coverted to Slide Show - 04.06.2024.docx
anothershaneroberts
 
Riverview City Loni Kalbhor Pune Brochure
Riverview City Loni Kalbhor Pune BrochureRiverview City Loni Kalbhor Pune Brochure
Riverview City Loni Kalbhor Pune Brochure
kishor21012022
 
Presentation to Windust Meadows HOA Board of Directors June 4, 2024: Focus o...
Presentation to Windust Meadows HOA Board of Directors June 4, 2024:  Focus o...Presentation to Windust Meadows HOA Board of Directors June 4, 2024:  Focus o...
Presentation to Windust Meadows HOA Board of Directors June 4, 2024: Focus o...
Joseph Lewis Aguirre
 
Dynamics 365 Bid Management for Construction Projects
Dynamics 365 Bid Management for Construction ProjectsDynamics 365 Bid Management for Construction Projects
Dynamics 365 Bid Management for Construction Projects
Dynamic Netsoft
 
Rixos Tersane Istanbul Residences Brochure_May2024_ENG.pdf
Rixos Tersane Istanbul Residences Brochure_May2024_ENG.pdfRixos Tersane Istanbul Residences Brochure_May2024_ENG.pdf
Rixos Tersane Istanbul Residences Brochure_May2024_ENG.pdf
Listing Turkey
 
Optimizing Your MCA Lead Capture Process for Better Results
Optimizing Your MCA Lead Capture Process for Better ResultsOptimizing Your MCA Lead Capture Process for Better Results
Optimizing Your MCA Lead Capture Process for Better Results
Lead Generation Media
 
Omaxe Sports City Dwarka A Comprehensive Guide
Omaxe Sports City Dwarka A Comprehensive GuideOmaxe Sports City Dwarka A Comprehensive Guide
Omaxe Sports City Dwarka A Comprehensive Guide
omaxesportscitydwark
 
How to keep your Home naturally Cool and Warm
How to keep your Home naturally Cool and WarmHow to keep your Home naturally Cool and Warm
How to keep your Home naturally Cool and Warm
Vinra Construction
 
Investing In The US As A Canadian… And How To Do It RIGHT!! (feat. Erwin Szet...
Investing In The US As A Canadian… And How To Do It RIGHT!! (feat. Erwin Szet...Investing In The US As A Canadian… And How To Do It RIGHT!! (feat. Erwin Szet...
Investing In The US As A Canadian… And How To Do It RIGHT!! (feat. Erwin Szet...
Volition Properties
 
Killer Referans Bahcesehir Catalog Listing Turkey
Killer Referans Bahcesehir Catalog Listing TurkeyKiller Referans Bahcesehir Catalog Listing Turkey
Killer Referans Bahcesehir Catalog Listing Turkey
Listing Turkey
 
One20 North Vancouver Floor Plans by Three Shores Development.
One20 North Vancouver Floor Plans by Three Shores Development.One20 North Vancouver Floor Plans by Three Shores Development.
One20 North Vancouver Floor Plans by Three Shores Development.
VickyAulakh1
 
Architectural & Interior design portfolio.pdf
Architectural & Interior design portfolio.pdfArchitectural & Interior design portfolio.pdf
Architectural & Interior design portfolio.pdf
susantebinum
 
Brigade Insignia at Yelahanka Brochure.pdf
Brigade Insignia at Yelahanka Brochure.pdfBrigade Insignia at Yelahanka Brochure.pdf
Brigade Insignia at Yelahanka Brochure.pdf
SachinChauhan191
 
Victory by Maskeen Group Surrey Floor plans June 2024 PDF
Victory by Maskeen Group Surrey Floor plans June 2024 PDFVictory by Maskeen Group Surrey Floor plans June 2024 PDF
Victory by Maskeen Group Surrey Floor plans June 2024 PDF
VickyAulakh1
 
Digital marketing strategy for Real Estate
Digital marketing strategy for Real EstateDigital marketing strategy for Real Estate
Digital marketing strategy for Real Estate
dheerajkumar8179
 

Recently uploaded (20)

Torun Center Residences Istanbul - Listing Turkey
Torun Center Residences Istanbul - Listing TurkeyTorun Center Residences Istanbul - Listing Turkey
Torun Center Residences Istanbul - Listing Turkey
 
Sense Levent Kagithane Catalog - Listing Turkey
Sense Levent Kagithane Catalog - Listing TurkeySense Levent Kagithane Catalog - Listing Turkey
Sense Levent Kagithane Catalog - Listing Turkey
 
Total Environment Tangled Up In The Green - Residential Plots Where Nature an...
Total Environment Tangled Up In The Green - Residential Plots Where Nature an...Total Environment Tangled Up In The Green - Residential Plots Where Nature an...
Total Environment Tangled Up In The Green - Residential Plots Where Nature an...
 
Simpolo Company Profile & Corporate Logo
Simpolo Company Profile & Corporate LogoSimpolo Company Profile & Corporate Logo
Simpolo Company Profile & Corporate Logo
 
The KA Housing - Catalogue - Listing Turkey
The KA Housing - Catalogue - Listing TurkeyThe KA Housing - Catalogue - Listing Turkey
The KA Housing - Catalogue - Listing Turkey
 
Hawthorn Module 1 Coverted to Slide Show - 04.06.2024.docx
Hawthorn Module 1 Coverted to Slide Show - 04.06.2024.docxHawthorn Module 1 Coverted to Slide Show - 04.06.2024.docx
Hawthorn Module 1 Coverted to Slide Show - 04.06.2024.docx
 
Riverview City Loni Kalbhor Pune Brochure
Riverview City Loni Kalbhor Pune BrochureRiverview City Loni Kalbhor Pune Brochure
Riverview City Loni Kalbhor Pune Brochure
 
Presentation to Windust Meadows HOA Board of Directors June 4, 2024: Focus o...
Presentation to Windust Meadows HOA Board of Directors June 4, 2024:  Focus o...Presentation to Windust Meadows HOA Board of Directors June 4, 2024:  Focus o...
Presentation to Windust Meadows HOA Board of Directors June 4, 2024: Focus o...
 
Dynamics 365 Bid Management for Construction Projects
Dynamics 365 Bid Management for Construction ProjectsDynamics 365 Bid Management for Construction Projects
Dynamics 365 Bid Management for Construction Projects
 
Rixos Tersane Istanbul Residences Brochure_May2024_ENG.pdf
Rixos Tersane Istanbul Residences Brochure_May2024_ENG.pdfRixos Tersane Istanbul Residences Brochure_May2024_ENG.pdf
Rixos Tersane Istanbul Residences Brochure_May2024_ENG.pdf
 
Optimizing Your MCA Lead Capture Process for Better Results
Optimizing Your MCA Lead Capture Process for Better ResultsOptimizing Your MCA Lead Capture Process for Better Results
Optimizing Your MCA Lead Capture Process for Better Results
 
Omaxe Sports City Dwarka A Comprehensive Guide
Omaxe Sports City Dwarka A Comprehensive GuideOmaxe Sports City Dwarka A Comprehensive Guide
Omaxe Sports City Dwarka A Comprehensive Guide
 
How to keep your Home naturally Cool and Warm
How to keep your Home naturally Cool and WarmHow to keep your Home naturally Cool and Warm
How to keep your Home naturally Cool and Warm
 
Investing In The US As A Canadian… And How To Do It RIGHT!! (feat. Erwin Szet...
Investing In The US As A Canadian… And How To Do It RIGHT!! (feat. Erwin Szet...Investing In The US As A Canadian… And How To Do It RIGHT!! (feat. Erwin Szet...
Investing In The US As A Canadian… And How To Do It RIGHT!! (feat. Erwin Szet...
 
Killer Referans Bahcesehir Catalog Listing Turkey
Killer Referans Bahcesehir Catalog Listing TurkeyKiller Referans Bahcesehir Catalog Listing Turkey
Killer Referans Bahcesehir Catalog Listing Turkey
 
One20 North Vancouver Floor Plans by Three Shores Development.
One20 North Vancouver Floor Plans by Three Shores Development.One20 North Vancouver Floor Plans by Three Shores Development.
One20 North Vancouver Floor Plans by Three Shores Development.
 
Architectural & Interior design portfolio.pdf
Architectural & Interior design portfolio.pdfArchitectural & Interior design portfolio.pdf
Architectural & Interior design portfolio.pdf
 
Brigade Insignia at Yelahanka Brochure.pdf
Brigade Insignia at Yelahanka Brochure.pdfBrigade Insignia at Yelahanka Brochure.pdf
Brigade Insignia at Yelahanka Brochure.pdf
 
Victory by Maskeen Group Surrey Floor plans June 2024 PDF
Victory by Maskeen Group Surrey Floor plans June 2024 PDFVictory by Maskeen Group Surrey Floor plans June 2024 PDF
Victory by Maskeen Group Surrey Floor plans June 2024 PDF
 
Digital marketing strategy for Real Estate
Digital marketing strategy for Real EstateDigital marketing strategy for Real Estate
Digital marketing strategy for Real Estate
 

How to Fit Wooden Blinds

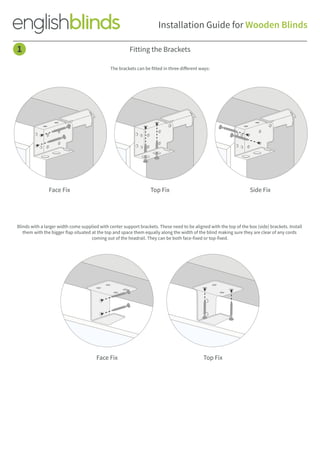
  • 1. 1 Fitting the Brackets The brackets can be fitted in three different ways: Face Fix Top Fix Side Fix Face Fix Top Fix Blinds with a larger width come supplied with center support brackets. These need to be aligned with the top of the box (side) brackets. Install them with the bigger flap situated at the top and space them equally along the width of the blind making sure they are clear of any cords coming out of the headrail. They can be both face-fixed or top-fixed. Installation Guide for Wooden Blinds
  • 2. 2 Installing the Blind Open the gate of the box brackets, lift the blind up and slide the headrail into the open brackets. Swing the hinged section of the bracket down and press firmly until it is locked. 3 Installing the Valance Screw one end of the valance return clip onto the valance using one of the screws provided. Next align the edge of the valance return with the valance and screw the other end of the valance clip onto the valance return. Handy Tip If you pull on the cords to tilt/rotate the wooden slats and they do not move: • Firstly, make sure the slats are in the fully open position and the two tilt cords are the same length. • Next, pull the blind all the way up to the top, lock it off and remove the blind from the brackets. • Now check inside the headrail and make sure the long metal rod is pushed fully into the tilting mechanism (as illustrated). Installation Guide for Wooden Blinds Screw the valance clips onto the back side of the valance with the screws provided. Hook the valance clip with the valance attached onto the top of the headrail.
  • 3. 4 Child Safety Drop of Blind *Distance between cord cleats (center to center) 1 - 1000mm 1001 - 2000mm 2001 - 3000mm 100mm 150mm 300mm Breakaway Cord Condenser A breakaway cord condenser comes pre-fitted to the lift cords, so when a horizontal force is applied to the cords entering the condenser, it will safely break apart thereby eliminating any hazardous loops. If the cord condenser becomes separated: Firstly, untwist and untangle the cords. If the blind features 2 cords: press the cord condenser together until it is fully closed. If the blind features 3 cords: Place the loose cord into the opening in one half of the cord condenser and press the cord condenser together until it is fully closed. If the blind features 4 cords: Place one of the loose cords into the opening of one half of the condenser, next place the remaining loose cord into the opening in the other half, then press the cord condenser together until it is fully closed. Cord Safety Cleat The safety cleat needs to be installed as close as possible to the headrail and in all cases not less than 1500mm from the floor. The cords must be fully wrapped around the safety cleat(s) when the blind is not in use. Refer to the table below to determine the distance required between the cleats to fully accumulate the cords when the blind is completely raised up. *Distance between cord cleats (center to center) Place the safety cleat in the desired position on the wall and mark the positions of the holes with a pencil. With the hole positions marked, drill as required and use the screws provided to attach the safety cleat to the wall. Wrap the cords around the cord cleats in a figure of 8. When the cords are fully accumulated, ensure they are secure so that when any cord is pulled, no excess cord is released. Installation Guide for Wooden Blinds
  • 4. Lift Cord Tilt Cords 5 Operation Instructions To tilt the blind: Pull on the required tilt cord tassel to tilt slats to the desired position. Make sure to tilt the slats to the horizontal (open) position before raising or lowering to extend the life of the blind. To lower the blind: Move the lift cord towards middle of the blind, pulling down gently until the cord lock releases. To raise the blind: Pull the lift cord downward until the blind reaches the desired height. To lock the cords: Pull the lift cord towards the outside of the blind and release. The cord will lock automatically. Installation Guide for Wooden Blinds 6 Recommended Care 1. When opening or closing the blind, only raise or lower it when the slats are in the horizontal (open) position. Larger blinds must be raised or lowered in stages. Raising or lowering in one singular motion will place excessive stress on the mechanism, strings and brackets. Do not force the cord when tilting the blinds, this may cause the mechanism to break. 2. It is not recommended for real wood blinds to be fitted in damp or wet environments as warpage may occur over time. 3. If the blind does become damp or wet, wipe it down immediately. The slats should be in the horizontal (open) position and the blind released and lowered completely. Allow to dry by removing the blinds from the brackets and lay down on a hard surface. Do not place the blind in direct sunlight as excessive heat may cause the slats to warp. If the blinds are excessively wet, do not place the blinds onto a surface that may absorb any stain from the wood. 4. Dust the blinds regularly. © 2023 English Blinds. All rights reserved.