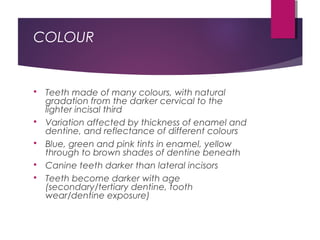
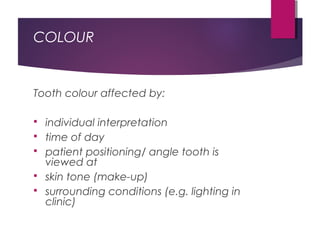
This document discusses tooth colour and bleaching techniques. It begins by describing the natural colours of teeth and factors that affect tooth colour. It then discusses intrinsic and extrinsic tooth discolouration, their causes, and management options. Bleaching techniques are summarized, including home bleaching using trays, in-office bleaching, and non-vital bleaching. Risks and management of sensitivity are also covered. Lasers can be used to enhance bleaching but have higher costs and potential sensitivity risks.
2. COLOUR
Teeth made of many colours, with natural
gradation from the darker cervical to the
lighter incisal third
Variation affected by thickness of enamel and
dentine, and reflectance of different colours
Blue, green and pink tints in enamel, yellow
through to brown shades of dentine beneath
Canine teeth darker than lateral incisors
Teeth become darker with age
(secondary/tertiary dentine, tooth
wear/dentine exposure)
3. COLOUR
Tooth colour affected by:
individual interpretation
time of day
patient positioning/ angle tooth is
viewed at
skin tone (make-up)
surrounding conditions (e.g. lighting in
clinic)
5. AETIOLOGY OF DISCOLOURATION
Extrinsic Discoloration:
Stains (chromogens) that lies on/attach to
the tooth surface or in the acquired pellicle,
or
The incorporation of extrinsic stain within the
tooth substance following dental
development. It occurs in enamel defects
and in the porous surface of exposed
dentine
6. AETIOLOGY OF DISCOLOURATION
Extrinsic Discolouration:
E.g.
Plaque, chromogenenic
bacteria
Mouthwashes
(chlorhexidine)
Smoking / chewing
tobacco
Beverages (tea, coffee,
red wine, cola)
Foods (curry, cooking oils
and fried foods, foods with
colorings, berries, beetroot)
Iron supplements
7. AETIOLOGY OF DISCOLOURATION
Intrinsic Discoloration:
Intrinsic discolouration occurs following a
change to the structural composition or
thickness of the dental hard tissues.
9. MANAGEMENT OF
DISCOLOURED TEETH
Treatment options:
1. No treatment
2. Removal of surface stain
3. Bleaching techniques
4. Operative techniques to mask
underlying discolouration
Veneers
Crowns
10. GENERAL INDICATIONS
Generalised staining
Ageing
Extrinsic stain - Smoking and dietary stains
(tea/coffee etc)
Fluorosis
Tetracycline staining (? in combination with
restorative techniques)
Traumatic pulpal changes
White spots
Brown spots (not as good response)
11. CONTRAINDICATIONS
Patients with high/unrealistic expectations
Decay and active peri-apical pathology (must be
resolved first)
Pregnancy/Breastfeeding
Sensitivity/cracks/exposed dentine
Existing crowns / large restorations (anteriorly)
Elderly patients with visible recession and yellow
roots (roots don’t bleach as readily as crowns)
12. Effects on
Soft tissues
Cervical resorption
Pulp
Hardness of teeth
Tooth coloured restorations
Adhesive bond strength
-changes composition of enamel and dentine,
therefore defer definitive adhesive restorations
until 2 weeks (at least 10 days) after bleaching
completed
13. BLEACHING
Definition
“any treatment procedure
or method a dental
professional might prescribe
to whiten the color and
brighten your teeth”
10-15% carbamide
peroxide used as a oral
disinfectant since late 1960s
– LONG CLINICAL HISTORY
14. BLEACHING TECHNIQUES
Vital bleaching :
Home use of 10 % (15%, 20% ALSO)
carbamide peroxide in a dental tray
“In office bleaching” (~30% carbamide
peroxide) carried out in single visit
(photo initiation) plus additional home
use of carbamide peroxide 10% to “top
up”
Non-vital bleaching :
(A.k.a Walking bleaching)
The ‘Inside/Outside’ method using 10 %
carbamide
15. MATERIALS
1. Hydrogen peroxide (HP): H2O2
2. Carbamide peroxide: CH6N2O3 much more
stable than hydrogen peroxide, hence it’s
preferred use
• Urea stabilises and buffers HP – shelf life!
• A 10% Carbamide peroxide solution
contains 3% HP, 7% Urea
1. Tetrahydrate sodium perborate: NaBO3
16. MATERIALS
Why 10% CP most widely used?
• 10% is the only bleaching concentration
approved by the FDI
Higher concentrations= increased
sensitivity and harmful effects
17. MODE OF ACTION
Thought to be due to the ingress of
oxidisers and oxygenating molecules
through enamel micropores.
Break/cleave pigment bonds and allow
molecules to diffuse through the tooth
&/or become smaller and absorb less
light and hence appear lighter
18. MODE OF ACTION 2
When bleach is applied to the
tooth it passes from the incisal
edge to the apex of the tooth
through the enamel, dentin &
pulp chamber within 5- 15
minutes.
Hydrogen Peroxide breaks
down very rapidly to water, an
oxygen ion and oxygen free
radicals. The 3 or 4 most
active free radical species are
OH- 95%, OOH- 2.3% & O-
2.3%.
19. MODE OF ACTION 3
The oxygen molecules then
attach to the double carbon
bonds (colour stain molecules)
and break them down into
single carbon bonds, thus
disfiguring their internal colors.
The Single carbon bonds
reflect light and therefore
make teeth appear brighter
and whiter. The changed
molecules are now translucent.
The molecules may also now
diffuse through the pores more
readily because of their
reduced size
22. NON-VITAL BLEACHING
Spasser (1961) - sodium perborate sealed
within canal (walking bleach)
Nutting and Poe (1963, 1967) – combination
walking bleach (perborate and HP)
Now carbamide peroxide 10% used widely
Known as walking bleaching
Indications:
To whiten endodontically treated, discolored
teeth.
23. NON-VITAL BLEACHING- RISK:
External (cervical) resorption, especially
when used with thermocatalytic
activation (heated instrument within pulp
chamber)
Heithersay found incidence increased
when associated with trauma (3.9-9.7%)
and orthodontic treatment (24%)
24. CLINICAL RELEVANCE:
Pre-operative radiograph
ensure no pathology (external resorption)
prior to commencing procedure
Warn patient if previous orthodontic
treatment or trauma- higher risk
Sealing GP with a 2mm RMGIC (minimum
2mm to prevent ingress of bleach into pulp
chamber
25. WARNINGS
Warn patient:
May not improve shade
May reverse, and patient may need to
repeat procedure in future at own cost
May require other treatment: veneer/crown
Tooth is hollow whilst carrying out bleaching
and patient must be careful, do not bit into
hard foods, tooth may fracture!
Cervical resorption? Previous trauma/ortho
If temp filling lost must see dentist urgently
(walking bleach)
26. NON-VITAL BLEACHING
1. History taking & examination
2. Examine the radiograph to establish adequate RCF
3. Take shade and photograph
4. Rubber dam isolation- single tooth
5. Remove all filling material and gutta percha 2-3mm apical to CEJ.
6. All restorative material must be removed to allow bleaching agent to
contact the internal tooth structure.
7. Mix RMGIC and place 2mm thickness to assure a seal. Light cure for
20s.
8. Express Carbamide Peroxide into the cavity (use a small tip, e.g. the
tips used for acid etch).
27. NON-VITAL BLEACHING
9. Place tiny cotton pellet into gel. Leave 1.0 to 1.5mm of space to
accommodate the provisional restoration.
10. Place a GIC provisional restorative material to seal the access
opening, check occlusion.
11. Repeat the procedure every 3 to 7 days until the desired color
change is achieved.
12. Remove provisional restorative material and bleaching material to
level of GI sealing material. Rinse and clean access opening. Place
a temp restoration.
13. A definitive resin composite restoration of a light colour should not
be placed before 14 days after the bleaching process.
28.
29. “INSIDE-OUTSIDE” BLEACHING
Essentially same technique as Non vital bleaching
1. Pre-op radiograph (assess endo)
2. Re-open access cavity
3. Ensure chamber free of Gutta percha
4. Seal off the root filling with resin-modified GIC
5. Place the 10% gel (may be higher) into a single
tooth tray with labial and lingual reservoirs.
6. Insert tray into the mouth. Remove excess as
necessary. This should be kept in position for at
least 2 to 3 hours and preferably overnight.
7. Clean the access cavities out with a toothbrush
or interproximal brush.
30. “INSIDE-OUTSIDE” BLEACHING
8. No limit to how many times the material
can be changed and changing the
material every 2 to 3 hours will probably
speed up the process.
9. The access cavity should ideally left open
for no longer than necessary
10. The chamber should be cleaned out
thoroughly and temporised.
11. A definitive resin composite restoration of
a light colour should not be placed until
14 days after the bleaching process.
31.
32. Home Bleaching (aka Night
Guard Vital Bleaching)
Make a diagnosis of the cause(s) of
discolouration and record this in the
notes.
Treatment plan: Discuss the various
alternative treatment options to
bleaching teeth, e.g. no treatment,
veneers, crowns.
Check that the patient is not allergic to
peroxide or plastic.
Identify the teeth for bleaching
**check their periapical status on radiograph.
33. Home bleaching
• Record the shade of the
discoloured teeth and write that
in the notes.
• Photograph if possible (with
shade tab)
• Obtain patient consent
• Warn restorations will not
change colour*
• Take alginate impressions for
tray- lab prescription*
• Fit bleaching trays, ensure
good fit and comfortable
• Advise patient on procedure-
demo use, give leaflets
35. PATIENT INFORMATION
Using the 10% CP
(Home Bleaching )
1. Brush teeth and floss as normal before each use.
2. Advise the patient to remove the tip from the syringe
containing the 10% carbamide gel and to extrude a
little (~1mm) of the gel into the deeper and front parts
of the tray. (No more than ½ a syringe). Place gel in
the tray on the cheek and the tongue side of the back
teeth.
3. Seat the tray over the teeth and press down firmly.
4. A finger, a tissue, or a soft toothbrush should be used to
remove excess gel that will flow beyond the edge of
the tray.
36. PATIENT INFORMATION
5. Rinse gently and do not swallow. The tray is usually worn whilst
sleeping or a minimum of 2 hours.
6. In the morning, remove the tray and brush the residual gel from
the teeth. Rinse out the tray and brush it. Store it in a safe
container.
The patient should not eat, drink or smoke while bleaching trays
in mouth.
10% CP should not be exposed to heat (decomposes), sunlight or
extreme cold. Store in a fridge and keep away from reach of
children.
37. PATIENT INFO 2
Advise the patient that it will probably
take about 2-6 weeks to achieve
satisfactory result
• Nicotine stain 1-3 months
• Tetracycline stain 2-6 months, sometimes 12
Further restorations
may be required
38. POST WHITENING INSTRUCTIONS
The Next 24 – 48 hours are important in enhancing
& maximizing whitening results.
Avoid substances which may stain teeth
Such as: Red wine, coca cola, coffee, tea
Sensitivity: Teeth can be sensitive for 24-48 hours
(esp after in office bleaching). It can range from
a dull ache in the teeth to sharp pains various
teeth. Take Panadol or Nurofen as required.
39. SENSITIVITY
55% to 75% of patients experience sensitivity
Cause:
•Passage of
hydrogen peroxide
through enamel
and dentine to the
pulp
40. SENSITIVITY
At risk patients:
Large pulp chambers
Exposed root surfaces
Abfraction, attrition, erosion,
abrasion lesions
Over wearing of trays
Improper fit of trays
High concentrations of bleaching
agent
41. Decrease wearing time/concentration
Desensitizing toothpaste
Potassium nitrate
works on the nerve of the tooth
10 - 30 mins in a tray
Neutral Sodium Fluoride
occludes the dentinal tubules ( 4-6 weeks)
Relief gel, Tooth mousse
Amorphous Calcium Phosphate
TREATMENT OF SENSITIVITY
42. Bleaching with laser
The role of laser in bleaching process:
Laser are intended to enhance the efficiency of
bleaching material . laser catalyze the oxidation
reaction by providing additional energy for the
more rapid breakdown of hydrogen peroxide into its
components – water& oxygen ions
Laser manufactures that : there is no pulpal effect
during laser bleaching : the laser energy heats the
bleaching solution far more quickly and efficiently
than the conventional heat sources with most of
energy absorbed directly into the chemical reaction
and dissipated quickly thereafter
43. Advantage of laser bleaching
Laser bleaching may work more quickly owing to a
higher concentration of active bleaching ingredient
or a more defined and localized release of a often
active oxygen ions in close proximity to the tooth
surface. It is often used to jump – start more difficult
cases such as tetracycline staining and fluorosis
44. Disadvantage of laser
bleaching
Equipment cost : laser are expensive
Chairside cost : the procedure , like all in office
bleaching treatment , its time consuming
Post operative sensitivity can be significant .
45. Types of laser
Many laser have dental application . Including
diode, carbon dioxide , argon , neodymium
doped : yttrium-aluminum-garnet (Nd : YAG) and
erbium , chromium, yttrium – scandium – gallium-
garnet (ErCr : YSGG) lasers .. Some are used for
bleaching procedure