Downloaded 106 times


![9
Using Big SQL to query the Bluemix sample data
With the sample data now in HDFS, you’re ready to work with Big SQL to query it. First, however, you’ll
need to create a table for this data. That’s not hard to do. In this section, you’ll create an externally
managed Big SQL table, which effectively layers a SQL schema over the directory that contains your
CSV file. Once that’s done, you can query the table.
__1. Launch your preferred Big SQL execution environment (e.g., JSqsh) and connect to your Big
SQL database. If you don’t know how to do this, consult the resources mentioned earlier in the
Overview section.
__2. Create a Big SQL external table (“greenhouse”) for the CSV file that you copied in to HDFS
earlier. Adjust the statement below as needed to match your environment:
create external hadoop table if not exists greenhouse
(area varchar(50),
year varchar(4),
co2 varchar(20),
hfc varchar(20),
methane varchar(20),
pfc varchar(20),
sf6 varchar(20),
n2o varchar(20) )
ROW FORMAT DELIMITED
FIELDS TERMINATED BY ','
LINES TERMINATED BY 'n'
location '/user/saracco/bluemix-data';
Because the raw CSV file contains column headings in the first line (or row), all column types must
support varying-length character strings even though the greenhouse gas measurements are decimals.
Later, you’ll explore options for addressing this.
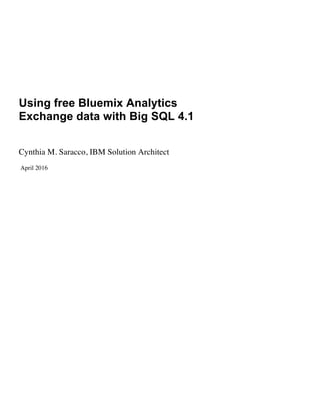
__3. Retrieve all columns from the table for the first 3 rows only.
select * from greenhouse fetch first 3 rows only;
[…][saracco] 1> select * from greenhouse fetch first 3 rows only;
+-----------------+------+---------------+---------------+-------------------+---------------+---------------+---------------+
| AREA | YEAR | CO2 | HFC | METHANE | PFC | SF6 | N2O |
+-----------------+------+---------------+---------------+-------------------+---------------+---------------+---------------+
| Country or Area | Year | co2_gigagrams | hfc_gigagrams | methane_gigagrams | pfc_gigagrams | sf6_gigagrams | n2o_gigagrams |
| Australia | 2012 | 397830.6047 | 7945.106379 | 111709.4988 | 253.6974615 | 134.1112518 | 25775.42951 |
| Australia | 2011 | 398161.3872 | 7512.150105 | 110274.7423 | 259.250564 | 134.1366201 | 25201.09362 |
+-----------------+------+---------------+---------------+-------------------+---------------+---------------+---------------+
__4. Query the table for information about methane and carbon dioxide (co2) emissions in 2012 for
any area, fetching only the first 10 rows.
select area, methane, co2 from greenhouse
where year = '2012'
fetch first 10 rows only;](https://image.slidesharecdn.com/bigsqlfreebluemixdata-160425150034/85/Big-Data-Using-free-Bluemix-Analytics-Exchange-Data-with-Big-SQL-10-320.jpg)
![10
[…][saracco] 1> select area, methane, co2 from greenhouse where year = '2012' fetch first 10 rows only;
+----------------+-------------+-------------+
| AREA | METHANE | CO2 |
+----------------+-------------+-------------+
| Australia | 111709.4988 | 397830.6047 |
| Austria | 5306.175712 | 67733.46873 |
| Belarus | 15390.5419 | 57490.68938 |
| Belgium | 6392.291172 | 100659.3803 |
| Bulgaria | 7185.373932 | 48363.94947 |
| Canada | 90563.313 | 550546.5937 |
| Croatia | 3422.543649 | 19233.20131 |
| Cyprus | 1303.681967 | 7082.826233 |
| Czech Republic | 10255.769 | 111301.871 |
| Denmark | 5522.202228 | 40798.82417 |
+----------------+-------------+-------------+
10 rows in results(first row: 0.23s; total: 0.23s)
__5. Retrieve carbon dioxide emissions (co2) data for Australia in decimal format.
select cast(co2 as decimal(20,10)), year
from greenhouse where area='Australia';
[…][saracco] 1> select cast(co2 as decimal(20,10)), year from greenhouse where area='Australia';
+-------------------+------+
| 1 | YEAR |
+-------------------+------+
| 397830.6047000000 | 2012 |
| 398161.3872000000 | 2011 |
| 399364.8191000000 | 2010 |
| 398668.7713000000 | 2009 |
| 399084.1509000000 | 2008 |
| 393918.3205000000 | 2007 |
| 385969.3355000000 | 2006 |
| 380440.4543000000 | 2005 |
| 376669.8639000000 | 2004 |
| 364605.1036000000 | 2003 |
| 358296.2618000000 | 2002 |
| 354266.4988000000 | 2001 |
| 346620.8507000000 | 2000 |
| 340605.4425000000 | 1999 |
| 331123.2263000000 | 1998 |
| 317772.2529000000 | 1997 |
| 309524.2626000000 | 1996 |
| 302576.4261000000 | 1995 |
| 291375.9340000000 | 1994 |
| 286804.3815000000 | 1993 |
| 282530.1556000000 | 1992 |
| 277590.3048000000 | 1991 |
| 276137.5504000000 | 1990 |
+-------------------+------+
23 rows in results(first row: 0.30s; total: 0.30s)
At this point, you have a working Big SQL table with sample data downloaded from the Bluemix Analytics
Exchange. But there’s certainly room for improvement. For example, you might want to get rid of the
column headings stored in the first row of the table. In addition, you might want to represent the
statistical data for greenhouse gas emissions in DECIMAL rather than VARCHAR(n) format. There are
various ways that you can achieve such goals.
Arguably, the best approach is to clean the data before creating a table over it. For example, you could
have edited the CSV file to remove the column heading information before you copied it into HDFS.](https://image.slidesharecdn.com/bigsqlfreebluemixdata-160425150034/85/Big-Data-Using-free-Bluemix-Analytics-Exchange-Data-with-Big-SQL-11-320.jpg)
![11
However, if other applications depend on this data in its raw format, you can leave the file as is and
create another “clean” Big SQL table based upon your existing external table.
__6. Experiment with using the CREATE TABLE AS . . . SELECT FROM . . . Big SQL statement to
create a new, “clean” table, using CAST functions and an appropriate query predicate (WHERE
clause). Here’s a partial example:
create hadoop table if not exists greenclean
(area varchar(50), year int, co2 decimal(20,10))
as select area, cast(year as int), cast(co2 as decimal(20,10))
from greenhouse where year <> 'Year';
[…][saracco] 1> create hadoop table if not exists greenclean (area varchar(50), year int, co2
decimal(20,10)) as select area, cast(year as int), cast(co2 as decimal(20,10)) from greenhouse where year
<> 'Year';
0 rows affected (total: 3.93s)
__7. Query the table you just created.
select * from greenclean fetch first 3 rows only;
[…][saracco] 1> select * from greenclean fetch first 3 rows only;
+-----------+------+-------------------+
| AREA | YEAR | CO2 |
+-----------+------+-------------------+
| Australia | 2012 | 397830.6047000000 |
| Australia | 2011 | 398161.3872000000 |
| Australia | 2010 | 399364.8191000000 |
+-----------+------+-------------------+
__8. Optionally, create a “clean” view of your original Big SQL greenhouse table and query this view.
Note that this approach will require Big SQL to dynamically apply the CASTing and query filtering
operations each time the view is queried. Doing so will result in runtime overhead, so you may
prefer to simply create a “clean” table as shown in the previous step.
create view greenview (area, year, co2)
as select area, cast(year as int), cast(co2 as decimal(20,10))
from greenhouse where year <> 'Year';
[…][saracco] 1> create view greenview (area, year, co2) as select area, cast(year as int), cast(co2 as
decimal(20,10)) from greenhouse where year <> 'Year';
0 rows affected (total: 0.1s)
select * from greenview fetch first 3 rows only;
[…][saracco] 1> select * from greenview fetch first 3 rows only;
+-----------+------+-------------------+
| AREA | YEAR | CO2 |
+-----------+------+-------------------+
| Australia | 2012 | 397830.6047000000 |
| Australia | 2011 | 398161.3872000000 |
| Australia | 2010 | 399364.8191000000 |
+-----------+------+-------------------+
3 rows in results(first row: 0.56s; total: 0.56s)](https://image.slidesharecdn.com/bigsqlfreebluemixdata-160425150034/85/Big-Data-Using-free-Bluemix-Analytics-Exchange-Data-with-Big-SQL-12-320.jpg)


The document provides a technical summary for using free sample data from IBM's Bluemix Analytics Exchange with Big SQL 4.2 on a Hadoop cluster. It outlines steps to acquire data, transfer it to HDFS, and query it using Big SQL, including creating external tables and cleaning the data format. Additional resources and tutorials are recommended for further learning about big data and SQL operations.