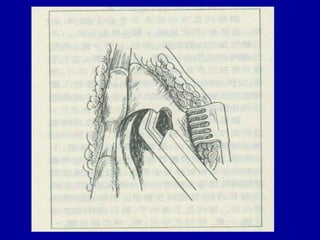
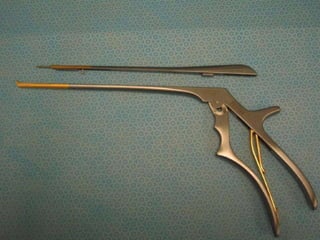
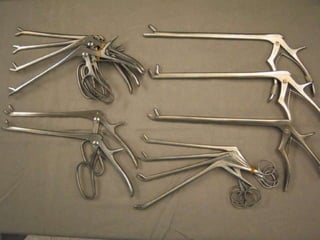
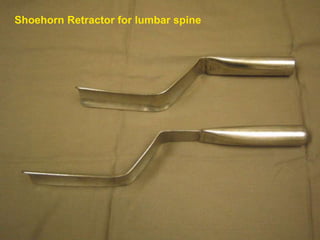
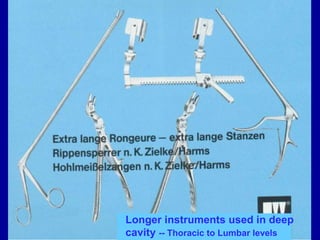
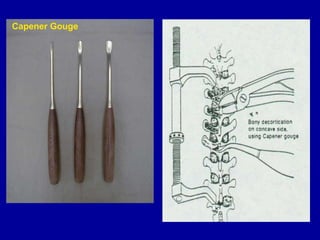
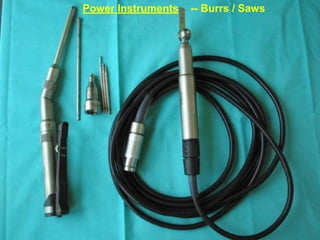
Basic Instruments
for
Spinal Operations
1) Basic Spinal Instruments
• Retractor
• Elevator
• Posterior Shear Cutter
• Currette
• Osteotome / Chisel
• Dissector / Nerve Root Retractor
• Bone Rongeur
Retractor
Beckman
Adson
Retractor
Adson Retractor
Norfolk & Norwich Retractor
Mollison
Self-retaining
Retractors
-1-2 levels hemi-
laminectomy
- cervical
Downing spinal retractor
Cervical Retractors
Meyerding Retractor
Periosteal
Elevator
AO Periosteal
Elevator
Cobb
Periosteal
Elevator
Posterior
Shear Cutter
Currette
Ligamentum Flavum
Osteotome /
Chisel
Osteotomes
Angled / Bayonet -
shaped
chisels
Sharp edges protected
Dissector
&
Nerve Root
Retractor
Nerve root
with a patch
of fat
Herniated disc
MacDonald Howarth
Nerve root retractors
Probe Dissector
Allerdyce
Probe Dissector
Nerve root retractor
Bone Punches
&
Rongeurs
•Up-cutting
•Down-cutting
Narrower tip – Cervical level
End plate Cutting edge
Broader tip – Thoracic to Lumbar level
Grooved +/-
centring pin
Pituitary Rongeur
Pituitary Rongeur
Cup-
shaped
jaw
Serrated jaw
2) Optional Instruments
 Cervical Instruments
• Thoracic Instruments
• Lumbar Instruments
• Bone Graft Instruments
• Power Instruments
Hartman’s retractor
( cervical )
Cervical Distractors – intervertebral space
distraction
(for cervical ASF)
Cervical Distractor
Caspar Pin
Thoracotomy
Instruments –
anterior approach
Rib Spreader
Rib approximator
Perioteal Elevators
Costotome
Rib Shears
Lung Retractor
Instruments for Lumbar level – anterior
approach
Shoehorn Retractor for lumbar spine
Longer instruments used in deep
cavity -- Thoracic to Lumbar levels
Bone Graft
Instruments
Ruler
Bone
Impactors
Taylor retractors
Bone
currettes
Osteotomes Gouges
Capener Gouge
Power Instruments -- Burrs / Saws
3) Instruments for Screws/
Hooks/Wires
USS-Fracture System. FractureFixation
for Spine.
Instruments for Screw /
Hook / Wires
Screw site
preparation
- under X-ray
control
1. Bone awl -
perforate outer cortex
of pedicle
2. Pedicle probe
3. Sound probe
1
Pedicle
Probe
- path finder
-Open pedicle
canal
Sounding
Probe
-pedicle feeler
-ball tipped
-ensure path is
surrounded by
bone
Screw Fixation
Taps Wrench
Screw fixation
Rocker
(persuader)
Screw cap
driver
Rod holder
Instruments for Hooks
Hook starter
-for lamina hook,
to separate
ligamentum
flavum at
underside
Hook insertion
Hook holder
Hook
driver
For lamina hook, a small osteotome used to remove some part
of lamina for easy insertion of lamina hook
hooks
Instruments for Rod
Rod Cutter
Table - top
Rod Bender
Rod Holder
Serrated jaws
Distractor & Compressor
compressor
distractor
Effect on the screw-to-rod
clamps --- lordosis
Final tightening of screw cap
-wrench with side handle acts as a
counter torque device allowing
screw tightening
Final tightening
with torque
immediate after
compression or
distraction
Wire Instruments
- Wire Tightener
- Wire Cutter
- Pliers
Wire holding
Forceps
Transverse
connector
Reduce
rotational
instability
Cervical
instrumentation
Pedicle
screws
Transverse
connector
Locking cap for
transverse
connector
Locking cap
Rod
Awl – marks the
entry point, prevent
drilll bit slipping
-Pedicle probe / path
finder/ drill to make
the path for screw
-Pedicle marker or
feeler to check the
depth of the screw
path
Or using power
drill to drill path,
with a drill sleeve
with depth stop
• Depth gauge to
measure required
screw length
• Tapping is optional
• Insert polyaxial
screw with screw
driver
Use rod template as a
guide to bend rod
• Rod benders
Insert rod with
a rod holder
Locking cap
screwdriver to
mount caps
onto screw
head, but not
too tight
• Or using the rod
introduction
instrument /persuader
to push rod onto screw
head, by squeezing the
handle
• Locking screw is
inserted thro the
cannulation of the
instrument
• Compressing or
distracting screws at
required level in
increase or decrease
lordosis as required
• The locking screws
should be loosely
fastened before
using the
compressor or
distractor then
tightened
Place the
selected
transverse
connector over
the appropriate
level on the
construct (with
extended locking
screw) with a
holding forcep
-hex screwdriver to thread
locking washer over the
stardrive locking screw
-Then final tightening of
the stardrive locking
screws with countertorque
Lock the
transverse
connector
with a crimper
-To add
transverse bar
to prevent
severe rod
contouring
- Can be place
onto rod from
top
--Connect lamina
substitute with a
3.5mm rod
-- mount from top
--tighten screw with
hex driver
-Can be placed
from top
- lock the set
screw on the
rod
-Lock the swivel
ring on the both
sides of
connector with
hex driver
Summary
 Recognise basic Spinal Instruments
 Preparation of instruments for spine operation at different level
– Basic
– Optional : appropriate inst for required level
( Consideration: Approach, spinal instrumentation,
Bone grafting, Power instruments,
Surgeon’s preference )
 Instruments for pedicle screw / hook / wire
 Example of a cervical instrumentation system
basic spinal instrument.docx

basic spinal instrument.docx