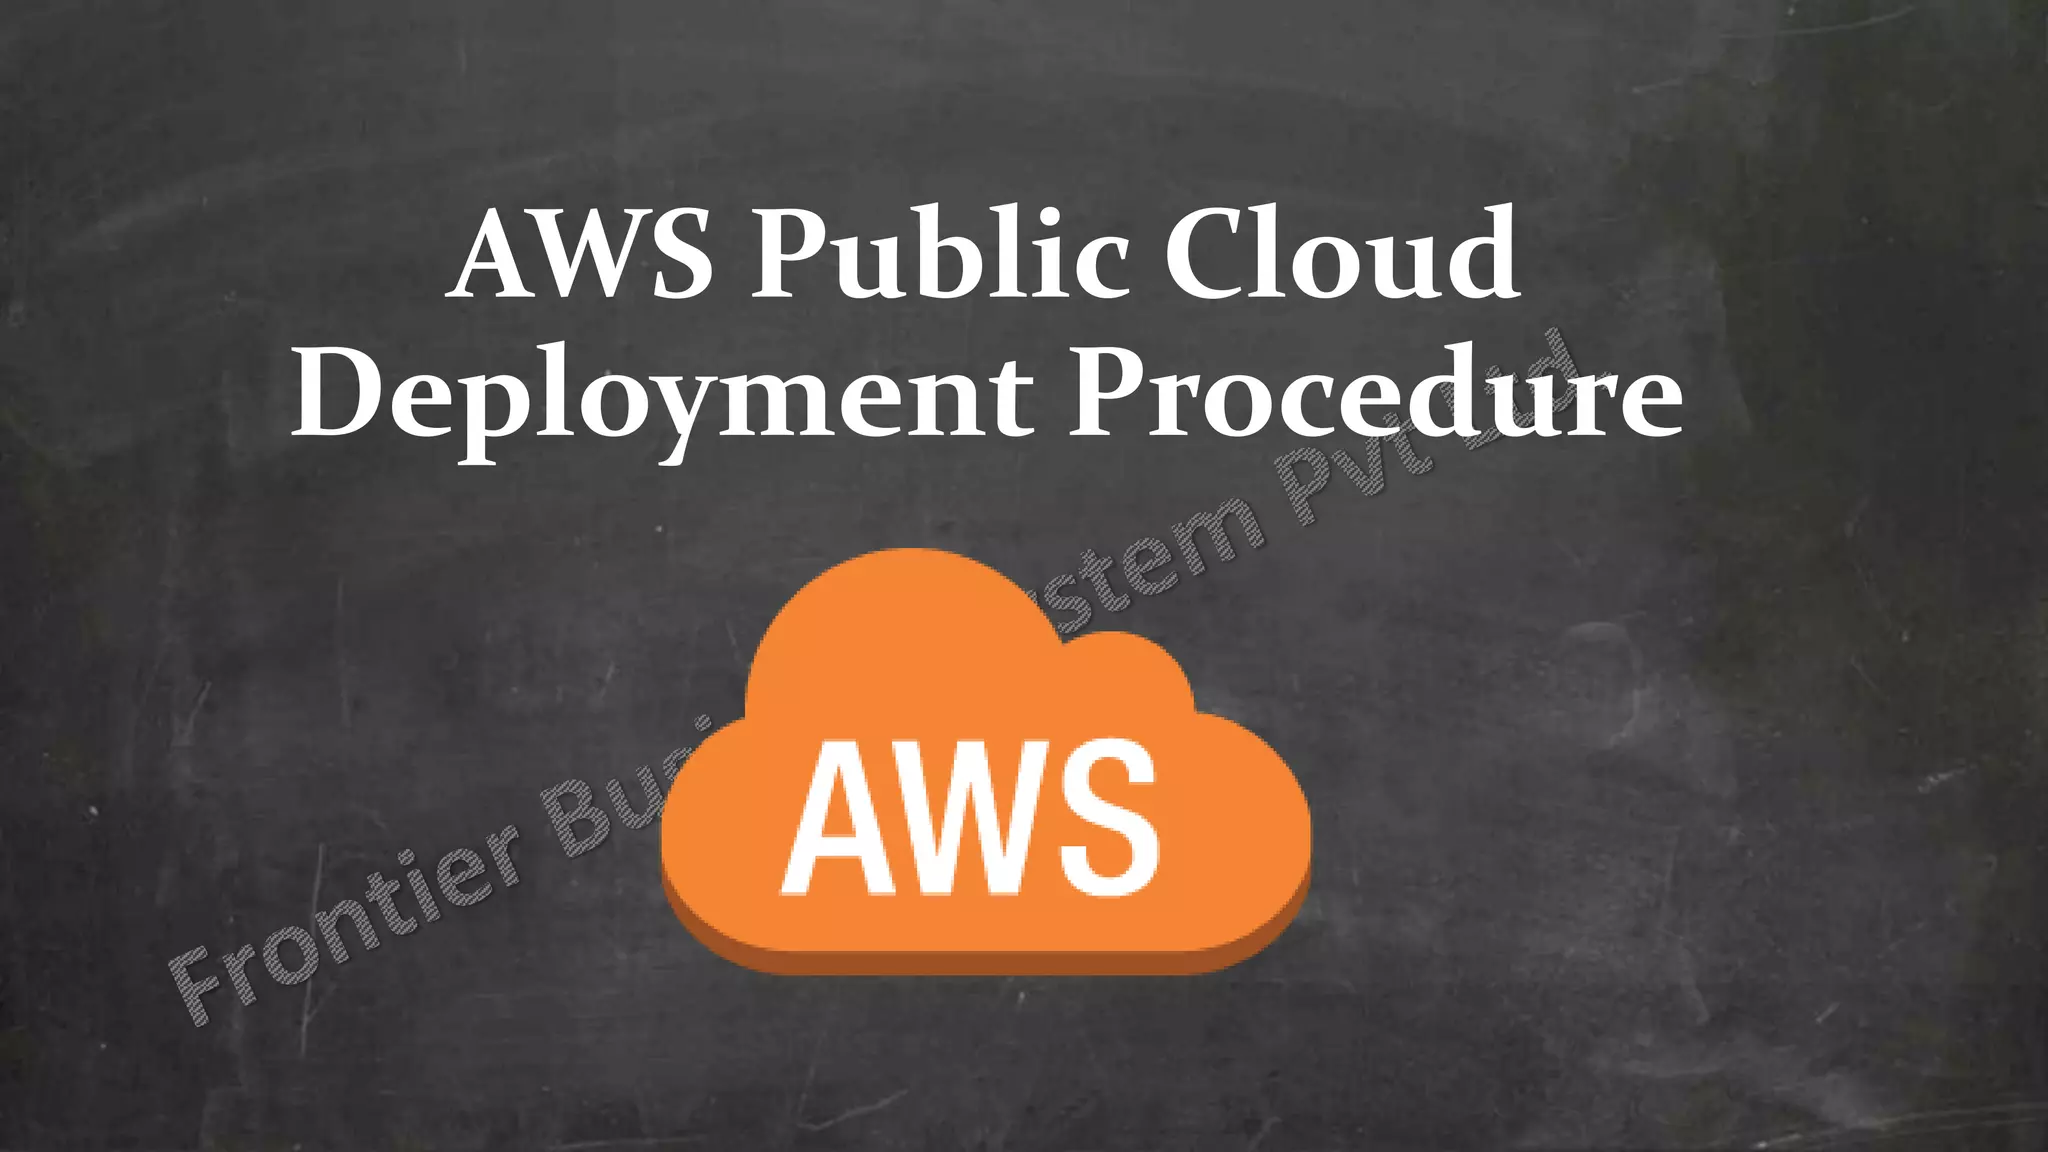
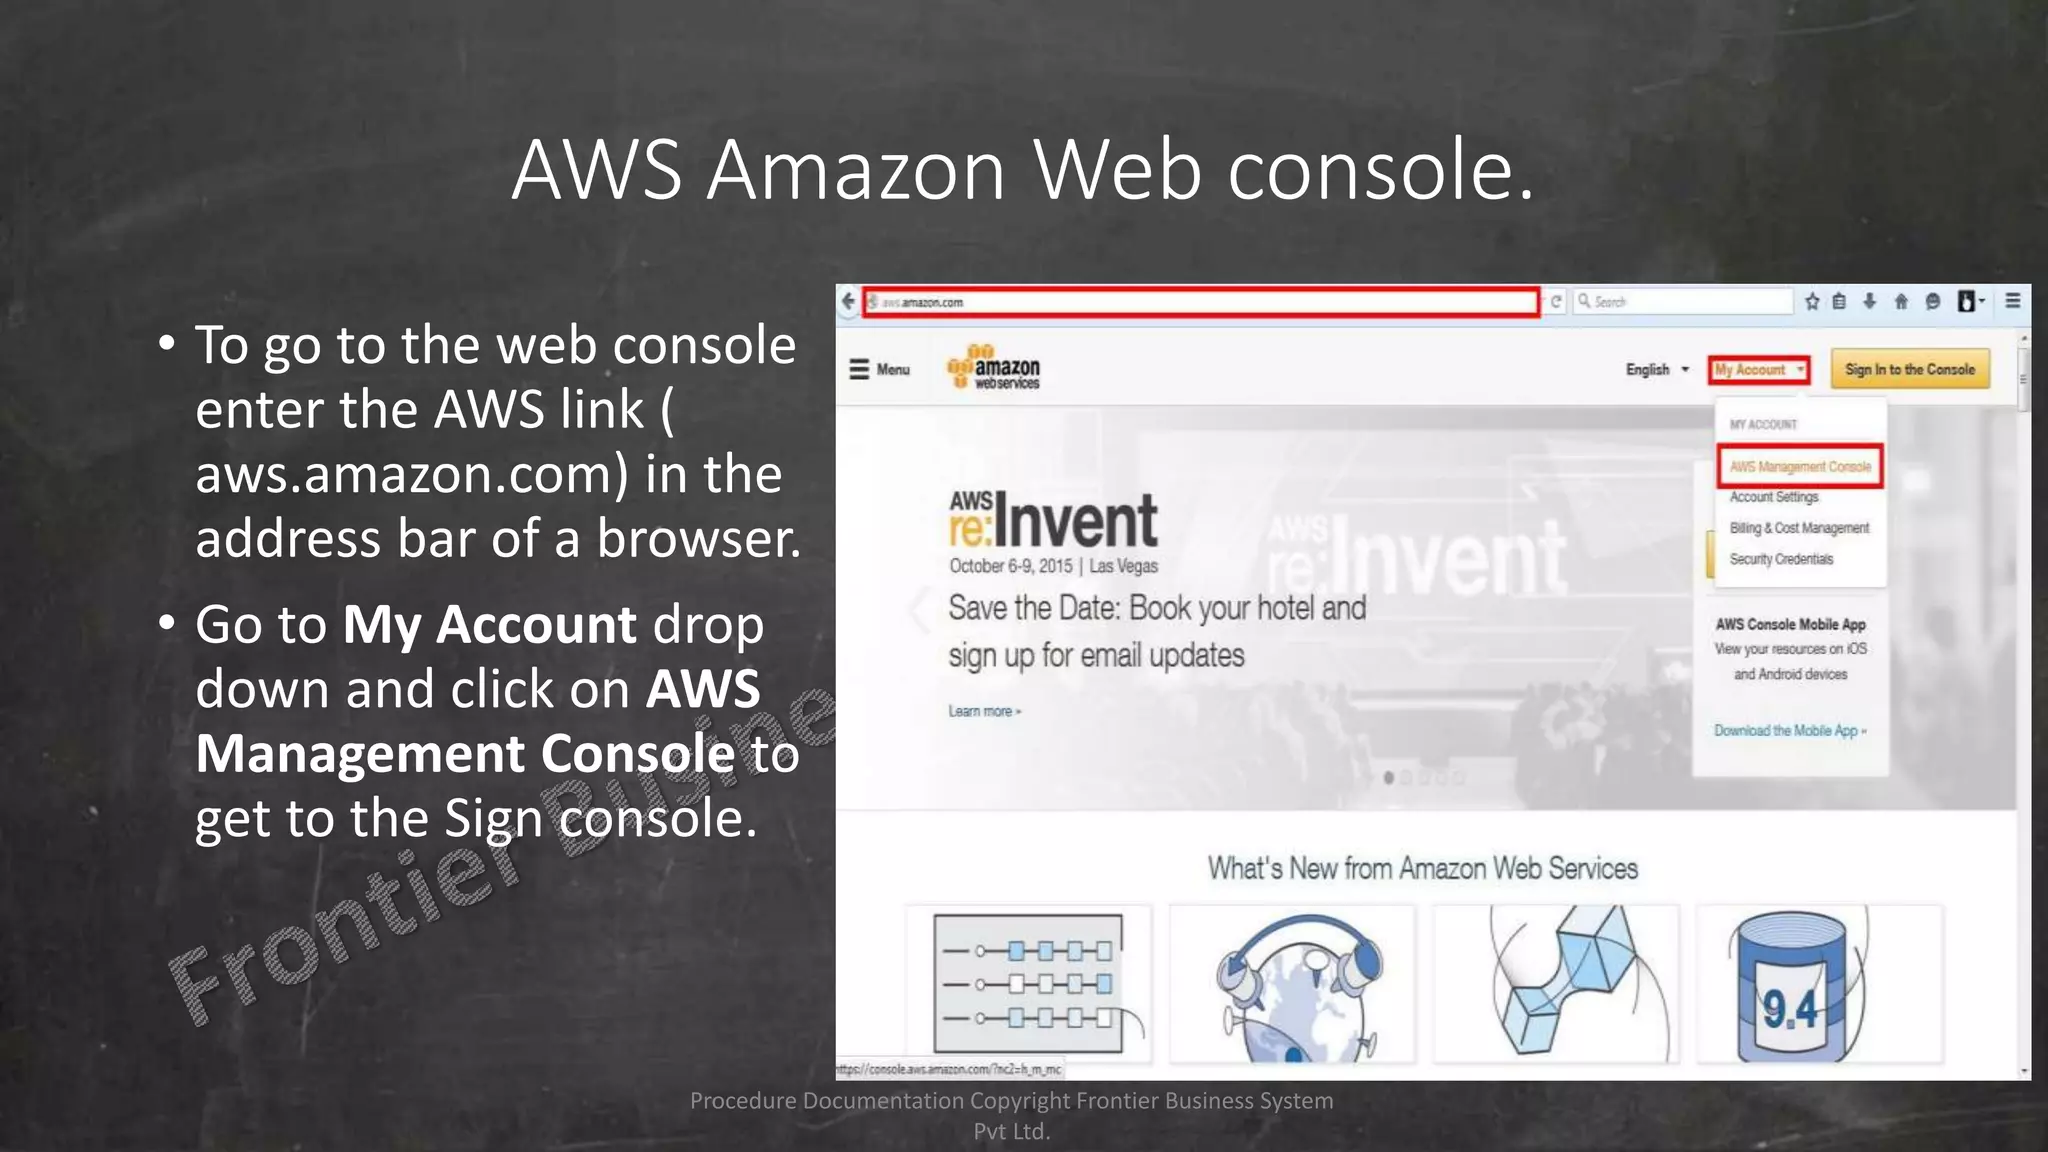
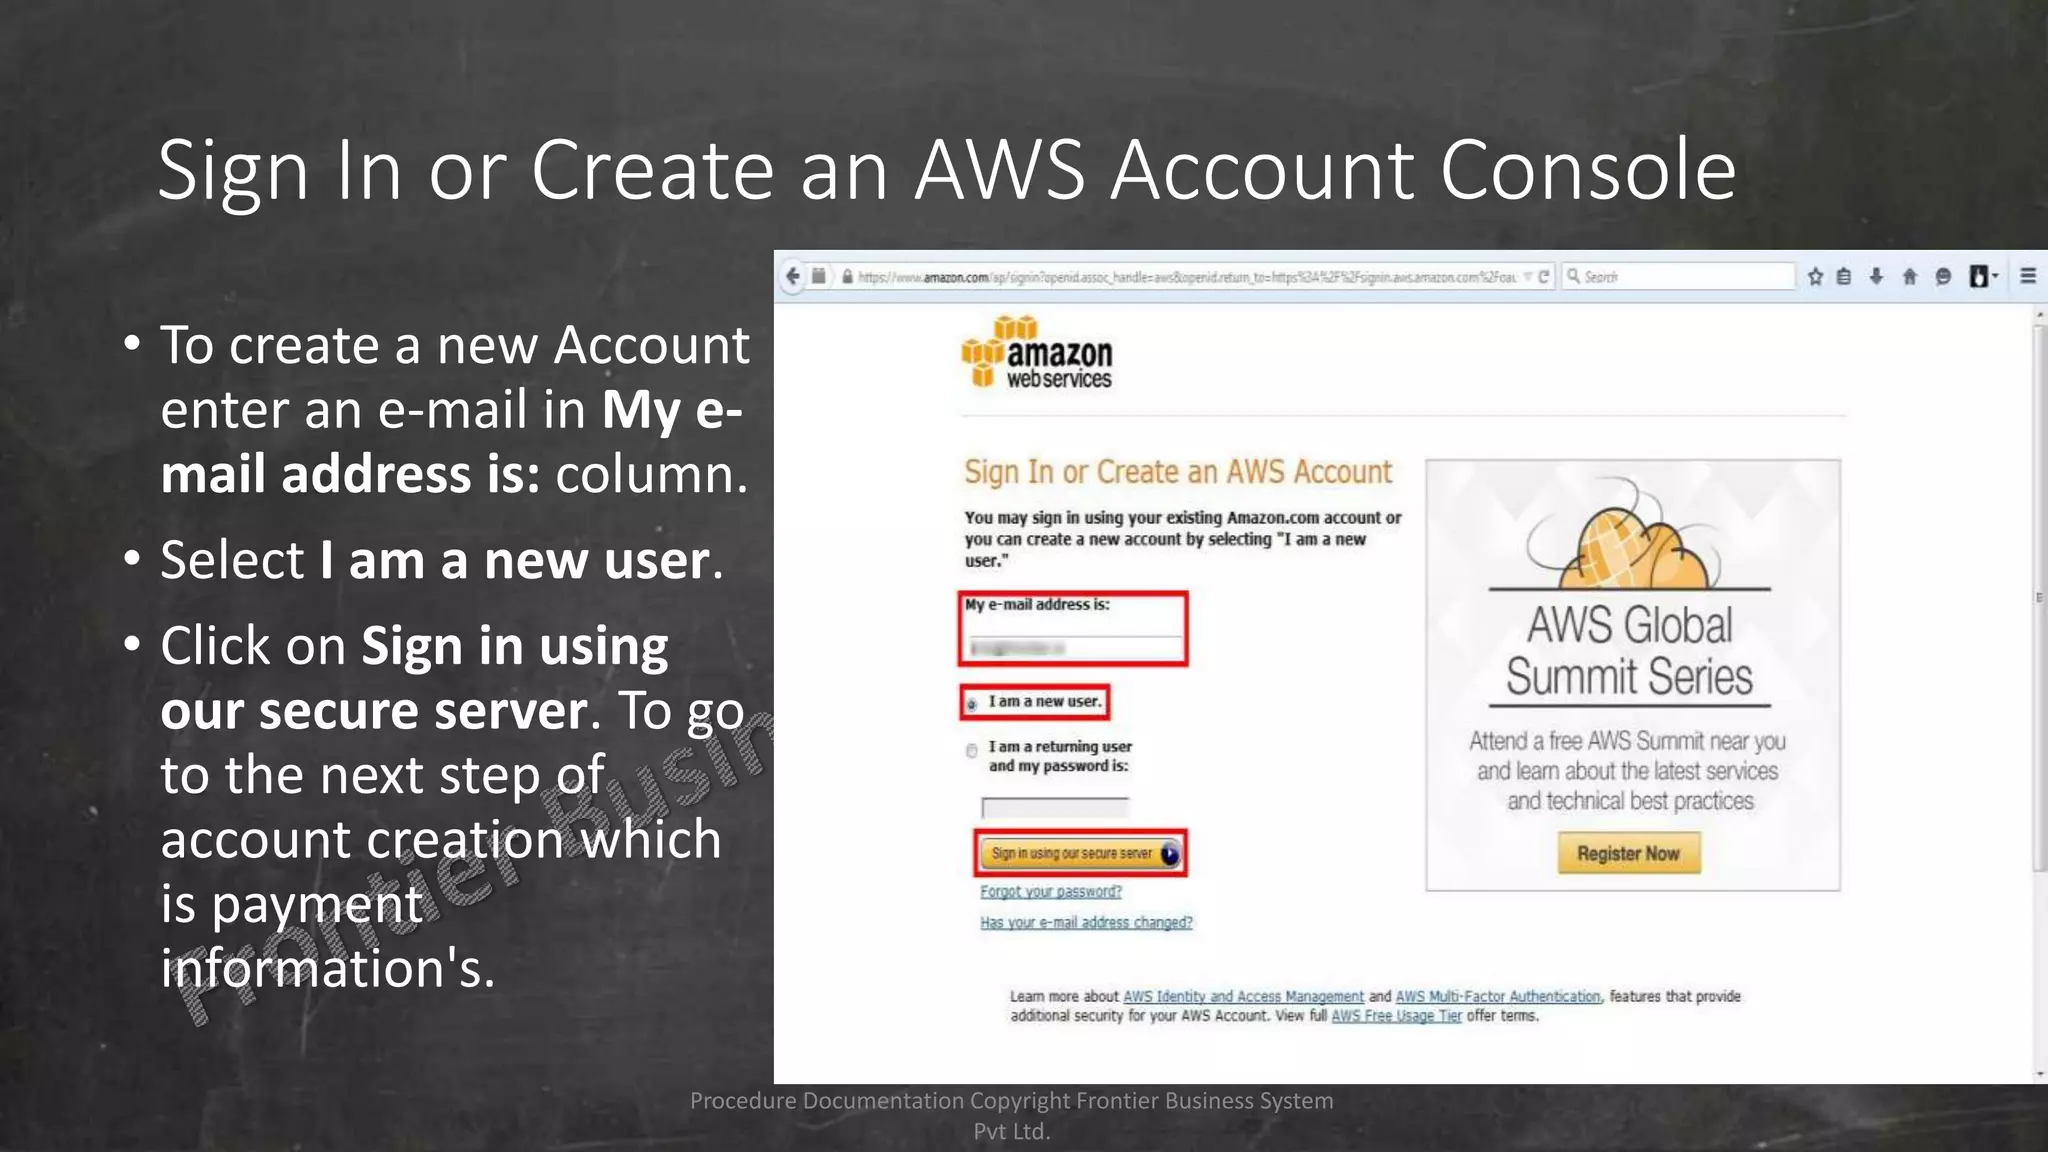
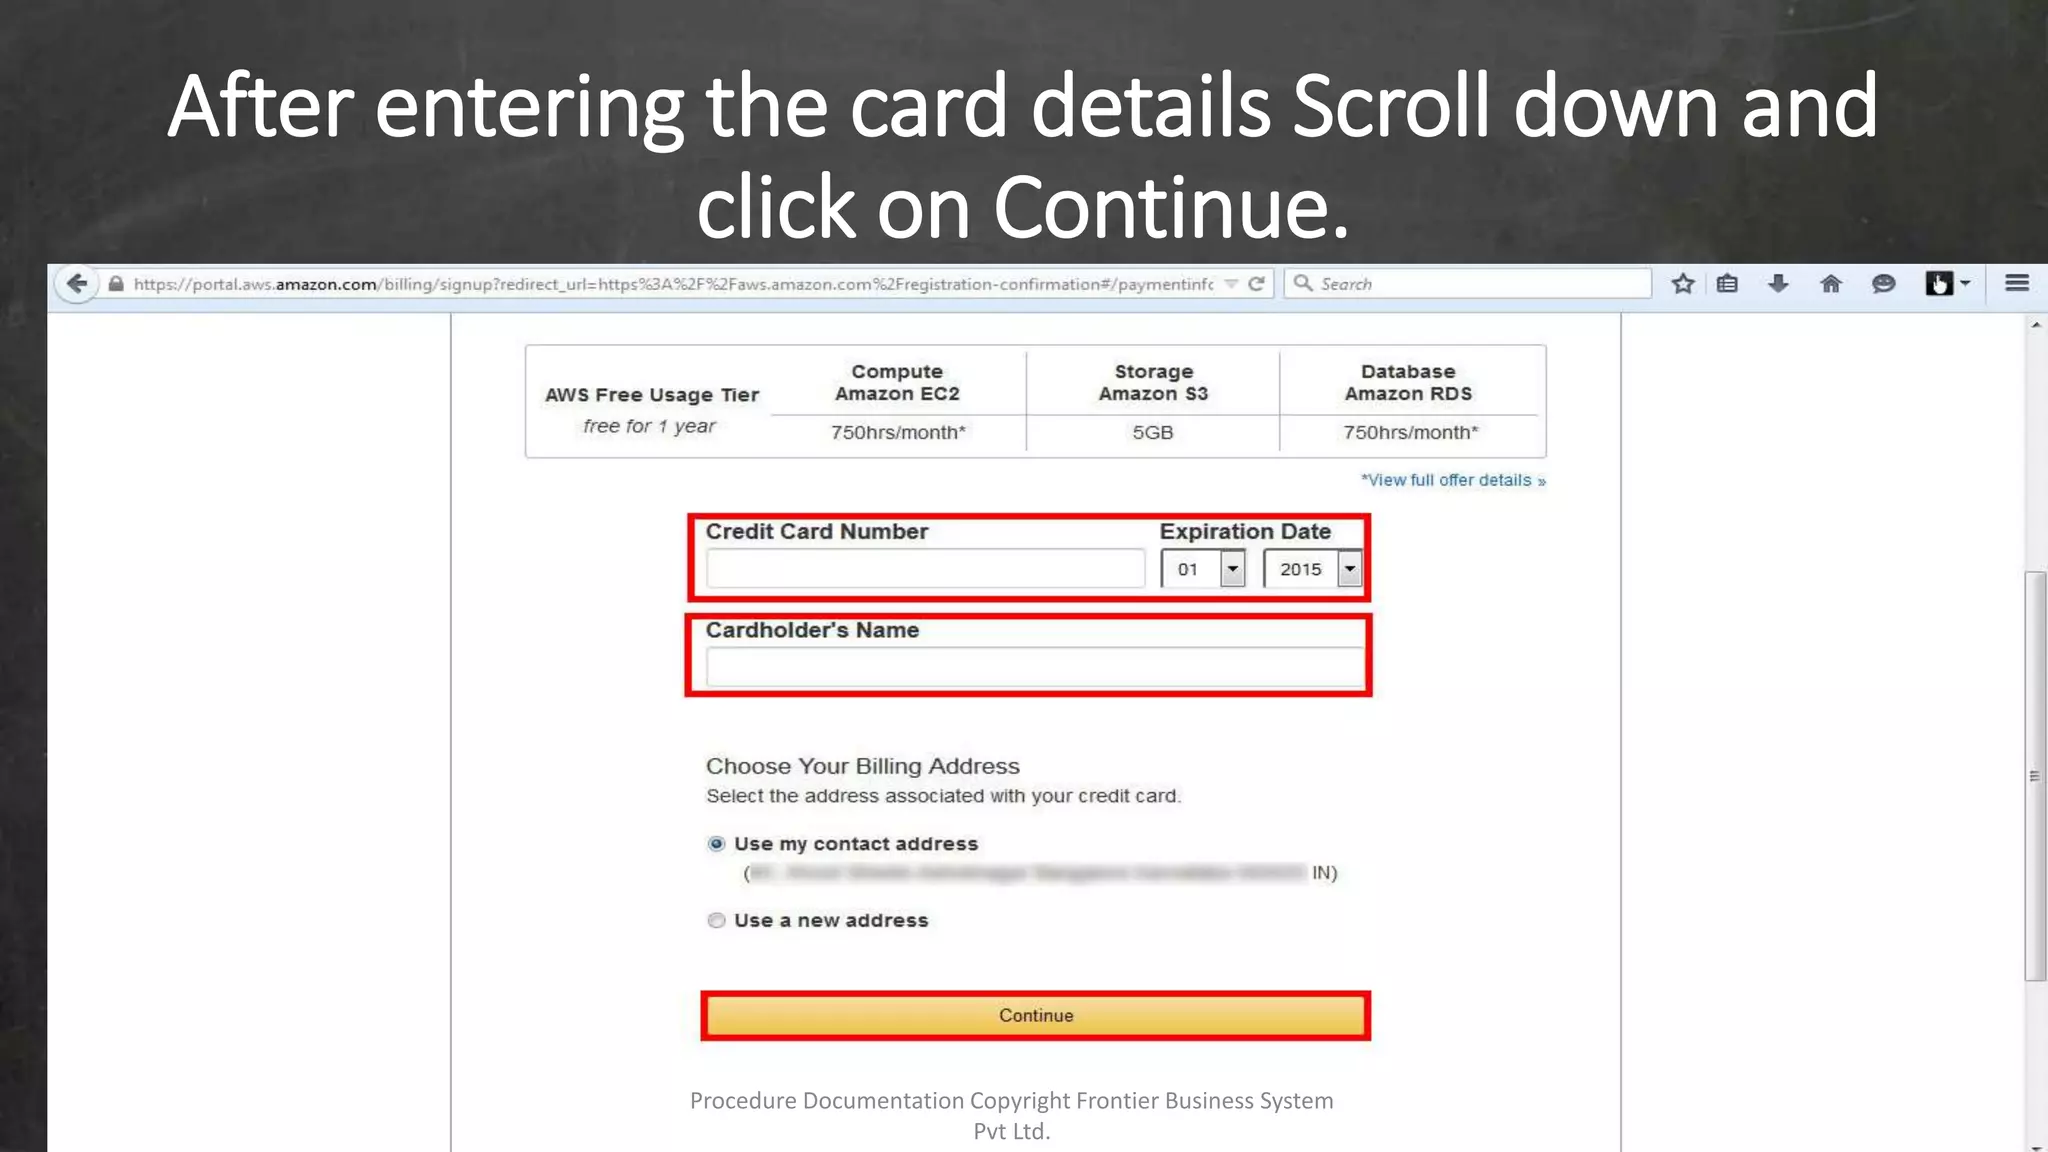
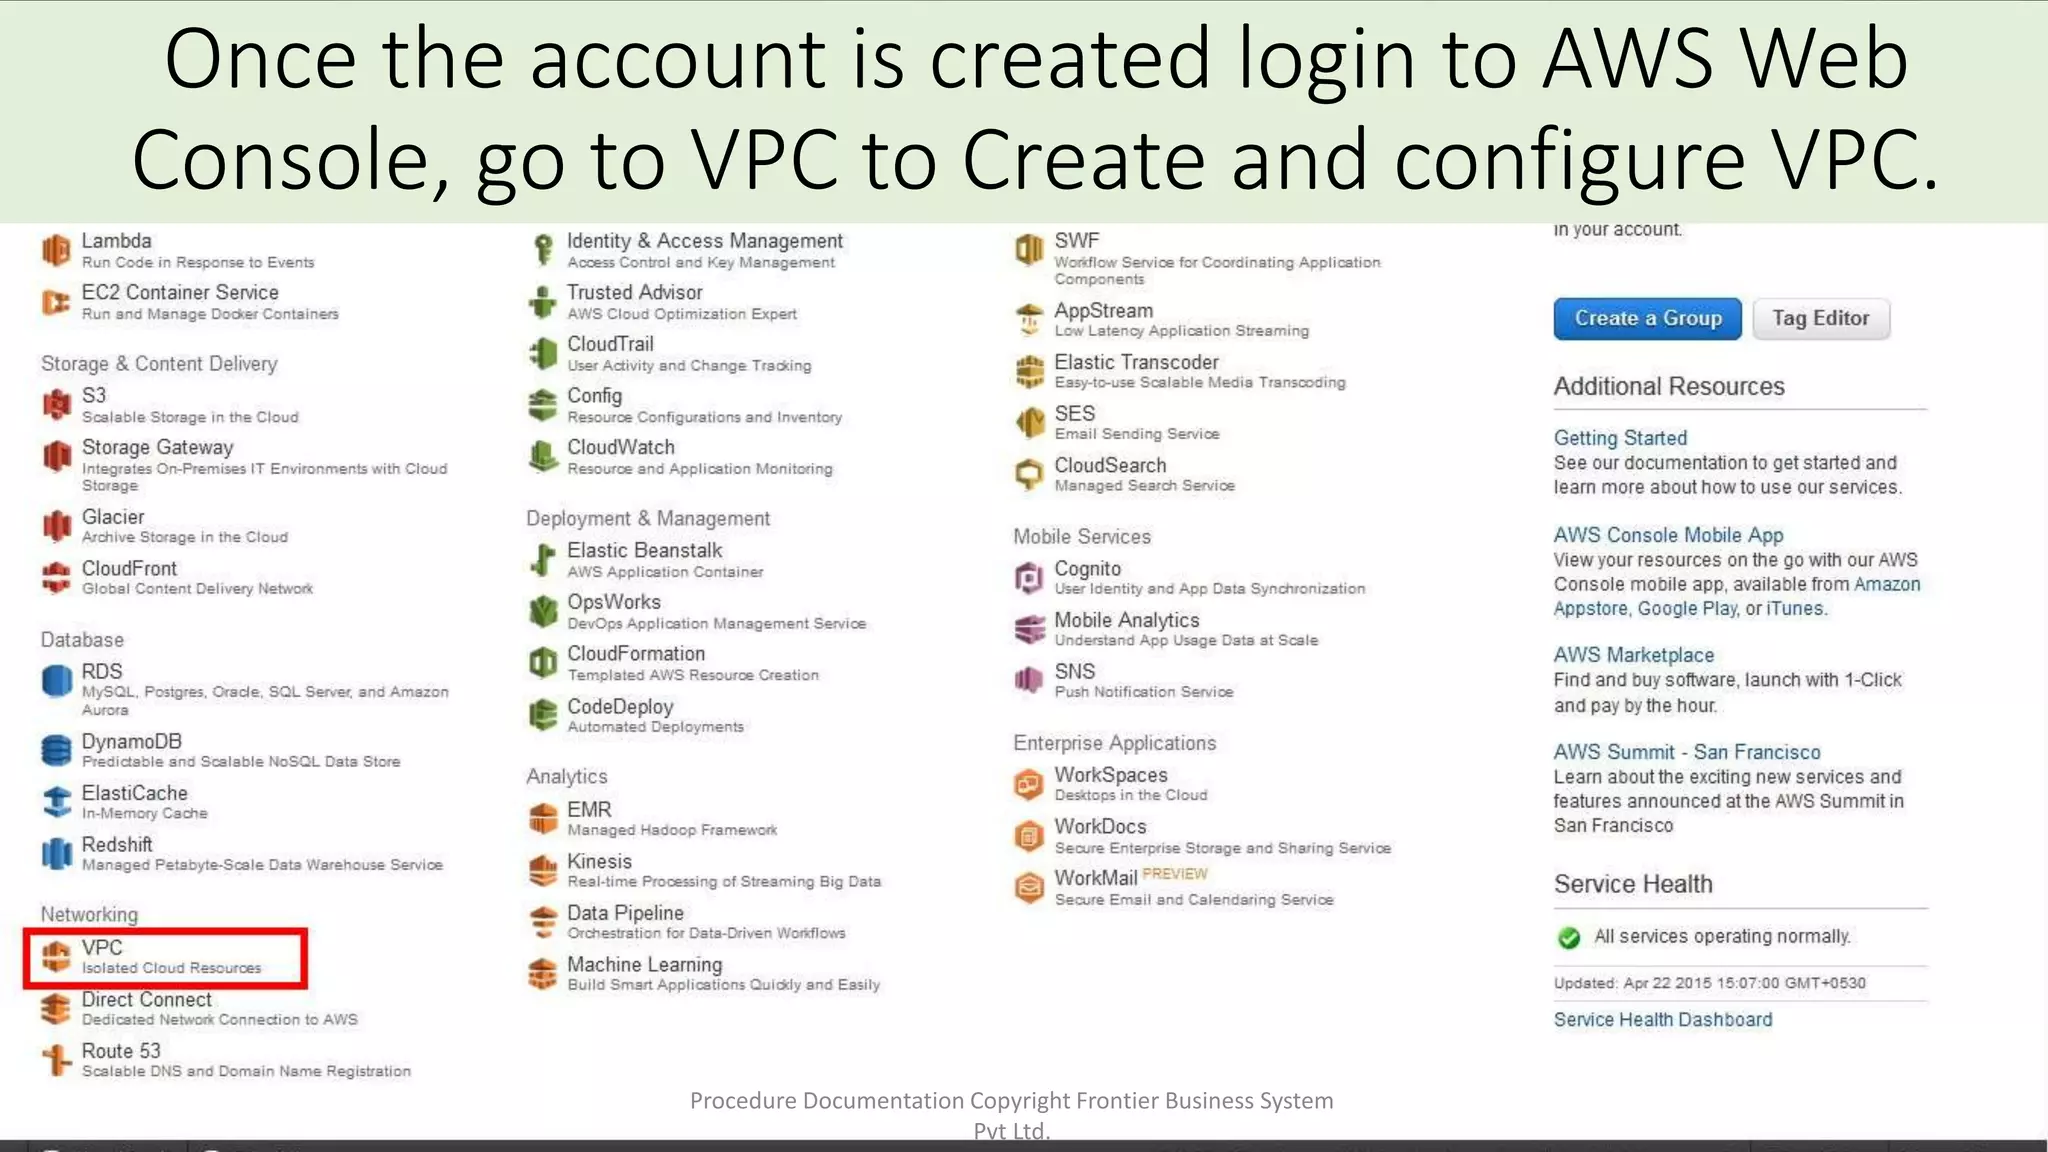
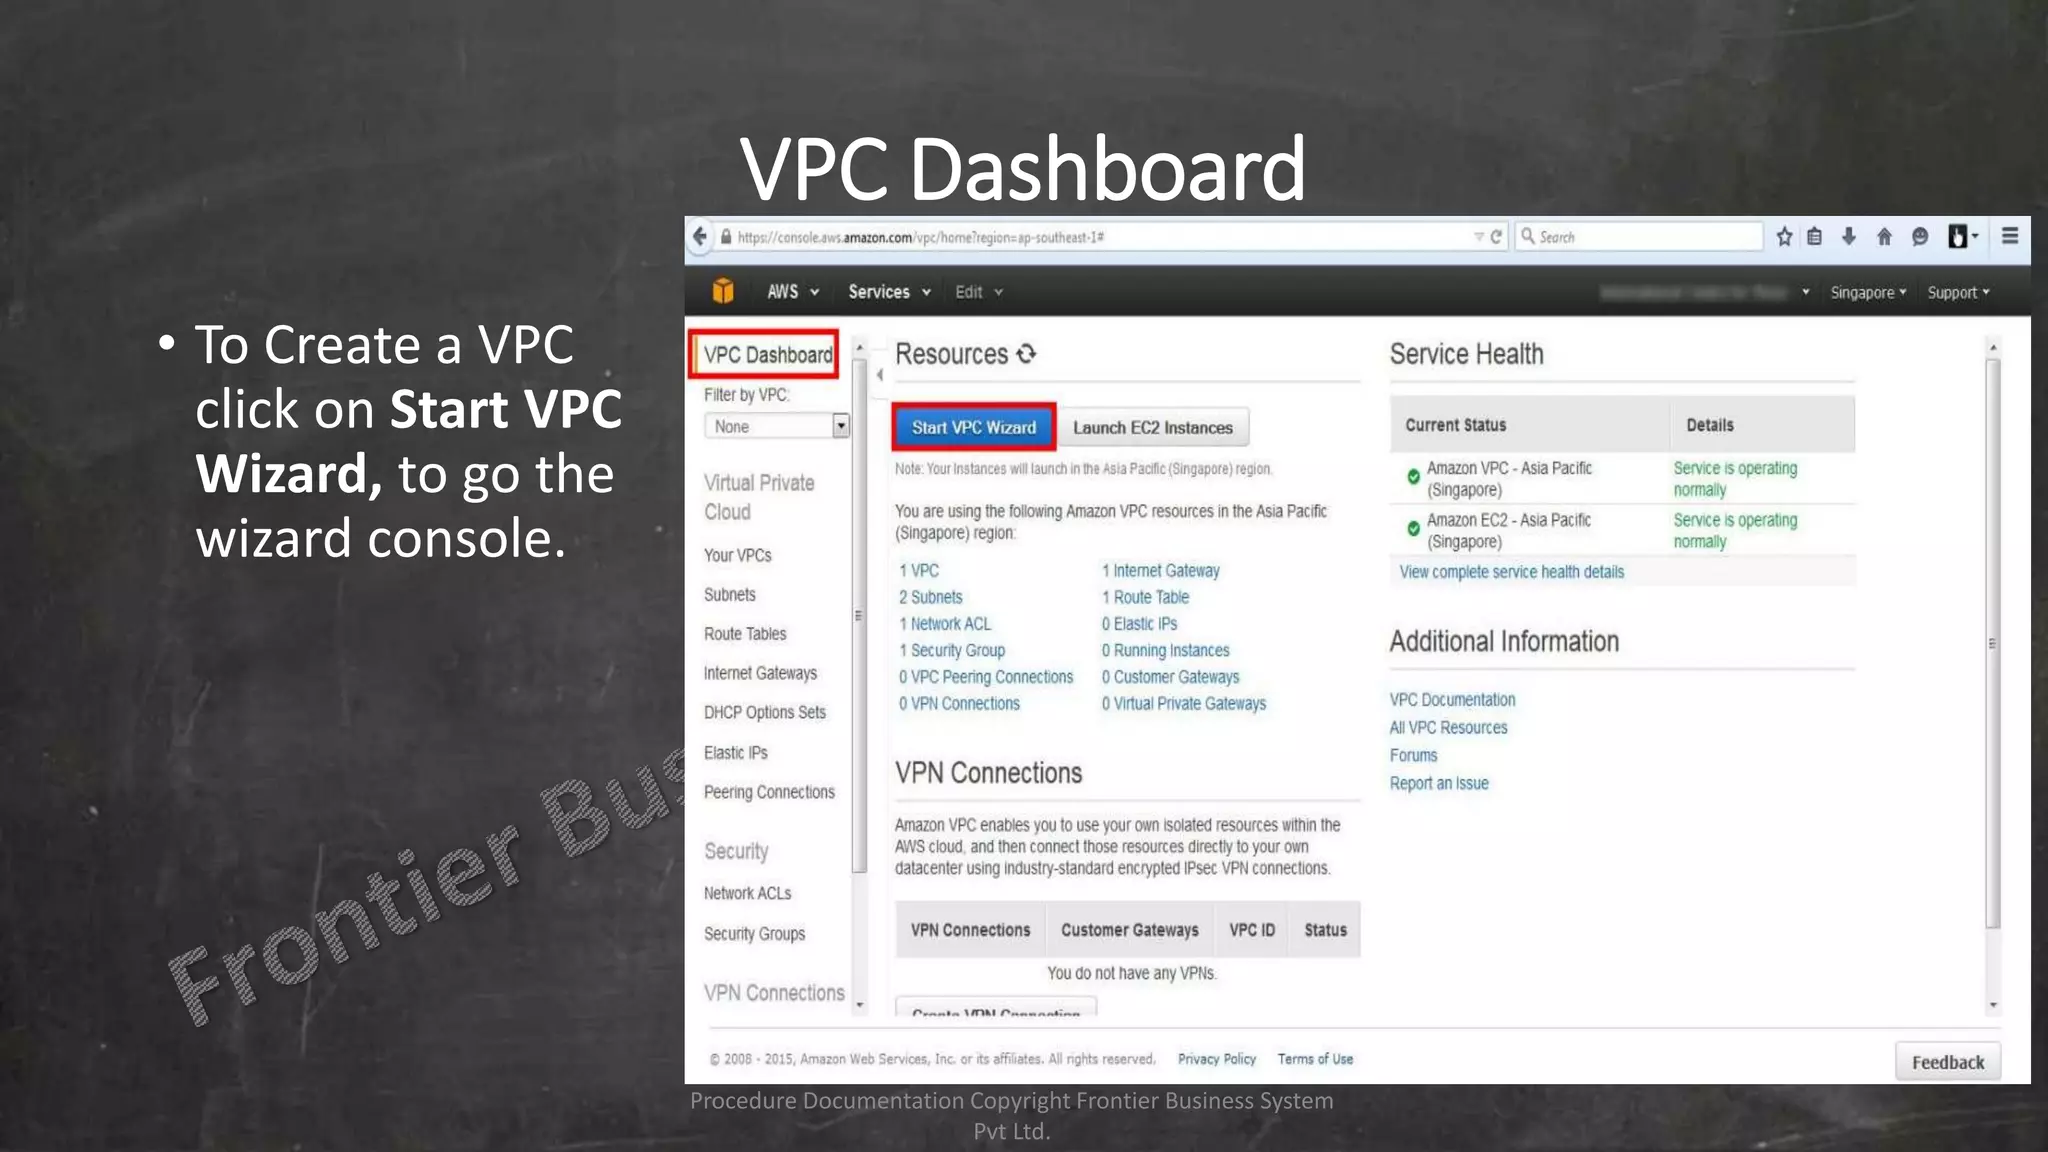
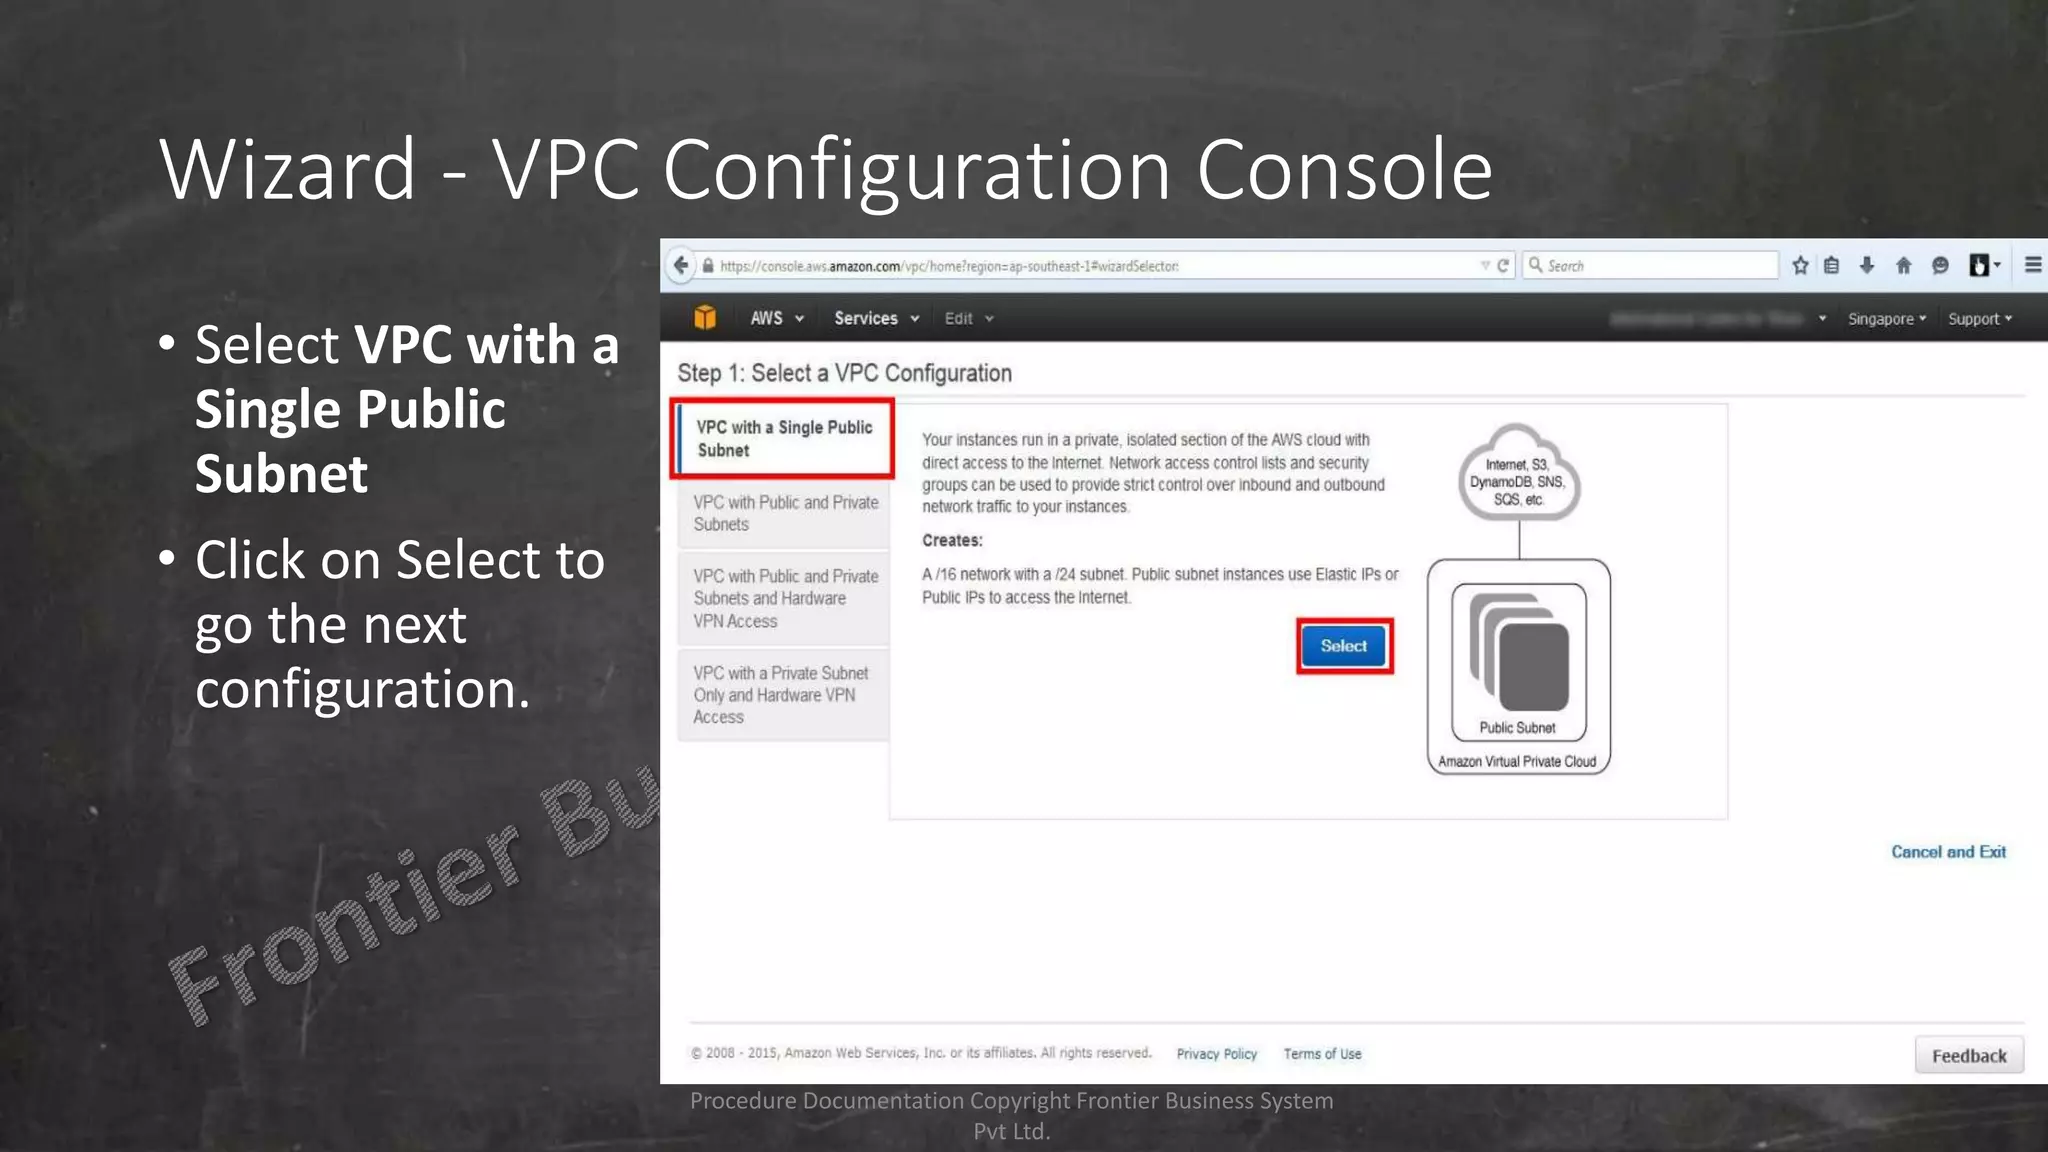
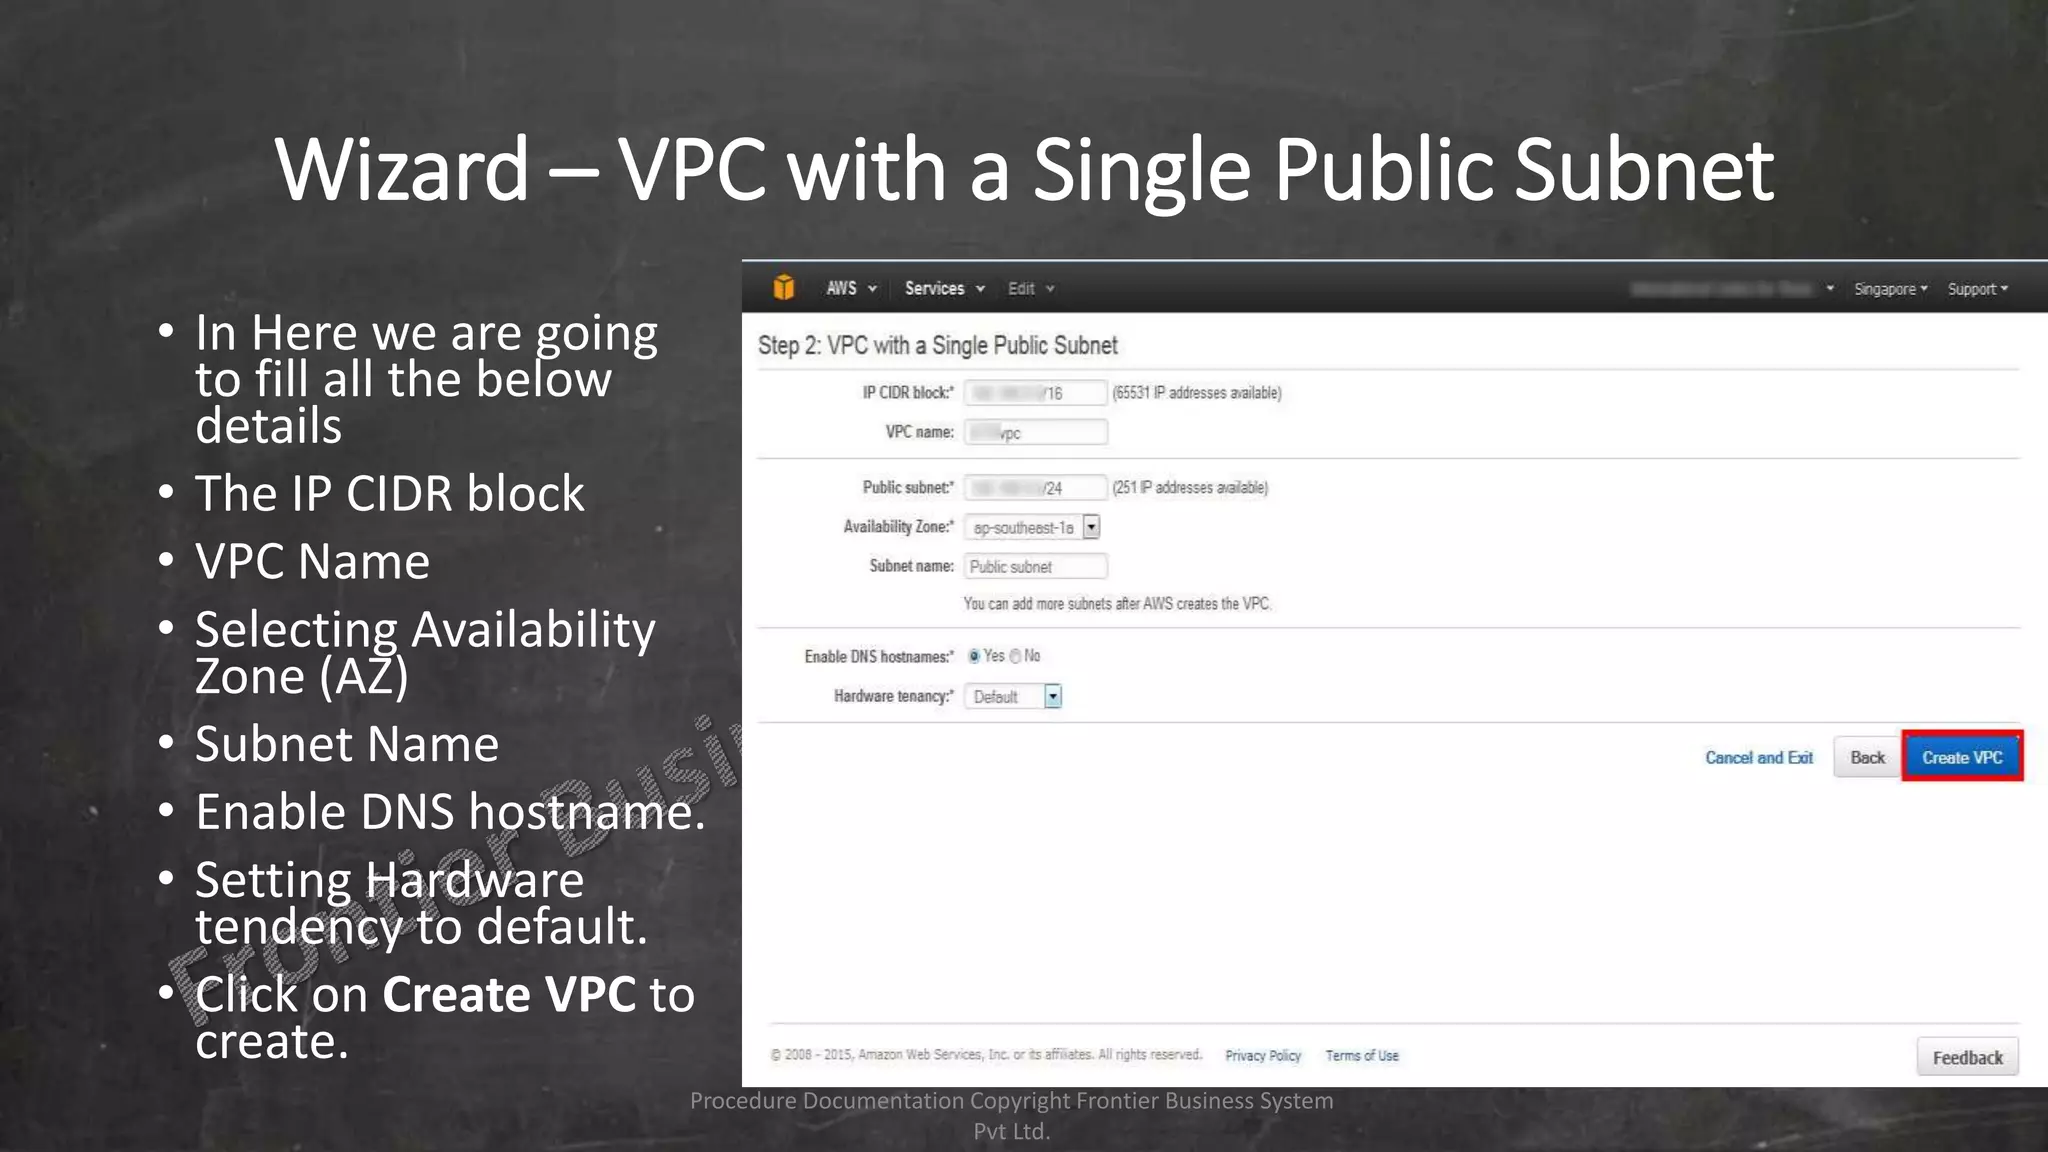
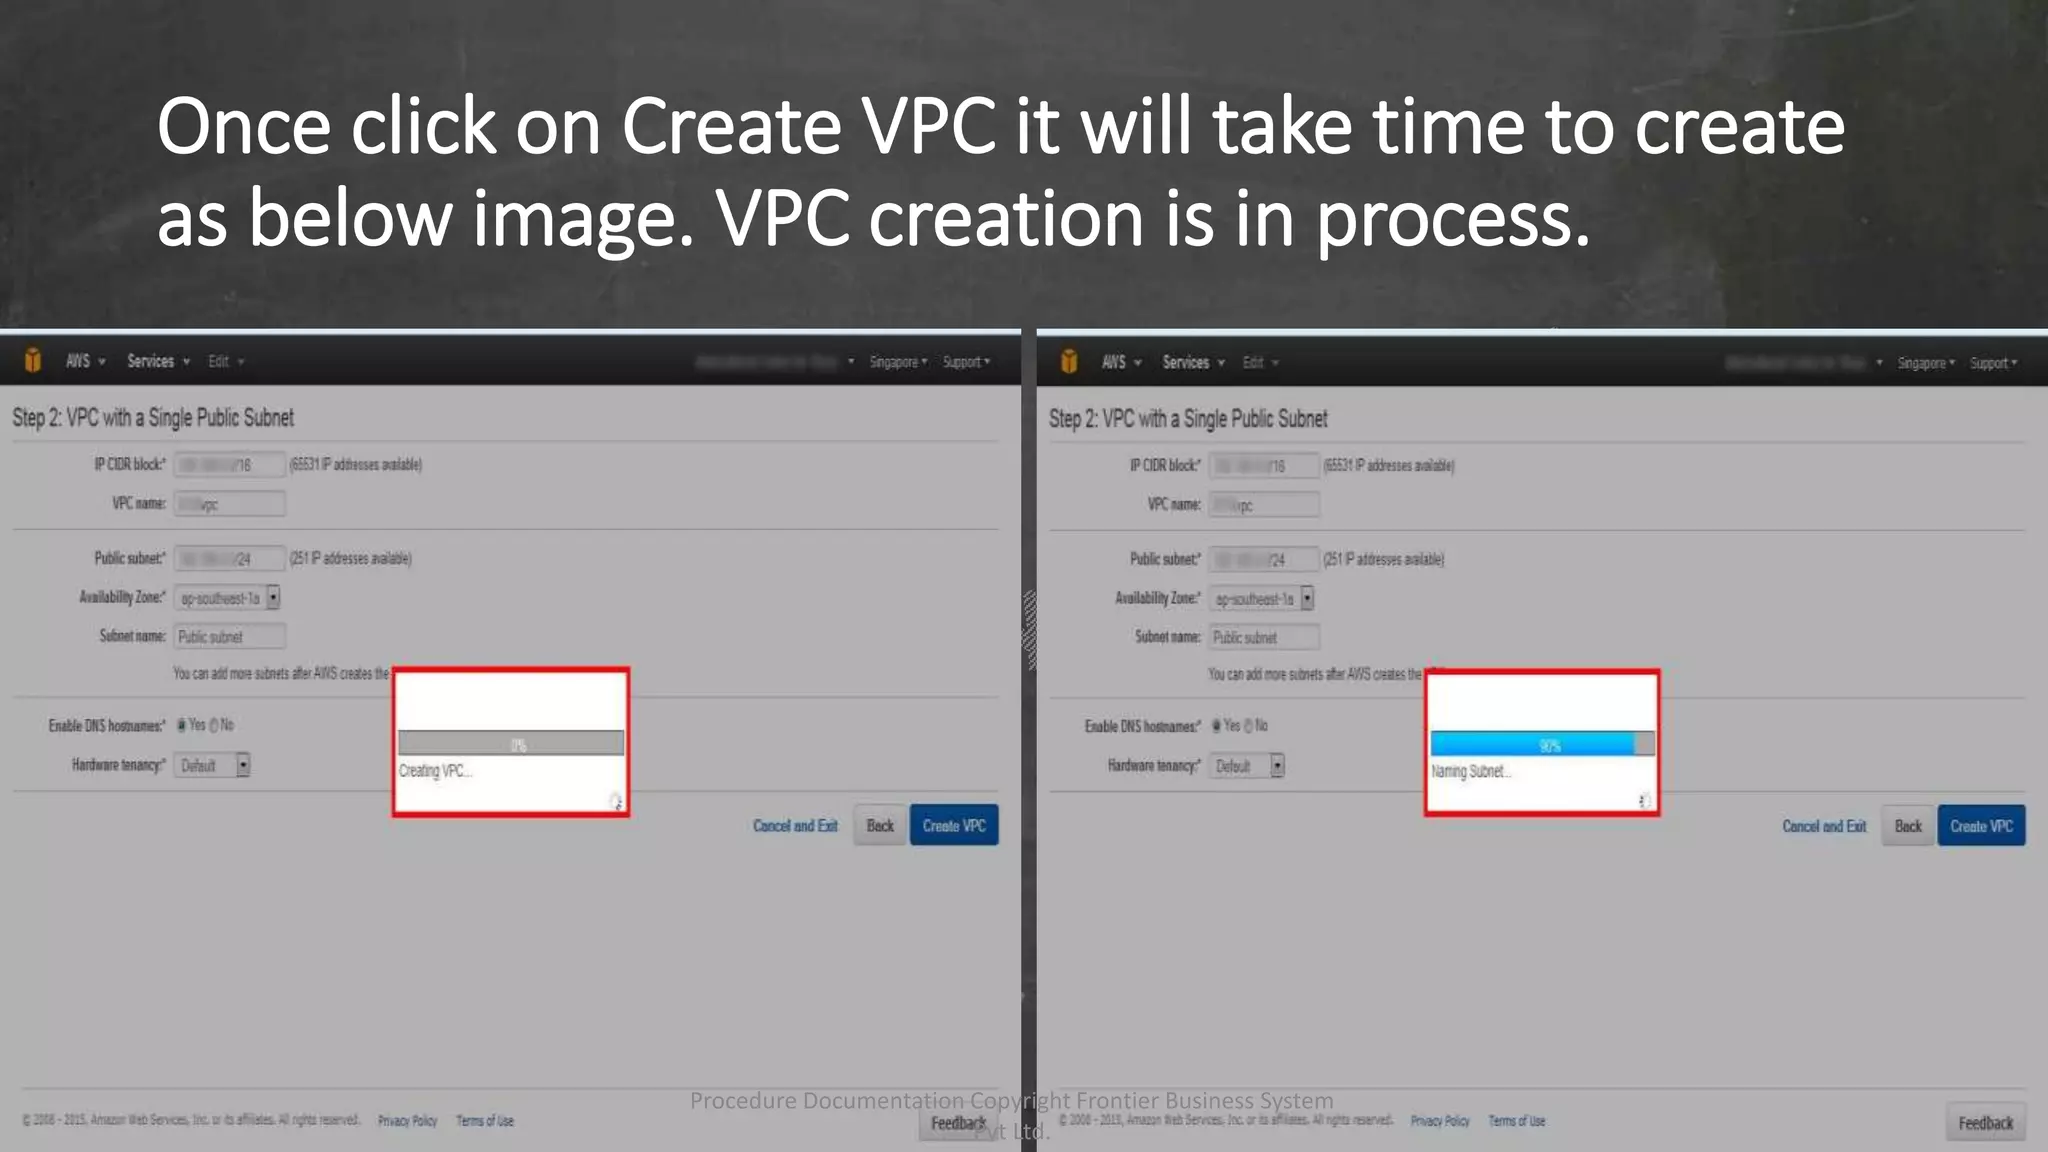
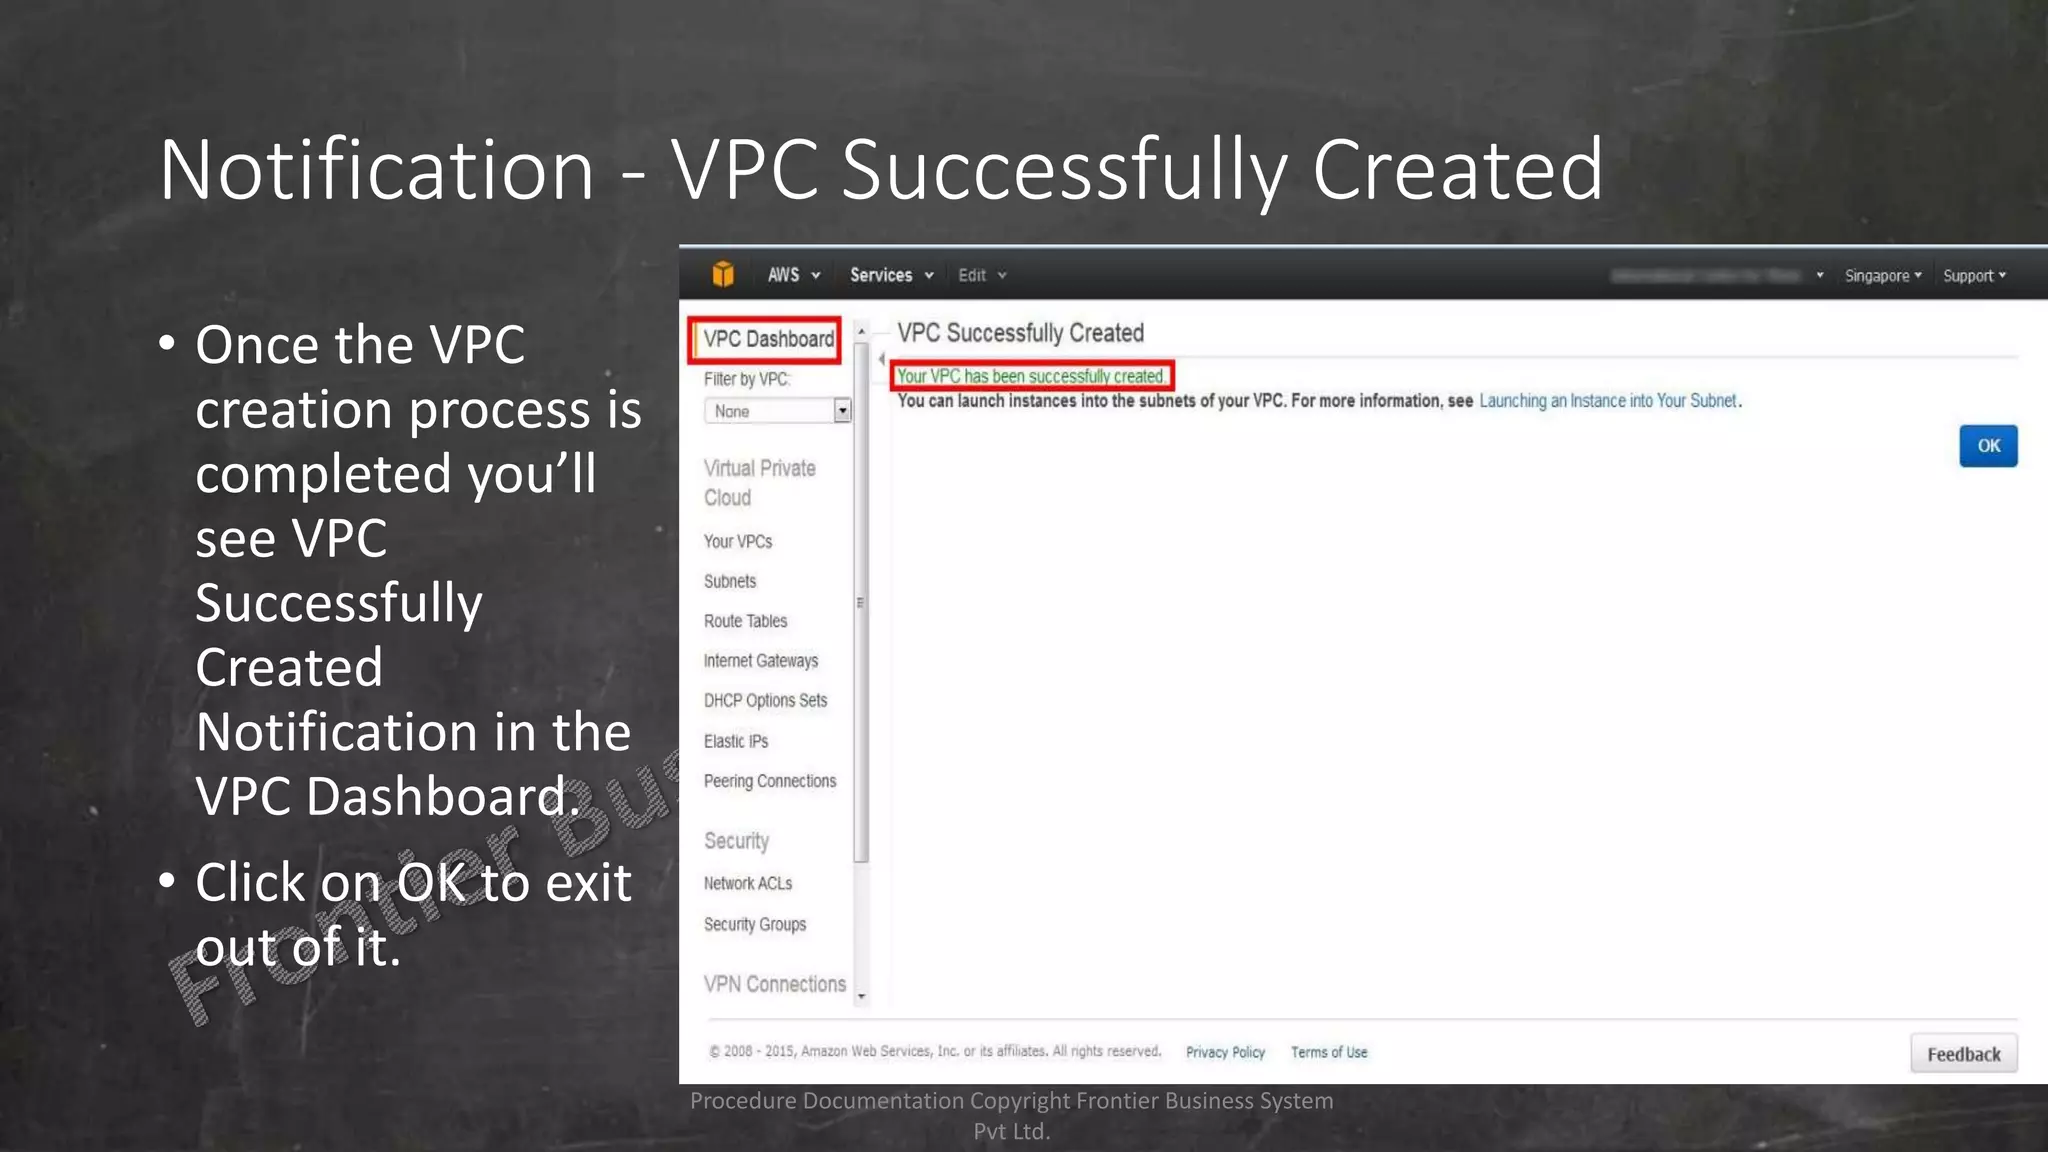
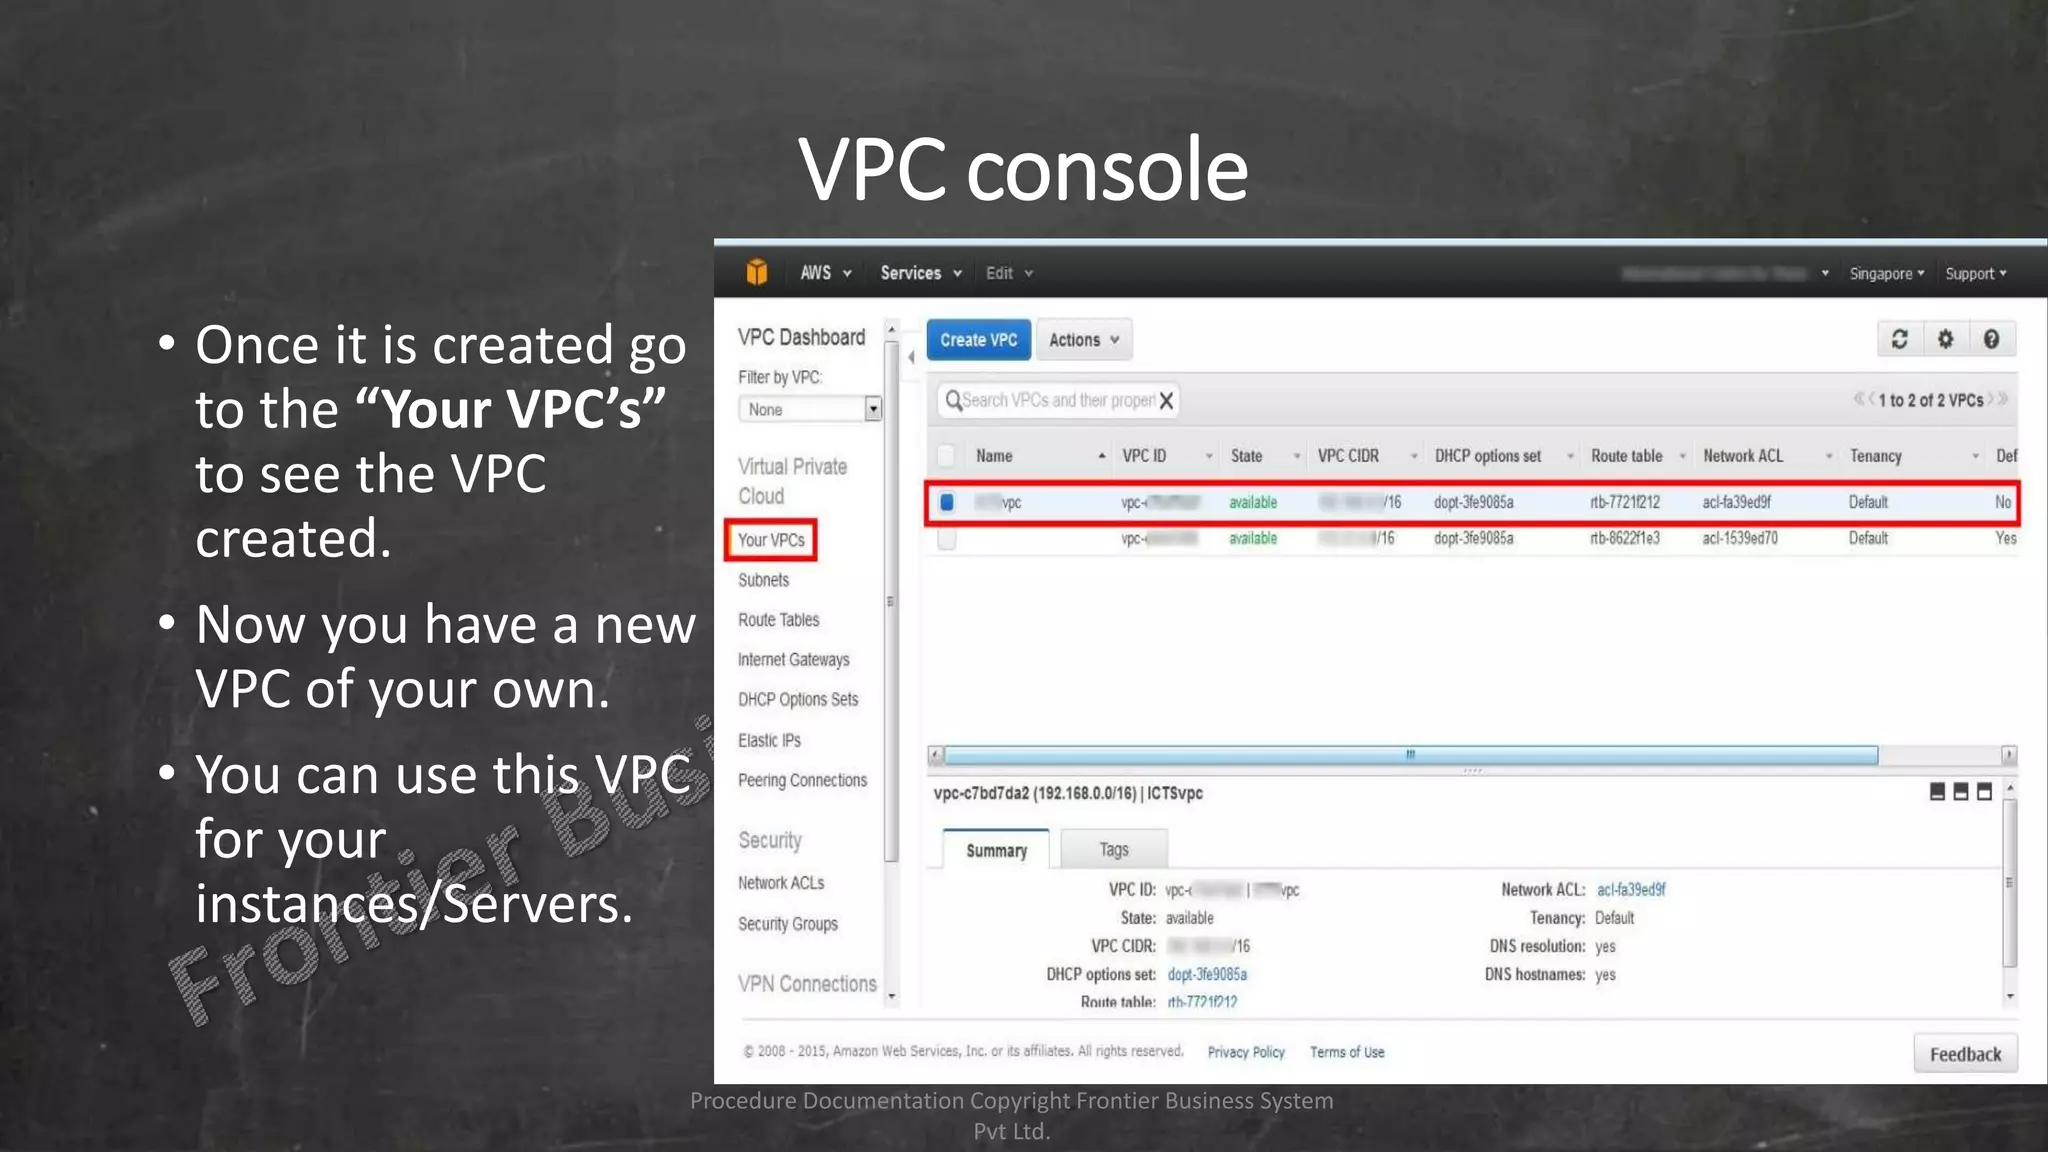
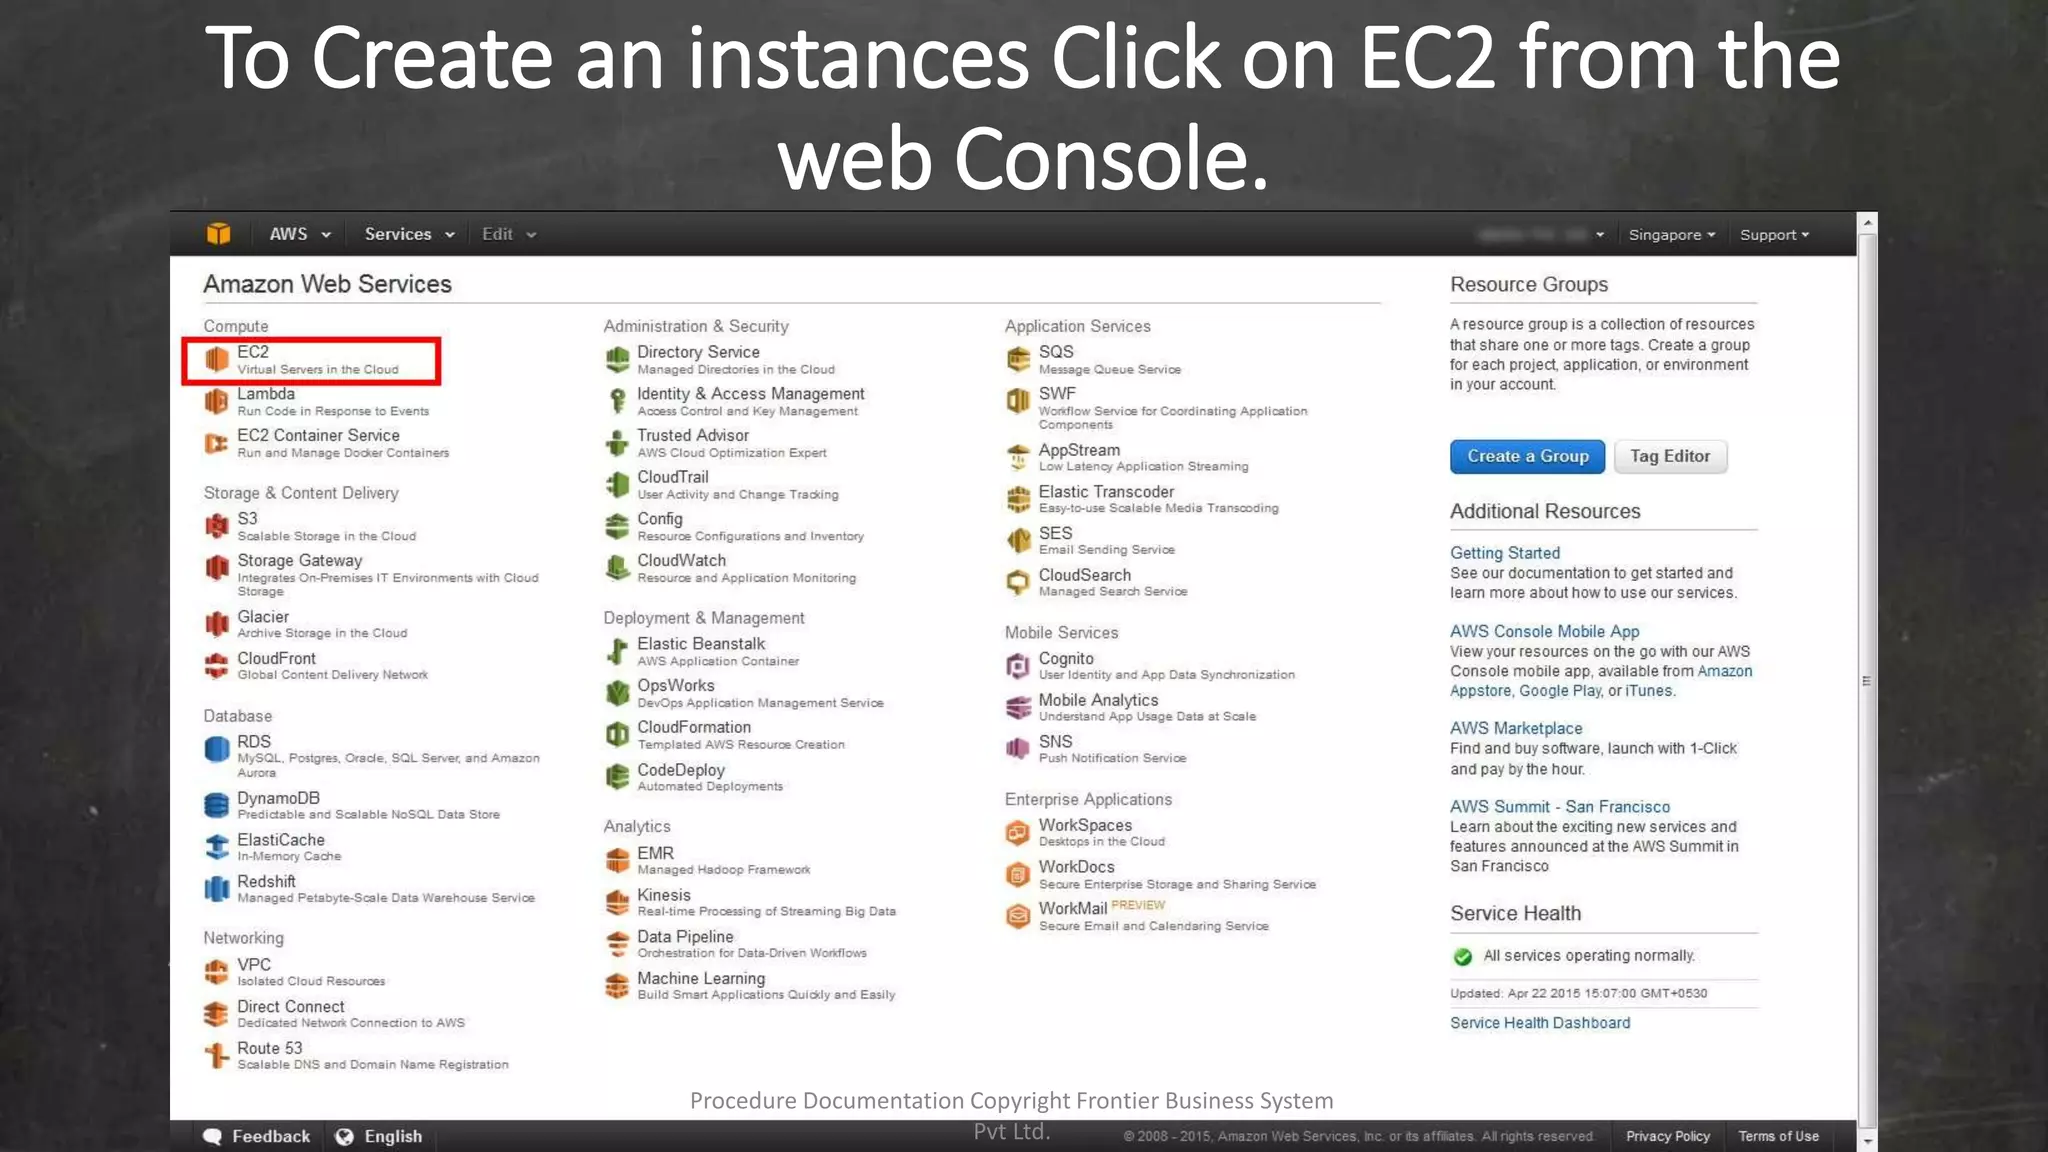
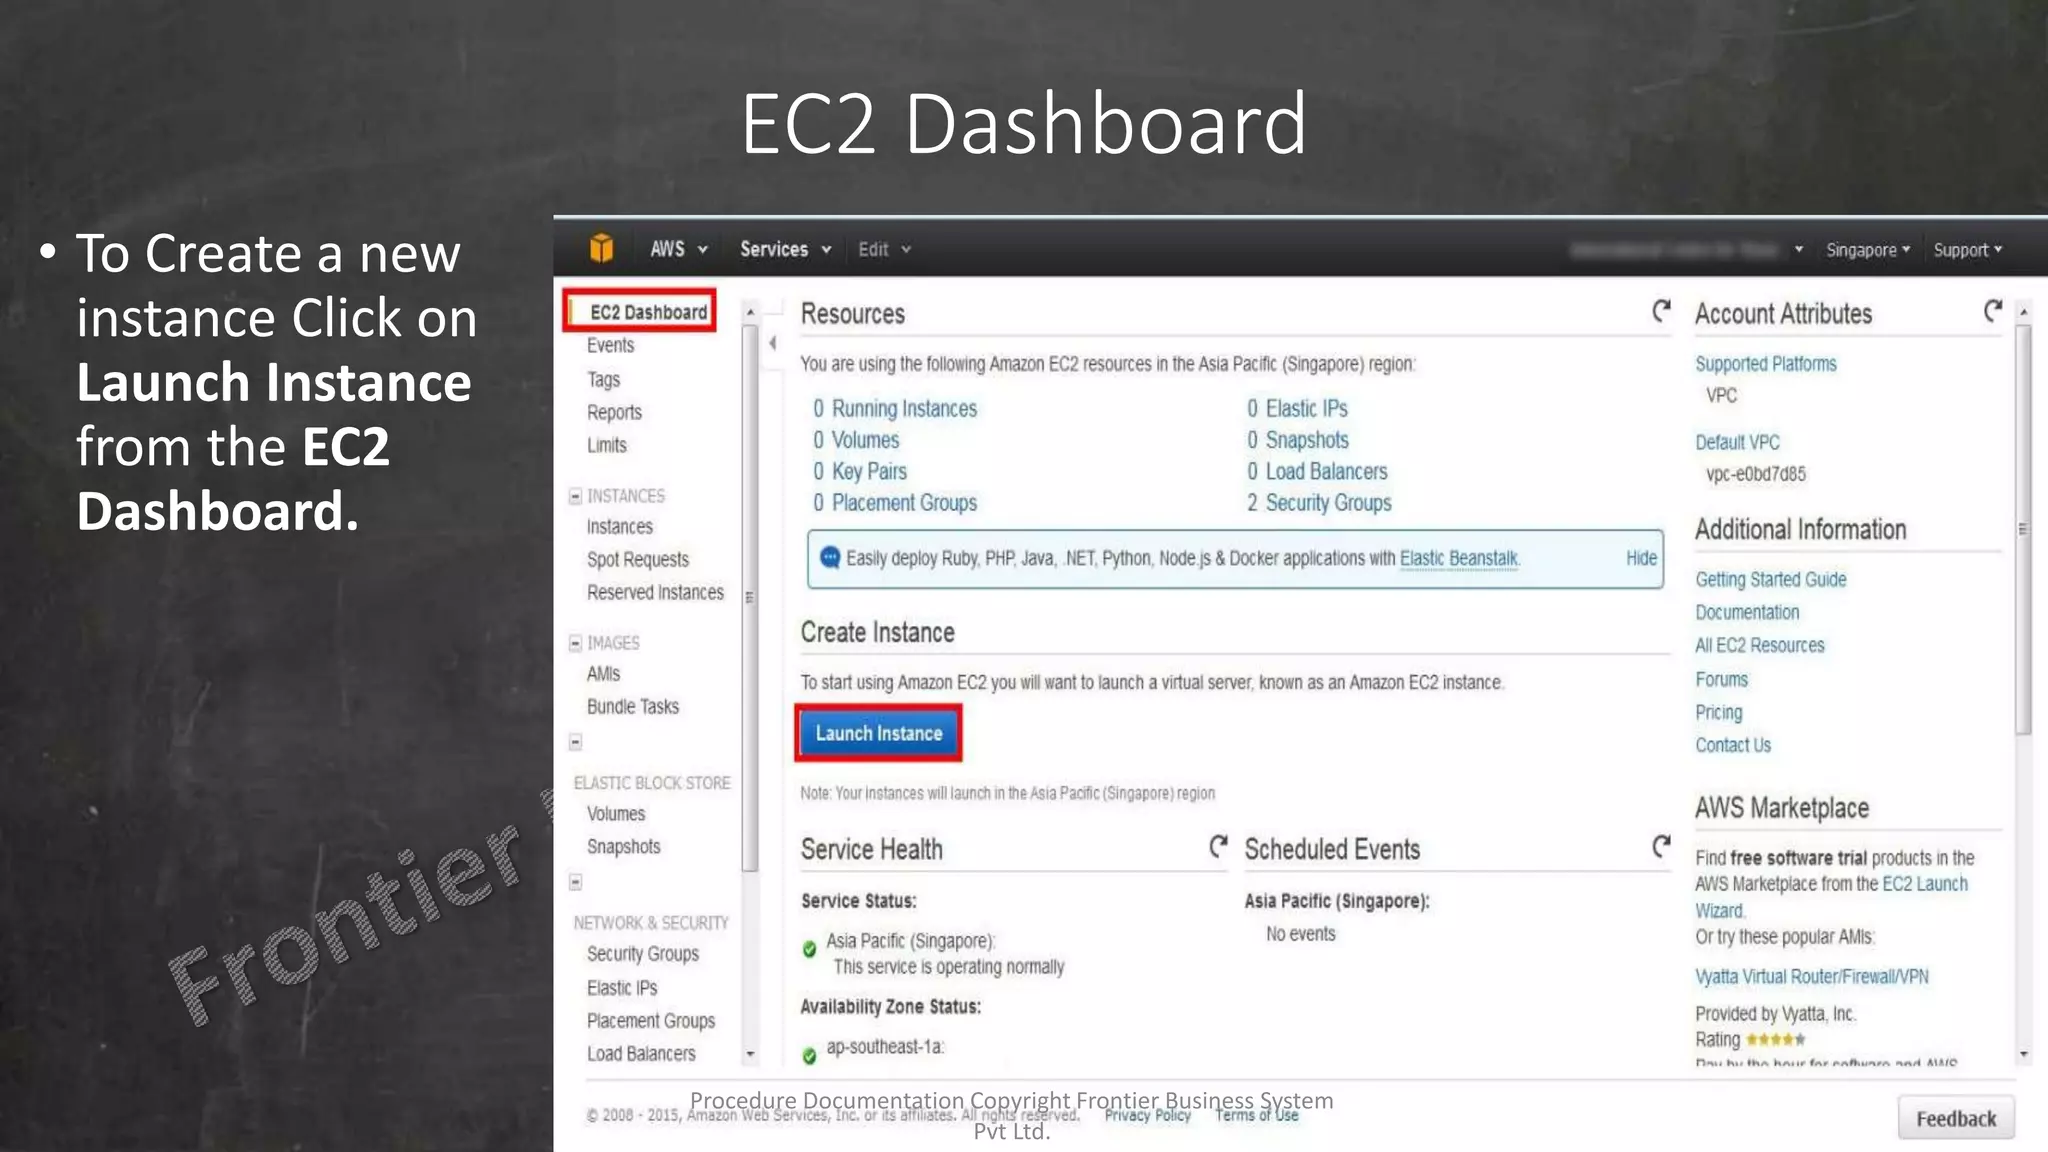
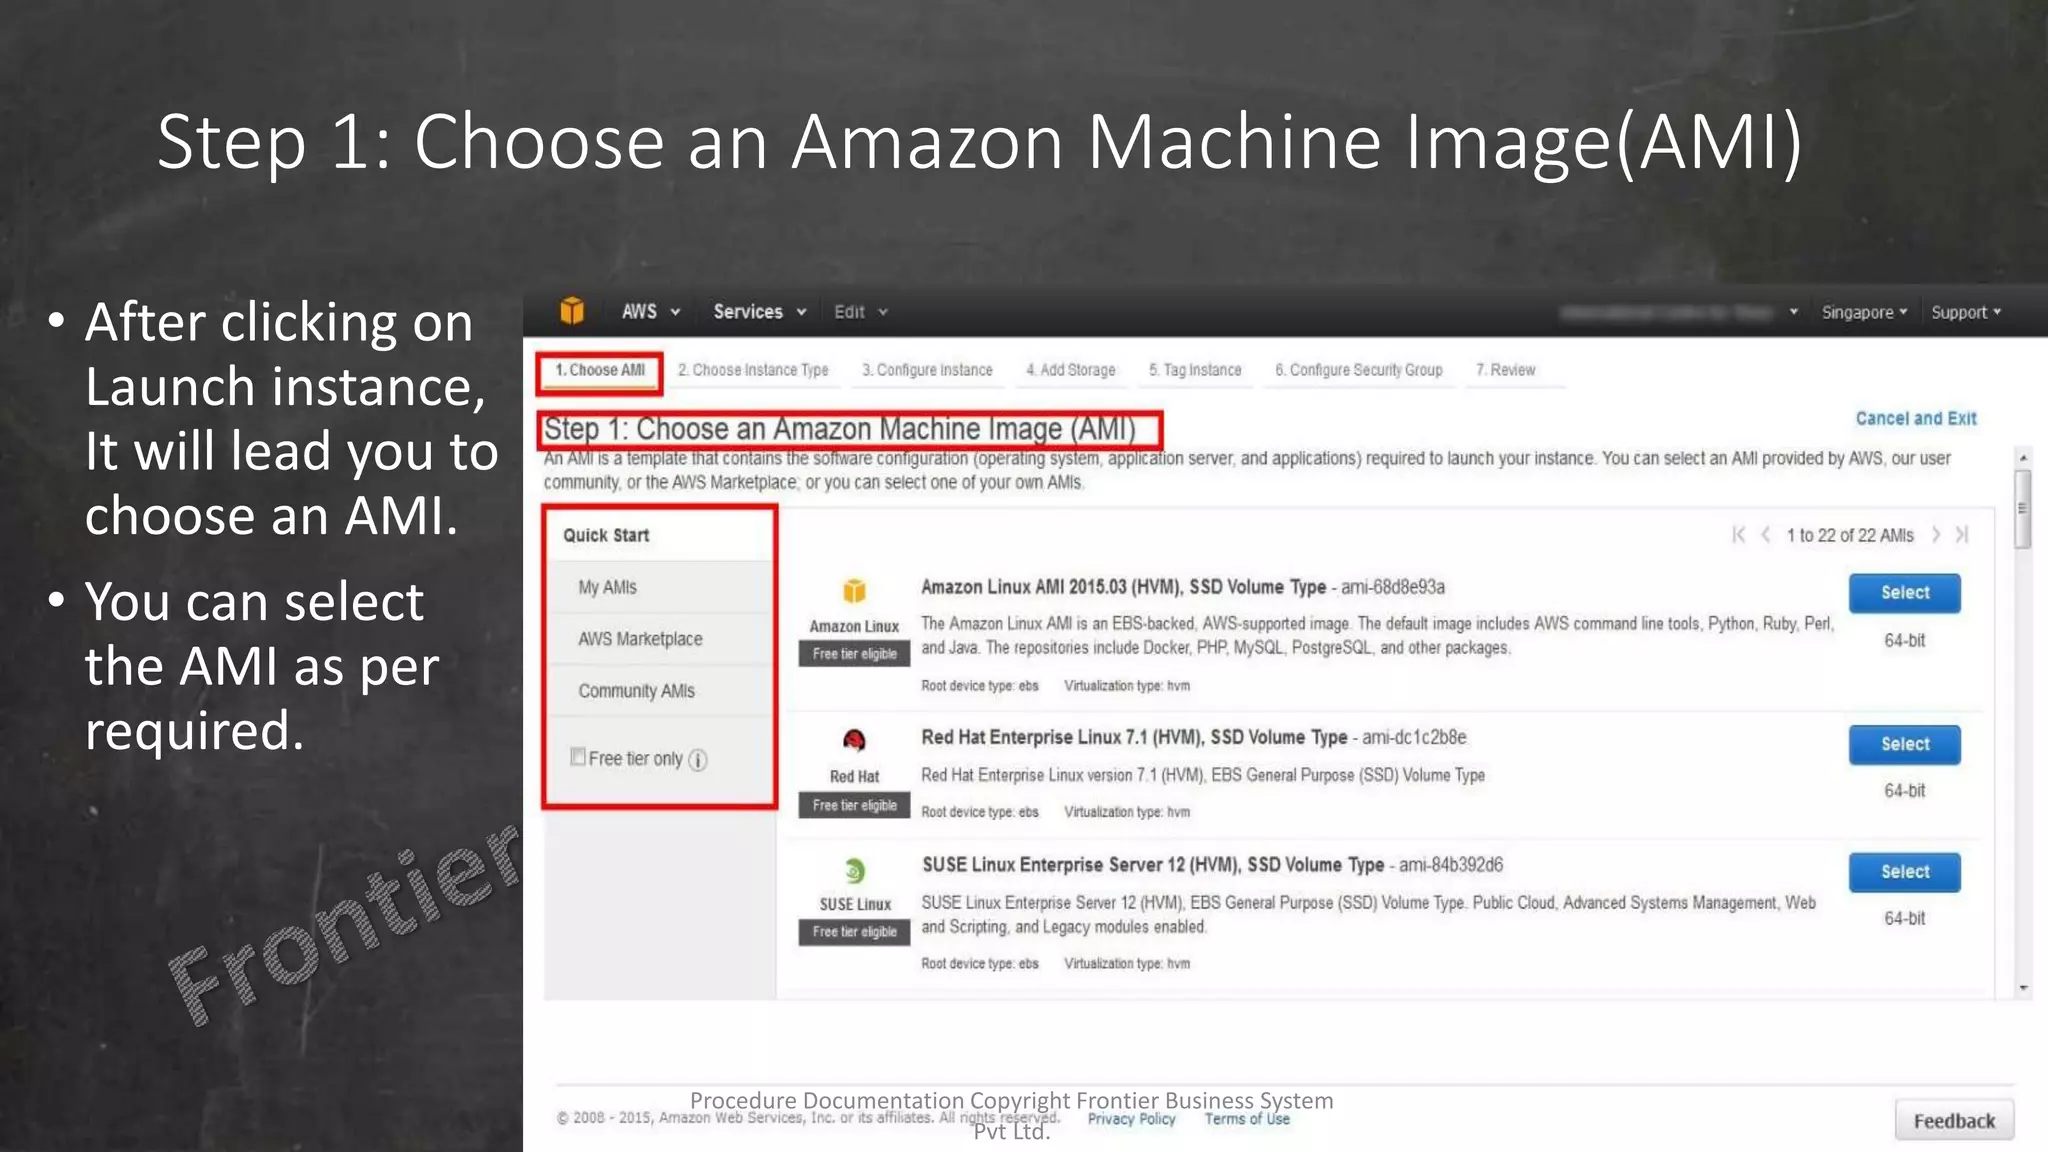
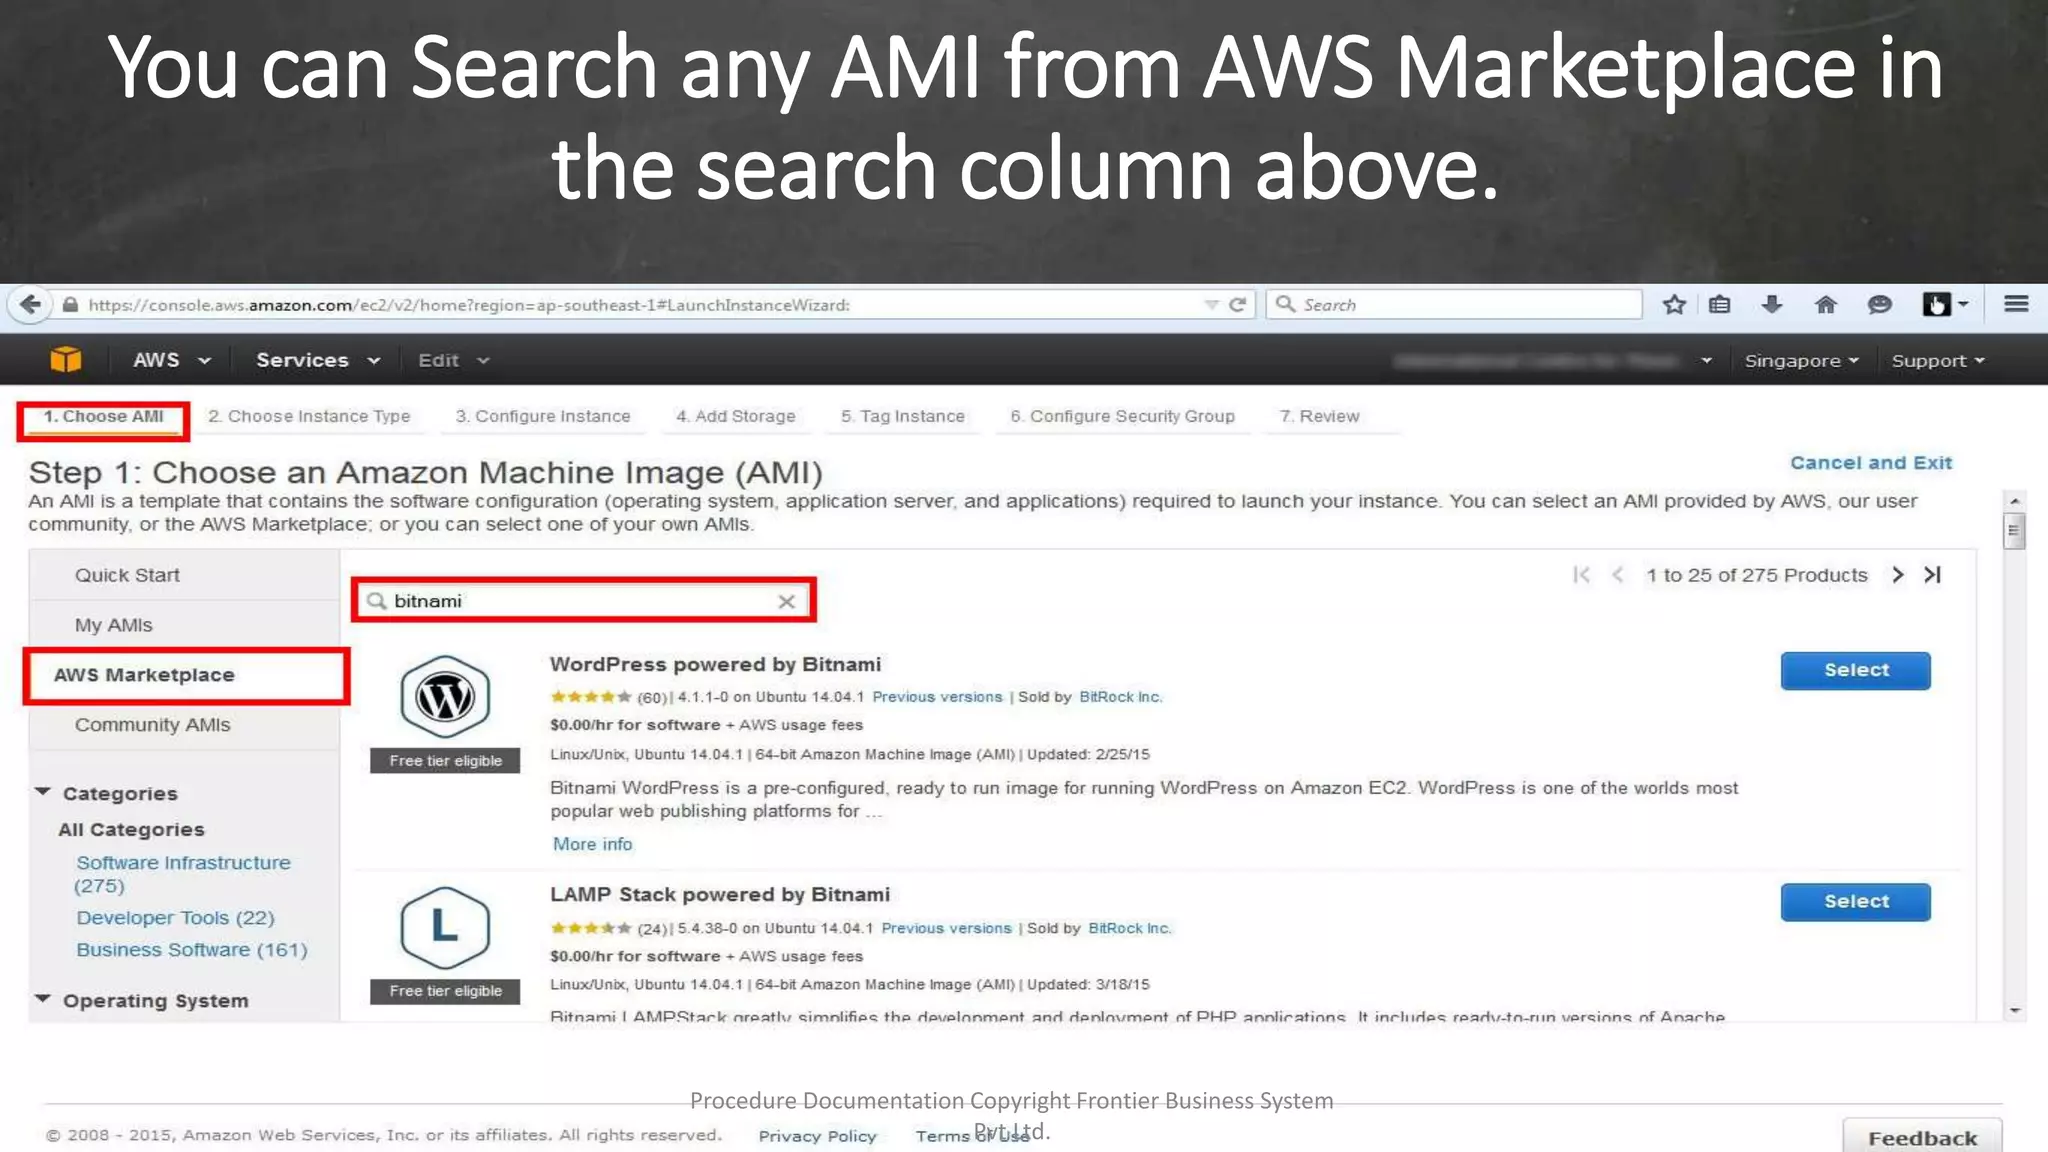
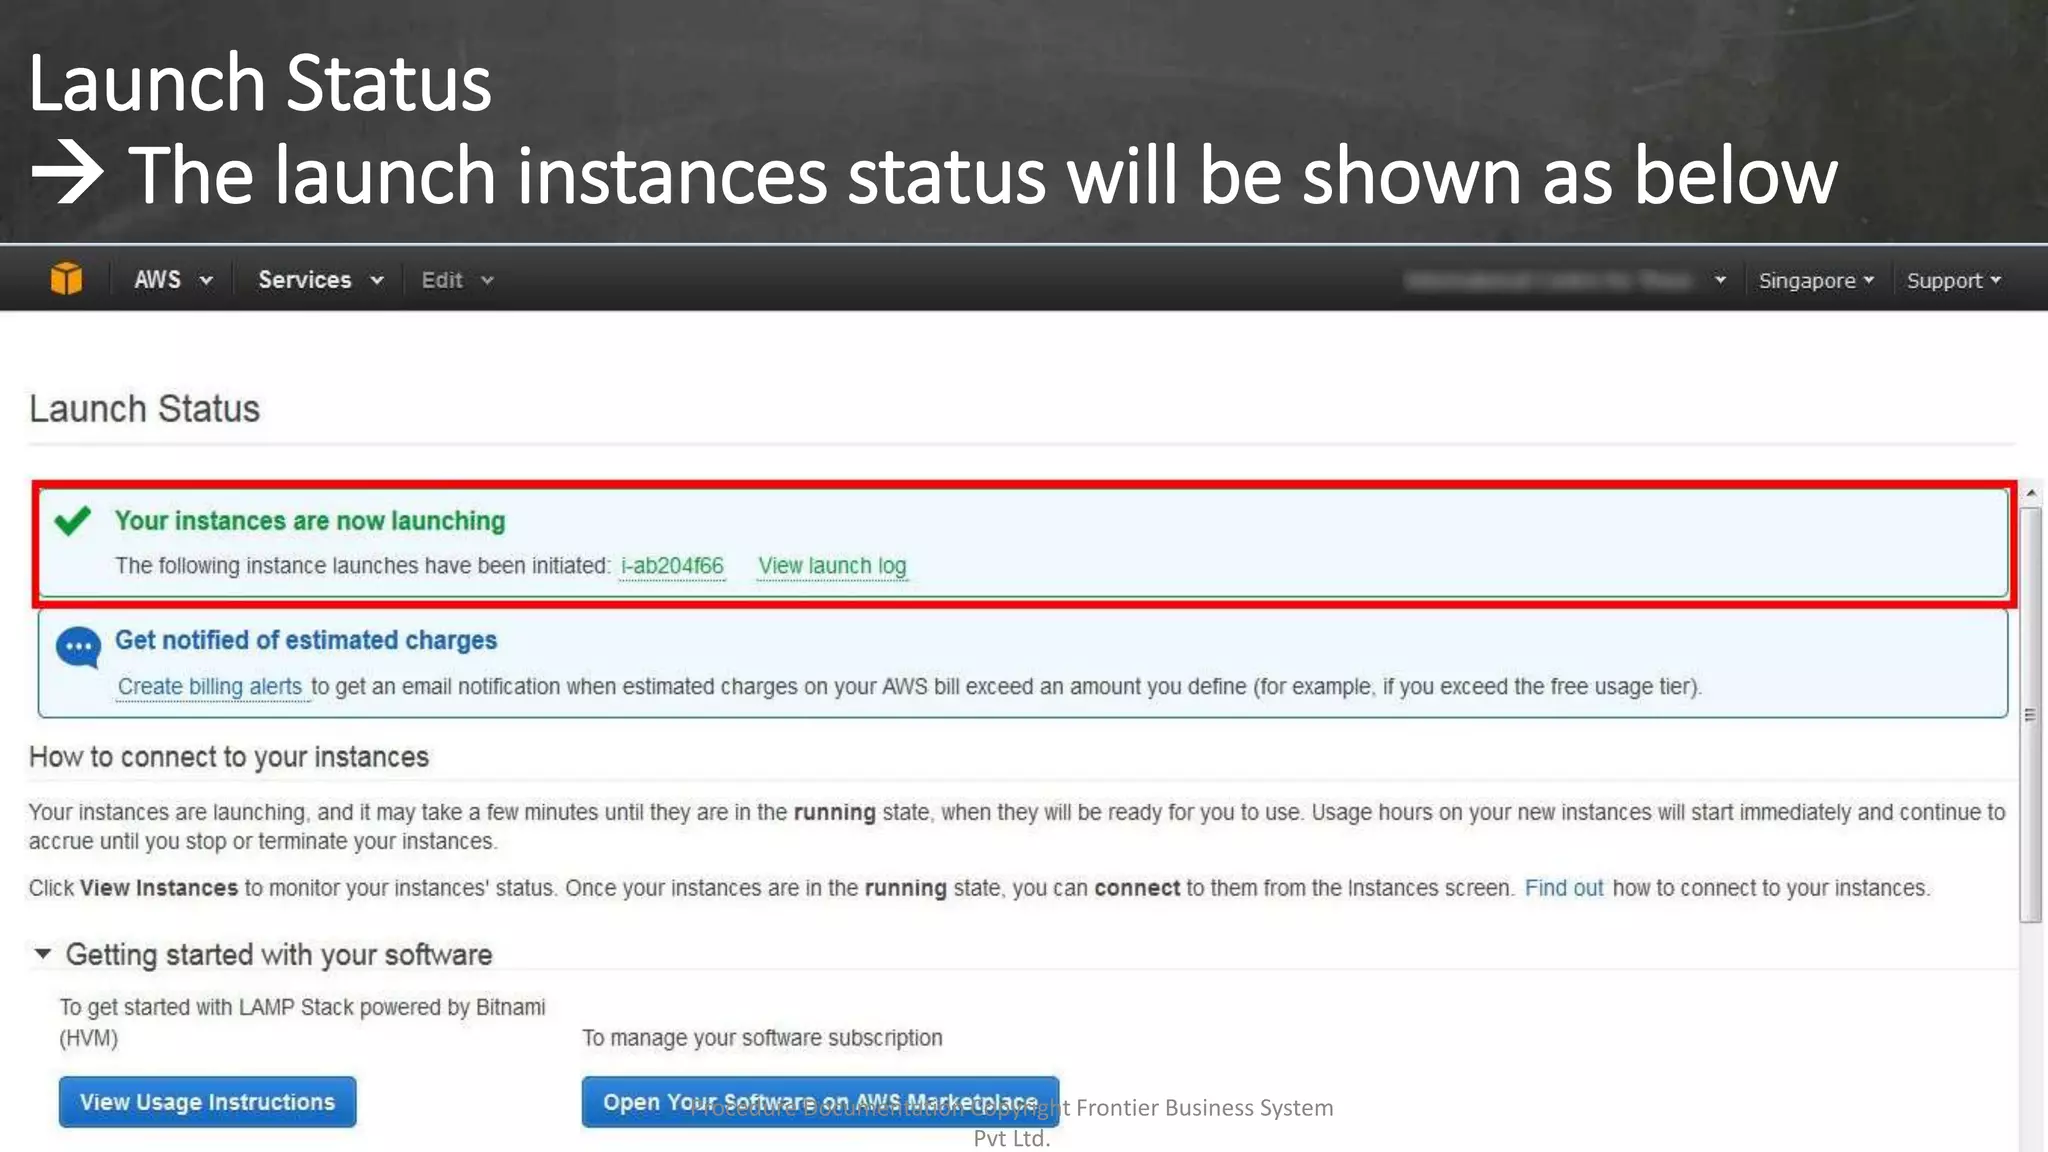
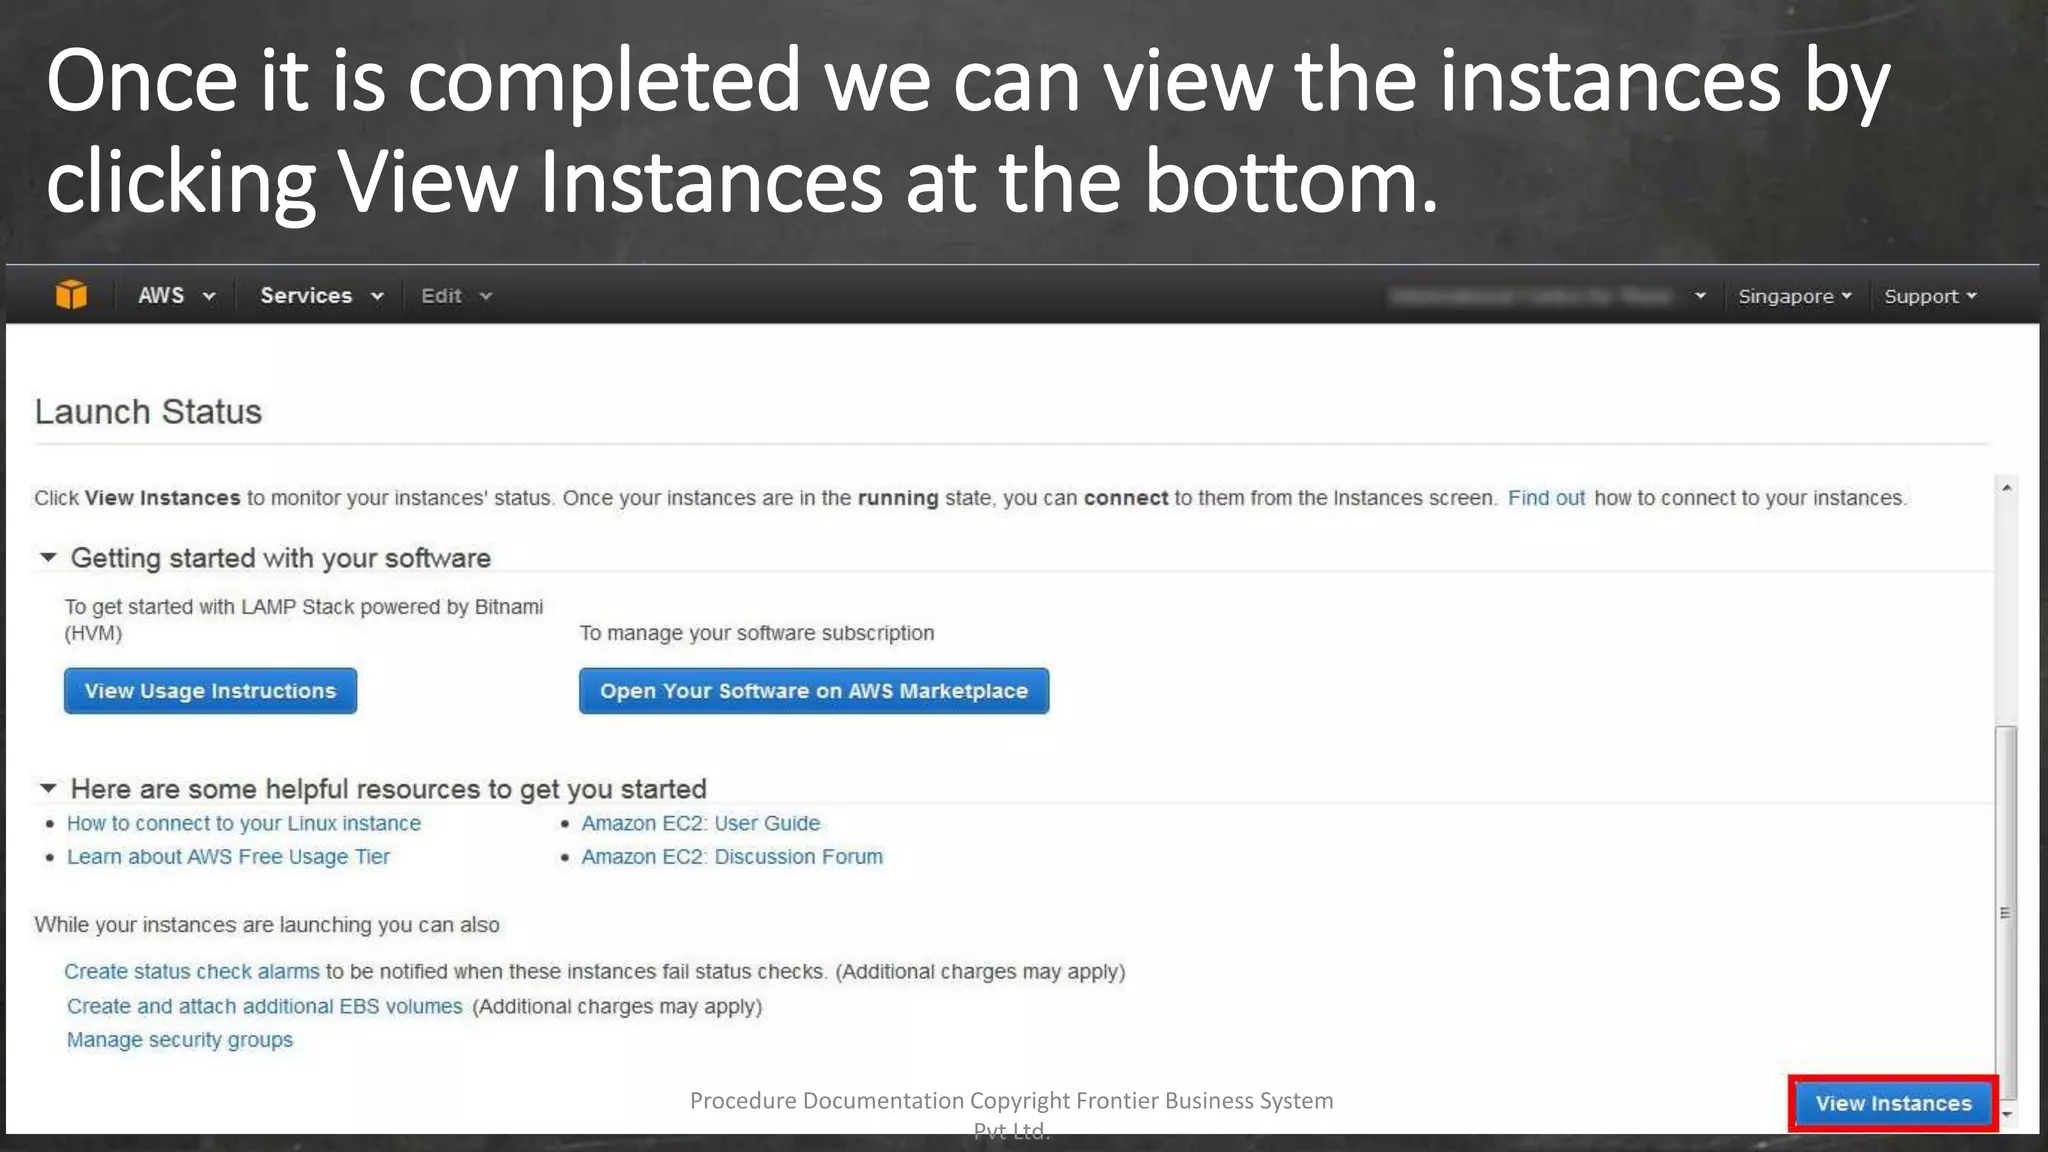
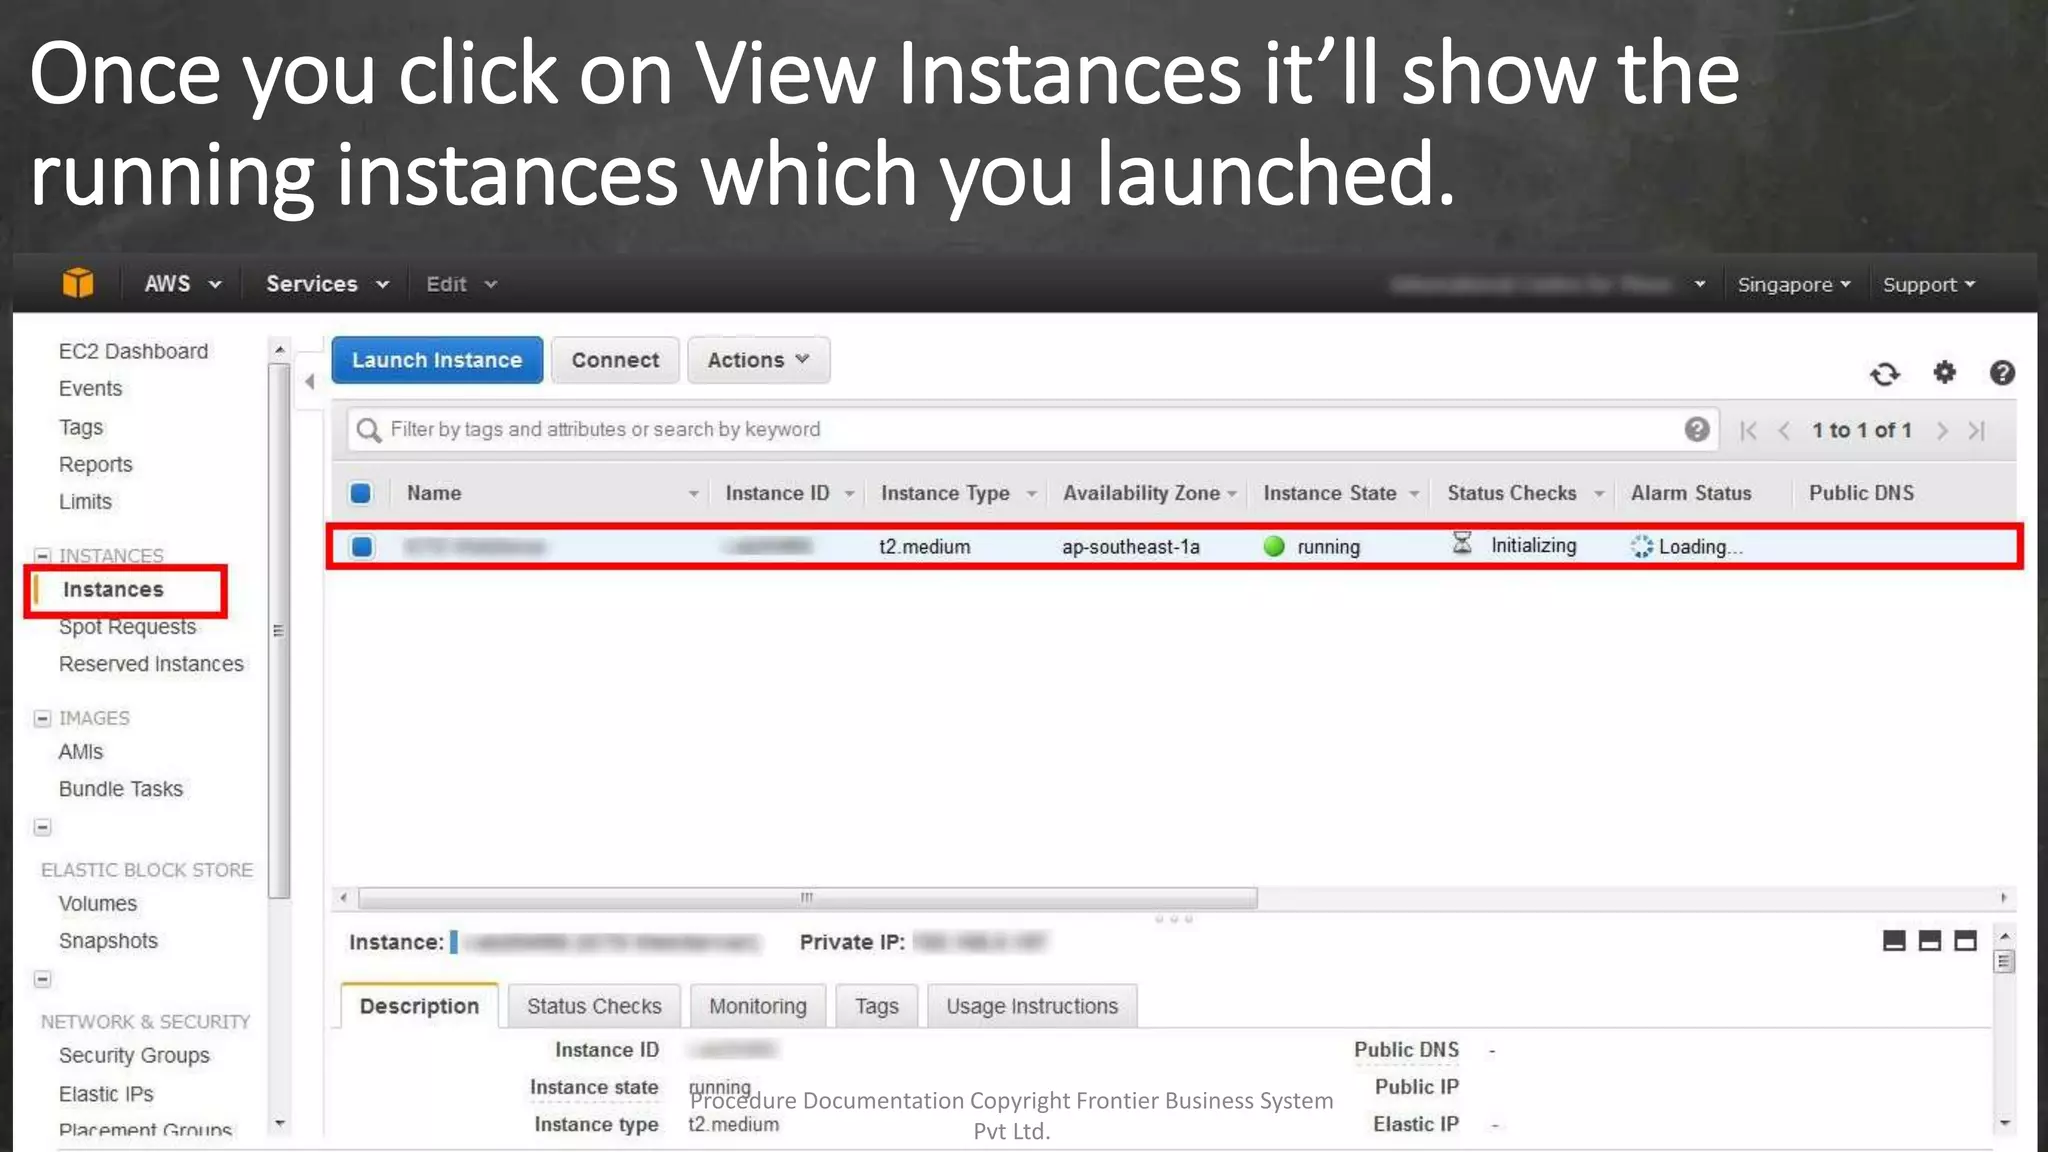
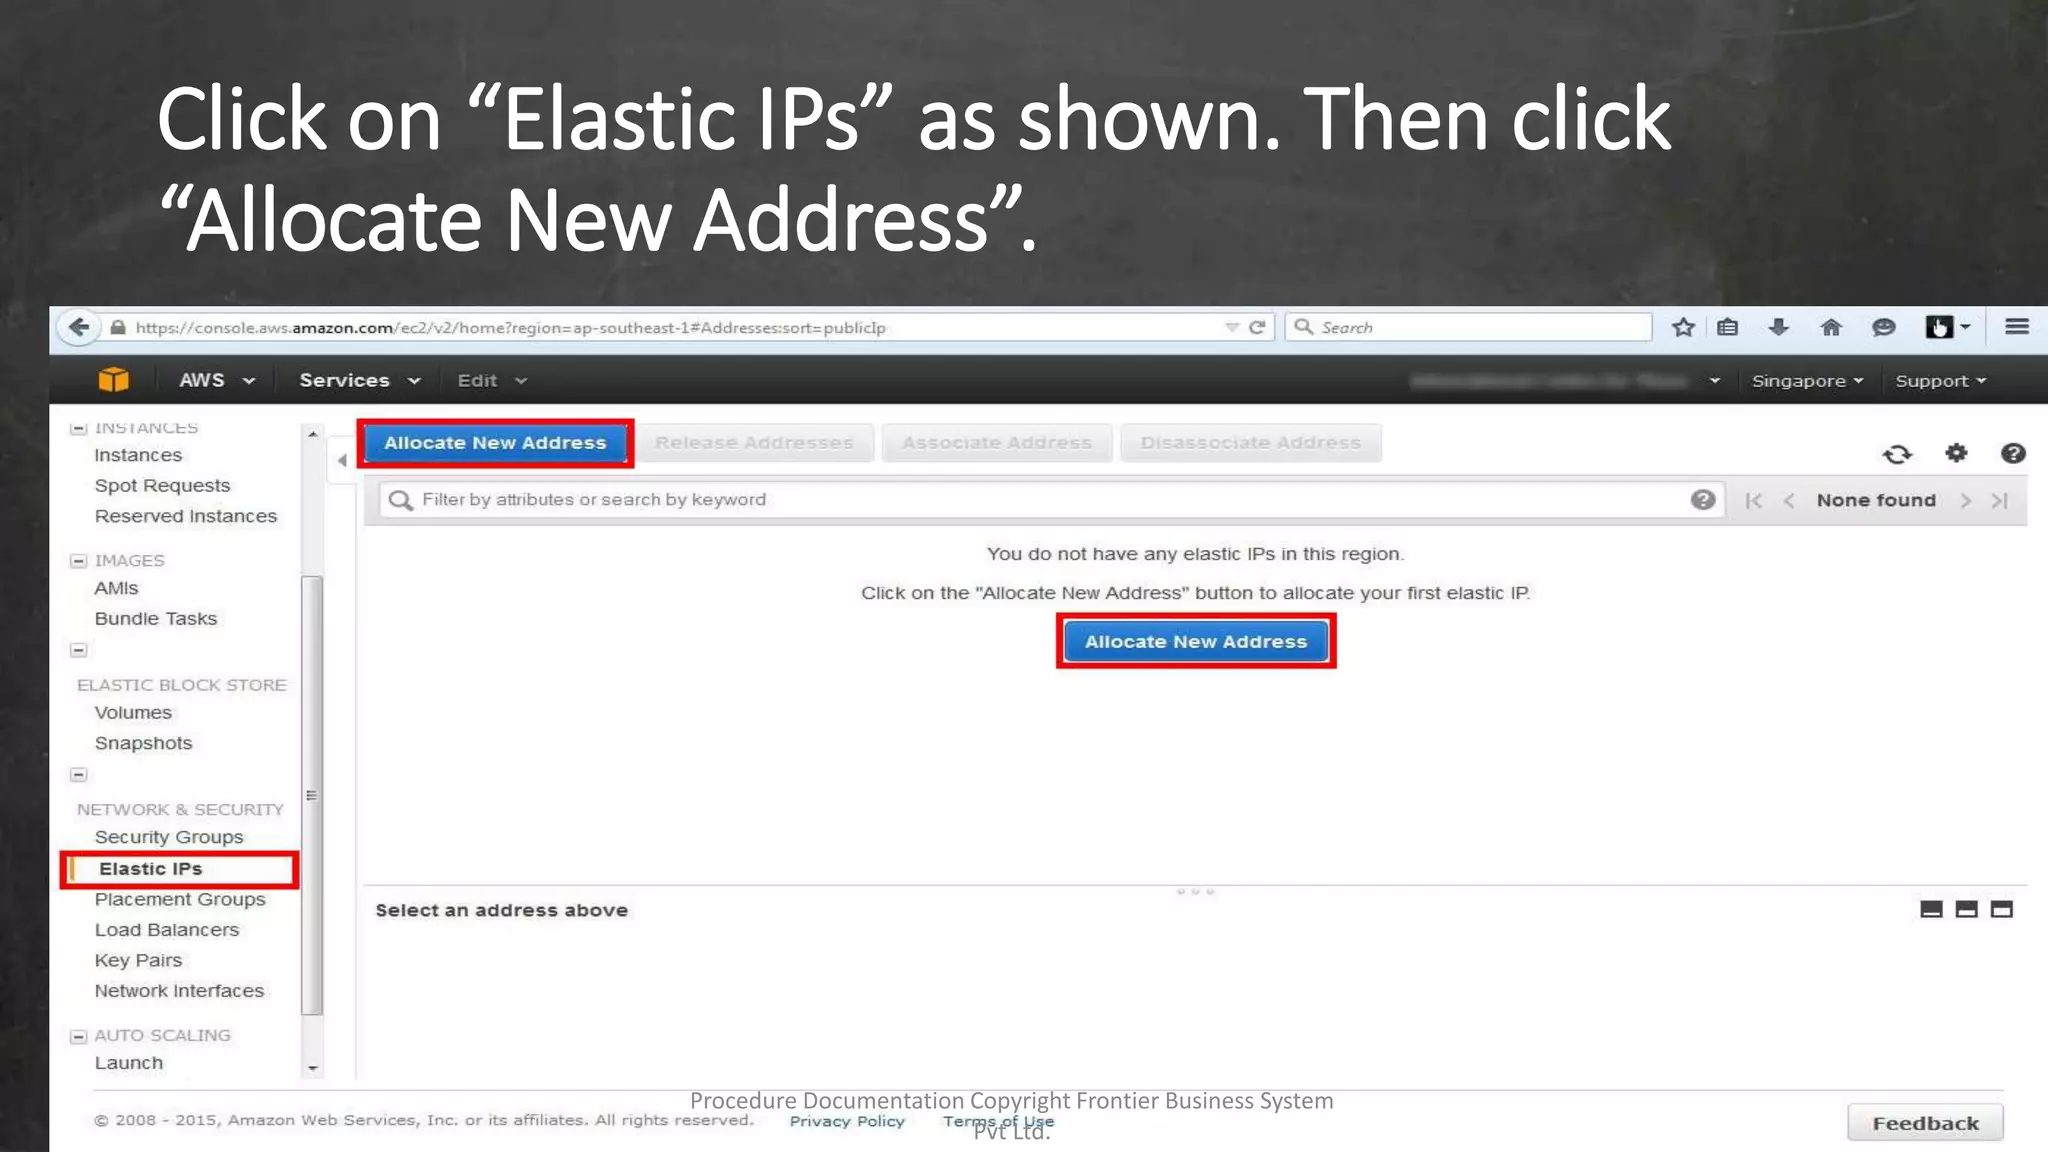
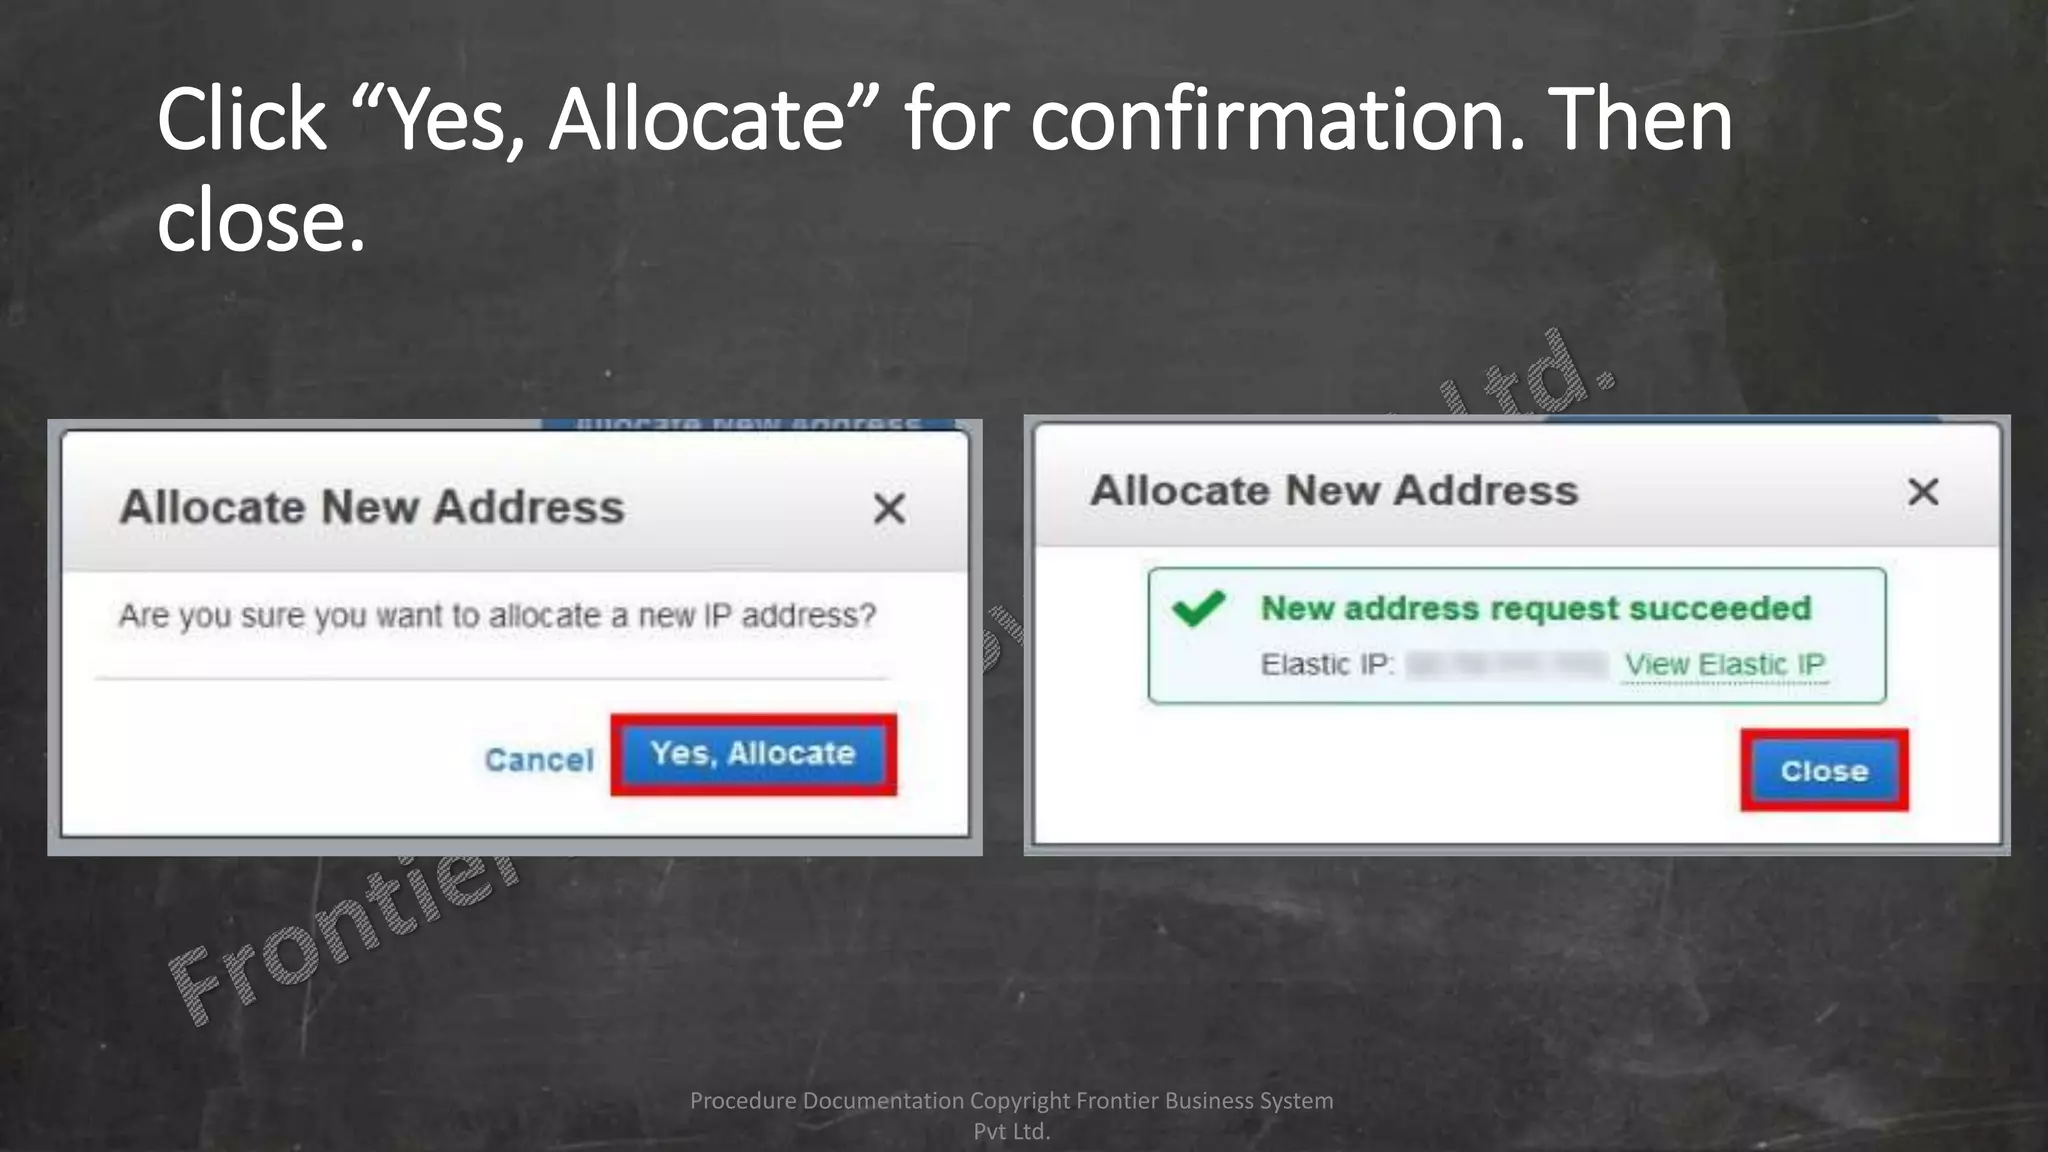
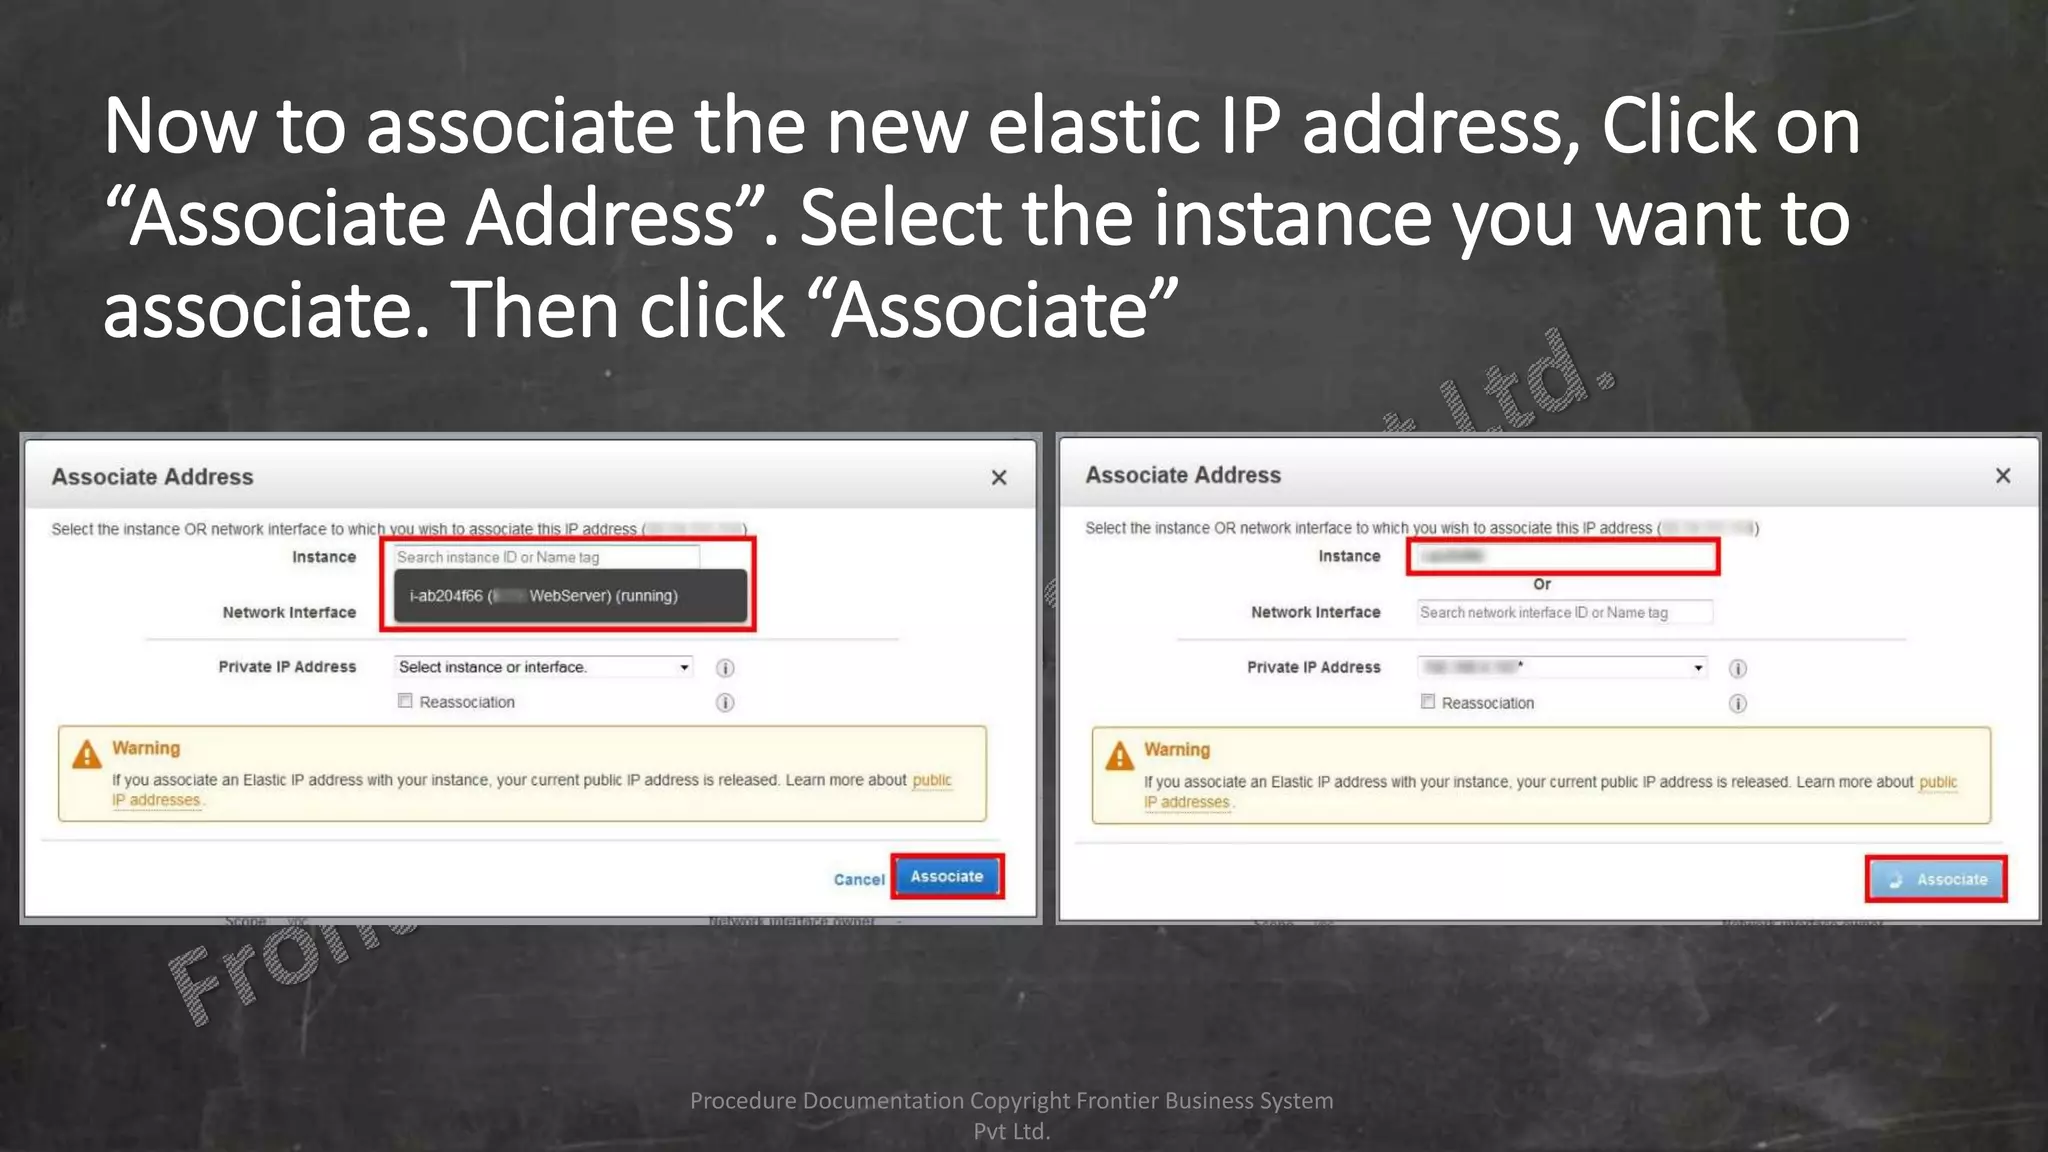
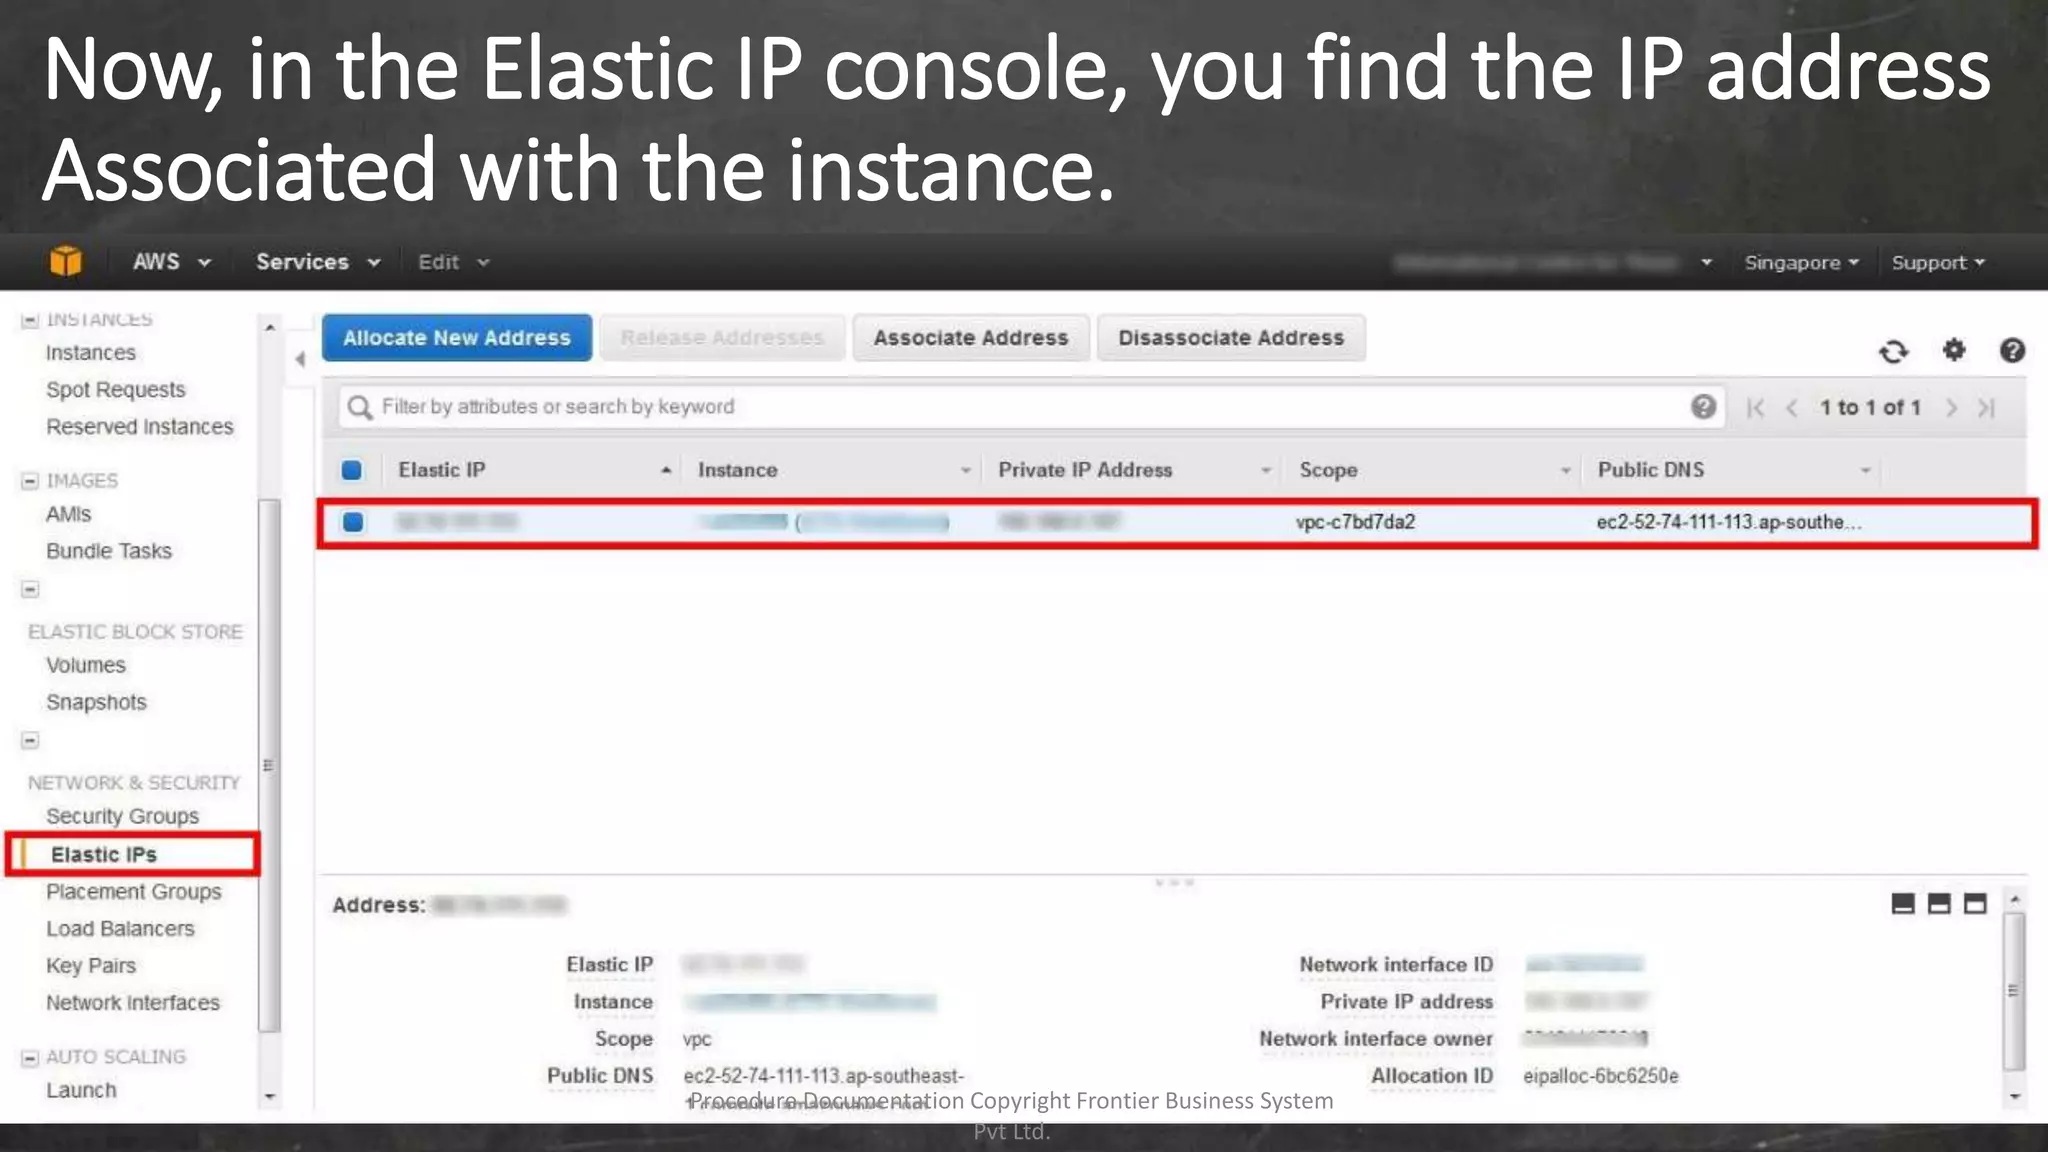
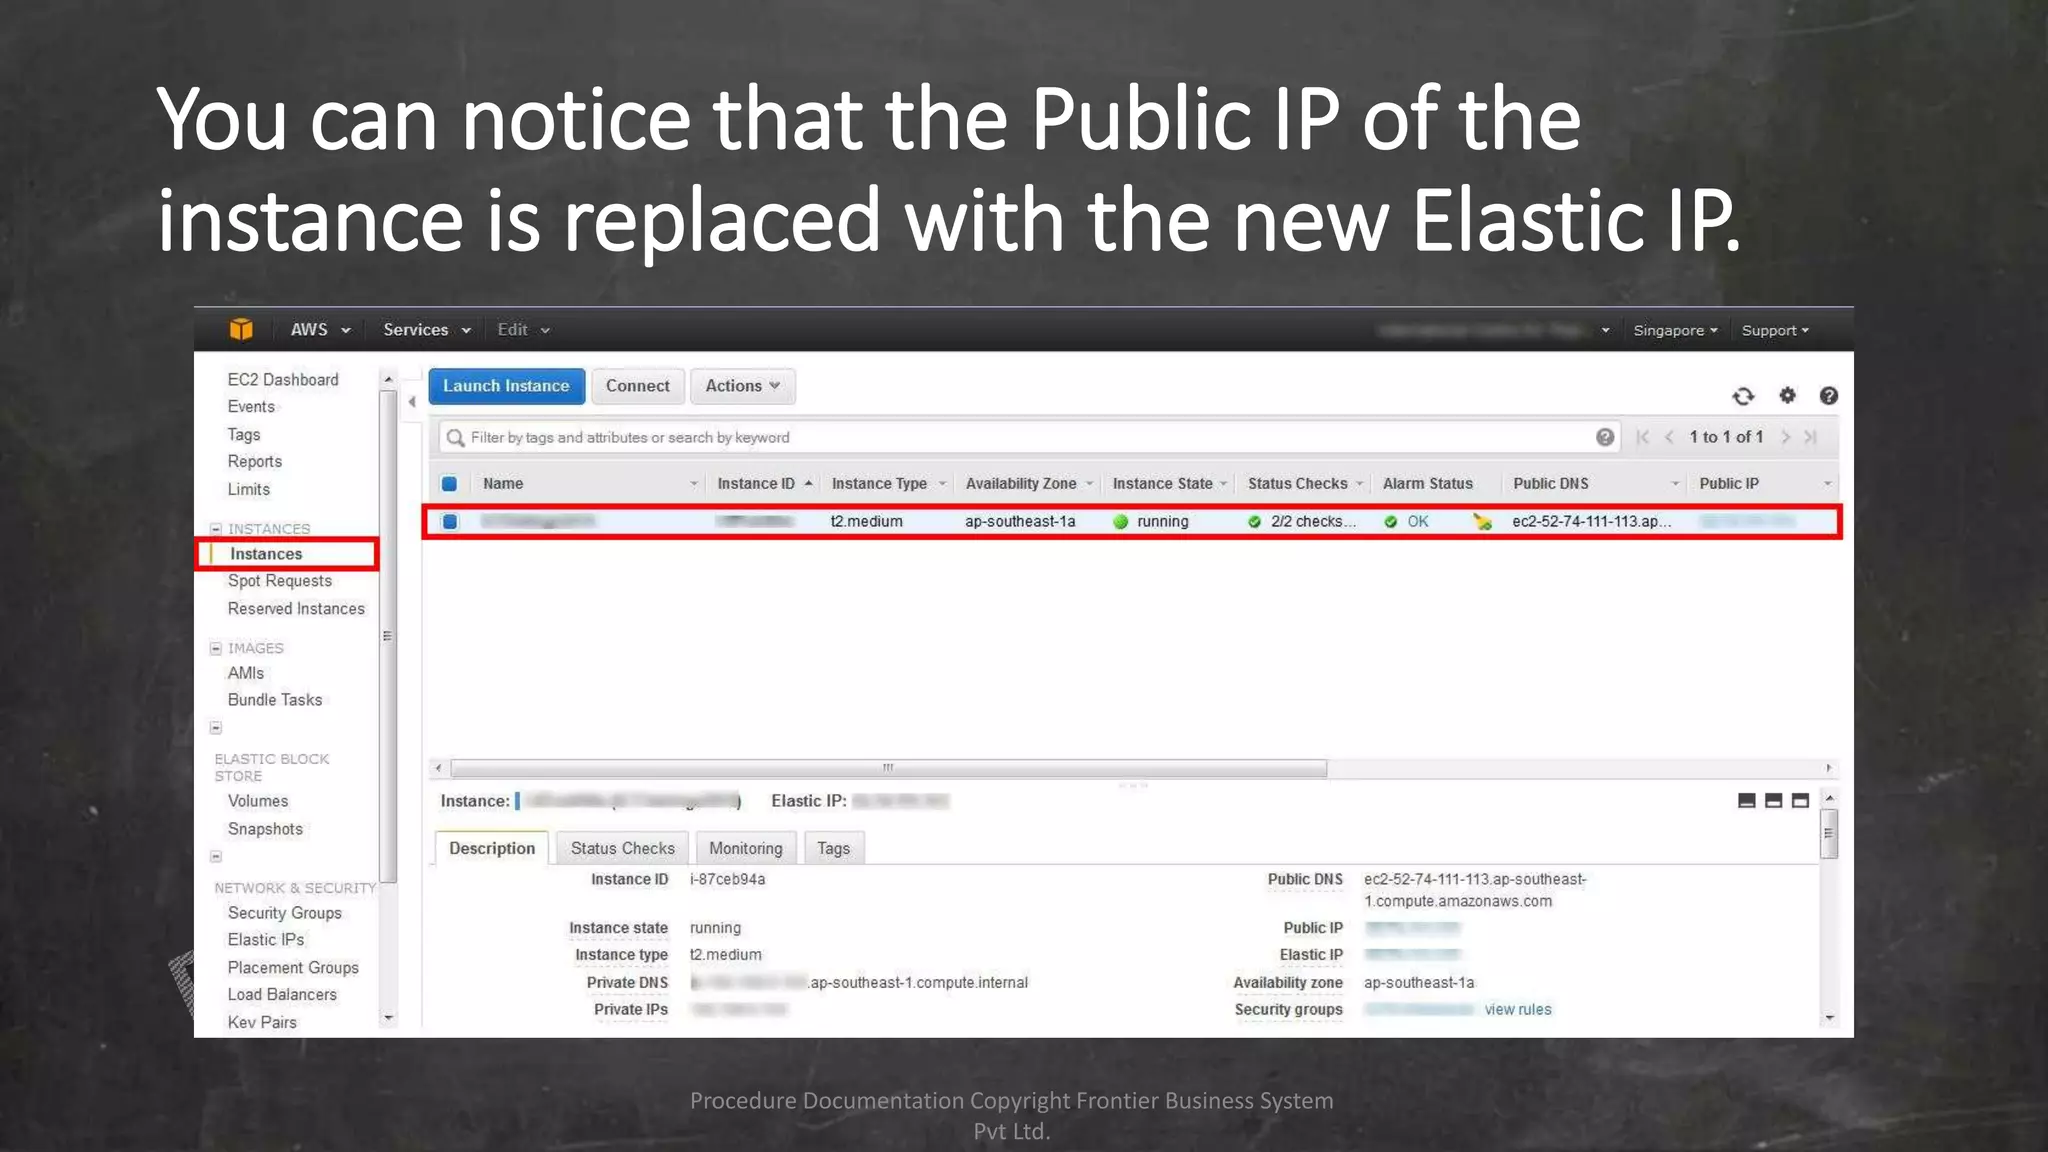
AWS Public Cloud
Deployment Procedure
AWS Amazon Web console.
• To go to the web console
enter the AWS link (
aws.amazon.com) in the
address bar of a browser.
• Go to My Account drop
down and click on AWS
Management Console to
get to the Sign console.
Procedure Documentation Copyright Frontier Business System
Pvt Ltd.
Sign In or Create an AWS Account Console
• To create a new Account
enter an e-mail in My e-
mail address is: column.
• Select I am a new user.
• Click on Sign in using
our secure server. To go
to the next step of
account creation which
is payment
information's.
Procedure Documentation Copyright Frontier Business System
Pvt Ltd.
Payment Information Console.
• Enter the Credit Card
Details.
• Enter the Credit Card
Number in its column
and Expiration Date.
• Next Enter the
Cardholder’s Name in
the space provided.
Procedure Documentation Copyright Frontier Business System
Pvt Ltd.
After entering the card details Scroll down and
click on Continue.
Procedure Documentation Copyright Frontier Business System
Pvt Ltd.
Once the account is created login to AWS Web
Console, go to VPC to Create and configure VPC.
Procedure Documentation Copyright Frontier Business System
Pvt Ltd.
VPC Dashboard
• To Create a VPC
click on Start VPC
Wizard, to go the
wizard console.
Procedure Documentation Copyright Frontier Business System
Pvt Ltd.
Wizard - VPC Configuration Console
• Select VPC with a
Single Public
Subnet
• Click on Select to
go the next
configuration.
Procedure Documentation Copyright Frontier Business System
Pvt Ltd.
Wizard – VPC with a Single Public Subnet
• In Here we are going
to fill all the below
details
• The IP CIDR block
• VPC Name
• Selecting Availability
Zone (AZ)
• Subnet Name
• Enable DNS hostname.
• Setting Hardware
tendency to default.
• Click on Create VPC to
create.
Procedure Documentation Copyright Frontier Business System
Pvt Ltd.
Once click on Create VPC it will take time to create
as below image. VPC creation is in process.
Procedure Documentation Copyright Frontier Business System
Pvt Ltd.
Notification - VPC Successfully Created
• Once the VPC
creation process is
completed you’ll
see VPC
Successfully
Created
Notification in the
VPC Dashboard.
• Click on OK to exit
out of it.
Procedure Documentation Copyright Frontier Business System
Pvt Ltd.
VPC console
• Once it is created go
to the “Your VPC’s”
to see the VPC
created.
• Now you have a new
VPC of your own.
• You can use this VPC
for your
instances/Servers.
Procedure Documentation Copyright Frontier Business System
Pvt Ltd.
To Create an instances Click on EC2 from the
web Console.
Procedure Documentation Copyright Frontier Business System
Pvt Ltd.
EC2 Dashboard
• To Create a new
instance Click on
Launch Instance
from the EC2
Dashboard.
Procedure Documentation Copyright Frontier Business System
Pvt Ltd.
Step 1: Choose an Amazon Machine Image(AMI)
• After clicking on
Launch instance,
It will lead you to
choose an AMI.
• You can select
the AMI as per
required.
Procedure Documentation Copyright Frontier Business System
Pvt Ltd.
You can Search any AMI from AWS Marketplace in
the search column above.
Procedure Documentation Copyright Frontier Business System
Pvt Ltd.
In this case we have selected an Ubuntu AMI. Check the
configuration and click on Continue at the bottom.
Procedure Documentation Copyright Frontier Business System
Pvt Ltd.
Step 2: Choose an Instance Type
Choose an instance type and click on Next:
Configure Instance Details
Procedure Documentation Copyright Frontier Business System
Pvt Ltd.
Step 3: Configure Instance Details
• In here we’ll
configure the
instance details.
• Number of
Instances can be
set as per required
• Network & Subnet
will use from the
VPC the we create
earlier.
• Click on Next: Add
Storage after the
Instance is
Configured.
Procedure Documentation Copyright Frontier Business System
Pvt Ltd.
Step 4: Add Storage
We’ll add the Volume size and Type and click on Next
Procedure Documentation Copyright Frontier Business System
Pvt Ltd.
Step 5: Tag Instances
 Give a name for your Server and click on Next
Procedure Documentation Copyright Frontier Business System
Pvt Ltd.
Step 6: Configure Security Group
 Enable the required ports for the server and click on Review and Launch
Procedure Documentation Copyright Frontier Business System
Pvt Ltd.
Step 7: Review Instance Launch
 Will re-verified the configuration we set.
Procedure Documentation Copyright Frontier Business System
Pvt Ltd.
Once all the configuration is re-verified and confirmed click on Launch at the
bottom of the console.
Procedure Documentation Copyright Frontier Business System
Pvt Ltd.
Once it is Launch it will take some time to setup the instance.
Procedure Documentation Copyright Frontier Business System
Pvt Ltd.
Launch Status
 The launch instances status will be shown as below
Procedure Documentation Copyright Frontier Business System
Pvt Ltd.
Once it is completed we can view the instances by
clicking View Instances at the bottom.
Procedure Documentation Copyright Frontier Business System
Pvt Ltd.
Once you click on View Instances it’ll show the
running instances which you launched.
Procedure Documentation Copyright Frontier Business System
Pvt Ltd.
Click on “Elastic IPs” as shown. Then click
“Allocate New Address”.
Procedure Documentation Copyright Frontier Business System
Pvt Ltd.
Click “Yes, Allocate” for confirmation. Then
close.
Procedure Documentation Copyright Frontier Business System
Pvt Ltd.
Now to associate the new elastic IP address, Click on
“Associate Address”. Select the instance you want to
associate. Then click “Associate”
Procedure Documentation Copyright Frontier Business System
Pvt Ltd.
Now, in the Elastic IP console, you find the IP address
Associated with the instance.
Procedure Documentation Copyright Frontier Business System
Pvt Ltd.
You can notice that the Public IP of the
instance is replaced with the new Elastic IP.
Procedure Documentation Copyright Frontier Business System
Pvt Ltd.
Procedure Documentation Copyright © Frontier Business
System Pvt Ltd.

Aws public cloud deployment

  • 1.
  • 2.
    AWS Amazon Webconsole. • To go to the web console enter the AWS link ( aws.amazon.com) in the address bar of a browser. • Go to My Account drop down and click on AWS Management Console to get to the Sign console. Procedure Documentation Copyright Frontier Business System Pvt Ltd.
  • 3.
    Sign In orCreate an AWS Account Console • To create a new Account enter an e-mail in My e- mail address is: column. • Select I am a new user. • Click on Sign in using our secure server. To go to the next step of account creation which is payment information's. Procedure Documentation Copyright Frontier Business System Pvt Ltd.
  • 4.
    Payment Information Console. •Enter the Credit Card Details. • Enter the Credit Card Number in its column and Expiration Date. • Next Enter the Cardholder’s Name in the space provided. Procedure Documentation Copyright Frontier Business System Pvt Ltd.
  • 5.
    After entering thecard details Scroll down and click on Continue. Procedure Documentation Copyright Frontier Business System Pvt Ltd.
  • 6.
    Once the accountis created login to AWS Web Console, go to VPC to Create and configure VPC. Procedure Documentation Copyright Frontier Business System Pvt Ltd.
  • 7.
    VPC Dashboard • ToCreate a VPC click on Start VPC Wizard, to go the wizard console. Procedure Documentation Copyright Frontier Business System Pvt Ltd.
  • 8.
    Wizard - VPCConfiguration Console • Select VPC with a Single Public Subnet • Click on Select to go the next configuration. Procedure Documentation Copyright Frontier Business System Pvt Ltd.
  • 9.
    Wizard – VPCwith a Single Public Subnet • In Here we are going to fill all the below details • The IP CIDR block • VPC Name • Selecting Availability Zone (AZ) • Subnet Name • Enable DNS hostname. • Setting Hardware tendency to default. • Click on Create VPC to create. Procedure Documentation Copyright Frontier Business System Pvt Ltd.
  • 10.
    Once click onCreate VPC it will take time to create as below image. VPC creation is in process. Procedure Documentation Copyright Frontier Business System Pvt Ltd.
  • 11.
    Notification - VPCSuccessfully Created • Once the VPC creation process is completed you’ll see VPC Successfully Created Notification in the VPC Dashboard. • Click on OK to exit out of it. Procedure Documentation Copyright Frontier Business System Pvt Ltd.
  • 12.
    VPC console • Onceit is created go to the “Your VPC’s” to see the VPC created. • Now you have a new VPC of your own. • You can use this VPC for your instances/Servers. Procedure Documentation Copyright Frontier Business System Pvt Ltd.
  • 13.
    To Create aninstances Click on EC2 from the web Console. Procedure Documentation Copyright Frontier Business System Pvt Ltd.
  • 14.
    EC2 Dashboard • ToCreate a new instance Click on Launch Instance from the EC2 Dashboard. Procedure Documentation Copyright Frontier Business System Pvt Ltd.
  • 15.
    Step 1: Choosean Amazon Machine Image(AMI) • After clicking on Launch instance, It will lead you to choose an AMI. • You can select the AMI as per required. Procedure Documentation Copyright Frontier Business System Pvt Ltd.
  • 16.
    You can Searchany AMI from AWS Marketplace in the search column above. Procedure Documentation Copyright Frontier Business System Pvt Ltd.
  • 17.
    In this casewe have selected an Ubuntu AMI. Check the configuration and click on Continue at the bottom. Procedure Documentation Copyright Frontier Business System Pvt Ltd.
  • 18.
    Step 2: Choosean Instance Type Choose an instance type and click on Next: Configure Instance Details Procedure Documentation Copyright Frontier Business System Pvt Ltd.
  • 19.
    Step 3: ConfigureInstance Details • In here we’ll configure the instance details. • Number of Instances can be set as per required • Network & Subnet will use from the VPC the we create earlier. • Click on Next: Add Storage after the Instance is Configured. Procedure Documentation Copyright Frontier Business System Pvt Ltd.
  • 20.
    Step 4: AddStorage We’ll add the Volume size and Type and click on Next Procedure Documentation Copyright Frontier Business System Pvt Ltd.
  • 21.
    Step 5: TagInstances  Give a name for your Server and click on Next Procedure Documentation Copyright Frontier Business System Pvt Ltd.
  • 22.
    Step 6: ConfigureSecurity Group  Enable the required ports for the server and click on Review and Launch Procedure Documentation Copyright Frontier Business System Pvt Ltd.
  • 23.
    Step 7: ReviewInstance Launch  Will re-verified the configuration we set. Procedure Documentation Copyright Frontier Business System Pvt Ltd.
  • 24.
    Once all theconfiguration is re-verified and confirmed click on Launch at the bottom of the console. Procedure Documentation Copyright Frontier Business System Pvt Ltd.
  • 25.
    Once it isLaunch it will take some time to setup the instance. Procedure Documentation Copyright Frontier Business System Pvt Ltd.
  • 26.
    Launch Status  Thelaunch instances status will be shown as below Procedure Documentation Copyright Frontier Business System Pvt Ltd.
  • 27.
    Once it iscompleted we can view the instances by clicking View Instances at the bottom. Procedure Documentation Copyright Frontier Business System Pvt Ltd.
  • 28.
    Once you clickon View Instances it’ll show the running instances which you launched. Procedure Documentation Copyright Frontier Business System Pvt Ltd.
  • 29.
    Click on “ElasticIPs” as shown. Then click “Allocate New Address”. Procedure Documentation Copyright Frontier Business System Pvt Ltd.
  • 30.
    Click “Yes, Allocate”for confirmation. Then close. Procedure Documentation Copyright Frontier Business System Pvt Ltd.
  • 31.
    Now to associatethe new elastic IP address, Click on “Associate Address”. Select the instance you want to associate. Then click “Associate” Procedure Documentation Copyright Frontier Business System Pvt Ltd.
  • 32.
    Now, in theElastic IP console, you find the IP address Associated with the instance. Procedure Documentation Copyright Frontier Business System Pvt Ltd.
  • 33.
    You can noticethat the Public IP of the instance is replaced with the new Elastic IP. Procedure Documentation Copyright Frontier Business System Pvt Ltd.
  • 34.
    Procedure Documentation Copyright© Frontier Business System Pvt Ltd.