
Recommended
Recommended
More Related Content
What's hot
What's hot (16)
Similar to AWS Lambda Hands-on: How to Create Phone Call Notifications in a Serverless Way
Similar to AWS Lambda Hands-on: How to Create Phone Call Notifications in a Serverless Way (20)
More from Srushith Repakula
More from Srushith Repakula (14)
Recently uploaded
Recently uploaded (20)
AWS Lambda Hands-on: How to Create Phone Call Notifications in a Serverless Way
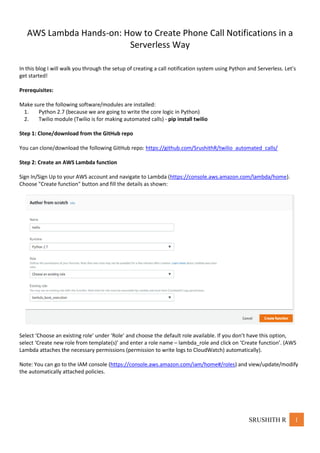
- 1. SRUSHITH R 1 AWS Lambda Hands-on: How to Create Phone Call Notifications in a Serverless Way In this blog I will walk you through the setup of creating a call notification system using Python and Serverless. Let’s get started! Prerequisites: Make sure the following software/modules are installed: 1. Python 2.7 (because we are going to write the core logic in Python) 2. Twilio module (Twilio is for making automated calls) - pip install twilio Step 1: Clone/download from the GitHub repo You can clone/download the following GitHub repo: https://github.com/SrushithR/twilio_automated_calls/ Step 2: Create an AWS Lambda function Sign In/Sign Up to your AWS account and navigate to Lambda (https://console.aws.amazon.com/lambda/home). Choose "Create function" button and fill the details as shown: Select ‘Choose an existing role’ under ‘Role’ and choose the default role available. If you don’t have this option, select ‘Create new role from template(s)’ and enter a role name – lambda_role and click on ‘Create function’. (AWS Lambda attaches the necessary permissions (permission to write logs to CloudWatch) automatically). Note: You can go to the IAM console (https://console.aws.amazon.com/iam/home#/roles) and view/update/modify the automatically attached policies.
- 2. SRUSHITH R 2 Paste the code from the "lambda_function.py" file (or as shown below) into the online editor and save it. """ Function to return TwilML content back to the client """ def lambda_handler(event, context): # for debugging, first print event contents print 'input to lambda {}'.format(event) # twilio expects an XML content for generating the voice. This is written in something strange called TwiML # Ignore all the blah blah in the angular brackets and the actual voice message is "Hi! ....". # The voice is spoken by Alice - <Say voice = "alice"> # The actual voice content is within the <Response> tags xml_content = """<?xml version="1.0" encoding="utf-8"?><Response><Say voice = "alice">Hi! Hope you are having a great time hacking code in the meetup</Say></Response>""" # frustratingly, lambda can not send XML content so we are wrapping it in the dummy JSON variable dummy = {'body' : xml_content} return dummy
- 3. SRUSHITH R 3 Now, let's test the lambda function with a sample event. Serverless functions are event driven and work on the inputs provided. Even though our application code is independent of the input, we have to provide one (sample test event) for testing in the AWS Lambda console. Click on the “Test” button and the following window would pop up. Provide an event name and click on create and click on “Test” button again. Hurray! It succeeded - here is the test results:
- 4. SRUSHITH R 4 Step 3: Create an API and resource on API Gateway Navigate to API Gateway (https://console.aws.amazon.com/apigateway/home) in the services section and create an API as shown below: Under the 'Actions' button, select 'Create Resource' and fill the details as shown and create a resource:
- 5. SRUSHITH R 5 Step 4: Create a method Create a POST method under the resource (that we created in the previous step - twilio) Select the lambda function that was created in step 2
- 6. SRUSHITH R 6 And once saved, the “Method Execution” page would like this: Follow these steps for configuring up the API Gateway: 4a. Click in “Integration Request” and scroll down to “Body Mapping Templates” and add “application/x- www-form-urlencoded” as the mapping template and provide the value as follows: { "reqbody":"$input.path('$')" }
- 7. SRUSHITH R 7 Save and navigate back to the “Method Execution” (click on "use current settings" when a message is popped up) 4b. Click the “Integration Response” and move to the “Body Mapping Templates” by clicking the triangular arrow. Edit the “application/json” Content-Type to “application/xml” with a template as follows and save it: $input.path('$').body 4c. Move back to the “Method Execution” and in the “Method Response”, edit “application/json” to “application/xml” in the "Response Body for 200" section and select "Empty" under the Models as shown below:
- 8. SRUSHITH R 8 Hit the 'Test' button in the “Method Execution” page and test the method (Leave the “Request Body” empty)The response would look like this: Step 5: Deploy the API After a successful test, it’s time you deploy the API. Select the POST method and click on “Deploy API” under the Actions tab
- 9. SRUSHITH R 9 Add the following details in the deployment pop-up and deploy: Once deployed, navigate to your method under the 'dev' section and copy the 'Invoke URL'
- 10. SRUSHITH R 10 Step 6: Take a deep breath! We are done with the AWS part now…. Take another deep breath, we are going to start with Twilio Step 7: Sign up on Twilio Twilio is a cloud communications platform as a service company and offers an array of services. We will be using the Twilio programmable voice service. Step 1a: Sign up for free on Twilio at https://www.twilio.com/try-twilio. Step 1b: Create a new project by just giving a project name Step 1c: Get started with the Twilio Programmable Voice Step 2: Get your first Twilio Number Click on "Get a Number"
- 11. SRUSHITH R 11 And click on "Choose this Number" (only if you like the number ;)). You can also search for a different number Note: Each number costs $1 per month. You don’t have to pay anything for using it in this demo though! Congo! Now you have a number to play with. Step 3: Make an outbound call Before you can make an outbound call, you need the Twilio credentials for authorization in your python code. They can be found at the Twilio console dashboard (https://www.twilio.com/user/account) - note down the account SID and the Auth token.
- 12. SRUSHITH R 12 “make_phone_call.py” (https://raw.githubusercontent.com/SrushithR/twilio_automated_calls/master/make_phone_call.py) is the python code to make an outgoing call. Here is the same code: # Download the Python helper library from twilio.com/docs/python/install from twilio.rest import Client # Your Account Sid and Auth Token from twilio.com/user/account account_sid = "AC5*******************811d8e4d445a" auth_token = "ef65********************aeb3" client = Client(account_sid, auth_token) call = client.calls.create( # the verified number to which you wanna call to="+918686519259", # the number that you just purchased on Twilio from_="+18034087781", # the invoke URL from API Gateway url="https://lskcr****.execute-api.us-east-1.amazonaws.com/dev/twilio" ) # An SID is generated for every call. It is useful for debugging print(call.sid) Before you run the above snippet, • Replace the account_sid and auth_token with your credentials • to - The number you want to call • from - The number you just bought. Since, we are still in the trial account (can be upgraded by adding credit/debit card information), you must verify the 'to' number under the 'Verified Caller IDs' (https://www.twilio.com/console/phone-numbers/verified). Give your number for testing purposes • URL - A URL that returns TwiML (Twilio Markup Language) with instructions on what should happen when the user picks up the call. In our case it is the 'Invoke URL' from the previous step
- 13. SRUSHITH R 13 Once all the details are updated in the code, run it: python make_phone_call.py The above file will output a SID, which you can use for debugging in the Twilio console (https://www.twilio.com/console/runtime/debugger) Reference URLs: 1. Twilio Docs: https://www.twilio.com/docs/voice/tutorials/how-to-make-outbound-phone-calls-python 2. https://www.twilio.com/blog/2015/09/build-your-own-ivr-with-aws-lambda-amazon-api-gateway-and- twilio.html