Downloaded 59 times
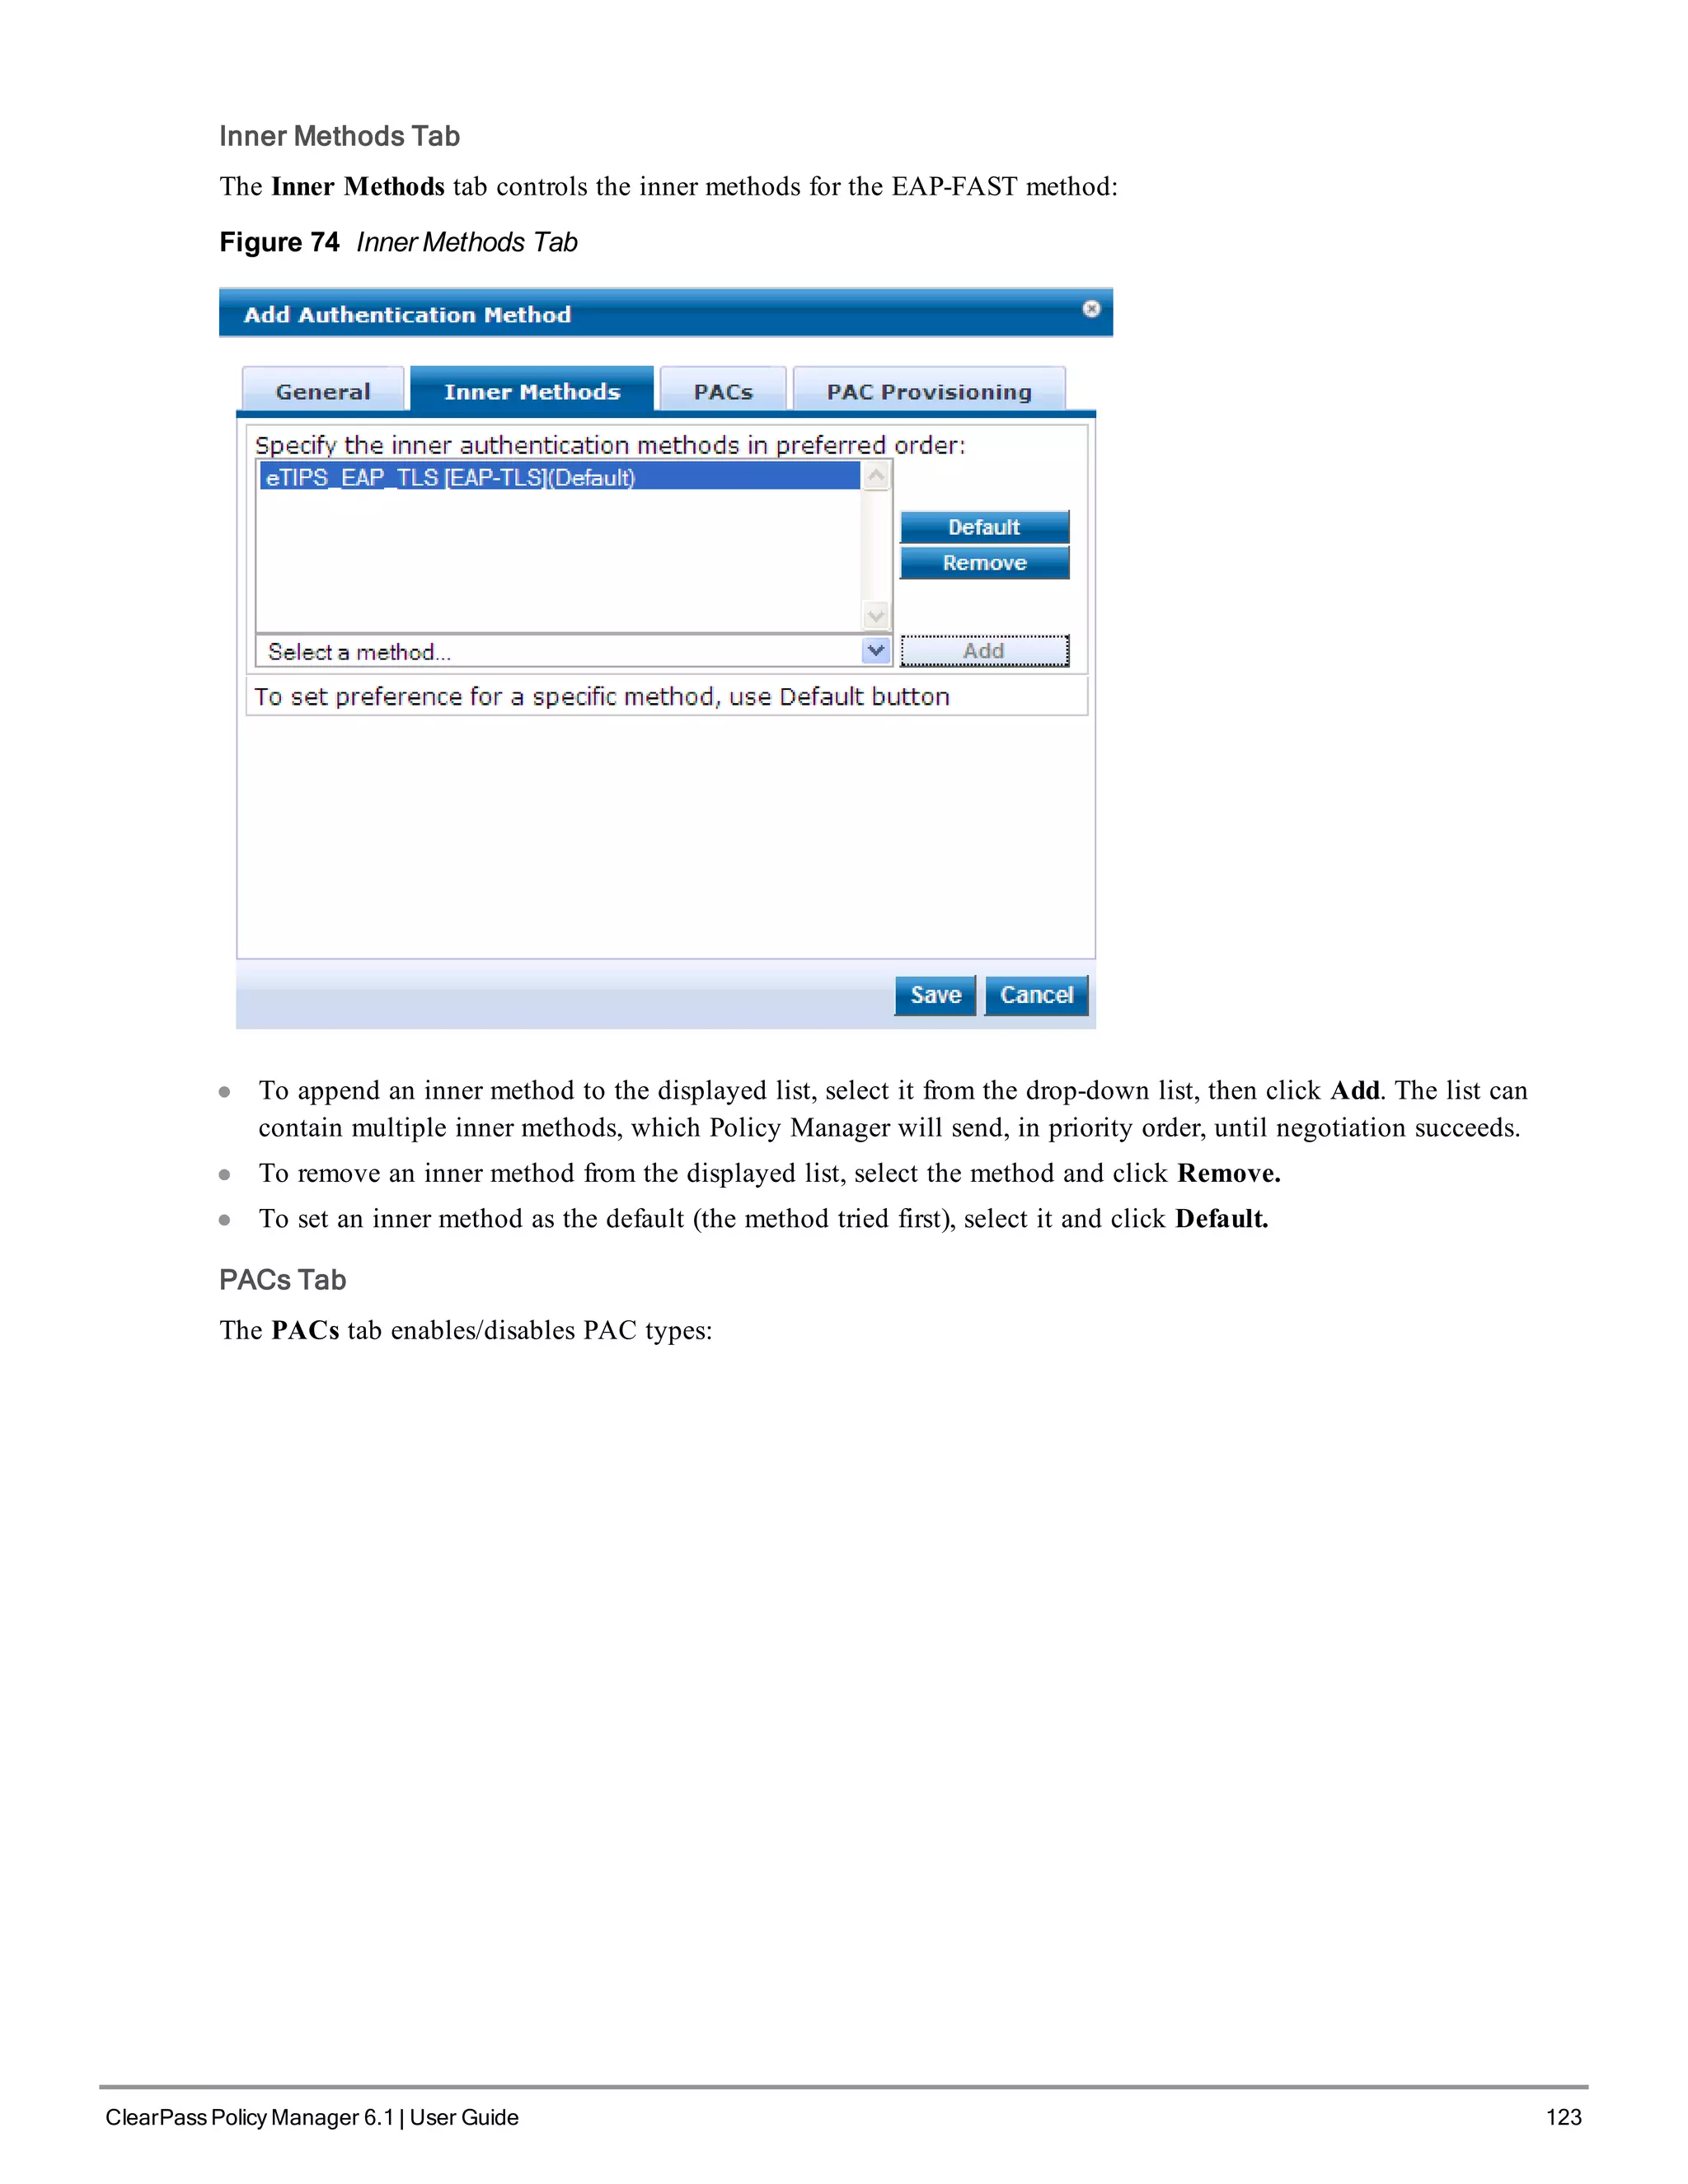
![3. Configure the Appliance
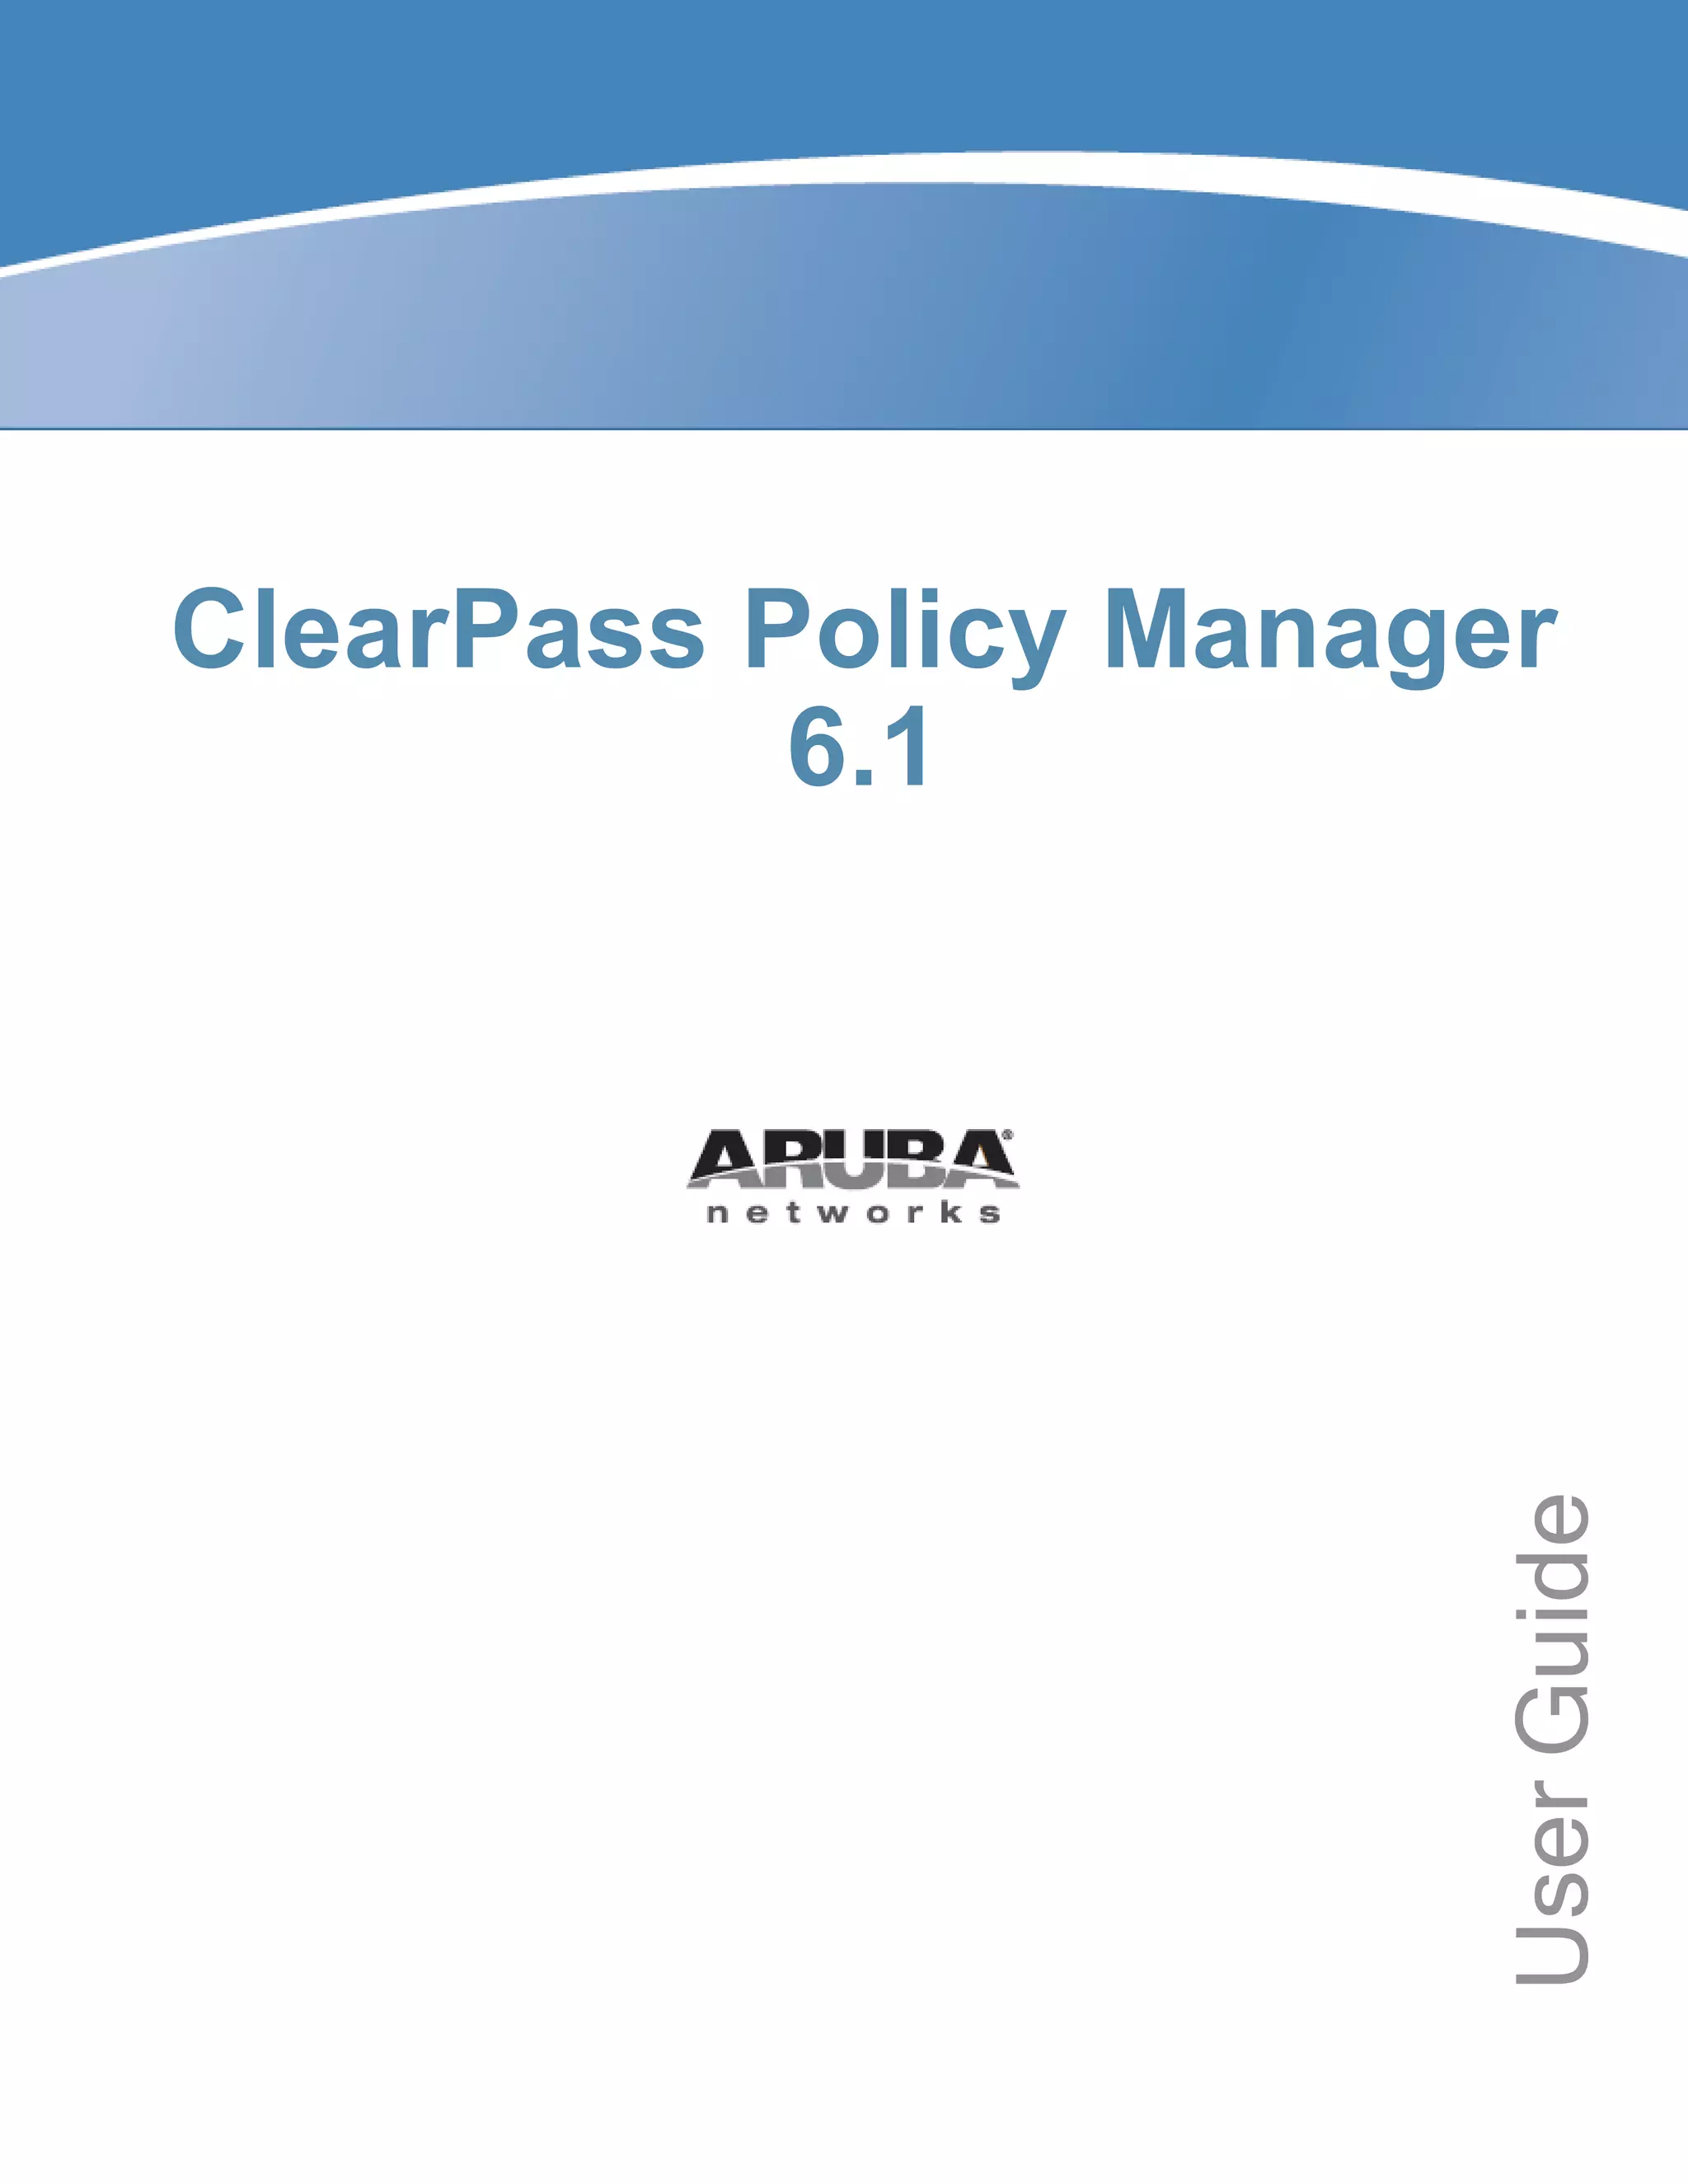
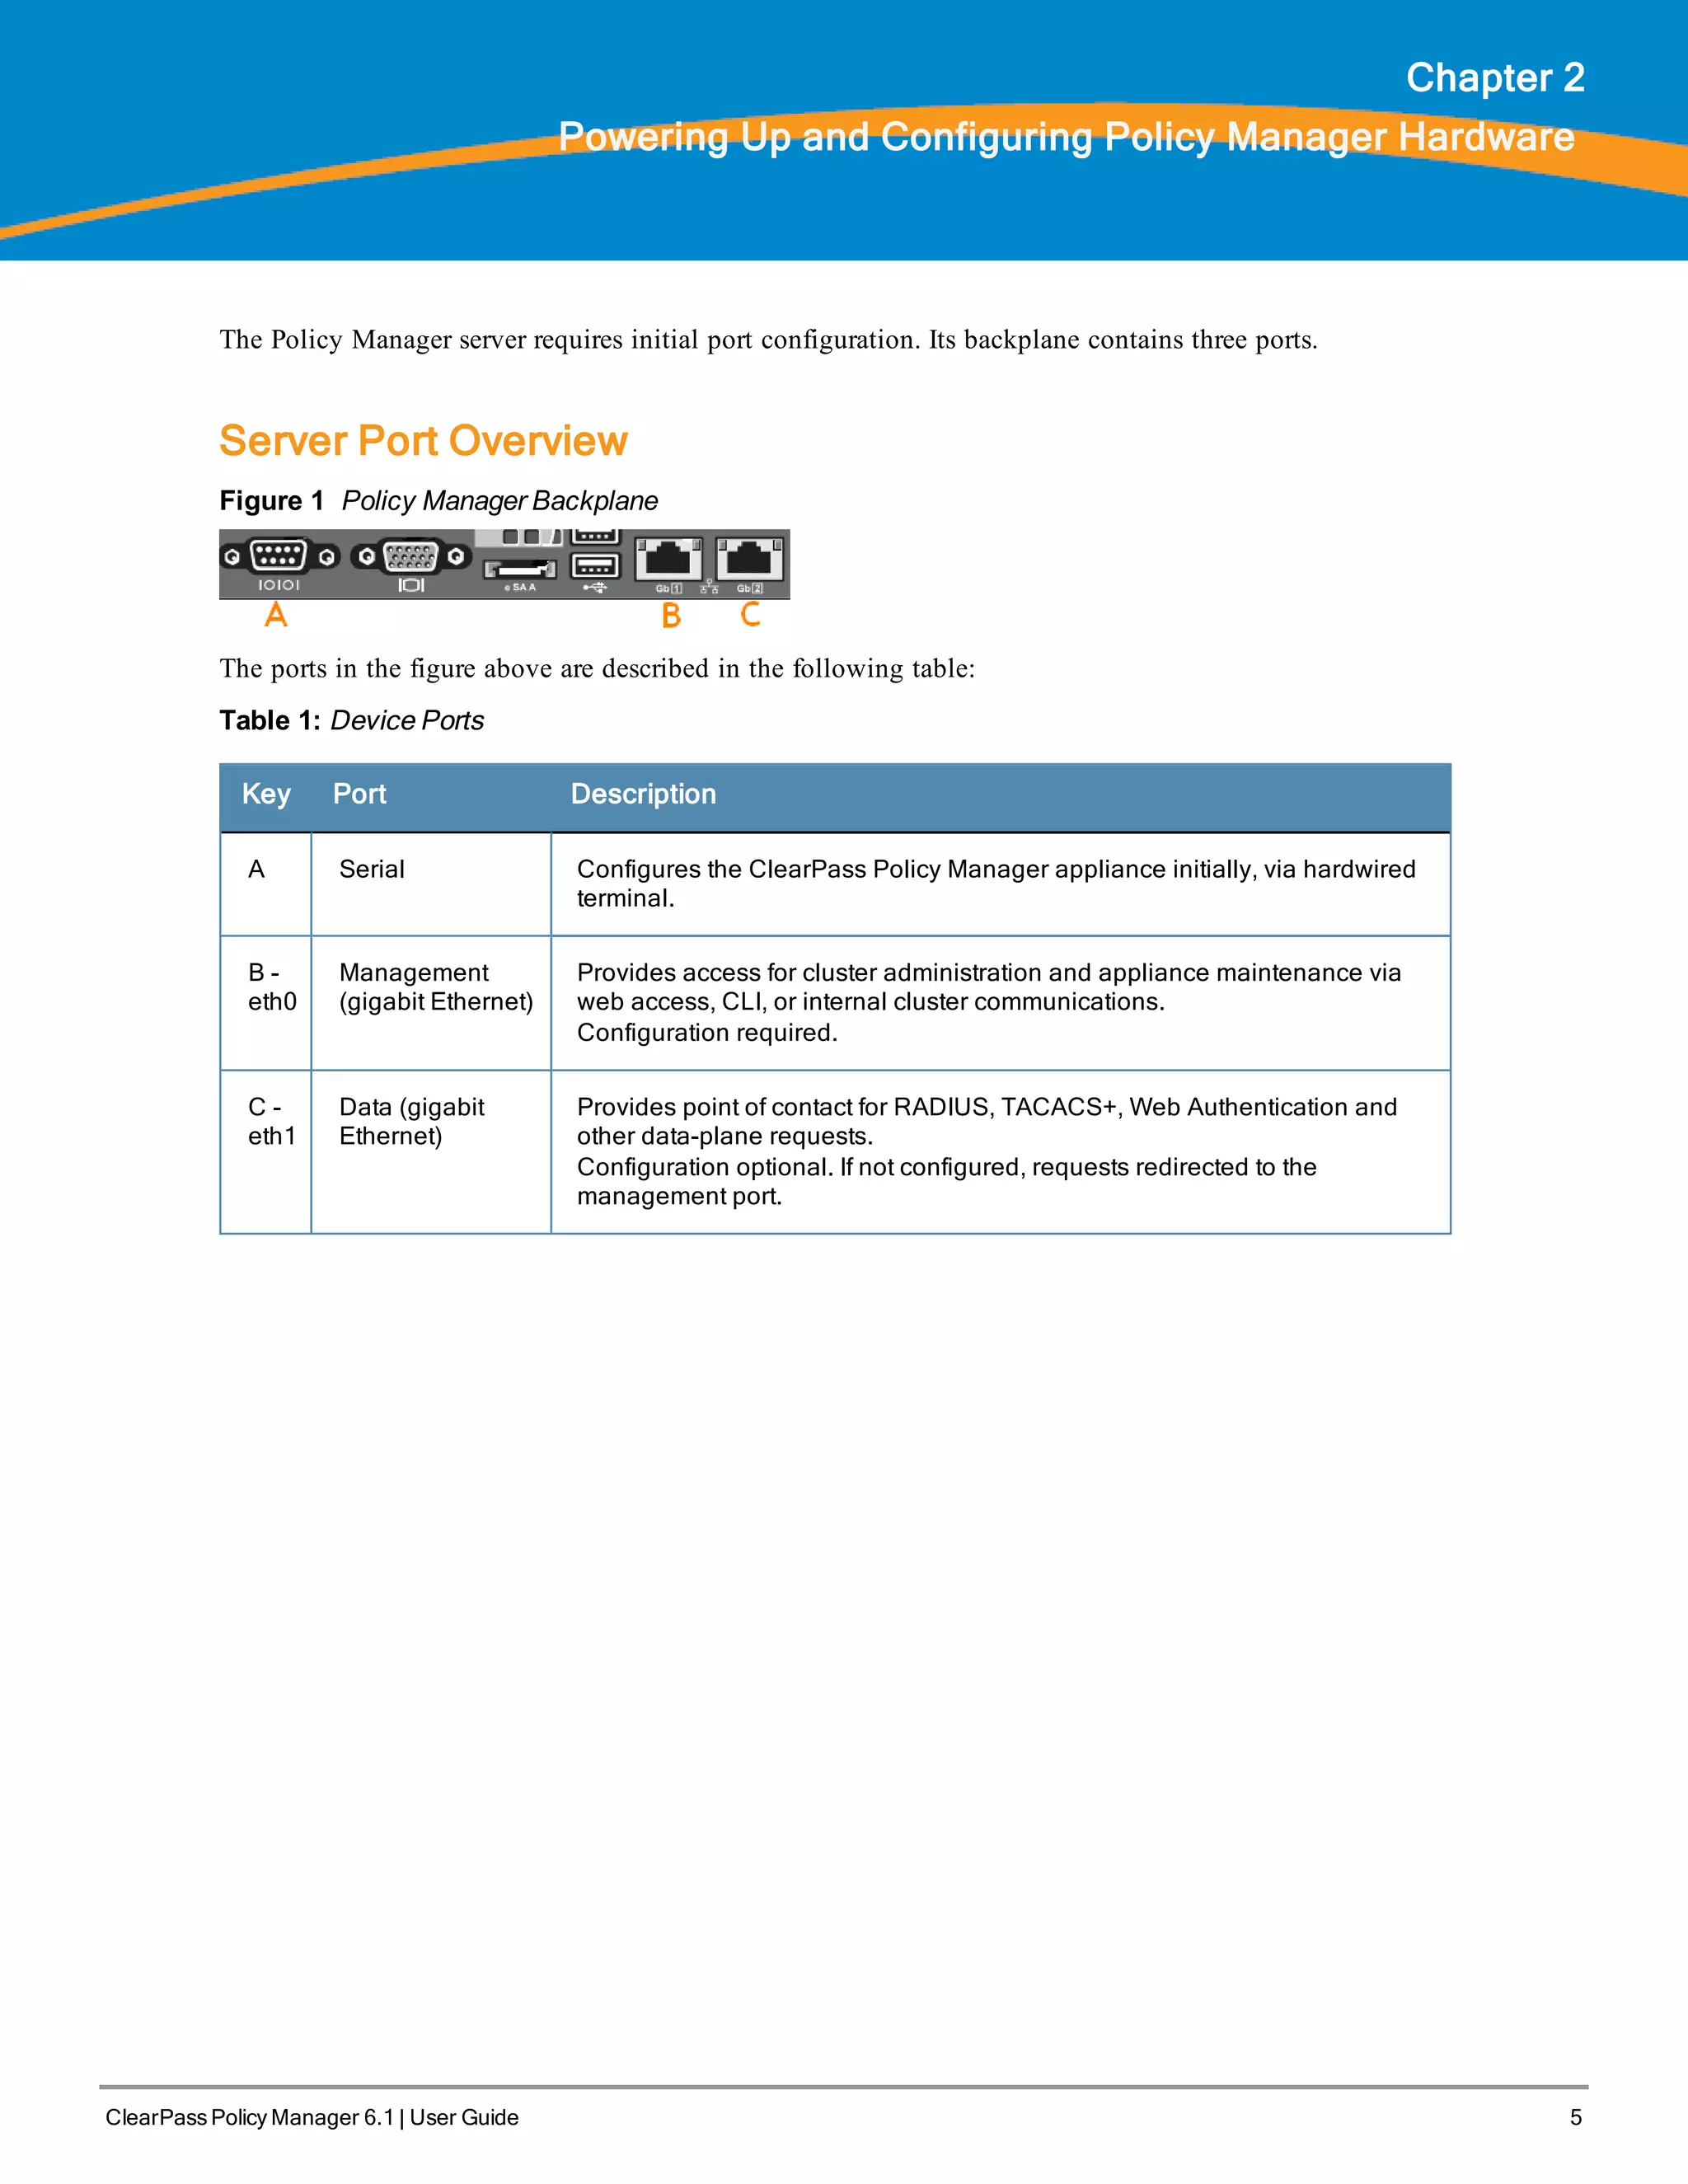
Replace the bolded placeholder entries in the following illustration with your local information:
Enter hostname:verne.xyzcompany.com
Enter Management Port IP Address: 192.168.5.10
Enter Management Port Subnet Mask: 255.255.255.0
Enter Management Port Gateway: 192.168.5.1
Enter Data Port IP Address: 192.168.7.55
Enter Data Port Subnet Mask: 255.255.255.0
Enter Data Port Gateway: 192.168.7.1
Enter Primary DNS: 198.168.5.3
Enter Secondary DNS: 192.168.5.1
4. Change your password
Use any string of at least six characters:
New Password:************
Confirm Password: ************
Going forward, you will use this password for cluster administration and management of the appliance.
5. Change the system date/time
Do you want to configure system date time information [y|n]: y
Please select the date time configuration options.
1) Set date time manually
2) Set date time by configuring NTP servers
Enter the option or press any key to quit: 2
Enter Primary NTP Server: pool.ntp.org
Enter Secondary NTP Server: time.nist.gov
Do you want to configure the timezone? [y|n]: y
After the timezone information is entered, you are asked to confirm the selection.
6. Commit or restart the configuration
Follow the prompts:
Proceed with the configuration [y[Y]/n[N]/q[Q]
y[Y] to continue
n[N] to start over again
q[Q] to quit
Enter the choice:Y
Successfully configured Policy Manager appliance
*************************************************************
* Initial configuration is complete.
* Use the new login password to login to the CLI.
* Exiting the CLI session in 2 minutes. Press any key to exit now.
When your Policy Manager system is up and running, navigate to the Administration > Agents and
Software Updates > Software Updates page to view and download any available software updates.
Refer to "Updating the Policy Manager Software " on page 305 for more information.
Powering Off the System
Perform the following to power off the system gracefully without logging in:
ClearPass Policy Manager 6.1 | User Guide 7](https://image.slidesharecdn.com/arubacppm61userguide-140926121722-phpapp01/75/Aruba-cppm-6_1_user_guide-7-2048.jpg)
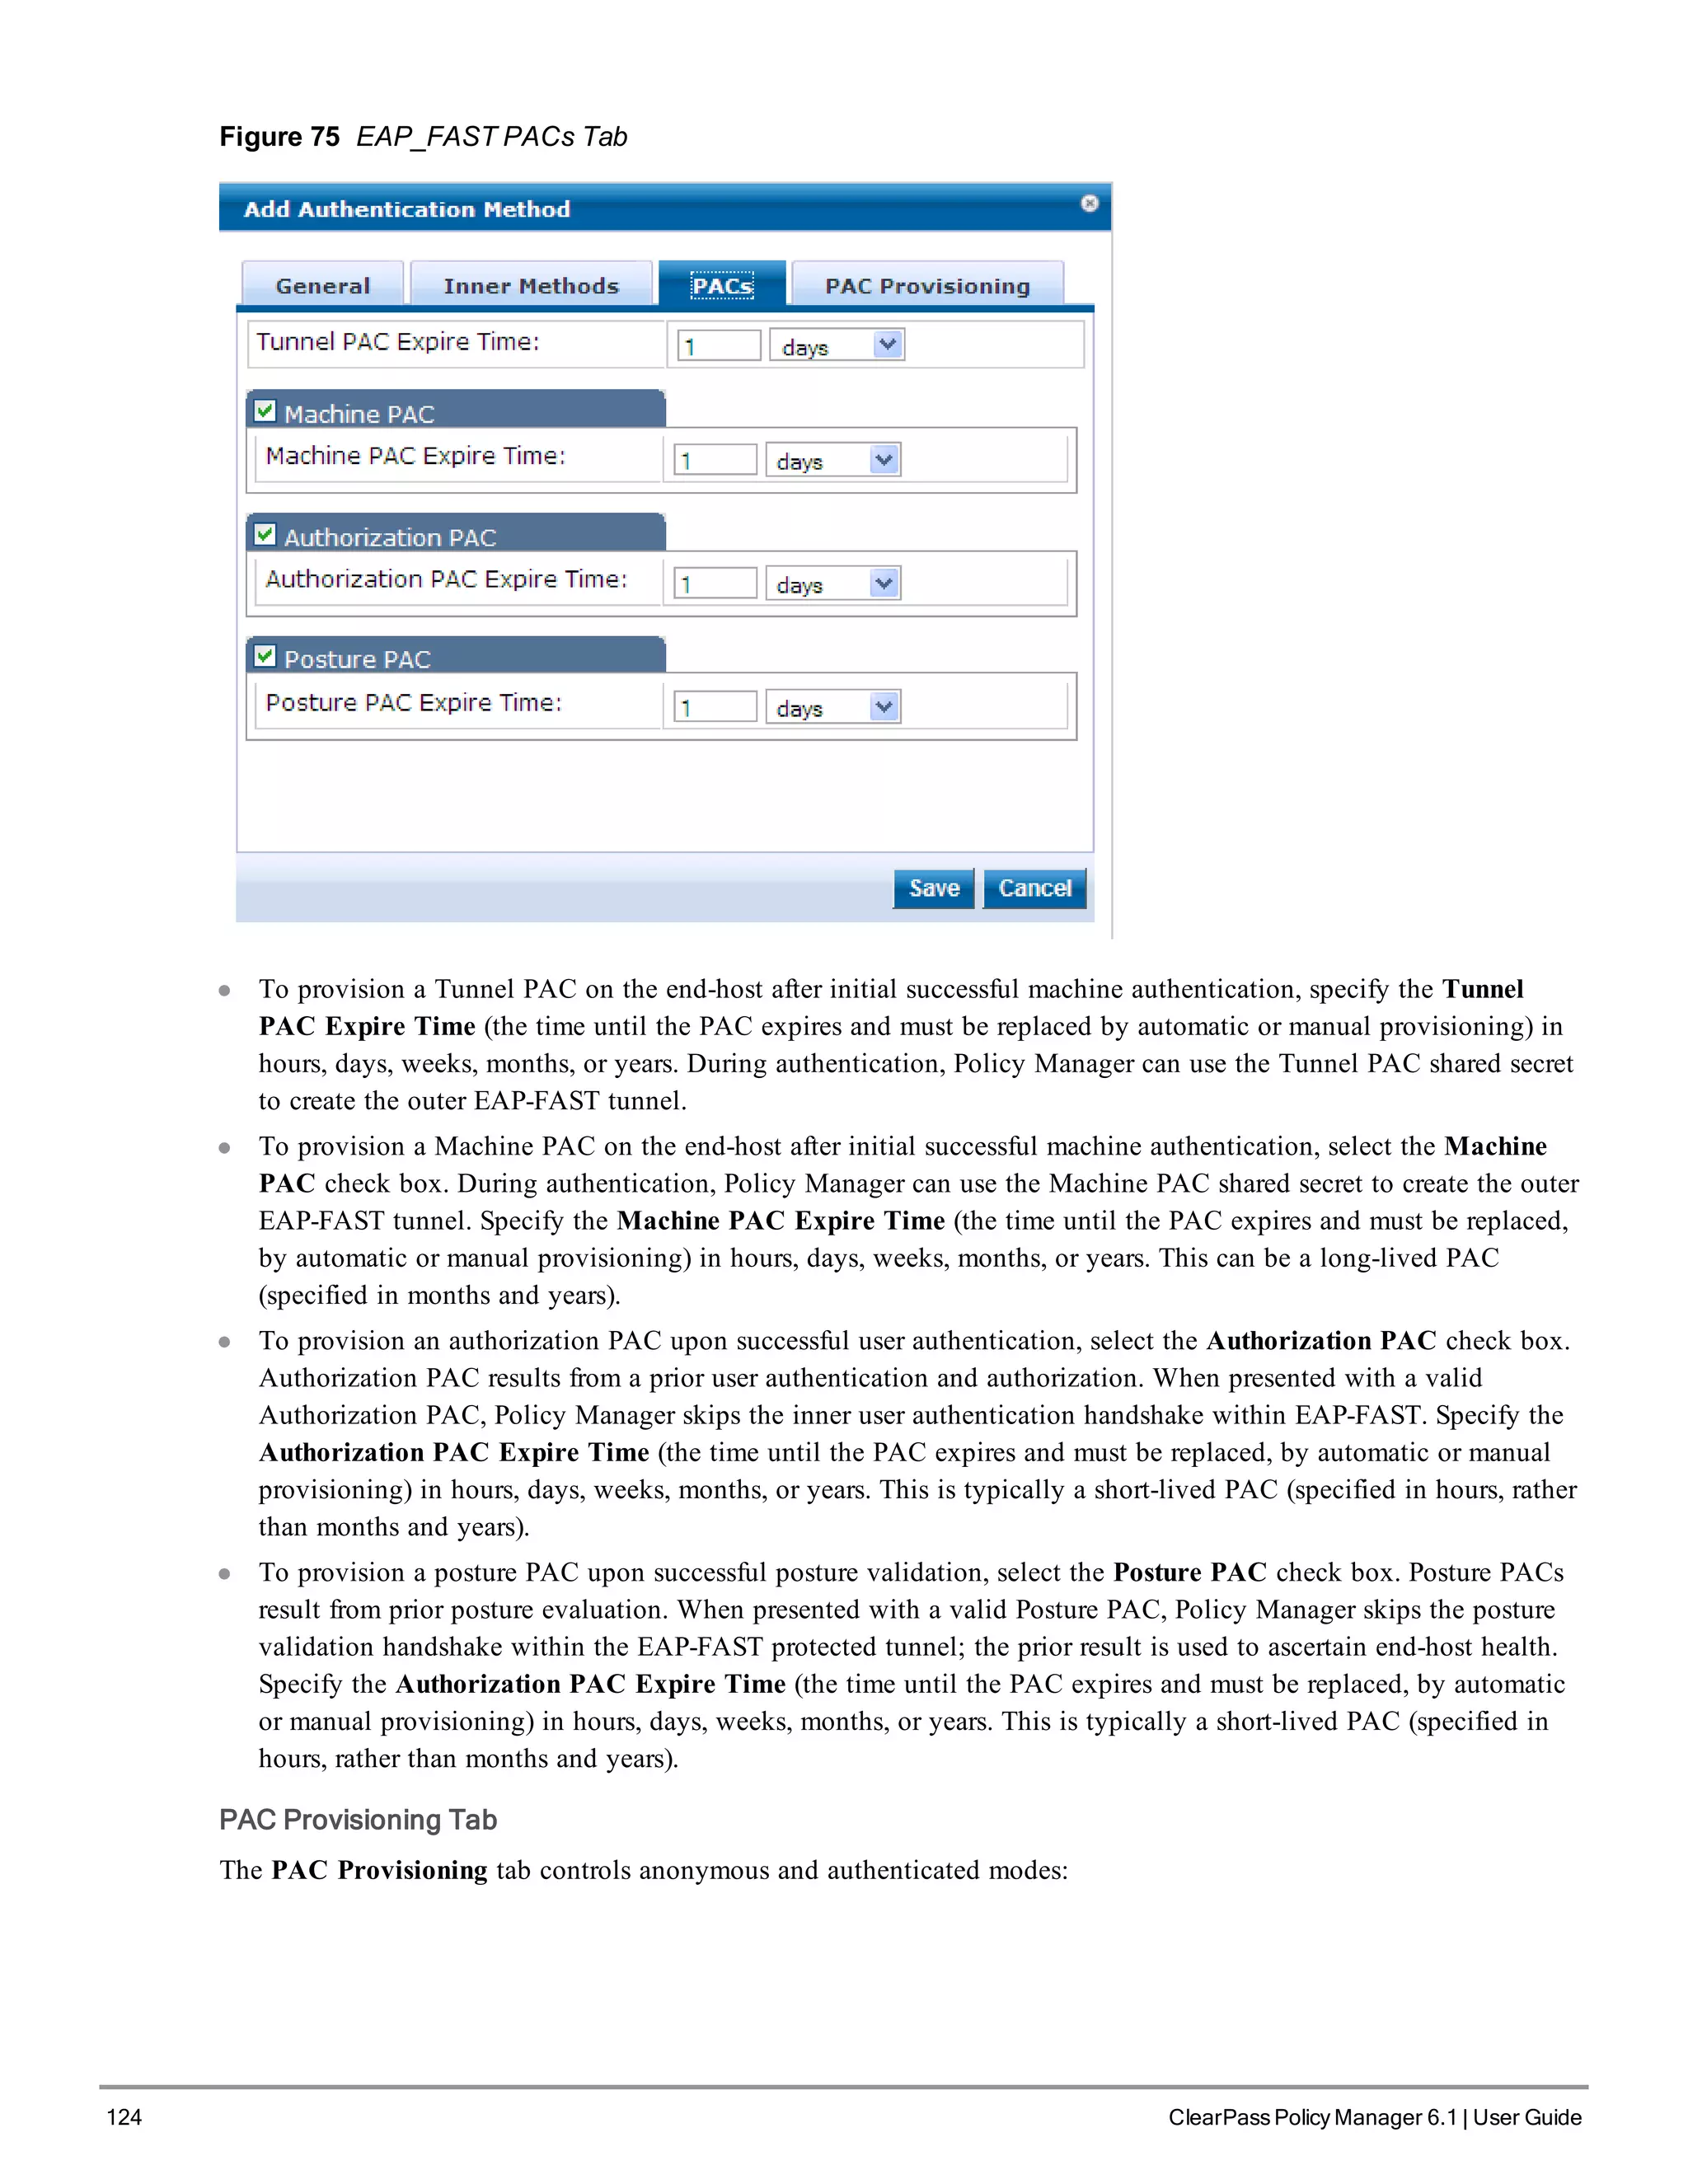
![8 ClearPass Policy Manager 6.1 | User Guide
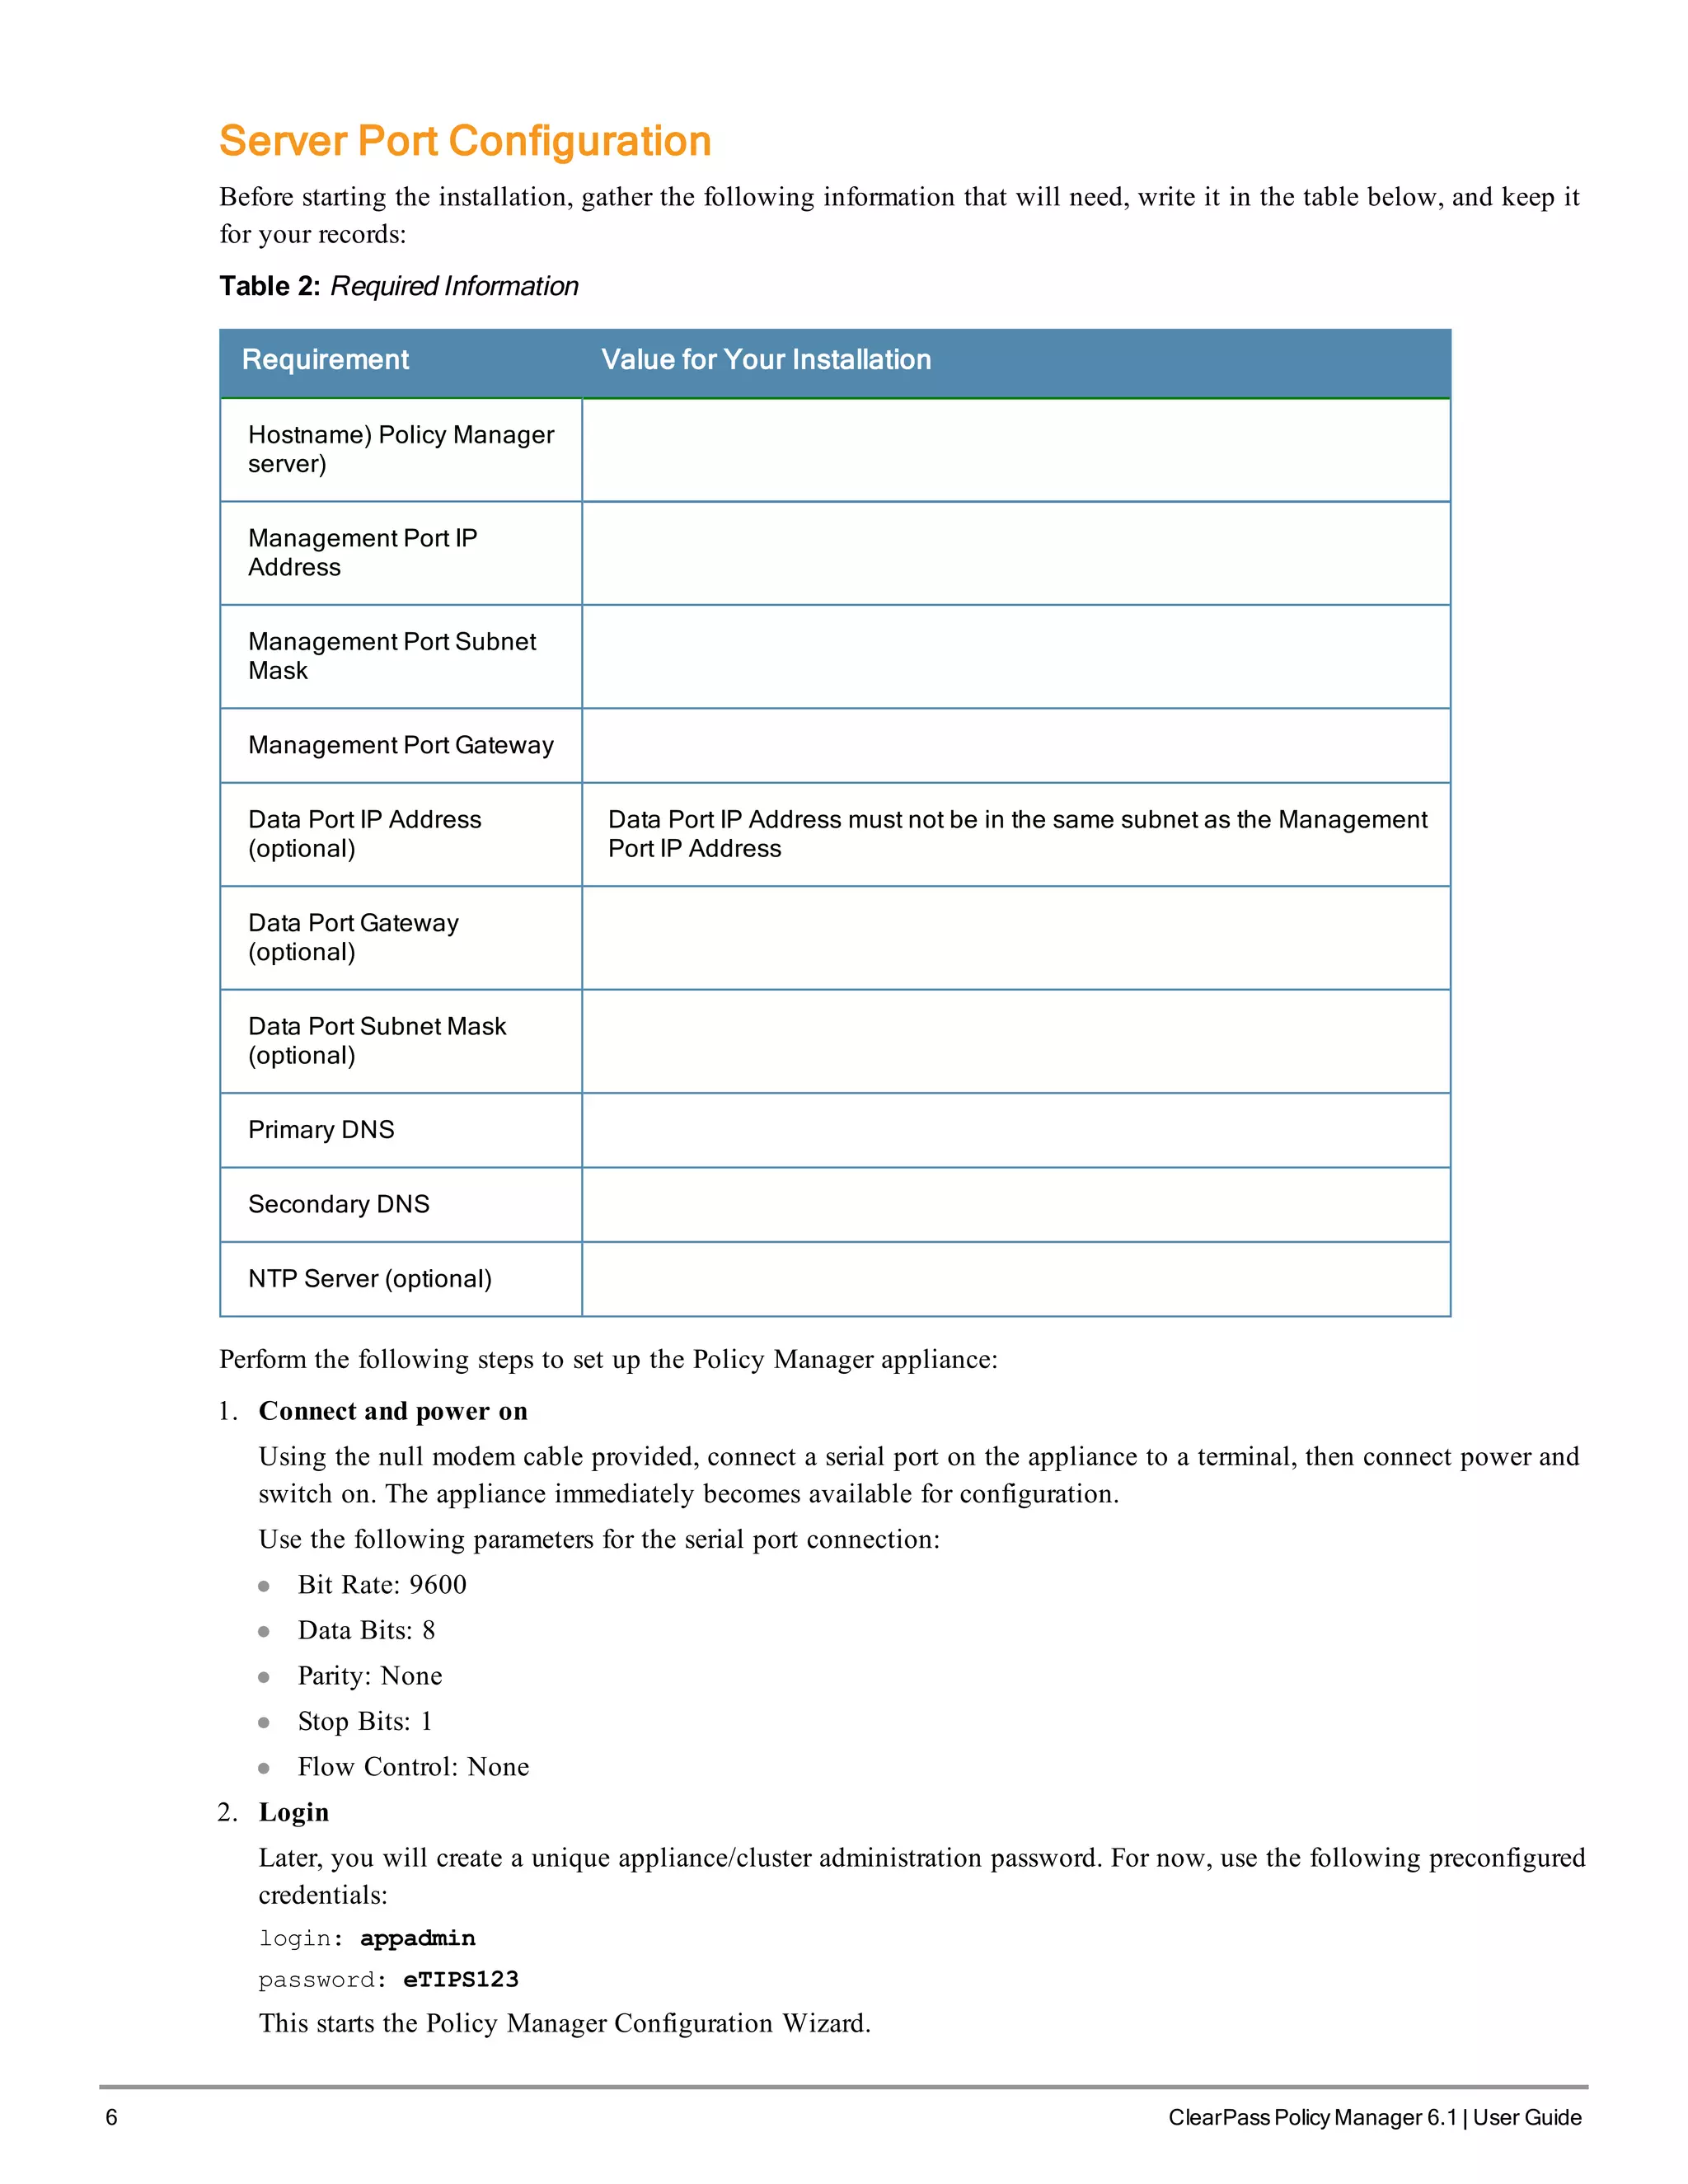
l Connect to the CLI from the serial console via the front serial port and enter the following:
login: poweroff
password: poweroff
This procedure gracefully shuts down the appliance.
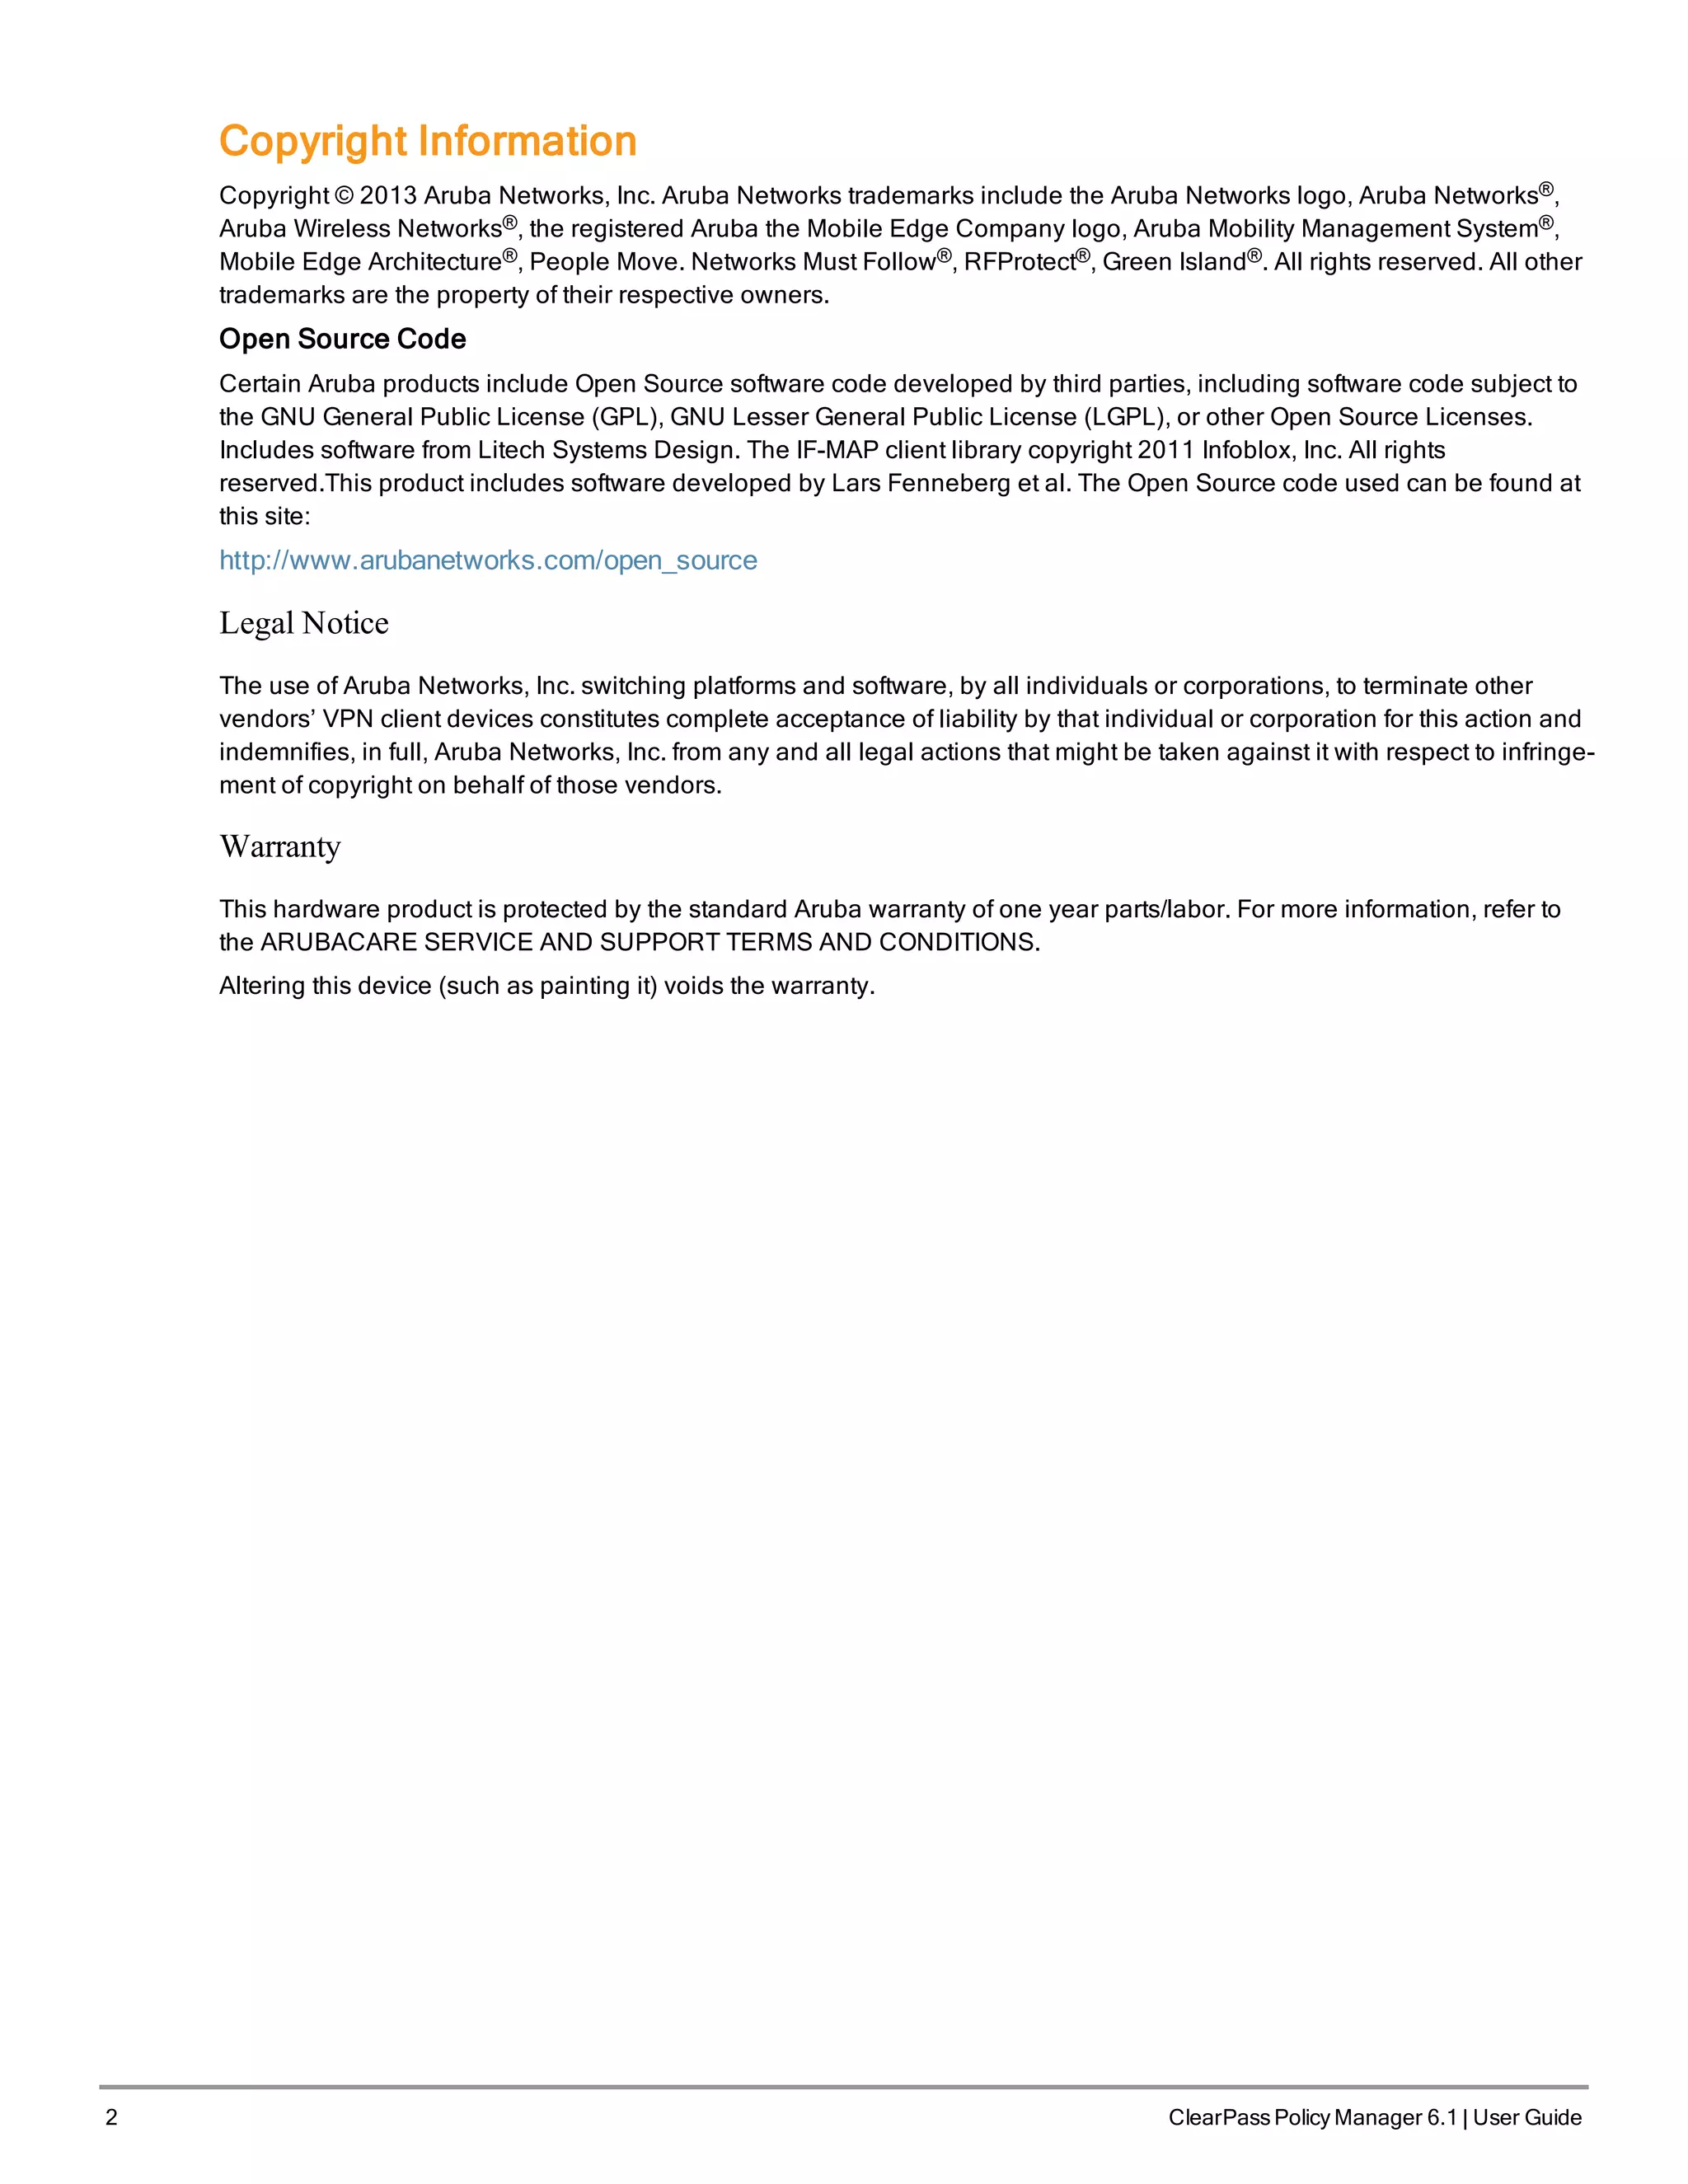
Resetting Passwords to Factory Default
Administrator passwords in Policy Manager can be reset to factory defaults by logging into the CLI as the apprecovery
user. The password to log in as the apprecovery user is dynamically generated.
Perform the following steps to generate the recovery password:
1. Connect to the Policy Manager appliance via the front serial port (using any terminal program). See "Server Port
Configuration " on page 6 for details.
2. Reboot the system. See the restart command.
3. When the system restarts, it waits at the following prompt for 10 seconds:
Generate support keys? [y/n]:
Enter ‘y’ at the prompt. The system prompts you with the following choices:
Please select a support key generation option.
1) Generate password recovery key
2) Generate a support key
3) Generate password recovery and support keys
Enter the option or press any key to quit:
4. To generate the recovery key, select option 1 (or 3, if you want to generate a support key, as well).
5. Once the password recovery key is generated, email the key to Aruba technical support. A unique password will be
generated from the recovery key and emailed back to you.
6. Enter the following at the command prompt:
[apprecovery] app reset-passwd
*******************************************************
* WARNING: This command will reset the system account *
* passwords to factory default values *
*******************************************************
Are you sure you want to continue? [y/n]: y
INFO - Password changed on local node
INFO - System account passwords have been reset to
factory default values
Generating Support Key for Technical Support
To troubleshoot certain critical system level errors, Aruba technical support might need to log into a support shell.
Perform the following steps to generate a dynamic support password:
1. Log into the Command Line Interface (CLI) and enter the command: system gen-support-key. See gen-support-
key for details.
2. Connect to the Policy Manager appliance via the front serial port (using any terminal program). See "Server Port
Configuration " on page 6 for details.
3. Reboot the system. See the restart command.
4. When the system restarts it waits at the following prompt for 10 seconds:](https://image.slidesharecdn.com/arubacppm61userguide-140926121722-phpapp01/75/Aruba-cppm-6_1_user_guide-8-2048.jpg)
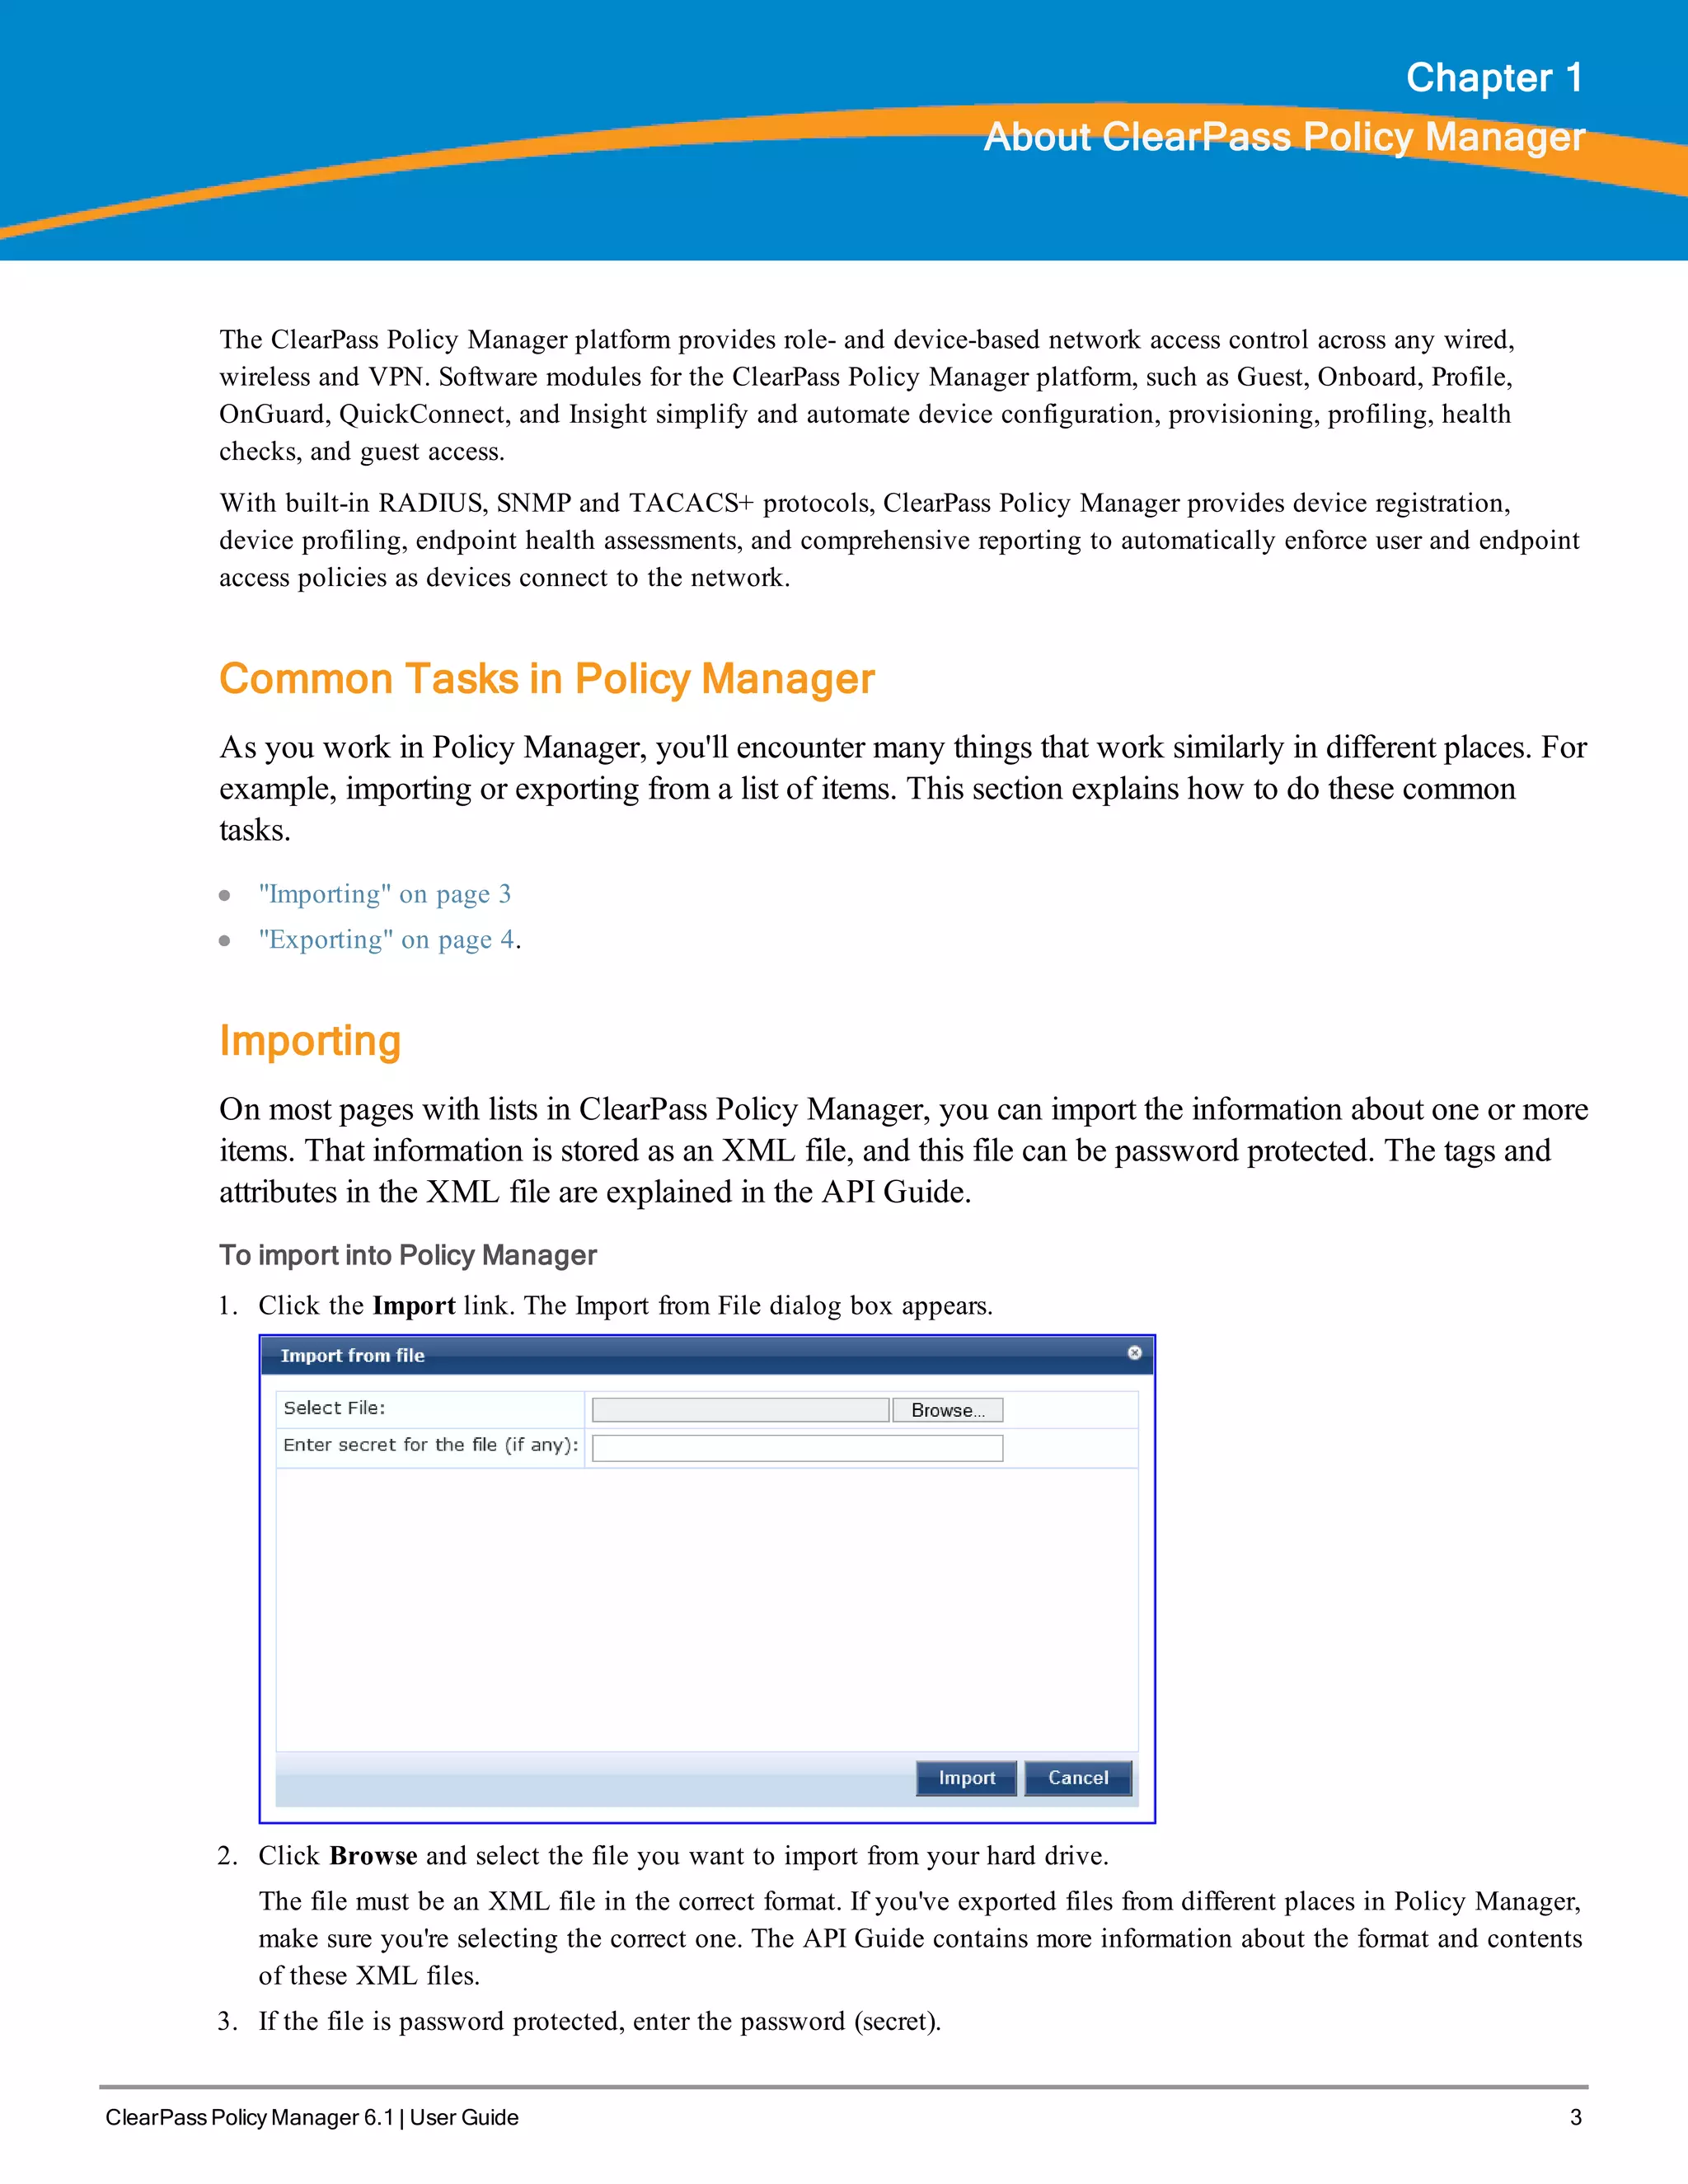
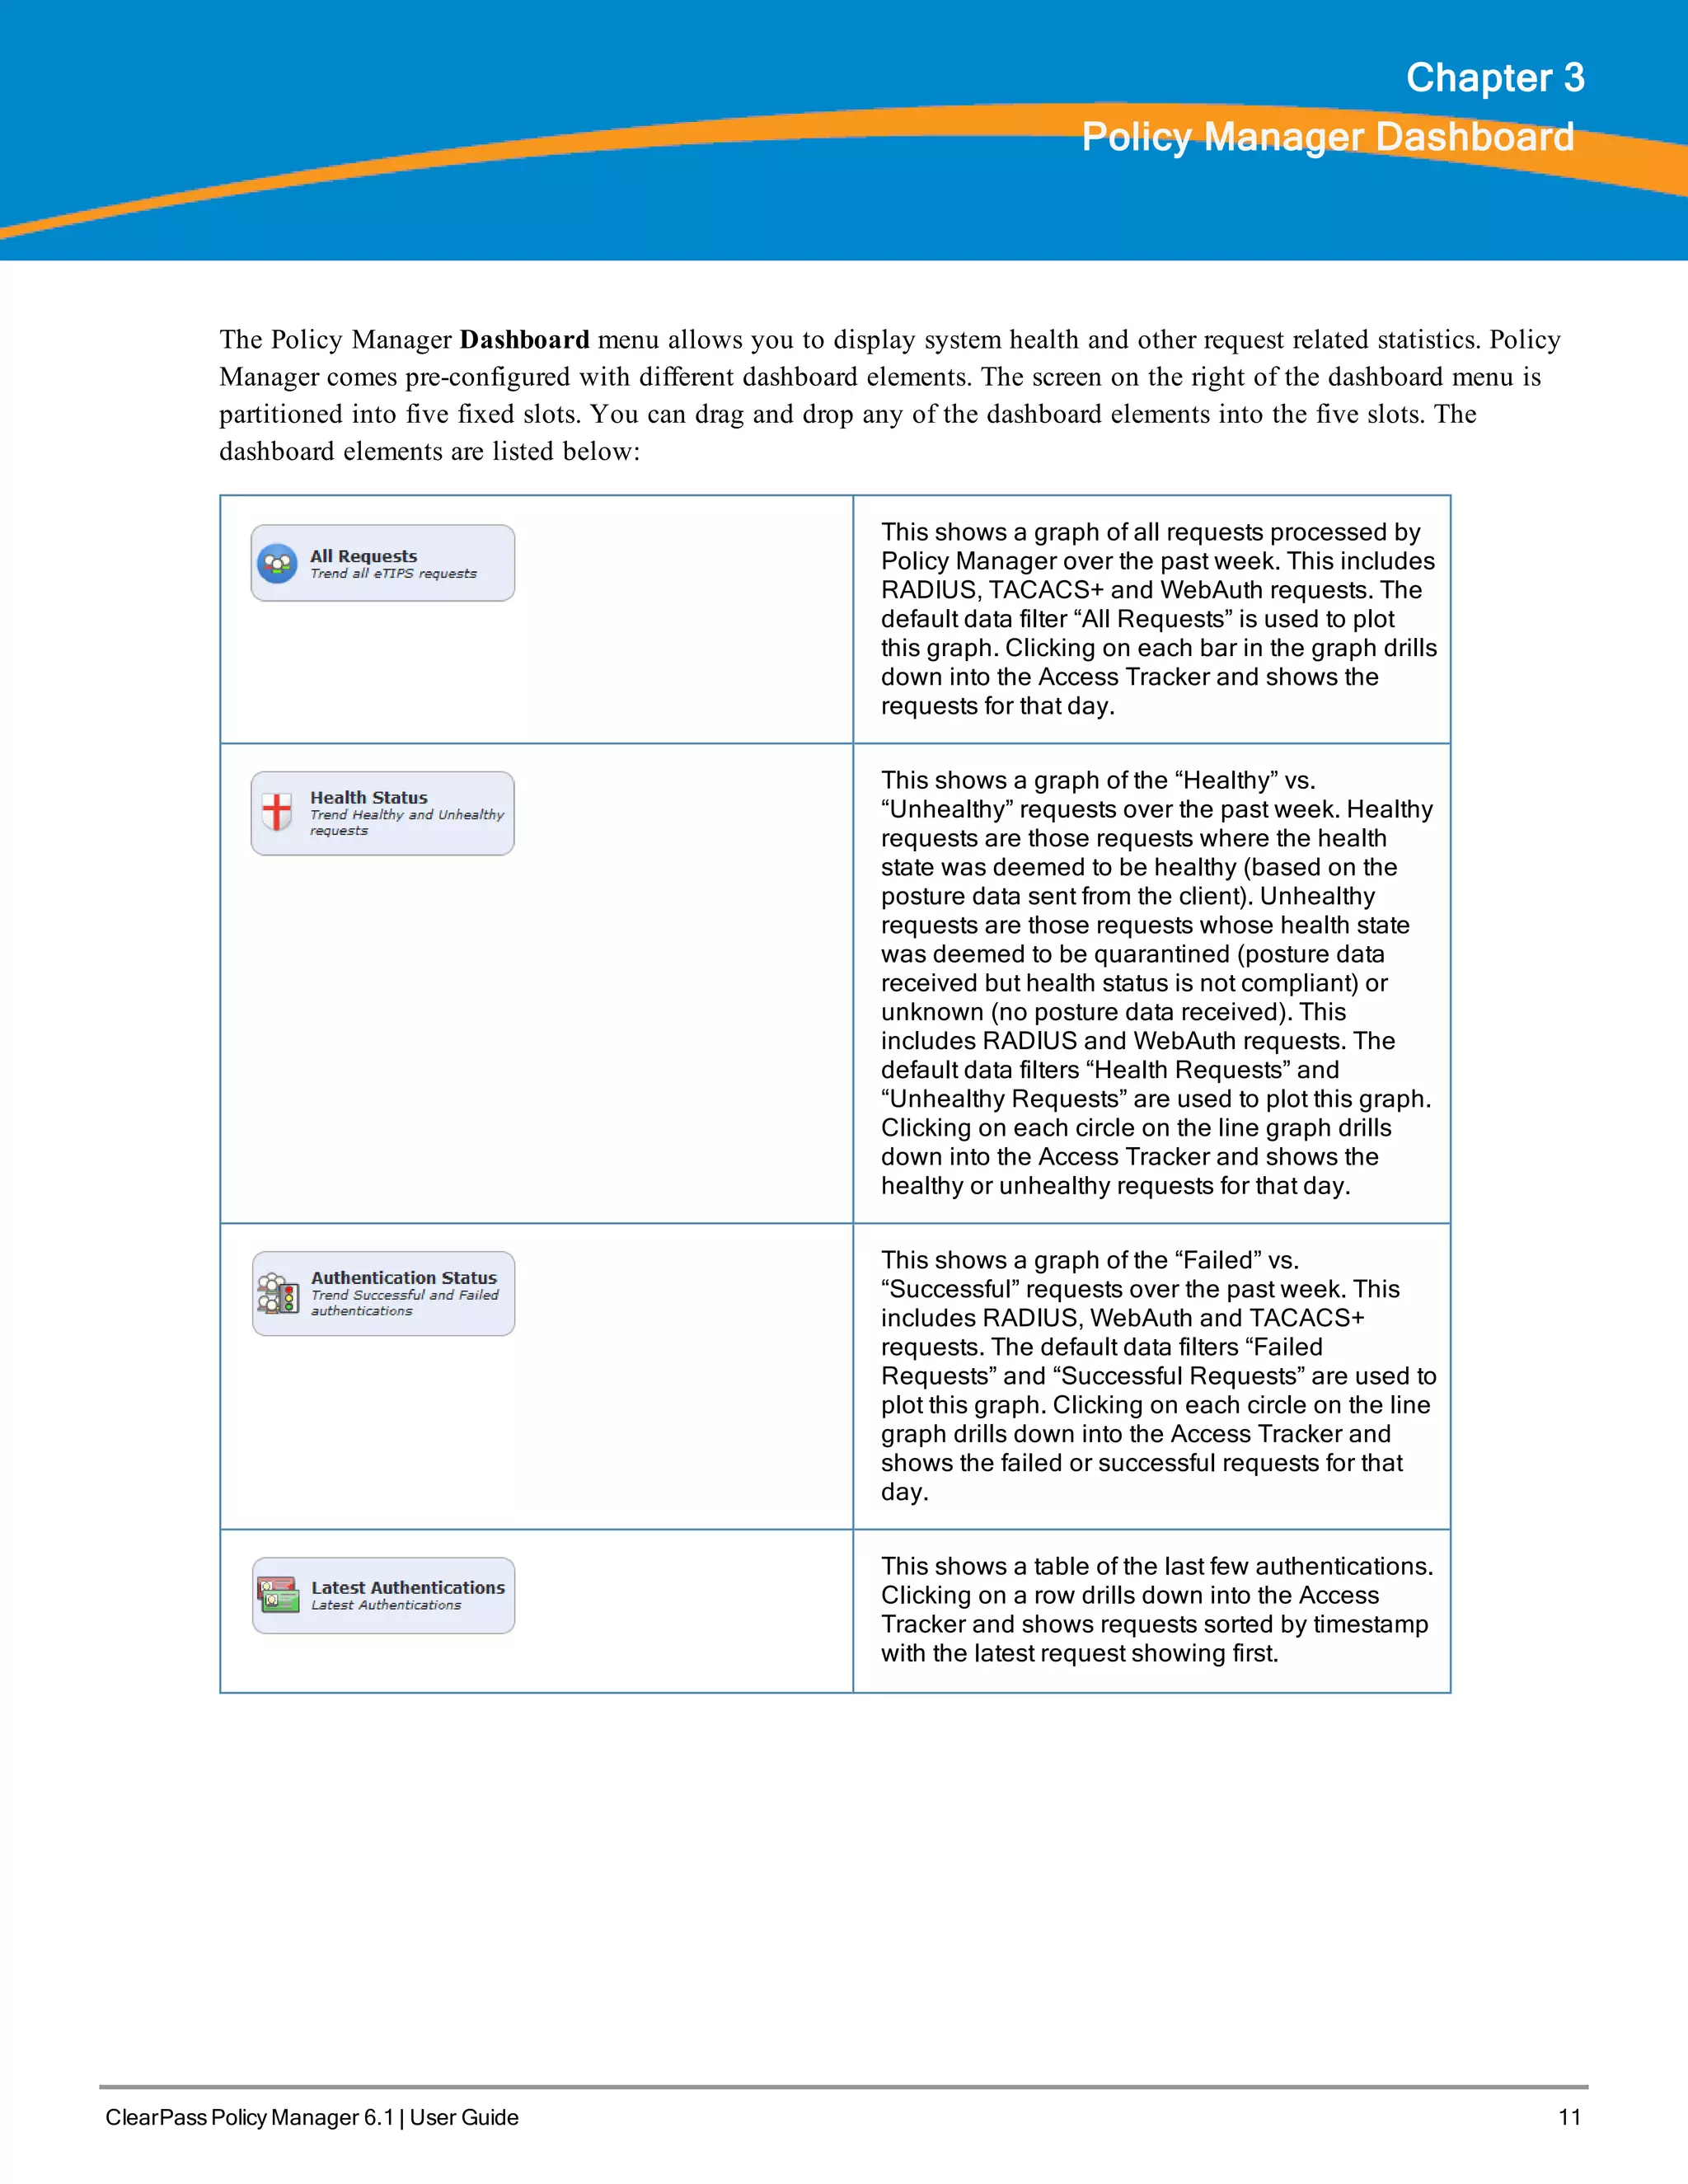
![Generate support keys? [y/n]:
Enter ‘y’ at the prompt. The system prompts with the following choices:
Please select a support key generation option.
1) Generate password recovery key
2) Generate a support key
3) Generate password recovery and support keys
Enter the option or press any key to quit:
5. To generate the support key, select option 2 (or 3, if you want to generate a password recovery key, as well).
6. Once the password recovery key is generated, email the key to Aruba technical support. A unique password can
now be generated by Aruba technical support to log into the support shell.
ClearPass Policy Manager 6.1 | User Guide 9](https://image.slidesharecdn.com/arubacppm61userguide-140926121722-phpapp01/75/Aruba-cppm-6_1_user_guide-9-2048.jpg)


![38 ClearPass Policy Manager 6.1 | User Guide
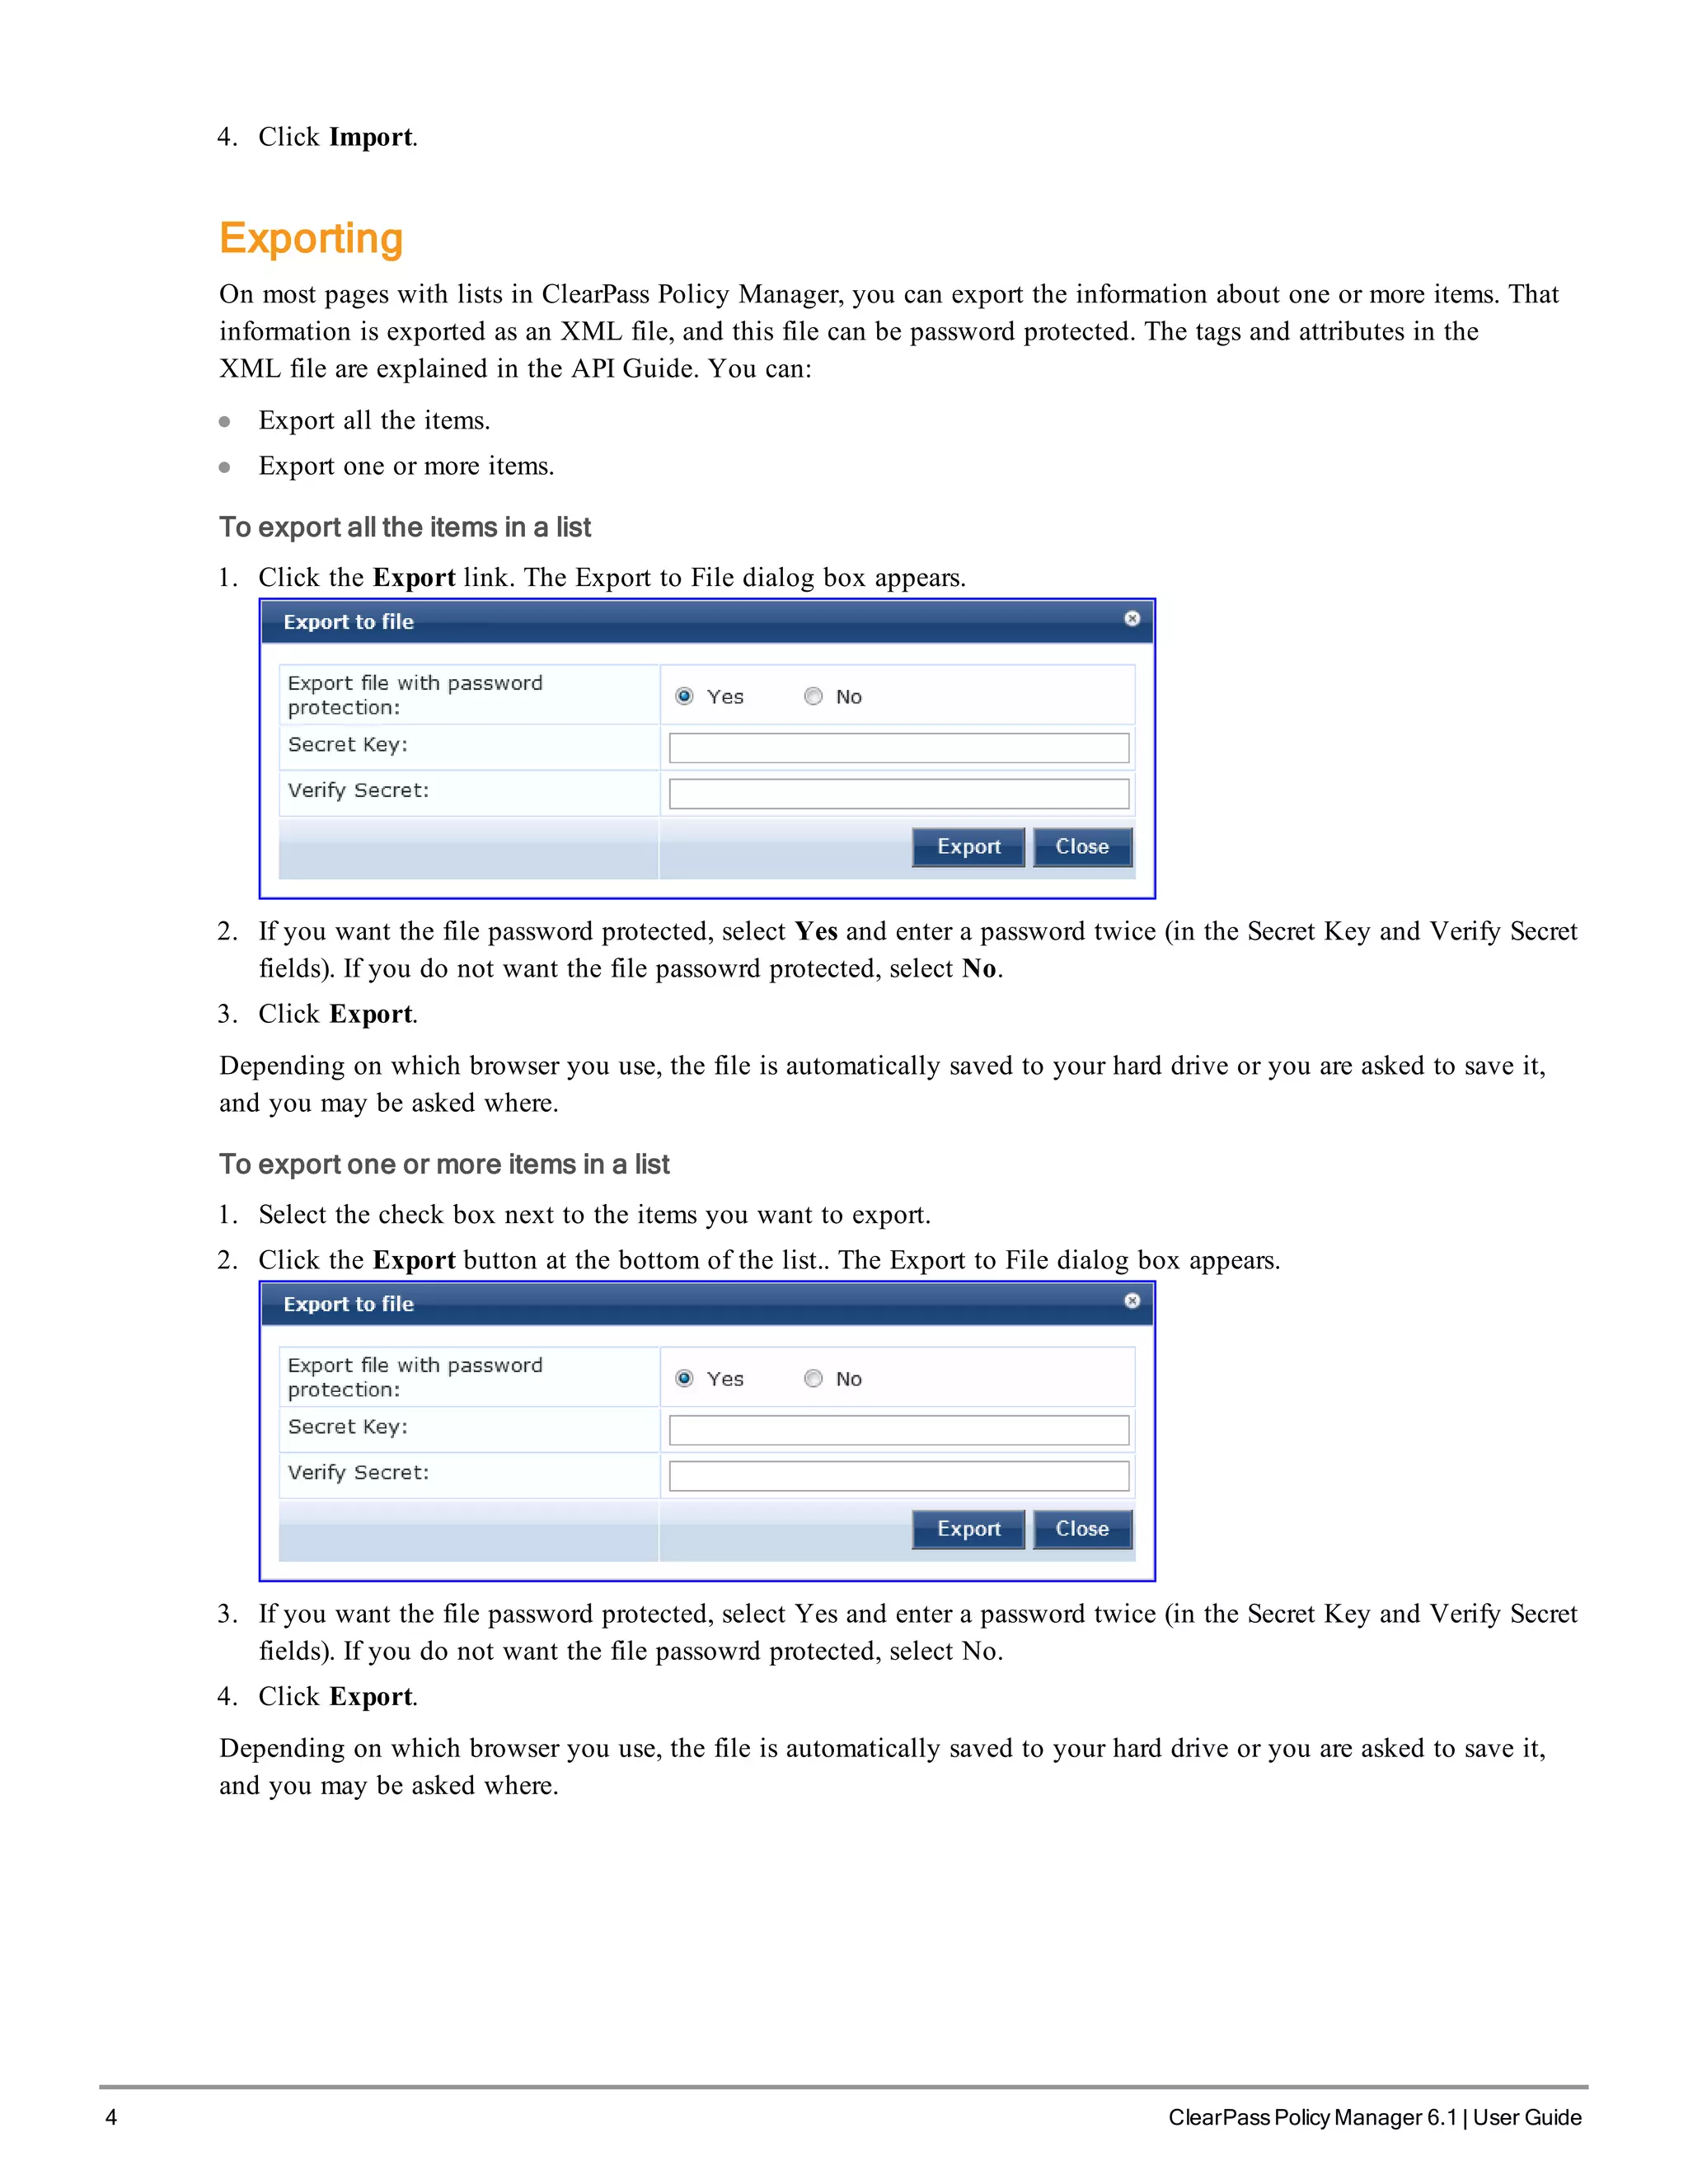
Figure 28 Generic Policy Manager Service Flow of Control
Table 17: Policy Manager Service Components
Component
Service:
component
ratio
Description
A -
Authentication
Method
Zero or more
per service
EAP or non-EAP method for client authentication.
Policy Manager supports four broad classes of authentication
methods:
l EAP, tunneled: PEAP, EAP-FAST, or EAP-TTLS.
l EAP, non-tunneled: EAP-TLS or EAP-MD5.
l Non-EAP, non-tunneled: CHAP, MS-CHAP, PAP, or [MAC AUTH].
[MAC AUTH] must be used exclusively in a MAC-based
Authentication Service. When the [MAC AUTH] method is selected,
Policy Manager: (1) makes internal checks to verify that the
request is indeed a MAC Authentication request (and not a
spoofed request) and (2) makes sure that the MAC address of the
device is present in the authentication source.
Some Services (for example, TACACS+) contain internal
authentication methods; in such cases, Policy Manager does not
make this tab available.
B -
Authentication
Source
Zero or more
per service
An Authentication Source is the identity repository against which
Policy Manager verifies identity. It supports these Authentication
Source types:
l Microsoft® Active Directory®
l any LDAP compliant directory
l RSA or other RADIUS-based token servers
l SQL database, including the local user store.
l Static Host Lists, in the case of MAC-based Authentication of](https://image.slidesharecdn.com/arubacppm61userguide-140926121722-phpapp01/75/Aruba-cppm-6_1_user_guide-38-2048.jpg)

![56 ClearPass Policy Manager 6.1 | User Guide
Table 22: 802.1X - Create Service Navigation and Settings
Navigation Settings
Create a new Service:
l Services >
l Add Service (link) >
Name the Service and select a pre-
configured Service Type:
l Service (tab) >
l Type (selector): 802.1X Wireless >
l Name/Description (freeform) >
l Upon completion, click Next (to
Authentication)
The following fields deserve special mention:
n Monitor Mode: Optionally, check here to allow handshakes to occur (for monitoring purposes), but without
enforcement.
n Service Categorization Rule: For purposes of this Use Case, accept the preconfigured Service Categorization
Rules for this Type.
2. Configure Authentication.
Follow the instructions to select [EAP FAST], one of the pre-configured Policy Manager Authentication Methods,
and Active Directory Authentication Source (AD), an external Authentication Source within your existing
enterprise.
Policy Manager fetches attributes used for role mapping from the Authorization Sources (that are associated with the
authentication source). In this example, the authentication and authorization source are one and the same.](https://image.slidesharecdn.com/arubacppm61userguide-140926121722-phpapp01/75/Aruba-cppm-6_1_user_guide-56-2048.jpg)
![Table 23: Configure Authentication Navigation and Settings
Navigation Settings
Select an Authentication Method
and an Active Directory server (that
you have already configured in
Policy Manager):
l Authentication (tab) >
l Methods (Select a method from
the drop-down list)
l Add >
l Sources (Select drop-down
list):
[Local User Repository] [Local
SQL DB]
[Guest User Repository] [Local
SQL DB]
[Guest Device Repository]
[Local SQL DB]
[Endpoints Repository] [Local
SQL DB]
[Onboard Devices Repository]
[Local SQL DB] >
[Admin User Repository] [Local
SQL DB] >
AmigoPod AD [Active
Directory>
l Add >
l Upon completion, Next (to
configure Authorization)
The following field deserves special mention:
n Strip Username Rules: Optionally, check here to pre-process the user name (to remove prefixes and suffixes)
before sending it to the authentication source.
To view detailed setting information for any preconfigured policy component, select the item and click View Details.
3. Configure Authorization.
Policy Manager fetches attributes for role mapping policy evaluation from the Authorization Sources. In this use
case, the Authentication Source and Authorization Source are one and the same.
Table 24: 802.1X - Configure Authorization Navigation and Settings
Navigation Settings
l Configure Service level authorization
source. In this use case there is nothing
to configure. Click the Next button.
l Upon completion, click Next (to Role
Mapping).
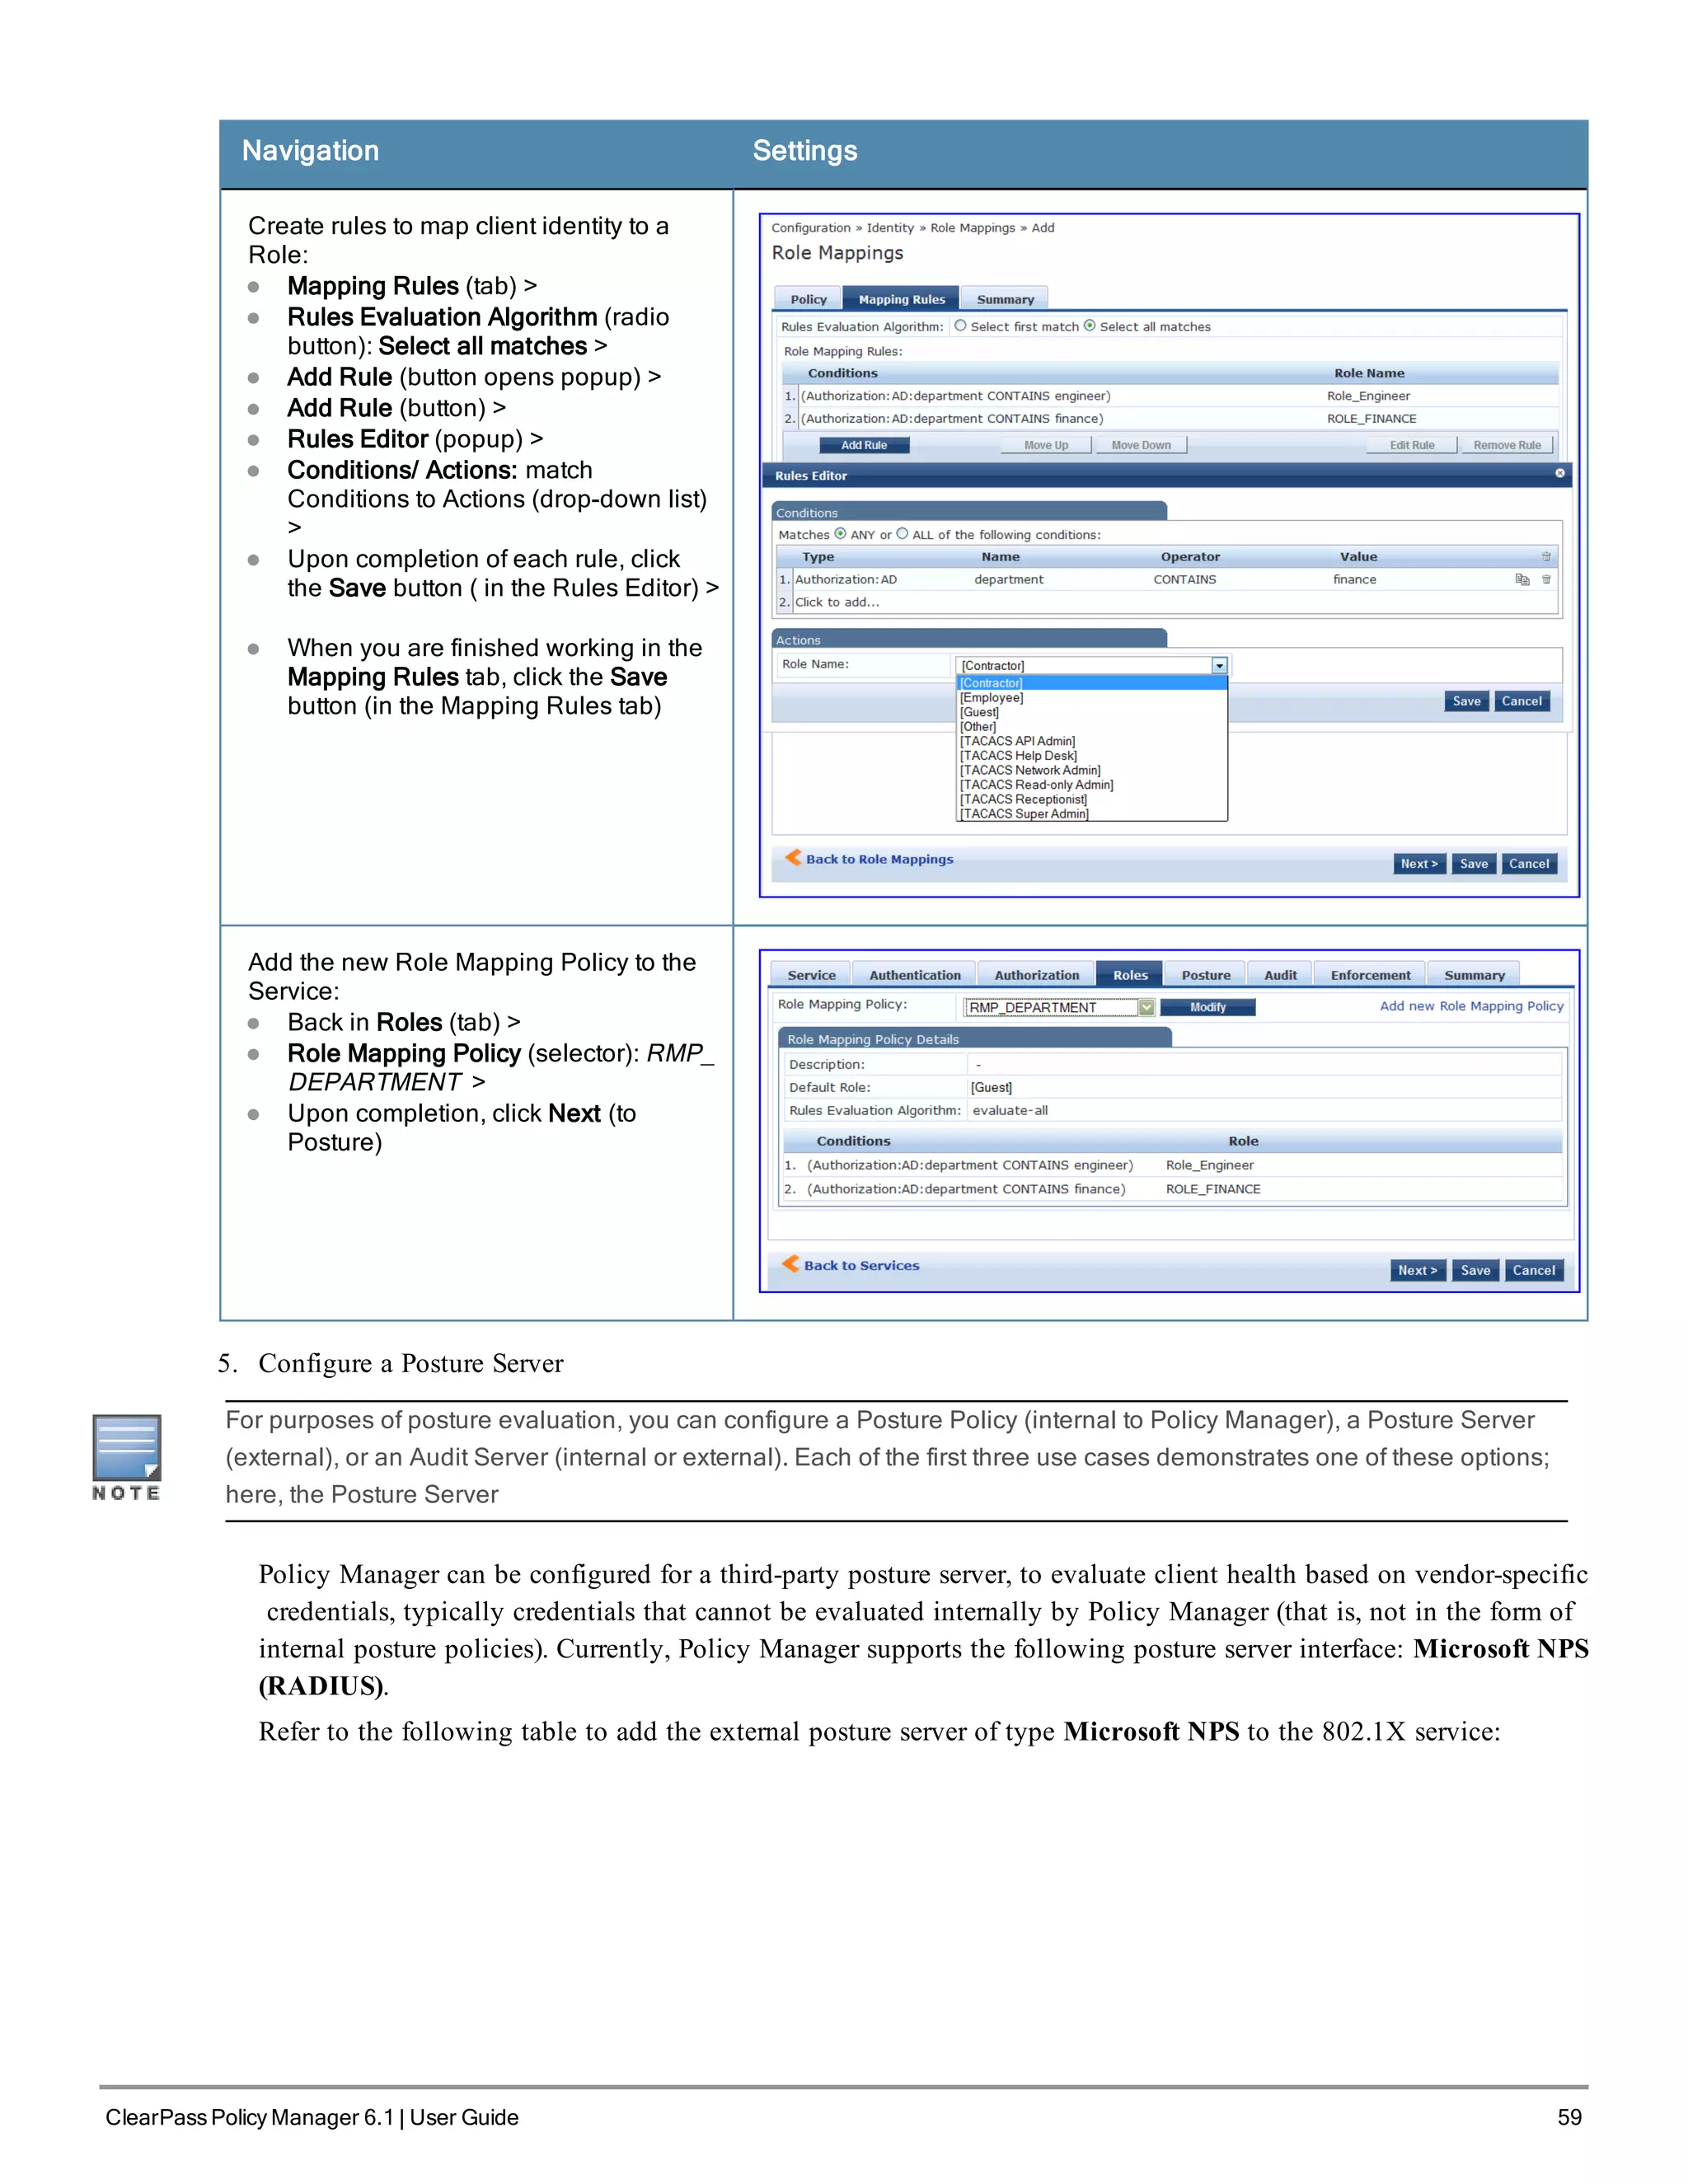
4. Apply a Role Mapping Policy
ClearPass Policy Manager 6.1 | User Guide 57](https://image.slidesharecdn.com/arubacppm61userguide-140926121722-phpapp01/75/Aruba-cppm-6_1_user_guide-57-2048.jpg)


![64 ClearPass Policy Manager 6.1 | User Guide
Navigation Settings
Name the Service and
select a pre-configured
Service Type:
l Service (tab) >
l Type (selector):
Aruba Web-Based
Authentication >
l Name/Description
(freeform) >
l Upon completion,
click Next.
3. Set up the Authentication.
a. Method: The Policy Manager WebAuth service authenticates WebAuth clients internally.
b. Source: Administrators typically configure Guest Users in the local Policy Manager database.
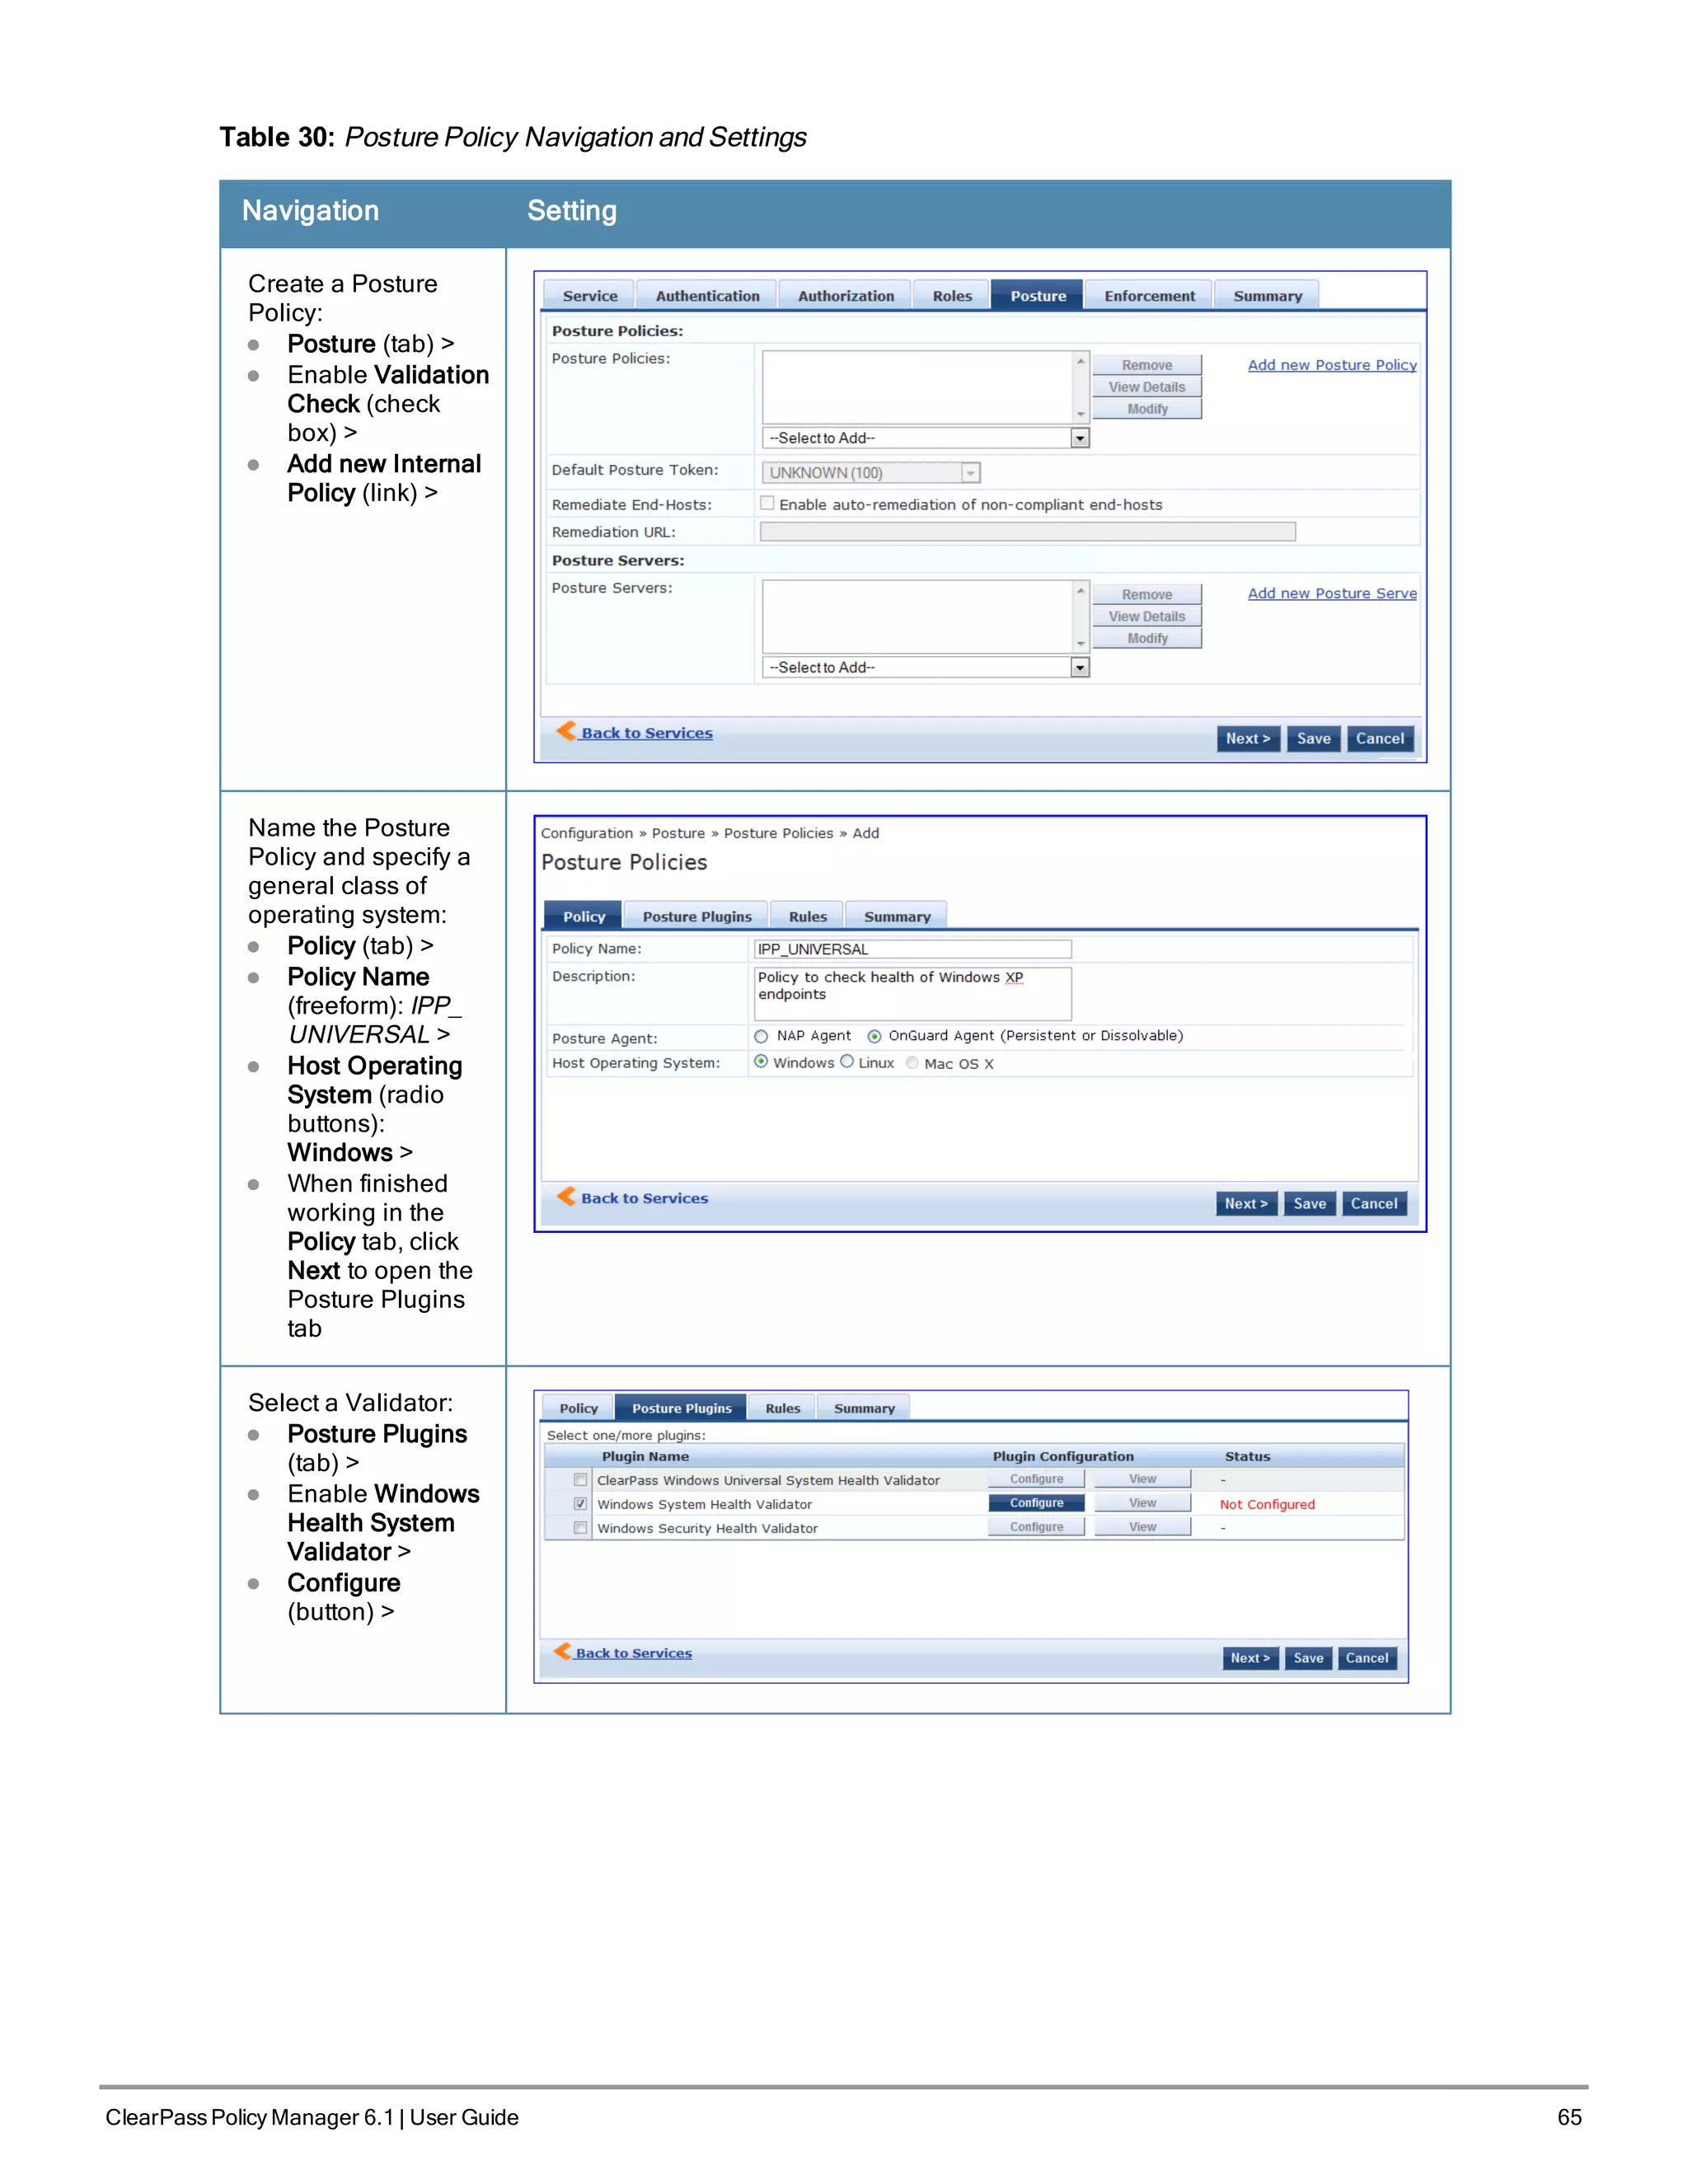
4. Configure a Posture Policy.
For purposes of posture evaluation, you can configure a Posture Policy (internal to Policy Manager), a Posture Server
(external), or an Audit Server (internal or external). Each of the first three use cases demonstrates one of these options.
This use case demonstrates the Posture Policy.
As of the current version, Policy Manager ships with five pre-configured posture plugins that evaluate the health of
the client and return a corresponding posture token.
To add the internal posture policy IPP_UNIVERSAL_XP, which (as you will configure it in this Use Case, checks
any Windows® XP clients to verify the most current Service Pack).
Table 29: Local Policy Manager Database Navigation and Settings
Navigation Settings
Select the local Policy Manager
database:
l Authentication (tab) >
l Sources (Select drop-down list):
[Local User Repository] >
l Add >
l Strip Username Rules (check box) >
l Enter an example of preceding or
following separators (if any), with the
phrase “user” representing the
username to be returned. For
authentication, Policy Manager strips
the specified separators and any
paths or domains beyond them.
l Upon completion, click Next (until you
reach Enforcement Policy).](https://image.slidesharecdn.com/arubacppm61userguide-140926121722-phpapp01/75/Aruba-cppm-6_1_user_guide-64-2048.jpg)
![Navigation Setting
Add the new Posture
Policy to the Service:
Back in Posture (tab)
>
Internal Policies
(selector): IPP_
UNIVERSAL_XP,
then click the Add
button
The following fields deserve special mention:
n Default Posture Token. Value of the posture token to use if health status is not available.
n Remediate End-Hosts. When a client does not pass posture evaluation, redirect to the indicated server for
remediation.
n Remediation URL. URL of remediation server.
5. Create an Enforcement Policy.
Because this Use Case assumes the Guest role, and the Aruba Web Portal agent has returned a posture token, it
does not require configuration of Role Mapping or Posture Evaluation.
The SNMP_POLICY selected in this step provides full guest access to a Role of [Guest] with a Posture of Healthy, and
limited guest access.
Table 31: Enforcement Policy Navigation and Settings
Navigation Setting
Add a new Enforcement
Policy:
l Enforcement (tab) >
l Enforcement Policy
(selector): SNMP_
POLICY
l Upon completion, click
Save.
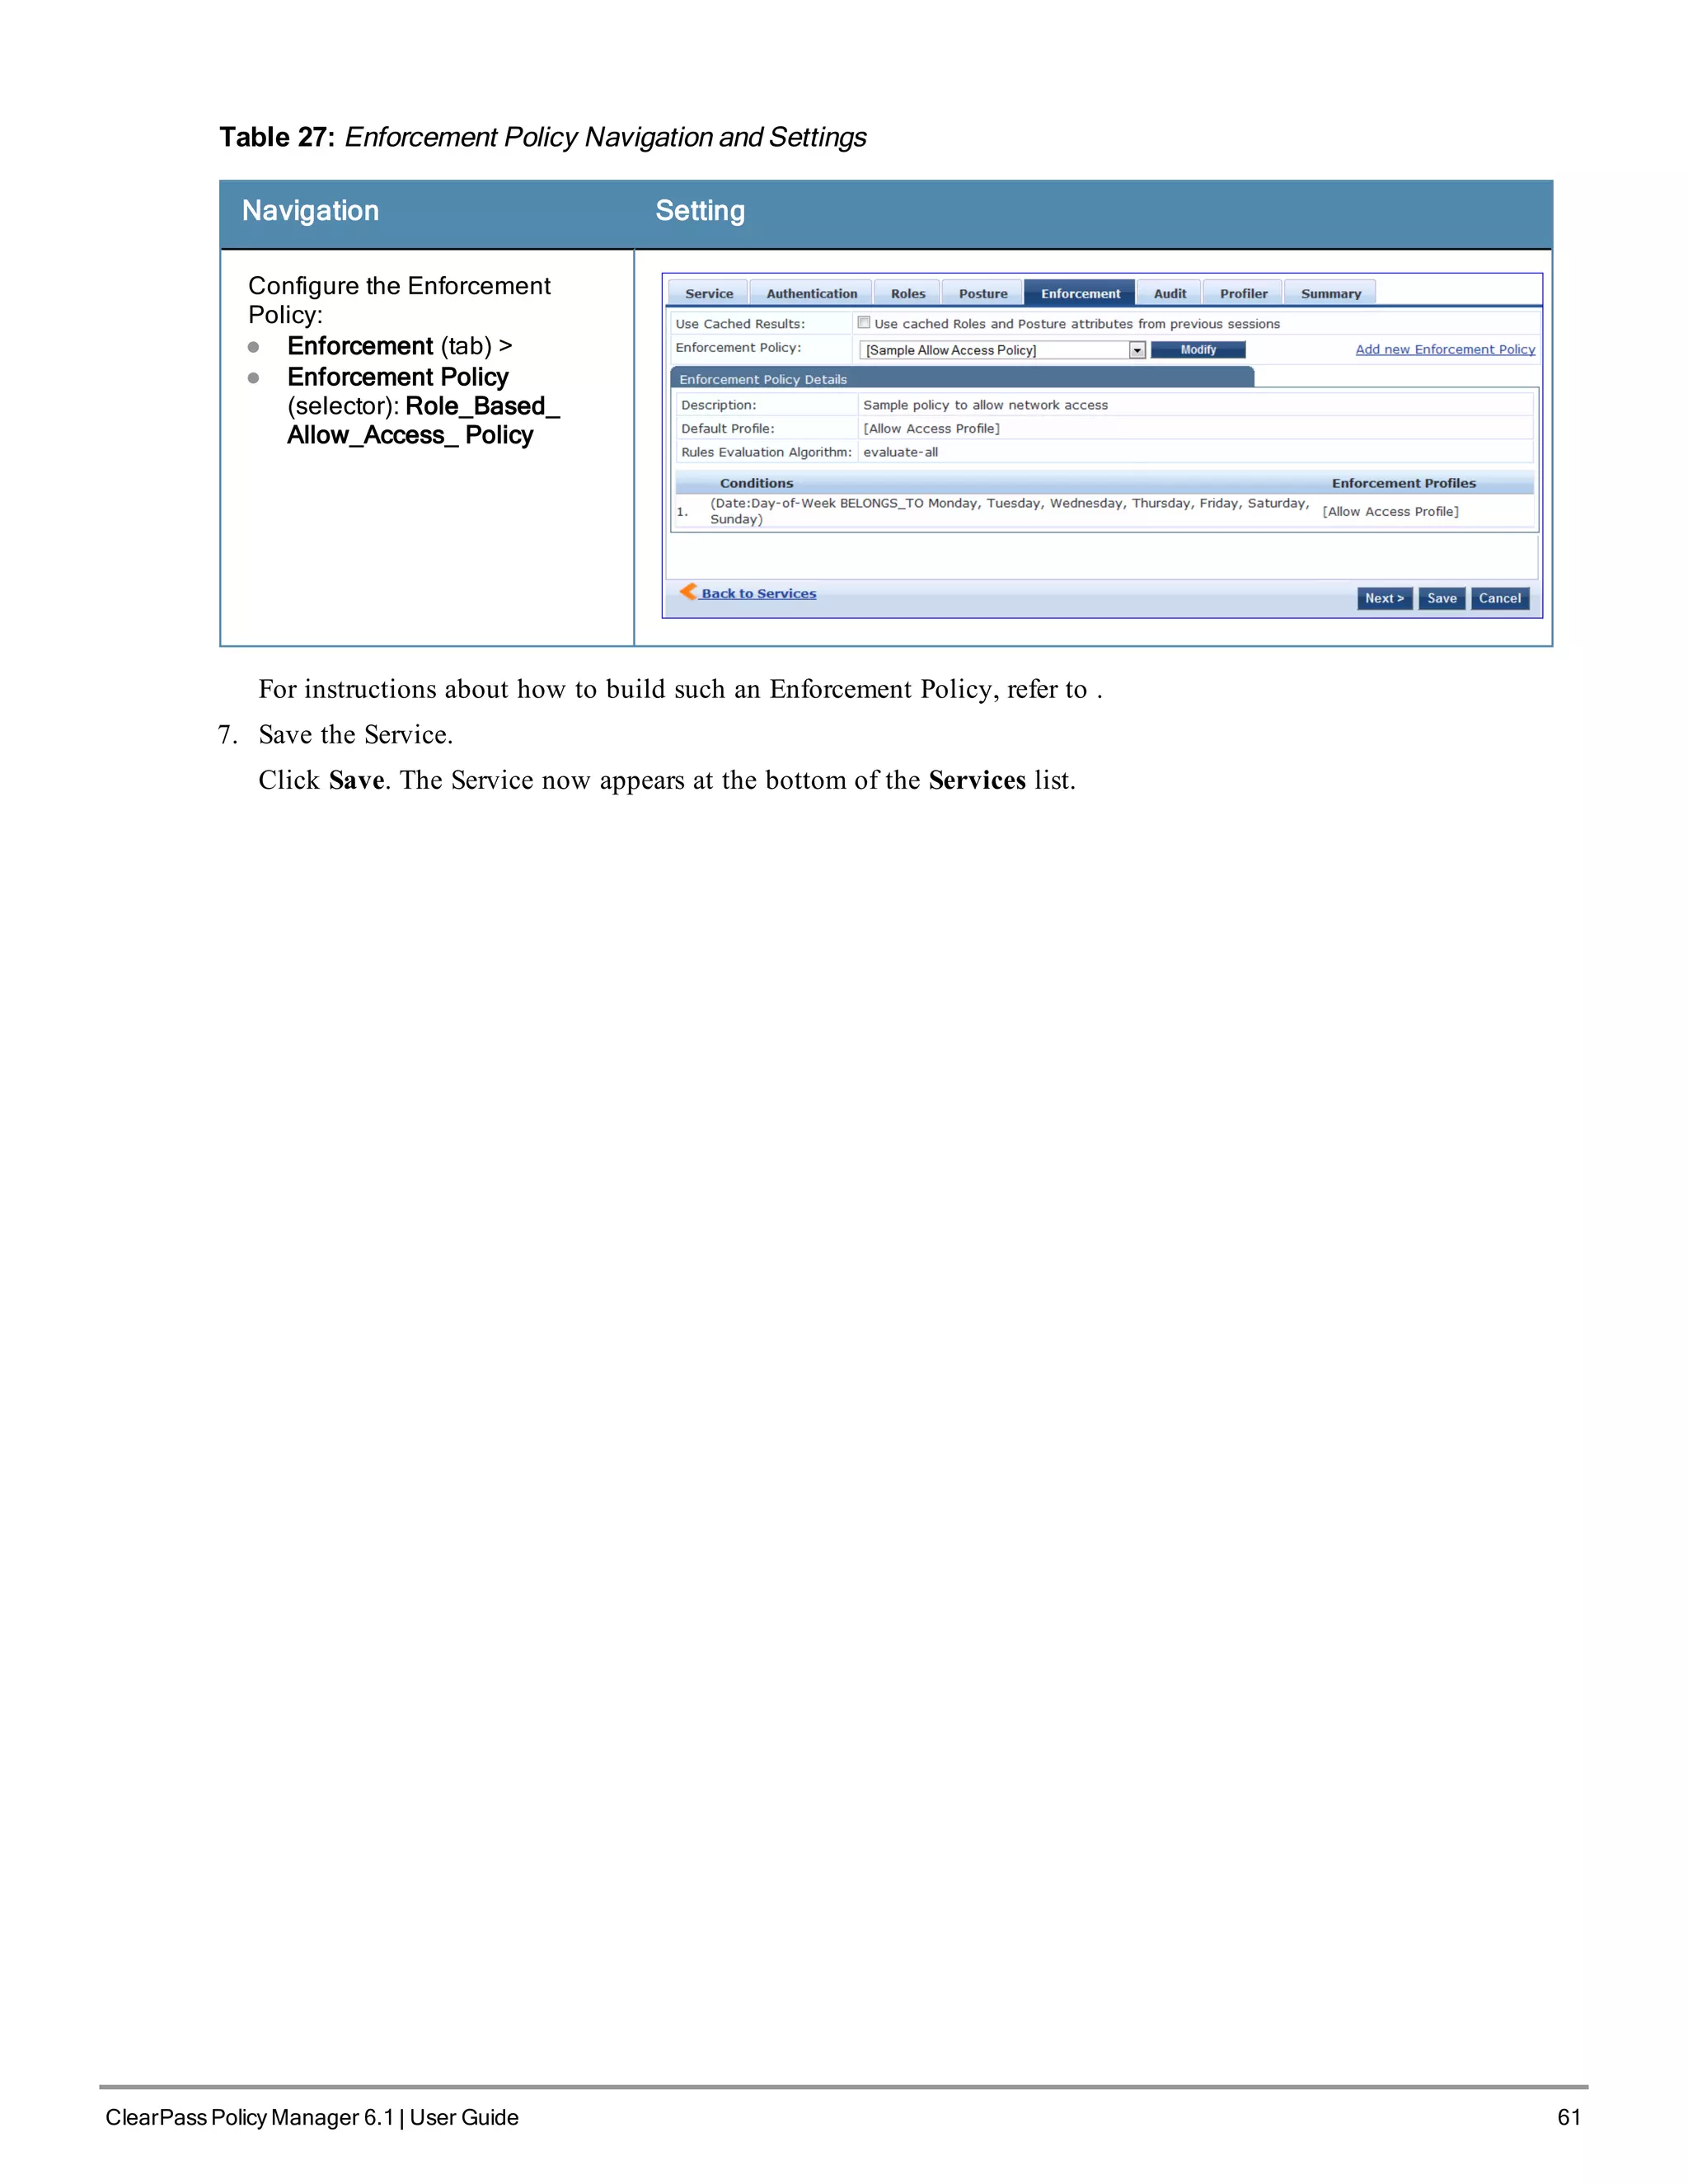
6. Save the Service.
Click Save. The Service now appears at the bottom of the Services list.
ClearPass Policy Manager 6.1 | User Guide 67](https://image.slidesharecdn.com/arubacppm61userguide-140926121722-phpapp01/75/Aruba-cppm-6_1_user_guide-67-2048.jpg)

![70 ClearPass Policy Manager 6.1 | User Guide
Table 32: MAC Authentication Service Navigation and Settings
Navigation Settings
Create a new Service:
l Services >
l Add Service (link) >
Name the Service and select
a pre-configured Service
Type:
l Service (tab) >
l Type (selector): MAC
Authentication >
l Name/Description
(freeform) >
l Upon completion, click
Next to configure
Authentication
2. Set up Authentication
Note that you can select any type of authentication/authorization source for a MAC Authentication service. Only a
Static Host list of type MAC Address List or MAC Address Regular Expression shows up in the list of
authentication sources (of type Static Host List). Refer to for more information. You can also select any other
supported type of authentication source.
Table 33: Authentication Method Navigation and Settings
Navigation Settings
Select an Authentication Method and
two authentication sources - one of
type Static Host List and the other of
type Generic LDAP server (that you
have already configured in Policy
Manager):
l Authentication (tab) >
l Methods (This method is
automatically selected for this type
of service): [MAC AUTH] >
l Add >
l Sources (Select drop-down list):
Handhelds [Static Host List] and
Policy Manager Clients White List
[Generic LDAP] >
l Add >
l Upon completion, Next (to Audit)
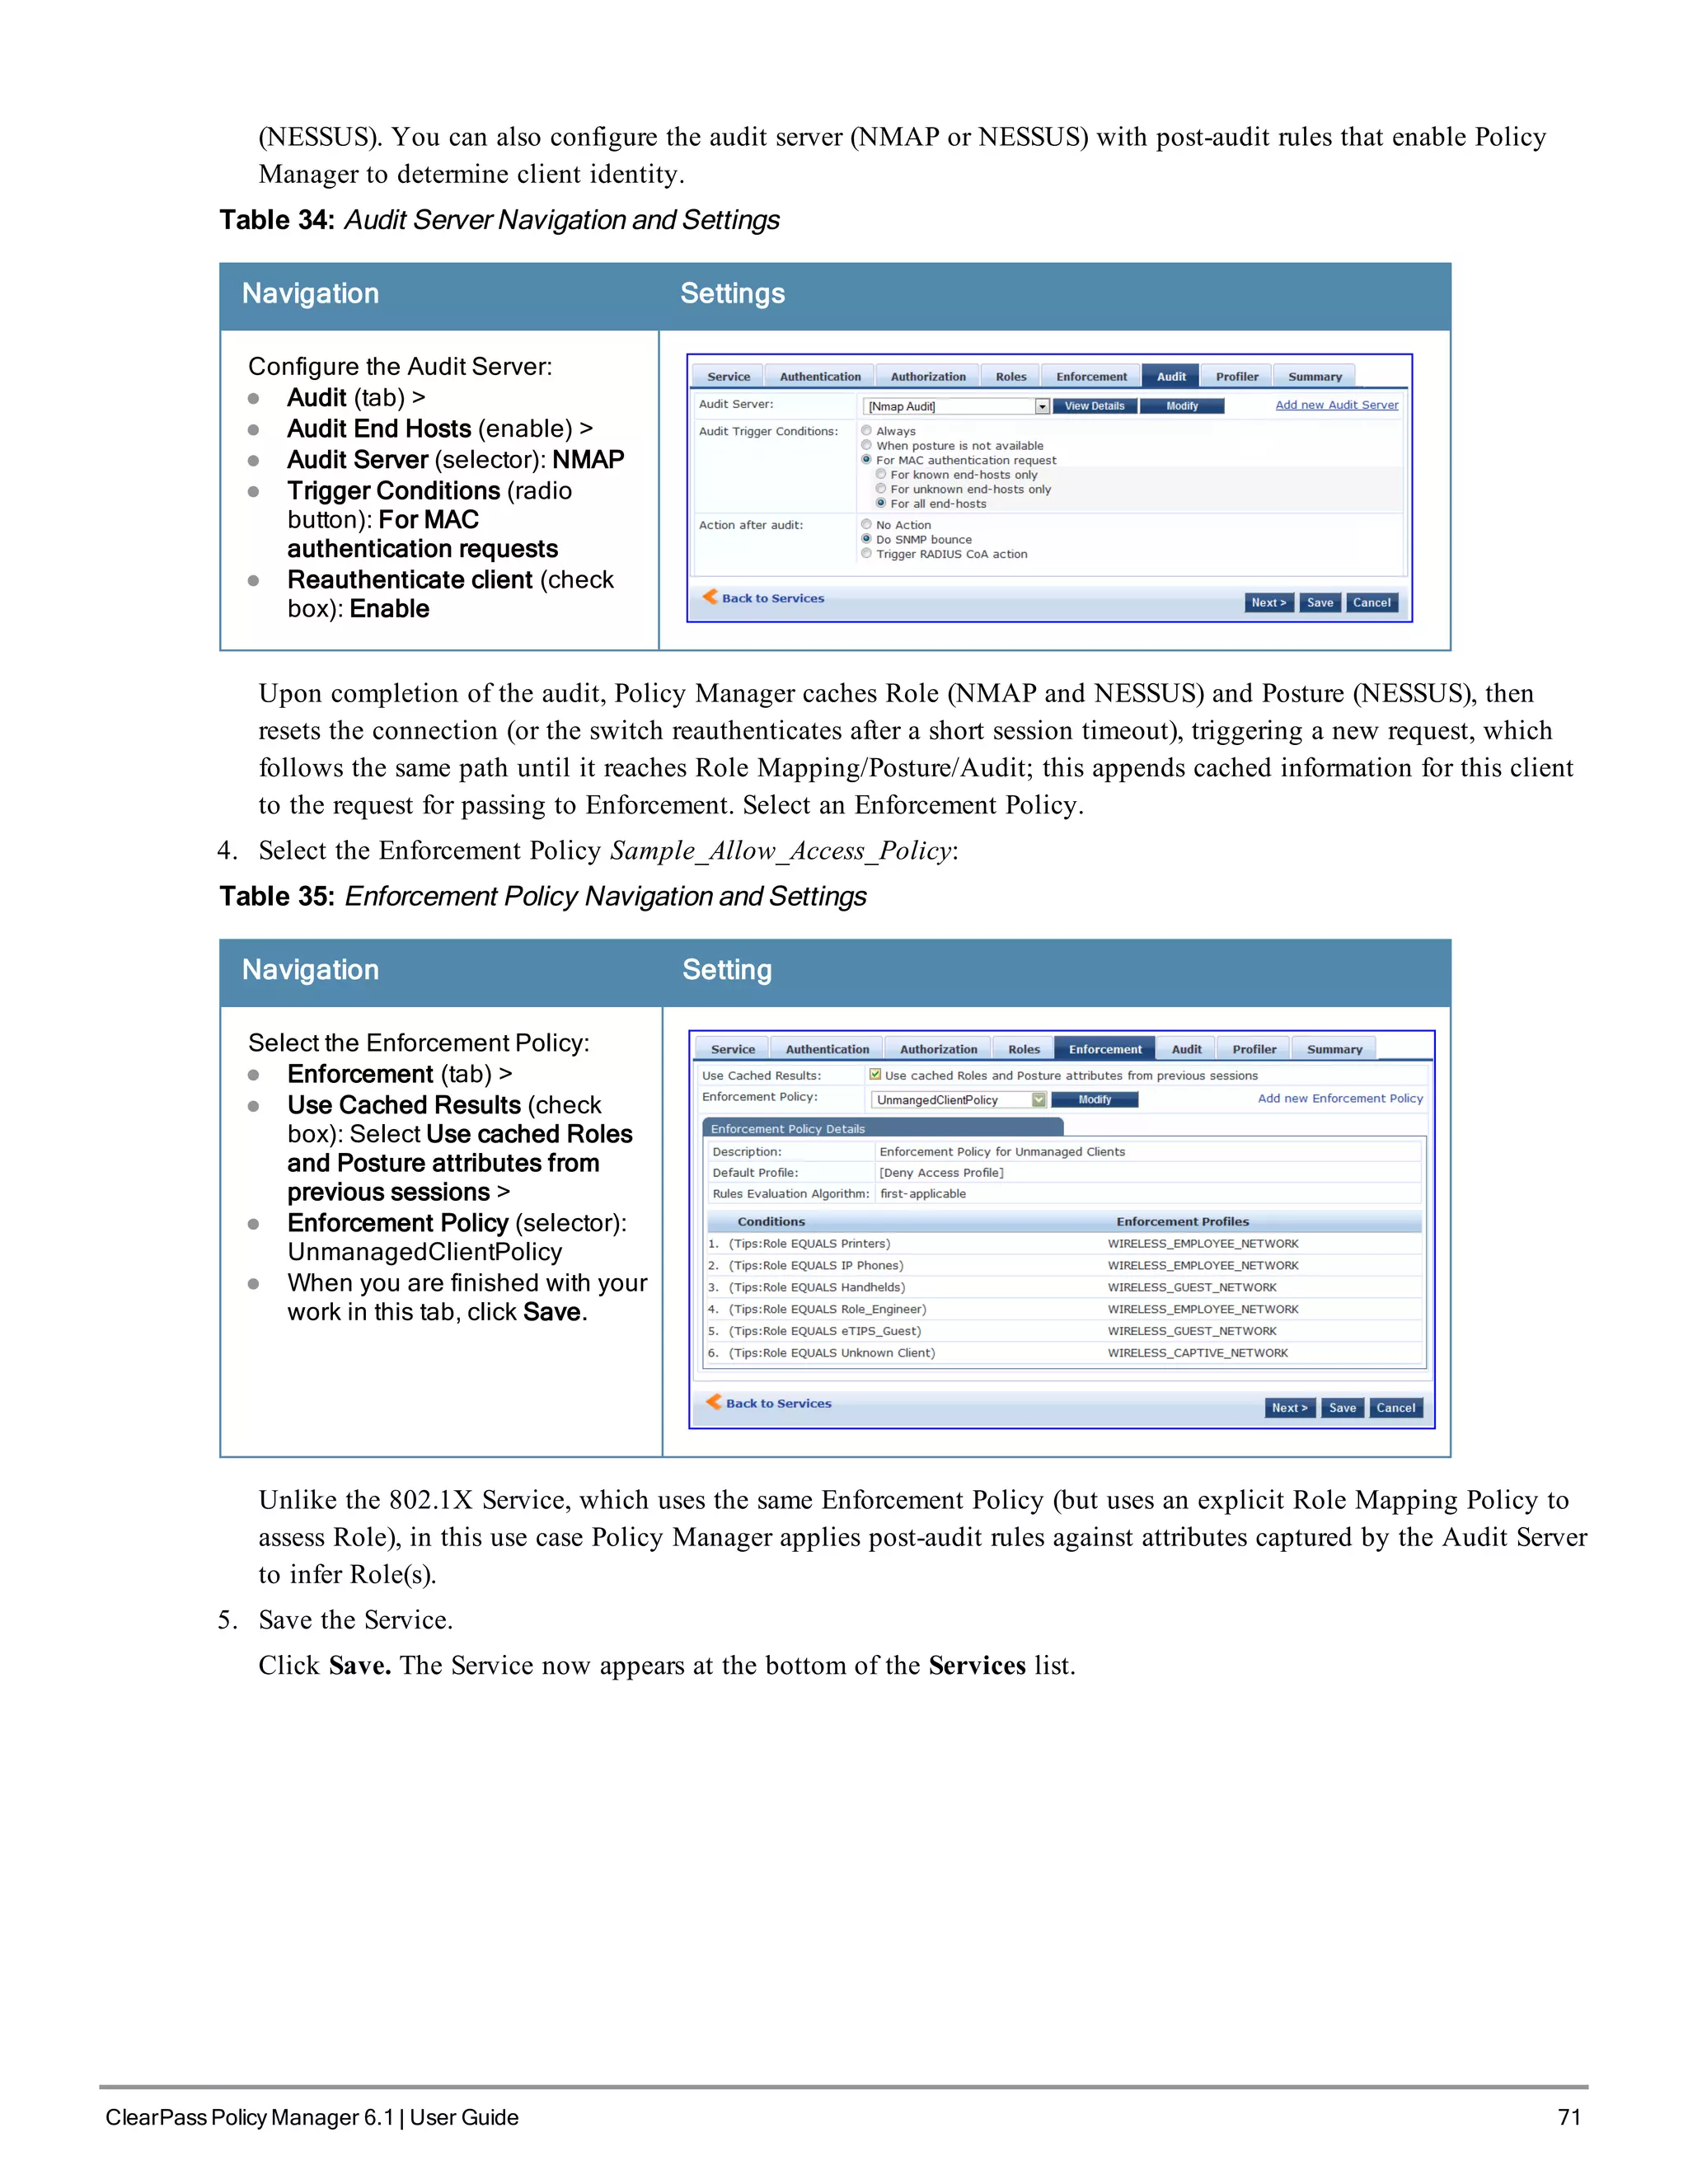
3. Configure an Audit Server.
This step is optional if no Role Mapping Policy is provided, or if you want to establish health or roles using an
audit. An audit server determines health by performing a detailed system and health vulnerability analysis](https://image.slidesharecdn.com/arubacppm61userguide-140926121722-phpapp01/75/Aruba-cppm-6_1_user_guide-70-2048.jpg)

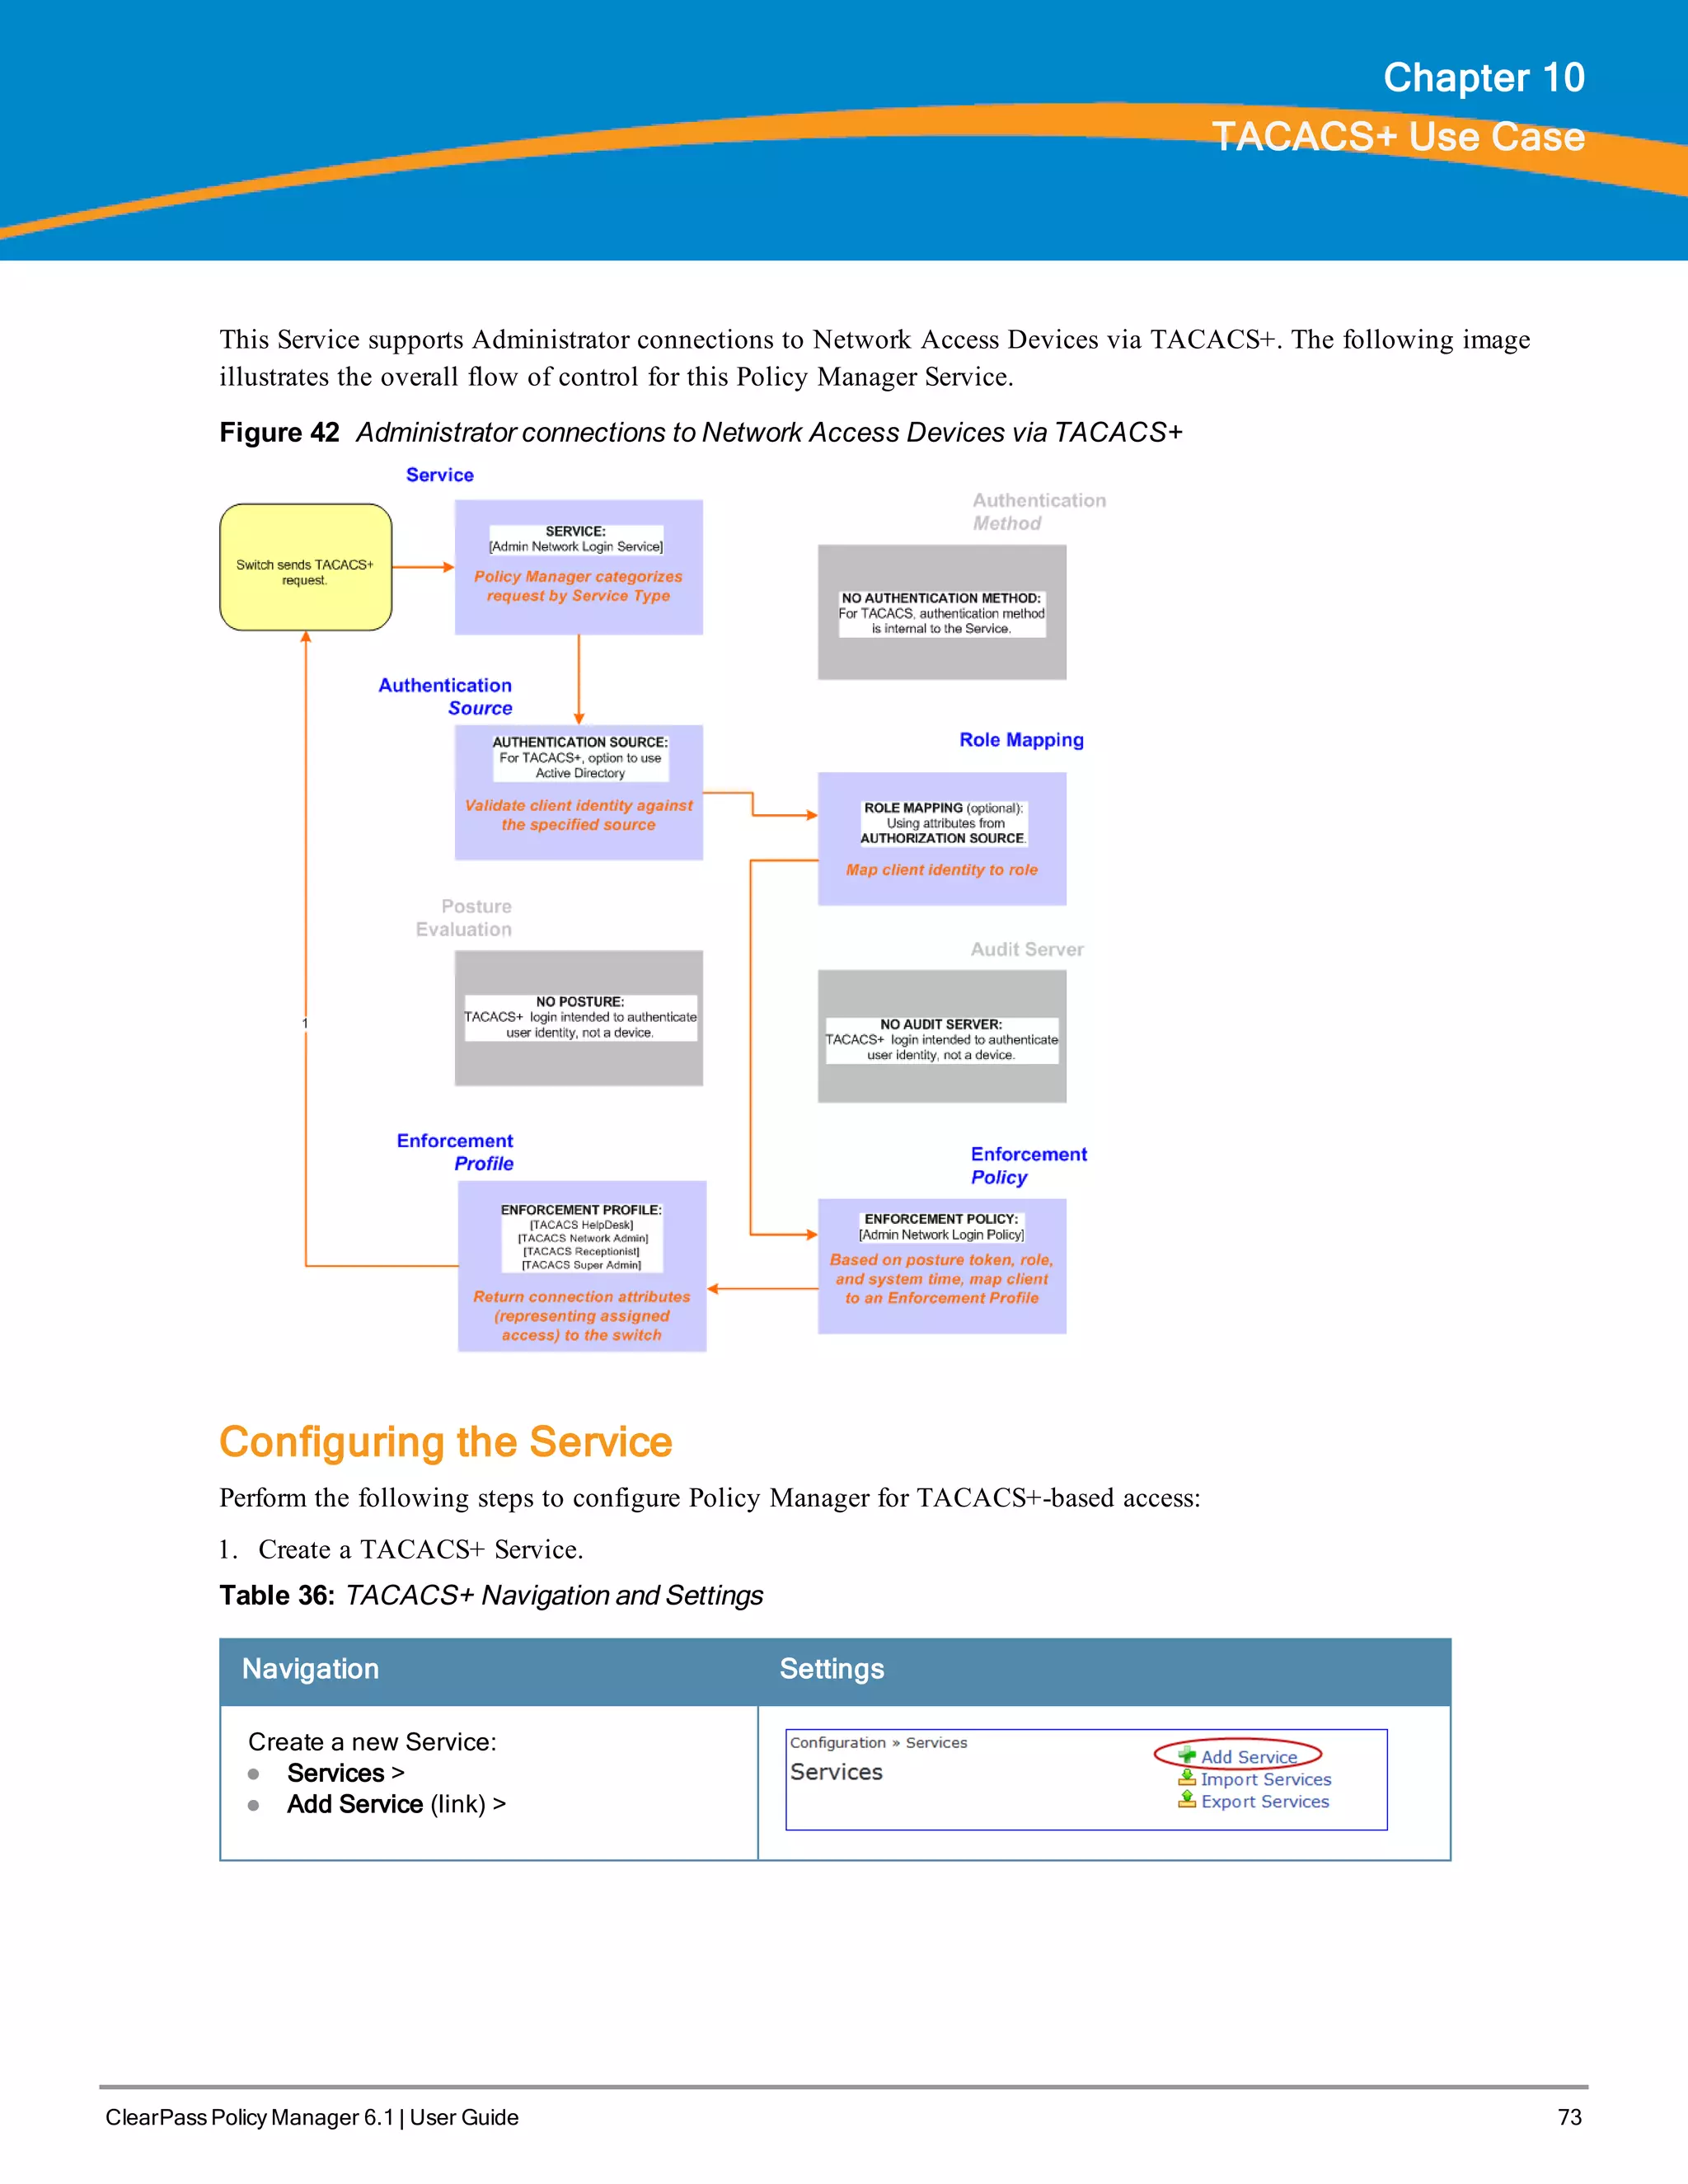
![74 ClearPass Policy Manager 6.1 | User Guide
Navigation Settings
Name the Service and select a pre-
configured Service Type:
l Service (tab) >
l Type (selector): [Policy Manager Admin
Network Login Service] >
l Name/Description (freeform) >
l Upon completion, click Next (to
Authentication)
2. Set up the Authentication
a. Method: The Policy Manager TACACS+ service authenticates TACACS+ requests internally.
b. Source: For purposes of this use case, Network Access Devices authentication data will be stored in the Active
Directory.
Table 37: Active Directory Navigation and Settings
Navigation Settings
Select an Active Directory server (that you have
already configured in Policy Manager):
l Authentication (tab) >
l Add >
l Sources (Select drop-down list): AD (Active
Directory) >
l Add >
l Upon completion, click Next (to Enforcement
Policy)
3. Select an Enforcement Policy.
Select the Enforcement Policy [Admin Network Login Policy] that distinguishes the two allowed roles (Net
Admin Limited and Device SuperAdmin.
Table 38: Enforcement Policy Navigation and Settings
Navigation Setting
Select the Enforcement Policy:
l Enforcement (tab) >
l Enforcement Policy (selector):
Device Command
Authorization Policy
l When you are finished with
your work in this tab, click Save.
4. Save the Service.
Click Save. The Service now appears at the bottom of the Services list.](https://image.slidesharecdn.com/arubacppm61userguide-140926121722-phpapp01/75/Aruba-cppm-6_1_user_guide-74-2048.jpg)


![86 ClearPass Policy Manager 6.1 | User Guide
Service Type Description
The default Authentication method used for this type of service is [MAC AUTH], which is
a special type of method called MAC-AUTH. When this authentication method is
selected, Policy Manager does stricter checking of the MAC Address of the client. This
type of service can use either a built-in static host list (refer to "Adding and Modifying
Static Host Lists " on page 167), or any other authentication source for the purpose of
white-listing or black-listing the client. You can also specify the role mapping policy,
based on categorization of the MAC addresses in the authorization sources.
NOTE: You cannot configure Posture for this type of service.
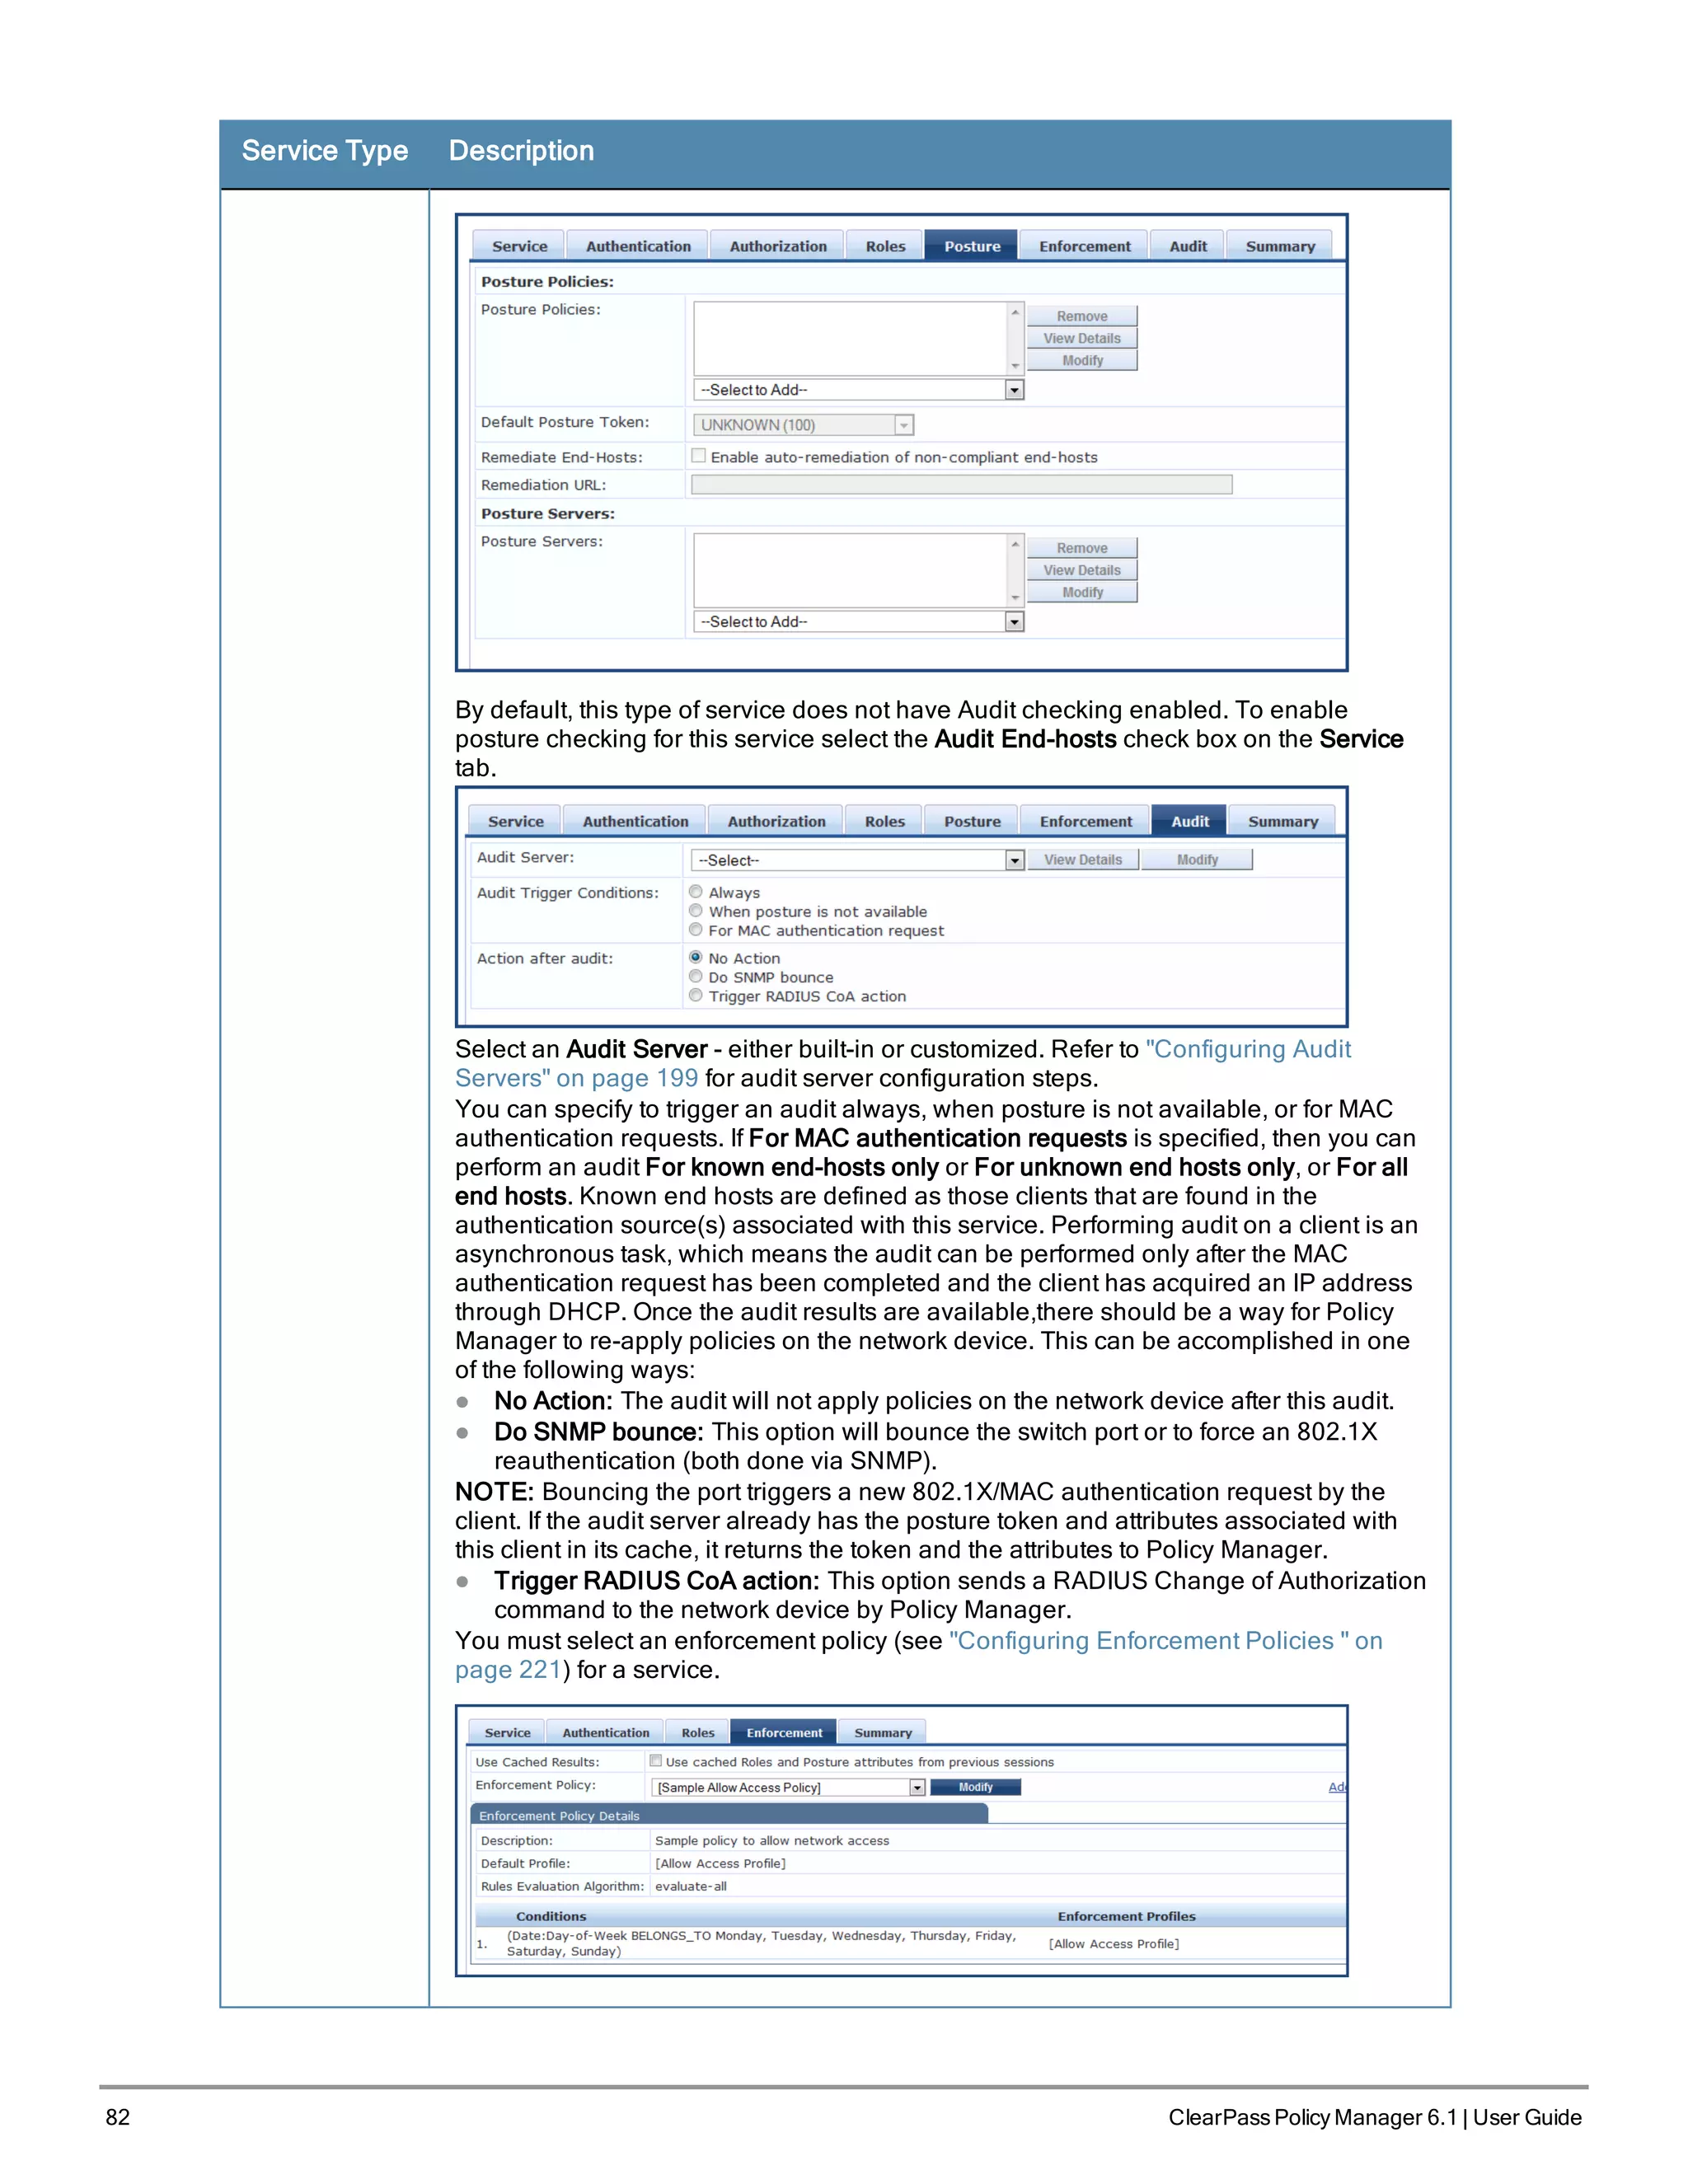
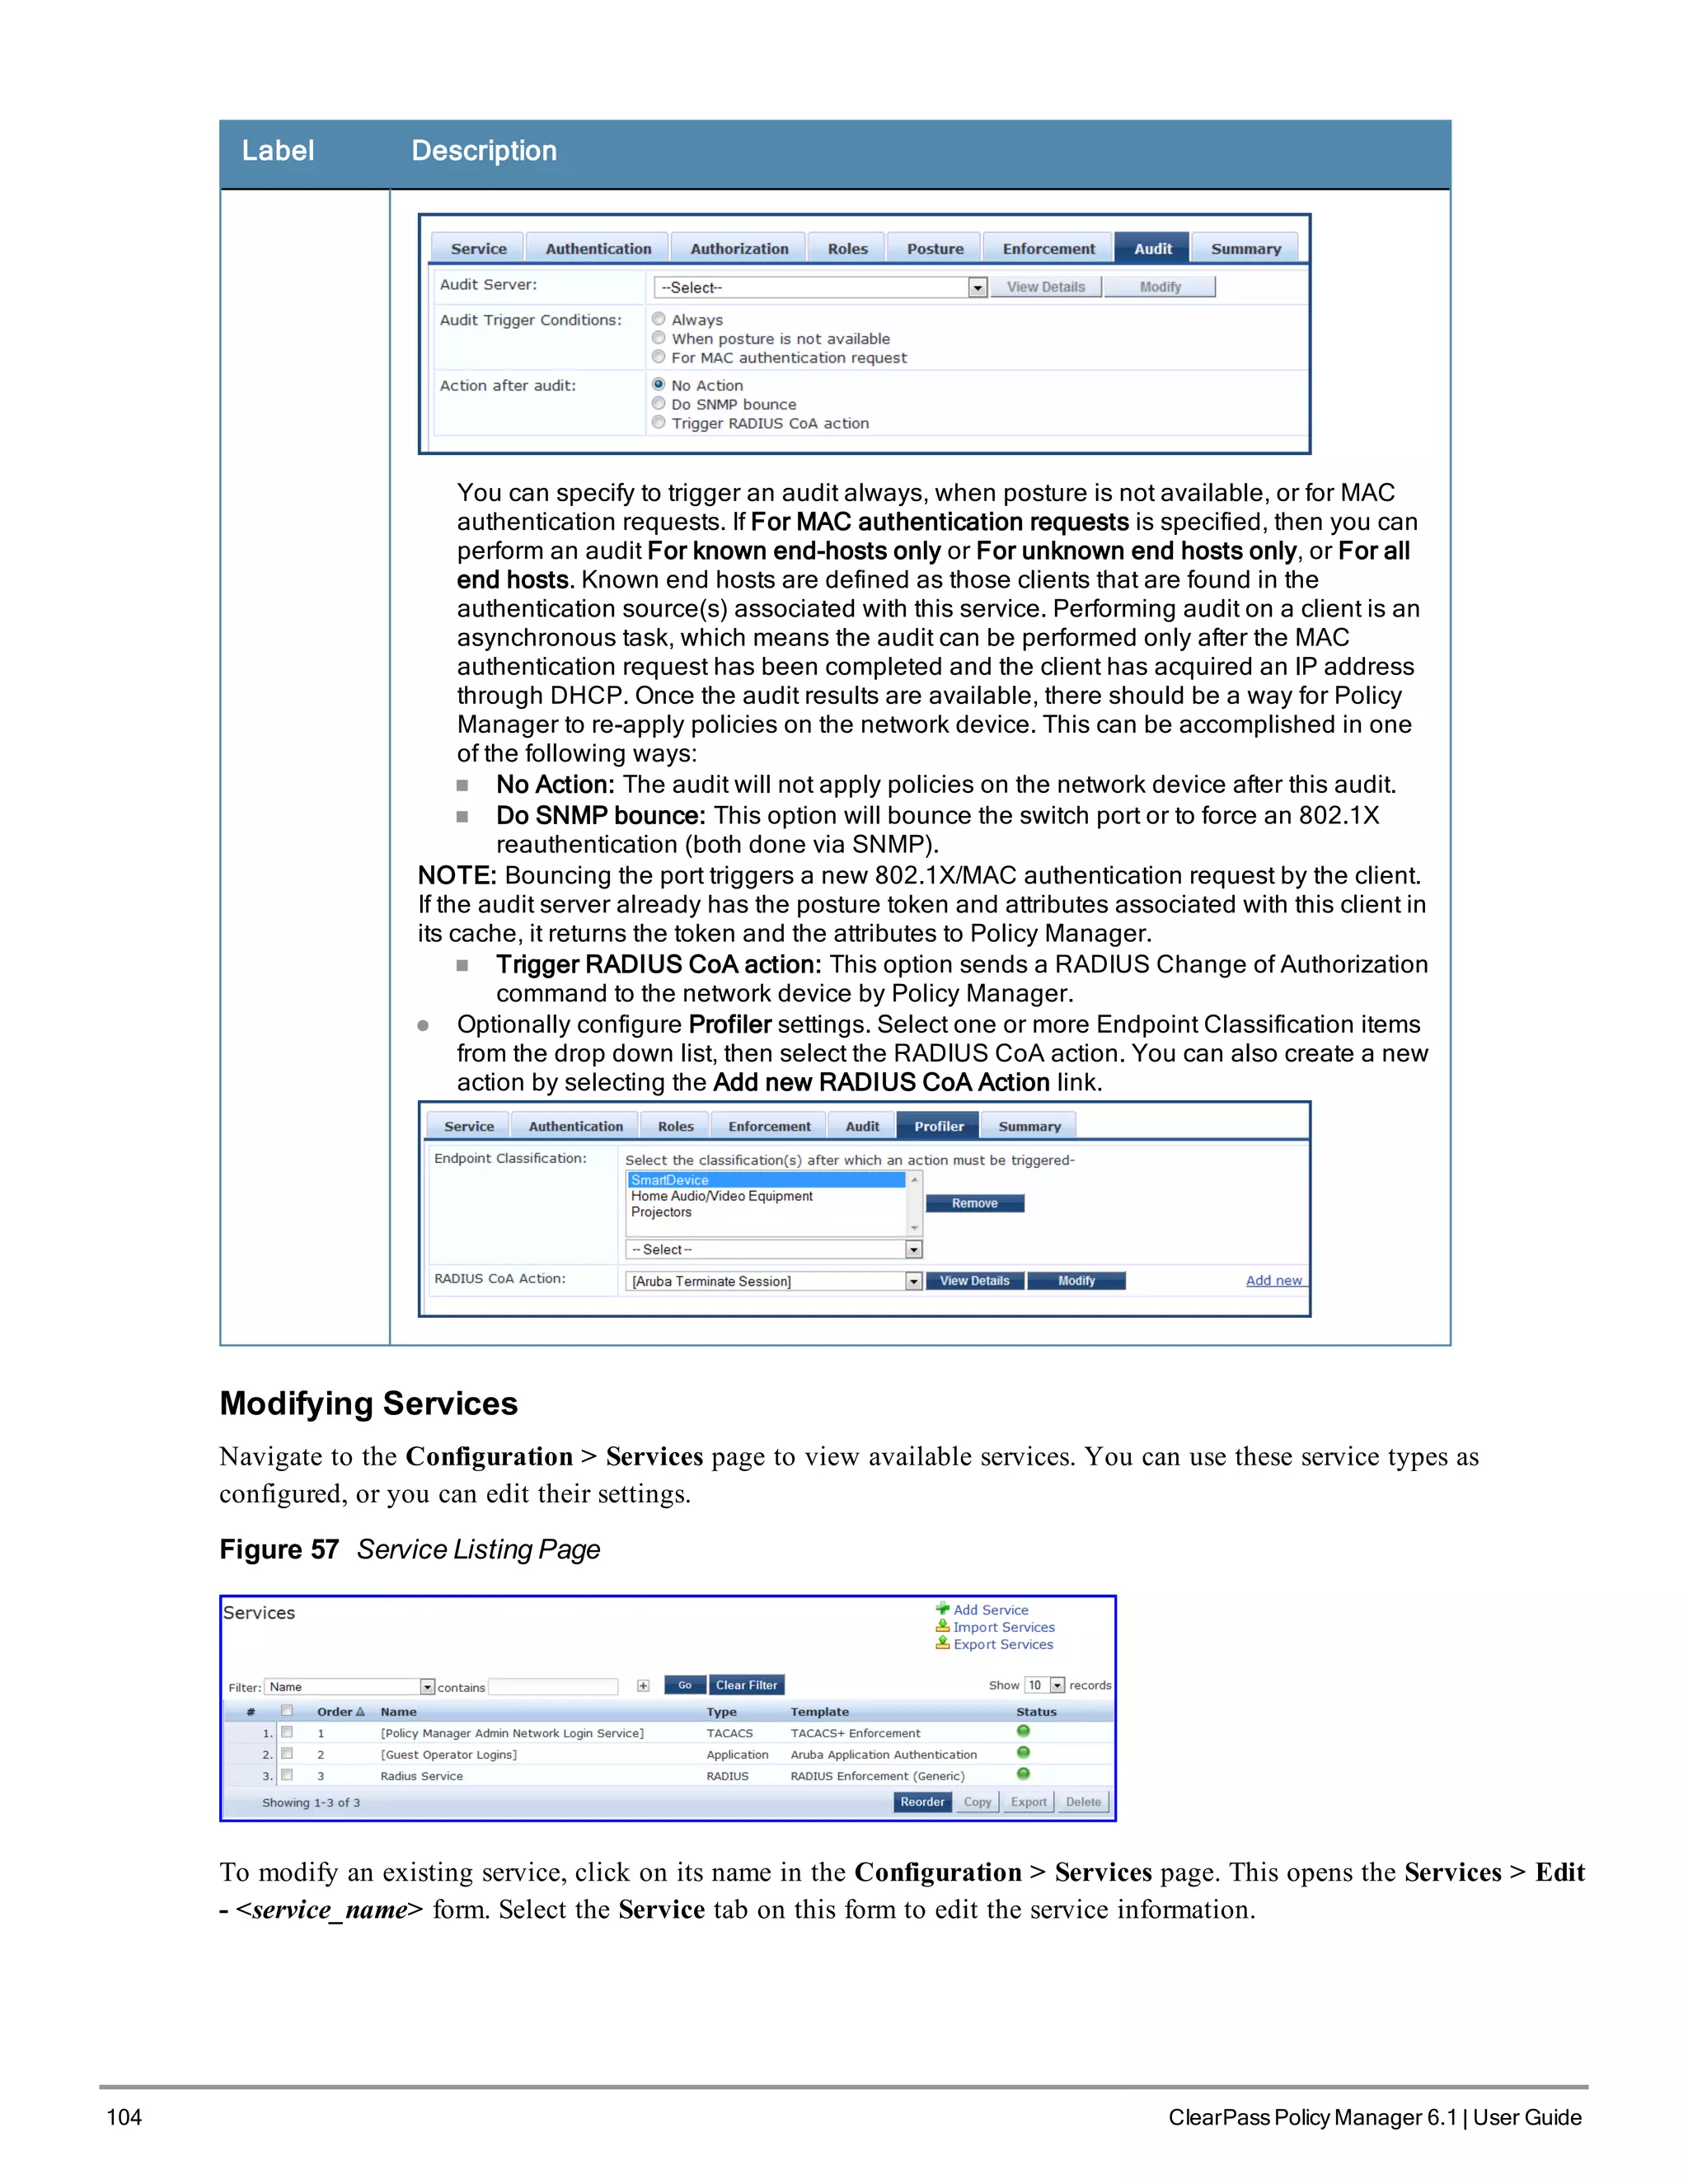
Audit can optionally be enabled for this type of service by checking the Audit End-hosts
check box on the Service tab.
You can perform audit For known end-hosts only or For unknown end hosts only or For
all end hosts. Known end hosts are defined as those clients that are found in the
authentication source(s) associated with this service. Performing audit on a client is an
asynchronous task, which means the audit can be performed only after the MAC
authentication request has been completed and the client has acquired an IP address
through DHCP. Once the audit results are available, there should be a way for Policy
Manager to re-apply policies on the network device. This can be accomplished in one
of the following ways:
l No Action: The audit will not apply policies on the network device after this audit.](https://image.slidesharecdn.com/arubacppm61userguide-140926121722-phpapp01/75/Aruba-cppm-6_1_user_guide-86-2048.jpg)
![88 ClearPass Policy Manager 6.1 | User Guide
Service Type Description
Web-based
Open Network
Access
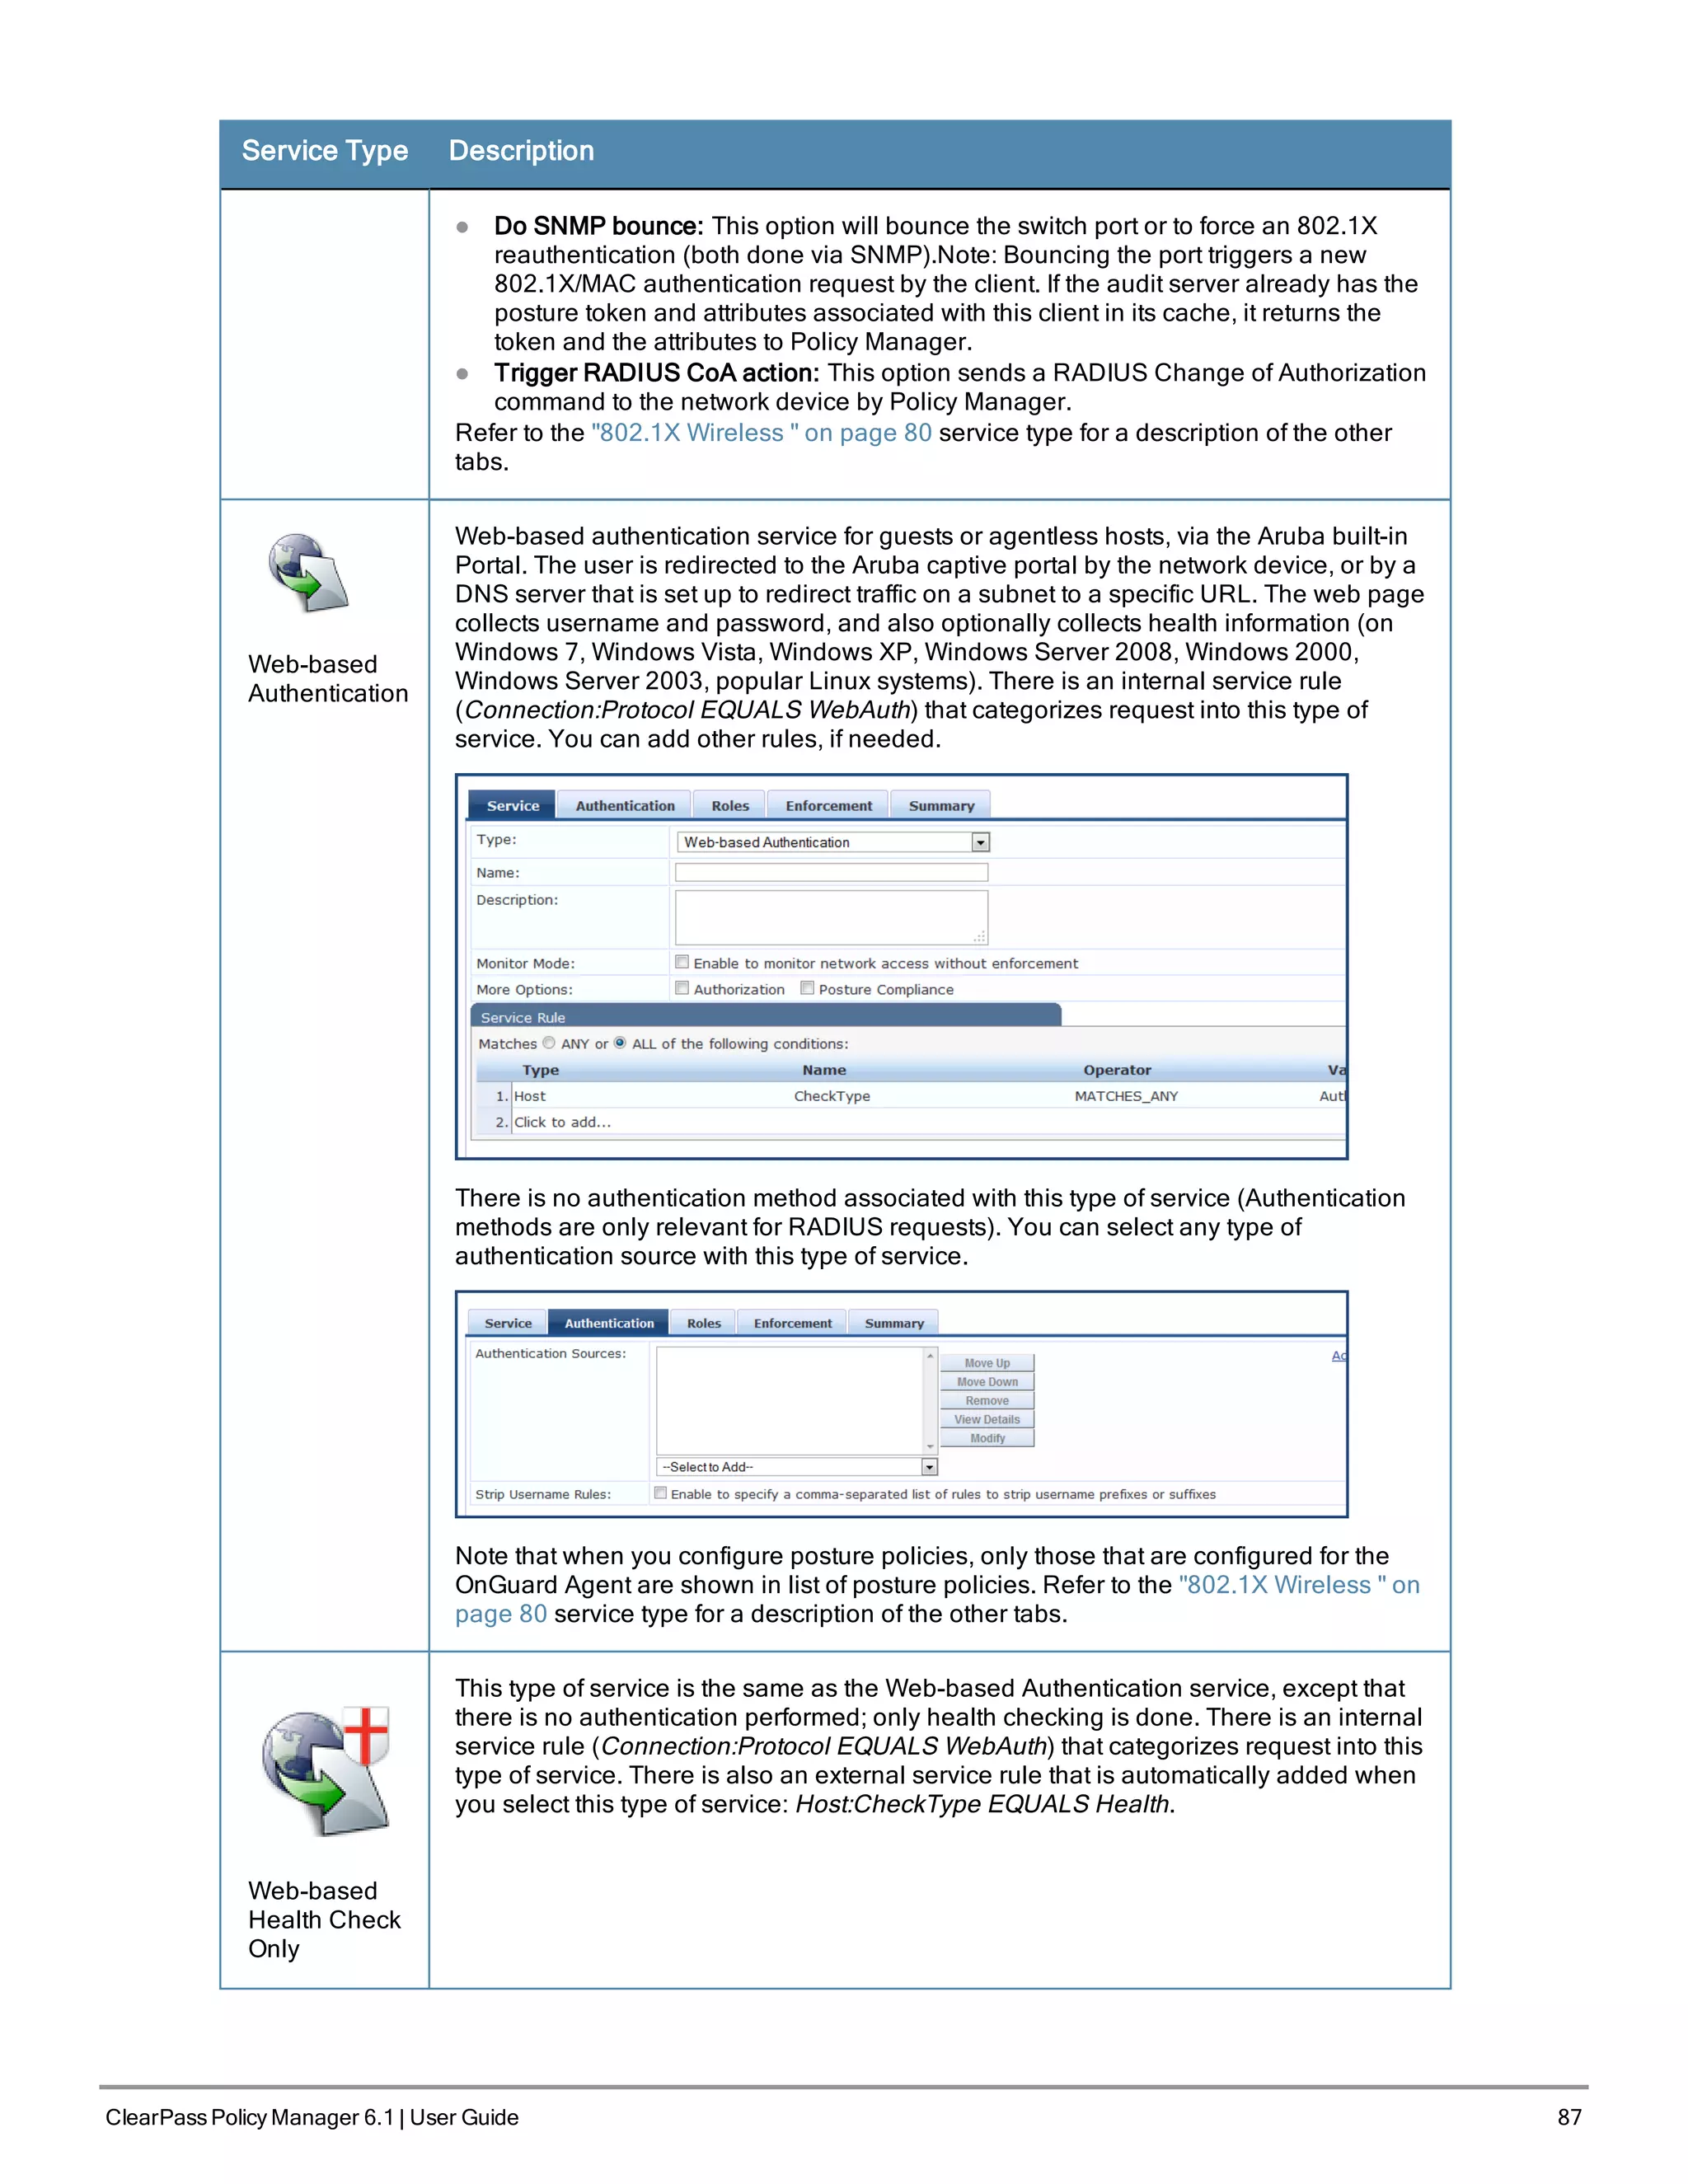
This type of service is similar to other Web-based services, except that authentication
and health checking are not performed on the endpoint. A Terms of Service page (as
configured on the Guest Portal page) is presented to the user. Network access is
granted when the user click on the submit action on the page.
802.1X
Wireless -
Identity Only
This type of service is the same as regular 802.1X Wireless Service, except that posture
and audit policies are not configurable when you use this template.
802.1X Wired -
Identity Only
This type of service is the same as regular 802.1X Wired Service, except that posture
and audit policies are not configurable when you use this template.
RADIUS
Enforcement
[Generic]
Template for any kind of RADIUS request. Rules can be added to handle RADIUS
requests that sends any type of standard or vendor-specific attributes.
NOTE: No default rule associated with this service type. Rules can be added to handle
any type of standard or vendor-specific RADIUS attributes (any attribute that is loaded
through the pre-packaged vendor-specific or standard RADIUS dictionaries, or through
other dictionaries imported into Policy Manager).
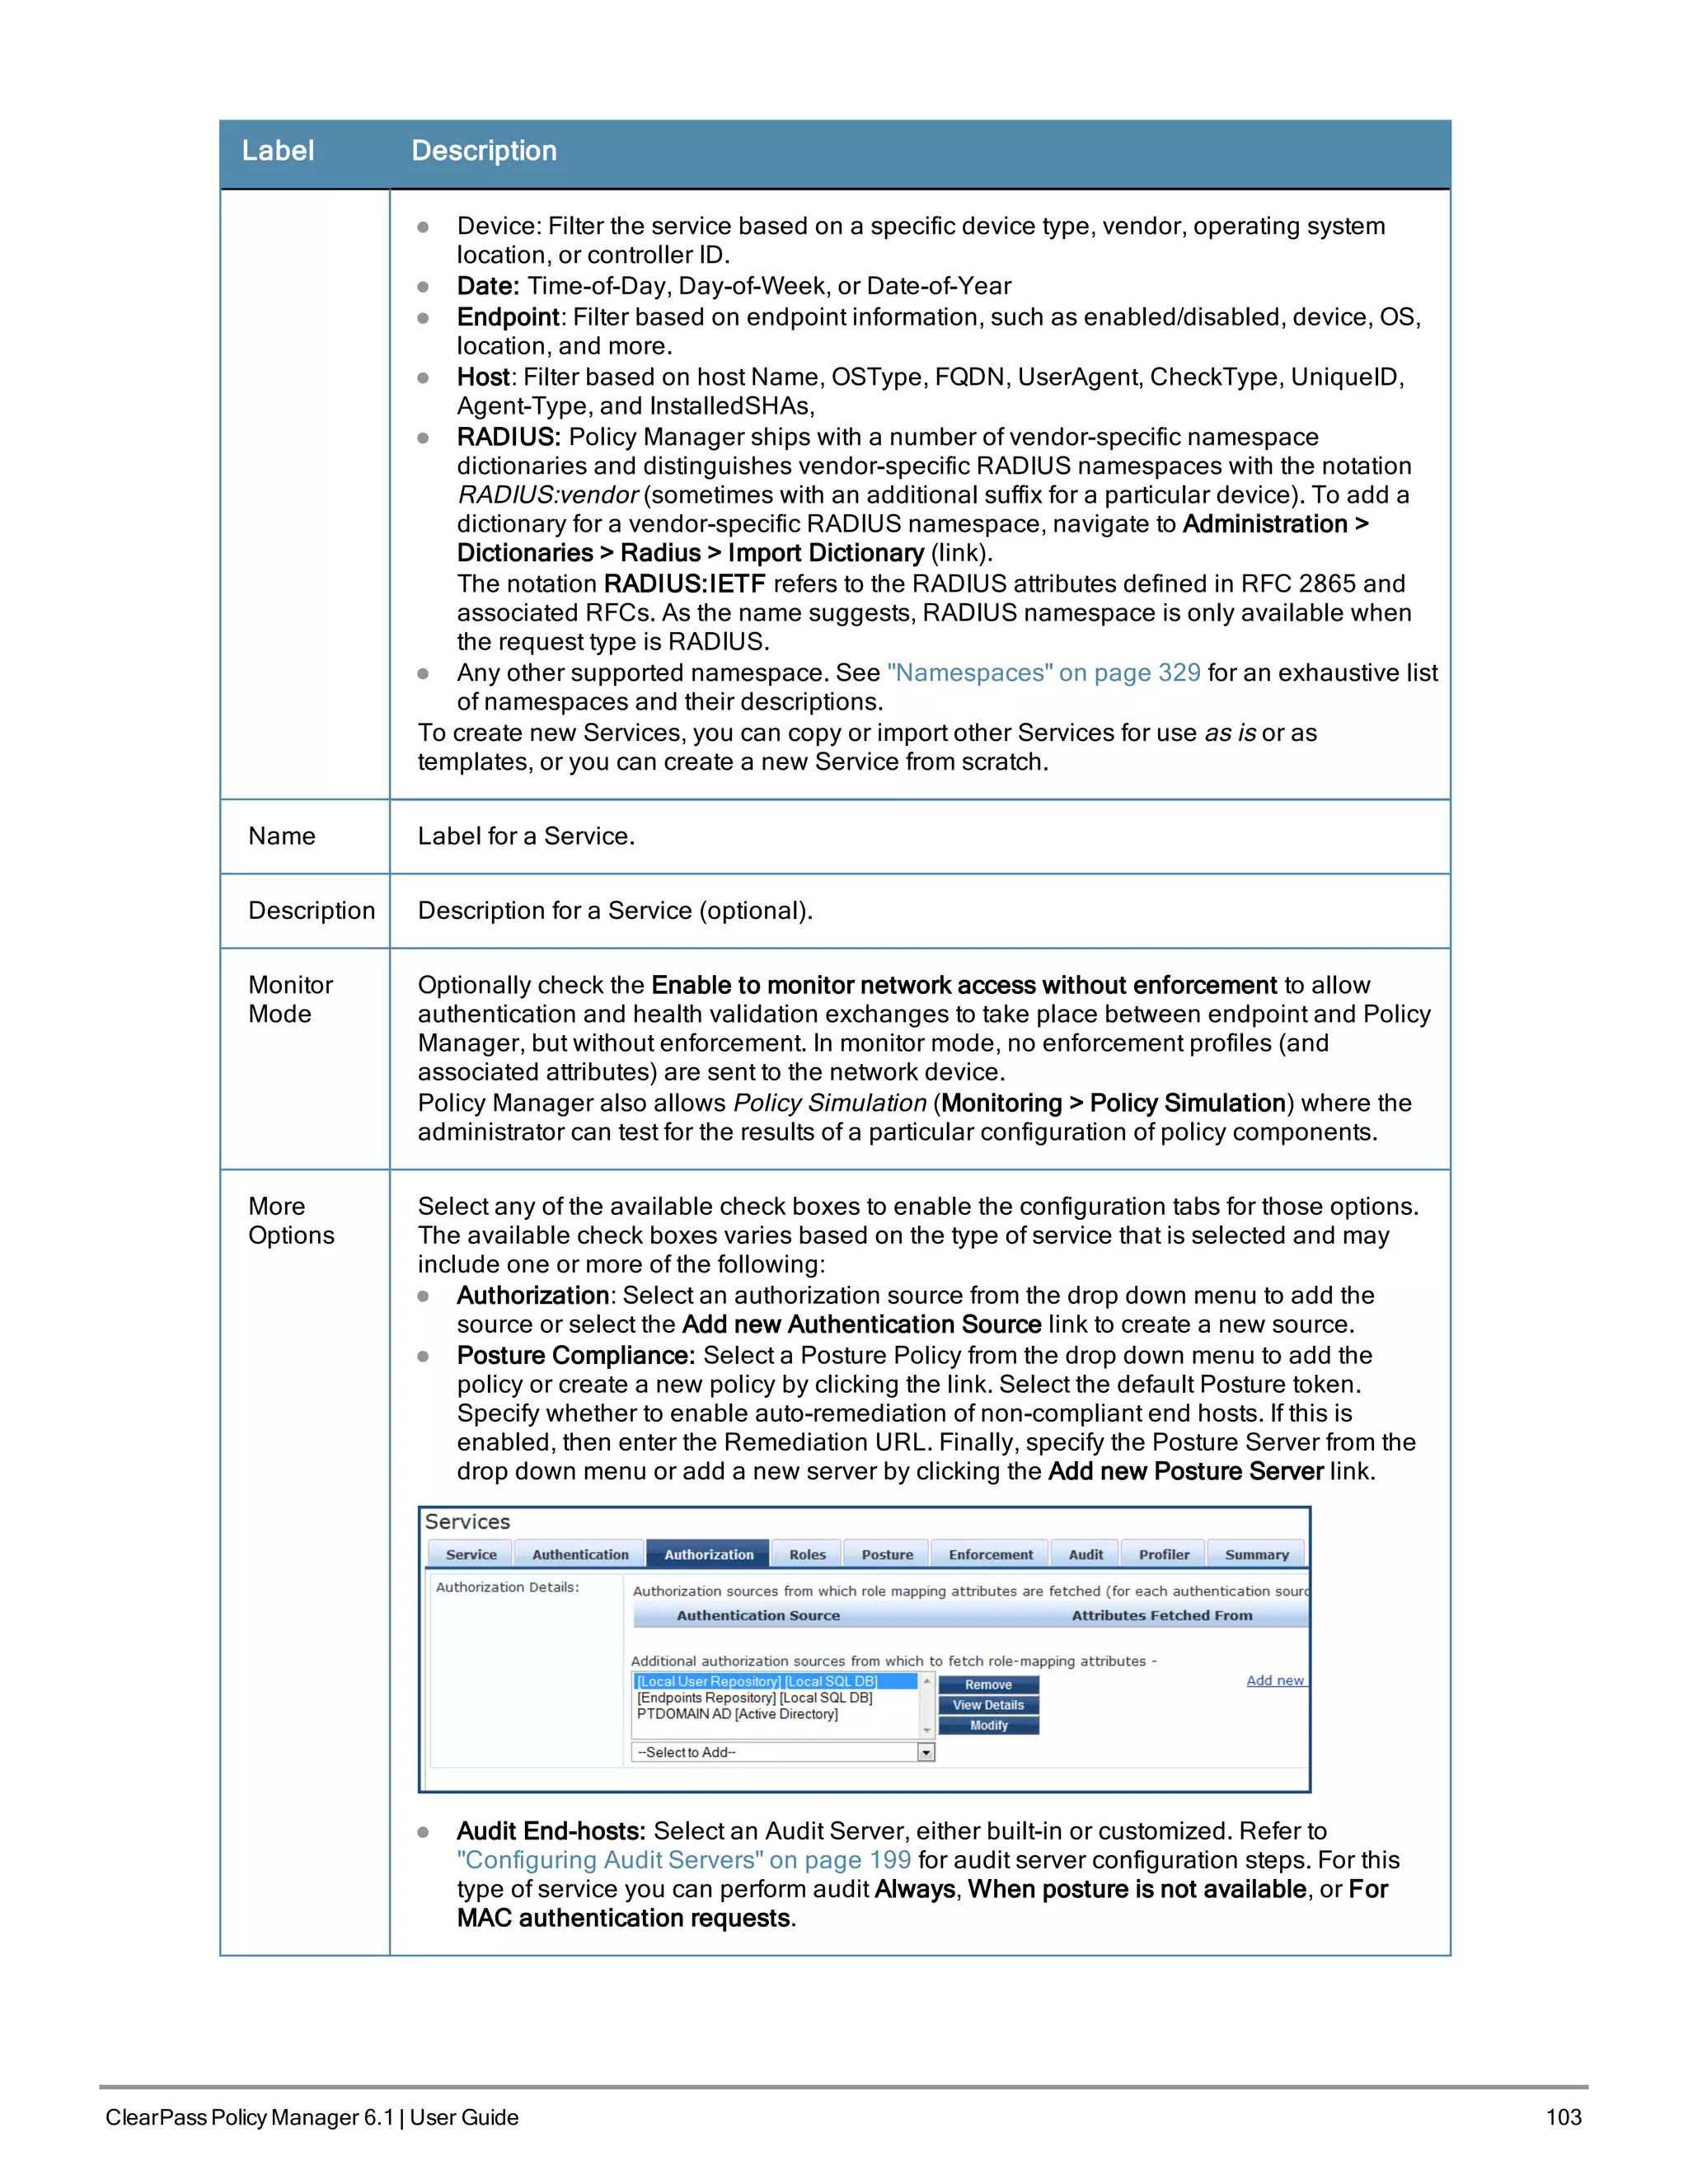
You can click on the Authorization, Posture Compliance, Audit End-hosts and Profile
Endpoints options to enable additional tabs. Refer to the "802.1X Wireless " on page 80
service type for a description of the other tabs.
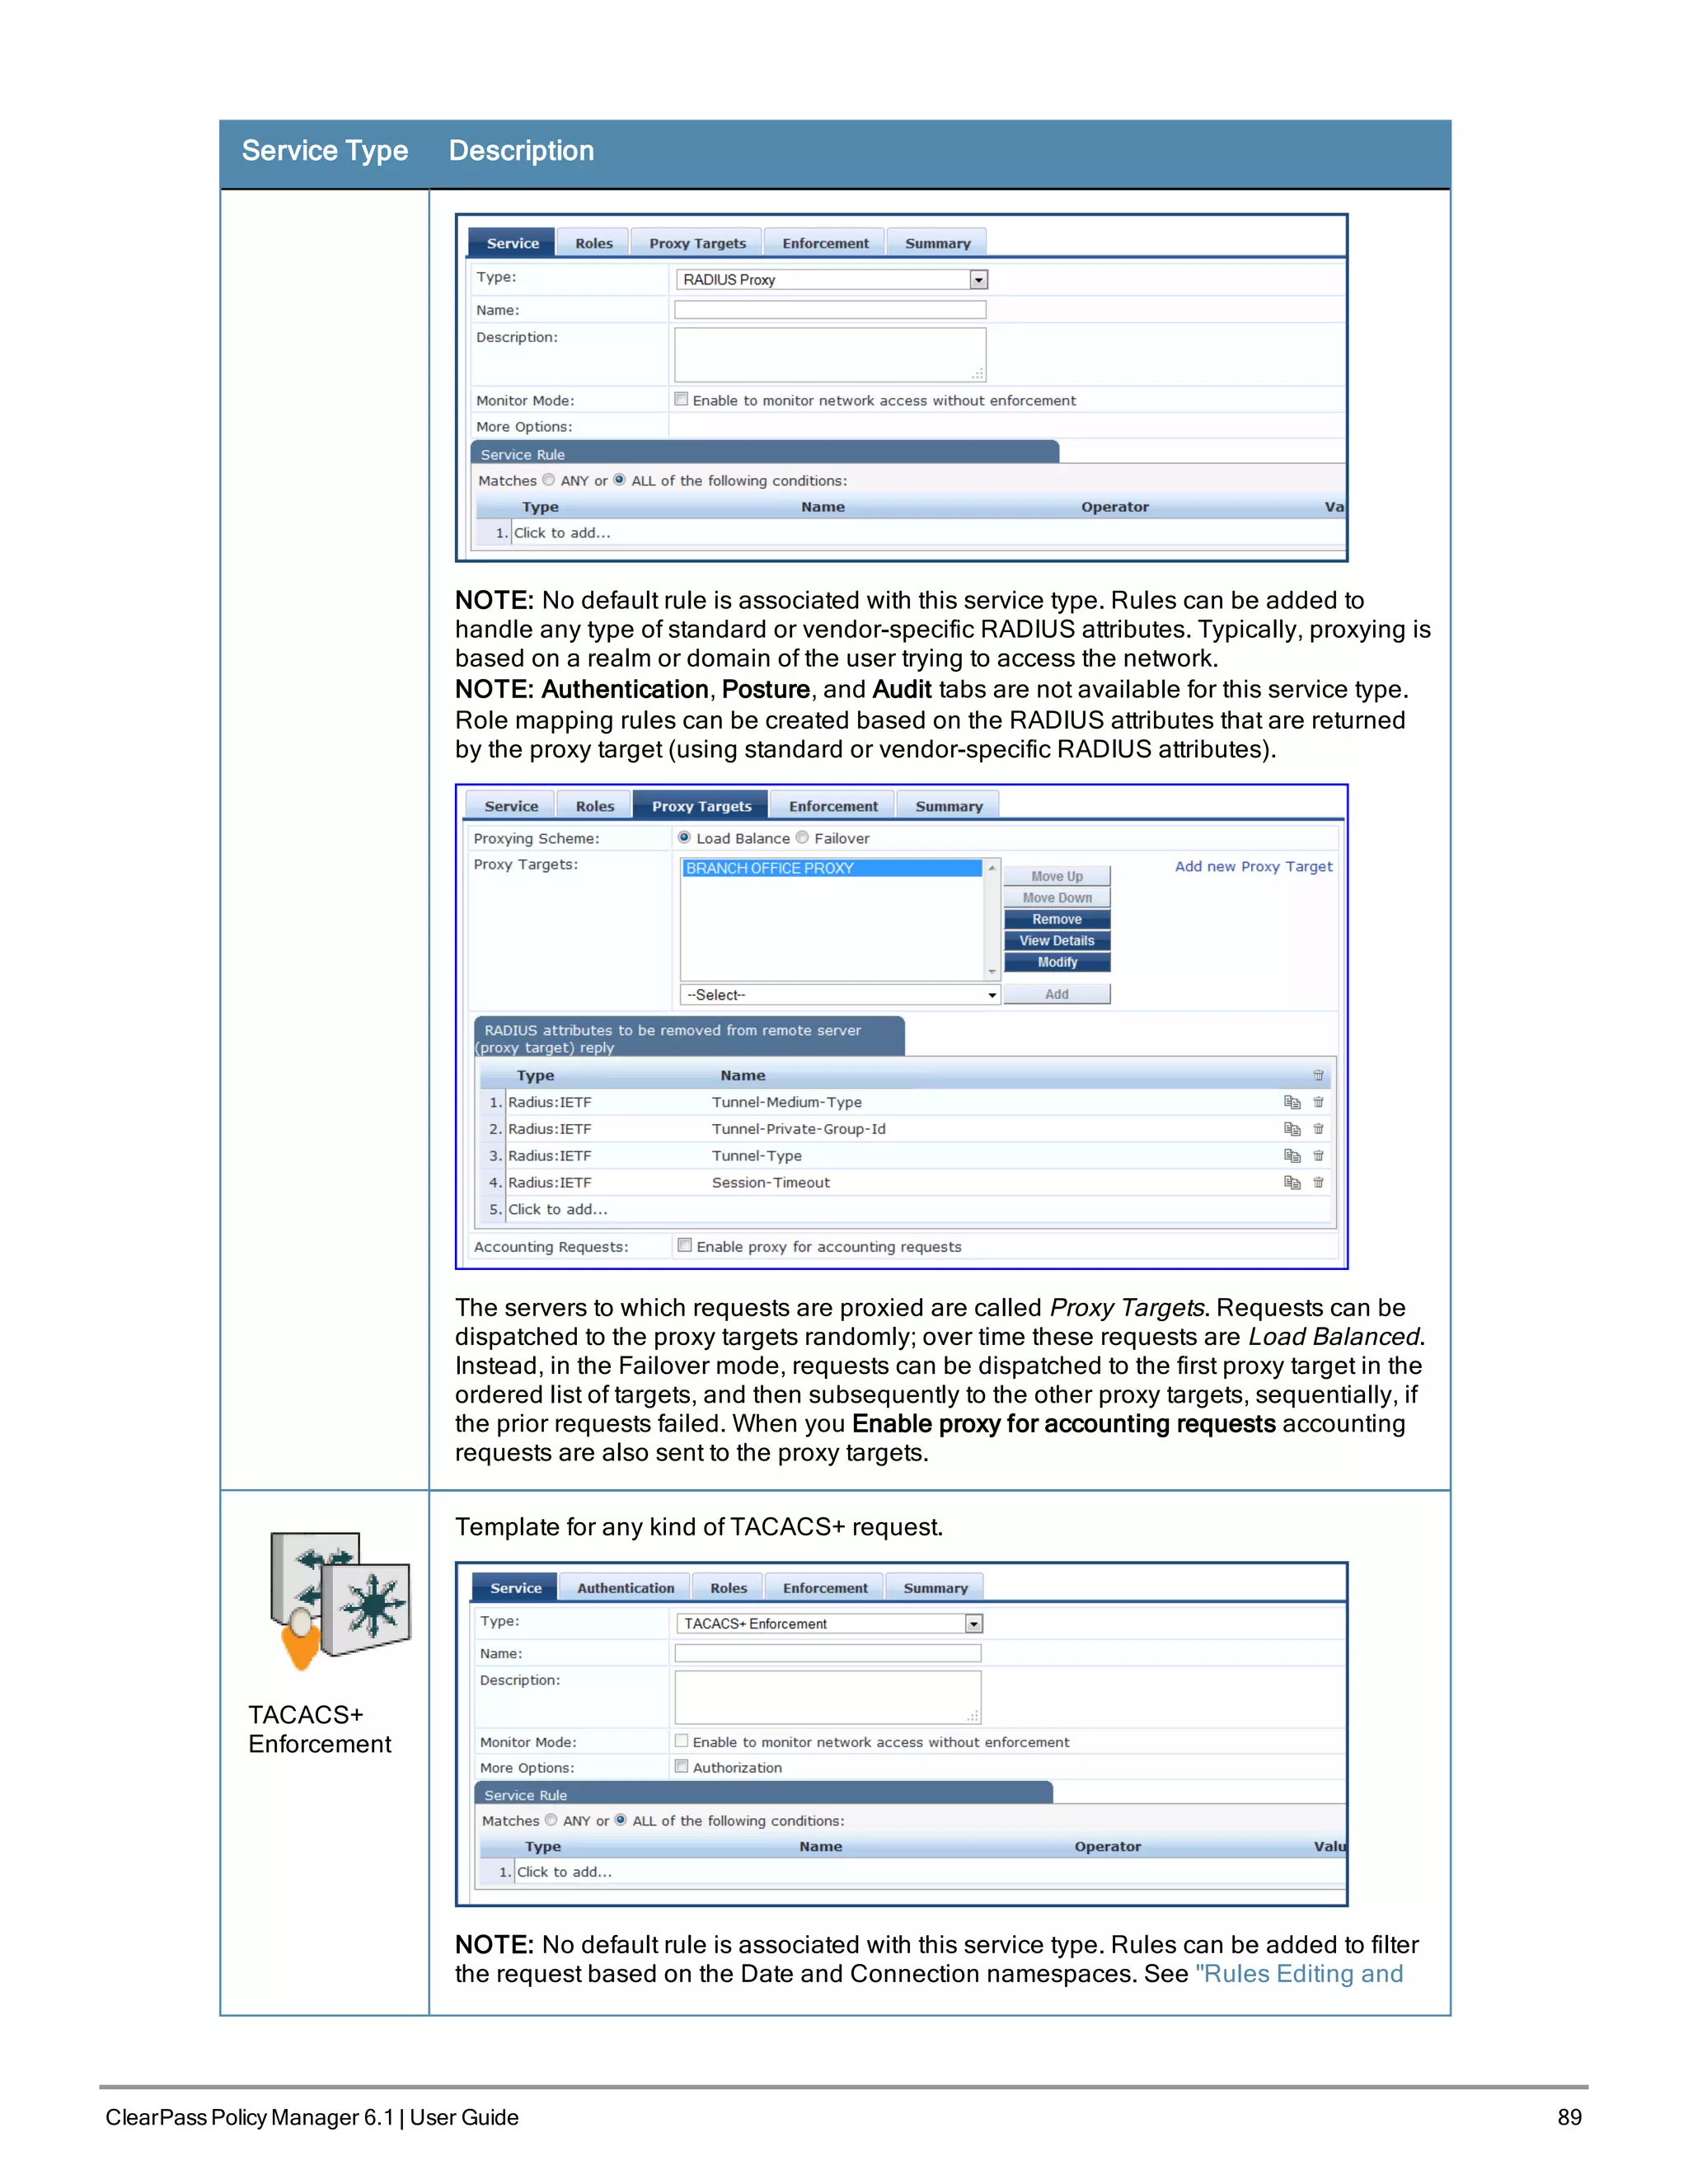
RADIUS Proxy
Template for any kind of RADIUS request that needs to be proxied to another RADIUS
server (a Proxy Target).](https://image.slidesharecdn.com/arubacppm61userguide-140926121722-phpapp01/75/Aruba-cppm-6_1_user_guide-88-2048.jpg)
![Service Type Description
By default, this service uses the Authentication Method [PAP] [PAP]
You can click on the Authorization and Audit End-hosts options to enable additional
tabs. Refer to the "802.1X Wireless " on page 80 service type for a description of these
tabs.
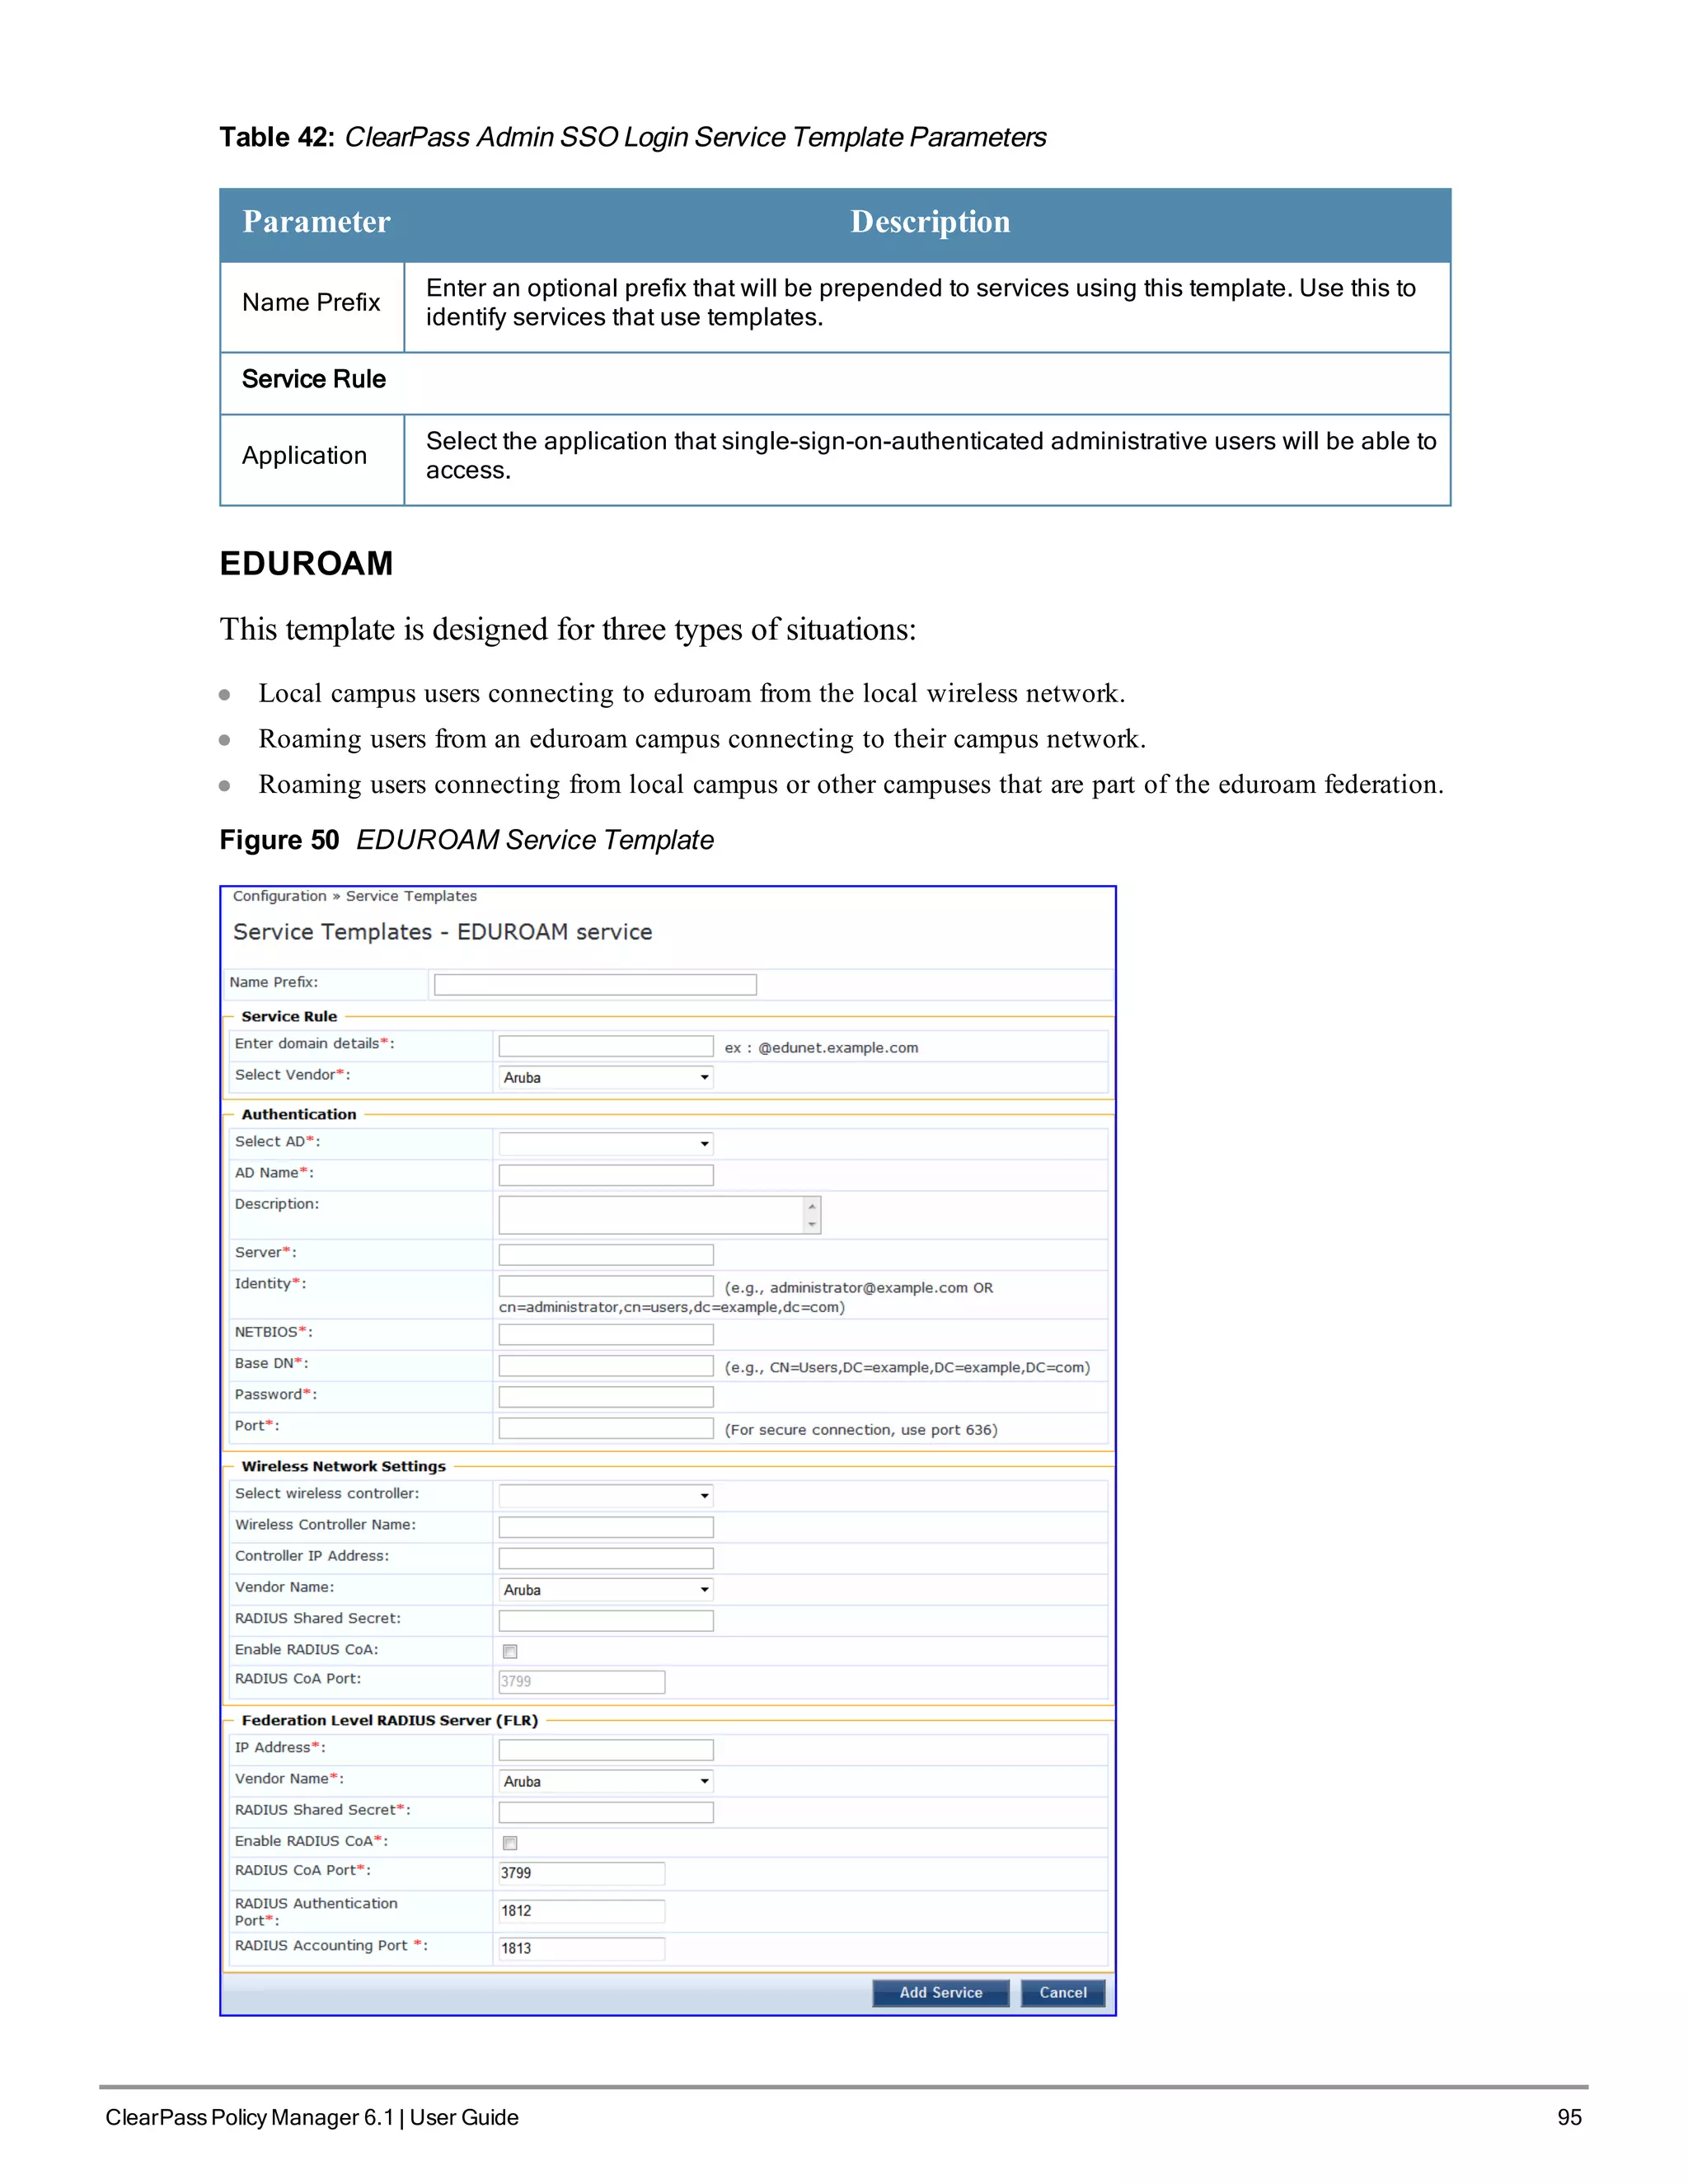
Service Templates
ClearPass Policy Manager Provides the ability to create templates for services where you can define baseline policies
and require specific data when you create services. Service templates are for creating services and other components
such as role-mapping policies, enforcement policies, and network devices with a fill in the blanks approach. You fill in
various fields and Policy Manager creates all the different configuration elements that are needed for the service.These
various configuration elements are added back to the service when it is created.
The services templates include
l 802.1X Wired, 802.1X Wireless, and Aruba 802.1X Wireless
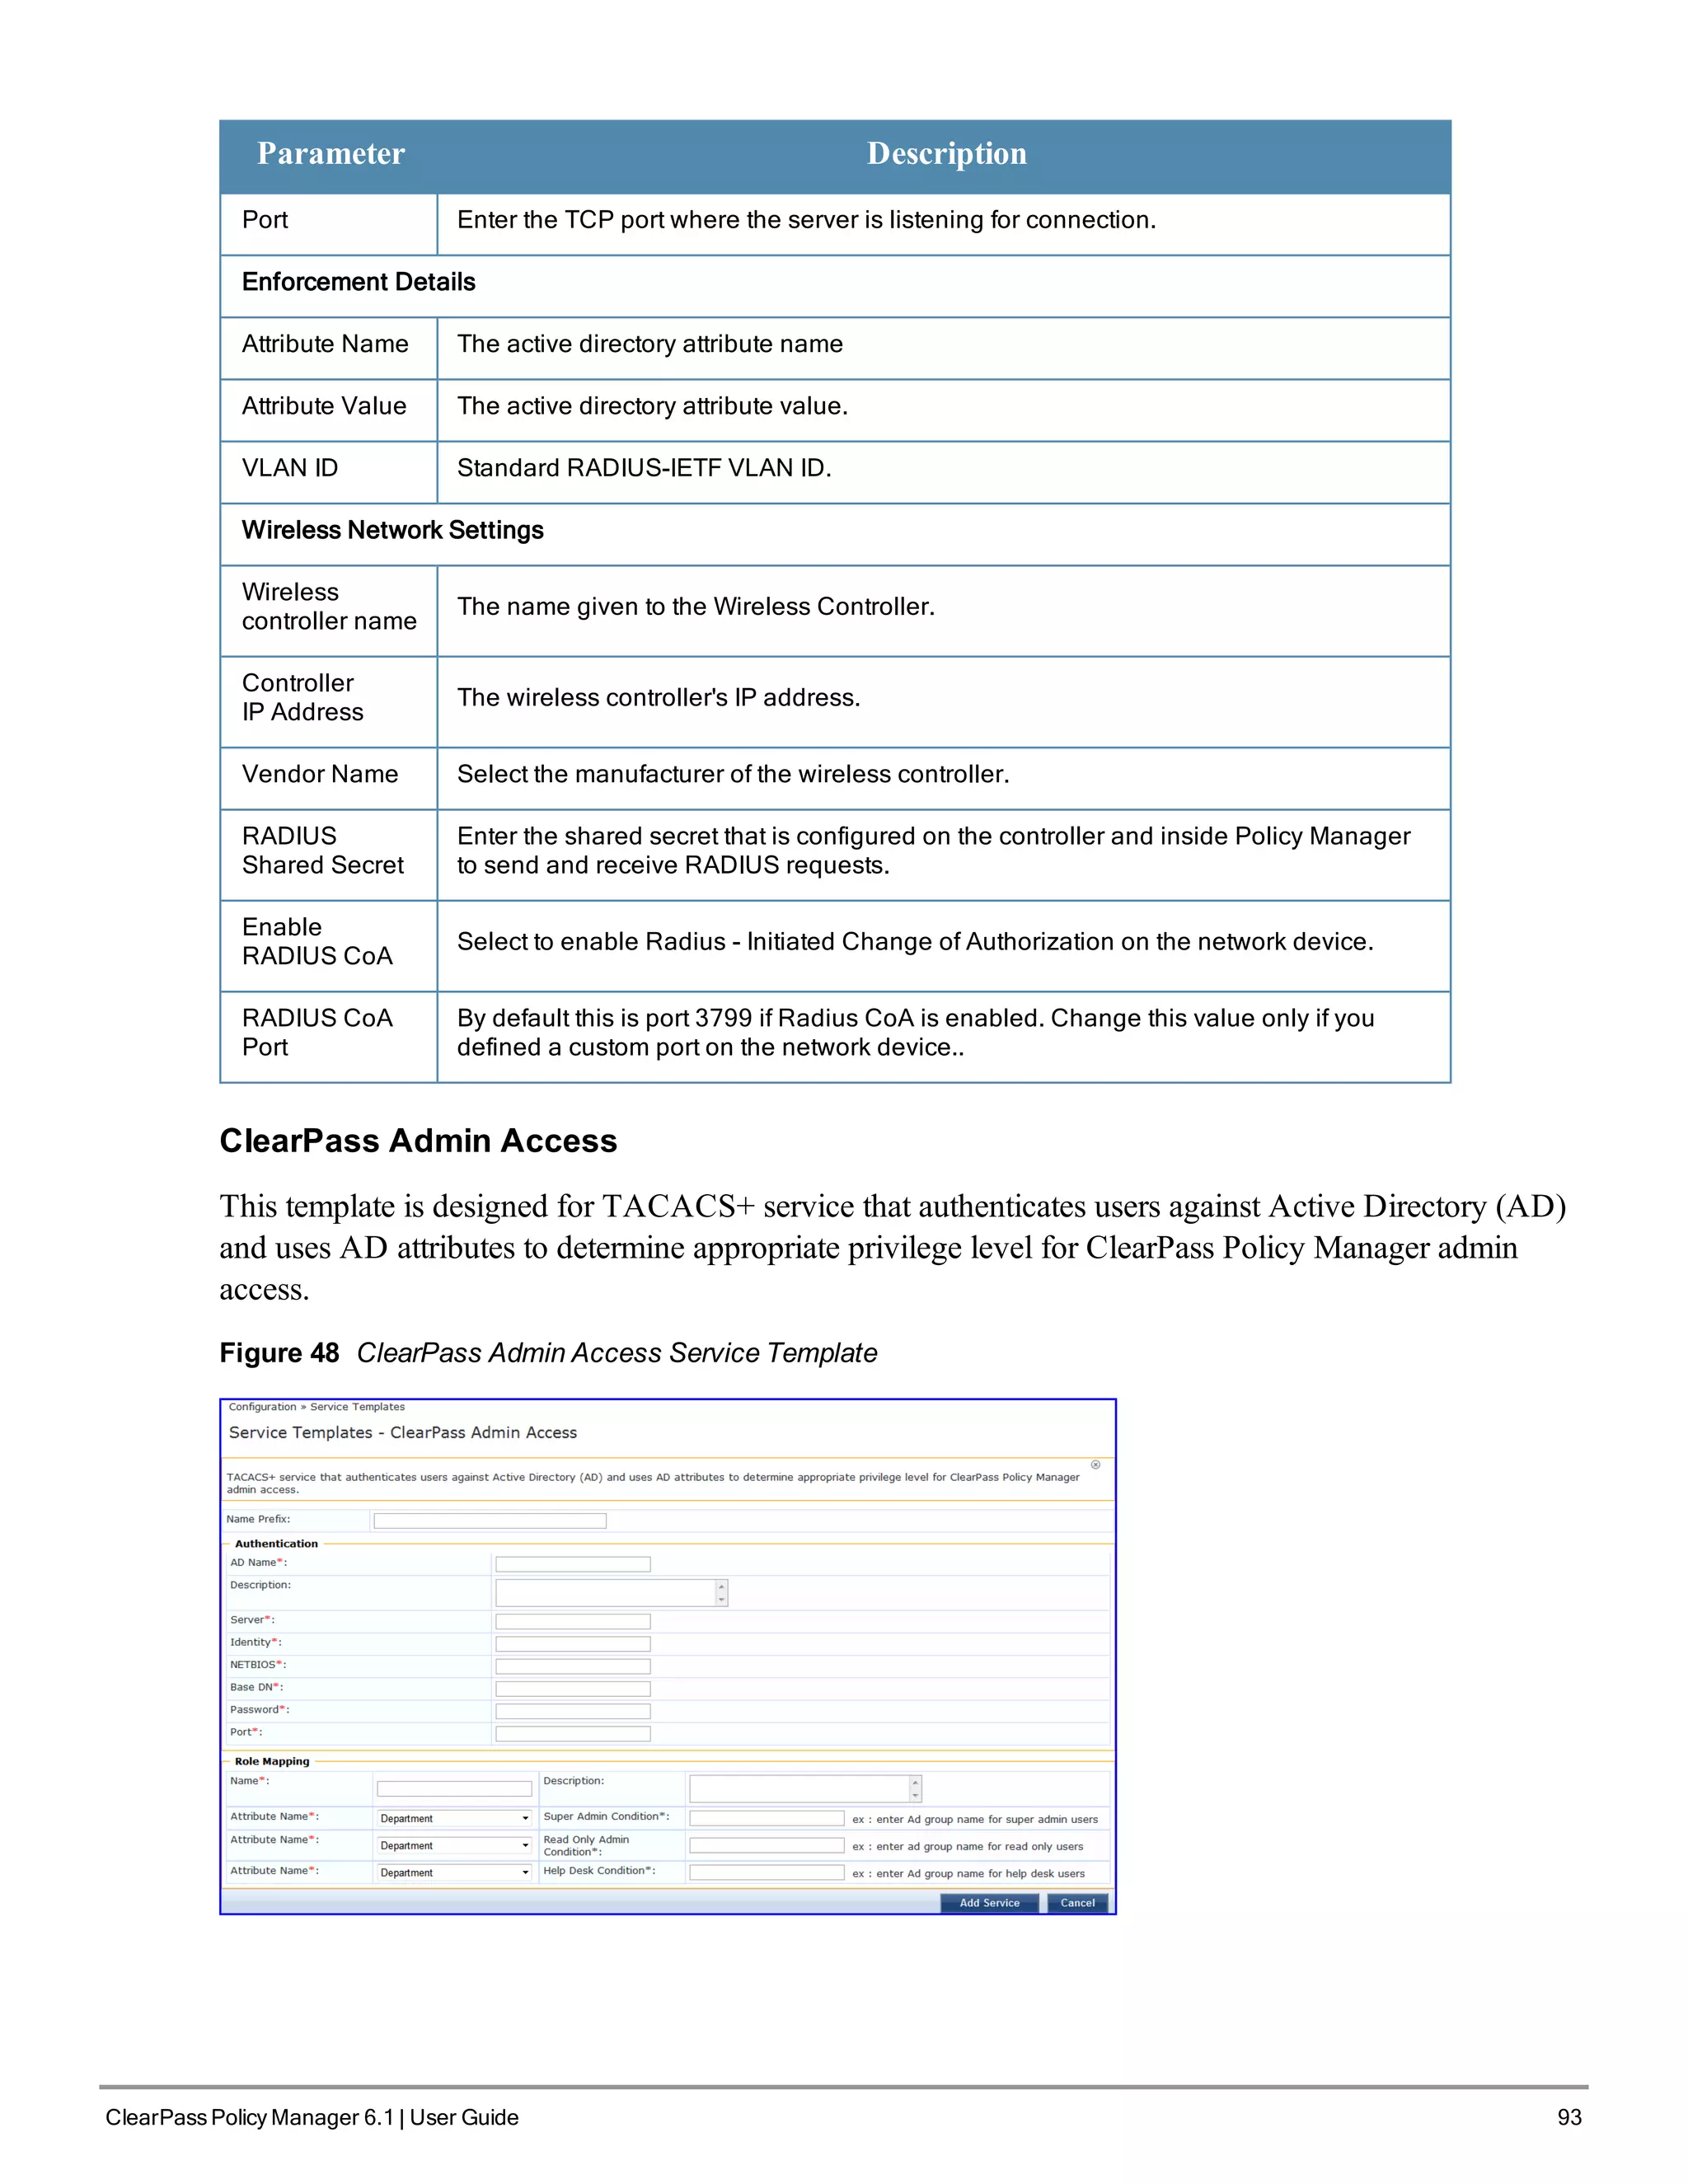
l ClearPass Admin Access
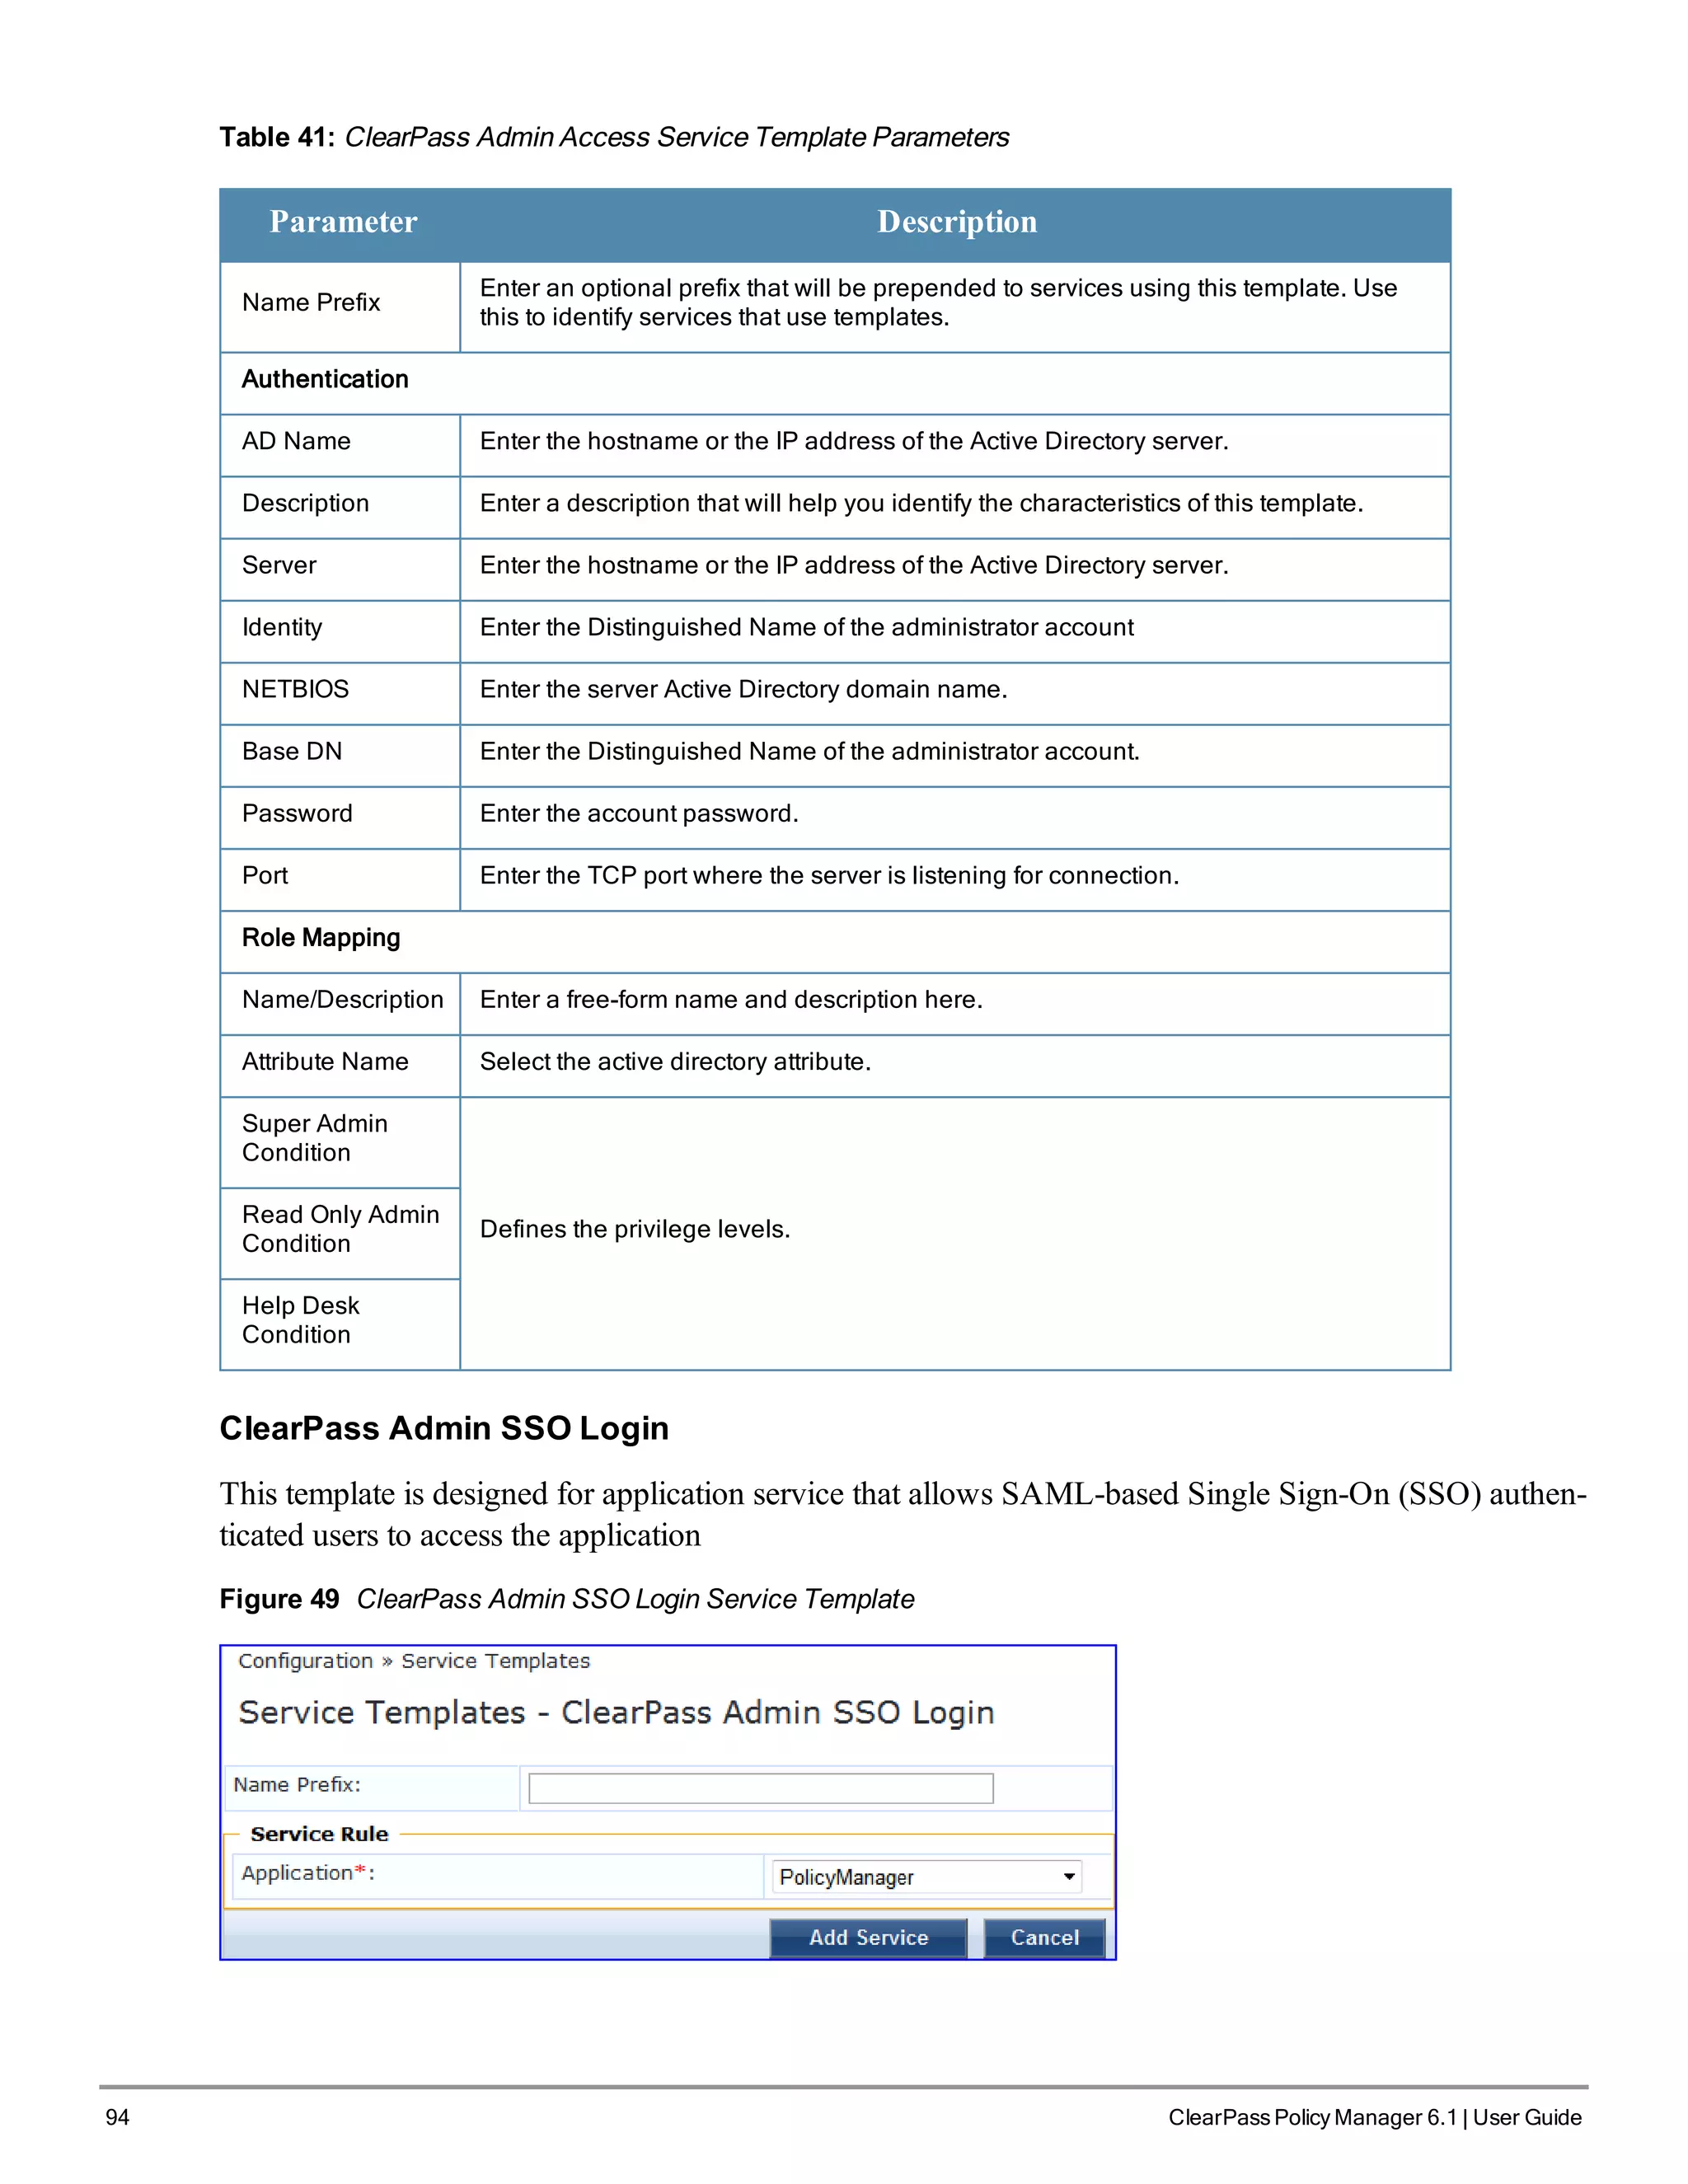
l ClearPass Admin SSO Login
l EDUROAM
l Guest Access - Web Login Pre-Auth
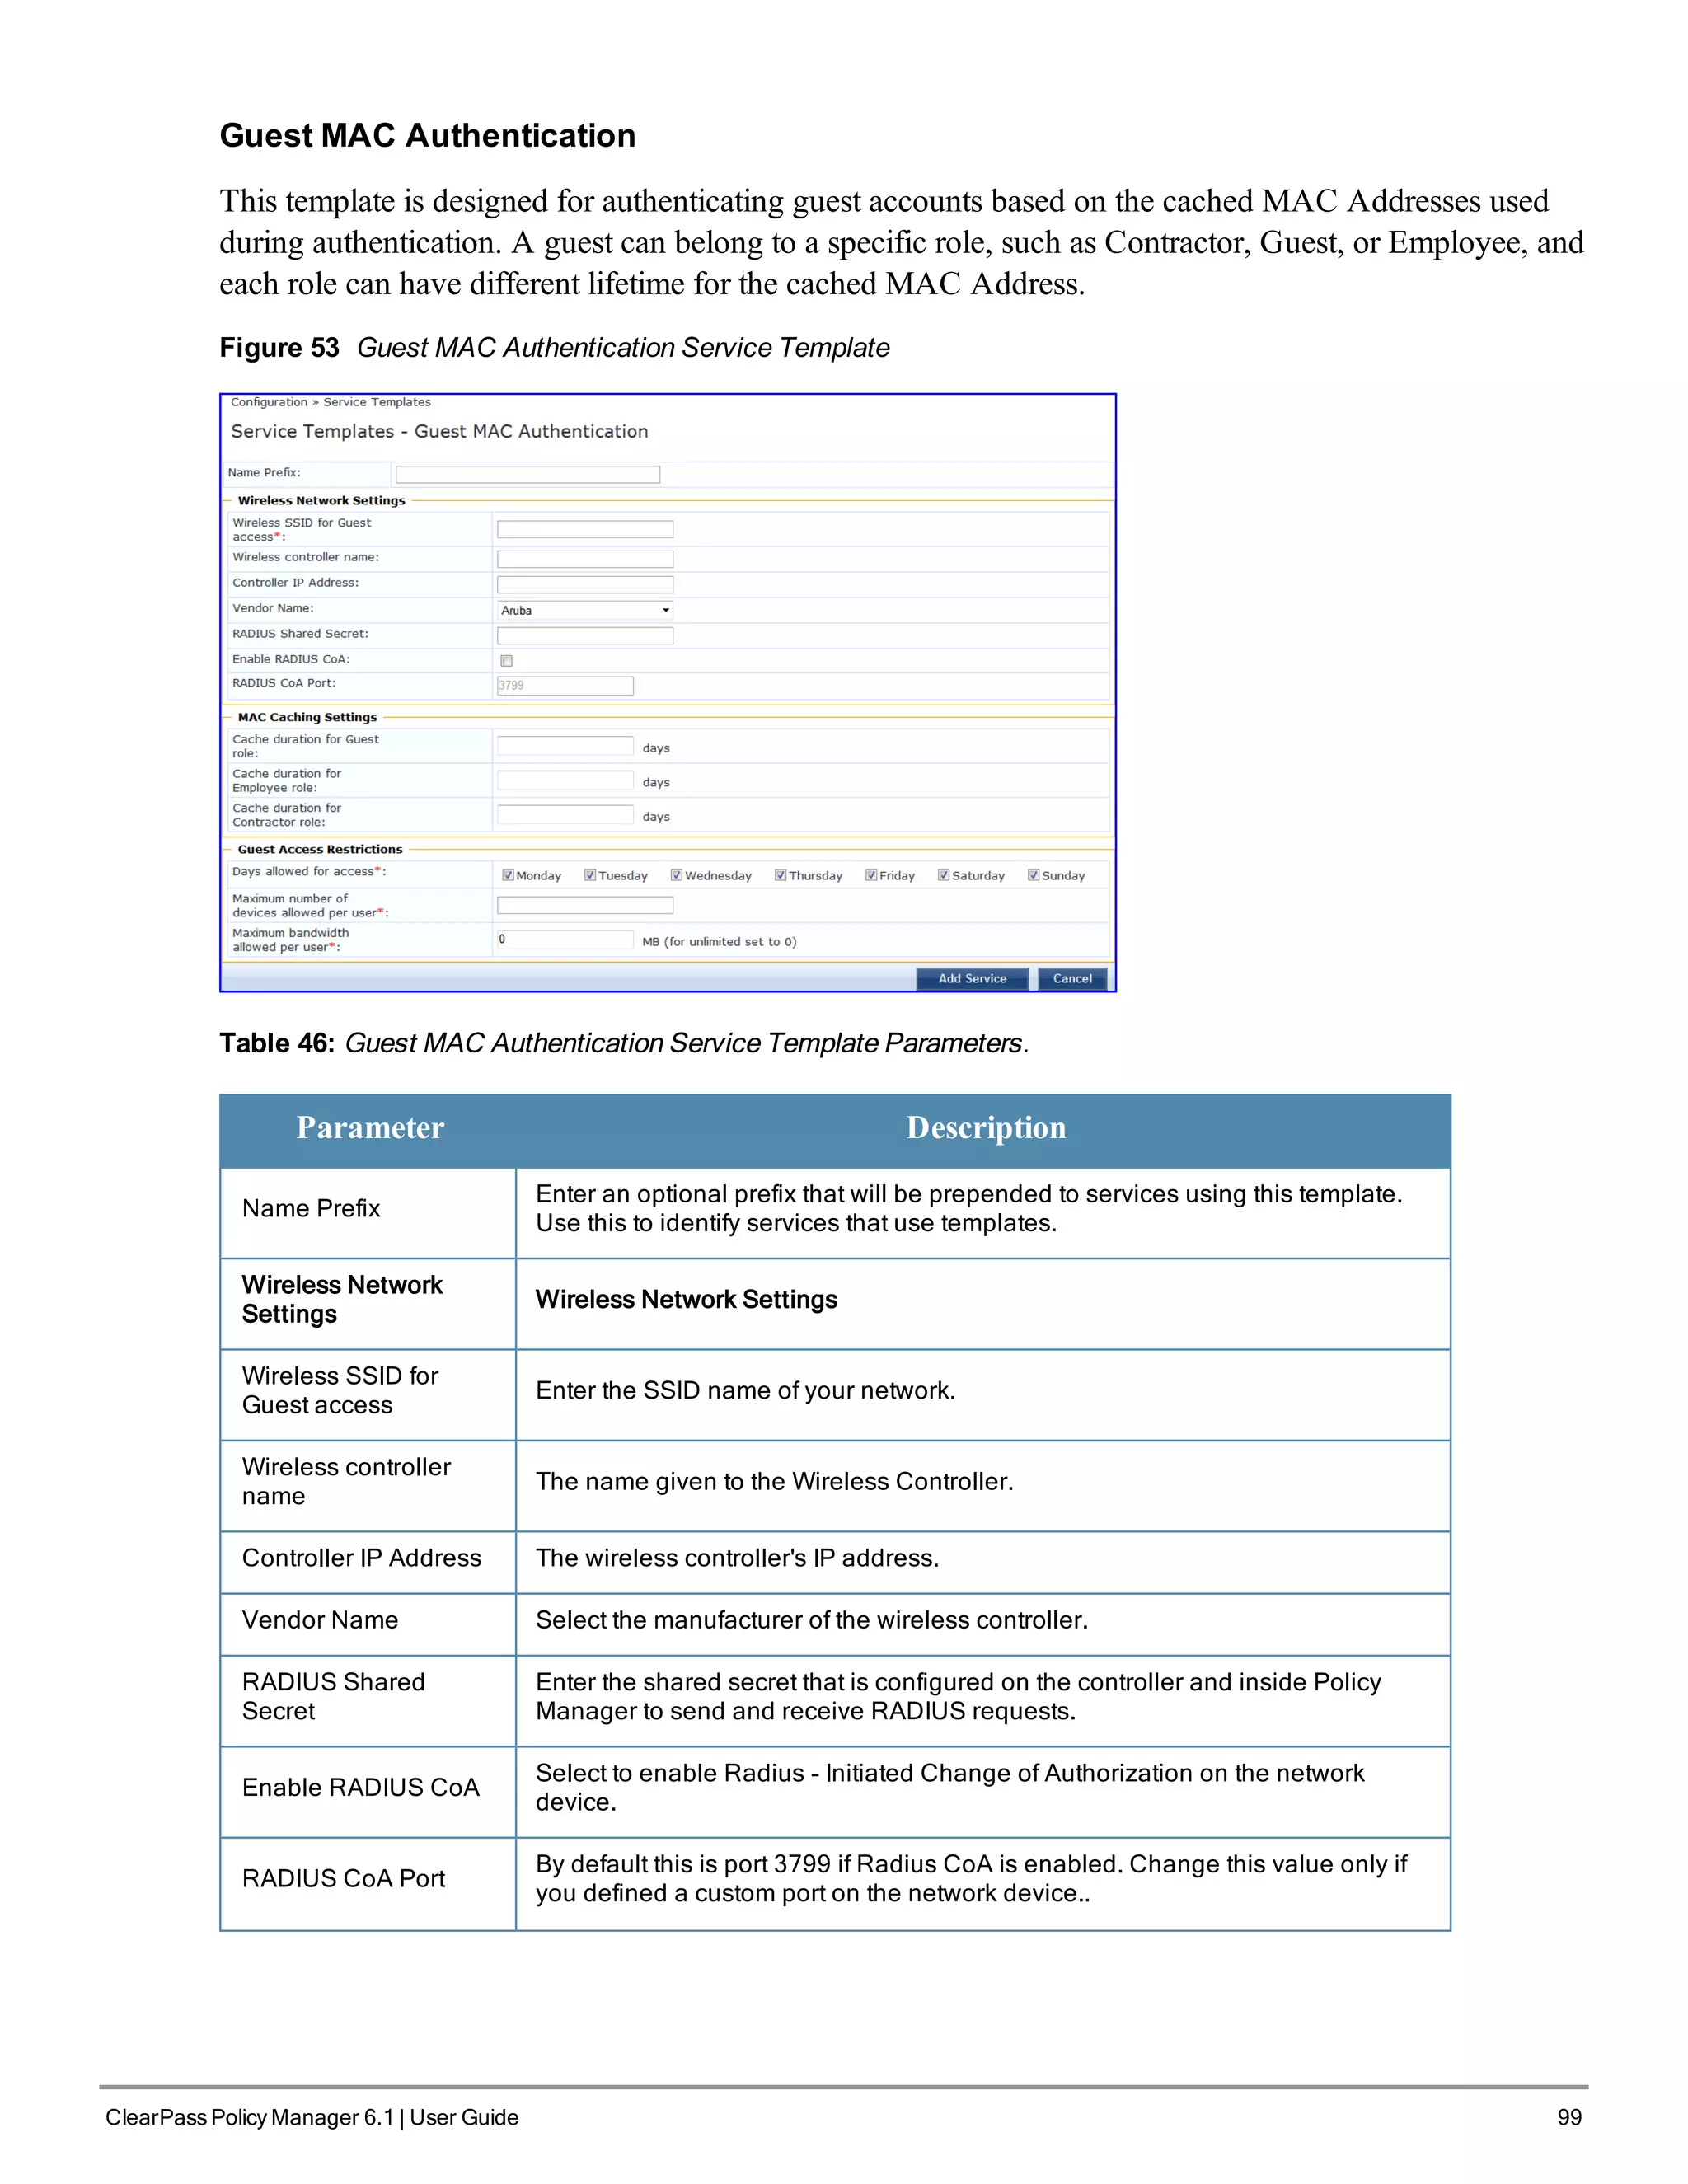
l Guest Access
l Guest MAC Authentication
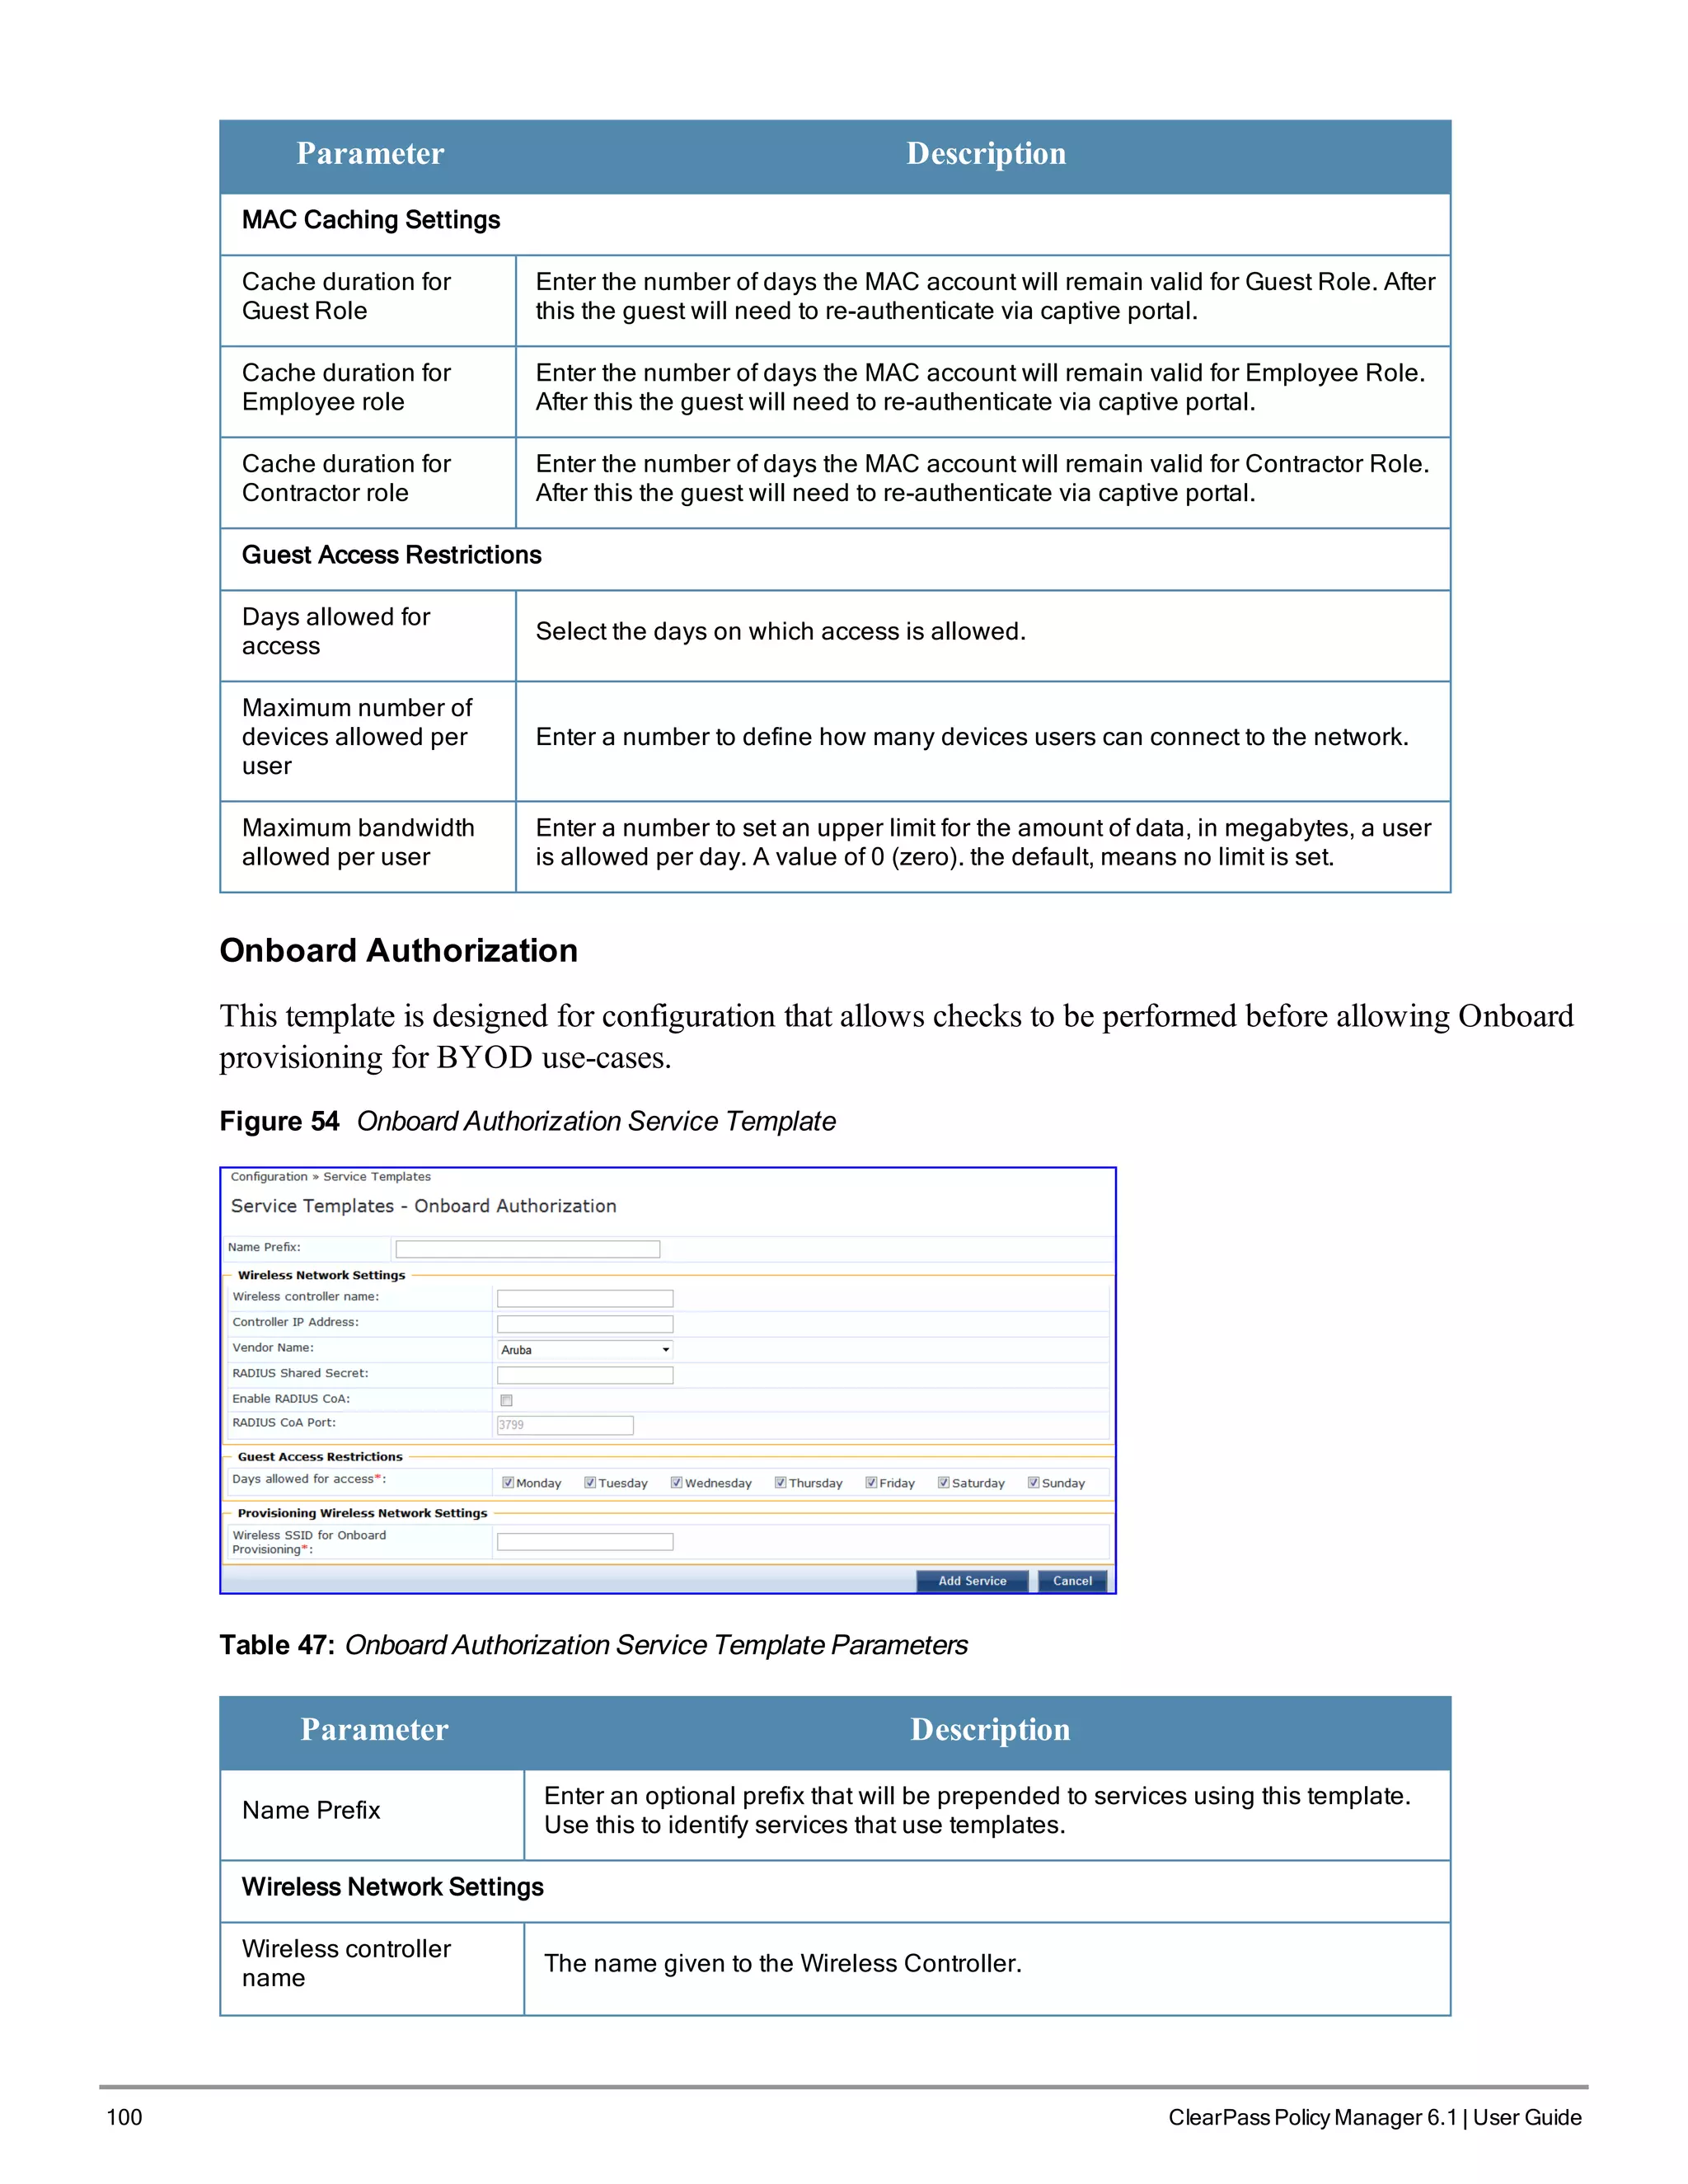
l Onboard Authorization
Figure 46 Service Templates home page
The following sections describe how to create a template.
ClearPass Policy Manager 6.1 | User Guide 91](https://image.slidesharecdn.com/arubacppm61userguide-140926121722-phpapp01/75/Aruba-cppm-6_1_user_guide-91-2048.jpg)

![102 ClearPass Policy Manager 6.1 | User Guide
Label Description
Status The status displays in the last column of the table. A green/red icon indicates
enabled/disabled state. Clicking on the icon allows you to toggle the status of a Service
between Enabled and Disabled. Note that when a service is in Monitor Mode, an [m] indicator
is displayed next to the status icon.
Reorder The Reorder button below the table is used for reorder services.
Copy Create a copy of the service. An instance of the name prefixed with Copy_of_ is created
Export Export the selected services
Delete Delete the selected services
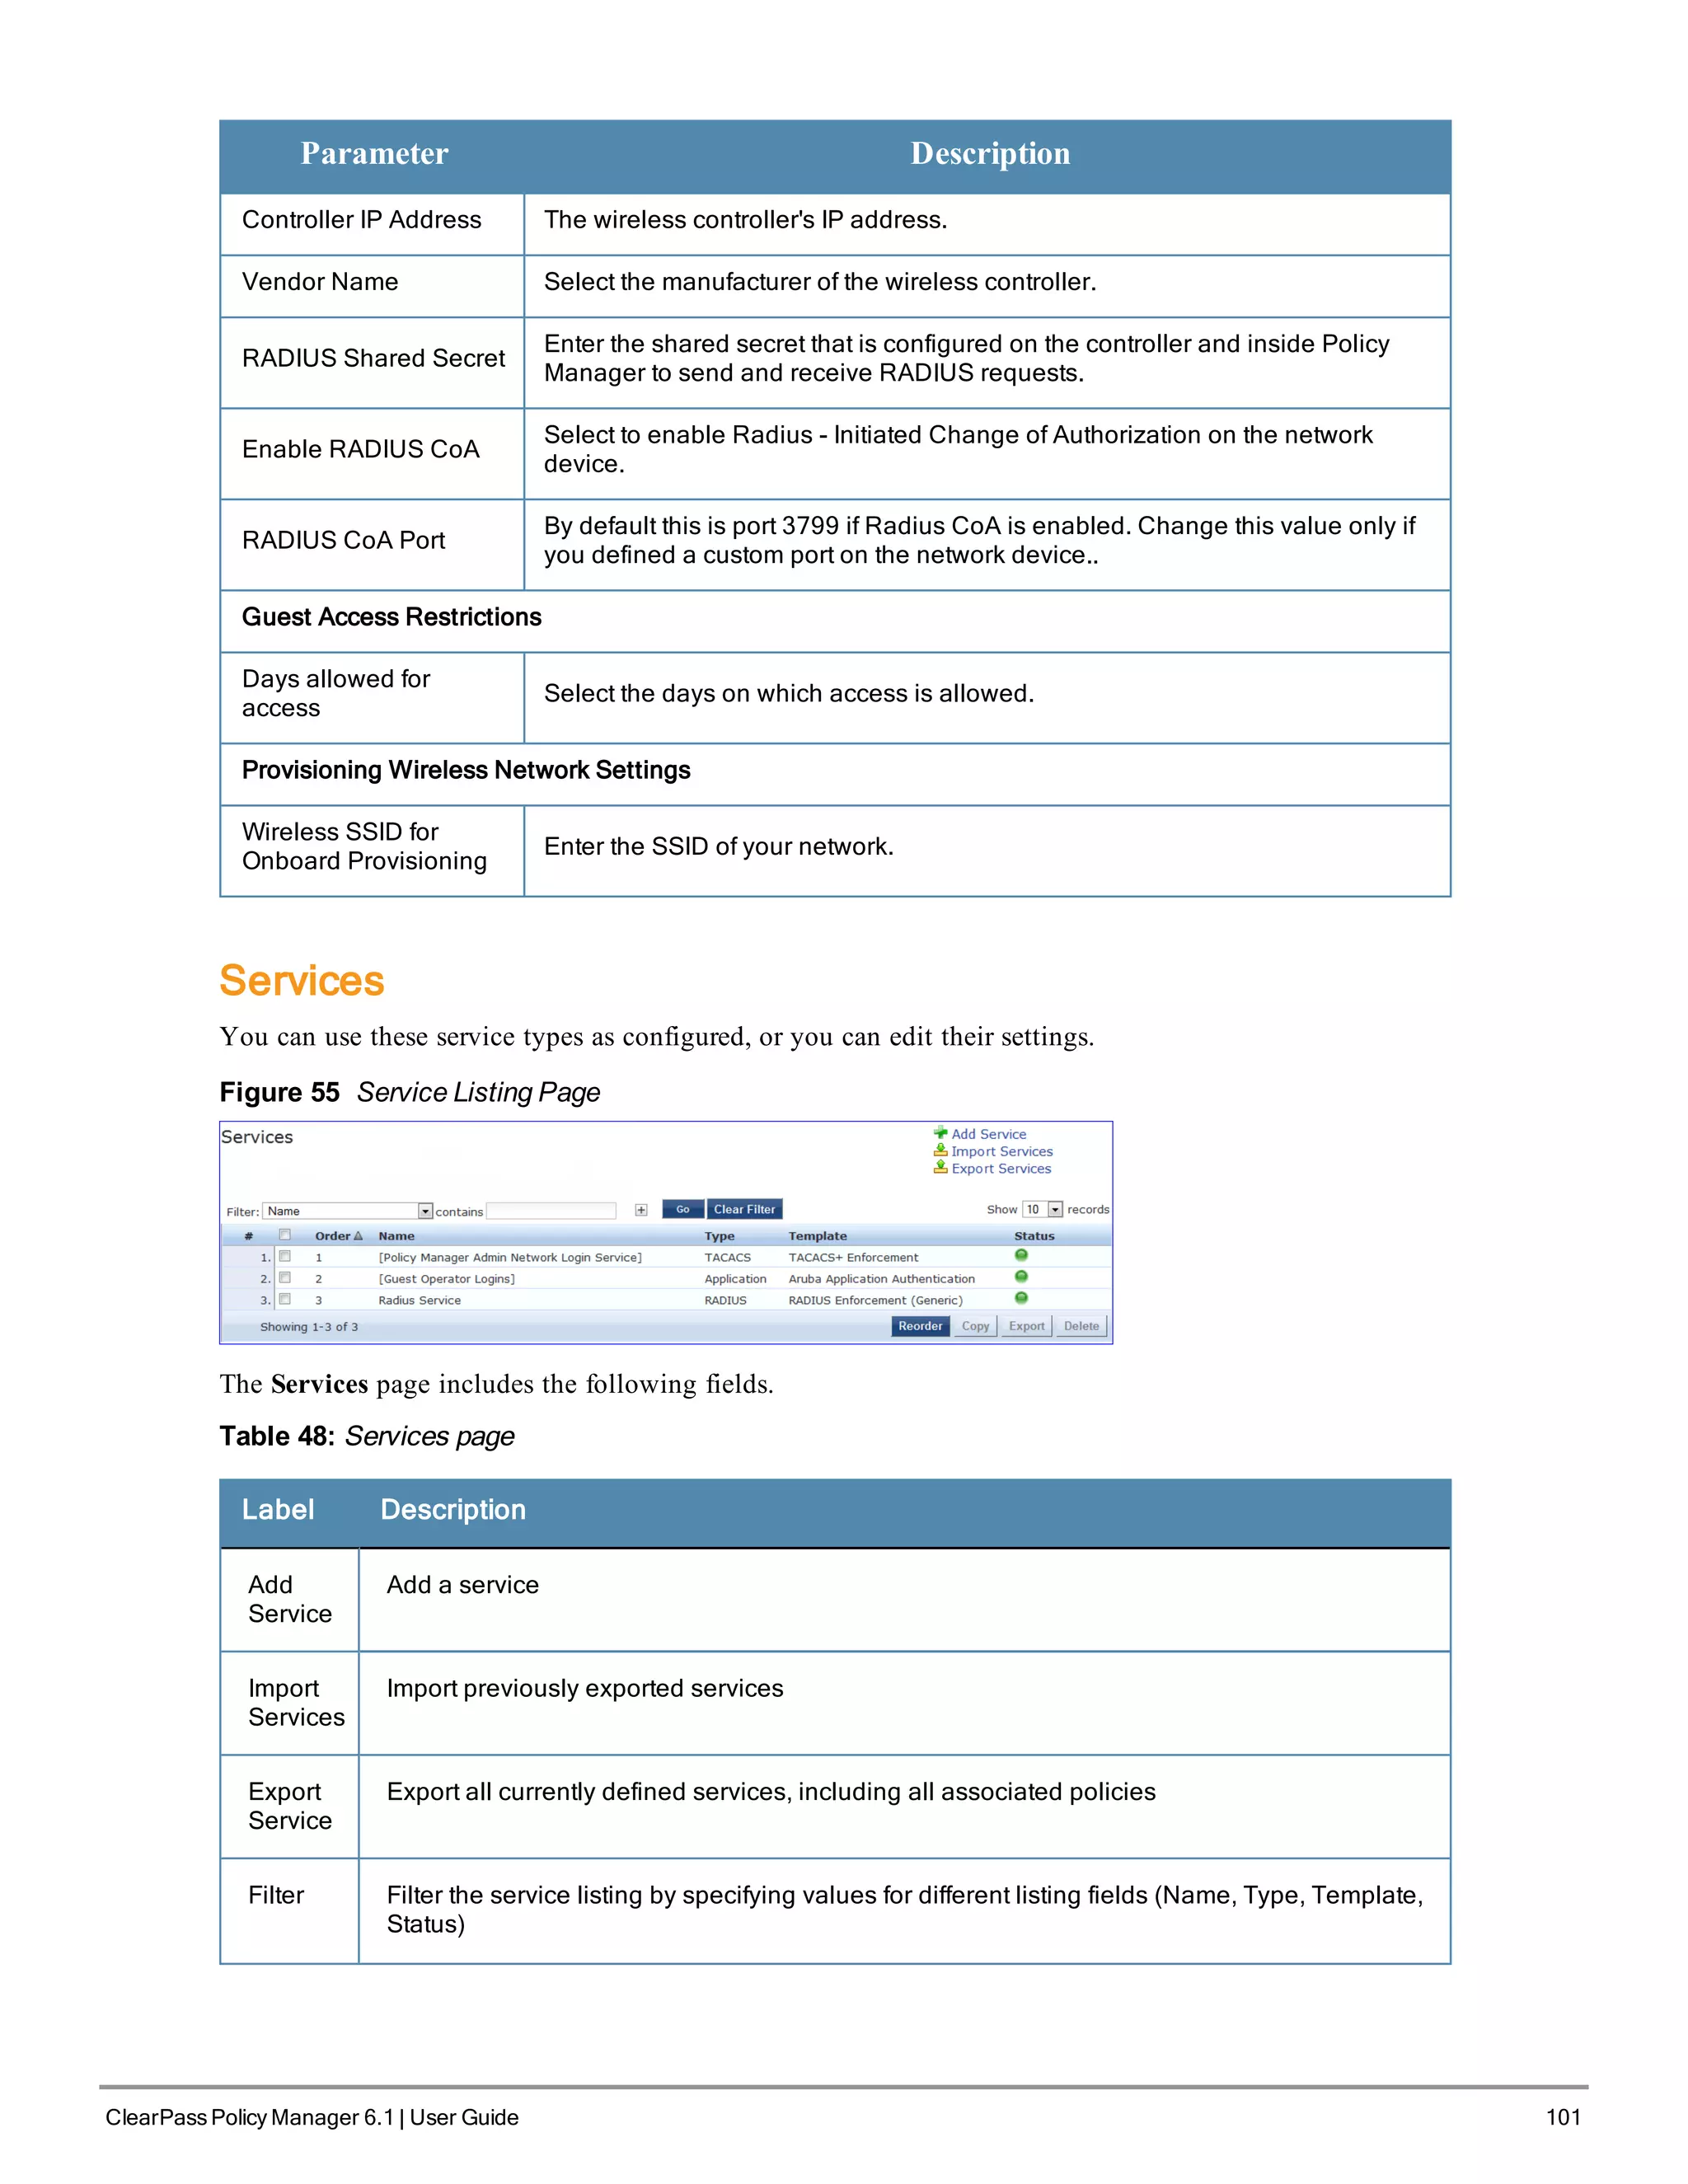
For additional information, refer to the following sections:
l "Adding Services " on page 102
l "Modifying Services" on page 104
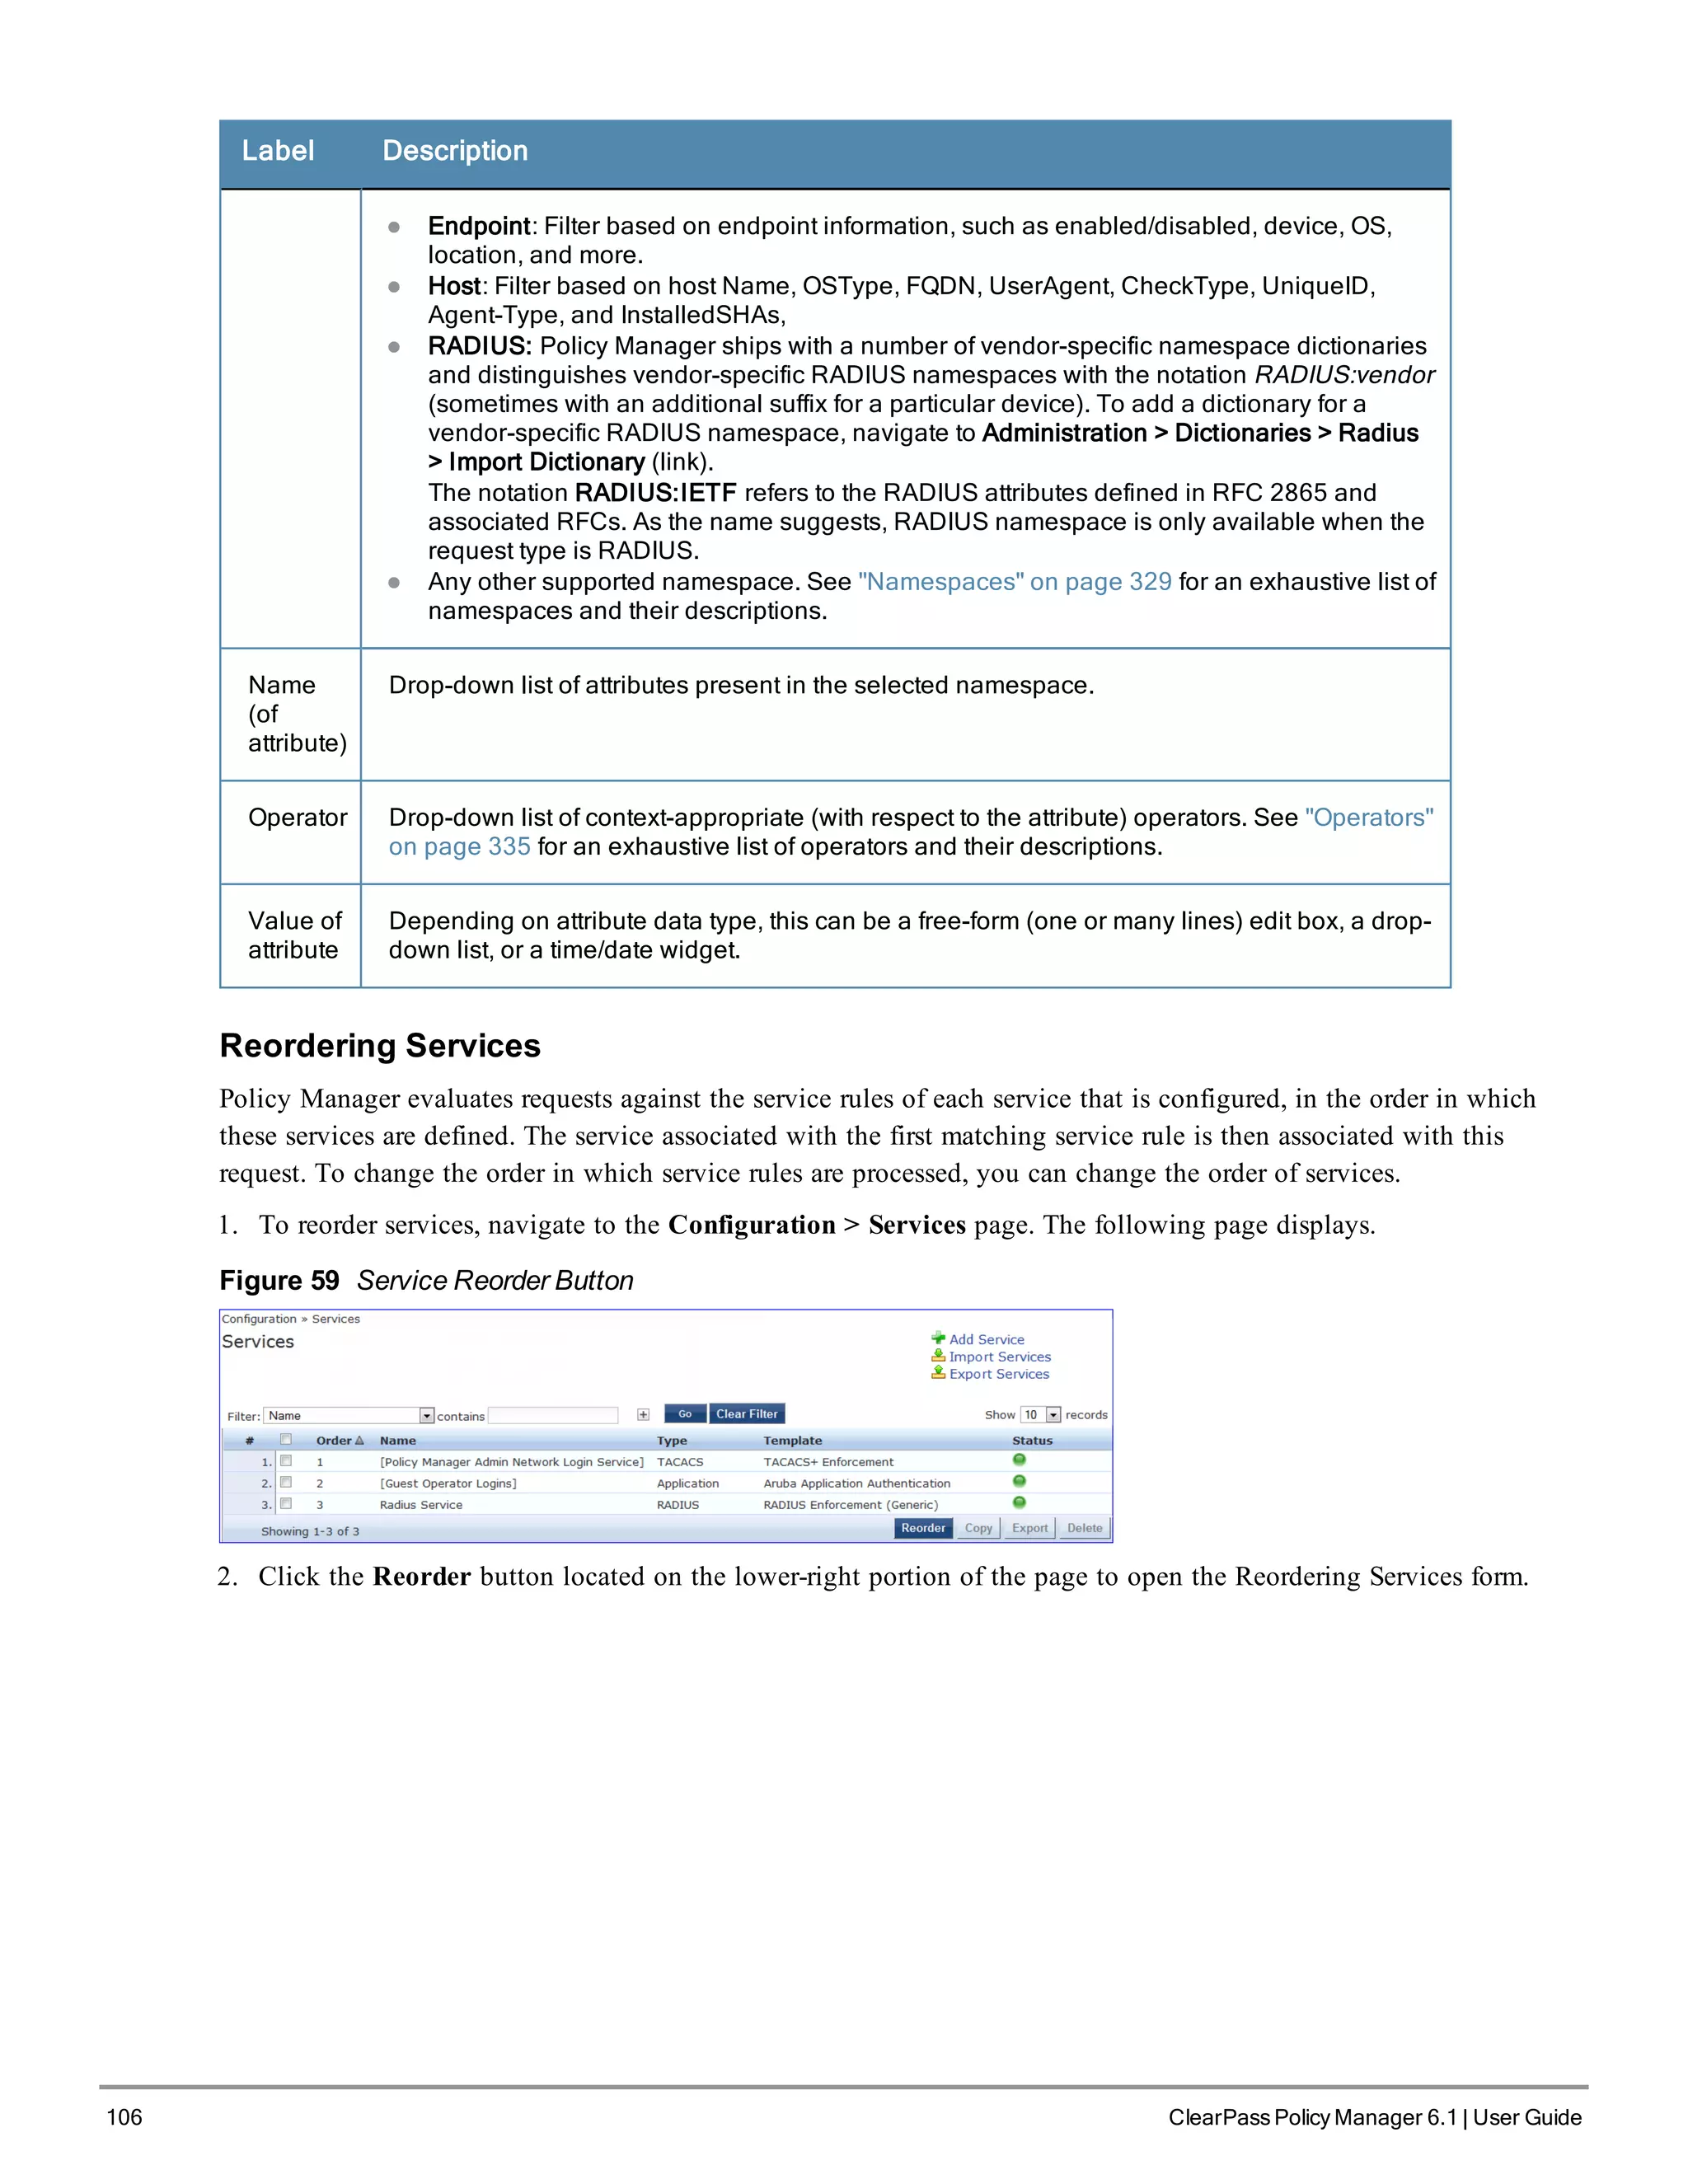
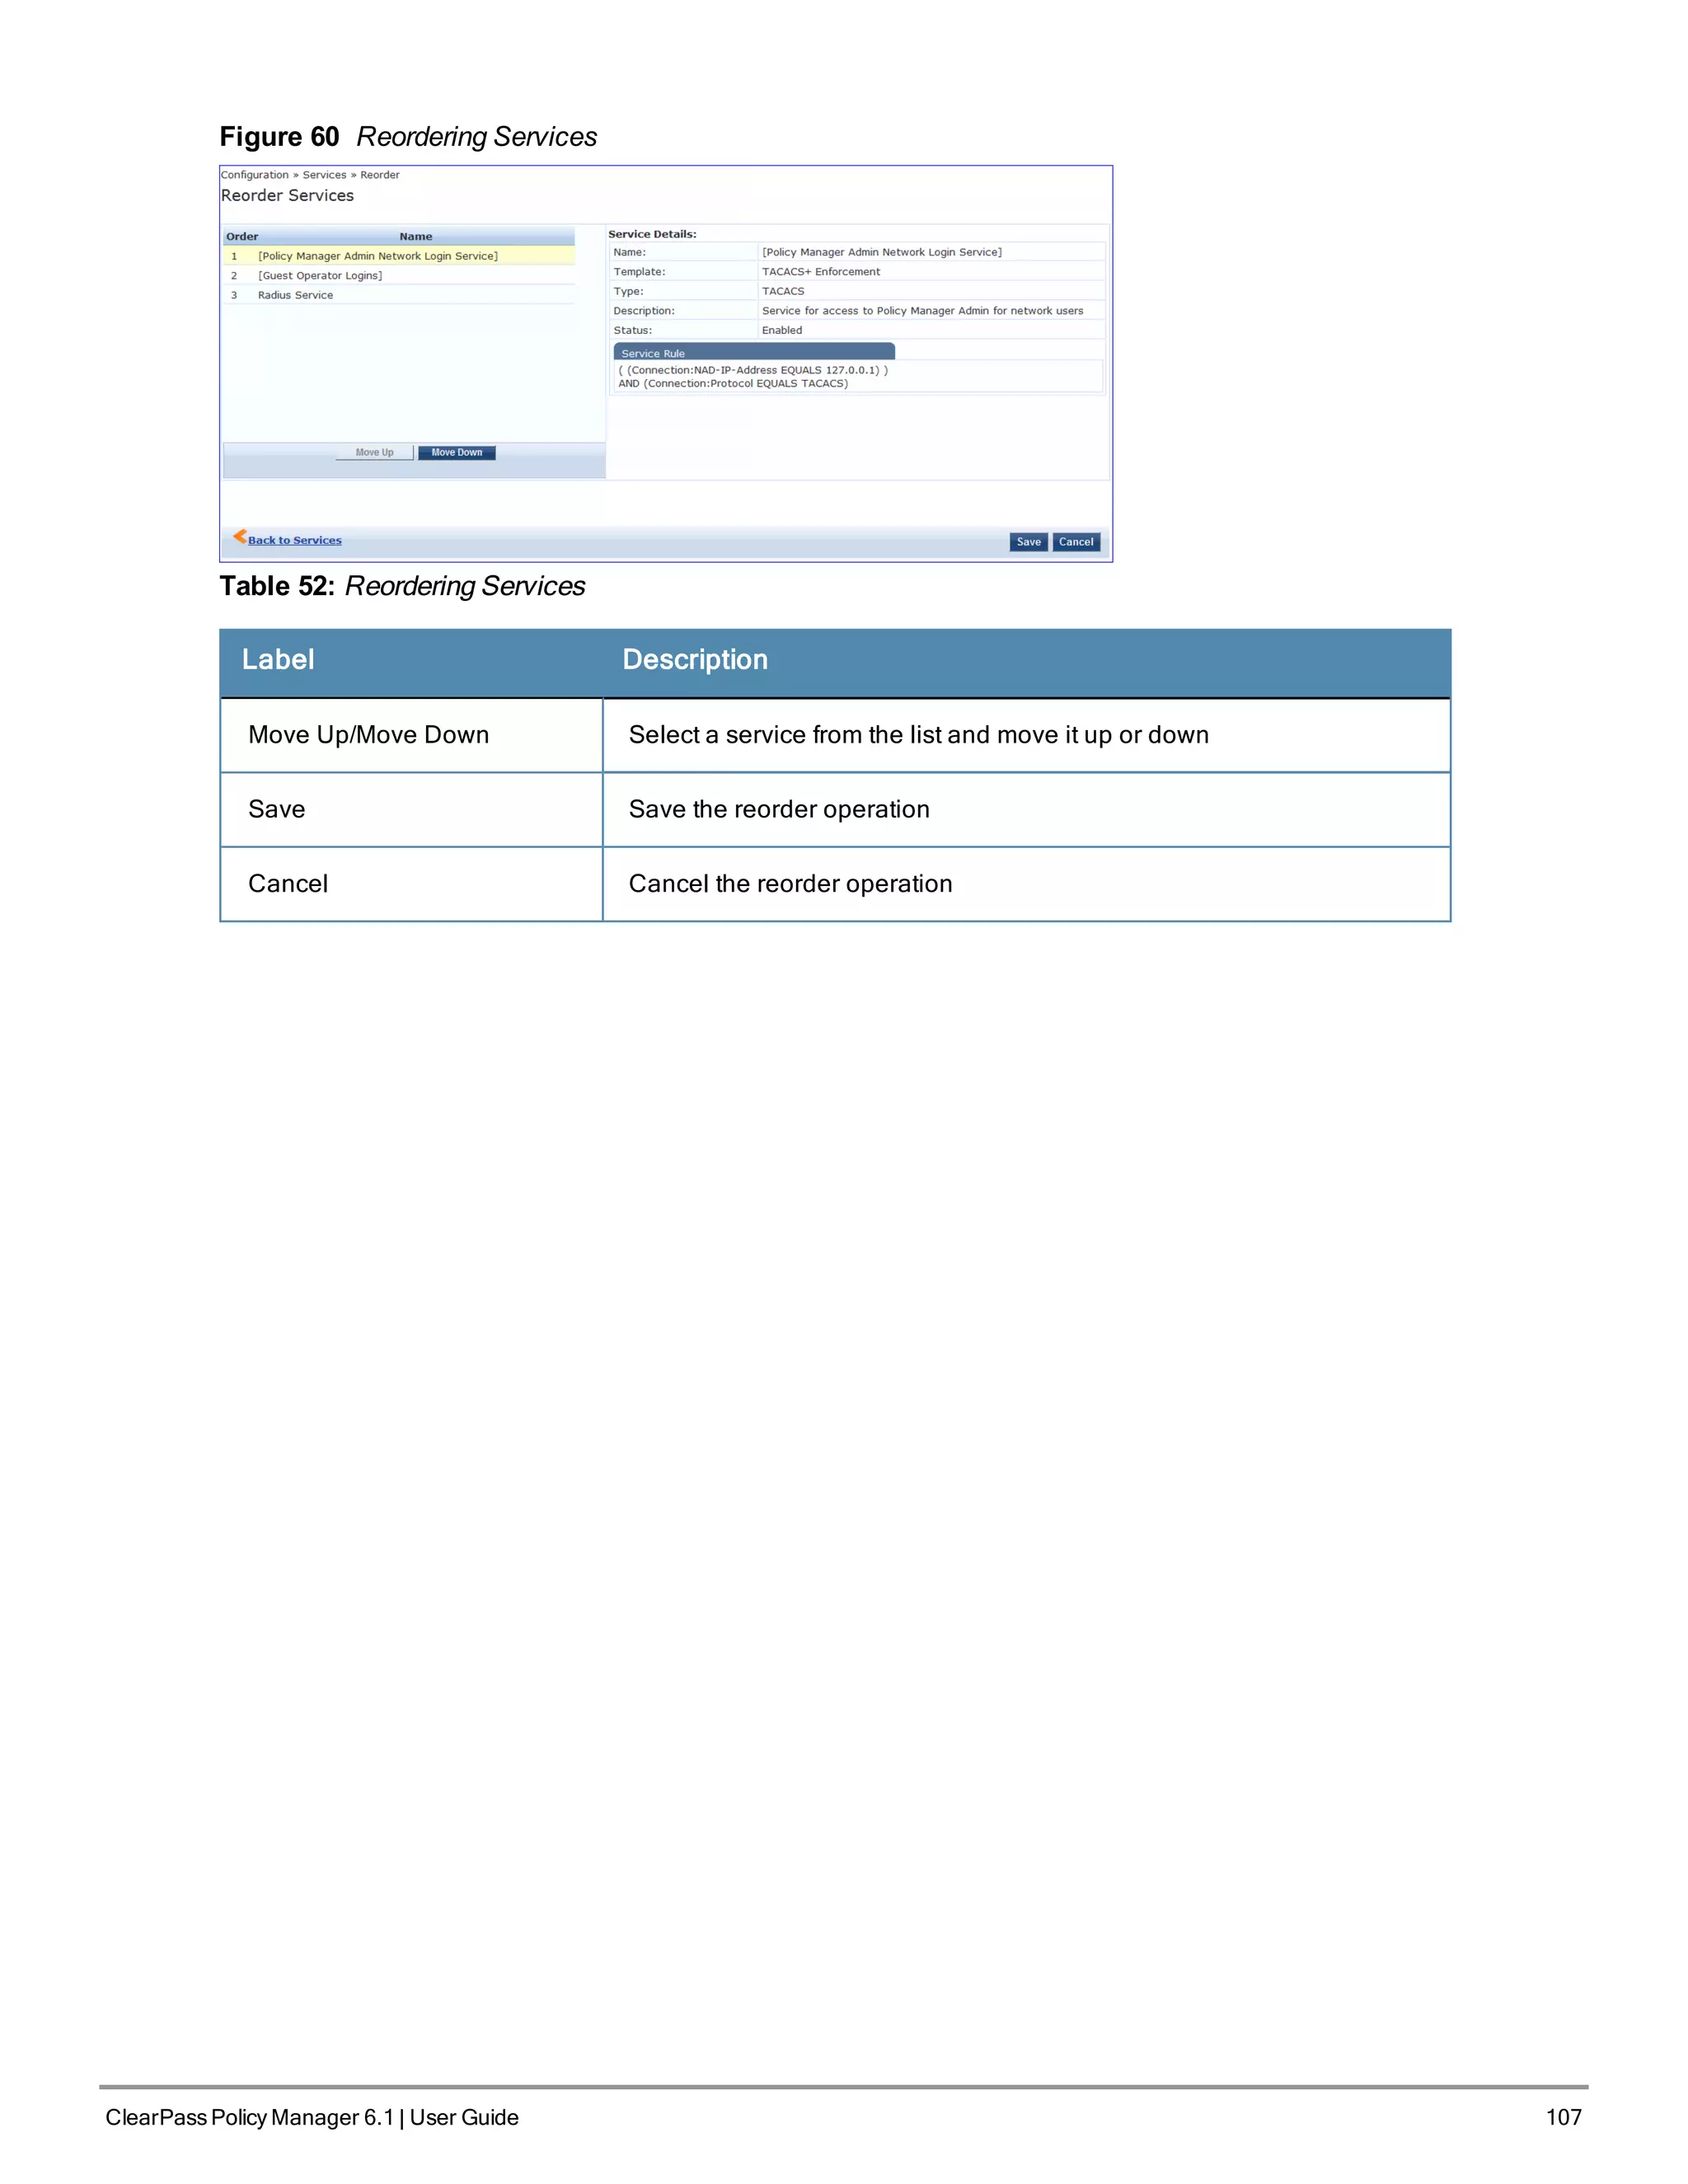
l "Reordering Services " on page 106
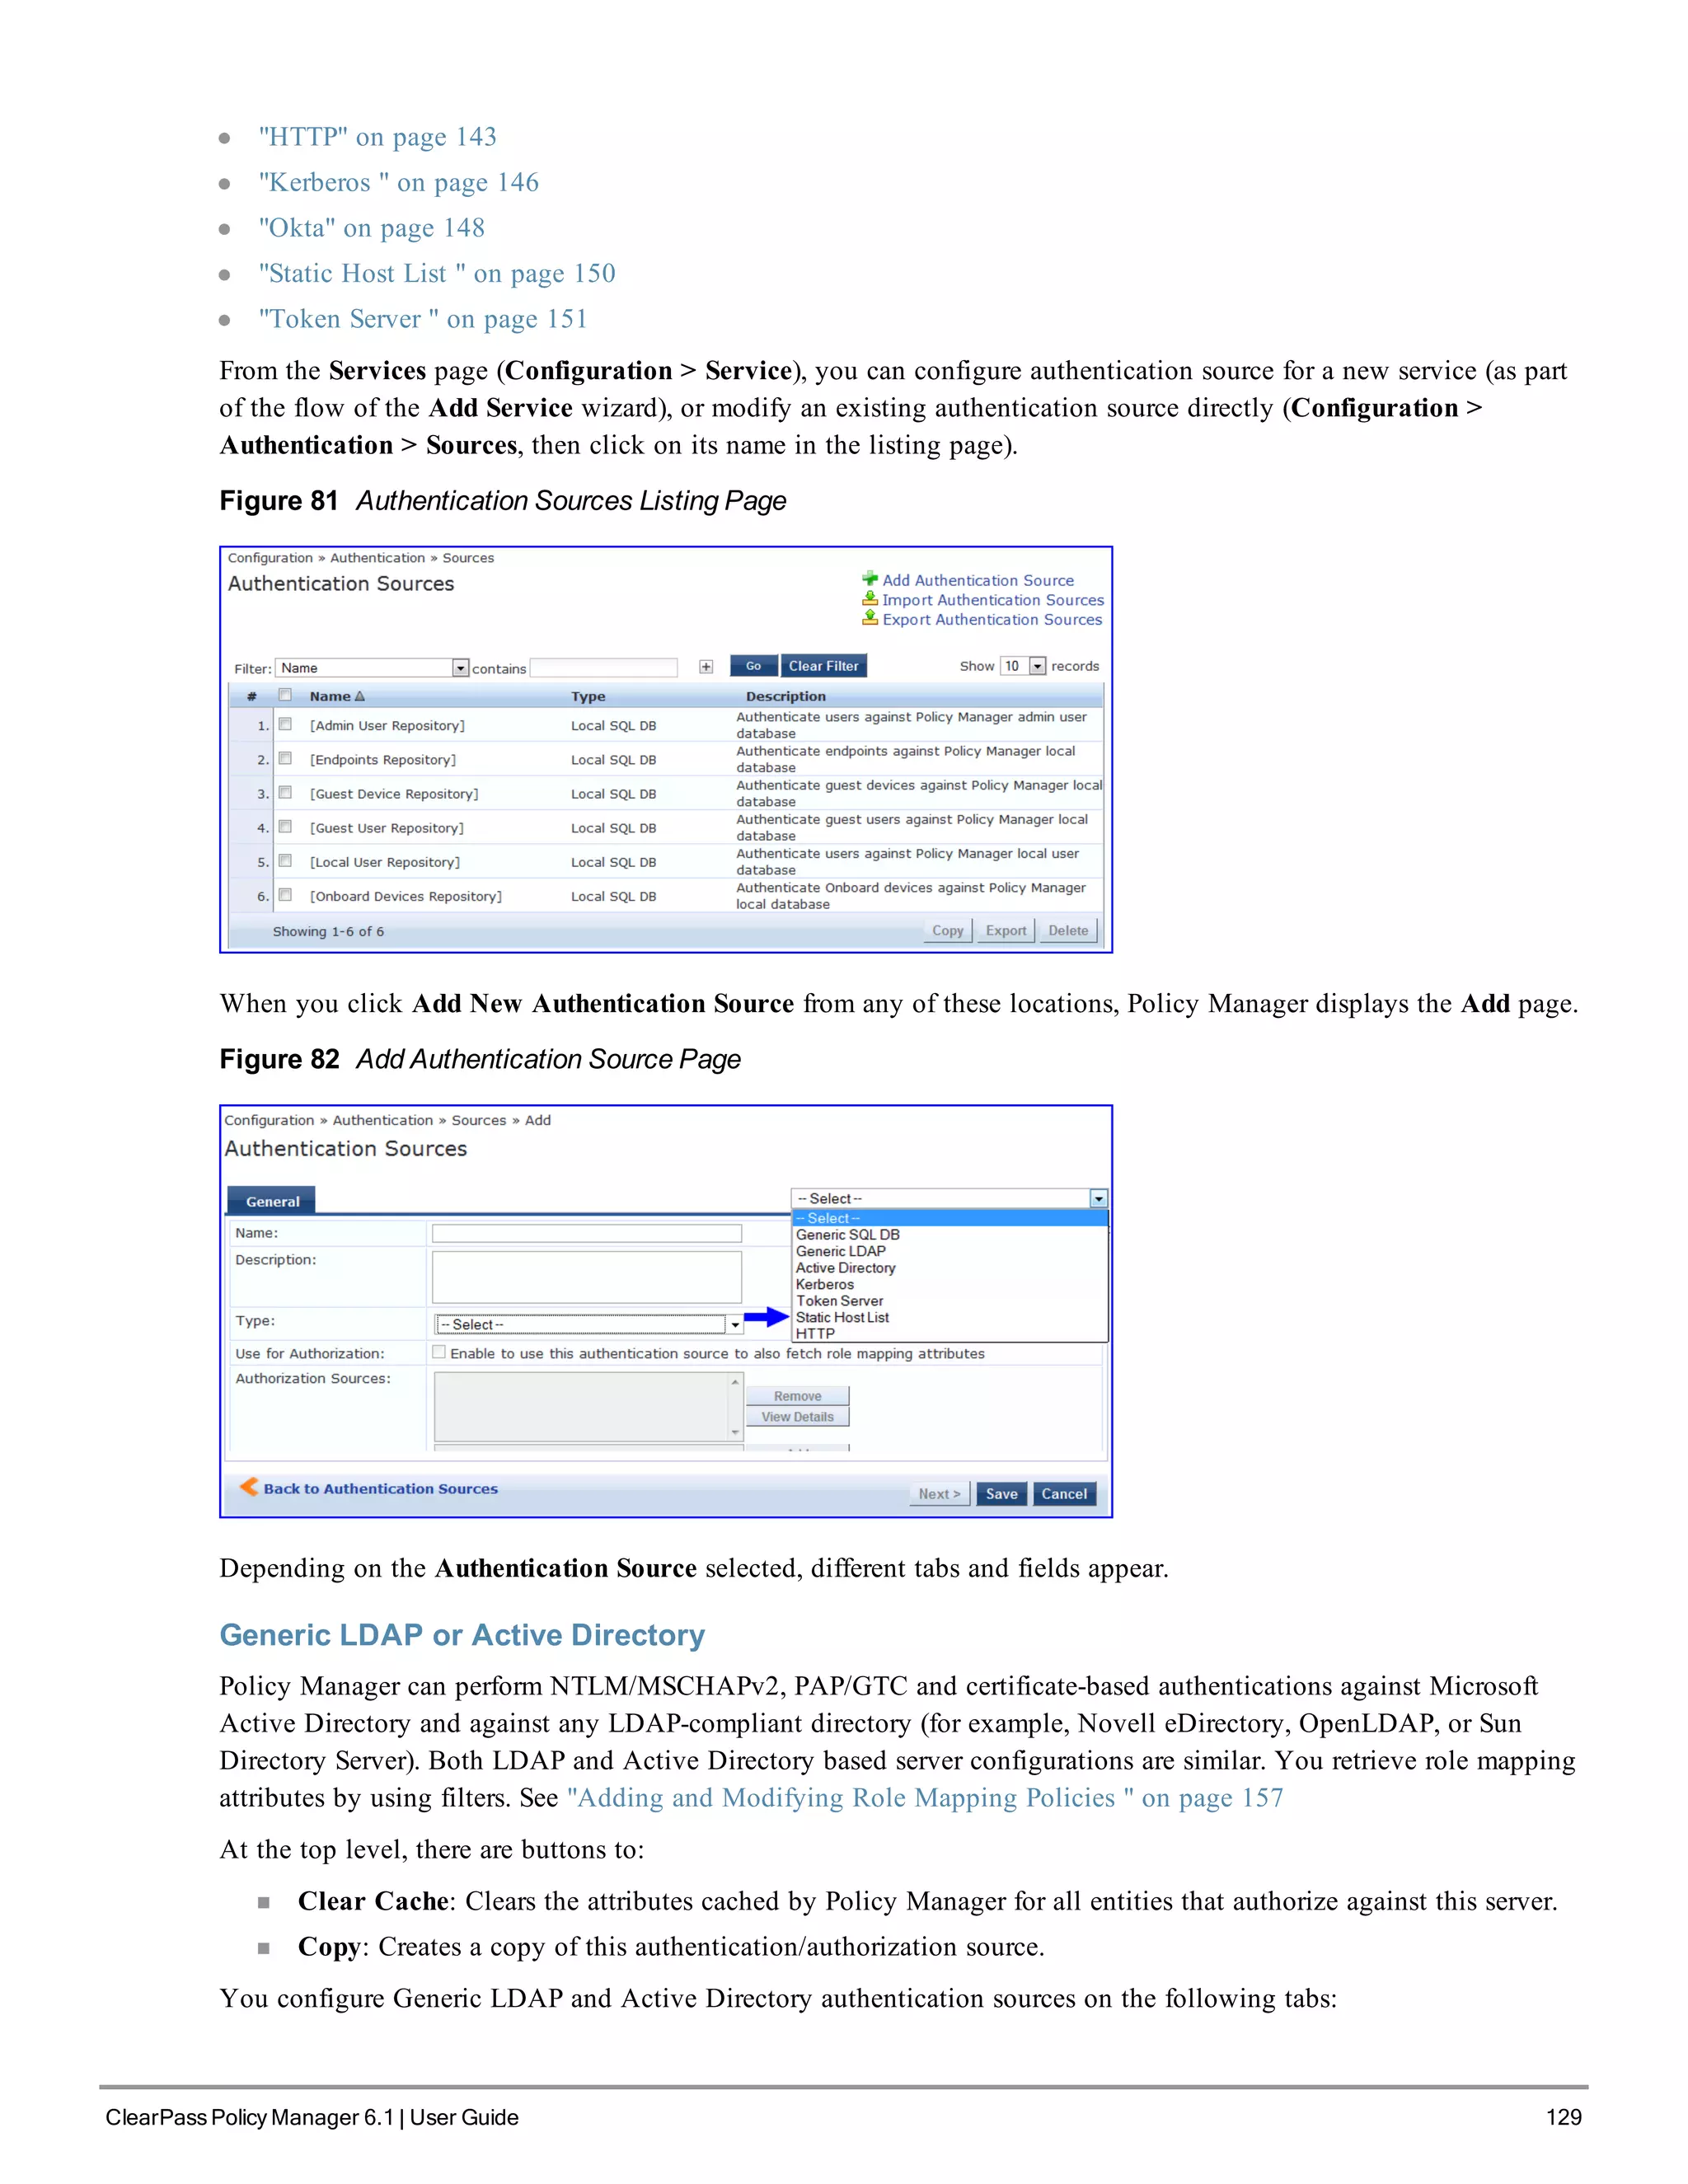
Adding Services
From the Services page (Configuration > Services) or from the Start Here page (Configuration > Start Here), you
can create a new service using the Add Service option.
Click on Add Service in the upper-right corner to add a new service.
Figure 56 Add Service Page
The Add Service tab includes the following fields.
Table 49: Service Page (General Parameters)
Label Description
Type Select the desired service type from the drop down menu. When working with service rules,
you can select from the following namespace dictionaries:
l Application: The type of application for this service.
l Authentication: The Authentication method to be used for this service.
l Connection: Originator address (Src-IP-Address, Src-Port), Destination address (Dest-
IP-Address, Dest-Port), and Protocol](https://image.slidesharecdn.com/arubacppm61userguide-140926121722-phpapp01/75/Aruba-cppm-6_1_user_guide-102-2048.jpg)


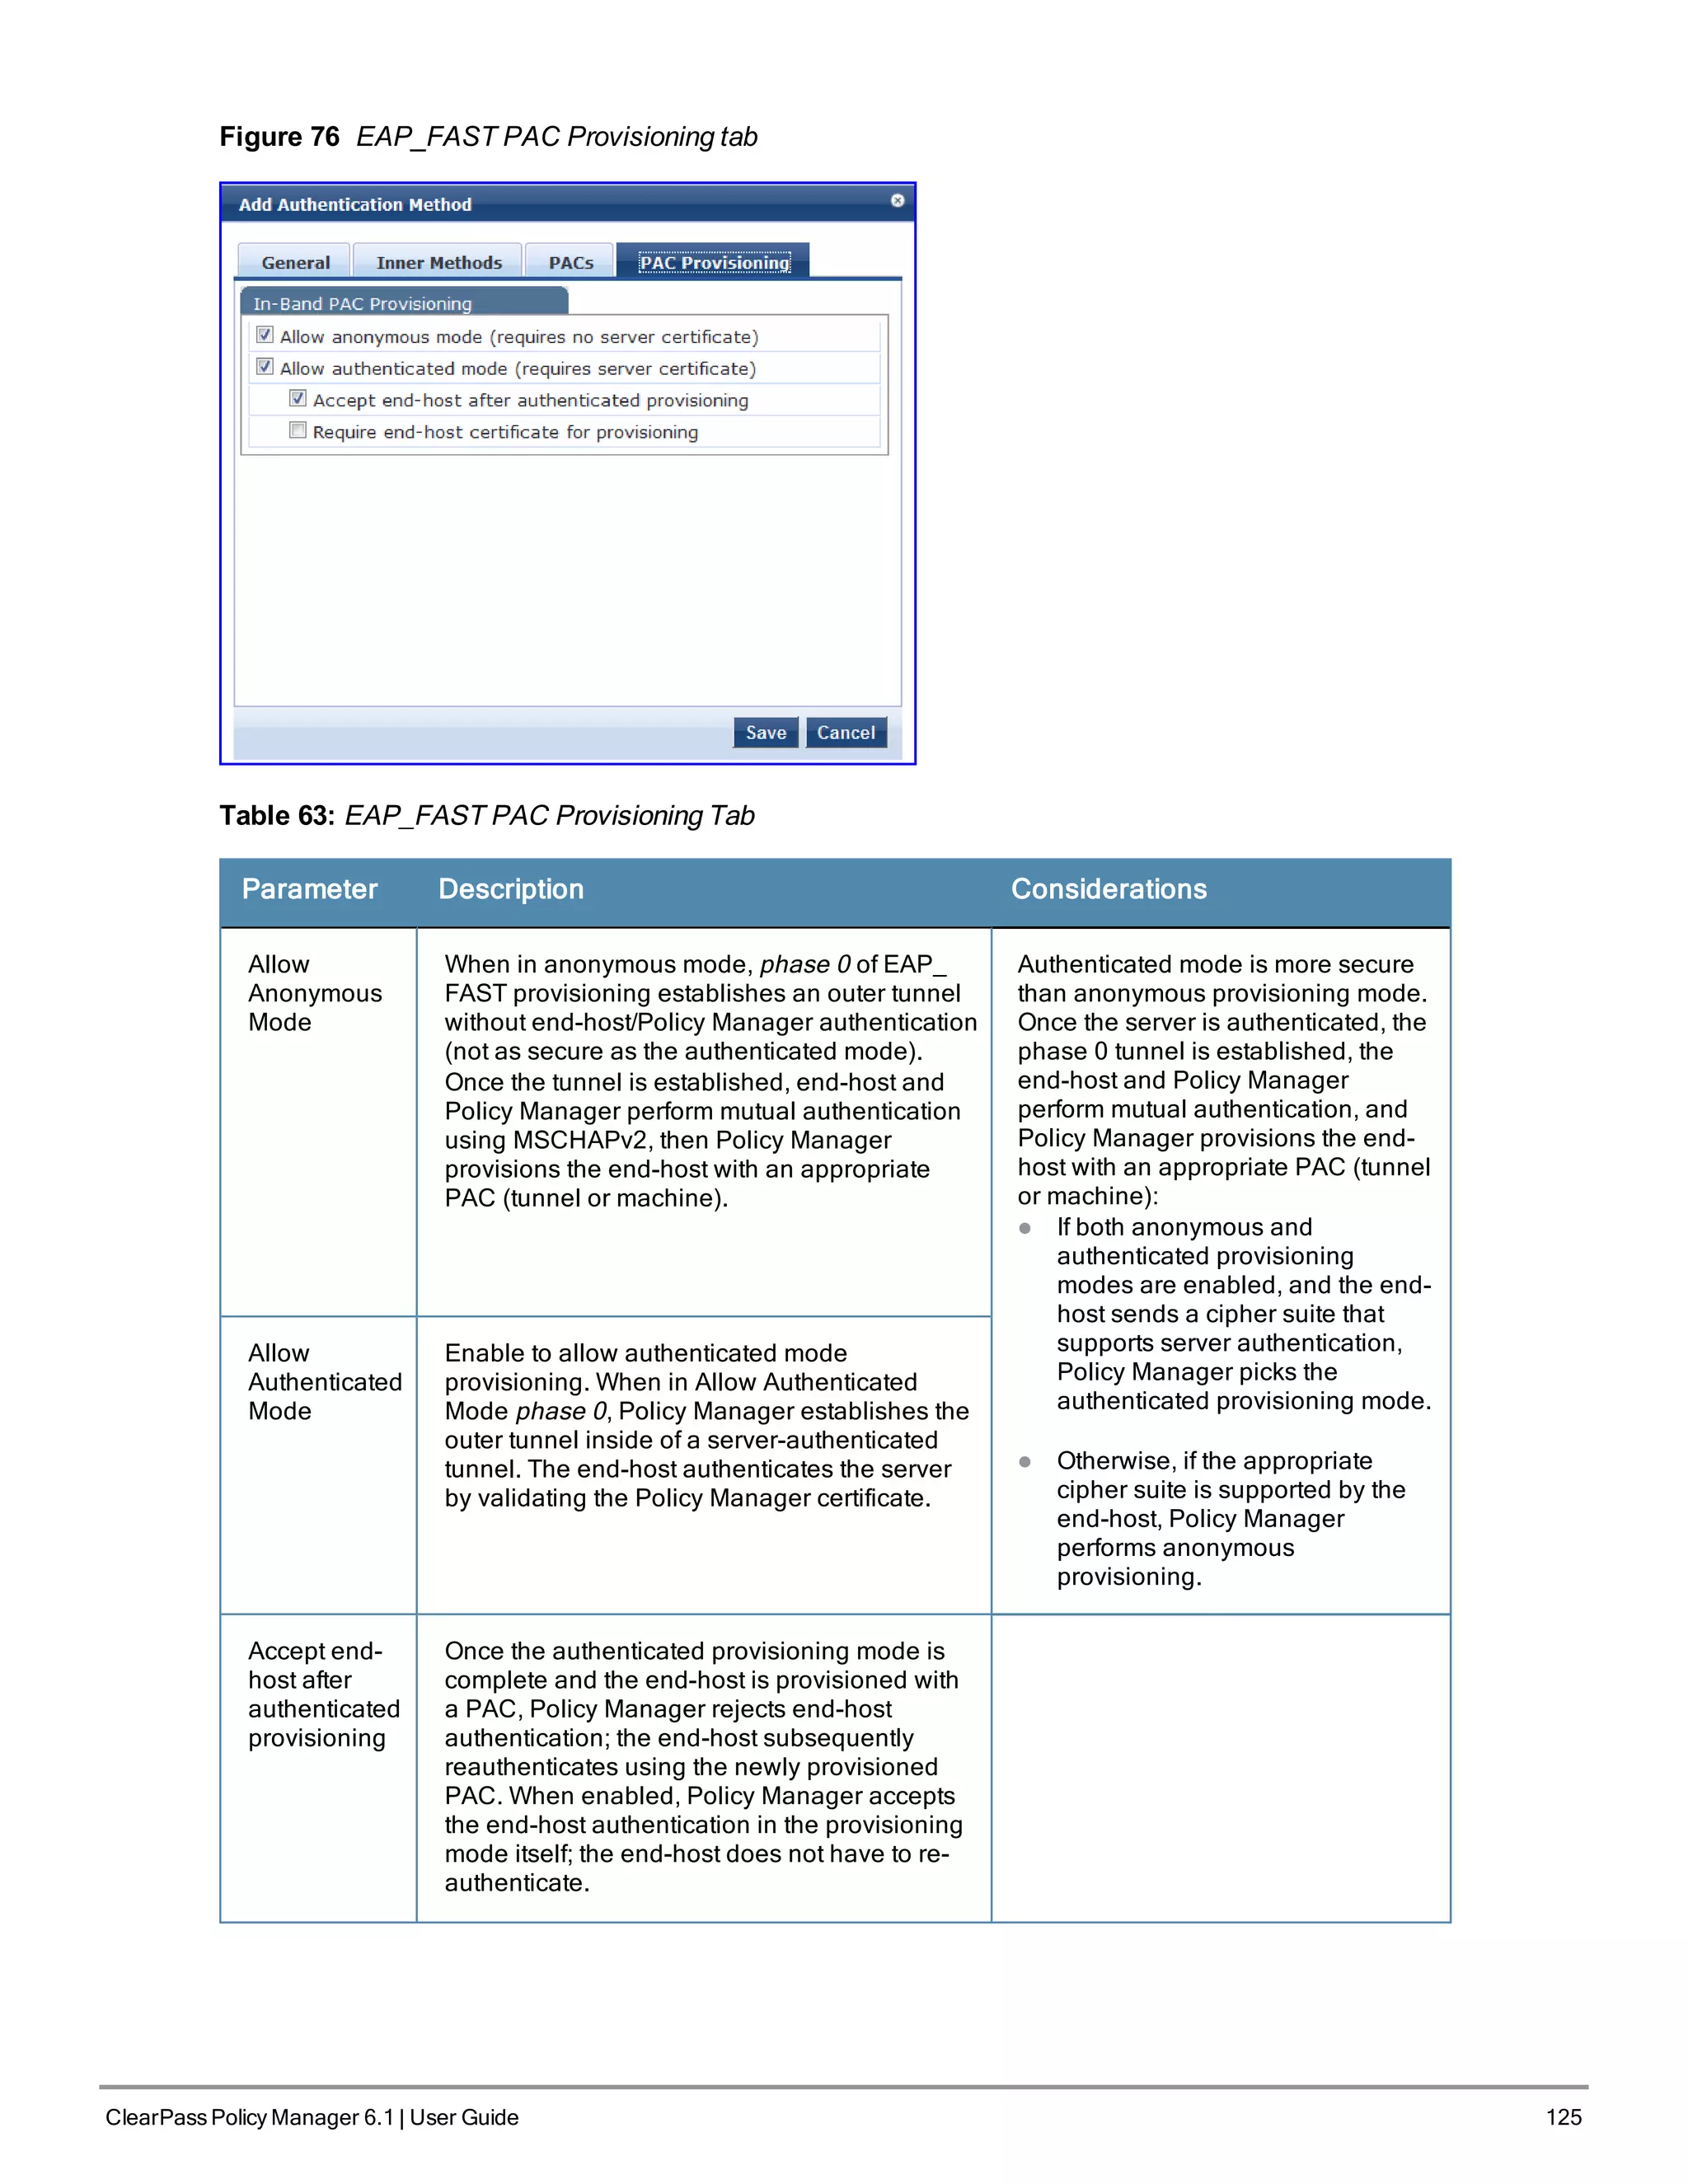
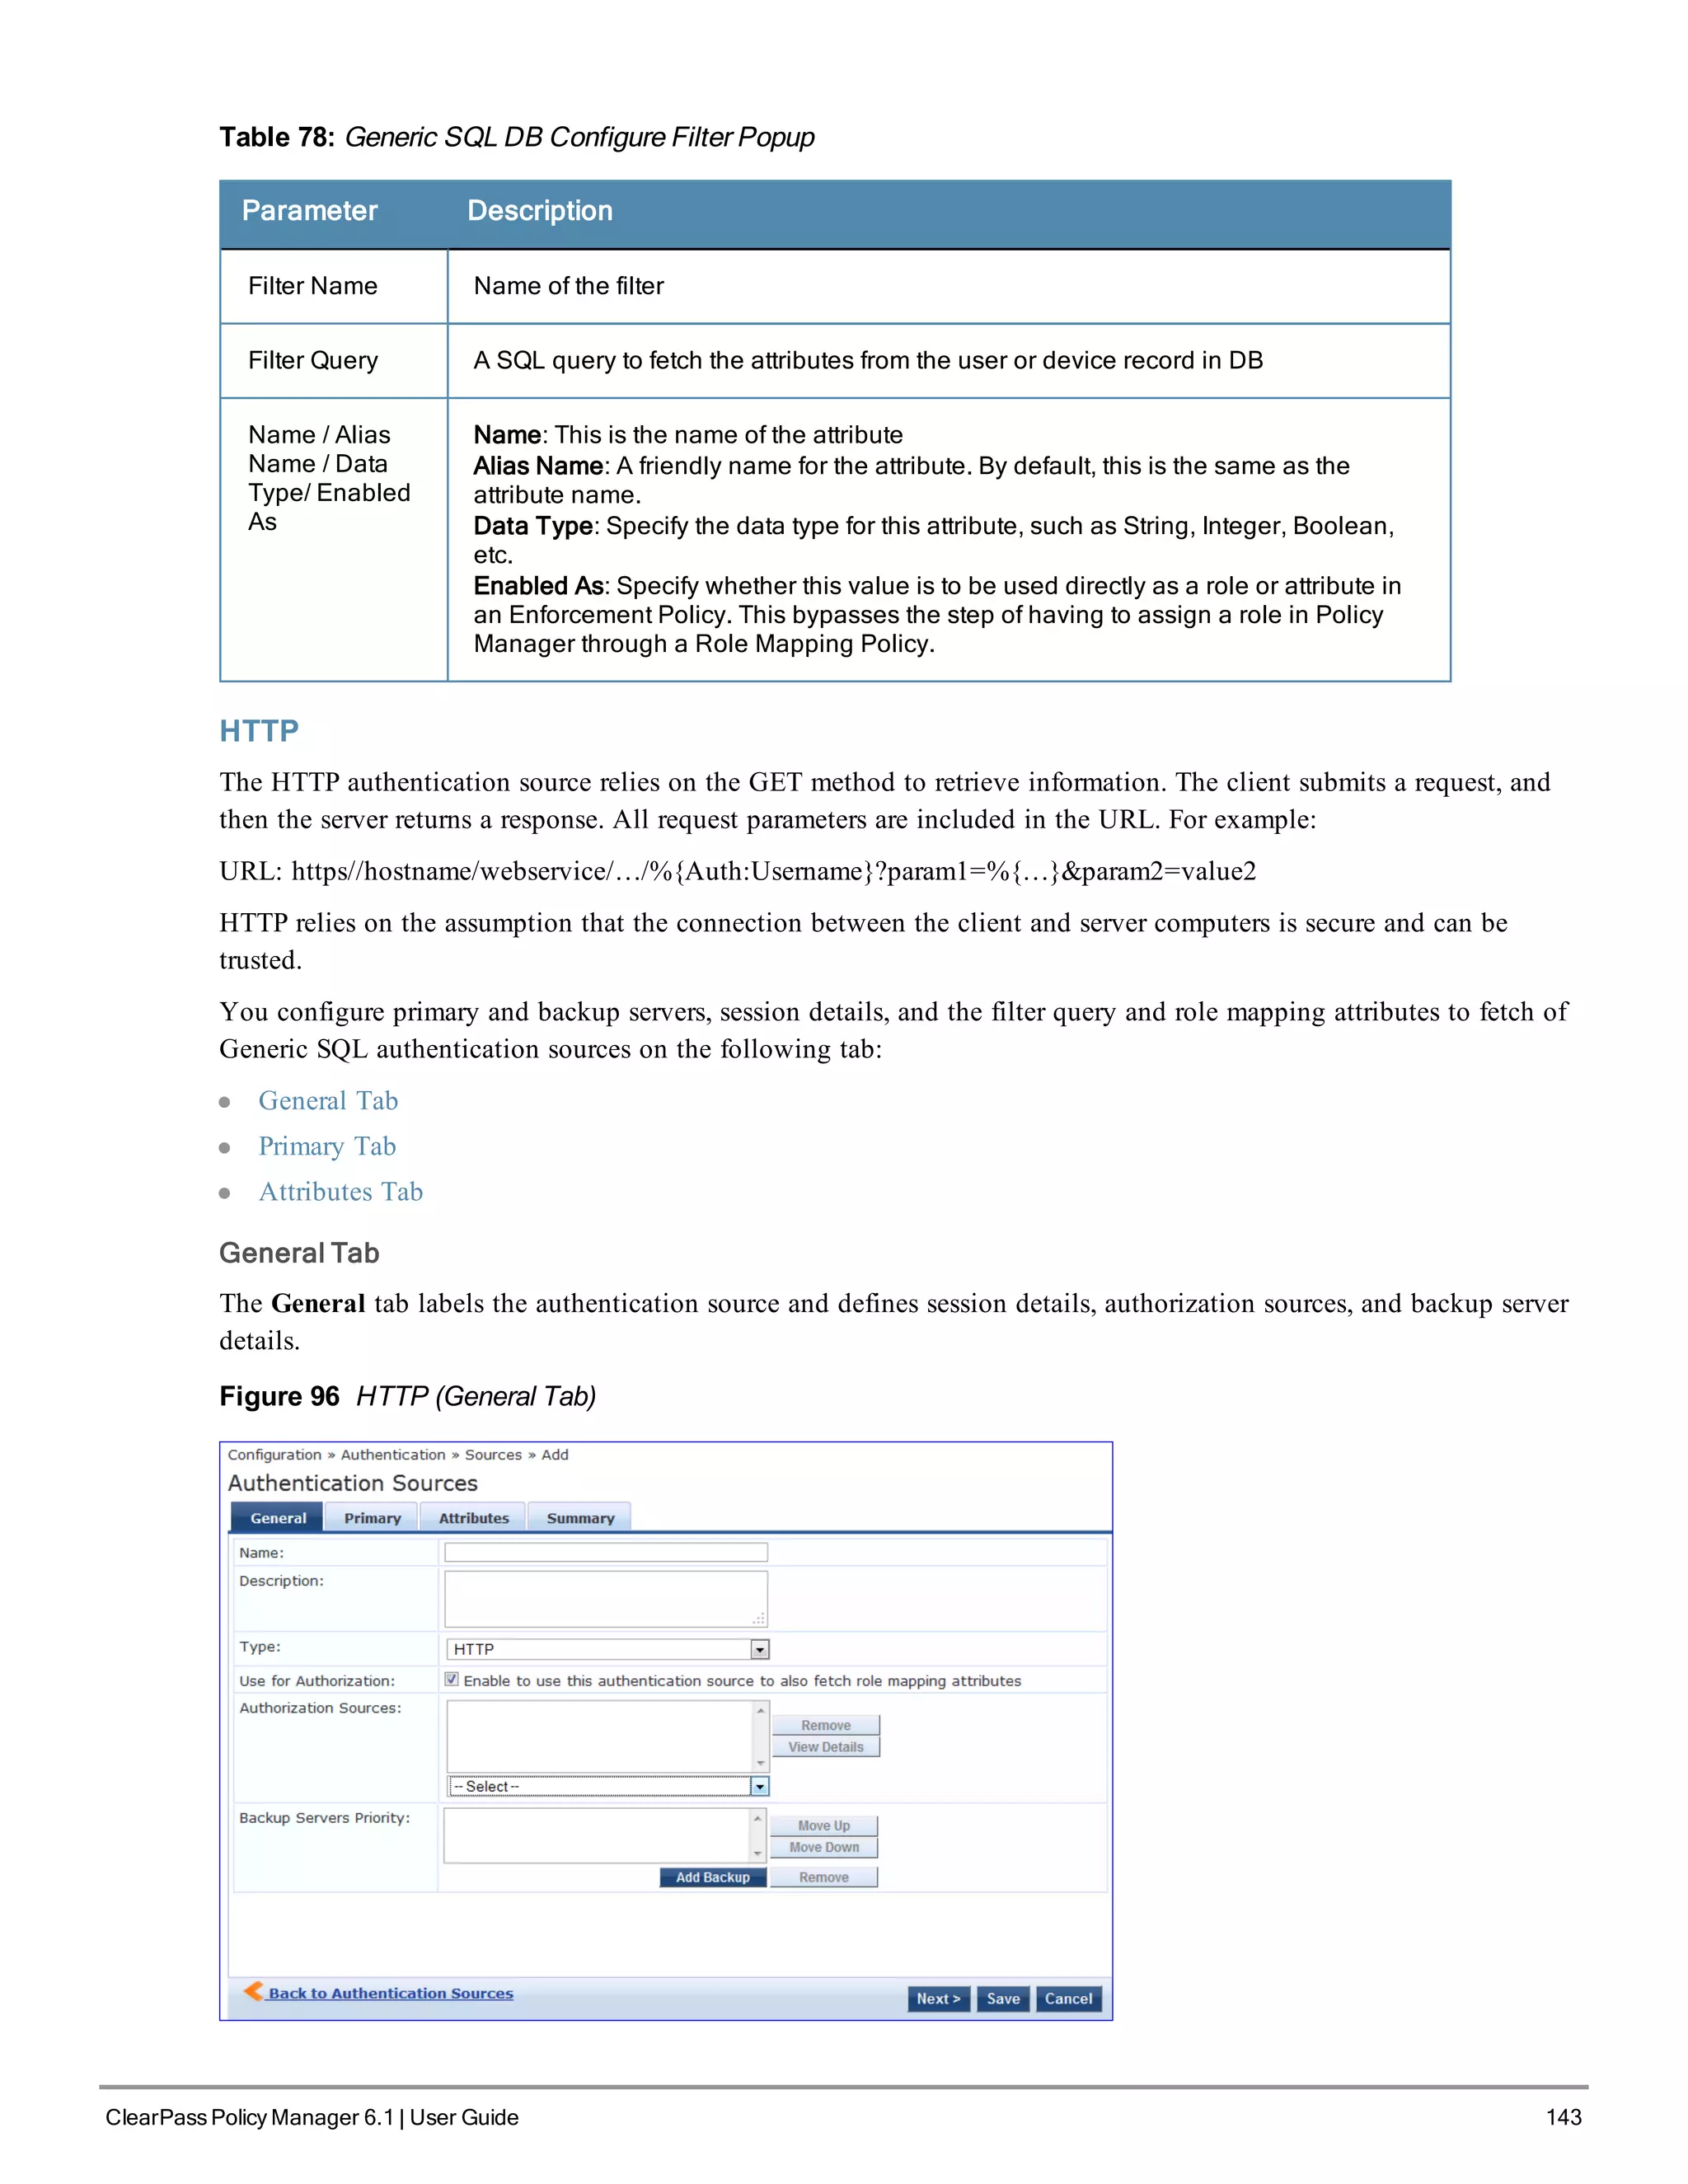
![126 ClearPass Policy Manager 6.1 | User Guide
Parameter Description Considerations
Required
end-host
certificate for
provisioning
In authenticated provisioning mode, the end-
host authenticates the server by validating the
server certificate, resulting in a protected outer
tunnel; the end-host is authenticated by the
server inside this tunnel. When enabled, the
server can require the end-host to send a
certificate inside the tunnel for the purpose of
authenticating the end-host.
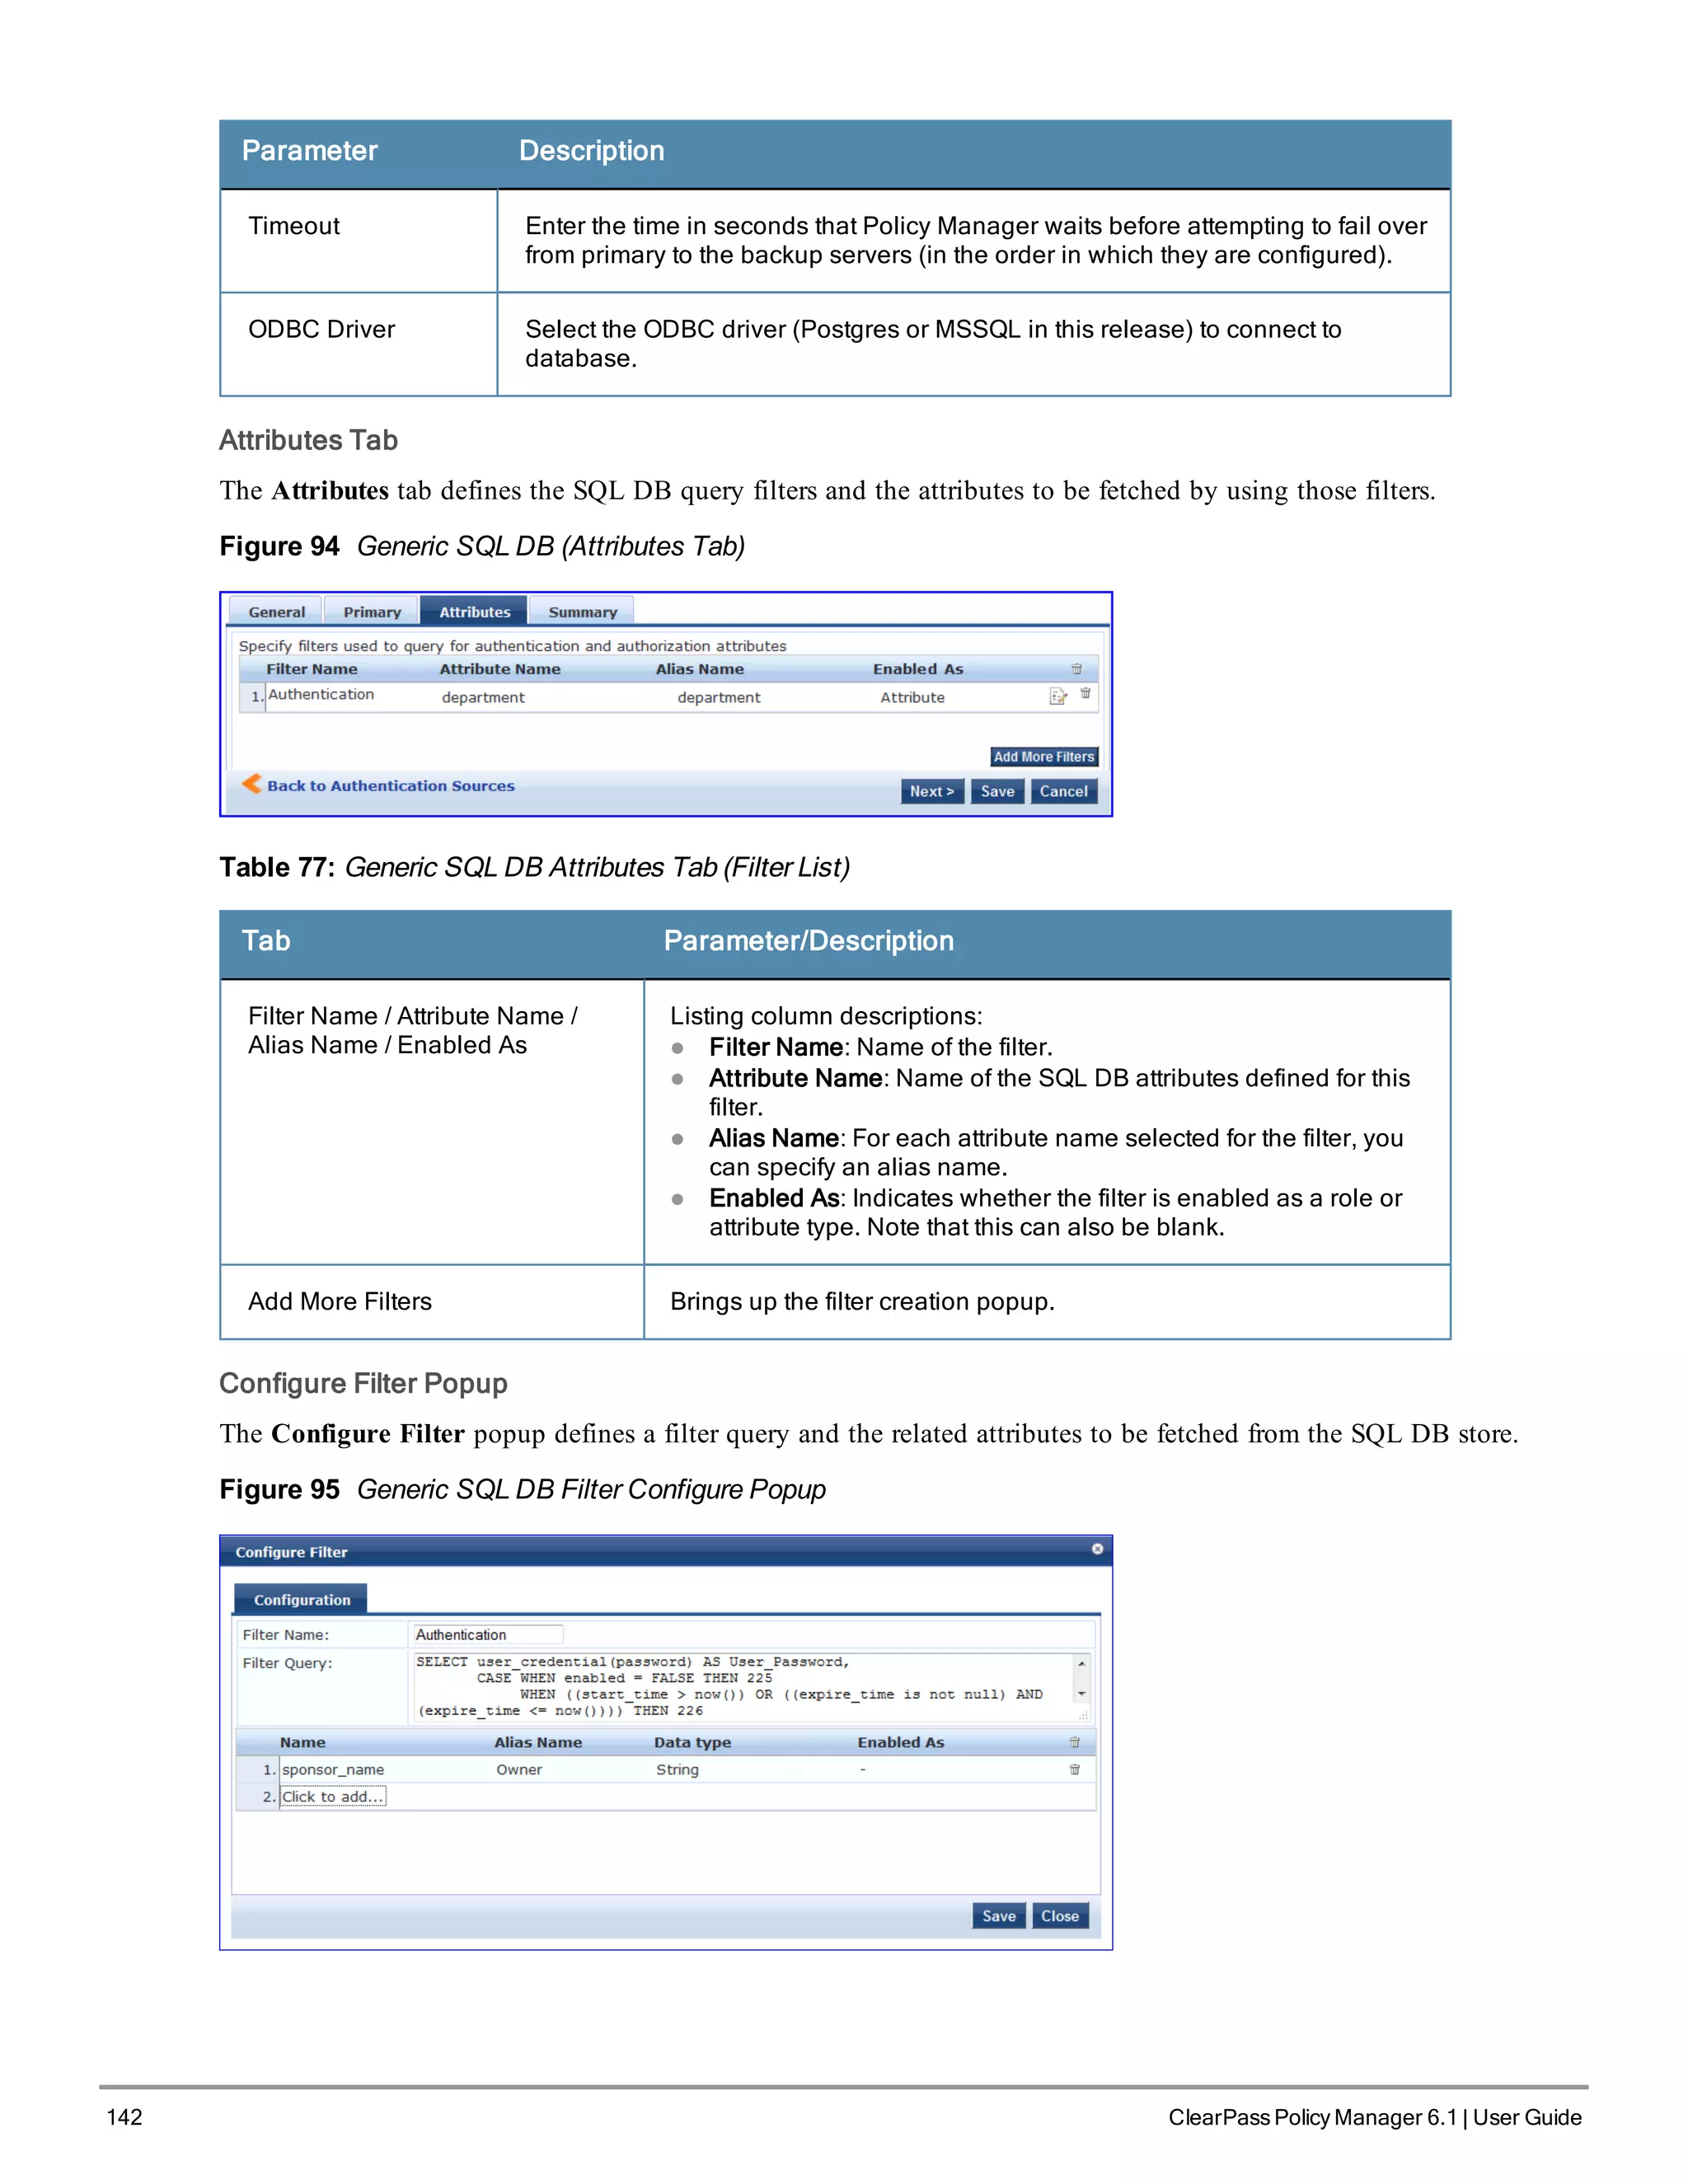
MAC-AUTH
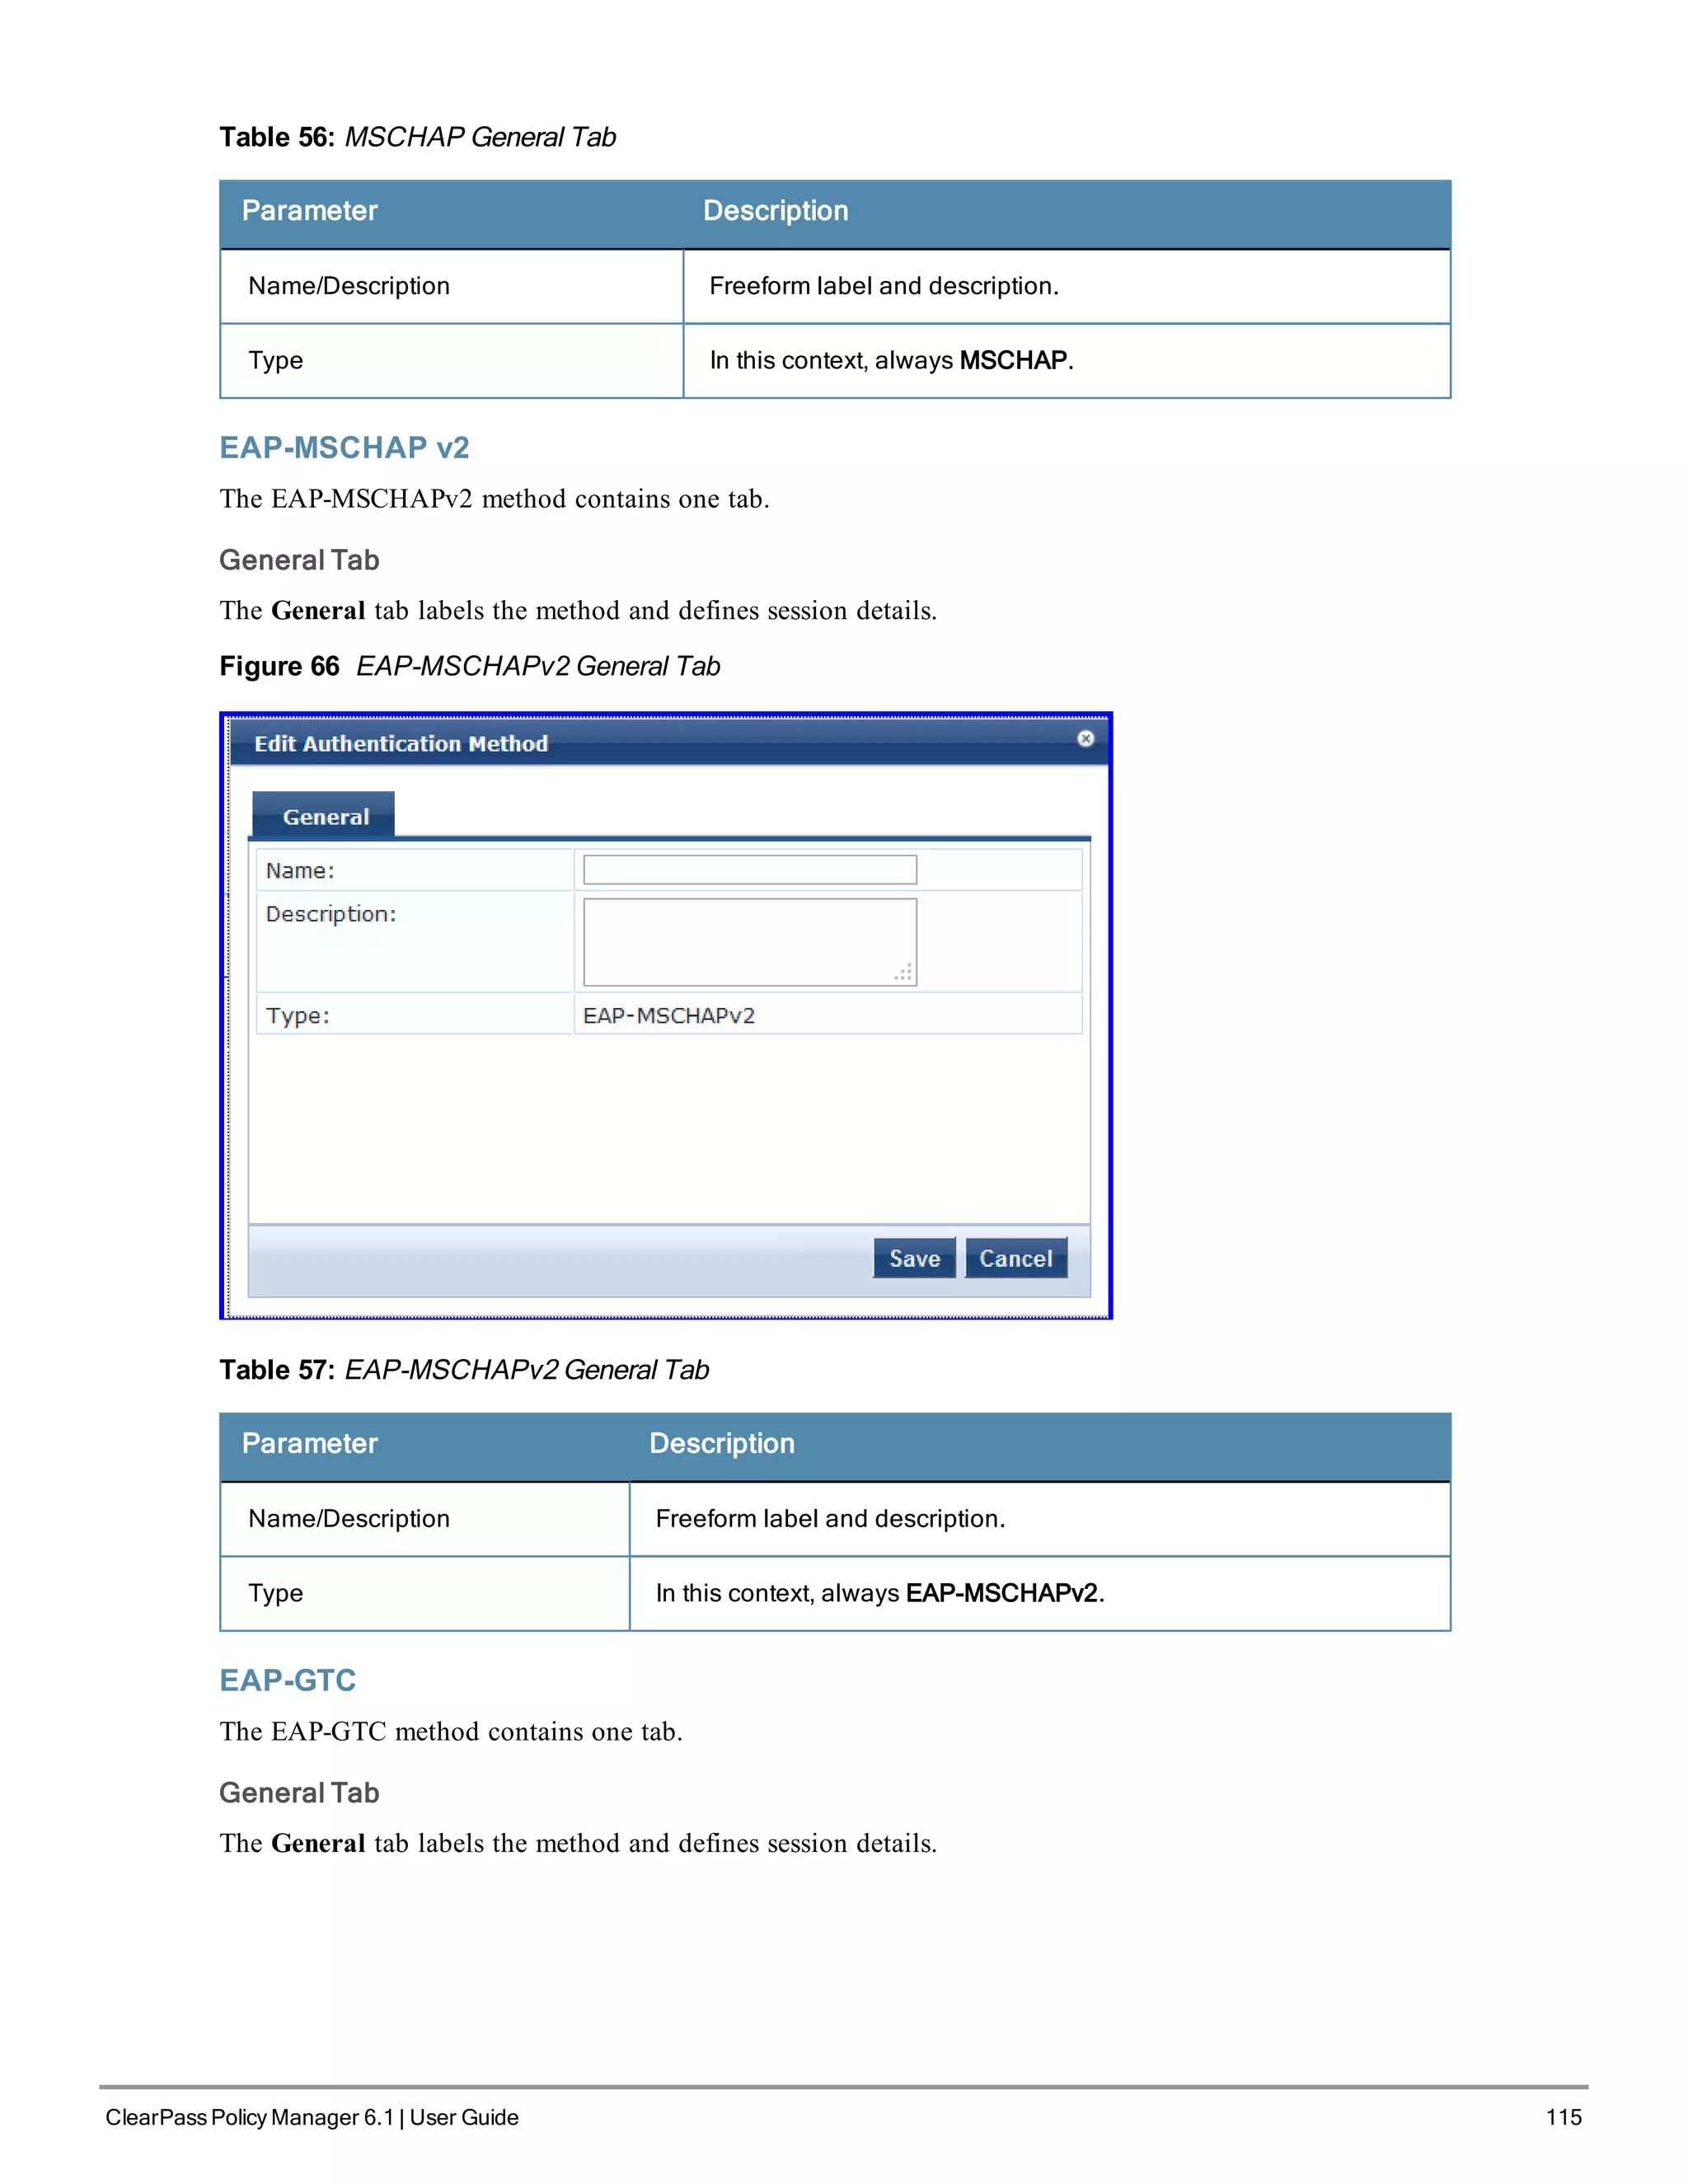
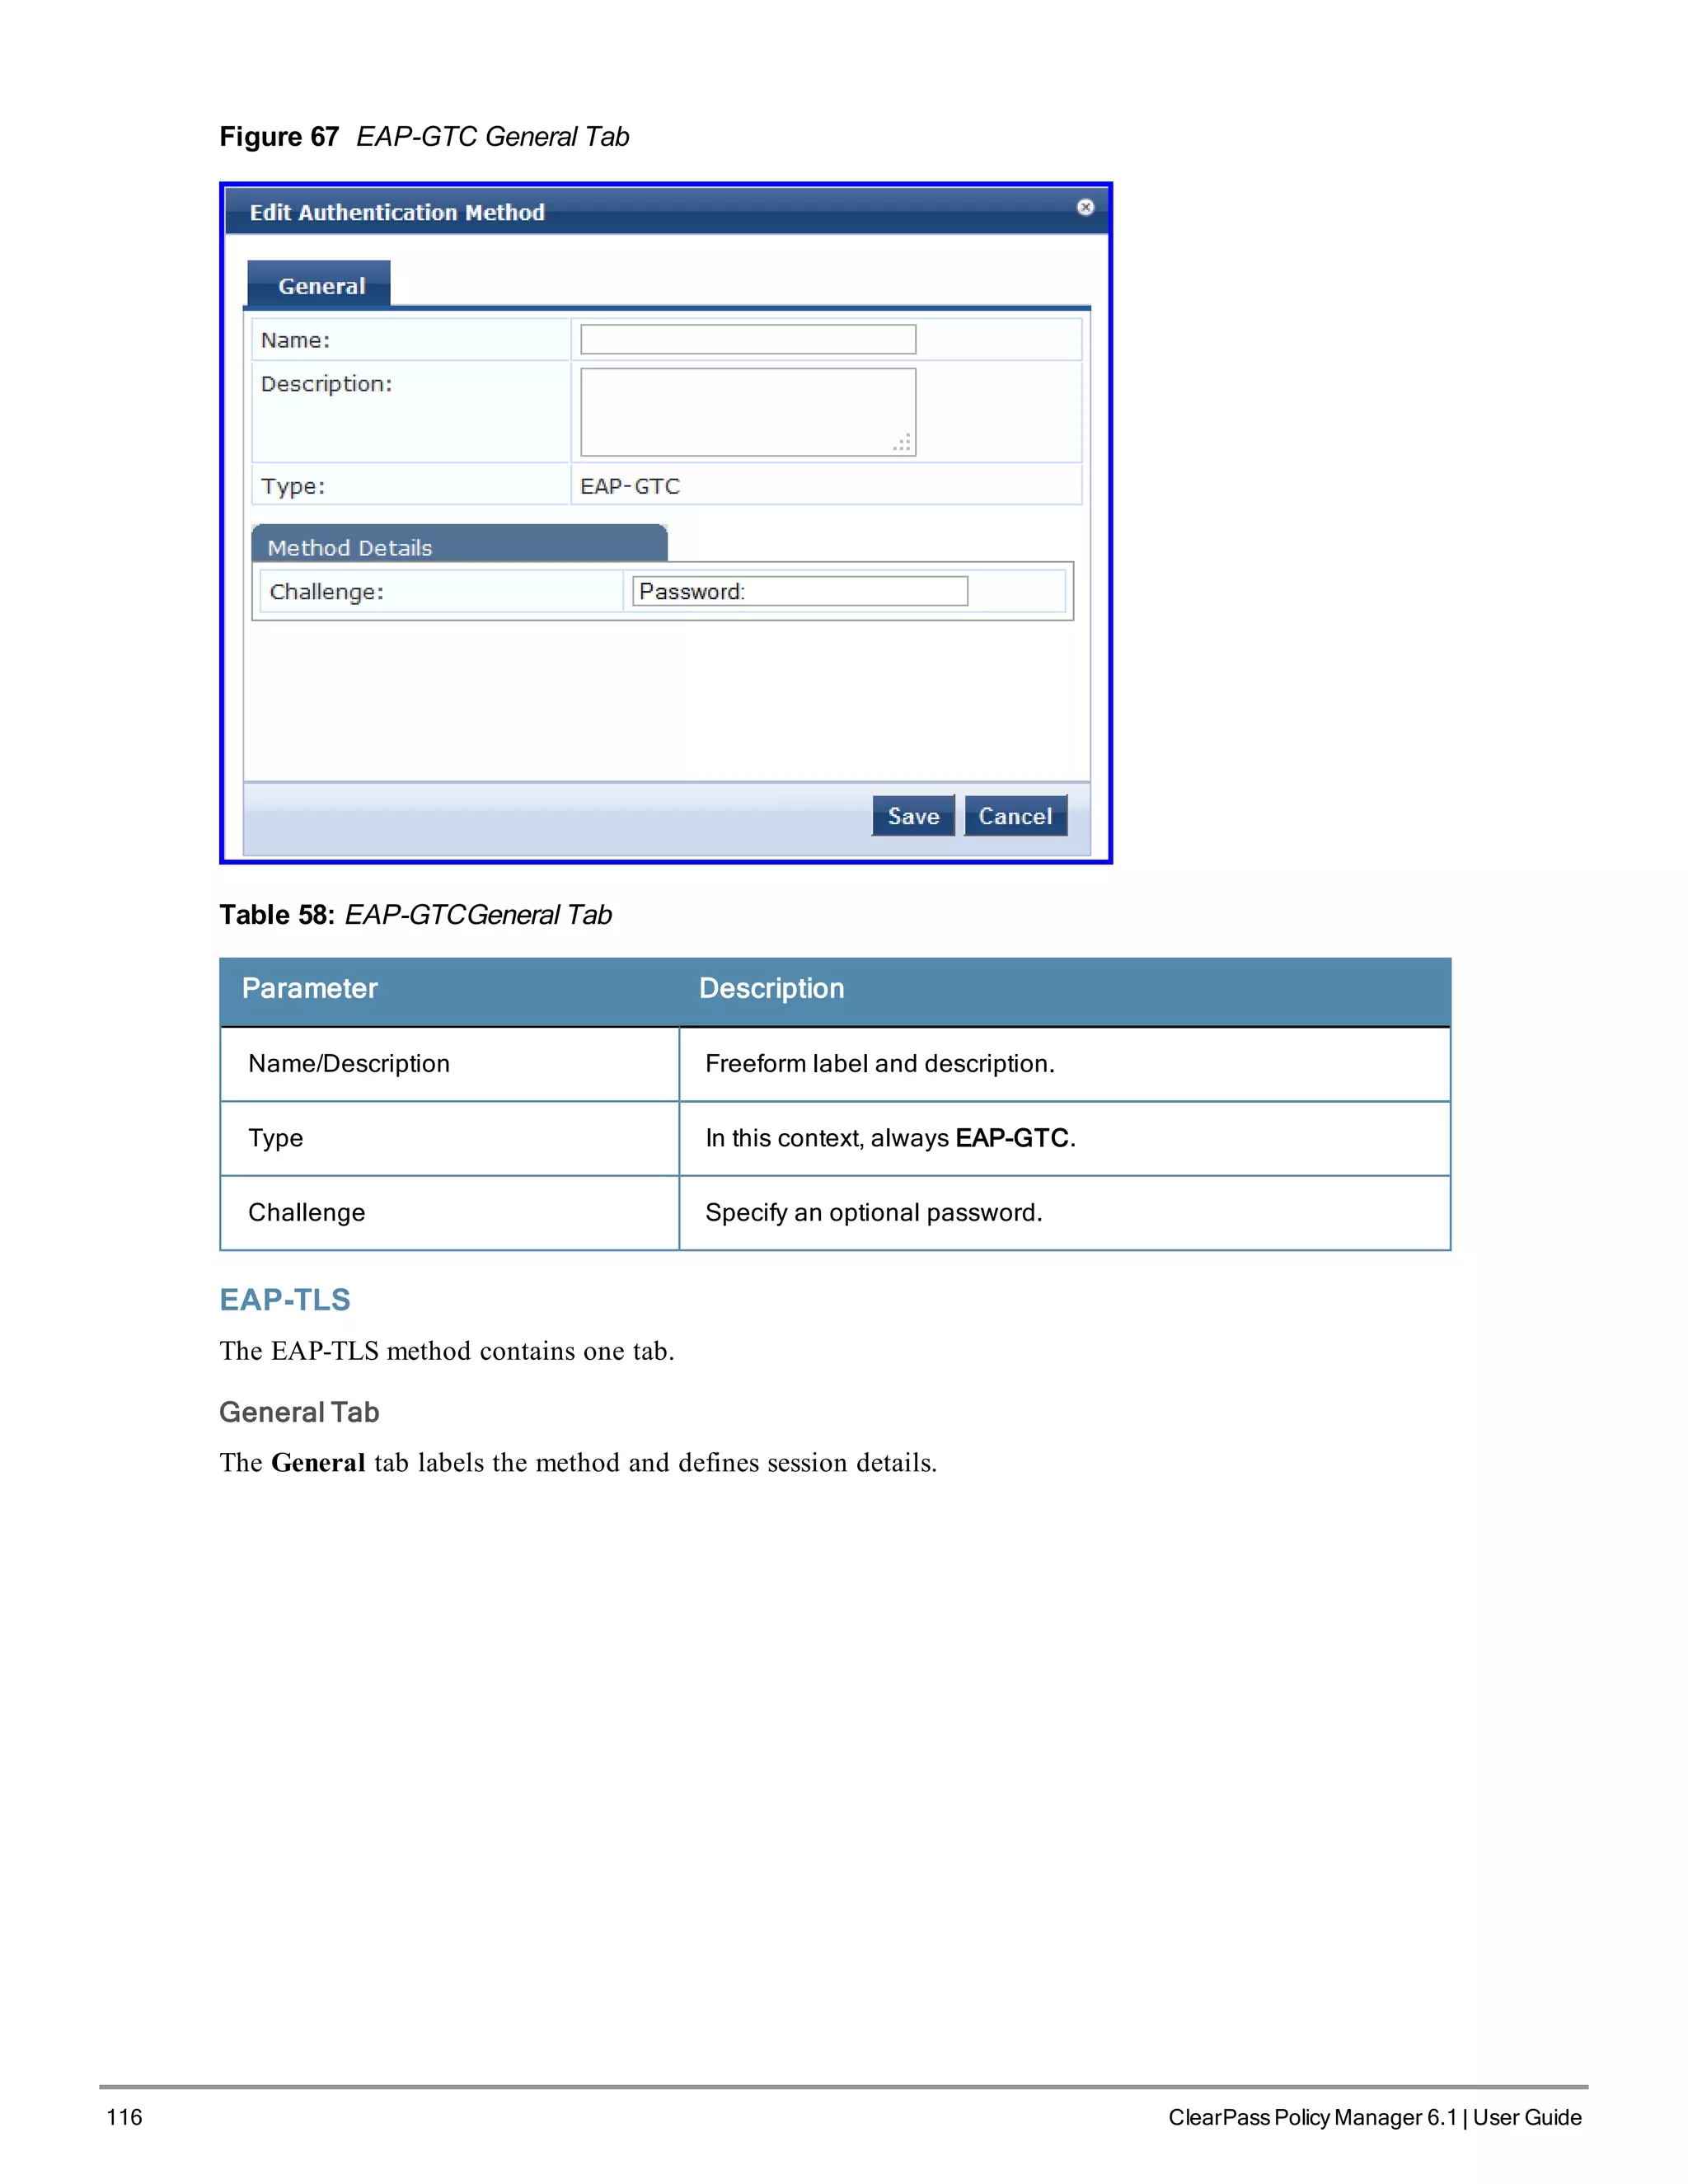
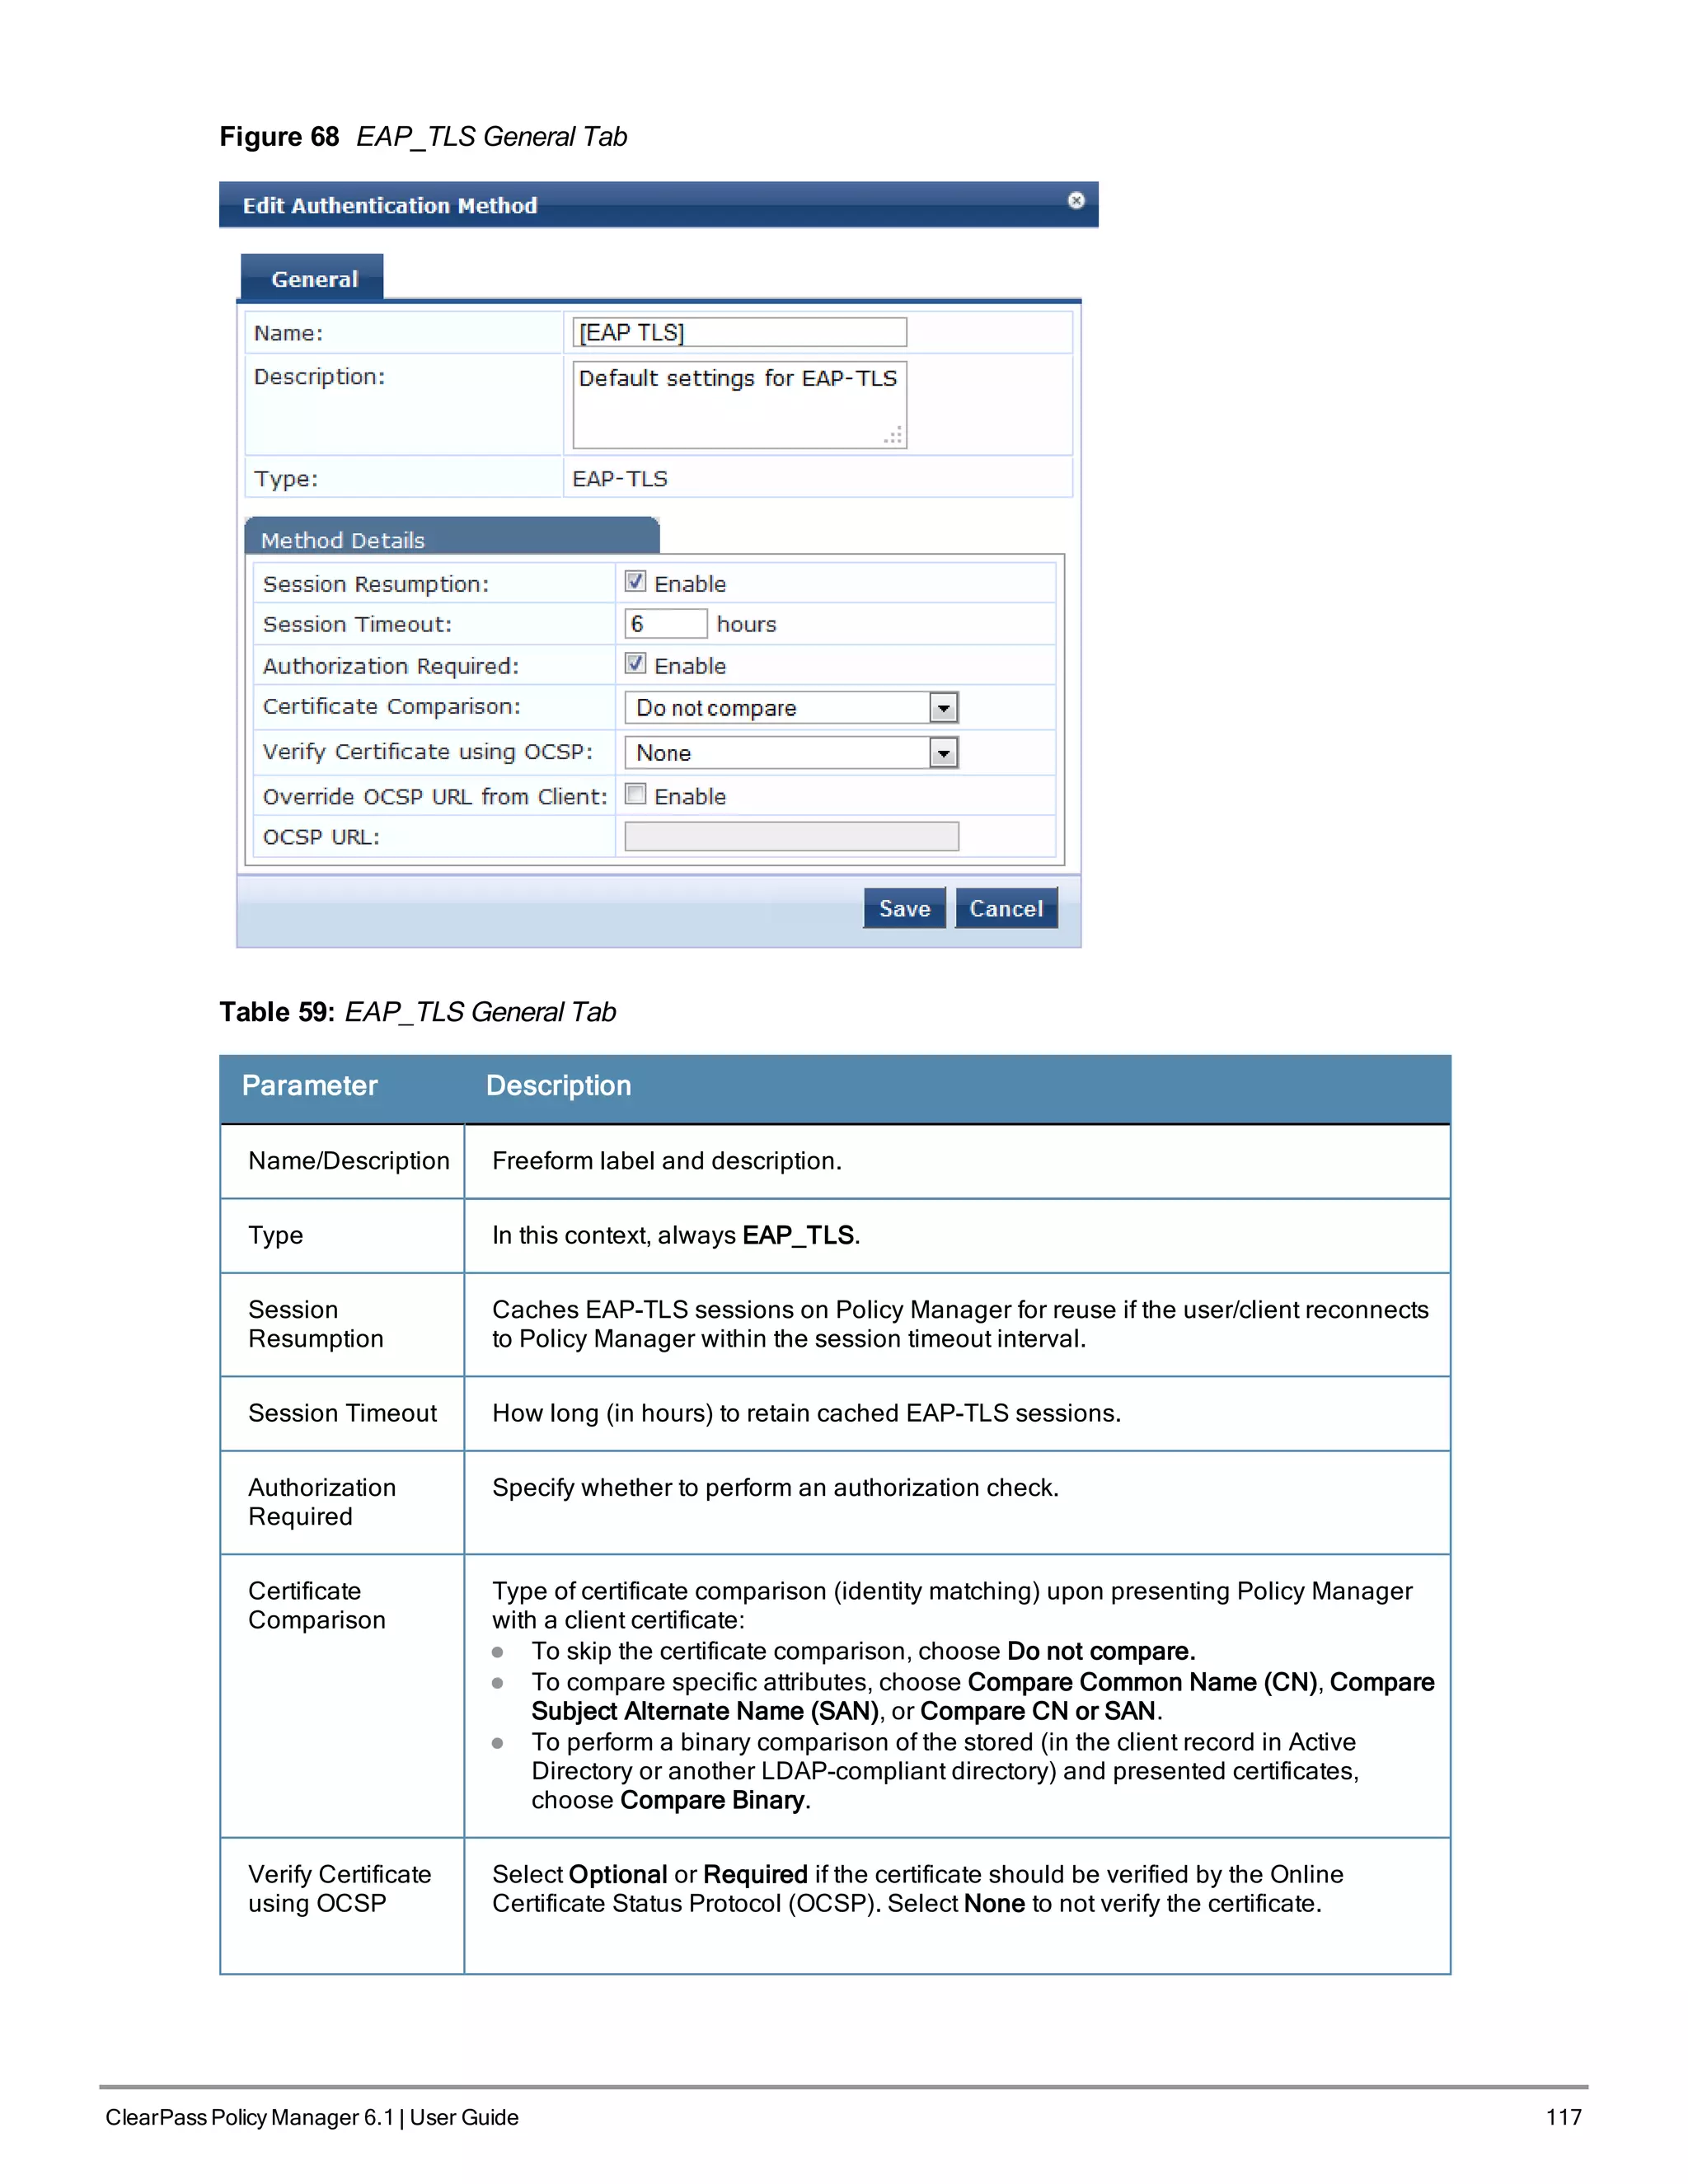
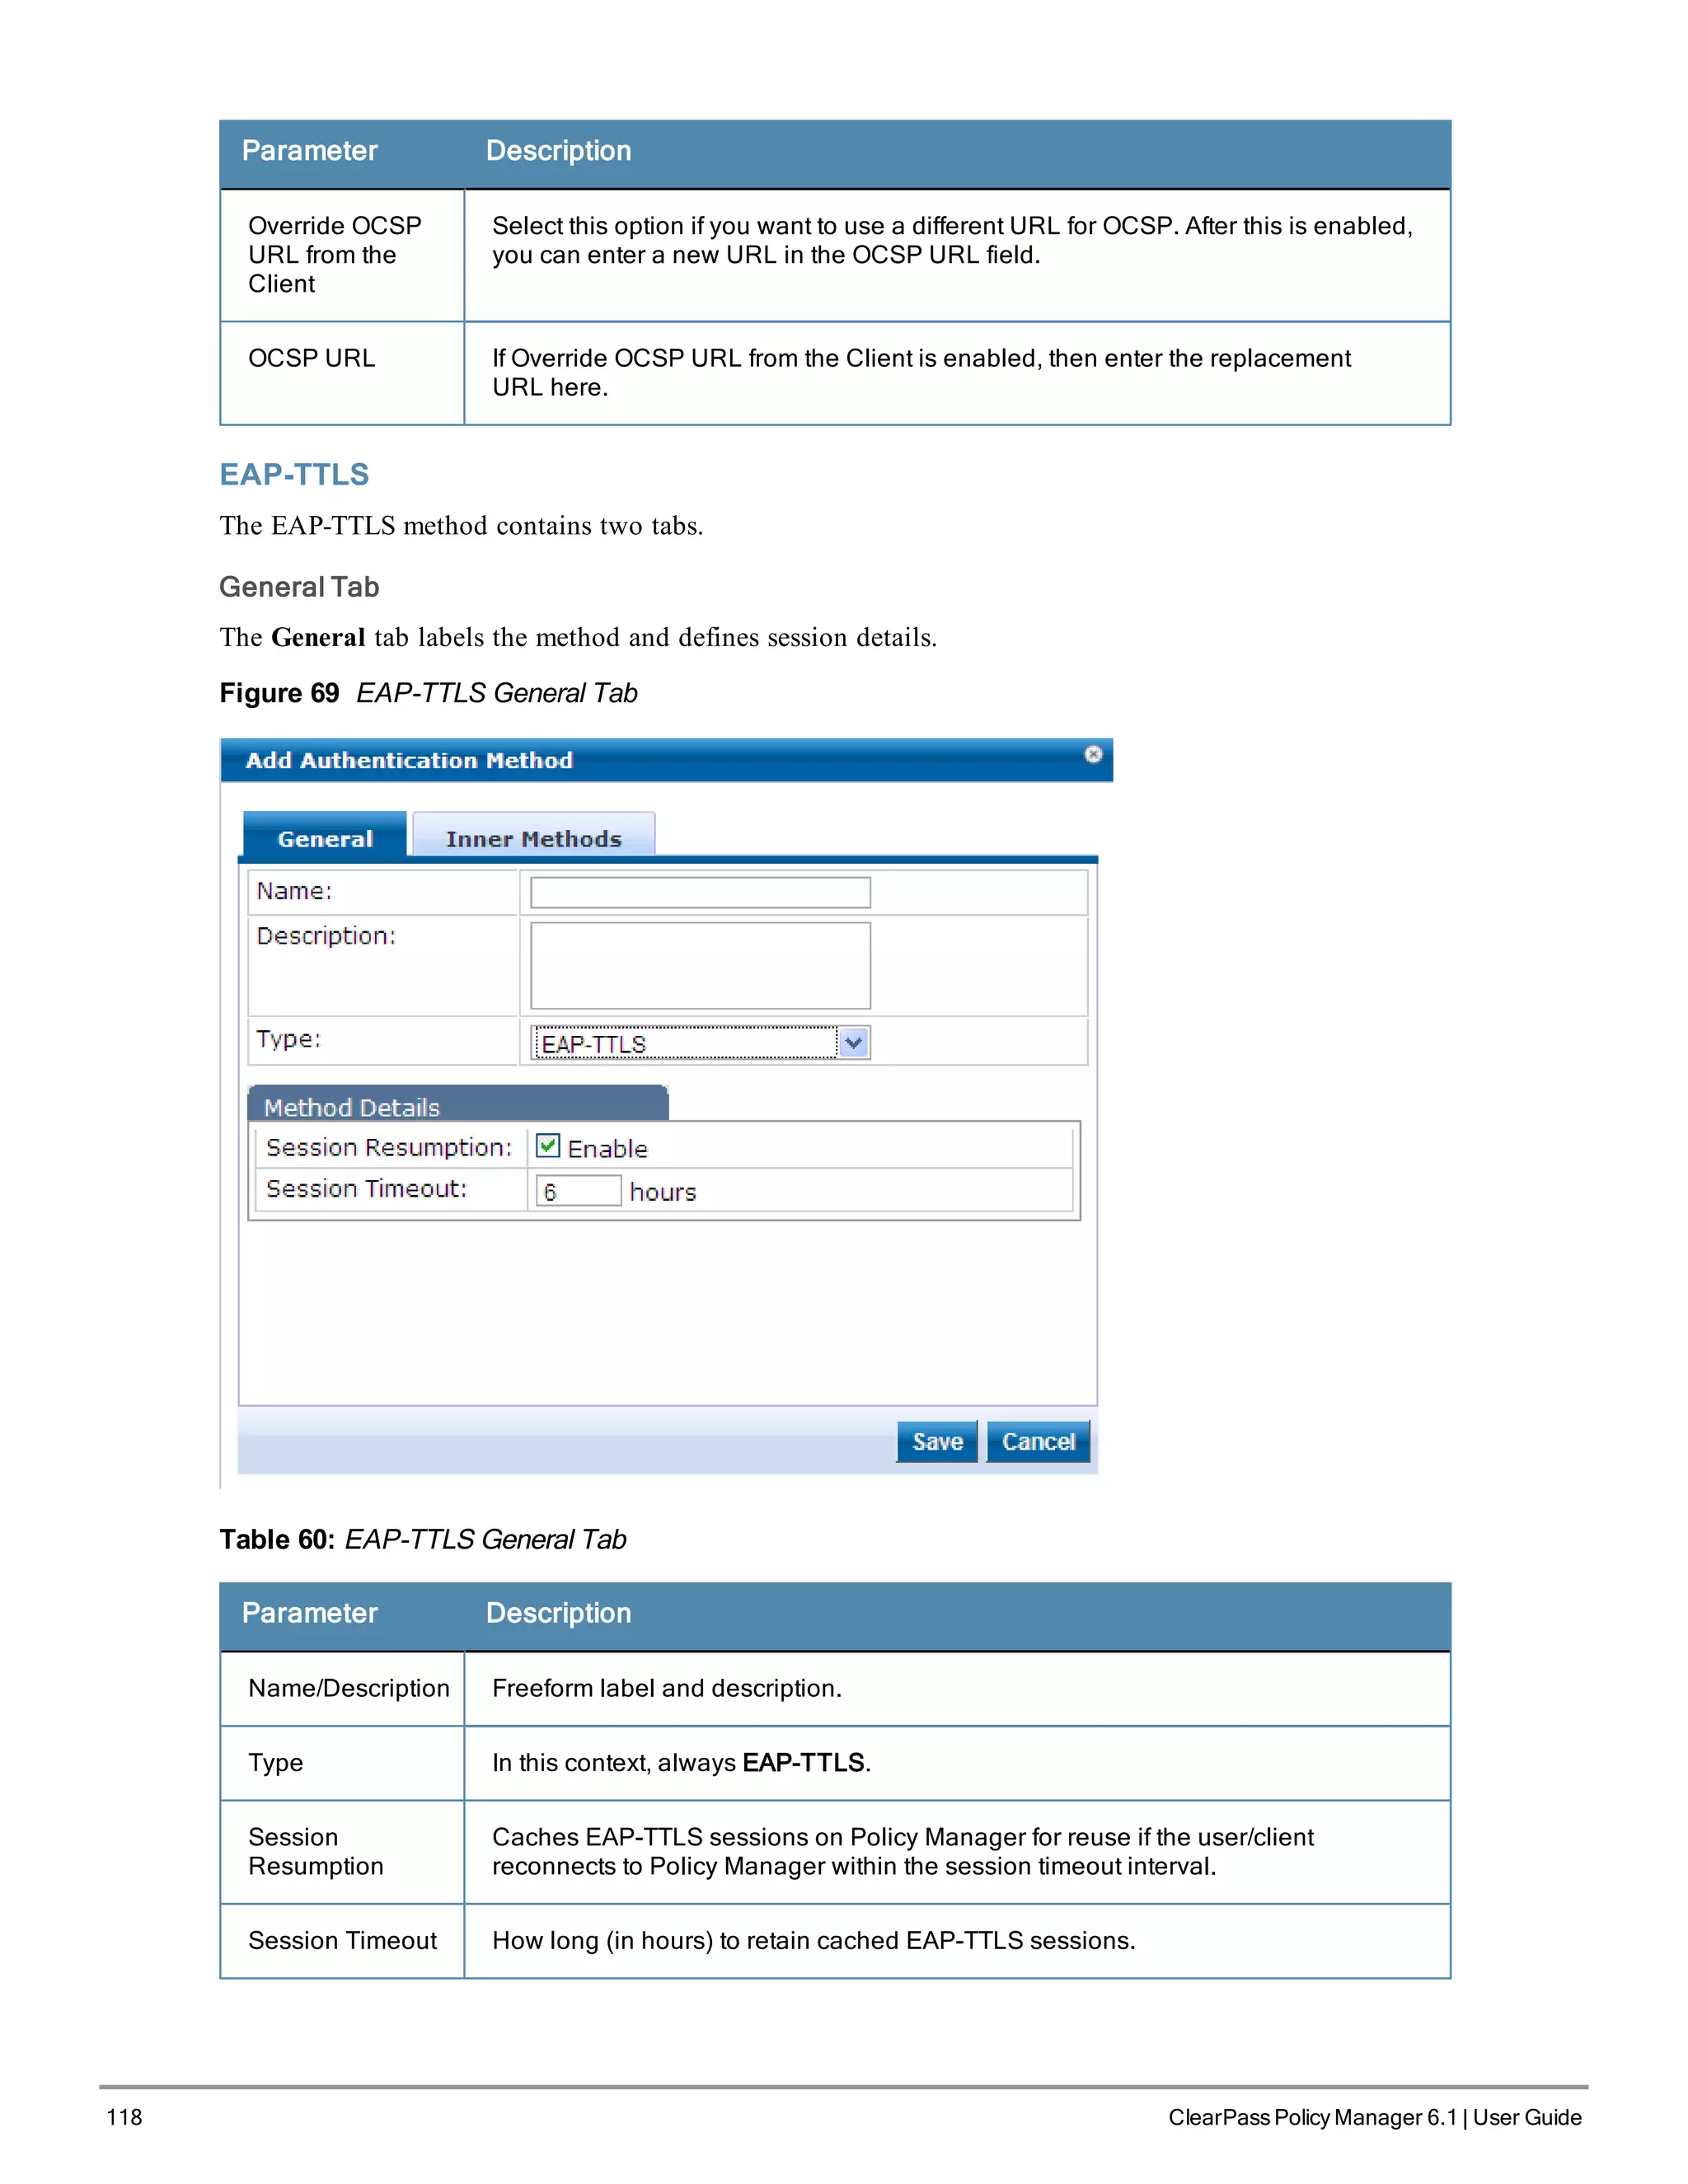
The MAC-AUTH method contains one tab.
General Tab
The General tab labels the method and defines session details.
Figure 77 MAC-AUTH General Tab
Table 64: MAC-Auth General Tab
Parameter Description
Name/Description Freeform label and description.
Type In this context, always MAC-AUTH.
Allow Unknown
End-Hosts
Enables further policy processing of MAC authentication requests of unknown
clients.
If this is not enabled, Policy Manager automatically rejects a request whose MAC
address is not in a configured authentication source. This setting is enabled, for
example, when you want Policy Manager to trigger an audit for an unknown client.
By turning on this check box and enabling audit (See "Configuring Audit Servers" on
page 199), you can trigger an audit of an unknown client.
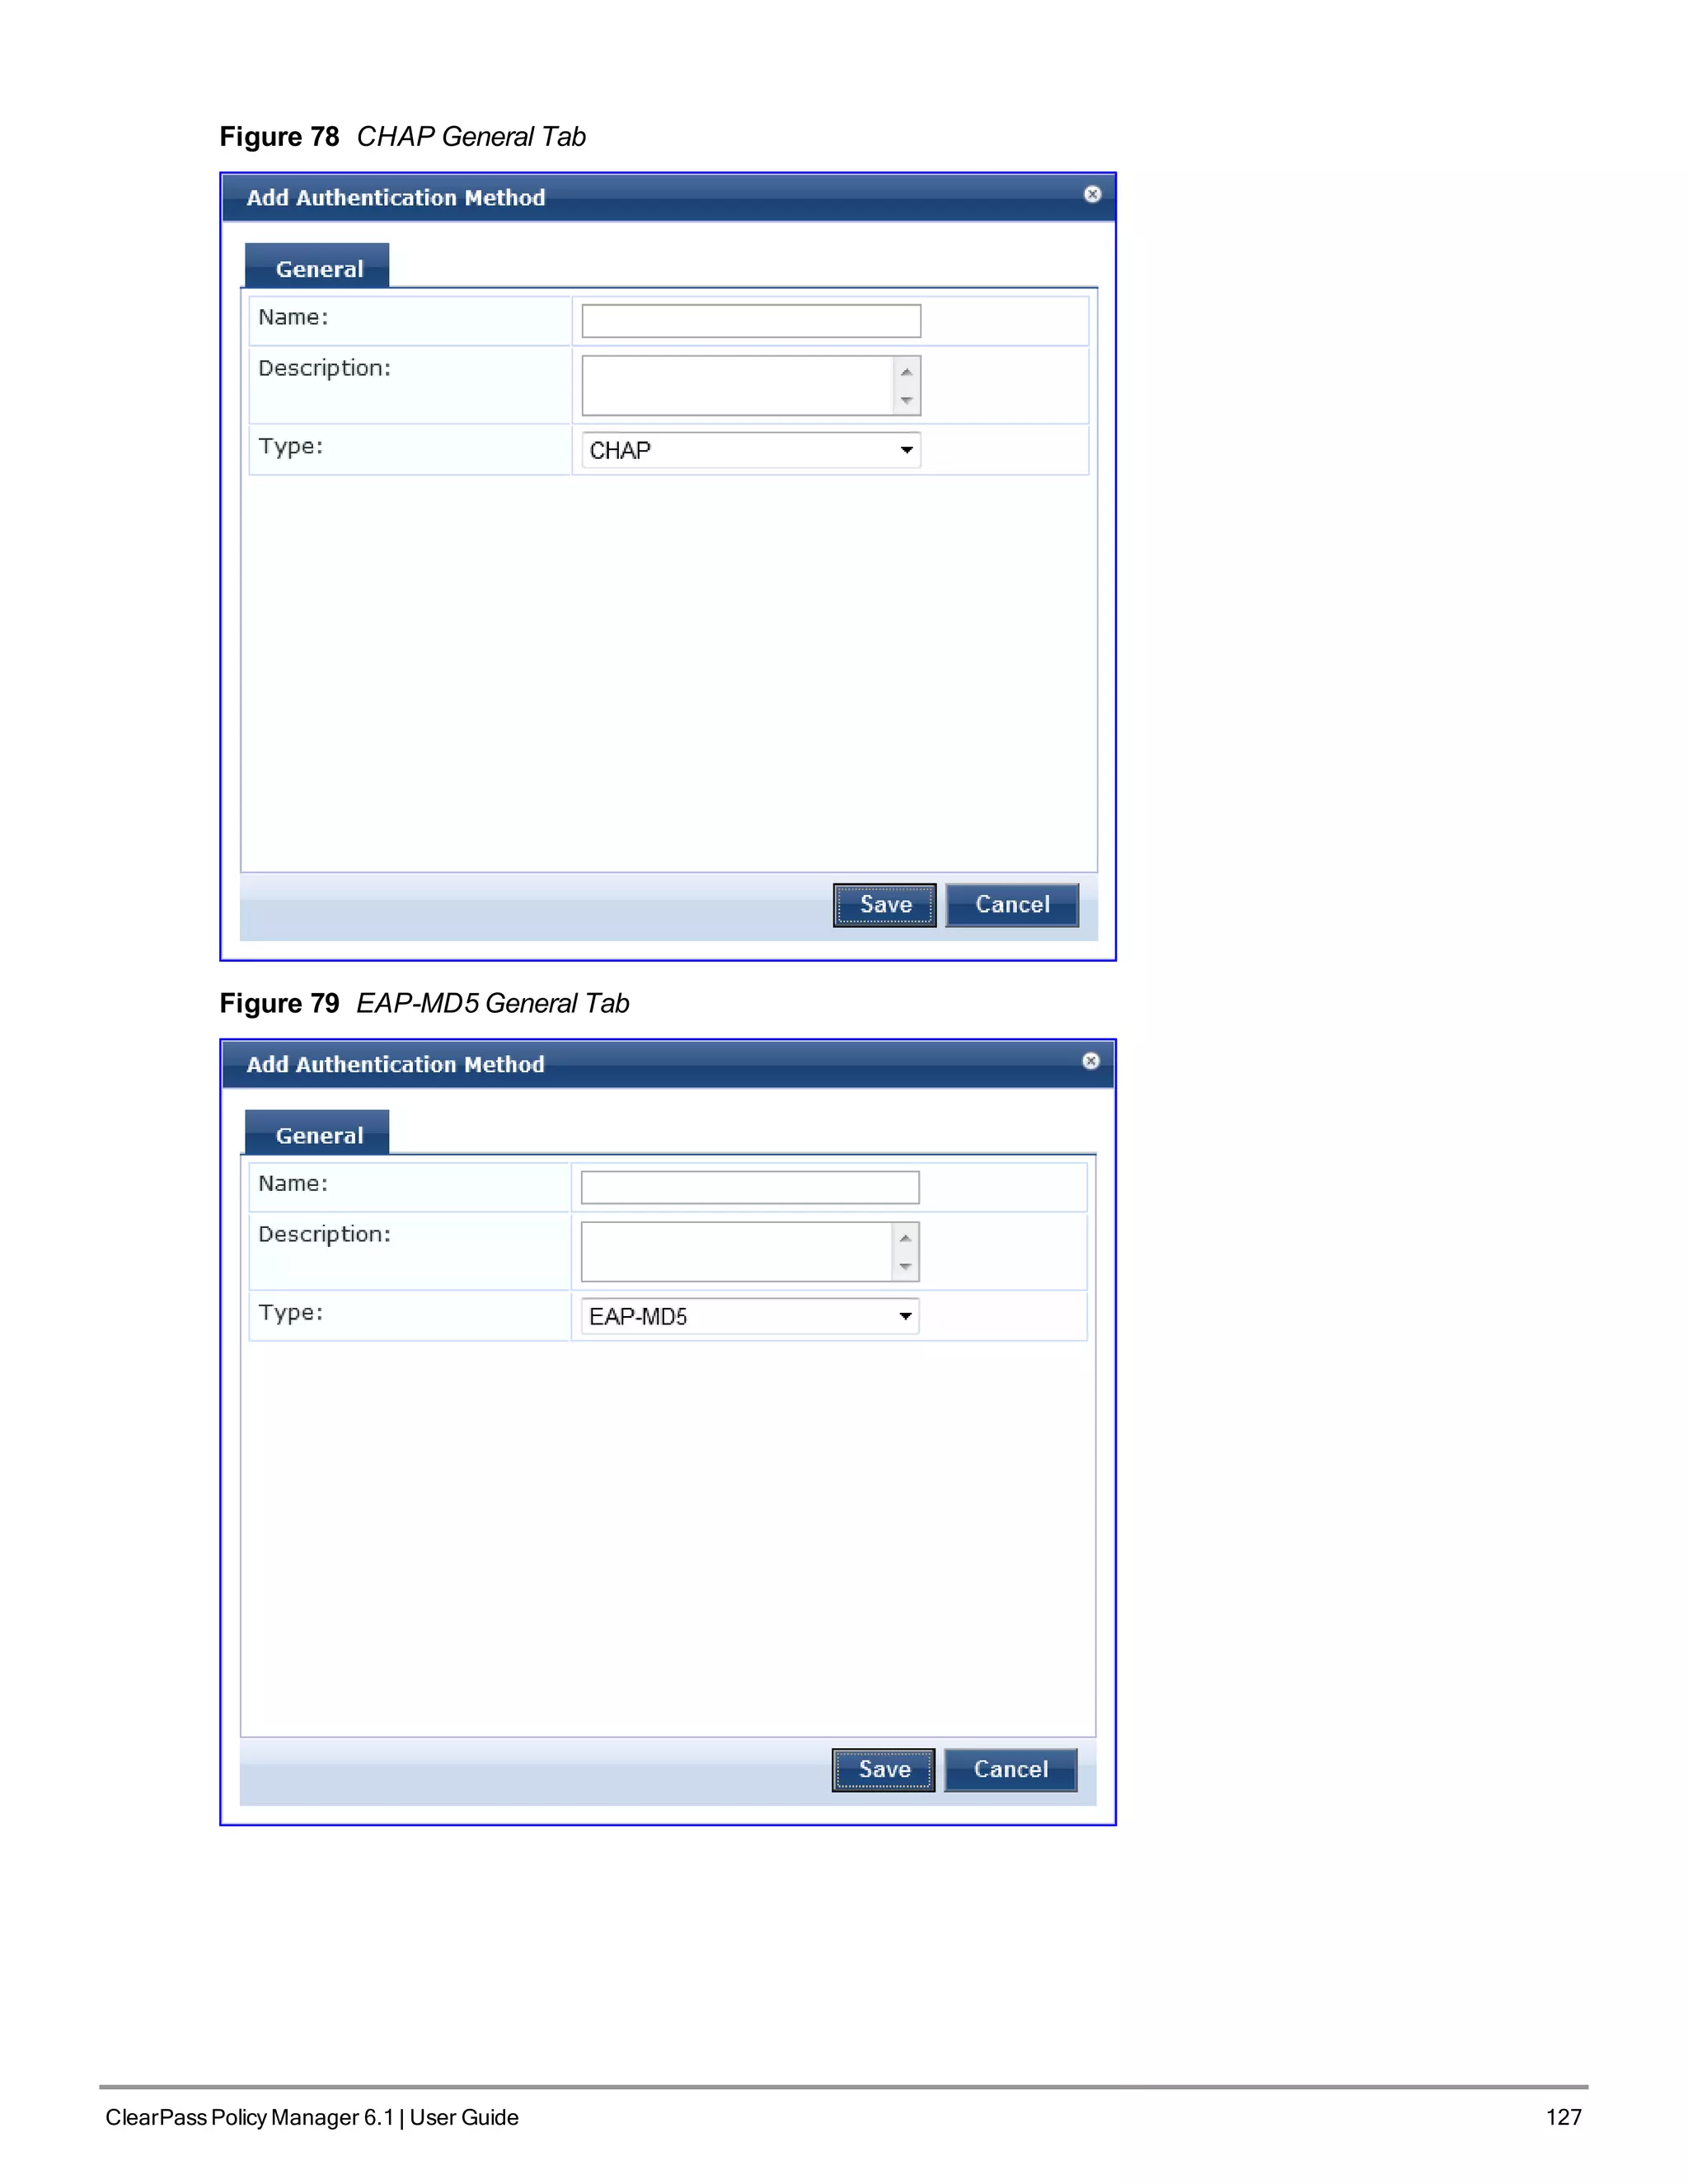
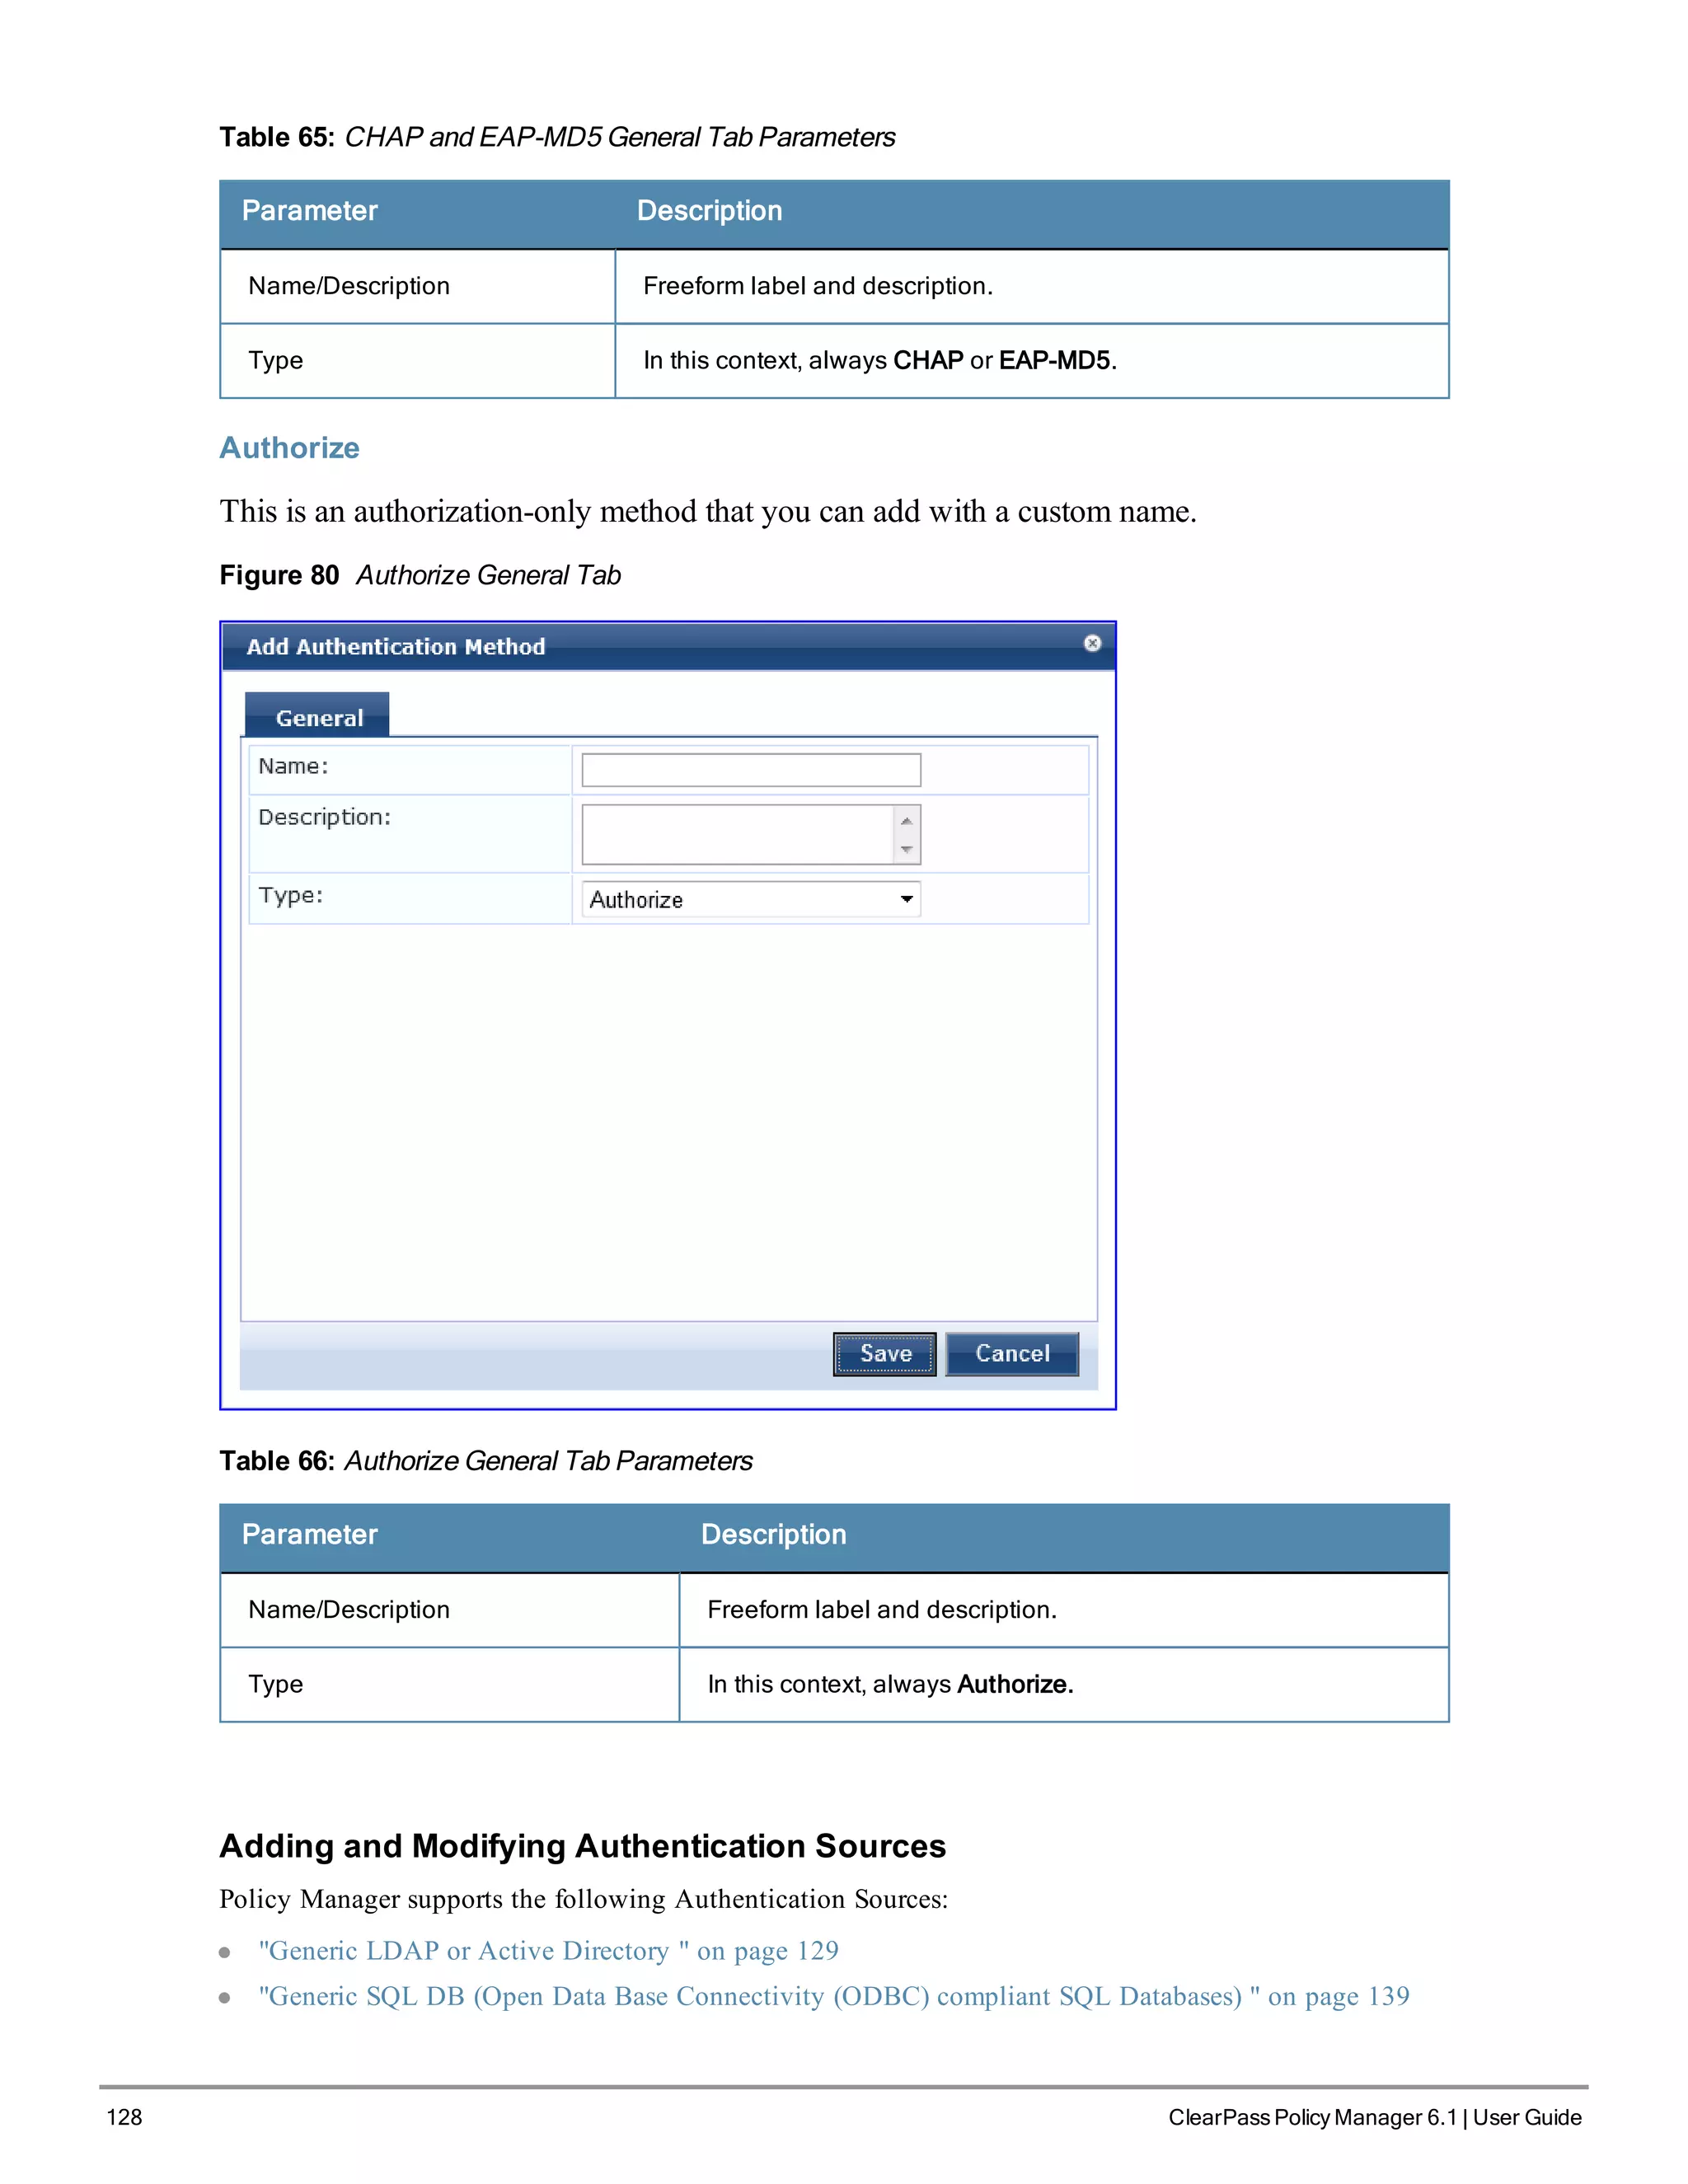
CHAP and EAP-MD5
In addition the methods listed above, Policy Manager also comes packaged with CHAP and EAP-MD5 methods. These
are named [CHAP] and [EAP-MD5], respectively. You can add methods of this type with a custom name. These
methods can also be associated to a Service as authentication methods.](https://image.slidesharecdn.com/arubacppm61userguide-140926121722-phpapp01/75/Aruba-cppm-6_1_user_guide-126-2048.jpg)
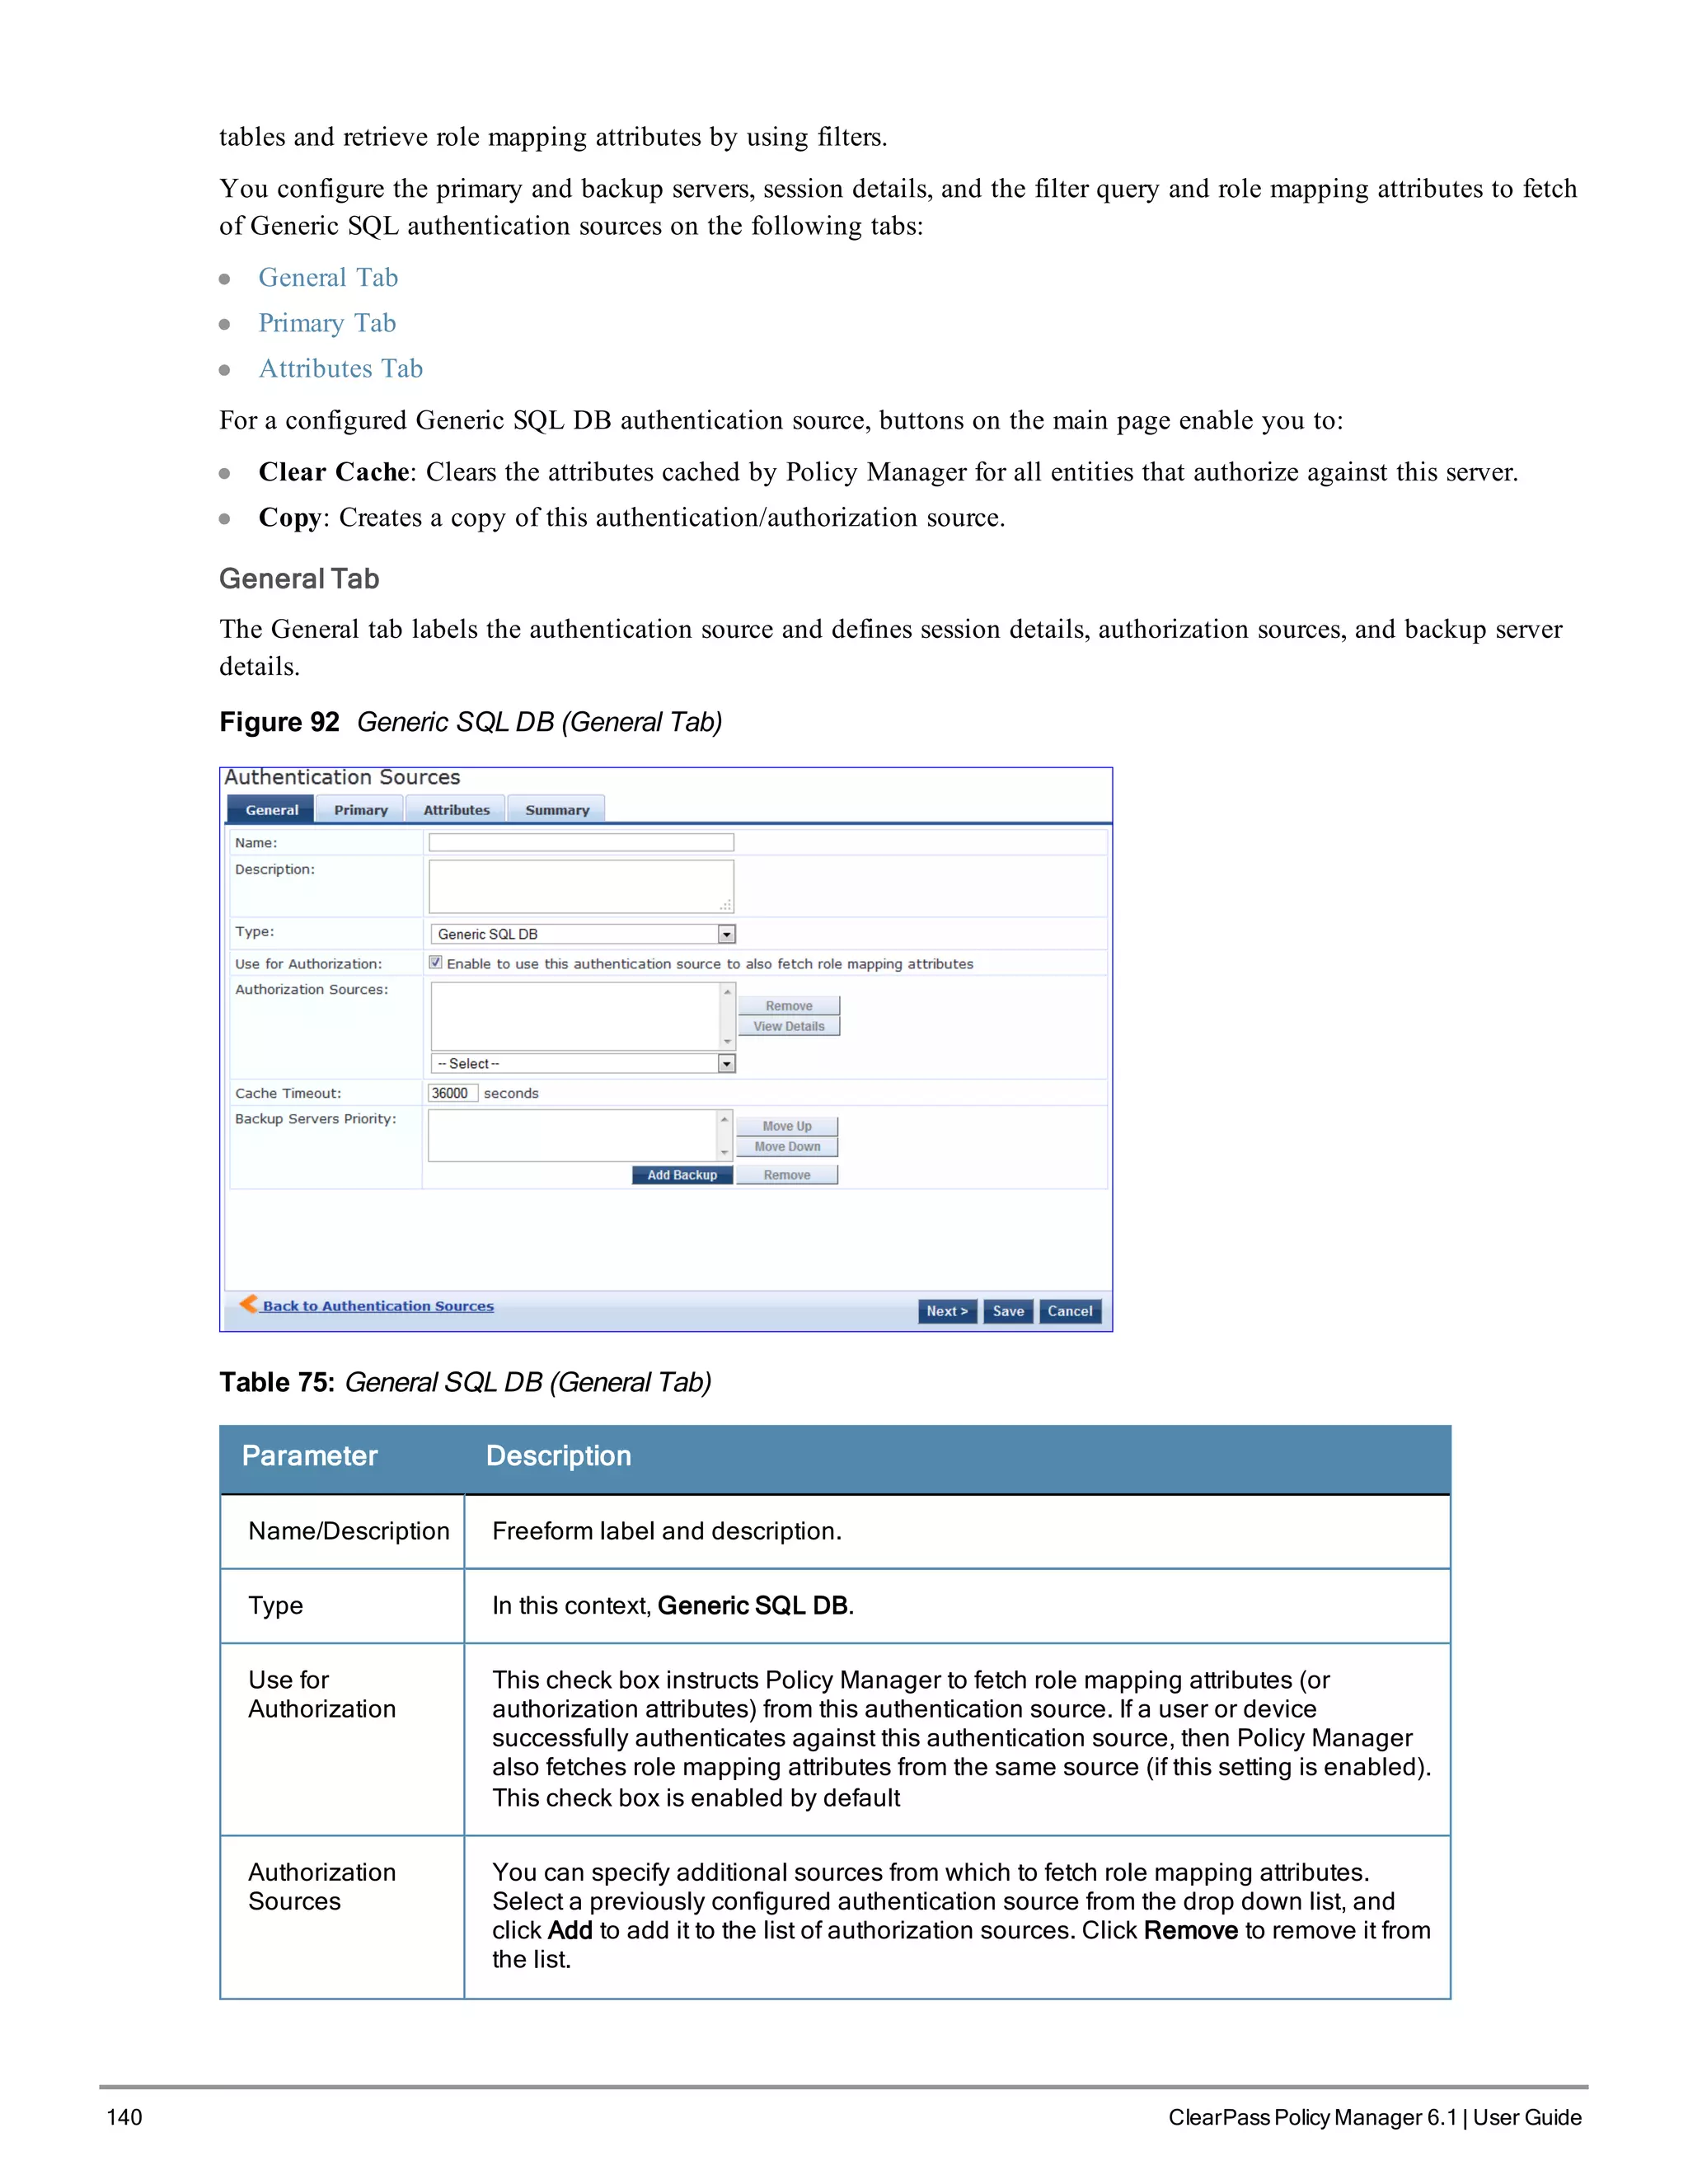
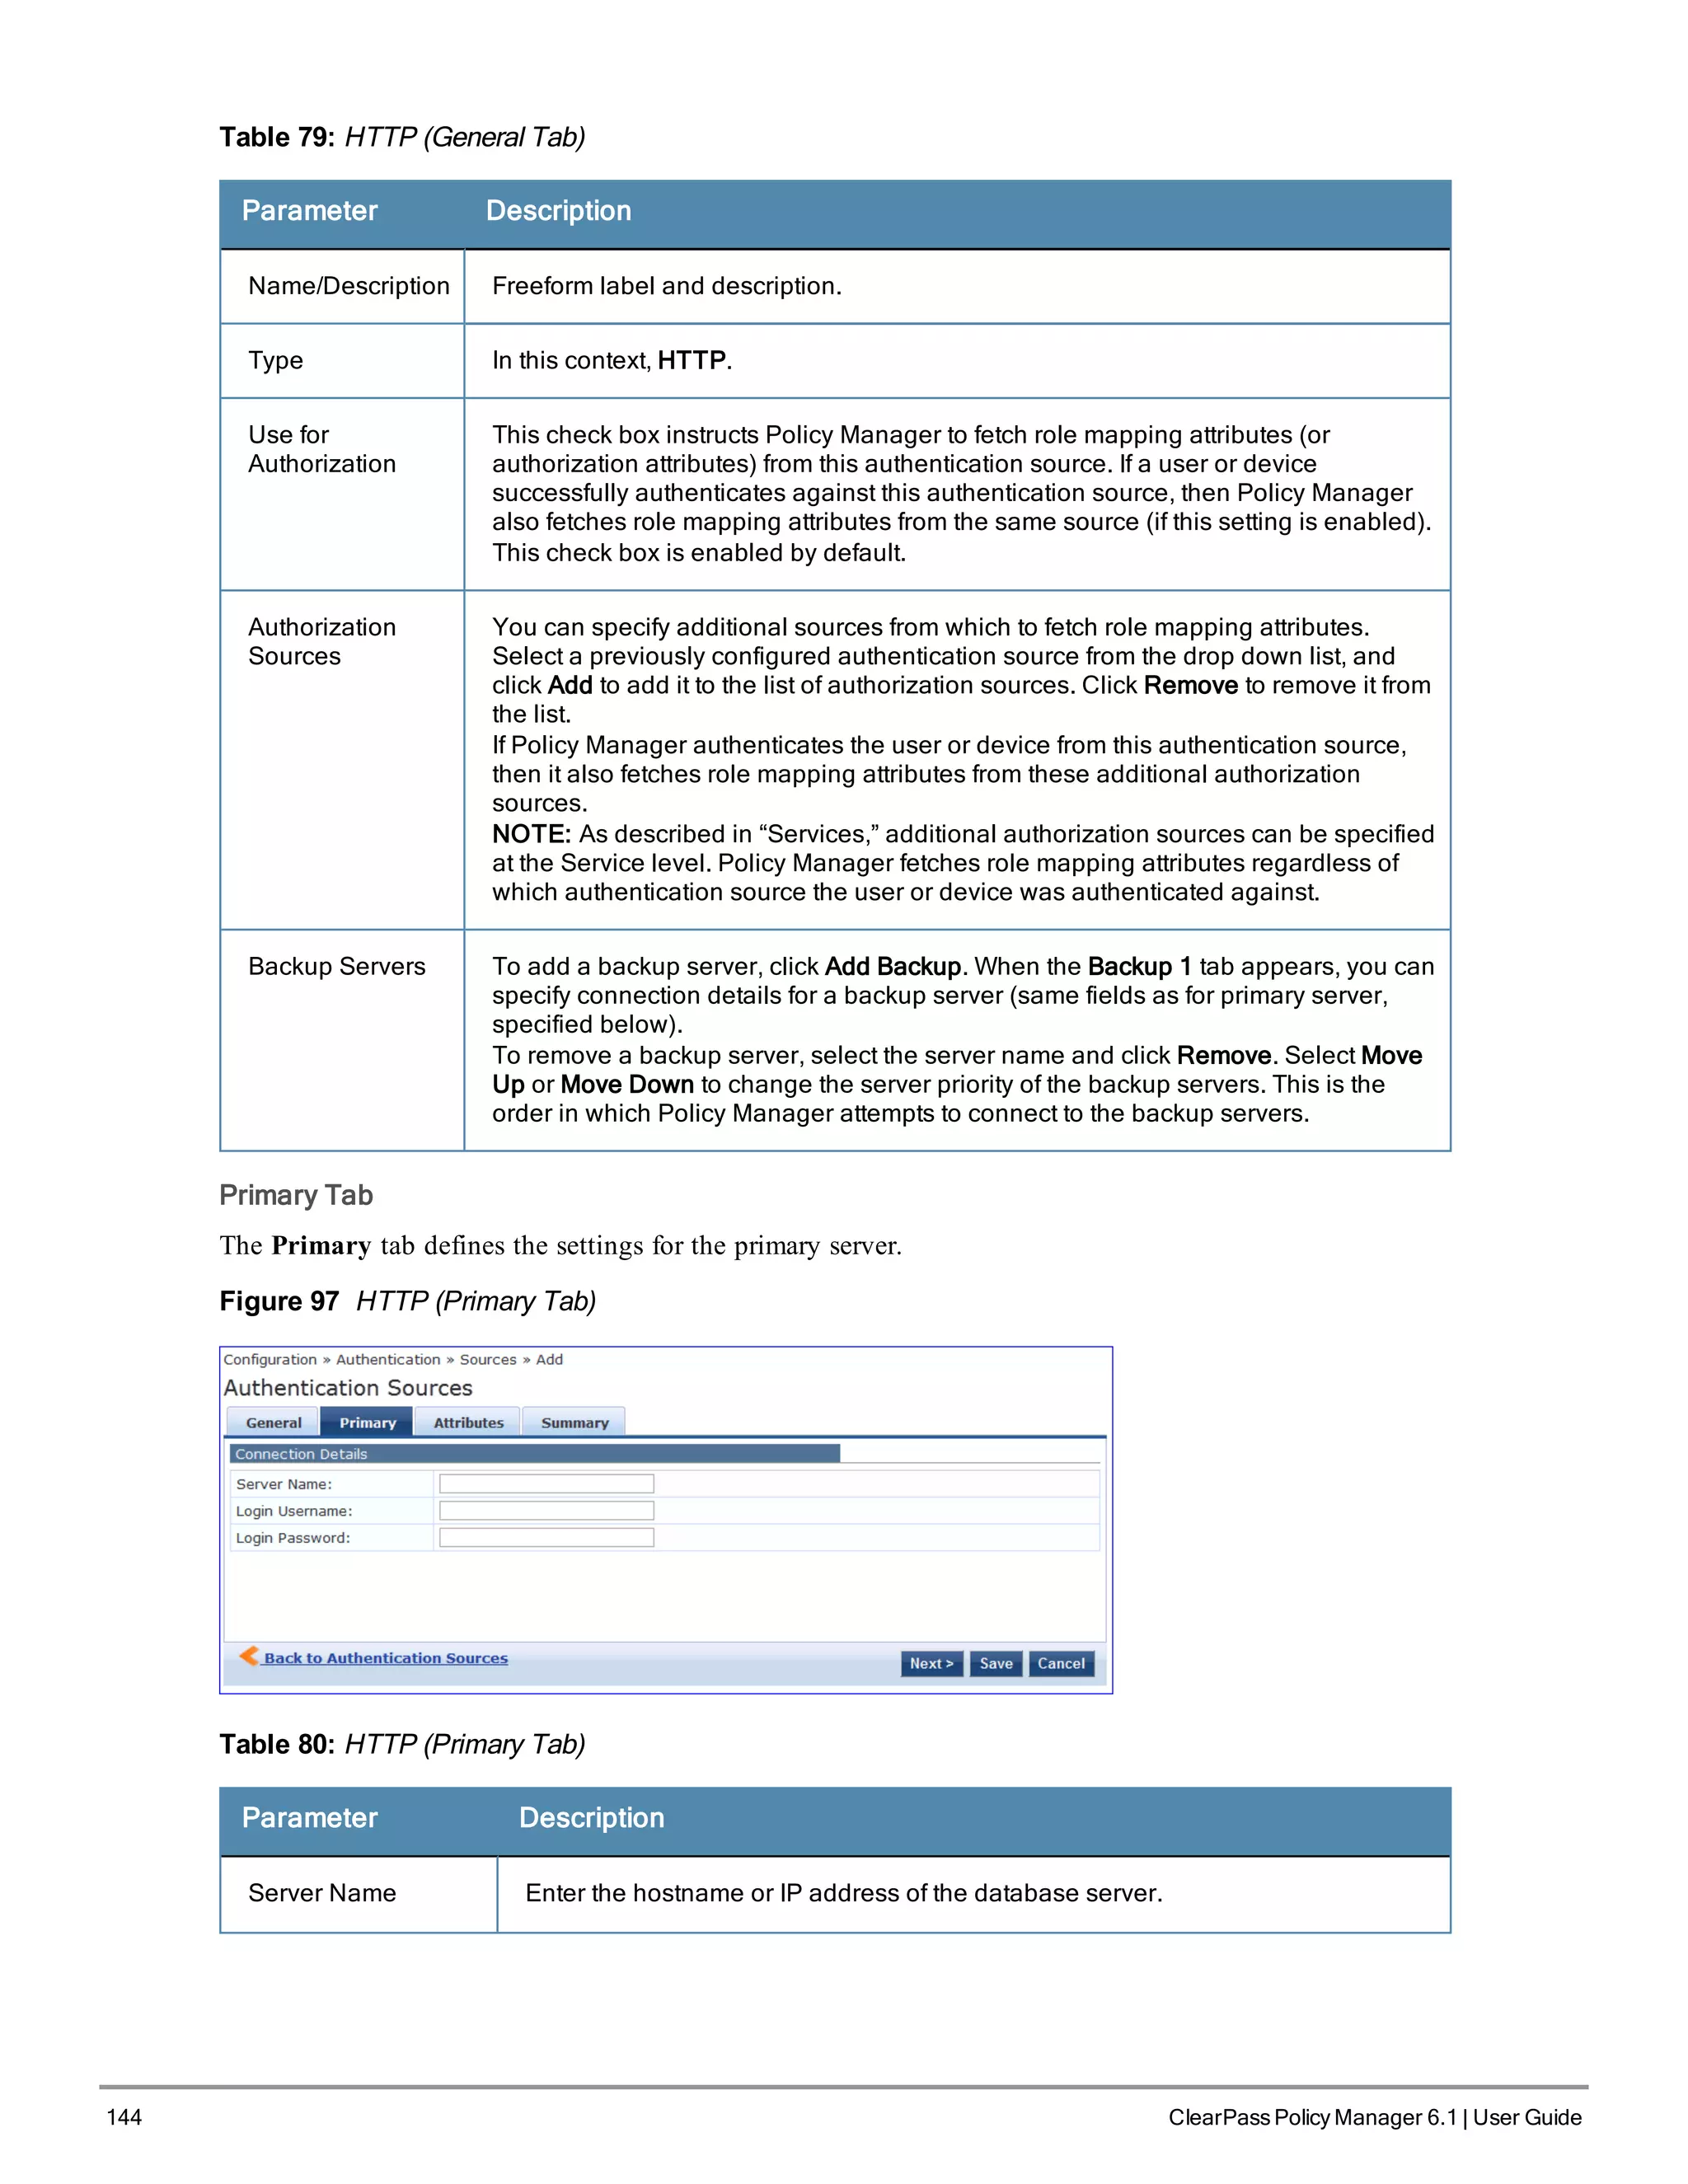
![146 ClearPass Policy Manager 6.1 | User Guide
Table 82: HTTP Configure Filter Popup
Parameter Description
Filter Name Name of the filter
Filter Query A SQL query to fetch the attributes from the user or device record in DB
Name / Alias
Name / Data
Type / Enabled
As
Name: This is the name of the attribute
Alias Name: A friendly name for the attribute. By default, this is the same as the
attribute name.
Data Type: Specify the data type for this attribute, such as String, Integer, Boolean,
etc.
Enabled As: Specify whether value is to be used directly as a role or attribute in an
Enforcement Policy. This bypasses the step of having to assign a role in Policy
Manager through a Role Mapping Policy.
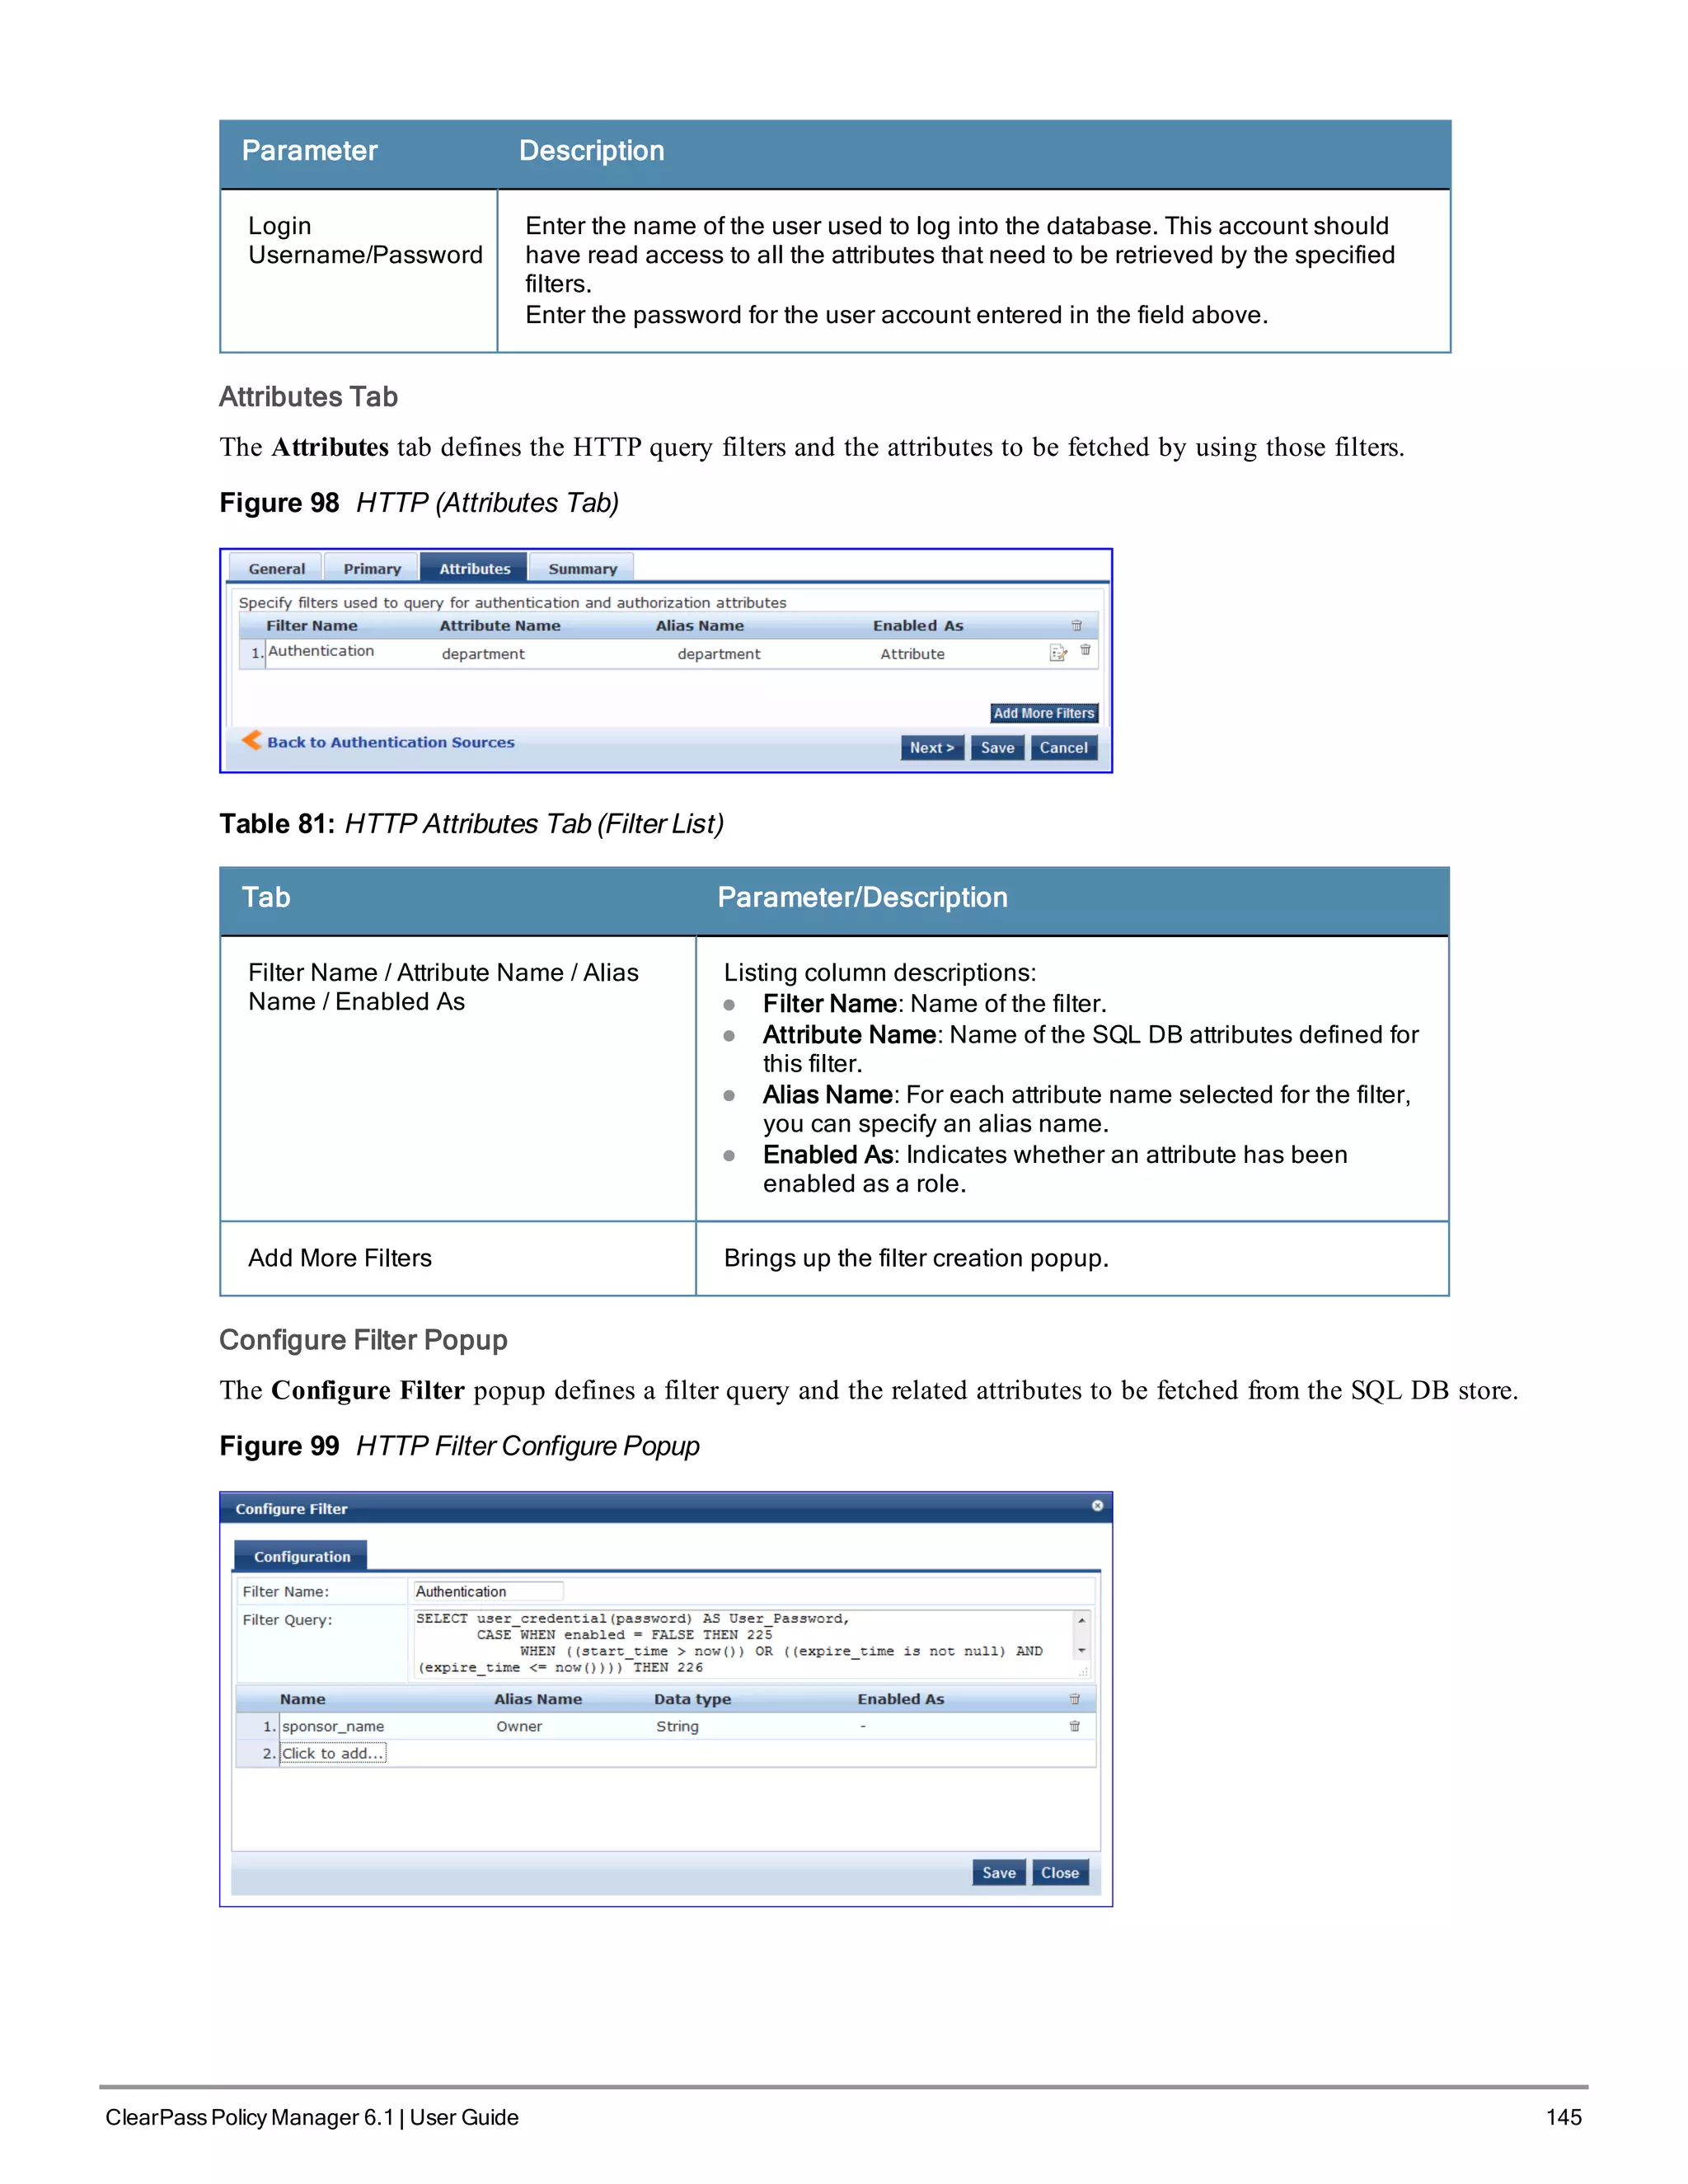
Kerberos
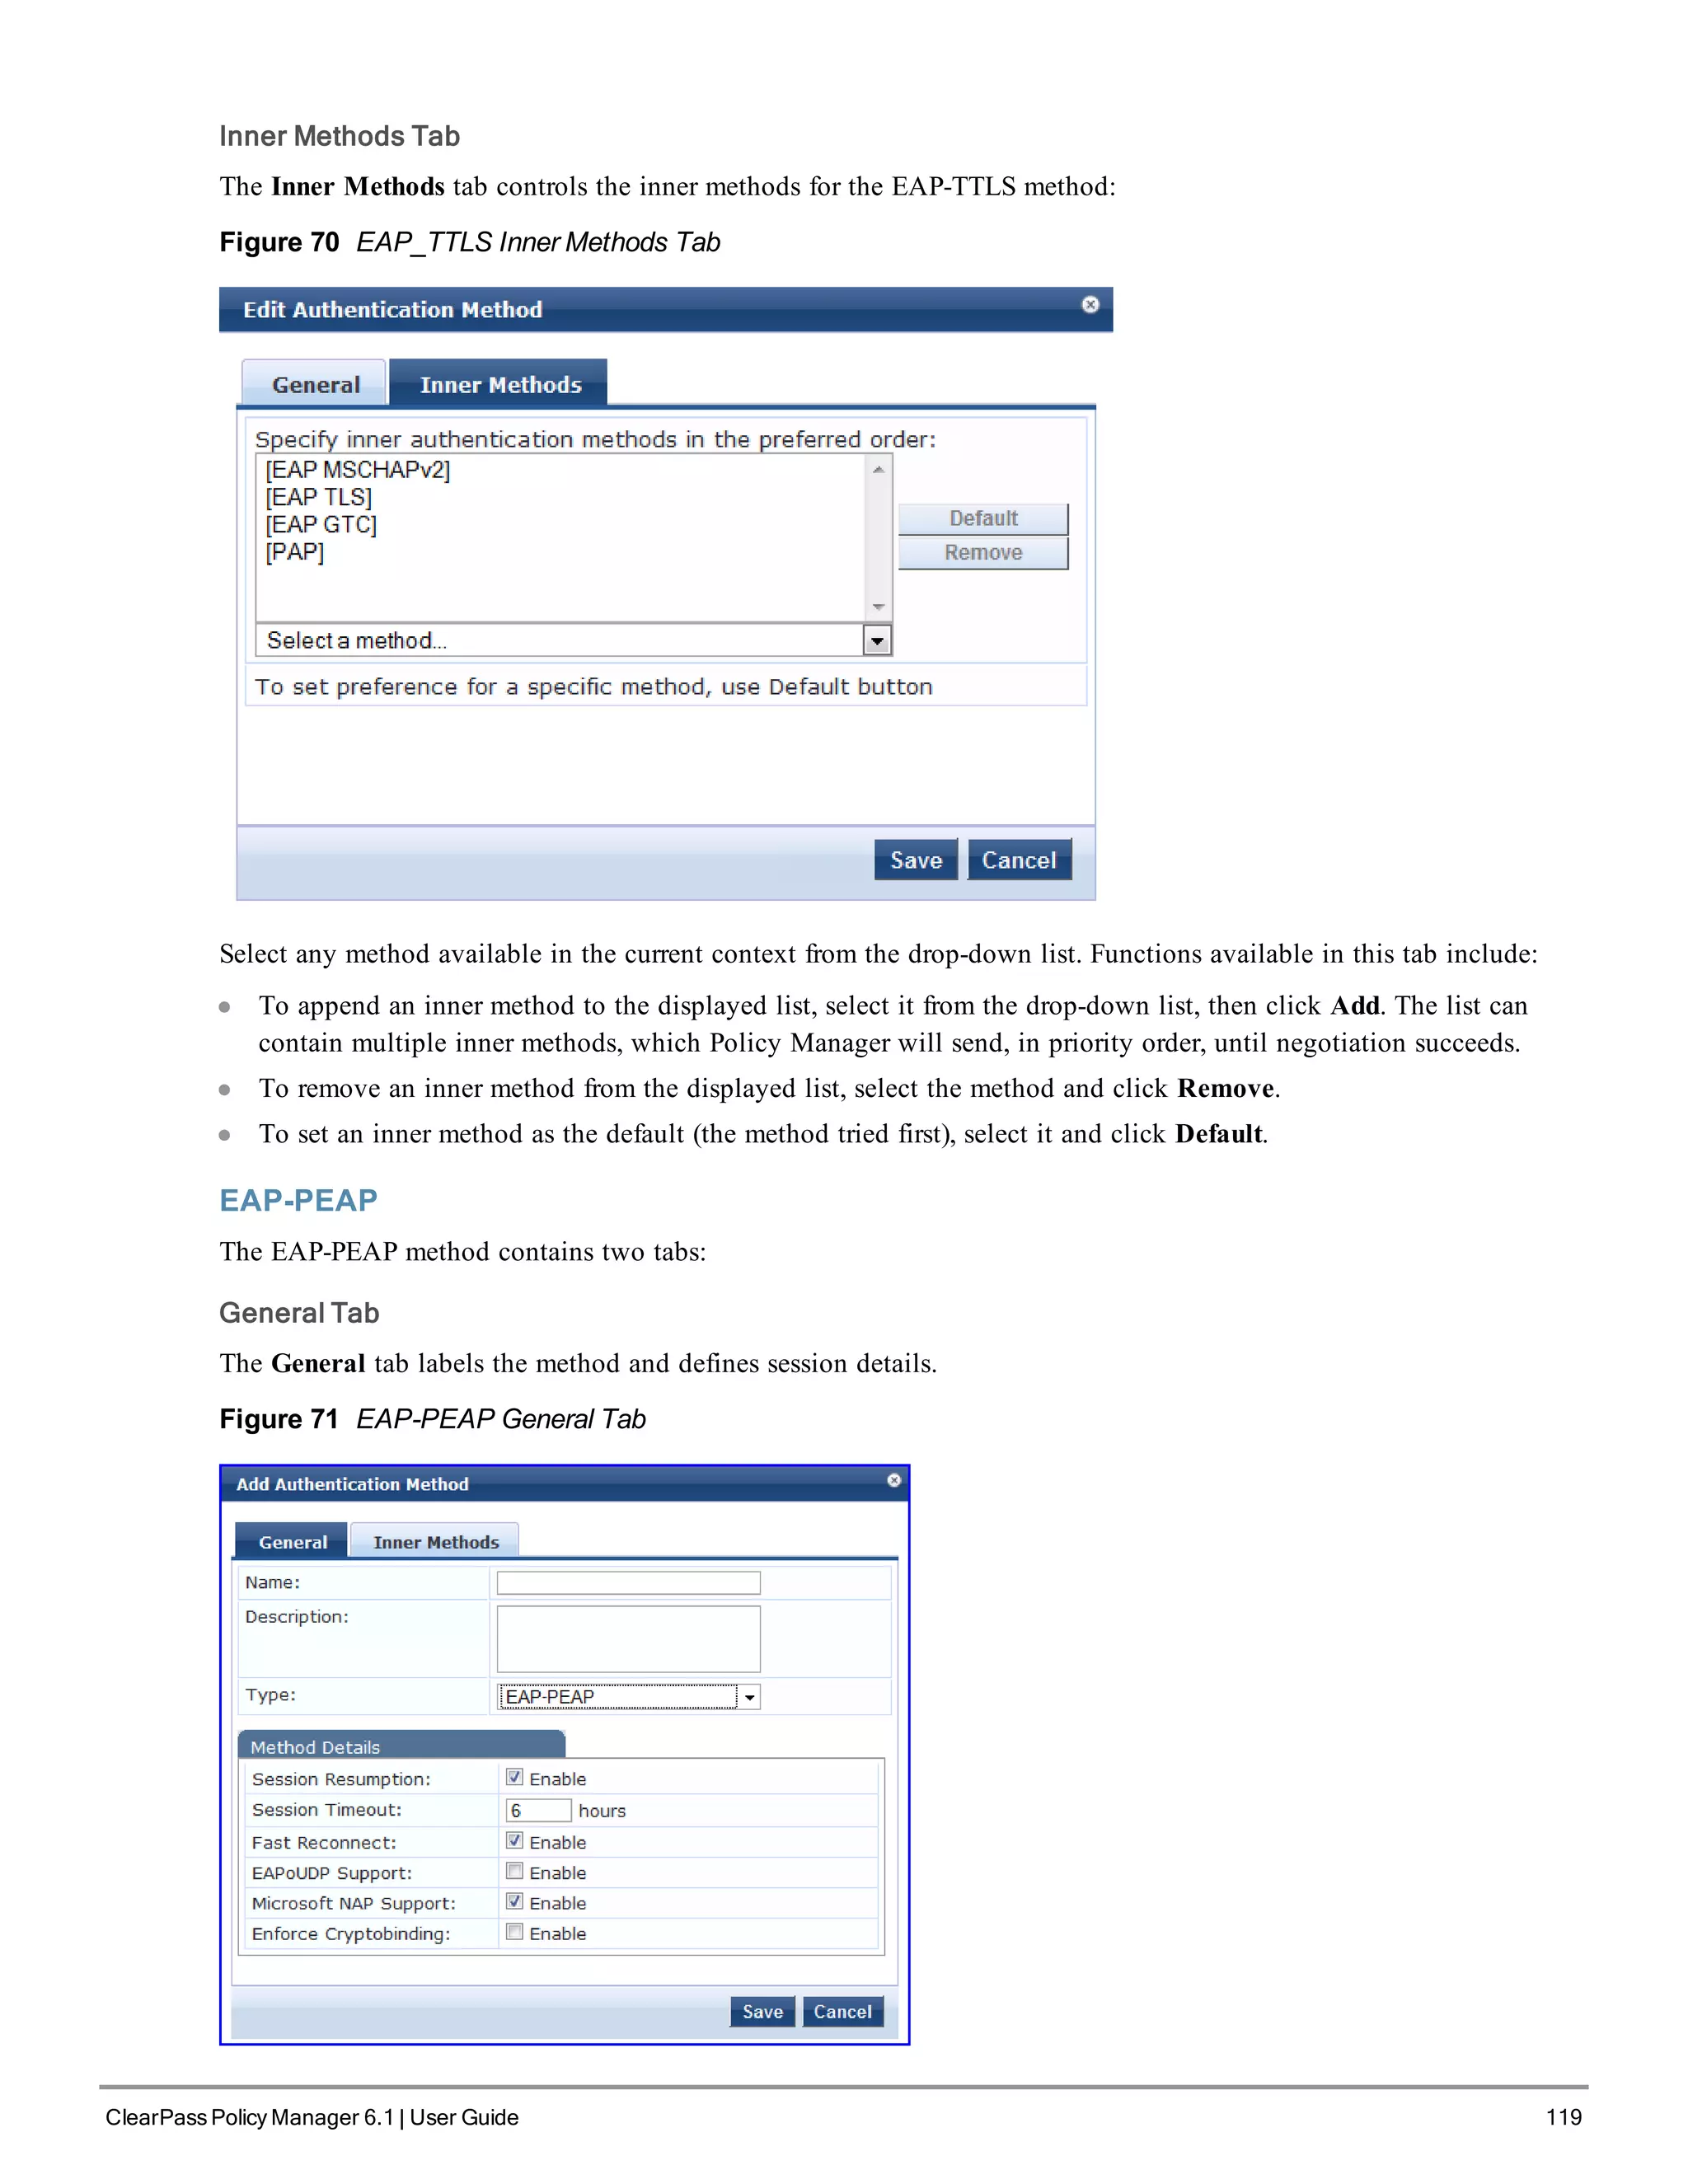
Policy Manager can perform standard PAP/GTC or tunneled PAP/GTC (for example, EAP-PEAP[EAP-GTC])
authentication against any Kerberos 5 compliant server such as the Microsoft Active Directory server. It is mandatory
to pair this Source type with an authorization source (identity store) containing user records.
You configure Kerberos authentication sources on the following tabs:
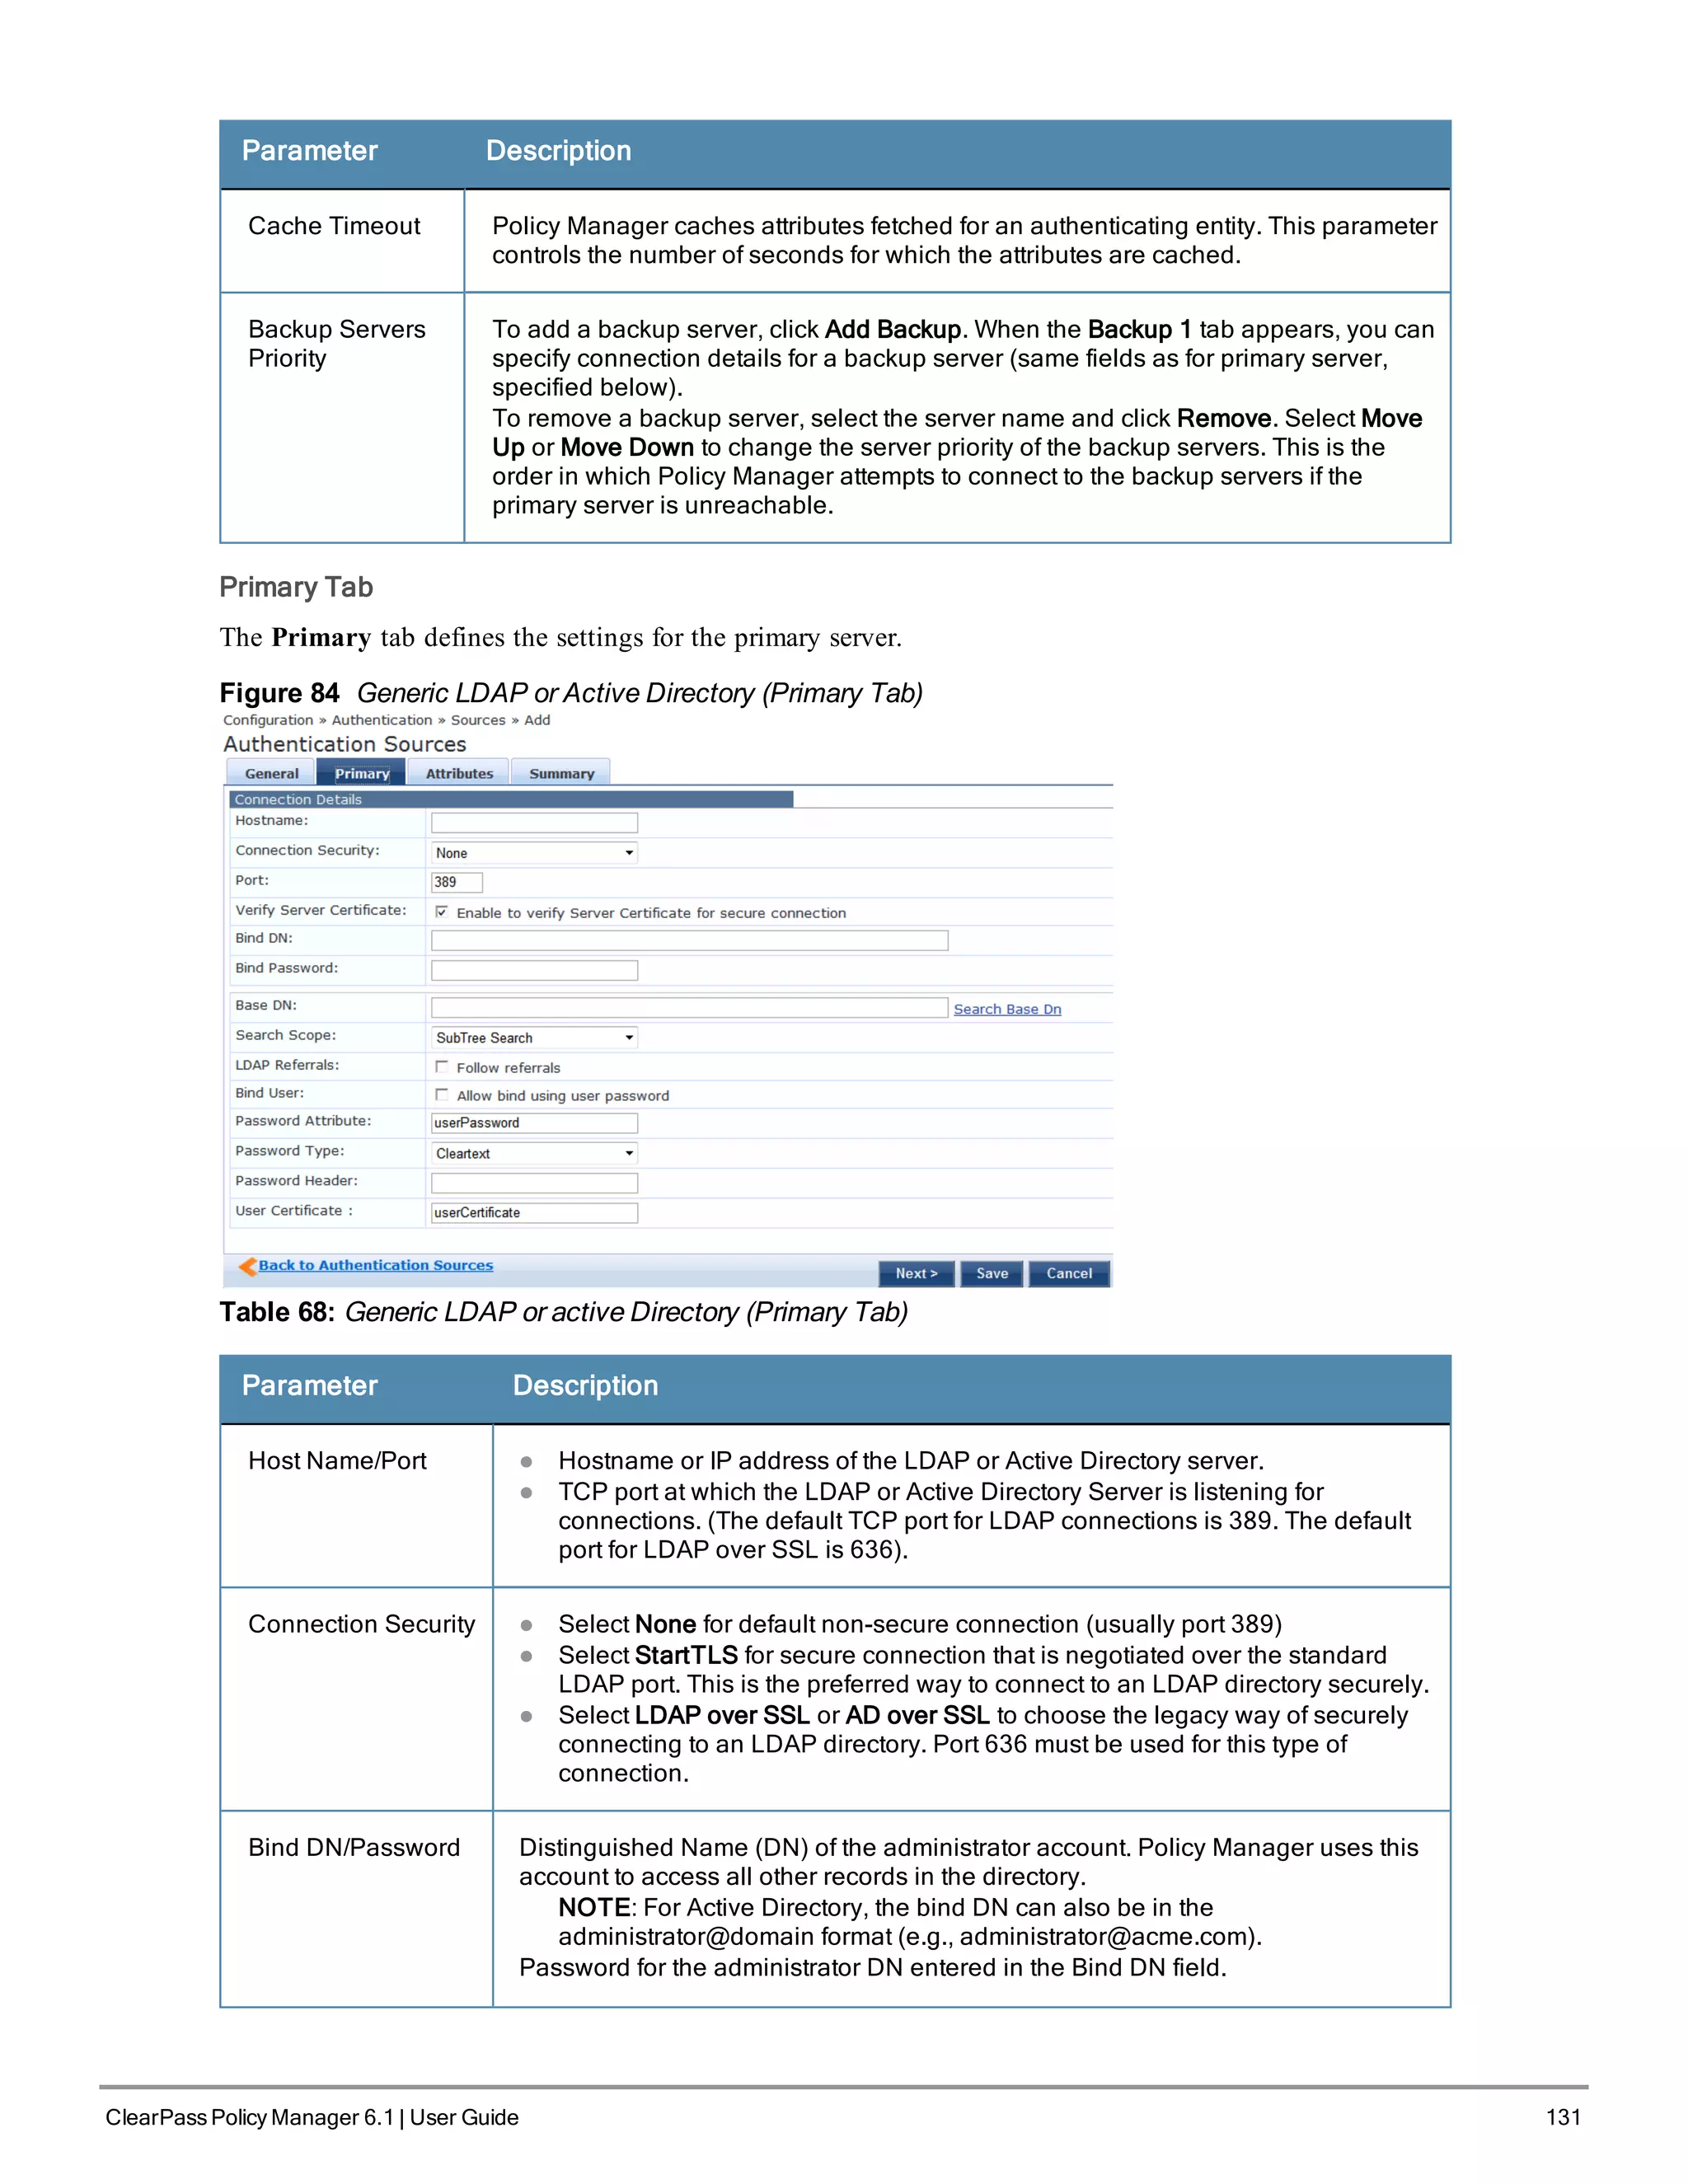
l General Tab
l Primary Tab
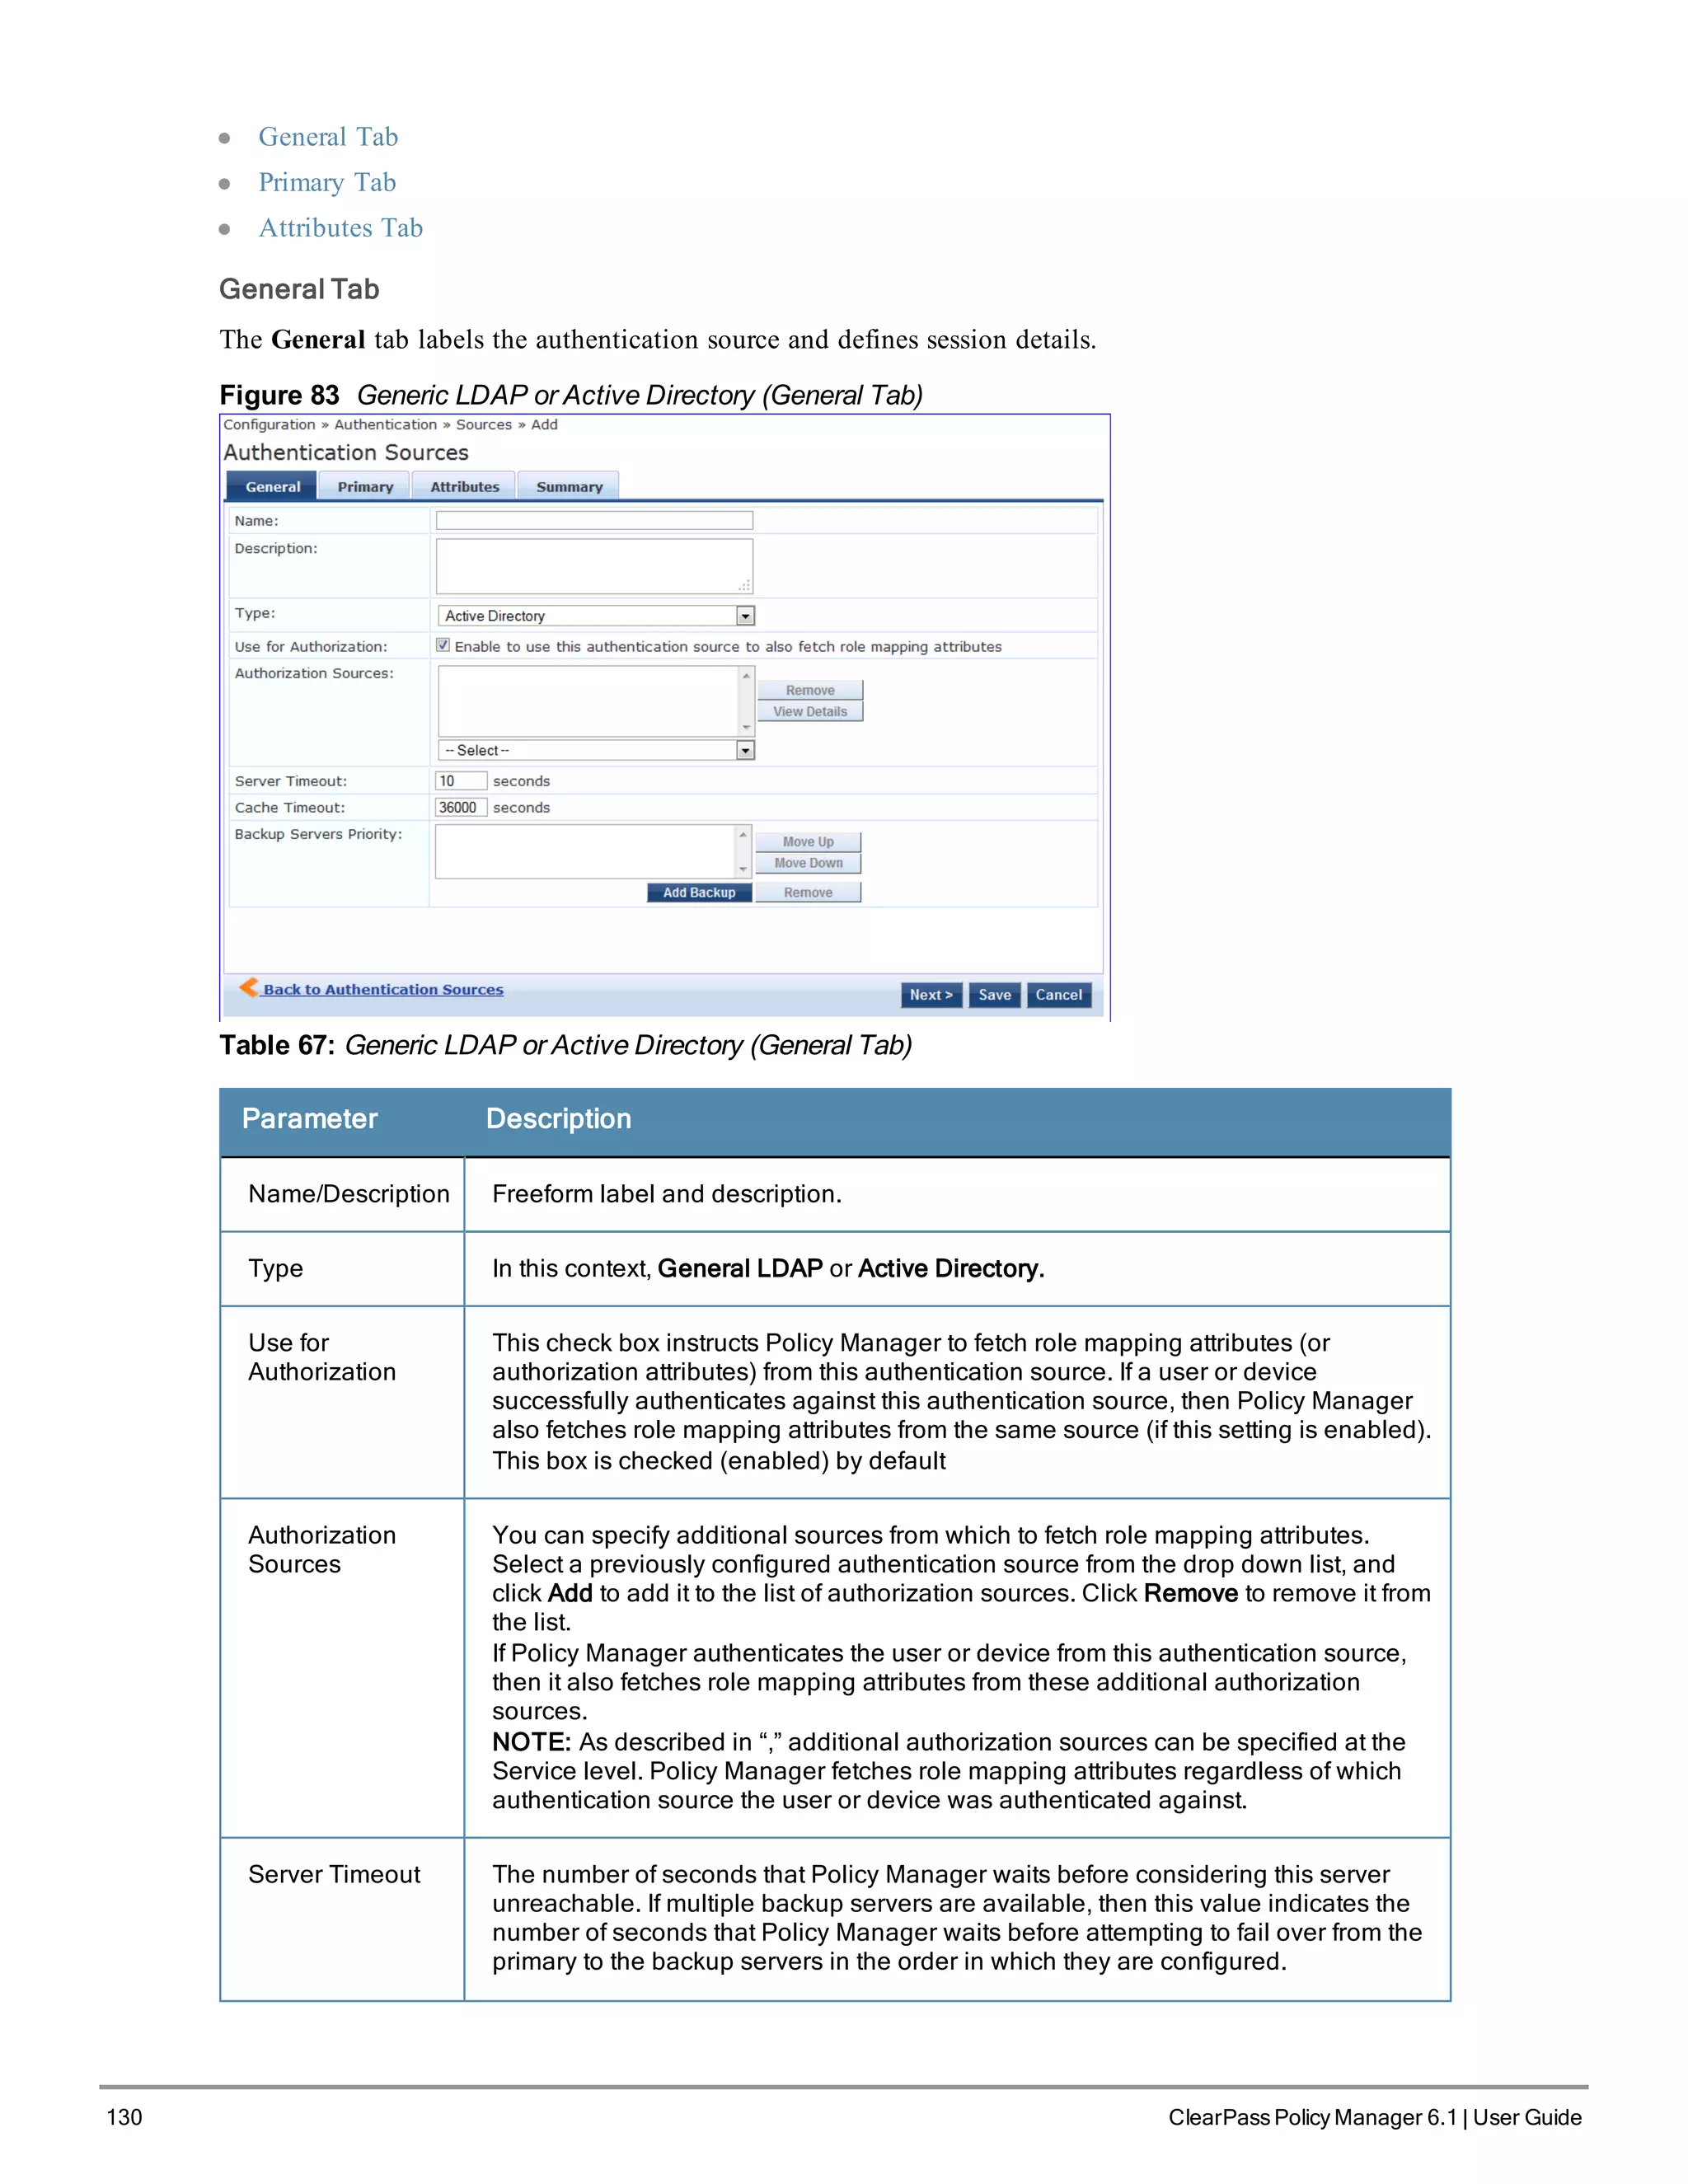
General Tab
The General tab labels the authentication source and defines session details, authorization sources, and backup server
details.
Figure 100 Kerberos General Tab](https://image.slidesharecdn.com/arubacppm61userguide-140926121722-phpapp01/75/Aruba-cppm-6_1_user_guide-146-2048.jpg)
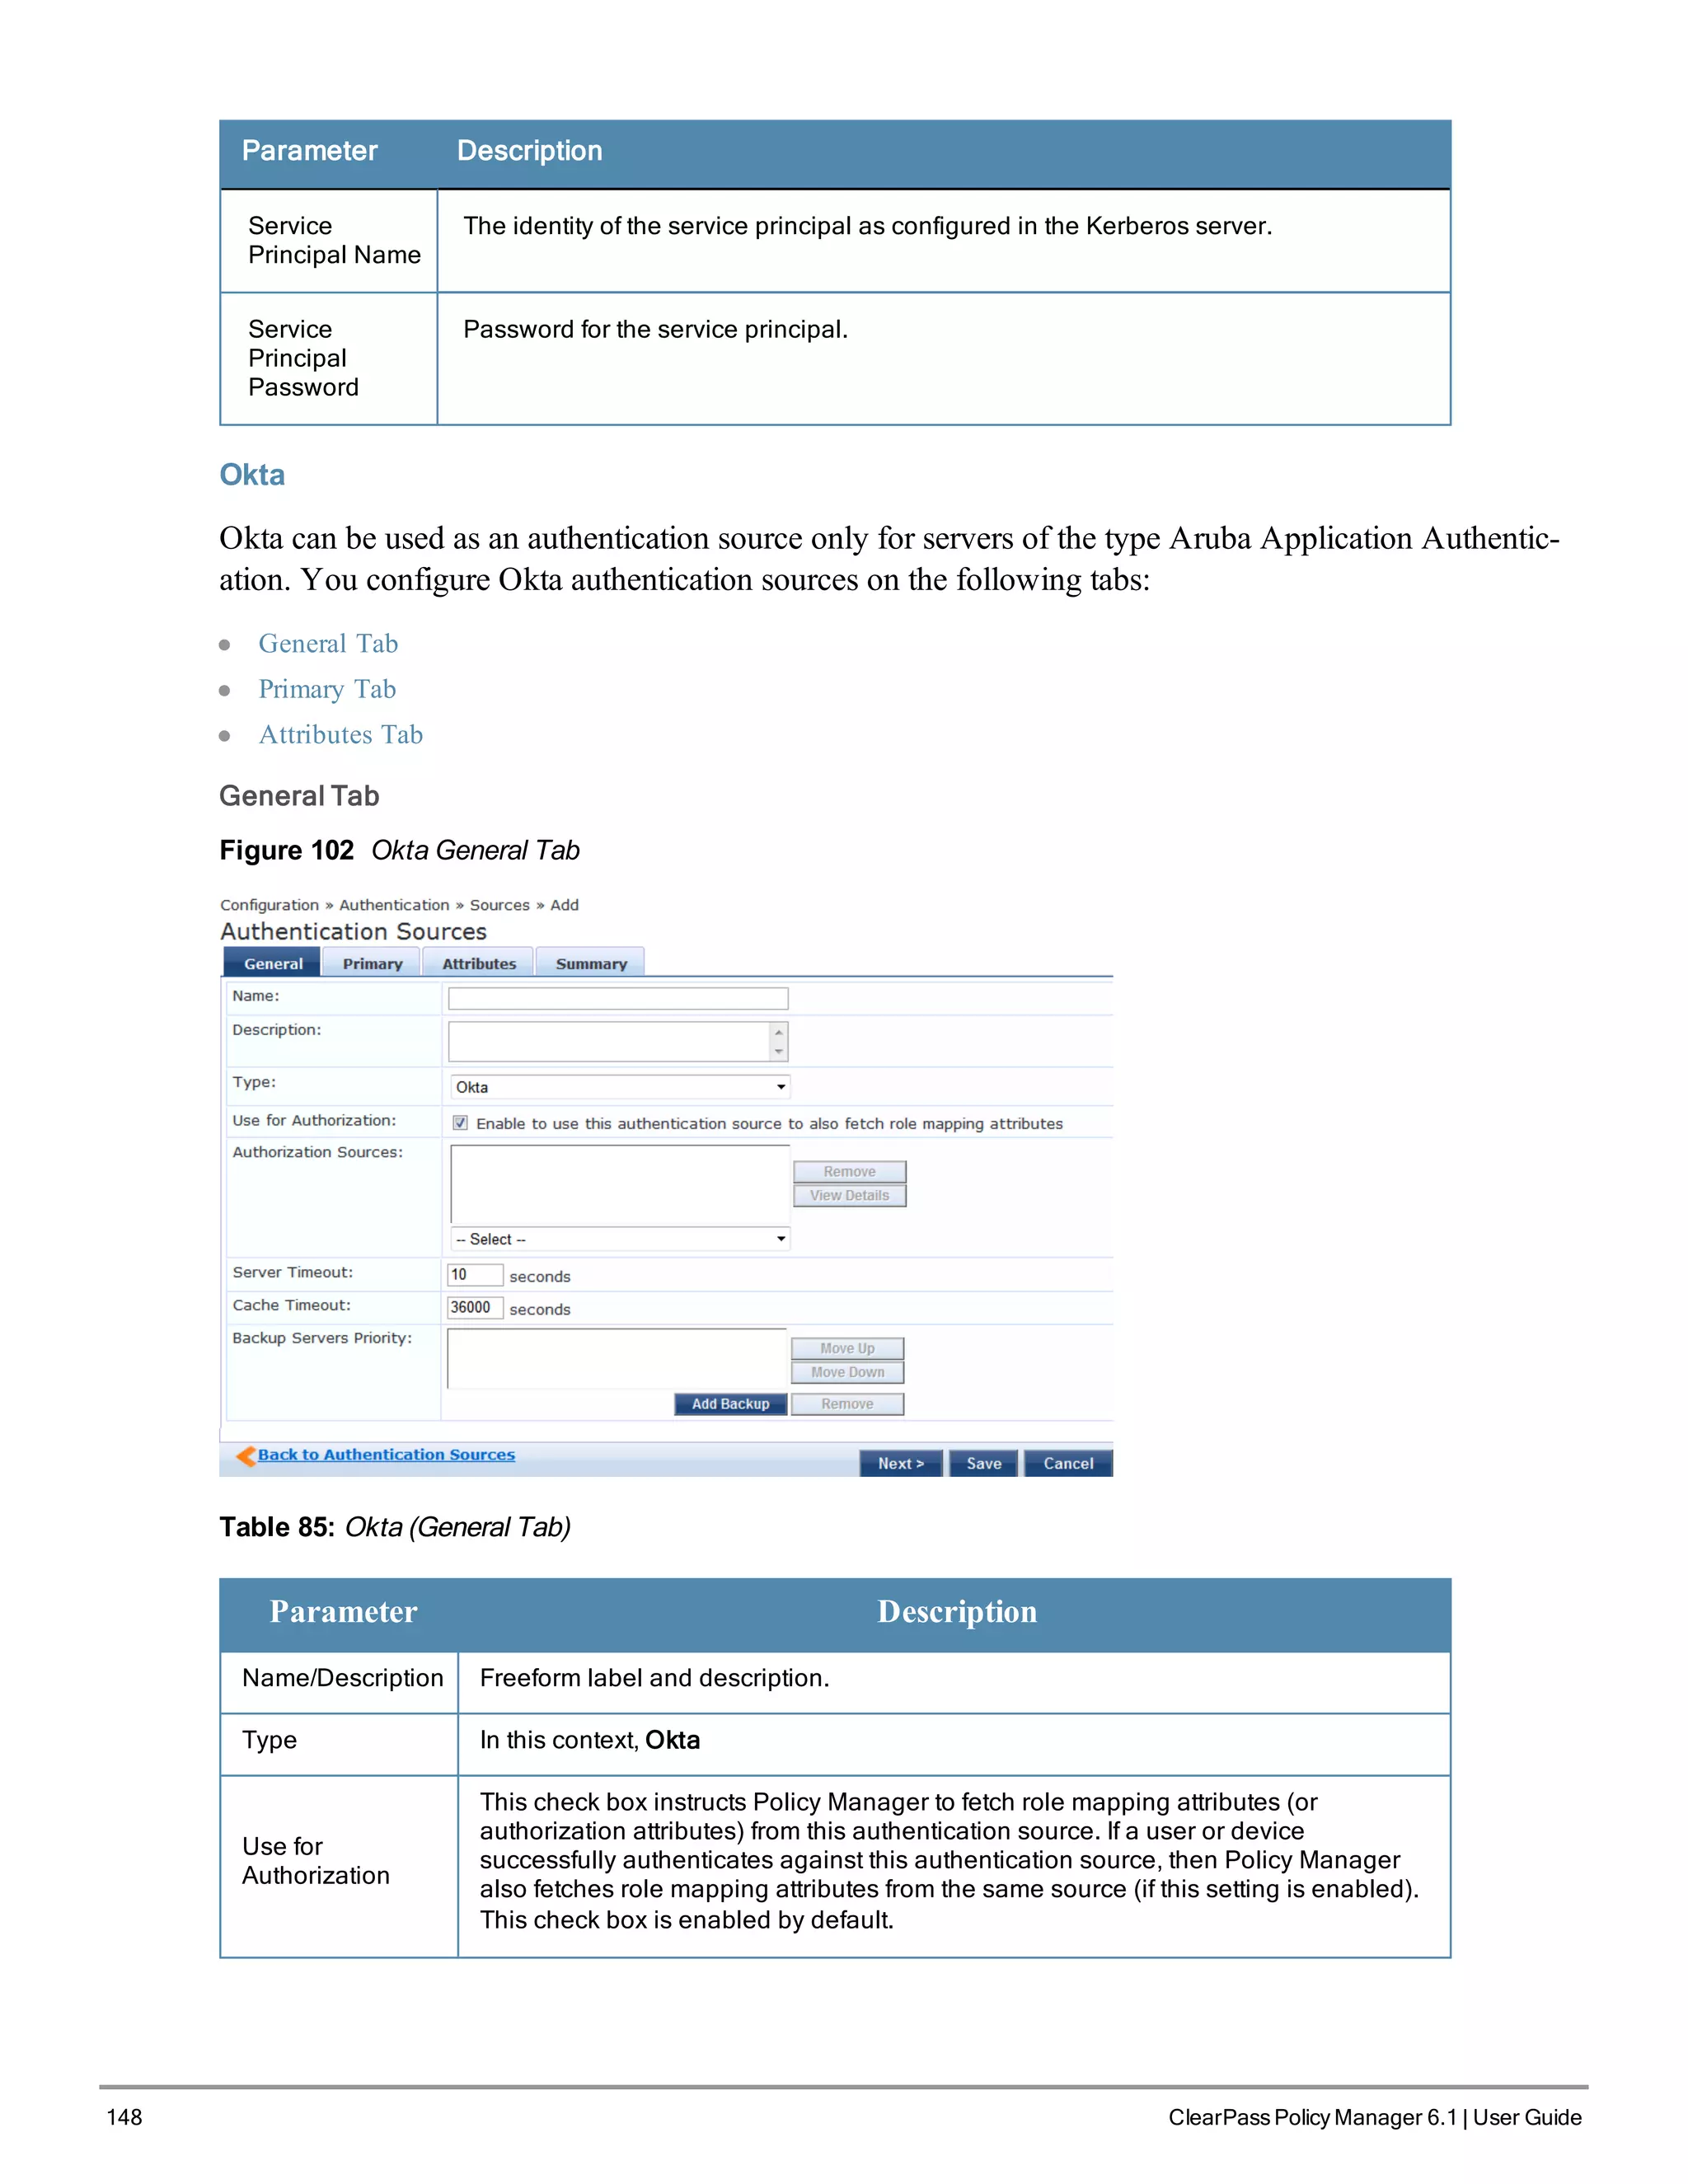
![150 ClearPass Policy Manager 6.1 | User Guide
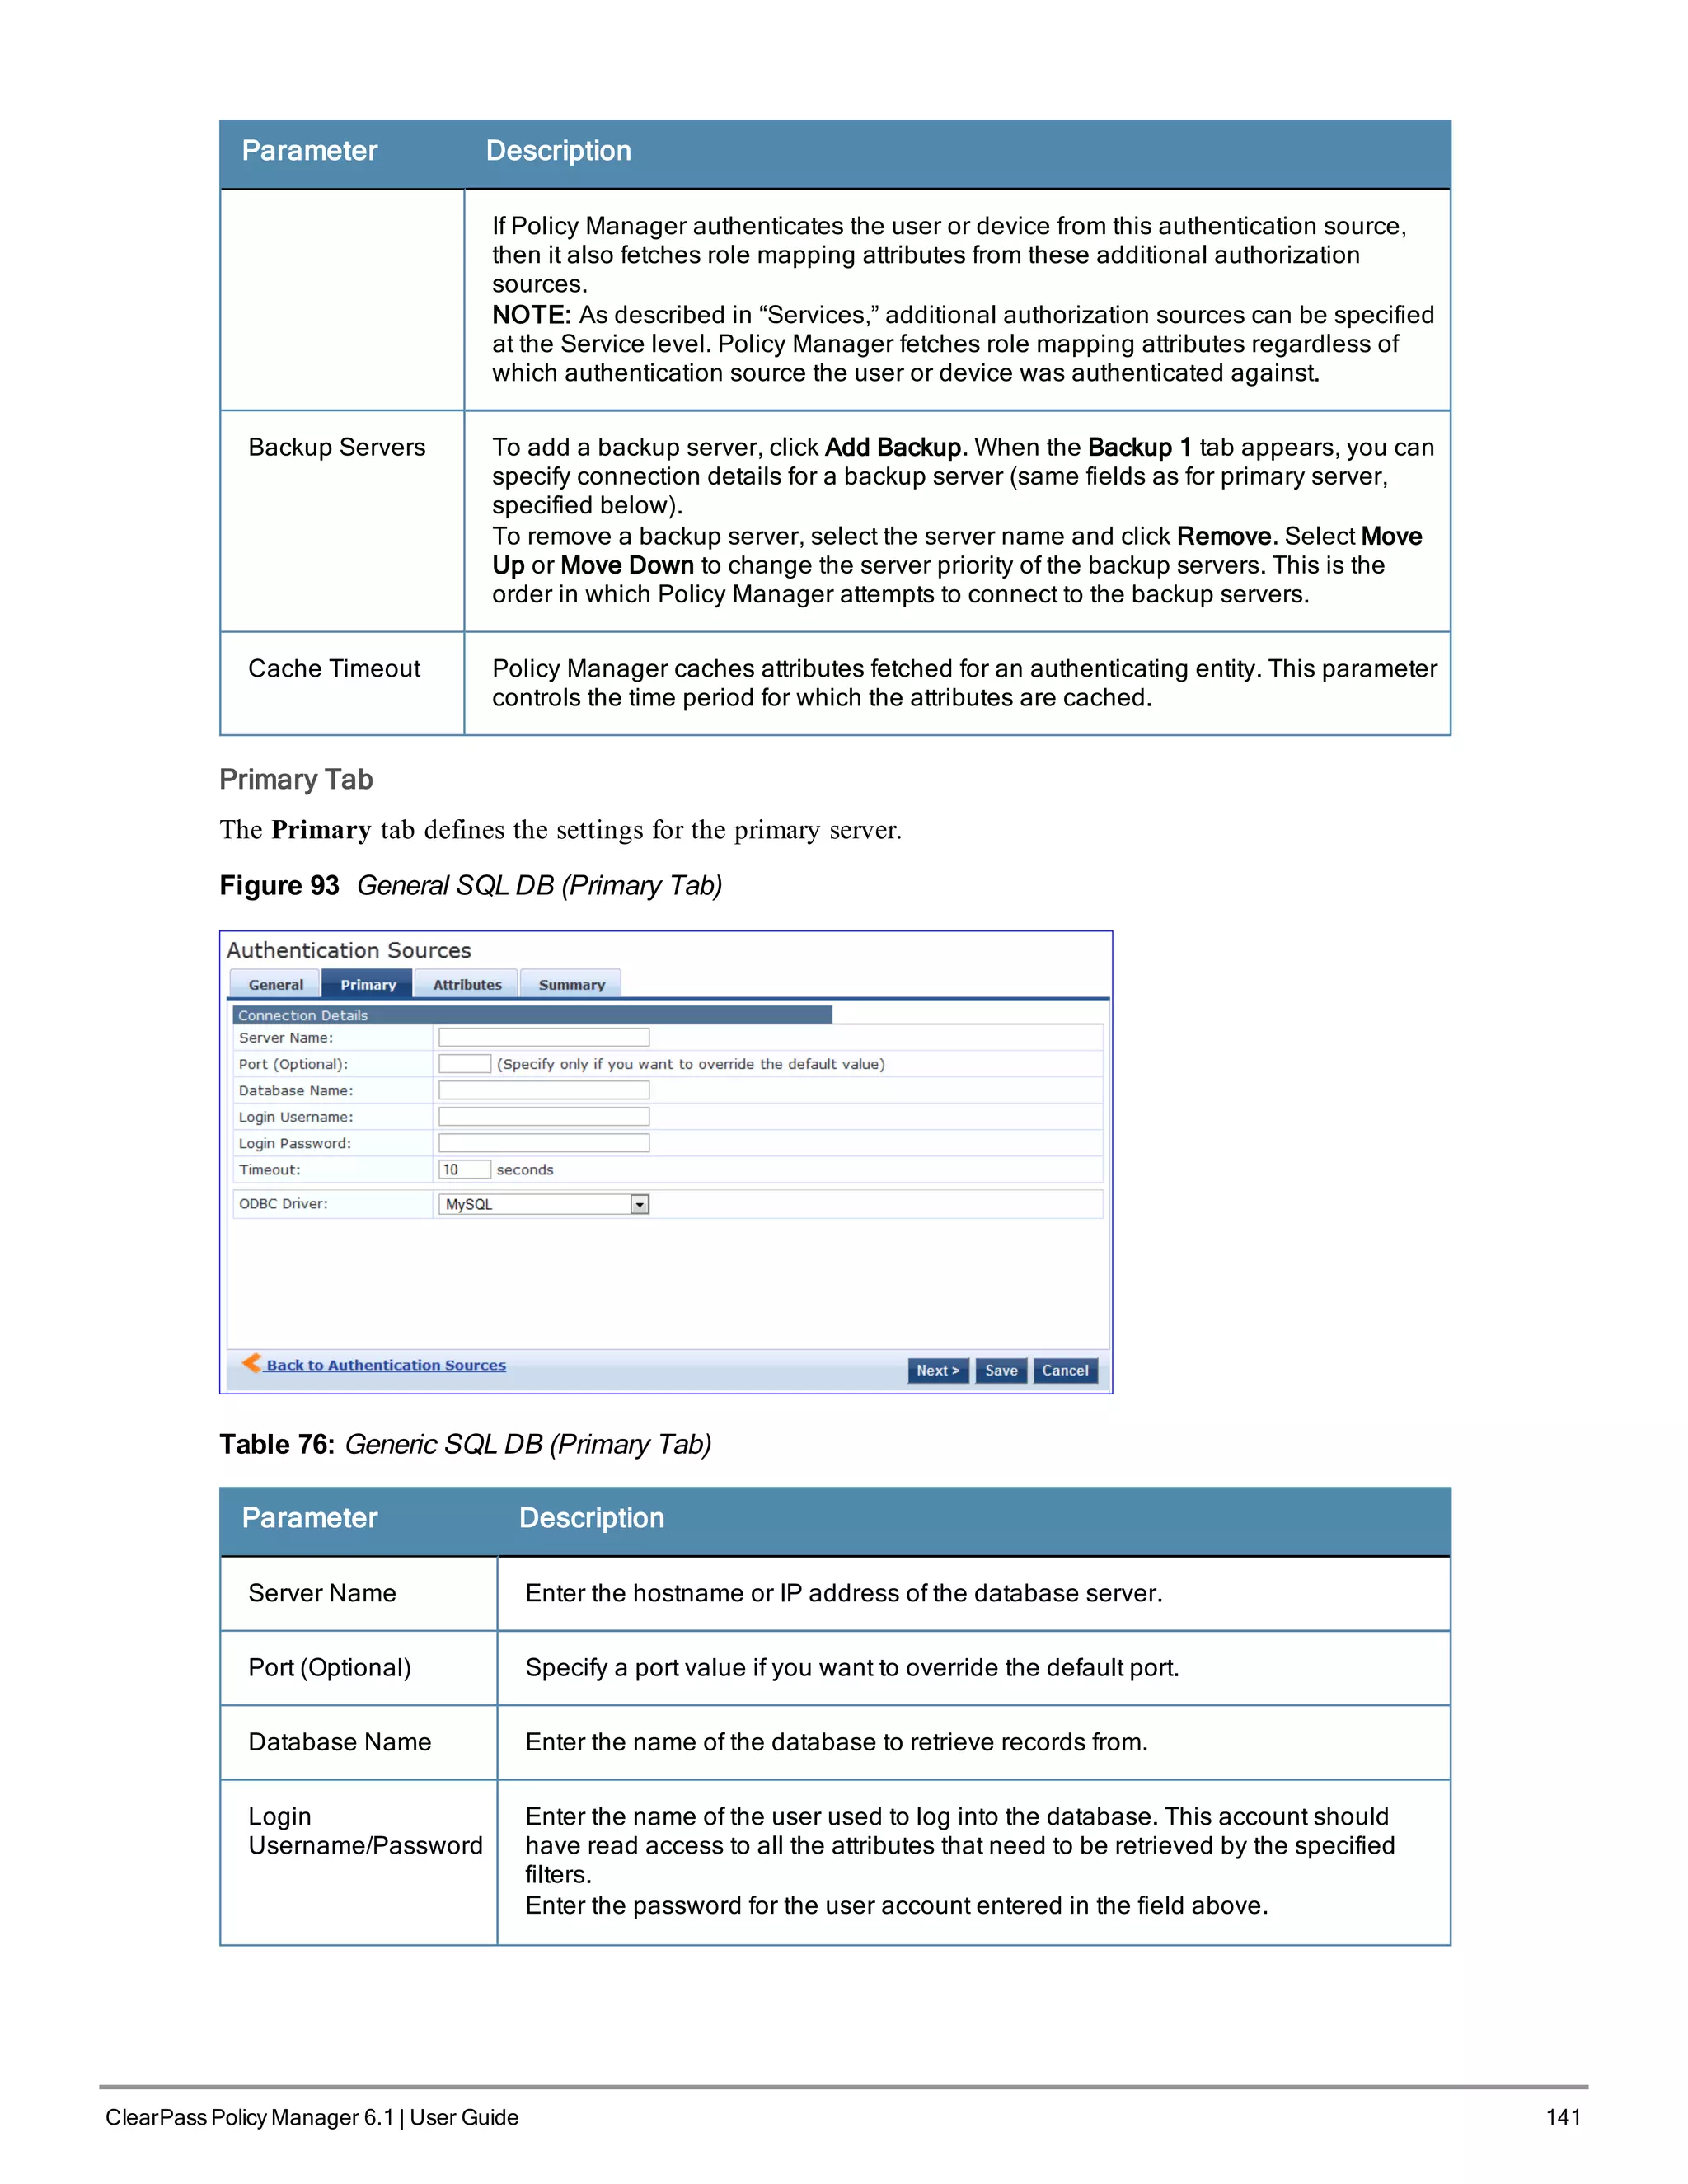
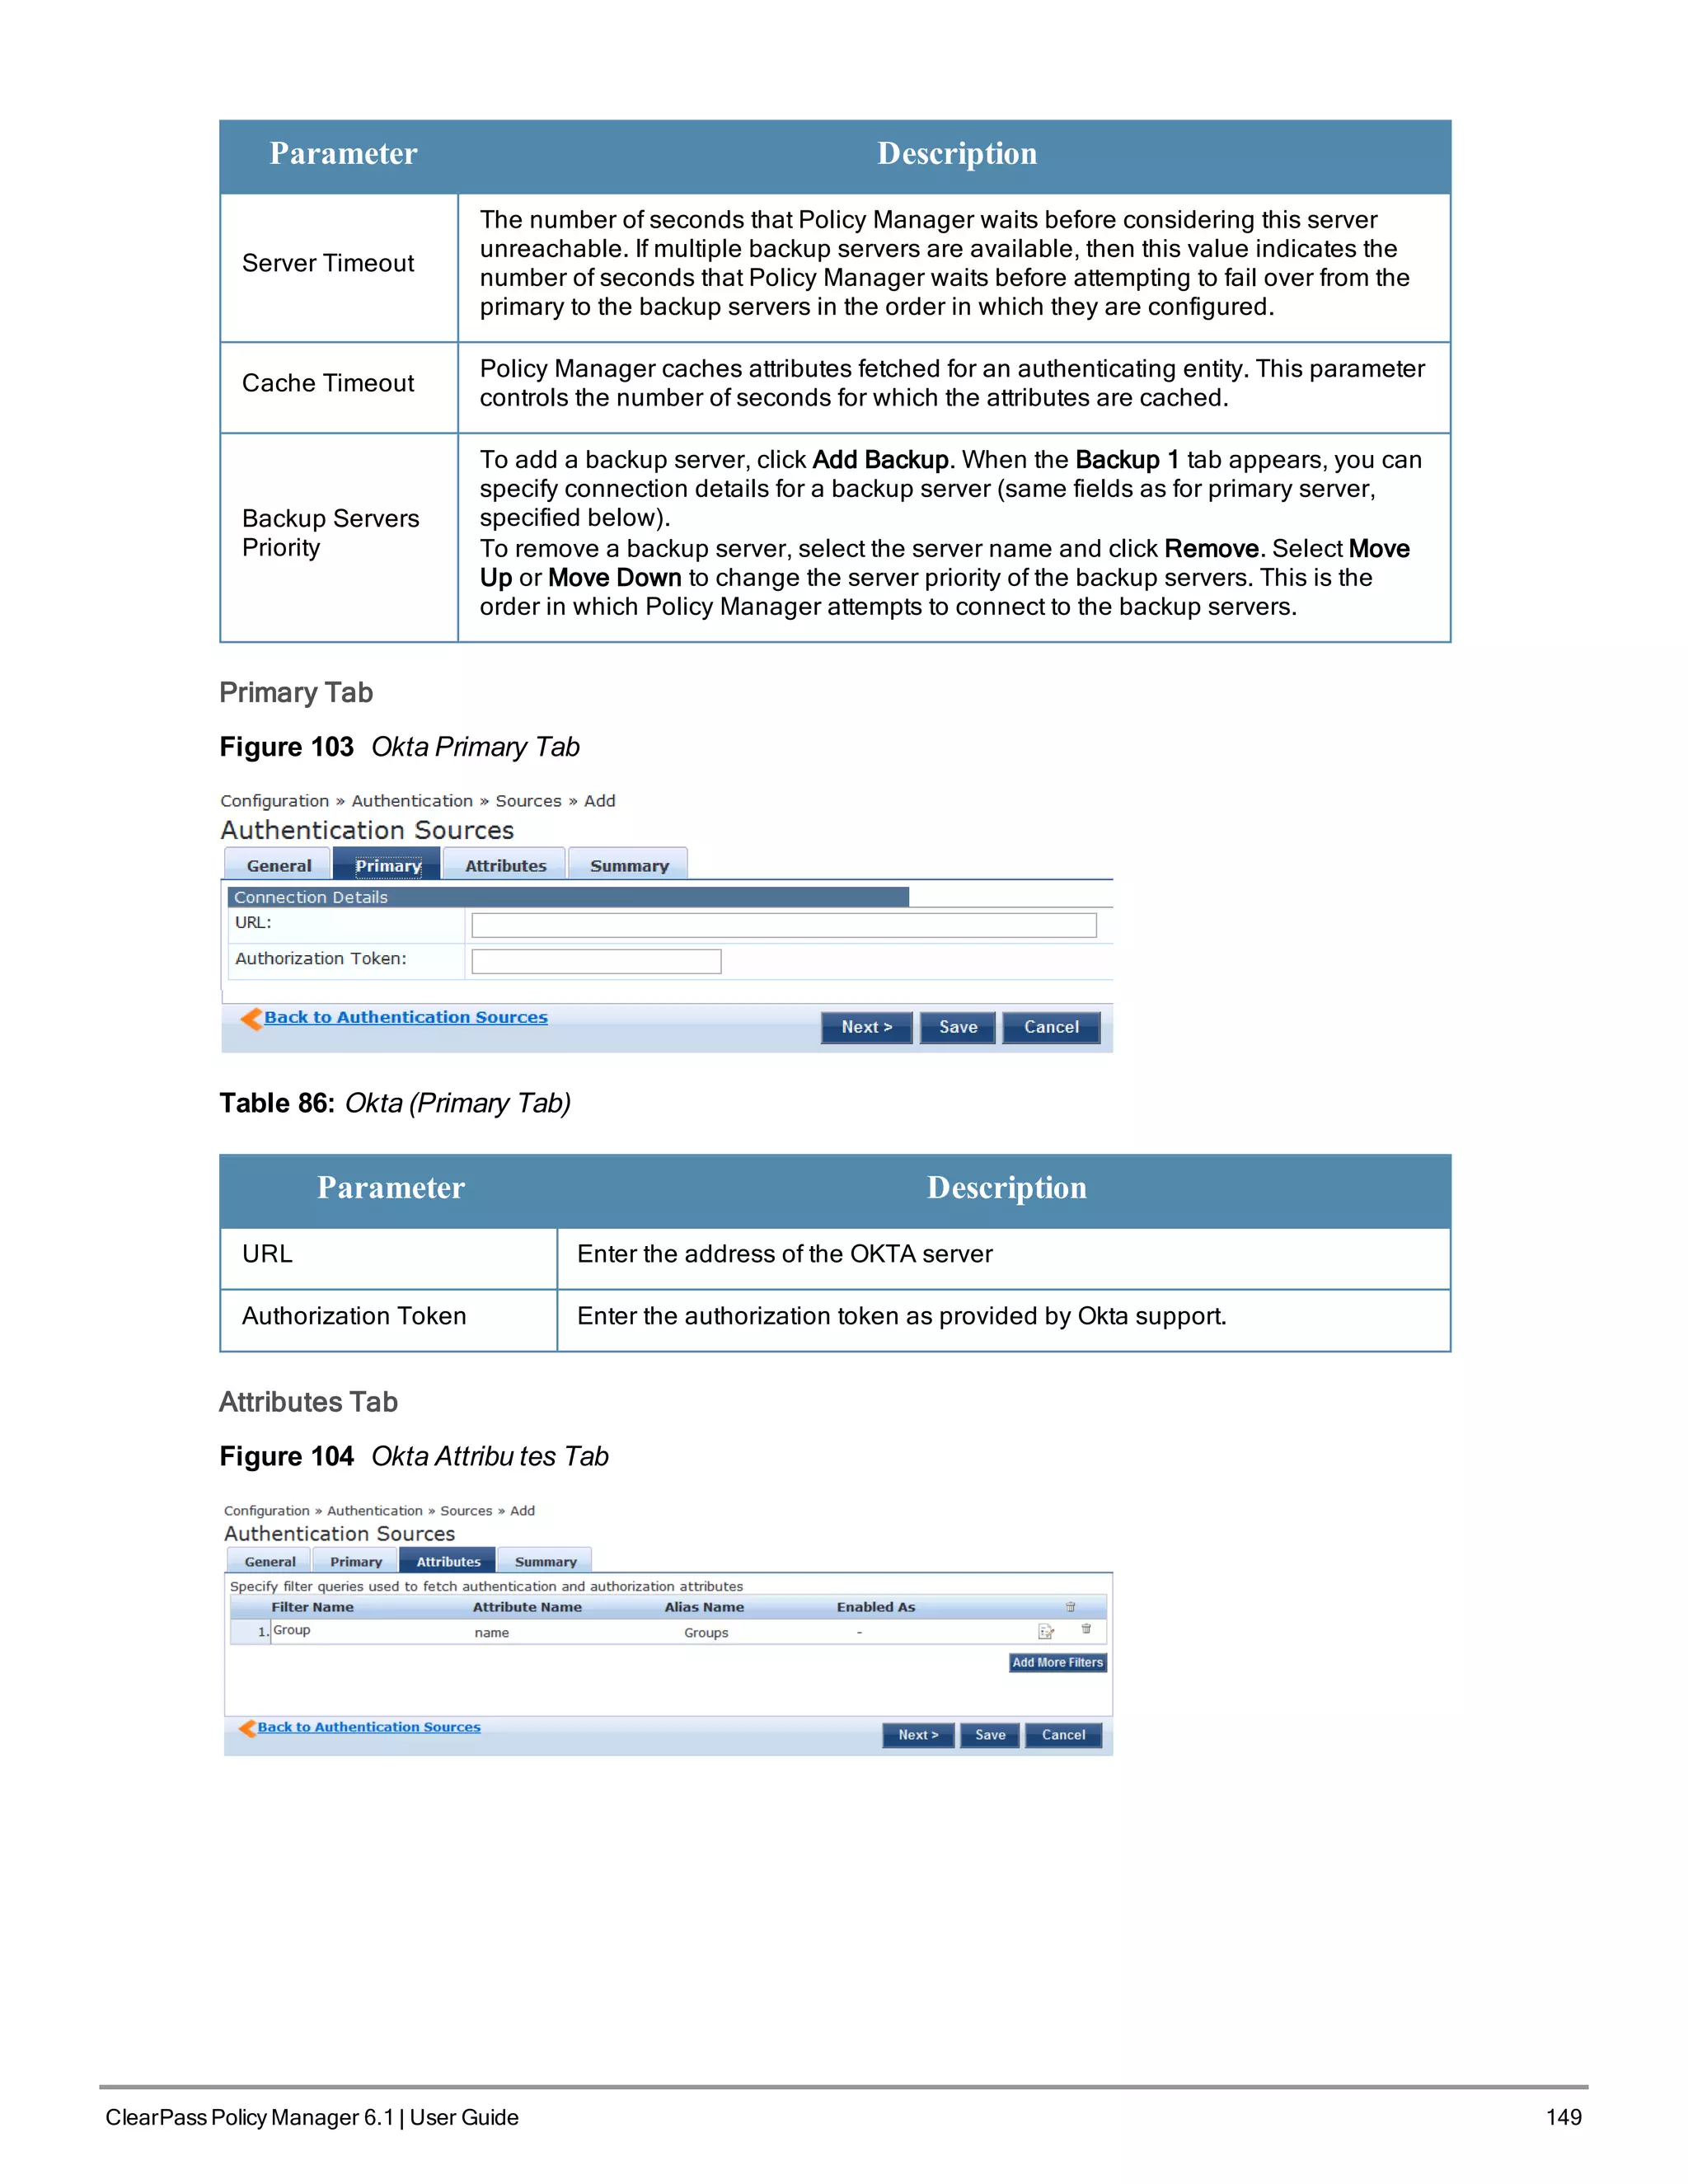
Table 87: Okta (Attributes Tab)
Tab Parameter/Description
Filter Name / Attribute
Name / Alias Name /
Enable as Role
Listing column descriptions:
l Filter Name: Name of the filter. (Only Group can be configured for Okta.)
l Attribute Name: Name of the LDAP/AD attributes defined for this filter.
l Alias Name: For each attribute name selected for the filter, you can specify an
alias name.
l Enabled As: Specify whether value is to be used directly as a role or attribute
in an Enforcement Policy. This bypasses the step of having to assign a role in
Policy Manager through a Role Mapping Policy.
Add More Filters Brings up the filter creation popup. This is described in the next image.
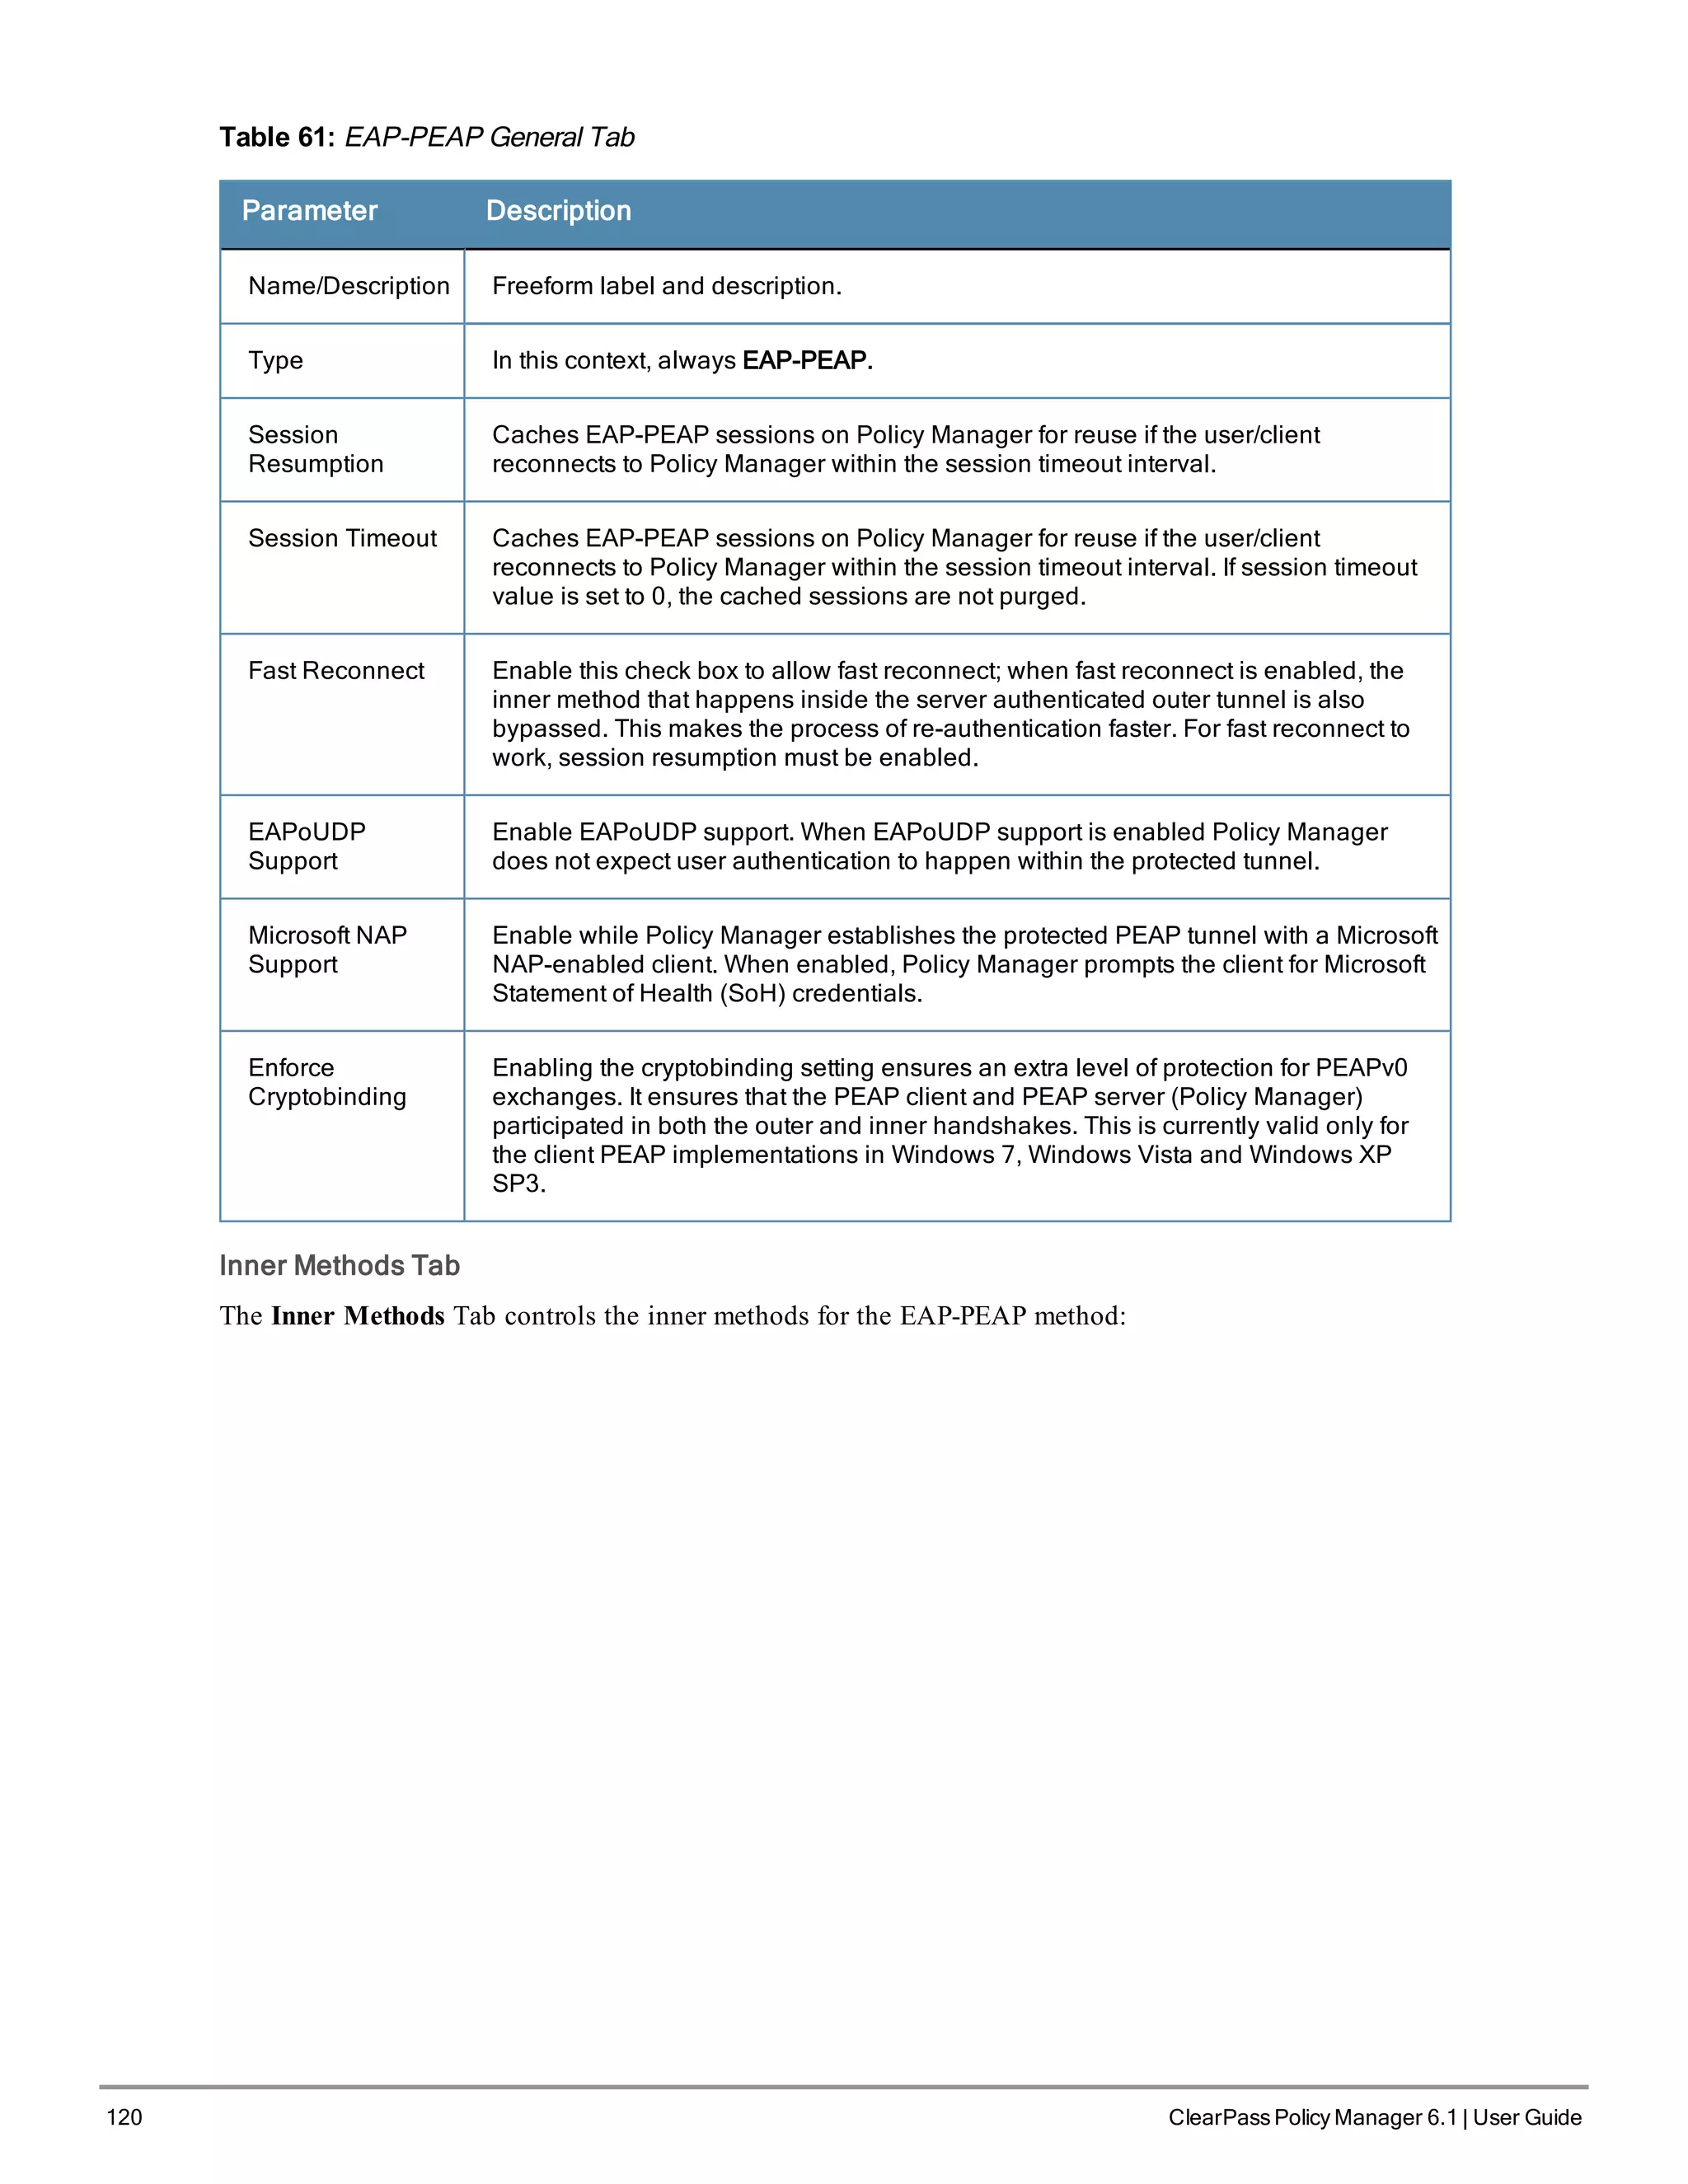
Static Host List
An internal relational database stores Policy Manager configuration data and locally configured user and device
accounts. Three pre-defined authentication sources, [Local User Repository] , [Guest User Repository], and [Guest
Device Repository], represent the three databases used to store local users, guest users and registered devices,
respectively.
While regular users typically reside in an authentication source such as Active Directory (or in other LDAP-compliant
stores), temporary users, including guest users can be configured in the Policy Manager local repositories. For a user
account created in the local database, the role is statically assigned to that account, which means a role mapping
policy need not be specified for user accounts in the local database. However, if new custom attributes are assigned to
a user (local or guest) account in the local database, these can be used in role mapping policies.
The local user database is pre-configured with a filter to retrieve the password and the expiry time for the account.
Policy Manager can perform MSCHAPv2 and PAP/GTC authentication against the local database.
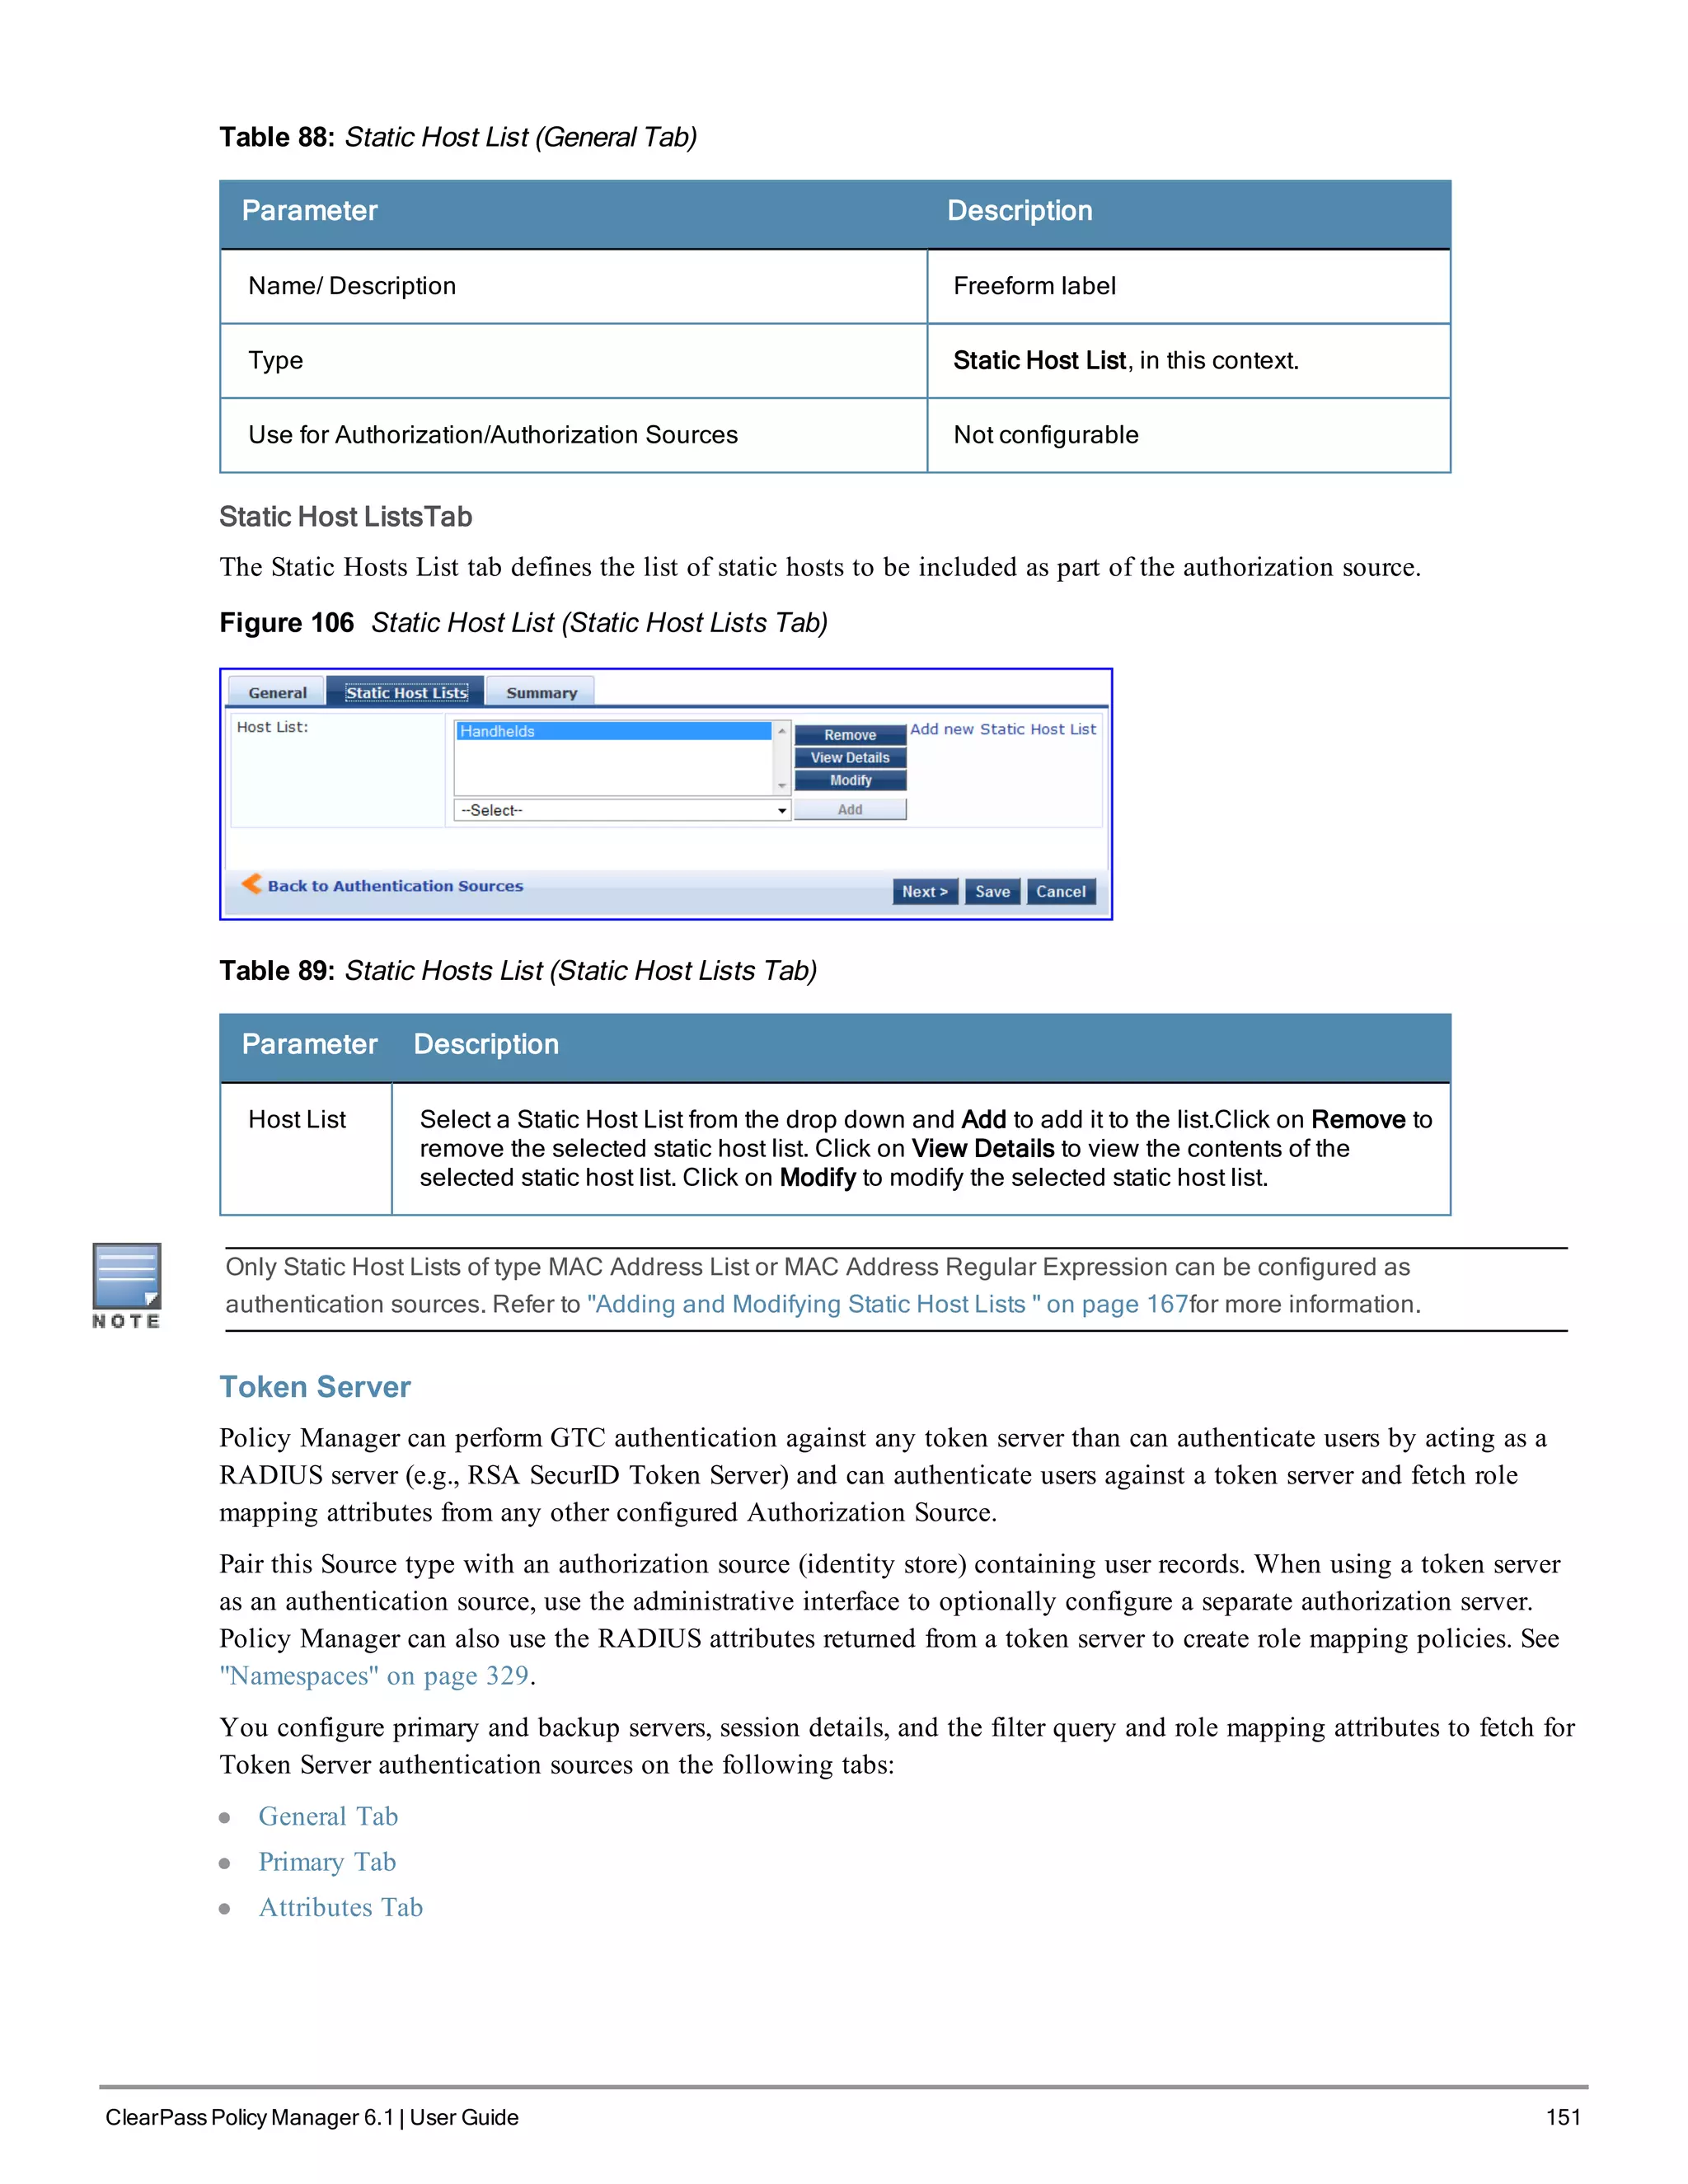
You configure primary and backup servers, session details, and the list of static hosts for Static Host List
authentication sources on the following tab:
l General Tab
l Static Host ListsTab
General Tab
The General Tab labels the authentication source.
Figure 105 Static Host List (General Tab)](https://image.slidesharecdn.com/arubacppm61userguide-140926121722-phpapp01/75/Aruba-cppm-6_1_user_guide-150-2048.jpg)

![156 ClearPass Policy Manager 6.1 | User Guide
l [Contractor] - Default role for a Contractor
l [Employee] - Default role for an Employee
l [Guest] - Default role for guest access
l [Other] - Default role for other user or device
l [TACACS API Admin] -API administrator role for Policy Manager admin
l [TACACS Help Desk] - Policy Manager Admin Role, limited to views of the Monitoring screens
l [TACACS Network Admin] - Policy Manager Admin Role, limited to Configuration and Monitoring UI screens
l [TACACS Read-only Admin] - Read-only administrator role for Policy Manager Admin
l [TACACS Receptionist] - Policy Manager Guest Provisioning Role
l [TACACS Super Admin] - Policy Manager Admin Role with unlimited access to all UI screens
Additional roles are available with AirGroup and Onboard licenses
You can also configure other roles. Refer to "Adding and Modifying Roles " on page 160.
Configuring Single Sign-On
Single Sigh-On allows ClearPass users to access the Policy Manager, Guest, and Insight applications without re-signing
in once they have signed in to one of the applications.
To configure single sign-on
1. Go to Configuration > Identity > Single Sign-On.
2. Enter the IdP (Identity Provider) Single sign-on URL. (See below for details.)
3. In the Enable SSO for section, select the check box for the applications you want users to access with single sign-
on.
4. If you want to do a certificate comparison, select the IdP Certificate to use.
5. Click Save.
Table 92: Single Sign-On parameters.
Parameter Description
IdP
SSO URL
This is the Identity Provider's HTTP-REDIRECT URl, which is the URL a user is redirected
to with a SAMLRequest when that user accesses a SAML protected resource.
IdP
Certificate
Single sign-on will operate with or without a certificate comparison. The certificates you
can choose in this list are the ones defined in "Certificate Trust List " on page 289.](https://image.slidesharecdn.com/arubacppm61userguide-140926121722-phpapp01/75/Aruba-cppm-6_1_user_guide-156-2048.jpg)
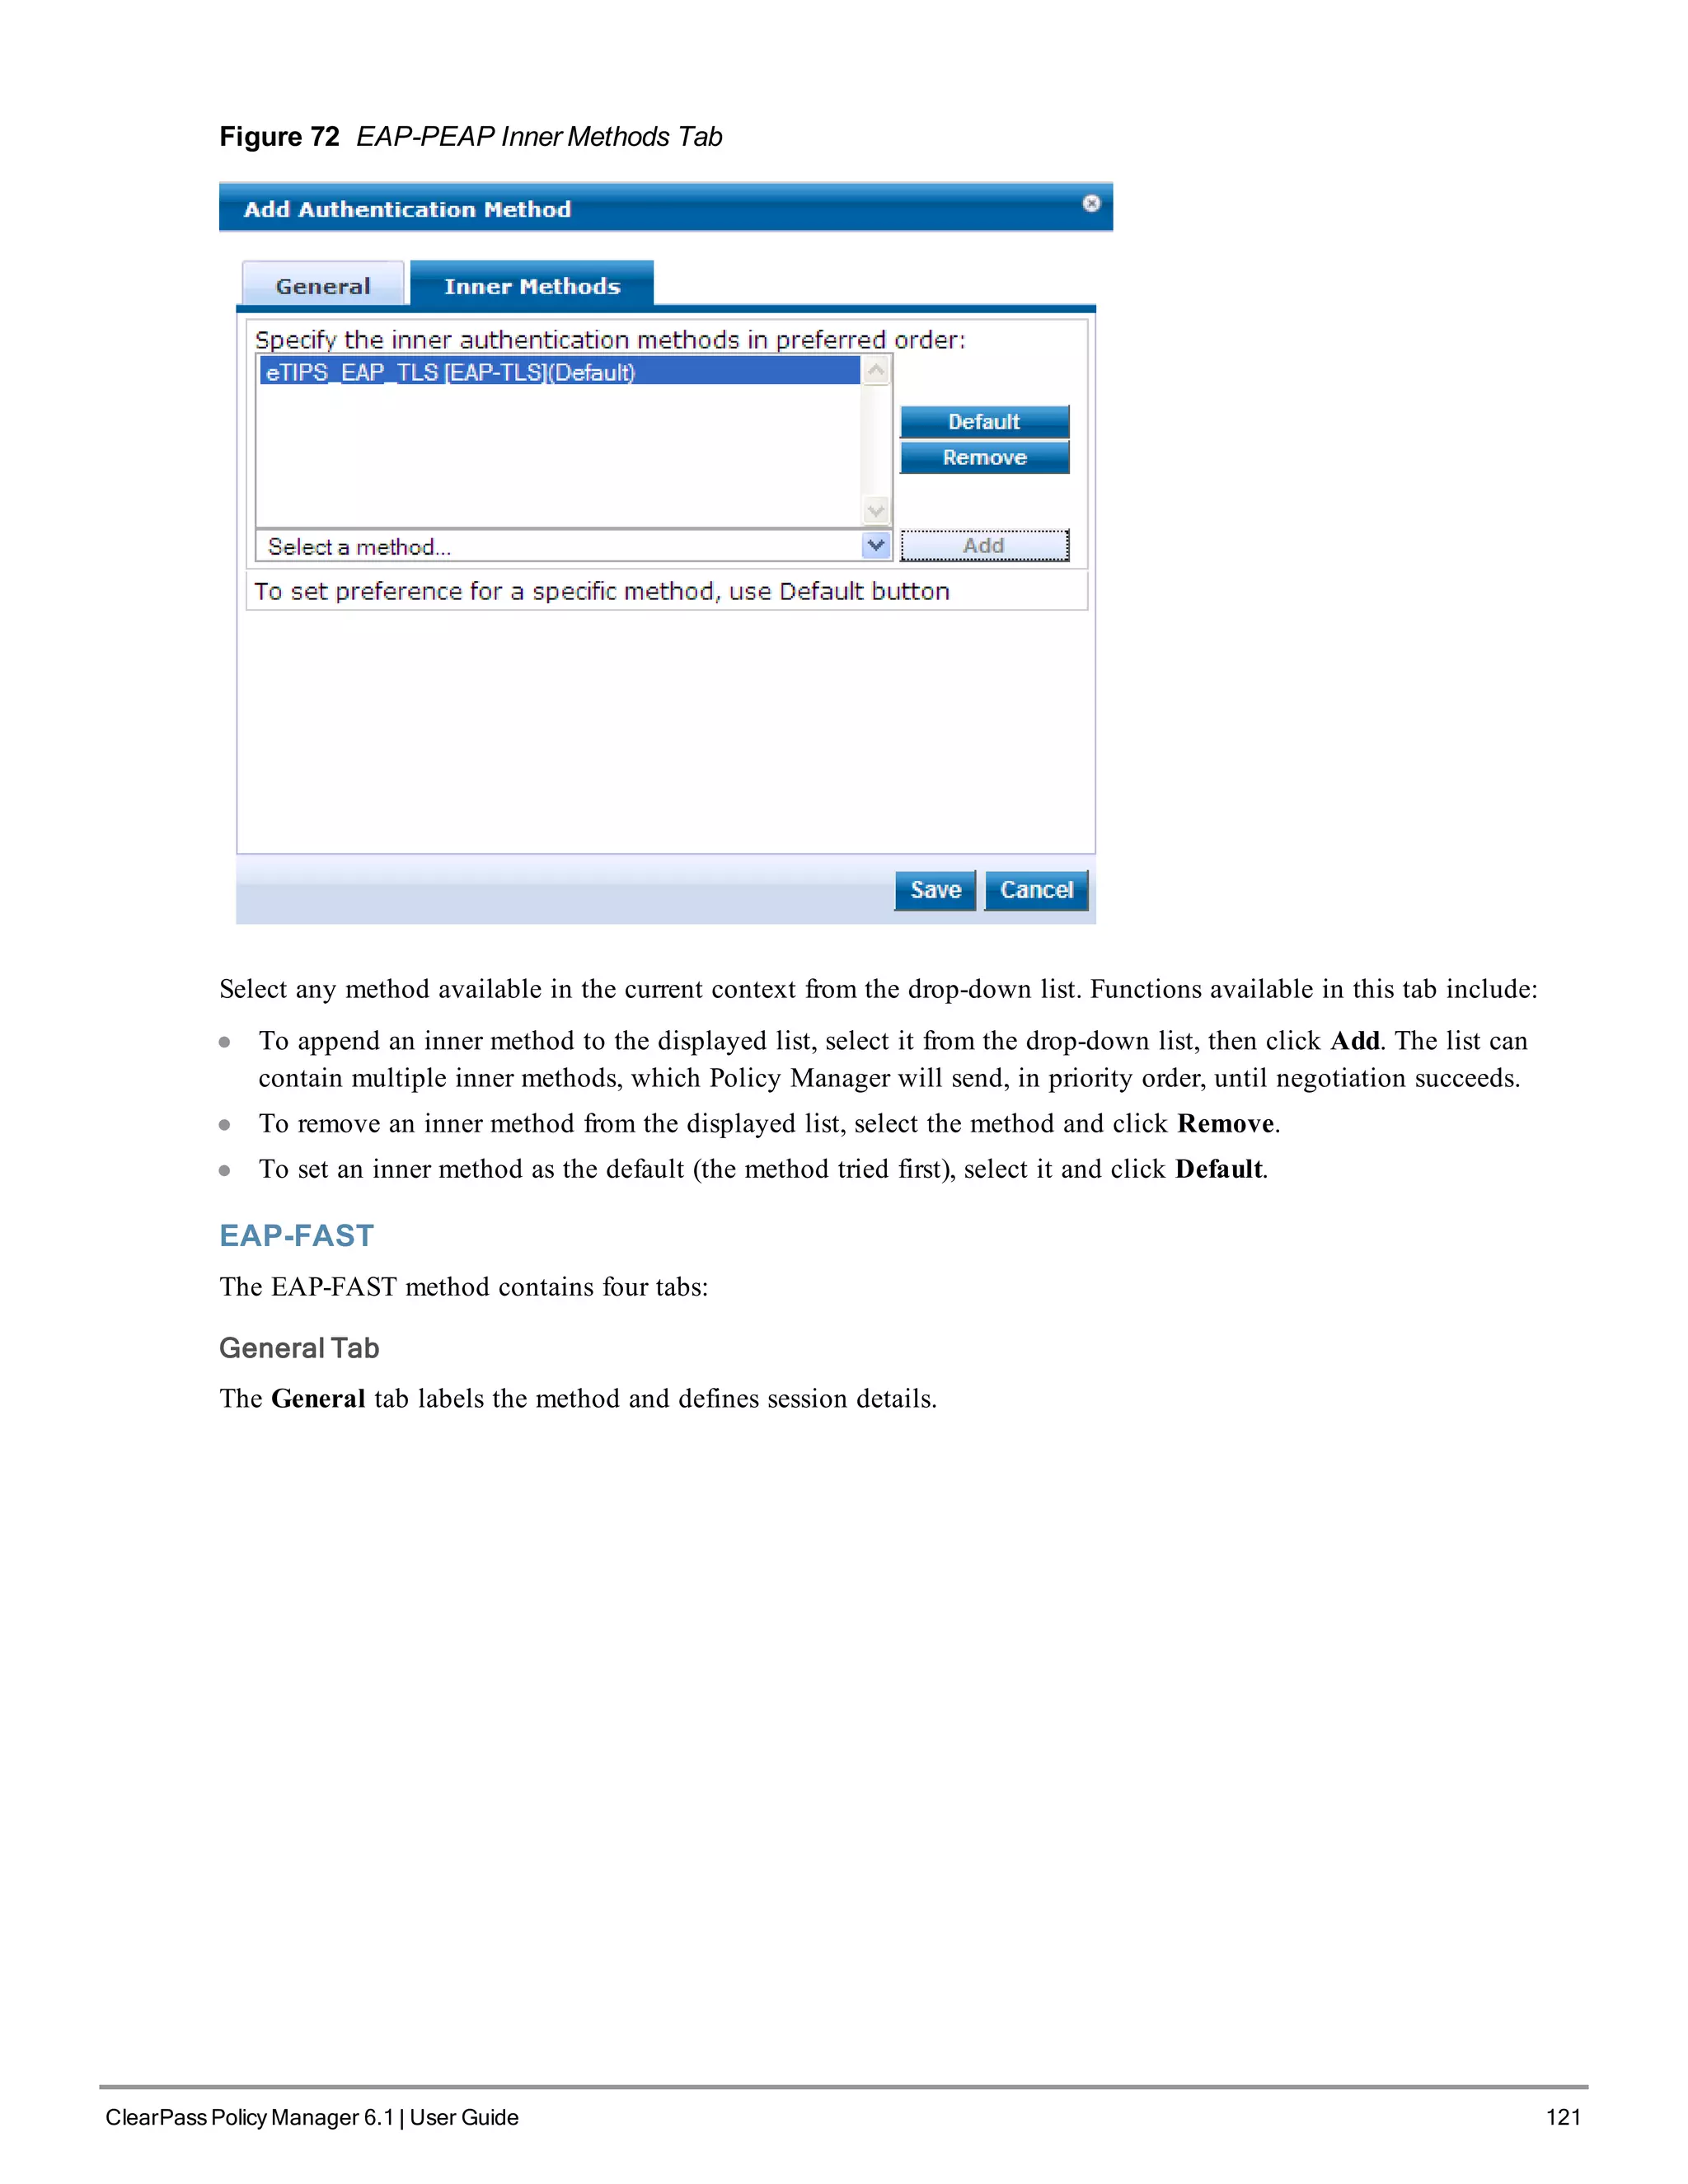
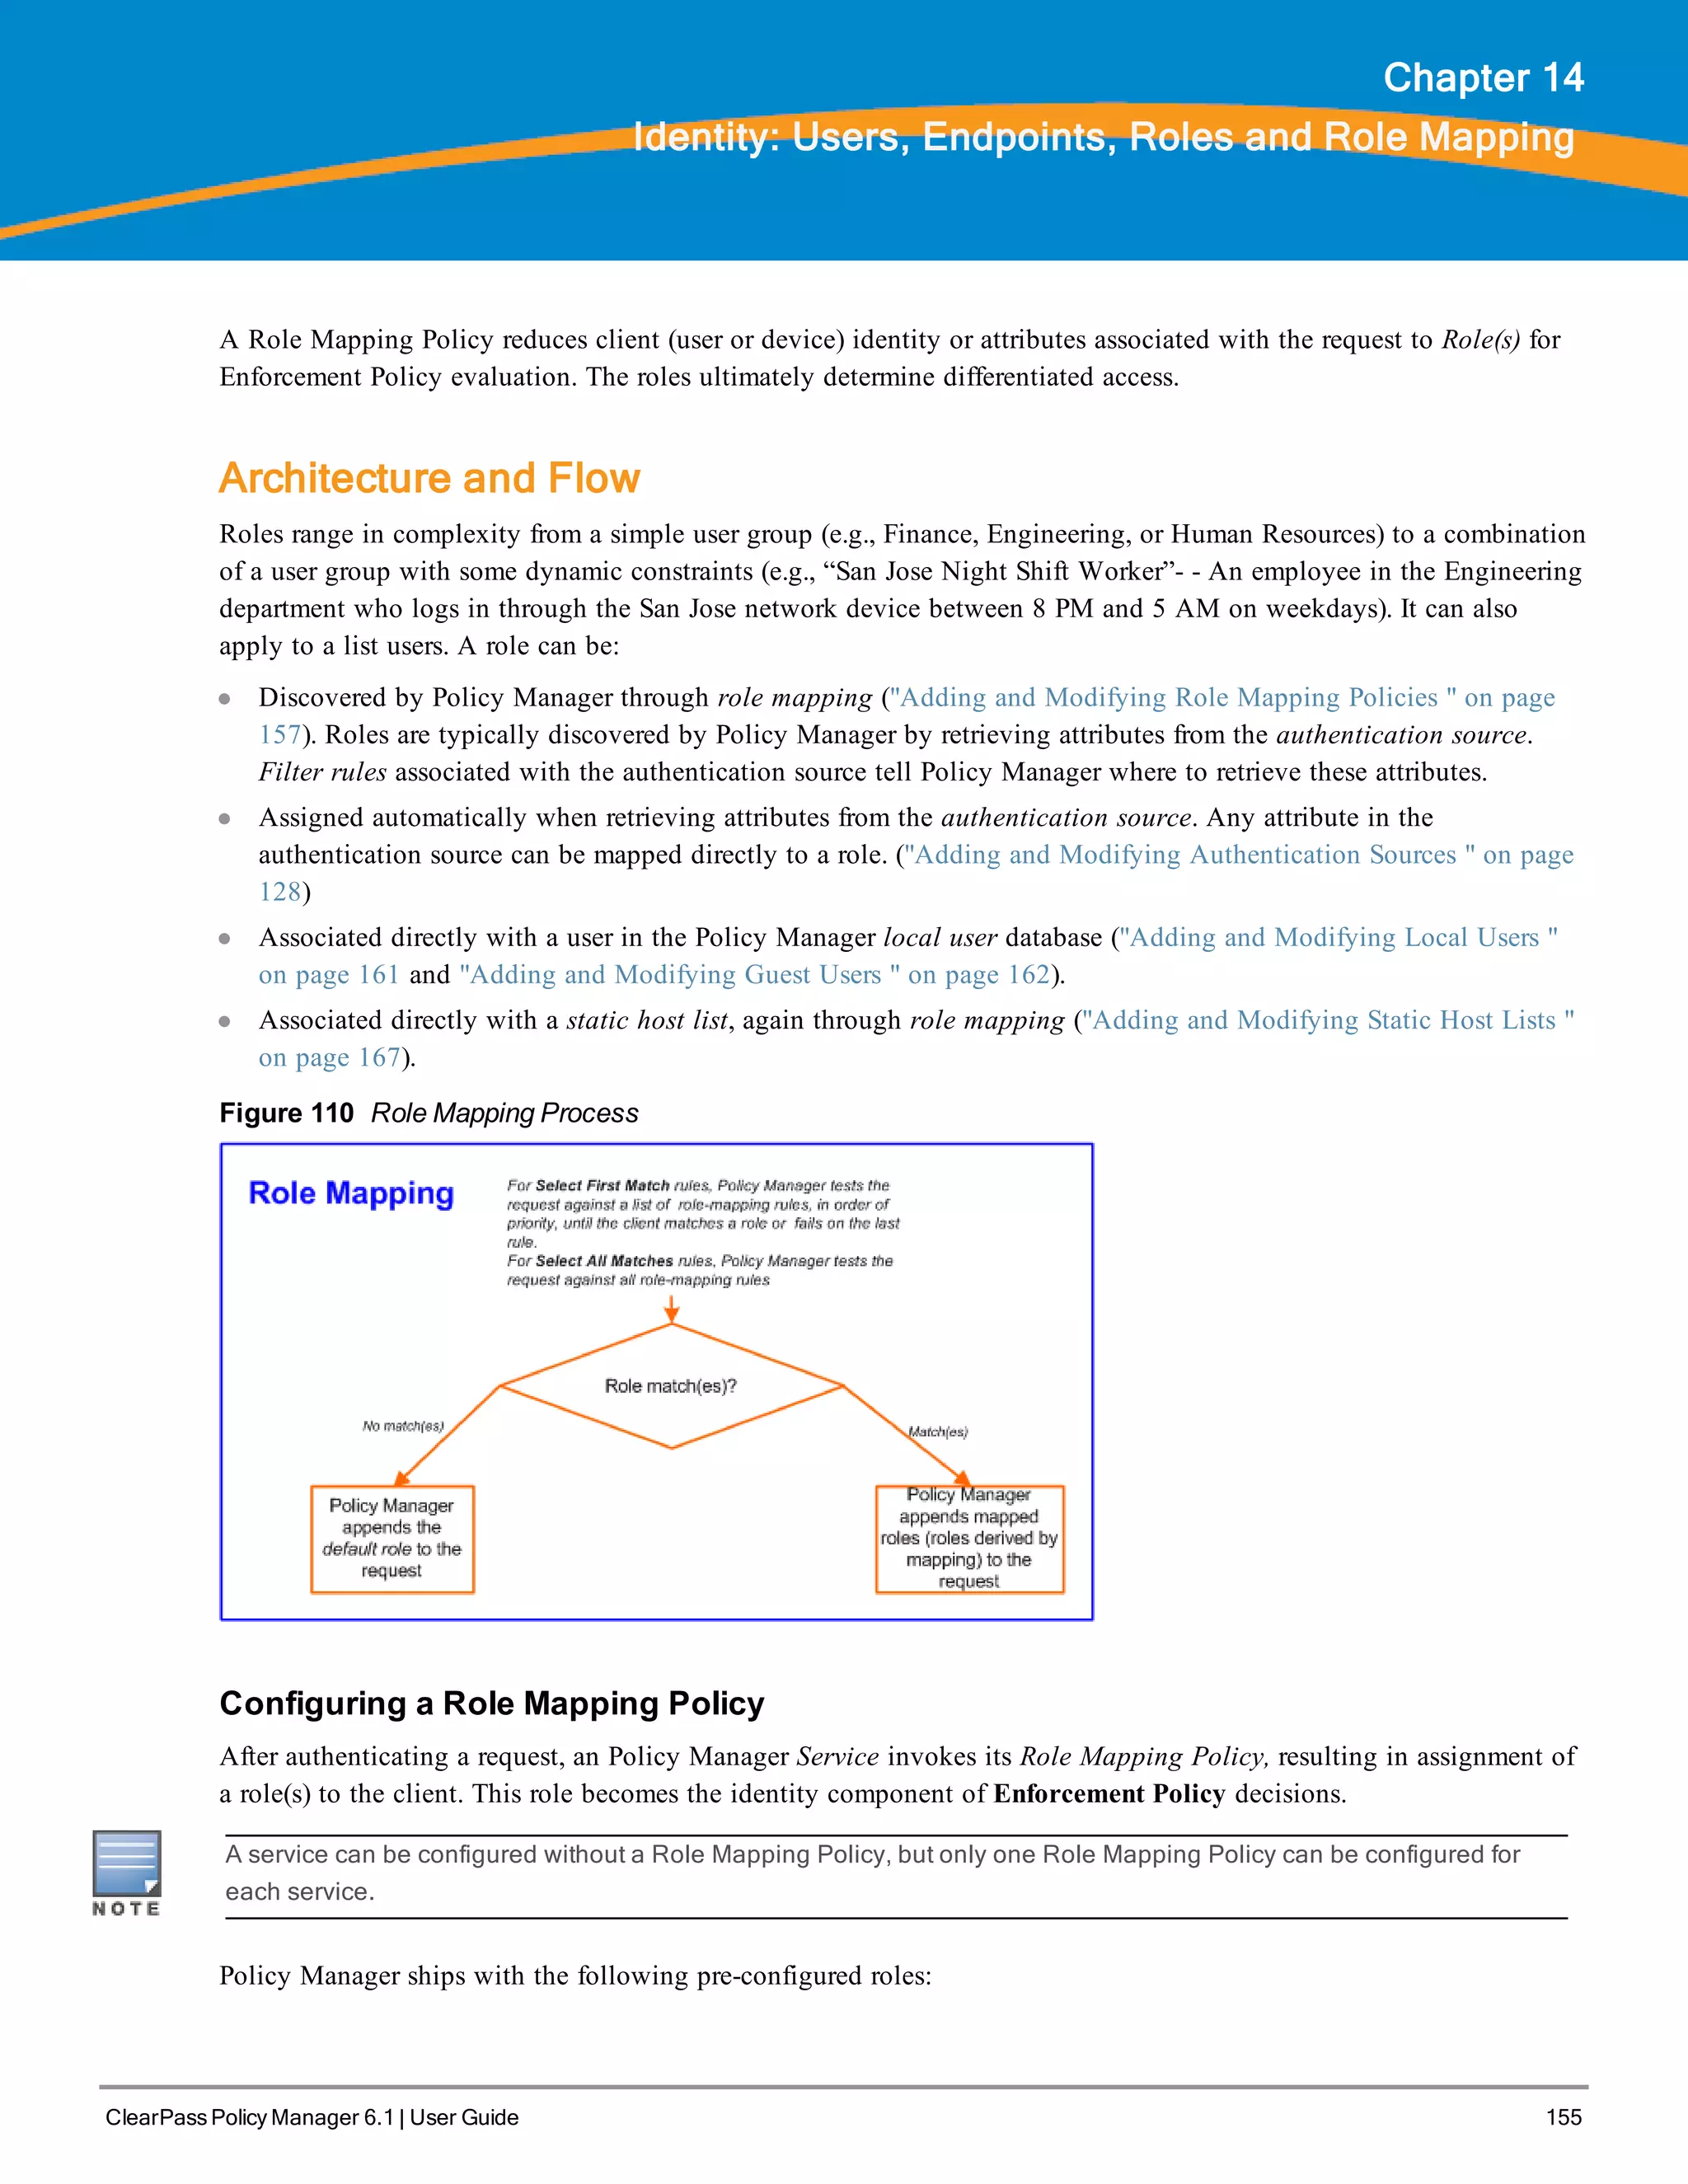
![Configuring a Role Mapping Policy
After authenticating a request, an Policy Manager Service invokes its Role Mapping Policy, resulting in assignment of
a role(s) to the client. This role becomes the identity component of Enforcement Policy decisions.
A Service can be configured without a Role Mapping Policy, but only one Role Mapping Policy can be configured for
each service.
Policy Manager ships with the following pre-configured roles:
l [Guest] - Role for guest access
l [TACACS Help Desk] - Policy Manager Admin Role, limited to views of the Monitoring screens
l [TACACS Network Admin] - Policy Manager Admin Role, limited to Configuration and Monitoring UI screens
l [TACACS Receptionist] - Policy Manager Guest Provisioning Role
l [TACACS Super Admin] - Policy Manager Admin Role with unlimited access to all UI screens
You can also configure additional roles. Refer to "Adding and Modifying Roles " on page 160 for more information.
Adding and Modifying Role Mapping Policies
From the Services page (Configuration > Service), you can configure role mapping for a new service (as part of the
flow of the Add Service wizard), or modify an existing role mapping policy directly (from the Configuration >
Identity > Role Mappings page).
Figure 111 Role Mapping Policies
When you click Add Role Mapping from any of these locations, Policy Manager displays the Add Role Mapping
popup, which contains the following three tabs:
l Policy
l Mapping Rules
l Summary
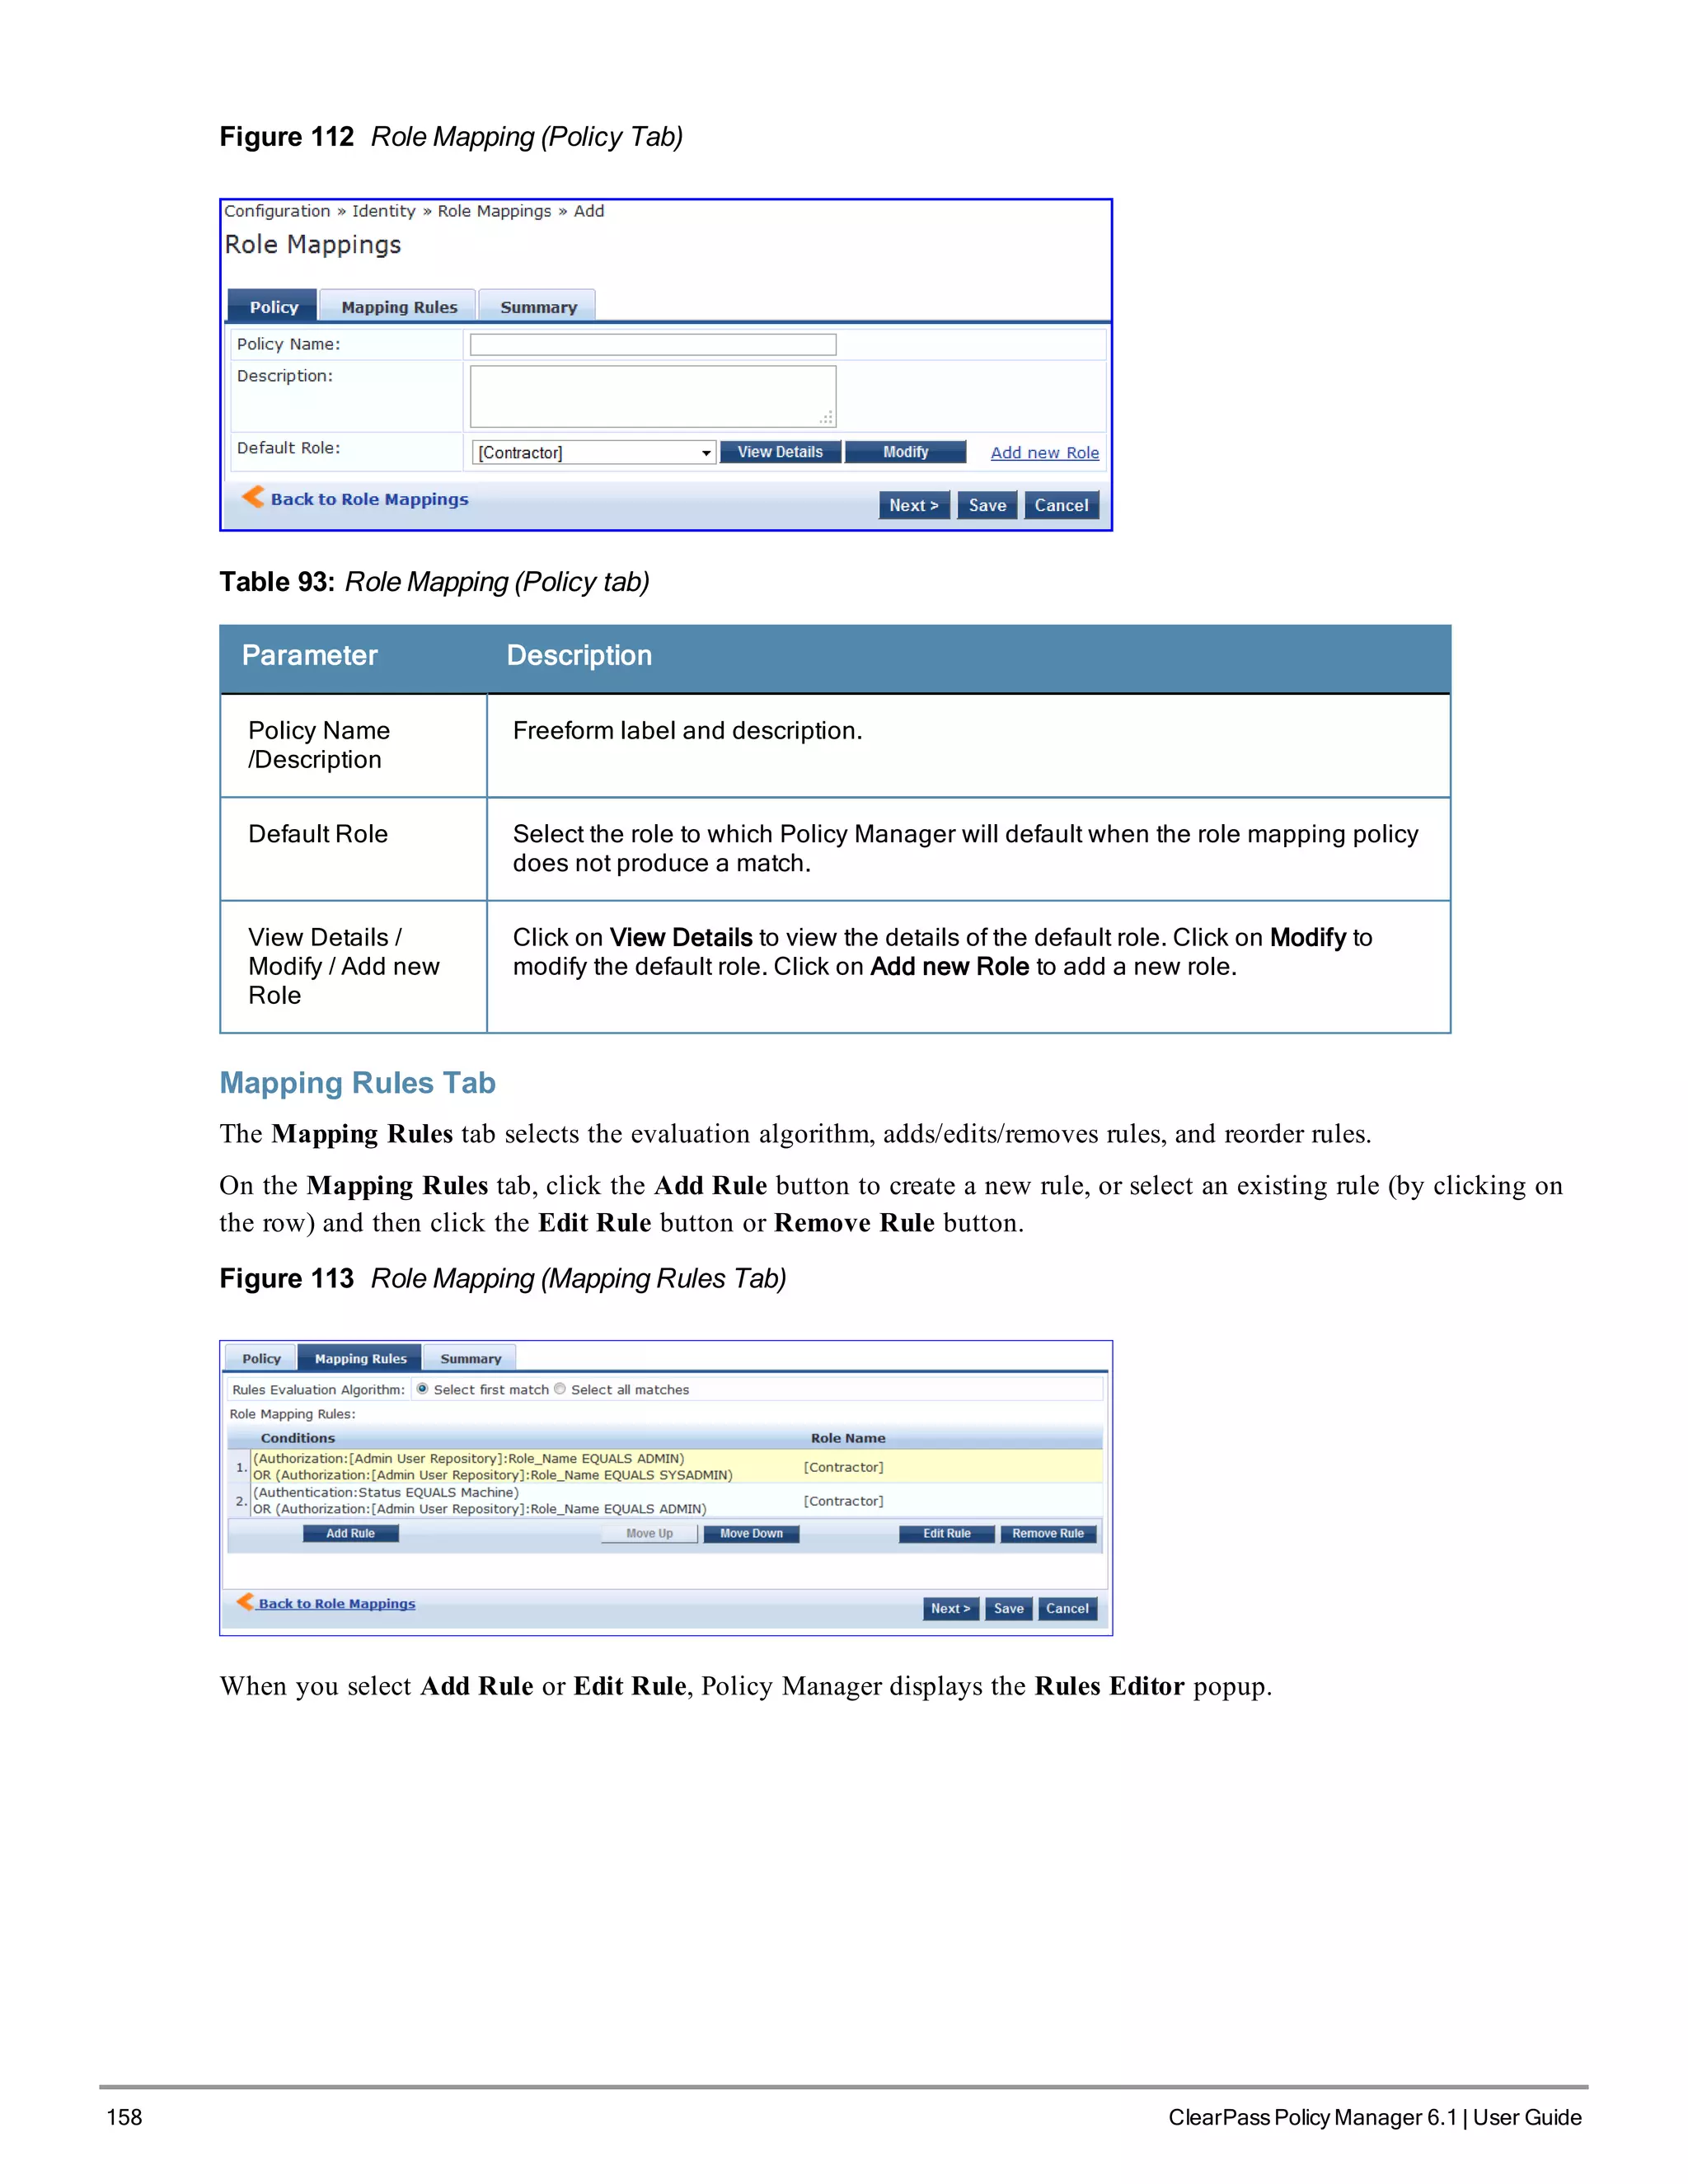
Policy Tab
The Policy tab labels the method and defines the Default Role (the role to which Policy Manager defaults if the
mapping policy does not produce a match for a given request).
ClearPass Policy Manager 6.1 | User Guide 157](https://image.slidesharecdn.com/arubacppm61userguide-140926121722-phpapp01/75/Aruba-cppm-6_1_user_guide-157-2048.jpg)
![160 ClearPass Policy Manager 6.1 | User Guide
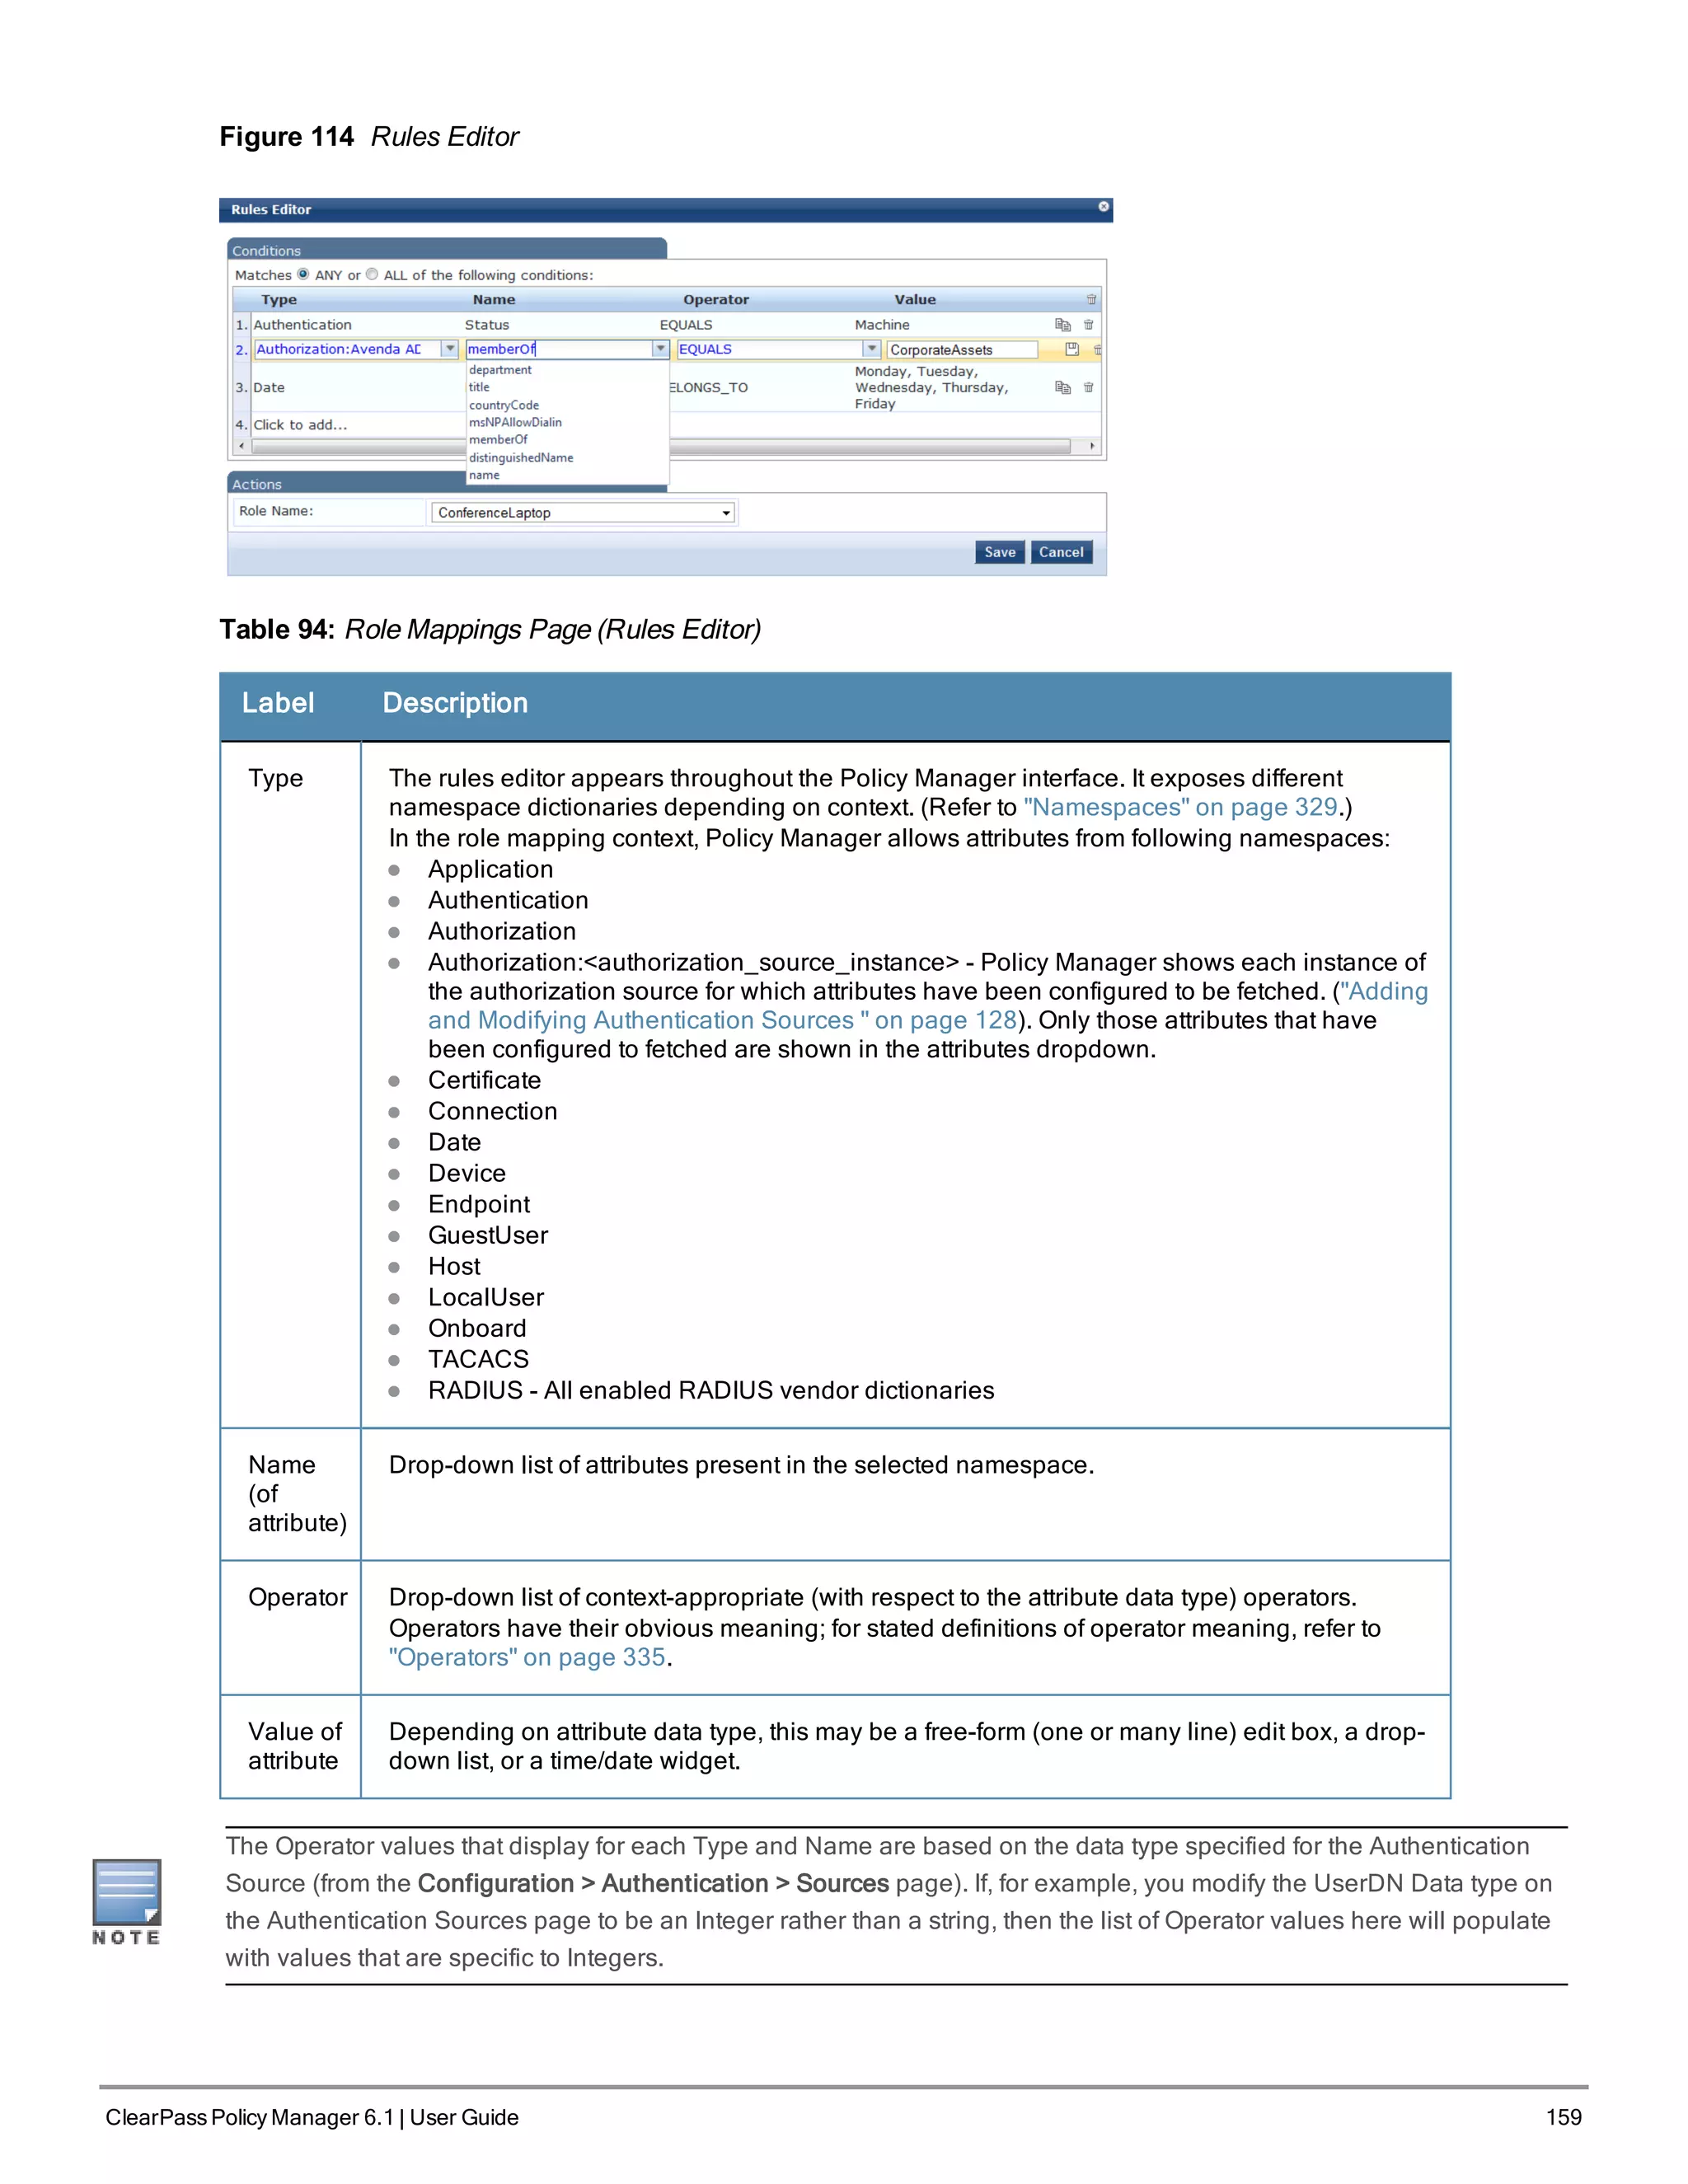
When you save your Role Mapping configuration, it appears in the Mapping Rules tab list. In this interface, you can
select a rule (click and the background changes color), and then use the various widgets to Move Up, Move Down,
Edit the rule, or Remove the rule.
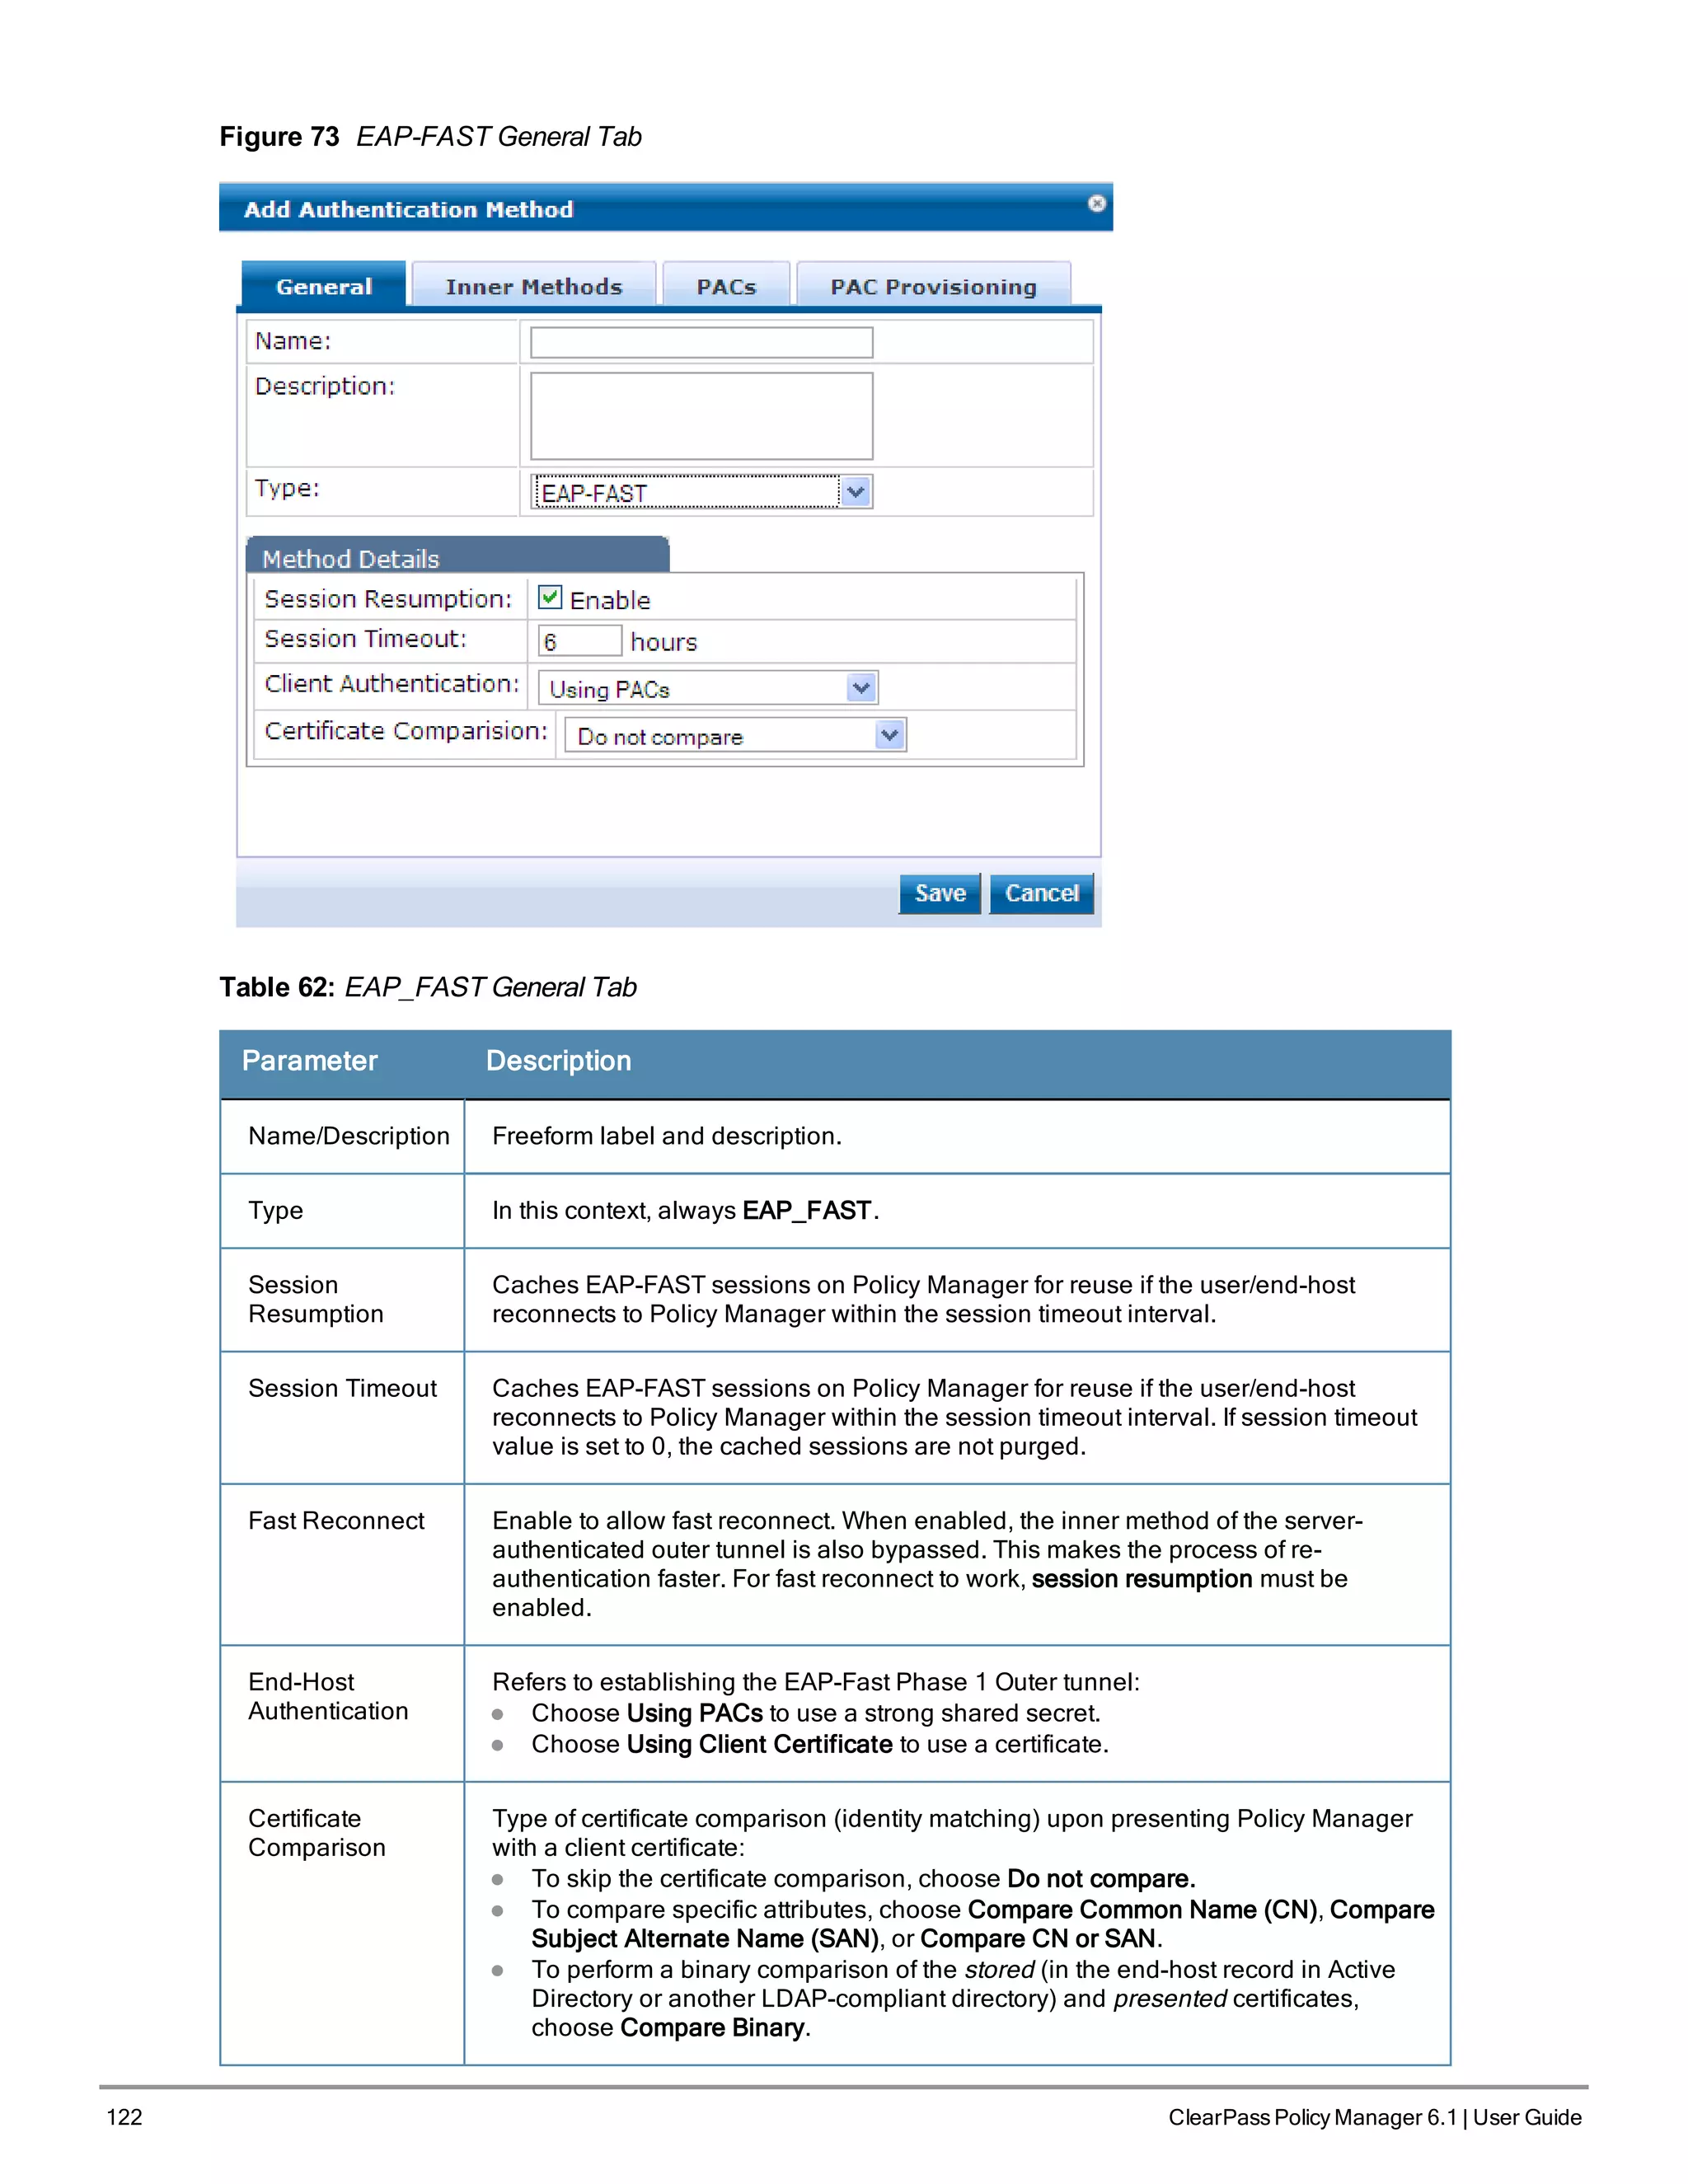
Adding and Modifying Roles
Policy Manager lists all available roles in the Roles page. From the menu, select Configuration > Identity > Roles.
Figure 115 Roles
You can configure a role from within a Role Mapping Policy (Add New Role), or independently from the menu
(Configuration > Identity > Roles > Add Roles). In either case, roles exist independently of an individual Service and
can be accessed globally through the Role Mapping Policy of any Service.
When you click Add Roles from any of these locations, Policy Manager displays the Add New Role popup.
Figure 116 Add New Role
Table 95: Add New Role
Parameter Description
Role Name /Description Freeform label and description.
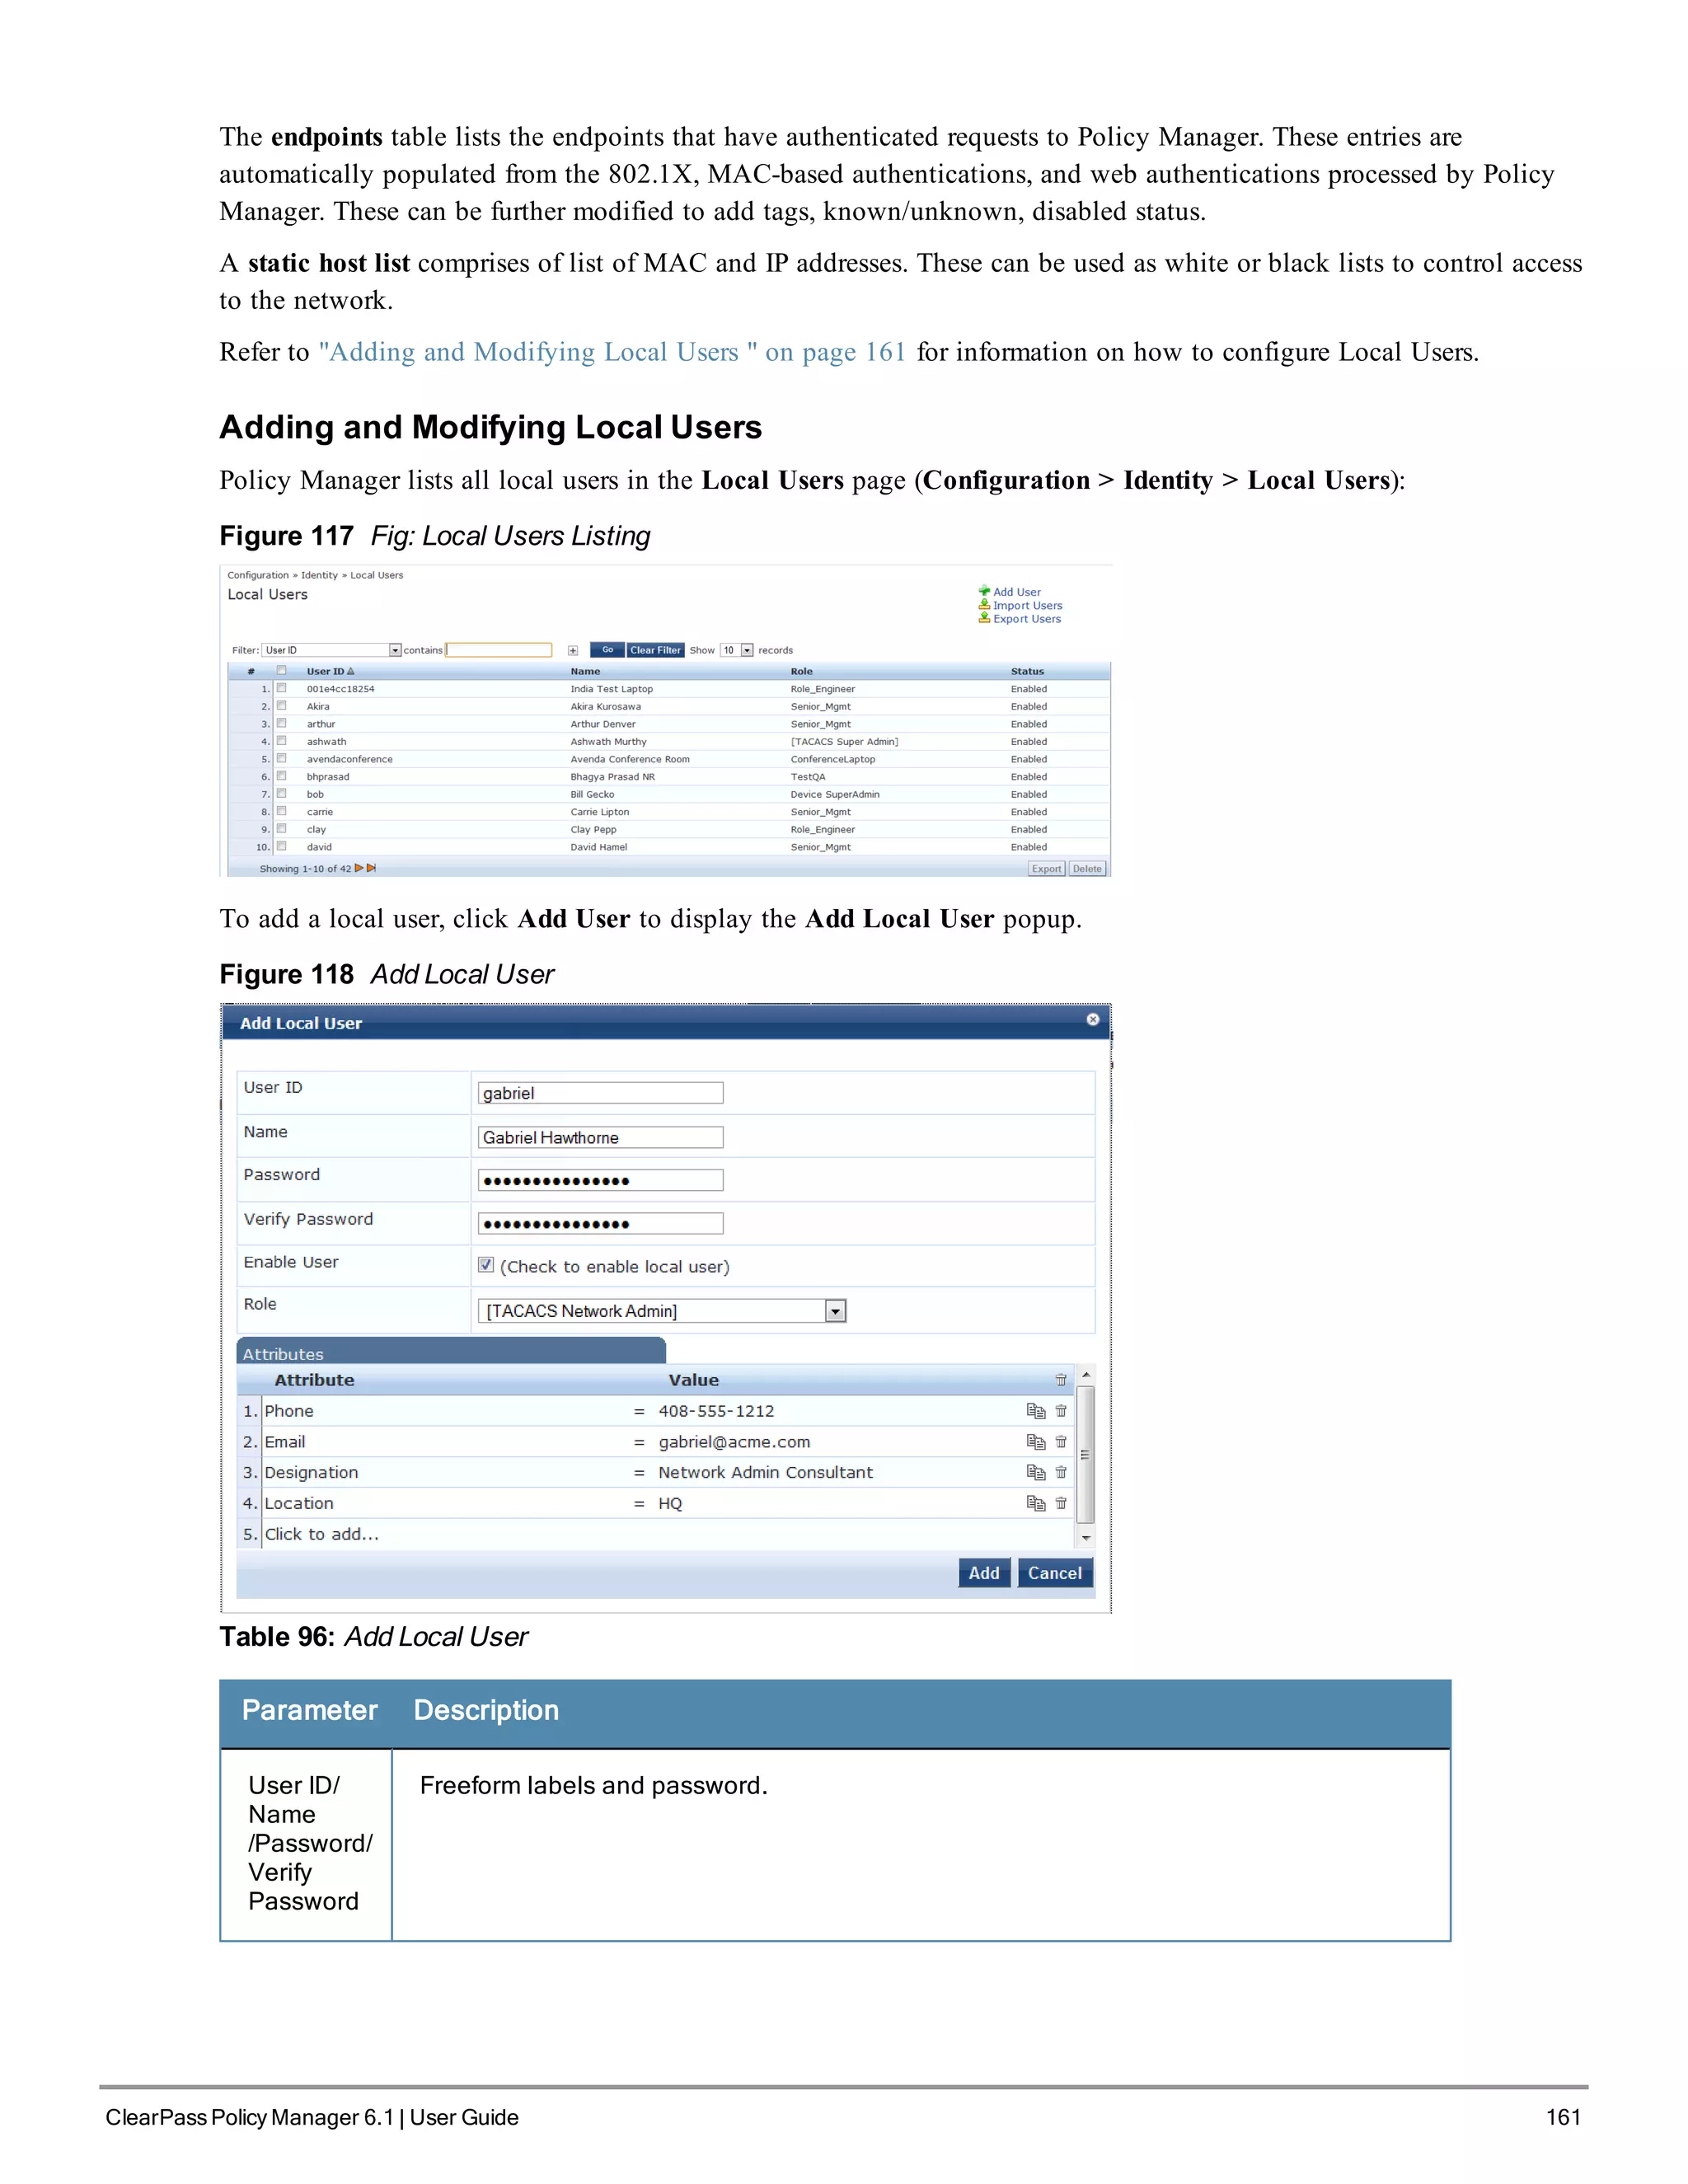
Local Users, Guest Users, Onboard Devices, Endpoints, and Static
Host List Configuration
The internal Policy Manager database ([Local User Repository], [Guest User Repository]) supports storage of user
records, when a particular class of users is not present in a central user repository (e.g., neither Active Directory nor
other database); by way of an example of such a class of users, guest or contractor records can be stored in the local
user repository.
To authenticate local users from a particular Service, include [Local User Repository] among the Authentication
Sources.](https://image.slidesharecdn.com/arubacppm61userguide-140926121722-phpapp01/75/Aruba-cppm-6_1_user_guide-160-2048.jpg)


![200 ClearPass Policy Manager 6.1 | User Guide
This section contains the following topics:
l "Built-In Audit Servers" on page 200
l "Custom Audit Servers" on page 202
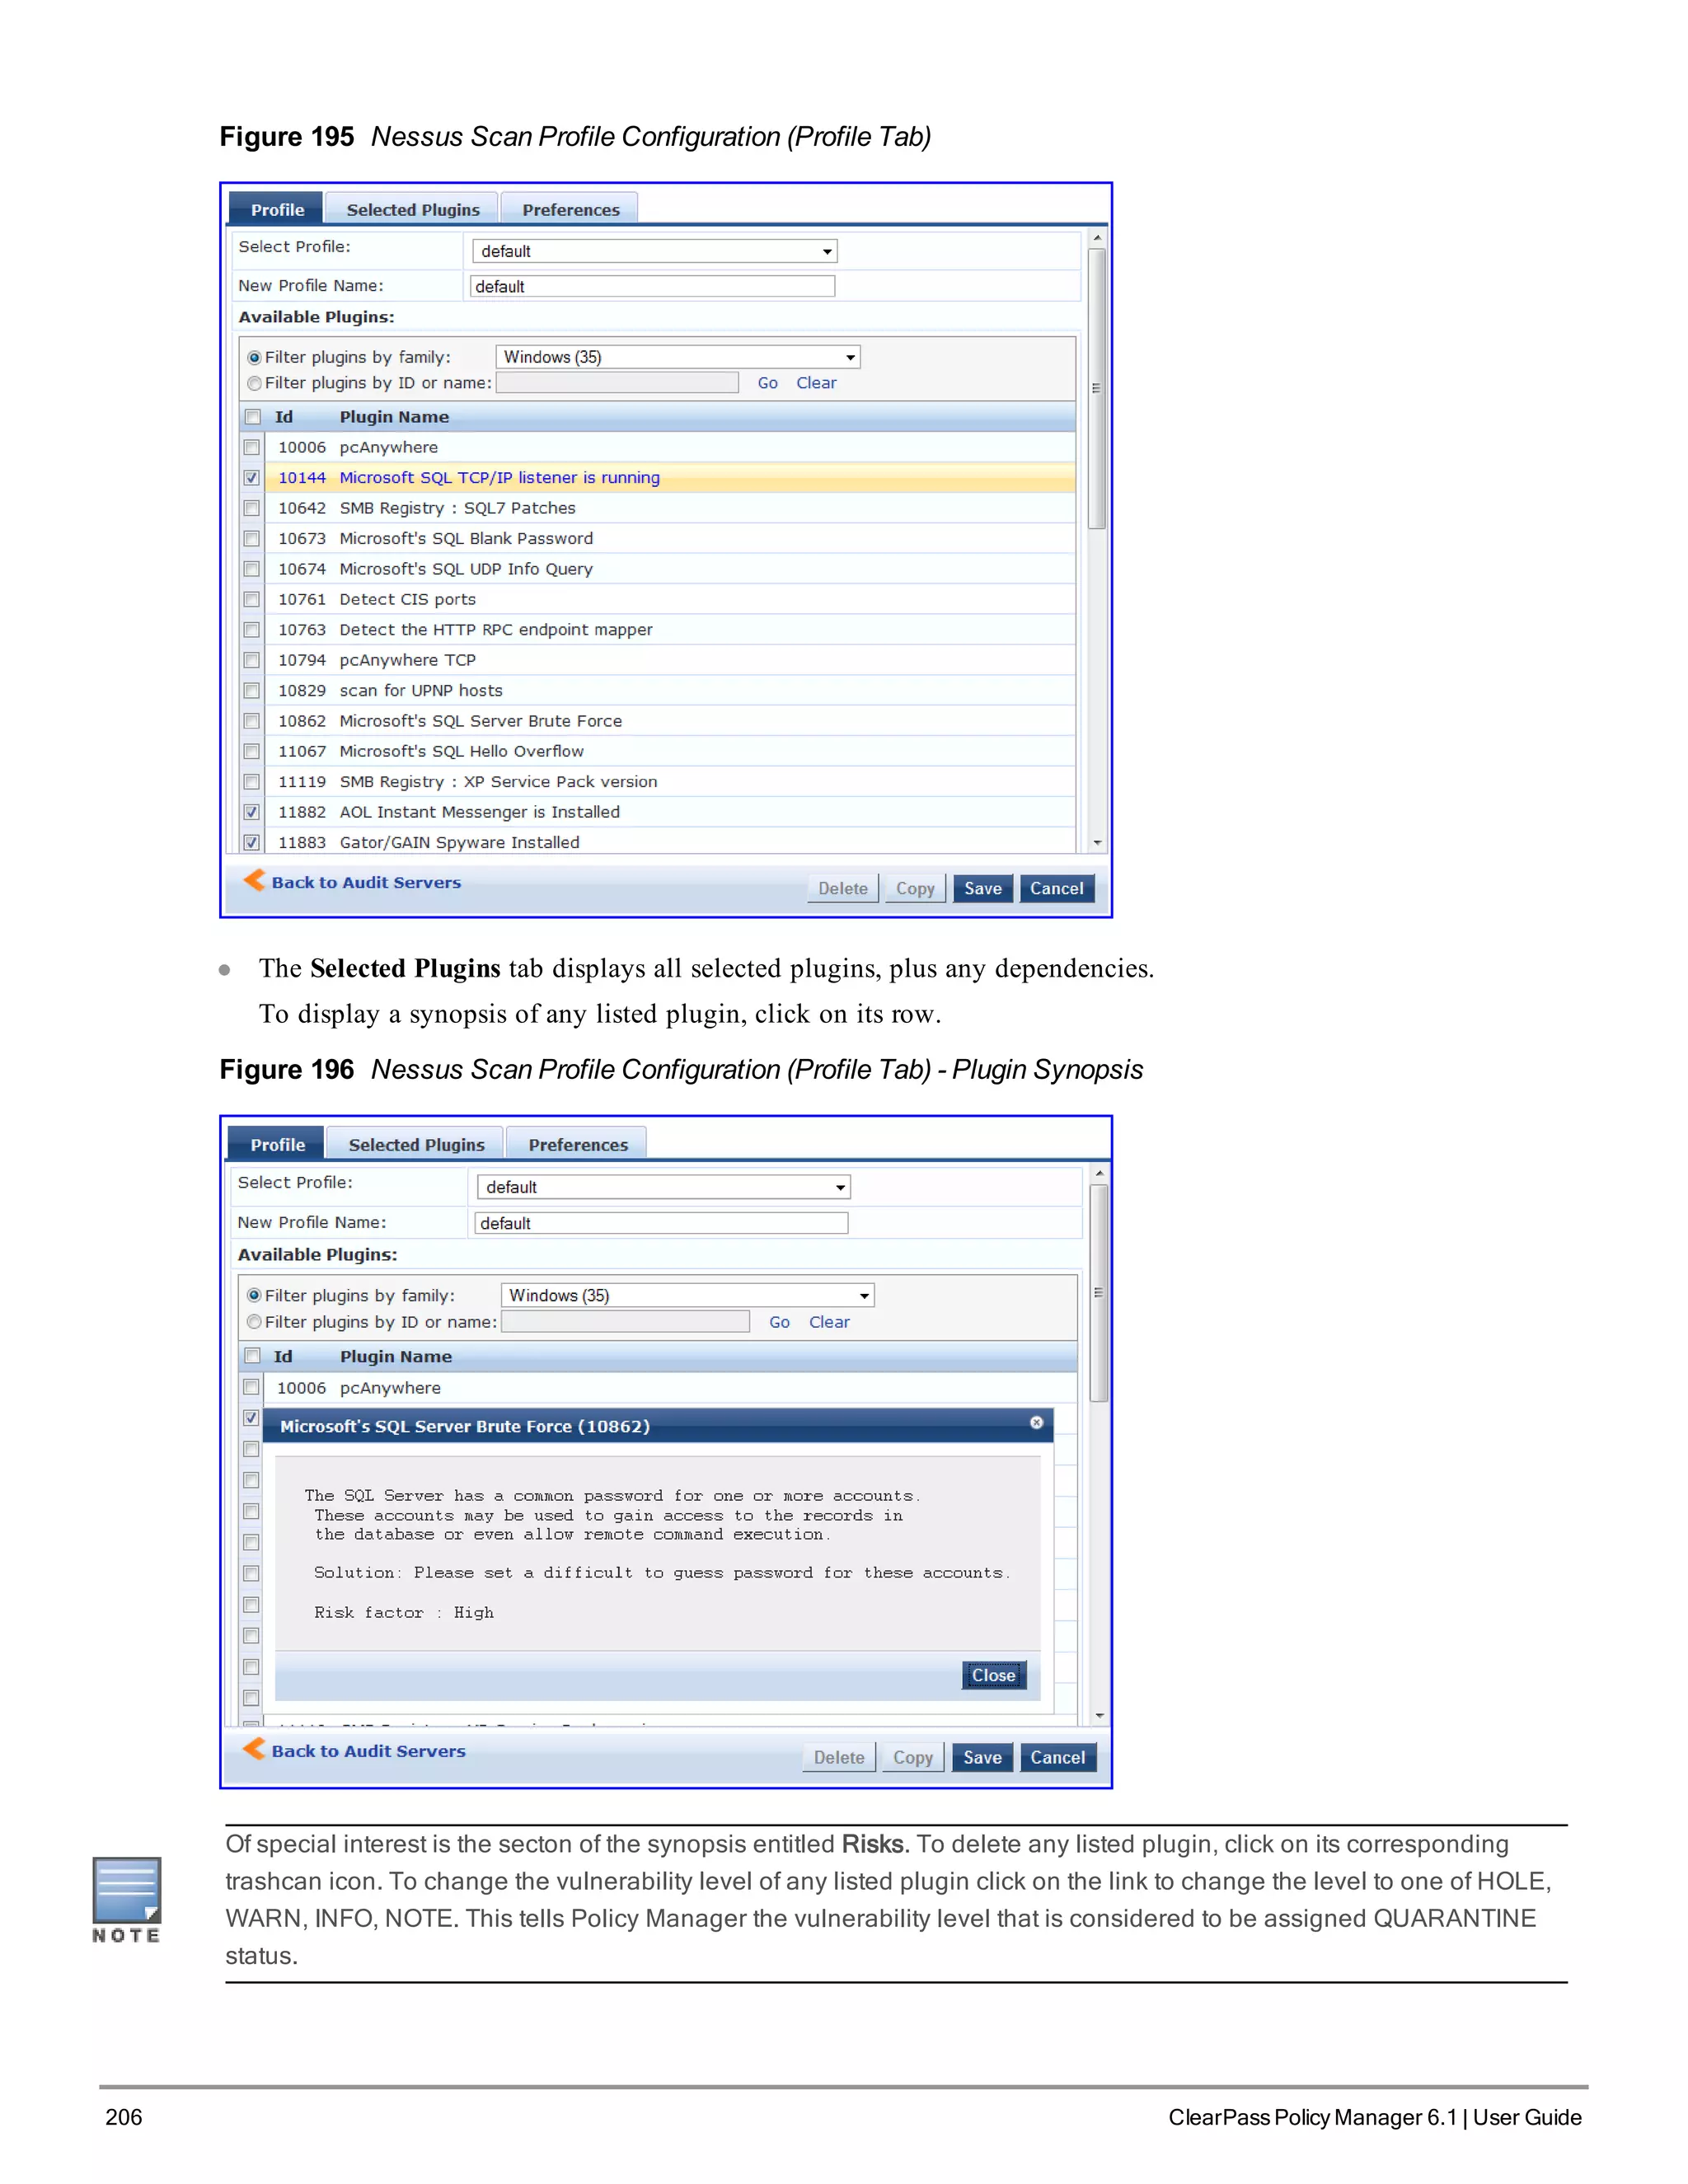
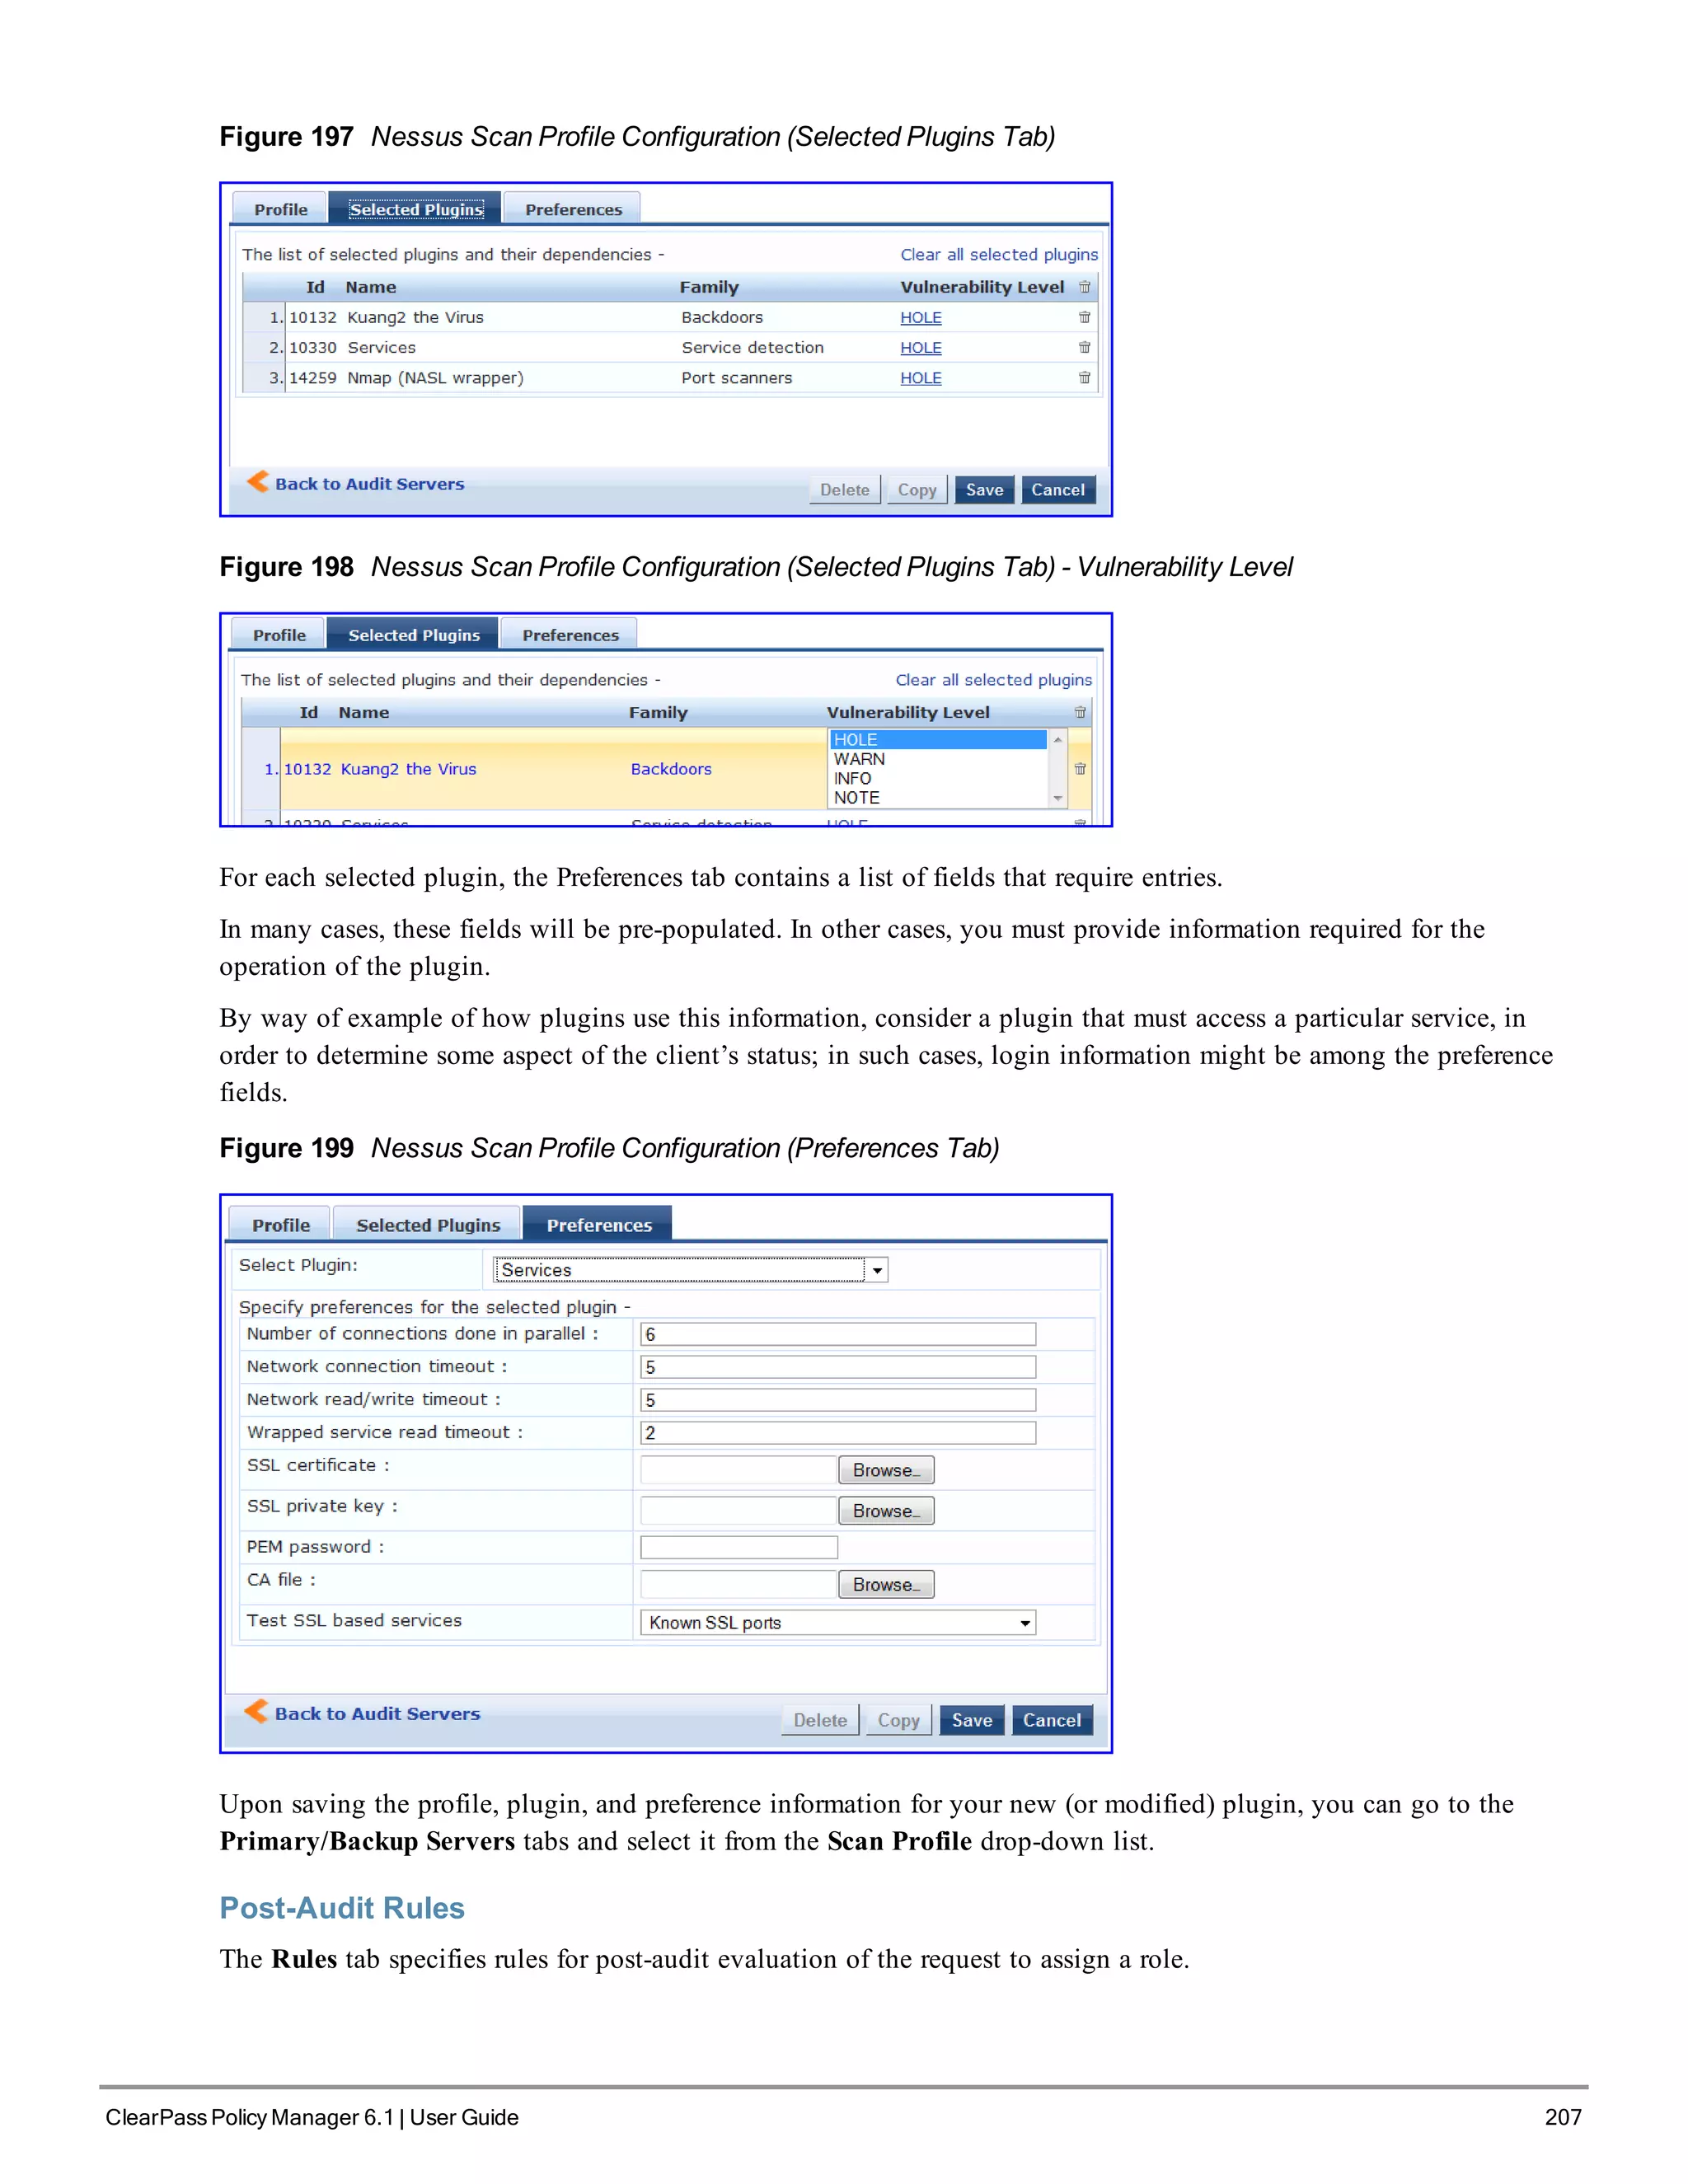
l "Nessus Scan Profiles" on page 205
Built-In Audit Servers
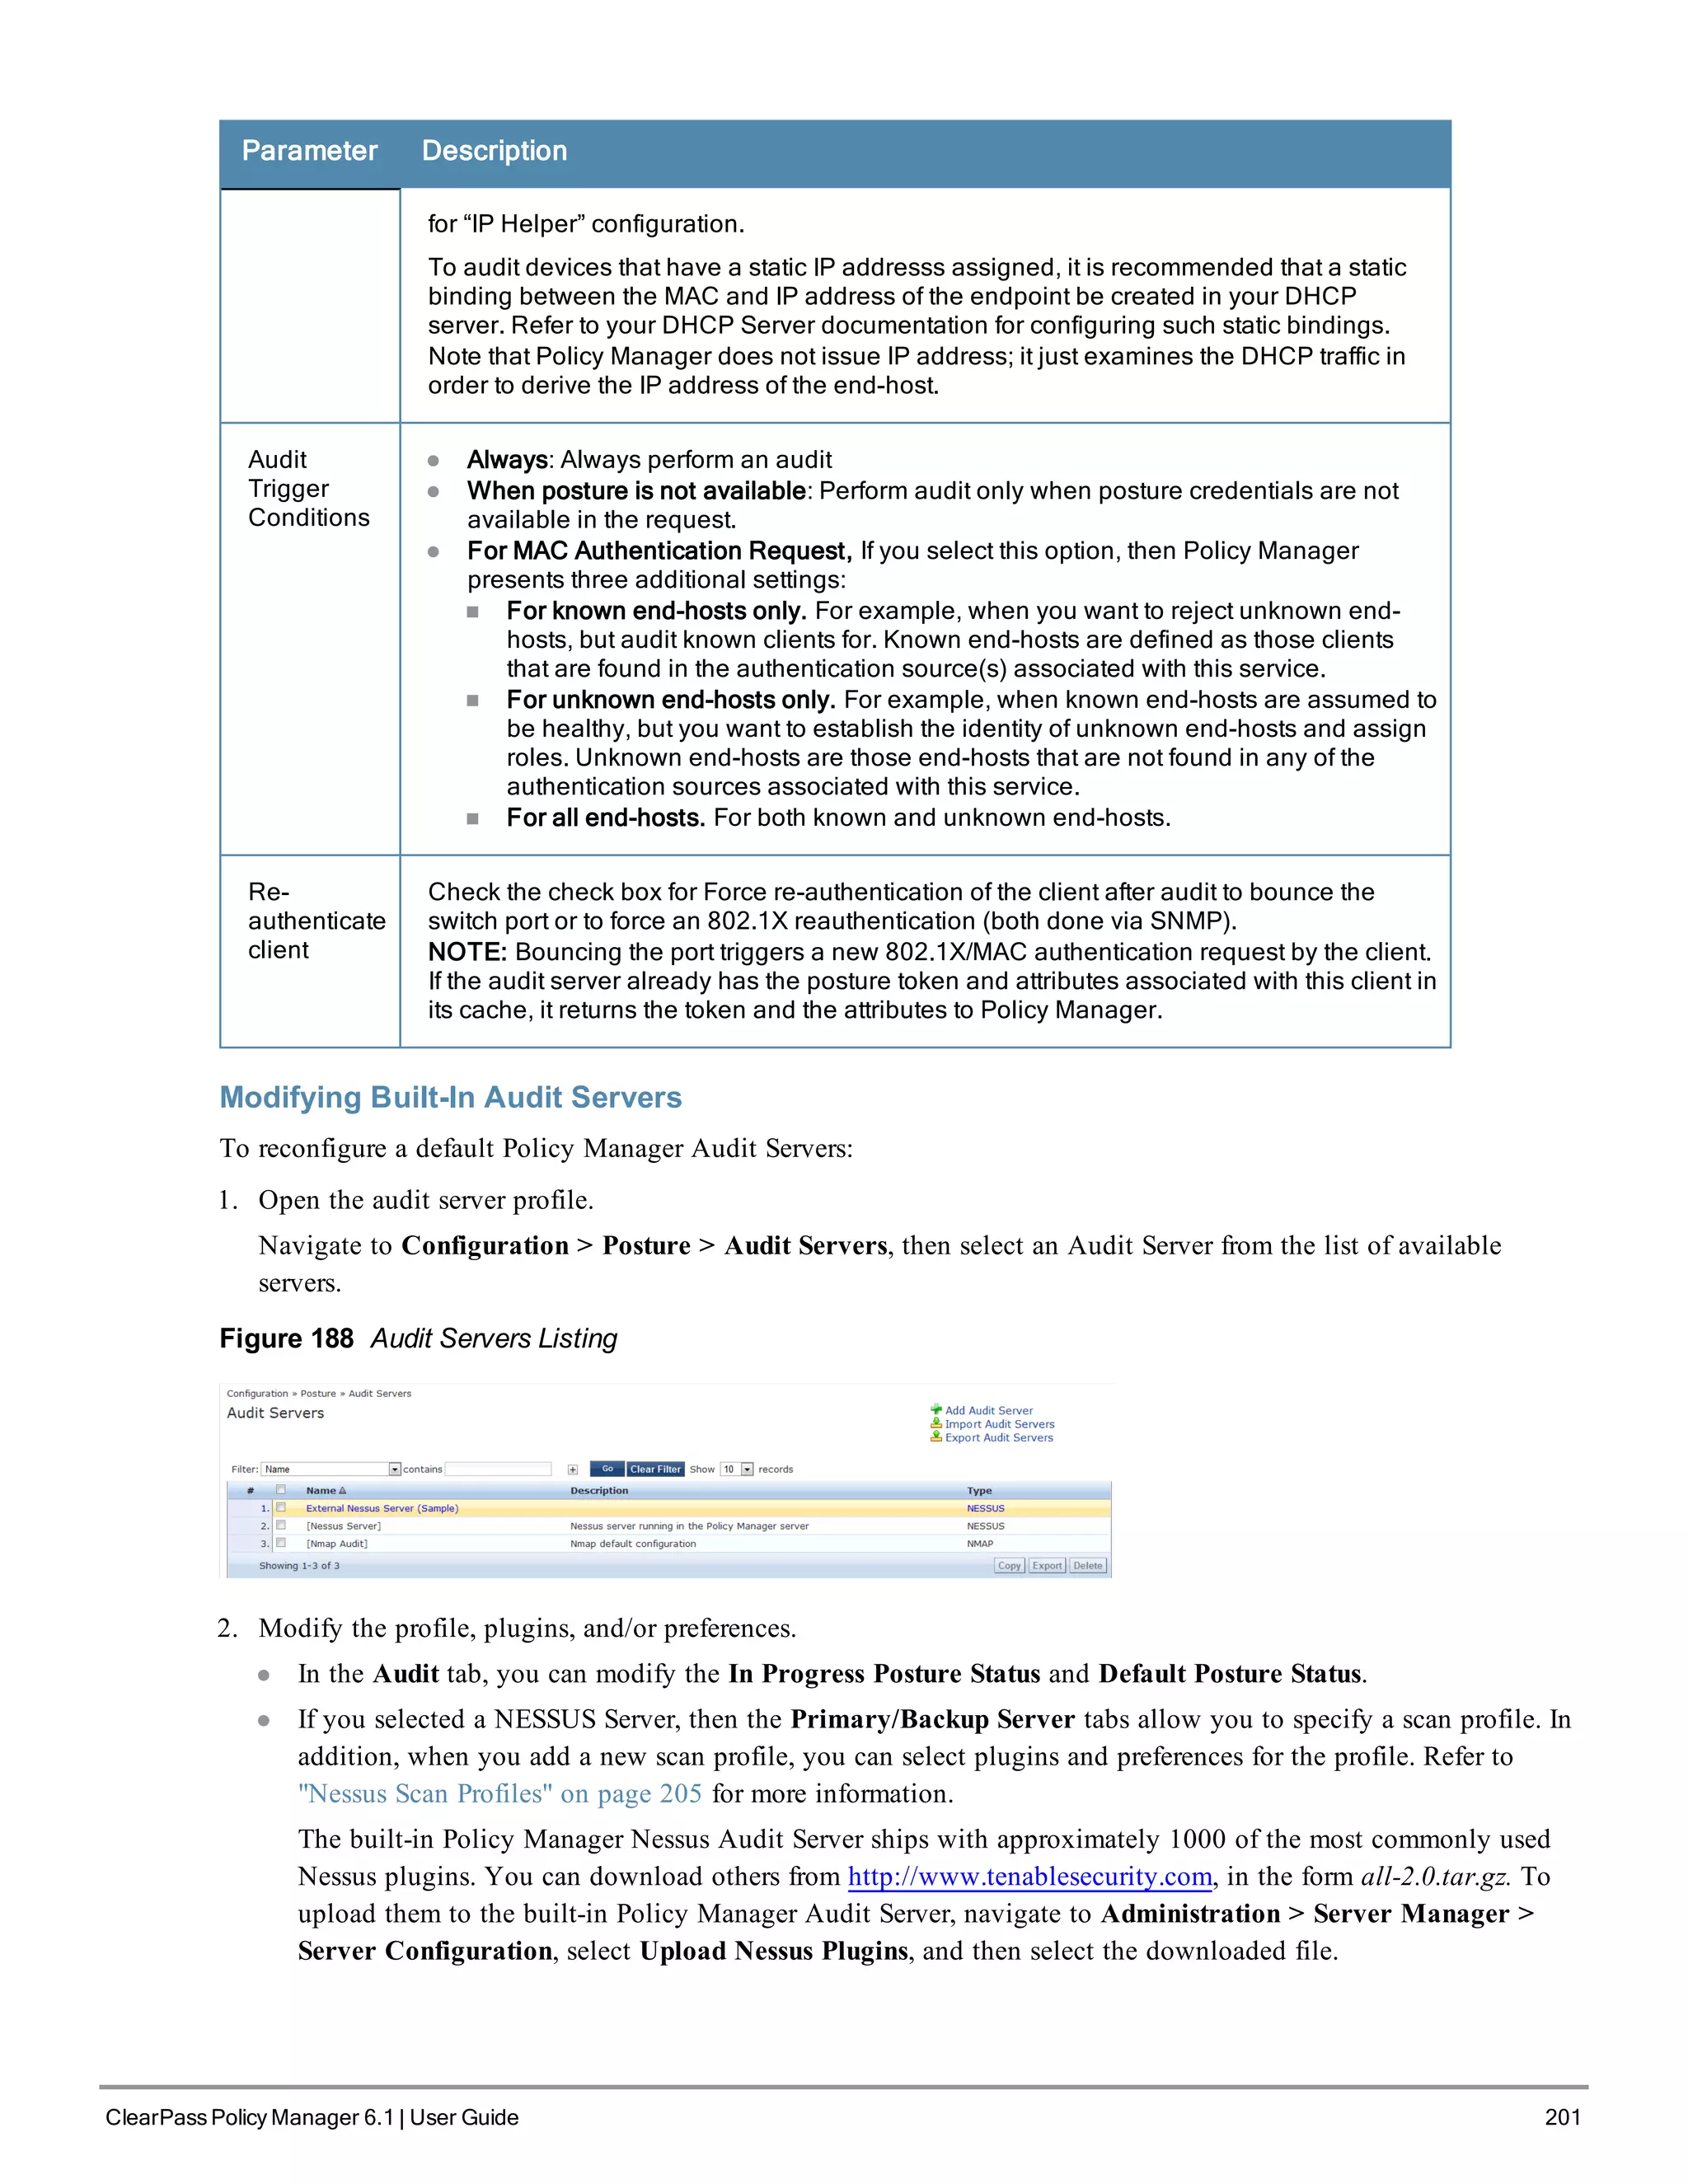
When configuring an audit as part of an Policy Manager Service, you can select the default Nessus ([Nessus Server]) or
NMAP ([Nmap Audit]) configuration.
Adding Auditing to a Policy Manager Service
1. Navigate to the Audit tab
l To configure an audit server for a new service (as part of the flow of the Add Service wizard), navigate to
Configuration > Services. Select the Add Services link. In the Add Services form, select the Audit tab.
You must select the Audit End-hosts check box on the Services tab in order for the Audit tab to display.
l To modify an existing audit server, navigate to Configuration > Posture > Audit Servers, then select an audit
server from the list.
2. Configure auditing
Complete the fields in the Audit tab as follows:
Figure 187 Audit Tab
Table 122: Audit Tab
Parameter Description
Audit
Server/Add
new Audit
Server
Select a built-in server profile from the list:
l The [Nessus Server] performs vulnerability scanning. It returns a Healthy/Quarantine
result.
l The [Nmap Audit] performs network port scans. The health evaluation always returns
Healthy. The port scan gathers attributes that allow determination of Role(s) through
post-audit rules.
NOTE: For Policy Manager to trigger an audit on an end-host, it needs to get the IP
address of this end-host. The IP address of the end-host is not available at the time of
initial authentication, in the case of 802.1X and MAC authentication requests. Policy
Manager has a built-in DHCP snooping service that can examine DHCP request and
response packets to derive the IP address of the end-host. For this to work, you need to
use this service, Policy Manager must be configured as a DHCP “IP Helper” on your
router/switch (in addition to your main DHCP server). Refer to your switch documentation](https://image.slidesharecdn.com/arubacppm61userguide-140926121722-phpapp01/75/Aruba-cppm-6_1_user_guide-200-2048.jpg)
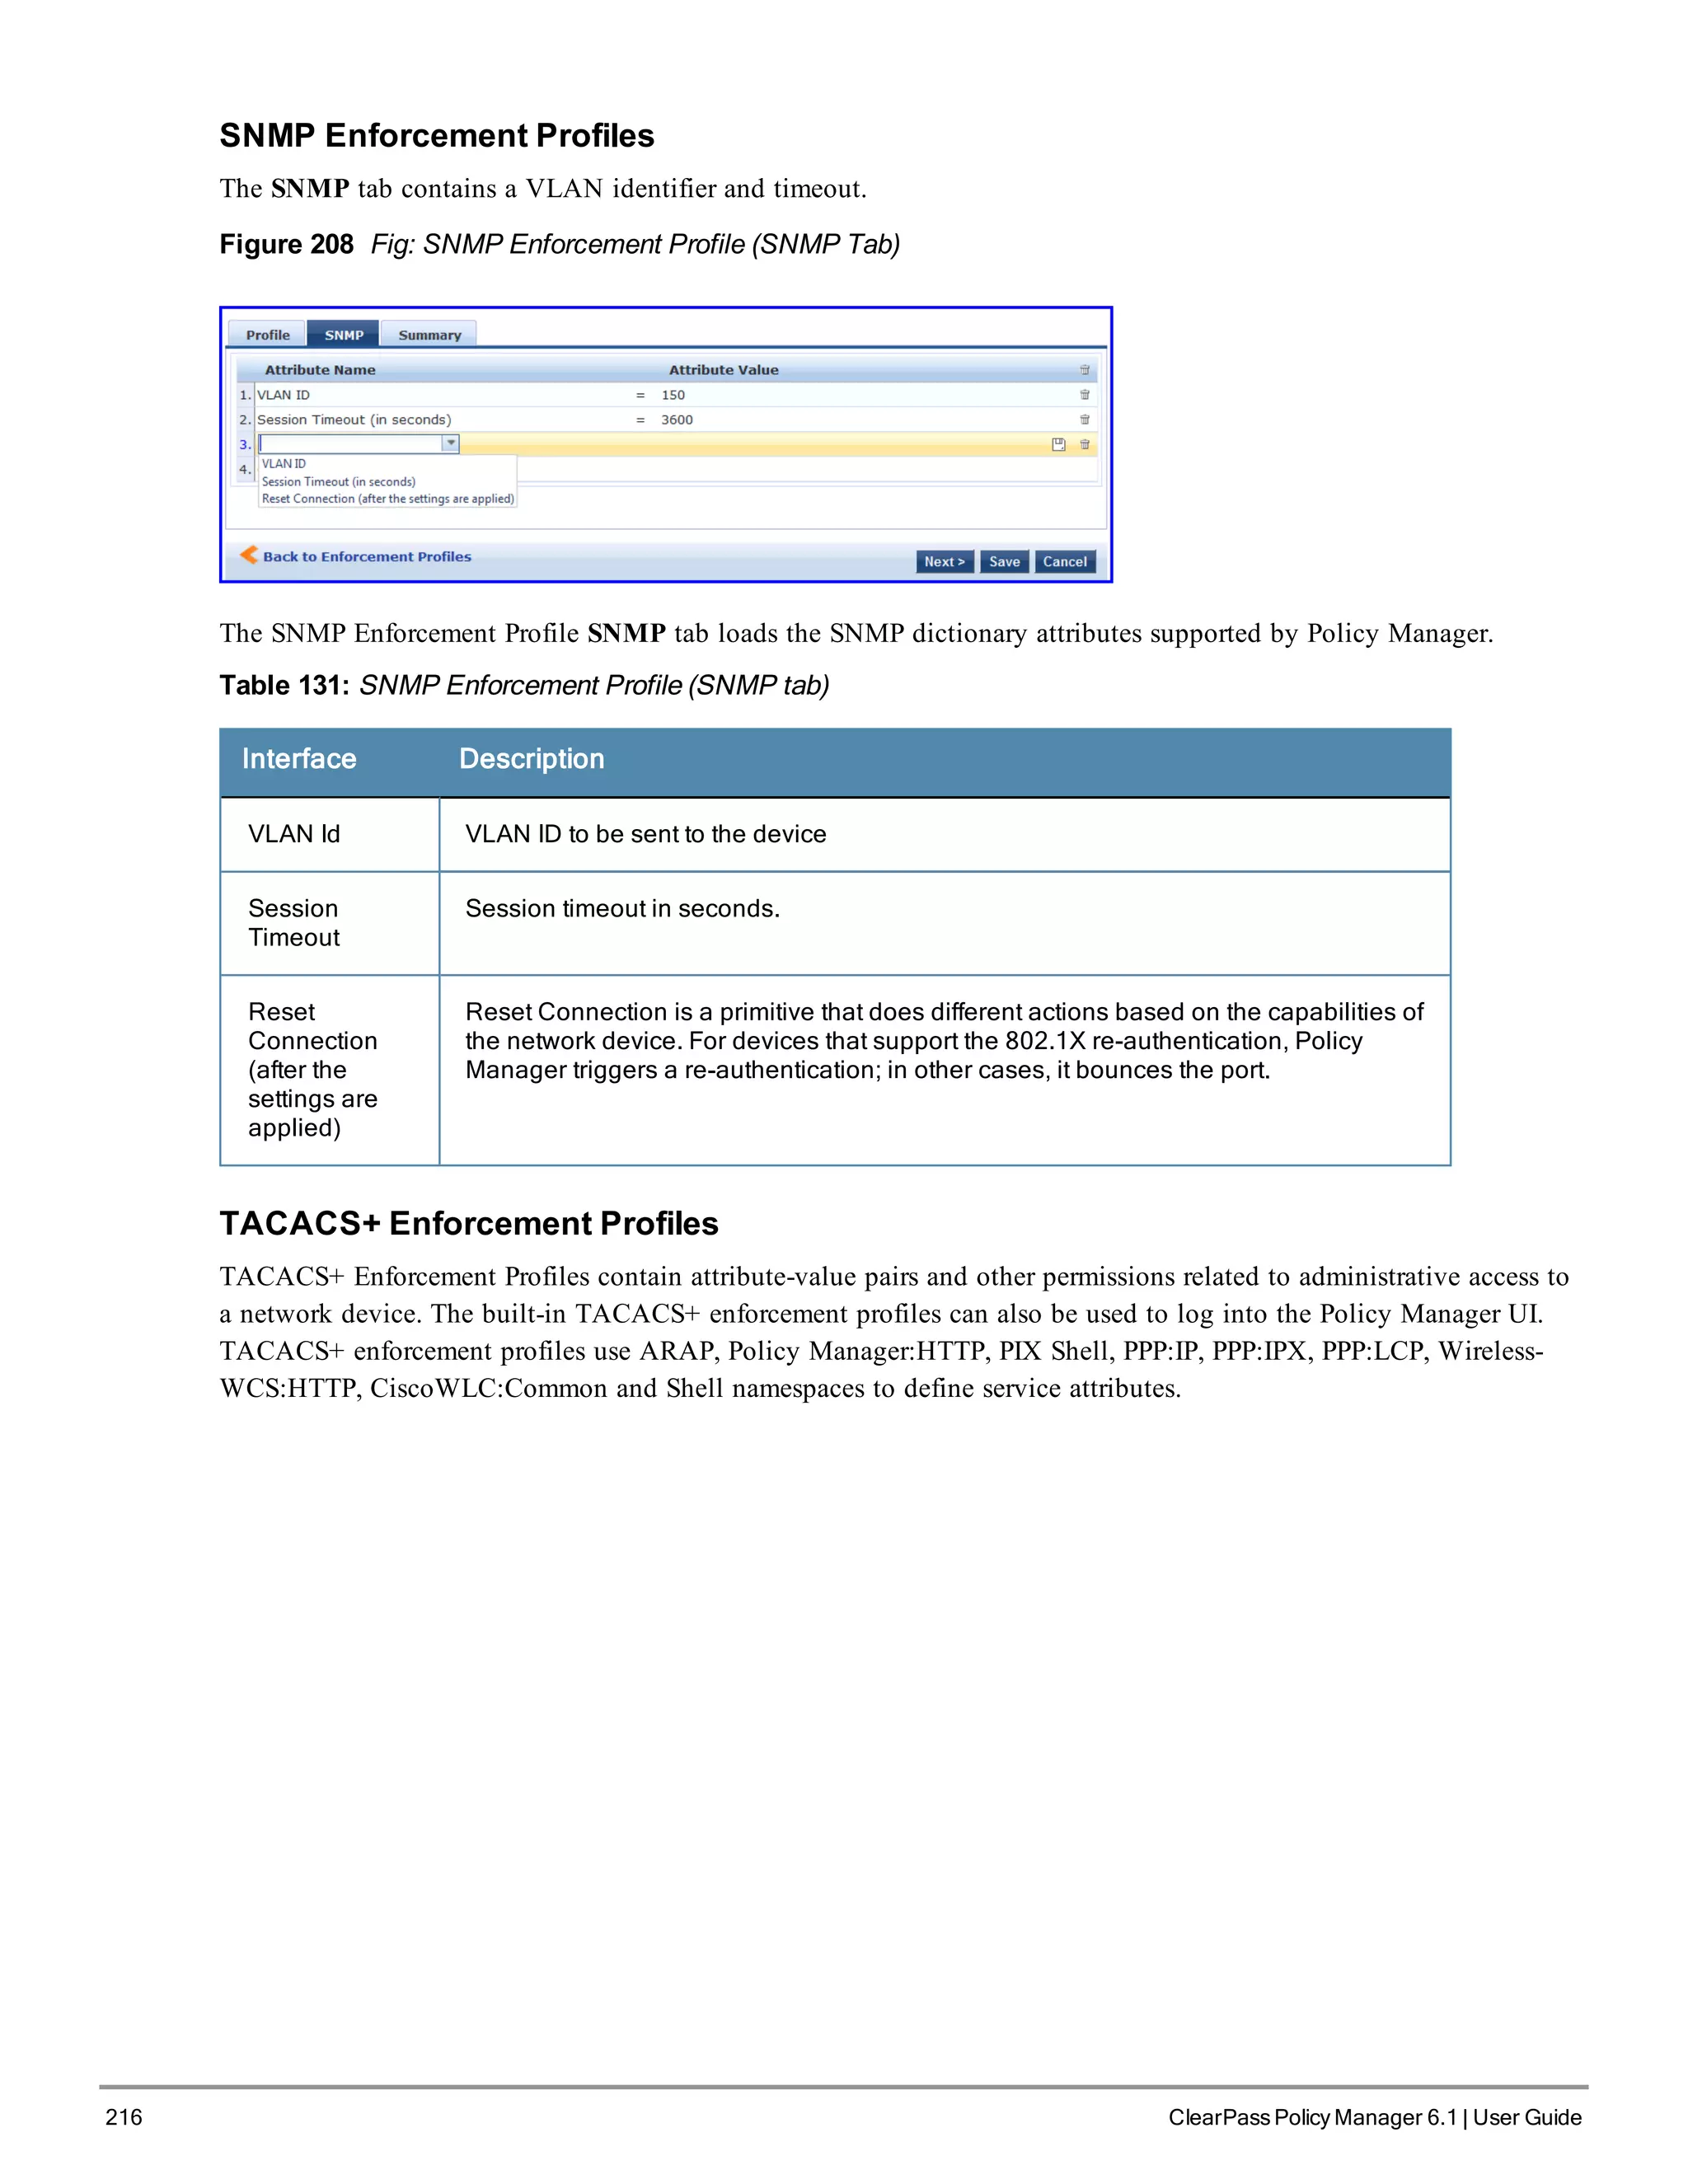
![210 ClearPass Policy Manager 6.1 | User Guide
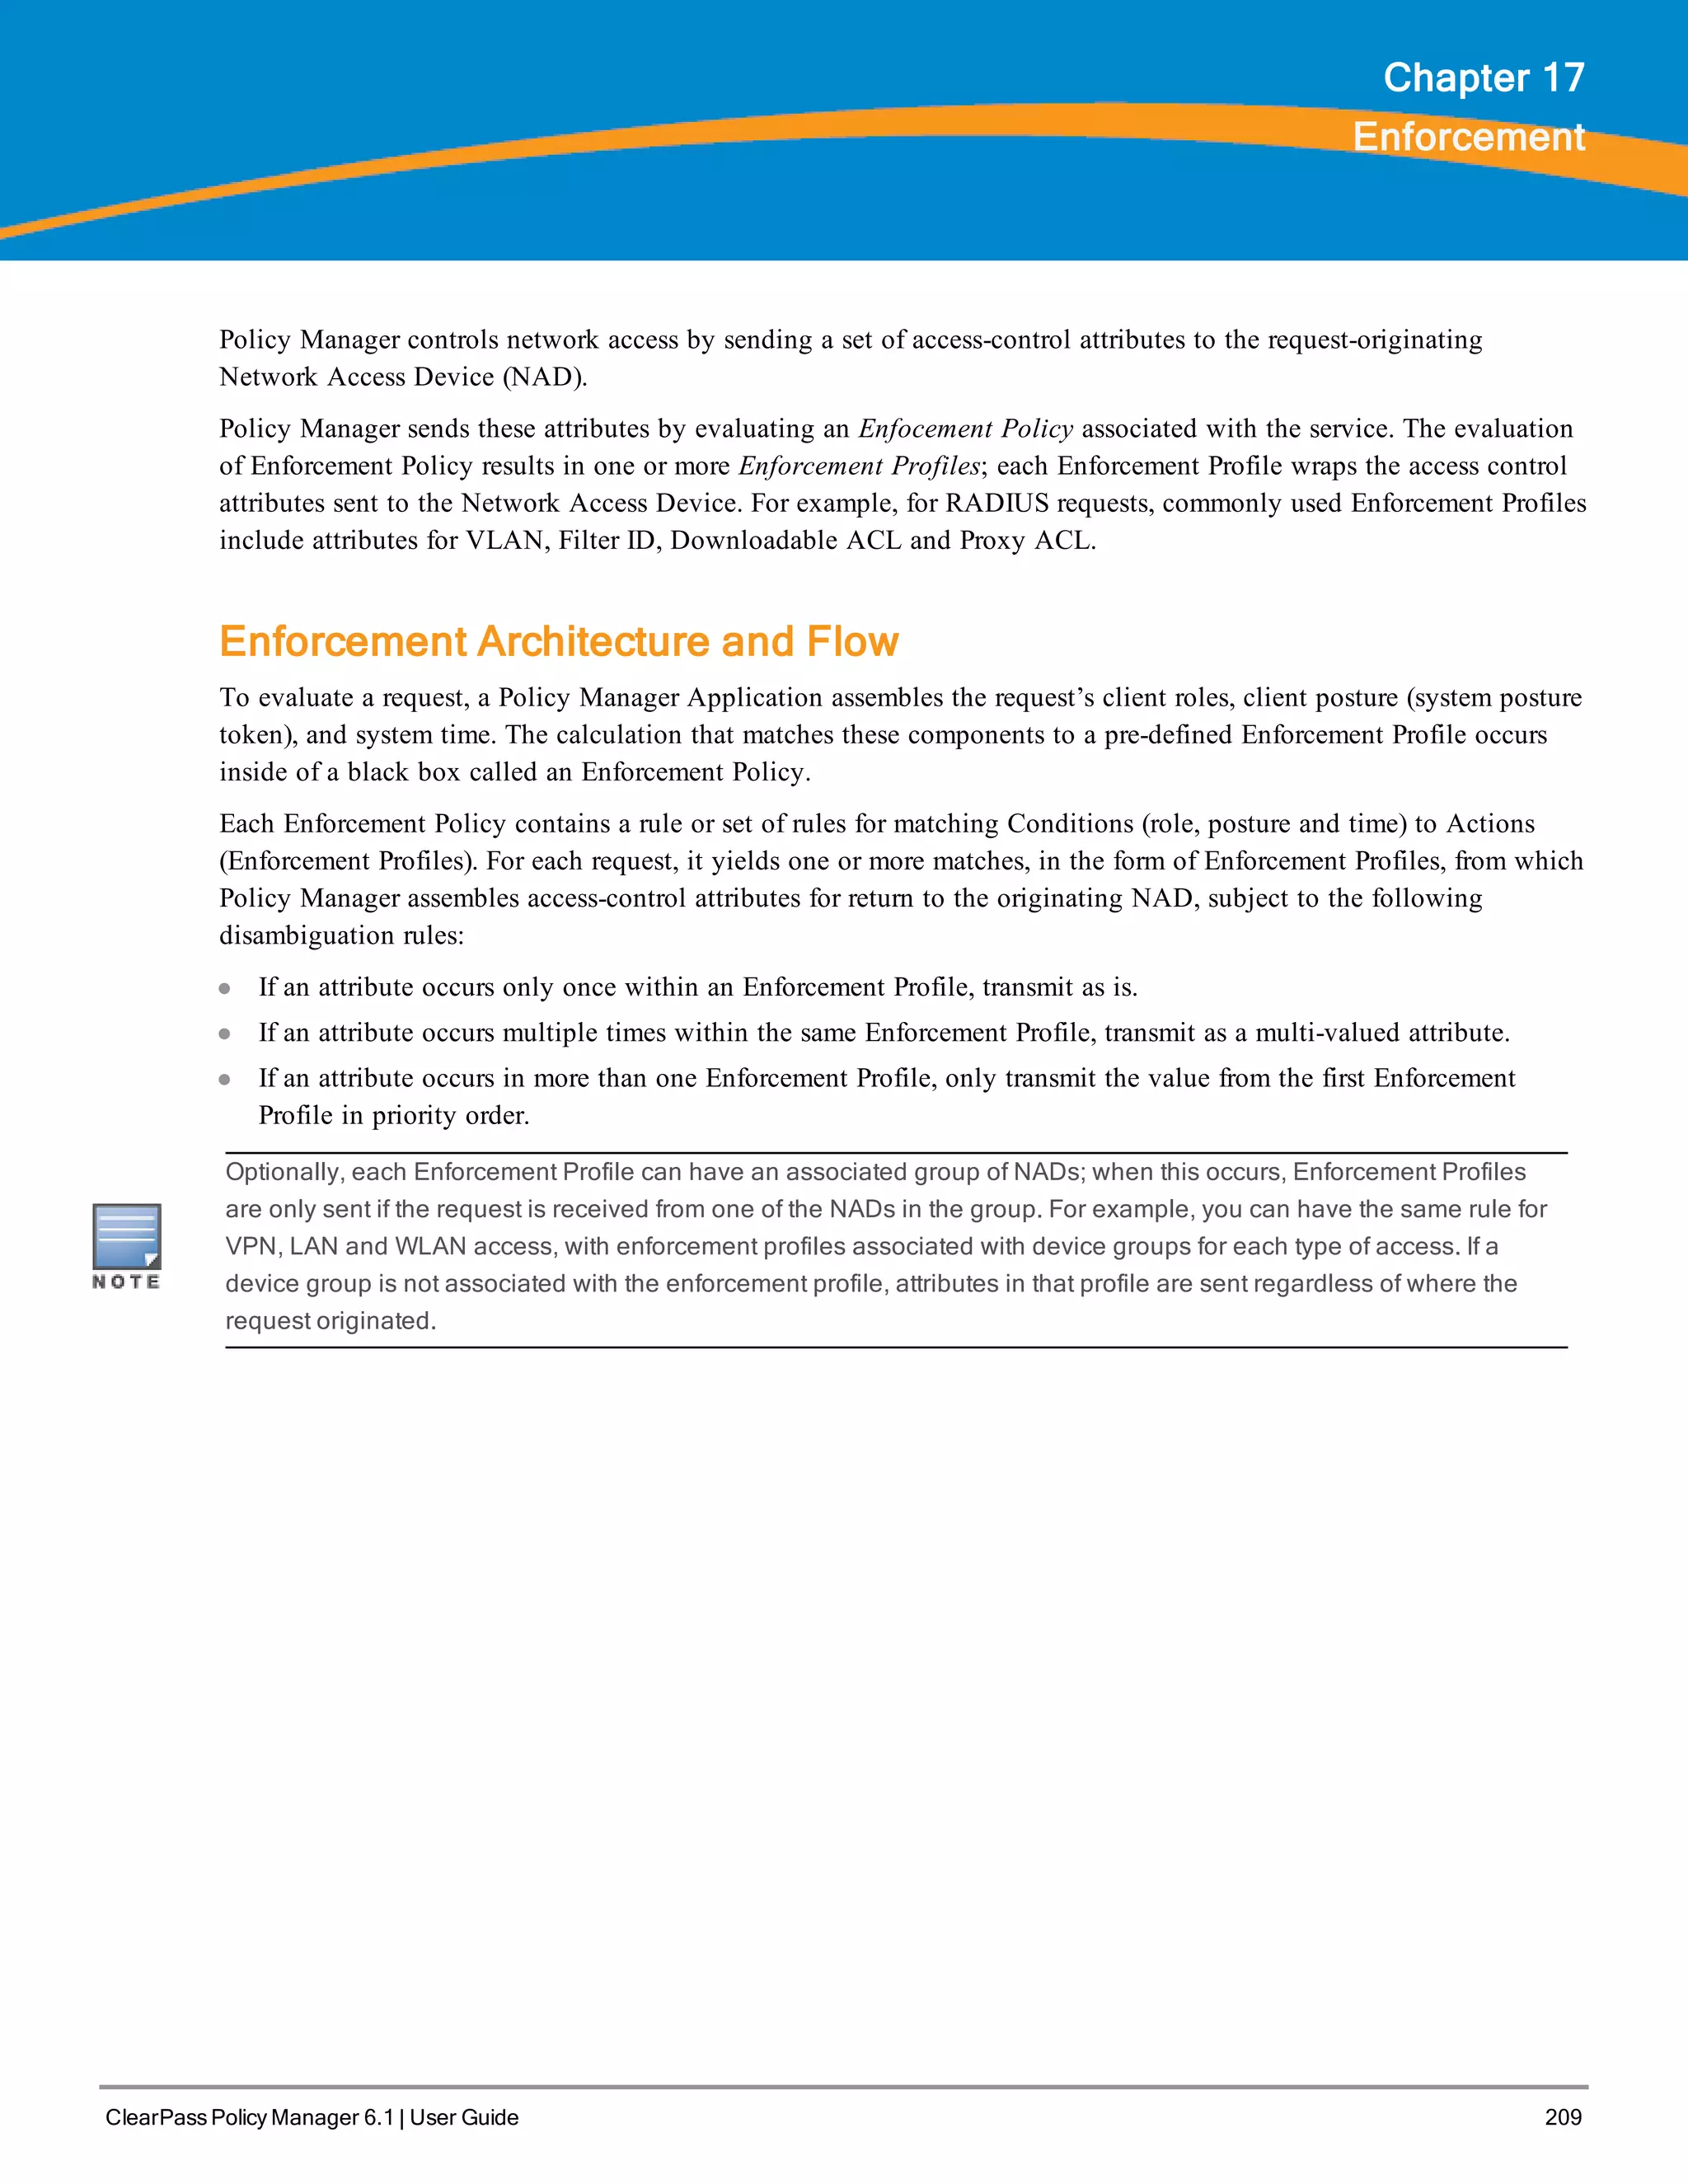
Figure 202 Flow of Control of Policy Manager Enforcement
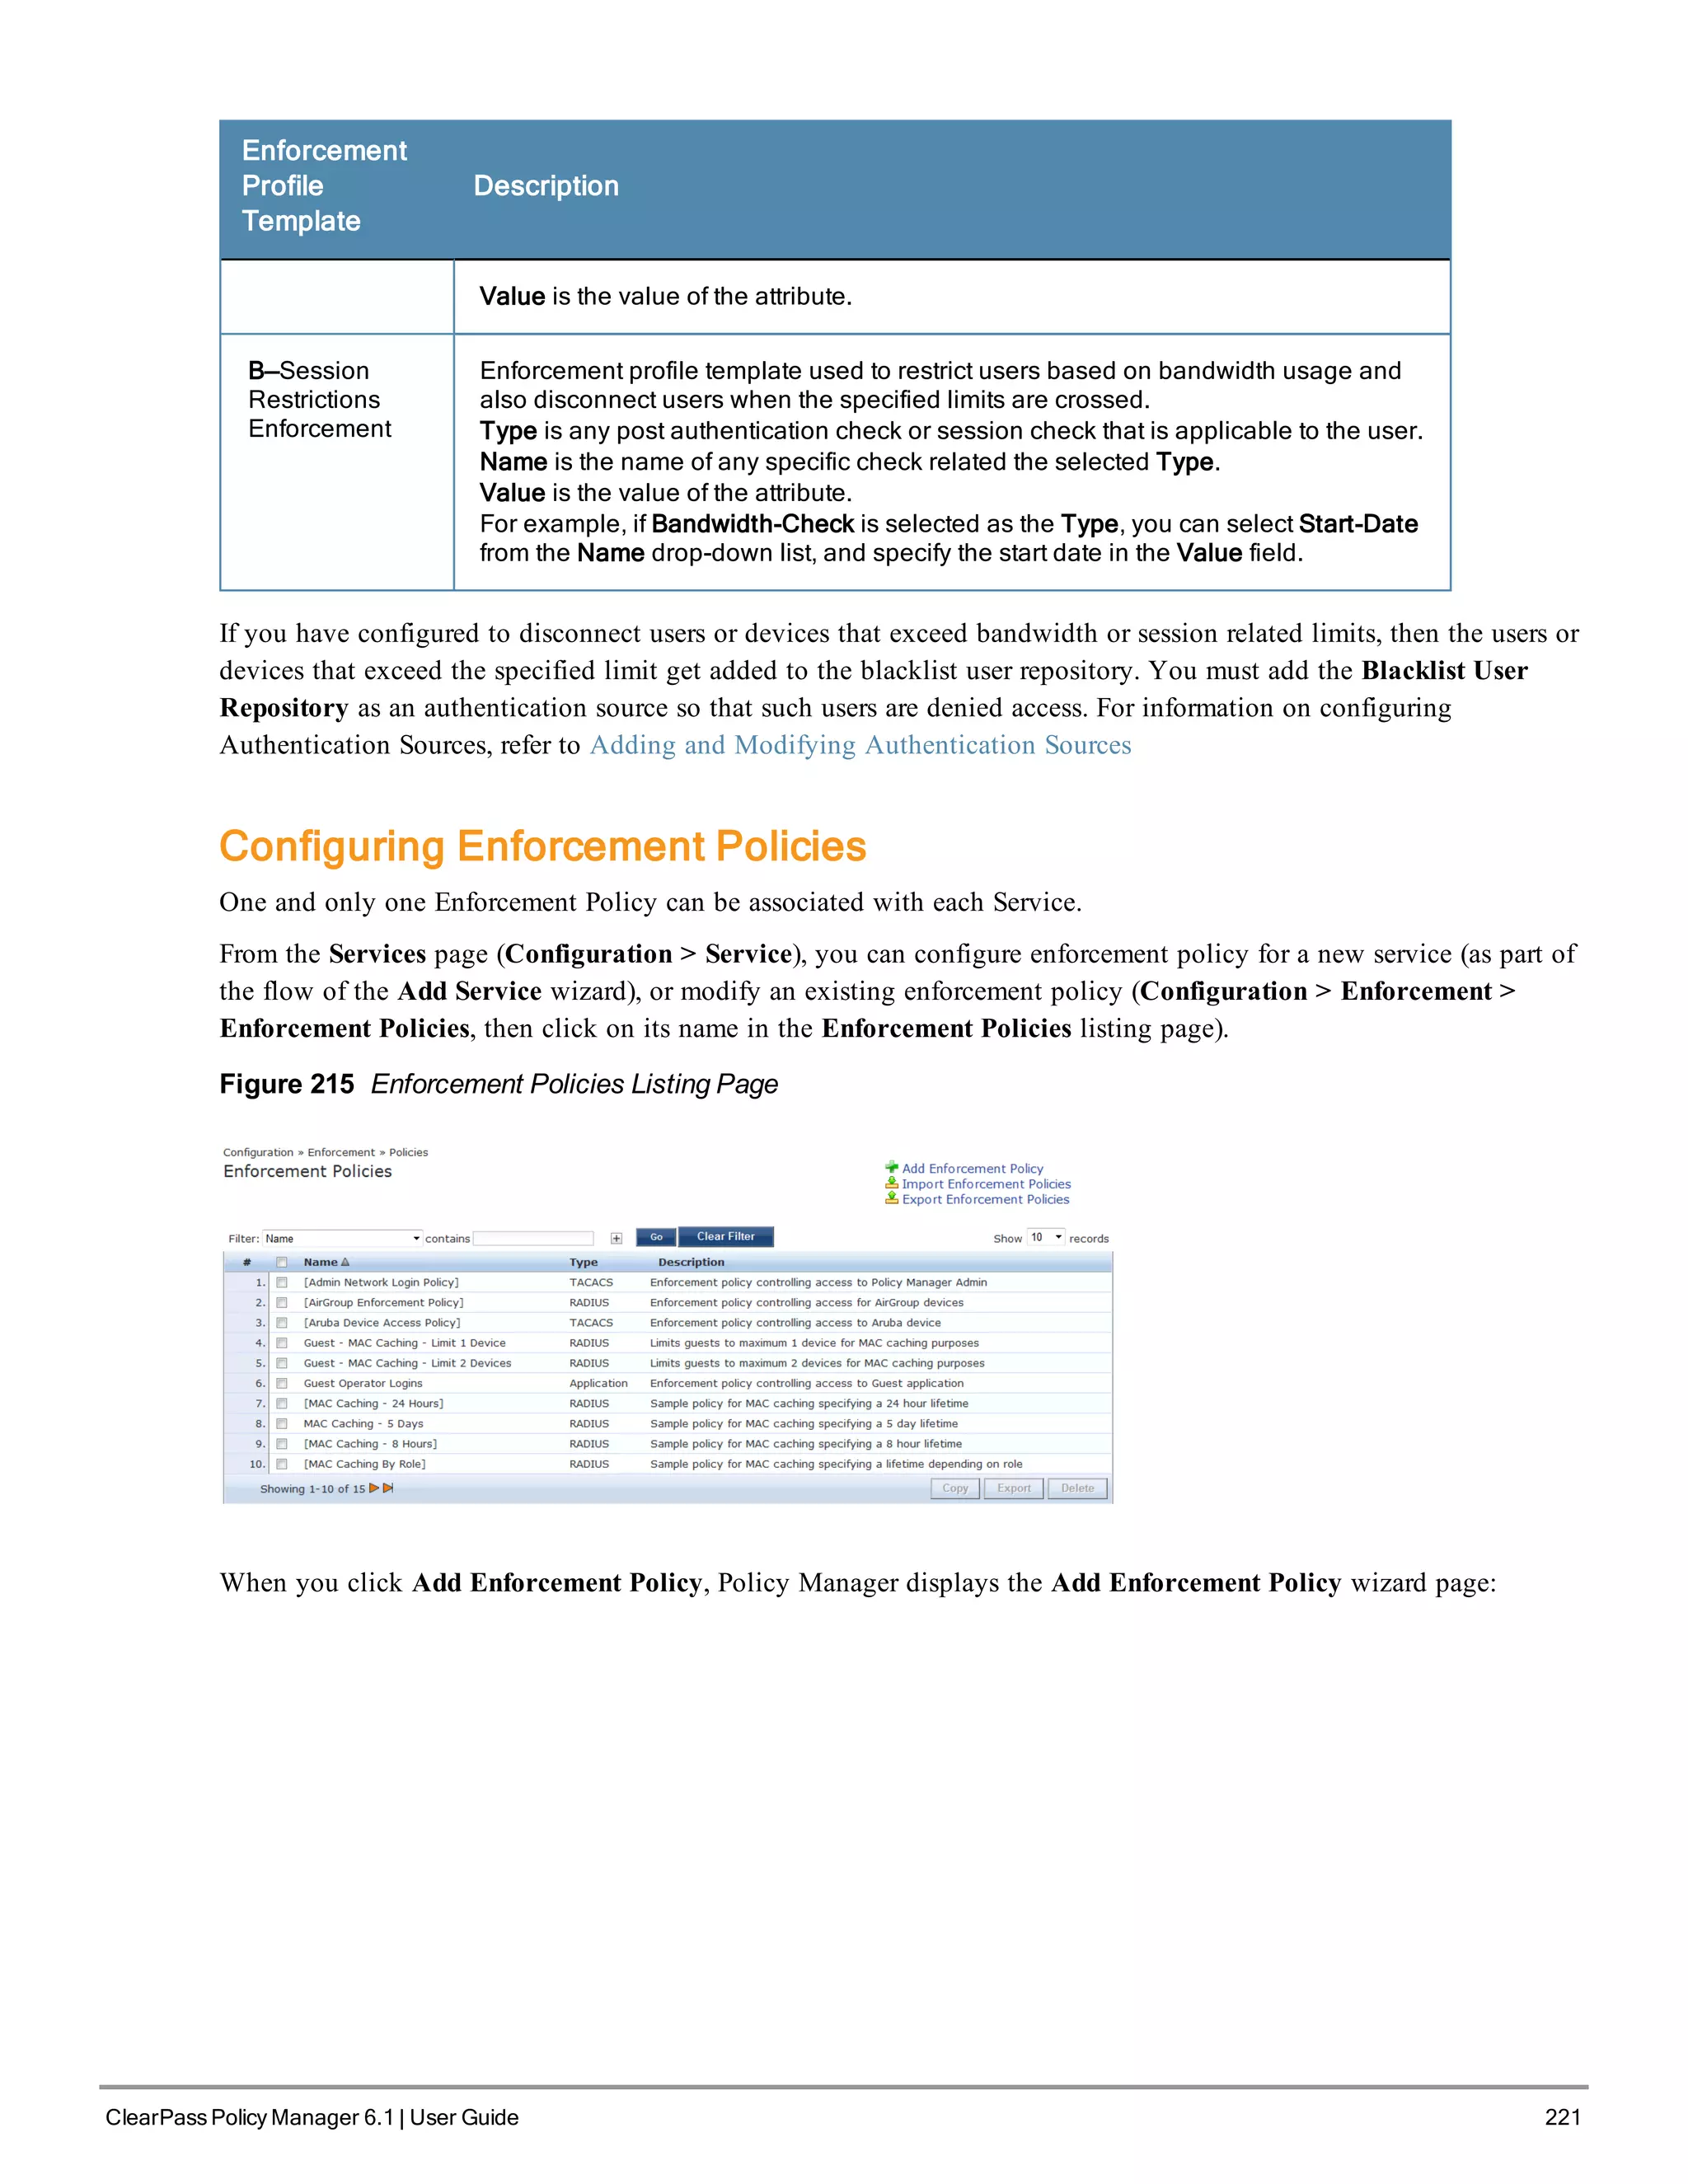
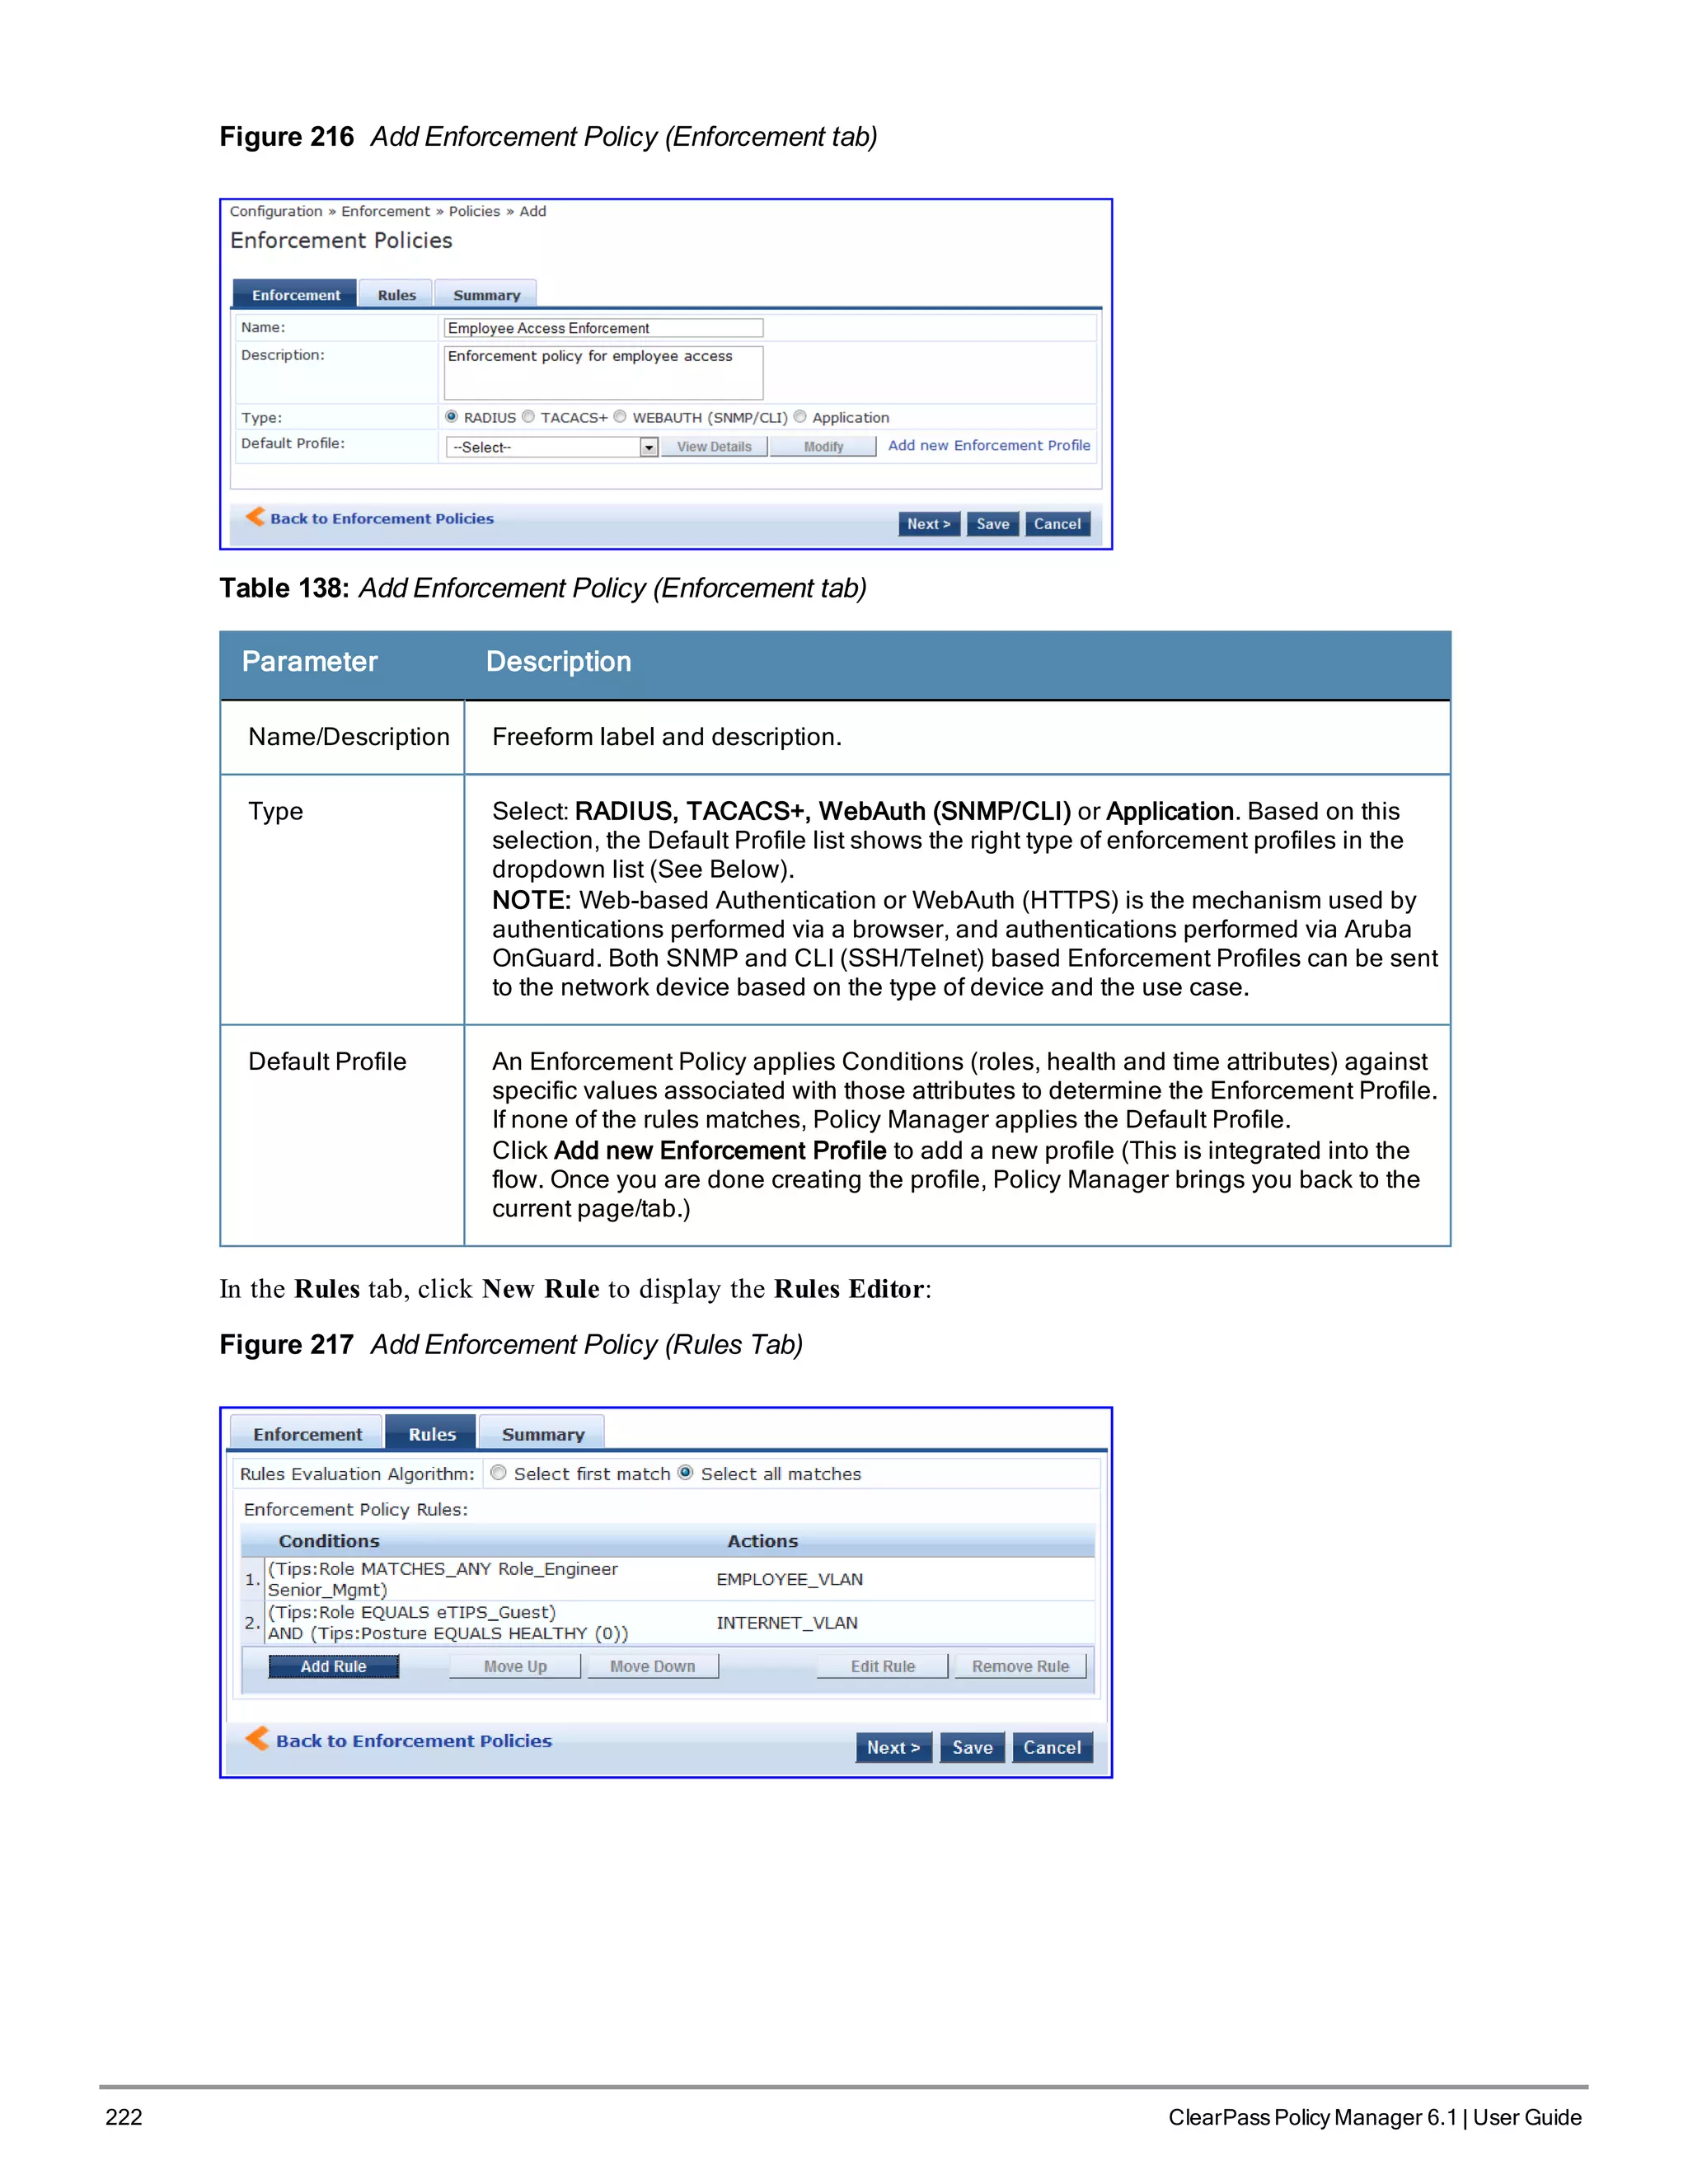
Configuring Enforcement Profiles
You configure Policy Manager Enforcement Profiles globally, but they must be referenced in an enforcement policy
that is associated with a Service to be evaluate,
From the Enforcement Policies page (Configuration > Enforcement > Policies), you can configure an Enforcement
Profile for a new enforcement policy (as part of the flow of the Add Enforcement Policy wizard), or modify an
existing Enforcement Profile directly (Configuration > Enforcement > Profiles, then click on its name in the
Enforcement Profile listing).
Figure 203 Enforcement Profiles Page
Policy Manager comes pre-packaged with the following system-defined enforcement profiles:
l [Allow Access Profile]. System-defined RADIUS profile to allow network access; Policy Manager sends a RADIUS
AccessAccept message with no attributes.](https://image.slidesharecdn.com/arubacppm61userguide-140926121722-phpapp01/75/Aruba-cppm-6_1_user_guide-210-2048.jpg)
![l [Deny Access Profile]. System-defined RADIUS profile to deny network access; Policy Manager sends a RADIUS
AccessReject message with no attributes.
l [Drop Access Profile]. System-defined profile to drop the network access request; Policy Manager silently drops
the RADIUS AccessRequest message.
l [TACACS Deny Profile]. System-defined TACACS+ profile to deny network device access through the TACACS+
protocol.
l There are several system-defined profiles associated with different vendors’ RADIUS CoA actions.
n [Cisco - Terminate Session] - Terminate a session on a Cisco device.
n [Cisco - Disable-Host-Port] - Disable a port on a Cisco Ethernet switching device.
n [Cisco - Bounce-Host-Port] - Perform link-up/link-down action on a Cisco Ethernet switching device.
n [Cisco - Reuthenticate-Session] - Trigger a session reauthentication on a Cisco device.
n [HP - Terminate Session] - Terminate a session on an HP device.
n [Aruba - Terminate Session] - Terminate a session on an Aruba Wireless Controller.
l There are four built-in TACACS+ profiles that are mapped to the different administrator roles available in Policy
Manager. These profiles can be used to give permissions to log into the Policy Manager UI.
n [TACACS Help Desk]. System-defined profile to allow administrative access to Policy Manager using the
Helpdesk role.
n [TACACS Network Admin]. System-defined profile to allow administrative access to Policy Manager using the
Network Administrator role.
n [TACACS Receptionist]. System-defined profile to allow administrative access to Policy Manager using the
Receptionist role.
n [TACACS Super Admin]. System-defined profile to allow administrative access to Policy Manager using the
Super Administrator role.
From the Enforcement Profile page, when you click Add Enforcement Profile, Policy Manager displays the Add
Enforcement Profile page:
Figure 204 Add Enforcement Profile Page
Policy Manager comes pre-packaged with several enforcement profile templates:
l VLAN Enforcement - All RADIUS attributes for VLAN enforcement are pre-filled in this template.
l Aruba RADIUS Enforcement - RADIUS tempate that can be filled with attributes from the Aruba RADIUS
dictionaries loaded into Policy Manager.
ClearPass Policy Manager 6.1 | User Guide 211](https://image.slidesharecdn.com/arubacppm61userguide-140926121722-phpapp01/75/Aruba-cppm-6_1_user_guide-211-2048.jpg)


![230 ClearPass Policy Manager 6.1 | User Guide
Figure 225 Add New Device Group Popup
Table 144: Add New Device Group popup
Container Description
Name/
Description/
Format
Specify identity of the device.
Subnet Enter a subnet consisting of network address and the network suffix (CIDR
notation); for example, 192.168.5.0/24
Regular
Expression
Specify a regular expression that represents all IPv4 addresses matching that
expression; for example, ^192(.[0-9]*){3}$
List:
Available/Selected
Devices
Use the widgets to move device identifiers between Available and Selected. Click
Filter to filter the list based on the text in the associated text box.
Save/Cancel Click Save to commit or Cancel to dismiss the popup.](https://image.slidesharecdn.com/arubacppm61userguide-140926121722-phpapp01/75/Aruba-cppm-6_1_user_guide-230-2048.jpg)


![Container Description
Enable Insight Enable the Insight reporting tool on this node. Note:
l When the admin enables the checkbox for Insight on a node in cluster, Admin will
automatically update the [Insight Repository] configuration to point to the
management IP of that server.
l When enabling the checkbox for other servers in the cluster, they will be added as
backups for the same auth source.
l The order of the primary and backup servers in the [Insight Repository] is the same
in which the user enables Insight on the server.
Management
Port: IP
Address
Management interface IP address. You access the Policy Manager UI via the
management interface.
Management
Port: Subnet
Mask
Management interface Subnet Mask
Management
Port: Default
Gateway
Default gateway for management interface
Data/External
Port: IP
Address
Data interface IP address. All authentication and authorization requests arrive on the
data interface.
Data/External
Port: Subnet
Mask
Data interface Subnet Mask
Data/External
Port: Default
Gateway
Default gateway for data interface
DNS: Primary
DNS
Primary DNS for name lookup
DNS:
Secondary
DNS
Secondary DNS for name lookup
AD Domains Displays a list of joined active directory domains Select Join Domain to join an Active
Directory domain. See below.
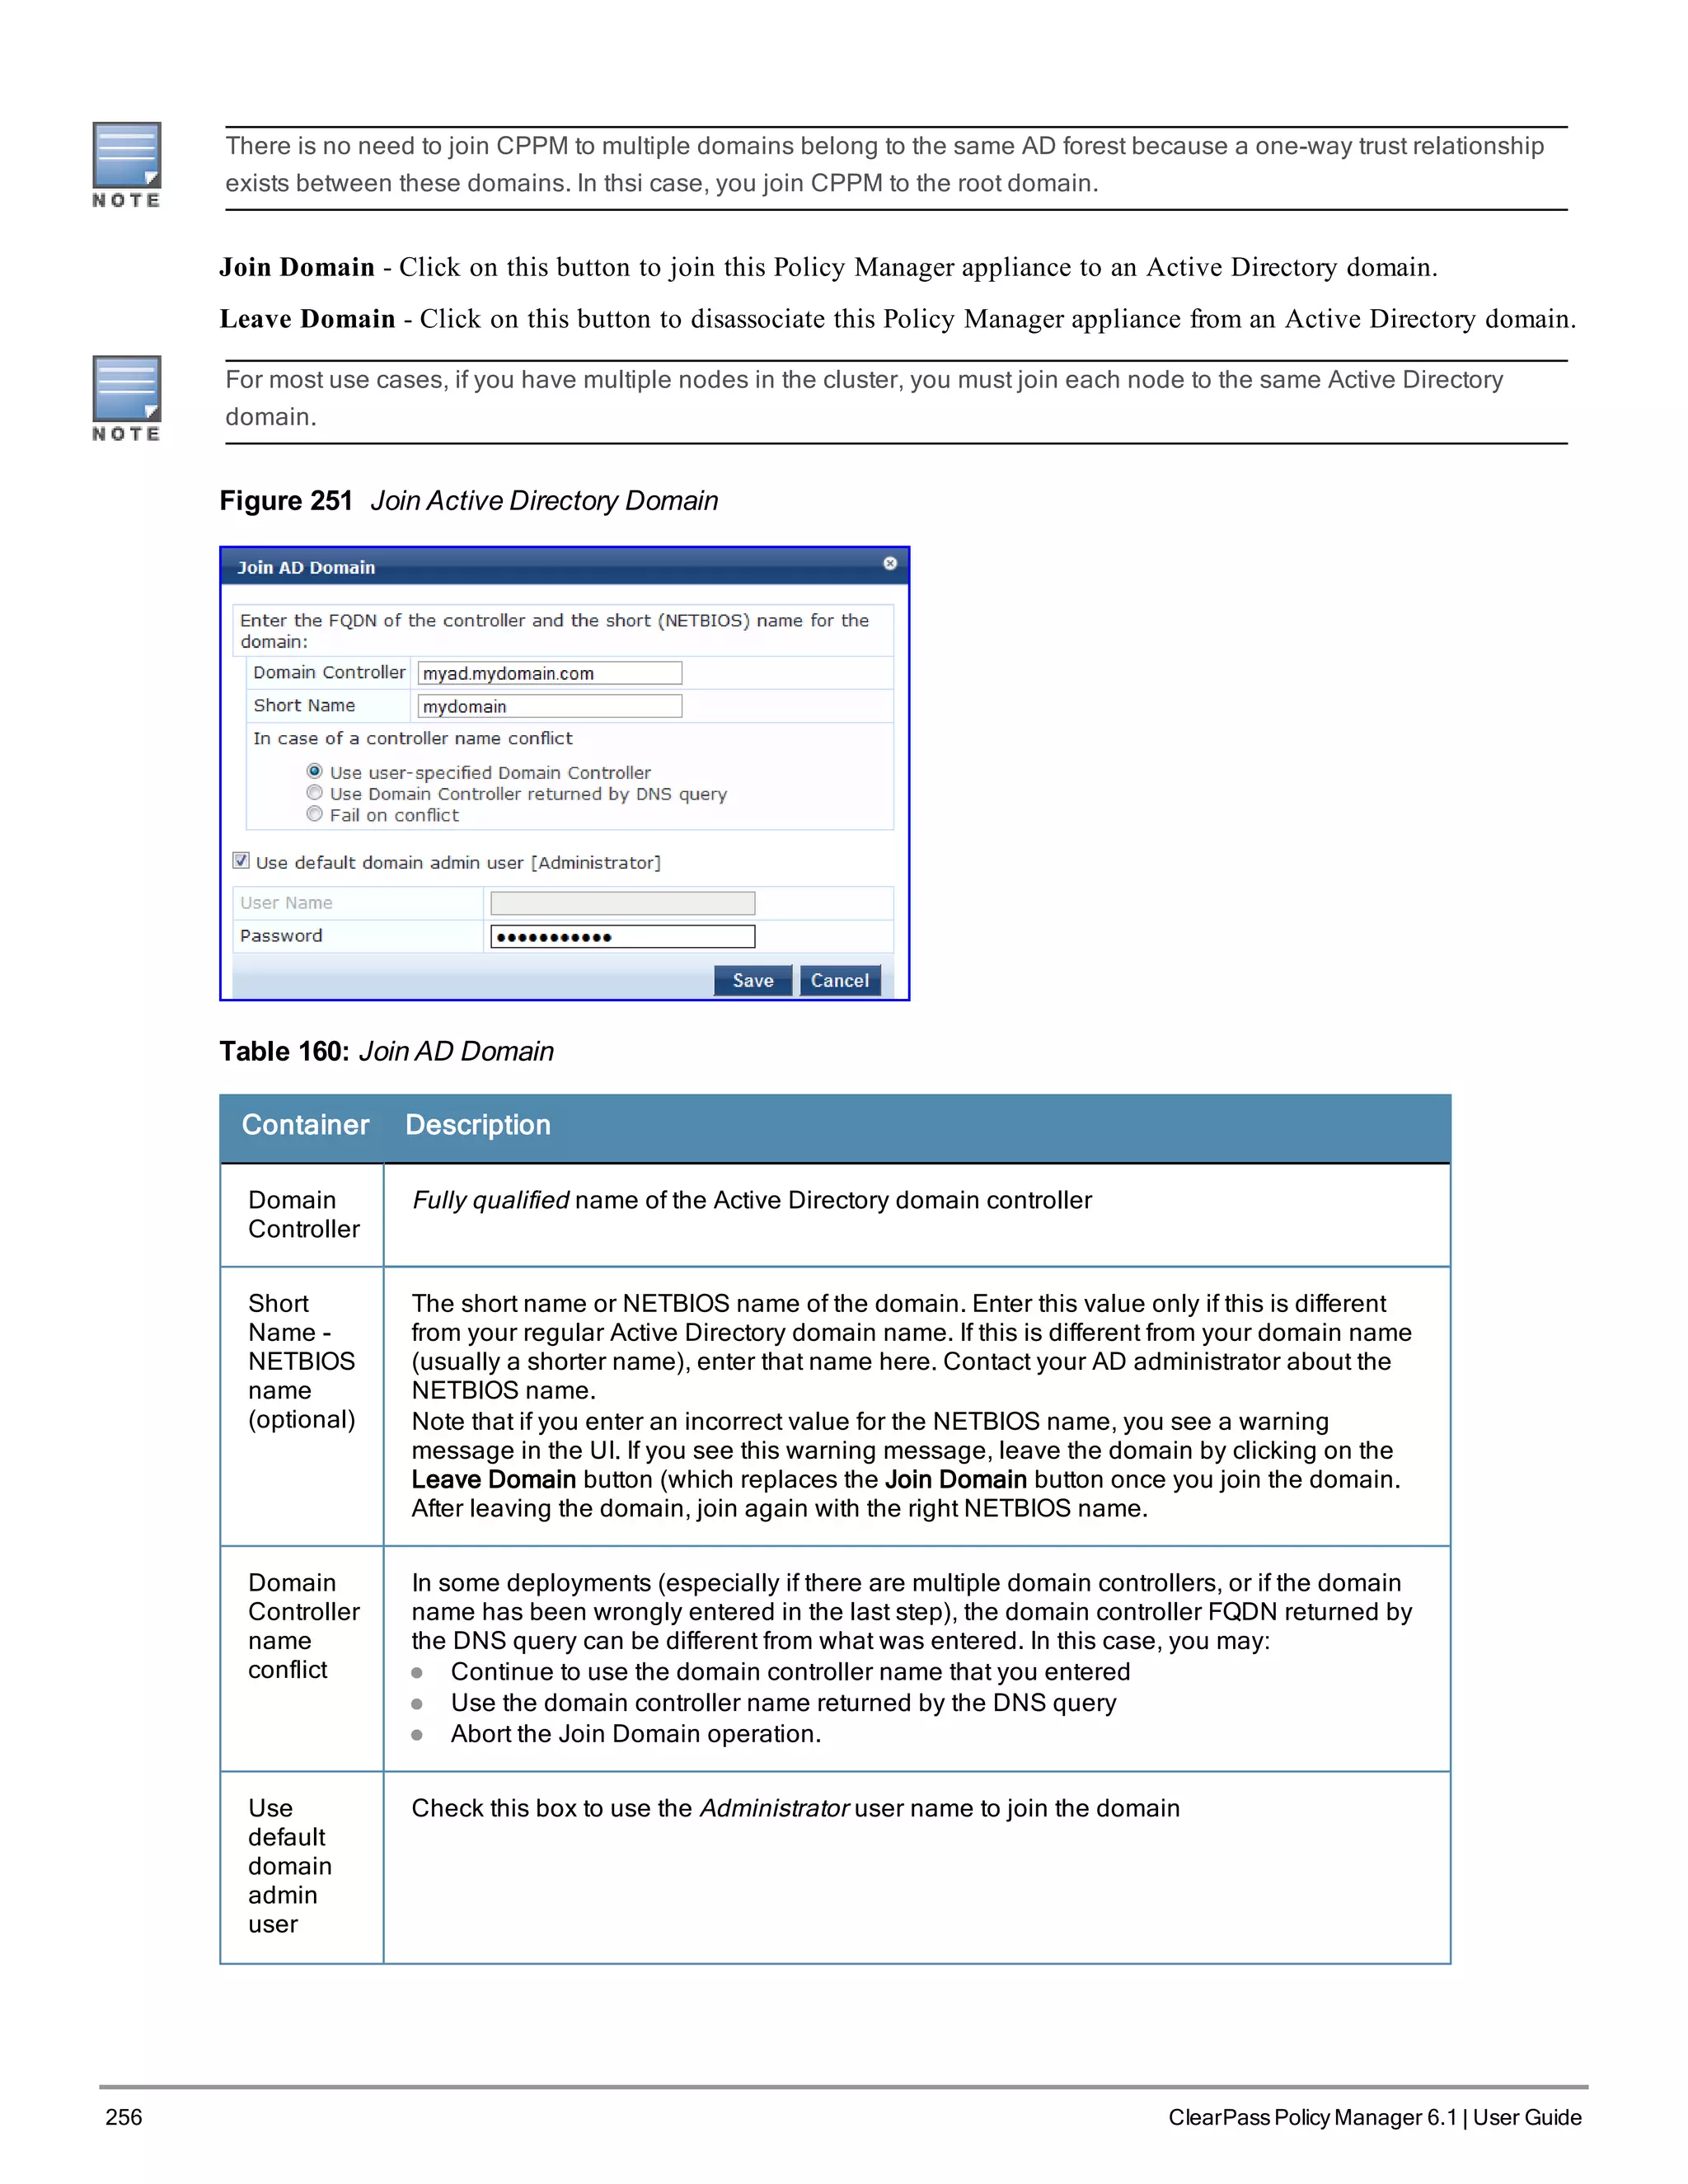
Multiple Active Directory Domains
You can join CPPM to an Active Directory domain to authenticate users and computers that are members of an Active
Directory domain.
Users can then authenticate into the network using 802.1X and EAP methods, such as PEAP-MSCHAPv2, with their
own their own AD credentials.
Joining CPPM to an Active Directory domain creates a computer account for the CPPM node in the AD database.
If you need to authenticate users belonging to multiple AD forests or domains in your network, and there is no trust
relationship between these entities, then you must join CPPM to each of these untrusting forests or domains.
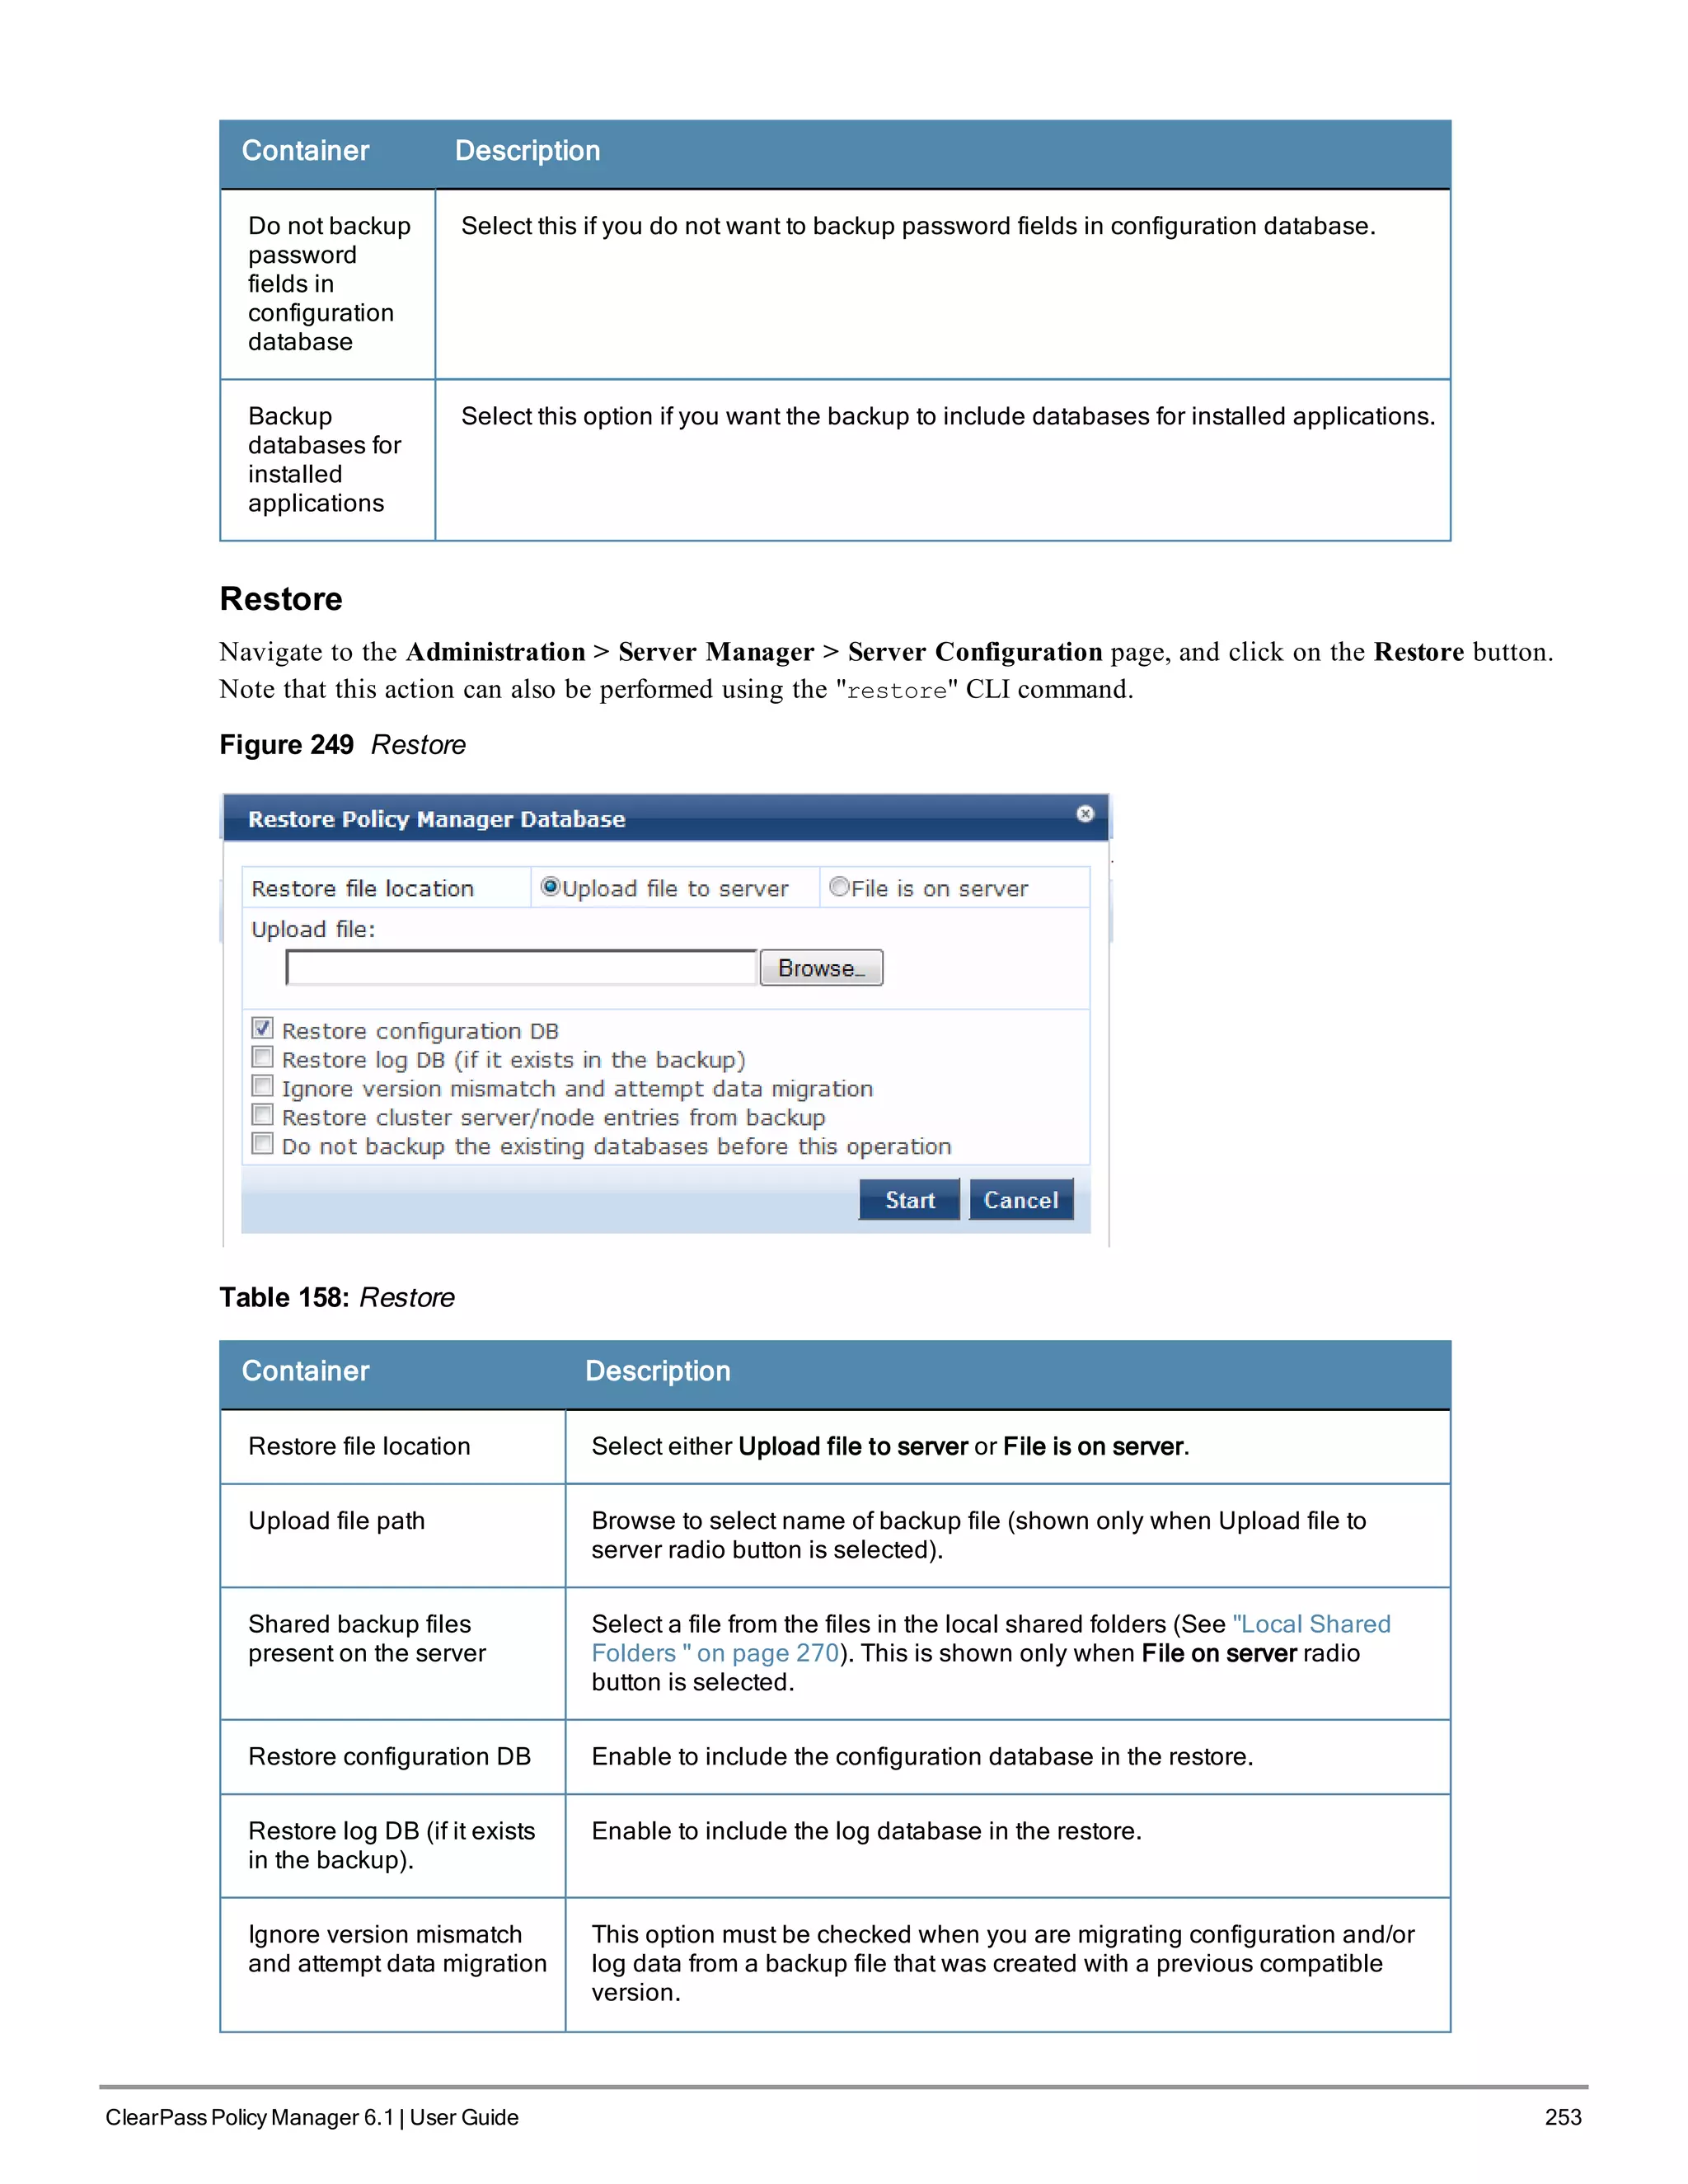
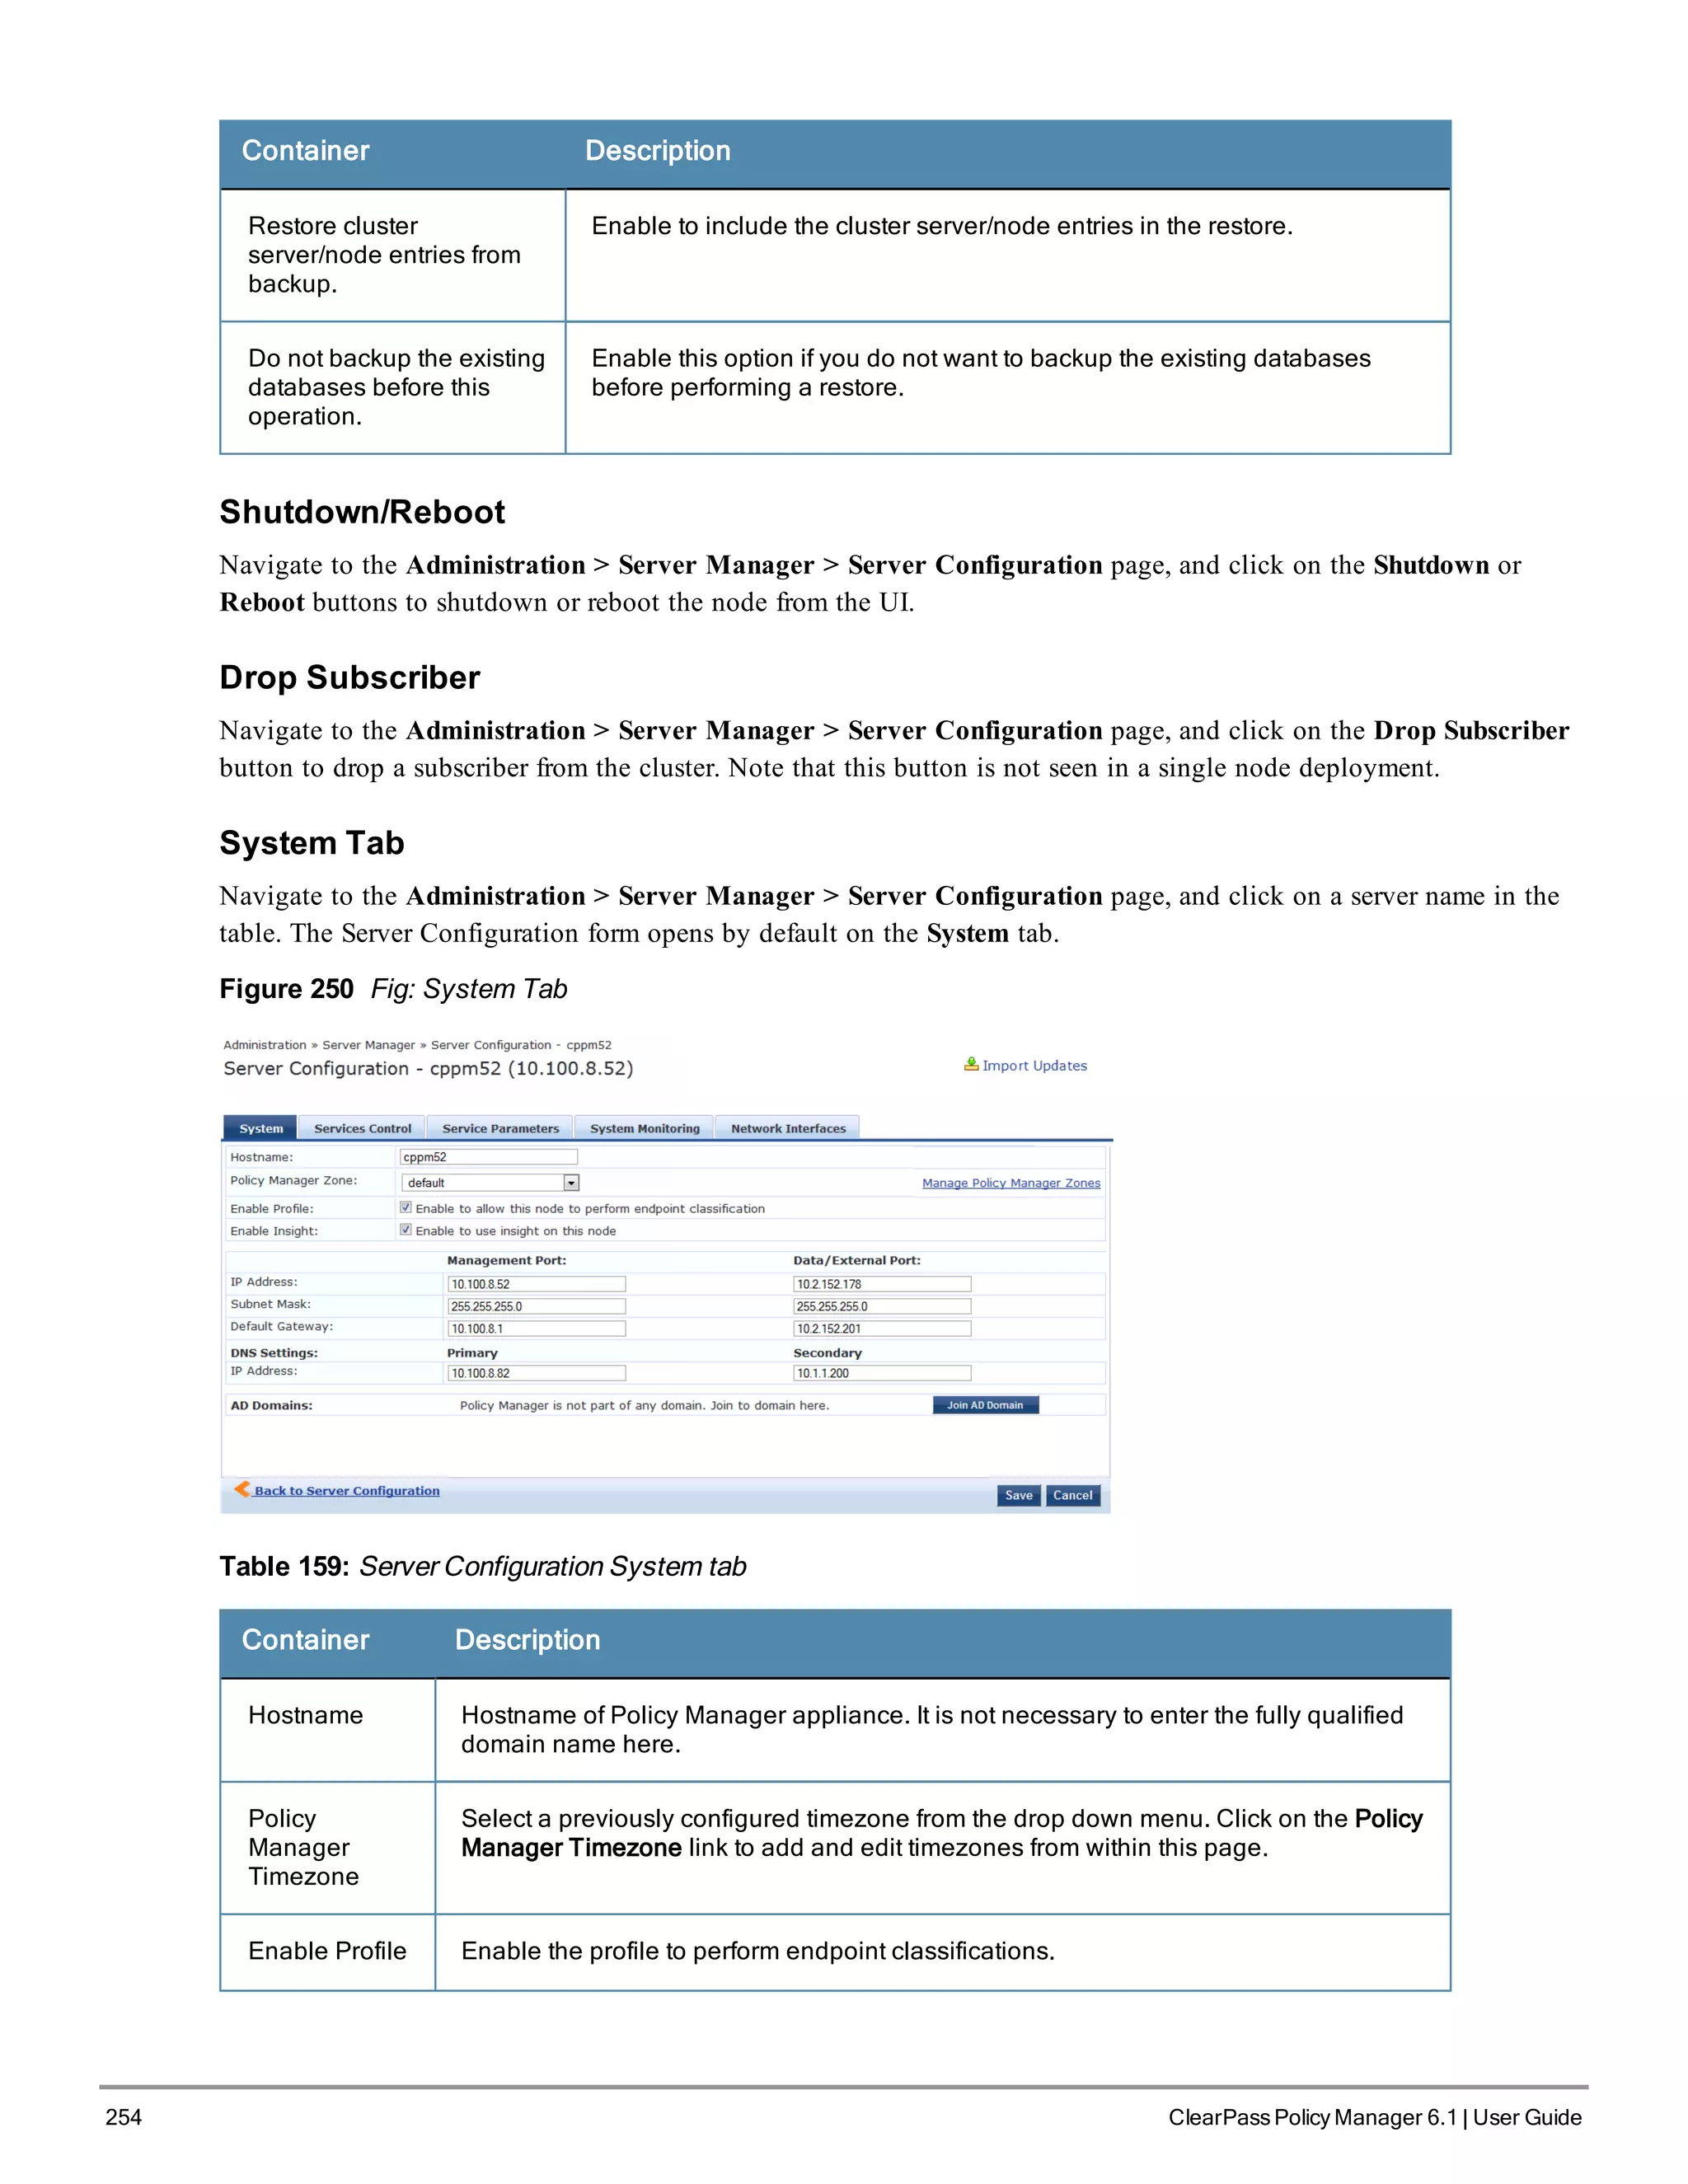
ClearPass Policy Manager 6.1 | User Guide 255](https://image.slidesharecdn.com/arubacppm61userguide-140926121722-phpapp01/75/Aruba-cppm-6_1_user_guide-255-2048.jpg)
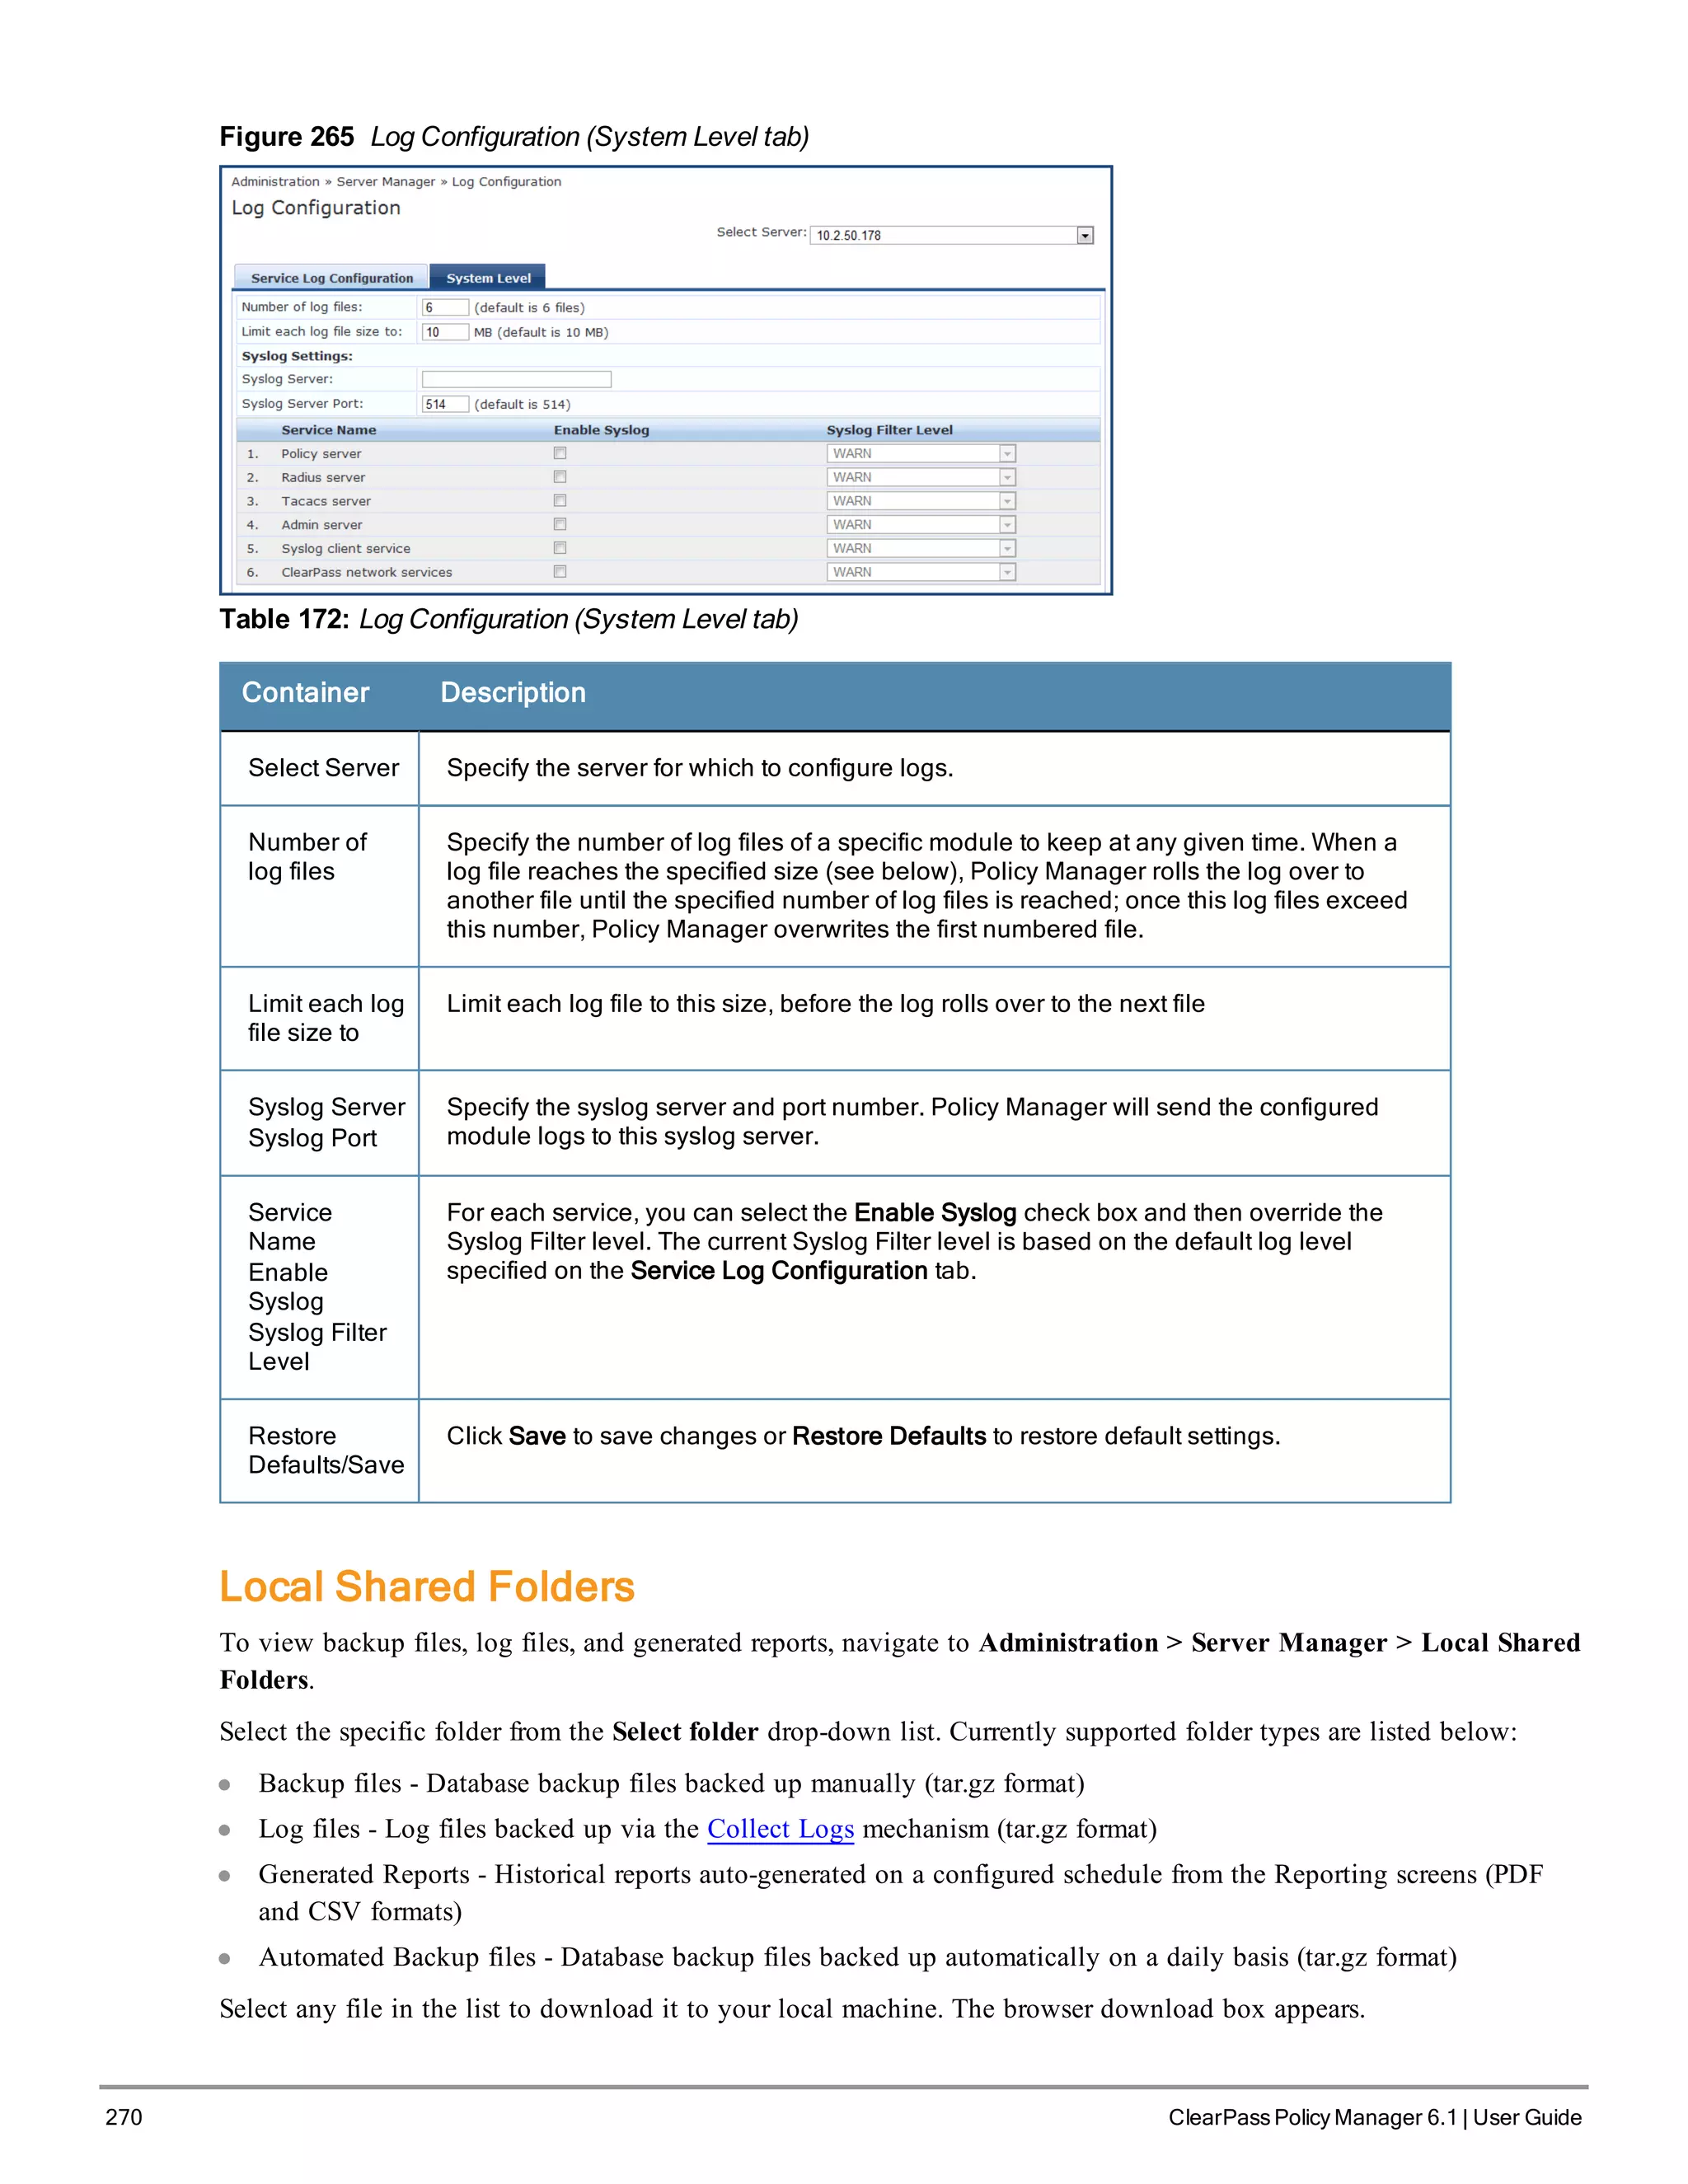
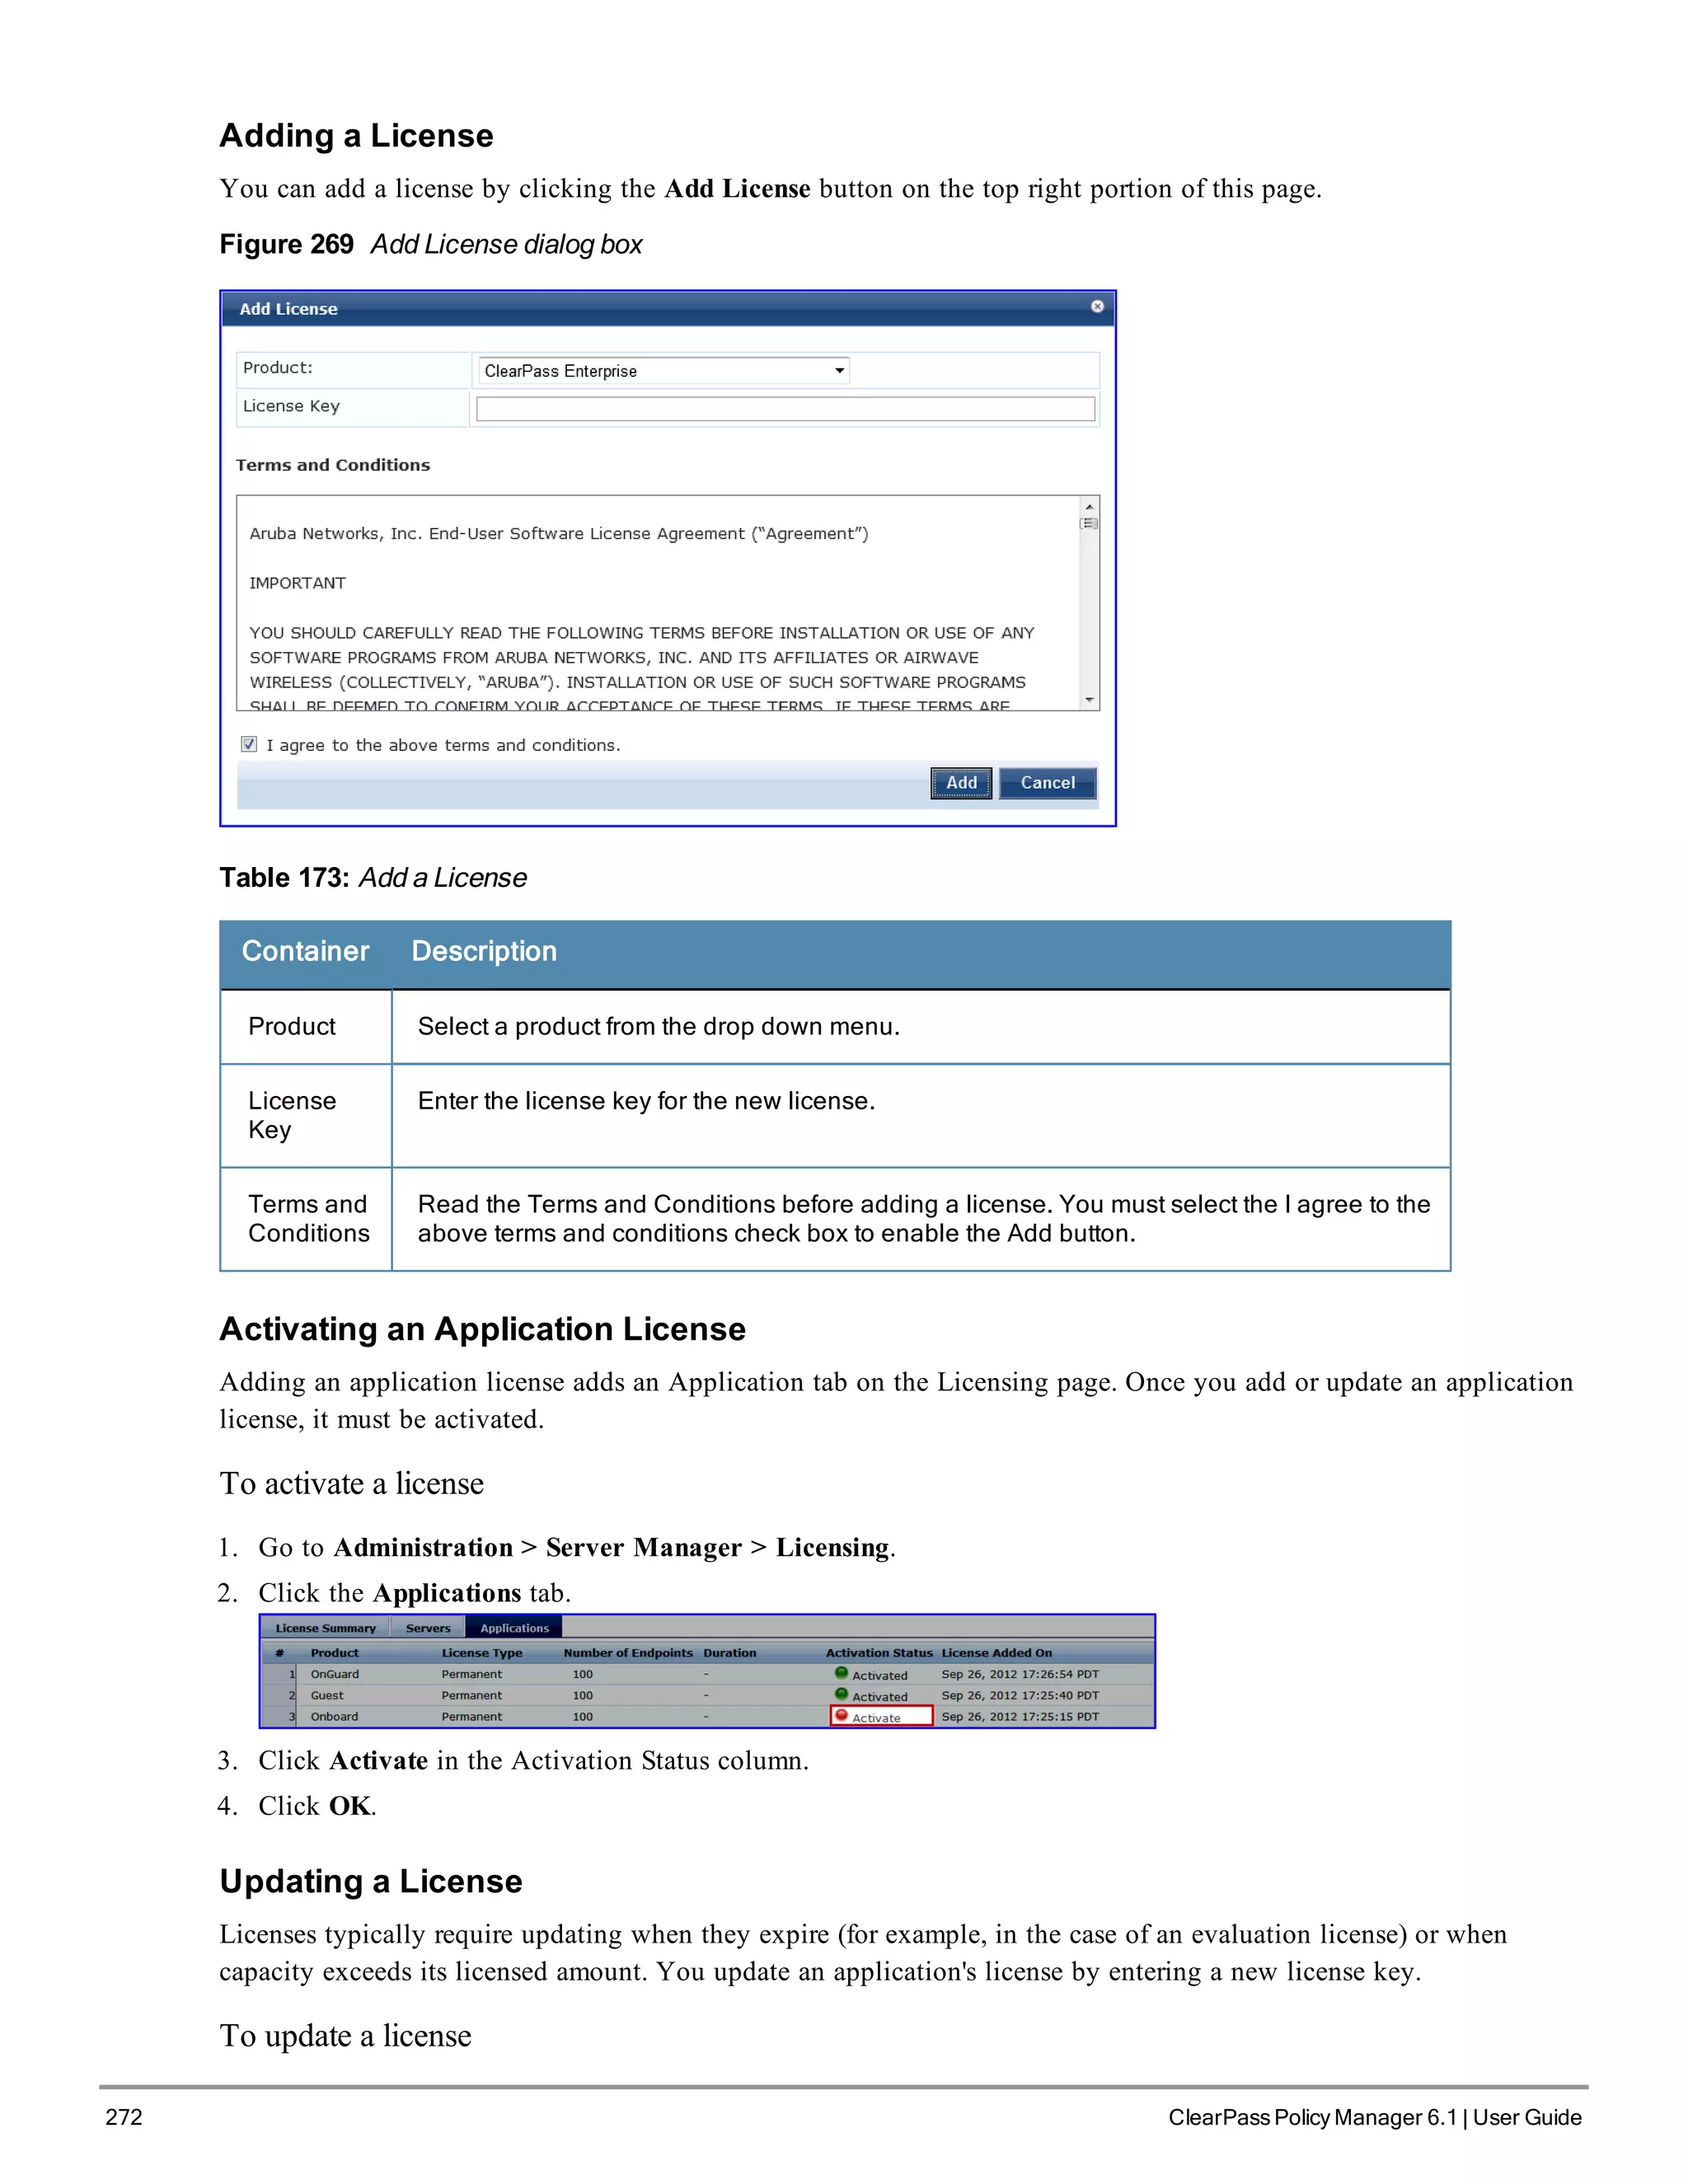
![1. Go to Administration > Server Manager > Licensing.
2. Click the Applications tab.
3. Click an application anywhere except in the Activation Status column. The Update License dialog box appears.
4. Enter the New License Key.
5. Read the Terms and Conditions, then select the I agree to the above terms and conditions check box.
6. Click Update.
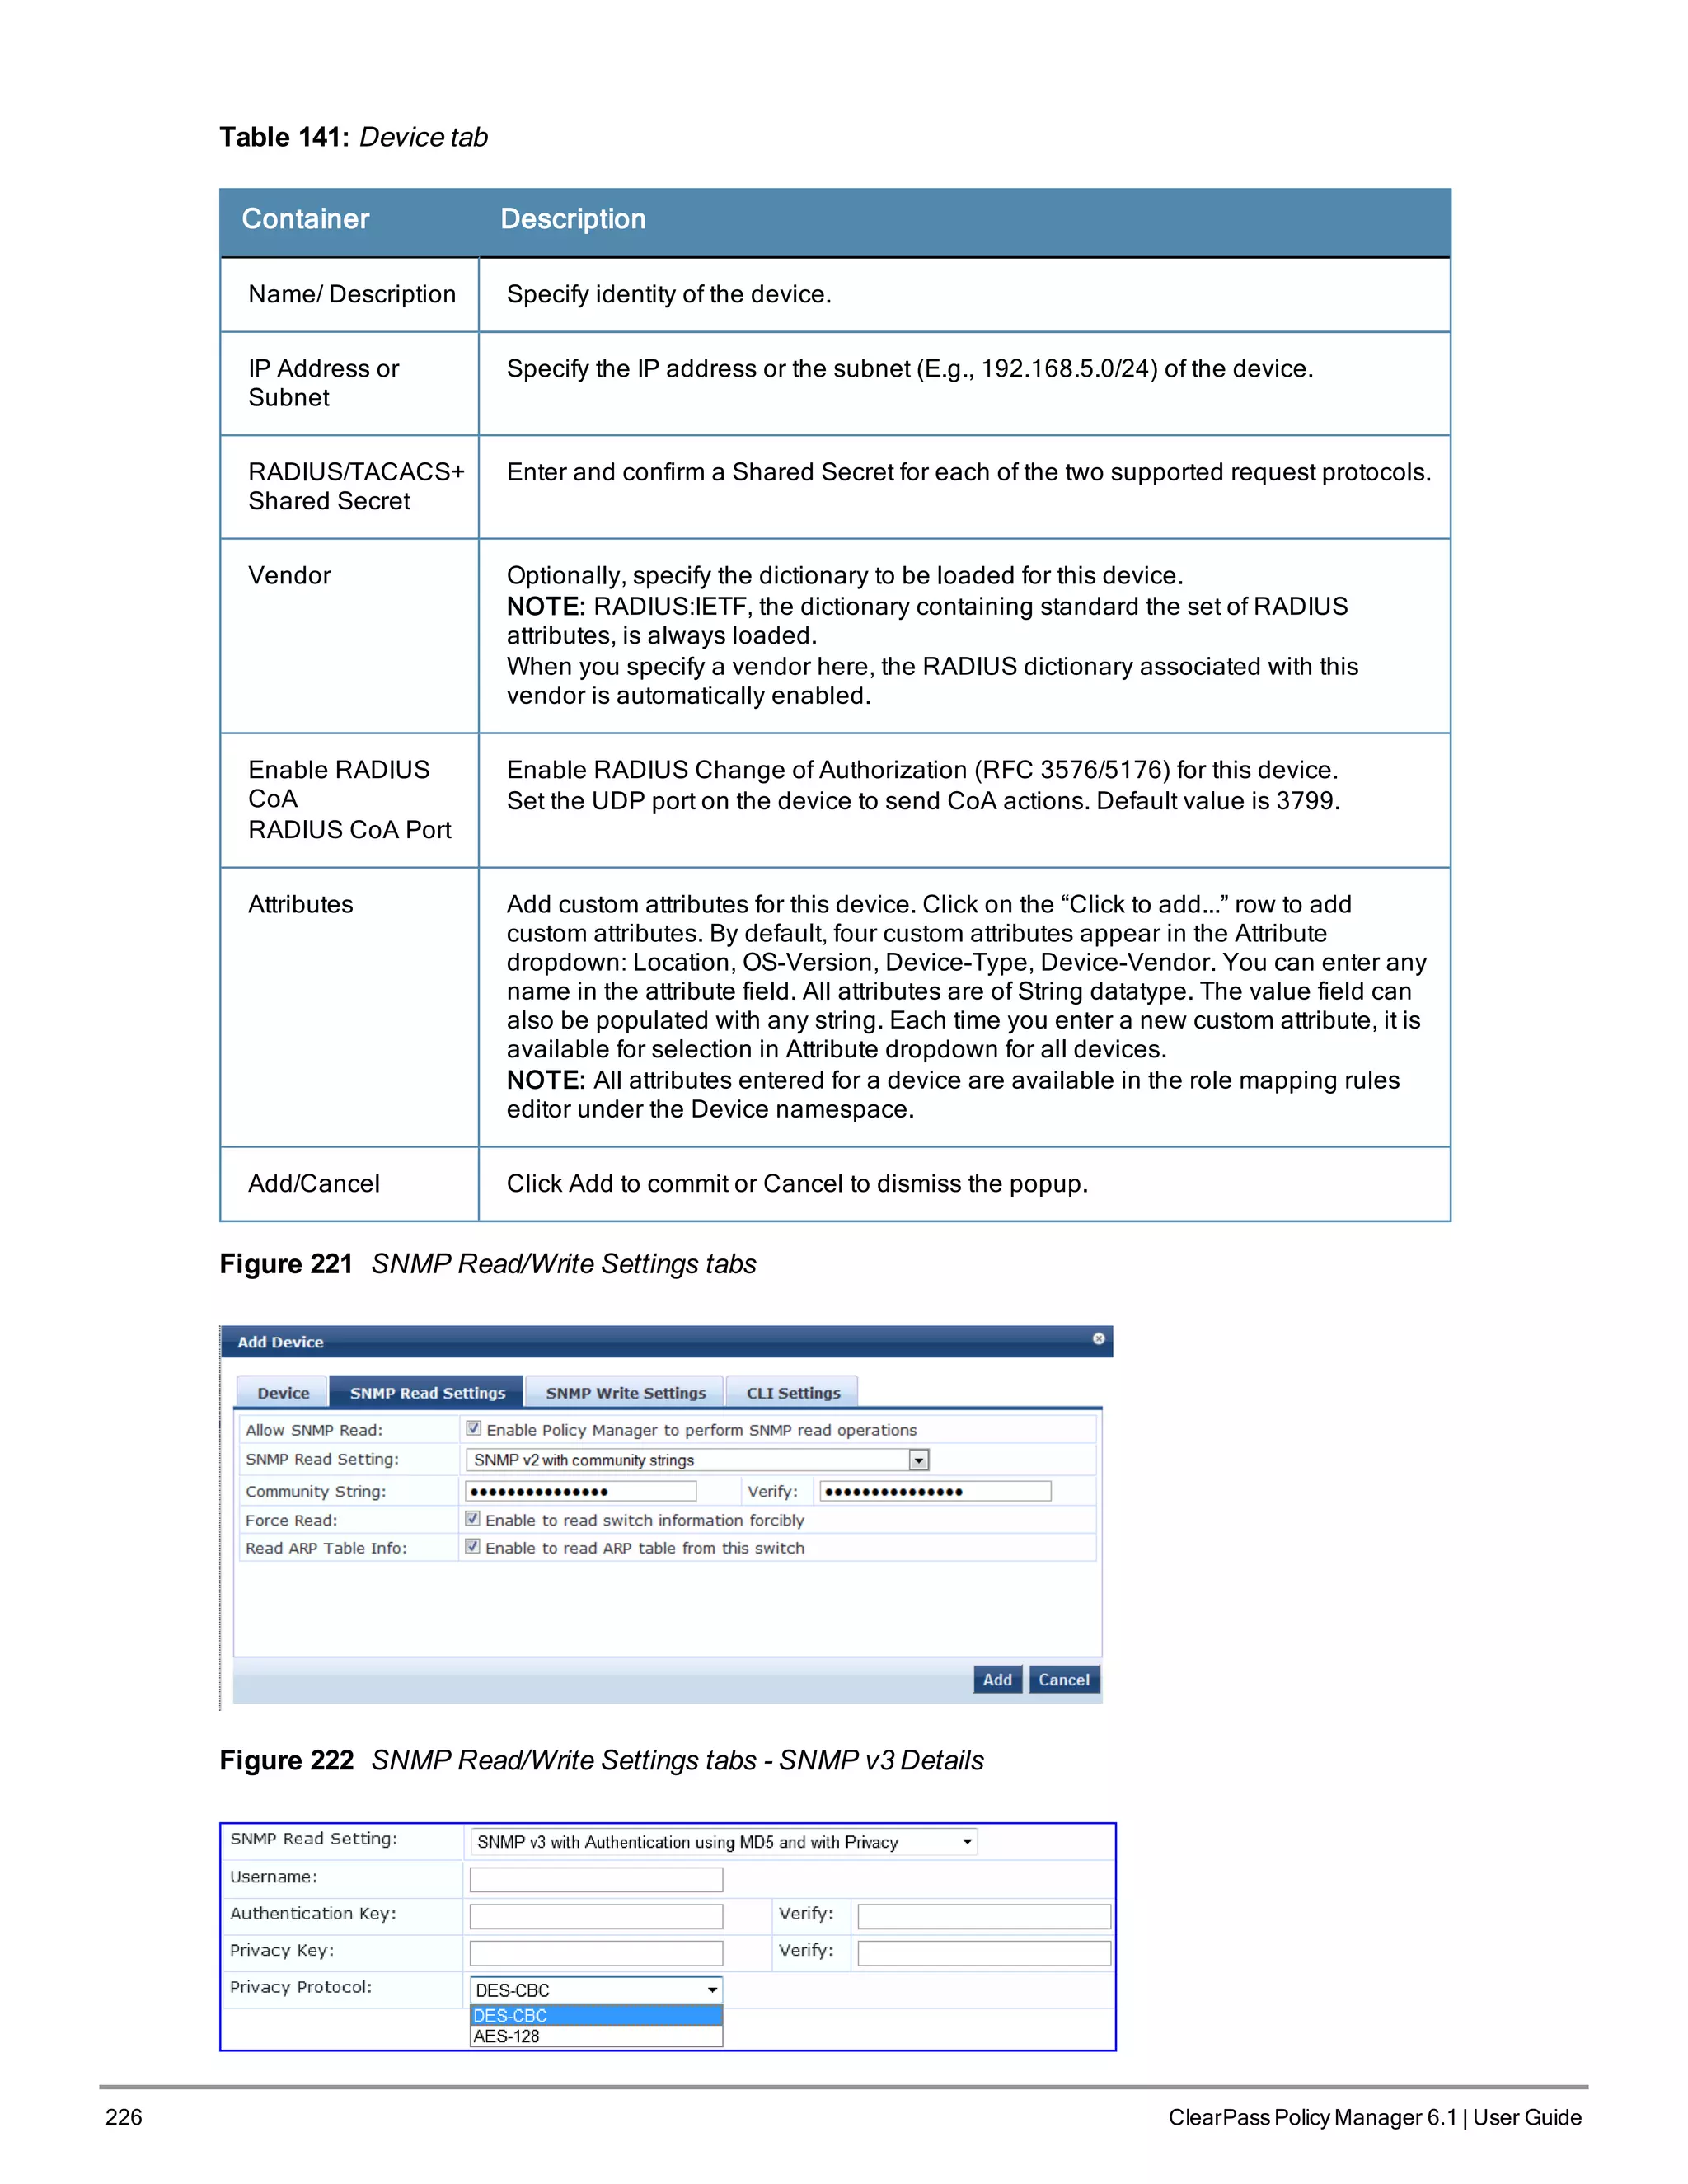
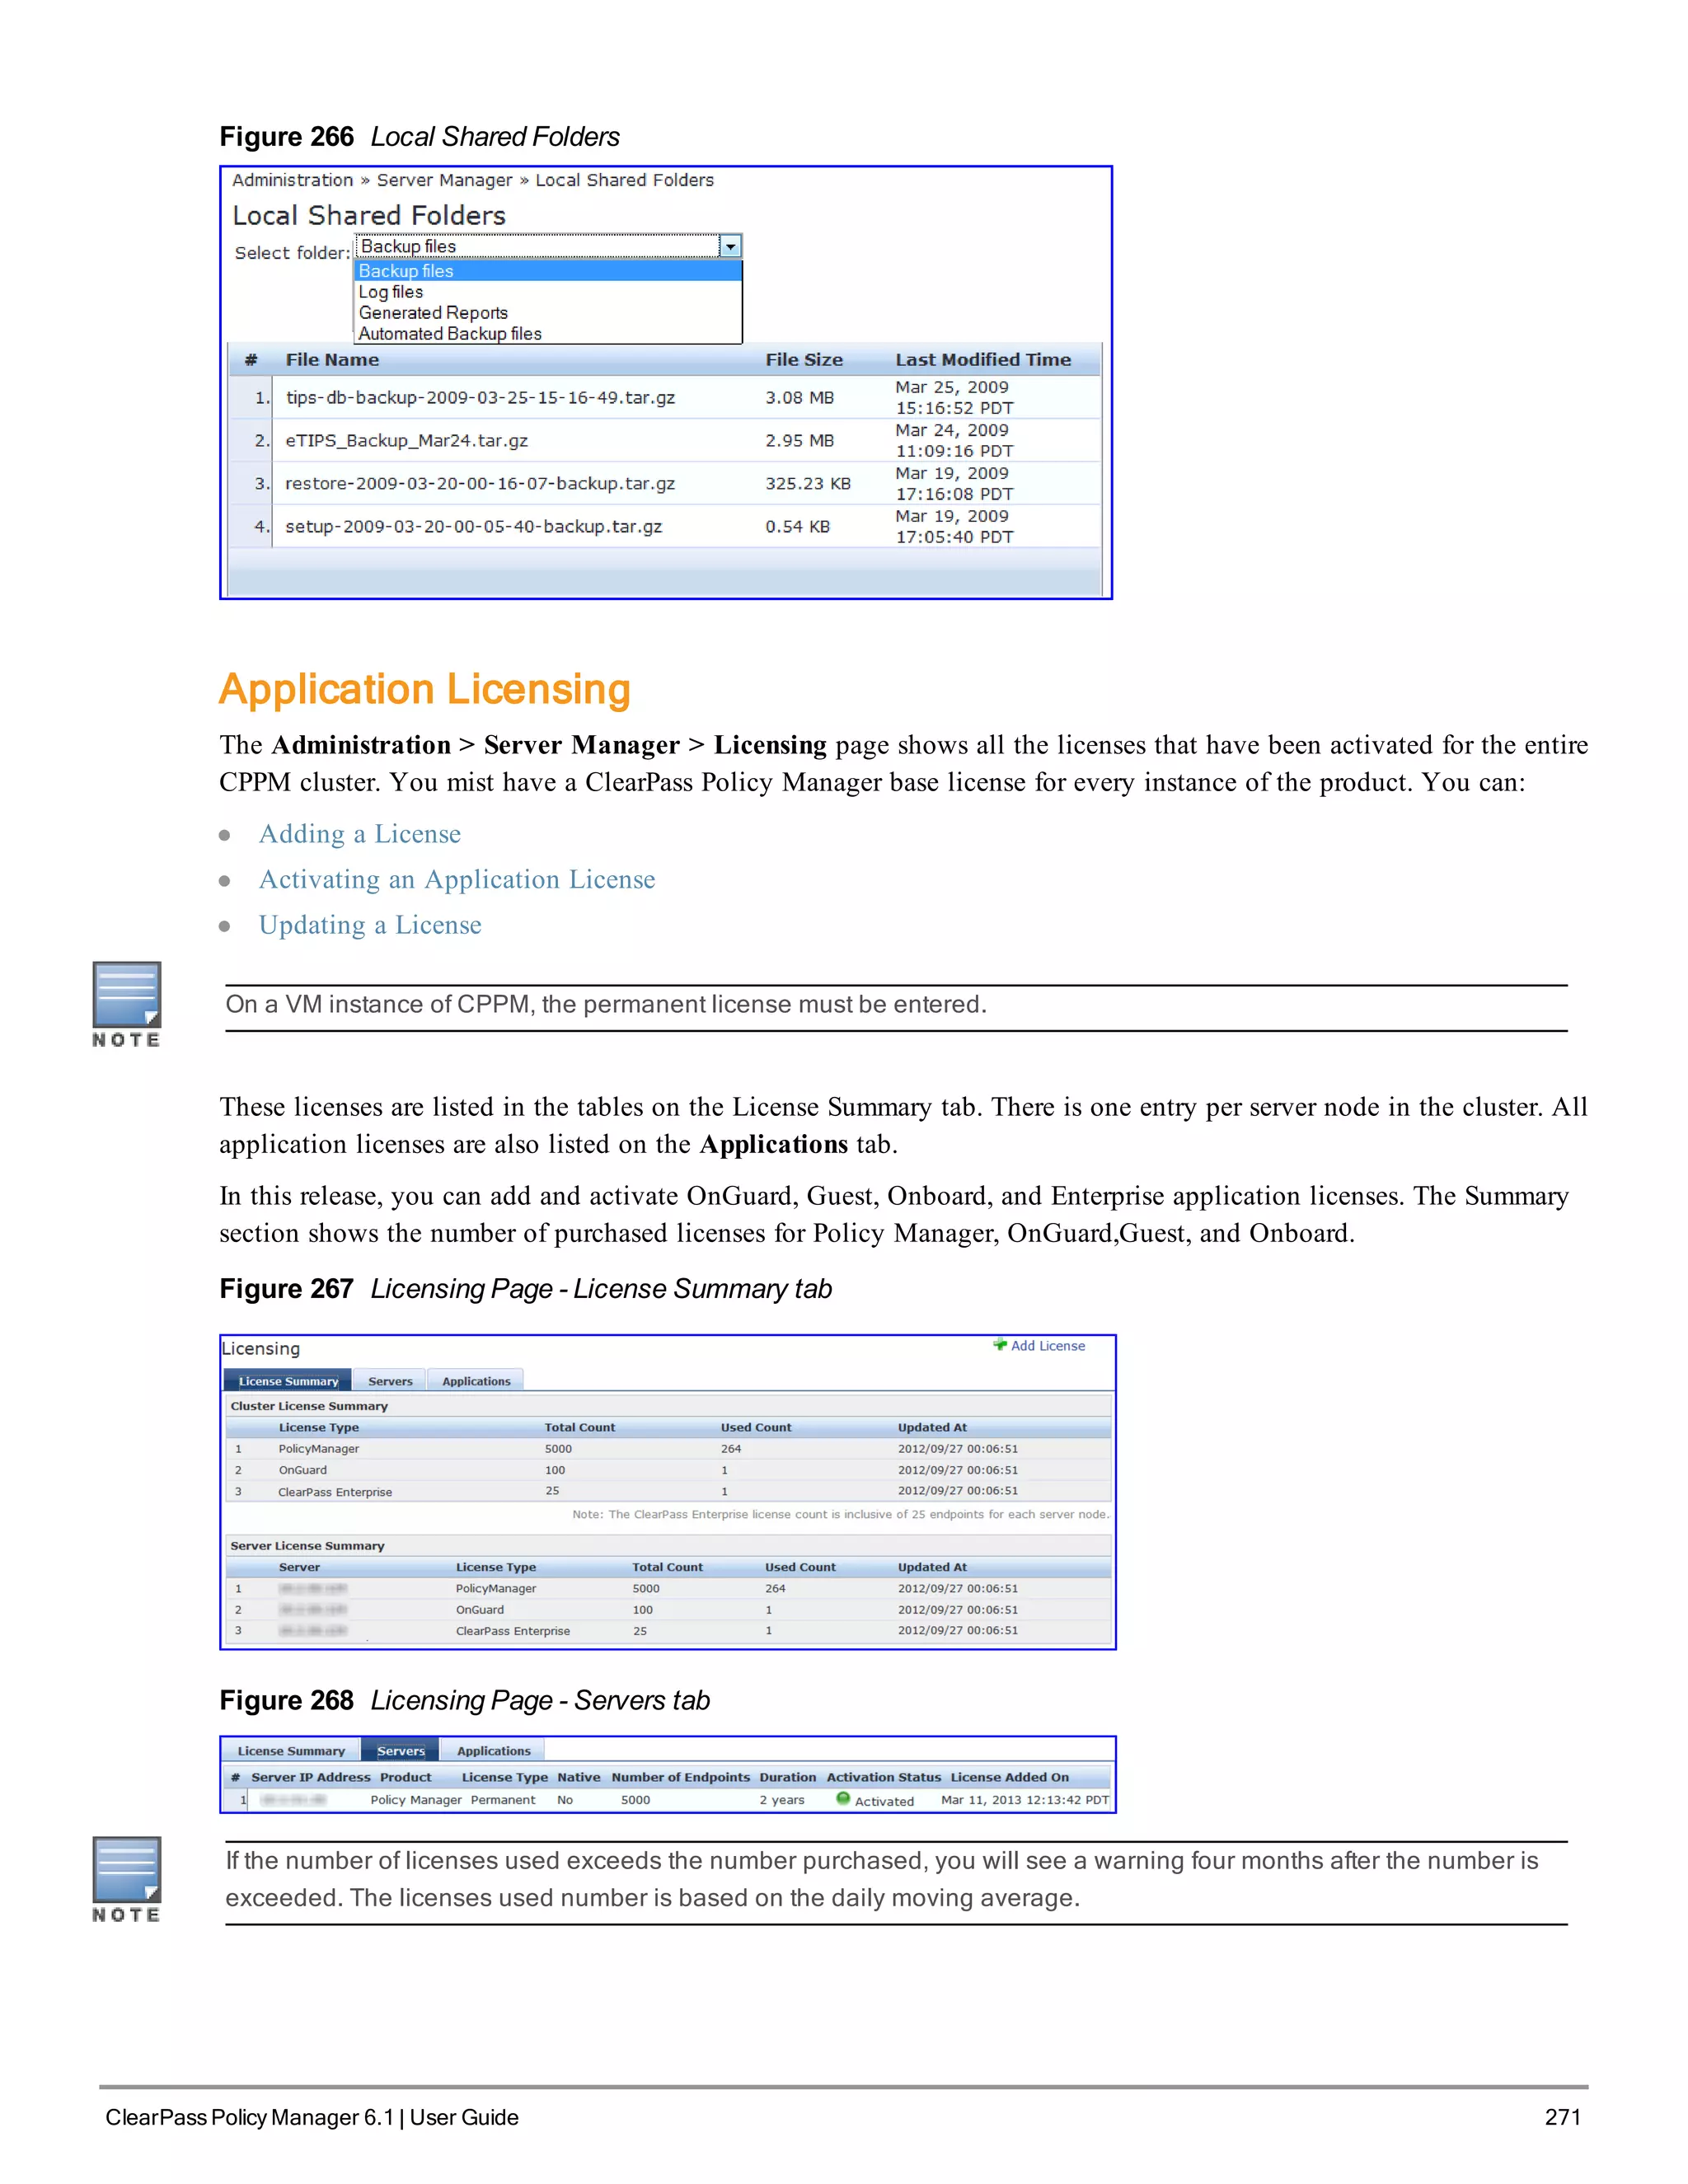
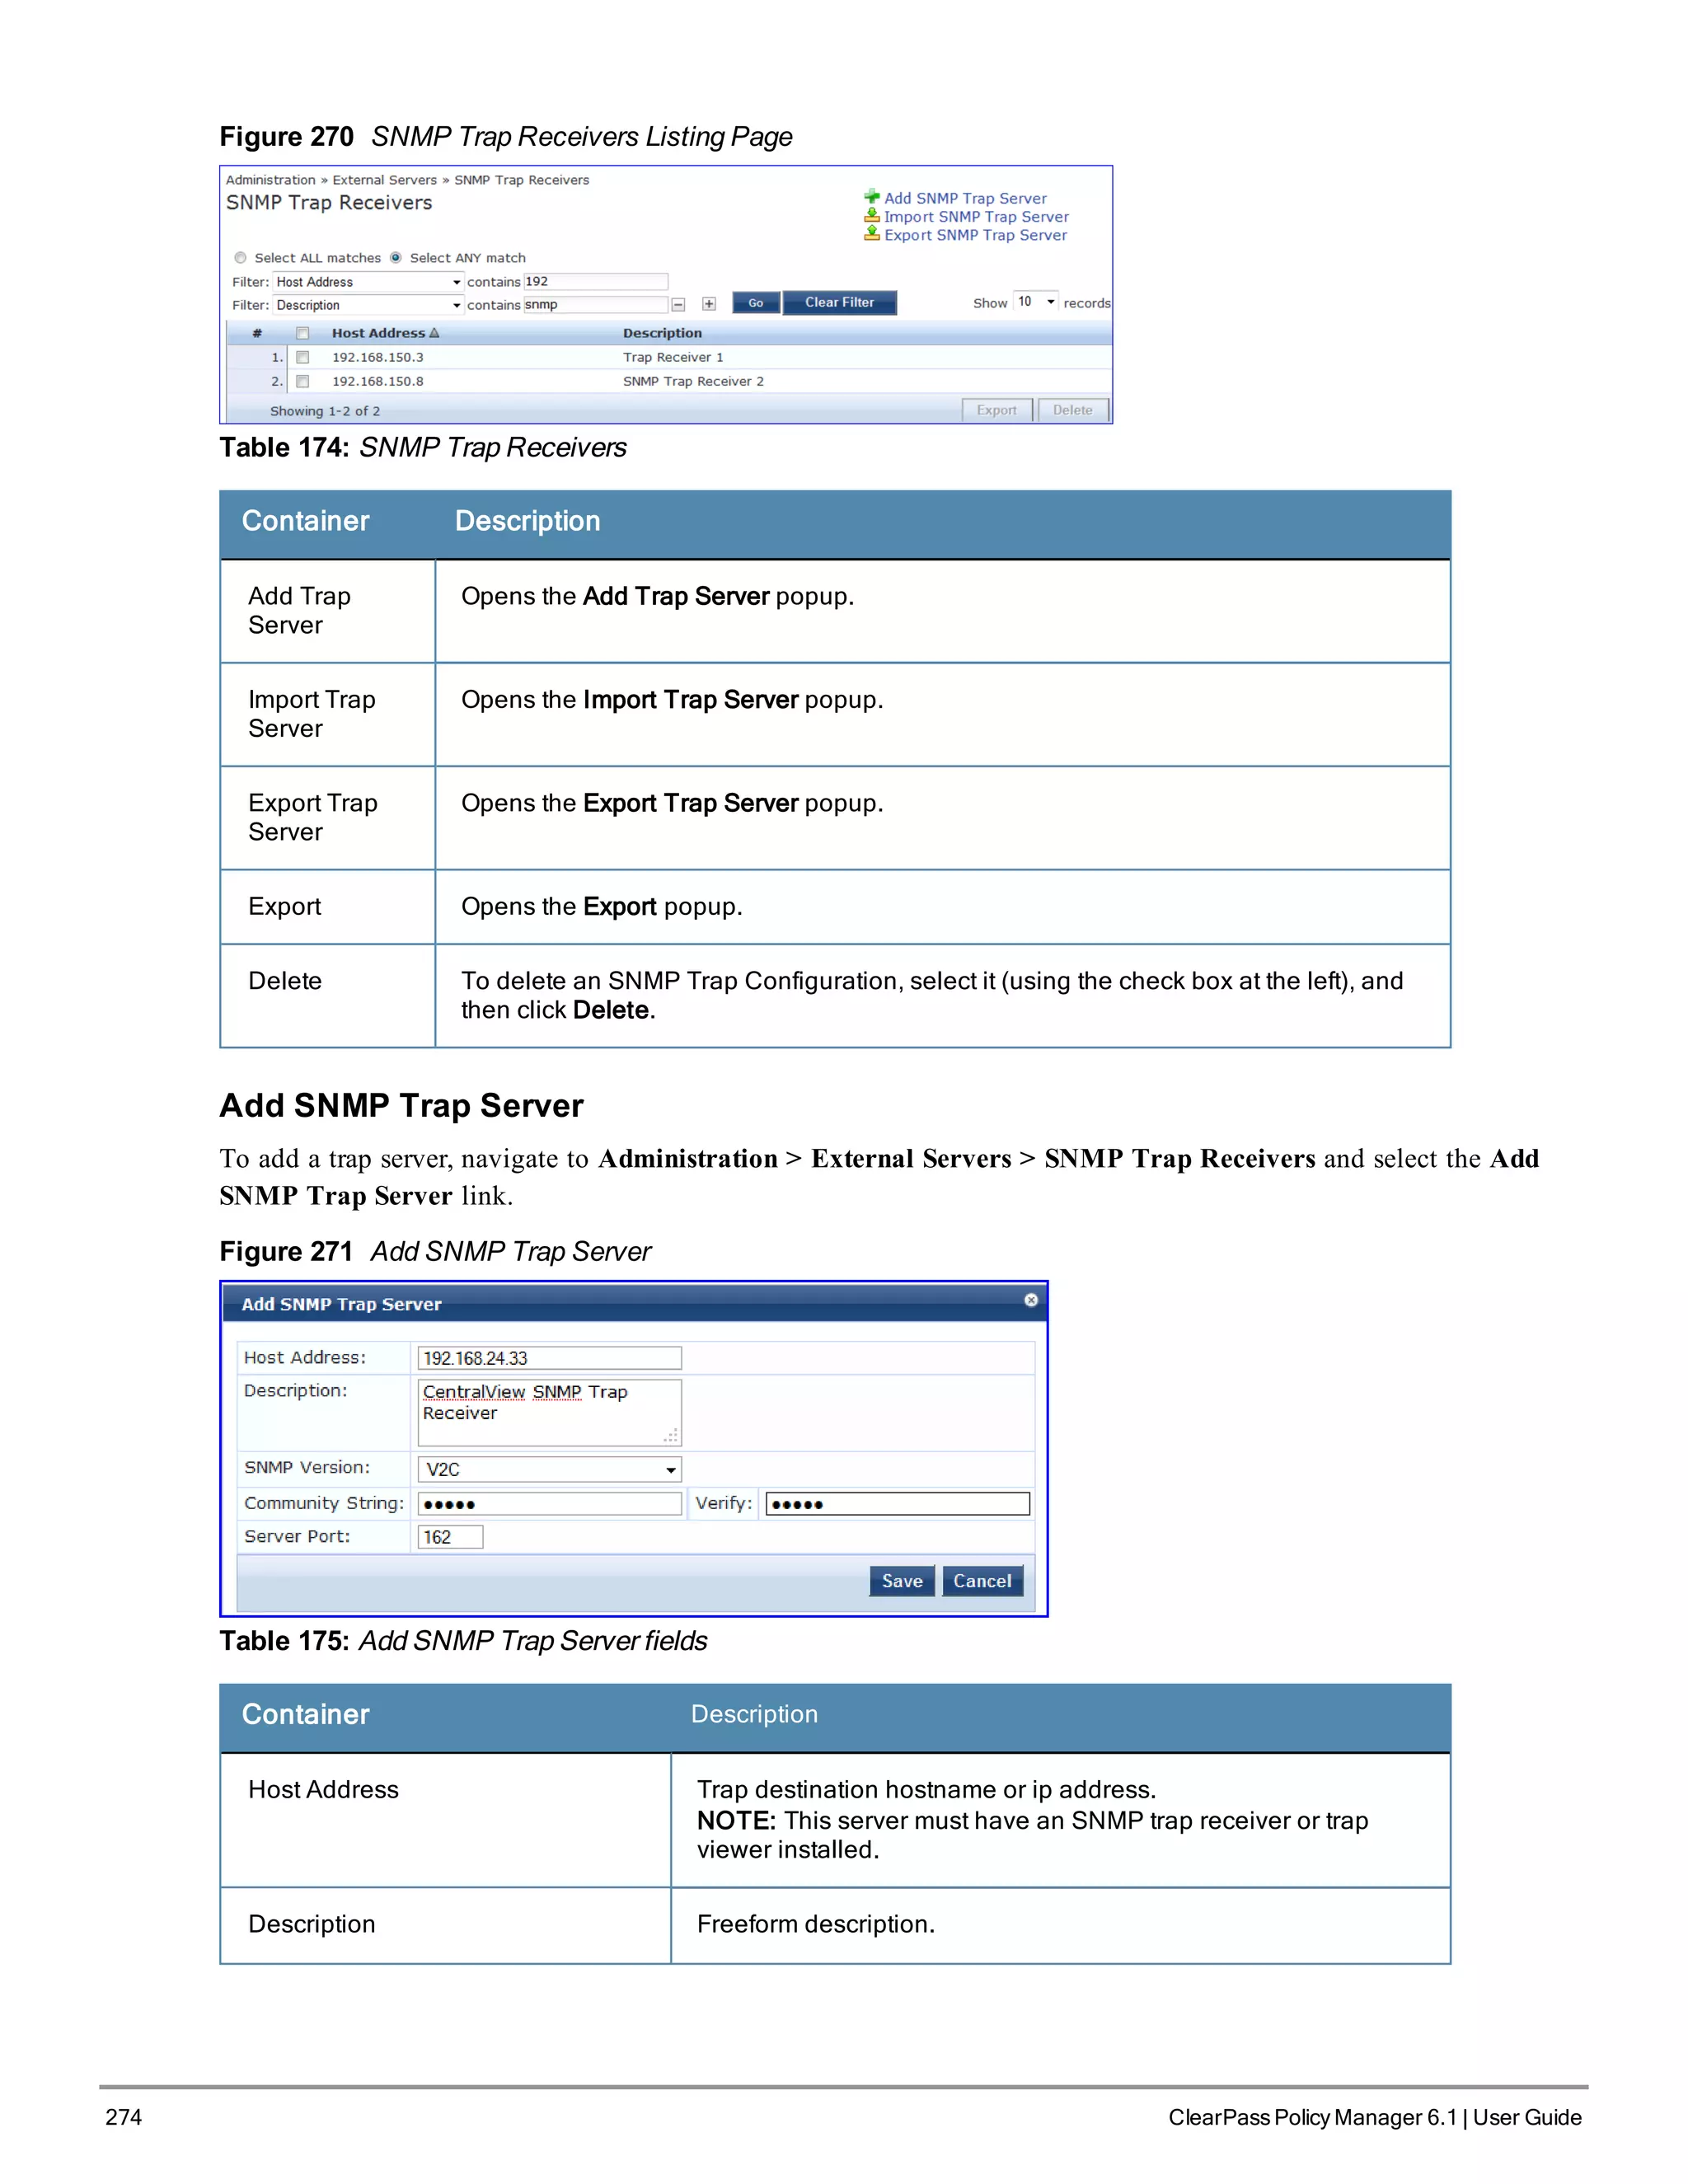
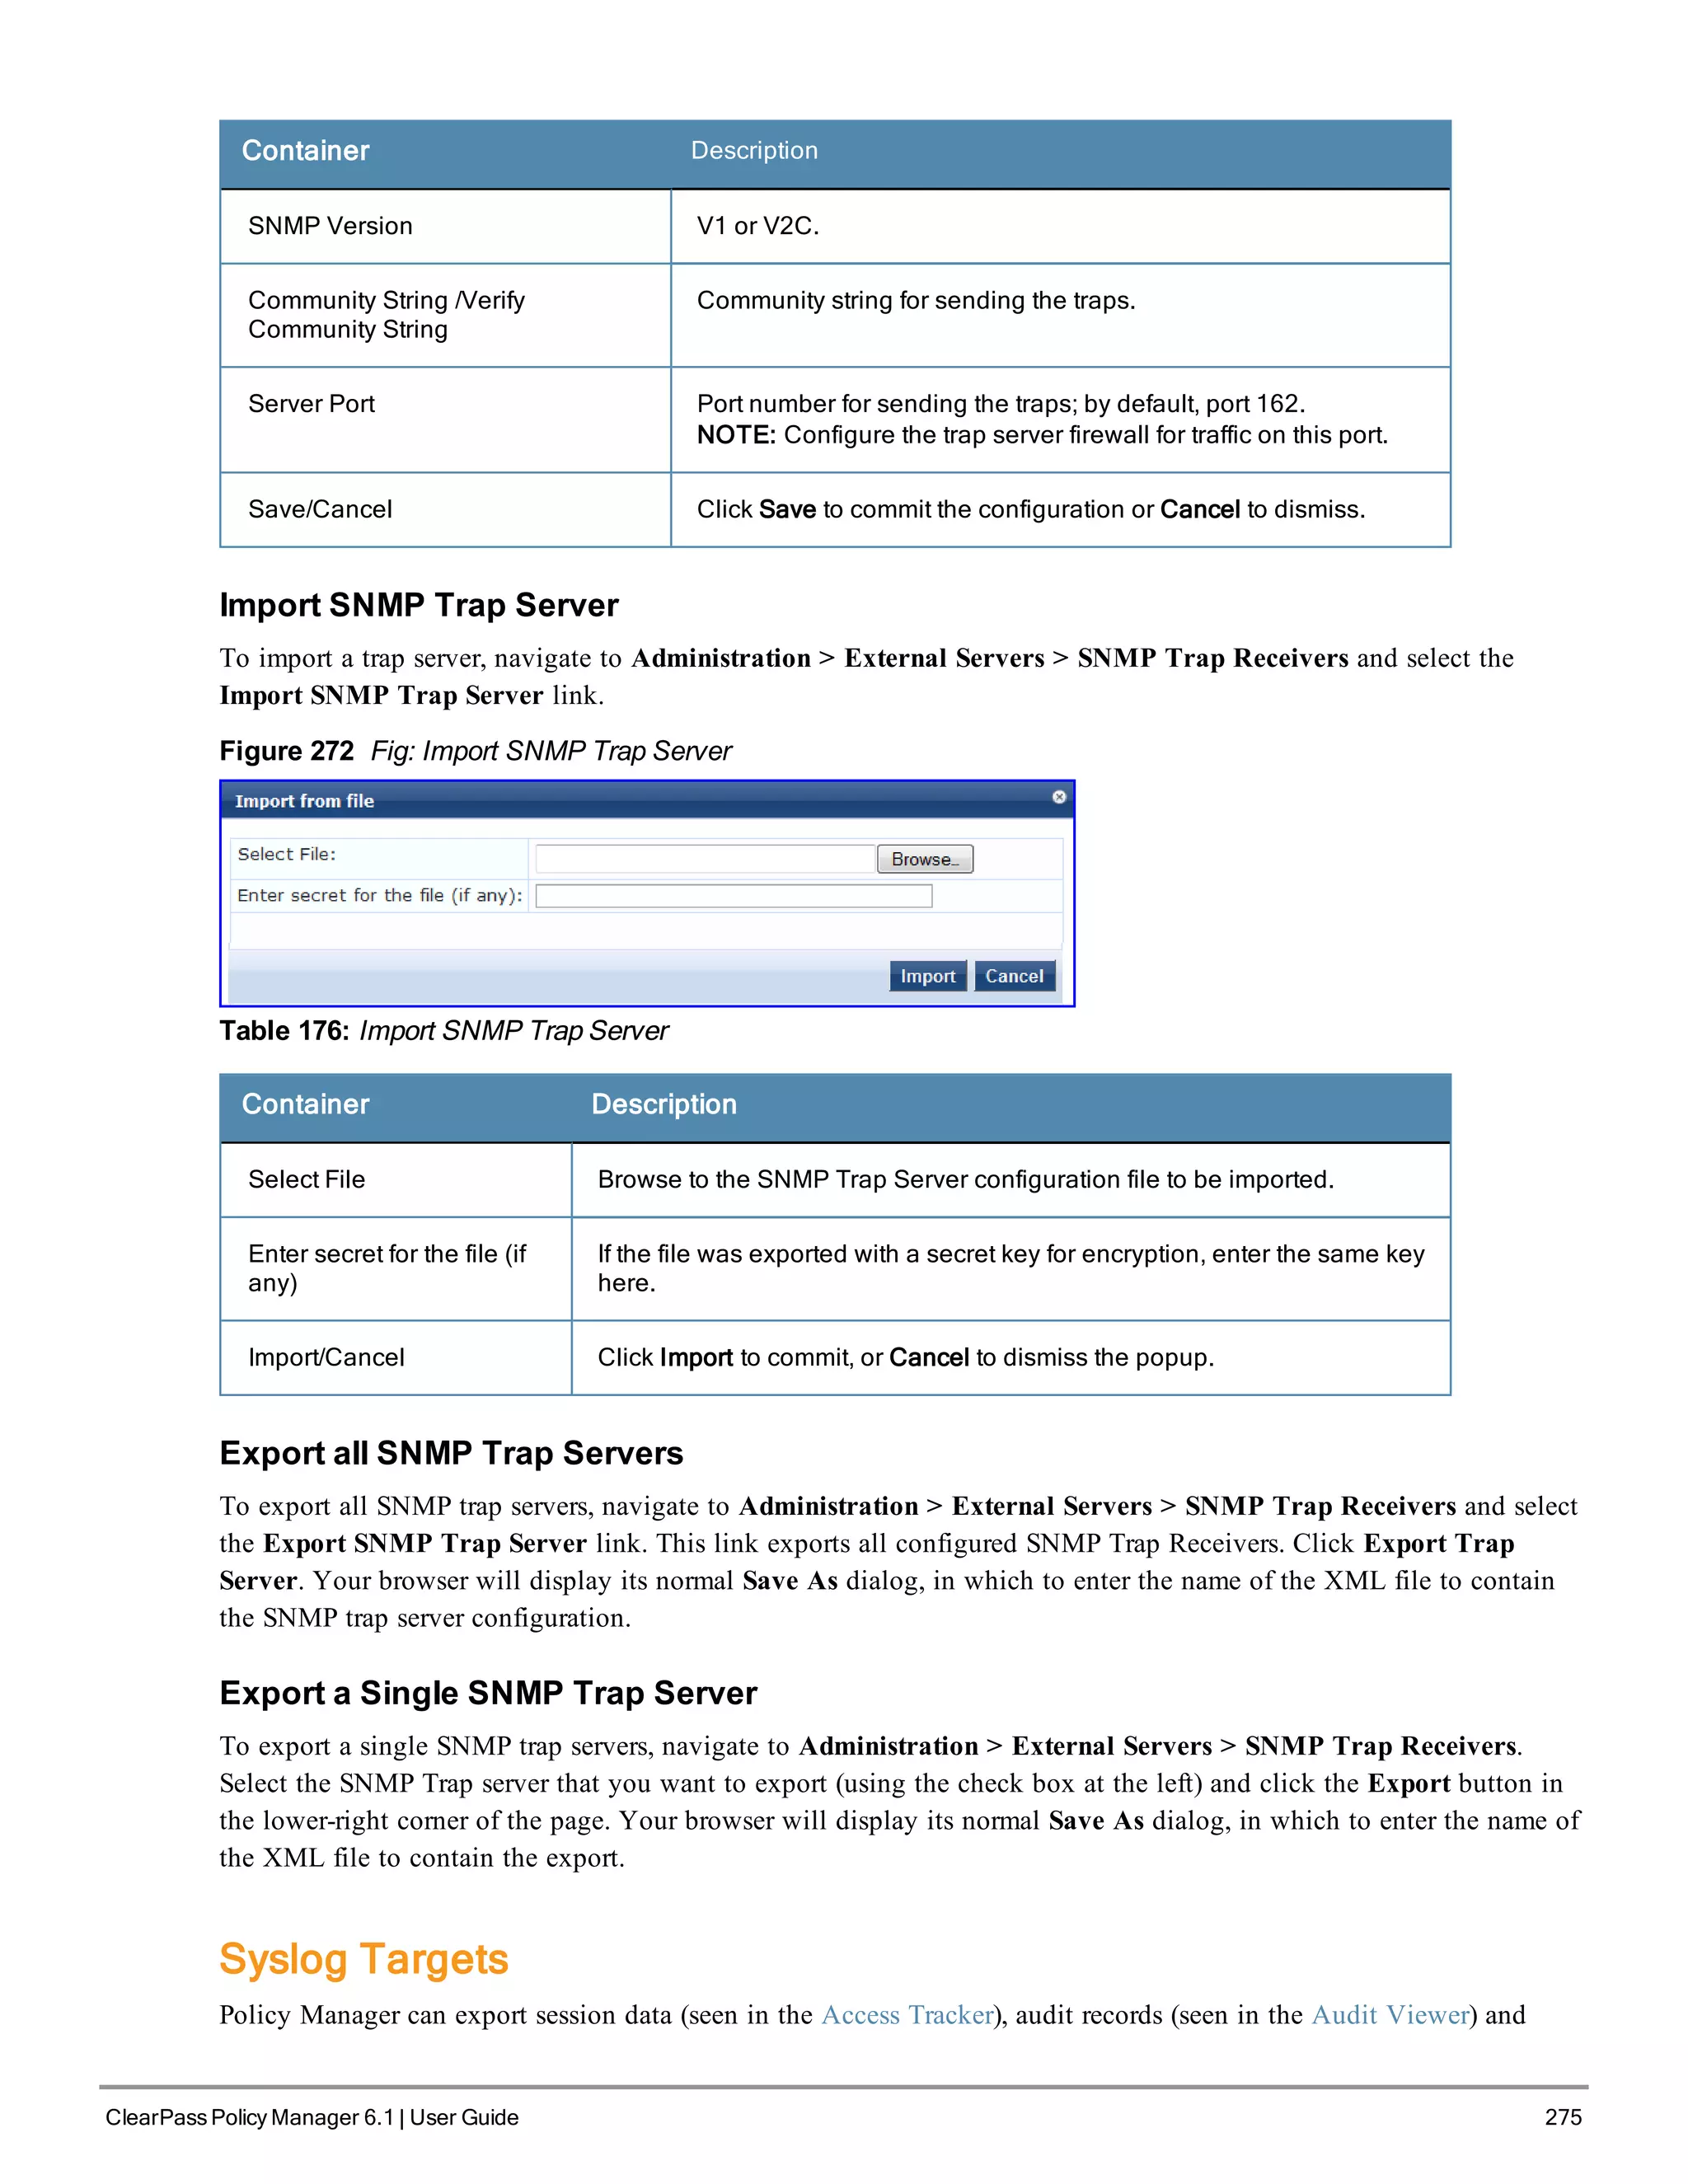
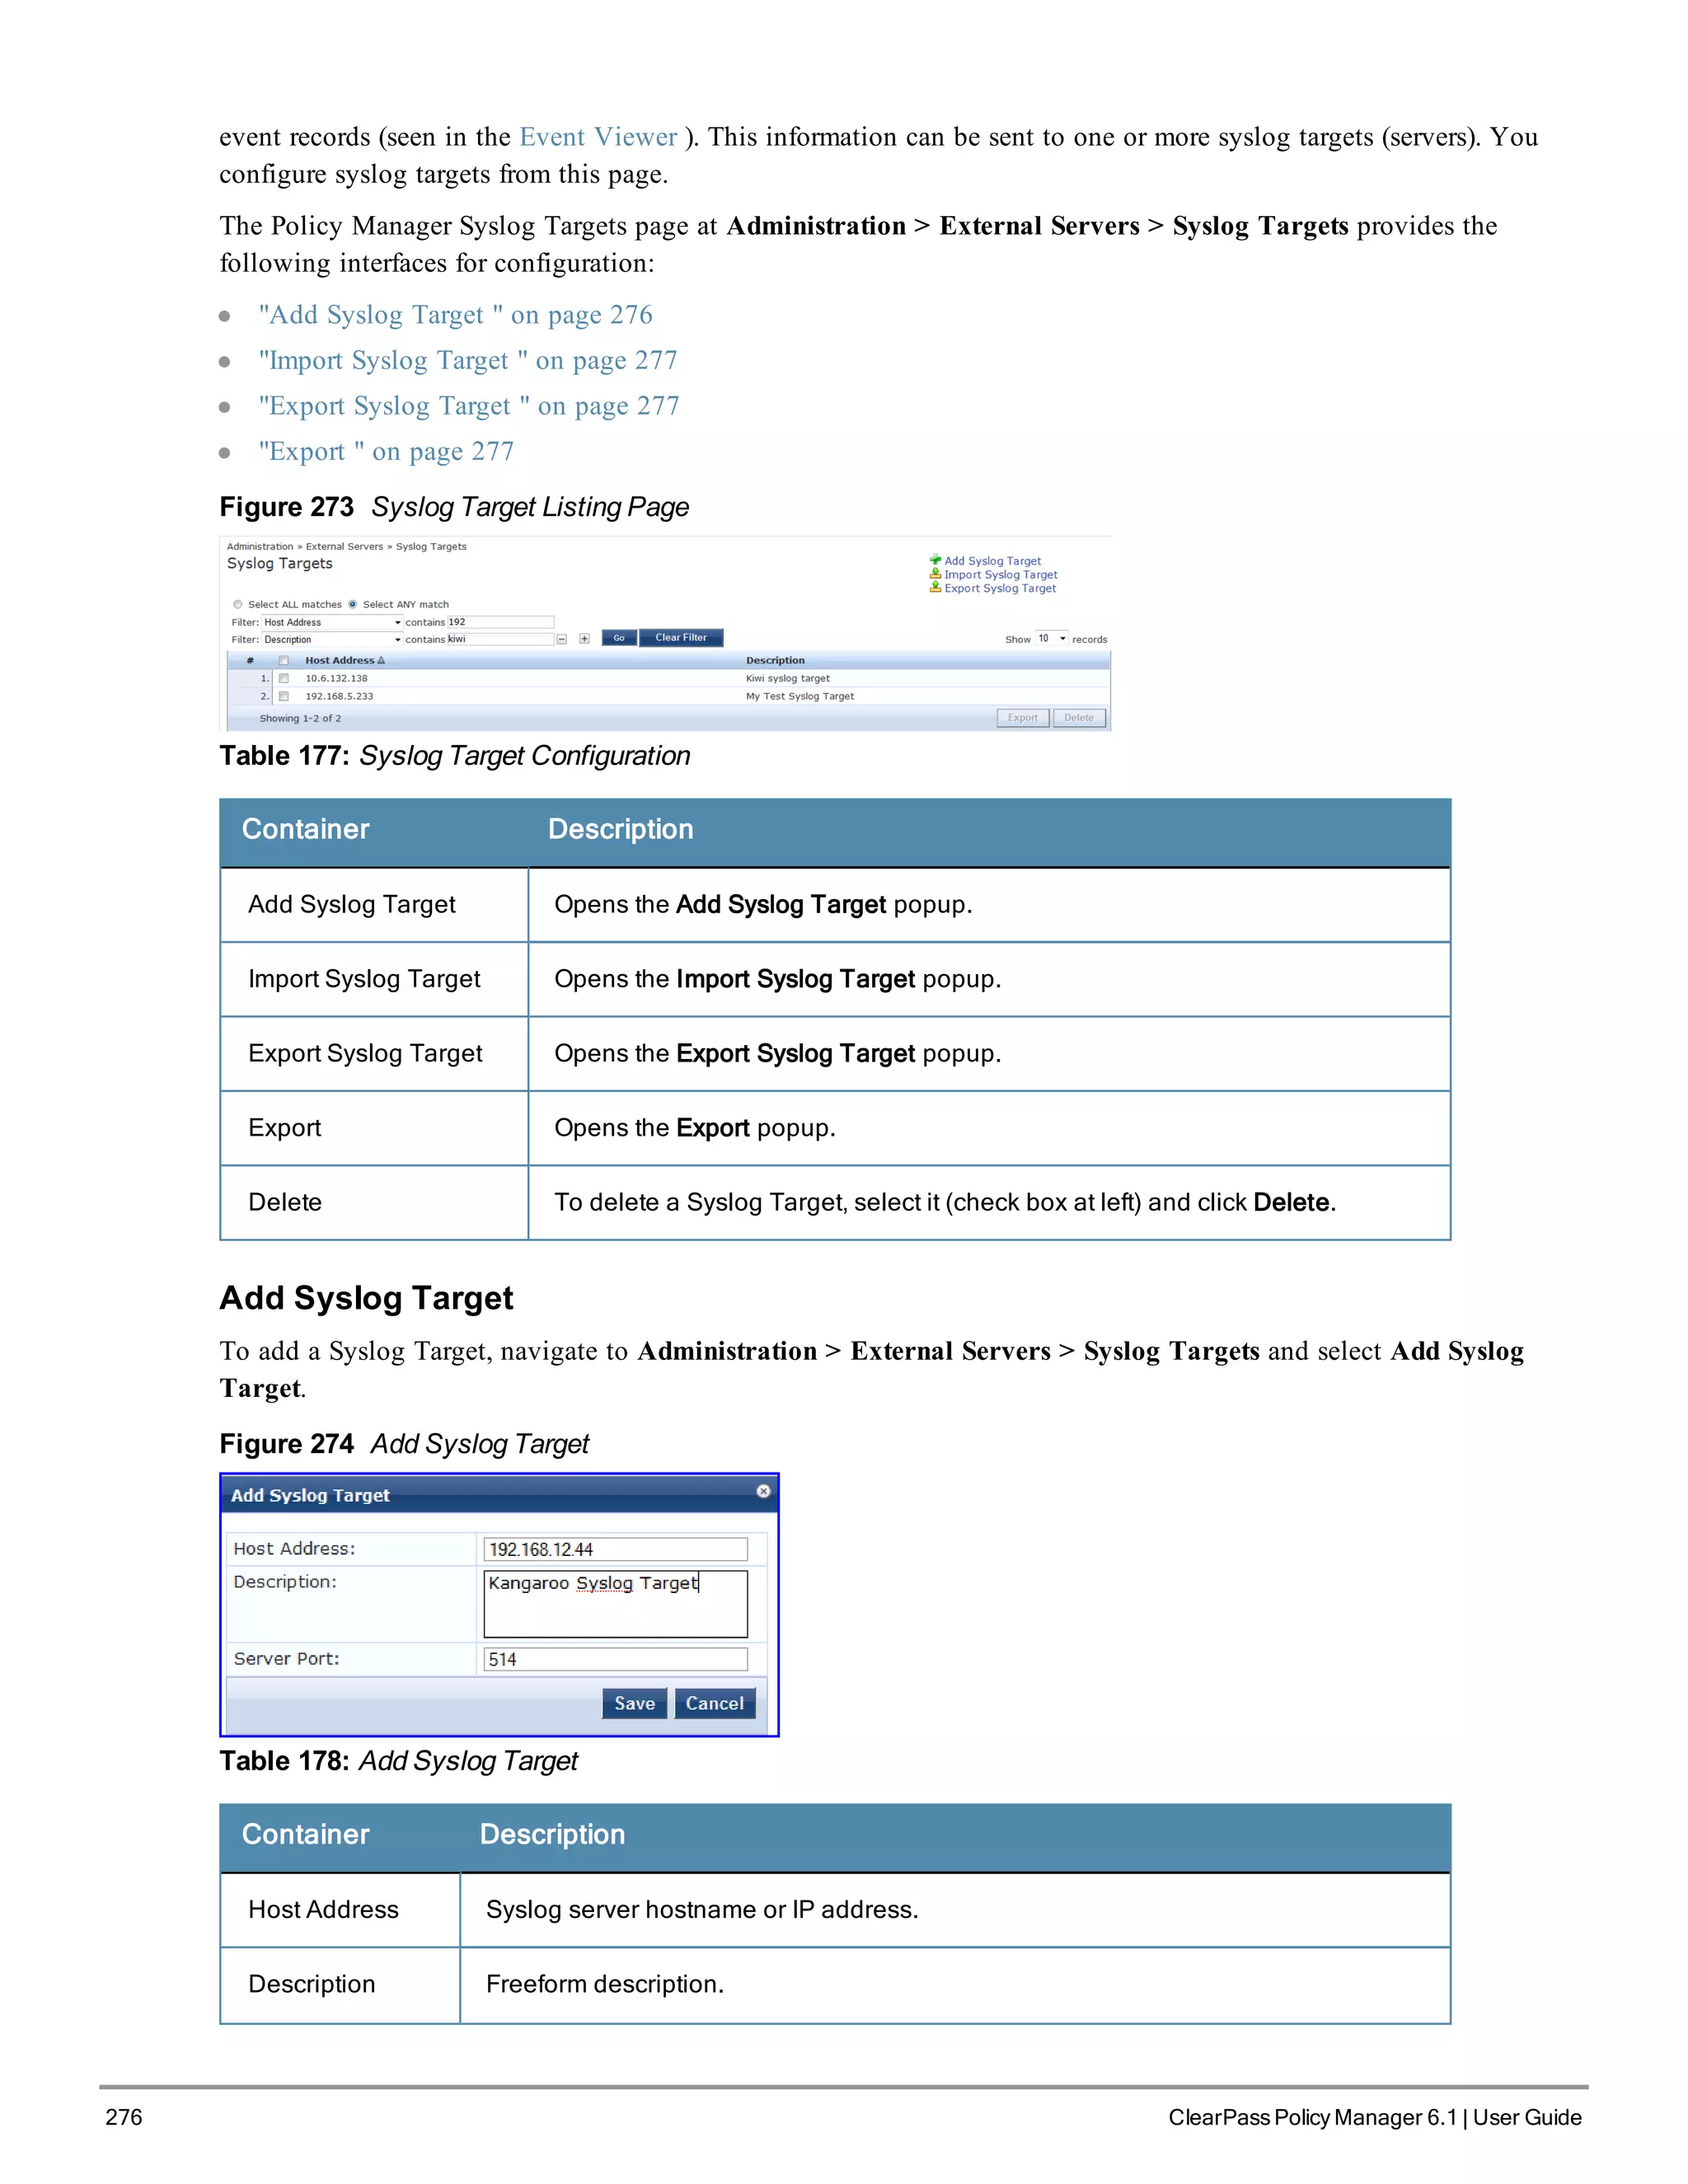
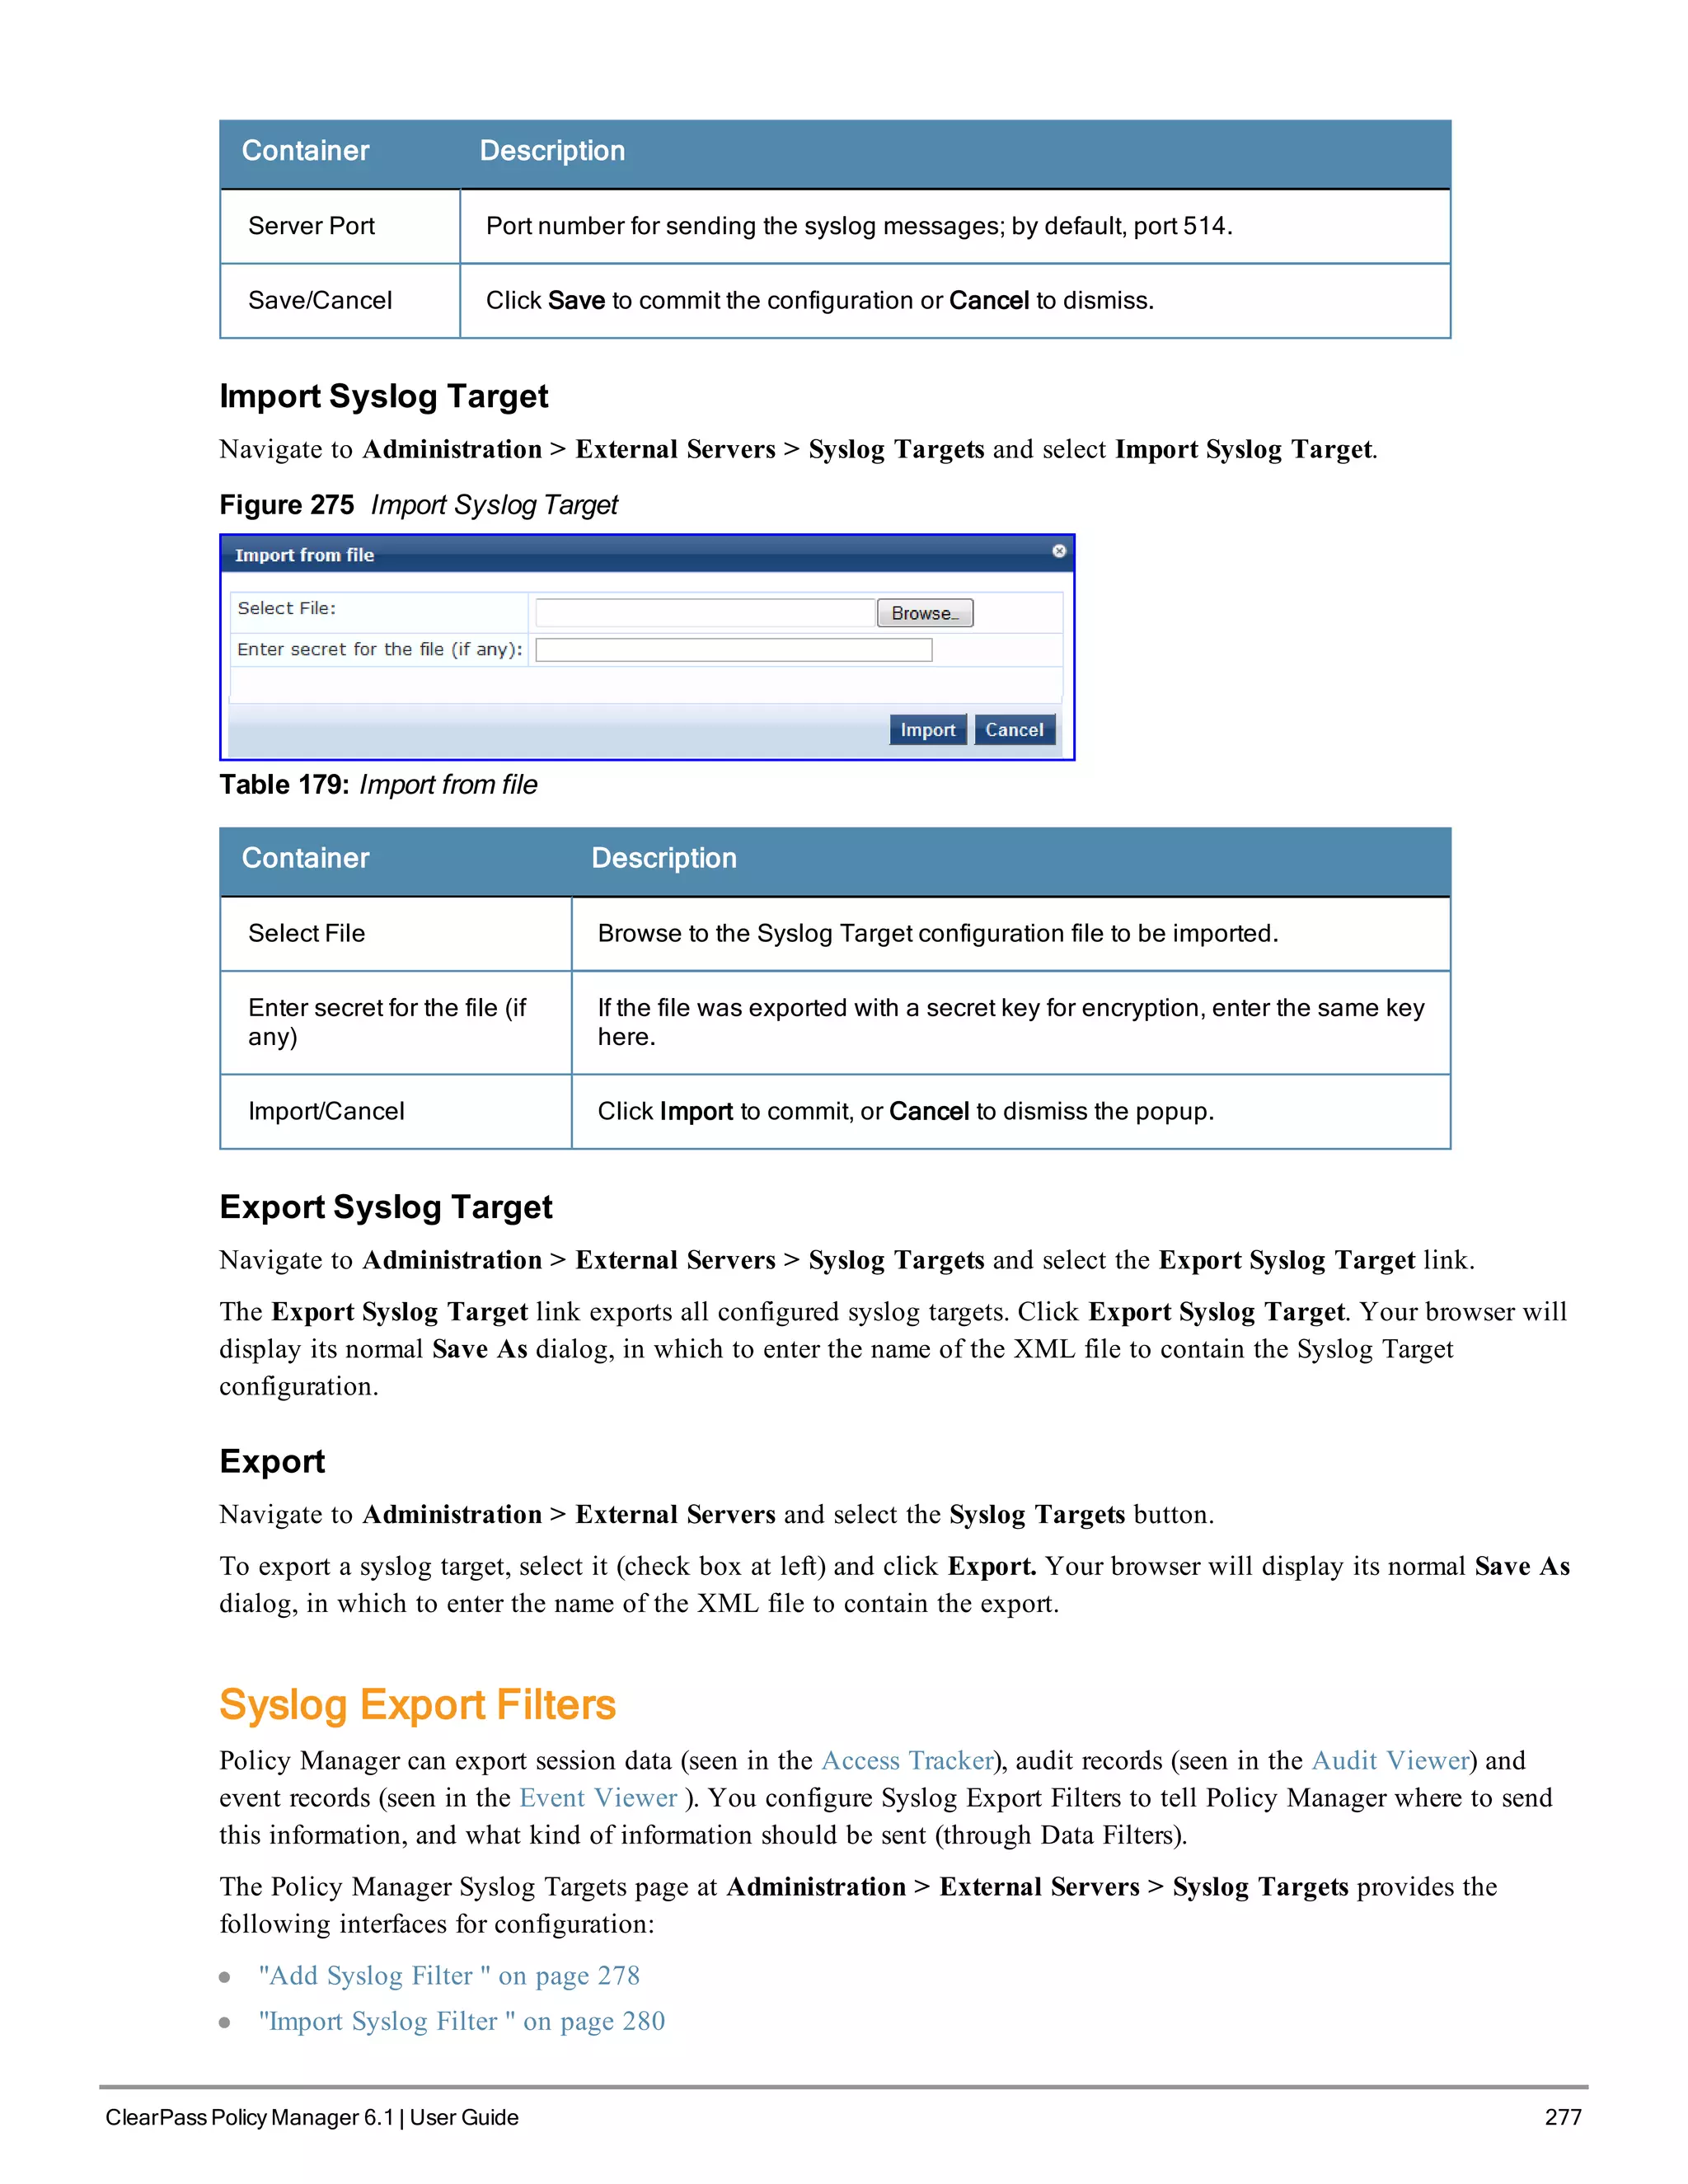
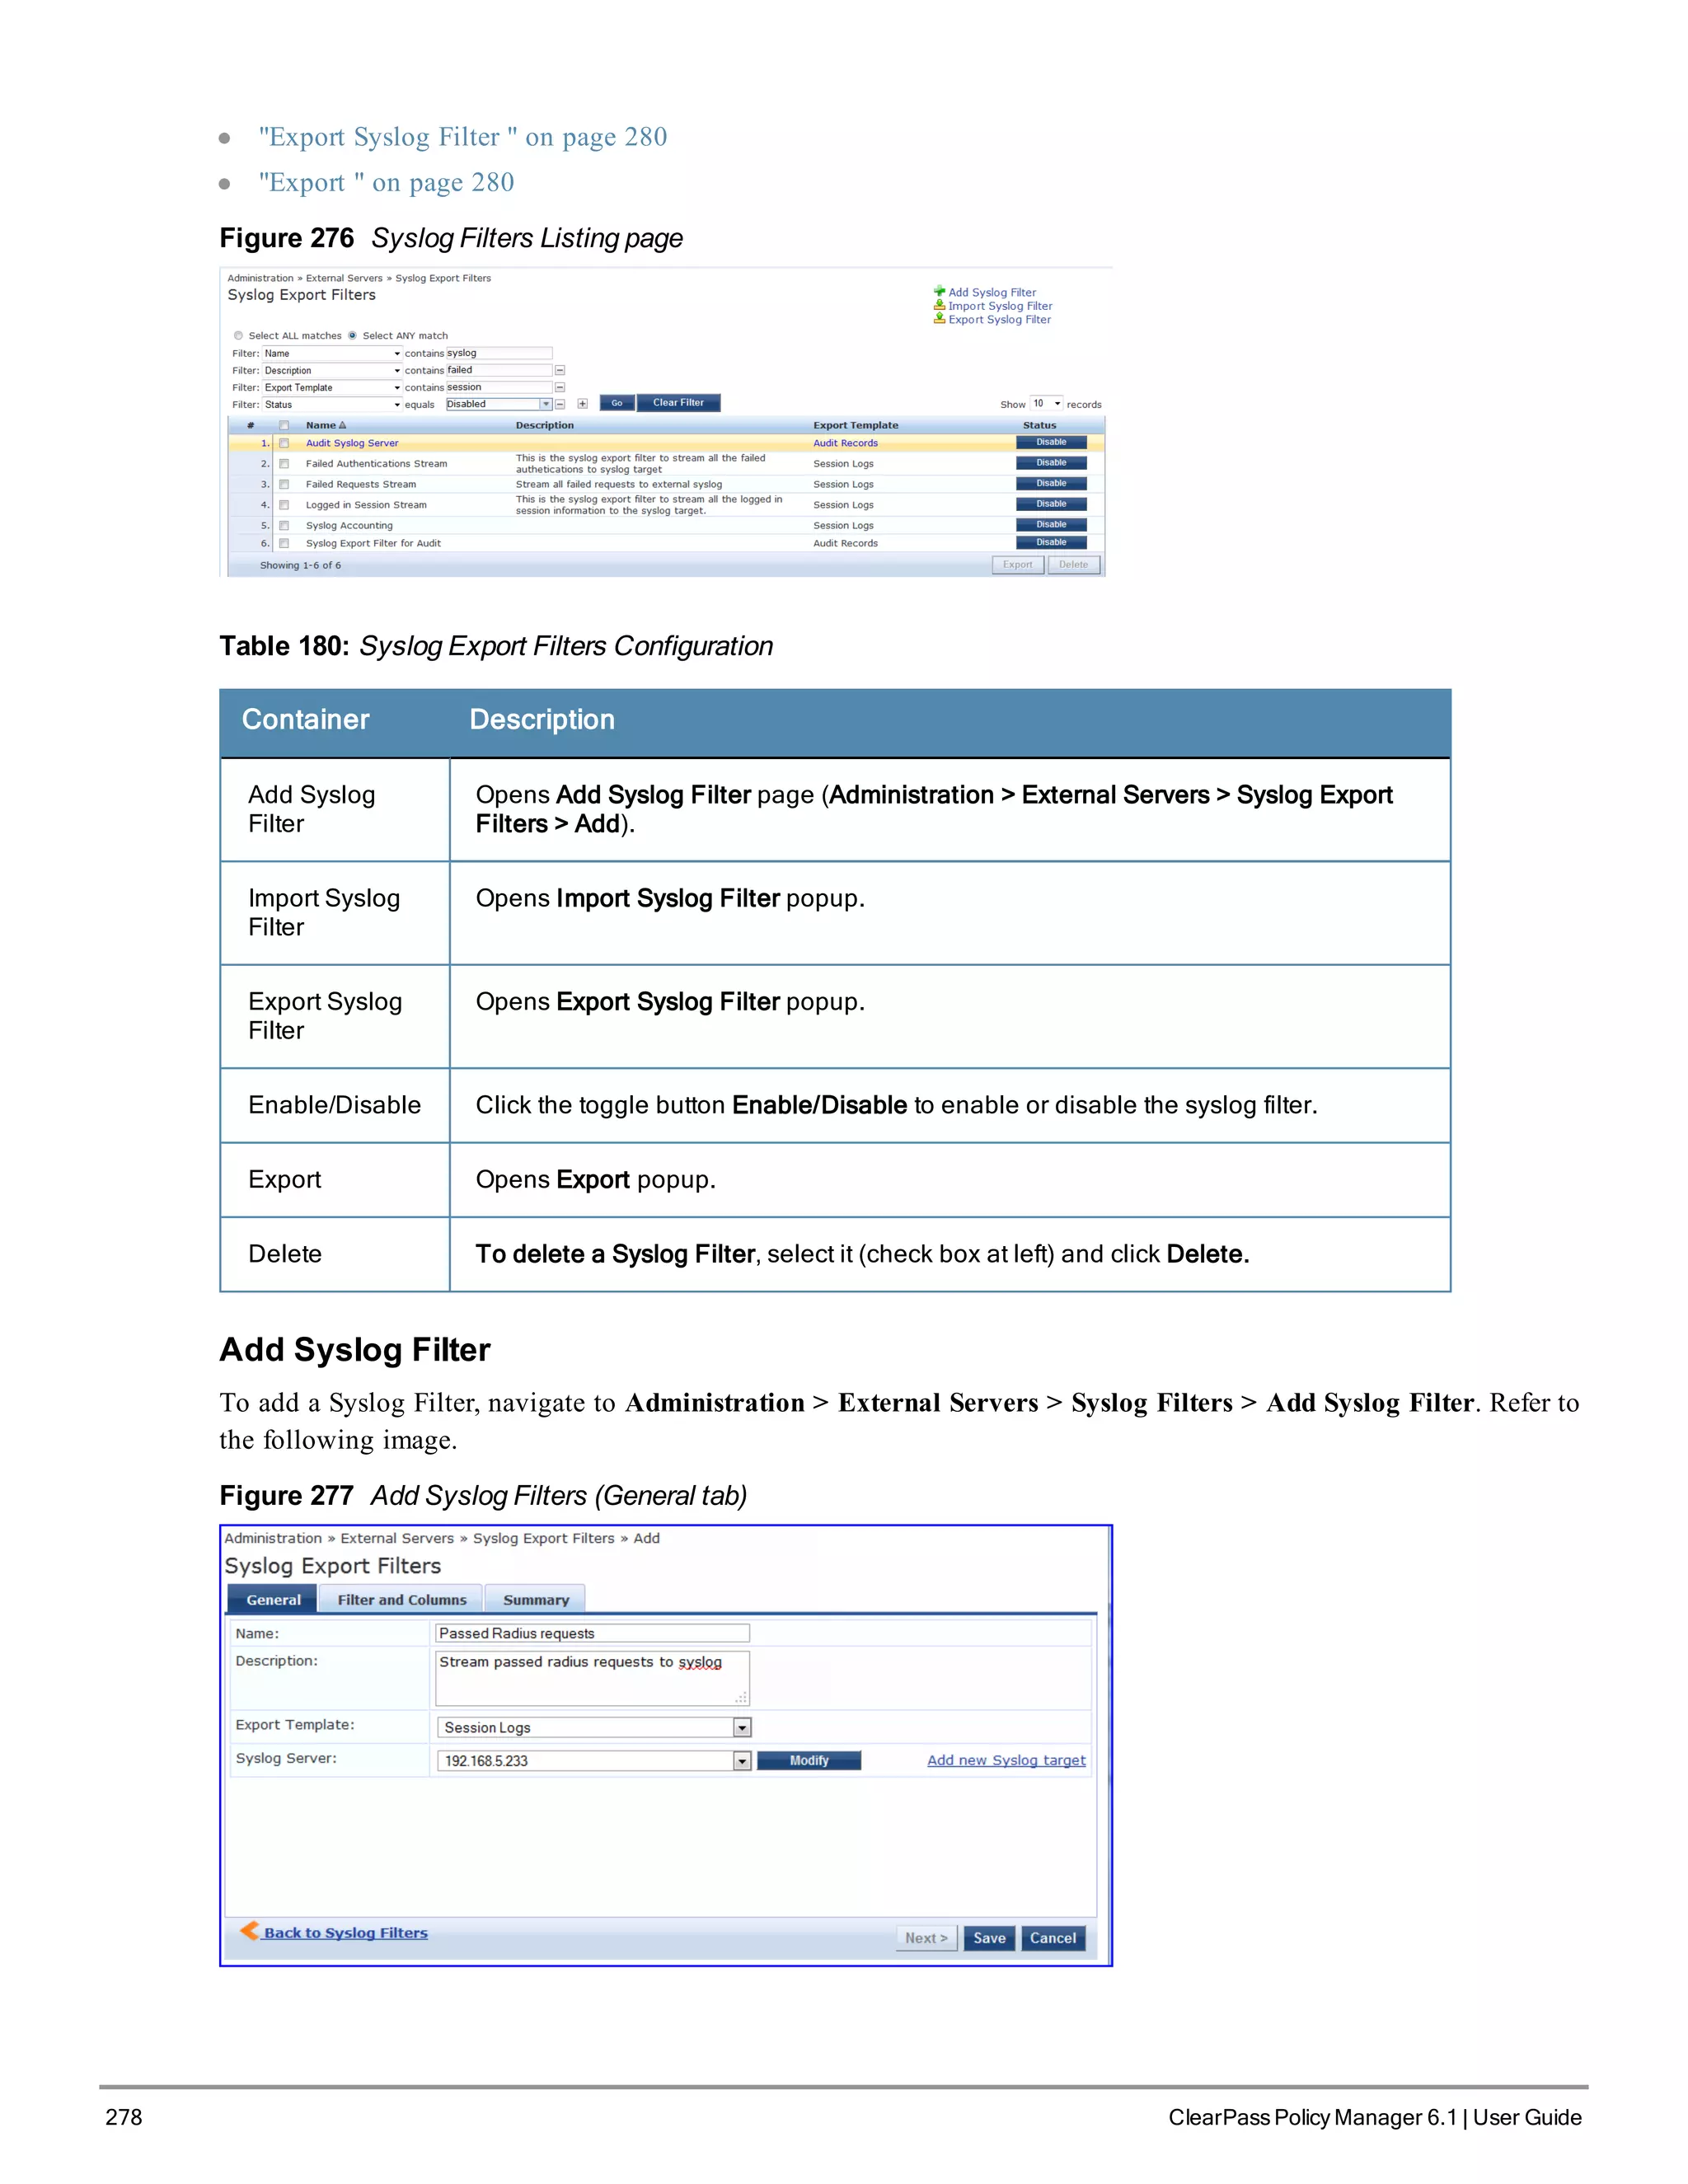
SNMP Trap Receivers
Policy Manager sends SNMP traps that expose the following server information:
l System uptime. Conveys information about how long the system is running
l Network interface statistics [up/down]. Provides information if the network interface is up or down.
l Process monitoring information. Check for the processes that should be running. Maximum and minimum number
of allowed instances. Sends traps if there is a change in value of maximum and minimum numbers.
l Disk usage.Check for disk space usage of a partition. The agent can check the amount of available disk space, and
make sure it is above a set limit. The value can be in % as well. Sends traps if there is a change in the value.
l CPU load information. Check for unreasonable load average values. For example if 1 minute CPU load average
exceeds the configured value [in percentage] then system would send the trap to the configured destination.
l Memory usage. Report the memory usage of the system.
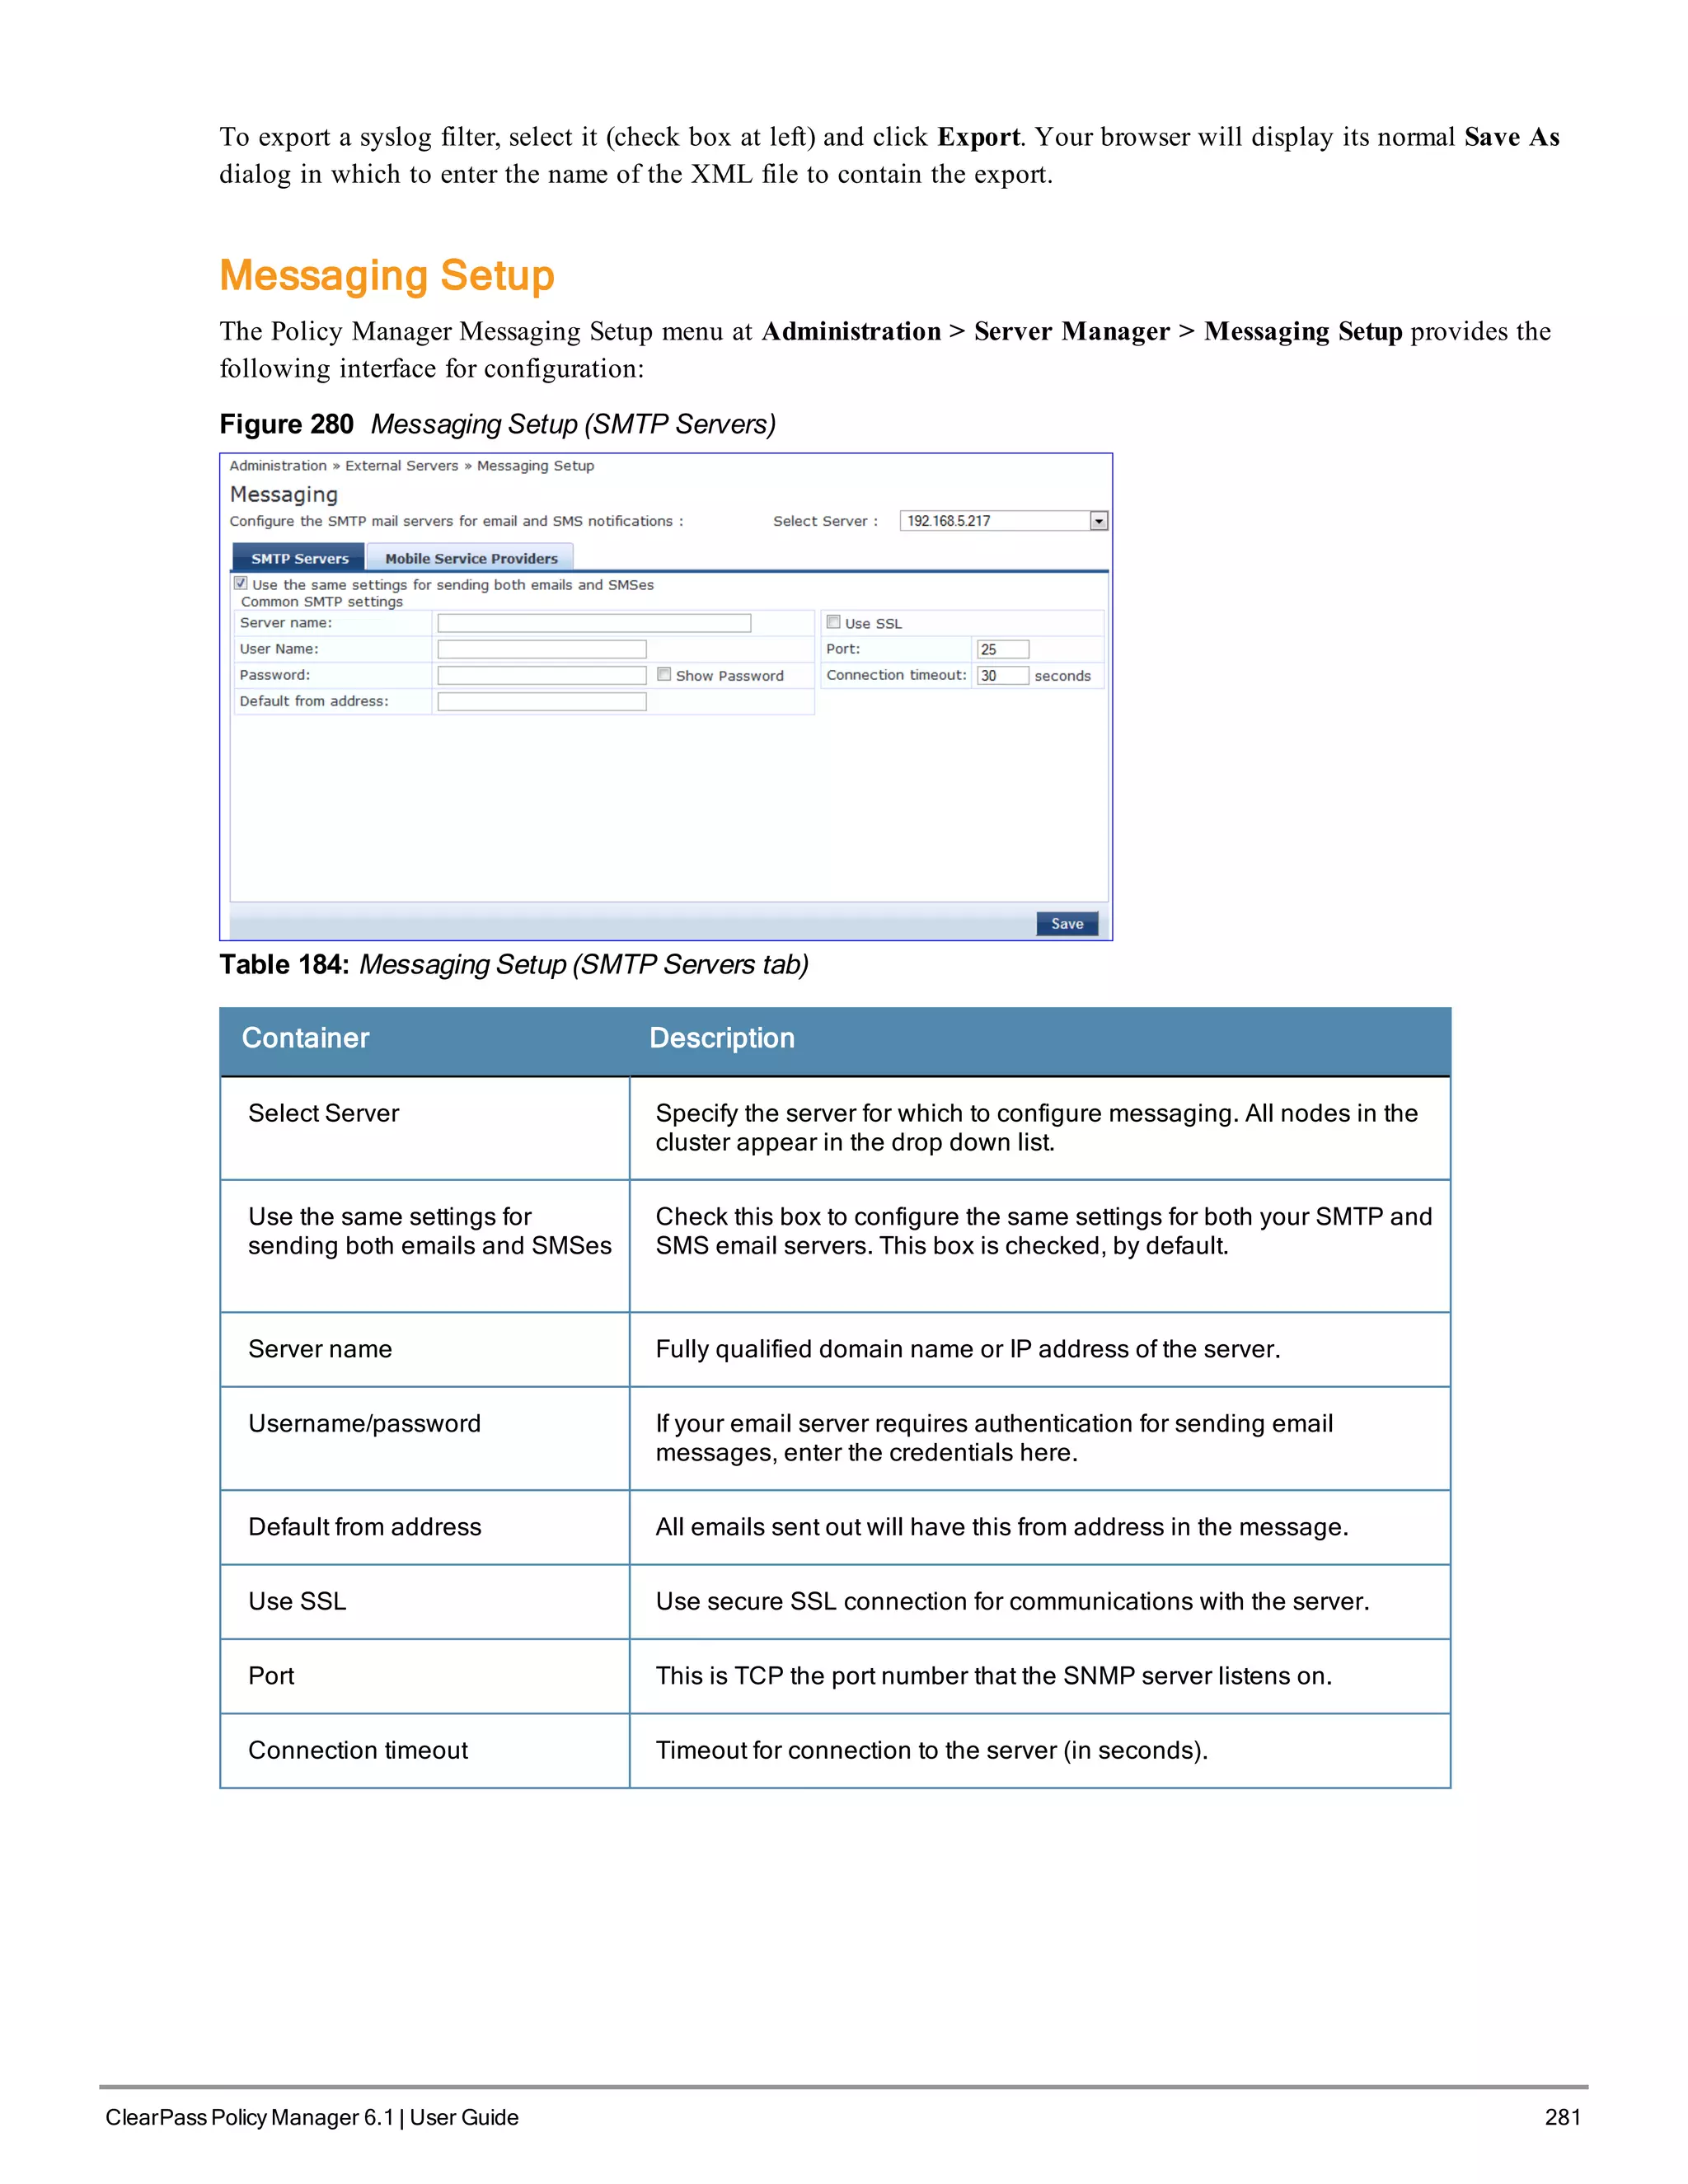
The Policy Manager SNMP Trap Configuration page at Administration > External Servers > SNMP Trap Receivers
provides the following interfaces for configuration:
l "Add SNMP Trap Server " on page 274
l "Import SNMP Trap Server " on page 275
l "Export all SNMP Trap Servers " on page 275
l "Export a Single SNMP Trap Server " on page 275
ClearPass Policy Manager 6.1 | User Guide 273](https://image.slidesharecdn.com/arubacppm61userguide-140926121722-phpapp01/75/Aruba-cppm-6_1_user_guide-273-2048.jpg)

![310 ClearPass Policy Manager 6.1 | User Guide
Syntax
cluster drop-subscriber [-f] [-i <IP Address>] -s
Where:
Flag/Parameter Description
-f Force drop, even for down nodes
-i <IP Address>
Management IP address of the node. If not
specified and the current node is a subscriber,
Policy Manager drops the current node.
-s
Do not reset the database on the dropped node.
By default, Policy Manager drops the current node
(if a subscriber) from the cluster.
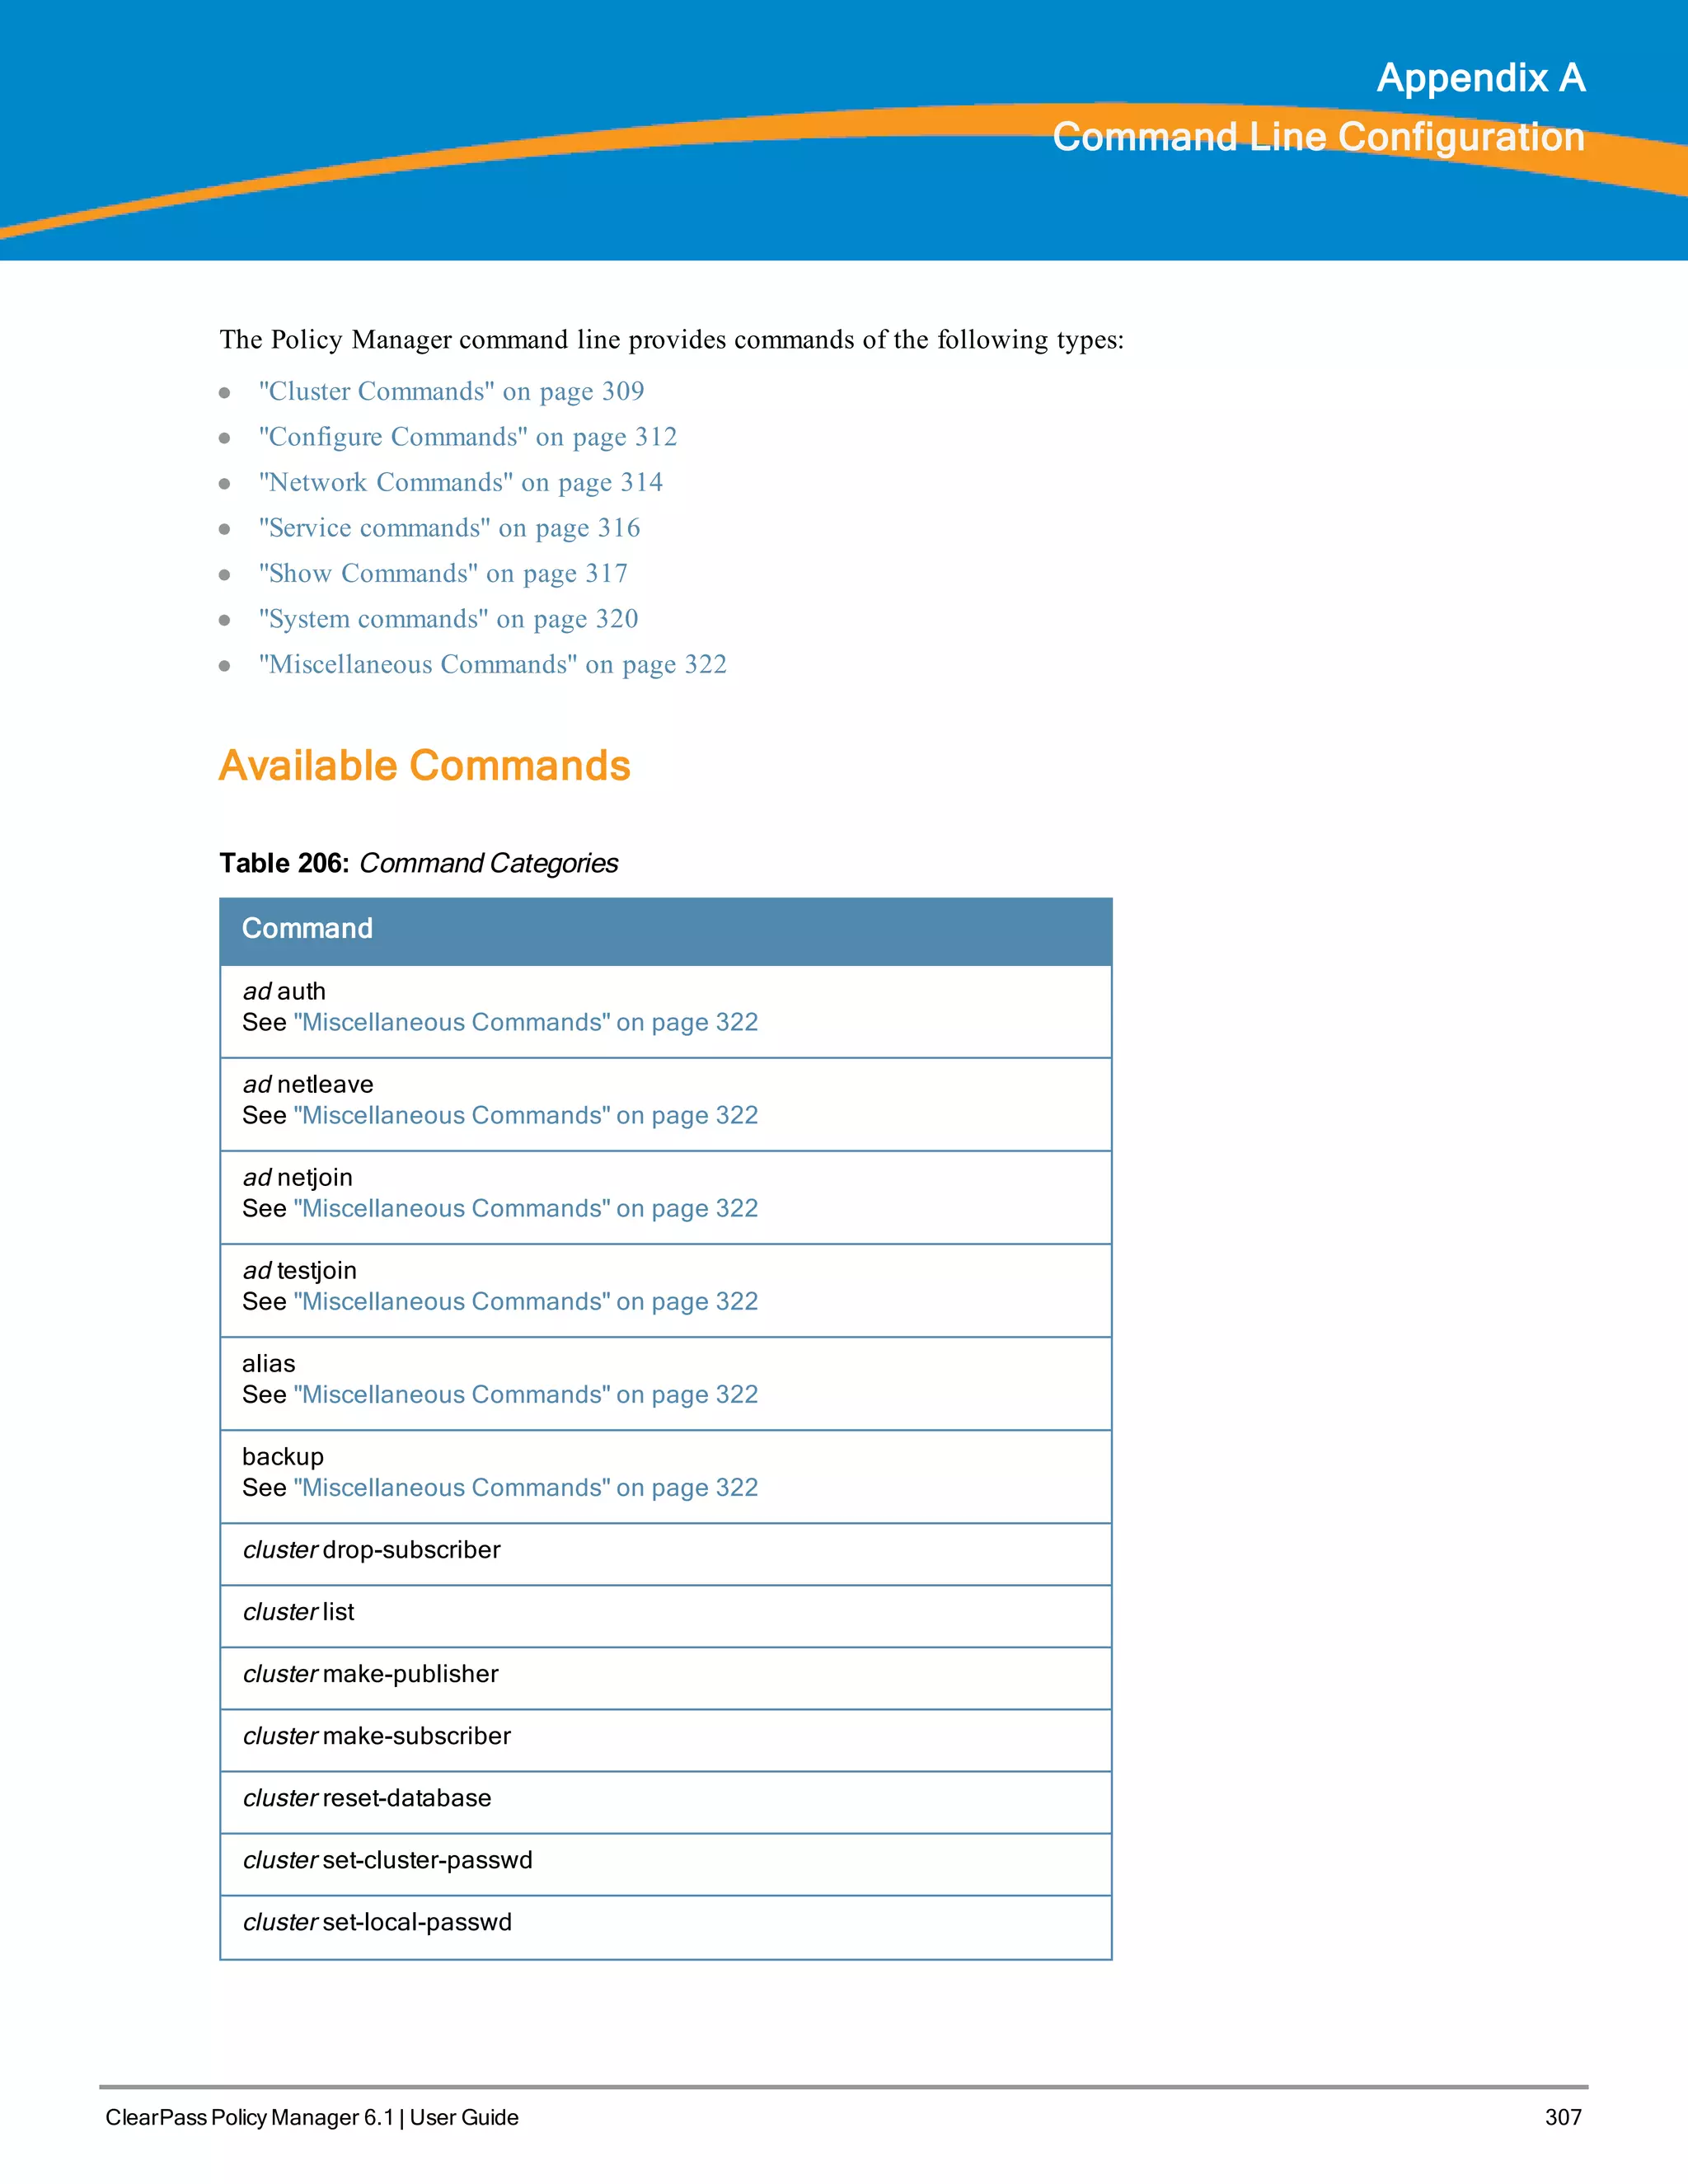
Table 207: Drop-Subscriber Commands
Example
[appadmin]# cluster drop-subscriber -f -i 192.168.1.1 -s
list
Lists the cluster nodes.
Syntax
cluster list
Example
[appadmin]# cluster list
cluster list
Publisher :
Management port IP=192.168.5.227
Data port IP=None [local machine]
make-publisher
Makes this node a publisher.
Syntax
cluster make-publisher
Example
[appadmin]# cluster make-publisher
********************************************************
* WARNING: Executing this command will promote the *
* current machine (which must be a subscriber in the *
* cluster) to the cluster publisher. Do not close the *
* shell or interrupt this command execution. *
********************************************************
Continue? [y|Y]: y
make-subscriber
Makes this node a subscriber to the specified publisher node.
Syntax
make-subscriber -i <IP Address> [-l]](https://image.slidesharecdn.com/arubacppm61userguide-140926121722-phpapp01/75/Aruba-cppm-6_1_user_guide-310-2048.jpg)
![Where:
Flag/Parameter Description
-i <IP Address>
Required.
Publisher IP address.
-l
Optional.
Restore the local log database after this
operation.
Table 208: Make-Subscriber Commands
Example
[appadmin]# cluster make-subscriber –i 192.168.1.1 –p !alore -l
reset-database
Resets the local database and erases its configuration.
Syntax
cluster reset-database
Returns
[appadmin]# cluster reset-database
**********************************************************
* WARNING: Running this command will erase the Policy Manager *
* configuration and leave the database with default *
* configuration. You will lose all the configured data. *
* Do not close the shell or interrupt this command *
* execution. *
*********************************************************
Continue? [y|Y]: y
set-cluster-passwd
Changes the cluster password on all publisher nodes. Executed on the publisher; prompts for the new cluster password.
Syntax
cluster set-cluster-passwd
Returns
[appadmin]# cluster set-cluster-passwd
cluster set-cluster-passwd
Enter Cluster Passwd: santaclara
Re-enter Cluster Passwd: santaclara
INFO - Password changed on local (publisher) node
Cluster password changed
set-local-passwd
Changes the local password. Executed locally; prompts for the new local password.
Syntax
cluster sync-local-password
Returns
[appadmin]# cluster set-local-password
ClearPass Policy Manager 6.1 | User Guide 311](https://image.slidesharecdn.com/arubacppm61userguide-140926121722-phpapp01/75/Aruba-cppm-6_1_user_guide-311-2048.jpg)
![312 ClearPass Policy Manager 6.1 | User Guide
cluster sync-local-passwd
Enter Password: !alore
Re-enter Password: !alore
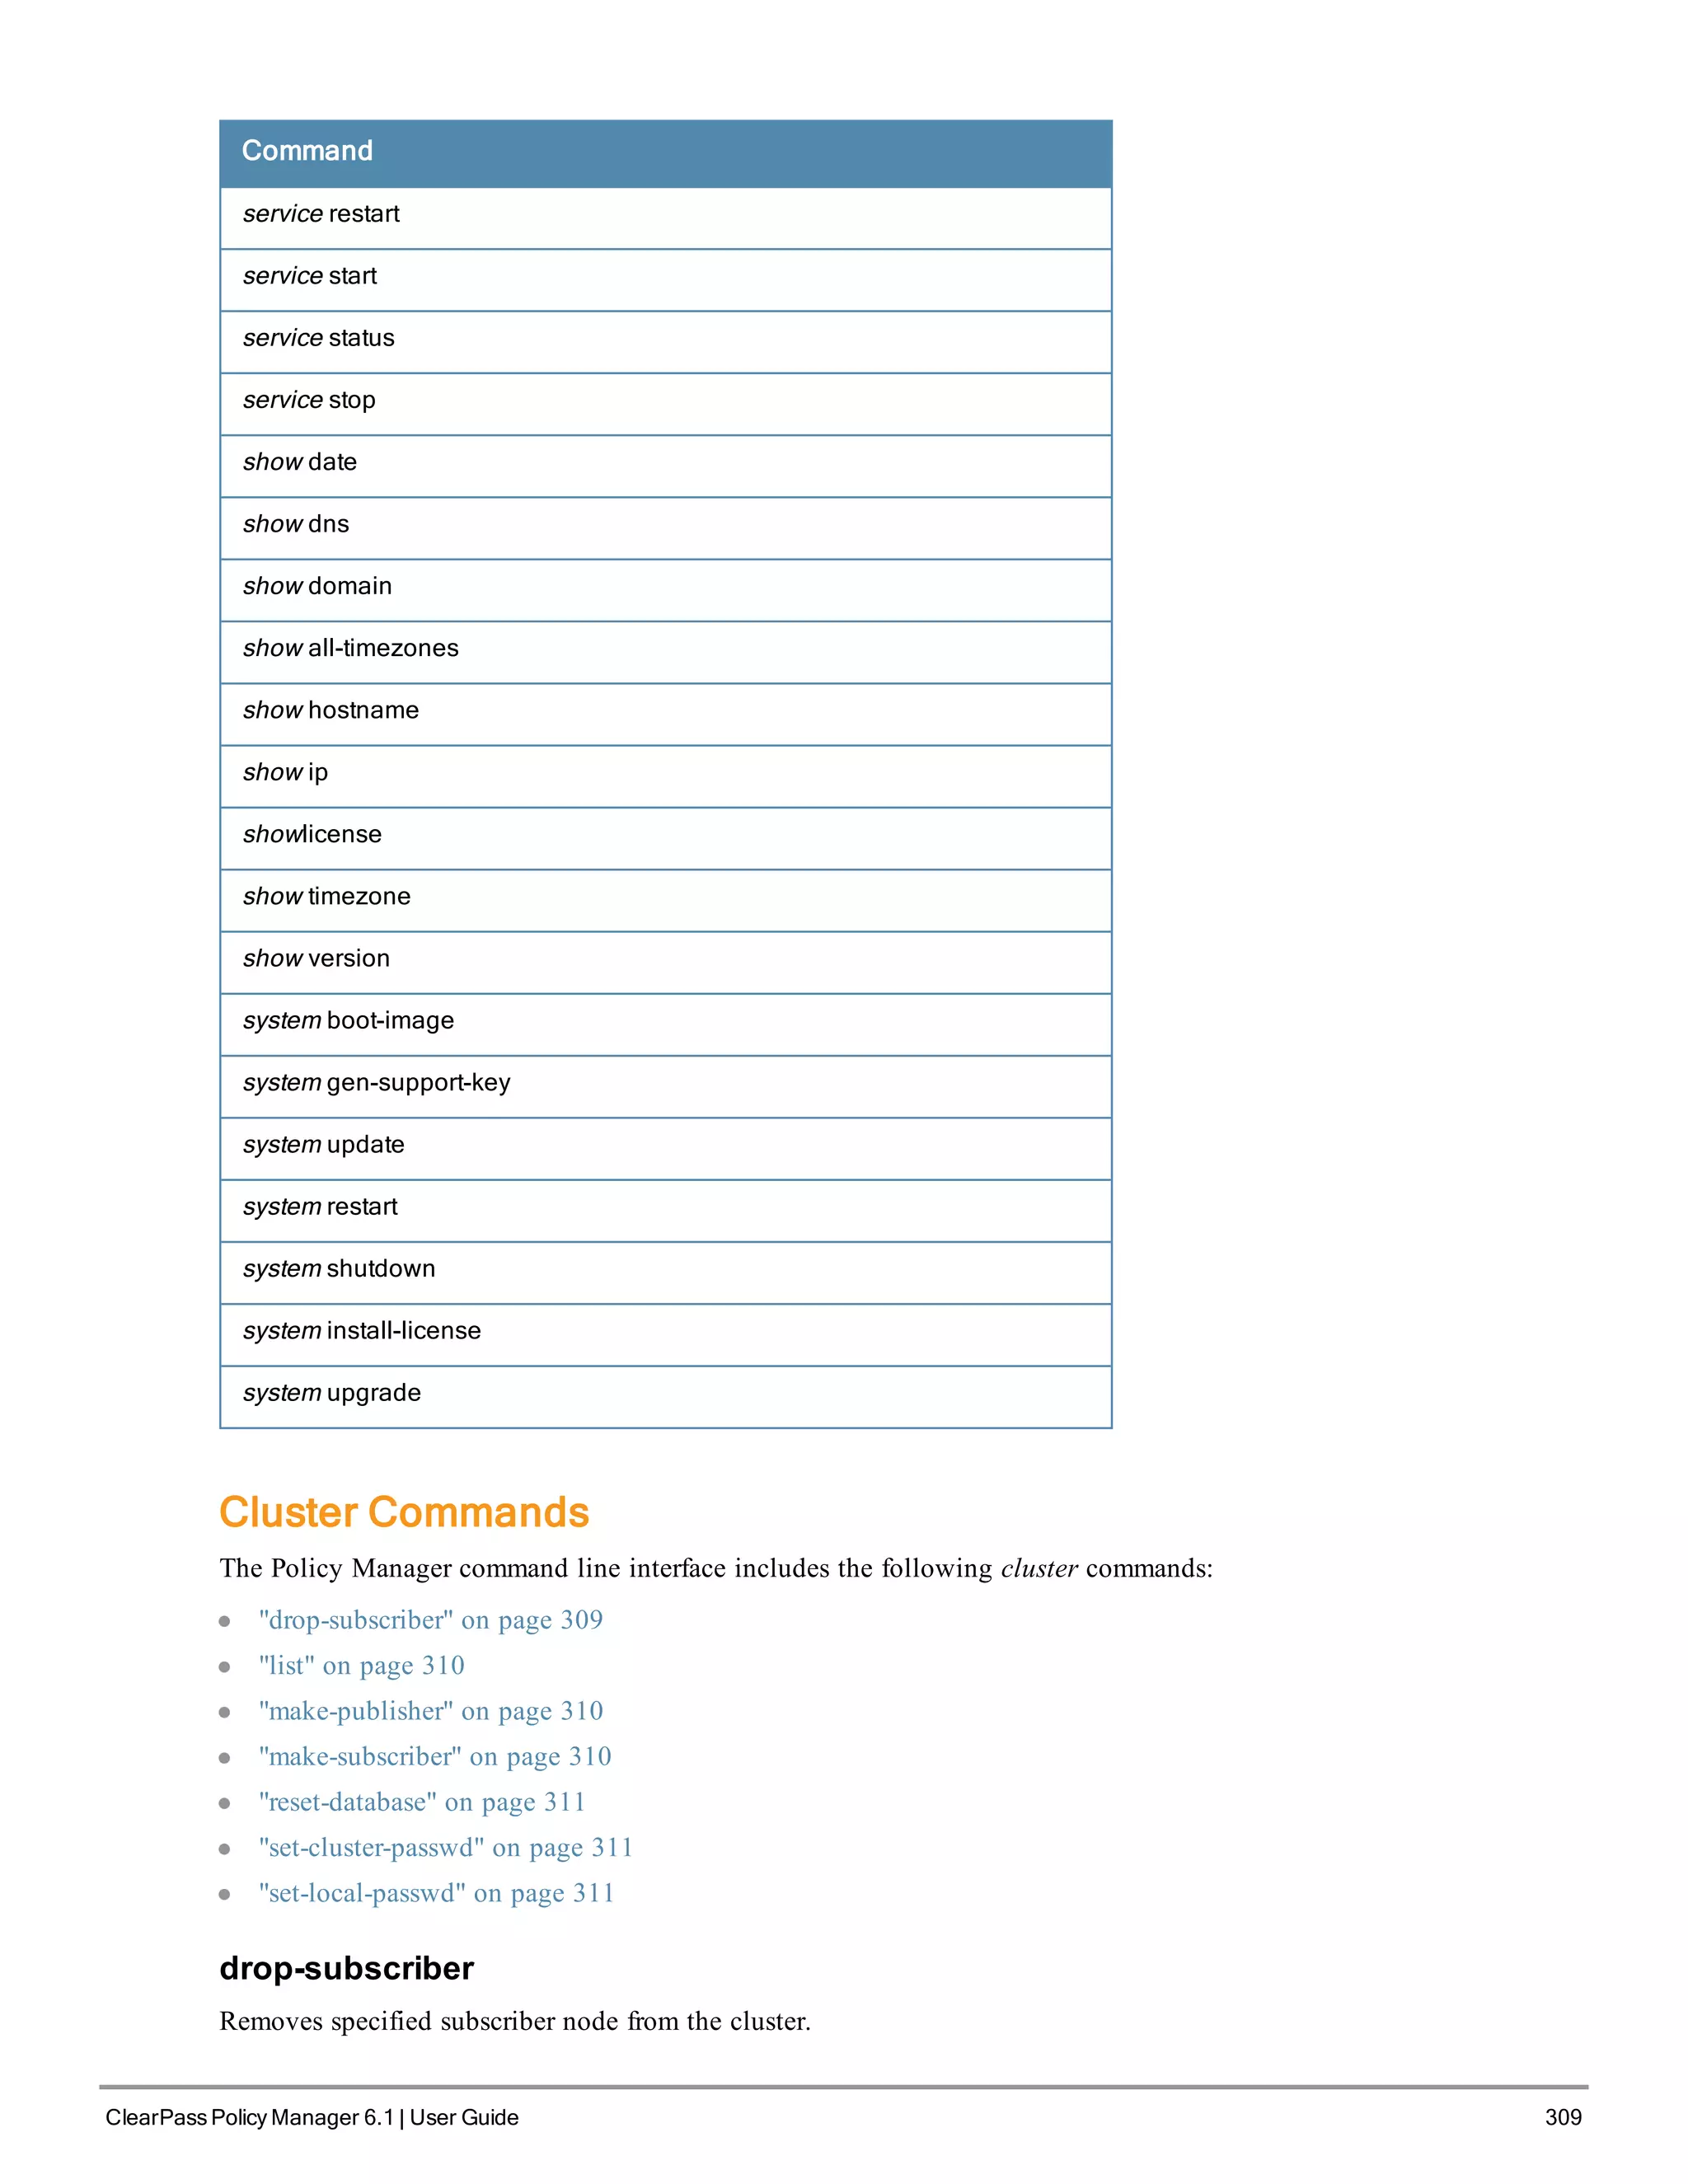
Configure Commands
The Policy Manager command line interface includes the following configuration commands:
l "date" on page 312
l "dns" on page 312
l "hostname" on page 313
l "ip" on page 313
l "timezone" on page 313
date
Sets System Date, Time and Time Zone.
Syntax
configure date -d <date> [-t <time> ] [-z <timezone>]
or
configure date -s <ntpserver> [-z <timezone>]
Where:
Flag/Parameter Description
-s <ntpserver>
Optional.
Synchronize time with specified NTP server.
-d <date>
Required.
Syntax: yyyy-mm-dd
-t <time>
Optional.
Syntax: hh:mm:ss
-z <timezone>
Optional.
Syntax: To view the list of supported timezone
values, enter: show all-timezones.
Table 209: Date Commands
Example 1
Specify date/time/timezone:
[appadmin]# configure date –d 2007-06-22 –t 12:00:31 –z America/Los_Angeles
Example 2
Synchronize with a specified NTP server:
[appadmin]# -s <ntpserver>
dns
Configure DNS servers. At least one DNS server must be specified; a maximum of three DNS servers can be specified.](https://image.slidesharecdn.com/arubacppm61userguide-140926121722-phpapp01/75/Aruba-cppm-6_1_user_guide-312-2048.jpg)
![Syntax
configure dns <primary> [secondary] [tertiary]
Example 1
[appadmin]# configure dns 192.168.1.1
Example 2
[appadmin]# configure dns 192.168.1.1 192.168.1.2
Example 3
[appadmin]# configure dns 192.168.1.1 192.168.1.2 192.168.1.3
hostname
Configures the hostname.
Syntax
configure hostname <hostname>
Example
[appadmin]# configure hostname sun.us.arubanetworks.com
ip
Configures IP address, netmask and gateway.
Syntax
[appadmin]# configure ip <mgmt|data> <ipaddress> netmask <netmask address> gateway <gateway ad
dress>
Where:
Flag/Parameter Description
ip <mgmt|data> <ip
address>
Network interface type: mgmt or data
l Server ip address.
netmask <netmask
address>
Netmask address.
gateway <gateway
address>
Gateway address.
Table 210: IP Commands
Example
[appadmin]# configure ip data 192.168.5.12 netmask 255.255.255.0 gateway 192.168.5.1
timezone
Configures time zone interactively.
Syntax
configure timezone
Example
[appadmin]# configure timezone
ClearPass Policy Manager 6.1 | User Guide 313](https://image.slidesharecdn.com/arubacppm61userguide-140926121722-phpapp01/75/Aruba-cppm-6_1_user_guide-313-2048.jpg)
![314 ClearPass Policy Manager 6.1 | User Guide
configure timezone
*********************************************************
* WARNING: When the command is completed Policy Manager services *
* are restarted to reflect the changes. *
*********************************************************
Continue? [y|Y]: y
Network Commands
The Policy Manager command line interface includes the following network commands:
l "ip" on page 314
l "nslookup" on page 315
l "ping" on page 315
l "reset" on page 316
l "traceroute" on page 316
ip
Add, delete or list custom routes to the data or management interface routing table.
Syntax
network ip add <mgmt|data> [-i <id>] <[-s <SrcAddr>] [-d <DestAddr>]>
Add a custom routing rule. Where:
Flag/Parameter Description
<mgmt|data> Specify management or data interface
-i <id>
id of the network ip rule. If unspecified, the system will auto-generate an id. Note
that the id determines the priority in the ordered list of rules in the routing table.
-s <SrcAddr>
Optional. Specifies the ip address or network (for example, 192.168.5.0/24) or 0/0
(for all traffic) of traffic originator. Only one of SrcAddr or DstAddr must be
specified.
-d <DestAddr>
Optional. Specifies the destination ip address or network (for example,
192.168.5.0/24) or 0/0 (for all traffic). Only one of SrcAddr or DstAddr must be
specified.
Table 211: Network IP Add Commands
Syntax
network ip del <-i <id>>
Delete a rule. Where:
Flag/Parameter Description
-i <id> Id of the rule to delete.
Table 212: Network IP Delete Commands
Syntax
network ip list](https://image.slidesharecdn.com/arubacppm61userguide-140926121722-phpapp01/75/Aruba-cppm-6_1_user_guide-314-2048.jpg)
![List all routing rules.
Syntax
network ip reset
Reset routing table to factory default setting. All custom routes are removed.
Example 1
[appadmin]# network ip add data -s 192.168.5.0/24
Example 2
[appadmin]# network ip add data -s 192.168.5.12
Example 3
[appadmin]# network ip list
nslookup
Returns IP address of host using DNS.
Syntax
nslookup -q <record-type> <host>
Where:
Flag/Parameter Description
<record-type>
Type of DNS record. For example, A, CNAME,
PTR
<host> Host or domain name to be queried.
Table 213: Nslookup Commands
Example 1
[appadmin]# nslookup sun.us.arubanetworks.com
Example 2
[appadmin]# nslookup -q SRV arubanetworks.com
ping
Tests reachability of the network host.
Syntax
network ping [-i <SrcIpAddr>] [-t] <host>
Where:
Flag/Parameter Description
-i <SrcIpAddr>
Optional.
Originating IP address for ping.
-t Optional.
Table 214: Ping Commands
ClearPass Policy Manager 6.1 | User Guide 315](https://image.slidesharecdn.com/arubacppm61userguide-140926121722-phpapp01/75/Aruba-cppm-6_1_user_guide-315-2048.jpg)
![316 ClearPass Policy Manager 6.1 | User Guide
Flag/Parameter Description
Ping indefinitely.
<host> Host to be pinged.
Example
[appadmin]# network ping –i 192.168.5.10 –t sun.us.arubanetworks.com
reset
Reset network data port.
Syntax
network reset <port>
Where:
Flag/Parameter Description
<port>
Required.
Name of network port to reset.
Table 215: Reset Commands
Example
[appadmin]# network reset data
traceroute
Prints route taken to reach network host.
Syntax
network traceroute <host>
Where:
Flag/Parameter Description
<host> Name of network host.
Table 216: Traceroute Commands
Example
[appadmin]# network traceroute sun.us.arubanetworks.com
Service commands
The Policy Manager command line interface includes the following service commands:
l start
l stop
l status
l restart
l activate](https://image.slidesharecdn.com/arubacppm61userguide-140926121722-phpapp01/75/Aruba-cppm-6_1_user_guide-316-2048.jpg)
![l deactivate
l list
These commands in this section have identical syntax; therefore, this section presents them as variations on <action>.
<action>
Activates the specified Policy Manager service.
Syntax
service <action> <service-name>
Where:
Flag/Parameter Description
action
Choose an action: activate, deactivate, list, restart,
start, status, or stop.
service-name
Choose a service: tips-policy-server, tips-admin-
server, tips-system-auxiliary-server, tips-radius-
server, tips-tacacs-server, tips-dbwrite-server,
tips-repl-server, or tips-sysmon-server.
Table 217: Action Commands
Example 1
[appadmin]# service activate tips-policy-server
Example 2
[appadmin]# service list all
service list
Policy server [ tips-policy-server ]
Admin UI service [ tips-admin-server ]
System auxiliary services [ tips-system-auxiliary-server ]
Radius server [ tips-radius-server ]
Tacacs server [ tips-tacacs-server ]
Async DB write service [ tips-dbwrite-server ]
DB replication service [ tips-repl-server ]
System monitor service [ tips-sysmon-server ]
Example 3
[appadmin]# service status tips-domain-server
Show Commands
The Policy Manager command line interface includes the following show commands:
l "all-timezones" on page 318
l "date" on page 318
l "dns" on page 318
l "domain" on page 318
l "hostname" on page 319
l "ip" on page 319
l "license" on page 319
l "timezone" on page 319
ClearPass Policy Manager 6.1 | User Guide 317](https://image.slidesharecdn.com/arubacppm61userguide-140926121722-phpapp01/75/Aruba-cppm-6_1_user_guide-317-2048.jpg)
![318 ClearPass Policy Manager 6.1 | User Guide
l "version" on page 320
all-timezones
Interactively displays all available timezones
Syntax
show all-timezones
Example
[appadmin]# show all-timezones
Africa/Abidjan
Africa/Accra
.....
WET
Zulu
date
Displays System Date, Time, and Time Zone information.
Syntax
show date
Example
[appadmin]# show date
Wed Oct 31 14:33:39 UTC 2012
dns
Displays DNS servers.
Syntax
show dns
Example
[appadmin]# show dns
show dns
===========================================
DNS Information
-------------------------------------------
Primary DNS : 192.168.5.3
Secondary DNS : <not configured>
Tertiary DNS : <not configured>
===========================================
domain
Displays Domain Name, IP Address, and Name Server information.
Syntax
show domain
Example
[appadmin]# show domain](https://image.slidesharecdn.com/arubacppm61userguide-140926121722-phpapp01/75/Aruba-cppm-6_1_user_guide-318-2048.jpg)
![hostname
Displays hostname.
Syntax
show hostname
Example
[appadmin]# show hostname
show hostname
wolf
ip
Displays IP and DNS information for the host.
Syntax
show ip
Example
[appadmin]# show ip
show ip
===========================================
Device Type : Management Port
-------------------------------------------
IP Address : 192.168.5.227
Subnet Mask : 255.255.255.0
Gateway : 192.168.5.1
===========================================
Device Type : Data Port
-------------------------------------------
IP Address : <not configured>
Subnet Mask : <not configured>
Gateway : <not configured>
===========================================
DNS Information
-------------------------------------------
Primary DNS : 192.168.5.3
Secondary DNS : <not configured>
Tertiary DNS : <not configured>
===========================================
license
Displays the license key.
Syntax
show license
Example
[appadmin]# show license
show license
timezone
Displays current system timezone.
Syntax
show timezone
ClearPass Policy Manager 6.1 | User Guide 319](https://image.slidesharecdn.com/arubacppm61userguide-140926121722-phpapp01/75/Aruba-cppm-6_1_user_guide-319-2048.jpg)
![320 ClearPass Policy Manager 6.1 | User Guide
Example
[appadmin]# show timezone
show timezone
version
Displays Policy Manager software version hardware model.
Syntax
show version
Example
[appadmin]# show version
=======================================
Policy Manager software version : 2.0(1).6649
Policy Manager model number : ET-5010
=======================================
System commands
The Policy Manager command line interface includes the following system commands:
l "boot-image" on page 320
l "gen-support-key" on page 320
l "install-license" on page 321
l "restart" on page 321
l "shutdown" on page 321
l "update" on page 322
l "upgrade" on page 322
boot-image
Sets system boot image control options.
Syntax
system boot-image [-l] [-a <version>]
Where:
Flag/Parameter Description
-l
Optional.
List boot images installed on the system.
-a <version>
Optional.
Set active boot image version, in A.B.C.D syntax.
Table 218: Boot-Image Commands
Example
[appadmin]# system boot-image
gen-support-key
Generates the support key for the system.](https://image.slidesharecdn.com/arubacppm61userguide-140926121722-phpapp01/75/Aruba-cppm-6_1_user_guide-320-2048.jpg)
![Syntax
system gen-support-key
Example
[appadmin]# system gen-support-key
system gen-support-key
Support key='01U2FsdGVkX1+/WS9jZKQajERyzXhM8mF6zAKrzxrHvaM='
install-license
Replace the current license key with a new one.
Syntax
system install-license <license-key>
Where:
Flag/Parameter Description
<license-key>
Mandatory.
This is the newly issued license key.
Table 219: Install-License Commands
Example
[appadmin]# system install-license
restart
Restart the system
Syntax
system restart
Example
[appadmin]# system restart
system restart
*********************************************************
* WARNING: This command will shutdown all applications *
* and reboot the system *
********************************************************
Are you sure you want to continue? [y|Y]: y
shutdown
Shutdown the system
Syntax
system shutdown
Example
[appadmin]# system shutdown
********************************************************
* WARNING: This command will shutdown all applications *
* and power off the system *
********************************************************
Are you sure you want to continue? [y|Y]: y
ClearPass Policy Manager 6.1 | User Guide 321](https://image.slidesharecdn.com/arubacppm61userguide-140926121722-phpapp01/75/Aruba-cppm-6_1_user_guide-321-2048.jpg)
![322 ClearPass Policy Manager 6.1 | User Guide
update
Manages updates.
Syntax
system update [-i user@hostname:/<filename> | http://hostname/<filename>]
system update [-u <patch-name>]
system update [-l]
Where:
Flag/Parameter Description
-i
user@hostname:/<filenam
e> |
http://hostname/<filename>
Optional.
Install the specified patch on the system.
-u <patch-name>
Optional.
Uninstall the patch. (For exact patch names, refer
to [-l] in this table.)
-l
Optional.
List the patches installed on the system.
Table 220: Update Commands
Example
[appadmin]# system update
upgrade
Upgrades the system.
Syntax
system upgrade <filepath>
Where:
Flag/Parameter Description
<filepath>
Required.
Enter filepath, using either syntax provided in the
two examples provided.
Table 221: Upgrade Commands
Example 1
[appadmin]# system upgrade admin@sun.us.arubanetworks.com:/tmp/PolicyManager-x86-64-upgrade-7
1.tgz
Example 2
[appadmin]# system upgrade http://sun.us.arubanetworks.com/downloads/PolicyManager-x86-64-upg
rade-71.tgz
Miscellaneous Commands
The Policy Manager command line interface includes the following miscellaneous commands:](https://image.slidesharecdn.com/arubacppm61userguide-140926121722-phpapp01/75/Aruba-cppm-6_1_user_guide-322-2048.jpg)
![l "ad auth" on page 323
l "ad netjoin" on page 323
l "ad netleave" on page 324
l "ad testjoin" on page 324
l "alias" on page 324
l "backup" on page 324
l "dump certchain" on page 325
l "dump logs" on page 325
l "dump servercert" on page 326
l "exit" on page 326
l "help" on page 326
l "krb auth" on page 327
l "krb list" on page 327
l "ldapsearch" on page 327
l "quit" on page 328
l "restore" on page 328
ad auth
Authenticate the user agains AD.
Syntax
ad auth --username=<username>
Where:
Flag/Parameter Description
<username>
Required.
username of the authenticating user.
Table 222: Ad Auth Commands
Example
[appadmin]# ad auth --username=mike
ad netjoin
Joins host to the domain.
Syntax
ad netjoin <domain-controller.domain-name> [domain NETBIOS name]
Where:
Flag/Parameter Description
<domain-controller.
domain-name>
Required.
Host to be joined to the domain.
[domain NETBIOS name] Optional.
Table 223: Ad Netjoin Commands
ClearPass Policy Manager 6.1 | User Guide 323](https://image.slidesharecdn.com/arubacppm61userguide-140926121722-phpapp01/75/Aruba-cppm-6_1_user_guide-323-2048.jpg)
![324 ClearPass Policy Manager 6.1 | User Guide
Example
[appadmin]# ad netjoin atlas.us.arubanetworks.com
ad netleave
Removes host from the domain.
Syntax
ad netleave
Example
[appadmin]# ad netleave
ad testjoin
Tests if the netjoin command succeeded. Tests if Policy Manager is a member of the AD domain.
Syntax
ad testjoin
Example
[appadmin]# ad testjoin
alias
Creates or removes aliases.
Syntax
alias <name>=<command>
Where:
Flag/Parameter Description
<name>=<command> Sets <name> as the alias for <command>.
<name>= Removes the association.
Table 224: Alias Commands
Example 1
[appadmin]# alias sh=show
Example 2
[appadmin]# alias sh=
backup
Creates backup of Policy Manager configuration data. If no arguments are entered, the system auto-generates a filename
and backups up the configuration to this file.
Syntax
backup [-f <filename>] [-L] [-P]
Where:](https://image.slidesharecdn.com/arubacppm61userguide-140926121722-phpapp01/75/Aruba-cppm-6_1_user_guide-324-2048.jpg)
![Flag/Parameter Description
-f <filename>
Optional. Backup target.
If not specified, Policy Manager will auto-generate
a filename.
-L
Optional. Do not backup the log database
configuration
-P
Optional. Do not backup password fields from the
configuration database
Table 225: Backup Commands
Example
[appadmin]# backup -f PolicyManager-data.tar.gz
Continue? [y|Y]: y
dump certchain
Dumps certificate chain of any SSL secured server.
Syntax
dump certchain <hostname:port-number>
Where:
Flag/Parameter Description
<hostname:port-number> Specifies the hostname and SSL port number.
Table 226: Dump Certchain Commands
Example 1
[appadmin]# dump certchain ldap.acme.com:636
dump certchain
dump logs
Dumps Policy Manager application log files.
Syntax
dump logs -f <output-file-name> [-s yyyy-mm-dd] [-e yyyy-mm-dd] [-n <days>] [-t <log-type>] [-
h]
Where:
Flag/Parameter Description
-f <output-file-name> Specifies target for concatenated logs.
-s yyyy-mm-dd Optional. Date range start (default is today).
-e yyyy-mm-dd Optional. Date range end (default is today).
Table 227: Dump Logs Commands
ClearPass Policy Manager 6.1 | User Guide 325](https://image.slidesharecdn.com/arubacppm61userguide-140926121722-phpapp01/75/Aruba-cppm-6_1_user_guide-325-2048.jpg)
![326 ClearPass Policy Manager 6.1 | User Guide
Flag/Parameter Description
-n <days> Optional. Duration in days (from today).
-t <log-type> Optional. Type of log to collect.
-h Specify (print help) for available log types.
Example 1
[appadmin]# dump logs –f tips-system-logs.tgz -s 2007-10-06 –e 2007-10-17 –t SystemLogs
Example 2
[appadmin]# dump logs -h
dump servercert
Dumps server certificate of SSL secured server.
Syntax
dump servercert <hostname:port-number>
Where:
Flag/Parameter Description
<hostname:port-number> Specifies the hostname and SSL port number.
Table 228: Dump Servercert Commands
Example 1
[appadmin]# dump servercert ldap.acme.com:636
exit
Exits shell.
Syntax
exit
Example
[appadmin]# exit
help
Display the list of supported commands
Syntax
help <command>
Example
[appadmin]# help
help
alias Create aliases
backup Backup Policy Manager data
cluster Policy Manager cluster related commands
configure Configure the system parameters
dump Dump Policy Manager information](https://image.slidesharecdn.com/arubacppm61userguide-140926121722-phpapp01/75/Aruba-cppm-6_1_user_guide-326-2048.jpg)
![exit Exit the shell
help Display the list of supported commands
netjoin Join host to the domain
netleave Remove host from the domain
network Network troubleshooting commands
quit Exit the shell
restore Restore Policy Manager database
service Control Policy Manager services
show Show configuration details
system System commands
krb auth
Does a kerberos authentication against a kerberos server (such as Microsoft AD)
Syntax
krb auth <user@domain>
Where:
Flag/Parameter Description
<user@domain> Specifies the username and domain.
Table 229: Kerberos Authentication Commands
Example
[appadmin]# krb auth mike@corp-ad.acme.com
krb list
Lists the cached kerberos tickets
Syntax
krb list
Example
[appadmin]# krb list
ldapsearch
The Linux ldapsearch command to find objects in an LDAP directory. (Note that only the Policy Manager-specific
command line arguments are listed below. For other command line arguments, refer to ldapsearch man pages on the
Internet).
Syntax
ldapsearch -B <user@hostname>
Where:
Flag/Parameter Description
<user@hostname>
Specifies the username and the full qualified
domain name of the host. The -B command finds
the bind DN of the LDAP directory.
Table 230: LDAP Search commands
ClearPass Policy Manager 6.1 | User Guide 327](https://image.slidesharecdn.com/arubacppm61userguide-140926121722-phpapp01/75/Aruba-cppm-6_1_user_guide-327-2048.jpg)
![328 ClearPass Policy Manager 6.1 | User Guide
Example
[appadmin]# ldapsearch -B admin@corp-ad.acme.com
restore
Restores Policy Manager configuration data from the backup file
Syntax
restore user@hostname:/<backup-filename> [-l] [-i] [-c|-C] [-p] [-s]
Where:
Flag/Parameter Description
user@hostname:/<backup-
filename>
Specify filepath of restore source.
-c Restore configuration database (default).
-C Do not restore configuration database.
-l
Optional. If it exists in the backup, restore log
database.
-i
Optional. Ignore version mismatch errors and
proceed.
-p
Optional. Force restore from a backup file that
does not have password fields present.
-s
Optional. Restore cluster server/node entries from
the backup. (Node entries disabled on restore.)
Table 231: Restore Commands
Example
[appadmin]# restore user@hostname:/tmp/tips-backup.tgz -l -i -c -s
quit
Exits shell.
Syntax
quit
Example
[appadmin]# quit](https://image.slidesharecdn.com/arubacppm61userguide-140926121722-phpapp01/75/Aruba-cppm-6_1_user_guide-328-2048.jpg)
![Operator Description
E.g., RADIUS:IETF:Service-Type BELONGS_TO Login-User,Framed-
User,Authenticate-Only
For integer data type, true if the run-time value of the attribute matches a set of configured
integer values.
E.g., RADIUS:IETF:NAS-Port BELONGS_TO 1,2,3
For day data type, true if run-time value of the attribute matches a set of configured days of
the week.
E.g., Date:Day-of-Week BELONGS_TO MONDAY,TUESDAY,WEDNESDAY
When Policy Manager is aware of the values that can be assigned to BELONGS_TO
operator, it populates the value field with those values in a multi-select list box; you can
select the appropriate values from the presented list. Otherwise, you must enter a comma
separated list of values.
EQUALS_
IGNORE_
CASE
For string data type, true if the run-time value of the attribute matches the configured value,
regardless of whether the string is upper case or lower case.
E.g., RADIUS:IETF:NAS-Identifier EQUALS_IGNORE_CASE "sj-vpn-device"
MATCHES_
REGEX
For string data type, true if the run-time value of the attribute matches the regular
expression in the configured value.
E.g., RADIUS:IETF:NAS-Identifier MATCHES_REGEX sj-device[1-9]-dev*
EXISTS For string data type, true if the run-time value of the attribute exists. This is a unary
operator.
E.g., RADIUS:IETF:NAS-Identifier EXISTS
GREATER_
THAN
For integer, time and date data types, true if the run-time value of the attribute is greater
than the configured value.
E.g., RADIUS:IETF:NAS-Port GREATER_THAN 10
GREATER_
THAN_OR_
EQUALS
For integer, time and date data types, true if the run-time value of the attribute is greater
than or equal to the configured value.
E.g., RADIUS:IETF:NAS-Port GREATER_THAN_OR_EQUALS 10
LESS_
THAN
For integer, time and date data types, true if the run-time value of the attribute is less than
the configured value.
E.g., RADIUS:IETF:NAS-Port LESS_THAN 10
LESS_
THAN_OR_
EQUALS
For integer, time and date data types, true if the run-time value of the attribute is less than
or equal to the configured value.
E.g., RADIUS:IETF:NAS-Port LESS_THAN_OR_EQUALS 10
IN_RANGE For time and date data types, true if the run-time value of the attribute is less than or equal
to the first configured value and less than equal to the second configured value.
E.g., Date:Date-of-Year IN_RANGE 2007-06-06,2007-06-12
MATCHES_
ANY
For list data types, true if any of the run-time values in the list matches one of the
configured values.
E.g., Tips:Role MATCHES_ANY HR,ENG,FINANCE
MATCHES_
ALL
For list data types, true if all of the run-time values in the list are found in the configured
values.
E.g., Tips:Role MATCHES_ALL HR,ENG,FINANCE. In this example, if the run-time values
of Tips:Role are HR,ENG,FINANCE,MGR,ACCT the condition evaluates to true.
ClearPass Policy Manager 6.1 | User Guide 337](https://image.slidesharecdn.com/arubacppm61userguide-140926121722-phpapp01/75/Aruba-cppm-6_1_user_guide-337-2048.jpg)
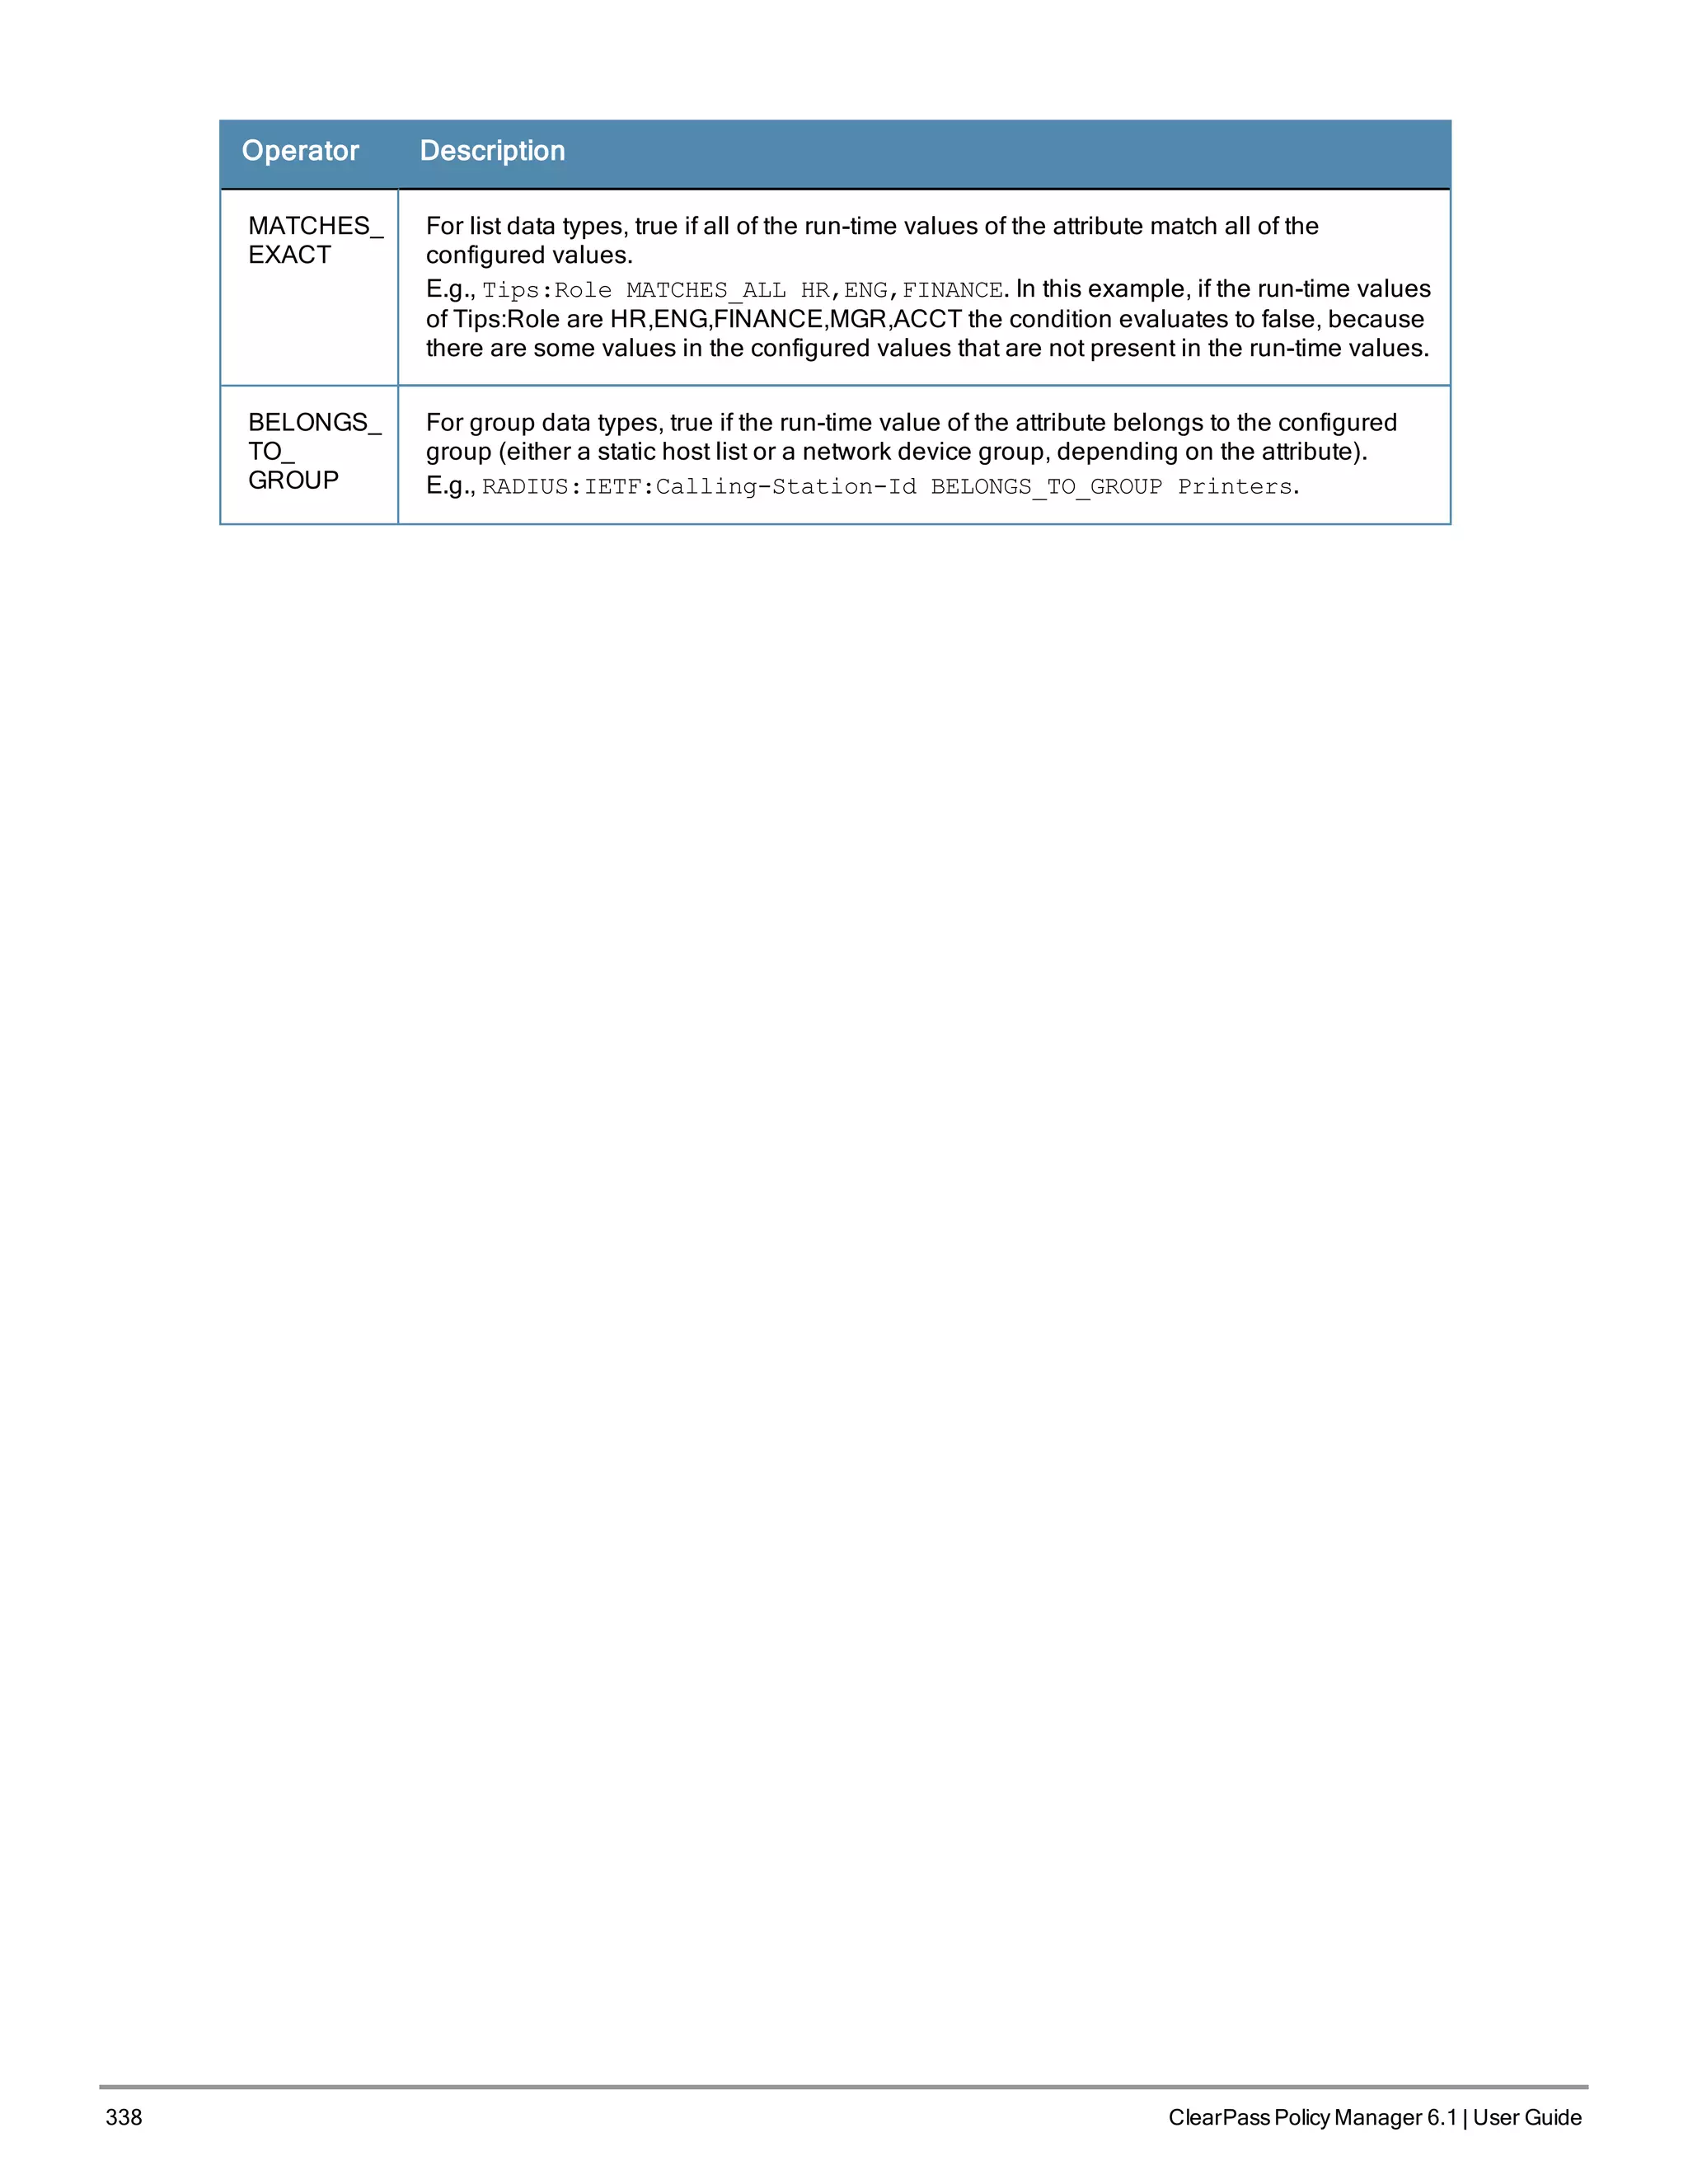
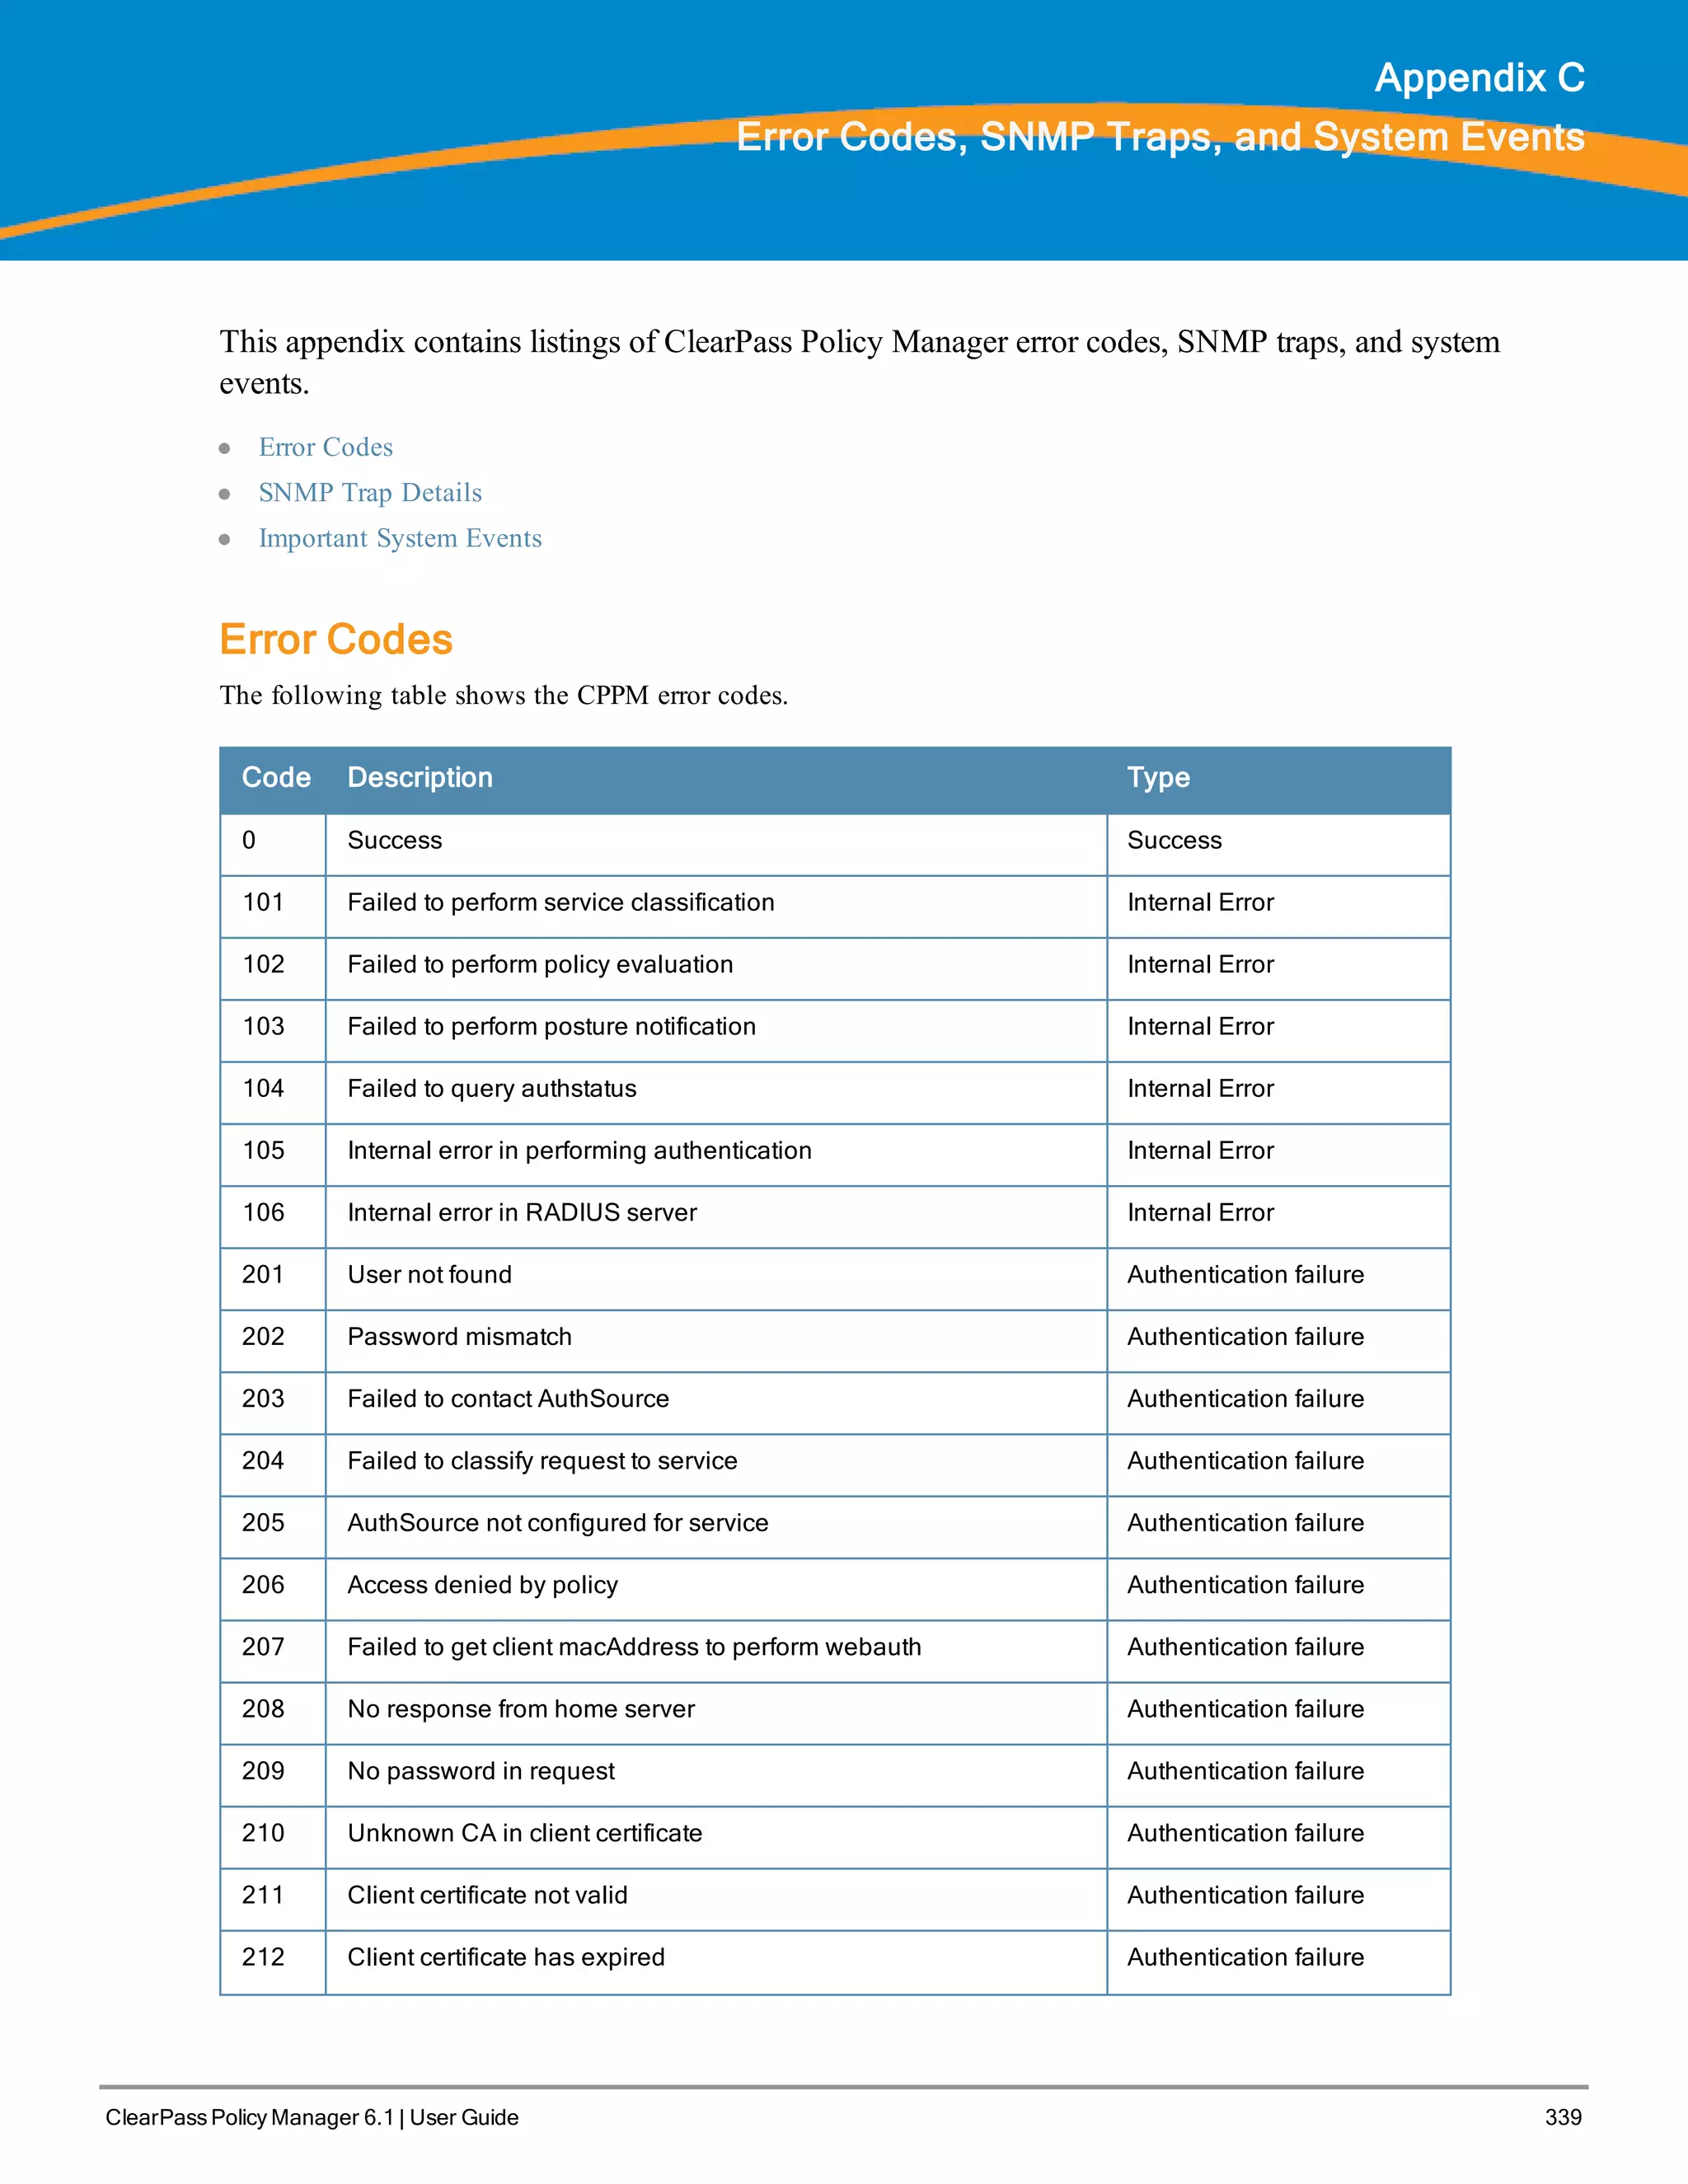
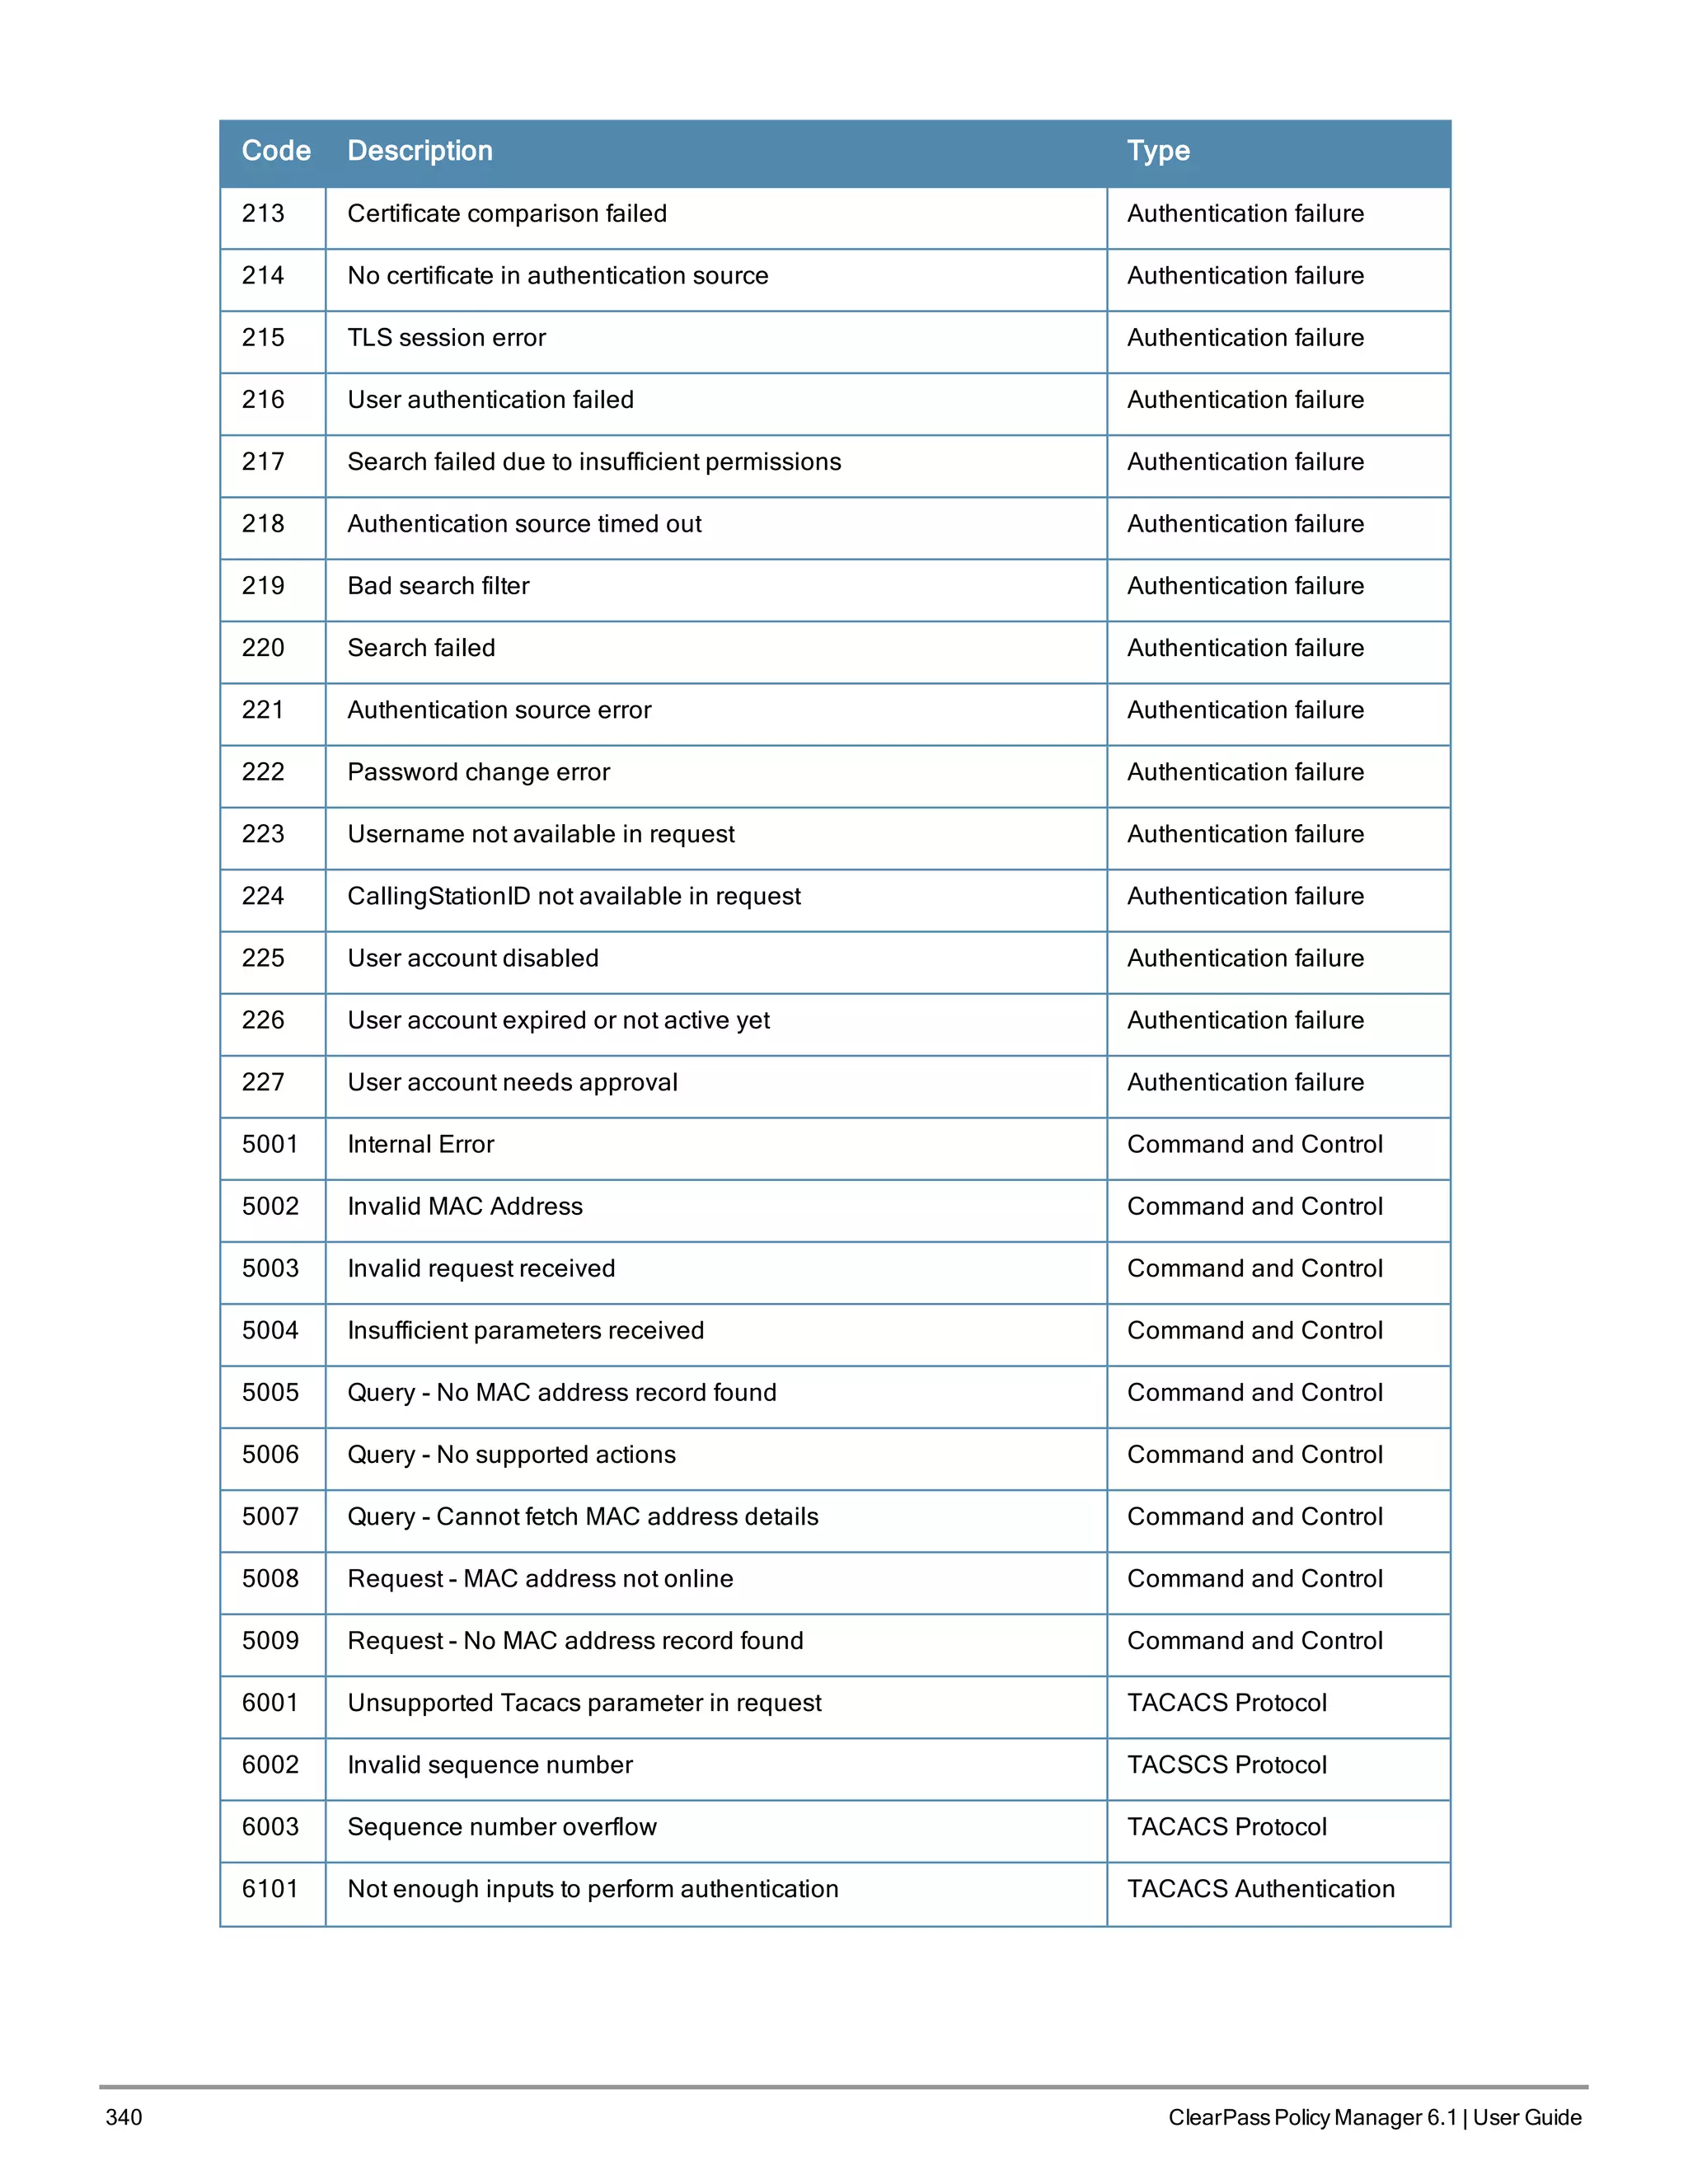
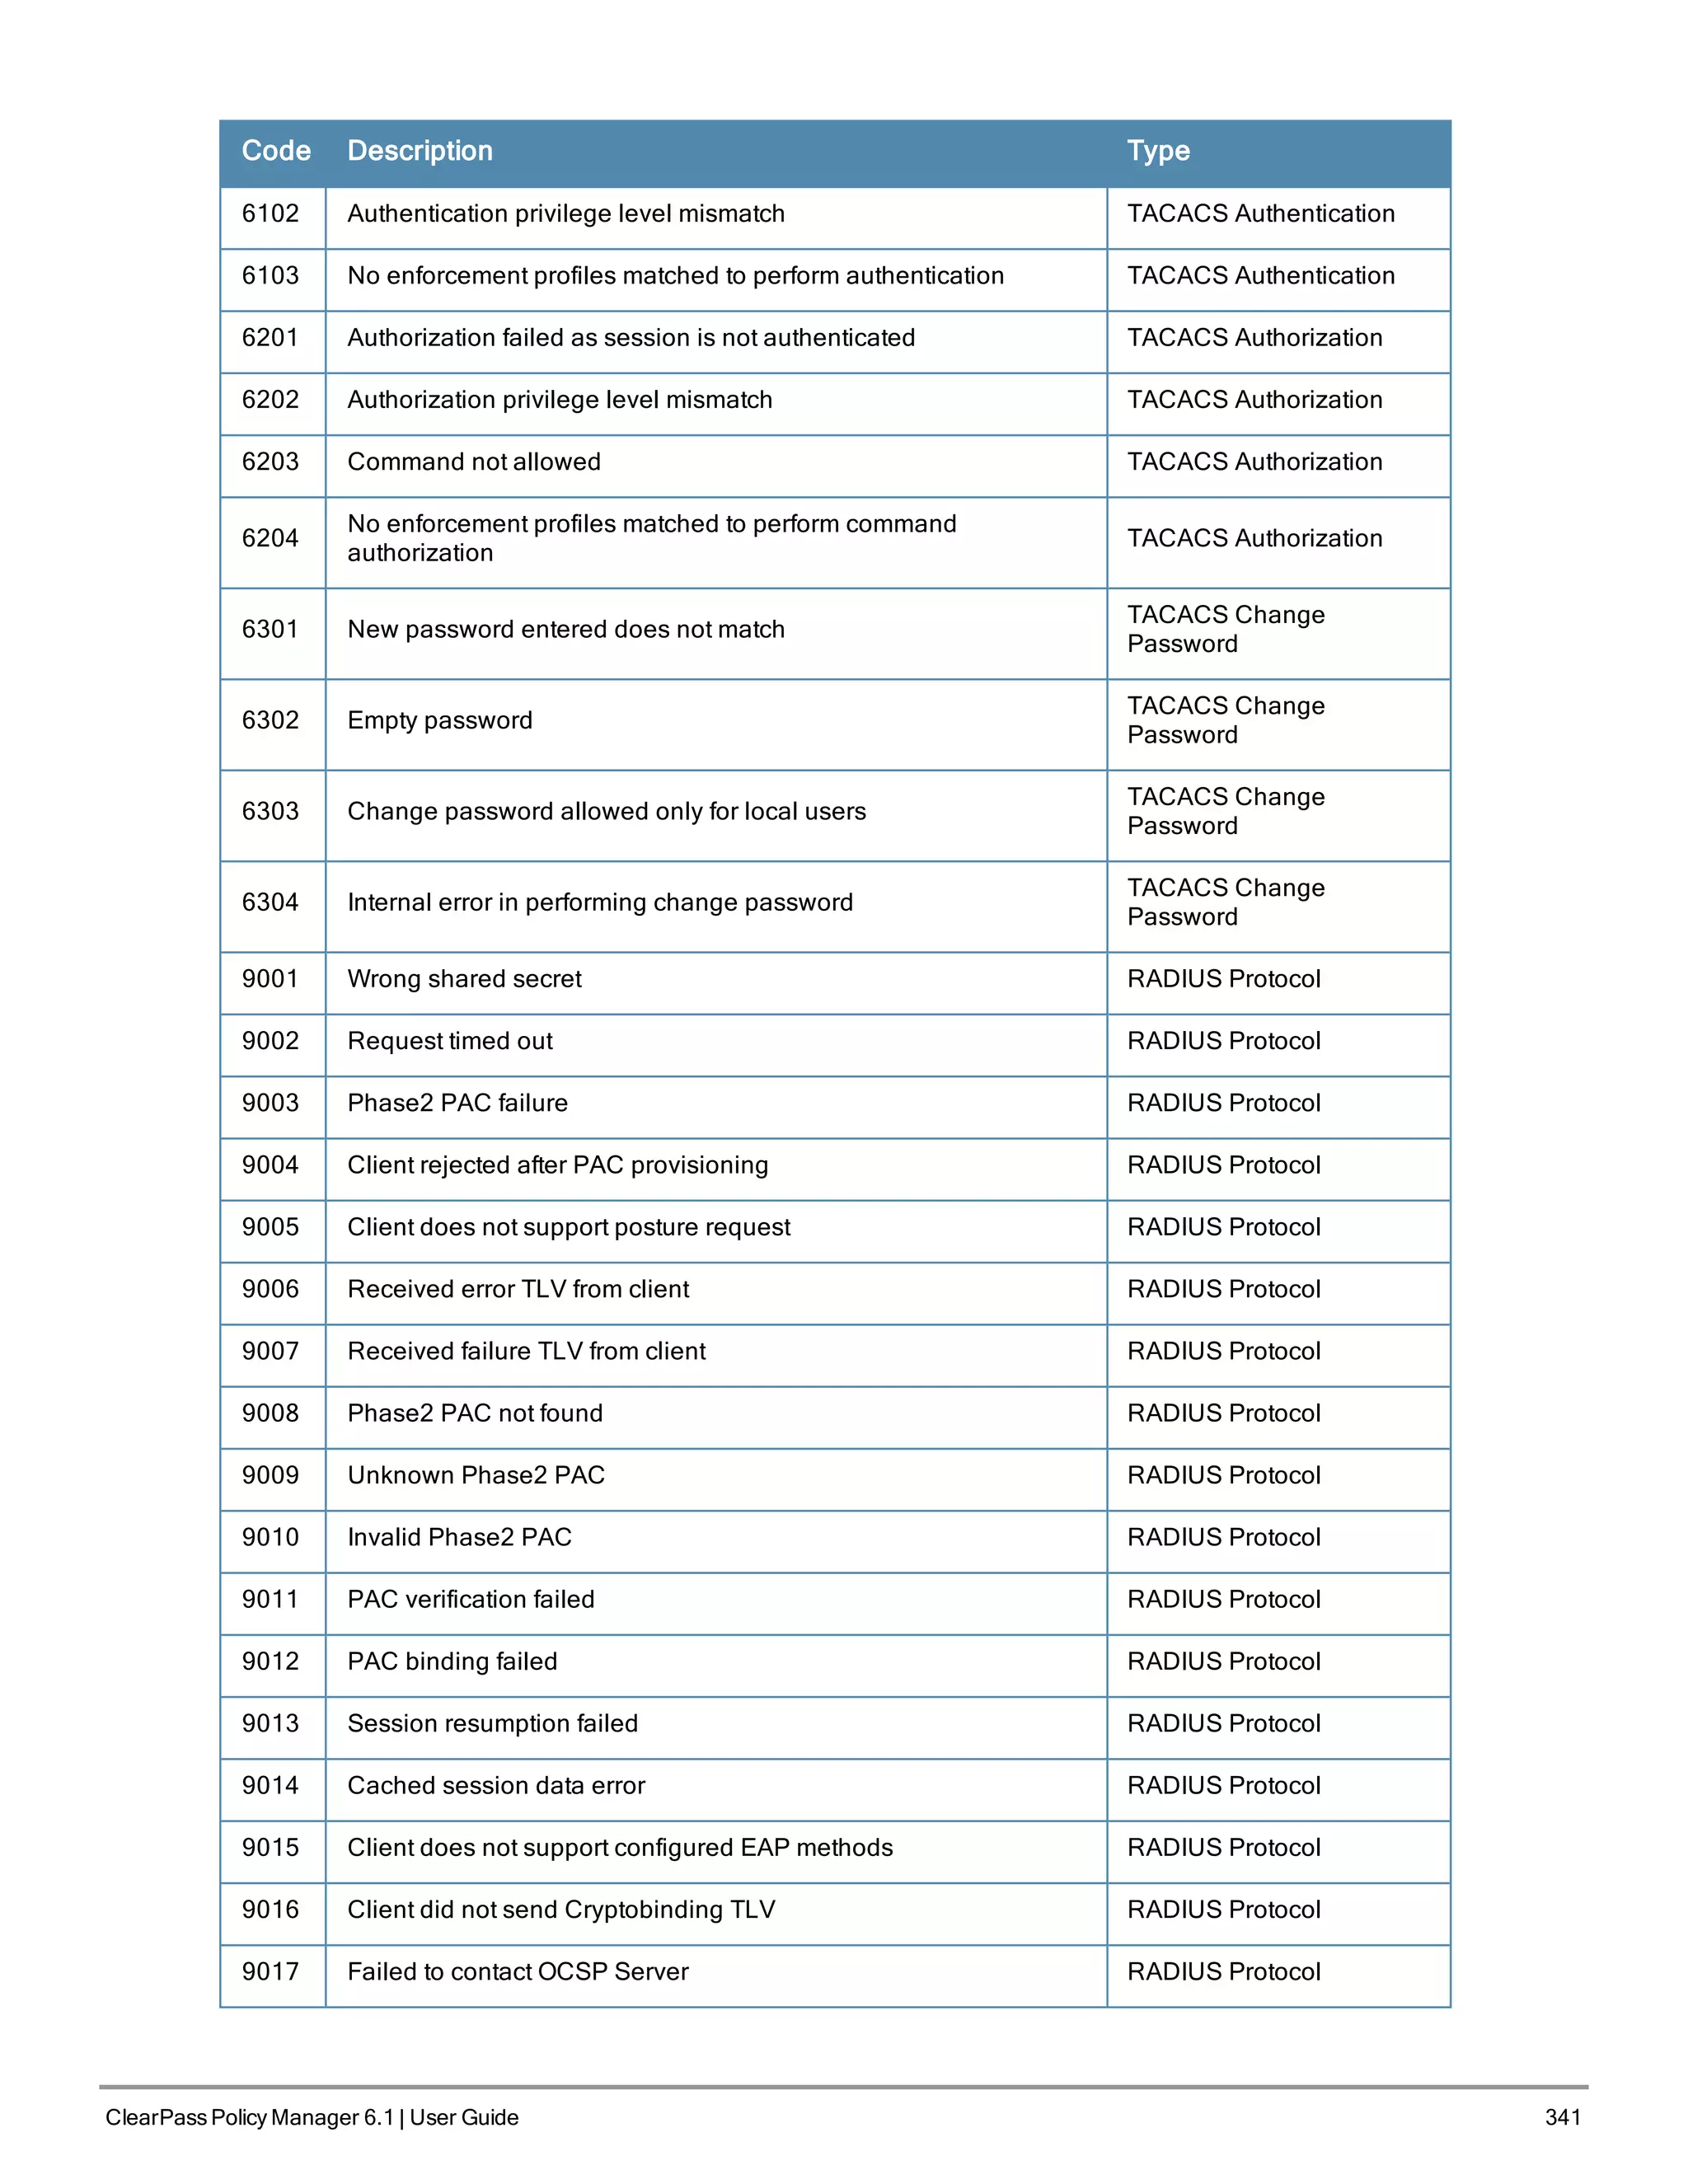
![342 ClearPass Policy Manager 6.1 | User Guide
SNMP Trap Details
CPPM leverages native SNMP support from the 'net-snmp' package to send trap notifications for the following events:
1. snmp daemon trap events
Trap OIDs:
.1.3.6.1.6.3.1.1.5.1
.1.3.6.1.6.3.1.1.5.2
2. CPPM processes stop and start events
Trap OIDs:
.1.3.6.1.2.1.88.2.0.2 [mteTriggerRising]
.1.3.6.1.2.1.88.2.0.3 [mteTriggerFalling]
3. Network interface up and down events
Trap OIDs:
.1.3.6.1.6.3.1.1.5.3:
.1.3.6.1.6.3.1.1.5.4:
4. Disk utilization threshold exceed events
Trap OIDs:
.1.3.6.1.2.1.88.2.0.2 [mteTriggerRising]
.1.3.6.1.2.1.88.2.0.3 [mteTriggerFalling]
5. CPU load average exceed events for 1, 5 and 15 mins thresholds
Trap OIDs:
.1.3.6.1.2.1.88.2.0.2 [mteTriggerRising]
.1.3.6.1.2.1.88.2.0.3 [mteTriggerFalling]
The following are the OIDs for the various trap events that are sent from CPPM.
snmp daemon traps:
.1.3.6.1.6.3.1.1.5.1 ==> Coldstart trap indicating the reinitialization of 'netsnmp' daemon and its configuration
file may have been altered
.1.3.6.1.6.3.1.1.5.2 ==> Warmstart trap indicating the reinitialization of 'netsnmp' daemon and its configuration
file is not altered
Process status traps:
.1.3.6.1.4.1.2021.2.1.100.X ==> Error flag on a process status. The value will be set to 1, if the process is
stopped and set to 0 if the process is running.
.1.3.6.1.4.1.2021.2.1.101.X ==> Error message on the process status. The value will contain the error message
when the process is stopped and will be empty when the process is running.
.1.3.6.1.4.1.2021.2.1.2.X ==> Name of the process for which the status is reported as indicated by above trap
OIDs.
In all the above trap OIDs, the value of X varies from 1 through N depending on the number of process status being
checked. Details of the specific OIDs associated with the processes are listed in the next section.
Example 1
The following example shows the OIDs and the values set when Policy Server process is stopped
OID: .1.3.6.1.4.1.2021.2.1.100.1:
Value: INTEGER: 1:
.1.3.6.1.4.1.2021.2.1.2.1: policy_server:
.1.3.6.1.4.1.2021.2.1.101.1: No policy_server process running.:](https://image.slidesharecdn.com/arubacppm61userguide-140926121722-phpapp01/75/Aruba-cppm-6_1_user_guide-342-2048.jpg)
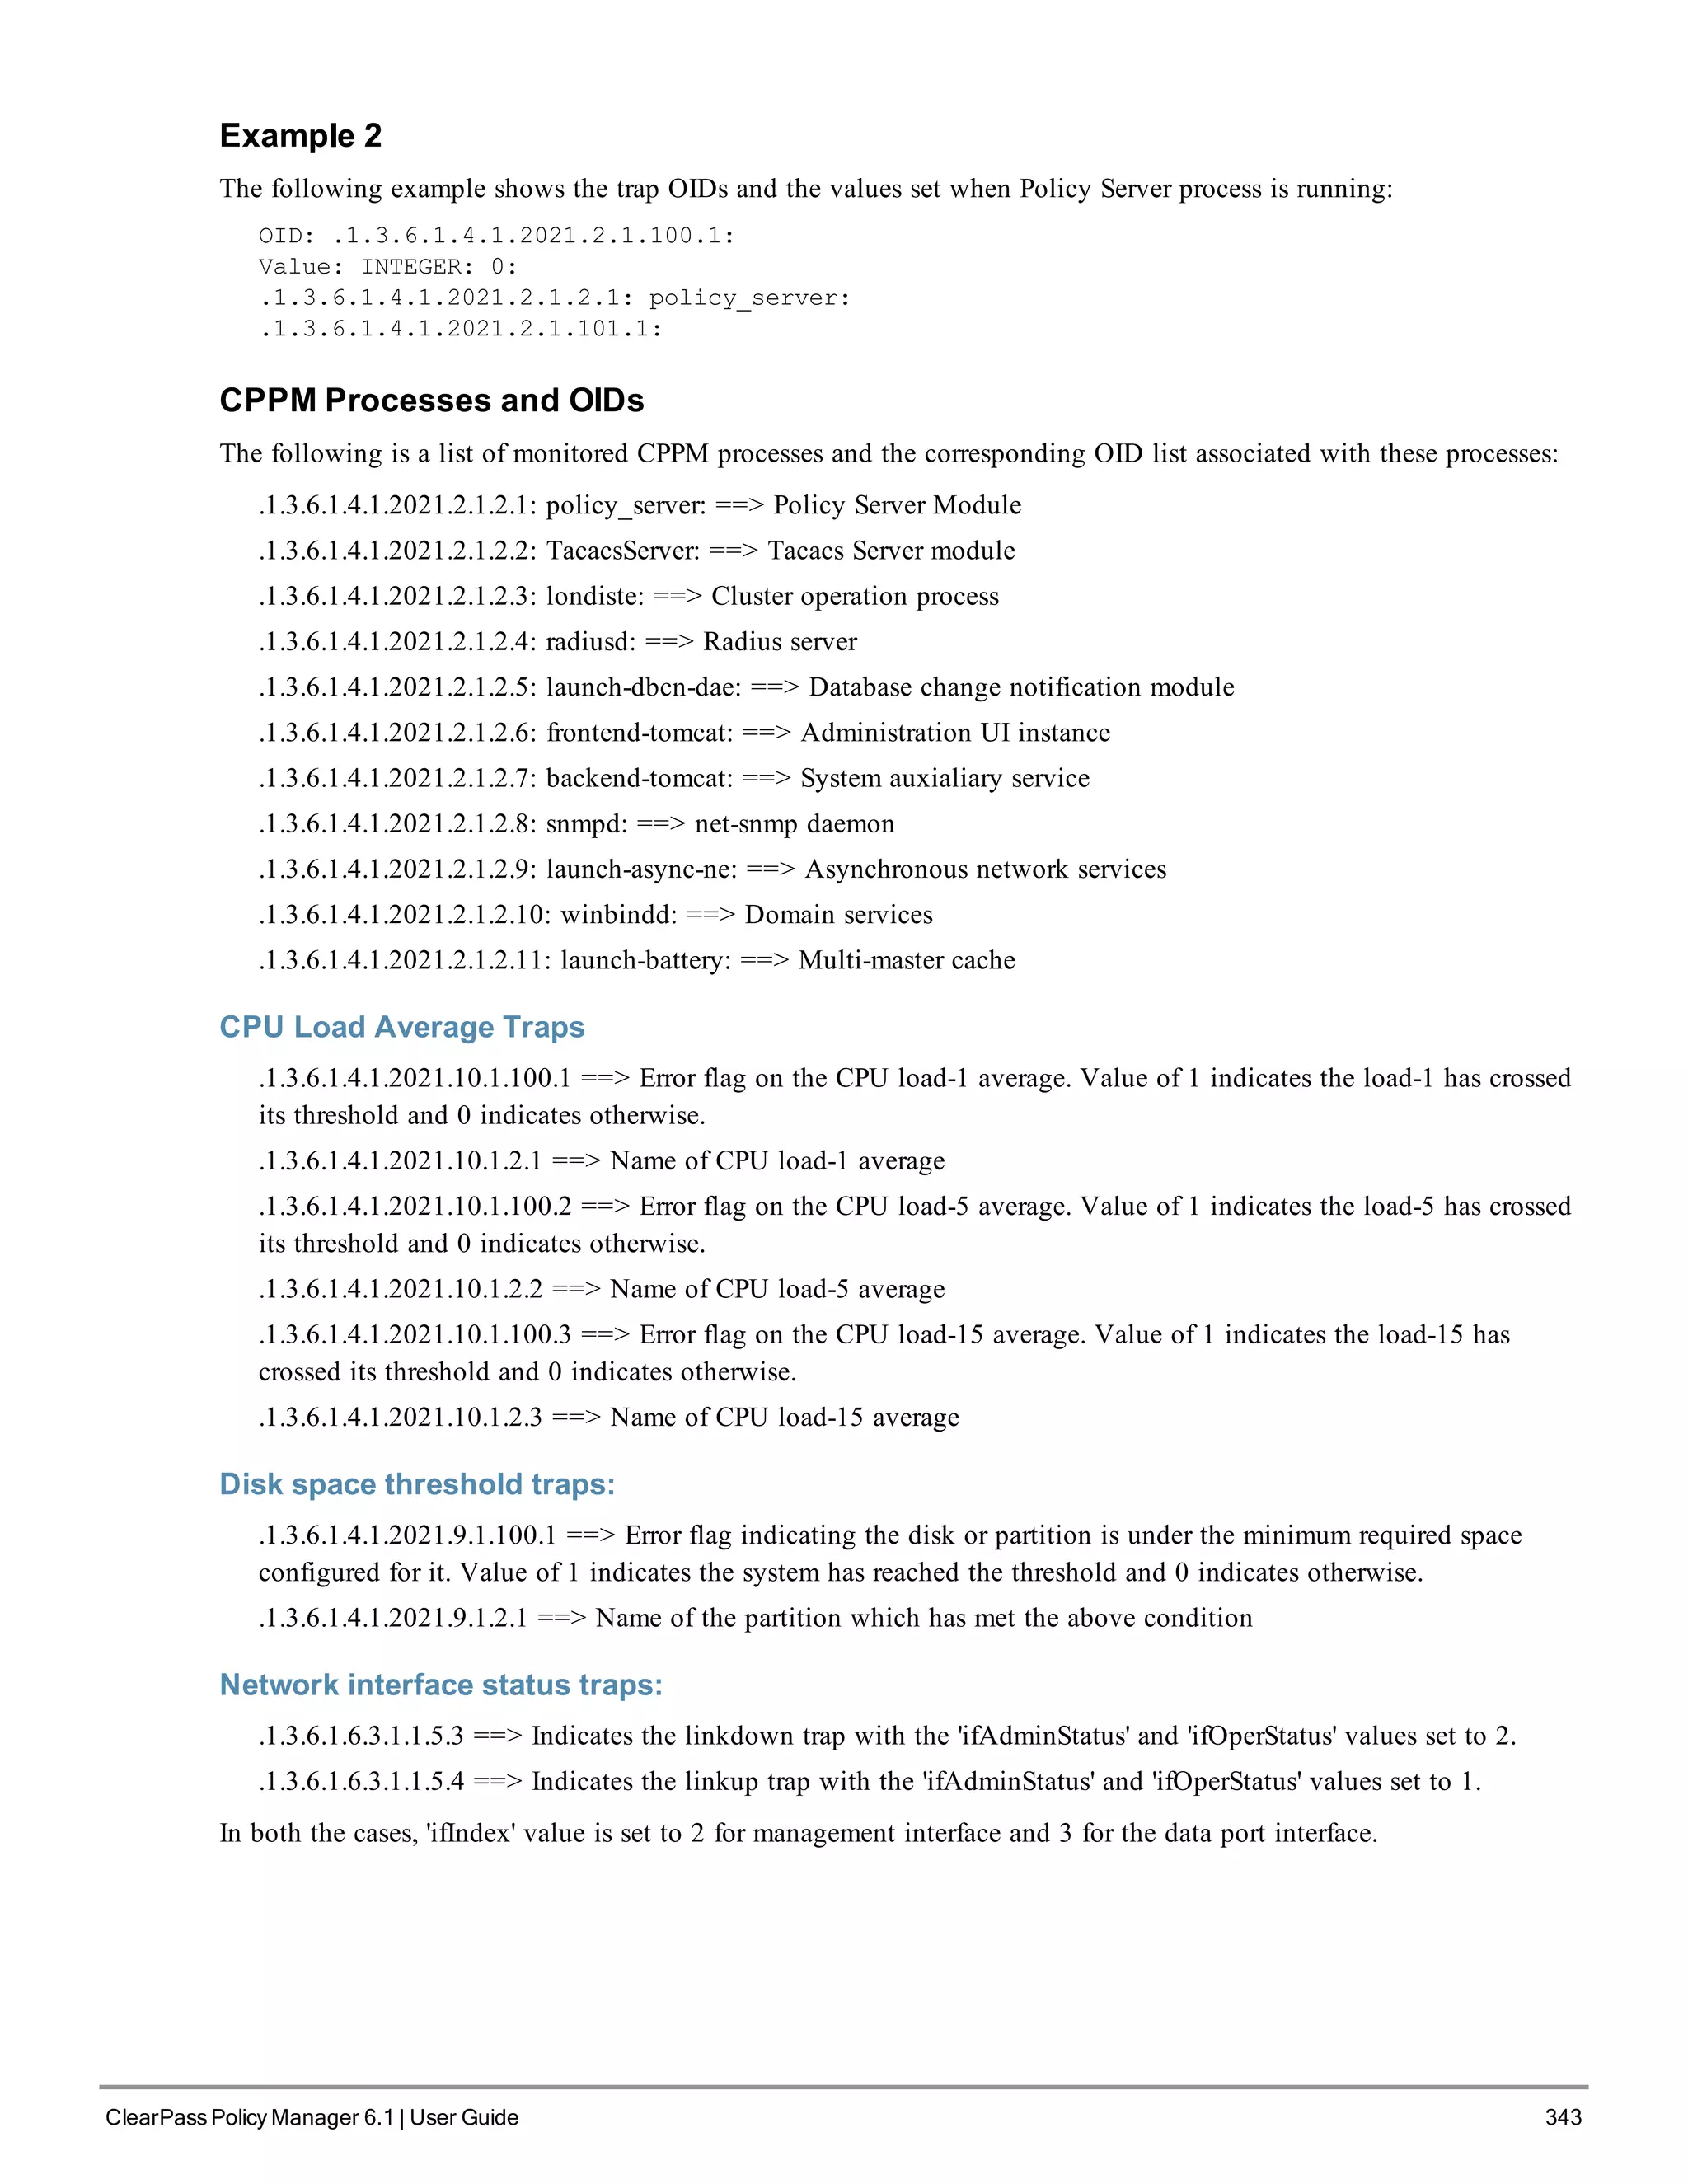
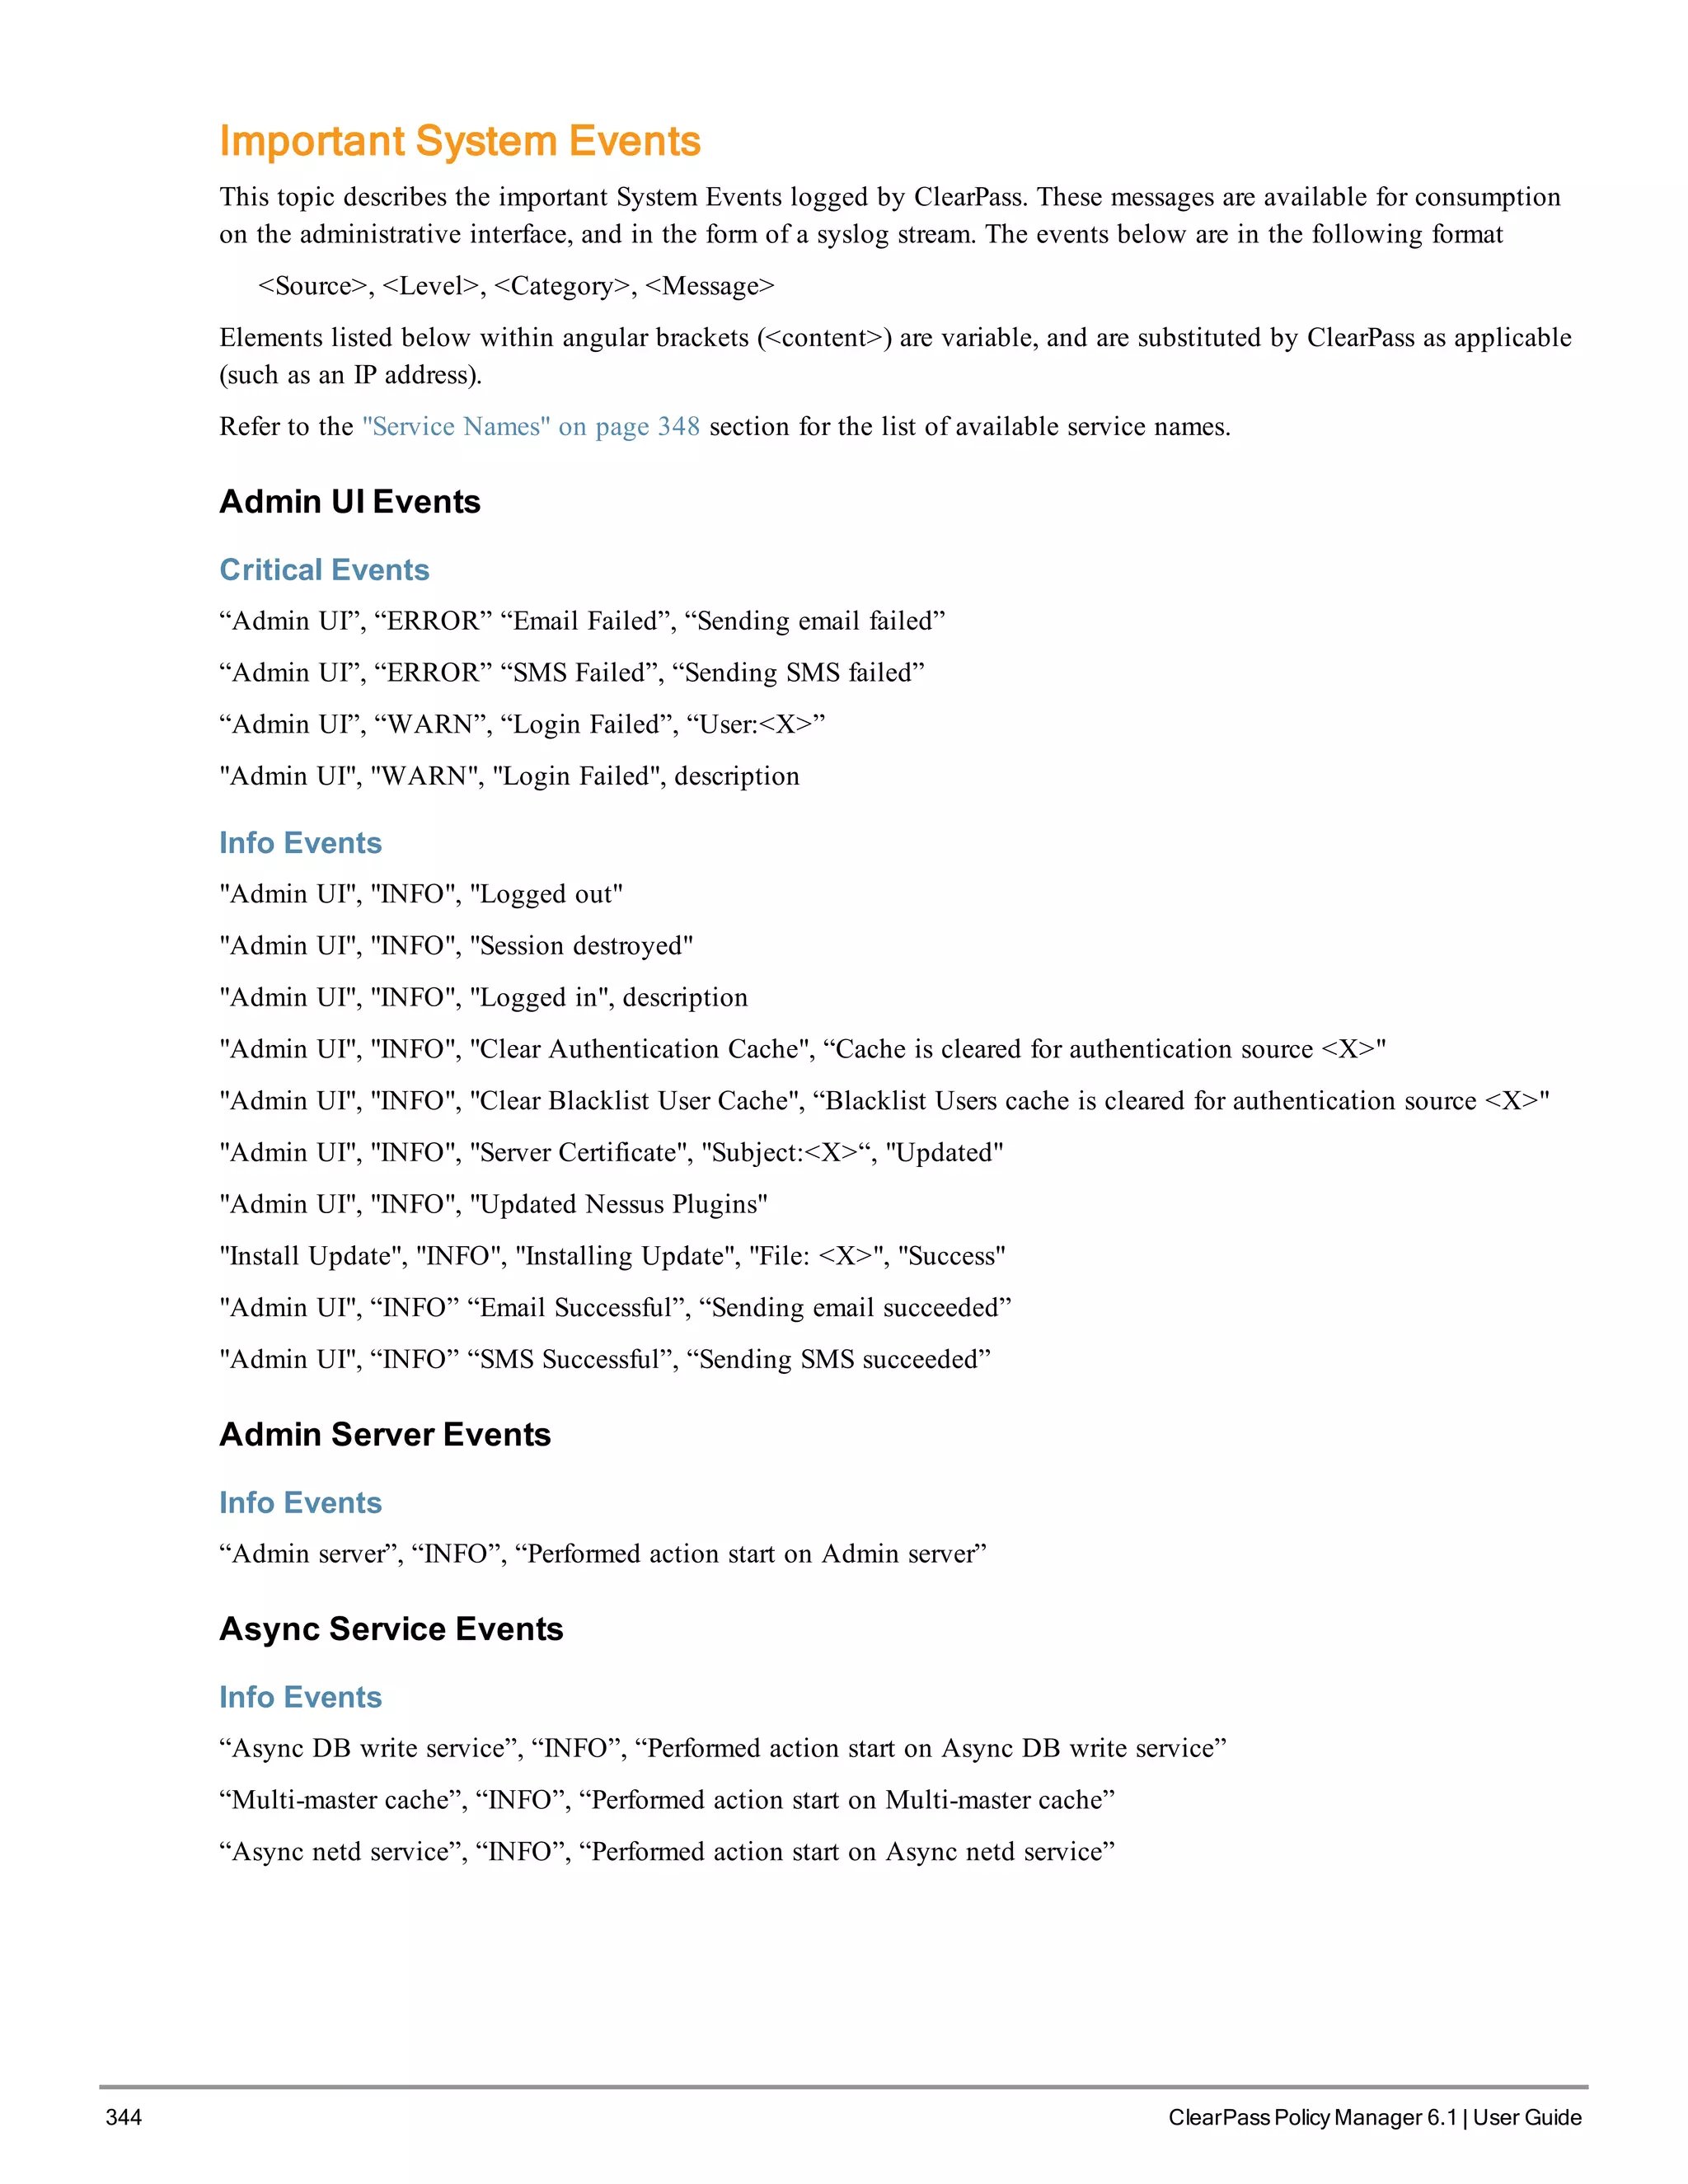
![348 ClearPass Policy Manager 6.1 | User Guide
Service Names
l AirGroup notification service
l Async DB write service
l Async network services
l DB change notification server
l DB replication service
l Micros Fidelio FIAS
l Multi-master cache
l Policy server
l RADIUS server
l System auxiliary services
l System monitor service
l TACACS server
l Virtual IP service
l [YOURSERVERNAME] Domain service](https://image.slidesharecdn.com/arubacppm61userguide-140926121722-phpapp01/75/Aruba-cppm-6_1_user_guide-348-2048.jpg)
![ClearPass Policy Manager 6.1 | User Guide 349
Appendix D
Software Copyright and License Statements
This appendix lists the copyright notices for the binary distribution from Aruba Networks. A copy of the source code
is available for portions of the software whose copyright statement requires Aruba Networks to publish any modified
source code. To cover the costs of duplication and shipping, there is a nominal cost to obtain the source code material.
To obtain a copy of the source code, contact info@arubanetworks.com.
Copyright statements for portions of software are listed below.
PostgreSQL Copyright
PostgreSQL is Copyright © 2004-2010 by the PostgreSQL Global Development Group and is distributed under the
terms of the license of the University of California below.
Permission to use, copy, modify, and distribute this software and its documentation for any purpose, without fee, and
without a written agreement is hereby granted, provided that the above copyright notice and this paragraph and the
following two paragraphs appear in all copies.
IN NO EVENT SHALL THE UNIVERSITY OF CALIFORNIA BE LIABLE TO ANY PARTY FOR DIRECT,
INDIRECT, SPECIAL, INCIDENTAL, OR CONSEQUENTIAL DAMAGES, INCLUDING LOST PROFITS, ARISING
OUT OF THE USE OF THIS SOFTWARE AND ITS DOCUMENTATION, EVEN IF THE UNIVERSITY OF
CALIFORNIA HAS BEEN ADVISED OF THE POSSIBILITY OF SUCH DAMAGE.
THE UNIVERSITY OF CALIFORNIA SPECIFICALLY DISCLAIMS ANY WARRANTIES, INCLUDING, BUT NOT
LIMITED TO, THE IMPLIED WARRANTIES OF MERCHANTABILITY AND FITNESS FOR A PARTICULAR
PURPOSE. THE SOFTWARE PROVIDED HEREUNDER IS ON AN "AS-IS" BASIS, AND THE UNIVERSITY OF
CALIFORNIA HAS NO OBLIGATIONS TO PROVIDE MAINTENANCE, SUPPORT, UPDATES,
ENHANCEMENTS, OR MODIFICATIONS.
GNU LGPL
Version 2, June 1991
Copyright (C) 1991 Free Software Foundation, Inc.
51 Franklin St, Fifth Floor, Boston, MA 02110-1301, USA
Everyone is permitted to copy and distribute verbatim copies of this license document, but changing it is not allowed.
[This is the first released version of the library GPL. It is numbered 2 because it goes with version 2 of the ordinary
GPL.]
Preamble
The licenses for most software are designed to take away your freedom to share and change it. By contrast, the GNU
General Public Licenses are intended to guarantee your freedom to share and change free software--to make sure the
software is free for all its users.
This license, the Library General Public License, applies to some specially designated Free Software Foundation
software, and to any other libraries whose authors decide to use it. You can use it for your libraries, too.
When we speak of free software, we are referring to freedom, not price. Our General Public Licenses are designed to
make sure that you have the freedom to distribute copies of free software (and charge for this service if you wish), that](https://image.slidesharecdn.com/arubacppm61userguide-140926121722-phpapp01/75/Aruba-cppm-6_1_user_guide-349-2048.jpg)


![* Redistribution and use in source and binary forms, with or without
* modification, are permitted provided that the following conditions
* are met:
* 1. Redistributions of source code must retain the copyright
* notice, this list of conditions and the following disclaimer.
* 2. Redistributions in binary form must reproduce the above copyright
* notice, this list of conditions and the following disclaimer in the
* documentation and/or other materials provided with the distribution.
* 3. All advertising materials mentioning features or use of this software
* must display the following acknowledgement:
* "This product includes cryptographic software written by
* Eric Young (eay@cryptsoft.com)"
* The word 'cryptographic' can be left out if the rouines from the library
* being used are not cryptographic related :-).
* 4. If you include any Windows specific code (or a derivative thereof) from
* the apps directory (application code) you must include an acknowledgement:
* "This product includes software written by Tim Hudson (tjh@cryptsoft.com"
*
* THIS SOFTWARE IS PROVIDED BY ERIC YOUNG ``AS IS'' AND
* ANY EXPRESS OR IMPLIED WARRANTIES, INCLUDING, BUT NOT LIMITED TO, THE
* IMPLIED WARRANTIES OF MERCHANTABILITY AND FITNESS FOR A PARTICULAR PURPOSE
* ARE DISCLAIMED. IN NO EVENT SHALL THE AUTHOR OR CONTRIBUTORS BE LIABLE
* FOR ANY DIRECT, INDIRECT, INCIDENTAL, SPECIAL, EXEMPLARY, OR CONSEQUENTIAL
* DAMAGES (INCLUDING, BUT NOT LIMITED TO, PROCUREMENT OF SUBSTITUTE GOODS
* OR SERVICES; LOSS OF USE, DATA, OR PROFITS; OR BUSINESS INTERRUPTION)
* HOWEVER CAUSED AND ON ANY THEORY OF LIABILITY, WHETHER IN CONTRACT, STRICT
* LIABILITY, OR TORT (INCLUDING NEGLIGENCE OR OTHERWISE) ARISING IN ANY WAY
* OUT OF THE USE OF THIS SOFTWARE, EVEN IF ADVISED OF THE POSSIBILITY OF
* SUCH DAMAGE.
*
* The licence and distribution terms for any publically available version or
* derivative of this code cannot be changed. i.e. this code cannot simply be
* copied and put under another distribution licence
* [including the GNU Public Licence.] */
OpenLDAP License
The OpenLDAP Public License
ClearPass Policy Manager 6.1 | User Guide 363](https://image.slidesharecdn.com/arubacppm61userguide-140926121722-phpapp01/75/Aruba-cppm-6_1_user_guide-363-2048.jpg)

The ClearPass Policy Manager dashboard provides system administrators with visual summaries of network access requests, device health statuses, authentication results, and top device types. It displays weekly and daily graphs of total requests, healthy/unhealthy requests, and successful/failed authentications. Recent authentication and event logs are also shown. Quick links allow navigating to key configuration and monitoring areas. The cluster status widget indicates the health and resource usage of each ClearPass node.


![Vibe Coding vs. Spec-Driven Development [Free Meetup]](https://cdn.slidesharecdn.com/ss_thumbnails/vibecodingvsspecdrivendevelopment-251209105622-43f455e7-thumbnail.jpg?width=640&height=640&fit=bounds)


