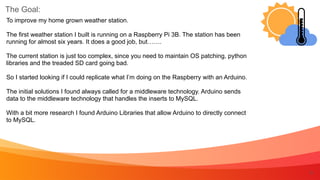
Arduino Direct Connections to Percona Server
Howdy!
Wayne Leutwyle
r

“Courage is being scared to death, but saddling up anyway.” -John Wayne
3
4
The Goal - Direct connections from Arduino to Percona Server


Hardware


Software


Database DDL


See it in Action
Agenda
The Goal:
5
To improve my home grown weather station.


The first weather station I built is running on a Raspberry Pi 3B. The station has been
running for almost six years. It does a good job, but…….


The current station is just too complex, since you need to maintain OS patching, python
libraries and the treaded SD card going bad.


So I started looking if I could replicate what I’m doing on the Raspberry with an Arduino.


The initial solutions I found always called for a middleware technology. Arduino sends
data to the middleware technology that handles the inserts to MySQL.


With a bit more research I found Arduino Libraries that allow Arduino to directly connect
to MySQL.
Data being collected.
6
For this presentation, I’m gathering data from these sensors:


Temperature


Humidity


Dew Point


Heat Index


You could add more sensors to the project to collect:


Wind Speed


Rain Fall amount


Barometric Pressure


UV Levels
Hardware:
Let's look at the hardware we needed for this
project. It’s a short list!
7
Arduino Uno


Ethernet Shield W5100


DHT11 Sensor


Jumper wires x 3


Approximate cost: $32.00


Wireless Arduino UNO can be used.
Wiring:
8
Let's do the wiring of the sensor to the Arduino.


*** Caution ***


Don’t have the Arduino connected to your PC while you do these setup. You


could fry the Arduino or damage your PC.


Start off by connecting the Ethernet shield to your Arduino. The Ethernet shield


should come with instructions. If by chance you did not get Instruction. To Add


the shield. Just align the male pins on the shield to the female connectors on the


Arduino. Gently push them together.


Connect the 5V from the Arduino to the 5V VIN pin on the DHT11.


Connect the ground from the Arduino to the Ground on the DHT11.


Connect Pin 8 on the Arduino will go to the Signal pin on the DHT11.


*** Check and Double Check ***


Verify that the 5V and Ground on the Arduino, are connected the the DHT11.


If 5V and ground are reversed you will fry the DHT11.


That’s it you're all ready for the code. Go ahead and connect your Arduino to


your PC.
Software:
9
Developer Tools:


Arduino IDE V1.18.3.


Arduino Web Based IDE.
Libraries:


Adafruit DHT Library


MySQL Connection Library
Links:


https://github.com/ChuckBell/MySQL_Connector_Arduino


https://github.com/adafruit/DHT-sensor-library


https://www.arduino.cc/en/software


https://github.com/cetanhota/wam
The Code:


WAM version 1.0.5
Arduino Code:
10
/* 2/14/2021


* Wayne Leutwyler


*/


#include "DHT.h"


#include <MySQL_Connection.h>


#include <MySQL_Cursor.h>


#define DHTTYPE DHT11 // DHT 11


#define DHTPIN 2


DHT dht(DHTPIN, DHTTYPE);


byte mac_addr[] = { 0xDE, 0xAD, 0xBE, 0xEF,
0xFE, 0xED };


IPAddress server_addr(000,000,0,00);


char user[] = "DrNo";


char password[] = “Spector";


EthernetClient client;


MySQL_Connection conn((Client *)&client);


//define delay into hours


const unsigned long SECOND = 1000;


const unsigned long HOUR =
3600*SECOND;


void setup() {


Serial.begin(9600);


Ethernet.begin(mac_addr);


Serial.println(F("DHTxx test!”));


dht.begin();


}


void loop() {


float tf = dht.readTemperature(true);


float h = dht.readHumidity();


float dew = (tf-(100-h)/5.0);


float hif = dht.computeHeatIndex(tf, h);


//connect to database


Serial.println("Connecting...");


if (conn.connect(server_addr, 3306, user,
password)) {


delay(1000);


// asign values for inserting


char INSERT_DATA[] = "INSERT INTO
weather.percona (tmp,hum,dew,hif) VALUES (%s,
%s,%s,%s)";


char query[128];


char temperature[10];


char humidity[10];


char dewpoint[10];


char heatindex[10];


int str_temperature = (tf);


int str_humidity = (h);


int str_dewpoint = (dew);


int str_heatindex = (hif);


//prepare data for inserting


dtostrf(str_temperature, 4, 2, temperature);


dtostrf(str_humidity, 4, 2, humidity);


dtostrf(str_dewpoint, 4, 2, dewpoint);


dtostrf(str_heatindex, 4, 2, heatindex);
//send data to mysql


sprintf(query, INSERT_DATA, temperature, 


humidity, dewpoint, heatindex);


MySQL_Cursor *cur_mem = 


new MySQL_Cursor(&conn);


//send data to serial output for debugging.


Serial.println((query));


Serial.print("Temperature: ");


Serial.print(tf); Serial.println("ºF");


Serial.print("Humidity: ");


Serial.print(h); Serial.println("%");


Serial.print("DewPoint: ");


Serial.print(dew); Serial.println("ºF");


Serial.print("Heat Index: ");


Serial.print(hif); Serial.println("ºF");


//excute query and delete cursor


cur_mem->execute(query);


delete cur_mem;


Serial.println("Data recorded.”);


}


else


Serial.println("Connection failed.");


conn.close();


delay (SECOND*300);


}
MySQL DDL
11
Here is the layout of the database:


CREATE DATABASE WEATHER;


CREATE TABLE `weather` (


`id` int(11) NOT NULL AUTO_INCREMENT,


`tmp` int(11) NOT NULL,


`hum` int(11) NOT NULL,


`dew` int(11) NOT NULL DEFAULT '0',


`hif` int(11) NOT NULL DEFAULT '0',


`ts` timestamp NOT NULL DEFAULT CURRENT_TIMESTAMP,


PRIMARY KEY (`id`)


);
Live View!
12
Using the Arduino Serial Plotter Tool we can watch our data while it's being collected.
Historic View:
13
Using a bit of python code we can pull data from MySQL
and display it in a Graph. The python code can be found on
my GitHub repo.
14
Final Thoughts
This project started about the time COVID19 hit the world. My original
Idea was to give this to the STEM learning centers in my area. I really
want to encourage young people to get involved with technology.


This was and is a labor of love. I really think this project would be great
for anyone looking to explore new technologies or just get started with
the Arduino and MySQL.


I love the fact that we get to look at 4 different technologies in this
project.


MySQL.


Arduino Hardware.


Arduino Programing.


Python Programing.


I hope you enjoyed this presentation. Please share it was family and
friends. Let's motivate the young minds of today. This is a starting block
to a future filled with new and wondrous things.
15
Thank you!
Remember too have fun!
Wayne Leutwyle
r

Github Project: https://github.com/cetanhota/wam
16

Ardunio + MySQL = direct database connections.

  • 2.
    Arduino Direct Connectionsto Percona Server
  • 3.
    Howdy! Wayne Leutwyle r “Courage isbeing scared to death, but saddling up anyway.” -John Wayne 3
  • 4.
    4 The Goal -Direct connections from Arduino to Percona Server Hardware Software Database DDL See it in Action Agenda
  • 5.
    The Goal: 5 To improvemy home grown weather station. The first weather station I built is running on a Raspberry Pi 3B. The station has been running for almost six years. It does a good job, but……. The current station is just too complex, since you need to maintain OS patching, python libraries and the treaded SD card going bad. So I started looking if I could replicate what I’m doing on the Raspberry with an Arduino. The initial solutions I found always called for a middleware technology. Arduino sends data to the middleware technology that handles the inserts to MySQL. With a bit more research I found Arduino Libraries that allow Arduino to directly connect to MySQL.
  • 6.
    Data being collected. 6 Forthis presentation, I’m gathering data from these sensors: Temperature Humidity Dew Point Heat Index You could add more sensors to the project to collect: Wind Speed Rain Fall amount Barometric Pressure UV Levels
  • 7.
    Hardware: Let's look atthe hardware we needed for this project. It’s a short list! 7 Arduino Uno Ethernet Shield W5100 DHT11 Sensor Jumper wires x 3 Approximate cost: $32.00 Wireless Arduino UNO can be used.
  • 8.
    Wiring: 8 Let's do thewiring of the sensor to the Arduino. *** Caution *** Don’t have the Arduino connected to your PC while you do these setup. You could fry the Arduino or damage your PC. Start off by connecting the Ethernet shield to your Arduino. The Ethernet shield should come with instructions. If by chance you did not get Instruction. To Add the shield. Just align the male pins on the shield to the female connectors on the Arduino. Gently push them together. Connect the 5V from the Arduino to the 5V VIN pin on the DHT11. Connect the ground from the Arduino to the Ground on the DHT11. Connect Pin 8 on the Arduino will go to the Signal pin on the DHT11. *** Check and Double Check *** Verify that the 5V and Ground on the Arduino, are connected the the DHT11. If 5V and ground are reversed you will fry the DHT11. That’s it you're all ready for the code. Go ahead and connect your Arduino to your PC.
  • 9.
    Software: 9 Developer Tools: Arduino IDEV1.18.3. Arduino Web Based IDE. Libraries: Adafruit DHT Library MySQL Connection Library Links: https://github.com/ChuckBell/MySQL_Connector_Arduino https://github.com/adafruit/DHT-sensor-library https://www.arduino.cc/en/software https://github.com/cetanhota/wam The Code: WAM version 1.0.5
  • 10.
    Arduino Code: 10 /* 2/14/2021 *Wayne Leutwyler */ #include "DHT.h" #include <MySQL_Connection.h> #include <MySQL_Cursor.h> #define DHTTYPE DHT11 // DHT 11 #define DHTPIN 2 DHT dht(DHTPIN, DHTTYPE); byte mac_addr[] = { 0xDE, 0xAD, 0xBE, 0xEF, 0xFE, 0xED }; IPAddress server_addr(000,000,0,00); char user[] = "DrNo"; char password[] = “Spector"; EthernetClient client; MySQL_Connection conn((Client *)&client); //define delay into hours const unsigned long SECOND = 1000; const unsigned long HOUR = 3600*SECOND; void setup() { Serial.begin(9600); Ethernet.begin(mac_addr); Serial.println(F("DHTxx test!”)); dht.begin(); } void loop() { float tf = dht.readTemperature(true); float h = dht.readHumidity(); float dew = (tf-(100-h)/5.0); float hif = dht.computeHeatIndex(tf, h); //connect to database Serial.println("Connecting..."); if (conn.connect(server_addr, 3306, user, password)) { delay(1000); // asign values for inserting char INSERT_DATA[] = "INSERT INTO weather.percona (tmp,hum,dew,hif) VALUES (%s, %s,%s,%s)"; char query[128]; char temperature[10]; char humidity[10]; char dewpoint[10]; char heatindex[10]; int str_temperature = (tf); int str_humidity = (h); int str_dewpoint = (dew); int str_heatindex = (hif); //prepare data for inserting dtostrf(str_temperature, 4, 2, temperature); dtostrf(str_humidity, 4, 2, humidity); dtostrf(str_dewpoint, 4, 2, dewpoint); dtostrf(str_heatindex, 4, 2, heatindex); //send data to mysql sprintf(query, INSERT_DATA, temperature, humidity, dewpoint, heatindex); MySQL_Cursor *cur_mem = new MySQL_Cursor(&conn); //send data to serial output for debugging. Serial.println((query)); Serial.print("Temperature: "); Serial.print(tf); Serial.println("ºF"); Serial.print("Humidity: "); Serial.print(h); Serial.println("%"); Serial.print("DewPoint: "); Serial.print(dew); Serial.println("ºF"); Serial.print("Heat Index: "); Serial.print(hif); Serial.println("ºF"); //excute query and delete cursor cur_mem->execute(query); delete cur_mem; Serial.println("Data recorded.”); } else Serial.println("Connection failed."); conn.close(); delay (SECOND*300); }
  • 11.
    MySQL DDL 11 Here isthe layout of the database: CREATE DATABASE WEATHER; CREATE TABLE `weather` ( `id` int(11) NOT NULL AUTO_INCREMENT, `tmp` int(11) NOT NULL, `hum` int(11) NOT NULL, `dew` int(11) NOT NULL DEFAULT '0', `hif` int(11) NOT NULL DEFAULT '0', `ts` timestamp NOT NULL DEFAULT CURRENT_TIMESTAMP, PRIMARY KEY (`id`) );
  • 12.
    Live View! 12 Using theArduino Serial Plotter Tool we can watch our data while it's being collected.
  • 13.
    Historic View: 13 Using abit of python code we can pull data from MySQL and display it in a Graph. The python code can be found on my GitHub repo.
  • 14.
    14 Final Thoughts This projectstarted about the time COVID19 hit the world. My original Idea was to give this to the STEM learning centers in my area. I really want to encourage young people to get involved with technology. This was and is a labor of love. I really think this project would be great for anyone looking to explore new technologies or just get started with the Arduino and MySQL. I love the fact that we get to look at 4 different technologies in this project. MySQL. Arduino Hardware. Arduino Programing. Python Programing. I hope you enjoyed this presentation. Please share it was family and friends. Let's motivate the young minds of today. This is a starting block to a future filled with new and wondrous things.
  • 15.
    15 Thank you! Remember toohave fun! Wayne Leutwyle r Github Project: https://github.com/cetanhota/wam
  • 16.