SlideShare a Scribd company logo
1 of 44
Download to read offline
By Ravi Kishore 1
STORES CUTTING
SECTION
SEWING
SECTION
FINISHING SECTION
I E
SAM &
SAMPLE
LAB TESTS,
REPORTS &
APPROVALS
BULK
FABRIC
IN-HOUSE
FABRIC
INSPECTION CUT PLAN
& CUTTING
BUNDLING &
NUMBERING
EMBROIDERY
& PRINTING
SEWING
CHECKING
FINISHINGTAGGING
FINAL
INSPECTION
DOCUMENTS
DELIVERY
PACKING IRONING
TRIMMING
2. APPAREL PRODUCTION PROCESS
We have traced the evolution of the mass production of garments and the organisation of
the manufacturing units to manage long assemblies of machines and manpower. The
production of garments is the penultimate activity in the supply chain before they are
delivered to the customer. The activities prior to garment production concern fabric and
trims procurement based on the purchase order of the customer in this case a retail buyer.
These are activities related to merchandising and sourcing and, therefore, let us not bother
too much with these activities.
Let us then trace the path of the activities that take place after the raw materials are
received in the garment factory warehouse. A flurry of activities takes place within a
short span of time from the time fabric lands in the warehouse to convert it into garments.
Many of these activities are both predictable and routine. In fact you can say they are
established procedures. We can therefore safely say that a process is set in motion to
convert fabric into garment. These activities are what we call “Apparel Production
Process”. In the following sessions let us discuss the production process.
Unlike a chemical process which is a continuous process where two or more chemicals
react to form a compound, the apparel production process is not a continuous one. The
process occurs in various sections of the production department as the raw material
moves. In fact it can be best represented by a flow chart as below.
By Ravi Kishore 2
As can be seen the process starts with the stores where materials are received checked,
inspected and tested. Fabric then moves to cutting section where it is cut according to cut
plan using patterns, the cuts are then bundled and numbered; some parts are sent for
embroidery or print as necessary and received. The cuttings are then sent to sewing
section which receives the SAM from industrial engineering and the approved sample
from sample department to proceed with sewing operations. Stitched garments are then
moved to the finishing section where they are checked, trimmed, finished and ironed. The
ironed garments are then tagged and packed in cartons for final inspection. Document for
the inspected garments are prepared and the goods are delivered. These are the various
production processes performed in the production department. We will discuss the
processes in each department at length and their salient features.
Stores
The work in the production department starts with the receiving of fabric and trims in the
stores. The fabric is checked and inspected following a procedure. In fact the fabric
supplier as per the conditions laid down by the sourcing department sends the fabric for
testing the quality with reference to the colour fastness, dimensional stability and physical
properties as required. These fabrics are sent to independent testing laboratories where the
fabric is tested as per the test parameters and standards laid down internationally and
stipulated by the customer. This procedure of testing the fabric is called “Fabric Package
Test”. These laboratories submit their test reports to the retailer. In case if the fabric does
not meet the required standards, the retailer directs the supplier to reprocess the fabric to
achieve the desired standards. Ultimately the final quality of garment depends on the
quality of fabric.
The fabric is received at the stores is accepted for its quality by the customer. However
physical defects of the fabric are detected through intense inspection as per the desired
quality standards. The inspection procedure followed by the quality assurance department
of the stores is as follows –
Width Variation: Receive the fabric either in rolls or bales form and check all rolls or
bales for width and tabulate. Verify the widths with the packing list. If there are variations
in width, sort rolls/bales by width and stack them separately. Place widths that vary up to
plus or minus 5% together as a group. Variations between 5% - 10% together are
By Ravi Kishore 3
grouped. Similarly group rolls/bales with no variations together. Grouping is required to
lay rolls of same widths or with marginal variations together in order to minimize fabric
wastage in cutting. Patterns are prepared according to the width and any significant
variations will result in lower yield per meter of fabric. That means the fabric
consumptions will increase and there will be shortage to complete the production.
Shrinkage: Cut 60 Cms in full width from each roll/bale. Mark and send half width of the
cutting for shrinkage test. Receive shrunk fabrics swatches, iron the swatches and
measure and prepare shrinkage report. Sort fabric rolls/bales already sorted for width,
now by variable shrinkages. Rolls/bales which have shrinkage of between 2%-5% are
grouped together since the dimensional stability of the finished garments made form these
rolls does not vary significantly. Group rolls/bales that shrink between 5% - 10%
together. Shrinkage groups are made so that fabric rolls/bales with closer shrinkages are
laid together for cutting with a common or single pattern. If the shrinkage variation is
high among the rolls/bales, patterns have to be remade for each shrinkage group.
Grouping by shrinkage ensures that the finished garments will be consistent in their
dimensional stability.
Shade Variation: During the process of dyeing, fabric usually tend to take up the dye
uniformly. However some times the dye may not be fixed uniformly resulting in shade
variations. The tendency towards shade variation is significant as the width of the fabric
increases, thus wider width fabrics show greater shade variation from their center to their
selvedges.
For this purpose to determine the shade variation use the second half of the cutting to
prepare shade bands. The cut piece covers fabric width from the center to one selvedge.
This procedure is followed if the garment has no wash. However, if there is garment
wash, use the cuttings that were earlier washed and used for shrinkage sorting. The
purpose of this sorting is to group the cuttings and hence the rolls/bales by shade
variation. Based on the number of shades that are likely, the swatches are arranged in
order of their degree of variance. The shades are then sorted as families – lighter shades
with variance of 1-3 degrees, medium shades of 4-6 degrees and darker shades of 6-8.
The families of shades will be cut together for sewing. As the degree of variance is within
reasonable acceptability, finished garments can be packed together with the approval of
By Ravi Kishore 4
the customer. This process of sorting by shades is called shade banding and this will help
the customer to place the garments of a family of shade together for display in the store.
Inspection for Defects: The sorted fabric rolls/bales are inspected for any weaving or
knitting defects. This part of the inspection improves the cutting productivity since the
defects are marked. It also helps in identifying any major defects in the fabric so that such
rolls can be separated and returned to the supplier for replacement. In case of high defect
percentage, customer can be alerted for any shortage in garment order quantity. Such an
inspection system also improves the quality standards of the production. The inspection
procedure followed is as follows:
1. Select the number of rolls to be inspected. This is based on the total fabric received
for garment production of the style. A sample is drawn following a statistical sample
selection plan. The sample lists the minimum quantity of fabric for each slot that is
sorted based on width variation, shrinkage and shade variation. The rolls are randomly
selected. In case the number of defects is found high in selected rolls/bales, increase
the quantity to be inspected.
2. The sampling plan will be as follows: Since fabric from the Fareast countries like
China, Korea and Taiwan is shipped in yards, the fabric lot sizes will be considered in
yards. Fabrics from Europe and India are shipped in meters; the lot sizes to be
considered will be in meters.
Lot Size
Yards
Inspection
Yards
Lot Size
Meters
Inspection
Meters
Percent of
Total Lot
0 – 2,500 Not less than 500 0 – 2,300 Not less than 460 20%
2,501 – 5,000 251 - 500 2,301 – 4,500 230 - 450 10%
5,001 – 20,000 400 – 1,600 4,501 – 18,300 360 - 1465 8%
20,001 – 30,000 1,200 – 1,800 18,301 – 27,400 1,100 – 1,645 6%
3. Fabric inspection of the quantity of fabric is estimated as above. The next step is to
proceed with identifying the fabric rolls to be inspected which will cover the total
number of required meters or yards. The identified rolls are inspected as per different
inspection systems. There are two systems of inspection based on 4-points and 6-
points considering the number of points assigned to the size and significance of
defect. Among the two, 4-point system is commonly practiced in the garment
manufacturing industry. The points 1, 2, 3, and 4 are assigned to indicate the size and
By Ravi Kishore 5
significance of the defect. If the fabric lot is in yards, defect size is measured in inches
and if it is in meters defect size is represented in Cms.
4 – Point System of Fabric Defect Evaluation
Assigned
Points
Size of Defects
In Inches in Cms
1 3 inches or less 8cms or less
2 More than 3” but less
than 6”
More than 8cms but less
than 15cms
3 More than 6“ but less
than 9”
More than15” but less than
23cms
4 More than 9” More than 23cms
Assigning Defect Points: Under the system of inspection, a maximum of 4 penalty points
are assigned to any single defect. Penalty points are assigned to Major defects only.
Minor defects are not assigned penalty points. A major defect is any defect that makes
the finished garment to be considered as a second in sale. Major woven fabric defects
include slubs, holes, missing yarns, yarn variation, end out, soiled yarns, and wrong yarn.
Similarly major dye or printing defects are out of register, dye spots, machine stop, color
out, color smear, or shading. But these are not comprehensive lists.
If there is a continuous running defect exceeding 9 inches, it must be assigned a penalty
point of 4. If there is an additional defect within the same linear yard or meter, consider it
as a separate defect and assign it defect points depending on its severity Any continuous
defect such as roll to roll shade variation, narrow or irregular width within the roll,
creasing, uneven finish, barre’, skew must be assigned 4 points for every yard or meter
within a shipment. Each full width defect must be assigned 4 points. Obvious and
noticeable defects are assigned 4 points for in each yard or meter they are noticed
irrespective of their size.
Add up the total points assigned per every 100
yards of fabric inspected. The acceptance of
maximum defects varies from customer to
customer. For some up to points 40 per 100
yards are acceptable but for others not more
than 20 or 28 are acceptable. For example, JC
Penney accepts 26 points per 100 linear yards per roll, but must not be more than 13
points in 100 linear yards in the total shipment. Similarly, Nordstrom accepts 20 points
per square 100 square yards in a roll but in a shipment not more than 15 points are
By Ravi Kishore 6
allowed per 100 square yards. The acceptable defects vary with the fabric type. Some
retail buyers have the following level of acceptance for common fabrics:
Group Fabric Description Points per Roll Points per shipment
1 Dress shirting’s, Worsted/ Woolens, suiting
fabrics, O/E denim 12-16 oz/yd2
, manmade
fabrics, filament rayon, twills
poplin/oxford/gingham shirting, light and
medium weight denim
20 points / 100 yards2
24 points / 100 meters2
15 points / 100 yards2
18 points / meters2
2 Ring spun denim 12-16 oz/yd2
, canvas,
corduroy, velvet, flannel, woven fabrics with
spandex, seersucker, dobby, jacquard,
chambray, silks, basic knits
25 points / 100 yards2
30 points / 100 meters2
20 points / 100 yards2
24 points / meters2
3 All specialty knits 30 points / 100 yards2
36 points / 100 meters2
25 points / 100 yards2
30 points / meters2
The Point Calculation:
For Rolls
 Points per 100 square yards = Total Points for the Roll X 3600
Yards inspected X Cuttable width (inch)
 Points per 100 square meters = Total Points for the roll X 100,000
Yards inspected X Cuttable Fabric Width (mm)
For a shipment
Total shipment points per 100 yards2
= Total average points per linear yard X 3600
Shipment inspected yards X Cuttable Fabric width (inch)
Total shipment points per 100 meters2
= Total average points per linear meter X 10,000
Shipment inspected meters X Cuttable Fabric width (mm)
Common Fabric Inspection requirements –
1. Ensure that the fabric is inspected by the supplier mill before shipment.
2. Flag all major defects and all seams
3. Minimum length of a roll must not be less than 40 yards
4. Any defect that repeats continuously for 3 yards is a running defect and the roll must
be rejected regardless of the final point count.
5. Two part pieces must not exceed 10% of the rolls shipped. Minimum length of either
part cannot be less than 25 yards.
6. All seams must be counted as 4 points per seam. Seams and full width defects are
considered as major defects.
7. Any piece with more than 6 major defects per 100 yards, including seams or 3 major
defects in 50 yards will be considered as second quality
8. The full width cutting from the beginning of the roll must be used to check the
side/side and end /end shade variation.
9. Width variation must be checked at the middle and end of the rolls.
Format of the inspection report:
4 POINT FABRIC INSPECTION REPORT
Supplier Name & Address: Fabric P.O No. Style No. In-house Date Inspection Date:
. Roll Length Cuttable Width
Mill Roll
No.
Warehouse
Roll No
Ticketed Actual Difference Roll
Width
Roll
Starting
Roll
Middle
End of
roll
Defect
Points
By Ravi Kishore 7
III Process – Cutting, Numbering & Issue
II Process – Laying & Spreading
I Process – Fabric receipt & Marker Preparation
Lay
reconciliation
report
Cutting
Worksheet
Fabric Request
to stores
Fabric Details
from stores
Fabric
Inspection
Report
Cut Plan
Marker
Preparation
Duplicate
Patterns
Fabric
relaxation
Request for
Marker to
CAD
Marker receipt
from CAD
Fabric cut
order
Fabric
Cutting
Fabric lay
report
Fabric Lay
Preparation
Fabric End
bit register
Fabric
Spreading
Fabric receipt
from stores
Bundling
Numbering Checking
Parts
Replacement
Cutting
report
Cuttings Issue
Register
Pilot Run
Issue cuttings to
sewing section
The inspection report prepared is circulated to the merchandiser concerned, fabric
sourcing department, production department. Based on the number of points and
acceptability, the fabric is issued for production to cutting section.
Cutting Section
Inspected fabric is received from the stores for further process. Cutting process has
greater impact on cost of garment than many other sections concerned with production.
While some of the costs are incurred in the cutting section, other costs are in the
remaining production sections due to errors committed in the cutting section.
It must be remembered that the cost of fabric is constitutes nearly 50% of the garment
cost. The cutting section also uses large workforce for the various operations. Therefore
the cutting process is given much care and importance in the production process. The
common procedure followed in the cutting section can be graphically presented as-
I Process: Cutting section places an indent for fabric based on the production order
received from the merchandiser together with the style file, sample and trim cards. The
process begins with the receipt of fabric after inspection from the stores. When the fabric
By Ravi Kishore 8
is sent from the stores, it is accompanied with fabric inspection and test reports. A cut
plan is prepared by the cutting section considering the various issues highlighted in the
fabric report. A cut order plan translates customer orders into cutting orders. It is the
process that coordinates customer orders with all the variables of marker making,
spreading, and cutting to minimize total production costs and meet customer demand for
timely products. It seeks most effective use of labor, equipment, fabric and space.
FABRIC INSPECTION REPORT
Supplier Name &
Address:
Fabric P.O No. Style No. In-house Date Inspection Date:
.Roll Length Cuttable Width Shrinkage %
Roll
No.
Ticketed Actual Difference Width Starting Middle End Length Width
The cut order plan considers -
 production order and fabric width and availability
 volume, size ratios, and sectioning procedures for marker making
 whether file markers are available or new ones are needed
 developing specifications for optimum marker making and fabric utilization
 most effective use of spreading and cutting equipment and personnel
 issuing orders for marker making, spreading and cutting
 number of sizes in order and colours
 maximum/minimum number of sizes allowed in marker
 maximum spread length and ply height
 percentage of over cut or undercut units
 usable fabric width and variations
 common lines among pattern pieces
 costs of marking markers, spreading, cutting, bundling
 fabric cost per yard
The cut order plan considers the fabric test reports and inspection reports received from
the stores. The test report highlights the shrinkage and colour fastness of the bulk fabric.
It does not reflect the roll/bale wise shrinkage. For this the inspection report is used which
is in two parts. The first part deals with the roll/bale wise fabric width and shrinkage.
Marker: The cutting section receives a set of duplicate patterns from the sample
department. An indent is placed with the CAD section to prepare a marker. The marker is
planned to determine the most efficient combination of sizes and shades in an order and
to produce the best fabric yield and equipment utilization. The marker plan determines the
most efficient layout of all the pattern pieces for all the sizes of a style on a given fabric.
It is prepared to the cuttable width of the fabric.
There are two types of markers – Open marker made with full pattern pieces; Closed
marker made with half garment pieces for laying along the folds of a tube (Tubular knit
By Ravi Kishore 9
fabric). Marker plan is based on the nature of the fabric and the desired result in the
finished garment, pattern alignment in relation to the grain of the fabric and symmetry
and asymmetry required in the garment. It is also based on the design characteristic of the
finished garment.
Marker efficiency is calculated as Area of patterns in the marker plan X 100%
Total area of the marker plan
It is determined to estimate fabric utilization and reduce or minimise waste. Efficiency of
marker depends on fabric and pattern characteristics, splitting pattern pieces and creating
a seam, reducing seam allowances, hem width, adjusting and modifying grain line, grain
orientation, fabric utilisation standards – 90 to 97% which lead to 80 -85% achievement.
Fabric Laying and Quality: The cutting section will
proceed to lay and spread the fabric rolls on the lay
table as per the cut plan and marker. Wherever the
selvedges are tight resulting in roll up of fabric, they
are cut and the fabric is smoothened.
Fabrics have to be relaxed after laying and
spreading for a minimum of 12 hours and
depending on the fabric and its construction. Some
fabrics such as crepe, georgette, chiffon, voiles,
lycra blends and knits require longer time to relax.
Relaxation eliminates tension caused in finishing and winding of fabric. Lay report must
be prepared for all the fabric that is laid as per the cut plan.
Laying Fabric
Lay down underlay paper on cutting table and place original paper marker on top. Mark start and end of the lay
making an allowance at each end of the lay taking into account the nature of the fabric being used, and expected
shrinkage when the fabric is unrolled. Also mark joins on the underlay paper so that fabric flaws can be cut out and the
fabric rejoined throughout the lay.
Laying Up
Make sure to separate all rolls, even of similar colour / shade, by using a paper between lays of each roll, to ensure all
garment pieces are separated. This way no two rolls of fabric will become mixed during the bundling or production
process. Mixing of two rolls of fabric will almost certainly lead to shaded garments, drastically reducing their value,
even if able to be sold. Visually inspect the fabric while laying up for fabric flaws to verify any flaws or defects like,
twisted weave, same roll shading , inconsistent width or any other fabric discrepancies. Always lay Right Side Up.
Fabric flaws may not be visible on the wrong side. Also consistency of this laying process will assist in the sewing
section to know the right side. Record the actual lay length to calculate actual yield per unit and a way of assessing
total fabric usage. This can then be deducted from the beginning fabric roll total to give an estimated roll balance.
By Ravi Kishore 10
Spreading is the processes of superimposing lengths of fabric on a spreading table or
cutting table. A spread or lay-up is the total amount of fabric prepared for a single
marker. Spreading mode is the manner in which fabric plies are laid out for cutting.
Care must be taken during spreading for-
• Direction of the fabric: it
may be positioned in two
ways face-to-face (F/F) or
with all plies facing-one-way
(F/O/W)
• Direction of the Fabric Nap:
it may be positioned nap-
one-way (N/O/W) or nap-up-
down
Spreading process must take care to sort shades of fabric rolls, maintain correct ply
direction and adequate lay stability, align plies properly, maintain correct ply tension,
eliminate fabric faults, eliminate of static electricity, avoid distortion in the spread and
avoid fusion of plies during cutting.
The lay report gives the time the fabric laid, so that the cutting room manager can decide
the time for relaxation. After the fabric is relaxed as per standard, the lay fabric is moved
to the cutting table.
Before we move to cutting section we must consider the marker efficiencies and fabric
spreading and their implication on the costs.
Example of marker efficiency:
If the size and order quantity are
Total order = 617
If the marker is made for single size as in the picture, for size
40, the length will be 186 cms and fabric utilisation will be
FABRIC LAY REPORT
Date: Style No.: Garment Description: Fabric Consumption:
Lay Time: P. O. No.: Fabric Count /
Construction:
Total Rolls Received:
Roll No. Width Cuttable
Width
Yards/
Meters
Yards /
Meters Laid
End Bit
Length (Yds /
Mtrs)
Fabric Defect
Length
(Yds /Mtrs)
Size 36 38 40 42 44
Qty 43 115 202 138 119
Spreading modes
F/O/W
N/O/W
F/F
N/O/W
F/F
N/U/D
F/O/W
N/U/D
By Ravi Kishore 11
62%. Based on the single pattern marker for all the sizes, fabric utilisation for all the sizes
will be as follows:
Considering the cutting plan, the fabric spread
will be a step lay as in the picture below.
Although this method of lay is economical in
use of manpower available, it will result in
high fabric utilisation.
Instead if two sizes are placed on a marker, the
utilisation will be as follows:
The marker for the two sizes in 40 will be as
above. The marker length will be 2.86 mtrs and fabric utilisation will be 77.8%.
The fabric is cut at the end of each lay after
spreading with an end cutter. The end cutter
prevents uneven edges if the fabric were to be cut
with scissors resulting in wastage.
Cutting and Quality: Marker is placed on the lay and held in position with the help of
clamps or weights. Cutting marker has one each part comprehensive details – style no.,
colour, shade no., if more than one shade, size, part. Fabric is then cut as per the marker
following the marking guidelines. To mark start and finish position of sewing operations
such as darts, pocket etc. the lay fabric is drilled with light duty drilling machine as per
the marker indications. At places where two cut parts are attached in sewing such as
Size Length of marker
(cms)
X Plies (no.s)
Total
Meterage
36 177 X 43 76.11
38 183 X 115 210.45
40 186 X 202 375.22
42 227 X 138 313.26
44 230 X 119 274.70
Order Quantity 617 1238.74
+ 2% allowance 24.97
Total fabric 1273.71
Average consumption
2.06 mtrs / garment
= 1273.71
617 Marker
No.
No. of
Plies
Sizes Total
36 38 40 42 44
1 22 2 44
2 58 2 116
3 101 2 202
4 69 2 138
5 60 2 120
Total No. of garments to cut
with 3 extra garments
620
By Ravi Kishore 12
collar band to yoke, front pleats of a pant to waist band, sleeve placket to cuff, the parts
are notched after cutting the parts.
Fabric lay on the cutting table can be cut using a straight knife
cutting machine which is commonly used in many garment
factories. Experienced cutting technicians such as the senior cutting
technician usually do the cutting. Despite a correct marker in place,
if the cutting technician does not cut accurately, it will result in a
total loss to the factory. Some of the precautions that need to be
taken are that hands must not shake and the palms need to be sweat
free.
Automatic cutting machines are used which are
computer driven and the accuracy of cutting is
much better. Although these machines are
expensive, their accuracy and minimum wastage
and the speed make for the cost.
Each lay of cut parts on the cutting table is
called as a bundle. Each bundle must be
securely tied together with the marker sheet at
the top. These bundles are now placed with larger parts at the bottom and smaller parts
over them. These parts are now counted and the total number of parts is tallied with the
parts of the marker. Each lay part in the bundle is numbered with a sticker
By Ravi Kishore
Fabric Cutting
Follow Specifications
Check Specification Sheet of the style received with cutting plan. Check information on fabric, lining and fusible; yields,
cloth direction, type and colour of lining and fusible. Note if different from "normal" procedure relating to fusing and
lining cut directions. For example, cutting of fusible off grain (bias) or on the opposite grain (across the weft) for any
reason must be adhered to.
Sealer Sample
The sealer sample or sealed pre-production sample must be accompany the cutting plan. The sample will be referred
for a number of important points. Check sample for fabric pile direction, matching points on check and / or stripe
fabrics, fusible interlining position, contrast panels, lining preferred right side. This is the first stage of cutting process.
Marker and Pattern
Check if all pattern parts needed are available, by comparing the sample or with specification sheet. Check the
direction of brushed, piled and one-way fabrics to ensure each fabric’s characteristics before starting a marker Check
the master or base size pattern against the graded set to ensure if all aspects are covered in the size set patterns. This is
a quality concern that will save time and money in the later stages of production. On oversight may cost the company
dearly and the cutter branded negligent.
The CAD marker is checked with patterns to ensure that no parts are missing. In case a manual marker has to be made
lay all the patterns parts and mark them on the marker paper. Ensure all patterns are marked on the correct grain.
Mark all nicks and drill holes from pattern piece on to the marker clearly. Garment pieces requiring hem, cuff and
pocket position fusing after cutting must have fusing position marked in distinct colour like red.
Cutting
Place the marker on top of the fabric laid and check all joints marked on the marker line up with the marks on the base
paper. All joints should overlap to ensure complete coverage of all panels and laid fabric is marginally longer than the
maker. Check the marker one final time and the laid fabric for the required number of cuttings. Check the cutting
machine before start of cutting for blade condition, its sharpness and straight edge. If there are any curves or bends in
the blade’s edge, fabric cut will have ragged edges. Check the oil level and sharpening belt of the cutting machine. If
necessary change the blade or machine because the cutting process is irreversible. Make sure that the marker will not
move while cutting by either using weights, pins, staples, clamps, sticky sprays or a combination of any of these
methods.
Stretch fabrics, and other similar fabrics, should be cut across the lay (from selvedge to selvedge), at the end of each
size before cutting any marked in pattern pieces. This will give one last chance to allow for shrinkage before the final
process of cutting out the marked in pieces. Some fabrics such as COTTON ELASTANE need each panel to be cut as a
block and relayed before cutting it to pattern shape, eliminating uneven inherent shrinkage.
Fabrics that have a tight selvedge causing twisted, distorted, uneven effects throughout the lay need to have the
selvedges cut off both sides to release the tight warp threads. This will relax the fabric creating an easier cutting
process and a more accurate final product.
Test drill holes and observe fabric reactions like pulled threads, fabric fusion, holes closing up after drill removed, on a
block of waste fabric within the lay to be cut. These problems can be resolved by using hollow tip drill bits, hot tip
drills, larger or smaller diameter drill bits.
Depth of nicks needs to be relevant and appropriate for the fabric being cut. More open weave fabrics may require a
slightly deeper or visible nick cut into the fabric block. Otherwise the nick may not be visible. Fabrics such as denim,
nylons, 100% cotton shirting and similar stable fabrics need shallow nick. The depth of these nicks can vary from 2-3
mm for stable fabrics to 5 mm for open weave fabrics. All nicks must be within seam allowance. These nicks must also
be of a consistent depth from the top to the bottom of the lay.
By Ravi Kishore 14
Sewing Section
The cut parts move from cutting section to sewing for sewing and assembly. The parts are
issued through an issue register by the cutting section upon
receiving an indent from the sewing section supervisor. The parts
are numbered and bundled in numbers of 10 or 20 per bundle. The
process in this section follows an assembly line system with a
large number of industrial sewing machines described earlier
placed in long columns. The sewing lines are laid out for
production of specific styles of garments considering the type of
machines required. For example a men’s shirt production line
requires a mix of machines including single needle and double
needle lockstitch machines, overlock and chain stitch machines,
buttonhole and buttoning machines.
The process in the sewing section starts with the preparation of
production plan and operation bulletin. These are prepared by the industrial engineer (IE)
prior to the arrival of the fabric and trims. The I.E first estimates the time required for
producing the garment style based on the number of seams and their length and type. He
measures the seam length of the garment and the time required to stitch a standard seam
of 5 or 10 cms.
For example if the average time taken for stitching a length of 10 cms is 7 seconds and if
a shirt has seams totaling a length of 3000 cms, the time required for production of a
single garment will be approximately 35 minutes. The IE will then calculate the number
of shirts that can be produced in a day as
480 working minutes available (60 mnts X 8 hrs)
35 minutes per one shirt
= 13 shirts per working day
If the order quantity is 2000 shirts, it takes nearly 154 days for one machine and one
person to complete the order. This of course is not practical. Therefore, the production
will be undertaken by an assembly line of machines. The number of machines required
will depend on the number of parts that are there in the shirt and the number of
operations. That means the IE breaks down the shirt production by the various parts that it
is made of and the operations required to assemble them. The sum of the times taken for
completing all the operations to assemble the shirt will be 35 minutes.
By Ravi Kishore 15
The IE thus prepares the work break down for every garment style and estimates the time
it requires to be made. A standard software application called general sewing data (GSD)
is used for this purpose. Using this application software the time required for each
operation and the time for one garment are calculated. The table below explains the
number of operations in a shirt and the time. This table is called as Operation Bulletin.
OPN
NO.
DESCRIPTION MACHINE
SMV
(Mnts)
SAM
(Mnts)
UNITS/
DAY
OPERATO
RS REQ
MAX
PRO
D
EFF %
PROD/
HOUR
COLLAR
1 COLLAR RUN STITCH SNLSEC 0.5 0.769 624 1.5 936 77% 78
2 COLLAR TRIM, TURN & IRON EWATEX 0.35 0.538 891.429 1 891 81% 111
3 COLLAR STAY STITCH SNLS 0.23 0.354 1356.52 1 1357 53% 170
4 ATTACH COLLAR TO INNER COLLAR SNLS 0.45 0.692 693.333 1.5 1040 69% 87
5 TURN & IRON COLLAR IRON BOX 0.3 0.462 1040 1 1040 69% 130
6 INNER COLLAR RUN ST SNLSEC 0.55 0.846 567.273 1.5 851 85% 71
7 IINER COLLAR TRIM, TURN & IRON EWATEX 0.4 0.615 780 1 780 92% 98
CUFF
8 CUFF RUN STITCH @ SIDES SNLSEC 0.7 1.077 445.714 2 891 81% 56
9 TURN AND IRON CUFF EWATEX 0.4 0.615 780 1 780 92% 98
10 CUFF EDGE STITCH SNLS 0.7 1.077 445.714 2 891 81% 56
11 PRESS UNDER CUFF MANUALLY IRON BOX 0.3 0.462 1040 1 1040 69% 130
SLEEVE
12 LOWER SLEEVE PLKT ATTACH SNLS 0.42 0.646 742.857 1 743 97% 93
13 TACK SLEEVE VENT, 2 CM SNLS 0.4 0.615 780 1 780 92% 98
14 UPPER SLV PLKT IRON IRON BOX 0.71 1.092 439.437 2 879 82% 55
15 UPPER SLV PLKT BOX SNLS 1.3 2.000 240 3 720 100% 30
BACK
16
MAIN & SIZE LABEL ATTACH ON BK
YOKE
SNLS 0.35 0.538 891.429 1 891 81% 111
17 JOIN BACK PANELS 5TO/L 0.75 1.154 416 2 832 87% 52
18 ATTACH WASH CARE LBL TO SIDE SNLS 0.3 0.462 1040 1 1040 69% 130
FRONT
19 JOIN INNER PLKT PANELS SNLS 0.4 0.615 780 1 780 92% 98
20 ATTACH INNER PLKT TO FR PLKT SNLS 0.35 0.538 891.429 1 891 81% 111
21 TACK FRONT PLKT @ SIDE SNLS 0.3 0.462 1040 1 1040 69% 130
22 FRONT PLACKET IRON IRON BOX 0.6 0.923 520 1.5 780 92% 65
23 B/H ON FRONT PLKT B/H 0.45 0.600 800 1 800 90% 100
24 ATTACH PLACKET TO FRONT SNLS 0.98 1.508 318.367 3 955 75% 40
25 HEM FRONT PLKTS SNLS 0.85 1.308 367.059 2 734 98% 46
26 TACK B/H PLKT @ BTM SNLS 0.2 0.308 1560 0.5 780 92% 195
27 JOIN FRONT PANELS 5TO/L 0.75 1.154 416 2 832 87% 52
28 FRONT YOKE IRON FOR PLEATS IRON BOX 0.95 1.462 328.421 2.5 821 88% 41
29 LOCK PLEATS ON YOKE SNLS 1 1.538 312 2.5 780 92% 39
30 ATTACH YOKE TO FRONT SNLS 0.7 1.077 445.714 2 891 81% 56
31 LOCK YOKE @ SHOULDER SNLS 0.65 1.000 480 2 960 75% 60
ASSEMBLY
32 FRONT & BACK NO. SETTING MANUAL 0.3 0.462 1040 1 1040 69% 130
33 SHOULDER ATTACH 5TO/L 0.55 0.846 567.273 2 1135 63% 71
34 SHOULDER EDGE STITCH SNLS 0.3 0.462 1040 1 1040 69% 130
35 COLLAR PAIRING & CENTRE MARKING MANUAL 0.3 0.462 1040 1 1040 69% 130
36 COLLAR ATTACH SNLS 0.58 0.892 537.931 2 1076 67% 67
37 COLLAR FINISH SNLS 0.65 1.000 480 2 960 75% 60
38 SLEEVE PAIRING MANUAL 0.2 0.308 1560 1 1560 46% 195
39 SLEEVE ATTACH 5TO/L 0.98 1.508 318.367 3 955 75% 40
40 TACK AT ARM HOLE SNLS 0.35 0.538 891.429 1 891 81% 111
41 CLOSE SIDE SEAM 5TO/L 0.63 0.969 495.238 2 990 73% 62
42 CUFF PAIRING, MARK CUFF ATTACH MANUAL 0.3 0.462 1040 1 1040 69% 130
43 CUFF ATTACH SNLS 0.76 1.169 410.526 2 821 88% 51
44 BOTTOM TRIM MANUAL 0.35 0.538 891.429 1 891 81% 111
45 HEM BOTTOM SNLS 0.6 0.923 520 1.5 780 92% 65
46 B/H ON CUFF & SLV PLKT B/H 0.36 0.554 866.667 1 867 83% 108
47 BUTTONING MARKING MANUAL 0.4 0.615 780 1 780 92% 98
48 BUTTONING OPERTION BTN 0.78 1.200 400 2 800 90% 50
Total 25.680 39.42 240.00 73 720 81%
By Ravi Kishore 16
for each operation. There are 48 operations in the production for the style given in the
table. There are 5 parts in the shirt – collar, cuff, sleeve, back and front. As per the
scheme above the number of operations in each part is as below:
1. Collar – 7
2. Cuff – 4
3. Sleeve – 4
4. Back – 3
5. Front – 13
Once the parts are prepared, they are assembled to form the garment. The number of
operations required to assemble are 17. As can be noticed, the number of operations and
parts can increase or decrease depending on the design of the style.
In the table above there are two columns that give time for each operation –
SMV – standard minute value
SAM – standard allowable minute
Time for these two is given in minutes. The SMV is the actual time that an operation will
take to be completed. This time is calculated based on the time computed using GSD
software. It can also be measured by actual measurement of time while the operation is
being performed. It is called as Work Measurement and the study of the operation using
time as a unit of measure is called Time Study. The IE conducts time study regularly in
the factory to gather time taken for each operation. Time study is conducted continuously
to estimate the average time required for each operation. The average time thus calculated
is called as Standard Time.
Time study is defined as “a technique of work measurement used for determining
accurately as possible from a limited number of observations, the time necessary to carry
out a given activity at a defined standard of performance”.
The table below is an example of time study. The operation performed is shoulder
attachment of a shirt which is broken down into 9 elements. Time taken to perform each
element of work is observed. This process is repeated thrice. 3 observed times are taken
recorded. Their average time is then calculated. The average time is called basic time or
standard time for the operation. The basic time is also the standard minute value or SMV
for the operation. Allowances such as personal allowance or fatigue allowance are added
to the SMV to calculate the standard allowable minute for the operation.
By Ravi Kishore 17
No ELEMENT DESCRIPTION
Observed Time Total O.T.
Average
O.T.
B.T.
1 2 3
1 Shirt back picked 1.98 2.36 2.17 6.51 2.17 2.17
2 Shirt front picked 1.29 1.31 1.59 4.19 1.39 1.39
3
Back aligned with front at
shoulder side
5.32 5.41 6.86 17.59 5.86 5.86
4 Assembly placed in stitching area 4.98 5.87 5.68 16.53 5.51 5.51
5 Pressure bar and Needle put down 2.3 2.18 2.10 6.58 2.19 2.19
6
stitch at 5 mm from edge of
shoulder
4.03 4.69 5.48 14.20 4.73 4.73
7
Pressure bar and needle moved up
pulling fabric out
4.10 5.65 4.85 14.6 4.86 4.86
8 Thread been cut 1.62 1.98 2.65 6.25 2.08 2.08
9 Stitched fabric kept left side 4.49 4.57 3.17 12.23 4.07 4.07
R=Rating O.T.=Observed Time B.T.=Basic Time
Calculation of SAM:
Personal Allowance: 11%
Personal Allowance = 11/100 * 32.86 = 3.61
Machine Allowance: 5 %
5/100 * 32.86 = 1.64
Contingency Allowance: 3 %
3/100 * 32.86 = 0.98
Total Allowances = Machine Allowance + Personal allowance +
Contingency Allowance
= 1.64 sec + 3.61 sec + 0.98 sec = 6.23 sec
SAM (Standard Allowed Minutes) = Basic Time + Total Allowances
Therefore SAM = 32.86 + 6.23 = 39.09 sec or 0.652 minute.
Based on the total SAM of the garment as in the operation bulletin above, the production
target is fixed for a day, the number of machines required and also the number of
operators as given in the table below:.
Style XT 151 EFF @ F/S LDS SHIRT Date
Buyer 65% TARGET /SHIFT 720
MACHINE SAM 23.830 36.569 DIRECT OPERATORS 54.9
BAL
EFF%
80.99%
MANUAL SAM 1.850 2.846 TOTAL WORK MINS 480 PCS/MC 10.75
Total 25.680 39.415 ACTUAL OPERATORS 67.0
The machines required is summarised in the operation bulletin as in the table below.
MACHINES REQUIRED
Single Needle Lock Stitch machine SNLS 36
Single Needle Lock Stitch machine with edge cutting SNLSEC 5
5 thread overlock machine 5TO/L 11
IRON BOX 8
Collar and cuff turning and trimming machine EWATEX 3
Button hole machine B/H 2
Button stitch machine BTN 2
Manual operations MANUAL 6
By Ravi Kishore 18
The machine plan is prepared based on the operation bulletin and the number of
production lines is determined. If the order
quantity requires more than one sewing line
to complete production within the given
number of days, accordingly as many
production lines are planned.
In the conventional production system the work stations (sewing machines and work
tables) are placed in successive rows. A production line is usually about 50 work stations
long. An overhead bus bar travels across the length of the sewing lines to facilitate power
supply to the machines and lighting as in the
picture above.
Production systems
The traditional tailor has given way to
readymade garments sold across retail counters across the world. Mass production of
garments evolved out of customised production for individual customers. The evolution
in technology including high speed sewing and cutting machines, computer controlled
cutting rooms and sewing floors, and above all demand for quality garments season after
season brought in many changes in garment production systems. Notable among the
systems that are still practiced in many countries are individual, departmental whole
garment, section or process, progressive bundle, straight-line, unit production and quick
response. Let us discuss each of these systems and their advantages and disadvantages.
Individual or Make through system: It is the traditional method of production where a
single tailor or operator assembles the entire garment. The tailor in the tailoring shop
performs all operations and makes a garment including sewing, hand work and pressing.
The operator takes a bundle of cuttings to sew according to his or her own method of
work. The tailor in this system is highly skilled and versatile. It is rare to find such skilled
persons and hence this system of production is highly expensive. The individual system is
most effective when a variety of garments have to be produced in small quantities such as
in the sample room of a garment factory
By Ravi Kishore 19
Departmental Whole garment system: In this production system one individual does all
the work with the equipment allocated to a department as in the case of a person working
in cutting section doing all the cutting work. A second person does all the sewing work in
sewing section, and the third person finishes, presses and packs the garments. The
workers in this system may use more than one equipment or tool to complete their
respective job. This method of production is followed in sample rooms of large factories
to produce size set samples and also in small boutiques.
Both individual and departmental systems are effective when a very large variety of
garments have to be produced in small quantities. These are also called as piece rate
system since the operators are paid for the complete garment produced. Involvement of
the operators is complete as they tend to earn more money if more garments are
completed. In the departmental method operators are specialised in their respective work
area. The Work in Progress (WIP) is reduced, since at a time one or few cut garments are
with one operator and so the amount as inventory is reduced.
However, these systems require highly skilled operators, and hence the cost of making is
high. It is also a disadvantage as the operator is more concerned on the number of pieces
finished instead of their quality. Productivity will be is low due to lack of specialisation as
each operator performs a number of operations. Where bulk production of large order
quantities is required both these systems are not effective.
Section or Process System: It is also popular as Group System. This is evolved from the
make through system, with the difference that the operators specialise in one major
component and sew it from beginning to end. For example, an operator specialising in
collar would assemble the collar by making the neck band, collar and attach the collar to
neck band and perform all the operations required to finish the part or component. The
production section will have a number of sections, each containing experienced operators
capable of performing all the operations required for a specific component. The sections
are built according to the average garment produced, and include:
º Pre-assembling or preparation of small parts
º Front and back making
º Main assembly or closing, setting collars and sleeves, etc
º Finishing operations such as buttonholes, button stitch
blind-stitching.
By Ravi Kishore 20
This is an efficient system to produce a variety of styles in reasonable quantities. As the
workforce of all levels - semi skilled, skilled, apprentice - can be used the cost of making
is less compared with the individual system. Productivity is higher compared to
individual system, due to the use of special machines and all specialised workforce.
Automation and specialisation can be implemented and absenteeism and machine
breakdown problems do not cause serious problems.
As operators of different skill sets are involved,the quality must be strictly maintained.
Although productivity is high, skilled operators are required to perform simple operation
within the section. As groups of people are involved in each section we require more
WIP, thus increasing the inventory cost. As this is not a bundling system, there are greater
chances for mix up, loss, shade variation, and sizes, so quality and production will be
affected.
Progressive Bundle System: This production system is also popular as - Batch System. As
the name implies in this system garments are gradually assembled as they move through
successive sub-assemblies and main assembly operations in bundle form. The principles
of this system are -
o The various sections are positioned according to main operation sequence, with each
section having a layout according to the sequence of operations required to produce a
particular component. For example, the collar section will have the following
operations in sequence:
1. Mark collar run stitch
2. Run stitch collar
3. Collar turn / trim / iron
4. Collar top stitch
The number of machines for each operation is determined by the output required.
o A WIP table is positioned at the start and end of every section used for storage of
work received from a preceding operation, and to hold work completed by that
section.
o Due to the WIP tables or buffers, each section is not directly dependent on the
preceding section, but can absorb variations in output through stocks held within the
section.
The progressive bundle system, while being somewhat cumbersome in operation and
requiring large quantities of work in progress, is probably one of the most stable systems
as regards output. Unless there is serious absenteeism or prolonged special machine
By Ravi Kishore 21
breakdowns, most of the usual hold-ups can be absorbed because of the amounts of work
in progress. Balancing and the changeover to new styles are simplified, due to the amount
of work held in reverse. When properly managed, the progressive bundle system is
versatile and efficient. Operators of all levels - unskilled, skilled, semi skilled are
involved in this system where complex operations are broken into small simple operation.
Hence the cost of making is competitive. The quality of each component is checked
during the individual operation as a result the overall quality is maintained. The
components are moved in bundles from one operation to next operation, so there are
fewer chances for lot mix-up, shade variation, size variation, etc Specialisation and
rhythm of operation increase productivity. As the WIP is high in this system, this is a
stable system. Due to WIP buffer, the breakdown, absenteeism, balancing of line, change
of style can be easily managed. Bundle tracking can be implemented to identify and solve
quality problems. An effective production and quality control systems can be
implemented using time and method study tools, operator training programmes and with
use of material handling equipment, such as centre table, chute, conveyor, trolley, bins,
etc.
However, line balancing is difficult and is
sometimes solved by an efficient
supervisor. But often it remains as one of
the major constraints. Regular maintenance
of equipment and machinery is needed.
Batch planning is required for each style,
which takes a lot of time. Improper
planning causes worker turnover, poor
quality, and loss in production. Increase in
WIP in each section increases the inventory
cost. Frequent change of styles and small
order quantities make this system of
production ineffective. Shuttle operators
and utility operators also termed as floaters
are needed in every batch to balance the line.
Straight-line or 'Synchro' System: This system is based on a synchronised flow of work
through each stage of producing a garment. Time-synchronisation is the most important
By Ravi Kishore 22
factor of this system because the flow of work cannot be synchronised if there are
considerable variations in the standard times allowed for all the operations performed on
the line.
For example, if one operation has a value of 1.25 minutes SAM, then all the other
operations in the line must have the same, or a very close, value. The manipulation
required to balance the standard time for each operator can sometimes lead to illogical
combinations of whole or part operations which do not always improve the efficiency of
individual operators. The synchro system by its very nature is rigid and particularly
vulnerable to absenteeism and machine breakdowns. At all times reserve operators and
machines must be available to fill the gaps. In addition, this system requires sufficient
volume of the same type of garments to keep the line in continuous operation.
Unit Production System (UPS): It is a mechanical system that has been in use for quite
sometime, but major advancements were made in 1983 when computers were first used to
plan, control and direct the flow of work through the system.
The essential features of this system are:
1. The unit of production is a single garment and not bundles
2. The garment components are automatically transported from workstation to work
station according to a pre-determined sequence
3. The work stations are so constructed that the components are presented as close as
possible to the operator's left hand in order to reduce or minimise the movement
required to grasp and position and component to be sewn.
The system operates as described below-
All parts for one garment are loaded onto a carrier at a workstation
specially designed. The carrier itself is divided into sections, with each
section having a quick-release clamp, which prevents the components
from falling during movement through the system. When a batch of
garments is loaded onto carriers they are fed past a mechanical or
electronic device, which records the number of the carrier and addresses it
to its first destination. The more intelligent systems address the carriers with all the
destinations that they have to pass through to complete. The loaded carriers are then fed
onto the main powered line, which continually circulates between the rows of machines.
This main, or head, line is connected to each workstation by junctions, which open
automatically if the work on a carrier is addressed to that particular station. The carrier is
By Ravi Kishore 23
directed to the left side of the operator and waits its turn along with the other carriers in
the station.
When the operator has completed work on one carrier, a push button at the side of the
sewing machine is pressed and this activates a mechanism, which transports the carrier
back to the main line. As one carrier leaves the station, another is automatically fed in to
take its place. When the carrier leaves the station it is recorded on the data collection
system, and then addressed to its next destination.
Unit Production System requires
considerable investments, which are not
always justified by conventional payback
calculations. Apart from the measurable
tangible benefits, UPS also have many
intangible benefits such as a more orderly
and controlled flow of work, and the
ability to simulate production situation in advance. These intangibles are difficult to
measure, but in themselves make a very positive contribution to the overall viability of
the unit. All things considered, unit production systems have major advantages over the
other manual and mechanical systems.
Bundle handling is completely eliminated in this system. The time involved in the pick-up
and disposal of sewing parts by operator is reduced to minimum. Output is automatically
recorded, thus eliminating the operator to register the work. The computerised systems
automatically balance the work between stations. Up to 40 styles can be produced
simultaneously on one system.
Unit production system requires high investments. The payback period of the investment
takes long time. Proper planning is required to make the system effective.
Quick Response Sewing System: It was first developed in Japan to enable manufacturers
to respond quickly to market changes, especially when orders for individual styles were in
small lots. Each workstation is equipped with two or four machines and the operator will
take the garment through the required operations, including pressing, before it is
transported to the next workstation.
Some of the machines are duplicated in different stations
and consequently if there is a bottleneck in one section
By Ravi Kishore 24
the overload is automatically transported to other stations where operator capacity is
available. All the parts of one garment are loaded on a hanging clamp attached to a trolley
and in theory, there should only be one garment at each workstation. Work is transported
by a computer controlled, overhead trolley system and each station has an individual
controller, which provides the operator with information on the style being worked on
displayed on an information card accompanying each trolley. A less sophisticated version
of QRS uses a wheeled trolley, which contains parts for one garment and is pushed along
the floor from operator to operator. Another feature of QRS is that all operators work in a
standing position for easy mobility from one machine to another within their own
workstation. Machine heights are adjusted accordingly and touch-pads and knee-pads
controls are used instead of conventional foot pedals.
Some of the salient features of QRS are that the supervisor is free to work with operators.
Operators must be highly skilled in the operation of all the different machines in one
workstation. In line inspection stations are built in and the inspector is able to return
faulty work with the help of the system to the operator concerned. Productivity is high
because the operator handles the garment once only for a number of operations. As there
are fewer garments on the line throughput time is extremely short, which is the objective
of this system. A typical unit would have eight work stations arranged around the
transport system.
A production system has four primary considerations, which together contribute to
system. Processing Time + Transportation Time + Temporary Storage Time + Inspection
Time = Total Production Time. Processing time is the total of working time of all
operations involved in the manufacture of a garment. Transportation time involves the
time taken to transport semi-finished or finished garments from one operation / machine
to another. Temporary storage time is time during which the garment / bundle is idle as it
waits for next operation or for completion of certain parts. Inspection time is time taken
for inspecting semi-finished garments for any defects during manufacturing or inspecting
fully finished garments before packing.
The main aim of any production system is to achieve minimum possible total production
time. This automatically reduces in-process inventory and its cost. The sub-assembly
system reduces temporary storage time to zero by combining temporary storage time with
transportation time.
By Ravi Kishore 25
The various production systems described above are adopted by the garment factories
depending on their turnover, production capacities, and financial investments. Depending
on the size of the factory, there may be more than one sewing line of about 50 industrial
sewing machines that perform different operations – lockstitch, chain stitch, bartack,
overlock, flat lock, interlock, button stitch and buttonhole.
Lockstitch machines with single double and three needles are used for top stitch and
decorative stitches such as on back shoulder, collar, front yoke and placket. Chainstitch
machines are available with single and double
needle. Specialised chainstitch machines like
feed-of the-arm (see picture) for side seaming
of a shirt or pants and four needle machine for
waist band attachment are available. Similarly
overlock
machine are
used for
closing side
seams of shirts, dresses etc. These machines are also used
to stitch fabric edges from fraying. Other specialised
machines like the collar contour stitch machine as in the
picture are used to quality collars with precision and speed.
Pocket welt machine (see picture) is used in the
sewing section for making quality pockets on
trousers, shorts, sportswear, jackets, coats and
suits.
The operations in the sewing room start with
the feeding helper collecting the cuttings and
loading them in the sewing line. The line
supervisor explains and demonstrates the
operations to the operators and highlights the quality issues. He or she also arranges the
machines as per the line plan and equips the line with necessary work tools such as
folders and attachments. He with the help of the maintenance mechanic sets the machines
for the number of stitches required (SPI) and checks the machine needles. Depending on
the fabric to be used, needles are selected.
By Ravi Kishore 26
Needle
Size
Fabric:
light
- heavy
Cotton Polyester
Spun
Polyester
Filament
Polyamid
Filament
Polyamide
Mono-
filament
Core Sun
Cotton
Polyester
Core
Spun
Poly
- Poly
Silk Embroidery
Yarn
(Ticket-)
Cotton
Rayon/
Nm. NeB
(Nr.)
Nm. Nm. Nm. Nm. den Nm. Nm. Nm. Nr. Nr.
40 - 50
50 - 60
55 - 60
60 - 70
65 - 75
70 - 80
75 - 90
80
70
60
50
40
30
24
20
12
7
120
120
100
80
70
60
50
40
30
20
15
10
360/240
200
150
120
80
70
60
50
40
30
20
18/3
15/3
11/3
11/4
100
80
60
50
40
30
20
180
110
80
70
60
50
40
30
20
50
80
110
130
150
180
230
300
450
120
100
80
75
50
40
35
30
25
20
25
11
8
5
150
120
100
80
20
200
160
140
130
120
100
70
60
50
40
30
10
80
60
50
40
30
20
16
12
75
60
Some common work aids such as hemmers, binders, folders and gauges shown below are
used in production to maintain quality and productivity.
Sewing Machine work aids
Raw edge upturn
hemmer
Clean finish hemmer
Right angle binder
Clean finish hemmer
Lap seam folder Swing guage T guage Three corner guage
In addition it is important to know the consumption of thread for different types of
machines that are commonly used in the sewing line. The consumption depends on the
type of stitch and the class of the stitch.
By Ravi Kishore 27
Stitch class Description No of needles Ratio Total thread (cm)
per cm of seam
301 lockstitch 1 1 to 1 2.5
101 chainstitch 1 1 to 0 4
401 2 thread chain stitch 1 1 to 3 5.5
304 zigzag 1 1 to 1 7
503 2 thread overlock 1 1.2 to 1 12
504 3 thread overlock 1 1 to 5 14
516 4 thread safety 2 1 to 1.4 17.5
512 4 thread mock safety 2 1 to 3.3 18
516 5 thread safety 2 1 to 3.4 20
516 6 thread safety 3 1 to 2 21
602 4 thread cover 2 1 to 3.5 25
606 9 thread flat lock 4 1 to 3.5 32
607 6 thread flat seam 4 1 to 3.5 32
The consumption of thread per garment is equally important, particularly because the
thread is dyed to match the fabric colour. Often it is difficult to procure DTM thread at
short notice and hence consumption must be carefully monitored. Thread consumption
depends on the fabric thickness and density, number of stitches per inch or stitch density
(SPI), thread wastage due to breakage, needle breakage and change and machine
breakdown.
Mtrs Mtrs Mtrs Mtrs Mtrs
Item Per item Item per item Item per item Item per item Item per item
Anorak 210 Corset 95 Jacket(C) 160
Pajamas
(C)
100 Slacks(C) 130
Apron 25 Coverall 530 Jacket(L) 175
Pajamas
(L)
140 Slacks(L) 160
Boiler suit 420 Dress(C) 90 Jeans(C) 145
Pajamas
(M)
190 Slacks(M) 185
Bra 45 Dress(L) 190 Jeans(L) 175 Quilt 320 Trousers(C) 170
Briefs(C) 40
Dressing
gown
165 Jeans(M) 210 Raincoat 285 Trousers(M) 270
Briefs(L) 65
Knitwear
(M)
80
Knitwear
(C)
60 Shirt(B) 75
Vest/T-
shirt(C)
25
Briefs(M) 50 Nightie(C) 55
Knitwear
(L)
70 Shirt(M) 120
Vest/T-
shirt(M)
40
Coat(overall) 180
Nightie
(L)
100
Overcoat
(C)
135 Shorts(C) 35 Shorts(L) 20
Housecoat 185
Overcoat
(M)
610 Overcoat
(L)
315
Shorts
(sport)
70 Waistcoat 50
The production supervisor and the line supervisor are also responsible for the daily
productivity of the sewing lines. While loading the lines with the allotted styles, they
must keep in mind the skills of the operators and assign the tasks accordingly. A right
balance of skills used in appropriate workstations will balance the production line. For
this it is required to grade the operators by their proficiency in various skills and the ease
with which they operate machines. Those who are experienced to operate specialised
machines are obviously more skilled and are graded higher. Operator grading by their
experience and skills in a garment factory may be as follows:
By Ravi Kishore 28
A - GRADE OPERATIONS
1. UPPER SLV PLKT BOX
2. BUTTON HOLE PLACKET ATTACH (KANSAI)
3. POCKET ATTACH - SNLS
4. POCKET ATTACH - DNLS
5. COLLAR ATTACH
6. COLLAR FINISH
7. SLEEVE ATTACH ( FOLDER / MANUAL )
8. SLEEVE ATTACH ( O/L )
9. TOP STITCH ARM HOLE (FOLDER / MANUAL)
10. CLOSE SIDE SEAM - FOA
11. CLOSE SIDE SEAM - O/L
12. HEM BOTTOM ( FOLDER + MANUAL )
13. CUFF ATTACH
B GRADE OPERATIONS
1. BONE PATCH ATTACH TO COLLAR
2. ATTACH COLLAR TO TOP COLLAR BAND
3. COLLAR TOP STITCH
4. COLLAR PEAK READY
5. CUFF TOP STITCH
6. LOWER SLEEVE PLACKET ( FOLDER )
7. ATTACH MAIN / SIZE LABEL TO YOKE
8. ATTACH YOKE TO BACK - MANUAL
9. BACK YOKE TOP STITCH - DNLS
10. BUTTON PLACKET HEM
11. SHOULDER ATTACH - MANUAL
12. SLEEVE TACK TO BODY - LINE MATCH
13. ATTACH V - PATCH PIECE TO SIDE
14. HEM SLEEVE - FLAT
15. CLOSE SIDE SEAM – SNLS
16. ATTACH FLAP TO FRONT, 2 NO'S
17. FRONT B/H PLKT HEM
18. BUTTON HOLE OPERATION
19. BUTTONING OPERATION
20. SLEEVE PLACKET IRON
21. POCKET IRON
22. COLLAR TURNING ( EWATEX )
23. CUFF TURNING ( EWATEX )
B + GRADE OPERATIONS
1. COLLAR RUN STITCH
2. CUFF RUN STITCH
3. CUFF TAPE ATTACH
4. COLLAR TAPE ATTACH
5. ATTACH YOKE TO BACK - FOLDER
6. SHOULDER ATTACH - FOLDER
7. HEM CIRCULAR SLEEVE
8. HEM 2ND FOLD AT BTM, INSERT GST
9. TOP STITCH SIDE SEAM - SNLS
C GRADE OPERATIONS
1. HEM COLLAR BAND
2. COLLAR CENTER STITCH
3. NECKBAND LABEL ATTACH AT SIDES
4. CUFF HEM
5. TACK SLEEVE VENT
6. MAKE SLEEVE PLEATS
7. MAKE BACK PLEATS
8. EDGE / TOP STITCH YOKE
9. EDGE AND TOP STITCH POUCH PIECE
10. POCKET HEM
11. PREPARE LOOP
12. LOOP ATTACH
13. SHOULDER TOP STITCH
14. SHOULDER TOP STITCH - DNLS
15. ATTACH WASH CARE LABEL
16. TACK POUCH PIECE
17. CLOSE GUSSET SIDES,
18. COLLAR EDGE TRIM
19. COLLAR BOTTOM TRIM
20. READY TRIM COLLAR BAND
21. COLLAR READY TRIM
22. COLLAR IRON
23. CUFF IRON
24. FRONT PLACKET IRON
25. GUSSET IRON
26. BONE POUCH IRON
27. SLEEVE PLACKET CREASE ( EWATEX )
D GRADE OPERATIONS
1. ALL HELPER OPERATIONS
The cost of production of a style depends up on the number of operators employed in a
line and their grades. The higher grade operators get earn higher wages. Therefore the
production supervisor and the line supervisor must assess the operations carefully and
assign them to appropriate grade of operators.
Thus the cost of production depends on all these factors that we discussed. To measure
the cost of production it is necessary to know the method of calculation. As discussed
By Ravi Kishore 29
previously every garment is given a SAM value based on the time it tales to produce. Let
us calculate the cost of making of a shirt.
In the operation bulletin above the SAM of the shirt was given as 39.415 minutes. The
minute cost of making is now calculated as –
1. Total wages of the factory = Rs. 5,000,00 per month
2. Number of machines = 50
Cost per machine per month = Rs. 5,000,000 = Rs.100, 000
50
Cost per machine per day = Rs. 100,000 (considering that there are 5 holidays in a month)
25
Cost per machine per day = Rs. 4,000
Number of working hours in a day = 8
Cost per machine hour = Rs.4,000 = Rs.500
8
Cost per minute = Rs. 500 = Rs. 1.042
60 X 8
3. SAM of the shirt = 39.415 minutes
Cost of making per shirt = Rs.41.06
Note that the costs considered in the example are direct costs only. Overhead costs
must be calculated separately which include management salaries, electricity, water,
telephone, insurance, interest, maintenance etc.
In order to keep the cost of making low productivity, operator and line efficiency must be
constantly monitored by the line supervisor.
Productivity is calculated as below:
Operator productivity = Production per day 300 collars per day = 37.5 per hour
No. of work hours 8
Line efficiency = Actual production per day X 100 500 = 69.44%
Standard 720
TRADITIONAL Apparel Plant
Due to High Work In Progress, managers are unable to
manage the production well. Cut pieces from cutting
room, sewing section and to finishing sections will take
approx. 3-7 days. E.g. manufacturing a man's polo shirt,
the S.A.M. is 13.5mins, but in the bundle system, every
operator has 3-4 bundles of 25-30 pcs. thus every
operator will have min. of 100pcs WIP.
Through Put Time for complete sewing is 3 days.
Example
100pcs(WIP) x 13.5mins(SAM)=1,350 mins required
1,350 mins / 480 mins (8 hours per day) =2.8125 days
SMART-MRT System Plant
The most striking advantage of the SMRT
System is the drastic improvement in
Throughput Times. In the SMRT System Plant,
Total cycle time was reduced from 3 days to less
than a day. Fast throughput times is due to a
reduction in Work In Process.
For instance, the SMART System producing the
same polo shirt, SAM is still 13.5mins but the
Throughput Time is about 5 hours only!
Example
20pcs(WIP) x 13.5mins(SAM)=270 mins
270 mins / 480 mins(8 hours)
=0.563 day OR =4.5 hours only!
By Ravi Kishore 30
Progressive Bundle System
This traditional method of manufacturing has been
widely adopted in the Apparel Industry for the past 3
decades.
Parts of various component after being cut in the Cutting
Room are tied up in bundles and distributed out to the
Sewing Section. This is called the Progressive Bunle
System (PBS).
This method requires bundle to be transported to
individual sewing operators. Sometimes, factory
porters/helpers are hired to do this transporting work.
But usually, the operators have to stop and leave their
workspace to look for the bundles.
This is an INEFFECTIVE practice, as production
managers are unable to manage or plan the production
effectively.
Factory Automation with UPS
Factory Automation by the usage of UPS is
NEW leapt into Garment Productionin the
garment arena.
This practice taps on the capability of
Technology by the mechanical transportation of
cloth pieces to operators by the automated
system.
This results in an Easier pick-up and Disposal at
each workstation.
Further, the system addresses the problem of
Wasted Time spent when the garment is idle
between workstations.
Most crucially, UPS systems address the
weakness of:
-Long Delivery Times
-Long Response Times
Intensive Direct Labour Contents
Statistics show that operators in most Progressive
Bundles Systems (PBS) factory often spend a
considerable time on tying and untying bundles, pulling
the bundle tickets, handling works and associated
clerical works.
Reduction is Direct Labour Contents
The UPS presents the garment directly to the
operator for easy pick-up and then automatically
removes the garment upon completion. This
reduces the Direct Labor Content by eliminating
bundle handling costs and the associated clerical
duties.
High Work In Process
The PBS philosophy adopts the "High Work In
Process", or "Keep The Girl Busy" task management.
E.g. If an operator can sew 200 dozens works per day,
regardless of the production of other operators ( 120-150
dozens daily ). So everyday that particular sewing girl
produces an extra 50-70 dozens work pieces left over,
because others could not cope with her capacity. After 5
days, the extra builds up to 250-350 dozens, so WIP was
increasing daily. Alas, the manager has to get additional
manpower to work on the slacks.
Great Reduction in Work In Process
UPS systems cause a reduction in Work In
Process levels and change in the management
Philosophy of an apparel plant from "High Work
in Process" levels to "Low Work in Process"
levels, which allow quick response.
In a UPS plant, every workstation will hold a
max. of 25 garments per station. So a great
reduction in Work In Process as compared to the
Bundle System Plant where each operator has
100 pieces (WIP). All finished garments are
transported automatically between workstations.
More cutting works required
As a result of High Work In Process required by sewing
section, cutting sections are required to perform 60-70%
more than actual production can handle.
Reduction in cutting works
Lower WIP results in less cutting works.
Coordination between cutting section and
sewing section will improve.
High Inventory
Due to more cutting jobs being required, manufacturer
needs to stock more fabrics and other accessories in
advance of the actual planned production to fulfill the
needs of the High WIP.
High Inventory avoided
As a direct result of lower WIP, manufacturer
will not be required to stock larger amount of
fabric.
Long Delivery and Slow Through Put Time
Due to the High Work In Progress, managers are unable
to manage the production well.
Cut pieces from cutting room, sewing section and to
finishing sections will take approx. 3-7 days or more.
E.g. if manufacturing a man's shirt, the S.A.M. is
13.5mins, but due to the bundle system, each operator
Fast Through Put Times
Probably the most striking advantage of the UPS
System is the drastic improvement in Through
Put Times. Within the UPS Plant, the total cycle
time was reduced from 3 days to less than 1 day!
Fast through put times due to a reduction in
WIP.
By Ravi Kishore 31
has min. of 3-4 bundles and every bundle has 25-30 pcs
. thus every operator will have min. of 100 pcs WIP.
The Through Put Times for complete sewing is 3 days.
Calculation:
100pcs(WIP) x 13.5mins(SAM)=1,350 mins
1,350 mins / 480 mins (8 hrs per day)=2.8125 days
E.g. a UPS system producing the same man's
shirt, SAM is still 13.5mins but the Through Put
Times is about 5 hours only.
Calculation:
20pcs(WIP) x 13.5mins(SAM)=270 mins
270 mins / 480 mins (8 hours)=0.563 day OR
=4.5 hours only!
Direct Labor Excesses
Progressive Bundle System often needs more overtime
works, operators make-up and to do repair works due to
some unfinished operations. The average Direct Labor
Excesses is 13.3% which is definitely higher than UPS
System.
Reduction in Direct Labor Excesses
Direct Labor Excesses were greatly reduced.
Average excesses in plants using PBS were
13.3% of Direct Labor, while the average
excesses in plants using the UPS were much
lower. Consequently, UPS systems experienced
less overtime, operator make-up and total repair
costs versus those costs attributed to the PBS
system.
Finishing Section
We have so far discussed the process in sewing section. Sewn garments move from
sewing to finishing for further processing. In this section garments are received after they
are checked at the end table in sewing section. However, in the finishing they are once
again checked.
Checking involves inspecting every garment for the following:
o Loose threads on the garment and inside it
o Untrimmed threads at seams
o Stains on the garment
o Broken stitches at any of the seams
o Skip stitches
o Uneven stitches
o Holes
o Shade variation within garment
o Major fabric defects visible
o Puckering and gatherings
Checking supervisor identifies and demonstrates
the various parameters described above to the
checkers. It is the responsibility of the checkers to
trim and cut extra threads. Using stain removing
apparatus and appropriate chemicals checkers must
remove any stains on the garments. Garments with
By Ravi Kishore 32
stubborn stains that cannot be removed must be kept aside.
Those garments that are checked and passed move to the
next process of dusting and loose thread removal. A thread
sucking machine is used for this purpose. These garments
are next sent through a needle detecting machine to remove
any broken needles that are stuck in the garments. This
procedure is particularly important for children’s garments.
Garments are now steam pressed and ironed on special
purpose ironing tables. These tables have heavy industrial
foam tops with a vacuum sucking. When a garment is placed
on the top and a pedal is pressed, vacuum suction holds the
garment in position to enable the ironer to press it thus
avoiding garment movement and the wrinkles that follow
with movement. The ironing tables are designed to suits
different shapes of garments like pants, shirts, jackets etc,
and they are equipped with attachments suitable for ironing long parts like shirt sleeves
and pants. There are two types of iron boxes those that have a heating element which gets
heated when electricity passes and those that get heated by steam. Iron boxes are also of
different weights to suit different fabric weights.
Ironing a dress shirt involves the following steps:
1. Place the collar on the iron tale and press
2. Wear the left sleeve on to the sleeve buck attached to
the iron table, smooth out wrinkles and press
3. Wear the right sleeve on to the sleeve buck attached to
the iron table, smooth out wrinkles and press
4. Spread the shirt inside back on the iron table, smooth
out wrinkles and press.
5. Place both the fronts on the back, button and smooth out any wrinkles and press.
6. Lift the shirt and place on hanger
These shirts are then placed back to the top on a folding table, hanger removed, back
support collar stand inserted into collar. Shirt is then folded up to the width of the back
support on either side. The overlapped flat tube is folded up to the collar, the shirt tails are
then tucked in and secured with two plastic clips on either side.
By Ravi Kishore 33
1. Button shirt. Spread shirt face down on
a smooth surface. Center folding board
below the shirt's back collar.
2. Fold left sleeve across the board. Use
the Folding Board's edge as the fold
guide.
3 Angle left sleeve fold along shirt’s body. 4 .Fold right sleeve across the board.
5. Angle right sleeve along shirt’s body. 6. Fold tail upward, below the
shoulders.
7. Remove the shirt folding board from the
fold.
8. Flip shirt over. .
For some garments like jeans, formal
pants, jackets, dresses, and suits special
finishing equipment are available called
form finishers. These are similar to the
body forms except that they are hollow.
When the garment is worn on the form,
steam is blown in and presses lift on
both side and press the form. Thus the
garment gets ironed and pressed without
any permanent crease marks being created. The finished and pressed garments are folded
and packed as per the production order.
By Ravi Kishore 34
Packing garments for delivery to the customer involves cost considerations. If the
delivery is by sea in a container, then the cartons must be strong enough to with stand
pressure. Some customers want the garments to be shipped on hangers. Finishing
supervisor must ensure that all packing material are
available in the section. They must be indented and
recived from the stores. Garments are tagged,
folded and placed in the polybags. The type of fold
and the size of the polybag are both as per the
instructions of the customer. Each packed garment
is placed in a carton or on the hanger as the case
may be. Carton packing can be by all sizes in a single colour or single size in all colours
or by single size and colour. Packed cartons are numbered and stacked for final inspection
by the customer or his representative. Each carton is marked as per the instructions of the
customer.
In case of
hanger packing
garments are
tagged and
placed on
hanger by size
and colour.
Garments on hanger are packed in cartons or placed in
containers. If carton packed they are placed with the
hanger placed on a rope fixed in the carton on either
side. Hangers are placed alternately on either side so as
to maintain uniform level. In case of shipment on
hangers in a shipping container, usually the smaller size
in the order goes first into the container followed by the
larger sizes. The largest size must be the size visible
when the container is opened.
All cartons packed and stacked with markings as instructed by customer are ready for
inspection. Packing list of the shipment is prepared with all the carton numbers, sizes and
colours packed in each carton. The list is given to the customer’s representative who will
By Ravi Kishore 35
choose the cartons to be inspected at random form the list. After the inspection, usually
the inspection report is issued together with the certificate. The finishing supervisor
collects all the documents after inspection and hands over to the merchandising or
logistics department.
Quality Assurance
Quality
assurance
department
which
reports
directly to
the top
managemen
t conducts
independent
quality
audit and
assures that
required
quality is
maintained.
Controlling
quality is
not the
function of
the QA. The
production
supervisor
and line
supervisor
are responsible to maintain quality in the sewing section. The QA D receives the fabric
test report from the merchandiser or the sourcing department and confirms the quality
standard of the material before it is dispatched by the supplier.
By Ravi Kishore 36
Retail customers require
quality merchandise from
garment manufacturers
which can be displayed
and sold with confidence.
They need to be assured of
quality of fabrics and
trims that go into the
garment and the garments
themselves. When retail
buyer places the purchase
order with garment
manufacturer, he or she
makes it a condition that
the fabrics and trims be
tested for their quality as
per the retail store’s
acceptable standards. The
quality standards vary
with the type of retail
business. While some
stores insist on elaborate
tests for a host of quality
parameters, others are less
demanding. In either case,
the buyer requires the
fabrics and trims to be
tested by independent testing services. This process of quality testing is termed in the
industry as third party testing. The fabric supplier is instructed by the factory to send the
fabric from bulk production to the testing agency recommended by the retail buyer.
Factory must send the request of test parameters to the testing agency together with the
name and purchase order details of the buyer. Each buyer has a specific test request form
specific the testing agency. The number of tests that need to be conducted by the testing
agency for the specific buyer is called – Fabric Package Test or FPT. The testing charges
are to the expense of the factory.
By Ravi Kishore 37
Based on the report fabrics and trims are either accepted or reprocessed and finished as
per the standards. Some of the common testing protocols that the QAD must observe and
include the fabric test report are-
Quality Standards for Woven Fabrics
Physical Standards
Test Norm / Standard Result
Pilling (Martindale) ISO 12945-2 2.000 turns ; 4
Snagging JIS L 1058
Method D-2
18.000 revolutions ; 4
Seam Slippage ISO13936– 1&2 12 daN / 6mm > 200gr/ m2
; 8 daN / 6mm < 200gr / m2
Tensile Strength ISO 13934-1 30 daN > 200gr / m2
; 22.5 daN < 135 – 200gr /m2
;15 daN < 135gr / m2
Tear Strength
(Elmendorf)
ISO 13937-1 1.600 cN > 200gr /m2
; 1.100 cN 135 – 200gr / m2
; 800 cN < 135gr / m2
Abrasion ISO 12947-2 Blouse/shirt/dress/pajamas/lining: 10000 ;Jacket / Coat : 20000
Dungarees / trousers/short/jeans: 30000
Fabric Weight EN12127 5%
Colourfastness and other tests
Quality Standards for Woven Fabrics
Colour Fastness and Other Standards
Rubbing Dry ISO 105-X12 Stain: 4
Rubbing Wet Stain: 3-4 specific requirements
Rubbing Dry ISO 105-X12 Stain: 4
Rubbing Wet Stain: 2-3 specific requirements
Washing ISO 105-C06 CC: 4 ; CS: 3- 4
Dry cleaning ISO 105 –D01 CC:4
Perspiration ISO 105 - E04 Stain: 4 Change: 4
Light (Xenon) Judge by TL83 (shop
light) and D65 (day light)
ISO 105 – B02 4
Water ISO 105 – E01 4
Non-chlorine Bleach Soaking Test 4 Cross staining for contrasting colours not accepted
Flammability 16 CFR 1610 > 3.5 flame spread
Water Repellence (spray test) ISO 4920 4
Electro Static DIN 24345 (part1) 109 ohm
Dimensional stability
Quality Standards for Woven Fabrics
Dimensional Stability
Shrinkage after washing ISO 6330 2% Warp and Weft
Machine Wash 400
C line dry ISO 6330 -5.4
Commercial dry clean ISO 3175 2%
Residual Elongation warp & weft
(>2% EA)
BS 4952 + / - 6% Pants weight
Fixed Load 6.0 kg + / - 10% Shirt weight
Steam Pressing (WIRA) ISO 3005 2% Warp & weft
Parameters fpr knit fabrics that re followed in the industry are physical standards
Quality Standards for Knit Fabrics
Physical Standards
Test Norm / Standard Result
Pilling (ICI pilling box) ISO 12945-1 18.000 revolutions
Judge by double jersey scale 4
Snagging JIS L 1058
Method D-2
5.000 revolutions ; 4
Bursting Strength ISO13938– 1 200 kpa / 50 cm2
; > 200gr / m2
D 80mm = 50sq.cm 170 kpa / 50 cm2
, < 200gr / m2
Abrasion AATCC93 5% loss in mass
Fabric Weight EN12127 5%
By Ravi Kishore 38
colourfastness standards to be followed are
Quality Standards for Knit Fabrics
Colour Fastness and Other Standards
Rubbing Dry ISO 105-X12 Stain: 4
Rubbing Wet Stain: 3-4 specific requirements
Rubbing Dry ISO 105-X12 Stain: 4
Rubbing Wet Stain: 2-3 specific requirements
Washing ISO 105-C06 CC: 4 ; CS: 3- 4
Dry cleaning ISO 105 –D01 CC:4
Perspiration ISO 105 - E04 Stain: 4 Change: 4
Light (Xenon) Judge by TL83 (shop
light) and D65 (day light)
ISO 105 – B02 4
Water ISO 105 – E01 4
Non-chlorine Bleach Soaking Test 4 Cross staining for contrasting colours not accepted
Flammability 16 CFR 1610 > 3.5 flame spread
Water Repellence (spray test) ISO 4920 4
Electro Static DIN 24345 (part1) 109 ohm
and for dimensional stability the parameters are-
Quality Standards for Knit Fabrics
Dimensional Stability
Shrinkage after washing ISO 6330 + 2% - 5% Length & width
Machine Wash 400C line dry ISO 6330 -5.4
Commercial dry clean ISO 3175 2% Length & width
Residual Elongation BS 4952 + / - 6% Length & width
Fixed Load 1.4 kg
Spiralty Test method as
specified
3%
5%
> 100gr / m2
< 100gr / m2
Thereafter when the fabric and trims arrive in the warehouse, the QAD either conducts
the fabric inspection and quality tests or supervises these activities undertaken by the
stores section. Based on the inspection reports, QAD in consultation with the
merchandising and sourcing departments decides the fabric utilisation. If the fabric
defects are within acceptable limits, fabric is issued to the cutting section otherwise the
QAD will not permit its use and the fabric will have to be returned to the supplier for
replacement.
The QAD checks the fabric cutting process. Based on the fabric inspection report, QAD
verifies the cutting plan, roll sorting by colour, width, shrinkage and defects. Its
responsibility also includes checking the fabric spreading, grain or direction and the
tension release at selvedges and even length of the lay.
Once cut, the quality of cuttings are inspected and checked for ragged edges, fraying,
size, markings, and inclusion of all parts of the garment. After bundling and numbering,
the bundles are checked for correct numbering. In case any cut parts are sent for
embroidery or printing their placement is checked before sending and quality of
embroidery or print and its placement is checked once received. It is the responsibility of
By Ravi Kishore 39
cutting section to ensure the quality of embroidery or printing its size, registration and
placement.
The cut parts when issued to the sewing section, QAD monitors the sewing quality. The
sewing defects, parts replacement etc are the responsibility of the production supervisor
and line supervisor. The quality auditor from QAD monitors the work of quality checkers
and guides them where necessary.
Quality in Sewing
We have discussed so far the quality issues that arise in the fabric store and the cutting
sections. Quality assurance in sewing section is vital for the finished garment to be
shipped out of the factory. If the quality procedures and processes are not followed, the
finished garment ends up as a seconds. Some of quality aspects that must be considered
are - seam allowances, proper interlining that enables collars, belts etc to keep their shape,
seam finishes that enclose raw edges, correct pressing, and applied techniques such as
beading or pick stitching.
The quality of the garment depends among others on the type of interlining used and
methods of its usage. QAD must check the usage of interlining which is usually starts
with verification of the interlining compatibility repot that the merchandiser gets from the
interlining manufacturer for the fabric and garment. The report suggests the type of
interlining – non-woven and woven to be used for the particular garment and the parts in
which specific types of interlinings can be used.
For example a shirt collar requires a stiff woven interlining if it is meant for inexpensive
office wear. A branded and premium dress shirt uses a non-woven medium density micro-
dotted fusible interlining on the lower collar. A casual shirt on the other hand uses a non-
woven low density fusible interlining. Each of these interlinings needs specific
temperature, pressure and time to effectively fuse with fabric. QA must ensure that the
fusing quality as per the manufacturer’s recommendations is maintained in the fusing
section so that the garment parts are usable. If the fusing parameters are not followed the
parts while after sewing and pressing wherever required will have bubble effect or the
fusing peels off due to low bond strength.
Next the QA must concentrate on the garment finish in sewing. Construction finish
prolongs durability of garment. The quality of stitching is the most important aspect of
finish in any garment. If this is poorly executed, with wrong thread etc, nothing will be
By Ravi Kishore 40
able to rescue the piece. Top stitching in a contrast thread if not executed properly will
damage the appearance of the garment. Among the many quality parameters of stitches
important are loose and raveling stitches. These are indications of poor quality
workmanship. Stitching should be clean and neat and except for when it's deliberately
meant to be in contrast, should sink almost invisibly into the fabric. Usually the thread
should be the same shade, or one shade darker, than the cloth as recommended by the
customer.
An indication of good quality is when the seams on a garment lie absolutely flat, with no
puckering and rucking where the fabric pieces join together. One area to watch out for is
bias-cut garments. Bias creates inherent stretch in the fabric; care must be taken to relax
the pieces by hanging for up to 24 hours stitching. If the fabric isn't fully relaxed, or isn't
sewn with enough inherent stretch in the seam, a bias skirt ruckles right along the seam-
lines.
Certain seams are more complicated to sew and therefore only appear on quality
garments. One is the French seam, where the seam is sewn inside out, then outside in,
enclosing all raw edges. It's usually seen on women's dresses and skirts. Another complex
seam is the flat fell seam, which is used on jeans. From the outside, it looks like a double
row of stitching, and the raw edges are contained inside it. On a good shirt, the majority
of the seams on the garment are flat-felled, including the armhole, side body and under
sleeve. On cheaper shirts, the seams are usually just simple seams with serging on the
inside.
The larger the seam allowance the better is its durability. On the other hand tight seam
allowance or minimal seam allowance increases strain on the garment at seams thus
increasing every possibility of tits rupture. Quality customers demand that the seam
allowance be bound with a bias binding or satin tape to prevent fraying. Transparent
elastic or stay tap is used in knitwear to reinforce seams and control stretch where
garment stretches such as at shoulders and armholes.
Hems on quality garments are deeper, and they may be bound with bias binding or
another finish in order to keep their shape. They must be finished invisibly, with no stitch
visible on the outside. The thread used for hemming on the blind stitch machine is usually
of fine monofilament yarn.
Next is the quality of constructing the facing. A facing is a piece of fabric used to finish
the raw edges of a garment at open areas, such as the neckline, armhole, and front and
By Ravi Kishore 41
back plackets or opening. They are must be sufficiently deep to provide support to the
part and provide clean finish.
QA must check and ensure that pockets on a garment are fit for their purpose. The pocket
opening must sufficiently wide or as per the measurement given by the customer to
permit the hands to freely move in and out. Narrow pocket openings obstruct hand
movement. Since they are frequently used, to withstand wear and tare, the opening must
be reinforced with bartack stitch. Pocket opening must be flat when the garment placed
flat and must not open wide.
It is important for the QA to know the various stitch types and their formation in order to
identify their defects. It is also necessary for the QA to understand applications and
purpose of different types of stitches. Some of the more common stitches and their
applications are given below.
Single Thread Chainstitch
Top view Bottom view
ISO
4915
Number
101
Common
Application
Basting Stitch for
Tailored Clothing
Stitch Description
Stitch formed by a needle thread
passing through the material and
inter looping with itself on the
underside of the seam with the
assistance of a spreader.
Single Thread Chainstitch or
Lockstitch Button sew, Buttonhole or Bartack
101 or
304
Button sew
Specify stitches
per cycle,
Buttonhole
specify length &
width
Bartack specify
length & width
Single thread blind stitch
Tope view No stitch visible
in bottom view
103 Blind stitch
hemming, felling,
making belt loops
Stitch is formed with one needle
thread interlooped with itself on
the top surface of the material.
The thread passes through the top
ply and horizontally through
portions of the bottom ply
without completely penetrating it
the full depth.
Lockstitch – most common stitch
Top view Bottom view
301 Topstitching,
Single Needle
Stitching,
Straight
Stitching
Stitch formed by a needle thread
passing through the material and
interlocking with a bobbin thread
with the threads meeting in the
center of the seam. Stitch looks
the same top & bottom.
Top view Bottom view 401 Single needle
chain stitch as
main seams on
woven garments
Stitch formed by 1-needle thread
passing through the material and
interlooped with 1-looper thread
and pulled up to the underside of
the seam.
By Ravi Kishore 42
The common sewing defects that need to be monitored and rectified before the garments
move to finishing section are given below:
Improper Stitch Balance - 301
Lockstitch DESCRIPTION: Where loops are seen either on the bottom side
or topside of the seam. More conspicuous different coloured
topstitch and bobbin threads. This also occurs when the stitch is too
loose.
SOLUTIONS: 1) Check thread quality for frictional consistency
2) Properly balance the stitch so that the needle and bobbin threads
meet in the middle of the seam. Always start by checking the
bobbin thread tension to make sure it is set correctly, so that the
minimum thread tension is required to get a balanced stitch.
Improper Stitch Balance - 401
Chainstitch DESCRIPTION: Where the loops on the bottom-side of the seam
are inconsistent and do not appear uniform.
SOLUTIONS: 1) Use a quality thread with consistent frictional
characteristics; 2) Properly balance the stitch so that when the
looper thread is unraveled, the needle loop lays over half way to the
next needle loop on the underside of the seam.
Open Seam - Seam Failure - Fabric DESCRIPTION: Where the stitch line is intact but the
yarns in the fabric rupture.
MINIMIZING SEAM FAILURES - FABRIC:
1) Reinforce stress points with Bartack. Make sure the
bartacks are of proper length and width for the
application
2) Check patterns for proper fit
3) Use ideal seam construction
Puckered Seams - Knits & Stretch wovens DESCRIPTION: Where the seam does not lay flat after
stitching.
SOLUTIONS:
1) If sewing machines are equipped with differential
feed, set them properly for the fabric
2) Use minimum presser foot pressure during sewing
3) Observe operator for correct handling techniques.
Too much stretching of the fabric by the sewing operator
will cause this problem.
Excessive Seam Puckering - Wovens DESCRIPTION: Where the seam does not lay flat and
smooth along the stitch line. Causes:
By Ravi Kishore 43
1) Feed Puckering - where the plies of fabric in the seam
are not aligned properly during sewing
2) Tension Puckering - where thread is stretched and
sewn into the seam. It causes the seam to draw back and
pucker
3) Yarn Displacement or structural jamming – due to
sewing seams with thick thread that causes the yarns in
the seam to be displaced, giving a puckered appearance.
SOLUTIONS:
1) Use the correct thread type and size for the fabric.
Thinner, high tenacity thread is required to minimize
seam puckering but maintain seam strength
2) Sew with minimum sewing tension
3) Make sure machines are set up properly for the fabric
Ragged/Inconsistent Edge – Over edge or
Safety stitch
DESCRIPTION: Where the edge of the seam is either
extremely "ragged" or "rolls" inside the stitch.
SOLUTIONS:
1) Make sure sewing machine knives are sharp
2) The knives should be adjusted properly in relation to
the "stitch tongue" on the needle plate to get proper seam
width or width bite.
Re-stitched Seams / Broken stitches DESCRIPTION: Where a "splice" occurs on the stitch
line. If this occurs on Topstitching, then the seam does
not appear to be 1st quality merchandise. Causes:
1.thread breaks or thread run-out during sewing
2. cut or broken stitches during wash etc.
SOLUTIONS: 1) Use quality sewing thread. This may
using higher performance thread designed to minimize
sewing interruptions. 2) Ensure machine maintenance
and sewing machine adjustments
3. Observe sewing operators for correct material
handling techniques.
The QAD must inspect the sewn garments for stitching defects that may occur during the
sewing operations due to various factors. The stitches per inch vary with the fabric type
being stitched. The SPI also varies for seams for closures and side seams and for top
stitch.
Some common guidelines for performing construction seams and top stitch are given
below:
 Lockstitch must not be used on stretch fabrics
 Back rise seams must be reinforced with double needle lockstitch or topstitched with
edge stitch or double needle
 Blind hem felling must be securely latched off with no run back of the thread end. Set
the machine accordingly
 All raw edges must be turned or overlock neatened. Visible raw edges are a defect.
 French seams must be securely constructed. The 1st
seam sewn does not pull apart
with wash and wear.
 Thread tension and stitch density must be correct to prevent seam grinning.
Fabric Seams Stitch
Light to medium weight woven fabrics 10 - 12 9 – 10
Light to medium weight stretch fabrics 12 - 14 14 – 16
Men’s dress shirt 12 - 14 14 – 16
Lingerie 16 - 20 14 - 16
Denim and canvas 10 12 8 - 9
By Ravi Kishore 44
 Construction seams must be of lockstitch and overlock neaten or mock safety stitch
or 4-thread 2 needle overlock or 5-thread safety stitch
Bartacking is required in the following operations:
 on all top corners of patch pockets and at each end of inset pockets
 at each end of welt pocket – bartack to the depth of the welt
 all belt loops attached to the waist band
 at the edge of the fly base, at the base of fly curve to secure fly facing to the
garment
 at the top of splits
 Stitches at seam end must be secured by another seam or securely back stitched
 Where folded edges are joined as in sleeve cuffs or neckbands, there must be a row of
tack stitching to reinforce.
 Overlocking threads must be turned under the seam and secured
General workmanship of all production operations must maintain the following standards:
 Technical notation / direction of wales and direction of fabric must be complied with
for cutting
 All parts of a garment must be cut from the same roll of fabric
 Colour / embossing / hand feel must not differ in garments in a pack or purchase order
 Collars and pocket must be symmetrical
 Iron marks as shiny areas must not be there
 Garments must be clean, dust free, with no loose threads
 Carton quality must be checked for bursting strength
Guidelines for seam construction:
Seam allowances –
 all parts of patterns must have sufficient seam allowance
 all visible edges must be trimmed and over-edged
 open edges must be uniformly cut back
Seam finishing:
 needle sizes must selected according to the fabric and regularly changed
 minimum stitch density for woven fabrics is 4 stitches/cm , for knitwear it is 5
stitches/cm
 thread tension must be adjusted to suit fabric
 elasticity of must be ensured in elastic materials to prevent tearing of fabric
 quilting seams must be parallel to the edges
The QAD is responsible for the over all quality of the garments when delivered to the
customer. After the garments are finally packed, and prior to the final inspection, QA
manager must conduct a final inspection. If deficiencies are found, the packed garments
must be returned for re-work. A second inspection must be conducted after the rework.
Only after it is fully satisfied with the inspection, should the QAD and the production
manager offer the packed shipment for customer inspection.

More Related Content

What's hot

Garment manufacturing process from fabric to poduct
Garment manufacturing process from fabric to poductGarment manufacturing process from fabric to poduct
Garment manufacturing process from fabric to poductKarthika M Dev
 
Presetation on factory visit
Presetation on factory visitPresetation on factory visit
Presetation on factory visitNazmus Sama Sunia
 
3 GIS QA Process - Denim
3  GIS QA Process - Denim3  GIS QA Process - Denim
3 GIS QA Process - DenimBarun Naha
 
Garment inspection and testing process or dyeing process
Garment inspection and testing process or dyeing processGarment inspection and testing process or dyeing process
Garment inspection and testing process or dyeing processNahar spinning mills bhopal
 
An overview in garment industry (dept. wise)
An overview in garment industry (dept. wise)An overview in garment industry (dept. wise)
An overview in garment industry (dept. wise)negatve
 
Automatic Machines for Bedsheets Manufacturing
Automatic Machines for Bedsheets ManufacturingAutomatic Machines for Bedsheets Manufacturing
Automatic Machines for Bedsheets ManufacturingRavish Khan
 
Top 6 garment manufacturing processes and quality checks
Top 6 garment manufacturing processes and quality checksTop 6 garment manufacturing processes and quality checks
Top 6 garment manufacturing processes and quality checksThe sourcing place
 
Denim Garments Quality Control and Inspection Services
Denim Garments Quality Control and Inspection ServicesDenim Garments Quality Control and Inspection Services
Denim Garments Quality Control and Inspection ServicesAsia Quality Control
 
TTQC 3: How you can positively improve buyers influence at your industry
TTQC 3: How you  can positively improve buyers influence at your industryTTQC 3: How you  can positively improve buyers influence at your industry
TTQC 3: How you can positively improve buyers influence at your industryHasan Noman
 
Visual inspection for fabric quality control
Visual inspection for fabric quality controlVisual inspection for fabric quality control
Visual inspection for fabric quality controlAzmir Latif Beg
 
U 1 introduction to garment industry
U 1 introduction to garment industryU 1 introduction to garment industry
U 1 introduction to garment industrykibrom G
 

What's hot (20)

Garment manufacturing process from fabric to poduct
Garment manufacturing process from fabric to poductGarment manufacturing process from fabric to poduct
Garment manufacturing process from fabric to poduct
 
Garments process
Garments processGarments process
Garments process
 
Inspection
InspectionInspection
Inspection
 
Presetation on factory visit
Presetation on factory visitPresetation on factory visit
Presetation on factory visit
 
Scap ppt
Scap pptScap ppt
Scap ppt
 
Manu Process
Manu ProcessManu Process
Manu Process
 
Finishing & packaging
Finishing & packagingFinishing & packaging
Finishing & packaging
 
Quality control
Quality controlQuality control
Quality control
 
3 GIS QA Process - Denim
3  GIS QA Process - Denim3  GIS QA Process - Denim
3 GIS QA Process - Denim
 
Garment inspection and testing process or dyeing process
Garment inspection and testing process or dyeing processGarment inspection and testing process or dyeing process
Garment inspection and testing process or dyeing process
 
4 poient system
4 poient system4 poient system
4 poient system
 
An overview in garment industry (dept. wise)
An overview in garment industry (dept. wise)An overview in garment industry (dept. wise)
An overview in garment industry (dept. wise)
 
Garment Production Standards
Garment Production StandardsGarment Production Standards
Garment Production Standards
 
Wastage
Wastage Wastage
Wastage
 
Automatic Machines for Bedsheets Manufacturing
Automatic Machines for Bedsheets ManufacturingAutomatic Machines for Bedsheets Manufacturing
Automatic Machines for Bedsheets Manufacturing
 
Top 6 garment manufacturing processes and quality checks
Top 6 garment manufacturing processes and quality checksTop 6 garment manufacturing processes and quality checks
Top 6 garment manufacturing processes and quality checks
 
Denim Garments Quality Control and Inspection Services
Denim Garments Quality Control and Inspection ServicesDenim Garments Quality Control and Inspection Services
Denim Garments Quality Control and Inspection Services
 
TTQC 3: How you can positively improve buyers influence at your industry
TTQC 3: How you  can positively improve buyers influence at your industryTTQC 3: How you  can positively improve buyers influence at your industry
TTQC 3: How you can positively improve buyers influence at your industry
 
Visual inspection for fabric quality control
Visual inspection for fabric quality controlVisual inspection for fabric quality control
Visual inspection for fabric quality control
 
U 1 introduction to garment industry
U 1 introduction to garment industryU 1 introduction to garment industry
U 1 introduction to garment industry
 

Similar to Apparel production process

Garment manufacturing process fabric to finished product
Garment manufacturing process fabric to finished productGarment manufacturing process fabric to finished product
Garment manufacturing process fabric to finished productPrasanta Sarkar
 
Apparelmanufacturingprocess 140214034521-phpapp01
Apparelmanufacturingprocess 140214034521-phpapp01Apparelmanufacturingprocess 140214034521-phpapp01
Apparelmanufacturingprocess 140214034521-phpapp01Rihazudin Razik MBCS
 
Apparelmanufacturingprocess 140214034521-phpapp01
Apparelmanufacturingprocess 140214034521-phpapp01Apparelmanufacturingprocess 140214034521-phpapp01
Apparelmanufacturingprocess 140214034521-phpapp01Rumali Sahanika
 
Apparel production overview
Apparel production overview Apparel production overview
Apparel production overview Fouzia Mirza
 
apparelmanufacturingprocess-140214034521-phpapp01
apparelmanufacturingprocess-140214034521-phpapp01apparelmanufacturingprocess-140214034521-phpapp01
apparelmanufacturingprocess-140214034521-phpapp01dilawar shaikh
 
Garment-Manufacturing-Pro.7112349.powerpoint.pptx
Garment-Manufacturing-Pro.7112349.powerpoint.pptxGarment-Manufacturing-Pro.7112349.powerpoint.pptx
Garment-Manufacturing-Pro.7112349.powerpoint.pptxPravin Ukey
 
Enhance the fabric quality by new approach
Enhance the fabric quality by new approachEnhance the fabric quality by new approach
Enhance the fabric quality by new approachDr.V.Ramesh Babu
 
Processfromfabrictopoduct 131115122436-phpapp02
Processfromfabrictopoduct 131115122436-phpapp02Processfromfabrictopoduct 131115122436-phpapp02
Processfromfabrictopoduct 131115122436-phpapp02Mostafa Abd-Alrehim
 
The four point system
The four point systemThe four point system
The four point systemPadmaKumar34
 
Apparelmanufacturingprocess 140214034521-phpapp01
Apparelmanufacturingprocess 140214034521-phpapp01Apparelmanufacturingprocess 140214034521-phpapp01
Apparelmanufacturingprocess 140214034521-phpapp01Mustafa Rajib
 

Similar to Apparel production process (20)

Raw Material Of Quality Control
Raw Material Of Quality ControlRaw Material Of Quality Control
Raw Material Of Quality Control
 
Suraaj Linens
Suraaj LinensSuraaj Linens
Suraaj Linens
 
Garment manufacturing process fabric to finished product
Garment manufacturing process fabric to finished productGarment manufacturing process fabric to finished product
Garment manufacturing process fabric to finished product
 
Apparelmanufacturingprocess 140214034521-phpapp01
Apparelmanufacturingprocess 140214034521-phpapp01Apparelmanufacturingprocess 140214034521-phpapp01
Apparelmanufacturingprocess 140214034521-phpapp01
 
Apparel manufacturing process
Apparel manufacturing process Apparel manufacturing process
Apparel manufacturing process
 
Apparelmanufacturingprocess 140214034521-phpapp01
Apparelmanufacturingprocess 140214034521-phpapp01Apparelmanufacturingprocess 140214034521-phpapp01
Apparelmanufacturingprocess 140214034521-phpapp01
 
Apparel production overview
Apparel production overview Apparel production overview
Apparel production overview
 
apparelmanufacturingprocess-140214034521-phpapp01
apparelmanufacturingprocess-140214034521-phpapp01apparelmanufacturingprocess-140214034521-phpapp01
apparelmanufacturingprocess-140214034521-phpapp01
 
Garment-Manufacturing-Pro.7112349.powerpoint.pptx
Garment-Manufacturing-Pro.7112349.powerpoint.pptxGarment-Manufacturing-Pro.7112349.powerpoint.pptx
Garment-Manufacturing-Pro.7112349.powerpoint.pptx
 
Apparel Manufacturing Process
Apparel Manufacturing ProcessApparel Manufacturing Process
Apparel Manufacturing Process
 
Apparel manufacturing process
Apparel manufacturing processApparel manufacturing process
Apparel manufacturing process
 
Enhance the fabric quality by new approach
Enhance the fabric quality by new approachEnhance the fabric quality by new approach
Enhance the fabric quality by new approach
 
Processfromfabrictopoduct 131115122436-phpapp02
Processfromfabrictopoduct 131115122436-phpapp02Processfromfabrictopoduct 131115122436-phpapp02
Processfromfabrictopoduct 131115122436-phpapp02
 
Manufa theory
Manufa theoryManufa theory
Manufa theory
 
The four point system
The four point systemThe four point system
The four point system
 
Apparel manufacturing process
Apparel manufacturing processApparel manufacturing process
Apparel manufacturing process
 
Apparelmanufacturingprocess 140214034521-phpapp01
Apparelmanufacturingprocess 140214034521-phpapp01Apparelmanufacturingprocess 140214034521-phpapp01
Apparelmanufacturingprocess 140214034521-phpapp01
 
The Four Point System
The Four Point SystemThe Four Point System
The Four Point System
 
Presentation1
Presentation1Presentation1
Presentation1
 
Internship report
Internship reportInternship report
Internship report
 

Recently uploaded

Enzyme, Pharmaceutical Aids, Miscellaneous Last Part of Chapter no 5th.pdf
Enzyme, Pharmaceutical Aids, Miscellaneous Last Part of Chapter no 5th.pdfEnzyme, Pharmaceutical Aids, Miscellaneous Last Part of Chapter no 5th.pdf
Enzyme, Pharmaceutical Aids, Miscellaneous Last Part of Chapter no 5th.pdfSumit Tiwari
 
Introduction to ArtificiaI Intelligence in Higher Education
Introduction to ArtificiaI Intelligence in Higher EducationIntroduction to ArtificiaI Intelligence in Higher Education
Introduction to ArtificiaI Intelligence in Higher Educationpboyjonauth
 
Alper Gobel In Media Res Media Component
Alper Gobel In Media Res Media ComponentAlper Gobel In Media Res Media Component
Alper Gobel In Media Res Media ComponentInMediaRes1
 
Meghan Sutherland In Media Res Media Component
Meghan Sutherland In Media Res Media ComponentMeghan Sutherland In Media Res Media Component
Meghan Sutherland In Media Res Media ComponentInMediaRes1
 
CARE OF CHILD IN INCUBATOR..........pptx
CARE OF CHILD IN INCUBATOR..........pptxCARE OF CHILD IN INCUBATOR..........pptx
CARE OF CHILD IN INCUBATOR..........pptxGaneshChakor2
 
internship ppt on smartinternz platform as salesforce developer
internship ppt on smartinternz platform as salesforce developerinternship ppt on smartinternz platform as salesforce developer
internship ppt on smartinternz platform as salesforce developerunnathinaik
 
Hierarchy of management that covers different levels of management
Hierarchy of management that covers different levels of managementHierarchy of management that covers different levels of management
Hierarchy of management that covers different levels of managementmkooblal
 
भारत-रोम व्यापार.pptx, Indo-Roman Trade,
भारत-रोम व्यापार.pptx, Indo-Roman Trade,भारत-रोम व्यापार.pptx, Indo-Roman Trade,
भारत-रोम व्यापार.pptx, Indo-Roman Trade,Virag Sontakke
 
call girls in Kamla Market (DELHI) 🔝 >༒9953330565🔝 genuine Escort Service 🔝✔️✔️
call girls in Kamla Market (DELHI) 🔝 >༒9953330565🔝 genuine Escort Service 🔝✔️✔️call girls in Kamla Market (DELHI) 🔝 >༒9953330565🔝 genuine Escort Service 🔝✔️✔️
call girls in Kamla Market (DELHI) 🔝 >༒9953330565🔝 genuine Escort Service 🔝✔️✔️9953056974 Low Rate Call Girls In Saket, Delhi NCR
 
Historical philosophical, theoretical, and legal foundations of special and i...
Historical philosophical, theoretical, and legal foundations of special and i...Historical philosophical, theoretical, and legal foundations of special and i...
Historical philosophical, theoretical, and legal foundations of special and i...jaredbarbolino94
 
KSHARA STURA .pptx---KSHARA KARMA THERAPY (CAUSTIC THERAPY)————IMP.OF KSHARA ...
KSHARA STURA .pptx---KSHARA KARMA THERAPY (CAUSTIC THERAPY)————IMP.OF KSHARA ...KSHARA STURA .pptx---KSHARA KARMA THERAPY (CAUSTIC THERAPY)————IMP.OF KSHARA ...
KSHARA STURA .pptx---KSHARA KARMA THERAPY (CAUSTIC THERAPY)————IMP.OF KSHARA ...M56BOOKSTORE PRODUCT/SERVICE
 
Computed Fields and api Depends in the Odoo 17
Computed Fields and api Depends in the Odoo 17Computed Fields and api Depends in the Odoo 17
Computed Fields and api Depends in the Odoo 17Celine George
 
EPANDING THE CONTENT OF AN OUTLINE using notes.pptx
EPANDING THE CONTENT OF AN OUTLINE using notes.pptxEPANDING THE CONTENT OF AN OUTLINE using notes.pptx
EPANDING THE CONTENT OF AN OUTLINE using notes.pptxRaymartEstabillo3
 
“Oh GOSH! Reflecting on Hackteria's Collaborative Practices in a Global Do-It...
“Oh GOSH! Reflecting on Hackteria's Collaborative Practices in a Global Do-It...“Oh GOSH! Reflecting on Hackteria's Collaborative Practices in a Global Do-It...
“Oh GOSH! Reflecting on Hackteria's Collaborative Practices in a Global Do-It...Marc Dusseiller Dusjagr
 
Presiding Officer Training module 2024 lok sabha elections
Presiding Officer Training module 2024 lok sabha electionsPresiding Officer Training module 2024 lok sabha elections
Presiding Officer Training module 2024 lok sabha electionsanshu789521
 
ECONOMIC CONTEXT - PAPER 1 Q3: NEWSPAPERS.pptx
ECONOMIC CONTEXT - PAPER 1 Q3: NEWSPAPERS.pptxECONOMIC CONTEXT - PAPER 1 Q3: NEWSPAPERS.pptx
ECONOMIC CONTEXT - PAPER 1 Q3: NEWSPAPERS.pptxiammrhaywood
 
Earth Day Presentation wow hello nice great
Earth Day Presentation wow hello nice greatEarth Day Presentation wow hello nice great
Earth Day Presentation wow hello nice greatYousafMalik24
 
Full Stack Web Development Course for Beginners
Full Stack Web Development Course  for BeginnersFull Stack Web Development Course  for Beginners
Full Stack Web Development Course for BeginnersSabitha Banu
 

Recently uploaded (20)

Enzyme, Pharmaceutical Aids, Miscellaneous Last Part of Chapter no 5th.pdf
Enzyme, Pharmaceutical Aids, Miscellaneous Last Part of Chapter no 5th.pdfEnzyme, Pharmaceutical Aids, Miscellaneous Last Part of Chapter no 5th.pdf
Enzyme, Pharmaceutical Aids, Miscellaneous Last Part of Chapter no 5th.pdf
 
Introduction to ArtificiaI Intelligence in Higher Education
Introduction to ArtificiaI Intelligence in Higher EducationIntroduction to ArtificiaI Intelligence in Higher Education
Introduction to ArtificiaI Intelligence in Higher Education
 
TataKelola dan KamSiber Kecerdasan Buatan v022.pdf
TataKelola dan KamSiber Kecerdasan Buatan v022.pdfTataKelola dan KamSiber Kecerdasan Buatan v022.pdf
TataKelola dan KamSiber Kecerdasan Buatan v022.pdf
 
Alper Gobel In Media Res Media Component
Alper Gobel In Media Res Media ComponentAlper Gobel In Media Res Media Component
Alper Gobel In Media Res Media Component
 
Meghan Sutherland In Media Res Media Component
Meghan Sutherland In Media Res Media ComponentMeghan Sutherland In Media Res Media Component
Meghan Sutherland In Media Res Media Component
 
CARE OF CHILD IN INCUBATOR..........pptx
CARE OF CHILD IN INCUBATOR..........pptxCARE OF CHILD IN INCUBATOR..........pptx
CARE OF CHILD IN INCUBATOR..........pptx
 
internship ppt on smartinternz platform as salesforce developer
internship ppt on smartinternz platform as salesforce developerinternship ppt on smartinternz platform as salesforce developer
internship ppt on smartinternz platform as salesforce developer
 
Hierarchy of management that covers different levels of management
Hierarchy of management that covers different levels of managementHierarchy of management that covers different levels of management
Hierarchy of management that covers different levels of management
 
भारत-रोम व्यापार.pptx, Indo-Roman Trade,
भारत-रोम व्यापार.pptx, Indo-Roman Trade,भारत-रोम व्यापार.pptx, Indo-Roman Trade,
भारत-रोम व्यापार.pptx, Indo-Roman Trade,
 
call girls in Kamla Market (DELHI) 🔝 >༒9953330565🔝 genuine Escort Service 🔝✔️✔️
call girls in Kamla Market (DELHI) 🔝 >༒9953330565🔝 genuine Escort Service 🔝✔️✔️call girls in Kamla Market (DELHI) 🔝 >༒9953330565🔝 genuine Escort Service 🔝✔️✔️
call girls in Kamla Market (DELHI) 🔝 >༒9953330565🔝 genuine Escort Service 🔝✔️✔️
 
Historical philosophical, theoretical, and legal foundations of special and i...
Historical philosophical, theoretical, and legal foundations of special and i...Historical philosophical, theoretical, and legal foundations of special and i...
Historical philosophical, theoretical, and legal foundations of special and i...
 
9953330565 Low Rate Call Girls In Rohini Delhi NCR
9953330565 Low Rate Call Girls In Rohini  Delhi NCR9953330565 Low Rate Call Girls In Rohini  Delhi NCR
9953330565 Low Rate Call Girls In Rohini Delhi NCR
 
KSHARA STURA .pptx---KSHARA KARMA THERAPY (CAUSTIC THERAPY)————IMP.OF KSHARA ...
KSHARA STURA .pptx---KSHARA KARMA THERAPY (CAUSTIC THERAPY)————IMP.OF KSHARA ...KSHARA STURA .pptx---KSHARA KARMA THERAPY (CAUSTIC THERAPY)————IMP.OF KSHARA ...
KSHARA STURA .pptx---KSHARA KARMA THERAPY (CAUSTIC THERAPY)————IMP.OF KSHARA ...
 
Computed Fields and api Depends in the Odoo 17
Computed Fields and api Depends in the Odoo 17Computed Fields and api Depends in the Odoo 17
Computed Fields and api Depends in the Odoo 17
 
EPANDING THE CONTENT OF AN OUTLINE using notes.pptx
EPANDING THE CONTENT OF AN OUTLINE using notes.pptxEPANDING THE CONTENT OF AN OUTLINE using notes.pptx
EPANDING THE CONTENT OF AN OUTLINE using notes.pptx
 
“Oh GOSH! Reflecting on Hackteria's Collaborative Practices in a Global Do-It...
“Oh GOSH! Reflecting on Hackteria's Collaborative Practices in a Global Do-It...“Oh GOSH! Reflecting on Hackteria's Collaborative Practices in a Global Do-It...
“Oh GOSH! Reflecting on Hackteria's Collaborative Practices in a Global Do-It...
 
Presiding Officer Training module 2024 lok sabha elections
Presiding Officer Training module 2024 lok sabha electionsPresiding Officer Training module 2024 lok sabha elections
Presiding Officer Training module 2024 lok sabha elections
 
ECONOMIC CONTEXT - PAPER 1 Q3: NEWSPAPERS.pptx
ECONOMIC CONTEXT - PAPER 1 Q3: NEWSPAPERS.pptxECONOMIC CONTEXT - PAPER 1 Q3: NEWSPAPERS.pptx
ECONOMIC CONTEXT - PAPER 1 Q3: NEWSPAPERS.pptx
 
Earth Day Presentation wow hello nice great
Earth Day Presentation wow hello nice greatEarth Day Presentation wow hello nice great
Earth Day Presentation wow hello nice great
 
Full Stack Web Development Course for Beginners
Full Stack Web Development Course  for BeginnersFull Stack Web Development Course  for Beginners
Full Stack Web Development Course for Beginners
 

Apparel production process

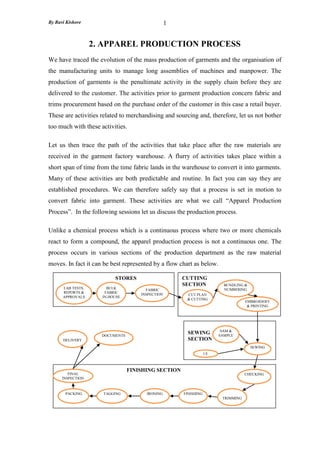
  • 1. By Ravi Kishore 1 STORES CUTTING SECTION SEWING SECTION FINISHING SECTION I E SAM & SAMPLE LAB TESTS, REPORTS & APPROVALS BULK FABRIC IN-HOUSE FABRIC INSPECTION CUT PLAN & CUTTING BUNDLING & NUMBERING EMBROIDERY & PRINTING SEWING CHECKING FINISHINGTAGGING FINAL INSPECTION DOCUMENTS DELIVERY PACKING IRONING TRIMMING 2. APPAREL PRODUCTION PROCESS We have traced the evolution of the mass production of garments and the organisation of the manufacturing units to manage long assemblies of machines and manpower. The production of garments is the penultimate activity in the supply chain before they are delivered to the customer. The activities prior to garment production concern fabric and trims procurement based on the purchase order of the customer in this case a retail buyer. These are activities related to merchandising and sourcing and, therefore, let us not bother too much with these activities. Let us then trace the path of the activities that take place after the raw materials are received in the garment factory warehouse. A flurry of activities takes place within a short span of time from the time fabric lands in the warehouse to convert it into garments. Many of these activities are both predictable and routine. In fact you can say they are established procedures. We can therefore safely say that a process is set in motion to convert fabric into garment. These activities are what we call “Apparel Production Process”. In the following sessions let us discuss the production process. Unlike a chemical process which is a continuous process where two or more chemicals react to form a compound, the apparel production process is not a continuous one. The process occurs in various sections of the production department as the raw material moves. In fact it can be best represented by a flow chart as below.
  • 2. By Ravi Kishore 2 As can be seen the process starts with the stores where materials are received checked, inspected and tested. Fabric then moves to cutting section where it is cut according to cut plan using patterns, the cuts are then bundled and numbered; some parts are sent for embroidery or print as necessary and received. The cuttings are then sent to sewing section which receives the SAM from industrial engineering and the approved sample from sample department to proceed with sewing operations. Stitched garments are then moved to the finishing section where they are checked, trimmed, finished and ironed. The ironed garments are then tagged and packed in cartons for final inspection. Document for the inspected garments are prepared and the goods are delivered. These are the various production processes performed in the production department. We will discuss the processes in each department at length and their salient features. Stores The work in the production department starts with the receiving of fabric and trims in the stores. The fabric is checked and inspected following a procedure. In fact the fabric supplier as per the conditions laid down by the sourcing department sends the fabric for testing the quality with reference to the colour fastness, dimensional stability and physical properties as required. These fabrics are sent to independent testing laboratories where the fabric is tested as per the test parameters and standards laid down internationally and stipulated by the customer. This procedure of testing the fabric is called “Fabric Package Test”. These laboratories submit their test reports to the retailer. In case if the fabric does not meet the required standards, the retailer directs the supplier to reprocess the fabric to achieve the desired standards. Ultimately the final quality of garment depends on the quality of fabric. The fabric is received at the stores is accepted for its quality by the customer. However physical defects of the fabric are detected through intense inspection as per the desired quality standards. The inspection procedure followed by the quality assurance department of the stores is as follows – Width Variation: Receive the fabric either in rolls or bales form and check all rolls or bales for width and tabulate. Verify the widths with the packing list. If there are variations in width, sort rolls/bales by width and stack them separately. Place widths that vary up to plus or minus 5% together as a group. Variations between 5% - 10% together are
  • 3. By Ravi Kishore 3 grouped. Similarly group rolls/bales with no variations together. Grouping is required to lay rolls of same widths or with marginal variations together in order to minimize fabric wastage in cutting. Patterns are prepared according to the width and any significant variations will result in lower yield per meter of fabric. That means the fabric consumptions will increase and there will be shortage to complete the production. Shrinkage: Cut 60 Cms in full width from each roll/bale. Mark and send half width of the cutting for shrinkage test. Receive shrunk fabrics swatches, iron the swatches and measure and prepare shrinkage report. Sort fabric rolls/bales already sorted for width, now by variable shrinkages. Rolls/bales which have shrinkage of between 2%-5% are grouped together since the dimensional stability of the finished garments made form these rolls does not vary significantly. Group rolls/bales that shrink between 5% - 10% together. Shrinkage groups are made so that fabric rolls/bales with closer shrinkages are laid together for cutting with a common or single pattern. If the shrinkage variation is high among the rolls/bales, patterns have to be remade for each shrinkage group. Grouping by shrinkage ensures that the finished garments will be consistent in their dimensional stability. Shade Variation: During the process of dyeing, fabric usually tend to take up the dye uniformly. However some times the dye may not be fixed uniformly resulting in shade variations. The tendency towards shade variation is significant as the width of the fabric increases, thus wider width fabrics show greater shade variation from their center to their selvedges. For this purpose to determine the shade variation use the second half of the cutting to prepare shade bands. The cut piece covers fabric width from the center to one selvedge. This procedure is followed if the garment has no wash. However, if there is garment wash, use the cuttings that were earlier washed and used for shrinkage sorting. The purpose of this sorting is to group the cuttings and hence the rolls/bales by shade variation. Based on the number of shades that are likely, the swatches are arranged in order of their degree of variance. The shades are then sorted as families – lighter shades with variance of 1-3 degrees, medium shades of 4-6 degrees and darker shades of 6-8. The families of shades will be cut together for sewing. As the degree of variance is within reasonable acceptability, finished garments can be packed together with the approval of
  • 4. By Ravi Kishore 4 the customer. This process of sorting by shades is called shade banding and this will help the customer to place the garments of a family of shade together for display in the store. Inspection for Defects: The sorted fabric rolls/bales are inspected for any weaving or knitting defects. This part of the inspection improves the cutting productivity since the defects are marked. It also helps in identifying any major defects in the fabric so that such rolls can be separated and returned to the supplier for replacement. In case of high defect percentage, customer can be alerted for any shortage in garment order quantity. Such an inspection system also improves the quality standards of the production. The inspection procedure followed is as follows: 1. Select the number of rolls to be inspected. This is based on the total fabric received for garment production of the style. A sample is drawn following a statistical sample selection plan. The sample lists the minimum quantity of fabric for each slot that is sorted based on width variation, shrinkage and shade variation. The rolls are randomly selected. In case the number of defects is found high in selected rolls/bales, increase the quantity to be inspected. 2. The sampling plan will be as follows: Since fabric from the Fareast countries like China, Korea and Taiwan is shipped in yards, the fabric lot sizes will be considered in yards. Fabrics from Europe and India are shipped in meters; the lot sizes to be considered will be in meters. Lot Size Yards Inspection Yards Lot Size Meters Inspection Meters Percent of Total Lot 0 – 2,500 Not less than 500 0 – 2,300 Not less than 460 20% 2,501 – 5,000 251 - 500 2,301 – 4,500 230 - 450 10% 5,001 – 20,000 400 – 1,600 4,501 – 18,300 360 - 1465 8% 20,001 – 30,000 1,200 – 1,800 18,301 – 27,400 1,100 – 1,645 6% 3. Fabric inspection of the quantity of fabric is estimated as above. The next step is to proceed with identifying the fabric rolls to be inspected which will cover the total number of required meters or yards. The identified rolls are inspected as per different inspection systems. There are two systems of inspection based on 4-points and 6- points considering the number of points assigned to the size and significance of defect. Among the two, 4-point system is commonly practiced in the garment manufacturing industry. The points 1, 2, 3, and 4 are assigned to indicate the size and
  • 5. By Ravi Kishore 5 significance of the defect. If the fabric lot is in yards, defect size is measured in inches and if it is in meters defect size is represented in Cms. 4 – Point System of Fabric Defect Evaluation Assigned Points Size of Defects In Inches in Cms 1 3 inches or less 8cms or less 2 More than 3” but less than 6” More than 8cms but less than 15cms 3 More than 6“ but less than 9” More than15” but less than 23cms 4 More than 9” More than 23cms Assigning Defect Points: Under the system of inspection, a maximum of 4 penalty points are assigned to any single defect. Penalty points are assigned to Major defects only. Minor defects are not assigned penalty points. A major defect is any defect that makes the finished garment to be considered as a second in sale. Major woven fabric defects include slubs, holes, missing yarns, yarn variation, end out, soiled yarns, and wrong yarn. Similarly major dye or printing defects are out of register, dye spots, machine stop, color out, color smear, or shading. But these are not comprehensive lists. If there is a continuous running defect exceeding 9 inches, it must be assigned a penalty point of 4. If there is an additional defect within the same linear yard or meter, consider it as a separate defect and assign it defect points depending on its severity Any continuous defect such as roll to roll shade variation, narrow or irregular width within the roll, creasing, uneven finish, barre’, skew must be assigned 4 points for every yard or meter within a shipment. Each full width defect must be assigned 4 points. Obvious and noticeable defects are assigned 4 points for in each yard or meter they are noticed irrespective of their size. Add up the total points assigned per every 100 yards of fabric inspected. The acceptance of maximum defects varies from customer to customer. For some up to points 40 per 100 yards are acceptable but for others not more than 20 or 28 are acceptable. For example, JC Penney accepts 26 points per 100 linear yards per roll, but must not be more than 13 points in 100 linear yards in the total shipment. Similarly, Nordstrom accepts 20 points per square 100 square yards in a roll but in a shipment not more than 15 points are
  • 6. By Ravi Kishore 6 allowed per 100 square yards. The acceptable defects vary with the fabric type. Some retail buyers have the following level of acceptance for common fabrics: Group Fabric Description Points per Roll Points per shipment 1 Dress shirting’s, Worsted/ Woolens, suiting fabrics, O/E denim 12-16 oz/yd2 , manmade fabrics, filament rayon, twills poplin/oxford/gingham shirting, light and medium weight denim 20 points / 100 yards2 24 points / 100 meters2 15 points / 100 yards2 18 points / meters2 2 Ring spun denim 12-16 oz/yd2 , canvas, corduroy, velvet, flannel, woven fabrics with spandex, seersucker, dobby, jacquard, chambray, silks, basic knits 25 points / 100 yards2 30 points / 100 meters2 20 points / 100 yards2 24 points / meters2 3 All specialty knits 30 points / 100 yards2 36 points / 100 meters2 25 points / 100 yards2 30 points / meters2 The Point Calculation: For Rolls  Points per 100 square yards = Total Points for the Roll X 3600 Yards inspected X Cuttable width (inch)  Points per 100 square meters = Total Points for the roll X 100,000 Yards inspected X Cuttable Fabric Width (mm) For a shipment Total shipment points per 100 yards2 = Total average points per linear yard X 3600 Shipment inspected yards X Cuttable Fabric width (inch) Total shipment points per 100 meters2 = Total average points per linear meter X 10,000 Shipment inspected meters X Cuttable Fabric width (mm) Common Fabric Inspection requirements – 1. Ensure that the fabric is inspected by the supplier mill before shipment. 2. Flag all major defects and all seams 3. Minimum length of a roll must not be less than 40 yards 4. Any defect that repeats continuously for 3 yards is a running defect and the roll must be rejected regardless of the final point count. 5. Two part pieces must not exceed 10% of the rolls shipped. Minimum length of either part cannot be less than 25 yards. 6. All seams must be counted as 4 points per seam. Seams and full width defects are considered as major defects. 7. Any piece with more than 6 major defects per 100 yards, including seams or 3 major defects in 50 yards will be considered as second quality 8. The full width cutting from the beginning of the roll must be used to check the side/side and end /end shade variation. 9. Width variation must be checked at the middle and end of the rolls. Format of the inspection report: 4 POINT FABRIC INSPECTION REPORT Supplier Name & Address: Fabric P.O No. Style No. In-house Date Inspection Date: . Roll Length Cuttable Width Mill Roll No. Warehouse Roll No Ticketed Actual Difference Roll Width Roll Starting Roll Middle End of roll Defect Points
  • 7. By Ravi Kishore 7 III Process – Cutting, Numbering & Issue II Process – Laying & Spreading I Process – Fabric receipt & Marker Preparation Lay reconciliation report Cutting Worksheet Fabric Request to stores Fabric Details from stores Fabric Inspection Report Cut Plan Marker Preparation Duplicate Patterns Fabric relaxation Request for Marker to CAD Marker receipt from CAD Fabric cut order Fabric Cutting Fabric lay report Fabric Lay Preparation Fabric End bit register Fabric Spreading Fabric receipt from stores Bundling Numbering Checking Parts Replacement Cutting report Cuttings Issue Register Pilot Run Issue cuttings to sewing section The inspection report prepared is circulated to the merchandiser concerned, fabric sourcing department, production department. Based on the number of points and acceptability, the fabric is issued for production to cutting section. Cutting Section Inspected fabric is received from the stores for further process. Cutting process has greater impact on cost of garment than many other sections concerned with production. While some of the costs are incurred in the cutting section, other costs are in the remaining production sections due to errors committed in the cutting section. It must be remembered that the cost of fabric is constitutes nearly 50% of the garment cost. The cutting section also uses large workforce for the various operations. Therefore the cutting process is given much care and importance in the production process. The common procedure followed in the cutting section can be graphically presented as- I Process: Cutting section places an indent for fabric based on the production order received from the merchandiser together with the style file, sample and trim cards. The process begins with the receipt of fabric after inspection from the stores. When the fabric
  • 8. By Ravi Kishore 8 is sent from the stores, it is accompanied with fabric inspection and test reports. A cut plan is prepared by the cutting section considering the various issues highlighted in the fabric report. A cut order plan translates customer orders into cutting orders. It is the process that coordinates customer orders with all the variables of marker making, spreading, and cutting to minimize total production costs and meet customer demand for timely products. It seeks most effective use of labor, equipment, fabric and space. FABRIC INSPECTION REPORT Supplier Name & Address: Fabric P.O No. Style No. In-house Date Inspection Date: .Roll Length Cuttable Width Shrinkage % Roll No. Ticketed Actual Difference Width Starting Middle End Length Width The cut order plan considers -  production order and fabric width and availability  volume, size ratios, and sectioning procedures for marker making  whether file markers are available or new ones are needed  developing specifications for optimum marker making and fabric utilization  most effective use of spreading and cutting equipment and personnel  issuing orders for marker making, spreading and cutting  number of sizes in order and colours  maximum/minimum number of sizes allowed in marker  maximum spread length and ply height  percentage of over cut or undercut units  usable fabric width and variations  common lines among pattern pieces  costs of marking markers, spreading, cutting, bundling  fabric cost per yard The cut order plan considers the fabric test reports and inspection reports received from the stores. The test report highlights the shrinkage and colour fastness of the bulk fabric. It does not reflect the roll/bale wise shrinkage. For this the inspection report is used which is in two parts. The first part deals with the roll/bale wise fabric width and shrinkage. Marker: The cutting section receives a set of duplicate patterns from the sample department. An indent is placed with the CAD section to prepare a marker. The marker is planned to determine the most efficient combination of sizes and shades in an order and to produce the best fabric yield and equipment utilization. The marker plan determines the most efficient layout of all the pattern pieces for all the sizes of a style on a given fabric. It is prepared to the cuttable width of the fabric. There are two types of markers – Open marker made with full pattern pieces; Closed marker made with half garment pieces for laying along the folds of a tube (Tubular knit
  • 9. By Ravi Kishore 9 fabric). Marker plan is based on the nature of the fabric and the desired result in the finished garment, pattern alignment in relation to the grain of the fabric and symmetry and asymmetry required in the garment. It is also based on the design characteristic of the finished garment. Marker efficiency is calculated as Area of patterns in the marker plan X 100% Total area of the marker plan It is determined to estimate fabric utilization and reduce or minimise waste. Efficiency of marker depends on fabric and pattern characteristics, splitting pattern pieces and creating a seam, reducing seam allowances, hem width, adjusting and modifying grain line, grain orientation, fabric utilisation standards – 90 to 97% which lead to 80 -85% achievement. Fabric Laying and Quality: The cutting section will proceed to lay and spread the fabric rolls on the lay table as per the cut plan and marker. Wherever the selvedges are tight resulting in roll up of fabric, they are cut and the fabric is smoothened. Fabrics have to be relaxed after laying and spreading for a minimum of 12 hours and depending on the fabric and its construction. Some fabrics such as crepe, georgette, chiffon, voiles, lycra blends and knits require longer time to relax. Relaxation eliminates tension caused in finishing and winding of fabric. Lay report must be prepared for all the fabric that is laid as per the cut plan. Laying Fabric Lay down underlay paper on cutting table and place original paper marker on top. Mark start and end of the lay making an allowance at each end of the lay taking into account the nature of the fabric being used, and expected shrinkage when the fabric is unrolled. Also mark joins on the underlay paper so that fabric flaws can be cut out and the fabric rejoined throughout the lay. Laying Up Make sure to separate all rolls, even of similar colour / shade, by using a paper between lays of each roll, to ensure all garment pieces are separated. This way no two rolls of fabric will become mixed during the bundling or production process. Mixing of two rolls of fabric will almost certainly lead to shaded garments, drastically reducing their value, even if able to be sold. Visually inspect the fabric while laying up for fabric flaws to verify any flaws or defects like, twisted weave, same roll shading , inconsistent width or any other fabric discrepancies. Always lay Right Side Up. Fabric flaws may not be visible on the wrong side. Also consistency of this laying process will assist in the sewing section to know the right side. Record the actual lay length to calculate actual yield per unit and a way of assessing total fabric usage. This can then be deducted from the beginning fabric roll total to give an estimated roll balance.
  • 10. By Ravi Kishore 10 Spreading is the processes of superimposing lengths of fabric on a spreading table or cutting table. A spread or lay-up is the total amount of fabric prepared for a single marker. Spreading mode is the manner in which fabric plies are laid out for cutting. Care must be taken during spreading for- • Direction of the fabric: it may be positioned in two ways face-to-face (F/F) or with all plies facing-one-way (F/O/W) • Direction of the Fabric Nap: it may be positioned nap- one-way (N/O/W) or nap-up- down Spreading process must take care to sort shades of fabric rolls, maintain correct ply direction and adequate lay stability, align plies properly, maintain correct ply tension, eliminate fabric faults, eliminate of static electricity, avoid distortion in the spread and avoid fusion of plies during cutting. The lay report gives the time the fabric laid, so that the cutting room manager can decide the time for relaxation. After the fabric is relaxed as per standard, the lay fabric is moved to the cutting table. Before we move to cutting section we must consider the marker efficiencies and fabric spreading and their implication on the costs. Example of marker efficiency: If the size and order quantity are Total order = 617 If the marker is made for single size as in the picture, for size 40, the length will be 186 cms and fabric utilisation will be FABRIC LAY REPORT Date: Style No.: Garment Description: Fabric Consumption: Lay Time: P. O. No.: Fabric Count / Construction: Total Rolls Received: Roll No. Width Cuttable Width Yards/ Meters Yards / Meters Laid End Bit Length (Yds / Mtrs) Fabric Defect Length (Yds /Mtrs) Size 36 38 40 42 44 Qty 43 115 202 138 119 Spreading modes F/O/W N/O/W F/F N/O/W F/F N/U/D F/O/W N/U/D
  • 11. By Ravi Kishore 11 62%. Based on the single pattern marker for all the sizes, fabric utilisation for all the sizes will be as follows: Considering the cutting plan, the fabric spread will be a step lay as in the picture below. Although this method of lay is economical in use of manpower available, it will result in high fabric utilisation. Instead if two sizes are placed on a marker, the utilisation will be as follows: The marker for the two sizes in 40 will be as above. The marker length will be 2.86 mtrs and fabric utilisation will be 77.8%. The fabric is cut at the end of each lay after spreading with an end cutter. The end cutter prevents uneven edges if the fabric were to be cut with scissors resulting in wastage. Cutting and Quality: Marker is placed on the lay and held in position with the help of clamps or weights. Cutting marker has one each part comprehensive details – style no., colour, shade no., if more than one shade, size, part. Fabric is then cut as per the marker following the marking guidelines. To mark start and finish position of sewing operations such as darts, pocket etc. the lay fabric is drilled with light duty drilling machine as per the marker indications. At places where two cut parts are attached in sewing such as Size Length of marker (cms) X Plies (no.s) Total Meterage 36 177 X 43 76.11 38 183 X 115 210.45 40 186 X 202 375.22 42 227 X 138 313.26 44 230 X 119 274.70 Order Quantity 617 1238.74 + 2% allowance 24.97 Total fabric 1273.71 Average consumption 2.06 mtrs / garment = 1273.71 617 Marker No. No. of Plies Sizes Total 36 38 40 42 44 1 22 2 44 2 58 2 116 3 101 2 202 4 69 2 138 5 60 2 120 Total No. of garments to cut with 3 extra garments 620
  • 12. By Ravi Kishore 12 collar band to yoke, front pleats of a pant to waist band, sleeve placket to cuff, the parts are notched after cutting the parts. Fabric lay on the cutting table can be cut using a straight knife cutting machine which is commonly used in many garment factories. Experienced cutting technicians such as the senior cutting technician usually do the cutting. Despite a correct marker in place, if the cutting technician does not cut accurately, it will result in a total loss to the factory. Some of the precautions that need to be taken are that hands must not shake and the palms need to be sweat free. Automatic cutting machines are used which are computer driven and the accuracy of cutting is much better. Although these machines are expensive, their accuracy and minimum wastage and the speed make for the cost. Each lay of cut parts on the cutting table is called as a bundle. Each bundle must be securely tied together with the marker sheet at the top. These bundles are now placed with larger parts at the bottom and smaller parts over them. These parts are now counted and the total number of parts is tallied with the parts of the marker. Each lay part in the bundle is numbered with a sticker
  • 13. By Ravi Kishore Fabric Cutting Follow Specifications Check Specification Sheet of the style received with cutting plan. Check information on fabric, lining and fusible; yields, cloth direction, type and colour of lining and fusible. Note if different from "normal" procedure relating to fusing and lining cut directions. For example, cutting of fusible off grain (bias) or on the opposite grain (across the weft) for any reason must be adhered to. Sealer Sample The sealer sample or sealed pre-production sample must be accompany the cutting plan. The sample will be referred for a number of important points. Check sample for fabric pile direction, matching points on check and / or stripe fabrics, fusible interlining position, contrast panels, lining preferred right side. This is the first stage of cutting process. Marker and Pattern Check if all pattern parts needed are available, by comparing the sample or with specification sheet. Check the direction of brushed, piled and one-way fabrics to ensure each fabric’s characteristics before starting a marker Check the master or base size pattern against the graded set to ensure if all aspects are covered in the size set patterns. This is a quality concern that will save time and money in the later stages of production. On oversight may cost the company dearly and the cutter branded negligent. The CAD marker is checked with patterns to ensure that no parts are missing. In case a manual marker has to be made lay all the patterns parts and mark them on the marker paper. Ensure all patterns are marked on the correct grain. Mark all nicks and drill holes from pattern piece on to the marker clearly. Garment pieces requiring hem, cuff and pocket position fusing after cutting must have fusing position marked in distinct colour like red. Cutting Place the marker on top of the fabric laid and check all joints marked on the marker line up with the marks on the base paper. All joints should overlap to ensure complete coverage of all panels and laid fabric is marginally longer than the maker. Check the marker one final time and the laid fabric for the required number of cuttings. Check the cutting machine before start of cutting for blade condition, its sharpness and straight edge. If there are any curves or bends in the blade’s edge, fabric cut will have ragged edges. Check the oil level and sharpening belt of the cutting machine. If necessary change the blade or machine because the cutting process is irreversible. Make sure that the marker will not move while cutting by either using weights, pins, staples, clamps, sticky sprays or a combination of any of these methods. Stretch fabrics, and other similar fabrics, should be cut across the lay (from selvedge to selvedge), at the end of each size before cutting any marked in pattern pieces. This will give one last chance to allow for shrinkage before the final process of cutting out the marked in pieces. Some fabrics such as COTTON ELASTANE need each panel to be cut as a block and relayed before cutting it to pattern shape, eliminating uneven inherent shrinkage. Fabrics that have a tight selvedge causing twisted, distorted, uneven effects throughout the lay need to have the selvedges cut off both sides to release the tight warp threads. This will relax the fabric creating an easier cutting process and a more accurate final product. Test drill holes and observe fabric reactions like pulled threads, fabric fusion, holes closing up after drill removed, on a block of waste fabric within the lay to be cut. These problems can be resolved by using hollow tip drill bits, hot tip drills, larger or smaller diameter drill bits. Depth of nicks needs to be relevant and appropriate for the fabric being cut. More open weave fabrics may require a slightly deeper or visible nick cut into the fabric block. Otherwise the nick may not be visible. Fabrics such as denim, nylons, 100% cotton shirting and similar stable fabrics need shallow nick. The depth of these nicks can vary from 2-3 mm for stable fabrics to 5 mm for open weave fabrics. All nicks must be within seam allowance. These nicks must also be of a consistent depth from the top to the bottom of the lay.
  • 14. By Ravi Kishore 14 Sewing Section The cut parts move from cutting section to sewing for sewing and assembly. The parts are issued through an issue register by the cutting section upon receiving an indent from the sewing section supervisor. The parts are numbered and bundled in numbers of 10 or 20 per bundle. The process in this section follows an assembly line system with a large number of industrial sewing machines described earlier placed in long columns. The sewing lines are laid out for production of specific styles of garments considering the type of machines required. For example a men’s shirt production line requires a mix of machines including single needle and double needle lockstitch machines, overlock and chain stitch machines, buttonhole and buttoning machines. The process in the sewing section starts with the preparation of production plan and operation bulletin. These are prepared by the industrial engineer (IE) prior to the arrival of the fabric and trims. The I.E first estimates the time required for producing the garment style based on the number of seams and their length and type. He measures the seam length of the garment and the time required to stitch a standard seam of 5 or 10 cms. For example if the average time taken for stitching a length of 10 cms is 7 seconds and if a shirt has seams totaling a length of 3000 cms, the time required for production of a single garment will be approximately 35 minutes. The IE will then calculate the number of shirts that can be produced in a day as 480 working minutes available (60 mnts X 8 hrs) 35 minutes per one shirt = 13 shirts per working day If the order quantity is 2000 shirts, it takes nearly 154 days for one machine and one person to complete the order. This of course is not practical. Therefore, the production will be undertaken by an assembly line of machines. The number of machines required will depend on the number of parts that are there in the shirt and the number of operations. That means the IE breaks down the shirt production by the various parts that it is made of and the operations required to assemble them. The sum of the times taken for completing all the operations to assemble the shirt will be 35 minutes.
  • 15. By Ravi Kishore 15 The IE thus prepares the work break down for every garment style and estimates the time it requires to be made. A standard software application called general sewing data (GSD) is used for this purpose. Using this application software the time required for each operation and the time for one garment are calculated. The table below explains the number of operations in a shirt and the time. This table is called as Operation Bulletin. OPN NO. DESCRIPTION MACHINE SMV (Mnts) SAM (Mnts) UNITS/ DAY OPERATO RS REQ MAX PRO D EFF % PROD/ HOUR COLLAR 1 COLLAR RUN STITCH SNLSEC 0.5 0.769 624 1.5 936 77% 78 2 COLLAR TRIM, TURN & IRON EWATEX 0.35 0.538 891.429 1 891 81% 111 3 COLLAR STAY STITCH SNLS 0.23 0.354 1356.52 1 1357 53% 170 4 ATTACH COLLAR TO INNER COLLAR SNLS 0.45 0.692 693.333 1.5 1040 69% 87 5 TURN & IRON COLLAR IRON BOX 0.3 0.462 1040 1 1040 69% 130 6 INNER COLLAR RUN ST SNLSEC 0.55 0.846 567.273 1.5 851 85% 71 7 IINER COLLAR TRIM, TURN & IRON EWATEX 0.4 0.615 780 1 780 92% 98 CUFF 8 CUFF RUN STITCH @ SIDES SNLSEC 0.7 1.077 445.714 2 891 81% 56 9 TURN AND IRON CUFF EWATEX 0.4 0.615 780 1 780 92% 98 10 CUFF EDGE STITCH SNLS 0.7 1.077 445.714 2 891 81% 56 11 PRESS UNDER CUFF MANUALLY IRON BOX 0.3 0.462 1040 1 1040 69% 130 SLEEVE 12 LOWER SLEEVE PLKT ATTACH SNLS 0.42 0.646 742.857 1 743 97% 93 13 TACK SLEEVE VENT, 2 CM SNLS 0.4 0.615 780 1 780 92% 98 14 UPPER SLV PLKT IRON IRON BOX 0.71 1.092 439.437 2 879 82% 55 15 UPPER SLV PLKT BOX SNLS 1.3 2.000 240 3 720 100% 30 BACK 16 MAIN & SIZE LABEL ATTACH ON BK YOKE SNLS 0.35 0.538 891.429 1 891 81% 111 17 JOIN BACK PANELS 5TO/L 0.75 1.154 416 2 832 87% 52 18 ATTACH WASH CARE LBL TO SIDE SNLS 0.3 0.462 1040 1 1040 69% 130 FRONT 19 JOIN INNER PLKT PANELS SNLS 0.4 0.615 780 1 780 92% 98 20 ATTACH INNER PLKT TO FR PLKT SNLS 0.35 0.538 891.429 1 891 81% 111 21 TACK FRONT PLKT @ SIDE SNLS 0.3 0.462 1040 1 1040 69% 130 22 FRONT PLACKET IRON IRON BOX 0.6 0.923 520 1.5 780 92% 65 23 B/H ON FRONT PLKT B/H 0.45 0.600 800 1 800 90% 100 24 ATTACH PLACKET TO FRONT SNLS 0.98 1.508 318.367 3 955 75% 40 25 HEM FRONT PLKTS SNLS 0.85 1.308 367.059 2 734 98% 46 26 TACK B/H PLKT @ BTM SNLS 0.2 0.308 1560 0.5 780 92% 195 27 JOIN FRONT PANELS 5TO/L 0.75 1.154 416 2 832 87% 52 28 FRONT YOKE IRON FOR PLEATS IRON BOX 0.95 1.462 328.421 2.5 821 88% 41 29 LOCK PLEATS ON YOKE SNLS 1 1.538 312 2.5 780 92% 39 30 ATTACH YOKE TO FRONT SNLS 0.7 1.077 445.714 2 891 81% 56 31 LOCK YOKE @ SHOULDER SNLS 0.65 1.000 480 2 960 75% 60 ASSEMBLY 32 FRONT & BACK NO. SETTING MANUAL 0.3 0.462 1040 1 1040 69% 130 33 SHOULDER ATTACH 5TO/L 0.55 0.846 567.273 2 1135 63% 71 34 SHOULDER EDGE STITCH SNLS 0.3 0.462 1040 1 1040 69% 130 35 COLLAR PAIRING & CENTRE MARKING MANUAL 0.3 0.462 1040 1 1040 69% 130 36 COLLAR ATTACH SNLS 0.58 0.892 537.931 2 1076 67% 67 37 COLLAR FINISH SNLS 0.65 1.000 480 2 960 75% 60 38 SLEEVE PAIRING MANUAL 0.2 0.308 1560 1 1560 46% 195 39 SLEEVE ATTACH 5TO/L 0.98 1.508 318.367 3 955 75% 40 40 TACK AT ARM HOLE SNLS 0.35 0.538 891.429 1 891 81% 111 41 CLOSE SIDE SEAM 5TO/L 0.63 0.969 495.238 2 990 73% 62 42 CUFF PAIRING, MARK CUFF ATTACH MANUAL 0.3 0.462 1040 1 1040 69% 130 43 CUFF ATTACH SNLS 0.76 1.169 410.526 2 821 88% 51 44 BOTTOM TRIM MANUAL 0.35 0.538 891.429 1 891 81% 111 45 HEM BOTTOM SNLS 0.6 0.923 520 1.5 780 92% 65 46 B/H ON CUFF & SLV PLKT B/H 0.36 0.554 866.667 1 867 83% 108 47 BUTTONING MARKING MANUAL 0.4 0.615 780 1 780 92% 98 48 BUTTONING OPERTION BTN 0.78 1.200 400 2 800 90% 50 Total 25.680 39.42 240.00 73 720 81%
  • 16. By Ravi Kishore 16 for each operation. There are 48 operations in the production for the style given in the table. There are 5 parts in the shirt – collar, cuff, sleeve, back and front. As per the scheme above the number of operations in each part is as below: 1. Collar – 7 2. Cuff – 4 3. Sleeve – 4 4. Back – 3 5. Front – 13 Once the parts are prepared, they are assembled to form the garment. The number of operations required to assemble are 17. As can be noticed, the number of operations and parts can increase or decrease depending on the design of the style. In the table above there are two columns that give time for each operation – SMV – standard minute value SAM – standard allowable minute Time for these two is given in minutes. The SMV is the actual time that an operation will take to be completed. This time is calculated based on the time computed using GSD software. It can also be measured by actual measurement of time while the operation is being performed. It is called as Work Measurement and the study of the operation using time as a unit of measure is called Time Study. The IE conducts time study regularly in the factory to gather time taken for each operation. Time study is conducted continuously to estimate the average time required for each operation. The average time thus calculated is called as Standard Time. Time study is defined as “a technique of work measurement used for determining accurately as possible from a limited number of observations, the time necessary to carry out a given activity at a defined standard of performance”. The table below is an example of time study. The operation performed is shoulder attachment of a shirt which is broken down into 9 elements. Time taken to perform each element of work is observed. This process is repeated thrice. 3 observed times are taken recorded. Their average time is then calculated. The average time is called basic time or standard time for the operation. The basic time is also the standard minute value or SMV for the operation. Allowances such as personal allowance or fatigue allowance are added to the SMV to calculate the standard allowable minute for the operation.
  • 17. By Ravi Kishore 17 No ELEMENT DESCRIPTION Observed Time Total O.T. Average O.T. B.T. 1 2 3 1 Shirt back picked 1.98 2.36 2.17 6.51 2.17 2.17 2 Shirt front picked 1.29 1.31 1.59 4.19 1.39 1.39 3 Back aligned with front at shoulder side 5.32 5.41 6.86 17.59 5.86 5.86 4 Assembly placed in stitching area 4.98 5.87 5.68 16.53 5.51 5.51 5 Pressure bar and Needle put down 2.3 2.18 2.10 6.58 2.19 2.19 6 stitch at 5 mm from edge of shoulder 4.03 4.69 5.48 14.20 4.73 4.73 7 Pressure bar and needle moved up pulling fabric out 4.10 5.65 4.85 14.6 4.86 4.86 8 Thread been cut 1.62 1.98 2.65 6.25 2.08 2.08 9 Stitched fabric kept left side 4.49 4.57 3.17 12.23 4.07 4.07 R=Rating O.T.=Observed Time B.T.=Basic Time Calculation of SAM: Personal Allowance: 11% Personal Allowance = 11/100 * 32.86 = 3.61 Machine Allowance: 5 % 5/100 * 32.86 = 1.64 Contingency Allowance: 3 % 3/100 * 32.86 = 0.98 Total Allowances = Machine Allowance + Personal allowance + Contingency Allowance = 1.64 sec + 3.61 sec + 0.98 sec = 6.23 sec SAM (Standard Allowed Minutes) = Basic Time + Total Allowances Therefore SAM = 32.86 + 6.23 = 39.09 sec or 0.652 minute. Based on the total SAM of the garment as in the operation bulletin above, the production target is fixed for a day, the number of machines required and also the number of operators as given in the table below:. Style XT 151 EFF @ F/S LDS SHIRT Date Buyer 65% TARGET /SHIFT 720 MACHINE SAM 23.830 36.569 DIRECT OPERATORS 54.9 BAL EFF% 80.99% MANUAL SAM 1.850 2.846 TOTAL WORK MINS 480 PCS/MC 10.75 Total 25.680 39.415 ACTUAL OPERATORS 67.0 The machines required is summarised in the operation bulletin as in the table below. MACHINES REQUIRED Single Needle Lock Stitch machine SNLS 36 Single Needle Lock Stitch machine with edge cutting SNLSEC 5 5 thread overlock machine 5TO/L 11 IRON BOX 8 Collar and cuff turning and trimming machine EWATEX 3 Button hole machine B/H 2 Button stitch machine BTN 2 Manual operations MANUAL 6
  • 18. By Ravi Kishore 18 The machine plan is prepared based on the operation bulletin and the number of production lines is determined. If the order quantity requires more than one sewing line to complete production within the given number of days, accordingly as many production lines are planned. In the conventional production system the work stations (sewing machines and work tables) are placed in successive rows. A production line is usually about 50 work stations long. An overhead bus bar travels across the length of the sewing lines to facilitate power supply to the machines and lighting as in the picture above. Production systems The traditional tailor has given way to readymade garments sold across retail counters across the world. Mass production of garments evolved out of customised production for individual customers. The evolution in technology including high speed sewing and cutting machines, computer controlled cutting rooms and sewing floors, and above all demand for quality garments season after season brought in many changes in garment production systems. Notable among the systems that are still practiced in many countries are individual, departmental whole garment, section or process, progressive bundle, straight-line, unit production and quick response. Let us discuss each of these systems and their advantages and disadvantages. Individual or Make through system: It is the traditional method of production where a single tailor or operator assembles the entire garment. The tailor in the tailoring shop performs all operations and makes a garment including sewing, hand work and pressing. The operator takes a bundle of cuttings to sew according to his or her own method of work. The tailor in this system is highly skilled and versatile. It is rare to find such skilled persons and hence this system of production is highly expensive. The individual system is most effective when a variety of garments have to be produced in small quantities such as in the sample room of a garment factory
  • 19. By Ravi Kishore 19 Departmental Whole garment system: In this production system one individual does all the work with the equipment allocated to a department as in the case of a person working in cutting section doing all the cutting work. A second person does all the sewing work in sewing section, and the third person finishes, presses and packs the garments. The workers in this system may use more than one equipment or tool to complete their respective job. This method of production is followed in sample rooms of large factories to produce size set samples and also in small boutiques. Both individual and departmental systems are effective when a very large variety of garments have to be produced in small quantities. These are also called as piece rate system since the operators are paid for the complete garment produced. Involvement of the operators is complete as they tend to earn more money if more garments are completed. In the departmental method operators are specialised in their respective work area. The Work in Progress (WIP) is reduced, since at a time one or few cut garments are with one operator and so the amount as inventory is reduced. However, these systems require highly skilled operators, and hence the cost of making is high. It is also a disadvantage as the operator is more concerned on the number of pieces finished instead of their quality. Productivity will be is low due to lack of specialisation as each operator performs a number of operations. Where bulk production of large order quantities is required both these systems are not effective. Section or Process System: It is also popular as Group System. This is evolved from the make through system, with the difference that the operators specialise in one major component and sew it from beginning to end. For example, an operator specialising in collar would assemble the collar by making the neck band, collar and attach the collar to neck band and perform all the operations required to finish the part or component. The production section will have a number of sections, each containing experienced operators capable of performing all the operations required for a specific component. The sections are built according to the average garment produced, and include: º Pre-assembling or preparation of small parts º Front and back making º Main assembly or closing, setting collars and sleeves, etc º Finishing operations such as buttonholes, button stitch blind-stitching.
  • 20. By Ravi Kishore 20 This is an efficient system to produce a variety of styles in reasonable quantities. As the workforce of all levels - semi skilled, skilled, apprentice - can be used the cost of making is less compared with the individual system. Productivity is higher compared to individual system, due to the use of special machines and all specialised workforce. Automation and specialisation can be implemented and absenteeism and machine breakdown problems do not cause serious problems. As operators of different skill sets are involved,the quality must be strictly maintained. Although productivity is high, skilled operators are required to perform simple operation within the section. As groups of people are involved in each section we require more WIP, thus increasing the inventory cost. As this is not a bundling system, there are greater chances for mix up, loss, shade variation, and sizes, so quality and production will be affected. Progressive Bundle System: This production system is also popular as - Batch System. As the name implies in this system garments are gradually assembled as they move through successive sub-assemblies and main assembly operations in bundle form. The principles of this system are - o The various sections are positioned according to main operation sequence, with each section having a layout according to the sequence of operations required to produce a particular component. For example, the collar section will have the following operations in sequence: 1. Mark collar run stitch 2. Run stitch collar 3. Collar turn / trim / iron 4. Collar top stitch The number of machines for each operation is determined by the output required. o A WIP table is positioned at the start and end of every section used for storage of work received from a preceding operation, and to hold work completed by that section. o Due to the WIP tables or buffers, each section is not directly dependent on the preceding section, but can absorb variations in output through stocks held within the section. The progressive bundle system, while being somewhat cumbersome in operation and requiring large quantities of work in progress, is probably one of the most stable systems as regards output. Unless there is serious absenteeism or prolonged special machine
  • 21. By Ravi Kishore 21 breakdowns, most of the usual hold-ups can be absorbed because of the amounts of work in progress. Balancing and the changeover to new styles are simplified, due to the amount of work held in reverse. When properly managed, the progressive bundle system is versatile and efficient. Operators of all levels - unskilled, skilled, semi skilled are involved in this system where complex operations are broken into small simple operation. Hence the cost of making is competitive. The quality of each component is checked during the individual operation as a result the overall quality is maintained. The components are moved in bundles from one operation to next operation, so there are fewer chances for lot mix-up, shade variation, size variation, etc Specialisation and rhythm of operation increase productivity. As the WIP is high in this system, this is a stable system. Due to WIP buffer, the breakdown, absenteeism, balancing of line, change of style can be easily managed. Bundle tracking can be implemented to identify and solve quality problems. An effective production and quality control systems can be implemented using time and method study tools, operator training programmes and with use of material handling equipment, such as centre table, chute, conveyor, trolley, bins, etc. However, line balancing is difficult and is sometimes solved by an efficient supervisor. But often it remains as one of the major constraints. Regular maintenance of equipment and machinery is needed. Batch planning is required for each style, which takes a lot of time. Improper planning causes worker turnover, poor quality, and loss in production. Increase in WIP in each section increases the inventory cost. Frequent change of styles and small order quantities make this system of production ineffective. Shuttle operators and utility operators also termed as floaters are needed in every batch to balance the line. Straight-line or 'Synchro' System: This system is based on a synchronised flow of work through each stage of producing a garment. Time-synchronisation is the most important
  • 22. By Ravi Kishore 22 factor of this system because the flow of work cannot be synchronised if there are considerable variations in the standard times allowed for all the operations performed on the line. For example, if one operation has a value of 1.25 minutes SAM, then all the other operations in the line must have the same, or a very close, value. The manipulation required to balance the standard time for each operator can sometimes lead to illogical combinations of whole or part operations which do not always improve the efficiency of individual operators. The synchro system by its very nature is rigid and particularly vulnerable to absenteeism and machine breakdowns. At all times reserve operators and machines must be available to fill the gaps. In addition, this system requires sufficient volume of the same type of garments to keep the line in continuous operation. Unit Production System (UPS): It is a mechanical system that has been in use for quite sometime, but major advancements were made in 1983 when computers were first used to plan, control and direct the flow of work through the system. The essential features of this system are: 1. The unit of production is a single garment and not bundles 2. The garment components are automatically transported from workstation to work station according to a pre-determined sequence 3. The work stations are so constructed that the components are presented as close as possible to the operator's left hand in order to reduce or minimise the movement required to grasp and position and component to be sewn. The system operates as described below- All parts for one garment are loaded onto a carrier at a workstation specially designed. The carrier itself is divided into sections, with each section having a quick-release clamp, which prevents the components from falling during movement through the system. When a batch of garments is loaded onto carriers they are fed past a mechanical or electronic device, which records the number of the carrier and addresses it to its first destination. The more intelligent systems address the carriers with all the destinations that they have to pass through to complete. The loaded carriers are then fed onto the main powered line, which continually circulates between the rows of machines. This main, or head, line is connected to each workstation by junctions, which open automatically if the work on a carrier is addressed to that particular station. The carrier is
  • 23. By Ravi Kishore 23 directed to the left side of the operator and waits its turn along with the other carriers in the station. When the operator has completed work on one carrier, a push button at the side of the sewing machine is pressed and this activates a mechanism, which transports the carrier back to the main line. As one carrier leaves the station, another is automatically fed in to take its place. When the carrier leaves the station it is recorded on the data collection system, and then addressed to its next destination. Unit Production System requires considerable investments, which are not always justified by conventional payback calculations. Apart from the measurable tangible benefits, UPS also have many intangible benefits such as a more orderly and controlled flow of work, and the ability to simulate production situation in advance. These intangibles are difficult to measure, but in themselves make a very positive contribution to the overall viability of the unit. All things considered, unit production systems have major advantages over the other manual and mechanical systems. Bundle handling is completely eliminated in this system. The time involved in the pick-up and disposal of sewing parts by operator is reduced to minimum. Output is automatically recorded, thus eliminating the operator to register the work. The computerised systems automatically balance the work between stations. Up to 40 styles can be produced simultaneously on one system. Unit production system requires high investments. The payback period of the investment takes long time. Proper planning is required to make the system effective. Quick Response Sewing System: It was first developed in Japan to enable manufacturers to respond quickly to market changes, especially when orders for individual styles were in small lots. Each workstation is equipped with two or four machines and the operator will take the garment through the required operations, including pressing, before it is transported to the next workstation. Some of the machines are duplicated in different stations and consequently if there is a bottleneck in one section
  • 24. By Ravi Kishore 24 the overload is automatically transported to other stations where operator capacity is available. All the parts of one garment are loaded on a hanging clamp attached to a trolley and in theory, there should only be one garment at each workstation. Work is transported by a computer controlled, overhead trolley system and each station has an individual controller, which provides the operator with information on the style being worked on displayed on an information card accompanying each trolley. A less sophisticated version of QRS uses a wheeled trolley, which contains parts for one garment and is pushed along the floor from operator to operator. Another feature of QRS is that all operators work in a standing position for easy mobility from one machine to another within their own workstation. Machine heights are adjusted accordingly and touch-pads and knee-pads controls are used instead of conventional foot pedals. Some of the salient features of QRS are that the supervisor is free to work with operators. Operators must be highly skilled in the operation of all the different machines in one workstation. In line inspection stations are built in and the inspector is able to return faulty work with the help of the system to the operator concerned. Productivity is high because the operator handles the garment once only for a number of operations. As there are fewer garments on the line throughput time is extremely short, which is the objective of this system. A typical unit would have eight work stations arranged around the transport system. A production system has four primary considerations, which together contribute to system. Processing Time + Transportation Time + Temporary Storage Time + Inspection Time = Total Production Time. Processing time is the total of working time of all operations involved in the manufacture of a garment. Transportation time involves the time taken to transport semi-finished or finished garments from one operation / machine to another. Temporary storage time is time during which the garment / bundle is idle as it waits for next operation or for completion of certain parts. Inspection time is time taken for inspecting semi-finished garments for any defects during manufacturing or inspecting fully finished garments before packing. The main aim of any production system is to achieve minimum possible total production time. This automatically reduces in-process inventory and its cost. The sub-assembly system reduces temporary storage time to zero by combining temporary storage time with transportation time.
  • 25. By Ravi Kishore 25 The various production systems described above are adopted by the garment factories depending on their turnover, production capacities, and financial investments. Depending on the size of the factory, there may be more than one sewing line of about 50 industrial sewing machines that perform different operations – lockstitch, chain stitch, bartack, overlock, flat lock, interlock, button stitch and buttonhole. Lockstitch machines with single double and three needles are used for top stitch and decorative stitches such as on back shoulder, collar, front yoke and placket. Chainstitch machines are available with single and double needle. Specialised chainstitch machines like feed-of the-arm (see picture) for side seaming of a shirt or pants and four needle machine for waist band attachment are available. Similarly overlock machine are used for closing side seams of shirts, dresses etc. These machines are also used to stitch fabric edges from fraying. Other specialised machines like the collar contour stitch machine as in the picture are used to quality collars with precision and speed. Pocket welt machine (see picture) is used in the sewing section for making quality pockets on trousers, shorts, sportswear, jackets, coats and suits. The operations in the sewing room start with the feeding helper collecting the cuttings and loading them in the sewing line. The line supervisor explains and demonstrates the operations to the operators and highlights the quality issues. He or she also arranges the machines as per the line plan and equips the line with necessary work tools such as folders and attachments. He with the help of the maintenance mechanic sets the machines for the number of stitches required (SPI) and checks the machine needles. Depending on the fabric to be used, needles are selected.
  • 26. By Ravi Kishore 26 Needle Size Fabric: light - heavy Cotton Polyester Spun Polyester Filament Polyamid Filament Polyamide Mono- filament Core Sun Cotton Polyester Core Spun Poly - Poly Silk Embroidery Yarn (Ticket-) Cotton Rayon/ Nm. NeB (Nr.) Nm. Nm. Nm. Nm. den Nm. Nm. Nm. Nr. Nr. 40 - 50 50 - 60 55 - 60 60 - 70 65 - 75 70 - 80 75 - 90 80 70 60 50 40 30 24 20 12 7 120 120 100 80 70 60 50 40 30 20 15 10 360/240 200 150 120 80 70 60 50 40 30 20 18/3 15/3 11/3 11/4 100 80 60 50 40 30 20 180 110 80 70 60 50 40 30 20 50 80 110 130 150 180 230 300 450 120 100 80 75 50 40 35 30 25 20 25 11 8 5 150 120 100 80 20 200 160 140 130 120 100 70 60 50 40 30 10 80 60 50 40 30 20 16 12 75 60 Some common work aids such as hemmers, binders, folders and gauges shown below are used in production to maintain quality and productivity. Sewing Machine work aids Raw edge upturn hemmer Clean finish hemmer Right angle binder Clean finish hemmer Lap seam folder Swing guage T guage Three corner guage In addition it is important to know the consumption of thread for different types of machines that are commonly used in the sewing line. The consumption depends on the type of stitch and the class of the stitch.
  • 27. By Ravi Kishore 27 Stitch class Description No of needles Ratio Total thread (cm) per cm of seam 301 lockstitch 1 1 to 1 2.5 101 chainstitch 1 1 to 0 4 401 2 thread chain stitch 1 1 to 3 5.5 304 zigzag 1 1 to 1 7 503 2 thread overlock 1 1.2 to 1 12 504 3 thread overlock 1 1 to 5 14 516 4 thread safety 2 1 to 1.4 17.5 512 4 thread mock safety 2 1 to 3.3 18 516 5 thread safety 2 1 to 3.4 20 516 6 thread safety 3 1 to 2 21 602 4 thread cover 2 1 to 3.5 25 606 9 thread flat lock 4 1 to 3.5 32 607 6 thread flat seam 4 1 to 3.5 32 The consumption of thread per garment is equally important, particularly because the thread is dyed to match the fabric colour. Often it is difficult to procure DTM thread at short notice and hence consumption must be carefully monitored. Thread consumption depends on the fabric thickness and density, number of stitches per inch or stitch density (SPI), thread wastage due to breakage, needle breakage and change and machine breakdown. Mtrs Mtrs Mtrs Mtrs Mtrs Item Per item Item per item Item per item Item per item Item per item Anorak 210 Corset 95 Jacket(C) 160 Pajamas (C) 100 Slacks(C) 130 Apron 25 Coverall 530 Jacket(L) 175 Pajamas (L) 140 Slacks(L) 160 Boiler suit 420 Dress(C) 90 Jeans(C) 145 Pajamas (M) 190 Slacks(M) 185 Bra 45 Dress(L) 190 Jeans(L) 175 Quilt 320 Trousers(C) 170 Briefs(C) 40 Dressing gown 165 Jeans(M) 210 Raincoat 285 Trousers(M) 270 Briefs(L) 65 Knitwear (M) 80 Knitwear (C) 60 Shirt(B) 75 Vest/T- shirt(C) 25 Briefs(M) 50 Nightie(C) 55 Knitwear (L) 70 Shirt(M) 120 Vest/T- shirt(M) 40 Coat(overall) 180 Nightie (L) 100 Overcoat (C) 135 Shorts(C) 35 Shorts(L) 20 Housecoat 185 Overcoat (M) 610 Overcoat (L) 315 Shorts (sport) 70 Waistcoat 50 The production supervisor and the line supervisor are also responsible for the daily productivity of the sewing lines. While loading the lines with the allotted styles, they must keep in mind the skills of the operators and assign the tasks accordingly. A right balance of skills used in appropriate workstations will balance the production line. For this it is required to grade the operators by their proficiency in various skills and the ease with which they operate machines. Those who are experienced to operate specialised machines are obviously more skilled and are graded higher. Operator grading by their experience and skills in a garment factory may be as follows:
  • 28. By Ravi Kishore 28 A - GRADE OPERATIONS 1. UPPER SLV PLKT BOX 2. BUTTON HOLE PLACKET ATTACH (KANSAI) 3. POCKET ATTACH - SNLS 4. POCKET ATTACH - DNLS 5. COLLAR ATTACH 6. COLLAR FINISH 7. SLEEVE ATTACH ( FOLDER / MANUAL ) 8. SLEEVE ATTACH ( O/L ) 9. TOP STITCH ARM HOLE (FOLDER / MANUAL) 10. CLOSE SIDE SEAM - FOA 11. CLOSE SIDE SEAM - O/L 12. HEM BOTTOM ( FOLDER + MANUAL ) 13. CUFF ATTACH B GRADE OPERATIONS 1. BONE PATCH ATTACH TO COLLAR 2. ATTACH COLLAR TO TOP COLLAR BAND 3. COLLAR TOP STITCH 4. COLLAR PEAK READY 5. CUFF TOP STITCH 6. LOWER SLEEVE PLACKET ( FOLDER ) 7. ATTACH MAIN / SIZE LABEL TO YOKE 8. ATTACH YOKE TO BACK - MANUAL 9. BACK YOKE TOP STITCH - DNLS 10. BUTTON PLACKET HEM 11. SHOULDER ATTACH - MANUAL 12. SLEEVE TACK TO BODY - LINE MATCH 13. ATTACH V - PATCH PIECE TO SIDE 14. HEM SLEEVE - FLAT 15. CLOSE SIDE SEAM – SNLS 16. ATTACH FLAP TO FRONT, 2 NO'S 17. FRONT B/H PLKT HEM 18. BUTTON HOLE OPERATION 19. BUTTONING OPERATION 20. SLEEVE PLACKET IRON 21. POCKET IRON 22. COLLAR TURNING ( EWATEX ) 23. CUFF TURNING ( EWATEX ) B + GRADE OPERATIONS 1. COLLAR RUN STITCH 2. CUFF RUN STITCH 3. CUFF TAPE ATTACH 4. COLLAR TAPE ATTACH 5. ATTACH YOKE TO BACK - FOLDER 6. SHOULDER ATTACH - FOLDER 7. HEM CIRCULAR SLEEVE 8. HEM 2ND FOLD AT BTM, INSERT GST 9. TOP STITCH SIDE SEAM - SNLS C GRADE OPERATIONS 1. HEM COLLAR BAND 2. COLLAR CENTER STITCH 3. NECKBAND LABEL ATTACH AT SIDES 4. CUFF HEM 5. TACK SLEEVE VENT 6. MAKE SLEEVE PLEATS 7. MAKE BACK PLEATS 8. EDGE / TOP STITCH YOKE 9. EDGE AND TOP STITCH POUCH PIECE 10. POCKET HEM 11. PREPARE LOOP 12. LOOP ATTACH 13. SHOULDER TOP STITCH 14. SHOULDER TOP STITCH - DNLS 15. ATTACH WASH CARE LABEL 16. TACK POUCH PIECE 17. CLOSE GUSSET SIDES, 18. COLLAR EDGE TRIM 19. COLLAR BOTTOM TRIM 20. READY TRIM COLLAR BAND 21. COLLAR READY TRIM 22. COLLAR IRON 23. CUFF IRON 24. FRONT PLACKET IRON 25. GUSSET IRON 26. BONE POUCH IRON 27. SLEEVE PLACKET CREASE ( EWATEX ) D GRADE OPERATIONS 1. ALL HELPER OPERATIONS The cost of production of a style depends up on the number of operators employed in a line and their grades. The higher grade operators get earn higher wages. Therefore the production supervisor and the line supervisor must assess the operations carefully and assign them to appropriate grade of operators. Thus the cost of production depends on all these factors that we discussed. To measure the cost of production it is necessary to know the method of calculation. As discussed
  • 29. By Ravi Kishore 29 previously every garment is given a SAM value based on the time it tales to produce. Let us calculate the cost of making of a shirt. In the operation bulletin above the SAM of the shirt was given as 39.415 minutes. The minute cost of making is now calculated as – 1. Total wages of the factory = Rs. 5,000,00 per month 2. Number of machines = 50 Cost per machine per month = Rs. 5,000,000 = Rs.100, 000 50 Cost per machine per day = Rs. 100,000 (considering that there are 5 holidays in a month) 25 Cost per machine per day = Rs. 4,000 Number of working hours in a day = 8 Cost per machine hour = Rs.4,000 = Rs.500 8 Cost per minute = Rs. 500 = Rs. 1.042 60 X 8 3. SAM of the shirt = 39.415 minutes Cost of making per shirt = Rs.41.06 Note that the costs considered in the example are direct costs only. Overhead costs must be calculated separately which include management salaries, electricity, water, telephone, insurance, interest, maintenance etc. In order to keep the cost of making low productivity, operator and line efficiency must be constantly monitored by the line supervisor. Productivity is calculated as below: Operator productivity = Production per day 300 collars per day = 37.5 per hour No. of work hours 8 Line efficiency = Actual production per day X 100 500 = 69.44% Standard 720 TRADITIONAL Apparel Plant Due to High Work In Progress, managers are unable to manage the production well. Cut pieces from cutting room, sewing section and to finishing sections will take approx. 3-7 days. E.g. manufacturing a man's polo shirt, the S.A.M. is 13.5mins, but in the bundle system, every operator has 3-4 bundles of 25-30 pcs. thus every operator will have min. of 100pcs WIP. Through Put Time for complete sewing is 3 days. Example 100pcs(WIP) x 13.5mins(SAM)=1,350 mins required 1,350 mins / 480 mins (8 hours per day) =2.8125 days SMART-MRT System Plant The most striking advantage of the SMRT System is the drastic improvement in Throughput Times. In the SMRT System Plant, Total cycle time was reduced from 3 days to less than a day. Fast throughput times is due to a reduction in Work In Process. For instance, the SMART System producing the same polo shirt, SAM is still 13.5mins but the Throughput Time is about 5 hours only! Example 20pcs(WIP) x 13.5mins(SAM)=270 mins 270 mins / 480 mins(8 hours) =0.563 day OR =4.5 hours only!
  • 30. By Ravi Kishore 30 Progressive Bundle System This traditional method of manufacturing has been widely adopted in the Apparel Industry for the past 3 decades. Parts of various component after being cut in the Cutting Room are tied up in bundles and distributed out to the Sewing Section. This is called the Progressive Bunle System (PBS). This method requires bundle to be transported to individual sewing operators. Sometimes, factory porters/helpers are hired to do this transporting work. But usually, the operators have to stop and leave their workspace to look for the bundles. This is an INEFFECTIVE practice, as production managers are unable to manage or plan the production effectively. Factory Automation with UPS Factory Automation by the usage of UPS is NEW leapt into Garment Productionin the garment arena. This practice taps on the capability of Technology by the mechanical transportation of cloth pieces to operators by the automated system. This results in an Easier pick-up and Disposal at each workstation. Further, the system addresses the problem of Wasted Time spent when the garment is idle between workstations. Most crucially, UPS systems address the weakness of: -Long Delivery Times -Long Response Times Intensive Direct Labour Contents Statistics show that operators in most Progressive Bundles Systems (PBS) factory often spend a considerable time on tying and untying bundles, pulling the bundle tickets, handling works and associated clerical works. Reduction is Direct Labour Contents The UPS presents the garment directly to the operator for easy pick-up and then automatically removes the garment upon completion. This reduces the Direct Labor Content by eliminating bundle handling costs and the associated clerical duties. High Work In Process The PBS philosophy adopts the "High Work In Process", or "Keep The Girl Busy" task management. E.g. If an operator can sew 200 dozens works per day, regardless of the production of other operators ( 120-150 dozens daily ). So everyday that particular sewing girl produces an extra 50-70 dozens work pieces left over, because others could not cope with her capacity. After 5 days, the extra builds up to 250-350 dozens, so WIP was increasing daily. Alas, the manager has to get additional manpower to work on the slacks. Great Reduction in Work In Process UPS systems cause a reduction in Work In Process levels and change in the management Philosophy of an apparel plant from "High Work in Process" levels to "Low Work in Process" levels, which allow quick response. In a UPS plant, every workstation will hold a max. of 25 garments per station. So a great reduction in Work In Process as compared to the Bundle System Plant where each operator has 100 pieces (WIP). All finished garments are transported automatically between workstations. More cutting works required As a result of High Work In Process required by sewing section, cutting sections are required to perform 60-70% more than actual production can handle. Reduction in cutting works Lower WIP results in less cutting works. Coordination between cutting section and sewing section will improve. High Inventory Due to more cutting jobs being required, manufacturer needs to stock more fabrics and other accessories in advance of the actual planned production to fulfill the needs of the High WIP. High Inventory avoided As a direct result of lower WIP, manufacturer will not be required to stock larger amount of fabric. Long Delivery and Slow Through Put Time Due to the High Work In Progress, managers are unable to manage the production well. Cut pieces from cutting room, sewing section and to finishing sections will take approx. 3-7 days or more. E.g. if manufacturing a man's shirt, the S.A.M. is 13.5mins, but due to the bundle system, each operator Fast Through Put Times Probably the most striking advantage of the UPS System is the drastic improvement in Through Put Times. Within the UPS Plant, the total cycle time was reduced from 3 days to less than 1 day! Fast through put times due to a reduction in WIP.
  • 31. By Ravi Kishore 31 has min. of 3-4 bundles and every bundle has 25-30 pcs . thus every operator will have min. of 100 pcs WIP. The Through Put Times for complete sewing is 3 days. Calculation: 100pcs(WIP) x 13.5mins(SAM)=1,350 mins 1,350 mins / 480 mins (8 hrs per day)=2.8125 days E.g. a UPS system producing the same man's shirt, SAM is still 13.5mins but the Through Put Times is about 5 hours only. Calculation: 20pcs(WIP) x 13.5mins(SAM)=270 mins 270 mins / 480 mins (8 hours)=0.563 day OR =4.5 hours only! Direct Labor Excesses Progressive Bundle System often needs more overtime works, operators make-up and to do repair works due to some unfinished operations. The average Direct Labor Excesses is 13.3% which is definitely higher than UPS System. Reduction in Direct Labor Excesses Direct Labor Excesses were greatly reduced. Average excesses in plants using PBS were 13.3% of Direct Labor, while the average excesses in plants using the UPS were much lower. Consequently, UPS systems experienced less overtime, operator make-up and total repair costs versus those costs attributed to the PBS system. Finishing Section We have so far discussed the process in sewing section. Sewn garments move from sewing to finishing for further processing. In this section garments are received after they are checked at the end table in sewing section. However, in the finishing they are once again checked. Checking involves inspecting every garment for the following: o Loose threads on the garment and inside it o Untrimmed threads at seams o Stains on the garment o Broken stitches at any of the seams o Skip stitches o Uneven stitches o Holes o Shade variation within garment o Major fabric defects visible o Puckering and gatherings Checking supervisor identifies and demonstrates the various parameters described above to the checkers. It is the responsibility of the checkers to trim and cut extra threads. Using stain removing apparatus and appropriate chemicals checkers must remove any stains on the garments. Garments with
  • 32. By Ravi Kishore 32 stubborn stains that cannot be removed must be kept aside. Those garments that are checked and passed move to the next process of dusting and loose thread removal. A thread sucking machine is used for this purpose. These garments are next sent through a needle detecting machine to remove any broken needles that are stuck in the garments. This procedure is particularly important for children’s garments. Garments are now steam pressed and ironed on special purpose ironing tables. These tables have heavy industrial foam tops with a vacuum sucking. When a garment is placed on the top and a pedal is pressed, vacuum suction holds the garment in position to enable the ironer to press it thus avoiding garment movement and the wrinkles that follow with movement. The ironing tables are designed to suits different shapes of garments like pants, shirts, jackets etc, and they are equipped with attachments suitable for ironing long parts like shirt sleeves and pants. There are two types of iron boxes those that have a heating element which gets heated when electricity passes and those that get heated by steam. Iron boxes are also of different weights to suit different fabric weights. Ironing a dress shirt involves the following steps: 1. Place the collar on the iron tale and press 2. Wear the left sleeve on to the sleeve buck attached to the iron table, smooth out wrinkles and press 3. Wear the right sleeve on to the sleeve buck attached to the iron table, smooth out wrinkles and press 4. Spread the shirt inside back on the iron table, smooth out wrinkles and press. 5. Place both the fronts on the back, button and smooth out any wrinkles and press. 6. Lift the shirt and place on hanger These shirts are then placed back to the top on a folding table, hanger removed, back support collar stand inserted into collar. Shirt is then folded up to the width of the back support on either side. The overlapped flat tube is folded up to the collar, the shirt tails are then tucked in and secured with two plastic clips on either side.
  • 33. By Ravi Kishore 33 1. Button shirt. Spread shirt face down on a smooth surface. Center folding board below the shirt's back collar. 2. Fold left sleeve across the board. Use the Folding Board's edge as the fold guide. 3 Angle left sleeve fold along shirt’s body. 4 .Fold right sleeve across the board. 5. Angle right sleeve along shirt’s body. 6. Fold tail upward, below the shoulders. 7. Remove the shirt folding board from the fold. 8. Flip shirt over. . For some garments like jeans, formal pants, jackets, dresses, and suits special finishing equipment are available called form finishers. These are similar to the body forms except that they are hollow. When the garment is worn on the form, steam is blown in and presses lift on both side and press the form. Thus the garment gets ironed and pressed without any permanent crease marks being created. The finished and pressed garments are folded and packed as per the production order.
  • 34. By Ravi Kishore 34 Packing garments for delivery to the customer involves cost considerations. If the delivery is by sea in a container, then the cartons must be strong enough to with stand pressure. Some customers want the garments to be shipped on hangers. Finishing supervisor must ensure that all packing material are available in the section. They must be indented and recived from the stores. Garments are tagged, folded and placed in the polybags. The type of fold and the size of the polybag are both as per the instructions of the customer. Each packed garment is placed in a carton or on the hanger as the case may be. Carton packing can be by all sizes in a single colour or single size in all colours or by single size and colour. Packed cartons are numbered and stacked for final inspection by the customer or his representative. Each carton is marked as per the instructions of the customer. In case of hanger packing garments are tagged and placed on hanger by size and colour. Garments on hanger are packed in cartons or placed in containers. If carton packed they are placed with the hanger placed on a rope fixed in the carton on either side. Hangers are placed alternately on either side so as to maintain uniform level. In case of shipment on hangers in a shipping container, usually the smaller size in the order goes first into the container followed by the larger sizes. The largest size must be the size visible when the container is opened. All cartons packed and stacked with markings as instructed by customer are ready for inspection. Packing list of the shipment is prepared with all the carton numbers, sizes and colours packed in each carton. The list is given to the customer’s representative who will
  • 35. By Ravi Kishore 35 choose the cartons to be inspected at random form the list. After the inspection, usually the inspection report is issued together with the certificate. The finishing supervisor collects all the documents after inspection and hands over to the merchandising or logistics department. Quality Assurance Quality assurance department which reports directly to the top managemen t conducts independent quality audit and assures that required quality is maintained. Controlling quality is not the function of the QA. The production supervisor and line supervisor are responsible to maintain quality in the sewing section. The QA D receives the fabric test report from the merchandiser or the sourcing department and confirms the quality standard of the material before it is dispatched by the supplier.
  • 36. By Ravi Kishore 36 Retail customers require quality merchandise from garment manufacturers which can be displayed and sold with confidence. They need to be assured of quality of fabrics and trims that go into the garment and the garments themselves. When retail buyer places the purchase order with garment manufacturer, he or she makes it a condition that the fabrics and trims be tested for their quality as per the retail store’s acceptable standards. The quality standards vary with the type of retail business. While some stores insist on elaborate tests for a host of quality parameters, others are less demanding. In either case, the buyer requires the fabrics and trims to be tested by independent testing services. This process of quality testing is termed in the industry as third party testing. The fabric supplier is instructed by the factory to send the fabric from bulk production to the testing agency recommended by the retail buyer. Factory must send the request of test parameters to the testing agency together with the name and purchase order details of the buyer. Each buyer has a specific test request form specific the testing agency. The number of tests that need to be conducted by the testing agency for the specific buyer is called – Fabric Package Test or FPT. The testing charges are to the expense of the factory.
  • 37. By Ravi Kishore 37 Based on the report fabrics and trims are either accepted or reprocessed and finished as per the standards. Some of the common testing protocols that the QAD must observe and include the fabric test report are- Quality Standards for Woven Fabrics Physical Standards Test Norm / Standard Result Pilling (Martindale) ISO 12945-2 2.000 turns ; 4 Snagging JIS L 1058 Method D-2 18.000 revolutions ; 4 Seam Slippage ISO13936– 1&2 12 daN / 6mm > 200gr/ m2 ; 8 daN / 6mm < 200gr / m2 Tensile Strength ISO 13934-1 30 daN > 200gr / m2 ; 22.5 daN < 135 – 200gr /m2 ;15 daN < 135gr / m2 Tear Strength (Elmendorf) ISO 13937-1 1.600 cN > 200gr /m2 ; 1.100 cN 135 – 200gr / m2 ; 800 cN < 135gr / m2 Abrasion ISO 12947-2 Blouse/shirt/dress/pajamas/lining: 10000 ;Jacket / Coat : 20000 Dungarees / trousers/short/jeans: 30000 Fabric Weight EN12127 5% Colourfastness and other tests Quality Standards for Woven Fabrics Colour Fastness and Other Standards Rubbing Dry ISO 105-X12 Stain: 4 Rubbing Wet Stain: 3-4 specific requirements Rubbing Dry ISO 105-X12 Stain: 4 Rubbing Wet Stain: 2-3 specific requirements Washing ISO 105-C06 CC: 4 ; CS: 3- 4 Dry cleaning ISO 105 –D01 CC:4 Perspiration ISO 105 - E04 Stain: 4 Change: 4 Light (Xenon) Judge by TL83 (shop light) and D65 (day light) ISO 105 – B02 4 Water ISO 105 – E01 4 Non-chlorine Bleach Soaking Test 4 Cross staining for contrasting colours not accepted Flammability 16 CFR 1610 > 3.5 flame spread Water Repellence (spray test) ISO 4920 4 Electro Static DIN 24345 (part1) 109 ohm Dimensional stability Quality Standards for Woven Fabrics Dimensional Stability Shrinkage after washing ISO 6330 2% Warp and Weft Machine Wash 400 C line dry ISO 6330 -5.4 Commercial dry clean ISO 3175 2% Residual Elongation warp & weft (>2% EA) BS 4952 + / - 6% Pants weight Fixed Load 6.0 kg + / - 10% Shirt weight Steam Pressing (WIRA) ISO 3005 2% Warp & weft Parameters fpr knit fabrics that re followed in the industry are physical standards Quality Standards for Knit Fabrics Physical Standards Test Norm / Standard Result Pilling (ICI pilling box) ISO 12945-1 18.000 revolutions Judge by double jersey scale 4 Snagging JIS L 1058 Method D-2 5.000 revolutions ; 4 Bursting Strength ISO13938– 1 200 kpa / 50 cm2 ; > 200gr / m2 D 80mm = 50sq.cm 170 kpa / 50 cm2 , < 200gr / m2 Abrasion AATCC93 5% loss in mass Fabric Weight EN12127 5%
  • 38. By Ravi Kishore 38 colourfastness standards to be followed are Quality Standards for Knit Fabrics Colour Fastness and Other Standards Rubbing Dry ISO 105-X12 Stain: 4 Rubbing Wet Stain: 3-4 specific requirements Rubbing Dry ISO 105-X12 Stain: 4 Rubbing Wet Stain: 2-3 specific requirements Washing ISO 105-C06 CC: 4 ; CS: 3- 4 Dry cleaning ISO 105 –D01 CC:4 Perspiration ISO 105 - E04 Stain: 4 Change: 4 Light (Xenon) Judge by TL83 (shop light) and D65 (day light) ISO 105 – B02 4 Water ISO 105 – E01 4 Non-chlorine Bleach Soaking Test 4 Cross staining for contrasting colours not accepted Flammability 16 CFR 1610 > 3.5 flame spread Water Repellence (spray test) ISO 4920 4 Electro Static DIN 24345 (part1) 109 ohm and for dimensional stability the parameters are- Quality Standards for Knit Fabrics Dimensional Stability Shrinkage after washing ISO 6330 + 2% - 5% Length & width Machine Wash 400C line dry ISO 6330 -5.4 Commercial dry clean ISO 3175 2% Length & width Residual Elongation BS 4952 + / - 6% Length & width Fixed Load 1.4 kg Spiralty Test method as specified 3% 5% > 100gr / m2 < 100gr / m2 Thereafter when the fabric and trims arrive in the warehouse, the QAD either conducts the fabric inspection and quality tests or supervises these activities undertaken by the stores section. Based on the inspection reports, QAD in consultation with the merchandising and sourcing departments decides the fabric utilisation. If the fabric defects are within acceptable limits, fabric is issued to the cutting section otherwise the QAD will not permit its use and the fabric will have to be returned to the supplier for replacement. The QAD checks the fabric cutting process. Based on the fabric inspection report, QAD verifies the cutting plan, roll sorting by colour, width, shrinkage and defects. Its responsibility also includes checking the fabric spreading, grain or direction and the tension release at selvedges and even length of the lay. Once cut, the quality of cuttings are inspected and checked for ragged edges, fraying, size, markings, and inclusion of all parts of the garment. After bundling and numbering, the bundles are checked for correct numbering. In case any cut parts are sent for embroidery or printing their placement is checked before sending and quality of embroidery or print and its placement is checked once received. It is the responsibility of
  • 39. By Ravi Kishore 39 cutting section to ensure the quality of embroidery or printing its size, registration and placement. The cut parts when issued to the sewing section, QAD monitors the sewing quality. The sewing defects, parts replacement etc are the responsibility of the production supervisor and line supervisor. The quality auditor from QAD monitors the work of quality checkers and guides them where necessary. Quality in Sewing We have discussed so far the quality issues that arise in the fabric store and the cutting sections. Quality assurance in sewing section is vital for the finished garment to be shipped out of the factory. If the quality procedures and processes are not followed, the finished garment ends up as a seconds. Some of quality aspects that must be considered are - seam allowances, proper interlining that enables collars, belts etc to keep their shape, seam finishes that enclose raw edges, correct pressing, and applied techniques such as beading or pick stitching. The quality of the garment depends among others on the type of interlining used and methods of its usage. QAD must check the usage of interlining which is usually starts with verification of the interlining compatibility repot that the merchandiser gets from the interlining manufacturer for the fabric and garment. The report suggests the type of interlining – non-woven and woven to be used for the particular garment and the parts in which specific types of interlinings can be used. For example a shirt collar requires a stiff woven interlining if it is meant for inexpensive office wear. A branded and premium dress shirt uses a non-woven medium density micro- dotted fusible interlining on the lower collar. A casual shirt on the other hand uses a non- woven low density fusible interlining. Each of these interlinings needs specific temperature, pressure and time to effectively fuse with fabric. QA must ensure that the fusing quality as per the manufacturer’s recommendations is maintained in the fusing section so that the garment parts are usable. If the fusing parameters are not followed the parts while after sewing and pressing wherever required will have bubble effect or the fusing peels off due to low bond strength. Next the QA must concentrate on the garment finish in sewing. Construction finish prolongs durability of garment. The quality of stitching is the most important aspect of finish in any garment. If this is poorly executed, with wrong thread etc, nothing will be
  • 40. By Ravi Kishore 40 able to rescue the piece. Top stitching in a contrast thread if not executed properly will damage the appearance of the garment. Among the many quality parameters of stitches important are loose and raveling stitches. These are indications of poor quality workmanship. Stitching should be clean and neat and except for when it's deliberately meant to be in contrast, should sink almost invisibly into the fabric. Usually the thread should be the same shade, or one shade darker, than the cloth as recommended by the customer. An indication of good quality is when the seams on a garment lie absolutely flat, with no puckering and rucking where the fabric pieces join together. One area to watch out for is bias-cut garments. Bias creates inherent stretch in the fabric; care must be taken to relax the pieces by hanging for up to 24 hours stitching. If the fabric isn't fully relaxed, or isn't sewn with enough inherent stretch in the seam, a bias skirt ruckles right along the seam- lines. Certain seams are more complicated to sew and therefore only appear on quality garments. One is the French seam, where the seam is sewn inside out, then outside in, enclosing all raw edges. It's usually seen on women's dresses and skirts. Another complex seam is the flat fell seam, which is used on jeans. From the outside, it looks like a double row of stitching, and the raw edges are contained inside it. On a good shirt, the majority of the seams on the garment are flat-felled, including the armhole, side body and under sleeve. On cheaper shirts, the seams are usually just simple seams with serging on the inside. The larger the seam allowance the better is its durability. On the other hand tight seam allowance or minimal seam allowance increases strain on the garment at seams thus increasing every possibility of tits rupture. Quality customers demand that the seam allowance be bound with a bias binding or satin tape to prevent fraying. Transparent elastic or stay tap is used in knitwear to reinforce seams and control stretch where garment stretches such as at shoulders and armholes. Hems on quality garments are deeper, and they may be bound with bias binding or another finish in order to keep their shape. They must be finished invisibly, with no stitch visible on the outside. The thread used for hemming on the blind stitch machine is usually of fine monofilament yarn. Next is the quality of constructing the facing. A facing is a piece of fabric used to finish the raw edges of a garment at open areas, such as the neckline, armhole, and front and
  • 41. By Ravi Kishore 41 back plackets or opening. They are must be sufficiently deep to provide support to the part and provide clean finish. QA must check and ensure that pockets on a garment are fit for their purpose. The pocket opening must sufficiently wide or as per the measurement given by the customer to permit the hands to freely move in and out. Narrow pocket openings obstruct hand movement. Since they are frequently used, to withstand wear and tare, the opening must be reinforced with bartack stitch. Pocket opening must be flat when the garment placed flat and must not open wide. It is important for the QA to know the various stitch types and their formation in order to identify their defects. It is also necessary for the QA to understand applications and purpose of different types of stitches. Some of the more common stitches and their applications are given below. Single Thread Chainstitch Top view Bottom view ISO 4915 Number 101 Common Application Basting Stitch for Tailored Clothing Stitch Description Stitch formed by a needle thread passing through the material and inter looping with itself on the underside of the seam with the assistance of a spreader. Single Thread Chainstitch or Lockstitch Button sew, Buttonhole or Bartack 101 or 304 Button sew Specify stitches per cycle, Buttonhole specify length & width Bartack specify length & width Single thread blind stitch Tope view No stitch visible in bottom view 103 Blind stitch hemming, felling, making belt loops Stitch is formed with one needle thread interlooped with itself on the top surface of the material. The thread passes through the top ply and horizontally through portions of the bottom ply without completely penetrating it the full depth. Lockstitch – most common stitch Top view Bottom view 301 Topstitching, Single Needle Stitching, Straight Stitching Stitch formed by a needle thread passing through the material and interlocking with a bobbin thread with the threads meeting in the center of the seam. Stitch looks the same top & bottom. Top view Bottom view 401 Single needle chain stitch as main seams on woven garments Stitch formed by 1-needle thread passing through the material and interlooped with 1-looper thread and pulled up to the underside of the seam.
  • 42. By Ravi Kishore 42 The common sewing defects that need to be monitored and rectified before the garments move to finishing section are given below: Improper Stitch Balance - 301 Lockstitch DESCRIPTION: Where loops are seen either on the bottom side or topside of the seam. More conspicuous different coloured topstitch and bobbin threads. This also occurs when the stitch is too loose. SOLUTIONS: 1) Check thread quality for frictional consistency 2) Properly balance the stitch so that the needle and bobbin threads meet in the middle of the seam. Always start by checking the bobbin thread tension to make sure it is set correctly, so that the minimum thread tension is required to get a balanced stitch. Improper Stitch Balance - 401 Chainstitch DESCRIPTION: Where the loops on the bottom-side of the seam are inconsistent and do not appear uniform. SOLUTIONS: 1) Use a quality thread with consistent frictional characteristics; 2) Properly balance the stitch so that when the looper thread is unraveled, the needle loop lays over half way to the next needle loop on the underside of the seam. Open Seam - Seam Failure - Fabric DESCRIPTION: Where the stitch line is intact but the yarns in the fabric rupture. MINIMIZING SEAM FAILURES - FABRIC: 1) Reinforce stress points with Bartack. Make sure the bartacks are of proper length and width for the application 2) Check patterns for proper fit 3) Use ideal seam construction Puckered Seams - Knits & Stretch wovens DESCRIPTION: Where the seam does not lay flat after stitching. SOLUTIONS: 1) If sewing machines are equipped with differential feed, set them properly for the fabric 2) Use minimum presser foot pressure during sewing 3) Observe operator for correct handling techniques. Too much stretching of the fabric by the sewing operator will cause this problem. Excessive Seam Puckering - Wovens DESCRIPTION: Where the seam does not lay flat and smooth along the stitch line. Causes:
  • 43. By Ravi Kishore 43 1) Feed Puckering - where the plies of fabric in the seam are not aligned properly during sewing 2) Tension Puckering - where thread is stretched and sewn into the seam. It causes the seam to draw back and pucker 3) Yarn Displacement or structural jamming – due to sewing seams with thick thread that causes the yarns in the seam to be displaced, giving a puckered appearance. SOLUTIONS: 1) Use the correct thread type and size for the fabric. Thinner, high tenacity thread is required to minimize seam puckering but maintain seam strength 2) Sew with minimum sewing tension 3) Make sure machines are set up properly for the fabric Ragged/Inconsistent Edge – Over edge or Safety stitch DESCRIPTION: Where the edge of the seam is either extremely "ragged" or "rolls" inside the stitch. SOLUTIONS: 1) Make sure sewing machine knives are sharp 2) The knives should be adjusted properly in relation to the "stitch tongue" on the needle plate to get proper seam width or width bite. Re-stitched Seams / Broken stitches DESCRIPTION: Where a "splice" occurs on the stitch line. If this occurs on Topstitching, then the seam does not appear to be 1st quality merchandise. Causes: 1.thread breaks or thread run-out during sewing 2. cut or broken stitches during wash etc. SOLUTIONS: 1) Use quality sewing thread. This may using higher performance thread designed to minimize sewing interruptions. 2) Ensure machine maintenance and sewing machine adjustments 3. Observe sewing operators for correct material handling techniques. The QAD must inspect the sewn garments for stitching defects that may occur during the sewing operations due to various factors. The stitches per inch vary with the fabric type being stitched. The SPI also varies for seams for closures and side seams and for top stitch. Some common guidelines for performing construction seams and top stitch are given below:  Lockstitch must not be used on stretch fabrics  Back rise seams must be reinforced with double needle lockstitch or topstitched with edge stitch or double needle  Blind hem felling must be securely latched off with no run back of the thread end. Set the machine accordingly  All raw edges must be turned or overlock neatened. Visible raw edges are a defect.  French seams must be securely constructed. The 1st seam sewn does not pull apart with wash and wear.  Thread tension and stitch density must be correct to prevent seam grinning. Fabric Seams Stitch Light to medium weight woven fabrics 10 - 12 9 – 10 Light to medium weight stretch fabrics 12 - 14 14 – 16 Men’s dress shirt 12 - 14 14 – 16 Lingerie 16 - 20 14 - 16 Denim and canvas 10 12 8 - 9
  • 44. By Ravi Kishore 44  Construction seams must be of lockstitch and overlock neaten or mock safety stitch or 4-thread 2 needle overlock or 5-thread safety stitch Bartacking is required in the following operations:  on all top corners of patch pockets and at each end of inset pockets  at each end of welt pocket – bartack to the depth of the welt  all belt loops attached to the waist band  at the edge of the fly base, at the base of fly curve to secure fly facing to the garment  at the top of splits  Stitches at seam end must be secured by another seam or securely back stitched  Where folded edges are joined as in sleeve cuffs or neckbands, there must be a row of tack stitching to reinforce.  Overlocking threads must be turned under the seam and secured General workmanship of all production operations must maintain the following standards:  Technical notation / direction of wales and direction of fabric must be complied with for cutting  All parts of a garment must be cut from the same roll of fabric  Colour / embossing / hand feel must not differ in garments in a pack or purchase order  Collars and pocket must be symmetrical  Iron marks as shiny areas must not be there  Garments must be clean, dust free, with no loose threads  Carton quality must be checked for bursting strength Guidelines for seam construction: Seam allowances –  all parts of patterns must have sufficient seam allowance  all visible edges must be trimmed and over-edged  open edges must be uniformly cut back Seam finishing:  needle sizes must selected according to the fabric and regularly changed  minimum stitch density for woven fabrics is 4 stitches/cm , for knitwear it is 5 stitches/cm  thread tension must be adjusted to suit fabric  elasticity of must be ensured in elastic materials to prevent tearing of fabric  quilting seams must be parallel to the edges The QAD is responsible for the over all quality of the garments when delivered to the customer. After the garments are finally packed, and prior to the final inspection, QA manager must conduct a final inspection. If deficiencies are found, the packed garments must be returned for re-work. A second inspection must be conducted after the rework. Only after it is fully satisfied with the inspection, should the QAD and the production manager offer the packed shipment for customer inspection.