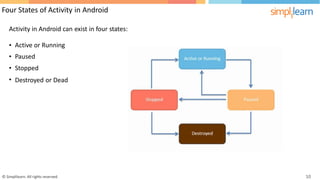
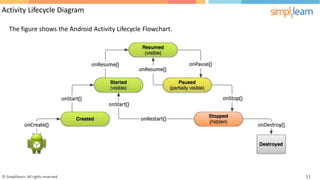
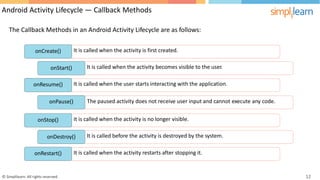
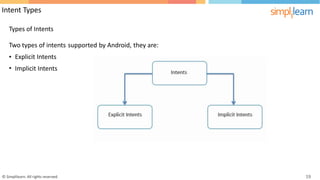
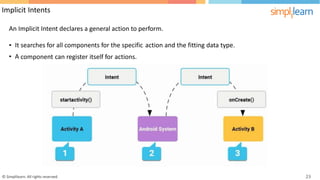
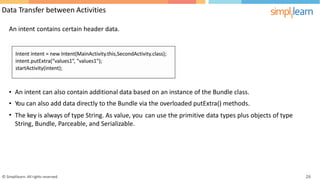
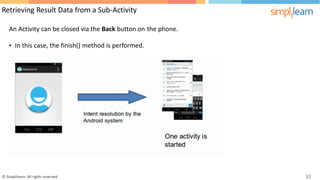
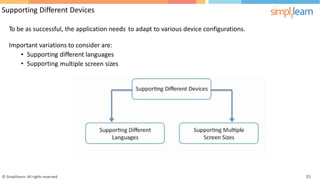
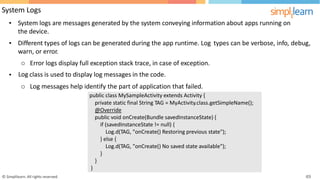
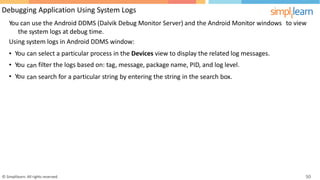
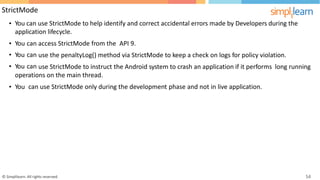
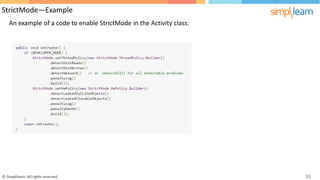
© Simplilearn. All rights reserved. 1
Android Applications Development—Beginners
Lesson 3—Android Activity and Intents
© Simplilearn. All rights reserved.
Lesson Objectives
• Use Gradle
• Explain the activity lifecycles
• List Intents
• Demonstrate how to pass data and launch activities
• Define your application to support different devices
• Describe the
applications
process of adding an action bar and saving data in Android
© Simplilearn. All rights reserved. 2
After completing this
lesson, you will be
able to:
Gradle Environment inside Android Studio
Gradle and Build Variants
© Simplilearn. All rights reserved. 3
Gradle—Overview
Gradle is a build tool package for building Android apps.
• Gradle automates and manages the build process while
configurations.
allowing you to define flexible custom build
• By default,
o Global
o Global
a Gradle-based Android application
gradle setting file (setting. gradle)
contains the following gradle files:
gradle build file (build. gradle )
o Modulespecific gradle file (build. gradle)
© Simplilearn. All rights reserved. 4
Gradle—Overview (contd.)
There are three parts in the Gradle build system: Task, Console, and Terminal.
• Gradle tasks are the fundamental unit of the build activity. The tasks are collections of build instructions
that Gradle executes as it performs a build.
•
•
The
The
output of the executed Gradle task and commands can
can
be
be
viewed in the Gradle console.
Gradle tasks and commands such as “gradle clean” executed in the Gradle terminal.
© Simplilearn. All rights reserved. 5
Update Android plugin
Android Studio uses the Android Gradle plugin to build apps with Gradle.
Android Gradle plugin can also be updated independently.
plugin version is specified in the File > Project Structure > Project menu.
•
•
•
•
The
The
The
Gradle can be updated by editing the distributionUrl in the gradle-wrapper.properties
https://services.gradle.org/distributions/gradle-2.10-all.zip
file.
© Simplilearn. All rights reserved. 6
Configure Build Variants and Dependency Management
Each build variant represents a different version of an app that you can build.
Configuring custom builds in Gradle involves the following parameters:
• Build type:
o Debug
o Release
Product flavors
Create source sets for build variants
•
•
Dependencies are classes, files, and JAR (Java ARchive) files that
project successfully.
The three types of dependencies in Gradle are the following:
are required for building and deploying a
•
•
•
Module dependencies
Remote binary dependencies
Local binary dependencies
© Simplilearn. All rights reserved. 7
Intents, Passing Data, and Launching Activities
Launching Activities
© Simplilearn. All rights reserved. 8
Activity Lifecycles — Overview
Activity is an individual User Interface screen where visual elements are called Views or Widgets.
• There are five widgets:
o TextView
o EditText
o Analog Clock
o Two Buttons
• Two different ways to create widgets:
o Java code
o XML code
© Simplilearn. All rights reserved. 9
Four States of Activity in Android
Activity in Android can exist in four states:
•
•
•
•
Active or Running
Paused
Stopped
Destroyed or Dead
© Simplilearn. All rights reserved. 10
Activity Lifecycle Diagram
The figure shows the Android Activity Lifecycle Flowchart.
© Simplilearn. All rights reserved. 11
Android Activity Lifecycle — Callback Methods
The Callback Methods in an Android Activity Lifecycle are as follows:
It is called when the activity is first created.
onCreate()
It is called when the activity becomes visible to the user.
onStart()
It is called when the user starts interacting with the application.
onResume()
The paused activity does not receive user input and cannot execute any code.
onPause()
It is called when the activity is no longer visible.
onStop()
It is called before the activity is destroyed by the system.
onDestroy()
It is called when the activity restarts after stopping it.
onRestart()
© Simplilearn. All rights reserved. 12
Activity—Paused State
Activity can remain in the Paused State if:
•
•
•
•
•
The user has clicked the Home button.
Another activity on top does not completely obscure the visibility.
The device goes to sleep.
User resumes the activity by closing the new activity.
Activity gets killed by the system under extremely low memory conditions.
Activity goes to stopped state by executing onStop() method.
© Simplilearn. All rights reserved. 13
Activity—Stopped State
Activity in stopped state, has three different scenarios. They are as follows:
• The
o
system kills it to free resources.
It needs to start the cycle again with onCreate() method.
• It gets restarted by calling onRestart(), onStart(), and onResume() methods.
o In this case the User Interface is intact and need not be restored.
onDestroy() method is called and the Activity is destroyed.
•
© Simplilearn. All rights reserved. 14
Android Activity Lifecycle Loops
Lifecycle Loops exist for every Activity and are defined by the callback methods.
Three lifecycle loops exist for every Activity. They are:
•
•
•
Entire Lifetime
Visible Lifetime
The Entire lifetime
happens between
onCreate() – onDestroy()
Foreground Lifetime
The Visible lifetime
happens between
onStart() – onStop
The Foreground lifetime
happens between
onResume() – onPause()
© Simplilearn. All rights reserved. 15
Intents, Passing Data, and Launching Activities
An Android Intent is an abstract description of an operation to be performed.
•
•
Intent is a messaging object used to request an action from another app component.
Intents allow you to interact with components from the same applications and components
by other applications.
For example, an activity can start an external activity for taking a picture.
Intents are objects of the “android.content.Intent” type.
contributed
•
•
•
•
Your code can send them to the Android system defining the components you are targeting.
Intent can contain data via a Bundle.
© Simplilearn. All rights reserved. 16
Intents and Intent Filters
Intents facilitate communication between components in several ways.
• There are three fundamental
o Start an activity
use-cases:
o Start a service
o Deliver a broadcast
© Simplilearn. All rights reserved. 17
Demo 1—Adding a button to an existing XML file
Demonstrate how to add a button to an existing XML file; that way when you click the button, the next
activity will appear.
18
© Simplilearn. All rights reserved.
Intent Types
Types of Intents
Two types of intents supported by Android, they are:
•
•
Explicit Intents
Implicit Intents
© Simplilearn. All rights reserved. 19
Intent Types
Explicit Intents
© Simplilearn. All rights reserved. 20
Demo 2—Creating an Explicit Intent
Demonstrate how to create an explicit intent.
21
© Simplilearn. All rights reserved.
Intent Types
Implicit Intents
© Simplilearn. All rights reserved. 22
Implicit Intents
An Implicit Intent declares a general action to perform.
•
•
It
A
searches for all components for the specific action and the fitting data type.
component can register itself for actions.
© Simplilearn. All rights reserved. 23
Demo 3—Example of an Implicit Intent
Demonstrate a simple example of an Implicit Intent.
24
© Simplilearn. All rights reserved.
Passing Data
Data Transfer between Activities
© Simplilearn. All rights reserved. 25
Data Transfer between Activities
An intent contains certain header data.
•
•
•
An intent can also contain additional data based on an instance of the Bundle class.
You can also add data directly to the Bundle via the overloaded putExtra() methods.
The key is always of type String. As value, you
String, Bundle, Parceable, and Serializable.
can use the primitive data types plus objects of type
© Simplilearn. All rights reserved. 26
Demo 4—Data Transfer Between Activities
Demonstrate how data transfer happens between activities.
27
© Simplilearn. All rights reserved.
Intent Types
Share Intent
© Simplilearn. All rights reserved. 28
Intent Types
Using the Share Intent
•
•
Applications allow you to share some data.
For
•
•
•
•
Example:
Facebook
Google
Gmail
Twitter
Plus
© Simplilearn. All rights reserved. 29
Demo 5—Using Share Intent within your application
Demonstrate how to use the Share Intent within your application.
30
© Simplilearn. All rights reserved.
Intents, Passing data, Launching activities
Retrieving Result Data from a Sub-Activity
© Simplilearn. All rights reserved. 31
Retrieving Result Data from a Sub-Activity
An Activity can be closed via the Back button on the phone.
• In this case, the finish() method is performed.
© Simplilearn. All rights reserved. 32
Retrieving Result Data from a Sub-Activity (contd.)
An Activity can be closed via the Back button on the phone.
• In the startActivityForResult()
started.
call method, you can specify a result code to determine which activity you
onActivityResult(requestCode, resultCode, intent)
© Simplilearn. All rights reserved. 33
Demo 6—Retrieving Result Data from a Sub-Activity
Demonstrate how to retrieve result data from a sub-activity.
34
© Simplilearn. All rights reserved.
Supporting Different Devices
To be as successful, the application needs to adapt to various device configurations.
Important variations to consider are:
•
•
Supporting
Supporting
different languages
multiple screen sizes
© Simplilearn. All rights reserved. 35
Supporting Different Devices
Supporting Different Languages
© Simplilearn. All rights reserved. 36
Demo 7—Supporting Different Languages
Demonstrate how to support different languages.
37
© Simplilearn. All rights reserved.
Supporting Different Devices (contd.)
Android devices can be categorized based on screen size and screen resolution or density.
• There are four generalized
o Small
o Normal
o Large
o Extra Large
There are four generalized
o Low
o Medium
o High
o Extra High
sizes:
• screen densities:
© Simplilearn. All rights reserved. 38
Supporting Different Devices
Supporting Different Screen Sizes
© Simplilearn. All rights reserved. 39
Demo 8—Supporting Different Screen Sizes
Demonstrate how to support different screen sizes.
40
© Simplilearn. All rights reserved.
Adding Action Bar
To add a toolbar or an action bar to the activity,
•
•
•
Add the v7 appcompat library to your project.
Ensure that the activity extends AppCompatActivity.
Set the <application> element to use one of the AppCompat’s themes.
© Simplilearn. All rights reserved. 41
Android Activity and Intents
Adding Action Bar
© Simplilearn. All rights reserved. 42
Demo 9—Setting the Action Bar
Demonstrate how to set the Action Bar.
43
© Simplilearn. All rights reserved.
Saving Data
In an Application, there is always a need to create, update, and delete the data.
•
•
•
•
Data is managed on a File system or with a Database like
Use a relational database like Oracle and postgres.
Save it in the form of key-value pairs in the file system.
SQLlite (in-memory database).
Create a new shared preference file or access an existing one by:
o Get
o Get
Shared Preference method, or
Preference method.
© Simplilearn. All rights reserved. 44
Saving Data
Shared Preference
© Simplilearn. All rights reserved. 45
Demo 10—Setting the Action Bar
Demonstrate how to open a shared preference file and get a shared preference object.
46
© Simplilearn. All rights reserved.
Saving Data (contd.)
In Android, we can also create new files in the file system.
•
•
•
Android uses a file system which is similar to a disc-based file system on
All android devices have internal and external storage or file systems.
Internal File system:
o Always available
o Accessible by only your application
o System removes and cleans up all the files
o Neither the user nor other applications can access your files
External File system:
o Not always available
o World-readable
o System removes your applications files
o Applicable for files that do not require access restrictions
any platform.
•
© Simplilearn. All rights reserved. 47
Debugging
Debugging Application Using System Logs
© Simplilearn. All rights reserved. 48
System Logs
• System logs are messages generated by the system conveying information about apps running on
the device.
• Different types of logs can be generated during the app runtime. Log
warn, or error.
types can be verbose, info, debug,
Error logs display full exception stack trace, in case of exception.
class is used to display log messages in the code.
o
Log
o
•
Log messages help identify the part of application that failed.
© Simplilearn. All rights reserved. 49
public class MySampleActivity extends Activity {
private static final String TAG = MyActivity.class.getSimpleName();
@Override
public void onCreate(Bundle savedInstanceState) {
if (savedInstanceState != null) {
Log.d(TAG, "onCreate() Restoring previous state");
} else {
Log.d(TAG, "onCreate() No saved state available");
}
}
}
Debugging Application Using System Logs
You can use the Android DDMS (Dalvik Debug Monitor Server) and the Android Monitor windows
the system logs at debug time.
Using system logs in Android DDMS window:
to view
•
•
•
You
You
You
can
can
can
select a particular process in the Devices view to display the related log messages.
filter the logs based on: tag, message, package name, PID, and log level.
search for a particular string by entering the string in the search box.
© Simplilearn. All rights reserved. 50
Identifying Error Locations from the Log Messages
You can view the log messages in the Logcat window:
•
•
The uncaught exception logs are displayed in red color by default.
The full stack exception trace is displayed with numbers of the lines where the exceptions or
occurred.
errors
•
•
The
You
“call hierarchy” method is displayed with the respective line numbers.
can go to the line of exception by clicking on the line where the exception is “thrown”.
© Simplilearn. All rights reserved. 51
App Debugging in Android Studio
The Android Studio provides a debugger to easily debug the apps. It involves the following steps:
1.
2.
3.
Select a device or emulator to debug your app on.
Set breakpoints in your code where you want to inspect the state by pausing the execution.
Inspect variable values or evaluate expression.
© Simplilearn. All rights reserved. 52
App Debugging in Android Studio (contd.)
The Android Studio Debug window displays the execution
execution at the breakpoints.
flow in debug mode. It shows the states of
•
•
•
•
•
•
•
Variable View—to examine the specific variable
Evaluate Expression—to check the output of expression at the breakpoint.
Step
Step
Step
Over—to go to the next line.
Into—to go to the first line inside a method.
Out—to go to the next line after coming out of the current method
program.
block.
Resume Program—to continue the normal execution of
View Breakpoints—to see all the breakpoints applied in the app.
© Simplilearn. All rights reserved. 53
StrictMode
• You can use StrictMode to help identify and correct accidental errors made by Developers during the
application lifecycle.
•
•
•
You
You
You
can
can
can
access StrictMode from the API 9.
use the penaltyLog() method via StrictMode to keep a check on logs for policy violation.
use StrictMode to instruct the Android system to crash an application if it performs long running
operations on the main thread.
• You can use StrictMode only during the development phase and not in live application.
© Simplilearn. All rights reserved. 54
StrictMode—Example
An example of a code to enable StrictMode in the Activity class:
© Simplilearn. All rights reserved. 55
• Explained the activity lifecycles
• Listed intents
• Demonstrated how to pass data and launch activities
• Defined our application to support different devices
• Described the
application
process of adding an action bar and saving data in Android
© Simplilearn. All rights reserved.
Quiz
© Simplilearn. All rights reserved.
a. onStart
b. onPause
c. onCreate
d. onResume
© Simplilearn. All rights reserved.
QUIZ
1
Which Activity Lifecycle method is called before the activity is visible and ready for user
interaction?
a. onStart
b. onPause
c. onCreate
d. onResume
© Simplilearn. All rights reserved.
The correct answer is d.
Explanation: onResume is called just before the activity starts interacting with the user
. At this point,
the activity is at the top of the activity stack, with user input going to it.
QUIZ
1
Which Activity Lifecycle method is called before the activity is visible and ready for user
interaction?
a. Activity
b. Broadcast Receiver
c. Service
d. All of the above
© Simplilearn. All rights reserved.
QUIZ
2
Which of the following application components can an Intent activate?
a. Activity
b. Broadcast Receiver
c. Service
d. All of the above
© Simplilearn. All rights reserved.
The correct answer is d.
Explanation: An Intent can activate and activity, a broadcast receiver and Service. It cannot activate a
Content Provider.
QUIZ
2
Which of the following application components can an Intent activate?
a. TRUE
b. FALSE
© Simplilearn. All rights reserved.
QUIZ
3
It is possible to create an activity without a screen or user interface.
a. TRUE
b. FALSE
© Simplilearn. All rights reserved.
The correct answer is a.
Explanation: Without UI, an activity can perform some background functionalities.
QUIZ
3
It is possible to create an activity without a screen or user interface.
a. TRUE
b. FALSE
© Simplilearn. All rights reserved.
QUIZ
4
You cannot start an activity that belongs to another application.
a. TRUE
b. FALSE
© Simplilearn. All rights reserved.
The correct answer is b.
Explanation: Any application can start any activity provided the Intent action for that activity is
known.
QUIZ
4
You cannot start an activity that belongs to another application.
a. getFilesDir()
b. getCacheDir()
c. getFreeSpace()
d. Not Allowed
© Simplilearn. All rights reserved.
QUIZ
5
How can you get the internal storage directory for an application?
a. getFilesDir()
b. getCacheDir()
c. getFreeSpace()
d. Not Allowed
© Simplilearn. All rights reserved.
The correct answer is a.
Explanation: getFilesDir() gets the absolute path to the file system directory where your internal files
are saved.
QUIZ
5
How can you get the internal storage directory for an application?
a. By adding the jar file in the libs folder
b. By declaring dependency in the gradle script file
c. By adding the library project's src and resources
d. By adding the project as module in Android studio
© Simplilearn. All rights reserved.
QUIZ
6
How can you add a library project to a Android project via Gradle?
a. By adding the jar file in the libs folder
b. By declaring dependency in the gradle script file
c. By adding the library project's src and resources
d. By adding the project as module in Android studio
© Simplilearn. All rights reserved.
The correct answer is b.
Explanation: You can add library project to an Android project via Gradle, by declaring dependency in
the gradle script file.
QUIZ
6
How can you add a library project to a Android project via Gradle?
a. By displaying logs with the expression outcome
b. By putting a breakpoint and running the app in debug mode
c. By using StrictMode
d. Both a and b
© Simplilearn. All rights reserved.
QUIZ
7
How can you see the outcome of an expression while debugging?
a. By displaying logs with the expression outcome
b. By putting a breakpoint and running the app in debug mode
c. By using StrictMode
d. Both a and b
© Simplilearn. All rights reserved.
The correct answer is d.
Explanation: You can see the outcome of an expression while debugging by displaying logs with the
expression outcome and by putting a breakpoint and running the app in debug mode.
QUIZ
7
How can you see the outcome of an expression while debugging?
a. Activity
b. Service
c. BroadcastReceiver
d. All of above
© Simplilearn. All rights reserved.
QUIZ
8
Which of the following application components can be invoked by the PendingIntent?
a. Activity
b. Service
c. BroadcastReceiver
d. All of above
© Simplilearn. All rights reserved.
The correct answer is d.
Explanation: The PendingIntent can invoke Activity, Service, and the BroadcastReceiver
.
QUIZ
8
Which of the following application components can be invoked by the PendingIntent?
© Simplilearn.All rights reserved.
This concludes ‘Android Activity and Intents’.
The next lesson is ‘Layouts and Controls’.
© Simplilearn. All rights reserved.
© Simplilearn. All rights reserved. 75
Thank You
© Copyright 2015, Simplilearn. All rights reserved.

android ch3.pptx

  • 1.
    © Simplilearn. Allrights reserved. 1 Android Applications Development—Beginners Lesson 3—Android Activity and Intents © Simplilearn. All rights reserved.
  • 2.
    Lesson Objectives • UseGradle • Explain the activity lifecycles • List Intents • Demonstrate how to pass data and launch activities • Define your application to support different devices • Describe the applications process of adding an action bar and saving data in Android © Simplilearn. All rights reserved. 2 After completing this lesson, you will be able to:
  • 3.
    Gradle Environment insideAndroid Studio Gradle and Build Variants © Simplilearn. All rights reserved. 3
  • 4.
    Gradle—Overview Gradle is abuild tool package for building Android apps. • Gradle automates and manages the build process while configurations. allowing you to define flexible custom build • By default, o Global o Global a Gradle-based Android application gradle setting file (setting. gradle) contains the following gradle files: gradle build file (build. gradle ) o Modulespecific gradle file (build. gradle) © Simplilearn. All rights reserved. 4
  • 5.
    Gradle—Overview (contd.) There arethree parts in the Gradle build system: Task, Console, and Terminal. • Gradle tasks are the fundamental unit of the build activity. The tasks are collections of build instructions that Gradle executes as it performs a build. • • The The output of the executed Gradle task and commands can can be be viewed in the Gradle console. Gradle tasks and commands such as “gradle clean” executed in the Gradle terminal. © Simplilearn. All rights reserved. 5
  • 6.
    Update Android plugin AndroidStudio uses the Android Gradle plugin to build apps with Gradle. Android Gradle plugin can also be updated independently. plugin version is specified in the File > Project Structure > Project menu. • • • • The The The Gradle can be updated by editing the distributionUrl in the gradle-wrapper.properties https://services.gradle.org/distributions/gradle-2.10-all.zip file. © Simplilearn. All rights reserved. 6
  • 7.
    Configure Build Variantsand Dependency Management Each build variant represents a different version of an app that you can build. Configuring custom builds in Gradle involves the following parameters: • Build type: o Debug o Release Product flavors Create source sets for build variants • • Dependencies are classes, files, and JAR (Java ARchive) files that project successfully. The three types of dependencies in Gradle are the following: are required for building and deploying a • • • Module dependencies Remote binary dependencies Local binary dependencies © Simplilearn. All rights reserved. 7
  • 8.
    Intents, Passing Data,and Launching Activities Launching Activities © Simplilearn. All rights reserved. 8
  • 9.
    Activity Lifecycles —Overview Activity is an individual User Interface screen where visual elements are called Views or Widgets. • There are five widgets: o TextView o EditText o Analog Clock o Two Buttons • Two different ways to create widgets: o Java code o XML code © Simplilearn. All rights reserved. 9
  • 10.
    Four States ofActivity in Android Activity in Android can exist in four states: • • • • Active or Running Paused Stopped Destroyed or Dead © Simplilearn. All rights reserved. 10
  • 11.
    Activity Lifecycle Diagram Thefigure shows the Android Activity Lifecycle Flowchart. © Simplilearn. All rights reserved. 11
  • 12.
    Android Activity Lifecycle— Callback Methods The Callback Methods in an Android Activity Lifecycle are as follows: It is called when the activity is first created. onCreate() It is called when the activity becomes visible to the user. onStart() It is called when the user starts interacting with the application. onResume() The paused activity does not receive user input and cannot execute any code. onPause() It is called when the activity is no longer visible. onStop() It is called before the activity is destroyed by the system. onDestroy() It is called when the activity restarts after stopping it. onRestart() © Simplilearn. All rights reserved. 12
  • 13.
    Activity—Paused State Activity canremain in the Paused State if: • • • • • The user has clicked the Home button. Another activity on top does not completely obscure the visibility. The device goes to sleep. User resumes the activity by closing the new activity. Activity gets killed by the system under extremely low memory conditions. Activity goes to stopped state by executing onStop() method. © Simplilearn. All rights reserved. 13
  • 14.
    Activity—Stopped State Activity instopped state, has three different scenarios. They are as follows: • The o system kills it to free resources. It needs to start the cycle again with onCreate() method. • It gets restarted by calling onRestart(), onStart(), and onResume() methods. o In this case the User Interface is intact and need not be restored. onDestroy() method is called and the Activity is destroyed. • © Simplilearn. All rights reserved. 14
  • 15.
    Android Activity LifecycleLoops Lifecycle Loops exist for every Activity and are defined by the callback methods. Three lifecycle loops exist for every Activity. They are: • • • Entire Lifetime Visible Lifetime The Entire lifetime happens between onCreate() – onDestroy() Foreground Lifetime The Visible lifetime happens between onStart() – onStop The Foreground lifetime happens between onResume() – onPause() © Simplilearn. All rights reserved. 15
  • 16.
    Intents, Passing Data,and Launching Activities An Android Intent is an abstract description of an operation to be performed. • • Intent is a messaging object used to request an action from another app component. Intents allow you to interact with components from the same applications and components by other applications. For example, an activity can start an external activity for taking a picture. Intents are objects of the “android.content.Intent” type. contributed • • • • Your code can send them to the Android system defining the components you are targeting. Intent can contain data via a Bundle. © Simplilearn. All rights reserved. 16
  • 17.
    Intents and IntentFilters Intents facilitate communication between components in several ways. • There are three fundamental o Start an activity use-cases: o Start a service o Deliver a broadcast © Simplilearn. All rights reserved. 17
  • 18.
    Demo 1—Adding abutton to an existing XML file Demonstrate how to add a button to an existing XML file; that way when you click the button, the next activity will appear. 18 © Simplilearn. All rights reserved.
  • 19.
    Intent Types Types ofIntents Two types of intents supported by Android, they are: • • Explicit Intents Implicit Intents © Simplilearn. All rights reserved. 19
  • 20.
    Intent Types Explicit Intents ©Simplilearn. All rights reserved. 20
  • 21.
    Demo 2—Creating anExplicit Intent Demonstrate how to create an explicit intent. 21 © Simplilearn. All rights reserved.
  • 22.
    Intent Types Implicit Intents ©Simplilearn. All rights reserved. 22
  • 23.
    Implicit Intents An ImplicitIntent declares a general action to perform. • • It A searches for all components for the specific action and the fitting data type. component can register itself for actions. © Simplilearn. All rights reserved. 23
  • 24.
    Demo 3—Example ofan Implicit Intent Demonstrate a simple example of an Implicit Intent. 24 © Simplilearn. All rights reserved.
  • 25.
    Passing Data Data Transferbetween Activities © Simplilearn. All rights reserved. 25
  • 26.
    Data Transfer betweenActivities An intent contains certain header data. • • • An intent can also contain additional data based on an instance of the Bundle class. You can also add data directly to the Bundle via the overloaded putExtra() methods. The key is always of type String. As value, you String, Bundle, Parceable, and Serializable. can use the primitive data types plus objects of type © Simplilearn. All rights reserved. 26
  • 27.
    Demo 4—Data TransferBetween Activities Demonstrate how data transfer happens between activities. 27 © Simplilearn. All rights reserved.
  • 28.
    Intent Types Share Intent ©Simplilearn. All rights reserved. 28
  • 29.
    Intent Types Using theShare Intent • • Applications allow you to share some data. For • • • • Example: Facebook Google Gmail Twitter Plus © Simplilearn. All rights reserved. 29
  • 30.
    Demo 5—Using ShareIntent within your application Demonstrate how to use the Share Intent within your application. 30 © Simplilearn. All rights reserved.
  • 31.
    Intents, Passing data,Launching activities Retrieving Result Data from a Sub-Activity © Simplilearn. All rights reserved. 31
  • 32.
    Retrieving Result Datafrom a Sub-Activity An Activity can be closed via the Back button on the phone. • In this case, the finish() method is performed. © Simplilearn. All rights reserved. 32
  • 33.
    Retrieving Result Datafrom a Sub-Activity (contd.) An Activity can be closed via the Back button on the phone. • In the startActivityForResult() started. call method, you can specify a result code to determine which activity you onActivityResult(requestCode, resultCode, intent) © Simplilearn. All rights reserved. 33
  • 34.
    Demo 6—Retrieving ResultData from a Sub-Activity Demonstrate how to retrieve result data from a sub-activity. 34 © Simplilearn. All rights reserved.
  • 35.
    Supporting Different Devices Tobe as successful, the application needs to adapt to various device configurations. Important variations to consider are: • • Supporting Supporting different languages multiple screen sizes © Simplilearn. All rights reserved. 35
  • 36.
    Supporting Different Devices SupportingDifferent Languages © Simplilearn. All rights reserved. 36
  • 37.
    Demo 7—Supporting DifferentLanguages Demonstrate how to support different languages. 37 © Simplilearn. All rights reserved.
  • 38.
    Supporting Different Devices(contd.) Android devices can be categorized based on screen size and screen resolution or density. • There are four generalized o Small o Normal o Large o Extra Large There are four generalized o Low o Medium o High o Extra High sizes: • screen densities: © Simplilearn. All rights reserved. 38
  • 39.
    Supporting Different Devices SupportingDifferent Screen Sizes © Simplilearn. All rights reserved. 39
  • 40.
    Demo 8—Supporting DifferentScreen Sizes Demonstrate how to support different screen sizes. 40 © Simplilearn. All rights reserved.
  • 41.
    Adding Action Bar Toadd a toolbar or an action bar to the activity, • • • Add the v7 appcompat library to your project. Ensure that the activity extends AppCompatActivity. Set the <application> element to use one of the AppCompat’s themes. © Simplilearn. All rights reserved. 41
  • 42.
    Android Activity andIntents Adding Action Bar © Simplilearn. All rights reserved. 42
  • 43.
    Demo 9—Setting theAction Bar Demonstrate how to set the Action Bar. 43 © Simplilearn. All rights reserved.
  • 44.
    Saving Data In anApplication, there is always a need to create, update, and delete the data. • • • • Data is managed on a File system or with a Database like Use a relational database like Oracle and postgres. Save it in the form of key-value pairs in the file system. SQLlite (in-memory database). Create a new shared preference file or access an existing one by: o Get o Get Shared Preference method, or Preference method. © Simplilearn. All rights reserved. 44
  • 45.
    Saving Data Shared Preference ©Simplilearn. All rights reserved. 45
  • 46.
    Demo 10—Setting theAction Bar Demonstrate how to open a shared preference file and get a shared preference object. 46 © Simplilearn. All rights reserved.
  • 47.
    Saving Data (contd.) InAndroid, we can also create new files in the file system. • • • Android uses a file system which is similar to a disc-based file system on All android devices have internal and external storage or file systems. Internal File system: o Always available o Accessible by only your application o System removes and cleans up all the files o Neither the user nor other applications can access your files External File system: o Not always available o World-readable o System removes your applications files o Applicable for files that do not require access restrictions any platform. • © Simplilearn. All rights reserved. 47
  • 48.
    Debugging Debugging Application UsingSystem Logs © Simplilearn. All rights reserved. 48
  • 49.
    System Logs • Systemlogs are messages generated by the system conveying information about apps running on the device. • Different types of logs can be generated during the app runtime. Log warn, or error. types can be verbose, info, debug, Error logs display full exception stack trace, in case of exception. class is used to display log messages in the code. o Log o • Log messages help identify the part of application that failed. © Simplilearn. All rights reserved. 49 public class MySampleActivity extends Activity { private static final String TAG = MyActivity.class.getSimpleName(); @Override public void onCreate(Bundle savedInstanceState) { if (savedInstanceState != null) { Log.d(TAG, "onCreate() Restoring previous state"); } else { Log.d(TAG, "onCreate() No saved state available"); } } }
  • 50.
    Debugging Application UsingSystem Logs You can use the Android DDMS (Dalvik Debug Monitor Server) and the Android Monitor windows the system logs at debug time. Using system logs in Android DDMS window: to view • • • You You You can can can select a particular process in the Devices view to display the related log messages. filter the logs based on: tag, message, package name, PID, and log level. search for a particular string by entering the string in the search box. © Simplilearn. All rights reserved. 50
  • 51.
    Identifying Error Locationsfrom the Log Messages You can view the log messages in the Logcat window: • • The uncaught exception logs are displayed in red color by default. The full stack exception trace is displayed with numbers of the lines where the exceptions or occurred. errors • • The You “call hierarchy” method is displayed with the respective line numbers. can go to the line of exception by clicking on the line where the exception is “thrown”. © Simplilearn. All rights reserved. 51
  • 52.
    App Debugging inAndroid Studio The Android Studio provides a debugger to easily debug the apps. It involves the following steps: 1. 2. 3. Select a device or emulator to debug your app on. Set breakpoints in your code where you want to inspect the state by pausing the execution. Inspect variable values or evaluate expression. © Simplilearn. All rights reserved. 52
  • 53.
    App Debugging inAndroid Studio (contd.) The Android Studio Debug window displays the execution execution at the breakpoints. flow in debug mode. It shows the states of • • • • • • • Variable View—to examine the specific variable Evaluate Expression—to check the output of expression at the breakpoint. Step Step Step Over—to go to the next line. Into—to go to the first line inside a method. Out—to go to the next line after coming out of the current method program. block. Resume Program—to continue the normal execution of View Breakpoints—to see all the breakpoints applied in the app. © Simplilearn. All rights reserved. 53
  • 54.
    StrictMode • You canuse StrictMode to help identify and correct accidental errors made by Developers during the application lifecycle. • • • You You You can can can access StrictMode from the API 9. use the penaltyLog() method via StrictMode to keep a check on logs for policy violation. use StrictMode to instruct the Android system to crash an application if it performs long running operations on the main thread. • You can use StrictMode only during the development phase and not in live application. © Simplilearn. All rights reserved. 54
  • 55.
    StrictMode—Example An example ofa code to enable StrictMode in the Activity class: © Simplilearn. All rights reserved. 55
  • 56.
    • Explained theactivity lifecycles • Listed intents • Demonstrated how to pass data and launch activities • Defined our application to support different devices • Described the application process of adding an action bar and saving data in Android © Simplilearn. All rights reserved.
  • 57.
    Quiz © Simplilearn. Allrights reserved.
  • 58.
    a. onStart b. onPause c.onCreate d. onResume © Simplilearn. All rights reserved. QUIZ 1 Which Activity Lifecycle method is called before the activity is visible and ready for user interaction?
  • 59.
    a. onStart b. onPause c.onCreate d. onResume © Simplilearn. All rights reserved. The correct answer is d. Explanation: onResume is called just before the activity starts interacting with the user . At this point, the activity is at the top of the activity stack, with user input going to it. QUIZ 1 Which Activity Lifecycle method is called before the activity is visible and ready for user interaction?
  • 60.
    a. Activity b. BroadcastReceiver c. Service d. All of the above © Simplilearn. All rights reserved. QUIZ 2 Which of the following application components can an Intent activate?
  • 61.
    a. Activity b. BroadcastReceiver c. Service d. All of the above © Simplilearn. All rights reserved. The correct answer is d. Explanation: An Intent can activate and activity, a broadcast receiver and Service. It cannot activate a Content Provider. QUIZ 2 Which of the following application components can an Intent activate?
  • 62.
    a. TRUE b. FALSE ©Simplilearn. All rights reserved. QUIZ 3 It is possible to create an activity without a screen or user interface.
  • 63.
    a. TRUE b. FALSE ©Simplilearn. All rights reserved. The correct answer is a. Explanation: Without UI, an activity can perform some background functionalities. QUIZ 3 It is possible to create an activity without a screen or user interface.
  • 64.
    a. TRUE b. FALSE ©Simplilearn. All rights reserved. QUIZ 4 You cannot start an activity that belongs to another application.
  • 65.
    a. TRUE b. FALSE ©Simplilearn. All rights reserved. The correct answer is b. Explanation: Any application can start any activity provided the Intent action for that activity is known. QUIZ 4 You cannot start an activity that belongs to another application.
  • 66.
    a. getFilesDir() b. getCacheDir() c.getFreeSpace() d. Not Allowed © Simplilearn. All rights reserved. QUIZ 5 How can you get the internal storage directory for an application?
  • 67.
    a. getFilesDir() b. getCacheDir() c.getFreeSpace() d. Not Allowed © Simplilearn. All rights reserved. The correct answer is a. Explanation: getFilesDir() gets the absolute path to the file system directory where your internal files are saved. QUIZ 5 How can you get the internal storage directory for an application?
  • 68.
    a. By addingthe jar file in the libs folder b. By declaring dependency in the gradle script file c. By adding the library project's src and resources d. By adding the project as module in Android studio © Simplilearn. All rights reserved. QUIZ 6 How can you add a library project to a Android project via Gradle?
  • 69.
    a. By addingthe jar file in the libs folder b. By declaring dependency in the gradle script file c. By adding the library project's src and resources d. By adding the project as module in Android studio © Simplilearn. All rights reserved. The correct answer is b. Explanation: You can add library project to an Android project via Gradle, by declaring dependency in the gradle script file. QUIZ 6 How can you add a library project to a Android project via Gradle?
  • 70.
    a. By displayinglogs with the expression outcome b. By putting a breakpoint and running the app in debug mode c. By using StrictMode d. Both a and b © Simplilearn. All rights reserved. QUIZ 7 How can you see the outcome of an expression while debugging?
  • 71.
    a. By displayinglogs with the expression outcome b. By putting a breakpoint and running the app in debug mode c. By using StrictMode d. Both a and b © Simplilearn. All rights reserved. The correct answer is d. Explanation: You can see the outcome of an expression while debugging by displaying logs with the expression outcome and by putting a breakpoint and running the app in debug mode. QUIZ 7 How can you see the outcome of an expression while debugging?
  • 72.
    a. Activity b. Service c.BroadcastReceiver d. All of above © Simplilearn. All rights reserved. QUIZ 8 Which of the following application components can be invoked by the PendingIntent?
  • 73.
    a. Activity b. Service c.BroadcastReceiver d. All of above © Simplilearn. All rights reserved. The correct answer is d. Explanation: The PendingIntent can invoke Activity, Service, and the BroadcastReceiver . QUIZ 8 Which of the following application components can be invoked by the PendingIntent?
  • 74.
    © Simplilearn.All rightsreserved. This concludes ‘Android Activity and Intents’. The next lesson is ‘Layouts and Controls’. © Simplilearn. All rights reserved.
  • 75.
    © Simplilearn. Allrights reserved. 75 Thank You © Copyright 2015, Simplilearn. All rights reserved.