1
ANDROID APPLICATION DEVELOPMENT –
LEVEL 2
2
Table Of Contents
1. Prerequisite ....................................................... 3
2. Workshop Objectives ................................................ 3
3. EditText ........................................................... 3
4. RadioButton and RadioGroup ......................................... 3
5. CheckBox ........................................................... 4
6. Elements and Attributes to be used in XML .......................... 4
7. Object-Oriented Programming(OOP) in Java ........................... 5
8. Define and call a method ........................................... 5
9. Objects ............................................................ 6
10. Class ............................................................. 7
11. Creating an object ................................................ 7
12. Call method on object ............................................. 8
13. Inheritance of behaviour .......................................... 9
14. Find View by Id .................................................. 10
15. Creating object by casting ....................................... 11
16. Auto Import library .............................................. 12
17. Example 1 – Temperature Converter ................................ 12
18. Example 2 – General Quiz App ..................................... 17
3
1. Prerequisite
It is assumed that the learner has completed Android Application – Level 1 or have basic
knowledge of how Android applications(App) are developed and deployed to the device using
Android Studio.
2. Workshop Objectives
Level 2 workshop aims to let the leaners to further improve skills of Android App Development
by:
- Understanding new concepts for designing user interface (UI) in XML.
- Understanding concept of Object-Oriented Programming in Java.
- Applying the theoretical concepts learnt for both XML and Java to create interactive
applications.
3. EditText
It is an element of UI for the user to enter and modify data to be entered. i.e. text or number in
any format. So accordingly, input type has to be mentioned in the code whether number or text.
It is predefined subclass of TextView that includes rich editing capabilities.
Figure 1: Styles of EditText
4. RadioButton and RadioGroup
RadioButton allows the user to select one option from a set. It is a two-state button that can be
checked or unchecked. If a radio button is unchecked then a user can check it by simply clicking
on it. Once a RadioButton is checked by user it can’t be unchecked by simply pressing on the
same button.
4
RadioGroup class allows to create a scope for set of radio buttons to function as per the user
requirement. Hence, when one radio button is checked within a RadioGroup provided that one
of the radio buttons is already checked, that radio button will be unchecked automatically.
Figure 2: Example of RadioButtons in a RadioGroup
5. CheckBox
Checkboxes allows the user to select multiple options from a set. If multiple options are
required for selection purpose, space can be separately reserved (using LinearLayout as its
space scope) instead of using radio buttons that allows only one option to be selected. It can
also be checked and unchecked by the user. It allows the user to uncheck if not necessary option
is selected.
Figure 3: Example of Checkbox
6. Elements and Attributes to be used in XML
Elements as per the concepts explained in previous that will be used in XML files shown in
table 1:
Table 1: New elements to be used
EditText Allows the user to enter input which can be text or numerical format for
computation purpose.
RadioButton Allows the user to select an option in a defined scope.
5
RadioGroup It is the defined scope that allows the user to select an option by means
of radio button.
CheckBox Allows the user to select an option or uncheck it.
Table 2: New attribute to be used in Android Manifest XML file
android:screenOrientation Allows user to lock screen mode to either “portrait” or
“landscape” mode. This attribute will be used in
AndroidManifest.xml files.
Android:hint It will prompt the user to enter specific output. Only used
for EditText view.
7. Object-Oriented Programming(OOP) in Java
To write intermediary and complex level programs in Java, it is essential to learn concepts of
OOP. In Android Development, OOP allows us to dynamically interact with views so that we
can read state of the views and then change content of the views while the app is running (after
deploying the app to the device). Also, it will allow for determination of the state of radio
buttons and check boxes.
OOP refers to the type of programming in which programmers not only define the data types
but also the operation types that can be applied to solve a problem. Objects, classes, inheritance,
and packages are the terms that are commonly used in OOP.
8. Define and call a method
The format to define method is shown in figure 4.
Figure 4: Format to define a method
Access Modifier – It determines who has the access to the method. There are three types of
access modifier: public, private and protected. The public class is visible to all classes
6
everywhere in the specific package. The private access modifier mentions that the member can
only be accessed in its own class. The protected access modifier specifies that the member can
only be accessed within the same package where it is declared.
Return data type – It mentions which data type value will be returned by the method. E.g. int,
float and void.
Method name – Any name that can be set by the user for the method.
Inside the parenthesis, parameter data type and the name to be set by user mentioned such that
inputs are passed to be it which has to be processed/computed.
Once declared and defined, the method can be used by calling it separately or call on the
objects.
9. Objects
Objects are key to understand the concept of object-oriented technology. There can be many
objects that include buildings, cars, toys, television etc. They all have state and behavior.
Similarly, objects that are used to make UI for e.g. TextView which is actually a Java object
that controls the text that appear in UI also share state and behavior. State is made up of bunch
of fields (variables in other languages). The behavior of the states are exposed through
methods. E.g. in order to interact with TextView Java object and change it while the app is
running, we can call methods on TextView objects. e.g. setText(), getText().
Figure 5: TextView object depicted as object
7
10. Class
To know all the fields and methods in TextView object, we need to look at its class definition.
It is the file – TextView.java. Class is a blueprint from which individual objects are created.
Each object from which class it is created is known as an instance of a class.
Figure 6: Depiction of TextView class and its object instances
From figure 6, we can see TextView class includes state and methods (ofcourse not exactly state
and method is mentioned) from which TextView objects are created. These objects can have
different text string values. They can have different font sizes, text colors, text styles. However,
they are all based on the class .java file.
11. Creating an object
Creating an object follows same format as that of declaring a variable. Analogies can be
observed between figure 7 and figures 8 and 9.
Figure 7: Declared variable with initialized value
Figure 8: Example of creating object with constructor
8
Constructor is a special method (in this case is the TextView) that initializes object of that type.
To determine what to pass as input to the constructor, we have to look at java doc file (for
special classes created by Java which is TextView in this example) or the class file of the object.
Figure 9: Example of creating object with factory method
Instead of creating objects by means of constructors, sometimes depending on the application
we may create object using factory methods. Factory method allows to create other objects of
a varying prototype or class.
12. Call method on object
In the previous section, we have learnt how to create an object. To get meaningful output, we
need to call method on the created object. We must follow the format show in figure 9 when
we call method on object.
Figure 10: Example of calling method on object
setText(input parameters) method is exactly defined this way in TextView Java class. The
method declaration also specifies that there’s an input parameter of a string as input. When we
write the code shown in figure 10, titleTextView object is modified so that the string of text is
displayed on the screen. Object variable name is used instead of object data type because there
can be multiple TextView objects in the app.
9
While specifying input arguments, make sure you are specifying it correctly in the right order
as per the declaration of method which can be either int, float or String type. If the declared
method doesn’t consist of any arguments, then we leave empty set of parentheses – passing no
input string or number. This can be confirmed from the documentation.
13. Inheritance of behaviour
Object-Oriented Programming allows classes to inherit commonly used state and behaviour
from other classes. In MainActivity.java file, when we call methods like findViewById() and
setText(), we can observe that it is nowhere defined in the MainActivity class. This means
that MainActivity is extension of the functionality in AppCompatActivity class shown in figure
11. It is the part of Android support library which allows to use latest UI features on Android
while still working on older Android devices.
Figure 11: Main class
Hence by extending AppCompatActivity class, we are getting all the functions, states and
methods from here within MainActivity.
Figure 12: Illustration of how state and method are accessed from AppCompatActivity class
10
Accessing of methods and states from other classes is known as inheritance. Sometimes we
will require to inherit behaviour but other times we want to modify slightly. We can override
certain methods. This done by adding @override method at the top of method inherited from
AppCompatActivity class.
So whatever class we observe that extends, it is known as the superclass. AppCompatActivity is
a superclass and MainActivity would then be subclass. This can be visualised as class hierarchy
diagram shown in figure 13.
Figure 13: Class Hierarchy
14. Find View by Id
Visualization of what is exactly happening between XML and Java is shown in figure 14.
Figure 14: Interaction between XML and Java
• When an app is opened in the device, MainActivity is initialized and within the code,
onCreate method of the MainActivity gets called by the system.
• setContentView is called within onCreate method with resource id which allows direct
mapping to XML file.
11
• Once we set the content view, the activity goes and finds the XML layout file and then
reads through each line.
• For each view object, it creates a Java object for it. Hence, it goes through the XML file
and then builds up this whole hierarchy of Java objects.
• When creating each of the views, it is actually calling constructor such as new TextView
or new LinearLayout and then passing all the attributes into the Java objects so that it
can be set up properly.
• It can be noticed that we didn’t require to write extra code. All of it was handled by
inflation process of activity.
Similarly, findViewById method finds a view that corresponds with the ID that is passed as an
input. And the activity searches for this view in the view hierarchy from the XML that was
created in the onCreate method. The return value of this method is an object of type view. Main
Activity Java code will look like this:
Figure 15: Example of how findViewById method is used
We can call findViewById and then pass in resource id as input of the view that we want and
eventually it will follow similar process as explained in the last page.
15. Creating object by casting
Casting shows the use of an object of one type in place of another type among objects that are
allowed by implementations and inheritance. Example shown in figure 16.
Figure 16: Example of casting
TextView is a subclass of View. And findViewById is a method that is declared in View class.
Therefore, we can use a View object that is returned by findViewById method and then it will
be treated as a TextView by casting.
12
16. Auto Import library
This setting in Android Studio will allow to add import libraries automatically when methods
that are not defined in MainActivity class are called and these methods are defined in the
libraries that will be automatically added to the import library list. To enable this feature, follow
the steps:
1. Go to file menu.
2. Click on settings.
3. Under Editor tab, click General.
4. Under General tab, click Auto Import.
5. Ensure to check the options as shown in figure 17.
Figure 17: Enabling of Auto Import feature
Now you will not have to externally add library for calling required methods.
17. Example 1 – Temperature Converter
After creating a project (for more details refer to Level 1 document), write the code as follows:
<resources>
<!-- Base application theme. -->
<style name="AppTheme" parent="Theme.AppCompat.Light">
<!-- Customize your theme here. -->
<item name="colorPrimary">#4FC3F7</item>
<item name="colorButtonNormal">#4FC3F7</item>
</style>
</resources>
❖ Discussion
Light blue theme was set for the app. Color theme was chosen from material design of UI.
Lock the screen orientation by using the statement mentioned in table 2. Then write the
following code in activity_main.xml file:
<?xml version="1.0" encoding="utf-8"?>
<RelativeLayout
xmlns:android="http://schemas.android.com/apk/res/android"
android:layout_width="match_parent"
13
android:layout_height="match_parent"
android:background="#E1F5FE">
<EditText
android:id="@+id/editText"
android:layout_width="match_parent"
android:layout_height="wrap_content"
android:layout_marginTop="50dp"
android:background="@android:color/white"
android:gravity="center_horizontal"
android:hint="Enter Temperature"
android:inputType="numberDecimal"
android:padding="15dp"
android:textSize="25sp" />
<LinearLayout
xmlns:android="http://schemas.android.com/apk/res/android"
android:layout_width="match_parent"
android:layout_height="wrap_content"
android:orientation="horizontal"
android:layout_below="@+id/editText"
android:layout_alignParentStart="true"
android:layout_marginTop="50dp"
android:id="@+id/linear_1">
<Button
android:id="@+id/button1"
android:layout_width="0dp"
android:layout_weight="1"
android:layout_height="wrap_content"
android:layout_below="@+id/textView"
android:text="Celsius to fahrenheit"
android:padding="16dp"
android:textSize="20sp"
android:onClick="celsiusToFahrenheit"/>
<Button
android:id="@+id/button2"
android:layout_width="0dp"
android:layout_weight="1"
android:layout_height="wrap_content"
android:layout_below="@+id/textView"
android:text="fahrenheit to celsius"
android:padding="16dp"
android:textSize="20sp"
android:onClick="fahrenheitToCelsius"/>
</LinearLayout>
<TextView
android:id="@+id/textView"
android:layout_width="match_parent"
android:layout_height="wrap_content"
android:gravity="center_horizontal"
android:hint="Temperature in °C or °F"
android:textSize="24dp"
android:background="#FFF"
android:padding="15dp"
android:layout_marginTop="50dp"
android:layout_below="@+id/linear_1"
android:layout_alignParentStart="true" />
<Button
android:id="@+id/button3"
android:layout_width="wrap_content"
android:layout_height="wrap_content"
android:text="Clear"
14
android:padding="16dp"
android:textSize="20sp"
android:layout_centerHorizontal="true"
android:onClick="clear"
android:layout_alignParentBottom="true” />
</RelativeLayout>
UI in XML visualizer will look like this:
Figure 18: UI of Temperature Converter App in XML visualizer
❖ Discussion
- RelativeLayout is coded to be the parent layout for the UI of this application. Within this
layout consists of EditText, LinearLayout, TextView and Button as its children. Specific
background color is set as per the material design and the color theme of this app.
- EditText object on UI is where the user will enter the temperature either in Celsius or
Fahrenheit. It is specifically set to its input type as number decimal such that only numbers
of any format can be entered. Its background is set to white color and aligned
center_horizontal. Attribute hint is set to “Enter Temperature” for user to enter the input.
- Within LinearLayout contains two Buttons as its children that are horizontally oriented.
CELSIUS TO FAHRENHEIT button will allow to convert entered temperature in Celsius
to convert into Fahrenheit and FAHRENHEIT TO CELSIUS button vice versa. The buttons
have onClick attributes “celsiusToFahrenheit” and “fahrenheitToCelsius” which will be
used as method names in Java file.
15
- TextView object will allow to display the output. Similar to EditText attributes, its
background color is set to white, hint is set to Temperature in ℃ or ℉ and is aligned
center_horizontal.
- Clear Button will allow to remove the entered values from EditText object and the output
from the TextView. Its onclick attribute is set to “clear” based on which method will be
declared in Java file.
- Proper adjustments of weight and height of all elements and margin, padding and alignment
is done in each of the child elements to give good appearance of UI.
We are now ready to make the app logically meaningful via MainActivity.Java file.
Write the following code right below main class:
EditText temp;
Then Write the following code inside onCreate method and below the line where
setContentView method is called:
temp = (EditText) findViewById(R.id.editText);
Now enter the whole code inside main class and below onCreate method:
/*Display of converted temperature*/
private void displayResult(String message) {
TextView resultView = (TextView) findViewById(R.id.textView);
resultView.setText(message);
}
/*Buttons*/
private void celsiusToFahrenheit(View view) {
String temperature = temp.getText().toString();
if(!(temperature.equals(""))) {
double celsius = Double.valueOf(temperature);
double fahrenheit = celsius * (9.0 / 5.0) + 32;
DecimalFormat df = new DecimalFormat("0.00");
displayResult(df.format(fahrenheit) + " °F");
}
else {
displayResult (null);
temp.setText(null);
}
}
private void fahrenheitToCelsius(View view) {
String temperature = temp.getText().toString();
if(!(temperature.equals(""))) {
double fahrenheit = Double.valueOf(temperature);
double celsius = (fahrenheit - 32) * (5.0 / 9.0);
DecimalFormat df = new DecimalFormat("0.00");
displayResult(df.format(celsius) + " °C");
}
else {
displayResult(null);
temp.setText(null);
}
16
}
private void clear(View view) {
displayResult(null);
temp.setText(null);
}
❖ Discussion
- Initially, EditText object is declared as global variable and is named as temp. This object
will hold the temperature value in ℃ or ℉.
- Inside onCreate method, temp object is assigned and casted such the value returned by
findViewById method is treated as EditText object instead of View object. Note: EditText
is also a subclass of View class. Resource id: R.id.editText is passed to findViewById
method for mapping the EditText object declared in this file to the EditText object in XML
file. Now, as the value that will be entered by user, it will direct will be stored in temp object.
- Private access modifier and void return data type is used for declaring displayResult
method to which String value will be passed to it as its input. A TextView object named as
resultView is declared and created. It is mapped to resource id: R.id.textView to UI via
findViewById method. Then setText() is called on resultView object to which the value that
is passed to this method is passed to it to display the result in UI.
- Private access modifier and void return data type is used for declaring celsiusToFahrenheit
method to which View view objects are passed. These objects act as onClick listeners
handled by InputMethodManager in Android.
- The value that is stored in temp object is not string value. So initially, it has to be converted
to String value by calling methods getText() and ToString() to it. Then the converted
value is stored to the temperature variable which is declared as String type.
- In order to avoid crash of application on mobile device, if and else statements were used.
The application is likely to crash when no value is entered and buttons used for computation
purpose is clicked. Hence, inside if function it is set that when temperature is not equal to
empty space, the lines involved for computation is executed. Else, null parameter is passed
to displayResult method and setText method which is called on temp object.
- The lines involved for computation to convert from Celsius to Fahrenheit follows:
o Operations cannot be performed on String values. Therefore, the temperature
variable is converted to double value and is assigned to celsius variable which is
declared as double data type.
o General formula is applied in order to convert from Celsius to Fahrenheit and is
then it is assigned to fahrenheit variable.
17
o This value has to be rounded to two decimal places (to truncate unnecessary values
after two decimal places). Hence DecimalFormat object is created and is named df.
String “0.00” which will allow rounding the number off to two decimal places.
o Finally, displayResult method is called and df.format(fahrenheit) + “ ℉” will
be passed in order to display temperature in Celsius to two decimal places.
- In very similar way of how the functionality of button to convert from Celsius to Fahrenheit
is implemented, method fahrenheitToCelsius is also implemented only the formula is
rearranged to compute celsius and the variable names are switched.
- Private access modifier and void return data type is used to implement clear method. View
view is set as its input parameters as they act as onClick listeners. displayResult method is
called and setText method is called on temp object to which null parameter is passed to
clear both input and output fields.
18. Example 2 – General Quiz App
After getting done with creating a new project named SimpleQuizApp, from res folder click
strings.xml and change string name from “SimpleQuizApp” to “General Quiz App :)”. This
allowed to change the name of the title of the app.
Then write the following code in styles.xml file:
<resources>
<!-- Base application theme. -->
<style name="AppTheme" parent="Theme.AppCompat.Light">
<!-- Customize your theme here. -->
<!-- Primary theme color of the app (sets background color of app bar) --
>
<item name="colorPrimary">#26A69A</item>
<!-- Background color of buttons in the app -->
<item name="colorButtonNormal">#26A69A</item>
</style>
</resources>
❖ Discussion
Main theme of this app is chosen to be aqua green. Color codes used from material design.
Write the following code in main_acitivity.xml file:
<?xml version="1.0" encoding="utf-8"?>
<RelativeLayout xmlns:android="http://schemas.android.com/apk/res/android"
android:layout_width="match_parent"
android:layout_height="wrap_content"
android:background="#E0F2F1">
<LinearLayout xmlns:android="http://schemas.android.com/apk/res/android"
android:id="@+id/linearLayout1"
android:layout_width="match_parent"
android:layout_height="wrap_content"
android:orientation="vertical">
18
<TextView
android:layout_width="match_parent"
android:layout_height="wrap_content"
android:fontFamily="sans-serif"
android:padding="12dp"
android:text="Which reptile can change it's color:"
android:textColor="@android:color/black"
android:textSize="16sp"
android:background="#C5E1A5" />
<RadioGroup
android:id="@+id/radio_group_one"
android:layout_width="match_parent"
android:layout_height="wrap_content"
android:orientation="horizontal"
android:background="#C5E1A5"
android:padding="8dp">
<RadioButton
android:id="@+id/radio_box_one"
android:layout_width="0dp"
android:layout_height="wrap_content"
android:layout_weight="1"
android:onClick="rgClick"
android:text="Chameleon" />
<RadioButton
android:id="@+id/radio_box_two"
android:layout_width="0dp"
android:layout_height="wrap_content"
android:layout_weight="1"
android:onClick="rgClick"
android:text="Lizard" />
<RadioButton
android:id="@+id/radio_box_three"
android:layout_width="0dp"
android:layout_height="wrap_content"
android:layout_weight="1"
android:onClick="rgClick"
android:text="Iguana" />
</RadioGroup>
<TextView
android:layout_width="match_parent"
android:layout_height="wrap_content"
android:background="#CC80DEEA"
android:fontFamily="sans-serif"
android:lineSpacingExtra="5sp"
android:padding="12dp"
android:text="There are three states of matter: Solid, Liquid and?"
android:textColor="@android:color/black"
android:textSize="16sp" />
<RadioGroup
android:id="@+id/radio_group_two"
android:layout_width="match_parent"
android:layout_height="wrap_content"
android:background="#CC80DEEA"
android:orientation="horizontal"
android:padding="8dp">
<RadioButton
android:id="@+id/radio_box_four"
android:layout_width="0dp"
android:layout_height="wrap_content"
android:layout_weight="1"
19
android:onClick="rgClick"
android:text="Helium" />
<RadioButton
android:id="@+id/radio_box_five"
android:layout_width="0dp"
android:layout_height="wrap_content"
android:layout_weight="1"
android:onClick="rgClick"
android:text="Gas" />
<RadioButton
android:id="@+id/radio_box_six"
android:layout_width="0dp"
android:layout_height="wrap_content"
android:layout_weight="1"
android:onClick="rgClick"
android:text="Atom" />
</RadioGroup>
<TextView
android:layout_width="match_parent"
android:layout_height="wrap_content"
android:background="#CCFFF176"
android:padding="12dp"
android:text="Accord is a car model manufactured by:"
android:textColor="@android:color/black"
android:textSize="16sp" />
<RadioGroup
android:id="@+id/radio_group_three"
android:layout_width="match_parent"
android:layout_height="wrap_content"
android:background="#CCFFF176"
android:orientation="horizontal"
android:padding="8dp">
<RadioButton
android:id="@+id/radio_box_seven"
android:layout_width="0dp"
android:layout_height="wrap_content"
android:layout_weight="1"
android:onClick="rgClick"
android:text="Mercedes" />
<RadioButton
android:id="@+id/radio_box_eight"
android:layout_width="0dp"
android:layout_height="wrap_content"
android:layout_weight="1"
android:onClick="rgClick"
android:text="Toyota" />
<RadioButton
android:id="@+id/radio_box_nine"
android:layout_width="0dp"
android:layout_height="wrap_content"
android:layout_weight="1"
android:onClick="rgClick"
android:text="Honda" />
</RadioGroup>
<TextView
android:layout_width="match_parent"
android:layout_height="wrap_content"
android:background="#FF8A65"
android:padding="12dp"
20
android:text="Main parts of a computer include:"
android:textColor="@android:color/black"
android:textSize="16sp" />
<LinearLayout
android:id="@+id/linearLayoutThree"
android:layout_width="match_parent"
android:layout_height="wrap_content"
android:background="#FF8A65"
android:orientation="horizontal"
android:padding="8dp">
<CheckBox
android:id="@+id/check_box_one"
android:layout_width="0dp"
android:layout_height="wrap_content"
android:layout_weight="1"
android:onClick="questionFour"
android:text="Hard Disk" />
<CheckBox
android:id="@+id/check_box_two"
android:layout_width="0dp"
android:layout_height="wrap_content"
android:layout_marginLeft="7dp"
android:layout_weight="1"
android:onClick="questionFour"
android:text="WebCam" />
<CheckBox
android:id="@+id/check_box_three"
android:layout_width="0dp"
android:layout_height="wrap_content"
android:layout_marginLeft="7dp"
android:layout_weight="1"
android:onClick="questionFour"
android:text="Monitor" />
</LinearLayout>
</LinearLayout>
<TextView
android:id="@+id/score_text_view"
android:layout_width="wrap_content"
android:layout_height="wrap_content"
android:layout_below="@id/linearLayout1"
android:layout_centerHorizontal="true"
android:layout_marginTop="26dp"
android:text="Score: 0/4"
android:textSize="20sp"
android:textStyle="bold" />
<LinearLayout
android:layout_width="wrap_content"
android:layout_height="wrap_content"
android:layout_alignParentBottom="true"
android:layout_centerHorizontal="true"
android:orientation="horizontal">
<Button
android:id="@+id/button_check"
android:layout_width="0dp"
android:layout_height="wrap_content"
android:layout_weight="1"
android:onClick="checkButton"
android:text="Check!" />
<Button
21
android:id="@+id/reset_button"
android:layout_width="0dp"
android:layout_height="wrap_content"
android:layout_weight="1"
android:onClick="reset"
android:text="Reset" />
</LinearLayout>
</RelativeLayout>
In XML visualizer, UI will look like this:
Figure 19: UI of General Quiz App in XML visualizer
❖ Discussion
- RelativeLayout is again set to be the parent ViewGroup for this app. Three LinearLayout
views and a TextView are its children. Specific background color is set as per the material
design and the color theme of this app.
- Within the first LinearLayout, it consists of four TextViews, three RadioGroups and a
LinearLayout as its children.
- For first three questions TextView objects display the question and RadioGroups provide
option to select one choice. Each of the questions and their choices share the same
background color.
22
- In each of the RadioGroup consists of three RadioButtons as its children. For horizontal
orientation of the RadioButtons, in each of the RadioGroups attribute orientation is set to
horizontal.
- For each of the RadioButtons, layout_width is set to 0dp and layout_weight is set to 1 to
occupy space equally within RadioGroup view.
- All of the RadioButtons share same onClick attribute: rgClick.
- Each of the RadioGroups and RadioButtons have unique ids which will be used in
MainActivity Java file for updation of quiz scores.
- The final question is displayed by TextView view which is child of the LinearLayout. Since,
there are multiple answers for this, CheckBoxes are used. For its proper arrangement in UI,
LinearLayout is set to be its parent ViewGroup. LinearLayout orientation attribute is set to
horizontal such that the CheckBoxes are horizontally oriented.
- For each of the CheckBoxes, layout_width is set to 0 and layout_weight is set to 1 to occupy
space equally within its LinearLayout parent ViewGroup. They also share the same onClick
attribute: questionFour based on which method will be defined in MainActivity Java file for
updating quiz score.
- To display the score, TextView object is used. layout_centerHorizontal is set to true and
layout_below is set to be below LinearLayout of the questions and the choices. Its
layout_width and layout_height is set to wrap_content.
- Two Buttons – Check! and Reset are children of LinearLayout. This LinearLayout’s
attributes layout_alignParentBottom and layout_centerHorizontal is set to true.
- Check! button onClick attribute is set as checkButton and Reset button onClick attribute is
set as reset. Using these names, methods will be defined in MainActivity Java file.
Now we are all set to make the application logically meaningful via MainActivity Java file.
Write the following code right below declaration of main class:
int score = 0; /*Global variable to store quiz scores*/
Then write following code inside onCreate method:
Toast.makeText(this, "Welcome to General Quiz App :) Feel free to take the
test.", Toast.LENGTH_SHORT).show();
Now write the rest of the following code inside MainActivity class:
/*Logical function in order to update the quiz scores*/
public void rgClick(View view) {
boolean checked = ((RadioButton) view).isChecked();
23
switch (view.getId()){
case R.id.radio_box_one:
if(checked){
score = score + 1;
break;
}
case R.id.radio_box_five:
if(checked){
score = score + 1;
break;
}
case R.id.radio_box_nine:
if(checked){
score = score + 1;
break;
}
}
}
/*Method declared to update score for final question*/
public void questionFour(View view){
CheckBox hardDrive = (CheckBox) findViewById(R.id.check_box_one);
boolean hasHardDrive = hardDrive.isChecked();
CheckBox monitor = (CheckBox) findViewById(R.id.check_box_three);
boolean hasMonitor = monitor.isChecked();
if(hasHardDrive&hasMonitor){
score = score + 1;
}
}
/*Check button function*/
public void checkButton(View view){
displayScore(score);
commentToast();
}
/*Method to display toast comments*/
public void commentToast(){
if(score==1){
Toast.makeText(this, "Poor score. Take test again!",
Toast.LENGTH_SHORT).show();
}
if(score==2){
Toast.makeText(this, "Not bad. Take test again!",
Toast.LENGTH_SHORT).show();
}
if(score==3){
Toast.makeText(this, "Good job!", Toast.LENGTH_SHORT).show();
}
if(score==4){
Toast.makeText(this, "Congratulations! Keep it up :)",
Toast.LENGTH_SHORT).show();
}
}
/*Method declared to display score*/
public void displayScore(int score) {
TextView scoreView = (TextView) findViewById(R.id.score_text_view);
scoreView.setText("Score: " +String.valueOf(score)+ "/4");
}
/*Reset button*/
public void reset(View view){
CheckBox hardDrive = (CheckBox) findViewById(R.id.check_box_one);
hardDrive.setChecked(false);
CheckBox webCam = (CheckBox) findViewById(R.id.check_box_two);
24
webCam.setChecked(false);
CheckBox monitor = (CheckBox) findViewById(R.id.check_box_three);
monitor.setChecked(false);
RadioGroup rgOne = (RadioGroup) findViewById(R.id.radio_group_one);
rgOne.clearCheck();
RadioGroup rgTwo = (RadioGroup) findViewById(R.id.radio_group_two);
rgTwo.clearCheck();
RadioGroup rgThree = (RadioGroup) findViewById(R.id.radio_group_three);
rgThree.clearCheck();
score = 0;
displayScore(score);
}
❖ Discussion
- Intially, score is declared as global variable to hold the score values and for its updating by
each of the methods.
- Toast object is initiated with makeText() method inside onCreate method. makeText()
method will take in three parameters: context which is set as “this”, text which is set as
Welcome message string and duration is set as Toast.LENGTH_SHORT so that the message
appears for very short time. Then show() method is called such that Toast message is
displayed. This object allows to display message temporarily for particular duration.
- rgClick method is declared which is the onClick attribute of the RadioButtons. Inside this
method, first a boolean variable is declared with name checked which will check whether a
radio button is checked or not. Then by making use of switch statements. view.getId()
method is passed to switch function which will return the values that are set in the cases.
Cases are set to be the resource ids of the radio buttons that are correct answers. If these
radio buttons are checked, scores will be added by 1.
- questionFour method is declared that will allow updating of final questions if they are
answered properly based on which score will be updated. Two CheckBox objects are created
inside this method which are correct answers of the final question – hardDrive and monitor.
Then boolean variables hasHardDrive and hasMonitor are declared to store 1 if choices are
correctly selected. If both hasHardDrive and hasMonitor is 1, then score will be added by 1.
Hence to get score of 1, both the options has to be selected, else even if one option is selected
and it is right, the score will not be updated and quiz taker will be marked 0 for the attempt
on final question.
- commentToast method is defined which represents the comments to be displayed by means
of Toast object. Based on the performance of the quiz taker on scale of 1 - 4, toast objects
will display these comments.
25
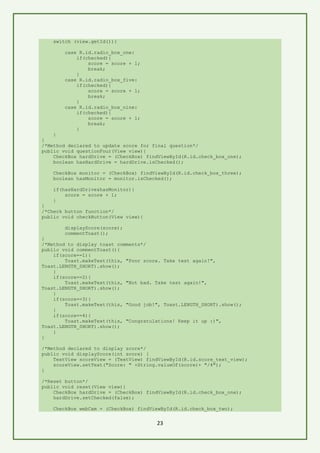
- displayScore method is defined for displaying the score. It will take in the updated score in
integer format. By calling setText method on TextView object, this score value will then be
converted to string format and then will be passed to the setText method for displaying.
- checkButton method is defined inside which displayScore and commentToast methods are
called. displayScore method takes in score global variable. commentToast will allow to
display Toast message which will indicate the comment on quiz takers performance.
- reset method is defined inside which all the CheckBox and RadioGroup objects are unchecked.
On CheckBox objects, setChecked method is called and false parameter is passed to it. On
RadioGroup objects, clearCheck() method is called. score variable is initialized as 0 and
then displayScore method is called to display score is 0.
References
Udacity. 2018. Udacity. [ONLINE] Available at: https://classroom.udacity.com/courses/ud834.
[Accessed 15 March 2018].
Udacity. 2018. Udacity. [ONLINE] Available at: https://classroom.udacity.com/courses/ud836.
[Accessed 15 March 2018].
tutorialspoint.com. 2018. Android Tutorial. [ONLINE] Available
at: https://www.tutorialspoint.com/android/index.htm. [Accessed 17 March 2018].

Android Application Development - Level 2

  • 1.
  • 2.
    2 Table Of Contents 1.Prerequisite ....................................................... 3 2. Workshop Objectives ................................................ 3 3. EditText ........................................................... 3 4. RadioButton and RadioGroup ......................................... 3 5. CheckBox ........................................................... 4 6. Elements and Attributes to be used in XML .......................... 4 7. Object-Oriented Programming(OOP) in Java ........................... 5 8. Define and call a method ........................................... 5 9. Objects ............................................................ 6 10. Class ............................................................. 7 11. Creating an object ................................................ 7 12. Call method on object ............................................. 8 13. Inheritance of behaviour .......................................... 9 14. Find View by Id .................................................. 10 15. Creating object by casting ....................................... 11 16. Auto Import library .............................................. 12 17. Example 1 – Temperature Converter ................................ 12 18. Example 2 – General Quiz App ..................................... 17
  • 3.
    3 1. Prerequisite It isassumed that the learner has completed Android Application – Level 1 or have basic knowledge of how Android applications(App) are developed and deployed to the device using Android Studio. 2. Workshop Objectives Level 2 workshop aims to let the leaners to further improve skills of Android App Development by: - Understanding new concepts for designing user interface (UI) in XML. - Understanding concept of Object-Oriented Programming in Java. - Applying the theoretical concepts learnt for both XML and Java to create interactive applications. 3. EditText It is an element of UI for the user to enter and modify data to be entered. i.e. text or number in any format. So accordingly, input type has to be mentioned in the code whether number or text. It is predefined subclass of TextView that includes rich editing capabilities. Figure 1: Styles of EditText 4. RadioButton and RadioGroup RadioButton allows the user to select one option from a set. It is a two-state button that can be checked or unchecked. If a radio button is unchecked then a user can check it by simply clicking on it. Once a RadioButton is checked by user it can’t be unchecked by simply pressing on the same button.
  • 4.
    4 RadioGroup class allowsto create a scope for set of radio buttons to function as per the user requirement. Hence, when one radio button is checked within a RadioGroup provided that one of the radio buttons is already checked, that radio button will be unchecked automatically. Figure 2: Example of RadioButtons in a RadioGroup 5. CheckBox Checkboxes allows the user to select multiple options from a set. If multiple options are required for selection purpose, space can be separately reserved (using LinearLayout as its space scope) instead of using radio buttons that allows only one option to be selected. It can also be checked and unchecked by the user. It allows the user to uncheck if not necessary option is selected. Figure 3: Example of Checkbox 6. Elements and Attributes to be used in XML Elements as per the concepts explained in previous that will be used in XML files shown in table 1: Table 1: New elements to be used EditText Allows the user to enter input which can be text or numerical format for computation purpose. RadioButton Allows the user to select an option in a defined scope.
  • 5.
    5 RadioGroup It isthe defined scope that allows the user to select an option by means of radio button. CheckBox Allows the user to select an option or uncheck it. Table 2: New attribute to be used in Android Manifest XML file android:screenOrientation Allows user to lock screen mode to either “portrait” or “landscape” mode. This attribute will be used in AndroidManifest.xml files. Android:hint It will prompt the user to enter specific output. Only used for EditText view. 7. Object-Oriented Programming(OOP) in Java To write intermediary and complex level programs in Java, it is essential to learn concepts of OOP. In Android Development, OOP allows us to dynamically interact with views so that we can read state of the views and then change content of the views while the app is running (after deploying the app to the device). Also, it will allow for determination of the state of radio buttons and check boxes. OOP refers to the type of programming in which programmers not only define the data types but also the operation types that can be applied to solve a problem. Objects, classes, inheritance, and packages are the terms that are commonly used in OOP. 8. Define and call a method The format to define method is shown in figure 4. Figure 4: Format to define a method Access Modifier – It determines who has the access to the method. There are three types of access modifier: public, private and protected. The public class is visible to all classes
  • 6.
    6 everywhere in thespecific package. The private access modifier mentions that the member can only be accessed in its own class. The protected access modifier specifies that the member can only be accessed within the same package where it is declared. Return data type – It mentions which data type value will be returned by the method. E.g. int, float and void. Method name – Any name that can be set by the user for the method. Inside the parenthesis, parameter data type and the name to be set by user mentioned such that inputs are passed to be it which has to be processed/computed. Once declared and defined, the method can be used by calling it separately or call on the objects. 9. Objects Objects are key to understand the concept of object-oriented technology. There can be many objects that include buildings, cars, toys, television etc. They all have state and behavior. Similarly, objects that are used to make UI for e.g. TextView which is actually a Java object that controls the text that appear in UI also share state and behavior. State is made up of bunch of fields (variables in other languages). The behavior of the states are exposed through methods. E.g. in order to interact with TextView Java object and change it while the app is running, we can call methods on TextView objects. e.g. setText(), getText(). Figure 5: TextView object depicted as object
  • 7.
    7 10. Class To knowall the fields and methods in TextView object, we need to look at its class definition. It is the file – TextView.java. Class is a blueprint from which individual objects are created. Each object from which class it is created is known as an instance of a class. Figure 6: Depiction of TextView class and its object instances From figure 6, we can see TextView class includes state and methods (ofcourse not exactly state and method is mentioned) from which TextView objects are created. These objects can have different text string values. They can have different font sizes, text colors, text styles. However, they are all based on the class .java file. 11. Creating an object Creating an object follows same format as that of declaring a variable. Analogies can be observed between figure 7 and figures 8 and 9. Figure 7: Declared variable with initialized value Figure 8: Example of creating object with constructor
  • 8.
    8 Constructor is aspecial method (in this case is the TextView) that initializes object of that type. To determine what to pass as input to the constructor, we have to look at java doc file (for special classes created by Java which is TextView in this example) or the class file of the object. Figure 9: Example of creating object with factory method Instead of creating objects by means of constructors, sometimes depending on the application we may create object using factory methods. Factory method allows to create other objects of a varying prototype or class. 12. Call method on object In the previous section, we have learnt how to create an object. To get meaningful output, we need to call method on the created object. We must follow the format show in figure 9 when we call method on object. Figure 10: Example of calling method on object setText(input parameters) method is exactly defined this way in TextView Java class. The method declaration also specifies that there’s an input parameter of a string as input. When we write the code shown in figure 10, titleTextView object is modified so that the string of text is displayed on the screen. Object variable name is used instead of object data type because there can be multiple TextView objects in the app.
  • 9.
    9 While specifying inputarguments, make sure you are specifying it correctly in the right order as per the declaration of method which can be either int, float or String type. If the declared method doesn’t consist of any arguments, then we leave empty set of parentheses – passing no input string or number. This can be confirmed from the documentation. 13. Inheritance of behaviour Object-Oriented Programming allows classes to inherit commonly used state and behaviour from other classes. In MainActivity.java file, when we call methods like findViewById() and setText(), we can observe that it is nowhere defined in the MainActivity class. This means that MainActivity is extension of the functionality in AppCompatActivity class shown in figure 11. It is the part of Android support library which allows to use latest UI features on Android while still working on older Android devices. Figure 11: Main class Hence by extending AppCompatActivity class, we are getting all the functions, states and methods from here within MainActivity. Figure 12: Illustration of how state and method are accessed from AppCompatActivity class
  • 10.
    10 Accessing of methodsand states from other classes is known as inheritance. Sometimes we will require to inherit behaviour but other times we want to modify slightly. We can override certain methods. This done by adding @override method at the top of method inherited from AppCompatActivity class. So whatever class we observe that extends, it is known as the superclass. AppCompatActivity is a superclass and MainActivity would then be subclass. This can be visualised as class hierarchy diagram shown in figure 13. Figure 13: Class Hierarchy 14. Find View by Id Visualization of what is exactly happening between XML and Java is shown in figure 14. Figure 14: Interaction between XML and Java • When an app is opened in the device, MainActivity is initialized and within the code, onCreate method of the MainActivity gets called by the system. • setContentView is called within onCreate method with resource id which allows direct mapping to XML file.
  • 11.
    11 • Once weset the content view, the activity goes and finds the XML layout file and then reads through each line. • For each view object, it creates a Java object for it. Hence, it goes through the XML file and then builds up this whole hierarchy of Java objects. • When creating each of the views, it is actually calling constructor such as new TextView or new LinearLayout and then passing all the attributes into the Java objects so that it can be set up properly. • It can be noticed that we didn’t require to write extra code. All of it was handled by inflation process of activity. Similarly, findViewById method finds a view that corresponds with the ID that is passed as an input. And the activity searches for this view in the view hierarchy from the XML that was created in the onCreate method. The return value of this method is an object of type view. Main Activity Java code will look like this: Figure 15: Example of how findViewById method is used We can call findViewById and then pass in resource id as input of the view that we want and eventually it will follow similar process as explained in the last page. 15. Creating object by casting Casting shows the use of an object of one type in place of another type among objects that are allowed by implementations and inheritance. Example shown in figure 16. Figure 16: Example of casting TextView is a subclass of View. And findViewById is a method that is declared in View class. Therefore, we can use a View object that is returned by findViewById method and then it will be treated as a TextView by casting.
  • 12.
    12 16. Auto Importlibrary This setting in Android Studio will allow to add import libraries automatically when methods that are not defined in MainActivity class are called and these methods are defined in the libraries that will be automatically added to the import library list. To enable this feature, follow the steps: 1. Go to file menu. 2. Click on settings. 3. Under Editor tab, click General. 4. Under General tab, click Auto Import. 5. Ensure to check the options as shown in figure 17. Figure 17: Enabling of Auto Import feature Now you will not have to externally add library for calling required methods. 17. Example 1 – Temperature Converter After creating a project (for more details refer to Level 1 document), write the code as follows: <resources> <!-- Base application theme. --> <style name="AppTheme" parent="Theme.AppCompat.Light"> <!-- Customize your theme here. --> <item name="colorPrimary">#4FC3F7</item> <item name="colorButtonNormal">#4FC3F7</item> </style> </resources> ❖ Discussion Light blue theme was set for the app. Color theme was chosen from material design of UI. Lock the screen orientation by using the statement mentioned in table 2. Then write the following code in activity_main.xml file: <?xml version="1.0" encoding="utf-8"?> <RelativeLayout xmlns:android="http://schemas.android.com/apk/res/android" android:layout_width="match_parent"
  • 13.
    13 android:layout_height="match_parent" android:background="#E1F5FE"> <EditText android:id="@+id/editText" android:layout_width="match_parent" android:layout_height="wrap_content" android:layout_marginTop="50dp" android:background="@android:color/white" android:gravity="center_horizontal" android:hint="Enter Temperature" android:inputType="numberDecimal" android:padding="15dp" android:textSize="25sp" /> <LinearLayout xmlns:android="http://schemas.android.com/apk/res/android" android:layout_width="match_parent" android:layout_height="wrap_content" android:orientation="horizontal" android:layout_below="@+id/editText" android:layout_alignParentStart="true" android:layout_marginTop="50dp" android:id="@+id/linear_1"> <Button android:id="@+id/button1" android:layout_width="0dp" android:layout_weight="1" android:layout_height="wrap_content" android:layout_below="@+id/textView" android:text="Celsiusto fahrenheit" android:padding="16dp" android:textSize="20sp" android:onClick="celsiusToFahrenheit"/> <Button android:id="@+id/button2" android:layout_width="0dp" android:layout_weight="1" android:layout_height="wrap_content" android:layout_below="@+id/textView" android:text="fahrenheit to celsius" android:padding="16dp" android:textSize="20sp" android:onClick="fahrenheitToCelsius"/> </LinearLayout> <TextView android:id="@+id/textView" android:layout_width="match_parent" android:layout_height="wrap_content" android:gravity="center_horizontal" android:hint="Temperature in °C or °F" android:textSize="24dp" android:background="#FFF" android:padding="15dp" android:layout_marginTop="50dp" android:layout_below="@+id/linear_1" android:layout_alignParentStart="true" /> <Button android:id="@+id/button3" android:layout_width="wrap_content" android:layout_height="wrap_content" android:text="Clear"
  • 14.
    14 android:padding="16dp" android:textSize="20sp" android:layout_centerHorizontal="true" android:onClick="clear" android:layout_alignParentBottom="true” /> </RelativeLayout> UI inXML visualizer will look like this: Figure 18: UI of Temperature Converter App in XML visualizer ❖ Discussion - RelativeLayout is coded to be the parent layout for the UI of this application. Within this layout consists of EditText, LinearLayout, TextView and Button as its children. Specific background color is set as per the material design and the color theme of this app. - EditText object on UI is where the user will enter the temperature either in Celsius or Fahrenheit. It is specifically set to its input type as number decimal such that only numbers of any format can be entered. Its background is set to white color and aligned center_horizontal. Attribute hint is set to “Enter Temperature” for user to enter the input. - Within LinearLayout contains two Buttons as its children that are horizontally oriented. CELSIUS TO FAHRENHEIT button will allow to convert entered temperature in Celsius to convert into Fahrenheit and FAHRENHEIT TO CELSIUS button vice versa. The buttons have onClick attributes “celsiusToFahrenheit” and “fahrenheitToCelsius” which will be used as method names in Java file.
  • 15.
    15 - TextView objectwill allow to display the output. Similar to EditText attributes, its background color is set to white, hint is set to Temperature in ℃ or ℉ and is aligned center_horizontal. - Clear Button will allow to remove the entered values from EditText object and the output from the TextView. Its onclick attribute is set to “clear” based on which method will be declared in Java file. - Proper adjustments of weight and height of all elements and margin, padding and alignment is done in each of the child elements to give good appearance of UI. We are now ready to make the app logically meaningful via MainActivity.Java file. Write the following code right below main class: EditText temp; Then Write the following code inside onCreate method and below the line where setContentView method is called: temp = (EditText) findViewById(R.id.editText); Now enter the whole code inside main class and below onCreate method: /*Display of converted temperature*/ private void displayResult(String message) { TextView resultView = (TextView) findViewById(R.id.textView); resultView.setText(message); } /*Buttons*/ private void celsiusToFahrenheit(View view) { String temperature = temp.getText().toString(); if(!(temperature.equals(""))) { double celsius = Double.valueOf(temperature); double fahrenheit = celsius * (9.0 / 5.0) + 32; DecimalFormat df = new DecimalFormat("0.00"); displayResult(df.format(fahrenheit) + " °F"); } else { displayResult (null); temp.setText(null); } } private void fahrenheitToCelsius(View view) { String temperature = temp.getText().toString(); if(!(temperature.equals(""))) { double fahrenheit = Double.valueOf(temperature); double celsius = (fahrenheit - 32) * (5.0 / 9.0); DecimalFormat df = new DecimalFormat("0.00"); displayResult(df.format(celsius) + " °C"); } else { displayResult(null); temp.setText(null); }
  • 16.
    16 } private void clear(Viewview) { displayResult(null); temp.setText(null); } ❖ Discussion - Initially, EditText object is declared as global variable and is named as temp. This object will hold the temperature value in ℃ or ℉. - Inside onCreate method, temp object is assigned and casted such the value returned by findViewById method is treated as EditText object instead of View object. Note: EditText is also a subclass of View class. Resource id: R.id.editText is passed to findViewById method for mapping the EditText object declared in this file to the EditText object in XML file. Now, as the value that will be entered by user, it will direct will be stored in temp object. - Private access modifier and void return data type is used for declaring displayResult method to which String value will be passed to it as its input. A TextView object named as resultView is declared and created. It is mapped to resource id: R.id.textView to UI via findViewById method. Then setText() is called on resultView object to which the value that is passed to this method is passed to it to display the result in UI. - Private access modifier and void return data type is used for declaring celsiusToFahrenheit method to which View view objects are passed. These objects act as onClick listeners handled by InputMethodManager in Android. - The value that is stored in temp object is not string value. So initially, it has to be converted to String value by calling methods getText() and ToString() to it. Then the converted value is stored to the temperature variable which is declared as String type. - In order to avoid crash of application on mobile device, if and else statements were used. The application is likely to crash when no value is entered and buttons used for computation purpose is clicked. Hence, inside if function it is set that when temperature is not equal to empty space, the lines involved for computation is executed. Else, null parameter is passed to displayResult method and setText method which is called on temp object. - The lines involved for computation to convert from Celsius to Fahrenheit follows: o Operations cannot be performed on String values. Therefore, the temperature variable is converted to double value and is assigned to celsius variable which is declared as double data type. o General formula is applied in order to convert from Celsius to Fahrenheit and is then it is assigned to fahrenheit variable.
  • 17.
    17 o This valuehas to be rounded to two decimal places (to truncate unnecessary values after two decimal places). Hence DecimalFormat object is created and is named df. String “0.00” which will allow rounding the number off to two decimal places. o Finally, displayResult method is called and df.format(fahrenheit) + “ ℉” will be passed in order to display temperature in Celsius to two decimal places. - In very similar way of how the functionality of button to convert from Celsius to Fahrenheit is implemented, method fahrenheitToCelsius is also implemented only the formula is rearranged to compute celsius and the variable names are switched. - Private access modifier and void return data type is used to implement clear method. View view is set as its input parameters as they act as onClick listeners. displayResult method is called and setText method is called on temp object to which null parameter is passed to clear both input and output fields. 18. Example 2 – General Quiz App After getting done with creating a new project named SimpleQuizApp, from res folder click strings.xml and change string name from “SimpleQuizApp” to “General Quiz App :)”. This allowed to change the name of the title of the app. Then write the following code in styles.xml file: <resources> <!-- Base application theme. --> <style name="AppTheme" parent="Theme.AppCompat.Light"> <!-- Customize your theme here. --> <!-- Primary theme color of the app (sets background color of app bar) -- > <item name="colorPrimary">#26A69A</item> <!-- Background color of buttons in the app --> <item name="colorButtonNormal">#26A69A</item> </style> </resources> ❖ Discussion Main theme of this app is chosen to be aqua green. Color codes used from material design. Write the following code in main_acitivity.xml file: <?xml version="1.0" encoding="utf-8"?> <RelativeLayout xmlns:android="http://schemas.android.com/apk/res/android" android:layout_width="match_parent" android:layout_height="wrap_content" android:background="#E0F2F1"> <LinearLayout xmlns:android="http://schemas.android.com/apk/res/android" android:id="@+id/linearLayout1" android:layout_width="match_parent" android:layout_height="wrap_content" android:orientation="vertical">
  • 18.
    18 <TextView android:layout_width="match_parent" android:layout_height="wrap_content" android:fontFamily="sans-serif" android:padding="12dp" android:text="Which reptile canchange it's color:" android:textColor="@android:color/black" android:textSize="16sp" android:background="#C5E1A5" /> <RadioGroup android:id="@+id/radio_group_one" android:layout_width="match_parent" android:layout_height="wrap_content" android:orientation="horizontal" android:background="#C5E1A5" android:padding="8dp"> <RadioButton android:id="@+id/radio_box_one" android:layout_width="0dp" android:layout_height="wrap_content" android:layout_weight="1" android:onClick="rgClick" android:text="Chameleon" /> <RadioButton android:id="@+id/radio_box_two" android:layout_width="0dp" android:layout_height="wrap_content" android:layout_weight="1" android:onClick="rgClick" android:text="Lizard" /> <RadioButton android:id="@+id/radio_box_three" android:layout_width="0dp" android:layout_height="wrap_content" android:layout_weight="1" android:onClick="rgClick" android:text="Iguana" /> </RadioGroup> <TextView android:layout_width="match_parent" android:layout_height="wrap_content" android:background="#CC80DEEA" android:fontFamily="sans-serif" android:lineSpacingExtra="5sp" android:padding="12dp" android:text="There are three states of matter: Solid, Liquid and?" android:textColor="@android:color/black" android:textSize="16sp" /> <RadioGroup android:id="@+id/radio_group_two" android:layout_width="match_parent" android:layout_height="wrap_content" android:background="#CC80DEEA" android:orientation="horizontal" android:padding="8dp"> <RadioButton android:id="@+id/radio_box_four" android:layout_width="0dp" android:layout_height="wrap_content" android:layout_weight="1"
  • 19.
    19 android:onClick="rgClick" android:text="Helium" /> <RadioButton android:id="@+id/radio_box_five" android:layout_width="0dp" android:layout_height="wrap_content" android:layout_weight="1" android:onClick="rgClick" android:text="Gas" /> <RadioButton android:id="@+id/radio_box_six" android:layout_width="0dp" android:layout_height="wrap_content" android:layout_weight="1" android:onClick="rgClick" android:text="Atom"/> </RadioGroup> <TextView android:layout_width="match_parent" android:layout_height="wrap_content" android:background="#CCFFF176" android:padding="12dp" android:text="Accord is a car model manufactured by:" android:textColor="@android:color/black" android:textSize="16sp" /> <RadioGroup android:id="@+id/radio_group_three" android:layout_width="match_parent" android:layout_height="wrap_content" android:background="#CCFFF176" android:orientation="horizontal" android:padding="8dp"> <RadioButton android:id="@+id/radio_box_seven" android:layout_width="0dp" android:layout_height="wrap_content" android:layout_weight="1" android:onClick="rgClick" android:text="Mercedes" /> <RadioButton android:id="@+id/radio_box_eight" android:layout_width="0dp" android:layout_height="wrap_content" android:layout_weight="1" android:onClick="rgClick" android:text="Toyota" /> <RadioButton android:id="@+id/radio_box_nine" android:layout_width="0dp" android:layout_height="wrap_content" android:layout_weight="1" android:onClick="rgClick" android:text="Honda" /> </RadioGroup> <TextView android:layout_width="match_parent" android:layout_height="wrap_content" android:background="#FF8A65" android:padding="12dp"
  • 20.
    20 android:text="Main parts ofa computer include:" android:textColor="@android:color/black" android:textSize="16sp" /> <LinearLayout android:id="@+id/linearLayoutThree" android:layout_width="match_parent" android:layout_height="wrap_content" android:background="#FF8A65" android:orientation="horizontal" android:padding="8dp"> <CheckBox android:id="@+id/check_box_one" android:layout_width="0dp" android:layout_height="wrap_content" android:layout_weight="1" android:onClick="questionFour" android:text="Hard Disk" /> <CheckBox android:id="@+id/check_box_two" android:layout_width="0dp" android:layout_height="wrap_content" android:layout_marginLeft="7dp" android:layout_weight="1" android:onClick="questionFour" android:text="WebCam" /> <CheckBox android:id="@+id/check_box_three" android:layout_width="0dp" android:layout_height="wrap_content" android:layout_marginLeft="7dp" android:layout_weight="1" android:onClick="questionFour" android:text="Monitor" /> </LinearLayout> </LinearLayout> <TextView android:id="@+id/score_text_view" android:layout_width="wrap_content" android:layout_height="wrap_content" android:layout_below="@id/linearLayout1" android:layout_centerHorizontal="true" android:layout_marginTop="26dp" android:text="Score: 0/4" android:textSize="20sp" android:textStyle="bold" /> <LinearLayout android:layout_width="wrap_content" android:layout_height="wrap_content" android:layout_alignParentBottom="true" android:layout_centerHorizontal="true" android:orientation="horizontal"> <Button android:id="@+id/button_check" android:layout_width="0dp" android:layout_height="wrap_content" android:layout_weight="1" android:onClick="checkButton" android:text="Check!" /> <Button
  • 21.
    21 android:id="@+id/reset_button" android:layout_width="0dp" android:layout_height="wrap_content" android:layout_weight="1" android:onClick="reset" android:text="Reset" /> </LinearLayout> </RelativeLayout> In XMLvisualizer, UI will look like this: Figure 19: UI of General Quiz App in XML visualizer ❖ Discussion - RelativeLayout is again set to be the parent ViewGroup for this app. Three LinearLayout views and a TextView are its children. Specific background color is set as per the material design and the color theme of this app. - Within the first LinearLayout, it consists of four TextViews, three RadioGroups and a LinearLayout as its children. - For first three questions TextView objects display the question and RadioGroups provide option to select one choice. Each of the questions and their choices share the same background color.
  • 22.
    22 - In eachof the RadioGroup consists of three RadioButtons as its children. For horizontal orientation of the RadioButtons, in each of the RadioGroups attribute orientation is set to horizontal. - For each of the RadioButtons, layout_width is set to 0dp and layout_weight is set to 1 to occupy space equally within RadioGroup view. - All of the RadioButtons share same onClick attribute: rgClick. - Each of the RadioGroups and RadioButtons have unique ids which will be used in MainActivity Java file for updation of quiz scores. - The final question is displayed by TextView view which is child of the LinearLayout. Since, there are multiple answers for this, CheckBoxes are used. For its proper arrangement in UI, LinearLayout is set to be its parent ViewGroup. LinearLayout orientation attribute is set to horizontal such that the CheckBoxes are horizontally oriented. - For each of the CheckBoxes, layout_width is set to 0 and layout_weight is set to 1 to occupy space equally within its LinearLayout parent ViewGroup. They also share the same onClick attribute: questionFour based on which method will be defined in MainActivity Java file for updating quiz score. - To display the score, TextView object is used. layout_centerHorizontal is set to true and layout_below is set to be below LinearLayout of the questions and the choices. Its layout_width and layout_height is set to wrap_content. - Two Buttons – Check! and Reset are children of LinearLayout. This LinearLayout’s attributes layout_alignParentBottom and layout_centerHorizontal is set to true. - Check! button onClick attribute is set as checkButton and Reset button onClick attribute is set as reset. Using these names, methods will be defined in MainActivity Java file. Now we are all set to make the application logically meaningful via MainActivity Java file. Write the following code right below declaration of main class: int score = 0; /*Global variable to store quiz scores*/ Then write following code inside onCreate method: Toast.makeText(this, "Welcome to General Quiz App :) Feel free to take the test.", Toast.LENGTH_SHORT).show(); Now write the rest of the following code inside MainActivity class: /*Logical function in order to update the quiz scores*/ public void rgClick(View view) { boolean checked = ((RadioButton) view).isChecked();
  • 23.
    23 switch (view.getId()){ case R.id.radio_box_one: if(checked){ score= score + 1; break; } case R.id.radio_box_five: if(checked){ score = score + 1; break; } case R.id.radio_box_nine: if(checked){ score = score + 1; break; } } } /*Method declared to update score for final question*/ public void questionFour(View view){ CheckBox hardDrive = (CheckBox) findViewById(R.id.check_box_one); boolean hasHardDrive = hardDrive.isChecked(); CheckBox monitor = (CheckBox) findViewById(R.id.check_box_three); boolean hasMonitor = monitor.isChecked(); if(hasHardDrive&hasMonitor){ score = score + 1; } } /*Check button function*/ public void checkButton(View view){ displayScore(score); commentToast(); } /*Method to display toast comments*/ public void commentToast(){ if(score==1){ Toast.makeText(this, "Poor score. Take test again!", Toast.LENGTH_SHORT).show(); } if(score==2){ Toast.makeText(this, "Not bad. Take test again!", Toast.LENGTH_SHORT).show(); } if(score==3){ Toast.makeText(this, "Good job!", Toast.LENGTH_SHORT).show(); } if(score==4){ Toast.makeText(this, "Congratulations! Keep it up :)", Toast.LENGTH_SHORT).show(); } } /*Method declared to display score*/ public void displayScore(int score) { TextView scoreView = (TextView) findViewById(R.id.score_text_view); scoreView.setText("Score: " +String.valueOf(score)+ "/4"); } /*Reset button*/ public void reset(View view){ CheckBox hardDrive = (CheckBox) findViewById(R.id.check_box_one); hardDrive.setChecked(false); CheckBox webCam = (CheckBox) findViewById(R.id.check_box_two);
  • 24.
    24 webCam.setChecked(false); CheckBox monitor =(CheckBox) findViewById(R.id.check_box_three); monitor.setChecked(false); RadioGroup rgOne = (RadioGroup) findViewById(R.id.radio_group_one); rgOne.clearCheck(); RadioGroup rgTwo = (RadioGroup) findViewById(R.id.radio_group_two); rgTwo.clearCheck(); RadioGroup rgThree = (RadioGroup) findViewById(R.id.radio_group_three); rgThree.clearCheck(); score = 0; displayScore(score); } ❖ Discussion - Intially, score is declared as global variable to hold the score values and for its updating by each of the methods. - Toast object is initiated with makeText() method inside onCreate method. makeText() method will take in three parameters: context which is set as “this”, text which is set as Welcome message string and duration is set as Toast.LENGTH_SHORT so that the message appears for very short time. Then show() method is called such that Toast message is displayed. This object allows to display message temporarily for particular duration. - rgClick method is declared which is the onClick attribute of the RadioButtons. Inside this method, first a boolean variable is declared with name checked which will check whether a radio button is checked or not. Then by making use of switch statements. view.getId() method is passed to switch function which will return the values that are set in the cases. Cases are set to be the resource ids of the radio buttons that are correct answers. If these radio buttons are checked, scores will be added by 1. - questionFour method is declared that will allow updating of final questions if they are answered properly based on which score will be updated. Two CheckBox objects are created inside this method which are correct answers of the final question – hardDrive and monitor. Then boolean variables hasHardDrive and hasMonitor are declared to store 1 if choices are correctly selected. If both hasHardDrive and hasMonitor is 1, then score will be added by 1. Hence to get score of 1, both the options has to be selected, else even if one option is selected and it is right, the score will not be updated and quiz taker will be marked 0 for the attempt on final question. - commentToast method is defined which represents the comments to be displayed by means of Toast object. Based on the performance of the quiz taker on scale of 1 - 4, toast objects will display these comments.
  • 25.
    25 - displayScore methodis defined for displaying the score. It will take in the updated score in integer format. By calling setText method on TextView object, this score value will then be converted to string format and then will be passed to the setText method for displaying. - checkButton method is defined inside which displayScore and commentToast methods are called. displayScore method takes in score global variable. commentToast will allow to display Toast message which will indicate the comment on quiz takers performance. - reset method is defined inside which all the CheckBox and RadioGroup objects are unchecked. On CheckBox objects, setChecked method is called and false parameter is passed to it. On RadioGroup objects, clearCheck() method is called. score variable is initialized as 0 and then displayScore method is called to display score is 0. References Udacity. 2018. Udacity. [ONLINE] Available at: https://classroom.udacity.com/courses/ud834. [Accessed 15 March 2018]. Udacity. 2018. Udacity. [ONLINE] Available at: https://classroom.udacity.com/courses/ud836. [Accessed 15 March 2018]. tutorialspoint.com. 2018. Android Tutorial. [ONLINE] Available at: https://www.tutorialspoint.com/android/index.htm. [Accessed 17 March 2018].