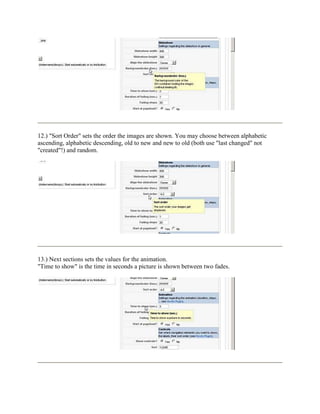
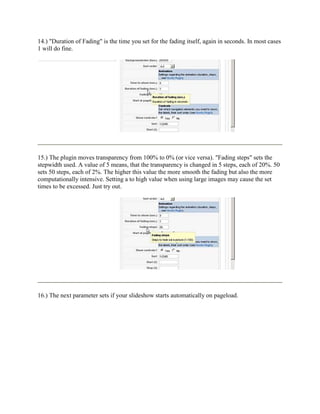
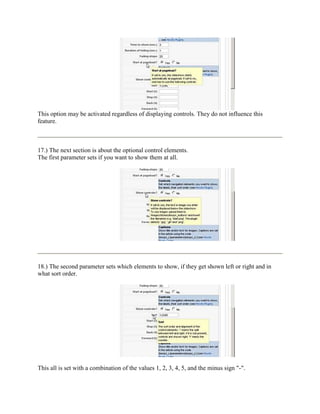
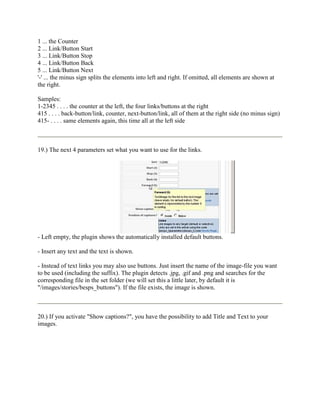
This document provides step-by-step instructions for installing and using the bretteleben.de Simple Picture Slideshow Plugin for Joomla. It outlines the installation process, configuration options, and how to add images and call the slideshow in articles. Key steps include uploading images to the media library, configuring plugin settings like dimensions, effects, and controls, and using shortcodes to display slideshows on pages.
This document is the user guide for Family Tree Explorer Premium genealogy software. It provides instructions on installation, activation, importing family trees from other programs, creating new family trees, and using the various tools and features in Family Tree Explorer Premium. The guide includes a comparison of the different versions of Family Tree Explorer, detailing the key differences between the Premium, Standard, and Viewer editions.
This document provides an introduction and overview of the Java Swing GUI toolkit. It discusses what Swing is, its main characteristics including being platform independent, customizable, extensible and lightweight. It explains that Swing is written entirely in Java and is part of the Java Foundation Classes. The document also provides examples of simple first programs using Swing including creating a basic window, centering a window, adding buttons and tooltips. It demonstrates creating menus and toolbars and includes examples of submenus and checkbox menu items.
The document provides tips for finding resources in the Eclipse workspace using a visitor. It describes creating a class that implements IResourceProxyVisitor and overriding the visit() method. This method would check each resource proxy for a match to the location string and return the resource if found. This allows recursively searching the workspace to locate a resource based on its path or other identifier.
The document provides instructions for importing family data created in other genealogy programs into Family Tree Explorer. It explains that the other program must be able to export data in the GEDCOM file format. The import process involves selecting the GEDCOM file to import, choosing import settings, and addressing any warnings about missing or invalid data. The status report helps identify data fields that did not import correctly so they can be manually re-entered.
The document discusses various GUI components in Java Swing and SWT toolkits. It describes Swing as the official Java GUI toolkit that is written entirely in Java and provides a rich set of widgets. It also discusses SWT as an alternative GUI library that is more lightweight but less powerful than Swing. Basic examples are provided for creating windows, adding buttons, menus, toolbars and other components in a Java Swing application.
The document discusses Java GUI building using AWT and Swing. It explains that AWT is the original toolkit for building GUIs in Java but that Swing provides more advanced and flexible components. It outlines the basic steps for building a GUI with a container, components, layout managers, and listeners to add interactivity. Key topics covered include common components, adding components to containers, using layout managers, and implementing listeners to handle user events.
This document provides an overview of GUI programming basics using the AWT API in Java. It discusses the key component, container and layout manager classes used to create graphical user interfaces in Java. Component classes like Button, Label and TextField are used to add interactive elements, while container classes like Frame and Panel hold other components. Layout managers help position and organize components visually. The document also provides examples of creating simple frames and applications using these AWT classes.
The Interweaved Fabrics of Reality: Material, Social and IntentionalYishay Mor
The document discusses patterned practices and how they shape human interaction and learning. It argues that educational design should aim to devise new experiences and tools that change the material, social, and intentional fabrics in order to encourage new patterned practices that support educational goals. The design process involves mapping existing forces, identifying tensions, narrating current practices, narrating hypothetical practices, and determining how technology could enable the desired scenarios.
The document discusses new opportunities for government organizations from tools like social media, open data, and mobile technology. It proposes starting small experiments and pilots to test these new approaches while focusing on real outcomes and changing roles from service provider to facilitator. The meeting aims to provide insight into related initiatives and create a mindset for partners to identify collaborative projects that leverage these new technologies.
The city of Melbourne, Australia was named after Melbourne, Derbyshire in England. [1] The 2nd Viscount Melbourne, who was the British Prime Minister and mentor to Queen Victoria, took his title from the town of Melbourne in Derbyshire. [2] As a tribute to Lord Melbourne, Queen Victoria decided to name the new settlement in Australia "Melbourne" in 1837. [3] There have since been friendly connections maintained between Melbourne, Australia and Melbourne, Derbyshire.
The document discusses the history and modern uses of money. It notes that before money, people bartered by trading goods and services of equal value. It then explains how money is commonly stored in banks and other financial institutions until needed, and can be accessed through various methods like ATMs, debit cards, internet banking, checks, loans, and EFTPOS. The document concludes by pointing out that different countries trade different goods, so the currency used varies between nations.
GuidanceFest is presented by Oklahoma CareerTech to high school guidance counselors as a way to continue dialogue about opportunities avaliable to students through careertech education. This presentation is a collaboration between 4 presenters.
Complementary health practices include herbal medicine, acupuncture, spinal adjustment, massage, meditative practices like meditation, yoga, and t'ai chi, relaxation techniques, dance and movement therapies, spiritual healing, energy healing, and homeopathy. When choosing therapies and providers, it is important to find practitioners who listen carefully, are willing to try different approaches, and teach self-help skills rather than make sweeping claims or blame the patient.
Respect your audience, how to make presentations that have impactBas Schrover
The document provides tips for creating effective presentations. It emphasizes focusing on meaning, message, structure, and form. The key points are to understand the audience and purpose, develop a clear and logical story or message, and use visuals and a structure that supports conveying the message in an engaging way. Form should follow the meaning and message. The overall goal is to use presentations to share meaningful ideas in a way that resonates with audiences.
This document provides internet safety tips in 7 sections:
1. Create a positive digital footprint and leave only positive information online.
2. Protect your privacy by not revealing personal information, using secure passwords, and being aware of security risks.
3. Protect yourself from identity theft by destroying private records, securing your mail, and monitoring credit reports.
4. Protect yourself from bullies by not engaging in bullying behavior, saving evidence of bullying, and telling a trusted adult.
5. Protect yourself from predators by being wary of emotionally vulnerable situations online and only interacting with people you know.
6. Protect yourself from yourself by avoiding posting anything online that could have negative consequences.
7. Overall, the tips
ID-SEC SOLUTIONS LTD provides a single sign-on solution called 4SO that allows users to access their Lotus Notes accounts without remembering a separate password. 4SO authenticates users based on their Active Directory credentials and generates a long, randomized password to access their Notes ID file. This reduces help desk calls related to forgotten Notes passwords and improves security by preventing password sharing and reuse. 4SO provides advantages over competing solutions such as supporting all versions of Lotus Notes, allowing offline access, and generating stronger randomized passwords compared to human chosen passwords. Several organizations have implemented 4SO successfully with over 13,000 users without any support calls related to accessing Notes accounts.
ID-SEC SOLUTIONS LTD provides a single sign-on solution called 4SO that allows users to access their Lotus Notes accounts without remembering a separate password. 4SO authenticates users based on their Active Directory credentials and generates a long, randomized password to access their Notes ID file. This reduces help desk calls related to forgotten Notes passwords and improves security by preventing password sharing and reuse. 4SO provides advantages over competing solutions such as supporting all versions of Lotus Notes, allowing offline access, and generating stronger randomized passwords compared to human chosen passwords. Several organizations have implemented 4SO successfully with no support calls.
This document introduces Ceedo, a company that develops application and desktop virtualization solutions. It summarizes Ceedo Enterprise, their flagship product, which provides a complete and secure workspace on a USB drive. It outlines their technology, customers, partners and resources available to help with sales. The roadmap shows their focus on Project Ren to enable user-installed applications and VDI, as well as upcoming Windows 8 support.
Effective Employers - The Evolving WorkforceTodd Wheatland
This document summarizes the results of a global workforce survey conducted with 97,000 respondents across 30 countries. The survey asked questions about effective employers and generational views of the workplace. Key findings include:
- When rating their bosses, employees gave a modest score of 6.4 out of 10.
- Only 37% felt their boss prepared them well for future success, though 44% in the Americas felt prepared.
- Less than half said their efforts at work are recognized or rewarded, usually through notice from management or bonuses.
- Younger workers viewed leadership culture more positively than older workers, while 31% described the culture as oppressive/authoritative.
Building and Evangelizing Holistic Experience Design - DMI Seattle 2011Samantha Starmer
The document provides guidance on designing holistic experiences by outlining strategies across four areas: expanding your mind, creating a vision, building a path, and just doing it. It suggests expanding one's mind by breaking out of silos, making new friends outside one's usual circles, getting outside of one's comfort zone, and finding comfort in discomfort. It recommends creating a vision by understanding the big picture, following a clear goal, storytelling to excite others, and leading change. It advises building a path by listening holistically, understanding executives' goals, managing stakeholders, and removing obstacles. Finally, it suggests just doing it by not waiting for permission, trying new things, using metrics, and starting small.
Create Successful Cross Channel Experiences - IA Summit 2011Samantha Starmer
The document discusses the importance of designing cross-channel experiences that are convenient, consistent, connected, contextual, and span time. It provides 5 principles and 5 methods for holistic experience design across digital and physical touchpoints. The principles are to think of services, share resources openly, gain diverse perspectives, address discomfort, and focus on user needs over solutions. Methods include documenting journeys, mapping experiences, understanding backend systems, storytelling, and cross-training teams. Tools involve using experience maps, getting different perspectives, telling stories, and cross-training teams in other disciplines. The talk encourages designing for the holistic experience rather than any single channel.
The document provides instructions for adding a background image to an Illustrator portrait, tracing the image, and placing the portrait on top of the background. It then explains how to save the Illustrator file as a JPEG and insert a Flash banner into a webpage by copying the source code and pasting it into the banner section of the HTML template.
Image Processing and Deep Learning (EEEM063) DIGITS IntrodMalikPinckney86
Image Processing and Deep Learning (EEEM063)
DIGITS Introductory Deep Learning Lab
Dr John Collomosse - Autumn 2017
Introduction
In this lab you will use a web based interface called “DIGITS” to run some simple classification
experiments using a convolution neural network (CNN). This lab assumes use of DIGITS v3.0.0 or
higher.
CNNs are state of the art deep neural networks that perform well at machine perception tasks such
as image classification. You will start learning about these in detail within Week 6.
To do this work you will need to connect to a teaching server
called aineko1 on the campus network. The server is not
visible off campus, so you are encouraged to use the lab or
library PCs on campus to do this work. If you want to use
your own laptop then you will be able to connect via the
campus wide “eduroam” wifi network. The campus wide
“The Cloud” network will not work. It is possible to connect
from offcampus using the https://anywhere.surrey.ac.uk
facility and entering the web interface address including
http:// into the text box in the upper-right of the portal.
The address of the web interface is http://aineko.eps.surrey.ac.uk:34448
Verify now that you can connect to the web interface via your browser, or you will not be able to
progress any further.
It is possible to install your own version of DIGITS on your local lab PC (e.g. in the Penguin lab). Since
we have a large class this year this may be useful if the aineko server becomes very busy. You can
refer to the supplementary instructions on SurreyLearn if you find is desirable to do this. If you want
to install DIGITS yourself on your own machine then you might find those instructions a useful
starting point but note that we do not have the resource to assist 50+ students installing their own
DIGITS on their own variants/configurations of Linux so if you try this you are on your own.
The aineko server (pictured right) is an Intel i7 PC with 4 Nvidia Titan-X GPUs which power our deep
learning experiments.
1. Getting Started
We will be working with a dataset of hand-written numbers 0-9, collected by the US postal service
from mail. The dataset is called MNIST and contains 70k images each only 28x28 pixels in size.
1 https://en.wikipedia.org/wiki/Accelerando
You must first create your own work area on the server and download the database.
Remotely login to the teaching server using ssh. In the Linux labs you can open up a terminal
window using Ctrl-Alt-T and then enter the following
ssh aineko.eps.surrey.ac.uk –l your_username
Note that character after the hyphen is a lower case L not a 1! Please substitute username you’re
your actual username. The password is your URN. If you are prompted by an “are you sure…”
prompt just type the word yes. If you can’t log in the we will have to create you an account.
Alternatively you may issue the same command in the Mac OS “Terminal” (usually found under
/Appl ...
- The document describes creating a custom Hero class in JavaScript that extends the createjs.Bitmap class. The Hero class overrides the initialize method to set properties like velocity and adds a tick method to update the position based on velocity.
- Creating an instance of Hero and adding it to the stage results in a jumping animation as the tick method increases velocity and position each frame.
- The document provides instructions on loading the Hero class, instantiating a Hero, and displaying it jumping on the canvas.
The document provides guidance on best practices for creating clean Photoshop (PSD) files for web design projects. It recommends starting with good file organization habits like logical naming and non-destructive editing using layers and masks. Adjustment layers and effects are preferable to allow easy changes later. Templates can then be reused each month. Specific tips covered include using the "Save for Web" feature to optimize file size, embedding fonts and images to ensure others can open the file properly, and using layer groups to organize elements.
Cis407 a ilab 3 web application development devry universitylhkslkdh89009
This document provides instructions for completing iLab 3 of the CIS407A course at Devry University. The lab involves adding user activity monitoring functionality to an existing payroll system website. Students are instructed to create a database table to store user activity data, add code to save activity data to the table, and display the activity data on a new web form. Validation logic is also added to an existing personnel form to validate field values. Upon completing the tasks and verifying the functionality, students are to submit all project files.
This document provides instructions for Assignment 3 of an introductory computer science course. Students are tasked with creating a graphical user interface (GUI) version of the text-based Sokoban game from Assignment 2, using the tkinter library. Modelling classes are provided from Assignment 2, and additional support code is also provided. Students must implement view classes for the game board, stats, and shop, as well as a controller class to link everything together. Detailed requirements and recommendations are given for setting up the GUI components and handling events.
Optimizing jpgs with MS Office Picture Managernewgraham
This document provides a guide for optimizing images for the web using Microsoft Office Picture Manager. It outlines 8 steps to resize an image to a smaller size and compress it to reduce the file size. The steps include making a copy of the original image, opening it in Picture Manager, resizing it to a custom width and height while avoiding a known bug, and exporting it as a JPEG file with a custom compression level between 55-75 to balance quality and file size. The final optimized image should be under 30KB in size.
How To Use PowerPoint and SlideShare To Upload Your Sims 2 Stories Ver2Stephanie Sahr
This document provides instructions for creating and uploading Sims 2 stories using PowerPoint. It discusses taking screenshots in the Sims 2 game at high quality settings. Pictures can then be organized and moved to folders. PowerPoint is used to insert the pictures and add text to create slideshows to upload. Tips are provided for resizing pictures and moving them on slides to make room for text. The tutorial aims to help Sims players share their stories online in a slideshow format.
The document provides instructions on how to embed various web applications into a website built using the Sponsor-Ed content management system (CMS). It begins by explaining how to embed a translator application using HTML code. Specific steps include:
1. Copying the HTML code for the translator from the application's website.
2. Pasting the code into the CMS page using the HTML button.
3. The translator will then appear on the website page for users to interact with.
The document continues with similar instructions for embedding an interactive map application and concludes with tips on advanced newsletter creation.
The document discusses various ways to extend functionality in Drupal, including using modules to add custom front pages, CAPTCHA support, image galleries, JavaScript and jQuery effects, more display control with Panels, and additional useful modules. It also provides instructions for implementing image galleries, using jQuery, integrating Panels, setting up a robots.txt file, adding location maps, social networking features, and commerce solutions like Ubercart. Backup and migration of the SQL database can be facilitated with the Backup and Migrate module.
Introduction to Advanced Product Options Ketan Raval
The Advanced Product Options extension allows merchants to create predefined custom product options and assign them to multiple products in bulk. It streamlines the process of creating custom options for many products. The extension also enables tracking inventory for custom options and making options dependent on each other. Recent updates include additional compatibility, option cost tracking, backorder options, and custom option weight configuration.
This document provides instructions for designing a website locally using MAMP or WAMP on a Mac or Windows system respectively. It describes downloading and installing the local development environment, creating a WordPress database and files, and editing the site using Dreamweaver live view and editing features to preview changes without being online. Specific instructions are given for installing themes, modifying CSS styles and HTML, and navigating the related PHP files to customize parts of the site like the footer.
Here's a basic introduction about Joomla 3 and step by step process you need to take to get an installation and also step guide for content, menu and category management
This document provides an introduction to using Adobe Photoshop CS6. It discusses getting started with Photoshop and setting up documents. It describes the interface layout including the menu bar, toolbar, image window, and main palettes. It explains the basic selection, alteration, drawing and selection tools. It covers using color boxes and modes and provides an overview of basic image editing techniques like cropping, resizing, correcting and saving images.
This document provides an overview of the Adobe Photoshop CS6 interface and basic tools. It explains how to open and set up a new document, including page size and orientation options. It then describes the main interface elements like the menu bar, toolbox, image window and palettes for adjusting colors, layers and more. Finally, it provides details on the selection, alteration and drawing tools available and how to use basic editing functions like cropping and resizing images.
This document provides an overview of the Adobe Photoshop CS6 interface and basic tools. It explains how to open and set up documents in Photoshop, including page size and resolution settings. The key areas of the interface are described, such as the menu bar, toolbox, image window, and palettes for adjusting colors, layers, and images. Common selection, alteration, and drawing tools are also introduced. The document serves as an introductory tutorial for getting started with Photoshop.
Dj image slider - presented at JUGT Feb. 2014 WorkshopDouglasPickett
This document provides instructions for setting up and configuring the DJ-ImageSlider extension in Joomla to display image sliders. It discusses using the extension with images from a folder or categories defined in the extension's component. Key steps include downloading and installing the extension, creating an image slider module instance and configuring its source folder or component category, image dimensions, and other display options. Advanced options like custom navigation buttons and descriptions are also covered.
This document provides instructions for creating a simple Android application using Adobe Flash CS6. It describes how to publish a Flash (.fla) file as an Android application package (apk) file. The main steps are to open the Flash file, configure Android application settings, add a developer certificate, and publish the file. Instructions are also provided for customizing aspects like the application name, icon, and navigation buttons. Templates are included for common application elements like menus, content pages, and quizzes. Overall the document aims to demonstrate how Flash animations can be packaged into a mobile app for Android devices.
Similar to A step for step tutorial on how to install and use the bretteleben (20)
Unlocking Productivity: Leveraging the Potential of Copilot in Microsoft 365, a presentation by Christoforos Vlachos, Senior Solutions Manager – Modern Workplace, Uni Systems
GraphSummit Singapore | The Art of the Possible with Graph - Q2 2024Neo4j
Neha Bajwa, Vice President of Product Marketing, Neo4j
Join us as we explore breakthrough innovations enabled by interconnected data and AI. Discover firsthand how organizations use relationships in data to uncover contextual insights and solve our most pressing challenges – from optimizing supply chains, detecting fraud, and improving customer experiences to accelerating drug discoveries.
Cosa hanno in comune un mattoncino Lego e la backdoor XZ?Speck&Tech
ABSTRACT: A prima vista, un mattoncino Lego e la backdoor XZ potrebbero avere in comune il fatto di essere entrambi blocchi di costruzione, o dipendenze di progetti creativi e software. La realtà è che un mattoncino Lego e il caso della backdoor XZ hanno molto di più di tutto ciò in comune.
Partecipate alla presentazione per immergervi in una storia di interoperabilità, standard e formati aperti, per poi discutere del ruolo importante che i contributori hanno in una comunità open source sostenibile.
BIO: Sostenitrice del software libero e dei formati standard e aperti. È stata un membro attivo dei progetti Fedora e openSUSE e ha co-fondato l'Associazione LibreItalia dove è stata coinvolta in diversi eventi, migrazioni e formazione relativi a LibreOffice. In precedenza ha lavorato a migrazioni e corsi di formazione su LibreOffice per diverse amministrazioni pubbliche e privati. Da gennaio 2020 lavora in SUSE come Software Release Engineer per Uyuni e SUSE Manager e quando non segue la sua passione per i computer e per Geeko coltiva la sua curiosità per l'astronomia (da cui deriva il suo nickname deneb_alpha).
Maruthi Prithivirajan, Head of ASEAN & IN Solution Architecture, Neo4j
Get an inside look at the latest Neo4j innovations that enable relationship-driven intelligence at scale. Learn more about the newest cloud integrations and product enhancements that make Neo4j an essential choice for developers building apps with interconnected data and generative AI.
Climate Impact of Software Testing at Nordic Testing DaysKari Kakkonen
My slides at Nordic Testing Days 6.6.2024
Climate impact / sustainability of software testing discussed on the talk. ICT and testing must carry their part of global responsibility to help with the climat warming. We can minimize the carbon footprint but we can also have a carbon handprint, a positive impact on the climate. Quality characteristics can be added with sustainability, and then measured continuously. Test environments can be used less, and in smaller scale and on demand. Test techniques can be used in optimizing or minimizing number of tests. Test automation can be used to speed up testing.
Sudheer Mechineni, Head of Application Frameworks, Standard Chartered Bank
Discover how Standard Chartered Bank harnessed the power of Neo4j to transform complex data access challenges into a dynamic, scalable graph database solution. This keynote will cover their journey from initial adoption to deploying a fully automated, enterprise-grade causal cluster, highlighting key strategies for modelling organisational changes and ensuring robust disaster recovery. Learn how these innovations have not only enhanced Standard Chartered Bank’s data infrastructure but also positioned them as pioneers in the banking sector’s adoption of graph technology.
Goodbye Windows 11: Make Way for Nitrux Linux 3.5.0!SOFTTECHHUB
As the digital landscape continually evolves, operating systems play a critical role in shaping user experiences and productivity. The launch of Nitrux Linux 3.5.0 marks a significant milestone, offering a robust alternative to traditional systems such as Windows 11. This article delves into the essence of Nitrux Linux 3.5.0, exploring its unique features, advantages, and how it stands as a compelling choice for both casual users and tech enthusiasts.
How to Get CNIC Information System with Paksim Ga.pptxdanishmna97
Pakdata Cf is a groundbreaking system designed to streamline and facilitate access to CNIC information. This innovative platform leverages advanced technology to provide users with efficient and secure access to their CNIC details.
UiPath Test Automation using UiPath Test Suite series, part 5DianaGray10
Welcome to UiPath Test Automation using UiPath Test Suite series part 5. In this session, we will cover CI/CD with devops.
Topics covered:
CI/CD with in UiPath
End-to-end overview of CI/CD pipeline with Azure devops
Speaker:
Lyndsey Byblow, Test Suite Sales Engineer @ UiPath, Inc.
Infrastructure Challenges in Scaling RAG with Custom AI modelsZilliz
Building Retrieval-Augmented Generation (RAG) systems with open-source and custom AI models is a complex task. This talk explores the challenges in productionizing RAG systems, including retrieval performance, response synthesis, and evaluation. We’ll discuss how to leverage open-source models like text embeddings, language models, and custom fine-tuned models to enhance RAG performance. Additionally, we’ll cover how BentoML can help orchestrate and scale these AI components efficiently, ensuring seamless deployment and management of RAG systems in the cloud.
GraphRAG for Life Science to increase LLM accuracyTomaz Bratanic
GraphRAG for life science domain, where you retriever information from biomedical knowledge graphs using LLMs to increase the accuracy and performance of generated answers
Observability Concepts EVERY Developer Should Know -- DeveloperWeek Europe.pdfPaige Cruz
Monitoring and observability aren’t traditionally found in software curriculums and many of us cobble this knowledge together from whatever vendor or ecosystem we were first introduced to and whatever is a part of your current company’s observability stack.
While the dev and ops silo continues to crumble….many organizations still relegate monitoring & observability as the purview of ops, infra and SRE teams. This is a mistake - achieving a highly observable system requires collaboration up and down the stack.
I, a former op, would like to extend an invitation to all application developers to join the observability party will share these foundational concepts to build on:
Observability Concepts EVERY Developer Should Know -- DeveloperWeek Europe.pdf
A step for step tutorial on how to install and use the bretteleben
1. A step for step tutorial on how to install and use the bretteleben.de Simple Picture Slideshow
Plugin.
Installation
1.) Log into your administration interface
2.) Go to "Extensions" > "Install/Uninstall"
3.) Select the Package File with the bretteleben.de Simple Picture Slideshow Plugin
2. 4.) Click "Upload file & Install"
5.) If everything worked fine, you get the message "Install Plugin Success"
6.) Select "Extensions" > "Plugin Manager"
3. 7.) Find the "bretteleben.de Simple Picture Slideshow" and click it
8.) The first section of parameters controls the layout of the slideshow.
The first parameter is the width of your slideshow in pixel.
9.) The next parameter is the height of your slideshow in pixel.
4. Pictures larger than set here are scaled by the visitors browser according to these settings.
Smaller pictures are not enlarged. If possible you should offline scale your pictures to the width
and height they will display because scaling by the visitors browser results in a loss of quality
and it increases the time your page takes to load without any additional benefit for your visitor.
10.) The next parameter sets the position of the gallery within the available space. You may
choose between left - centered - right, float left and float right. The last two options allow the
gallery to get wrapped by your text. They also increase the dependence from the used template
and will not always show the desired results!
11.) Background Color: The background color of your slideshow is of importance if you use
pictures of different size or pictures with proportions different from the settings above. It
prevents the next Pictures to be visible below the current one. Set the hexadecimal color-value
without the leading pound key (#), e.g. ffffff for white.
5. 12.) "Sort Order" sets the order the images are shown. You may choose between alphabetic
ascending, alphabetic descending, old to new and new to old (both use "last changed" not
"created"!) and random.
13.) Next sections sets the values for the animation.
"Time to show" is the time in seconds a picture is shown between two fades.
6. 14.) "Duration of Fading" is the time you set for the fading itself, again in seconds. In most cases
1 will do fine.
15.) The plugin moves transparency from 100% to 0% (or vice versa). "Fading steps" sets the
stepwidth used. A value of 5 means, that the transparency is changed in 5 steps, each of 20%. 50
sets 50 steps, each of 2%. The higher this value the more smooth the fading but also the more
computationally intensive. Setting a to high value when using large images may cause the set
times to be excessed. Just try out.
16.) The next parameter sets if your slideshow starts automatically on pageload.
7. This option may be activated regardless of displaying controls. They do not influence this
feature.
17.) The next section is about the optional control elements.
The first parameter sets if you want to show them at all.
18.) The second parameter sets which elements to show, if they get shown left or right and in
what sort order.
This all is set with a combination of the values 1, 2, 3, 4, 5, and the minus sign "-".
8. 1 ... the Counter
2 ... Link/Button Start
3 ... Link/Button Stop
4 ... Link/Button Back
5 ... Link/Button Next
'-' ... the minus sign splits the elements into left and right. If omitted, all elements are shown at
the right.
Samples:
1-2345 . . . . the counter at the left, the four links/buttons at the right
415 . . . . back-button/link, counter, next-button/link, all of them at the right side (no minus sign)
415- . . . . same elements again, this time all at the left side
19.) The next 4 parameters set what you want to use for the links.
- Left empty, the plugin shows the automatically installed default buttons.
- Insert any text and the text is shown.
- Instead of text links you may also use buttons. Just insert the name of the image-file you want
to be used (including the suffix). The plugin detects .jpg, .gif and .png and searches for the
corresponding file in the set folder (we will set this a little later, by default it is
"/images/stories/besps_buttons"). If the file exists, the image is shown.
20.) If you activate "Show captions?", you have the possibility to add Title and Text to your
images.
9. Even when deactivated, Captions can be used to replace the (otherwise used by default) image
filename as ALT-, TITLE-text.
21.) "Position of Captions" sets if the captions (and text) are shown crossfading over the lower
part of the image or below the image.
22.) "Use links?" allows - if activated - to set links for the images.
10. 23.) Image root configures the path to the folder you are uploading (directly or stored in
subfolders) your images. By default this parameter is set to /images/stories/ (and this folder is
also used when the parameter is empty). In most cases this setting will fit your needs and there is
no reason to change it. Only if you have organized your images in a folder structure outside of
/images/stories/, put the path here.
The set value of this parameter will be added to the folder name you insert in the code in your
article automatically by the plugin and must not be repeated in the article.
24.) Buttonfolder
If you are going to use custom buttons for the navigation between sets, this is the place to put the
path to the folder you uploaded this buttons. By default this parameter is set to
/images/stories/besps_buttons/ (and this folder is also used when the parameter is empty).
25.) Stylesheet
If you have modified the default stylesheet besps.css or want to use a completely different
stylesheet, you have the possibility to save it - with a different name - to the folder
/plugins/content/plugin_besps and choose it here.
This has the advantage that your renamed stylesheet does not get overwritten during an update
like the default stylesheet besps.css.
11. 26.) JavaScript
If you have modified the default JavaScript besps.js or want to use a completely different
JavaScript, you have the possibility to save it - with a different name - to the folder
/plugins/content/plugin_besps - and choose it here.
This has the advantage that your renamed JavaScript does not get overwritten during an update
like the default JavaScript besps.js.
27.) Preload
This parameter offers the possibility to reduce the time, the page takes to load by replacing
pictures with one small dummy-picture. This "besps.png" comes with the plugin and is stored in
the folder /plugins/content/plugin_besps automatically. On pageload the script replaces this
dummy with the actual images.
The default setting of the plugin is to load all pictures with your page. If you set a number larger
than 3 (the script needs at least 3 pictures to start), the pictures beyond this number will get
loaded by the JavaScript on pageload.
12. Samples:
Your folder contains 10 pictures, the parameter is empty, all pictures are loaded with the page.
Your folder contains 10 pictures, the parameter is set to 3, 3 pictures are loaded with the page, 7
by script afterwards.
Your folder contains 10 pictures, the parameter is set to 5, 5 pictures are loaded with the page, 5
by script afterwards. ...
The feature is rather experimental at the moment, the JavaScript does not check if it is showing
the real image or the dummy. If you use it, please do extended testing on it. Records about your
experiences are most welcome!
28.) The parameter "Foldername as ID" gives you the possibility to set the name of the folder,
from which the images are taken, as identity of the surrounding div-container of the slideshow.
(id="foldername").
The plugin contains in the folder (Joomla-Installation)/plugins/content/plugin_besps the style
sheet besps.css. This style sheet is loaded after the css-settings the plugin writes to the head-
section of the page and gives you the possibility to overwrite every single setting. This works
anyway and applies to all "simple picture slideshows" on your site.
13. Setting a unique identity gives you furthermore the possibility to use this identity as a CSS-
Selector and use individual styles for one single slideshow .
29.) Activate the plugin
30.) Click "Save" - done
Usage
Next we need the images. We upload them to a folder in (Joomla-Installation)/images/stories.
1.) Go to "Site" > "Media Manager"
14. 2.) Navigate to the folder "Media" > "stories"
3.) Create a new subfolder for your images. In this sample I choose the name "simpleslideshow"
4.) Navigate to the new folder.
15. 5.) ... and upload your images to it. The plugin accepts images of type ".jpg", ".gif" and ".png".
6.) optional: If you want to display custom image-buttons for your control-elements, we have to
take care of these images too. So, again navigate to the folder "Media" > "stories".
And create a folder called besps_buttons. This is the place the plugin looks for the images you
set in point 19 (Installation).
16. And therefore we upload them here.
Notice: The plugin does NOT create this folder automatically.
7.) Next, go to "Article Manager" and open the article you want to display the gallery.
8.) At the place you want the slideshow to be shown insert the code to call it.
17. The code consists of the call {*besps}{/besps*} (without the asterisks) and contains the name of
the folder with your images. The path to this folder "/images/stories" is added by the plugin
automatically and must not be inserted.
The complete call in our sample would look such as:
{*besps}simpleslideshow{/besps*} - without the asterisks
To use a folder within a folder, the path below "/images/stories/" is used, e. g. to use the folder
/images/stories/folder/subfolder" the call would look such as:
{*besps}folder/subfolder{/besps*} - without the asterisks
In general that´s it and the slideshow is ready to go.
How to show title and text with our images or modify the current slideshow from the default-
settings in the backend, find out in the second part of this howto (link at the end of the page).
9.) Save - done!
A survey of the possibilities to call, extend and modify galleries with the code in the content
item: Howto Plugin Code
If you have questions or suggestions, please use the comment-function. Please include the
installed Joomla! version and if you have problems - if any possible - the affected page in your
comment.
18. If you need additional features or customizations for your project that exceed the scope of
support offered through the comments, you are invited to submit your requirements specification
and the planned budget by email (menu item "Contact" in the menu at the top).
If you use this extensions, please post a rating and a review at extensions.joomla.org.