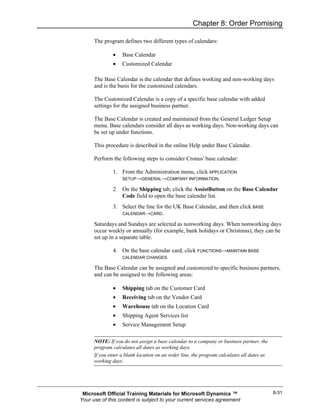
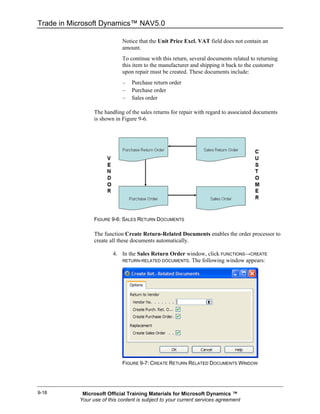
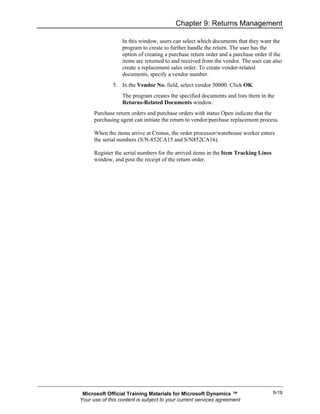
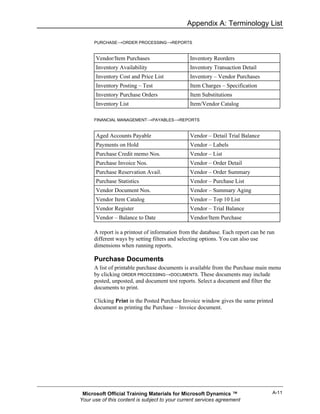
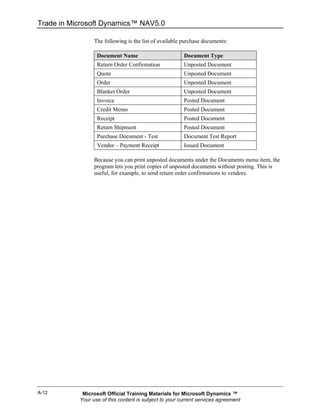
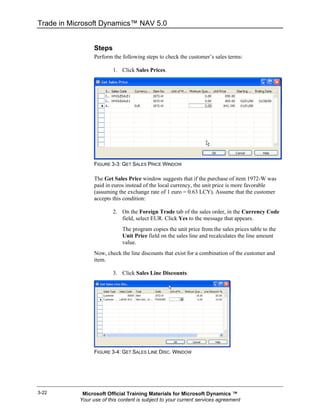
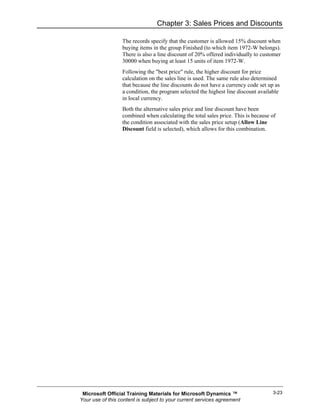
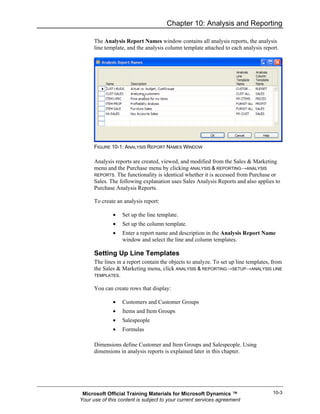
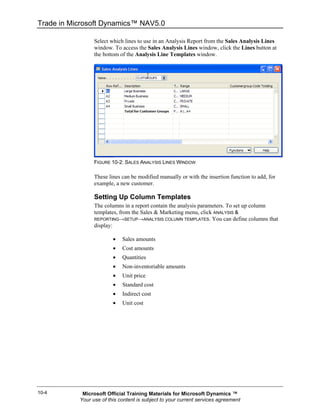
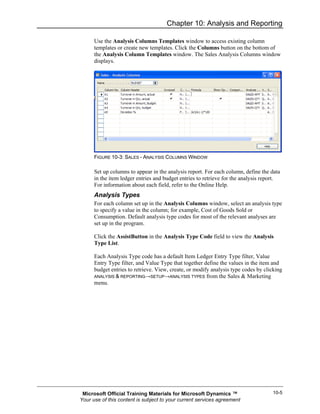
TRADE IN MICROSOFT DYNAMICS™ NAV 5.0


   Microsoft Official Training Materials for Microsoft Dynamics ™
  Your use of this content is subject to your current services agreement
Last Revision: February 2008


The information contained in this document represents the current view of Microsoft Corporation on the issues discussed as
of the date of publication. Because Microsoft must respond to changing market conditions, it should not be interpreted to be
a commitment on the part of Microsoft, and Microsoft cannot guarantee the accuracy of any information presented after the
date of publication.


This document is for informational purposes only. MICROSOFT MAKES NO WARRANTIES, EXPRESS, IMPLIED OR
STATUTORY, AS TO THE INFORMATION IN THIS DOCUMENT.


Complying with all applicable copyright laws is the responsibility of the user. Without limiting the rights under copyright,
no part of this document may be reproduced, stored in or introduced into a retrieval system, or transmitted in any form or
by any means (electronic, mechanical, photocopying, recording, or otherwise), or for any purpose, without the express
written permission of Microsoft Corporation.


Microsoft may have patents, patent applications, trademarks, copyrights, or other intellectual property rights covering
subject matter in this document. Except as expressly provided in any written license agreement from Microsoft, the
furnishing of this document does not give you any license to these patents, trademarks, copyrights, or other intellectual
property.


© 2007 Microsoft Corporation. All rights reserved. Microsoft, Microsoft Excel, Microsoft Windows, and Microsoft
Dynamics NAV are either trademarks or registered trademarks of Microsoft Corporation or Great Plains Software, Inc. or
their affiliates in the United States and/or other countries/regions. Great Plains Software, Inc. is a subsidiary of Microsoft
Corporation. The names of actual companies and products mentioned herein may be the trademarks of their respective
owners.


The names of actual companies and products mentioned herein may be the trademarks of their respective owners.

The certification requirements for Microsoft Dynamics NAV 5.0 will stay the same as for Microsoft Dynamics NAV 4.0 due
to the release window between Microsoft Dynamics NAV 5.0 and Microsoft Dynamics NAV 5.1. The certification
requirements are expected to be renewed with Microsoft Dynamics NAV 5.1


                             Microsoft Official Training Materials for Microsoft Dynamics ™
                            Your use of this content is subject to your current services agreement
Table of Contents


Introduction                                                                                                                 0-1
          Online Training ...................................................................................................0-1
          Classroom Training ............................................................................................0-1
          Training Materials ...............................................................................................0-1
          About the Trade in Microsoft Dynamics NAV Training Manual ..........................0-2
          About This Course..............................................................................................0-5
          Student Objectives .............................................................................................0-7
Chapter 1: TRADE Overview                                                                                                    1-1
          Quick Interaction: Lessons Learned ...................................................................1-2
Chapter 2: Sales Order Management                                                                                            2-1
          Objectives...........................................................................................................2-1
          Introduction.........................................................................................................2-1
          Sales Order Management Overview ..................................................................2-2
          Setting Up Sales Order Management.................................................................2-3
          Demonstration − Setting Up Sales Order Management .....................................2-3
          Setting Up Customers and Shipping Options .....................................................2-5
          Demonstration − Setting Up Shipping Options ...................................................2-5
          Setting Up Reservation Rules ............................................................................2-7
          Demonstration − Setting Up Customer Posting Groups .....................................2-7
          Demonstration − Setting Up Salespeople...........................................................2-9
          Managing Sales Transactions ............................................................................2-9
          Demonstration − Creating a Blanket Order ......................................................2-10
          Demonstration − Creating a Sales Order .........................................................2-12
          Sales Order Processing ...................................................................................2-14
          Drop Shipments................................................................................................2-16
          Demonstration − Creating Drop Shipments......................................................2-17
          Item Reservation ..............................................................................................2-20
          Demonstration − Reserving Items ....................................................................2-20
          Posting Orders .................................................................................................2-23
          Demonstration − Performing a Partial Shipment ..............................................2-24
          Invoicing a Combined Shipment.......................................................................2-25
          Demonstration − Invoicing a Combined Shipment ...........................................2-26
          Process Prepayment ........................................................................................2-27
          Demonstration − Creating Sales Order with Prepayment Percentage .............2-28
          Conclusion........................................................................................................2-30
          Lab 2.1 − Handling Sales .................................................................................2-31
          Quick Interaction: Lessons Learned .................................................................2-32
Sales Prices and Discounts                                                                                                       1
          Objectives.............................................................................................................. 1
          Introduction............................................................................................................ 1
          Overview of Sales Prices ...................................................................................... 2
          Sales Prices .......................................................................................................... 3
          Demonstration − Setting up Sales Prices .............................................................. 5
          Demonstration − Setting up Customer Price Groups ............................................ 6
          Demonstration − Creating a Sales Order with Sales Price Information................. 8


             Microsoft Official Training Materials for Microsoft Dynamics ™                                             Page       i
            Your use of this content is subject to your current services agreement
Trade in Microsoft Dynamics™ NAV 5.0

            Lab 3.1 − Managing Alternative Sales Prices...................................................... 10
            Lab 3.2 − Creating Sales Prices for a Campaign ................................................ 11
            Maintaining Sales Prices ..................................................................................... 12
            Demonstration − Creating Sales Prices and Customer Groups .......................... 13
            Lab 3.3 − Updating Sales Prices ......................................................................... 16
            Line and Invoice Discounts ................................................................................. 17
            Setting Up Line Discounts ................................................................................... 18
            Demonstration − Setting up Customer Discounts................................................ 19
            Using the Line Discount Mechanism ................................................................... 20
            Demonstration − Setting Up Sales Line Discounts.............................................. 21
            Lab 3.4 − The "Best Price" Rule .......................................................................... 24
            Invoice Discounts ................................................................................................ 25
            Conclusion........................................................................................................... 27
            Lab 3.5 − Creating Sales Line Discounts for a Campaign................................... 28
            Quick Interaction: Lessons Learned .................................................................... 29
Chapter 4: Customer Service Features                                                                                         4-1
            Objectives...........................................................................................................4-1
            Introduction.........................................................................................................4-1
            Using Item Substitution ......................................................................................4-2
            Demonstration − Creating a Sales Order with Substitutions ..............................4-4
            Lab 4.1 − Handle Items with Substitutes ............................................................4-6
            Creating Item Cross References ........................................................................4-7
            Demonstration − Setting Up Item Cross References..........................................4-7
            Demonstration − Creating a Sales Order with a Cross Reference .....................4-8
            Lab 4.2 − Handle Items with Cross Reference .................................................4-10
            Nonstock Items.................................................................................................4-11
            Demonstration − Creating a Nonstock Item Manually ......................................4-12
            Demonstration − Importing Vendor Catalogs ...................................................4-13
            Handling Nonstock Items .................................................................................4-14
            Demonstration − Using Drop Shipments ..........................................................4-15
            Conclusion........................................................................................................4-17
            Lab 4.3 − Handling the Sale of a Nonstock Item using a Special Order...........4-18
            Quick Interaction: Lessons Learned .................................................................4-19
Chapter 5: Purchase Order Management                                                                                         5-1
            Objectives...........................................................................................................5-1
            Introduction.........................................................................................................5-1
            Efficient Purchasing............................................................................................5-2
            Setting Up Purchases.........................................................................................5-3
            Demonstration − Setting Up Purchases .............................................................5-3
            Setting Up Vendors ............................................................................................5-4
            Demonstration − Setting Up Vendors .................................................................5-4
            Demonstration − Setting up Alternative Vendors................................................5-6
            Vendor Posting Groups ......................................................................................5-6
            Demonstration - Setting Up Vendor Posting Groups..........................................5-7
            Setting Up Purchasers .......................................................................................5-8
            Managing Purchase Transactions ......................................................................5-8
            Demonstration − Creating Purchase Quotes....................................................5-10


Page   ii      Microsoft Official Training Materials for Microsoft Dynamics ™
              Your use of this content is subject to your current services agreement
Table of Contents

          Demonstration − Creating Purchase Orders ....................................................5-11
          Purchase Prices and Discounts .......................................................................5-12
          Demonstration − Setting up Alternative Purchase Prices.................................5-12
          Demonstration − Setting Up Individual Prices based on Price Agreement.......5-14
          Using the Pricing Mechanism ...........................................................................5-15
          Lab 5.1 − Managing Alternative Purchase Prices.............................................5-16
          Line Discounts ..................................................................................................5-17
          Conclusion........................................................................................................5-18
          Lab 5.2 – Managing Purchase Line Discounts .................................................5-19
          Quick Interaction: Lessons Learned .................................................................5-20
Chapter 6: Requisition Management                                                                                           6-1
          Objectives...........................................................................................................6-1
          Introduction.........................................................................................................6-1
          Requisition Management....................................................................................6-2
          Requisition Management Setup .........................................................................6-2
          Demonstration − Setting Up Planning Parameters.............................................6-4
          The Requisition Worksheet ................................................................................6-8
          Demonstration − Using the Requisition Worksheet ............................................6-9
          Demonstration − Creating Purchase Orders from the Requisition Worksheet .6-10
          Additional Worksheet Features ........................................................................6-11
          Demonstration − Using the Additional Worksheet Features.............................6-12
          Conclusion........................................................................................................6-13
          Lab 6.1 − Calculating a Replenishment Plan from the Requisition Worksheet 6-14
          Quick Interaction: Lessons Learned .................................................................6-15
Chapter 7: Item Charges                                                                                                     7-1
          Objectives...........................................................................................................7-1
          Introduction.........................................................................................................7-1
          Overview of Item Charges ..................................................................................7-2
          Setting Up Item Charges ....................................................................................7-3
          Purchase Item Charges......................................................................................7-3
          Demonstration − Handling Additional Direct Cost as an Item Charge................7-4
          Lab 7.1 − Handling Purchase Item Charges.......................................................7-8
          Sales Item Charges ............................................................................................7-9
          Demonstration − Handling Sales Item Charges .................................................7-9
          Purchase and Sales Allowances ......................................................................7-11
          Demonstration − Creating Item Charge Credit Memo ......................................7-11
          Conclusion........................................................................................................7-12
          Lab 7.2 − Handling Purchase Allowances ........................................................7-13
          Quick Interaction: Lessons Learned .................................................................7-14
Chapter 8: Order Promising                                                                                                  8-1
          Objectives:..........................................................................................................8-1
          Introduction.........................................................................................................8-1
          Date Calculation Concepts .................................................................................8-2
          Promising Orders to Customers .........................................................................8-3
          Setting Up Date Calculation for Sales Orders ....................................................8-6
          Demonstration − Setting Up Outbound Warehouse Handling Time ...................8-6


             Microsoft Official Training Materials for Microsoft Dynamics ™                                          Page       iii
            Your use of this content is subject to your current services agreement
Trade in Microsoft Dynamics™ NAV 5.0

            Demonstration − Setting Up Shipping Time .......................................................8-7
            Demonstration − Setting Up an Availability Test Interval....................................8-8
            Setting Up the Order Promising Feature ............................................................8-8
            Promising Sales Order Delivery .........................................................................8-9
            Demonstration − Promising Sales Orders without a Requested Delivery Date..8-9
            Demonstration − Requesting Items that are not Available for Shipping ...........8-10
            Demonstration − Meeting the Requested Delivery Date ..................................8-12
            Demonstration − Requesting an Order where the Delivery Date cannot be Met8-13
            Demonstration − Setting Shipment Date Before Current Date .........................8-16
            Promising Sales Order Delivery in Other Situations.........................................8-17
            Demonstration − Requesting Different Shipment Dates on Lines ....................8-17
            Lab 8.1 − Promise Order Delivery to a Customer.............................................8-18
            Estimating Purchase Order Receipt .................................................................8-19
            Demonstration − Using Lead Time Calculations ..............................................8-23
            Estimating Purchase Order Receipt .................................................................8-24
            Demonstration − Calculating Purchase Order Receipt without a Receipt Date
            Requested ........................................................................................................8-24
            Demonstration − Estimating a Purchase Order Receipt with a Receipt Date
            Requested ........................................................................................................8-26
            Demonstration − Calculating an Order that must be Placed before the Current
            Date..................................................................................................................8-27
            Demonstration − Estimating a Purchase Order Receipt in Other Situations ....8-28
            Lab 8.2 − Order Promising ...............................................................................8-29
            Estimating Transfer Order Receipt ...................................................................8-30
            Calendars .........................................................................................................8-30
            Conclusion........................................................................................................8-32
            Quick Interaction: Lessons Learned .................................................................8-33
Chapter 9: Returns Management                                                                                                 9-1
            Objectives...........................................................................................................9-1
            Introduction.........................................................................................................9-1
            Sales Return Management.................................................................................9-2
            Setting Up Returns Management .......................................................................9-3
            Managing Returns from Customers....................................................................9-5
            Demonstration − Using Sales Return and Sales Allowance...............................9-7
            Demonstration − Processing the Sales Return.................................................9-14
            Demonstration − Returning Items for Repair at Vendor ...................................9-16
            Lab 9.1 − Processing the Customer Return .....................................................9-20
            Managing Returns to Vendors..........................................................................9-21
            Demonstration − Returning Items to Vendor for Repair ...................................9-23
            Demonstration − Using Purchase Allowance ...................................................9-25
            Lab 9.2 − Processing the Customer Return, II .................................................9-27
            Activity Diagram for Return Management.........................................................9-28
            Conclusion........................................................................................................9-28
            Quick Interaction: Lessons Learned .................................................................9-29
Chapter 10: Analysis and Reporting                                                                                         10-1
            Objectives.........................................................................................................10-1
            Introduction.......................................................................................................10-1


Page   iv      Microsoft Official Training Materials for Microsoft Dynamics ™
              Your use of this content is subject to your current services agreement
Table of Contents

          Analysis and Reporting ....................................................................................10-2
          Creating Analysis Reports ................................................................................10-2
          Demonstration − Customizing Analysis Reports ..............................................10-6
          Demonstration − Creating Analysis Reports.....................................................10-8
          Demonstration − Using Customer and Item Groups.......................................10-10
          Demonstration − Analyzing Quantity Purchased by Customer Groups..........10-12
          Demonstration − Using the Bar Chart Feature ...............................................10-13
          Lab 10.1 − Creating Analysis Reports ............................................................10-14
          Analysis by Dimensions .................................................................................10-15
          Demonstration − Using Analysis by Dimensions ............................................10-15
          Lab 10.2 − Performing Analysis by Dimensions .............................................10-18
          Sales and Purchase Budgets .........................................................................10-19
          Demonstration − Creating a Purchase Budget ...............................................10-20
          Demonstration − Exporting Budgets to Excel .................................................10-21
          Demonstration − Using Budgets in Analysis Reports .....................................10-23
          Lab 10.3 − Creating a Sales Budget...............................................................10-24
          Conclusion......................................................................................................10-25
          Quick Interaction: Lessons Learned ...............................................................10-26
Appendix A: Terminology List                                                                                            A-1
          Inventory Terminology List ................................................................................ A-1
          List of Sales Batch Jobs, Reports, and Sales Documents ................................ A-4
          List of Purchase Batch Jobs, Reports, and Purchase Documents .................... A-9
Appendix B: Functionality and Licenses                                                                                  B-1
          Trade licenses in Microsoft Dynamics NAV....................................................... B-1
Appendix C: Lab Solutions                                                                                               C-1
          Lab 2.1 − Handling Sales .................................................................................. C-1
          Lab 3.1 − Managing Alternative Sales Prices.................................................... C-3
          Lab 3.2 − Creating Sales Prices for a Campaign .............................................. C-4
          Lab 3.3 − Updating Sales Prices ....................................................................... C-6
          Lab 3.4 − The "Best Price" Rule ........................................................................ C-8
          Lab 3.5 − Creating Sales Line Discounts for a Campaign................................. C-9
          Lab 4.1 − Handle Items with Substitutes ......................................................... C-11
          Lab 4.2 − Handle Items with Cross Reference ................................................ C-12
          Lab 4.3 − Handling the Sale of a Nonstock Item using a Special Order.......... C-13
          Lab 5.1 − Managing Alternative Purchase Prices............................................ C-14
          Lab 5.2 − Managing Purchase Line Discounts ................................................ C-15
          Lab 6.1 − Calculating a Replenishment Plan from the Requisition Worksheet C-17
          Lab 7.1 − Handling Item Charges.................................................................... C-19
          Lab 7.2 − Handling Purchase Allowances ....................................................... C-19
          Lab 8.1 − Promise Order Delivery to a Customer............................................ C-21
          Lab 8.2 − Order Promising .............................................................................. C-22
          Lab 9.1 − Processing the Customer Return .................................................... C-23
          Lab 9.2 − Processing the Customer Return, II ................................................ C-25
          Lab 10.1 − Creating Analysis Reports ............................................................. C-26
          Lab 10.2 − Performing Analysis by Dimensions .............................................. C-28


             Microsoft Official Training Materials for Microsoft Dynamics ™                                       Page       v
            Your use of this content is subject to your current services agreement
Trade in Microsoft Dynamics™ NAV 5.0

            Lab 10.3 − Creating a Sales Budget................................................................ C-29


Page   vi      Microsoft Official Training Materials for Microsoft Dynamics ™
              Your use of this content is subject to your current services agreement
Introduction


INTRODUCTION
                Training is an important component of maintaining the value of your Microsoft
                Dynamics™ NAV 5.0 investment. Quality training from industry experts keeps
                you up-to-date and helps you develop the skills necessary for fully maximizing
                the value of your solution. Whether you want Online Training, Classroom
                Training, or Training Materials, there is a type of training to meet everyone’s
                needs. Select the training type that allows you to stay ahead of the competition.

Online Training
                Online Training delivers convenient, in-depth training to you in the comfort of
                your own home or office. Online training provides immediate access to training
                24 hours a day, and is perfect for the customer who does not have the time or
                budget to travel. The online training option, eCourses, combines the efficiency of
                online training with the in-depth product coverage of classroom training, with at
                least two weeks to complete each course.

Classroom Training
                Classroom Training provides serious, in-depth learning through hands-on
                interaction. From demonstrations to presentations to classroom activities, you
                will receive hands-on experience with instruction from a certified staff of experts.

Training Materials
                Training Materials enable you to learn at your own pace, on your own time, with
                information-packed training manuals. Our wide variety of training manuals
                feature many tips, tricks, and insights you can refer to repeatedly.

                Microsoft Dynamics Training Courseware: The Microsoft Dynamics Training
                Courseware are detailed training manuals, designed from a training perspective.
                These manuals include advanced topics and training objectives, exercises,
                interactions, and quizzes.


           Microsoft Official Training Materials for Microsoft Dynamics ™                      0-1
          Your use of this content is subject to your current services agreement
Trade in Microsoft Dynamics™ NAV 5.0


About the Trade in Microsoft Dynamics NAV Training Manual
                 This training manual provides a conceptual and operational description of the
                 standard trade functionality of Microsoft Dynamics NAV. The manual can be
                 used both in the context of an instructor-led training course and as reference
                 material for self-teaching.

                 Target Audience
                 This training manual is intended for Microsoft Certified Dynamics Partners'
                 employees selling, implementing, and supporting Microsoft Dynamics NAV.

                 Training Objectives
                 Whether used in a course setting or for self-teaching, the manual is designed to
                 equip course participants with the product knowledge, both at conceptual and
                 functional levels, required when implementing and supporting Microsoft
                 Dynamics NAV at a wide range of wholesale and manufacturing companies with
                 a focus on the trade area.

                 Training Prerequisites
                 To successfully participate in the Trade course or complete the training in the
                 self-teaching manner, participants must have passed the following:

                         •   The Microsoft Dynamics NAV Overview test (or have equivalent
                             experience with Microsoft Dynamics NAV (Financials) application).
                         •   The Microsoft Dynamics NAV Essentials test.

                 Additionally, participants need to have a background in distribution/logistics to
                 understand the underlying principles of these businesses.

                 Training Manual Overview
                 Before you start the course (self-teaching), you must install Microsoft Dynamics
                 NAV on your computer.

                 This manual provides the participants with an in depth understanding of the
                 granules and features of the trade-related functionality in Microsoft Dynamics
                 NAV. The manual consists of the following chapters:

                         •   Chapter 2: Sales Order Management
                         •   Chapter 3: Sales Prices and Discounts
                         •   Chapter 4: Customer Service Features
                         •   Chapter 5: Purchase Order Management
                         •   Chapter 6: Requisition Management
                         •   Chapter 7: Item Charges


0-2         Microsoft Official Training Materials for Microsoft Dynamics ™
           Your use of this content is subject to your current services agreement
Introduction

              •   Chapter 8: Order Promising
              •   Chapter 9: Returns Management
              •   Chapter 10: Analysis and Reporting

      Every chapter includes an overview of the feature, explains the setup procedure,
      and describes how the feature supports the associated operating processes
      involved in managing a reselling business.

      In this manual, the chapters are organized logically, reflecting the relationship
      between different granules of the program. It is, therefore, recommended that the
      course (when built on this manual) or self-teaching activity follows the suggested
      teaching path. If preferred, however, the users of the manual can choose
      alternative paths.

      The chapters in this training manual typically contain the following elements:

              •   Concepts
              •   Demonstrations
              •   Labs

      Concepts explain the business processes that can be managed by using the trade
      functionality of the program.

      Demonstrations represent the typical business situations where the application is
      used. Demonstrations provide a basis for examples that give practical step-by-
      step descriptions of how to use the application.

      Labs enable the course participants (manual readers) to practice using the
      program.

      The manual includes the following typographic conventions:

              •   Name is used for names of fields, tabs, and windows.
              •   PATHNAME→PATH     is used for navigation paths for users to follow.

      Dates
      The dates in the course manual are in the American format. In order to avoid
      confusion when reading the manual and following the exercises, if necessary, it is
      a good idea to change the date format in Windows before starting the training
      session.

      The working date is set to be 01/24/08 (January 24, 2008). It is important that
      this date is used when following the examples and doing the exercises included
      in the manual.


 Microsoft Official Training Materials for Microsoft Dynamics ™                         0-3
Your use of this content is subject to your current services agreement
Trade in Microsoft Dynamics™ NAV 5.0


                 Demonstration Data
                 All examples and exercises in this manual are based on a fictitious company,
                 Cronus International Ltd.

                 Where possible, examples and exercises in each chapter are designed
                 independently of each other. However, because of the limited scope of the
                 Cronus demo database, the same data is sometimes used in examples illustrating
                 different functionality.

                 To make sure that you always have a clean demo database, make a copy of the
                 database on the hard disk before you start the course.

                 License Information
                 To run the examples and exercises included in this training manual, you must
                 have a standard Cronus license. This is provided on the product CD.

                 Suggested Course Duration
                 When this training manual is used to run a course, it is recommended that the
                 course be taught over a period of two to three days.

                 Additional Information
                 You can learn more about Microsoft Dynamics NAV in the Financial
                 Management and Inventory Management courses, and in Microsoft Dynamics
                 NAV eCourses and Online Help.

                 You can learn more about the topics of distribution and supply chain
                 management from the APICS homepage: http://www.apics.org. APICS is a
                 nonprofit, educational society for resource management.


0-4         Microsoft Official Training Materials for Microsoft Dynamics ™
           Your use of this content is subject to your current services agreement
Introduction


About This Course
               This section provides you with a brief description of:

                       •   The course
                       •   Audience
                       •   Suggested prerequisites
                       •   Course objectives
                       •   Student materials
                       •   Related certification exams

               Description
               This two and a half day Microsoft Dynamics™ NAV Trade course explores all of
               the activities required to handle the purchase, sale, and return of inventory in the
               program. This course will show you how to manage sales and purchase
               transactions, including prices and discounts, item charges and order promising.
               Requisition management will be covered, as well as returns management and
               customer service features.

               Audience
               The intended audience includes individuals wanting to learn the basic features
               and to develop a working knowledge of the typical day-to-day procedures
               required to effectively use Microsoft Dynamics NAV Trade.

               The class is targeted toward sales and purchase managers, salespeople and
               purchasers, and others in an organization who are responsible for the setup and
               administration of trade functionality, including item prices, discounts, and
               substitutions.

               At Course Completion
               Completing this course allows students to:

                       •   Manage sales transactions
                       •   Create and use sales prices and discounts
                       •   Process sales of items with substitutions and cross references
                       •   Process sales of nonstock items
                       •   Manage purchase transactions
                       •   Create and process purchase requisitions
                       •   Set up and use item charges
                       •   Use the order promising functionality
                       •   Process returns from customers and to vendors
                       •   Create analysis reports


          Microsoft Official Training Materials for Microsoft Dynamics ™                      0-5
         Your use of this content is subject to your current services agreement
Trade in Microsoft Dynamics™ NAV 5.0

                         •   Perform analysis by dimensions
                         •   Create sales and purchase budgets

                 Prerequisites
                 Before attending this course, students must have:

                         •   General knowledge of Microsoft® Windows®
                         •   The ability to use Microsoft Dynamics NAV financials for financials
                             processing
                         •   Basic knowledge of distribution and logistics

                 Student Materials
                 The following material for Microsoft Dynamics NAV version 5.0 are releted to
                 this course:

                         •   What's New in Microsoft Dynamics version 5.0 Application, Part I
                         •   Introduction
                         •   Inventory Management
                         •   Finance

                 Certification Exams
                 This course is releted to the following exams:

                         •   Inventory Management


0-6         Microsoft Official Training Materials for Microsoft Dynamics ™
           Your use of this content is subject to your current services agreement
Introduction


Student Objectives
                What do you hope to learn by participating in this course?

                List three main objectives below:

                1.


                2.


                3.


           Microsoft Official Training Materials for Microsoft Dynamics ™                   0-7
          Your use of this content is subject to your current services agreement
Trade in Microsoft Dynamics™ NAV 5.0


0-8         Microsoft Official Training Materials for Microsoft Dynamics ™
           Your use of this content is subject to your current services agreement
Chapter 1: Trade Overview


CHAPTER 1: TRADE OVERVIEW
            Microsoft Dynamics™ NAV is a collaborative business management solution for
            medium-sized companies. It is an integrated product that includes functionality to
            support financial and relationship management, distribution, and manufacturing.

            The Microsoft Dynamics NAV Trade module is aimed at a variety of wholesale
            and manufacturing companies. The module provides tools to help with the
            following:

                    •   Manage day-to-day purchase and sales operations
                    •   Increase the level of customer service
                    •   Improve operational efficiency

            This course is a part of the Supply Chain curriculum and is designed for students
            who have passed the Microsoft Dynamics NAV Overview test (or have
            equivalent experience with the Microsoft Dynamics NAV Financials application)
            and the Microsoft Dynamics NAV Essentials test, and want to learn more about
            Microsoft Dynamics NAV for Trade.

            The course primarily provides explanations of the program’s conceptual design
            and functionality related to managing and administrating basic trading
            operations. Students who want to take the Financial Management exam can use
            this course as preparation.


       Microsoft Official Training Materials for Microsoft Dynamics ™                      1-1
      Your use of this content is subject to your current services agreement
Trade in Microsoft Dynamics™ NAV 5.0


Quick Interaction: Lessons Learned
                 Take a moment and write down three Key Points you have learned from this
                 chapter:

                 1.


                 2.


                 3.


1-2         Microsoft Official Training Materials for Microsoft Dynamics ™
           Your use of this content is subject to your current services agreement
Chapter 2: Sales Order Management


CHAPTER 2: SALES ORDER MANAGEMENT
Objectives
                The objectives are:

                        •   Provide an overview of the Sales Order Management process
                        •   Set up Sales Order Management, Customers and Shipping Options
                        •   Set up Reservation Rules, Customer Posting Groups, and Sales
                            People
                        •   Manage the Sales Transactions flow
                        •   Create Quotations, Blanket Orders, and Sales Orders
                        •   Perform Drop Shipments
                        •   Create Item Reservations
                        •   Post Orders
                        •   Perform Partial and Combined shipments
                        •   Process Prepayment

Introduction
                The sales handling process is the cornerstone in all companies in order to achieve
                a high customer service level. Microsoft Dynamics™ NAV supports companies
                in managing all the steps in the sales order management process from creating
                the blanket order to shipping and invoicing the order.

                Sales Order Management provides an overview of background and set up
                information. The main focus is put on common aspects of sales transaction
                handling and all aspects of the flow is described in details. Examples are given in
                comprehensive demonstrations. A list of sales batch jobs, reports, and sales
                documents is included in Appendix A.


           Microsoft Official Training Materials for Microsoft Dynamics ™                       2-1
          Your use of this content is subject to your current services agreement
Trade in Microsoft Dynamics NAV 5.0


Sales Order Management Overview
                  For companies to survive, they must keep customers satisfied. An instant and
                  accurate response to inquiries, such as delivery time or the price of the product, is
                  a key factor contributing to customer satisfaction. In addition, efficiently
                  handling special customer requests about shipping arrangements and invoicing
                  preferences is likely to ensure repeat orders. Typical examples of these requests
                  include:

                          •   Receiving shipments in parts or to different addresses
                          •   Receiving the orders before they are invoiced
                          •   Being invoiced for several shipped orders at the same time

                  Companies must also ensure they can easily register sales transaction
                  information. For example, adjusting customer balance and updating inventory
                  availability and values are tasks that must always be performed when handling
                  sales. Additionally, companies may want to keep a record of the salespeople
                  performing the sale.

                  As aspects of a future sales agreements are negotiated and agreed upon in the
                  presales stage, it is helpful for salespeople to record relevant agreement details
                  once and then reuse this information when creating an actual sales order.

                  There is a lot of functionality in Microsoft Dynamics™ NAV that supports
                  efficient sales transaction handling, such as:

                          •   Sales Order Management: This functionality includes documents
                              (quotes, blanket orders, and sales orders) that support the order
                              processor in efficiently managing sales. The functionality supports
                              partial order shipment, separation between shipping and invoicing,
                              and combined invoicing.
                          •   Alternative Ship-Tos: This facilitates handling sales orders for
                              customers who have several alternative shipping addresses.
                          •   Drop Shipments: This enables the order processor to efficiently
                              handle orders shipped directly from the vendor to the customer
                              without involving the company's operations.
                          •   Order processors/purchasing agents: This enables collection of sales
                              statistics at the salesperson level.
                          •   Shipping agents: This facilitates the management of carriers
                              (shipping agents) and related information.


2-2          Microsoft Official Training Materials for Microsoft Dynamics ™
            Your use of this content is subject to your current services agreement
Chapter 2: Sales Order Management


Setting Up Sales Order Management
               This chapter contains setup options that define the functionality of sales order
               management, focusing on the physical handling rather than financial aspects of a
               sales transaction. Setup options that support additional sales practices and tasks
               (for example, sales and invoice discounts, and return management) are discussed
               in separate chapters.

               The sales setup consists of the following elements:

                       •   Sales & Receivables setup: Based on their established practices,
                           companies must specify how they want the program to support them
                           in managing different aspects of their sales transactions. These are
                           general setup options the program applies to all sales transactions,
                           regardless of the item or customer.
                       •   Customer setup: Basic information such as name and address, in
                           addition to invoicing details (for example, credit limit, invoicing,
                           discount and payment terms, currencies, shipping schemes, and
                           reservation rules, and so on) are recorded for each customer on a
                           customer card.
                           The setup of customer posting groups defines the connection
                           between a customer and accounts in the general ledger. This is done
                           by assigning a customer to a posting group for which balance sheet
                           and income statement accounts are set up.
                       •   Salesperson setup: Companies can set up codes to identify and
                           describe salespeople. This is done to establish a link between a
                           salesperson and the performance in terms of, for example, the
                           number of sales transactions (orders, invoices, or returns) handled.

Demonstration − Setting Up Sales Order Management
               At Cronus, management wants to notify the order processor about a customer's
               credit and balance every time the customer places an order. Because management
               wants to ensure that orders are delivered on time, they want the program's
               feedback on item availability when a sales order is entered. They also require the
               program to create shipment and return receipt documents when posting invoices,
               credit memos or both.


          Microsoft Official Training Materials for Microsoft Dynamics ™                          2-3
         Your use of this content is subject to your current services agreement
Trade in Microsoft Dynamics NAV 5.0


                  Steps
                  These business requirements have led to the following Sales & Receivables setup
                  for Cronus:

                            1. On the Sales & Marketing menu, click SETUP→SALES & RECEIVABLES
                               SETUP. The Sales & Receivables Setup window appears.

                            2. Check the different fields that are explained in the following.

                    Field                        Explanation
                    General tab                  The fields on the General tab specify the program's
                                                 facilities for sales order management.
                    Credit Warnings              The Credit Warnings field specifies if the
                                                 program warns about the customer's credit standing
                                                 when the user creates a sales order or invoice for
                                                 the customer. When it is required, the warning can
                                                 be triggered by overdue balance, exceeded credit
                                                 limit, or both. Cronus has chosen both.
                    Stockout Warning             Selecting the Stockout Warning field specifies
                                                 that the program warns the user when there are not
                                                 enough items on inventory to fulfill a sales order.
                                                 The warning is based on a calculation that sums up
                                                 quantity amounts on all posted item ledger entries
                                                 and unposted sales order lines, including reserved
                                                 quantities.
                    Shipment on Invoice          Selecting the Shipment on Invoice and Return
                    and Return Receipt on        Receipt on Credit Memo fields automatically
                    Credit Memo                  creates posted shipment and posted return receipt
                                                 documents at the time of posting sales invoices and
                                                 sales credit memos. If these fields are clear, the
                                                 program only creates posted invoices, credit
                                                 memos or both. Posted shipment (return receipt)
                                                 documents are needed when you are using:
                                                     • The functionality of the Item Charges
                                                          granule.
                                                     • The automatic package tracking function.

                    Dimensions tab               Use the fields on the Dimensions tab to group
                                                 customers and salespeople for budgeting and sales
                                                 analysis purposes. These fields are described later
                                                 in this course.

                  The definition and setup options of all other fields on the General and
                  Numbering tabs of the Sales & Receivables Setup window can be found in
                  Help. Fields determining invoice discount setup and cost reversing options are
                  described in "Sales Prices and Discounts" and "Returns Management" sections in
                  this training manual.


2-4          Microsoft Official Training Materials for Microsoft Dynamics ™
            Your use of this content is subject to your current services agreement
Chapter 2: Sales Order Management


Setting Up Customers and Shipping Options
               Basic customer setup is covered in other courses. This topic explains additional
               setup options for customer data management. These options manage shipping-
               related information and processes and control item reservation rules. The set up
               information is followed by the explanation of the customer posting group setup
               considerations.

               Customers often have alternative sites in addition to the main business address
               for shipping items. For example, a subcontractor may require deliveries to
               several construction sites. Companies may have warehousing and production
               sites that have addresses different from the main office address.

               The Alternative Ship-To's functionality supports those customers that have
               alternative shipping sites. If a customer wants the orders shipped to different
               addresses, addresses can be recorded as alternative ship-to addresses and chosen
               by the order processor when creating an order/invoice.

               Ship-to addresses are entered in the Ship-to Address table. This can contain
               unlimited number of addresses for each customer. A code representing
               information such as customer number and name is linked to each address.

Demonstration − Setting Up Shipping Options
               Cronus' customer 10000 has two alternative ship-to addresses.

               Steps
               Perform the following steps:

                       1. Open the customer card for customer 10000 by selecting ORDER
                          PROCESSING→CUSTOMERS from the Sales & Marketing menu.

                       2. Click CUSTOMER→SHIP-TO ADDRESSES and press F5. The list of ship-
                          to addresses is displayed.
                       3. Select the second address line, and then click OK to review address
                          details.
               When the code for this ship-to address (found on the upper-left of the card) is
               selected in the Ship-to Code field on orders (invoices and credit memos), the
               ship-to information appears on document printouts. Ship-to codes are available
               on purchase orders that are drop-shipped to a customer.

               All other shipping setup options are located on the Shipping tab of a customer
               card.

                       4. Click the Shipping tab on the Customer Card. The shipping options
                          are displayed.


          Microsoft Official Training Materials for Microsoft Dynamics ™                         2-5
         Your use of this content is subject to your current services agreement
Trade in Microsoft Dynamics NAV 5.0

                  Companies may use a decentralized distribution strategy to ensure that orders are
                  delivered fast to their customers. Such a strategy suggests that customer orders
                  ship from local warehouses rather than from a central location. A company can
                  link a customer to a specific location by specifying a default location in the
                  Location Code field.

                  The option selected in the Shipping Advice field indicates if the customer
                  accepts partial order shipments or only wants complete shipments. For complete
                  shipments, the program does not allow posting of a sales order unless the Qty. to
                  Ship field is equal to the total sales order quantity.

                  Depending on their profile, industrial practices, and location, customers may
                  have different preferences as to whom (a customer or a supplier) picks up the
                  shipment, how orders must be shipped, and so on. The program can record all the
                  terms of sale and shipment methods (often based on INCOTERMS) that can be
                  associated with each customer.

                  Cronus has set up several Shipment Method Codes in the program.

                          1. From the Sales and Marketing menu, click ORDER
                             PROCESSING→SETUP→SHIPMENT METHODS. The Shipment Methods
                             window appears:


                              FIGURE 2-1: SHIPMENT METHODS WINDOW

                  When assigned to a customer, the shipment method code is copied to sales
                  documents for that customer.

                  The shipping setup options in the Shipping Agent Code, Shipping Agent
                  Service Code, and Shipping Time fields, and the two calendar fields on the
                  Shipping tab of the customer card calculate shipment and delivery dates for sales
                  documents. These setup options are described in Chapter 8, "Order Promising."


2-6          Microsoft Official Training Materials for Microsoft Dynamics ™
            Your use of this content is subject to your current services agreement
Chapter 2: Sales Order Management

                The combine shipments option using the Combine Shipments field is selected
                when invoicing or debiting a customer for several shipments or return receipts in
                one invoice or credit memo. This field is selected by default in the order header,
                but can be changed if it is required. The Combine Shipments or Return Receipts
                batch job combines the posted shipment or return receipt documents into one
                invoice or credit memo and includes the orders selected in the Combine
                Shipments field.

Setting Up Reservation Rules
                Companies can make and manage item reservations between sales and purchase
                orders, and they can decide whether reservations are made in relation to a
                specific customer.

                This decision is determined by selecting one of the options: Never, Optional, or
                Always in the Reserve field on the Shipping tab of the customer card. The
                selected option is copied to the Reserve field on the header of a sales document
                created for the customer, where it, in combination with the contents of the
                Reserve field on the item card, determine the reservation option for individual
                sales lines in the document.

                To complete customer setup, the following demonstration describes the setup
                details of customer posting groups.

Demonstration − Setting Up Customer Posting Groups
                The financial value of a sales transaction is posted to dedicated accounts in the
                general ledger. When companies do not want to establish accounts for each
                customer, they can put several customers into one posting group and specify
                accounts per group.

                After the company decides on criteria for how its customers are grouped, the
                groups must be set up in the Customer Posting Group table. In this table, the user
                can assign a code to each posting group and specify general ledger accounts for
                categories, such as receivables, service charges, payment discount amounts,
                interest, additional fees, and so on.


           Microsoft Official Training Materials for Microsoft Dynamics ™                           2-7
          Your use of this content is subject to your current services agreement
Trade in Microsoft Dynamics NAV 5.0


                  Steps
                  Cronus' accountants have set up two customer posting groups, domestic and
                  foreign:

                          1. From the Financial Management menu, click SETUP→POSTING
                             GROUPS→CUSTOMER to open the Customer Posting Groups
                             window.


                  FIGURE 2-2: CUSTOMER POSTING GROUPS WINDOW

                  Entering a code in the Customer Posting Group field of the Invoicing tab on a
                  customer card assigns the customer to a specific posting group:

                          2. Open the customer card for customer 10000 and then click the
                             Invoicing tab.
                          3. Check that Domestic has been selected in the Customer Posting
                             Group field.
                  Each customer can only be assigned one customer posting group.

                  When a sales transaction (orders, invoices, and credit memos) for this customer is
                  posted, the accounts for the posting group where the customer belongs is used.

                  NOTE: Accountants can also assign general business posting groups and VAT business
                  posting groups to customers. The business group code is used in combination with a
                  general product posting group code in the general posting setup to specify the posting
                  accounts to which certain transactions are posted. The VAT business posting group
                  code is used in combination with a VAT product posting group code to find the VAT %,
                  VAT calculation type, and VAT accounts to which the program posts VAT amounts. You
                  can learn more about general setup rules in the Microsoft Dynamics NAV Financial
                  Management course.


2-8          Microsoft Official Training Materials for Microsoft Dynamics ™
            Your use of this content is subject to your current services agreement
Chapter 2: Sales Order Management

               Each customer posting group can have different general ledger accounts or the
               same accounts set up for it. An advantage of having different groups that have
               the same accounts is that it gives accountants flexibility in grouping customers
               for reporting and analysis purposes. For example, a total receivables amount can
               be presented and analyzed with two groups representing domestic and foreign
               customers.

Demonstration − Setting Up Salespeople
               When companies want to monitor sales performance, they can record volume
               achieved by salespeople and produce statistics.

               Steps
               To set up salespeople, a company assigns a code to each salesperson. Cronus has
               set up several codes for their employees in the sales department:

                       1. From the Sales & Marketing menu, click SALES→SALESPEOPLE. A
                          Salesperson card appears.
               Details such as job title, commission percent, and other dimensions can be
               specified on each salesperson card.

                       2. To create a new salesperson, press F3.
                       3. To view a list of all salespeople in the program, click
                          SALESPERSON→LIST, or press F5.


               NOTE: Apart from two default dimensions (department and project) selected on the
               Invoicing tab of the salesperson card, companies can also assign additional default
               dimensions. This can be done for a single salesperson or the whole group. This setup
               option is found in the Salespeople/Purchasers window, by clicking
               SALESPERSON→DIMENSIONS→DIMENSIONS-SINGLE/DIMENSIONS-MULTIPLE.


               Selecting a salesperson code as the default on a customer card or directly in the
               sales documents makes sure that sales statistics are created at the salesperson
               level. Based on this, the overall performance of salespeople can be calculated and
               presented in a report.

Managing Sales Transactions
               Managing Sales Transations elaborates on the program's facilities that support
               common tasks in sales transaction management. The workflow includes the
               following steps:

                       •    Registering a blanket agreement with a customer
                       •    Converting the agreement into a sales order
                       •    Drop shipping
                       •    Reserving the ordered quantity for the sales order


          Microsoft Official Training Materials for Microsoft Dynamics ™                              2-9
         Your use of this content is subject to your current services agreement
Trade in Microsoft Dynamics NAV 5.0


                  Sales Quotes
                  A sales quote can be considered a "draft order" that the order processor gives to a
                  customer that specifies price, terms of sale, and description of items. If the
                  customer wants to buy the items on the quote, the quote can be converted to a
                  sales order.

                  Because the functionality in quotes is also available in sales orders (addressed in
                  detail later in this section), sales quotes are not described here.

                  Blanket Orders
                  A blanket sales order represents a framework for a long-term agreement between
                  the company and a customer.

                  The order processor makes a blanket order when the customer has committed to
                  buying large quantities to be delivered in several shipments over a period of time.
                  Often, blanket orders cover only one item with predetermined delivery dates.
                  Quantities on a blanket order do not affect item availability and can be used as a
                  worksheet for monitoring, forecasting, and planning.

                  On the blanket order, each shipment can be set up as an order line. This can then
                  be converted into a sales order at the time of shipping.

                  The following demonstration shows how to create a blanket order.

Demonstration − Creating a Blanket Order
                  A representative from customer 10000 calls the order processor at Cronus to
                  order 1000 units of item 70000. The customer wants the items to be delivered in
                  250 units every week over the next month.

                  Steps
                  Create a blanket order for 1000 units of item 70000 for customer 10000:

                          1. From the Sales & Marketing menu, select ORDER
                             PROCESSING→BLANKET ORDER. Press F3 to make a new order and
                             enter the customer information in the blanket order header.
                          2. Leave the Order Date field blank.
                              When separate sales orders are created from the blanket order, the
                              order date of the sales order is equal to the actual work date.
                              Notice that the Salesperson Code field on the order header contains
                              the default code for the salesperson assigned to the customer 10000.
                              This code is retrieved from the customer card.
                              Create four lines of 250 units of item 70000:


2-10         Microsoft Official Training Materials for Microsoft Dynamics ™
            Your use of this content is subject to your current services agreement
Chapter 2: Sales Order Management

                              3. On each line, in the Type field, select Item. In the No. field select
                                 70000. In the Quantity field, enter 250.
                              4. In the Shipment Date field, enter the shipment dates of 02/01/08,
                                 02/08/08, 02/15/08, and 02/22/08 respectively.
                                  Notice that the Qty. to Ship field is filled in automatically to indicate
                                  the quantity to be listed on the sales orders for the respective
                                  shipment dates.
                                  Create the order for the first shipment of 250 units:


                              5. In the Qty. to Ship field, leave the quantity of 250 for the first line
                                 and delete the quantity to ship in the three other lines.
                                  The completed blanket order looks as follows:


FIGURE 2-3: COMPLETED BLANKET SALES ORDER

                              Convert a blanket order into a sales order:
                              6. Click Make Order, selecting Yes in the information message and in
                                 all other warnings.
                                  The link between the blanket order and the sales order it is retained
                                  and enables the order processor to view unposted and posted sales
                                  order (invoice) lines.
                                  To view the list:


                              7. Select the first line in the blanket order and then click
                                 LINE→UNPOSTED LINES→ORDERS.


                 Microsoft Official Training Materials for Microsoft Dynamics ™                       2-11
                Your use of this content is subject to your current services agreement
Trade in Microsoft Dynamics NAV 5.0

                           8. In the Sales Lines window click LINE→SHOW document to view the
                              order.
                               The sales order contains all the lines from the blanket order. The
                               quantities for the lines where the quantity in the Qty. to Ship field
                               was deleted appear, but with blank quantity fields. Remember that
                               the sales order line quantity must not exceed the quantity of the
                               associated blanket order line. Otherwise, posting of the sales order is
                               not possible.


                           9. Delete the last three lines in the sales order.
                               When the sales order is posted as shipped, invoiced, or both, the
                               Quantity Shipped and Quantity Invoiced fields are updated on the
                               related blanket order.
                               As soon as the sales order(s) has been created for the total quantity of
                               a blanket order line, no other sales order(s) is created for the same
                               line.
                               The blanket order number and line number are recorded as properties
                               of the sales lines when created from a blanket order.


                           10. Zoom in on the lines of the sales order created earlier or press CTRL
                               + F8.
                               The Blanket Order No. and the Blanket Order Line No. fields
                               have corresponding references.


                  NOTE: Where sales orders are not created directly from the blanket order but are still
                  relate to it, a link between a sales order and a blanket order is established by selecting
                  the number of the blanket order in the Blanket Order No. field on the sales line.


Demonstration − Creating a Sales Order
                  This demonstration is a continuation of the previous demonstration: "Creating a
                  Blanket Order." The order processor at Cronus is about to ship 250 units of item
                  70000 to customer 10000. This is the first shipment out of four on the blanket
                  order. The shipment needs to be delivered to the customer's subsidiary address
                  instead of to the main address. The shipping agent is DHL, who provides the
                  option of package tracking.


2-12         Microsoft Official Training Materials for Microsoft Dynamics ™
            Your use of this content is subject to your current services agreement
Chapter 2: Sales Order Management


      Steps
      Perform the following steps:

               1. Locate the sales order created earlier from the blanket order.
                    The General tab of the sales header specifies default customer
                    details and additional information for the customer. These are copied
                    from the customer card when the order is created. The document
                    dates and delivery dates are addressed in detail later in this training
                    manual.


      NOTE: Links to more information about the customer, such as alternative shipping
      addresses, comments, contacts, and credit, can be found on the right pane of the sales
      order, across from the sales order header. When the salesperson clicks on the Sales
      History link, a list of previous sales transactions appears. Lines can be copied to the
      current sales order by clicking the Copy to Doc button at the bottom of the sales history
      form.
      Links to information about the item are located across from the sales lines. The
      salesperson can link directly to the item card and can access information about item
      availability, substitutions, sales prices, and sales line discounts by clicking the available
      fields.

                    The fields on the Shipping tab provides detailed shipping-related
                    information, for example, the customer's alternative shipping
                    address, shipment terms, agents, advice, ship-from location, and so
                    on. The values in these fields are copied from the customer card.
               2. On the sales order, click the Shipping tab.
                    According to scenario 3, the order must be delivered to an address
                    other than the company's main office.
               3. In the Ship-to Code field, select DUDLEY. This is an alternative
                  ship-to address for this customer. Click OK to accept all information
                  messages that appear.
      Because there is no default shipping agent associated with this ship-to address,
      the shipping agent code is selected directly on the sales header:

               4. On the Shipping tab, in the Shipping Agent Code field, select DHL.
                  Click Yes to update the lines.
                    When the shipment is picked up by the carrier, the assigned package
                    tracking number can be entered on the Shipping tab in the Package
                    Tracking No. field. The Internet address of the shipping agent can
                    access the agent's package tracking scheme.


 Microsoft Official Training Materials for Microsoft Dynamics ™                                2-13
Your use of this content is subject to your current services agreement
Trade in Microsoft Dynamics NAV 5.0

                              The contents of the Outbound Whse. Handling Time and Shipping
                              Time fields relate to the program's calculation of various delivery
                              dates. These fields and the Late Order Shipping field are explained
                              later in this training manual.
                              If the company has a default location (that is, a site where inventory
                              is physically stored, such as a warehouse, service car, showroom,
                              and so on) the appropriate code is copied to the sales order header in
                              the Location Code field. Depending on the company, a default
                              location for the order can be defined, for example, as their central
                              warehouse, or as a local warehouse. This serves customers within a
                              nearby geographical area.
                  When the sales order header is complete, the order processor can continue with
                  entering details that relates to the contents of the order and the items. The major
                  aspects and properties of the order lines are described in the following topics.

Sales Order Processing
                  A sales order can be used to register both a physical and financial transaction.
                  The choice of transaction is defined by one of the following line type options:

                          •   G/L Account
                          •   Item
                          •   Resource
                          •   Fixed Asset
                          •   Charge (Item)

                  The line type Item represents a sale of physical goods. Sales defined by G/L
                  Account, Resource, and Fixed Asset type are addressed in the Financial
                  Management training manual. Transactions of a Charge (Item) type are explained
                  later in this manual.

                  Location
                  Selecting a location code on the order line will start the features that support an
                  employee's tasks.

                  The order processor can:

                          •   Check the item availability in a specified location (including the
                              blank location).
                          •   Get an overview of item availability per specified location or on
                              other locations at the same time.


2-14         Microsoft Official Training Materials for Microsoft Dynamics ™
            Your use of this content is subject to your current services agreement
Chapter 2: Sales Order Management

      Inventory management employees and planners can:

               •   Use the requisition planning facility when considering replenishment
                   and planning parameters set up on the item stockkeeping units.
               •   Perform transfers of inventory between locations.
               •   Create inventory statistics per location.

      Accountants can calculate inventory value and cost of goods sold per location.

      Warehouse managers can use the bin management functionality associated with a
      location.

      Quantity
      Entering the quantity amount in the Quantity field causes the program to check
      for sufficient inventory in the location to fulfill the sales order. If this is not the
      case, the program gives a stockout warning (the Stockout Warning field in the
      Sales & Receivables Setup window must be selected). The program's mechanism
      of calculating item availability is explained in the Inventory Management
      training manual.

      NOTE: The program supports the practice of creating sales lines with negative
      quantity. A negative sales line implies a reverse transaction to the sales document. A
      negative line in a sales order means a sales return.
      Handling sales lines with negative quantity is supported throughout all functional
      areas.

      Unit of Measures
      The program automatically fills in the Unit of Measure Code field when the
      sales line is created. The value is copied from the Sales Unit of Measure field on
      the item card.

      The unit of measure code is used:

               •   When checking item availability.
               •   To determine the unit price amount.
               •   To validate if there are any alternative prices, line discounts, or both,
                   for the sale based on the unit of measure.

      Unit Price
      Selecting the item in the No. field automatically fills in the Unit Price field. The
      unit price is calculated and copied from the item card or the alternative sales
      prices applicable to the item and customer. The setup options and the mechanism
      of alternative sale prices are addressed in more detail later in this manual.


 Microsoft Official Training Materials for Microsoft Dynamics ™                                2-15
Your use of this content is subject to your current services agreement
Trade in Microsoft Dynamics NAV 5.0

                  When companies sell to retail consumers, they may want sales document prices
                  to include VAT information when printed. To enable this option, the Prices
                  Including VAT field on the Invoicing tab on the document header must be
                  selected. If the field is clear, Unit Price and Line Amount will exclude VAT
                  amounts, and the field names reflect this choice.

                  The Financials training manuals provide an in-depth setup description and
                  explanation of VAT functionality.

                  Item Tracking and Warehousing
                  For many companies, registration of a sales order must also include inventory
                  management related information. These are the records of item serial/lot numbers
                  and item physical placement (bin code) in a warehouse. These aspects of a sales
                  transaction are not directly associated with the customer interface but
                  characterize the company's internal processes, and are addressed in the Inventory
                  Management manual.

Drop Shipments
                  A drop shipment is the shipment of an item or a consignment of items from a
                  company's vendor directly to a customer. Drop shipments are used when a
                  company wants to avoid handling an order, such as stocking and delivering, but
                  wants to fulfill the customer's request and include the transaction in a calculation
                  of cost of goods sold and profit.

                  Companies can use the Drop Shipments functionality to ensure drop shipped
                  orders are handled efficiently. In addition to making a process easier that
                  involves many tasks and people, it makes sure that the correct inventory value
                  and item costs are calculated. Although the sales and purchase transactions of the
                  drop shipment are registered, the drop shipped items do not physically enter the
                  company's inventory.

                  Handling of a drop shipment is illustrated in Figure 2-4:


                  FIGURE 2-4: DROP SHIPMENTS


2-16         Microsoft Official Training Materials for Microsoft Dynamics ™
            Your use of this content is subject to your current services agreement
Chapter 2: Sales Order Management

               Specifically, drop shipping includes the following tasks:

                       1. The customer places a sales order with the company.
                       2. The company places a purchase order with the vendor.
                       3. The vendor delivers the ordered items directly to the customer.
                       4. The vendor invoices the company for the shipment.
                       5. The company invoices the customer.
               The following demonstration illustrates this process.

Demonstration − Creating Drop Shipments
               This demonstration is a continuation of the previous demonstration, "Creating a
               Sales Order." The current work date is 02/01/08. When Cronus' order processor
               is ready to post the first shipment from the blanket order, the representative for
               customer 10000 calls and orders 250 units of item 1984-W. The salesperson at
               Cronus notices that there is not enough quantity in stock, and knowing that
               Cronus will stop stocking it, decides to tell the vendor to ship directly to
               customer 10000. Item 1984-W is ordered from vendor 30000.

               Steps
               Enter the order details on the blanket order (according to the previous
               demonstration, "Creating a Sales Order").

                       1. Create a new sales line for item 1984-W, and enter 250 in the
                          Quantity field.
                       2. In the Purchasing Code field, click the AssistButton to open a list
                          of purchasing codes. (Use the Show Column function to make the
                          Purchasing Code and Drop Shipment fields visible.)
                           The window contains a list of purchasing codes the company sets up
                           to distinguish different purchase transactions.
                           Notice the special order code with the Special Order field selected.
                           This is the purchase transaction type companies use for handling
                           non-stock items. Non-stock items are items that are rarely ordered, or
                           items where there is a small variation compared to the regular item;
                           for example, color, stickers, and so on. (Read the appropriate topic in
                           the online Help for more information about the individual fields in
                           this window.)
                       3. In the Purchasing Codes window, select the DROP SHIP code with
                          the Drop Shipment field selected and then click OK.
                           The program places a check mark in the Drop Shipment field on the
                           sales order line.


          Microsoft Official Training Materials for Microsoft Dynamics ™                      2-17
         Your use of this content is subject to your current services agreement
Trade in Microsoft Dynamics NAV 5.0

                          4. In the Quantity field, enter 250, and in the Shipment Date field
                             enter 02/08/08.


                  FIGURE 2-5: SALES ORDER - DROP SHIPMENTS

                  This completes the drop shipment handling task on the sales side. The program
                  does not allow posting of the sales order until it is linked to a purchase order.

                  There are two ways to create the purchase order to be linked to the sales order for
                  drop shipment:

                          •   Manually, by creating an order directly.
                          •   Automatically, through a requisition worksheet.

                  The following steps go through the manual method. Because creating purchase
                  orders for drop shipments through requisition worksheets is based on the same
                  principles as creating orders directly, it is not described here. Learn more about
                  the mechanism behind requisition worksheets in Chapter 6, "Requisition
                  Management," of this manual.

                  After being informed about the drop shipment, a purchasing agent places the
                  order with vendor 30000, who delivers the shipment directly to customer 10000.


2-18         Microsoft Official Training Materials for Microsoft Dynamics ™
            Your use of this content is subject to your current services agreement
Chapter 2: Sales Order Management


      Steps
      To create the purchase order:

              1. Select the Purchase menu option and then click ORDER
                  PROCESSING→ORDERS.

              2. Press F3 to create a new purchase order.
              3. Fill in the order details on the purchase header by selecting vendor
                 30000 in the Buy-from Vendor No. field.
      Make a reference to the customer for a drop shipment:

              4. On the Shipping tab, in the Sell-to Customer No. field, select
                 customer 10000.
                  The purchasing agent must establish a link between the purchase
                  order and the sales order, and copy the sales lines to be drop shipped
                  into the purchase order:
              5. Click ORDER→DROP SHIPMENT→GET SALES ORDERS. The Order –
                 Sales List window appears.
                  This sales list contains all the sales orders for customer 10000 that
                  the customer specified in the Sell-to Customer No. field on the
                  purchase header.
              6. Select the relevant order (the first one on the list) and then click OK.
                  Before the purchasing agent can continue, the program indicates that
                  the purchase order must be shipped to a different ship-to address
                  (instead of the customer's regular address). This is the address
                  specified on the associated sales order.
              7. Click OK to the information message. On the Shipping tab of the
                 purchase order, in the Ship-to Code field, select DUDLEY.
              8. Repeat steps 3 and 4. The sales line selected for drop shipment is
                 now transferred to a purchase line.
      After being informed that the purchase order has been shipped to the customer,
      the purchasing agent can post the order as received. Posting the purchase order as
      invoiced can only occur after the linked sales order is invoiced. Upon posting the
      purchase order as received, the program automatically posts the associated sales
      order as shipped. The salesperson can post the sales order as invoiced. Posting
      the purchase order as invoiced completes the drop shipment handling.


 Microsoft Official Training Materials for Microsoft Dynamics ™                       2-19
Your use of this content is subject to your current services agreement
Trade in Microsoft Dynamics NAV 5.0


                  NOTE: The posting process can also start from the sales order. Identical to the
                  purchase order, when the sales order is posted as shipped, the program automatically
                  posts the associated purchase order.

                  Remember that before either the sales or purchase order is invoiced, the
                  purchasing agent can retrieve sales orders for a drop shipment from the purchase
                  order by clicking ORDER→DROP SHIPMENT→SALES ORDER. Similarly, the
                  salesperson can view the related purchase order for a drop shipped sales order by
                  clicking ORDER→DROP SHIPMENT→PURCHASE ORDER on the sales order. In both
                  cases, the documents are shown in uneditable mode.

                  To ensure that the transactions involved in drop shipment do not affect inventory
                  quantity and value, the program:

                          •    Creates the item ledger entries representing the sale and purchase in
                               question at the same time.
                          •    Links them by automatically creating a fixed application between
                               them.

                  NOTE: If serial/lot numbers are assigned on the corresponding sales order, the Get
                  Sales Order function also copies the item tracking lines to the newly created purchase
                  order. When a sales order does not have item tracking lines assigned, but they are
                  assigned to the associated purchase order, the program offers the option of creating
                  and synchronizing the lines on the sales order. Learn more about item tracking
                  functionality in Microsoft Dynamics NAV in the Inventory Management manual.


Item Reservation
                  In sales situations, for example, those with a high volume of transactions, there
                  may be a need to ensure that the required item quantity for a sales order is
                  available to be shipped on the agreed date. There is a need to allocate existing or
                  future inventory to the sale until the order shipment date so that it is not used to
                  fill other orders in the meantime. In Microsoft Dynamics NAV, this allocation is
                  performed through reservations.

                  The user assigns the reservation because it is considered a conscious and
                  intentional decision. By reserving quantities, the user gains full ownership of and
                  responsibility for these items. Reserved quantities are not included during
                  planning routines.

Demonstration − Reserving Items
                  The representative for customer 10000 informs Cronus' order processor that the
                  customer wants to order 250 units of item 80100. The customer stresses the
                  importance of receiving the order on 02/08/08. Since there is a risk of running
                  out of stock, the salesperson at Cronus reserves 250 items for this order.


2-20         Microsoft Official Training Materials for Microsoft Dynamics ™
            Your use of this content is subject to your current services agreement
Chapter 2: Sales Order Management


      Steps
      Create a sales order for 250 units of item 80100. Use the order created in the
      previous demonstration and add an extra sales line:

               1. Make a new line for item 80100. In the Location Code field, select
                  GREEN (the location where the item is stocked), and in the
                  Shipment Date field, enter 02/08/08.
               2. Enter 250 in the Quantity field.
                   Notice that the right pane shows the availability for the item on the
                   selected line. This is the availability for the Shipping Date indicated
                   and the Location Code selected, in this case, for the Green
                   warehouse on 02/08/08.


      NOTE: The Availability quantity shown in the right pane is in the Base Unit of
      Measure. This may not be the same as the Sales Unit of Measure. This is found on the
      Sales Order line. To view the Base, Sales, and Purchase units of measure for this item,
      click the Item Card in the right pane.


      NOTE: As soon as you enter a quantity for the item on the selected line, the Availability
      amount is reduced by that quantity. The Availability is the amount remaining after the
      quantity on the line is filled.

      The order processor makes a reservation of this sales line in the existing or future
      inventory:

               2. Click FUNCTIONS→RESERVE to open the Reservation window:
                   The window shows the quantities of item 80100 available to reserve.
                   Items can be reserved either from:
                   –    Existing stock (represented as item ledger entries on the line).
                   –    Open purchase orders.
                   –    Other inbound orders, such as transfer orders or production
                        orders.

      In the Reservation window, each option is represented by the corresponding
      line, summarizing the total unreserved and reserved quantities of all item ledger
      entries and all open purchase order lines respectively. It is possible to view the
      list of individual entries that make up the total quantity:

               3. In the Reservation window, select the line representing purchase
                  orders and then click LINE→AVAILABLE TO RESERVE. (Alternatively
                  press CTRL + F5)


 Microsoft Official Training Materials for Microsoft Dynamics ™                             2-21
Your use of this content is subject to your current services agreement
Trade in Microsoft Dynamics NAV 5.0

                               The Available – Purchase Lines window is displayed. This window
                               contains general information about the purchase line and quantity
                               details on unposted line quantity and existing reservations made for
                               the purchase line. The Current Reserved Quantity field contains
                               the quantity currently reserved.


                          4. Close the Available – Purchase Lines window to return to the
                             Reservation window.
                               The Quantity to Reserve field on the header contains the quantity
                               copied from the Quantity field on the line for the reservation. If a
                               partial shipment has occurred, the quantity to reserve corresponds
                               with the Outstanding Quantity field.
                               Notice that the Quantity to Reserve field contains 50 units instead
                               of the 250 specified on the sales line. For reservations, the program
                               operates with the base unit of measure – which are boxes in this case
                               – and not the sales unit of measure (packs), specified on the sales
                               order. Recalculation is based on one box that contains five packs.
                               There are three options when reserving items:
                               –   Auto Reserve – Automatically reserve items in the Reservation
                                   window.
                               –   Reserve from Current Line – Reserve the items from the selected
                                   reservation line. This is a manual reservation option.
                               –   Cancel Reservation from Current Line – Cancel reservation of
                                   the items from the selected reservation line.

                          5. In the Reservation window, click FUNCTION→AUTO RESERVE.
                               The program updates the Reserved and Available Quantity fields to
                               reflect the reservation. When the automatic reservation function is
                               used, the program reserves items from item ledger entries before it
                               reserves items from the purchase order lines.


                  NOTE: For better control over inventory, select the items using the Reserve from
                  Current Line option instead of letting the program do it.

                               When a reservation is made, the program creates a reservation entry.
                          6. On the sales order, select the line for item 80100 and then click
                             LINE→RESERVATION ENTRIES.

                  The window that appears shows that the quantity has been reserved from the
                  specified location.

                  This completes handling the tasks associated with reserving items.


2-22         Microsoft Official Training Materials for Microsoft Dynamics ™
            Your use of this content is subject to your current services agreement
Chapter 2: Sales Order Management


               Document Status
               The Status field on a document indicates whether the document is still open or
               released.

               When the document is Open, it implies that it is still undergoing changes and has
               not been released to the next stage of processing, for example, the warehouse
               handling. The order processor can set up batch posting to post only released
               orders. This enables separating the order entry and posting tasks.

               The Released status indicates that the salesperson has completed entering the
               order details, and the order is now ready for the next stage of processing.
               Information (price, currency, quantity, and so on) in the released order cannot be
               changed without reopening the order.

               An order can be released in two ways:

                        •   Automatically, when a single shipment has been posted for the order.
                        •   Manually, by using the release function (or alternatively, CTRL +
                            F11).

               Typically, releasing manually is relevant for companies with a separate
               warehousing environment.

               NOTE: The order document status is not connected to the availability calculations for
               the item on the order. Although an order has not been released, it is included in overall
               availability calculations.


Posting Orders
               Posting an order implies forwarding the financial value of a transaction to
               dedicated accounts in the general ledger. Additionally, quantity and financial
               information about the transaction is forwarded to subsidiary ledgers, such as
               customer and item entry ledgers (with associated value entries) that calculate
               various sales and inventory statistics.

               Because all sales transactions involving selling items to a customer include
               quantity and value (price and cost) information, the posting function is divided
               into two parts: Shipment (quantity change) and invoice (value change) posting.
               When posting an invoice, the two parts occur at the same time, without an option
               of separation. Posting an order, however, can be done by registering the order
               shipment first, while the order invoicing can occur later. This gives companies
               operational flexibility and enables them to benefit from the functionality that
               supports this process.


          Microsoft Official Training Materials for Microsoft Dynamics ™                             2-23
         Your use of this content is subject to your current services agreement
Trade in Microsoft Dynamics NAV 5.0

                  This functionality includes:

                           •   Combining several shipments in one invoice.
                           •   Undoing a quantity record for a posted but not yet invoiced
                               shipment.

                  Shipping
                  The Qty. to Ship and the Qty. to Invoice fields on a sales order represent the
                  posting quantities. The values in these fields are filled in automatically by the
                  program at the time when the quantity is entered in the Quantity field for a sales
                  line.

                  NOTE: When a location for a sales line uses the warehouse management functionality
                  (such as, for example, inventory/warehouse pick and put-away documents), the Qty. to
                  Ship and the Qty. to Invoice fields are blank and posting is not possible. This relates to
                  shipping and invoicing tasks performed in the warehouse, and it is from there that the
                  order posting occurs.
                  To continue with posting from the sales order, enter the quantities manually.

                  If it is required, the order processor can reduce the quantities in the Qty. to Ship
                  and Qty. to Invoice fields before posting, and thereby shipping and invoicing the
                  order partially. To post a partial shipment (invoicing), the Shipping Advice field
                  on the order header must contain Partial.

                  An order can have as many shipments and invoices as necessary. In partial order
                  posting, the Quantity Shipped and Quantity Invoiced fields indicate the
                  completed part of the order.

Demonstration − Performing a Partial Shipment
                  As a result of handling tasks described in the previous demonstrations, the sales
                  order for customer 10000 is ready to be shipped. At the last minute, however, the
                  representative for the customer calls Cronus to say that they only want half of the
                  shipment of item 70000 delivered now.

                  Steps
                  The order processor must now do a partial shipment of the line. The other order
                  lines are shipped as arranged.

                           1. Locate the sales order for customer 10000 created earlier.
                           2. In the Qty. to Ship field for the first line, change the quantity from
                              250 to 25 (entered by mistake, instead of 125). In the Qty. to Ship
                              field for the third line, enter 250 (to enable posting from the order
                              instead of through a warehouse). Click OK to accept the warning
                              message that appears.


2-24         Microsoft Official Training Materials for Microsoft Dynamics ™
            Your use of this content is subject to your current services agreement
Chapter 2: Sales Order Management

               Post the sales order as shipped, not invoiced:

                       3. Click POSTING→POST and select Ship.
                           Upon posting, the program creates a posted shipment document that
                           contains all the shipping details of the sales order.
                       4. From the Sales & Marketing menu, click HISTORY→POSTED
                          SHIPMENTS and locate the new document.

                           Realizing the mistake of entering and posting the incorrect quantity
                           for the first sales line, the order processor can undo the wrongly
                           posted quantity.


               To correct the wrongly posted quantity:

                       5. In the posted sales shipment, select the line for item 70000 and then
                          click FUNCTIONS→UNDO SHIPMENT. Click Yes to confirm the action.
                           The program inserts a corrective line with the same negative quantity
                           as the one being corrected in the posted shipment document and
                           selects both lines as corrective using the Correction field. (Use the
                           Show Column function to make the Correction field visible.)
                           At the same time, the quantity in the Quantity Shipped field on the
                           sales order in question is set to zero, while the Qty. to Ship field
                           contains the same value as the Quantity field. This implies that the
                           posting process for this line can be repeated.
                       6. Locate the sales order. In the Qty. to Ship field for the first line,
                          change the quantity from 250 to 125.
                       7. Post the order as shipped.
               The program updates the Qty. to Ship field for the partially shipped line to
               indicate the remaining quantity.

               Posting a shipment recognizes that a certain item quantity has left the company's
               inventory. The financial value of the corresponding transaction is not registered
               until the sales order is posted as invoiced. This implies that no G/L and customer
               ledger entries have yet been created, and the cost and price amounts on the
               created item ledger entries equal zero. Learn more about inventory costing in the
               Inventory Costing manual.

Invoicing a Combined Shipment
               In some cases, it is most efficient to combine several shipments into one invoice.
               Sometimes the customer requires this procedure.


          Microsoft Official Training Materials for Microsoft Dynamics ™                          2-25
         Your use of this content is subject to your current services agreement
Trade in Microsoft Dynamics NAV 5.0

                  Posting orders as invoiced follows the same principles as posting order
                  shipments:

                          •   An order can be invoiced completely or partially.
                          •   When posted as invoiced, order information transfers to a separate
                              document – a posted invoice.

                  Additionally:

                          •   G/L, customer, and VAT entries are created.
                          •   When completely invoiced (no outstanding quantity to invoice on
                              any of the order lines) the order is deleted automatically. This is with
                              the exception of when an order is invoiced through a combined
                              shipment.
                          •   Several shipments can be combined into one invoice.

                  The following demonstration shows how several shipments for one customer are
                  combined into one invoice.

Demonstration − Invoicing a Combined Shipment
                  A bookkeeper at Cronus wants to invoice all the orders recently shipped to
                  customer 10000. The shipments are combined into one invoice.

                  Steps
                  The bookkeeper performs the following steps:

                          1. To create a new invoice, select the Sales & Marketing menu and then
                             click ORDER PROCESSING→INVOICES. Press F3.
                          2. Enter the customer details on the header.
                  To retrieve all the posted shipment lines for the customer:

                          3. In the sales invoice, click FUNCTION→GET SHIPMENT LINES
                          4. Select all the lines and then click OK.
                  The program copies the shipment lines to the invoice.

                          5. Post the invoice.
                  The program updates the Quantity Invoiced fields on the lines of related sales
                  orders.


2-26         Microsoft Official Training Materials for Microsoft Dynamics ™
            Your use of this content is subject to your current services agreement
Chapter 2: Sales Order Management

               When an order is completely invoiced using a combined shipment function, it is
               not deleted automatically. This is done manually or with the Delete Invoiced
               Sales Order batch job. This batch job, and other sales-related batch jobs, is
               described in an appendix.

               If bookkeepers post a large number of sales documents, consider batch posting
               the documents instead of posting the documents individually. Access the Batch
               Post option by clicking Posting on the sales document. Refer to online Help for
               more information.

Process Prepayment
               Prepayment is a new functionality in Microsoft Dynamics NAV available from
               version 5.0 and onward for both sales and purchases. Prepayments enable a
               company to require customers to pay a part of the total amount of their order,
               specified as an amount or a percentage, in advance of the final invoice. On the
               Purchases side, prepayments enable a company to document and process
               prepayments that are required by vendors.

               Prepayments Set Up
               Using the new prepayments functionality requires that special general ledger
               accounts, posting groups, payment terms and number series are set up for this
               purpose. In addition, the prepayment percentages for selected vendors and
               customers in combination with special items need to be defined. Refer to the
               Finance training material for additional information.

               Using Prepayments
               Prepayment invoices are created from a sales or purchase order, using the new
               prepayment invoice option. The prepayment amount on the order is calculated
               based on the prepayment percentage populated from item, customer, or vendor
               cards. Users can edit the prepayment percentage or amount. Instead of using a
               percentage, a specific amount can be defined for the entire sales or purchase
               order. Prepayment amounts are set in the Sales Order Statistics window and the
               Purchase Order Statistics window in the Prepayment tab.

               For prepayment sales orders, the following steps list the typical process flow:

                       1. Create a sales order with a prepayment requirement.
                       2. Send a prepayment invoice for the prepayment amount to the
                          customer.
                       3. The customer pays the prepayment amount.
                       4. Apply the prepayment amount to the sales order.
                       5. Ship the order to the customer.


          Microsoft Official Training Materials for Microsoft Dynamics ™                         2-27
         Your use of this content is subject to your current services agreement
Trade in Microsoft Dynamics NAV 5.0

                          6. Create a sales invoice for the total amount of the sales order minus
                             the prepayment amount.
                          7. Receive payment from the customer and post the payment to the
                             sales order.
                  For prepayment purchase orders, the following steps list the typical process flow:

                          1. Create a purchase order with a prepayment requirement.
                          2. Post a prepayment invoice for the prepayment amount.
                          3. Send the prepayment amount to the vendor.
                          4. Apply the prepayment amount to the purchase order.
                          5. The vendor ships the order.
                          6. Create a purchase invoice for the total amount of the purchase order
                             minus the prepayment amount.
                          7. Send the payment to the vendor and post the payment to the purchase
                             order.
                  The following demonstration presents the typical flow for a sales order with
                  prepayment specified as a percentage.

Demonstration − Creating Sales Order with Prepayment
Percentage
                  Creating prepayment orders is similar to creating other sales and purchase orders.

                  Steps
                  To create a prepayment order, follow these steps:

                          1. Create a new sales or purchase order and fill in the header.
                          2. Click the Prepayment tab.


                              FIGURE 2-6: SALES ORDER FORM→PREPAYMENT TAB


2-28         Microsoft Official Training Materials for Microsoft Dynamics ™
            Your use of this content is subject to your current services agreement
Chapter 2: Sales Order Management

               3. The Prepayment % field is filled in automatically if there is a
                  default prepayment percent on the customer or vendor card. The
                  contents of this field can be edited.
                   The prepayment percent from the customer or vendor card only
                   applies to lines that do not have a default prepayment percent set up
                   for the customer-item or vendor-item combination.
               4. Place a check mark in the Compress Prepayment check box to
                  combine the prepayment lines on the invoice when they have the
                  same:
                   –    General Ledger account for prepayments (as defined in the
                        General Posting Setup)
                   –    Dimensions

                   The Compress Prepayment check box is selected as a default. If the
                   Compress Prepayment check box is left blank, an invoice is created
                   by using a separate line for each prepayment amount.
               5. Fill in the sales or purchase lines.
               6. For each order line, the contents of the Prepayment % field are
                  determined as follows:
                   –    If a default prepayment percent is set up for the item on the line,
                        it is automatically copied into the Prepayment % field.
                   –    If no default prepayment percent is set up for the item, the
                        prepayment percent from the customer or vendor card is copied
                        from the order header.
                   –    The Prepayment % field can be entered or changed manually
                        on a line-by-line basis.

      Although there can be different prepayment percents for each of the order lines, a
      single prepayment percent can be applied to the whole order. This is done after
      all the order lines are completed. To enter one prepayment percent that applies to
      all the order lines:

               7. On the Prepayment tab in the order header, enter the prepayment
                  percent in the Prepayment % field.
               8. The program displays a warning message. Click OK.
      The prepayment percentage on all the lines is updated to match the header.

      NOTE: As soon as a number is entered into the Prepayment % field on the header and
      the lines are updated, users cannot revert to the individual prepayment percents that
      existed for each line. To return to the individual prepayment percents, either delete and
      re-enter the lines or manually type the prepayment percent on the lines.


 Microsoft Official Training Materials for Microsoft Dynamics ™                             2-29
Your use of this content is subject to your current services agreement
Trade in Microsoft Dynamics NAV 5.0


Conclusion
                  Sales Order Management involves all the steps from creating a quotation or
                  blanket order to shipping and invoicing the sales order.
                  The accurate management of the sales transaction flow can help companies to
                  ensure a high level of customer service.

                  The section titled "Sales Prices and Discounts" will detail how to establish sales
                  prices and discounts, and other important aspects of customer service.


2-30         Microsoft Official Training Materials for Microsoft Dynamics ™
            Your use of this content is subject to your current services agreement
Chapter 2: Sales Order Management


Lab 2.1 − Handling Sales
                Scenario: You are the order processor at Cronus. Customer 20000 orders 1200
                units of item 70003. The customer requests that the order be delivered with 300
                units every week during the month of February (starting on 02/01/08). The
                delivery is shipped to the customer's subsidiary in Manchester.

                At the time of shipping the first delivery of item 70003, the customer also orders
                25 units of item 1968-W and 50 units of item 80100. Because of several
                considerations, the order processor decides to drop ship the order for item 1968-
                W (from vendor 30000) and confirm that the 50 units of item 80100 are reserved
                for this sales order.

                The customer also only wants half of the ordered quantity of item 70003 in this
                shipment.

                Challenge Yourself!
                Handle this scenario using the sales management functionality. Assume 01/28/08
                is the work date, that the order for item 70003 is to be shipped from the Blue
                location, and that the order for item 80100 is to be shipped from the Green
                location.

                Need a Little Help?
                The solution is provided in Appendix C.


           Microsoft Official Training Materials for Microsoft Dynamics ™                     2-31
          Your use of this content is subject to your current services agreement
Trade in Microsoft Dynamics NAV 5.0


Quick Interaction: Lessons Learned
                  Take a moment and write down three key points you have learned from this
                  chapter:

                  1.


                  2.


                  3.


2-32         Microsoft Official Training Materials for Microsoft Dynamics ™
            Your use of this content is subject to your current services agreement
Chapter 3: Sales Prices and Discounts


CHAPTER 3: SALES PRICES AND DISCOUNTS
Objectives
                The objectives are:

                        •   Overview of Sales Prices
                        •   Define Sales Prices
                        •   Set up Sales Prices and Customer Price Groups
                        •   Maintain Sales Prices
                        •   Set up Line Discounts and Invoice Discounts

Introduction
                Sales Prices and Discounts describe the background and key features and pricing
                functionality of Microsoft Dynamics™NAV.
                The right pricing of a company’s services and items is a crucial factor in the sales
                order management process. It directly affects how the company it placed in the
                marked place, the relationship with the customers, and the bottom line result.

                To explain how the program supports companies in their tasks of managing sales
                prices and discounts, demonstrations and examples are used. For an overview of
                typical procedures associated with setting up, using, and maintaining sales prices
                and discounts, refer to the respective topic in online Help.


           Microsoft Official Training Materials for Microsoft Dynamics ™                        3-1
          Your use of this content is subject to your current services agreement
Trade in Microsoft Dynamics™ NAV 5.0


Overview of Sales Prices
                 Companies, both producers and distributors, that are operating in price-sensitive
                 markets with diverse customer bases, often need pricing strategies that enable
                 them to differentiate, attract, and maintain customers. One of the typical
                 strategies is based on having several individual price agreements with large
                 customers and offering standard prices and discounts to other customers within a
                 specific market segment or across the segments. One agreement may cover more
                 than one individual customer if an agreement is made with a chain headquarters,
                 where items can be sold to customers of an individual chain member.

                 These strategies imply that companies’ sales and marketing departments develop
                 and maintain comprehensive and complex price and discount structures. The
                 complexity of price and discount structures increase when companies do
                 internally-driven initiatives, such as special campaigns aimed at removing soon-
                 to-be-obsolete items or as a way to introduce new items to the market.

                 Maintaining flexible price and discount structures can appear to be a tedious and
                 resource-demanding task. Without suitable price management tools, price
                 agreements, and special sales, prices are stored in private folders, spread sheets,
                 binders, and so on. This frequently creates problems related to price consistency,
                 when the customer is faced with price confusion or even billed the wrong price.
                 This leads to customer dissatisfaction and lost sales or unnecessary rework for
                 the company.

                 As the Internet is becoming a preferred form of shopping alongside conventional
                 channels, such as call center, mail, and fax, the same requirements of segment-
                 tailored prices must be met consistently regardless of the channel used.

                 Sales Line Pricing and Sales Line Discounting offer comprehensive pricing
                 functionality to companies with flexible price structures. Specifically, the
                 application provides a functionality characterized by the following key features:

                         •   Target specific customer segments
                         •   Consistent and transparent pricing
                         •   Minimized maintenance costs


3-2         Microsoft Official Training Materials for Microsoft Dynamics ™
           Your use of this content is subject to your current services agreement
Chapter 3: Sales Prices and Discounts


Sales Prices
                The ability to specify price information for each item on the item card
                significantly improves sales price management. The program automatically
                retrieves price information that is stored on an item card to copy it to the sales
                order line for an item. This price information is universal in nature; it is the same
                in all sales situations regardless of individual price agreements or different
                pricing policies applied toward customer profiles. These agreements and policies
                may be based on several conditions:

                        •   Item variant
                        •   Quantity purchased
                        •   Currency paid
                        •   Order date

                To manage and maintain alternative sales prices, sales representatives need an
                extended pricing functionality that goes beyond the standard item card. In
                Microsoft Dynamics NAV, Sales Line Pricing offers comprehensive pricing
                functionality. Sales representatives need to perform the following to maintain
                sales prices:

                        •   Setting up alternative sales prices
                        •   Using the pricing mechanism
                        •   Maintaining sales prices

                Setting Up Alternative Sales Prices
                Salespeople must use the Sales Prices table to record alternative sales prices a
                company has established by using their customers/group of customers or uses to
                strategically segment their customer base.

                Access the Sales Prices window from either the customer card or the item card.


           Microsoft Official Training Materials for Microsoft Dynamics ™                         3-3
          Your use of this content is subject to your current services agreement
Trade in Microsoft Dynamics™ NAV 5.0

                 From the Sales & Marketing menu, click Customers and locate customer card
                 for customer 10000. Click SALES→PRICES to open the Sales Prices window:


                 FIGURE 3-1: SALES PRICES WINDOW

                 In this window, a sales representative can specify the conditions that must be met
                 before a customer is offered a unit price for an item. For example, the conditions
                 can require that the customer belongs to a particular customer price group or a
                 purchase is made within a certain period. Special sales prices can also depend on:

                         •   Unit of measure
                         •   Item variant
                         •   Minimum quantity
                         •   Currency

                 The sales price table provides the option for defining if alternative prices are
                 combined with line and invoice discounts when a sales price is offered.
                 (Controlling the combination of sales prices and discounts is described in more
                 detail in the topic “Allowing/Disallowing Discounts.”)

                 Because this window was accessed through the customer card, the Sales Type is
                 set to Customer and the Sales Code is set to the customer number on the
                 customer card. These default settings can be edited. The Sales Type options are:

                         •   Customer
                         •   Customer Price Group
                         •   All Customers
                         •   Campaign
                         •   None

                 The Sales Code options depend on the selection in the Sales Type field.


3-4         Microsoft Official Training Materials for Microsoft Dynamics ™
           Your use of this content is subject to your current services agreement
Chapter 3: Sales Prices and Discounts

                The following scenario illustrates a situation where a company needs to set up
                individual prices based on both:

                        •   A price agreement reached with one of its key customers about some
                            selected items
                        •   A pricing decision targeting a specific customer segment

Demonstration − Setting up Sales Prices
                Cronus' sales to customer 40000 have been increasing lately. Until now, the
                customer has made purchases based on Cronus’ ordinary price rates, but now
                want to purchase items at more favorable prices. Based on the agreement, a sales
                representative decides that the customer can save 50 LCY for any purchase of
                item 1976-W if the quantity is at least ten units.

                At the same time, as part of a long-term marketing strategy, the sales manager
                decides that the company’s high performing wholesale customers are granted, as
                a group, a favorable price of 800 LCY when buying item 1972-W during the
                month of February, 2001.

                A sales representative must set up these decisions in the program.

                Steps
                Alternative sales prices are entered in the Sales Prices window.

                        1. Open the customer card for customer 40000. Click SALES→PRICES.
                            In the Sales Prices window, enter the conditions under which the
                            customer can obtain a favorable price rate (notice that the Sales
                            Type and the Sales Code fields contain values. This is done by
                            default as based on the respective filters in the window’s header).
                        2. In the Item No. field, select 1976-W, in the Minimum Quantity
                           field enter 10, and in the Unit Price field, enter 206.10 (or
                           alternatively, 256.10-50). This is the reduced unit price.
                Assume that the price agreement with this customer takes effect on the current
                date, which is 01/25/08.

                        3. In the Starting Date field, enter 01/25/08.
                            The sales representative may not need to enter an ending date as a
                            condition in the price agreement. If an agreement is renegotiated at a
                            later date, a new sales price line is entered with a new starting date,
                            which replaces the previous agreement.
                            To implement the pricing decision for the company’s wholesalers,
                            the sales manager must consider grouping the wholesalers together
                            and applying the price reduction to the whole group. Such an
                            approach is an efficient a way to manage the sales prices compared
                            to recording individual prices for each customer.


           Microsoft Official Training Materials for Microsoft Dynamics ™                         3-5
          Your use of this content is subject to your current services agreement
Trade in Microsoft Dynamics™ NAV 5.0


Demonstration − Setting up Customer Price Groups
                 After the company has decided on how its customers are categorized related to
                 price rates, the groups are set up in the program in the Customer Price Groups
                 table.

                 Steps
                 Perform the following steps:

                         1. From the Sales & Marketing menu, click ORDER PROCESSING →
                            SETUP→CUSTOMER PRICE GROUPS.

                             In this table, the user can assign a code to each customer price group.
                             When the price group code is entered in the Sales Prices window,
                             the program copies the information from the customer price group
                             table to the corresponding fields in the Sales Prices table.
                 Assume that the sales manager wants to create a group that consists of the
                 company's key wholesalers, to whom a reduced price rates will be offered:

                         2. In the Customer Price Groups window, in the Code field, enter
                            Wholesale1, and in the Description field, enter Wholesalers, Key
                            Performers.
                             The Allow Line Disc. and Allow Invoice Disc. fields offer the
                             possibility to combine the alternative price rate set up for a customer
                             group with two other discount types that may apply to customers in
                             this group in certain sales situations.
                             The program copies the status of these two discount-related fields to
                             the corresponding fields on the line with the customer price group
                             code selected in the Sales Prices window. The user can always
                             change the enabled discount combinations.
                         3. In the Customer Price Groups window, make sure that the Allow
                            Line Disc. and Allow Invoice Disc. fields are selected.
                 Assume that customers in the Wholesale1 group are buying item 1972-W for the
                 price of 800 LCY:

                         4. In the Customer Price Groups window, click CUST. PRICE
                             GROUP→SALES PRICES.


3-6         Microsoft Official Training Materials for Microsoft Dynamics ™
           Your use of this content is subject to your current services agreement
Chapter 3: Sales Prices and Discounts

               5. In the Item No. field, select item 1972-W, and in the Unit Price
                  field, enter 800. In the Starting Date and the Ending Date fields,
                  enter 02/01/08 and 02/28/08 respectively.
      Because customers are offered a regular price of 850 LCY both before and after
      the period, you can reflect that in the the program by creating a separate line in
      the Sales Prices window.

               6. On the next line, select item 1972-W. In the Unit Price field, type
                  850. For this line, leave the starting and ending dates blank.

      NOTE: Using the functionality described above assumes customers have access to
      Sales Line Pricing and maintain price-related information in the Sales Prices window
      without using the standard pricing functionality on the item card.


      For customers moving from standard pricing to Sales Line Pricing, this may require
      transferring all the item price information from item cards to the sales prices table.
      Transferring the information can be done using the Suggest Item Price on Worksheet
      batch job, described in detail later in the chapter.

      Assume that customer 40000 is a Cronus key wholesaler. Assign this customer to
      the price group newly created:

               7. Open the customer card for customer 40000. On the Invoicing tab, in
                  the Customer Price Group Code field, select Wholesale1.
      This completes the implementation of pricing decisions.

      Sales Prices Including/Excluding VAT
      The principles of including/excluding VAT in the unit price calculation are
      explained in the Financial Management course.

      Using the Pricing Mechanism
      Setting up alternative prices in the program supports sales representatives who
      always offer customers the best prices. The best price is defined as the lowest
      possible price with the highest possible line discount on the order date.

      When an order processor creates an order for a customer, the program checks
      whether:

               •   There are alternative sales prices set up for the customer.
               •   The sales header and line details meet the conditions for applying an
                   alternative price.

      If all the conditions are met, the program copies the applicable price from the
      Sales Prices window to the Unit Price (Excl./Incl. VAT) field on the sales line.
      Refer to Help in the "Best Price" topic on how the program selects the best price
      when more than one alternative price is set up.


 Microsoft Official Training Materials for Microsoft Dynamics ™                                3-7
Your use of this content is subject to your current services agreement
Trade in Microsoft Dynamics™ NAV 5.0

                 If there are no alternative sales prices or the conditions for applying an
                 alternative price are not satisfied, the program uses the regular unit price
                 specified on the item card as a suggestion on the sales document.

Demonstration − Creating a Sales Order with Sales Price
Information
                 Cronus' customer 40000 orders eight units of item 1976-W and five units of item
                 1972-W. The order date is of 01/28/08. The customer inquires about the unit
                 price of the purchase.

                 The order processor must create a sales order and inform the customer about the
                 price. In addition, the order processor may investigate if there are other
                 conditions the customer may want to accept to obtain a better price.

                 Steps
                 Create a sales order for customer 40000 in the following way:

                         1. Enter the header information, order date, and the two sales lines.
                             The Sales Prices field in the right pane shows the order processor if
                             there are alternative prices for the item on the line applicable to the
                             customer. If the field contains a number in parentheses, the order
                             processor may want to investigate the conditions on which more
                             favorable prices can be offered to the customer.
                         2. Select the first sales line and then click the Sales Prices field.
                             The Get Sales Price window contains the details of all the prices of
                             item 1976-W that the customer 40000 is allowed to obtain under
                             different conditions.

                 NOTE: The Get Sales Price window can also be accessed by selecting the line and
                 clicking FUNCTIONS→GET PRICE.

                             In this case, if the customer agreed to buy two more units of the item,
                             then the customer receive a quantity break. After the quantity break
                             the purchase is based on a reduced unit price.
                         3. Select the second sales line and then click the Sales Prices field. The
                            details for all the prices and conditions for item 1972-W display.
                             The order processor notifies the customer that he or she can obtain a
                             better price for the item if he or she postpones the order until
                             February 1.
                             Assume the customer accepted the new conditions to obtain better
                             prices for both products.


3-8         Microsoft Official Training Materials for Microsoft Dynamics ™
           Your use of this content is subject to your current services agreement
Chapter 3: Sales Prices and Discounts

              4. Enter the sales order details as based on the agreement with the
                 customer.
              5. After changing the order date, select the second sales line, and then
                 click the Sales Prices field.
              6. Select the line in the Get Sales Price window that shows the
                 discount for buying in February. Click OK to update the price on the
                 line.
      You can view the discounted price for each line in the Unit Price field.


 Microsoft Official Training Materials for Microsoft Dynamics ™                      3-9
Your use of this content is subject to your current services agreement
Trade in Microsoft Dynamics™ NAV 5.0


Lab 3.1 − Managing Alternative Sales Prices
                 Scenario: You are the order processor at Cronus responsible for restructuring
                 prices for item 70200 and item 1928-S according to the following conditions.

                 Challenge Yourself!

                         1. Item 70200: If any of Cronus’ customers buys this item in boxes
                            (which contain 100 pieces) instead of pieces, offer 30 LCY off the
                            regular price.

                 HINT: Add a new unit of measure BOX that contains 100 pieces, to the item’s units of
                 measure list.

                         2. Item 1928-S: When Cronus' overseas customer 31505050 buys this
                            item and pays in local currency (EUR), you offer 1 LCY off the
                            item’s regular price.

                 NOTE: The sales price for an item can be found on the Invoicing tab of the item card.

                 Need a Little Help?
                 The solution is provided in Appendix C.


3-10        Microsoft Official Training Materials for Microsoft Dynamics ™
           Your use of this content is subject to your current services agreement
Chapter 3: Sales Prices and Discounts


Lab 3.2 − Creating Sales Prices for a Campaign
                Scenario: If you are familiar with Microsoft Dynamics NAV Relationship
                Management functionality, try the following exercise:

                Challenge Yourself!
                Cronus’ sales manager is clearing out the stock of item 766BC-A within the
                period 02/01/08 to 02/28/08.

                        1. The sales price of item 766BC-A is 4000 LCY. The offer goes to all
                           business relations who are customers and whose job responsibility is
                           purchasing.

                HINT: To find the Sales Prices window, open the Sales & Marketing menu and then
                click MARKETING→CAMPAIGNS. Click the Campaign button in the Campaign card
                window. Use the wizard to create the segment. Remember to select Campaign Target
                on the Campaign tab of the Segment window.

                        2. Open the campaign by clicking FUNCTIONS→ACTIVATE SALES
                           PRICES/LINE DISCOUNTS.

                        3. To check that the business relations obtain the correct price, make a
                           sales quote for one of the contacts.

                Need a Little Help?
                The solution is provided in Appendix C.


           Microsoft Official Training Materials for Microsoft Dynamics ™                      3-11
          Your use of this content is subject to your current services agreement
Trade in Microsoft Dynamics™ NAV 5.0


Maintaining Sales Prices
                 Adjusting and changing item prices is a task sales managers and sales
                 representatives perform periodically because of changing market conditions, new
                 agreements with customers, and new sales initiatives.

                 Depending on the scope of a pricing policy, companies typically store price
                 information about item cards where the price structure is simple. For more
                 complex structures, individual sales prices are specified and stored in the sales
                 prices table. Using a combination of the two is also commonplace. In the
                 program, sales representatives have two tools that help them in preparing and
                 adjusting sales prices. Which one they use depends on the preferred pricing
                 setup.

                 The Sales Price Worksheet is used to enter changes to the alternative sales prices
                 recorded in the Sales Prices table. It is also used to apply those changes to an
                 individual customer, a group of customers, or all customers under specified
                 conditions.

                 The Adjust Item Costs/Prices batch job is used to update the cost- and price-
                 related values in the corresponding fields on the Invoicing tab of the item card.
                 The outcome of this batch job does not affect the alternative sales prices.

                 Sales Price Worksheet
                 The main function of the sales price worksheet is to enable sales representatives
                 to work with sales prices in a similar manner as they do in a Microsoft® Excel
                 spreadsheet or other means. By providing an overview of the existing pricing
                 structure (either based on item prices or alternative sales prices), the worksheet is
                 a convenient space where a sales representative can simulate, rearrange, and
                 update price information in a consistent and efficient way.

                 Sales prices entered in the worksheet are only the suggested prices, which do not
                 take effect until they are implemented (by running the Implement Price Change
                 batch job). Generally, suggestions in the worksheet for changing the existing
                 sales prices can be created in two ways: Either manually or automatically.

                 To fill in the worksheet automatically, run one of the following batch jobs:

                         •   Suggest Sales Price on Worksheet. With this batch job, sales
                             representatives can suggest unit sales prices based on sales prices
                             specified in the Sales Prices window. They can change sales prices
                             already set up or create new ones.
                         •   Suggest Item Price on Worksheet. With this batch job, sales
                             representatives can suggest unit sales prices based on the prices in
                             the Unit Price field on the item cards. For example, giving a
                             particular customer group a unit price that is lower than the regular
                             price. The price in the Unit Price field on the item card is not
                             changed by this batch job.


3-12        Microsoft Official Training Materials for Microsoft Dynamics ™
           Your use of this content is subject to your current services agreement
Chapter 3: Sales Prices and Discounts

               Both batch jobs end by displaying the newly calculated unit prices in the Sales
               Price Worksheet. Users can change unit prices that are not satisfactory or delete
               unnecessary lines.

Demonstration − Creating Sales Prices and Customer Groups
               The following demonstration explains how sales prices valid for one customer
               group are also applicable for another customer group under an additional
               condition.

               Currently, Cronus offers key wholesale customers reduced prices on item 1972-
               W. In the program, these customers are categorized into a price group and the
               reduced price is applied to the whole group. A sales representative wants to grant
               other wholesalers the same price offer, however, on the condition that the
               quantity of their purchase exceeds 15 units.

               The sales representative's task is to create new sales prices for the specified
               customers.

               The efficient way of performing the task in this demonstration is to copy existing
               sales prices from one customer group to another and make necessary
               modifications.

               Steps
               This procedure can be done by using the Sales Price Worksheet.

                       1. From the Sales & Marketing menu, click INVENTORY &
                           PRICING→SALES PRICE WORKSHEET.

                       2. In the worksheet, click FUNCTIONS→SUGGEST SALES PRICE ON WKSH.
                           In the request form for the batch job, define what is included in the
                           batch job by setting filters. By filling in the Sales Price tab,
                           determine the filtering of existing sales prices when copying them to
                           the worksheet.

                           Entering filters on the Options tab determines the suggestion as to
                           whom (a customer, customer group, all customers) and on what
                           conditions the sales prices (as specified on the Sales Price tab) are
                           applied. Read the online Help for more information with the request
                           form.


                       3. On the Sales Price tab, set the filter for the Sales Type field to
                          Customer Price Group and the Sales Code filter to Wholesale1.
                       4. On the Options tab, select Customer Price Group as a sales type.
                          Click the AssistButton in the Sales Code field to open the
                          Customer Price Group window.


          Microsoft Official Training Materials for Microsoft Dynamics ™                         3-13
         Your use of this content is subject to your current services agreement
Trade in Microsoft Dynamics™ NAV 5.0

                         5. Create a new customer group named Wholesale2. Enter
                            "Wholesalers, others" in the Description field and place check marks
                            in both the Allow Line Disc. and Allow Invoice Disc. fields.
                         6. Select the newly created group and then click OK.
                 Since this new customer price group does not have alternative sales prices set up,
                 when copying prices valid for the Wholesale1 group to the worksheet, indicate
                 that the prices must be created.

                         7. On the Options tab of the request form, select the Create New
                            Prices field.
                         8. Click OK to start the batch job.
                 The program fills in the Sales Price Worksheet table with price suggestions as
                 based on the specifications of the batch job.


                 FIGURE 3-2: SALES PRICES WORKSHEET WINDOW

                 The reduced prices in the period of 02/01/08-02/28/08 for the customers in this
                 group are valid on condition that they buy at least 15 units of the item.

                         9. For the line in the worksheet that has the starting and ending dates, in
                            the Minimum Quantity field, enter 15.
                 The contents of the fields in the worksheet are temporary until they are deleted or
                 transferred to the Sales Price table.

                         10. Click FUNCTIONS→IMPLEMENT PRICE CHANGE. Click Yes to the
                             message that appears and asks if you want to rename the record.
                             Click on the request form to start the batch job.
                         11. Click Yes to delete the suggested price changes.
                             The batch job now creates alternative sales prices for the new
                             customer group in the Sale Prices window and deletes the
                             suggestion lines in the price worksheet.


3-14        Microsoft Official Training Materials for Microsoft Dynamics ™
           Your use of this content is subject to your current services agreement
Chapter 3: Sales Prices and Discounts

      Verify that the new sales prices have been created for the customer group
      Wholesale2.

              12. From the Sales & Marketing menu, click ORDER
                  PROCESSING→SETUP→CUSTOMER PRICE GROUPS. Select the
                  Wholesale2 group and then click CUSTOMER PRICE GROUPS→SALES
                  PRICES.

      The options that are provided for the Suggest Item Price on Worksheet batch
      job, also available from the sales prices worksheet, are identical to the Suggest
      Sales Price on Worksheet batch job. The only difference is that the suggested unit
      sales prices are retrieved from the Unit Price field on the item cards, instead of
      the Sales Price window.

      This batch job does not change the amounts in the Unit Price field on the item
      card. This is the function of another batch job called Adjust Item Costs/Prices.

      Adjust Item Costs/Prices
      When sales representatives update pricing information about item cards, they can
      use the Adjust Item Costs/Prices batch job. There is no worksheet associated with
      the Adjust Item Costs/Prices batch job. This means that changes specified for the
      batch job are implemented directly on the item cards upon completion of the
      batch job. This also implies that the price information about the item card is
      replaced; no historic records of the original information are kept.

      NOTE: Verify that the information in the request form of the batch job is correct before
      running the job.


 Microsoft Official Training Materials for Microsoft Dynamics ™                            3-15
Your use of this content is subject to your current services agreement
Trade in Microsoft Dynamics™ NAV 5.0


Lab 3.3 − Updating Sales Prices
                 Scenario: You have decided to make the modifications to current prices as
                 follows:

                         •   Because of changed market conditions, increase the prices offered to
                             all customers for selected items (from 70100 to 70104) by 10%. The
                             new prices take effect on 02/01/08. You also consider rounding the
                             new prices to the nearest whole LCY.
                         •   As Cronus’ overseas customer base expands, extend the offer of a
                             reduced price for item 1928-S (if the purchase is paid in EUR) valid
                             for customer 31505050 to all international customers.

                 HINT: Consider grouping overseas customers.


                 Challenge Yourself!
                 Implement these modifications using the appropriate batch jobs.

                 Need a Little Help?
                 The solution is provided in Appendix C.


3-16        Microsoft Official Training Materials for Microsoft Dynamics ™
           Your use of this content is subject to your current services agreement
Chapter 3: Sales Prices and Discounts


Line and Invoice Discounts
                Companies' pricing policies may include different kinds of discounts offered to
                the customers. It is common to distinguish three discount types:

                        •   Item-related
                        •   Invoice
                        •   Payment
                Item-Related Discounts
                In Microsoft Dynamics NAV, item-related discounts are referred to as line
                discounts and managed by using the Sales Line Discounting functionality. As
                with alternative sales prices, line discounts can be granted to customers on the
                basis of predefined conditions, such as minimum quantity of a purchase, unit of
                measure, currency paid, and so on Discounts can be offered to individual
                customers, groups of customers, or all customers. In addition, discounts can be
                applied to both individual items and group of items.
                Invoice Discounts
                Invoice discounts are granted on the basis of the total invoice amount
                independent of the item(s) being sold. Line and invoice discounts can be
                combined.
                Payment Discounts
                Payment discounts are only granted to a customer if the customer pays the total
                invoice amount within a specified time period. More information about payment
                discounts is provided in the Financial Management training manual.

                General Discount Setup
                Before using the line and invoice discount mechanism, the company must decide
                how they want discounts posted and whether invoice discounts are calculated
                automatically when the sales document is created or the user is to apply the
                calculating function to calculate discounts.

                These decisions are implemented in the Sales & Receivables Setup window.
                This window is found in the Sales & Marketing menu, by clicking SETUP→SALES
                & RECEIVABLES SETUP.


           Microsoft Official Training Materials for Microsoft Dynamics ™                     3-17
          Your use of this content is subject to your current services agreement
Trade in Microsoft Dynamics™ NAV 5.0

                 The Discount Posting field on the General tab offers four options for defining
                 the way invoice and line discounts are to be posted to the general ledger:

                         •   No Discounts
                         •   Invoice Discounts
                         •   Line Discounts
                         •   All Discounts

                 The user can specify whether and what type of sales discounts are posted to the
                 G/L separately. For a detailed definition of each option, read the online Help for
                 the field.

                 If the option is selected that determines whether a specific (line or invoice)
                 discount or both discounts are posted separately, the user must make sure that:

                         •   A dedicated account(s) is (for example, Sales Invoice Discount
                             account) created in the chart of accounts.
                         •   The option is set up in the General Posting Setup window.

                 When posting sales documents, the program uses the general business posting
                 group of the customer and the general product posting group of the item to
                 retrieve the account set up in the General Posting Setup window.

                 If discounts are not set up to be posted separately, they become part of a sales
                 amount posted to the Sales account.

Setting Up Line Discounts
                 Sales representatives use the Sales Line Discount table to record price discounts
                 agreed upon with their individual or group of customers. The table can also be
                 used to help strategically segment customer base and can be accessed from both
                 the customer card and the item card.

                 The Sales Line Discount window enables a sales representative to specify the
                 conditions that must be met before a customer is offered a discount price. For
                 example, the conditions can require that the customer buys a certain quantity or
                 that a purchase is invoiced in a specified currency before a discount can be
                 granted.

                 Similar to alternative sales prices, line discounts can be applied to an individual
                 customer, customer group, and all customers. Unlike sales prices, discounts can
                 be extended from a single item to several items grouped by common
                 characteristics.

                 The following demonstration illustrates a situation where a company has set up
                 price discounts for certain item categories based on a pricing decision that targets
                 a specific customer segment.


3-18        Microsoft Official Training Materials for Microsoft Dynamics ™
           Your use of this content is subject to your current services agreement
Chapter 3: Sales Prices and Discounts


Demonstration − Setting up Customer Discounts
               To manage the company’s discount structure, Cronus’ sales manager has
               categorized customers in two major groups, Large Account and Retail customers.
               Because the purchase volume differs from one customer group to another, the
               price discount offered to customers must differ.

               Price discounts are also offered depending on what item category the customer is
               purchasing: Bigger discounts for raw materials, and reduced discounts for
               finished and retail items.

               Notice how the sales manager has set up this discount structure in the program.

               Steps
               The discount groups for customers are set up in the Customer Disc. Groups
               window.

                       1. From the Sales & Marketing menu, click ORDER
                          PROCESSING→SETUP→CUSTOMER DISC. GROUPS.

               A code identifying a customer discount group can be assigned to a customer to
               indicate that this customer is allowed to receive the discount price specified for
               the group. This is done by selecting an appropriate code in the Customer Disc.
               Group field on the customer card.

                       2. Open the customer card for customer 30000. Click the Invoicing tab.
                           Customer 30000 belongs to the discount group of large accounts.


               Note the sales conditions that must be fulfilled before the group of large accounts
               can receive a discount.

                       3. On the customer card, click the AssistButton in the Customer Disc.
                          Group field to open the customer discount groups list. Select the
                          Large Account group and then click CUST. DISC. GROUPS→SALES LINE
                          DISCOUNT.

                           Customers that belong to the discount group can receive three
                           different discounts depending on the item group: FINISHED, RAW
                           MAT, and RESALE.
                           Categorizing items into discount groups is based on the same
                           principles as categorizing customers: The user must set up an item
                           discount group by giving it a code. The code is then assigned to the
                           individual item for which the user wants to apply a discount.


          Microsoft Official Training Materials for Microsoft Dynamics ™                       3-19
         Your use of this content is subject to your current services agreement
Trade in Microsoft Dynamics™ NAV 5.0

                 At Cronus, there are five item discount groups.

                         4. From the Sales & Marketing menu, click ORDER
                            PROCESSING→SETUP→ITEM DISCOUNT GROUPS. The Item Disc.
                            Groups window appears. It shows the item discount groups.
                             When using the line discount functionality, it is not mandatory to
                             assign customers and items to discount groups; discounts can be set
                             up for a combination of individual customers and items.
                 Create a line discount for customer 30000 offering 20 % discount when buying at
                 least 15 units of item 1972-W.

                         5. On the customer card for customer 30000, click SALES→LINE
                            DISCOUNTS.

                         6. In the Sales Line Discounts window, create a line with a Sales Type
                            of Customer and Sales Code of 30000. In the Type field, select Item
                            and select 1972-W in the Code field.
                         7. Type 15 in the Minimum Quantity field. In the Line Discount %
                            field, type 20.
                         8. Close the window.

Using the Line Discount Mechanism
                 Setting up a line discount supports the sales representatives in their task of
                 always offering the customers the best prices.

                 After the line discounts and terms are set up, when an order processor creates an
                 order/invoice for a specific customer, the program checks whether there are line
                 discounts set up for the customer in question and, if yes, that the sales header and
                 line details meet the conditions for applying a discount price.

                 If all these conditions are met, the program copies the applicable discount
                 percentage from the Sales Line Discounts window to the Line Discount % field
                 on the sales line and enters the calculated discount price in the Line Amount
                 Excl./Incl. VAT field. When more than one discount percentage is set up for a
                 customer, the program selects the highest discount to comply with “the best
                 price” rule (described in the online Help topic “Best Price”).

                 If there are no discounts recorded, or the conditions for applying a discount are
                 not satisfied, the program uses the regular unit price specified on the item card as
                 a suggestion on the sales document (unless there is a special sales price set up for
                 the customer).


3-20        Microsoft Official Training Materials for Microsoft Dynamics ™
           Your use of this content is subject to your current services agreement
Chapter 3: Sales Prices and Discounts

                The Sales Line Discounts field in the right pane shows the number of discounts
                available in parentheses. Click this field to see the available line discounts.

                The best price is defined as the lowest possible price with the highest possible
                line discount on the order date. This mechanism is illustrated in the following
                demonstration, “Setting Up Sales Line Discounts.”

Demonstration − Setting Up Sales Line Discounts
                A representative of Cronus' customer 30000 calls the order processor to order 20
                units of item 1972-W. The order date is 01/25/08. The customer also inquires
                about the total price of the purchase, as well as the granted discount (if any).

                The order processor must create a sales order and inform the customer about the
                price. The order processor may also investigate whether there are other
                conditions that the customer may want to accept in order to obtain a better price.

                Before handling this demonstration, assign customer 30000 to a customer price
                group Wholesale1.

                Create a sales order for customer 30000. Enter 20 units of Item 1972-W on the
                lines.

                By looking at the values in relevant fields, the order processor can inform the
                customer that the total price for the 20 pieces of the item is 13,600 LCY (based
                on the unit price of 850 LCY and a discount of 20%). This is the best price the
                customer can receive considering the terms of this sale.

                At the same time, as indicated by the numbers in parentheses next to the Sales
                Prices and the Sales Line Discounts fields, the order processor may check the
                terms that determine whether the customer is allowed to an even better
                price/discount.


           Microsoft Official Training Materials for Microsoft Dynamics ™                      3-21
          Your use of this content is subject to your current services agreement
Trade in Microsoft Dynamics™ NAV 5.0


                 Steps
                 Perform the following steps to check the customer’s sales terms:

                         1. Click Sales Prices.


                 FIGURE 3-3: GET SALES PRICE WINDOW

                 The Get Sales Price window suggests that if the purchase of item 1972-W was
                 paid in euros instead of the local currency, the unit price is more favorable
                 (assuming the exchange rate of 1 euro = 0.63 LCY). Assume that the customer
                 accepts this condition:

                         2. On the Foreign Trade tab of the sales order, in the Currency Code
                            field, select EUR. Click Yes to the message that appears.
                             The program copies the unit price from the sales prices table to the
                             Unit Price field on the sales line and recalculates the line amount
                             value.
                 Now, check the line discounts that exist for a combination of the customer and
                 item.

                         3. Click Sales Line Discounts.


                 FIGURE 3-4: GET SALES LINE DISC. WINDOW


3-22        Microsoft Official Training Materials for Microsoft Dynamics ™
           Your use of this content is subject to your current services agreement
Chapter 3: Sales Prices and Discounts

                  The records specify that the customer is allowed 15% discount when
                  buying items in the group Finished (to which item 1972-W belongs).
                  There is also a line discount of 20% offered individually to customer
                  30000 when buying at least 15 units of item 1972-W.
                  Following the "best price" rule, the higher discount for price
                  calculation on the sales line is used. The same rule also determined
                  that because the line discounts do not have a currency code set up as
                  a condition, the program selected the highest line discount available
                  in local currency.
                  Both the alternative sales price and line discount have been
                  combined when calculating the total sales price. This is because of
                  the condition associated with the sales price setup (Allow Line
                  Discount field is selected), which allows for this combination.


 Microsoft Official Training Materials for Microsoft Dynamics ™                     3-23
Your use of this content is subject to your current services agreement
Trade in Microsoft Dynamics™ NAV 5.0


Lab 3.4 − The "Best Price" Rule
                 Scenario: You are the order processor at Cronus.
                 Customer 50000 is ordering 200 pieces of item 70200.

                 Challenge Yourself!
                 Offer the customer the best (cheapest) price for the purchase.

                 Need a Little Help?
                 The solution is provided in Appendix C.


3-24        Microsoft Official Training Materials for Microsoft Dynamics ™
           Your use of this content is subject to your current services agreement
Chapter 3: Sales Prices and Discounts


Invoice Discounts
                Independent of the line discounts, sales representatives may also offer customers
                an invoice discount. This is based on the whole invoice amount. Invoice
                discounts are given if the invoice is larger than a minimum amount.

                Different from line discounts, which are calculated by the program automatically
                as soon as the sales line is created, automatic calculation of invoice discounts is
                an option that companies may decide not to use. This option is set up in the
                general Sales & Receivables Setup window.

                The Calc. Inv. Discount and the Calc. Inv. Disc. per VAT ID fields define how
                the program automatically calculates the invoice discount amount for sales
                documents.

                Sales representatives use the customer invoice discounts table to define the rules
                for discounts and service charges for different customers,.They set up the invoice
                discount code for which a set of terms – a minimum amount, discount
                percentages, and service charges – can be specified.

                The program fills in the code for the invoice discount in the Invoice Disc. Code
                field on the Invoicing tab of the customer card automatically when a new
                customer is created. The program uses the customer number as a default value
                when creating the invoice discount code because, typically, invoice discounts are
                granted to the customers individually.

                        1. Open the customer card for customer 10000. Notice that the value in
                           the Invoice Disc. Code field matches the customer number.
                            The user can also set up several discount groups to assign the
                            customers with the same invoice discount type by replacing the
                            default code with a different code. This code is entered in the
                            Invoice Disc. Code field for each customer receiving the same
                            invoice discount.
                        2. Open the customer card for customer 49633663. Click the Invoicing
                           tab.
                            Instead of the customer number, the invoice discount code is
                            specified as A.
                After the invoice discount code is specified, the terms under which a discount can
                be granted are specified in the Cust. Invoice Discounts window.

                        3. On the customer card for customer 49633663, click SALES→INVOICE
                            DISCOUNTS.

                            Customers in group A receive an invoice discount of 5%, based on
                            one minimum invoice amount in local currency and another
                            minimum invoice amount in a specified foreign currency.


           Microsoft Official Training Materials for Microsoft Dynamics ™                      3-25
          Your use of this content is subject to your current services agreement
Trade in Microsoft Dynamics™ NAV 5.0

                             The Cust. Invoice Discounts window also lets the user specify a
                             service charge amount the customer must pay on a purchase whose
                             total amount is below a specified minimum amount.

                 Using the Invoice Discount Mechanism
                 After the invoice discount code and the associated terms have been set up, the
                 program enables the user to calculate the invoice discount when invoicing a
                 specific customer.

                 Depending on the specifications on the Sales & Receivables setup, this
                 calculation can be initiated manually or performed automatically.

                 To initiate the calculation of the invoice discount, use the function called
                 Calculate Invoice Discount on the sales order/invoice. The calculated amount of
                 the invoice discount can be verified in the Sales Order Statistics window.

                 Allowing/Disallowing Discounts
                 You can combine alternative (often reduced) sales prices with line and invoice
                 discounts. The option of allowing line discounts is available on the customer
                 card, a line in the Customer Price Groups window, and a price line in the Sales
                 Prices window.

                 The status of the Allow Line Disc. field on a price line in the Sales Prices
                 window has priority over the setting of the same field in the Customer Price
                 Groups window and on the customer card. For example, the line discount is
                 granted to the customer – even if it is disallowed for the customer in question – if
                 the sales price to which they are allowed justifies the line discount.

                 According to this rule, if the user wants to stop offering line discounts to a
                 specific customer, they have the following alternatives:

                         •   Clear the Allow Line Disc. field in the Sales Prices window for the
                             lines that allowed the customer to a special price, or
                         •   Assign the customer to a customer price group for which a line
                             discount is disallowed in relation to all sales prices.

                 Where no alternative sales prices records exist, clear the Allow Line Disc. field
                 on the customer card for the customer.

                 Similar principles are applied when controlling invoice discounts, with the
                 differences that:

                         •   The option of (dis)allowing invoice discounts is associated with the
                             item (and found on the item card).
                         •   The option can be (de)activated on the sales line (or sales price line if
                             such one exists).


3-26        Microsoft Official Training Materials for Microsoft Dynamics ™
           Your use of this content is subject to your current services agreement
Chapter 3: Sales Prices and Discounts


Conclusion
               Sales Prices and Discounts deals with the way sales prices and disounts are set up
               and maintained in Microsoft Dynamics NAV depending on the special
               agreements made with the customters. Sales Prices and Discounts are both
               important aspects of providing the best possible service and to maintain
               customers on the long term horizon.


          Microsoft Official Training Materials for Microsoft Dynamics ™                     3-27
         Your use of this content is subject to your current services agreement
Trade in Microsoft Dynamics™ NAV 5.0


Lab 3.5 − Creating Sales Line Discounts for a Campaign
                 Scenario: If you are familiar with the Microsoft Dynamics NAV Relationship
                 Management functionality, try the following exercise.

                 Cronus’ sales manager wants item 1988-S introduced to a larger range of
                 customers, and is making an introductory discount offer to a range of prospective
                 new customers. This discount is valid if the customers purchase the items
                 between 01/28/08 – 02/28/08.

                 Challenge Yourself!

                         1. The line discount on item 1988-S is 20% if the customer purchases at
                            least five units. The offer goes to prospective customers who have
                            the job responsibility of purchase.


                 HINT: To find the Sales Line Discount window, click the Campaign button in the
                 Campaign window. Use the wizard to create the segment. Remember to select
                 Campaign Target on the Campaign tab of the Segment window.

                         2. Open the campaign by clicking FUNCTIONS→ACTIVATE SALES
                            PRICES/LINE DISCOUNTS.

                         3. Create a sales quote for one of the contacts to verify the receipt of
                            the correct discount percentage.

                 Need a Little Help?
                 The solution is provided in Appendix C.


3-28        Microsoft Official Training Materials for Microsoft Dynamics ™
           Your use of this content is subject to your current services agreement
Chapter 3: Sales Prices and Discounts


Quick Interaction: Lessons Learned
                Take a moment and write down three key points you have learned from this
                chapter:

                1.


                2.


                3.


           Microsoft Official Training Materials for Microsoft Dynamics ™                  3-29
          Your use of this content is subject to your current services agreement
Trade in Microsoft Dynamics™ NAV 5.0


3-30        Microsoft Official Training Materials for Microsoft Dynamics ™
           Your use of this content is subject to your current services agreement
Chapter 4: Customer Service Features


CHAPTER 4: CUSTOMER SERVICE FEATURES
Objectives
                The objectives are:

                        •   Using Item Substitution
                        •   Setting up Item Substitution
                        •   Creating Sales Orders with substitutions
                        •   Creating Item Cross References
                        •   Handling Nonstock Items
                        •   Importing Vendor Catalogs

Introduction
                The Customer Service Features of Microsoft Dynamics NAV includes
                substituting one item with another, working with item cross reference and using
                nonstock items. The sale of a nonstock item is handled in one of two ways:
                Creating drop shipments and by using a special order.

                In this section, detailed demonstrations and examples show how the features
                support various aspects of the customer service.


           Microsoft Official Training Materials for Microsoft Dynamics ™                     4-1
          Your use of this content is subject to your current services agreement
Trade in Microsoft Dynamics™ NAV5.0


Using Item Substitution
                 Companies frequently offer products of similar quality and function as substitutes
                 for one another. The purpose of this is twofold:

                         •   A company can offer a variety of styles, brands, and prices of goods.
                             This enables their customers to select items that best suits their needs
                             and budgets.
                         •   By enabling customers to purchase inventory items of comparable
                             quality, function, and price, companies can maintain customer
                             satisfaction if stock shortages occur.

                 The Item Substitution feature enables a company to link items with the same or
                 similar properties to one another. The substitution can be either one-way (from
                 item x to item y, but not from y to x), or two-way. If the substitution is two-way,
                 the items are considered interchangeable. If one item is interchangeable with
                 another, the program automatically creates a "reverse substitution" entry for the
                 other item during the setup of the substitution information.

                 After substitution information is set up, every time that the number of the item
                 with a substitute(s) is entered on the sales line, the number of substitutions set up
                 displays in the Substitution field on the right side of the sales order. In addition,
                 when the quantity of items requested on the sales line exceeds the quantity
                 available from inventory, the program contains a check mark in the Substitutes
                 Exist field in the stockout message box.

                 If a substitute is chosen, the program updates the relevant fields on the sales line.


4-2         Microsoft Official Training Materials for Microsoft Dynamics ™
           Your use of this content is subject to your current services agreement
Chapter 4: Customer Service Features


Setting up Item Substitution
                A company must create and set up corresponding item substitution entries in
                order to use the item substitution functionality.

                At Cronus, several item substitution entries have already been set up. Take the
                following steps to view the entry made for item 1968-W:

                        1. From the Sales & Marketing menu, click INVENTORY &
                           PRICING→ITEMS. Locate the item card for item 1968-W.

                        2. In the Item Card window, click ITEM→SUBSTITUTIONS.


                FIGURE 4-1: ITEM SUBSTITUTION ENTRY WINDOW

                The fields in the Item Substitution Entry window specify information about the
                substitute item(s). The item number for the substitute item is entered in the
                Substitute No. field.

                An item can be substituted by either another item on the company's inventory list
                or by a nonstock item. The type of the item used as a substitute is selected in the
                Substitute Type field. Interchangeability of these items is defined by the check
                mark in the Interchangeable field.

                To enter comments about the conditions required to make substitutions for an
                item, click Condition to open the Condition window. If a condition has been
                entered, the program automatically inserts a check mark in the Condition field of
                the Item Substitution Entry window.

                As soon as a substitution entry is created for an item, the program inserts a check
                mark in the Substitution Available field on the sales line for this item.


           Microsoft Official Training Materials for Microsoft Dynamics ™                         4-3
          Your use of this content is subject to your current services agreement
Trade in Microsoft Dynamics™ NAV5.0


Demonstration − Creating a Sales Order with Substitutions
                 Cronus customer 10000 orders three units of item 1968-W.

                 An order processor creates an order for the customer and learns the quantity of
                 the requested item is not available. However, item 1968-W can be substituted by
                 another item. With the customer's consent, the order processor decides to ship a
                 substitute item.

                 Create a sales order of item 1968-W for customer 10000 (do not enter the
                 quantity at this point).

                 NOTE: The Substitution Available field on the sales lines is still available. By default,
                 this field cannot be seen as the information is now available on the right hand pane. To
                 make the Substitution Available field visible on these lines, right-click the field names
                 pane above the lines, select Show Column, and select Substitution Available.


                 FIGURE 4-2: SALES ORDER WINDOW

                 Notice that the Substitutions field has a number one in parentheses. This
                 indicates that one item has been set up as a substitute for the item on the line.


4-4         Microsoft Official Training Materials for Microsoft Dynamics ™
           Your use of this content is subject to your current services agreement
Chapter 4: Customer Service Features


      Steps
      Perform the following steps:

              1. In the Quantity field, enter 3 and press Enter. A stockout message
                 appears.
                  In the message box, the Substitutes Exist field is selected.
              2. Click Yes.
      To view the substitute item for the item on the sales line:

              3. Click Substitutions in the right pane.
                  The Item Substitution window specifies the relevant logistical
                  information about the substitute item(s). The header information is
                  copied from the related sales line. The Inventory and the Quantity
                  Avail. on Shpt. Date fields specify the respective quantities of the
                  substitute item.
              4. Select the line for item 1972-W and then click OK.
                  On the sales line, the program replaces the originally entered item
                  1968-W with 1972-W.
              5. Post the sales order shipment.


 Microsoft Official Training Materials for Microsoft Dynamics ™                         4-5
Your use of this content is subject to your current services agreement
Trade in Microsoft Dynamics™ NAV5.0


Lab 4.1 − Handle Items with Substitutes
                 Scenario: You are the order processor at Cronus. Customer 40000 orders seven
                 units of item 1980-S.

                 This customer's shipments are usually made from the Yellow warehouse.

                 Challenge Yourself!
                 Your tasks are as follows:

                         1. Create a sales order for the customer.
                         2. Determine whether the requested item 1980-S can be substituted by
                            another item.
                         3. Ship the requested quantity of a substitute item.


                 NOTE: Because the Yellow location requires picking, the program requires that you
                 process the shipping through the warehouse. You can skip this process by entering the
                 corresponding amounts in the Qty. To Ship field on the sales lines and then by
                 accepting the warning messages given by the program.


                 Need a Little Help?
                 The solution is provided in Appendix C.


4-6         Microsoft Official Training Materials for Microsoft Dynamics ™
           Your use of this content is subject to your current services agreement
Chapter 4: Customer Service Features


Creating Item Cross References
               With item cross references, a company can use another company's item number
               (used, for example, by the customer or vendor) and the program refers this
               number to the company's own internal item number. When the external item
               number in the Cross Reference No. field is entered, the program automatically
               fills in the internal item number and corresponding information about the sales
               order.

               Item cross reference enables the following types of item numbers to be set up for
               cross reference:

                       •   Blank
                       •   Customer
                       •   Vendor
                       •   Bar Code

Demonstration − Setting Up Item Cross References
               The Cronus employee responsible for managing customer relationships must set
               up cross references for several selected items.

               Item 1896-S is among those items. The condition is that when sold to customer
               40000, the customer's item reference (instead of the item number that is used at
               Cronus) is used on the sales documents.

               Steps
               Perform the following steps to set up cross references for the items:

                       1. From the Sales & Marketing menu, click INVENTORY &
                          PRICING→ITEMS. Locate the item card for item 1896-S.

                       2. Click ITEM→CROSS REFERENCES.


               FIGURE 4-3: ITEM CROSS REFERENCE ENTRIES


          Microsoft Official Training Materials for Microsoft Dynamics ™                      4-7
         Your use of this content is subject to your current services agreement
Trade in Microsoft Dynamics™ NAV5.0

                              In the Item Cross Reference Entries window, the user can specify
                              cross-reference details. Options in the Cross-Reference Type field
                              define for whom (customer or vendor) or for what (bar code) the
                              cross reference is used. Perhaps one item has different reference
                              number for the customer, vendor, and bar code. Option Blank means
                              that any cross-reference number (for example, an internal reference
                              used for information) can be entered and determine the item.
                              Depending on the selection made in the Cross-Reference Type
                              field, the user can enter either a customer or vendor number or a bar
                              code name in the Cross Reference Type Number field. A cross-
                              reference number of up to 20 characters can be entered in the Cross-
                              Reference No. field. The Description field enables entries of up to
                              30 characters.
                              The user can refer to the Discontinue Barcode field for information
                              when the Cross-Reference Type field is set to Bar Code and that
                              particular bar code is no longer valid.


                          3. In the Cross-Reference Type field, select Customer, and in the
                             Cross Reference Type No. field, select 40000.
                          4. In the Cross-Reference No. field, enter ED6DR3660, in the Unit of
                             Measure field, select PCS, and in the Description field, enter
                             Executive Desk, 6 Dr; 36x60.
                          5. Close the Item Cross Reference Entries window.
                 You have now created an item cross reference entry for item 1896-S.

Demonstration − Creating a Sales Order with a Cross
Reference
                 Cronus customer 40000 places a sales order for ten units of item 1896-S. The
                 customer gives the order processor item number - ED6DR3660.

                 Steps
                 The order processor must create a sales order that reflects the item number used
                 by the customer:

                          1. Create the sales order for customer 40000 (do not enter the item
                             number now).


                 NOTE: By default, the Cross-Reference No. field on the sales lines is not visible. To
                 make it visible, right-click the field names pane above the lines, select Show Column,
                 and select Cross-Reference No.

                          2. In the Cross-Reference No. field, click the AssistButton to open the
                             Cross Reference List window.


4-8         Microsoft Official Training Materials for Microsoft Dynamics ™
           Your use of this content is subject to your current services agreement
Chapter 4: Customer Service Features

              3. Select the cross-reference number ED6DR3660 and then click OK.
                  Notice that the cross-reference number and description appear on the
                  sales line.
              4. Click Print, Order Confirmation then Preview, to open a preview
                 of the order. The document shows item No. 1896-S and the
                 description of the cross-reference number.
              5. Complete and post the sales order.
      The principles behind the procedures for setting up and using cross references
      when purchasing items from vendors are the same as described earlier.


 Microsoft Official Training Materials for Microsoft Dynamics ™                        4-9
Your use of this content is subject to your current services agreement
Trade in Microsoft Dynamics™ NAV5.0


Lab 4.2 − Handle Items with Cross Reference
                 Scenario: Cronus customer 10000 places a sales order for eight units of item
                 1900-S. The customer gives the order processor item number – 22-786.

                 Challenge Yourself!
                 Your tasks are as follows:

                         1. Set up an item number that is used by customer 10000 as a reference
                            for item 1900-S (the item description is "Chair, lounge, black").
                         2. Create a sales order that reflects the item number that is used by the
                            customer. Post the order.

                 Need a Little Help?
                 The solution is provided in Appendix C.


4-10        Microsoft Official Training Materials for Microsoft Dynamics ™
           Your use of this content is subject to your current services agreement
Chapter 4: Customer Service Features


Nonstock Items
               Nonstock processing enables companies to order, ship, and invoice items that are
               not usually part of their inventory, and includes many areas of operation. The
               primary users of this functionality are purchasing/inventory management
               personnel and sales representatives.

               Nonstock item processing lets the user enter an item on a quote, sales order, or
               invoice. The item can be selected from an existing list of item numbers received
               from one or more vendors and imported into the program. As soon as the relevant
               vendor item has been selected, the program automatically creates an inventory
               item with a unique item number. The inventory item is processed as an ordinary
               "stocked" inventory item.

               Reports help companies decide whether certain nonstock items will be carried as
               stocked items.

               Setting Up Nonstock Items
               The program lets the user set up the numbering sequence and format for nonstock
               items. To prepare the program to process nonstock items, click
               SETUP→NONSTOCK ITEM SETUP from the Sales & Marketing menu. The Nonstock
               Item Setup window appears. The two fields in this window specify the format of
               the nonstock item number appearing on the item card. The number is generated
               by the program when the user enters a nonstock item on a document line for the
               first time.

               The No. Format field contains four options for how the program formats
               nonstock items. (Press F1 to read the definitions of each option.) The program
               can format item numbers of nonstock items using the entry number, vendor item
               number, or the manufacturer code. For the next scenario, the Vendor Item No. is
               selected.

               The No. Format Separator field contains the character that serves as a separator
               between the elements of a nonstock item number format when using a format of
               both a code and a number in the No. Format field.


          Microsoft Official Training Materials for Microsoft Dynamics ™                   4-11
         Your use of this content is subject to your current services agreement
Trade in Microsoft Dynamics™ NAV5.0


                 Creating Nonstock Items
                 To use nonstock processing, a company must create items the program
                 recognizes as nonstock goods. The program provides two methods for creating
                 nonstock items:

                         •   Manually: Creating the nonstock item from the nonstock item card.
                         •   Importing a vendor catalog: Bringing in a volume of nonstock items
                             using a dataport.

                 The following demonstration "Creating a Nonstock Item Manually" describes
                 each of these methods.

Demonstration − Creating a Nonstock Item Manually
                 The user must enter the item-related information in the appropriate fields on the
                 nonstock item card to create a nonstock item manually. This is similar to creating
                 a regular item card.

                 Steps
                 Cronus has set up several nonstock items. Consider the setup details for one of
                 them:

                         1. From the Sales & Marketing menu, click INVENTORY &
                            PRICING→NONSTOCK ITEMS. The Nonstock Item Card window
                            appears.
                             Enter general item information about the General tab. To read the
                             definitions of each field, click the field and press F1.
                             The fields on the Invoicing tab specify cost and posting details about
                             the nonstock item.
                             To handle nonstock items, complete the Vendor No., the Vendor
                             Item No., and the Item Category Code fields. The item category
                             code is important because this determines the posting groups and
                             costing methods that are used when the nonstock item is used in a
                             transaction.
                             The first time that a sales order for a nonstock item is created and
                             posted, the program automatically adds the item record to the
                             company's inventory list by creating an item card. To create an item
                             card for a nonstock item before using it in a transaction, run the
                             Create Item function available from the nonstock item card.


4-12        Microsoft Official Training Materials for Microsoft Dynamics ™
           Your use of this content is subject to your current services agreement
Chapter 4: Customer Service Features

               Create an item card for nonstock item with entry No. NS0001.

                       2. In the Nonstock Item Card window, click FUNCTION→CREATE ITEM.
                           The program creates the corresponding item card, adds a record in
                           the item vendor catalog, and provides confirmation.
                           Notice that the program assigns the newly created item the number
                           with the format (Vendor Item No.) specified in the Nonstock Item
                           Setup window.


               Open the new item card.

                       3. From the Sales & Marketing menu, click INVENTORY &
                          PRICING→ITEMS. Locate the item card for item 2100.

               Notice that the Created from Nonstock Item field is selected. This indicates
               that this was a nonstock item converted to a stocked item.

Demonstration − Importing Vendor Catalogs
               Vendors frequently make catalogs available by using an electronic file. The
               program provides a dataport (object number 5700, import nonstock items)
               designed to import the following comma-delimited format.

               Steps
               To open the dataport:

                       1. On the menu bar, click TOOLS→OBJECT DESIGNER. Click Dataport.


               FIGURE 4-4: OBJECT DESIGNER WINDOW


          Microsoft Official Training Materials for Microsoft Dynamics ™                      4-13
         Your use of this content is subject to your current services agreement
Trade in Microsoft Dynamics™ NAV5.0

                         2. Select the object number 5700 and then click Run. The Import
                            Nonstock Items window appears.
                 On the Nonstock Item tab of this window, set up filters for the information
                 desired from the catalogs. The path to the file that contains the vendor's catalog
                 must be entered in the File Name field on the Options tab.

                 NOTE: Typically, the file with the vendor catalog does not contain company-specific
                 information, such as item category code. For the program to handle the nonstock items,
                 however, a nonstock item card must contain an item category code. The easiest way to
                 enter this information is by using the Find and Replace function under the Edit menu
                 button.

                 Companies can create additional dataports customized to address formats that are
                 unique to a specific vendor.

                 NOTE: When using a dataport, make sure that the manufacturer code, vendor number,
                 unit of measure code, item category code, and product group code specified in the
                 dataport are set up. This can be checked by opening a nonstock item card and verifying
                 that the records in the tables related to the corresponding fields exist.


                 For example, if in a dataport, the manufacturer code is specified as ACME, then there
                 must be a code ACME set up in the manufacturer code list.


Handling Nonstock Items
                 Nonstock items are usually sold to customers as drop shipments or special orders.
                 Drop shipments are sent directly from the vendor to the customer, while special
                 orders are sent to the company's warehouse before they are sent to the customer.

                 By selecting drop shipment, companies buy and sell the item but avoid handling,
                 stocking, and delivering the item. When companies make a shipment to a
                 customer that contains both regular and nonstock items, or want to maintain a
                 uniform interface with customers, they might handle the sales order as a special
                 order.

                 In this section, handling the sale of nonstock items is illustrated using the
                 example of drop shipment. The principles behind the procedures for handling
                 sales orders selected as special orders are similar to the ones for handling drop
                 shipments.


4-14        Microsoft Official Training Materials for Microsoft Dynamics ™
           Your use of this content is subject to your current services agreement
Chapter 4: Customer Service Features


Demonstration − Using Drop Shipments
               Cronus' customer 10000 orders ten units of item 3100.

               Because item 3100 is a nonstock item, the order processor decides to deliver the
               order using drop shipment. The item must be purchased from a vendor (vendor
               30000) who ships the order directly to the Cronus customer.

               Steps
               First, create a sales order for a nonstock item.

               NOTE: Creating sales orders for nonstock items requires entries in the Purchasing
               Code field. In addition, the Nonstock field is an information field that indicates when an
               item is a nonstock. These do not appear in the standard layout. To insert these fields,
               use the Show Column function.

                        1. Fill in the fields on the sales header.
                            To enter the nonstock item number, the order processor can either:
                            –    Select the item from the nonstock items list.
                            –    Select the item from the regular item list (if the nonstock item
                                 has been added to the inventory list).

                        2. Click FUNCTIONS→NONSTOCK ITEMS.
                        3. Select item 3100 and then click OK.
                        4. In the Purchasing Code field, select DROP SHIP and in the
                           Quantity field, enter 10.
                        5. Release the order by selecting FUNCTIONS→RELEASE or by pressing
                           CTRL + F11.
                            The purchasing agent creates a purchase order for the nonstock items
                            that Cronus sells to customer 10000.
                            Purchase orders for drop shipments can be created in two ways:
                            –    Indirectly: As a part of a regular planning activity using the
                                 requisition worksheet.
                            –    Directly: From the purchase order.

               NOTE: To learn about the procedures related to each method, refer to the topics titled
               "Create Purchase orders for Drop Shipments Directly" in the online Help.

                            Suppose the purchasing agent creates a purchase order for drop
                            shipments directly.


          Microsoft Official Training Materials for Microsoft Dynamics ™                             4-15
         Your use of this content is subject to your current services agreement
Trade in Microsoft Dynamics™ NAV5.0

                 Create a new purchase order for vendor 30000.

                          6. Fill in the fields on the purchase header. Include a Vendor Invoice
                             number.
                          7. Click the Shipping tab. In the Sell-to Customer No. field, select
                             10000.
                          8. Click ORDER→DROP SHIPMENT→GET SALES ORDER. The Order –
                             Sales List window appears.
                              The lines in this window specify the sales orders created for the
                              customer selected in the Sell-to Customer No. field.
                          9. Select the line with the sales order created in the previous
                             demonstration and then click OK.
                              The program fills in the fields on the purchase line with the
                              information copied from the sales order.


                 The program also creates a link between the sales order, which will be drop
                 shipped, and the associated purchase order. With this link, the user can view the
                 associated sales order directly from the purchase order and vice versa.

                          10. In the Purchase Order window, click ORDER→DROP
                              SHIPMENT→SALES ORDER.

                              The sales order appears. To view the purchase order from the sales
                              order, use the Drop Shipment, Purchase Order function.
                          11. Release the purchase order.
                 To complete the drop shipment, process the related purchase and sales orders
                 according to the rules that are defined for drop shipment.

                          12. Post (ship and invoice) the sales order.
                              The program automatically runs the Receive function on the linked
                              purchase order and updates the Quantity Received field.
                          13. Post (invoice) the purchase order.


                 NOTE: You cannot post the sales order with lines selected for drop shipment until it is
                 linked to a purchase order.


                 NOTE: The program requires that you enter a Vendor Invoice No. before invoicing the
                 purchase order. Enter characters of your choice in this field.


4-16        Microsoft Official Training Materials for Microsoft Dynamics ™
           Your use of this content is subject to your current services agreement
Chapter 4: Customer Service Features


Conclusion
               This lesson examined the customer service features that are available in
               Microsoft Dynamics NAV version 5.0.

               Item substitution is used to link items with the same or similar characteristics in
               order to offer substitute items to customers in shortage situations or to propose an
               alternative item that has a better price.

               With item cross reference, another company's item number can be used as
               reference number on documents. This is used as an extra service to the customers
               to make it easier for them to find the documents.

               As an additional service to the customers, the nonstock items function can be
               used to handle the sale of items that are not maintained as part of the normal
               inventory

               These elements are all adding to the customer's overall perception of the
               company and serves to strengthen the long term relationship.


          Microsoft Official Training Materials for Microsoft Dynamics ™                        4-17
         Your use of this content is subject to your current services agreement
Trade in Microsoft Dynamics™ NAV5.0


Lab 4.3 − Handling the Sale of a Nonstock Item using a
Special Order
                 Scenario: Cronus' customer 10000 orders three units of item 4100.
                 Item 4100 is a nonstock item, which must be purchased from vendor 40000.

                 Challenge Yourself!
                 Your tasks are as follows:

                         1. Create a sales order for customer 10000, and select it as a special
                            order.
                         2. Create the purchase order for this nonstock item.
                         3. Receive and invoice the purchase order.
                         4. Ship and invoice the sales order.

                 Need a Little Help?
                 The solution is provided in Appendix C.


4-18        Microsoft Official Training Materials for Microsoft Dynamics ™
           Your use of this content is subject to your current services agreement
Chapter 4: Customer Service Features


Quick Interaction: Lessons Learned
                Take a moment and write down three key points you have learned from this
                chapter:

                1.


                2.


                3.


           Microsoft Official Training Materials for Microsoft Dynamics ™                  4-19
          Your use of this content is subject to your current services agreement
Trade in Microsoft Dynamics™ NAV5.0


4-20        Microsoft Official Training Materials for Microsoft Dynamics ™
           Your use of this content is subject to your current services agreement
Chapter 5: Purchase Order Management


CHAPTER 5: PURCHASE ORDER MANAGEMENT
Objectives
                 The objectives are:

                         •    Reviewing the business impact from efficient purchasing processes
                         •    Setting up Purchases, Vendors, Alternative Vendors and Vendor Posting
                              Groups
                         •    Managing Purchase Transactions
                         •    Creating Purchase Quotes
                         •    Setting up Purchase Prices and Discounts
                         •    Using the Pricing Mechanism
                         •    Managing Purchase Line Discounts

Introduction
                 Timely purchases made at the best price not only improve the efficiency of the
                 company's inventory management and reduce requisition costs, but also have a direct
                 impact on the company's ability to keep their customers satisfied.

                 This lesson demonstrates the key features of the purchase order management
                 functionality in Microsoft Dynamics™ NAV. The two main sections focus on the
                 most common aspects of purchase transaction handling and cover the following
                 topics:

                         •    Quote and purchase order
                         •    Order posting
                         •    Managing purchase prices and discounts

                 Purchase Order Management starts with describing the setup functionality. A list of
                 purchase batch jobs, reports, and purchase documents is included in Appendix A.
                 Additionally, demonstrations and examples help explain how the program supports
                 companies in managing the tasks involved in purchase handling processes.

                 NOTE: For an overviewof procedures associated with handling specific purchase
                 management tasks, refer to the relevant topic in the online Help. To learn more about
                 payables functionality in Microsoft Dynamics NAV, refer to the Financials traning materials.


                Microsoft Official Training Materials for Microsoft Dynamics ™                            5-1
               Your use of this content is subject to your current services agreement
Trade in Microsoft Dynamics™ NAV5.0


Efficient Purchasing
                 Companies must make sure each purchase transaction is based on the most favorable
                 terms, such as delivery time and price, and that the associated inventory and financial
                 information is registered correctly. Because many aspects of a future purchase
                 agreement with a vendor are negotiated and agreed upon in the pre-purchase stage, it
                 helps for purchasing agents to record the relevant agreement details once and reuse
                 this information when making a purchase.

                 There is a lot of functionality in Microsoft Dynamics™ NAV that supports purchase
                 transaction handling:

                         •   Purchase Order Management: This includes documents, such as quotes,
                             blanket orders, and purchase orders that support purchasing agents in
                             efficiently managing purchases. It also provides the facility for:
                             –   Partial order receipt
                             –   Separation between receiving and invoicing
                             –   Combined invoicing

                         •   Alternative Order Addresses: This facilitates handling purchase orders
                             toward vendors with several alternative shipping addresses.
                         •   Alternative Vendors: This supports purchase situations where the same
                             item is supplied by several different vendors.
                         •   Salespeople/Purchasers: This enables collection of purchase statistics at
                             an individual purchasing agent level.
                         •   Purchase Line Pricing: This helps maintain and manage alternative
                             purchase prices negotiated and agreed upon with individual vendors.
                         •   Purchase Line Discounting: This helps maintain and manage purchase
                             discounts that are percentage-based, negotiated, and agreed upon with
                             individual vendors.


5-2         Microsoft Official Training Materials for Microsoft Dynamics ™
           Your use of this content is subject to your current services agreement
Chapter 5: Purchase Order Management


Setting Up Purchases
             This chapter elaborates on setup options that define the functionality of purchase
             order management. This is done with the most common tasks found in purchase
             management in mind and with focus on the physical flow of purchase transactions
             instead of on the financial flow. The latter is addressed in more detail in the
             Financials training materials.

             The purchase setup consists of Purchases & Payables setup and Vendor setup.

             Purchases & Payables Setup
             Based on their established practices, companies must specify how they want the
             program to support them in managing different aspects of their purchase transactions.
             These are the general setup options applied to all purchase transactions regardless of
             which item and vendor are involved.

             Vendor Setup
             Managing vendor information is an important part of managing the total purchases
             and finances of a company. Basic information (such as name, address, and so on) and
             details (such as credit limit, invoicing, discount and payment terms, currencies, and
             list of regularly supplied items) are recorded for each vendor on a vendor card.

             The setup of vendor posting groups defines a connection between a vendor and the
             accounts in the general ledger. This is done by assigning a vendor to a posting group
             for which balance sheet and income statement accounts are then set up.

Demonstration − Setting Up Purchases
             At Cronus, management has a registration of all the receipts that enter their
             inventory. In the same manner, they want the program to automatically create a
             shipment note when they have to return items to the vendor. They also want to make
             sure that no purchase document can be posted unless several corresponding external
             documents are entered.

             Steps
             The business requirements listed above have led to the following Purchases &
             Payables setup for Cronus.

             On the Purchase menu, click SETUP→PURCHASES & PAYABLES SETUP. Setup of the
             fields on the General tab specifies the program's facilities for purchase order
             management. Check marks in the Receipt on Invoice and Return Shipment on Credit
             Memo fields indicate that the company wants to automatically create posted receipt
             and posted return shipment documents at the time of posting purchase invoices and
             purchase credit memos respectively.

             If these fields are clear, only posted invoices/credit memos are created. (This setup
             option is only relevant if, in addition to the Purchase Invoicing functionality, a
             company also uses the Purchase Order Management and Return Order Management.)


            Microsoft Official Training Materials for Microsoft Dynamics ™                        5-3
           Your use of this content is subject to your current services agreement
Trade in Microsoft Dynamics™ NAV5.0

                 The check mark in the Receipt on Invoice field is necessary if item charges are used
                 because they are applied to the receipt. There is more information about item charges
                 later in this training manual.

                 Selecting the Ext. Doc. No. Mandatory field indicates that users cannot post any
                 purchase document (order, invoice, and a credit memo) as invoiced without an
                 external document number in the Vendor Invoice No. field on a purchase header.
                 A check mark in the Exact Cost Reversing field indicates that the company wants
                 the program to automatically align the cost of every item returned to the vendors with
                 the original purchase entry.

                 The definition and setup options of all other fields on the General tab of the
                 Purchases & Payables Setup window can be found in the online Help. In addition,
                 fields determining costing reversing options are described in detail later in this
                 training manual.

Setting Up Vendors
                 The vendor card and the type of information and vendor details that can be recorded
                 are covered in other courses and are not repeated here.

                 Setting Up Receiving Options
                 A situation where a vendor may have alternative sites, in addition to their main
                 business address, from which they deliver items to their customers is not uncommon.
                 For example, companies may have various warehousing and production sites that
                 have addresses different from their main office.

                 Alternative Order Address supports companies when dealing with such vendors. If
                 the company receives orders from different vendor addresses, those addresses can be
                 recorded as alternative order addresses in the program and then chosen by the
                 purchasing agent when making an order/invoice for the vendor in question.

                 Alternative order addresses are entered in the Order Address table, which can contain
                 an unlimited number of addresses for each vendor. A code representing information
                 such as vendor number and name is linked to each address.

Demonstration − Setting Up Vendors
                 The following demonstration shows how to set up vendors.

                 Steps
                 Cronus' vendor 10000 has two alternative order addresses set up in the program.

                         1. From the Purchase menu, click ORDER PROCESSING→VENDORS.
                         2. Open the vendor card for vendor 10000. Click VENDOR→ORDER
                            ADDRESSES and press f5. The Order Address List is displayed.

                         3. Select the second address line, and then click OK to see the address
                            details.


5-4         Microsoft Official Training Materials for Microsoft Dynamics ™
           Your use of this content is subject to your current services agreement
Chapter 5: Purchase Order Management

              When the code is selected in the Order Address Code field on orders
              (invoices and credit memos), the order address information appears on
              document printouts.
              All other receiving setup options are found on the Receiving tab of the
              vendor card.
          4. Open the vendor card for vendor 10000, and then click the Receiving
             tab.
              For several reasons, for example to make sure that certain types of items
              are stored in the same warehouse, companies may use a decentralized
              location strategy. Such a strategy suggests that shipments from vendors
              are received in local warehouses instead of in a central one.

              To reflect these considerations, a company can link certain vendors to
              specific locations. This is done by specifying a default location in the
              Location Code field for the individual vendor. More information about
              the multiple locations setup is included in the Inventory Management
              training manual.
              Depending on their profile, industrial practices, and location, vendors
              and customers may have different agreements as to who transports orders
              to customers (vendors themselves, shipping agents, or customers) and
              according to which terms. The program offers the possibility to record all
              the different terms of purchase and shipment methods (often based on
              Incoterms) that can then be associated with each specific vendor.


  Cronus has set up several shipment methods in the program.

          5. From the Purchase menu, click ORDER PROCESSING→SETUP→SHIPMENT
             METHODS.

              When assigned to a vendor, the shipment method code is copied to
              purchase documents toward that vendor.
              The two other setup options on the Receiving tab affect the way the
              program calculates different purchase order receipt dates.
              The program uses the value in the Lead Time Calculation field to
              calculate the order planned and expected receipt dates, if there is no lead
              time calculation value set up on the card for the item being purchased or
              in the item vendor catalog.
              The two calendar fields relate to the program's facility to calculate
              various receiving and delivery dates on the purchase documents. These
              setup options are described in detail later in this training manual.


 Microsoft Official Training Materials for Microsoft Dynamics ™                        5-5
Your use of this content is subject to your current services agreement
Trade in Microsoft Dynamics™ NAV5.0


Demonstration − Setting up Alternative Vendors
                 If the company has more than one vendor supplying the same item, purchasing agents
                 may want these vendor-item combinations registered. To do this, they must create a
                 Vendor Item Catalog listing items that are purchased regularly from a specific
                 vendor.

                 Steps
                 At Cronus, vendor 30000 is among those vendors that have a vendor item catalog
                 created for them:

                 Open the card for vendor 30000. Click PURCHASES→ITEMS.

                 In addition to specifying items typically purchased from the vendor in question, the
                 vendor item catalog also contains information about the delivery lead time and
                 whether there are any special price and discount agreements with that vendor. The
                 setup and functionality of the latter is described in the section "Purchase Prices and
                 Discounts" in this chapter.

Vendor Posting Groups
                 The financial value of any purchase transaction must be posted to dedicated accounts
                 in the general ledger. Where companies do not find it possible to establish accounts
                 for each vendor, they can put several vendors into one posting group and then specify
                 accounts for such a group.

                 After the company has decided on criteria for how its vendors can be grouped, the
                 respective groups must be set up in the program in the Vendor Posting Group table.
                 In this table, the user can assign a code to each identified posting group and specify
                 general ledger accounts for different amount categories, such as:

                         •   Payables
                         •   Service charges
                         •   Payment discount amounts
                         •   Interest
                         •   Additional fees


5-6         Microsoft Official Training Materials for Microsoft Dynamics ™
           Your use of this content is subject to your current services agreement
Chapter 5: Purchase Order Management


Demonstration - Setting Up Vendor Posting Groups
              Cronus' accountants have set up two vendor posting groups: domestic and foreign.

              Steps
              Perform the following steps to set up the vendor posting groups:

                      1. From the Financial Management menu, click SETUP→POSTING
                         GROUPS→CUSTOMER.


                           FIGURE 5-1: CUSTOMER POSTING GROUPS WINDOW

                           Entering an appropriate code in the Vendor Posting Group field on the
                           Invoicing tab of a vendor card implies that the vendor is assigned to a
                           specific posting group.
                      2. Open the vendor card for vendor 10000, and then click the Invoicing tab.
                           Remember that each vendor can only be assigned to one vendor posting
                           group.
                           When a purchase transaction (order, invoice, or credit memo) involving
                           this vendor is posted, the program uses the accounts specified for the
                           posting group to which the vendor belongs.


              NOTE: Accountants must also assign general business posting groups to vendors. The
              business group code is used in combination with a general product posting group code in the
              general posting setup to specify the accounts to which certain transactions are posted. You
              can learn more about general setup rules in the Financials training materials.

              Each vendor posting group can have different general ledger accounts or the same
              accounts set up for it. An advantage of having different groups that have the same
              accounts is that it gives accountants flexibility in how they group vendors together
              for reporting and analysis purposes. For example, a total payables amount can be
              presented and analyzed per two groups representing domestic and foreign vendors.


             Microsoft Official Training Materials for Microsoft Dynamics ™                            5-7
            Your use of this content is subject to your current services agreement
Trade in Microsoft Dynamics™ NAV5.0


Setting Up Purchasers
                 If several purchasing agents work in the same company, they can each be set up and
                 assigned a code. The codes can be used to prepare statistics and to filter information
                 in printed reports.

                 To set up purchasing agents in the program, follow the procedure for setting up Sales
                 Representatives explained in the "Setting up Sales Management" section of this
                 training manual.

Managing Purchase Transactions
                 Previous courses explain how to create and process a simple purchase order. This
                 section elaborates on the facilities that support the most common tasks in purchase
                 transaction management. The section takes you through a workflow, from making a
                 quote to posting the order.

                 Purchase Quotes
                 The first step in a workflow involves making a purchase quote, which can be
                 described as a "draft order" in which purchasing agents can register the vendor's offer
                 specifying:

                         •   Price
                         •   Terms of sale
                         •   Description of items

                 If the offer matches the purchasing agent's requirements and they want to buy the
                 items on the quote, they can convert it into an order. Similarly, where there is a need
                 to replenish items on stock, inventory managers can send a request to the purchasing
                 department, who create a quote (which is later submitted to a vendor as a purchase
                 order).

                 Purchase Orders
                 The purchase order is a cornerstone of purchase management functionality in
                 Microsoft Dynamics NAV. In parallel with sales orders, the program supports the
                 purchasing agents in their task of:

                         •   Processing a purchase transaction by automatically copying the default
                             setup information to the order header and lines
                         •   Performing necessary calculations
                         •   Ensuring a correct update of the company's financial records.

                 Most of the properties of the purchase order header and lines (such as delivery
                 details, location, quantity, unit of measure, and so on) are identical to those on the
                 sales order.


5-8         Microsoft Official Training Materials for Microsoft Dynamics ™
           Your use of this content is subject to your current services agreement
Chapter 5: Purchase Order Management

  Therefore, only the features distinctive to the purchase order processing tasks are
  addressed in the demonstration "Creating Purchase Orders."

  Planning Flexibility
  By selecting a certain value in the Planning Flexibility field on the purchase order
  line (use the Show Column function to make the field visible), the purchasing agent
  defines if the order in question is included in the program's planning calculations.
  The value must be set to None, if the purchasing agent does not want the program to
  alter either the receipt date or the quantity of the ordered items.

  If the purchase order was created because of the requisition planning (and must
  remain available for possible changes), the Planning Flexibility field is set to
  Unlimited. This makes it possible to change or move the order date and adjust the
  quantity as long as the order has not been posted. The default selection is Unlimited.
  Learn more about purchases planning and managing later in this manual.

  Posting Orders
  The purchase order posting principles and mechanism are identical to those applied
  to sales orders (described in detail and illustrated earlier in this manual) and are not
  described here. However, the key points in purchasing are summarized in the
  following list:

          •   The posting function consists of two parts: receipt (quantity change) and
              invoice (value change) posting.
          •   The Qty. to Receive and the Qty. to Invoice fields on a purchase order
              represent the quantities referring to the posting function.
          •   Orders can be partially received/invoiced.
          •   When posting an invoice, the two parts occur at the same time, without
              an option to separate them in time.
          •   Posting of an order can be done by registering the order receipt first,
              while the order invoicing can occur later.
          •   Related to the previous point are the facilities: To combine several
              receipts in one invoice or to undo a quantity record for a posted but not
              invoiced receipt.


 Microsoft Official Training Materials for Microsoft Dynamics ™                          5-9
Your use of this content is subject to your current services agreement
Trade in Microsoft Dynamics™ NAV5.0


Demonstration − Creating Purchase Quotes
                 Cronus is interested in purchasing 100 units of items 70010 and 70011, respectively.
                 To do this, the purchasing agent wants quotes from three different vendors to find the
                 best offer. The purchasing agent calls up vendors 10000, 30000, and 40000 to hear
                 what they have to offer. Considering the quantity to be purchased, the prices are as
                 follows:

                 Vendor 10000 Item 70010: quantity 100-500 at 24.00 LCY per unit
                 Item 70011: quantity 100-500 at 35.00 LCY per unit

                 Vendor 30000 Item 70010: quantity 100-1000 at 26.00 LCY per unit
                 Item 70011: quantity 100-1000 at 34.00 LCY per unit

                 Vendor 40000: Item 70010: quantity 50-200 at 24.50 LCY per unit
                 Item 70011: quantity 50-200 at 35.00 LCY per unit

                 Steps
                 Create a purchase quote for each of the vendors so the offers are registered and the
                 total purchase prices can be compared. In addition to a quoted unit price, total
                 purchase prices may also include invoice discounts, currency calculation, and so on.

                         1. From the Purchase menu, click ORDER PROCESSING→QUOTES. Press F3 to
                            make a new quote, and enter the vendor information for vendor 10000 on
                            the quote header. Leave the Order Date field blank.
                         2. Create a line for 100 units of item 70010 and a line for 100 units of item
                            70011, filling in the Direct Unit Cost Excl. VAT field that has the
                            prices quoted here.
                             Create quotes for vendors 30000 and 40000 respectively.
                             From the total amount, it is clear the vendor 10000 gives the best offer.
                             The purchasing agent converts the quote for vendor 10000 into a
                             purchase order.
                         3. Click Make Order. Click Yes in the information message to confirm the
                            action.
                         4. Note the purchase order number.


5-10        Microsoft Official Training Materials for Microsoft Dynamics ™
           Your use of this content is subject to your current services agreement
Chapter 5: Purchase Order Management


Demonstration − Creating Purchase Orders
             Cronus' purchasing agent has discovered that not only does vendor 10000 have the
             best offer, they also have a warehouse close to Cronus. Because this is not the
             location from where they usually ship their orders, the purchasing agent has agreed
             with the vendor to ship the items from the alternative location.

             Steps
             The purchasing agent is working on the purchase order created in the demonstration,
             "Creating Purchase Quotes":

                     1. Locate the purchase order created in the demonstration, "Creating
                        Purchase Quotes".
                     2. Click the Order Address Code field, and select HOPE.
                         The program updates the buy-from address details on the header
                         respectively.
             If the company has more than one vendor supplying the same item, the purchasing
             agent may want to check if this is the case when creating and processing an order for
             specific items. Records of item-vendor combinations are stored in the Item Vendor
             Catalog, available from the item card:

                     3. In the purchase order, in the No. field on the first purchase line, click the
                        AssistButton to open the list of items. Click PURCHASES→VENDORS.


                         FIGURE 5-2: ITEM VENDOR CATALOG WINDOW

             In addition to specifying a typical vendor(s) for the item in question, the item vendor
             catalog also contains information about whether there are any special price and
             discount agreements with the vendor. This information can be accessed by clicking
             the Item Vendor buttons on the delivery lead time.


            Microsoft Official Training Materials for Microsoft Dynamics ™                       5-11
           Your use of this content is subject to your current services agreement
Trade in Microsoft Dynamics™ NAV5.0


Purchase Prices and Discounts
                 Companies have the possibility to specify cost information for each item on the item
                 card, and are given a functionality that facilitates the task of purchase price
                 management. The program automatically retrieves information about the last direct
                 cost stored on an item card to copy it to the purchase order line for the item in
                 question.

                 This direct cost information is the same in all purchase situations regardless of
                 whether individual price and discount agreements exist between the company and its
                 vendor. These agreements and policies can be based on several conditions, such as:

                         •   The item variant and quantity bought
                         •   Currency paid
                         •   Order date

                 Maintaining alternative purchase prices and discounts is challenging for the
                 company's purchasing department.

                 The Purchase Line Pricing and Purchase Line Discounting offer a pricing
                 functionality beyond the standard item card. The functionality is described in this
                 section, which is divided into two parts:

                         •   Purchase Prices
                         •   Line Discounts

Demonstration − Setting up Alternative Purchase Prices
                 To record alternative purchase prices that the purchasing agents have agreed upon
                 with their vendor/group of vendors, they must use the Purchase Price table.

                 Steps
                 The Purchase Prices window is accessed from both the vendor card and the item
                 card.

                         1. From the Purchases menu, click ORDER PROCESSING→VENDORS, and
                            locate the vendor card for vendor 10000.


5-12        Microsoft Official Training Materials for Microsoft Dynamics ™
           Your use of this content is subject to your current services agreement
Chapter 5: Purchase Order Management

          2. Click PURCHASES→PRICES to open the Purchase Prices window.


  FIGURE 5-3: PURCHASE PRICES WINDOW

  In this window, a purchasing agent can specify the conditions that must be met before
  a vendor offers a unit price for an item. For example, the conditions can require that a
  purchase is made within a certain period. A special purchase price can also depend on
  the following:

          •   A unit of measure
          •   Item variant
          •   Minimum quantity
          •   Currency

  The following demonstration illustrates a situation where a company must set up
  individual prices based on a price agreement reached with one of its vendors about
  some selected items.


 Microsoft Official Training Materials for Microsoft Dynamics ™                      5-13
Your use of this content is subject to your current services agreement
Trade in Microsoft Dynamics™ NAV5.0


Demonstration − Setting Up Individual Prices based on Price
Agreement
                 Cronus' purchases from vendor 40000 have been increasing lately. Until now, Cronus
                 has made purchases that have been based on vendor 40000's ordinary price rates.
                 Now they want to purchase items at more favorable prices. Based on an agreement,
                 Cronus obtains a deal that says that they can save 50 LCY for any purchase of item
                 1976-W if the quantity is at least ten units.

                 A purchasing agent at Cronus must set up these decisions in the program.

                 Steps
                 As mentioned earlier, the alternative purchase prices are entered in the Purchase
                 Prices window.

                         1. Open the vendor card for vendor 40000. Click PURCHASES→PRICES.

                             In the Purchase Prices window, enter the conditions under which Cronus
                             can obtain a favorable price rate.


                         2. In the Item No. field, select 1976-W, in the Minimum Quantity field
                            enter 10, and in the Direct Unit Cost field, enter 206.10 (or alternatively,
                            256.10-50), which is the reduced unit price.
                 Assume that Cronus' price agreement with this vendor will take effect from the
                 current date: 01/24/08.

                         3. In the Starting Date field, enter 01/24/08.

                             In this case, the purchasing agent may not have to enter an ending date as
                             a condition in the price agreement with the vendor. If an agreement is re-
                             negotiated at a later date, a new purchase price line is entered with a new
                             starting date. This then takes over the previous agreement.


5-14        Microsoft Official Training Materials for Microsoft Dynamics ™
           Your use of this content is subject to your current services agreement
Chapter 5: Purchase Order Management

Using the Pricing Mechanism
             The purpose of setting up alternative prices in the program is to support the
             purchasing agents in their task of always buying at the best prices. The best price is
             defined as the lowest possible price with the highest possible line discount on the
             order date.

             When a purchasing agent creates an order from a specific vendor, the program checks
             whether:

                     •   There are alternative purchase prices set up for the vendor in question.
                     •   The purchase header and line details meet the conditions for applying an
                         alternative price.
             If all the conditions are met, the applicable price from the Purchase Prices window
             is copied to the Direct Unit Cost (Excl./Incl. VAT) field on the purchase line.

             If there are no alternative purchase prices recorded in the program or the conditions
             for applying an alternative price are not satisfied, the program uses the regular unit
             cost specified on the item card as a suggestion on the purchase document.


            Microsoft Official Training Materials for Microsoft Dynamics ™                       5-15
           Your use of this content is subject to your current services agreement
Trade in Microsoft Dynamics™ NAV5.0


Lab 5.1 − Managing Alternative Purchase Prices
                 Scenario: You have a deal from vendor 10000 on items no. 1900-S and 1920-S
                 according to the following conditions:

                         •    Item 1900-S: If Cronus buys this item in pallets (that contains ten pieces)
                              instead of pieces, you receive ten LCY off the regular price.

                 HINT: Add a new unit of measure PALLET, which contains ten pieces, to the item's units of
                 measure list.

                         •    Item 1920-S: When Cronus buys this item and pays in local currency
                              (EUR), you receive 15 LCY off the item's regular price.

                 Challenge Yourself!
                 Enter these purchase prices in the Purchase Prices window and check their use by
                 creating a purchase order for two pallets of item 1900-S and five units of item 1920-
                 S.

                 HINT: Items can be accessed without leaving the Purchase menu. Click INVENTORY
                 COSTING→ITEMS.


                 Need a Little Help?
                 The solution is provided in Appendix C.


5-16        Microsoft Official Training Materials for Microsoft Dynamics ™
           Your use of this content is subject to your current services agreement
Chapter 5: Purchase Order Management


Line Discounts
              Line discounts allows the company to get a discount when ordering specific items at
              specific vendors. As opposite to invoice discounts that relates to the total invoice
              amount, line discount relates to the specific line item. Setting up and working with
              line discounts is described in the following section. First, the setup defining the
              general rules of how discounts are posted is explained.

              General Discount Setup
              Before using the line discount mechanism in the program, a company must decide
              how to post discount amounts. These decisions are implemented in the Purchases &
              Payables Setup window.

              The Discount Posting field on the General tab offers four options for defining the
              way the line discounts are to be posted to the general ledger:

                      •   No Discounts
                      •   Invoice Discounts
                      •   Line Discounts
                      •   All Discounts

              In principle, when the user makes a selection in this field, he or she can specify the
              type of purchase discounts to be posted to the general ledger (if any) and whether
              they are posted together or separately. For a detailed definition of each option, refer
              to the online Help for the field.

              If the option determining that a specific line discount is posted separately is selected,
              the user must ensure that:

                      •   A dedicated account(s) is created in the chart of accounts (for example, a
                          Purchase Line Discount account).
                      •   That the seperate line discount option is set up in the General Posting
                          Setup window.

              When posting purchase documents, the program uses the general business posting
              group of the vendor and the general product posting group of the item to retrieve the
              account set up in the General Posting Setup window.

              If discounts are not set up to be posted separately, they become part of a purchase
              amount posted to the Purchase account.

              Setting Up Line Discounts
              Purchasing agents must use the Purchase Line Discount table to record price
              discounts that they have agreed upon with different vendors. The table can be
              accessed from both the vendor card and the item card.


             Microsoft Official Training Materials for Microsoft Dynamics ™                         5-17
            Your use of this content is subject to your current services agreement
Trade in Microsoft Dynamics™ NAV5.0

                 The Purchase Line Discount window enables a purchasing agent to specify the
                 conditions that must be met before a vendor offers a discount price. For example, the
                 conditions can require that the purchasing agent buy a certain quantity or a purchase
                 is invoiced in a specified currency before a discount can be granted. Similar to
                 alternative purchase prices, line discounts are applied to a vendor.

                 Using the Line Discount Mechanism
                 The purpose of setting up a line discount in the program is to support the purchasing
                 agents in their task of purchasing items at the best prices.

                 After the line discounts and the associated terms have been set up, when a Purchasing
                 Agent creates an order/invoice for a specific vendor, the program checks whether:

                         •   There are line discounts set up for the vendor in question.
                         •   The purchase header and line details meet the conditions for applying a
                             discount price.

                 If these conditions are met, the program copies the discount percentage from the
                 Purchase Line Discounts window to the Line Discount % field on the purchase line
                 and enters the calculated discount price in the Direct Unit Cost Excl./Incl. VAT
                 field.

                 If there are no discounts recorded in the program or the conditions for applying a
                 discount are not satisfied, the program uses the last direct cost specified on the item
                 card as a suggestion on the purchase document (unless there is a special purchase
                 price set up for the customer).

                 Setup and use of the purchase line discount is similar to the setup and use of purchase
                 prices.

Conclusion
                         Purchase Order Management is an important discipline in order to get
                         purchased items in time, to maintain a good relationship with vendors and
                         achieve the best possible prices. This again has a direct effect on the
                         customer service a company provides to its own customers. Purchase Order
                         Management also affects the company's inventory management and can help
                         reduce requisition costs.


5-18        Microsoft Official Training Materials for Microsoft Dynamics ™
           Your use of this content is subject to your current services agreement
Chapter 5: Purchase Order Management


Lab 5.2 – Managing Purchase Line Discounts
              Scenario: You as the purchasing agent at Cronus have made an agreement with
              vendor 30000 that for items in the item range 70100-70104 purchased after 01/30/08,
              Cronus receives the following discount:

                      •   1-99 items: 10%
                      •   100-499 items: 15%
                      •   500 or more items: 25%

              Challenge Yourself!
              Enter the line discounts in the Purchase Line Discounts window and check that the
              program uses them by creating a purchase order for 250 units of item 70102 and 600
              units of item 70104.

              Need a Little Help?
              The solution is provided in Appendix C.


             Microsoft Official Training Materials for Microsoft Dynamics ™                  5-19
            Your use of this content is subject to your current services agreement
Trade in Microsoft Dynamics™ NAV5.0


Quick Interaction: Lessons Learned
                 Take a moment and write down three key points you have learned from this chapter:

                 1.


                 2.


                 3.


5-20        Microsoft Official Training Materials for Microsoft Dynamics ™
           Your use of this content is subject to your current services agreement
Chapter 6: Requisition Management


CHAPTER 6: REQUISITION MANAGEMENT
Objectives
                The objectives are:

                        •   Define Requisition Management
                        •   Set up Requisition Management
                        •   Use the Requisition Worksheet
                        •   Create Purchase Orders from the Requisition Worksheet
                        •   Define Additional Worksheet Features

Introduction
                The primary functions of purchasing include procuring materials and supplies in
                optimal quantities and scheduling a timely receipt into inventory. These activities
                contribute to a company's smooth operation, timely fulfillment of sales orders,
                and results in cost efficiencies, especially in inventory control.

                Demonstrations and Labs in this section provide detailed steps on how to use
                requisition management and the requisition work sheet.


           Microsoft Official Training Materials for Microsoft Dynamics ™                       6-1
          Your use of this content is subject to your current services agreement
Trade in Microsoft Dynamics™ NAV5.0


Requisition Management
                 In Microsoft Dynamics™ NAV, the Requisition Management functionality helps
                 automate the procurement process and enables the purchasing agent to perform
                 basic purchasing activities efficiently and confidently.

                 The requisition worksheet, which is the central processing tool, offers the
                 following features:

                         •   Calculates a current and detailed purchase order proposal plan.
                         •   Creates actual purchase orders from order proposal lines.
                         •   Handles stockkeeping units that are replenished by transfer and
                             creates the corresponding transfer orders.
                         •   Handles designated purchase order lines from other areas of the
                             application automatically.
                         •   Handles manually created purchase order proposal lines.
                         •   Controls the flow of relevant information between concerned
                             departments.
                         •   Provides a practical overview of the individual processes involved.

                 The planning functionality found in the requisition worksheet is the same as that
                 found in the planning worksheet in the manufacturing application area. The
                 difference is that the requisition worksheet plans for items that are replenished by
                 purchase and transfer, while the planning worksheet plans for items that are
                 manufactured, and purchased and transferred.

Requisition Management Setup
                 Successful use of the Requisition Management functionality requires setup in the
                 following areas:

                         •   The requisition worksheet template.
                         •   The planning parameter fields on items and stockkeeping units.

                 Requisition Worksheet Template
                 To set up a requisition worksheet, you must first create a template for it in the
                 Purchase menu, PLANNING→SETUP→REQ. WORKSHEET TEMPLATES.

                 Cronus has set up a worksheet template for requisitions to handle items that are
                 purchased and transferred.


6-2         Microsoft Official Training Materials for Microsoft Dynamics ™
           Your use of this content is subject to your current services agreement
Chapter 6: Requisition Management

      As soon as you have set up a requisition worksheet template, you can create
      different worksheets. For example, this can be a worksheet of a particular
      purchasing agent or a worksheet that handles specific items. When you open a
      requisition worksheet under PURCHASES→PLANNING→REQUISITION WORKSHEETS, it
      is empty.


      FIGURE 6-1: REQUISITION WORKSHEET

      Planning Parameters
      Planning parameters refer to a group of fields on the Replenishment and
      Planning tabs of the item and stockkeeping unit cards.

      Planning parameters are set up to reflect the optimal inventory levels a company
      wants to maintain with regard to market-preparedness, warehouse efficiency, and
      costs. Therefore, the parameters consider various market factors such as:

              •   Replenishment lead time
              •   Seasonal demand
              •   Pricing discounts for quantity
              •   Freight weights
              •   Delivery schedules

      The planning parameters also consider a company's internal policy with regard to
      inventory management and control.


 Microsoft Official Training Materials for Microsoft Dynamics ™                    6-3
Your use of this content is subject to your current services agreement
Trade in Microsoft Dynamics™ NAV5.0

                 Seen from a technical aspect, the planning parameters control the replenishment
                 calculation. Their primary functions are:

                         •   Setting the Time Bucket
                             The period of time defined by the Reorder Cycle field determines
                             which requirements and existing replenishment orders participate in
                             the availability calculation and which replenishment orders can
                             potentially be used to fill additional requirements. This, in turn,
                             determines which action message is issued.
                         •   Setting the Inventory Level
                             The inventory level, as defined by the Reorder Point and Safety
                             Stock Quantity fields, determines when to replenish the item. When
                             projected availability falls below the inventory level, the program
                             recognizes the need for replenishment.
                         •   Determining Order Quantity
                             The program calculates order quantities to cover all gross
                             requirements. This includes demand from forecast, sales orders, and
                             also replenishment of the inventory level.
                             At a minimum, order quantity is sufficient to replenish the inventory
                             level.
                             If there are additional requirements, the program uses the value in
                             the Reordering Policy field and the related fields to calculate order
                             quantity. The order modifier fields adjust the final quantity
                             afterward.
                 The Planning White Paper contains an in-depth description of the role of the
                 planning parameters for the planning calculations. The main fields are described
                 briefly here. However, refer to the online Help for additional guidelines on
                 effectively setting the parameters.

Demonstration − Setting Up Planning Parameters
                 The production planner at Cronus is responsible for maintaining the planning
                 parameters for all items. In this demonstration the order processor takes a look at
                 the planning parameters for item 1924-w. The planning parameters contains
                 detailed information about replenishment and planning for the specific item.


6-4         Microsoft Official Training Materials for Microsoft Dynamics ™
           Your use of this content is subject to your current services agreement
Chapter 6: Requisition Management


      Steps
      Use this steps to review the replenishment and planning parameters:

              1. Locate the item card for item 1924-W, and then click the
                 Replenishment tab.


      FIGURE 6-2: ITEM CARD REPLENISHMENT TAB

              2. Review how the the different fields below are set up for item 1924-
                 w.

       Replenishment System        This field indicates how the item is
                                   replenished and the type of order or order
                                   proposal the program creates.
                                   The options are Purchase or Production.
       Lead Time Calculation       This is the time that it takes to replenish the
                                   item. This field calculates the date fields on
                                   order and order proposal lines:

                                   On the purchase order line, the Order Date +
                                   Lead Time Calculation = Planned Receipt
                                   Date.


 Microsoft Official Training Materials for Microsoft Dynamics ™                      6-5
Your use of this content is subject to your current services agreement
Trade in Microsoft Dynamics™ NAV5.0

                         3. On the item card for item 1924-W, click the Planning tab.


                 FIGURE 6-3: ITEM CARD PLANNING TAB

                         4. Review how the the different fields below are set up for item 1924-
                            w.

                  Reordering        The reordering policy calculates replenishment order
                  Policy            quantity.
                                    Fixed Reorder Quantity - The quantity in the Reorder
                                    Quantity field is the standard lot size.
                                    Maximum Quantity - The quantity in the Maximum
                                    Inventory field calculates the order quantity.
                                    Order - Generates an order for each requirement and does
                                    not use the Reorder Cycle.
                                    Lot-for-Lot - Creates an order proposal with a quantity
                                    meeting the sum of the requirements due within the Reorder
                                    Cycle.
                                    Blank - The user can plan for the item manually.
                  Reorder Cycle     This is the planning time bucket for the item.
                                    Requirements that are due within the reorder cycle are
                                    grouped together.
                                    A replenishment order due within the reorder cycle may be
                                    rescheduled to fulfill a requirement.


6-6         Microsoft Official Training Materials for Microsoft Dynamics ™
           Your use of this content is subject to your current services agreement
Chapter 6: Requisition Management


       Safety Lead       A buffer period that protects against delays in the purchase
       Time              replenishment lead time. When calculating order and order
                         proposal lines, the program adds the safety lead time to the
                         lead time.
                         On the purchase order line, the Planned Receipt Date +
                         Safety Lead Time + Inbound Warehouse Handling Time =
                         Expected Receipt Date.
       Safety Stock      This is a quantity of stock wanted in inventory to protect
       Quantity          against fluctuations in demand and supply during the item's
                         replenishment lead time.
                         When the projected inventory falls below the safety stock
                         quantity, the program creates an order proposal that, at a
                         minimum, replenishes the safety stock quantity.
       Reorder Point     This is a quantity that sets the inventory level below which
                         you replenish the item.
                         When the projected inventory falls below the reorder point,
                         the program recognizes the need to replenish the item and
                         creates an order proposal that, at a minimum, replenishes to
                         the reorder point.
       Reorder           This is a standard quantity used for all order proposals.
       Quantity          This field is used with the reordering policy Fixed Reorder
                         Quantity.
       Maximum           This is the quantity used as a maximum inventory level. The
       Inventory         program calculates order quantity as the maximum
                         inventory minus the safety stock.

                         This field is used with the reordering policy Maximum
                         Quantity.
       Minimum           As soon as the order quantity is calculated, it can be
       Order             modified by a minimum allowed quantity for an order.
       Quantity
       Maximum           As soon as the order quantity is calculated, it can be
       Order             modified by a maximum allowed quantity for an order.
       Quantity
       Order             As soon as the order quantity is calculated, it can be
       Multiple          modified by an order multiple.


 Microsoft Official Training Materials for Microsoft Dynamics ™                         6-7
Your use of this content is subject to your current services agreement
Trade in Microsoft Dynamics™ NAV5.0


The Requisition Worksheet
                 The requisition worksheet can greatly facilitate the purchasing agent's job by
                 calculating a plan that states which items must be ordered, what quantities to
                 order, and when to order. The worksheet features two main batch jobs: one that
                 calculates the plan and one that creates orders based on the plan.

                 Calculate Plan Batch Job
                 The Calculate Plan – Req. Wksh. batch job calculates a requisition plan for items
                 or stockkeeping units set up for replenishment by purchase and transfer order.
                 Item Availability
                 An analysis of what must be ordered starts with an investigation of projected
                 item availability. This is a fairly straightforward task that involves summarizing
                 the whole demand and supply situation for an item at any point of time within a
                 defined period. This is calculated by using the following equation:

                 Projected Available Balance = Inventory + Scheduled Receipts + Planned
                 Receipts - Gross Requirement.

                 The result of the availability calculation, if negative, states a net requirement.
                 This represents the item quantities that must be replenished to fulfill outstanding
                 demand.
                 Replenishment Proposal
                 The batch job calculates the most efficient way to replenish the item and create a
                 requisition worksheet line. This is a purchase or transfer order proposal
                 accompanied by a corresponding action message. The action message suggests
                 how to replenish, while the order line provides the details:

                         •   Which item
                         •   What quantity
                         •   The relevant dates

                 The order proposal lines are based on the accumulated data existing at the time.
                 The proposed plan is considered a starting point from which the purchasing agent
                 can review and make necessary adjustments according to personal knowledge,
                 experience, and the expediency of the moment.

                 Action Messages
                 The program uses five action message options to suggest how to replenish an
                 item:

                         •   Change Quantity: Change the quantity on an existing replenishment
                             order to cover a changed or new requirement.
                         •   Reschedule: Reschedule the due date on an existing replenishment
                             order.


6-8         Microsoft Official Training Materials for Microsoft Dynamics ™
           Your use of this content is subject to your current services agreement
Chapter 6: Requisition Management

                       •    Reschedule and Change Quantity: Reschedule the due date and
                            change the quantity on an existing replenishment order.
                       •    New: Create a new order. If a requirement cannot be filled by point
                            1, 2, or 3 here, the program suggests creating a new order.
                       •    Cancel: Cancel an existing replenishment order.

               NOTE: The user can designate an existing purchase order line as being firm and
               unchangeable. This means that the program does not calculate action messages for the
               line during the planning calculations. Refer to the Planning Flexibility field on the
               purchase order line.


               Carry Out Action Message Batch Job
               As soon as the purchasing agent has made necessary adjustments to a requisition
               worksheet line and approved its contents, the Carry Out Action Msg. – Req.
               batch job converts the order proposal line to a purchase or transfer order line.

               The Accept Action Message field is selected by default. The check mark
               indicates that the line is included in the Carry Out Action Msg. – Req. batch
               job and that the batch job converts it to an order line. The field can be cleared.

Demonstration − Using the Requisition Worksheet
               An order processor calls the purchasing agent at Cronus with a rush order for an
               important customer.

               Steps
               The purchasing agent sees that inventory on the item is low and calculates a
               replenishment plan.

                       1. Open the item card for item 1924-W.
                            For Cronus item 1924-W, there are 26 units currently on inventory,
                            and the reorder point is set to 150.
                       2. On the Planning tab, enter the following additional information:
                          Reordering Policy = Fixed Reorder Quantity, and Reorder Quantity
                          = 200.
                       3. Create a sales order for customer 10000 for 100 units of item 1924-
                          W using the program work date of 01/24/08.
                       4. In the Purchase menu, from the Requisition Worksheet window,
                          click FUNCTIONS→CALCULATE PLAN to open the request form.
                       5. On the Item tab, set a filter for item 1924-W. On the Options tab, in
                          the Order Date field, enter 01/24/08, and in the Ending Date field,
                          enter 01/31/08.
                       6. Click OK.


          Microsoft Official Training Materials for Microsoft Dynamics ™                            6-9
         Your use of this content is subject to your current services agreement
Trade in Microsoft Dynamics™ NAV5.0

                 The program calculates a plan and presents the order proposal lines in the
                 Requisition Worksheet window.


                 FIGURE 6-4: REQUISITION WORKSHEET

                 The program has calculated the need for two new purchase orders, which can be
                 explained as follows:

                         •   The current inventory is 26 units. This gives a requirement of 74
                             units. Because the reorder quantity is 200, the program suggests
                             creating a new order of 200 units to cover this requirement.
                             The due date has been calculated as 01/24/08 to accommodate the
                             sales order Shipment Date of 01/24/08.
                         •   As soon as the requirement of 74 units is filled, there are 126 units in
                             inventory. However, the value in the Reorder Point field states 150.
                             The program suggests creating another new order to replenish the
                             reorder point. The new order must also meet the reorder quantity of
                             200.
                             The due date is calculated as 02/08/08. The program has added the
                             lead time calculation to the order date.

Demonstration − Creating Purchase Orders from the
Requisition Worksheet
                 The purchasing agent creates orders from the requisition worksheet lines even
                 though it is not possible to ship the items on the date the order processor
                 requested.


6-10        Microsoft Official Training Materials for Microsoft Dynamics ™
           Your use of this content is subject to your current services agreement
Chapter 6: Requisition Management


               Steps
               Perform the following steps:

                       1. From the Requisition Worksheet window, click FUNCTIONS→CARRY
                          OUT ACTION MESSAGE to open the request form.

                       2. Click OK.
                       3. The lines are removed from the Req. Worksheet, and a purchase
                          order is created.
                       4. Locate the newly created purchase order.
               The first order line shows a planned receipt date of 01/21/08, an expected receipt
               date of 01/24/08, and an order date of 01/07/08. Because of the immediate
               requirement, the program has backward scheduled the order from the due date on
               the requisition worksheet line by subtracting the lead time calculation of 2W.

               The order date is problematic as it occurs in the past. But the purchasing agent
               plans to call the vendor to find out whether this order can be expedited.

               The second order line shows a planned receipt date of 02/07/08 and an order date
               of 01/24/08. Because there is no immediate requirement, the program has
               forward scheduled the order.

Additional Worksheet Features
               There are other functions on the requisition worksheet of interest depending on
               the types of transactions a company performs in its daily business.

               Drop Shipment Lines
               A drop shipment is a transaction where the vendor delivers sold goods directly to
               the customer. The company does not receive the items into their inventory and
               avoids handling time and activities. A company can record a drop shipment by
               creating a purchase order based on the sales order.

               From the Requisition Worksheet window, a purchasing agent can access drop
               shipment-designated sales order lines and create the corresponding purchase
               order.


          Microsoft Official Training Materials for Microsoft Dynamics ™                      6-11
         Your use of this content is subject to your current services agreement
Trade in Microsoft Dynamics™ NAV5.0


Demonstration − Using the Additional Worksheet Features
                 Using a similar situation as described in the first demonstration, "Using the
                 Requisition Worksheet," an order processor calls the purchasing department with
                 a rush order for an important customer. The purchasing agent notices that
                 inventory on the item is low and that the replenishment lead time is long. The
                 order processor and purchasing agent agree to arrange a drop shipment to reduce
                 the delivery time to the customer.

                         1. Reuse the sales order created in the first demonstration, but assign it
                            for drop shipment as described earlier.
                         2. Open a requisition worksheet and click FUNCTIONS→DROP
                            SHIPMENT→GET SALES ORDERS. The Get Sales Orders batch job
                            request form opens.
                         3. Set a filter if desired. Click OK.
                 The batch job copies the drop shipment sales order line to the requisition
                 worksheet; it appears as a purchase order proposal.

                 As soon as the purchasing agent has approved the line, convert the line to an
                 actual purchase order line using the Carry Out Action Msg. – Req. Wksh.
                 batch job.

                 Planning Worksheet Lines
                 The Planning Worksheet Lines feature is relevant for a large manufacturing
                 company with separate departments handling production planning and
                 purchasing. In the manufacturing application area, a production planner uses the
                 planning worksheet to calculate an item replenishment plan for all items, whether
                 they are manufactured, purchased, or transferred.

                 From the planning worksheet, the planner can select order proposal lines for
                 items that are replenished by purchase or transfer and forward them to the
                 requisition worksheet by using the Carry Out Action Msg. – Plan. batch job.
                 You can read more about the batch job in the online Help.

                 This function, although initiated from the manufacturing application area, results
                 in order proposal lines appearing in the requisition worksheet. From there, the
                 purchasing agent can edit, approve, and convert the lines to actual purchase or
                 transfer order lines by using the Carry Out Action Msg. – Req. Wksh. batch
                 job.

                 Manually Created Lines
                 It is also possible to create lines manually in the requisition worksheet. This can
                 be practical in a situation where individual persons or departments use a
                 worksheet to list needed items. It can then be the responsibility of the purchasing
                 agent to approve order proposal lines and create orders using the Carry Out
                 Action Msg. – Req. Wksh. batch job.


6-12        Microsoft Official Training Materials for Microsoft Dynamics ™
           Your use of this content is subject to your current services agreement
Chapter 6: Requisition Management


Conclusion
               Purchase transactions can be automated by using the requisition management
               functionality in Microsoft Dynamics™ NAV. Requisitions management help to
               provide order processors with information about when an item can be delivered
               to the customer. Planning parameters set up on the item card defines how items
               are treated in the system.
               The requisition work sheet is an important element in the day to day planning
               activities of the purchasing agent; it differs from the planning worksheet because
               it only deals with purchase orders.


          Microsoft Official Training Materials for Microsoft Dynamics ™                     6-13
         Your use of this content is subject to your current services agreement
Trade in Microsoft Dynamics™ NAV5.0


Lab 6.1 − Calculating a Replenishment Plan from the
Requisition Worksheet
                 Scenario: You are the purchasing agent at Cronus. Perform the following set up
                 tasks:

                         1. For Cronus item 1330, change the value in the Reorder Quantity
                            field from 100 to 300 so that it has the following setup:
                             Inventory = 100
                             Reordering Policy = Fixed Reorder Quantity
                             Reorder Cycle = 1M
                             Reorder Point = 100
                             Reorder Quantity = 300

                         2. Create the following sales order lines:
                             40 units with a shipment date 5 days after the work date.
                             60 units with a shipment date 10 days after the work date.
                             70 units with a shipment date 20 days after the work date.

                         3. Create the following purchase order line:
                             50 units with an expected receipt date 15 days after the work date.

                 Challenge Yourself!
                 Calculate a plan from the requisition worksheet and explain the resulting order
                 proposal lines.

                 Need a Little Help?
                 The solution is provided in Appendix C.


6-14        Microsoft Official Training Materials for Microsoft Dynamics ™
           Your use of this content is subject to your current services agreement
Chapter 6: Requisition Management


Quick Interaction: Lessons Learned
                Take a moment and write down three key points you have learned from this
                chapter:

                1.


                2.


                3.


           Microsoft Official Training Materials for Microsoft Dynamics ™                  6-15
          Your use of this content is subject to your current services agreement
Trade in Microsoft Dynamics™ NAV5.0


6-16        Microsoft Official Training Materials for Microsoft Dynamics ™
           Your use of this content is subject to your current services agreement
Chapter 7: Item Charges


CHAPTER 7: ITEM CHARGES
Objectives
                The objectives are:

                        •   Provide an Overview of the Item Charges functionality
                        •   Set up Item Charges
                        •   Define Purchase Item Charges
                        •   Handle Additional Costs as an Item Charge
                        •   Define and handle Sales Item Charges
                        •   Use Item Charges regarding Purchase and Sales Allowances
                        •   Create Item Charge Credit Memo

Introduction
                This lesson demonstrates the multiple possibilities incorporated in the Item
                Charges functionality and explains how the program supports companies in their
                objective of achieving optimal cost control and creating a reliable basis for
                informed decision-making.

                Usage demonstrations included in this lesson are grouped under the following
                headings:

                        •   Purchase item charges
                        •   Sales item charges
                        •   Purchase and sales allowances

                To learn more about posting principles and the mechanism behind item charges,
                refer to the Inventory Costing training manual.


           Microsoft Official Training Materials for Microsoft Dynamics ™                      7-1
          Your use of this content is subject to your current services agreement
Trade in Microsoft Dynamics™ NAV5.0


Overview of Item Charges
                 Accurate and relevant cost accounting information is an important prerequisite to
                 efficient and competent decision-making in any trading company. At a minimum,
                 companies register and analyze cost records derived from invoice information
                 about their purchase and sales transactions.

                 However, as the cost of distributing, handling, and transporting goods starts to
                 represent a larger share in the total inventory cost than direct purchase and
                 manufacturing costs, there is a need to account for these costs. Examples of
                 additional costs are:

                         •   Insurance
                         •   Freight cost
                         •   Custom duties
                         •   Any other costs associated with delivering and transporting services

                 Moreover, the possibility to collect detailed cost statistics at the item level
                 becomes relevant when determining cost of goods sold and accounting for
                 additional sales expenses that affect profit calculations. In the first case, the
                 company's cost structure must enable allocation of additional acquisition cost
                 representing expenses (inventoriable costs) related to the purchase. In the second
                 case, additional costs incurred as part of a sale transaction must be directly linked
                 with the sale as expenses (non-inventoriable cost) to accurately calculate profit.

                 In Microsoft Dynamics™ NAV, to account for both inventoriable and non-
                 inventoriable cost incurred for purchase and sale transactions respectively,
                 accountants can use the Item Charges functionality. Item charges represented by,
                 for example, the cost of a purchase invoice from a transport agent for delivering a
                 shipment from a supplier, can be assigned to a receipt document. When posted,
                 this item charge becomes a part of the total landed cost of the item(s) to which
                 the charge was assigned.

                 Additionally, the item charges solution is flexible enough to incorporate a facility
                 that lets the user register and post additional cost independently of the posting
                 time of the associated purchase or sales document. That is, item charges can be
                 assigned to the delivery after they have been posted as received and invoiced and
                 even after the respective items have been sold. The program's costing mechanism
                 then guarantees that these costs are rolled into the inventory value and cost of
                 goods sold calculations. The functionality supports allocating the charge cost
                 amount based on quantity and amount.


7-2         Microsoft Official Training Materials for Microsoft Dynamics ™
           Your use of this content is subject to your current services agreement
Chapter 7: Item Charges


               In addition to its primary goal of supporting companies in identifying and
               accounting for additional landed and sales-related cost, the Item Charges
               functionality can be used when handling other sales and purchase situations. For
               example, in a sales return situation where items are not required to be physically
               returned to the company, an item charge can be used to register and post an
               allowance amount (in the form of a credit memo). Another example is
               represented by the practice of charging (selling) a customer transportation fees in
               relation to delivering shipments or charging restock fees for returns.


Setting Up Item Charges
               The item charges setup is part of the general Finance setup. Companies can set
               up different item charge numbers to distinguish charge types to account for and
               to create cost and sales statistics.

               Cronus has set up several different item charges that are typical for their business
               operations. From the Financial Management menu, click INVENTORY SETUP→ITEM
               CHARGES. The Item Charges window is displayed.


               Like an item, an item charge must have a general product posting group and
               VAT product posting group to determine which account to post the charge
               amount to.

               As soon as an item charge type is set up, it can be selected on a purchase (sales)
               document line. There are no limits as to what companies can include in the
               category of item charges.

Purchase Item Charges
               When purchasing goods from suppliers, companies frequently incur additional
               costs, such as freight, handling charges, import taxes, and so on. These make up
               the purchase's total landed costs and must be included in the calculation of
               inventory value and cost of goods sold.

               Depending on the nature of their sales agreements, companies may also pay these
               costs when delivering shipments. In this case, the costs represent non-
               inventoriable expenses that affect the company's overall profit calculation.

               In both situations, accountants can register these additional costs as a separate
               cost category and link them directly to related items. In Microsoft Dynamics™
               NAV, these costs are referred to as item charges. Registering item charges can be
               done in two ways:

                       •   As a separate document (purchase order/invoice)
                           Typically, this is used when the invoice for the cost amount arrives
                           some time after the original purchase document is posted or when the
                           charge must be assigned to a sales document.


          Microsoft Official Training Materials for Microsoft Dynamics ™                        7-3
         Your use of this content is subject to your current services agreement
Trade in Microsoft Dynamics™ NAV5.0

                         •   In the same purchase document
                             This option is used when the charge amount is known at the time of
                             posting the receipt of items to which the charge relates.


                 As an additional help, the program can also suggest an assignment of the item
                 charge to the selected document lines. This can be modified if it is required.

Demonstration − Handling Additional Direct Cost as an Item
Charge
                 Following the earlier shipment delivery from vendor 10000, Cronus' accounting
                 department receives an invoice for 100 LCY from the same vendor for the
                 transportation services they provided for this delivery.

                 Steps
                 The accountants must now register these additional landed costs in the program
                 and assign them to the purchase.

                 Because the purchase order has been posted, associated freight charges must be
                 registered in a separate invoice:

                         1. Open a purchase invoice and fill in the header with the vendor
                            details.
                         2. On the line, in the Type field, select Charge (Item). In the No. field,
                            select P-FREIGHT as a charge type representing freight-related cost.
                         3. In the Quantity field, enter 1, and in the Direct Unit Cost field,
                            enter 100. In this manner, entering charge details is appropriate
                            where the total invoice amount applies to the complete order
                            delivery.
                 The charge must be assigned to the posted purchase order.

                         4. Select the item charge line, and then click LINE→ITEM CHARGE
                            ASSIGNMENT. (Alternatively, click the AssistButton in the Qty. to
                            Assign field on the purchase line.)
                             The Item Charge Assignment (Purch) window is empty. This
                             signifies that an item charge is being assigned to an already posted
                             document instead of to an order line created in the same document as
                             the item charge. In the latter case, the order line(s) appear in the Item
                             Charge Assignment (Purch) window.


7-4         Microsoft Official Training Materials for Microsoft Dynamics ™
           Your use of this content is subject to your current services agreement
Chapter 7: Item Charges

      To assign a charge amount to a posted document, retrieve the document that uses
      the Get Line functions. According to the first demonstration, the freight invoice
      relates to a purchase order. Therefore, the user must retrieve respective posted
      receipt lines:

              5. In the Item Charge Assignment (Purch) window, click
                 FUNCTIONS→GET RECEIPT LINES. The Purch. Receipt Lines window
                 appears.


      NOTE: Item charges can be assigned to any posted outbound (return shipment and
      sales shipment) and inbound (return receipt and transfer receipt) documents.

              6. Locate the right order, select all four order lines, and then click OK.
                  The program copies the selected lines into the Item Charge
                  Assignment (Purch.) window.

                  Now the user can assign the charge amount manually by entering the
                  values in the Qty. to Assign field for all the lines or make the
                  assignment automatically.

                  In the second case, the total charge amount can be assigned either
                  equally among the lines or proportionally based on the line amount.
      Automatically assign the charge by amount.

              7. Click FUNCTIONS→SUGGEST ITEM CHARGE ASSIGNMENT. Select
                 Amount and then click OK.
                  The charge amount of 100 LCY is distributed proportionally among
                  the purchase order lines.
                  At the bottom of the Item Charge Assignment (Purch) window,
                  there are status fields that contain the total charge amount to assign,
                  how much of this has been assigned, and how much is left to be
                  assigned by both quantity and amount.
              8. Close the Item Charge Assignment (Purch) window.
                  The Qty. to Assign field on the purchase invoice line is updated.
              9. The program is set up to require a vendor invoice number. For the
                 purpose of this demonstration, enter some characters of your own
                 choice in the Vendor Invoice No. field.


 Microsoft Official Training Materials for Microsoft Dynamics ™                        7-5
Your use of this content is subject to your current services agreement
Trade in Microsoft Dynamics™ NAV5.0

                              10. Post the invoice. Because of this posting, the program creates a link
                                  between the items from the selected purchase order and the item
                                  charge.

                                  As the cost value (total landed cost) of the earlier purchased items
                                  has increased by the charge amount without the actual quantity
                                  increasing, an additional value entry is linked to the item ledger entry
                                  of the posted purchase receipt.
                      View the value entries related to the item ledger entry for item 1928-W that was
                      created by posting the purchase order (receipt number 107023) and the freight
                      charge.

                              11. From the Purchase menu, click HISTORY→POSTED RECEIPTS.
                              12. Locate the posted purchase receipt no. 107023. Open the item ledger
                                  entries.


FIGURE 7-1: ITEM LEDGER ENTRIES WINDOW

                                  The quantity has not changed.
                              13. Select the first item ledger entry for item 1928-W (posted for the
                                  Green location), and open the related value entries (press CTRL +
                                  F5).
                                  A new value entry of the type Direct Cost representing the additional
                                  cost of the freight invoice was created.


                      NOTE: Learn more about inventory accounting principles in the Inventory Costing
                      training manual.

                                  Based on the value entry, the charge amount is included in the cost
                                  and profit calculations. If required, accountants can also collect
                                  statistical information specified for each item charge category.


7-6              Microsoft Official Training Materials for Microsoft Dynamics ™
                Your use of this content is subject to your current services agreement
Chapter 7: Item Charges

               14. In the Item Statistics window, in the Show as Lines field, select
                   Purchase Item Charge Spec.


      FIGURE 7-2: ITEM STATISTICS WINDOW


      NOTE: Because an item charge assignment changes the item cost amount without
      changing the quantity of the posted entry, item charges can be used for correcting
      value-related errors that frequently occur in the starting phase of program
      implementation.


      Handling Non-inventoriable Costs as Item Charges
      In addition to having detailed statistics on their inventory landed cost, many
      companies find it important to account for non-inventoriable costs. This cost
      category becomes relevant where companies incur freight-out costs that affect the
      profit calculations, or they deal with vendor- or headquarters-owned inventory,
      and do not carry inventory on their own (the accounting model used in this case
      is frequently referred to as retail-minus).

      NOTE: The retail-minus model can be illustrated by the scenario where a company's
      subsidiary operates as a sales office and does not carry any inventory at its own
      premises. All sales could be done by using drop shipment, with the sales revenues
      posted at the subsidiary. The headquarters would then regularly send the subsidiary
      purchase invoices for the cost price of the items sold. Posted as item charges related to
      sales, these costs are recorded as sales expenses (non-inventoriable cost) and the
      subsidiary's profit calculated respectively.

      To account for non-inventoriable cost incurred for sale transactions, accountants
      can use item charges functionality. The registering and posting procedure is
      similar to the one described in the previous section. The only difference is that
      the item charge amount is assigned to outbound documents (posted sales and
      return shipments).


 Microsoft Official Training Materials for Microsoft Dynamics ™                               7-7
Your use of this content is subject to your current services agreement
Trade in Microsoft Dynamics™ NAV5.0


Lab 7.1 − Handling Purchase Item Charges
                 Scenario: You have an open purchase order from vendor 10000. You also
                 receive an invoice from the same vendor for freight service for the amount of 150
                 LCY.

                 Challenge Yourself!
                 Register these additional invoices, ensuring that inventory costs are updated
                 correctly.

                 Need a Little Help?
                 The solution is provided in Appendix C.


7-8         Microsoft Official Training Materials for Microsoft Dynamics ™
           Your use of this content is subject to your current services agreement
Chapter 7: Item Charges


Sales Item Charges
               The previous section introduced the functionality of item charges and illustrated
               how it can be used to handle additional (direct and non-inventoriable) costs –
               freight costs, packing, insurance, customs, and so on – that a company may incur
               as part of a purchase and sale transaction

               When these additional costs are paid by a customer, this is a regular sales
               transaction without physical items involved. The company can record the cost
               amounts as sales item charges and link them to the relevant outbound document,
               that is, sales shipment and sales return receipts. In this manner, the company can
               create detailed statistics of its sales and revenue figures.

               The principles of recording, assigning, and posting sale item charges are identical
               to those applied for purchase item charges and is not repeated here in more detail.

               The following demonstration highlights the main points of sales item charges.

Demonstration − Handling Sales Item Charges
               After several shipments were made to customer 20000 in January, on 01/24/08,
               Cronus' shipping department informed the accounting department that they had
               insured all the shipments for the total amount of 40 LCY.

               Steps
               The accountant must now invoice the customer for the additional insurance costs
               and make sure that these cost amounts are reflected in the sales statistics for the
               items to which insurance cost applies.

                       1. Add a new item charge category called Insurance to the company's
                          item charge list. Set it up with the same General and VAT Posting
                          Groups that the other Item Charges have.
                       2. Create a sales invoice, with a Posting Date of 01/24/08, for the
                          insurance amount of 40 LCY to be charged to customer 20000.
                            Notice that, as the charge is sold to the customer instead of incurred
                            by the company as cost, the charge amount must be entered in the
                            Unit Price Excl. VAT field.

               NOTE: You cannot post costs associated with a charge automatically as a part of
               posting a charge line from a sales document. Costs related to a charge must be posted
               directly to an appropriate G/L account as an expense or as an item charge from a
               purchase document.


          Microsoft Official Training Materials for Microsoft Dynamics ™                               7-9
         Your use of this content is subject to your current services agreement
Trade in Microsoft Dynamics™ NAV5.0

                         3. Assign the insurance charge to all the sales lines shipped to customer
                            20000. Use the Get Shipment Lines function from the Item Charge
                            Assignment (Sales) window to retrieve the lines.


                 FIGURE 7-3: SALES SHIPMENT LINES WINDOW

                         4. Click the Line button to access the Item Charge Assignment
                            (Sales) window and assign the charge to the lines based on the line
                            amounts. Click Functions and then Suggest Item Charge
                            Assignment and then select Amount.
                         5. Post the sales invoice.
                             The program creates value entries with a link to the item ledger
                             entries for original sales. Based on that, the sales statistics for the
                             sold items are updated.
                         6. View profit calculation statistics for item 1928-S.


                 FIGURE 7-4: ITEM STATISTICS WINDOW


7-10        Microsoft Official Training Materials for Microsoft Dynamics ™
           Your use of this content is subject to your current services agreement
Chapter 7: Item Charges

               The amount of 4.02 LCY is now included in revenues and profit calculations. If
               required, the accountants can also collect statistical information specified per
               each item charge category.

Purchase and Sales Allowances
               One of the essential functions of Item Charges is to facilitate registering changes
               to transaction costs and price amounts at the item level without affecting item
               availability information. This underlying principle can find many diverse
               applications within managing financial flow of purchase and sales transactions.

               This section illustrates the usage of item charges regarding purchase and sales
               allowances. Allowance is a term frequently used for returns. For example, if
               damaged items arrive to a customer, the company may offer the customer the
               opportunity to keep the damaged items and pay a reduced price for them instead
               of returning the items. The customer receives a sales allowance in a form of a
               credit memo for the reduced amount.

               Similarly, to correct a wrongly priced delivery (without a physical return of items
               involved), a vendor issues an allowance to the company, who registers this
               amount as a purchase credit memo of an item charge type. To learn more about
               sales and purchase returns, refer to Chapter 9 "Returns Management" in this
               training manual.

Demonstration − Creating Item Charge Credit Memo
               After a shipment was delivered and invoiced to customer 10000, the Order
               Processor at Cronus discovered that item 1964-W in the shipment was priced
               incorrectly – 15% higher than the agreed price. The shipment number is 102030.

               The customer must be compensated for the difference. As the items are in perfect
               condition, they will not be returned to Cronus.

               Steps
               An accountant must now issue a credit memo of an item charge type.

                       1. From the Financial Management menu, click RECEIVABLES→CREDIT
                          MEMO to create a new credit memo.

                       2. Enter the header details for customer 10000. Enter the charge line
                          details. (Consider using the Copy Document function to retrieve the
                          price information from the shipment document.)
                       3. Select Sales Allowance as the type of the item charge.
                       4. In the Quantity field enter 1, and in the Unit Price Excl. VAT field,
                          enter 438 (15% of the total order price of 2,920 LCY).


          Microsoft Official Training Materials for Microsoft Dynamics ™                      7-11
         Your use of this content is subject to your current services agreement
Trade in Microsoft Dynamics™ NAV5.0

                         5. Assign the charge to the sales line for item 1964-W.


                 FIGURE 7-5: SALES CREDIT MEMO WINDOW

                         6. Post this credit memo.
                 The customer and item sales statistics are updated without the original shipment
                 quantity (and therefore item availability) changing.

Conclusion
                 This lesson introduced how item charges can be used in the sales and purchase
                 process to ensure cost control and provide a good foundation for decision
                 making.
                 Purchase and sales allowances are frequently used in case a customer receives a
                 damaged item and is offered a reduced price for keeping the item instead of
                 returning it.


7-12        Microsoft Official Training Materials for Microsoft Dynamics ™
           Your use of this content is subject to your current services agreement
Chapter 7: Item Charges


Lab 7.2 − Handling Purchase Allowances
               Scenario: Upon receiving and invoicing a shipment (No. 107019) from vendor
               10000, the inventory manager at Cronus discovers that two units of item 70011
               had a small fault on the glass surface. The inventory manager contacts the vendor
               about the problem, and the vendor offers Cronus the opportunity to keep the
               items for a reduced price (by 40%). Cronus receives a credit memo from the
               vendor.

               Challenge Yourself!
               Your task is to register this agreement in the program, ensuring that the
               transaction is reflected at the item statistics level.

               Need a Little Help?
               The solution is provided in Appendix C.


          Microsoft Official Training Materials for Microsoft Dynamics ™                    7-13
         Your use of this content is subject to your current services agreement
Trade in Microsoft Dynamics™ NAV5.0


Quick Interaction: Lessons Learned
                 Take a moment and write down three key points you have learned from this
                 chapter:

                 1.


                 2.


                 3.


7-14        Microsoft Official Training Materials for Microsoft Dynamics ™
           Your use of this content is subject to your current services agreement
Chapter 8: Order Promising


CHAPTER 8: ORDER PROMISING
Objectives:
                The objectives are:

                        •   Describing the Date Calculation Concepts
                        •   Promising Orders to Customers
                        •   Setting up Date Calculations for Sales Orders
                        •   Setting up Outbound Warehouse Handling Time and Shipping Time
                        •   Setting up Availability Test Interval and Order Promising
                        •   Promising Sales Order Delivery
                        •   Estimating Purchase Order Receipt
                        •   Estimating Transfer Order Receipt
                        •   Defining Calendars

Introduction
                It is important for a company to possess the ability to give customers accurate
                information about order delivery and to estimate the receipt of orders shipped by
                the vendors.

                In Microsoft Dynamics™ NAV, the date calculation functionality and the Order
                Promising feature are the cornerstones of managing the sales orders. The
                program calculates the delivery and shipment dates that meet the dates requested
                by customers based on availability dates.

                This section explains the main steps in Order Promising by various detailed
                demonstrations and Labs.


           Microsoft Official Training Materials for Microsoft Dynamics ™                      8-1
          Your use of this content is subject to your current services agreement
Trade in Microsoft Dynamics™ NAV5.0


Date Calculation Concepts
                 The program operates with two concepts:

                         •   Available to Promise (ATP)
                         •   Capable to Promise (CTP)

                 Available to Promise
                 Available to Promise (ATP) is used for the date calculation functionality and is
                 based on the inventory reservation system. When the ATP function is used, the
                 program performs the availability check of the uncommitted (unreserved) part of
                 a company's inventory with regard to planned production, purchases, transfers,
                 and sales returns. Based on the availability date of the items, the delivery date for
                 the customer is calculated.

                 Capable to Promise
                 Capable to Promise (CTP) performs "what if" scenarios. If no items are available
                 in inventory and there are no inbound orders scheduled, the program calculates
                 the earliest date when items can be available if they are produced, bought, or
                 transferred from another location.

                 From the availability date of the items, the program:

                         •   Calculates the delivery date to the customer
                         •   Creates order lines for this date
                         •   Reserves the inventory

                 The CTP function includes capacity constraint issues in the calculation, and it
                 may be integrated to production scheduling, manufacturing, transfer, and
                 purchase planning. The level of CTP depends on the model selected in the
                 capacity-scheduling engine.

                 With date calculation functionality, companies can also estimate the expected
                 dates for order receipts from their vendors.

                 Promising orders to customers and estimating purchase and transfer order
                 receipts are explained and illustrated in the following sections. To follow the
                 suggested demonstrations, remember to install the clean database. Otherwise,
                 your results may vary from those described here.


8-2         Microsoft Official Training Materials for Microsoft Dynamics ™
           Your use of this content is subject to your current services agreement
Chapter 8: Order Promising


Promising Orders to Customers
               Order processors can use the date calculation functionality to give customers
               accurate information about sales order delivery; this relates to the available-to-
               promise situation. They can also supplement it with the Order Promising feature;
               this relates to the capable-to-promise situation.

               The date calculation functionality builds on series of calculations that are based
               on several dates and times. To understand this functionality, learn about the terms
               and definitions of the key dates and times used and calculated by the program,
               and then learn about a set of calculations that are based on the interrelations
               between those dates and times.

               After you have examined the functionality's terms and definitions, continue to
               discover how:

                       •   To set up the program to use the date calculation functionality and
                           the Order Promising feature.
                       •   The program supports order processors in managing their sales order
                           promising process, depending on customer requirements and item
                           availability.

               Definitions
               The following definitions explains important dates in Order Promising.

               Requested Delivery Date: The date when the customer wants the order
               delivered to his or her address. This date must be entered manually to affect the
               date calculation.

               Promised Delivery Date: The date when the company promised the order to be
               delivered to the customer's address. This date must be entered manually in order
               to affect the date calculation.

               Planned Delivery Date: The date when the company plans the order will be
               delivered to the customer's address. This date is calculated automatically. If a
               requested delivery date exists, the planned delivery date equals the requested
               delivery date.

               Planned Shipment Date: The date when the picking process is complete and
               items are shipped from the warehouse. This date is calculated automatically.

               Shipment Date: The date when an item must be available in inventory. The
               picking process can start on this date. This date is calculated automatically.

               Outbound Warehouse Handling Time: The time that is required to pick, pack,
               and label the items in an order.

               Shipping Time: The time between when the items are shipped from the
               warehouse to when they are being delivered to the customer's address.


          Microsoft Official Training Materials for Microsoft Dynamics ™                          8-3
         Your use of this content is subject to your current services agreement
Trade in Microsoft Dynamics™ NAV5.0


                 Date Calculations
                 The date calculations functionality enables an order processor to provide a
                 customer with an accurate date for when orders are delivered. The program
                 supports the order processor in two ways:

                          •   It calculates the earliest possible delivery date when the customer has
                              not requested a delivery date, considering item availability.
                          •   It verifies whether the delivery date requested by the
                              customer/promised by the order processor is realistic, considering
                              item availability.

                 To perform these two actions, the program performs a set of calculations that are
                 based on the dates entered by the order processor and information set up in the
                 program. The relationship between the dates and times used in calculations is
                 illustrated in the following scheme:

                       Shipment Date                 Planned Shipment         Planned Delivery Date
                                                     Date


                                       Out. Whse Handling       Shipping Time
                                       Time


                 To calculate the earliest delivery date for the orders when a customer has not
                 requested a delivery date, the program sets the shipment date to be equal to the
                 current working date and bases the availability date on that date. If items are
                 available on that date, the program makes a forward calculation to determine
                 when the order can be delivered to the customer. These calculations are
                 represented by the following formulas:

                 Shipment Date + Outbound Warehouse Handling Time =
                 Planned Shipment Date

                 and

                 Planned Shipment Date + Shipping Time =
                 Planned Delivery Date

                 To verify that the delivery date requested by the customer/promised by the order
                 processor can be met, the planned delivery date is set to be equal to the
                 requested/promised delivery date and a backward calculation determines the date
                 when items must be available to meet the customer's request/order processor's
                 promise.


8-4         Microsoft Official Training Materials for Microsoft Dynamics ™
           Your use of this content is subject to your current services agreement
Chapter 8: Order Promising

      These calculations are represented by the following formulas:

      Planned Delivery Date - Shipping Time =
      Planned Shipment Date

      and

      Planned Shipment Date - Outbound Warehouse Handling Time =
      Shipment Date

      The program uses the shipment date, which is the calculated availability date, to
      make the availability check. If items are available on this date, the program
      confirms that the requested/promised delivery date can be met by setting the
      planned delivery date equal to the requested/promised delivery date. In this
      manner, the interface between the time functionality and the availability check is
      at the shipment date.

      If the program determines that items are not available on the current working
      date (when there is no requested/promised delivery date) or on the calculated
      availability date (when there is a requested/promised delivery date), an order
      processor can use the CTP functionality of the Order Promising feature. Based on
      new dates, the program recalculates all other related dates according to the
      formulas defined here.

      The program also recalculates all related dates if an order processor manually
      changes any date involved in date calculations.

      There is an order of priority for how the program uses the dates entered on the
      sales header when calculating all related dates on the lines. These priorities are
      illustrated in the following table:

                             Promised Delivery       Requested Delivery      Shipment
                             Date                    Date                    Date
             Priority 1
             Priority 2      is not entered
             Priority 3      is not entered          is not entered

      The program takes the date with the highest priority as a starting point for the
      calculation.


 Microsoft Official Training Materials for Microsoft Dynamics ™                            8-5
Your use of this content is subject to your current services agreement
Trade in Microsoft Dynamics™ NAV5.0


Setting Up Date Calculation for Sales Orders
                 The setup for date calculations on the sales side consists of the following
                 elements:

                         •   The Outbound Warehouse Handling Time setup: This is the time
                             required to pick, pack, and label the items in an order before
                             shipping. The program uses the outbound warehouse handling time
                             in calculating the planned delivery date or shipment date.
                         •   The Shipping Time setup: This setup can include definitions of the
                             types of services the company's shipping agent can offer and the
                             corresponding shipping times.
                         •   The Availability Test Interval setup: This is the period within
                             which the program makes the availability calculation.

                 The following three demonstrations show the three elements in the setup process.

Demonstration − Setting Up Outbound Warehouse Handling
Time
                 Companies can set up the outbound warehouse handling time:

                         •   On the inventory setup card.
                         •   On the location card.

                             If a company has more than one location, they must set up handling
                             time for each location. This setup has priority over the setup on the
                             inventory setup card.

                 Steps
                 Set up the outbound warehouse handling time for the Blue warehouse:

                         1. From the Warehouse menu, click SETUP→LOCATIONS.
                         2. Locate the location card for the Blue warehouse, and then click the
                            Warehouse tab.
                         3. In the Outbound Whse. Handling Time field, enter 1D.
                 This specifies that it takes one day for the warehouse personnel at the Blue
                 location to handle the picking, packing, and labeling procedures.


8-6         Microsoft Official Training Materials for Microsoft Dynamics ™
           Your use of this content is subject to your current services agreement
Chapter 8: Order Promising


Demonstration − Setting Up Shipping Time
               Because the shipping time can depend on the type of shipping services
               companies' shipping agents offer, they can set up the shipping time per shipping
               agent service. With the shipping agent services and shipping times set up, the
               companies can link them to the customers. Then, whenever an order processor
               makes a sales order for a specific customer, the program uses the shipping time
               associated with the shipping agent service set up for this customer to calculate
               the planned delivery date.

               Companies can also set up a shipping time for each customer, independent of the
               specific shipping agent service. They do so by entering the information in the
               Shipping Time field on the Shipping tab of the customer card. In this case, they
               overwrite the shipping time associated with a specific shipping agent service.

               To use the shipping time dependent on a chosen shipping agent and services,
               companies must set up shipping agents and define their services.

               At Cronus, there are four shipping agents.

                       1. From the Sales & Marketing menu, click ORDER
                           PROCESSING→SETUP→SHIPPING AGENTS.

                           For each shipping agent, the company sets up several services that
                           differ on shipping time.
                       2. Select a DHL shipping agent and then click LINE→SHIPPING AGENT
                          SERVICES. The Shipping Agent Services window appears.

               The following is the procedure for how to link a shipping agent service to a
               specific customer.

               Steps
               Set up the FEDEX shipping agent and the Next Day shipping service for
               customer 20000.

                       1. From the Sales & Marketing menu, click ORDER
                          PROCESSING→CUSTOMERS. Locate the customer card for customer
                          20000, and then click the Shipping tab.
                       2. In the Shipping Agent Code field, select FEDEX and press Enter.
                       3. In the Shipping Agent Service Code field, select NEXT DAY, and
                          press Enter.
               The program fills in the Shipping Time field that has 1D.

               The next time that an order processor creates a sales order for this customer, the
               program copies the information about the shipping agent services and shipping
               time from the customer card to the corresponding fields on the Shipping tab of
               the sales order.


          Microsoft Official Training Materials for Microsoft Dynamics ™                        8-7
         Your use of this content is subject to your current services agreement
Trade in Microsoft Dynamics™ NAV5.0


Demonstration − Setting Up an Availability Test Interval
                 An availability test interval must be set up on the company information card.

                 Steps
                 Perform the following steps:

                         1. From the Administration menu, click APPLICATION
                            SETUP→GENERAL→COMPANY INFORMATION. Click the Shipping tab.

                         2. Notice that the Check-Avail. Period Calc. field contains 90D and
                            the Check-Avail. Time Bucket field contains Week.
                 When an order processor runs the ATP function, the program checks item
                 availability for 90 days starting from the current day, checking one week at a
                 time. The check-availability period reflects an agreement between a company
                 and its customers. This indicates the maximum time customers are willing to wait
                 before their order requests can be met.

Setting Up the Order Promising Feature
                 To set up the Order Promising feature, a company must specify certain
                 parameters for order promising calculations. These specify the time parameters
                 that calculate item availability and which worksheet stores the information.

                 The Order Promising feature is set up in the Order Promising Setup window.

                 You can read about how to set up parameters in the Order Promising Setup
                 window in the topic called "Setting Up Order Promising" in online Help.

                 At Cronus, the Order Promising Setup includes the following parameters.

                 Steps
                 Perform the following steps:

                         1. From the Sales & Marketing menu, click SETUP→ORDER PROMISING
                            SETUP to open the Order Promising Setup window.


                         2. Notice that the Order Promising Template field contains
                            PLANNING. This means that replenishment proposals are created by
                            default in the planning worksheet.


8-8         Microsoft Official Training Materials for Microsoft Dynamics ™
           Your use of this content is subject to your current services agreement
Chapter 8: Order Promising

Promising Sales Order Delivery
                The date calculations provides the order processor with information about when
                an order can be promised to a customer.

                The following demonstrations illustrate the date calculation functionality and the
                functionality of Order Promising. In these examples, the current day is assumed
                to be the 24th of January 2008 (01/24/08).

                The screenshots illustrating the demonstrations in this section do not represent
                the standard layout of the sales lines. The date-related fields, which are Planned
                Delivery Date, the Planned Shipment Date and Shipment Date, are moved to
                the left and inserted next to the Quantity field.

                The following two demonstrations describe a situation where customers place
                orders without a requested delivery date. The two demonstrations are as follows:

                        •   Items are available for shipping on the day that the customer placed
                            their order.
                        •   Items are not available.

Demonstration − Promising Sales Orders without a
Requested Delivery Date
                Cronus customer 10000 orders 100 units of item 70002. The customer does not
                request a specific delivery date.

                The order processor at Cronus creates a sales order and tells the customer when
                the order will be delivered.

                Steps
                Create a sales order for 100 units of item 70002 for customer 10000:

                        1. From the Sales & Marketing menu, click ORDER
                           PROCESSING→ORDERS. Press F3.

                        2. In the Sell-to Customer No. field, select customer 10000.
                        3. Leave the Requested Delivery Date field blank.
                        4. In the No. field, select item 70002, and in the Quantity field, enter
                           100.


           Microsoft Official Training Materials for Microsoft Dynamics ™                       8-9
          Your use of this content is subject to your current services agreement
Trade in Microsoft Dynamics™ NAV5.0

                      Notice the Planned Delivery Date, the Planned Shipment Date and the
                      Shipment Date fields on the sales lines.


FIGURE 8-1: DEMONSTRATION - SALES ORDER WINDOW

                      The program fills in the date fields with dates from the forward calculation, when
                      the shipment date is set equal to the order date.

                      First, the program checks the availability of the required quantity of item 70002
                      at the Blue warehouse on the current date. When the availability check shows
                      that items are available, the program performs forward calculation, taking this
                      date as a starting point for calculations. Because the outbound warehouse
                      handling time is one day for this location, and the shipping time is one day for
                      this customer, the program calculates the planned shipment date and the planned
                      delivery date.

                      The order processor can inform the customer that the order will be delivered to
                      his or her address in two days.

Demonstration − Requesting Items that are not Available for
Shipping
                      Now consider a situation where items are not available for shipping on the
                      current date.

                      Cronus customer 20000 orders 30 units of item 1968-S. The customer does not
                      request a specific delivery date, and the order will be shipped from the Green
                      warehouse.


8-10             Microsoft Official Training Materials for Microsoft Dynamics ™
                Your use of this content is subject to your current services agreement
Chapter 8: Order Promising

                      An order processor at Cronus creates a sales order and tells the customer when
                      the order will be delivered.

                      Steps
                      Create a sales order for 30 units of item 1968-S for customer 20000:

                              1. From the Sales & Marketing menu, click ORDER
                                 PROCESSING→ORDERS. Press F3.

                              2. In the Sell-to Customer No. field, select customer 20000.
                              3. Leave the Requested Delivery Date field blank. In the Location
                                 Code field of the Shipping tab, select GREEN.
                              4. In the No. field, select item 1968-S, and in the Quantity field, enter
                                 30.
                                  The program gives a stockout warning message.
                      The Earliest Availability Date field on the warning card contains 01/29/08. This
                      means that a transfer, production, or sales return order has been created for item
                      1968-S, and the expected receipt date for this order is 01/29/08. The order
                      processor uses this information to recalculate the date when the sales order can
                      be delivered.

                              5. Click Yes on the warning card. In the Shipment Date field on the
                                 sales line, enter 01/29/08 and press Enter.
                      The program recalculates the planned shipment date and the planned delivery
                      date.


FIGURE 8-2: DEMONSTRATION - SALES ORDER WINDOW


                 Microsoft Official Training Materials for Microsoft Dynamics ™                     8-11
                Your use of this content is subject to your current services agreement
Trade in Microsoft Dynamics™ NAV5.0

                 Based on these calculations, the order processor can say to the customer that the
                 order will be delivered to them on 01/31/08.

                 NOTE: In addition to using the suggested earliest availability date, the order processor
                 can run the CTP function. .

                              If the order processor decides to change the shipment date to a later
                              date, the program recalculates all related dates.


                 NOTE: If the user changes the shipment date on the header, and the availability check
                 for existing sales lines shows that items are unavailable on the new shipment date, the
                 program does not give a stockout message. The warning appears only when the
                 shipment date is changed on an individual line.

                 In the sales order created for customer 20000 for 30 units of item 1968-S, change
                 the shipment date from 01/29/08 to 01/30/08:

                          6. In the Shipment Date field on the sales line, change the date to
                             01/30/08.
                 The program makes the forward calculations to determine the new planned
                 shipment and planned delivery dates and fills in the corresponding fields on the
                 sales lines.

                 If the order processor decides to change the planned delivery date, the program
                 makes a backward calculation to determine when items must be available (the
                 shipment date). Based on this new date and depending on item availability, the
                 program performs forward calculations.

Demonstration − Meeting the Requested Delivery Date
                 Cronus customer 50000 orders 25 units of item 70010. The customer requests
                 that the order be delivered on 01/29/08. The order processor at Cronus creates a
                 sales order and checks if the requested order delivery date can be met.

                 Steps
                 Create a sales order for 25 units of item 70010 for customer 50000:

                          1. From the Sales & Marketing menu, click ORDER
                             PROCESSING→ORDERS. Press F3.

                          2. In the Sell-to Customer No. field, select customer 50000.
                          3. In the Requested Delivery Date field, enter 01/29/08.
                          4. On the Shipping tab, in the Location Code field, select Blue and
                             press Enter.
                          5. In the No. field, select item 70010, and in the Quantity field, enter
                             25.


8-12        Microsoft Official Training Materials for Microsoft Dynamics ™
           Your use of this content is subject to your current services agreement
Chapter 8: Order Promising

                            Notice the Planned Delivery Date, the Planned Shipment Date and
                            the Shipment Date fields on the sales lines.
                            –   Planned Delivery Date: 01/29/08
                            –   Planned Shipment Date: 01/27/08
                            –   Shipment Date: 01/26/08

                            The program fills in these fields with dates from the backward
                            calculation, when the planned delivery date is set equal to the
                            requested delivery date. Then it verifies that items are available for
                            shipping on the calculated shipping date (01/26/08) and leaves the
                            planned delivery date unchanged.
                            Based on these calculations, the order processor can inform the
                            customer that the order will be delivered on the requested delivery
                            date of 01/29/08.
                            If the order processor decides to change the shipping time and the
                            outbound warehouse handling time, the program recalculates all
                            related dates.
                In the sales order created for customer 50000 for 25 units of item 70010, change
                the outbound warehouse handling time from one day to two days.

                        6. On the Shipping tab, in the Outbound Warehouse Handling Time
                           field, overwrite 1D with 2D. Press Enter.
                        7. Click Yes on the message that appears.
                The program now recalculates the shipment date and verifies that items are
                available for shipping on this date. The requested delivery date remains
                unchanged.

Demonstration − Requesting an Order where the Delivery
Date cannot be Met
                Cronus customer 20000 orders 30 units of item 70200. The customer requests
                that the order arrives on 01/28/08.

                The order processor at Cronus creates a sales order and checks if the requested
                order delivery date can be met. The sales order will be shipped from the Green
                warehouse.

                Steps
                Create a sales order for 30 units of item 70200 for customer 20000:

                        1. Create a new sales order.
                        2. In the Sell-to Customer No. field, select customer 20000.
                        3. In the Requested Delivery Date field, enter 01/28/08.


           Microsoft Official Training Materials for Microsoft Dynamics ™                       8-13
          Your use of this content is subject to your current services agreement
Trade in Microsoft Dynamics™ NAV5.0

                         4. On the Shipping tab, in the Location Code field, select Green and
                            press Enter.
                         5. In the No. field, select item 70200 and in the Quantity field, enter
                            30.
                             The program gives the stockout warning message.
                             This message appears because the program checks whether the
                             needed quantity of the item is available for shipping on 01/26/08.
                             This is the day when the order must be shipped to meet the requested
                             delivery date of 01/28/08. The availability check shows that items
                             are unavailable on that date.


                 NOTE: If the user changes the requested delivery date on the header, and the
                 availability check for existing sales lines shows that items are unavailable on the
                 calculated shipment date, the program does not give a stockout warning. The warning
                 appears only when the requested delivery date is changed on an individual line.

                             The Earliest Availability Date field on the warning window does
                             not contain a date. This means that there are no transfer, production,
                             or sales return purchase orders created for item 70200.
                         6. Click Yes on the warning card.
                             The order processor can use the Capable-to Promise functionality of
                             the Order Promising functionality to calculate when the requested
                             quantity can be available. The following is the procedure for how to
                             use this functionality.

                         7. In the Sales Order window, click ORDER→ORDER PROMISING. The
                            Order Promising Lines window appears.
                             The program copies information to the Requested Delivery Date
                             field and the Original Shipment Date field from the sales order
                             header and line, respectively.


8-14        Microsoft Official Training Materials for Microsoft Dynamics ™
           Your use of this content is subject to your current services agreement
Chapter 8: Order Promising

               8. Click CALCULATE→CAPABLE-TO-PROMISE.
                   The program checks when the required item quantity can be
                   available if they must be produced, transferred, or purchased. Then it
                   fills in the Earliest Shipment Date field and, based on this date,
                   recalculates the new planned delivery date.


      FIGURE 8-3: DEMONSTRATION - ORDER PROMISING LINES WINDOW

               9. Click Accept.
      The program copies the dates from the fields on the Order Promising Lines
      window to the corresponding fields on the sales lines.

      Based on these calculations, the order processor can inform the customer that the
      requested delivery date cannot be met. At the same time, the order processor can
      inform the customer that Cronus can deliver the order two days later than first
      requested, on 01/30/08 (the Planned Delivery Date).

      NOTE: After the user runs the CTP function, the program reserves the required
      quantity for the sales order and creates a requisition proposal line in the Planning
      Worksheet in Manufacturing. If the user changes the requested delivery date after
      running the CTP function, the lines in the planning (requisition) worksheet are not
      updated.

      If, with the customer's agreement, the order processor moves the requested
      delivery date to another date, the program recalculates all related dates.

      Steps
      In the sales order created for customer 20000 for 30 units of item 70200, change
      the requested delivery date from 01/28/08 to 02/01/08.

               1. In the Requested Delivery Date field, change 01/28/08 to 02/01/08.
               2. Click Yes to the message that appears.
      The program recalculates all other dates and fills in the corresponding fields on
      the sales lines.


 Microsoft Official Training Materials for Microsoft Dynamics ™                              8-15
Your use of this content is subject to your current services agreement
Trade in Microsoft Dynamics™ NAV5.0

                 If the order processor changes the planned shipment date, the program
                 recalculates all associated dates and makes a backward calculation to determine
                 the new shipment date and a forward calculation to determine a new planned
                 delivery date.

Demonstration − Setting Shipment Date Before Current Date
                 Cronus' customer 50000 orders 20 units of item 1988-S, and the customer
                 requests that the order arrives on 01/26/08. The sales order is shipped from the
                 Yellow warehouse.

                 The order processor at Cronus creates a sales order and checks if the requested
                 order delivery date can be met.

                 Steps
                 Create a sales order for 20 units of item 1988-S for customer 50000:

                         1. Create a new sales order.
                         2. In the Sell-to Customer No. field, select customer 50000.
                         3. In the Requested Delivery Date field, enter 01/26/08.
                         4. On the Shipping tab, in the Location Code field, select YELLOW.
                         5. In the No. field, select item 1988-S.
                             The program performs calculations and gives a message that the
                             shipment date is before the work date. By clicking OK, you accept
                             the suggested shipment date of 01/24/08.
                         6. In the Quantity field, enter 20.
                 Notice that the Late Order Shipping field on the Shipping tab is selected. This
                 indicates that the shipment is delayed compared to the customer's requested
                 delivery date or the shipment date is before the work date. The program does not
                 give a direct warning.

                 In this situation, the order processor can:

                         •   Accept the planned delivery date, and the requested delivery date,
                             and find an internal solution to comply.
                             OR
                         •   Set the shipment date equal to the current date and make the program
                             recalculate all associated dates and suggest a new planned delivery
                             date.


8-16        Microsoft Official Training Materials for Microsoft Dynamics ™
           Your use of this content is subject to your current services agreement
Chapter 8: Order Promising


Promising Sales Order Delivery in Other Situations
                When creating sales orders, with or without requested delivery dates, order
                processors may want to ship the orders on a different date than that calculated by
                the program. Shipping orders on certain week days to a specific customer (and
                having a fixed routing schedule) is an example. Another example is when the
                shipping of various sales lines with different planned delivery dates on the same
                date is an optimal option for both the order processor and the customer.

                In these and similar situations, the order processor first confirms the new delivery
                date with the customer and then, with the customer's agreement, regards this date
                as a promised delivery date. After the date is entered in the Promised Delivery
                Date field, the program sets the planned delivery date equal to the promised
                delivery date and calculates all associated dates in the same way as if there is a
                requested delivery date.

Demonstration − Requesting Different Shipment Dates on
Lines
                Cronus' customer 50000 orders 10 units of item 1908-S, 15 units of item 1964-S,
                and 90 units of item 1906-S. The customer requests that the order be delivered on
                01/28/08. The sales order will be shipped from the Green warehouse. The order
                processor at Cronus creates the sales order and checks if the requested order
                delivery date can be met.

                Steps
                Perform the following steps:

                        1. Create the sales order for customer 50000.
                            When creating a sales line for item 1906-S, change the shipment date
                            of 01/24/08 to 01/31/08, which is the earliest availability date for this
                            item as suggested by the program in the stockout message.
                            The order now contains three sales lines with two different shipment
                            dates.
                            To ship all three items on the same date, the order processor obtains
                            the customer's acceptance to deliver the order on 02/03/08.


                        2. In the Promised Delivery Date field, enter 02/03/08.
                        3. Click Yes in the message that appears.
                The program recalculates all other dates and fills in the corresponding fields on
                the sales lines.


           Microsoft Official Training Materials for Microsoft Dynamics ™                       8-17
          Your use of this content is subject to your current services agreement
Trade in Microsoft Dynamics™ NAV5.0


Lab 8.1 − Promise Order Delivery to a Customer
                 Scenario: Cronus customer 50000 orders 50 units of item 70040.

                 The customer requests the order be delivered on 01/27/08. The sales order will be
                 shipped from the Yellow warehouse.


                 Challenge Yourself!
                 Your tasks are as follows:

                         1. Create the sales order and check if the requested order delivery date
                            can be met.
                         2. If the requested delivery date cannot be met, find out when you can
                            deliver the order. You may decide to run the CTP function.
                         3. The customer is not satisfied with the new delivery date. You,
                            promise the customer to deliver the order one day earlier and will
                            find a solution to fulfill the promise.

                 Need a Little Help?
                 The solution is provided in Appendix C.


8-18        Microsoft Official Training Materials for Microsoft Dynamics ™
           Your use of this content is subject to your current services agreement
Chapter 8: Order Promising


Estimating Purchase Order Receipt
               This section discusses how to use the Order Promising feature when estimating
               purchase order receipt.

               To understand the functionality of the Order Promising feature, first acquaint
               yourself with the terms and definitions of key dates and times used and
               calculated by the program. Then, examine a set of calculations, which are based
               on the interrelations between the dates and times.

               After you have become familiar with the terms, definitions, and calculations,
               review how:

                       •   To set up the program to use the date calculation functionality.
                       •   The program supports purchasing agents in managing the purchase
                           order receipt process.

               Definitions
               The following definitions explains important dates in Order Promising.

               Requested Receipt Date: The date when the company requests a vendor to
               deliver the order. This date must be entered manually to affect the date
               calculation.

               Promised Receipt Date: The date when the vendor promises the order will be
               delivered to the company. This date must be entered manually to affect the date
               calculation.

               Planned Receipt Date: The date when the company plans to receive the order.
               This date is calculated automatically.

               Expected Receipt Date: The date when the company expects the put-away
               process to finish and when items are available for picking. This date is calculated
               automatically and affects item availability.

               Order Date: The date when the vendor must ship the items to meet the planned
               receipt date.

               Inbound Warehouse Handling Time: The Time That Is Required to receive
               and put away the items of an order.

               Lead Time Calculation: The time interval between items being ordered at the
               vendor and items being received by the company.

               Safety Lead Time: The buffer period if there are delays in the production
               process. This affects the date when items are available for sale.


          Microsoft Official Training Materials for Microsoft Dynamics ™                       8-19
         Your use of this content is subject to your current services agreement
Trade in Microsoft Dynamics™ NAV5.0


                 Calculations
                 The date calculation functionality enables a purchasing agent to estimate when
                 orders are received at the company. The program supports a purchasing agent in
                 two ways:

                         •   It calculates the expected receipt date for the orders when a
                             purchasing agent has not requested a receipt date, considering
                             vendor's lead time.
                         •   It calculates the date when the purchasing agent must make a
                             purchase order to receive it on the requested date.

                 To perform these actions, the program makes a set of calculations based on the
                 dates entered by the purchasing agent and information set up in the program. The
                 relationship between the dates and times in calculations is illustrated in the
                 following scheme:

                  Order Date           Planned Receipt Date      Expected Receipt Date


                             Lead Time               In. Whse. Handling
                             Calculation             Time (+Safety
                                                     Lead Time)


                 To calculate the expected receipt date for orders when a purchasing agent does
                 not request a receipt date, the program sets the order date equal to the current
                 working date. The program makes a forward calculation from this date to
                 determine when the order will be delivered. These forward calculations are
                 represented by the following formulas.

                 Order date + Lead Time Calculation = Planned Receipt date

                 and

                 Planned Receipt date + Inbound Warehouse Handling time +
                 Safety Lead Time =
                 Expected Receipt date

                 To calculate an order date for an order to be received on the requested date, the
                 program sets the planned receipt date equal to the requested receipt date. The
                 program makes a backward calculation to determine when items must be ordered
                 (the order date).


8-20        Microsoft Official Training Materials for Microsoft Dynamics ™
           Your use of this content is subject to your current services agreement
Chapter 8: Order Promising

      To calculate the expected receipt date for an order with the requested receipt
      date, the program sets the planned receipt date equal to the requested receipt date.
      The program makes a forward calculation. These calculations are represented by
      the following formulas.

      Planned Receipt date - Lead Time Calculation = Order date

      and

      Planned Receipt date +
      Inbound Warehouse Handling time (+Safety Lead time) =
      Expected Receipt date

      The program also recalculates all related dates if a purchasing agent manually
      changes any date involved in date calculations.

      There is an order of priority for how the program uses the dates entered on the
      purchase header when calculating all related dates on the lines. These priorities
      are illustrated in the following table.

                       Promised         Requested          Expected           Order
                       Receipt Date     Receipt Date       Receipt Date       Date
       Priority 1
       Priority 2      is not entered
       Priority 3      is not entered   Is not entered
       Priority 4      is not entered   Is not entered     is not entered

      The program uses the date with the highest priority as a starting point for the
      calculation.

      Setting up Date Calculations for Purchase Orders
      The order promising setup on the purchase side consists of three elements:

              •     The Inbound Warehouse Handling Time setup: When users set up
                    the inbound warehouse handling time, they define the time that is
                    required to receive and put away items. The program uses this time
                    to calculate the planned receipt date or expected receipt date.
              •     The Lead Time Calculation setup: When users set up the lead time
                    calculation, they define a date formula for the time that is required
                    for the item to be delivered to the company.

                    Alternatively, the user can define a date formula for the time that is
                    required a vendor to deliver –orders – from when orders are placed
                    to when they are received at the company.


 Microsoft Official Training Materials for Microsoft Dynamics ™                         8-21
Your use of this content is subject to your current services agreement
Trade in Microsoft Dynamics™ NAV5.0

                             The program uses the formula to calculate the date when the
                             items/orders are planned to be received (when there is no requested
                             receipt date) or the order date (when there is a requested receipt
                             date).
                         •   The Safety Lead Time setup: In the planning process, this time
                             affects the date the items produced are available for sale. The safety
                             lead time is a buffer period if there are delays in the production
                             process.
                 Setting up Inbound Warehouse Handling Time
                 Companies can set up the inbound warehouse handling time:

                         •   On the inventory setup card.
                         •   On the location card.

                             If a company has multiple locations, they must set up the handling
                             time for each location. This setup has priority over the setup on the
                             inventory setup card.

                 Set up the inbound warehouse handling time for the Blue warehouse.

                         1. From the Warehouse menu, click SETUP→LOCATIONS. Locate the
                            location card for the Blue warehouse, and then click the Warehouse
                            tab.
                         2. In the Inbound Whse. Handling Time field, enter 1D.
                 This specifies that it takes one day for the warehouse personnel at the Blue
                 location to handle the receiving and putting away procedures before items are
                 available in the warehouse for picking.
                 Setting Up Lead Time Calculation and Safety Lead Time
                 Companies can set up the lead time calculation:

                         •   In the Item Vendor Catalog window
                         •   On the item card (on the SKU card if the stockkeeping unit exists for
                             the item)
                         •   On the vendor card

                 The program uses the lead time calculation in the same order of priority as shown
                 here.

                 Companies can set up the safety lead time on the item card or the Planning tab of
                 the Manufacturing Setup window, where the term "default safety lead time" is
                 used. The program uses the default safety lead time set up on the Manufacturing
                 Setup window only if it is not set up on the item card. Because this time is
                 relevant to manufacturing companies, it is recommended that non-manufacturing
                 companies set this time to zero on item cards or remove it from the
                 Manufacturing Setup window and the item card.


8-22        Microsoft Official Training Materials for Microsoft Dynamics ™
           Your use of this content is subject to your current services agreement
Chapter 8: Order Promising


Demonstration − Using Lead Time Calculations
               Based on the purchasing practices and long-term relationships with vendors,
               Cronus' purchasing agent has an idea of how long it takes a vendor to deliver
               each item. Similarly, it is known how long it takes for vendors to deliver a
               specific item and for a vendor to deliver orders.

               For example, it takes one week for item 70010 to be delivered to Cronus if
               shipped by vendor 30000, and it takes three days for vendor 40000 to deliver
               orders (regardless of the items). It takes any vendor two days to ship items 70011
               and 1928-W.

               The safety lead time is not relevant for Cronus' business operations. Therefore,
               all items on the company's inventory must have zero safety lead time.

               First, review how Cronus has set up the lead time calculation for item 70010 and
               vendor 40000. Then, set up the lead time calculation for items 70011 and 1928-
               W and the safety lead time for items 70010, 70011, 70040 and 1928-W in the
               program.

               Steps
               In the situation where several vendors ship the same items, companies can set up
               vendors for each item using the Item Vendor Catalog window.

                       1. From the Purchases menu, click INVENTORY & COSTING→ITEMS.
                          Locate item 70010, and then click PURCHASES→VENDORS. The Item
                          Vendor Catalog card is displayed.
                           Notice that the Vendor No. field contains 30000, and the Lead Time
                           Calculation field contains 1W. This means that when item 70010 is
                           purchased from vendor 30000, the program uses one week as a
                           default lead time in date calculation for the purchase order.
               The lead time for a specific vendor is set up on the vendor card.

                       2. From the Purchase menu, click ORDER PROCESSING→VENDORS.
                          Locate vendor 40000, and then click the Receiving tab.
                           Notice that the Lead Time Calculation field contains 3D.
               Set up the lead time calculation and safety lead time for items 70011 and 1928-
               W.

                       3. Click INVENTORY & COSTING→ITEMS. Locate item 70011, and then
                          click the Replenishment tab.
                       4. In the Lead Time Calculation field, enter 2D.
                       5. Click the Planning tab and in the Safety Lead Time field, enter 0D.


          Microsoft Official Training Materials for Microsoft Dynamics ™                       8-23
         Your use of this content is subject to your current services agreement
Trade in Microsoft Dynamics™ NAV5.0

                 Repeat Steps 1 through 3 for item 1928-W. Set up zero safety lead time for items
                 70010 and 70040.

Estimating Purchase Order Receipt
                 The receipt of a purchase order can be estimated by using the estima purchase
                 order receipt functionality.

                 The following demonstrations illustrate the date calculation functionality. In
                 these examples, the current day is assumed to be the 24th of January 2008
                 (01/24/08).

                 The screenshots for the demonstrations do not represent the standard layout of
                 the purchase lines. The date related fields –Planned Receipt Date, Expected
                 Receipt Date, and Order Date – are moved to the left and inserted next to the
                 Quantity field.

Demonstration − Calculating Purchase Order Receipt without
a Receipt Date Requested
                 A purchasing agent at Cronus orders 25 units of item 70011 with vendor 10000
                 and does not request a specific receipt date.

                 The purchasing agent creates a purchase order and wants to estimate when the
                 order will arrive at the Blue warehouse.

                 Steps
                 Create a purchase order for 25 units of item 70011 for vendor 10000:

                         1. From the Purchase menu, click ORDER PROCESSING→ORDERS. Press
                            F3. In the Buy-from Vendor No. field, select vendor 10000.

                         2. Click the Shipping tab. Leave the Requested Receipt Date field
                            blank.
                         3. In the Location Code field, select BLUE.
                         4. In the No. field, select item 70011, and in the Quantity field, enter
                            25.
                             The program calculates when the vendor can deliver the items to the
                             warehouse and when they are available for picking. Pay attention to
                             the Planned Receipt Date, the Expected Receipt Date and the
                             Order Date fields on the purchase lines.
                             Based on the lead time ( + safety lead time) set up for item 70011
                             and the inbound warehouse handling time set up for the Blue
                             warehouse, the program calculates planned and expected receipt
                             dates. The purchasing agent can expect the items to be available for
                             picking in the Blue warehouse on 01/25/08.


8-24        Microsoft Official Training Materials for Microsoft Dynamics ™
           Your use of this content is subject to your current services agreement
Chapter 8: Order Promising

                                 If the purchasing agent decides to change the order date, the program
                                 recalculates all related dates.
                                 In the purchase order created for vendor 10000 for 25 units of item
                                 70011, change the order date on the purchase line from 01/24/08 to
                                 01/30/08.

                             5. In the Order Date field, change the date to 01/30/08.
                     The program makes a forward calculation to determine the new planned receipt
                     date and expected receipt date and fills in the corresponding fields on the
                     purchase line.


FIGURE 8-4: DEMONSTRATION - PURCHASE ORDER WINDOW

                     If the purchasing agent changes the expected receipt date, the program makes a
                     backward calculation from this date to determine the new planned receipt date
                     and a new order date.


                Microsoft Official Training Materials for Microsoft Dynamics ™                    8-25
               Your use of this content is subject to your current services agreement
Trade in Microsoft Dynamics™ NAV5.0


Demonstration − Estimating a Purchase Order Receipt with a
Receipt Date Requested
                 A purchasing agent at Cronus orders 30 units of item 70010 with vendor 30000
                 and requests that the order be delivered to the Blue warehouse on 02/02/08.

                 The purchasing agent creates a purchase order and wants to estimate the latest
                 order date for it to arrive at the Blue warehouse on the requested date and when
                 the items will be available for picking.

                 Steps
                 Create a purchase order for 30 units of item 70010 for vendor 30000.

                         1. Create a new purchase order. In the Buy-from Vendor No. field,
                            select vendor 30000.
                         2. Click the Shipping tab. In the Location Code field, select BLUE.
                         3. In the Requested Receipt Date field on the shipping tab enter
                            02/02/08.
                         4. In the No. field, select item 70010, and in the Quantity field, enter
                            30.
                             The program calculates when the vendor can deliver the items to the
                             warehouse and when they will be available for picking. Pay attention
                             to the Planned Receipt Date, Expected Receipt Date, and the
                             Order Date fields on the purchase lines.
                             The program sets the planned receipt date equal to the requested
                             receipt date from which the program subtracts the lead time (set up
                             for this item to one week if purchased from vendor 30000) to
                             calculate the order date. The program calculates the expected receipt
                             date by adding inbound warehouse handling time (+ safety lead time)
                             to the planned receipt date.
                             The purchasing agent estimates that to receive the items on 02/02/08,
                             the order must be placed on 01/26/08. If the purchasing agent
                             changes the requested receipt date, the program recalculates all
                             related dates accordingly.


                 In the purchase order created for vendor 30000 for 30 units of item 70010,
                 change the requested receipt date from 02/02/08 to 02/01/08.


8-26        Microsoft Official Training Materials for Microsoft Dynamics ™
           Your use of this content is subject to your current services agreement
Chapter 8: Order Promising

                         5. In the Requested Receipt Date field on the purchase header, change
                            the date to 02/01/08. Press Enter.
                         6. Click Yes on the message that appears.
                Based on the new requested receipt date, the program makes a backward
                calculation from this date to determine the new order date and then a forward
                calculation to determine a new expected receipt date.

Demonstration − Calculating an Order that must be Placed
before the Current Date
                A purchasing agent at Cronus orders 40 units of item 70040 with vendor 40000
                and requests that the order be delivered to the Green warehouse on 01/26/08.

                The purchasing agent creates a purchase order and wants to estimate the latest
                order date for the order to arrive at the warehouse on the requested date.

                Steps
                Perform the following steps to enter the order:

                         1. Create a purchase order for 40 units of item 70040 for vendor 40000
                            with the requested receipt date on 01/26/08.
                             When selecting the item number in the No. field, the program gives a
                             work date warning.
                         2. Click OK.
                The program does not change the calculated order date that is before the work
                date.

                In this situation, the purchasing agent can:

                         •   Discuss the possibility of receiving the items on the initially
                             requested receipt date (leaving the dates on the line unchanged).
                             OR
                         •   Set the order date equal to the current date and make the program
                             recalculate all associated dates.

                NOTE: If the user changes the requested receipt date on the header and the date
                calculation for existing purchase lines results in the order date being before the work
                date, the program does not give a warning. The warning appears only when the
                requested receipt date is changed on an individual line.


           Microsoft Official Training Materials for Microsoft Dynamics ™                             8-27
          Your use of this content is subject to your current services agreement
Trade in Microsoft Dynamics™ NAV5.0


Demonstration − Estimating a Purchase Order Receipt in
Other Situations
                 When using the program to estimate the receipt of purchase orders, the
                 purchasing agents accept the assumption that the delivery process adheres to time
                 periods set up for this process. However, purchasing agents like to confirm the
                 program's calculated delivery dates with their vendors. If a vendor requests
                 another date, the purchasing agent considers it as a promised receipt date.

                 After entering the date in the Promised Receipt Date field, the program sets the
                 planned receipt date equal to the promised receipt date and the program makes a
                 forward calculation to suggest a new expected receipt date. The first calculated
                 order date remains unchanged.

                 A purchasing agent at Cronus orders 20 units of item 1928-W with vendor 40000
                 and requests that the order be delivered to the Green warehouse on 01/28/08.

                 The purchasing agent creates a purchase order and uses the program to estimate
                 the latest order date for the order to arrive at the warehouse on the requested date.

                 Steps
                 The purchasing agent confirms the calculated receipt date with the vendor.

                         1. Create a purchase order for 20 units of item 1928-W for vendor
                            40000 with the requested receipt date of 01/28/08.
                             Notice that the program uses the lead time set up for the item (two
                             days for item 1928-W) to calculate the order date instead of using the
                             lead time set up for the vendor (three days for vendor 40000).
                             The vendor cannot deliver the order on the requested date and
                             promises to deliver three days later on 01/31/08.


                         2. In the Promised Receipt Date field, enter 01/31/08.
                         3. Click Yes to update the lines.
                 The program sets the planned receipt date equal to the promised receipt date and
                 calculates forward to suggest a new expected receipt date. The initial order date
                 of 01/25/08 remains unchanged.


8-28        Microsoft Official Training Materials for Microsoft Dynamics ™
           Your use of this content is subject to your current services agreement
Chapter 8: Order Promising


Lab 8.2 − Order Promising
                Scenario: A purchasing agent at Cronus orders ten units of item 70011 with
                vendor 30000 and requests that the order be delivered at the Green warehouse on
                02/05/08.

                Challenge Yourself!
                Your tasks are:

                        1. Create the purchase order and estimate the latest order date when the
                           order will arrive at the warehouse.
                        2. Suppose that after talking to the vendor, they can deliver the order
                           three days earlier than first requested. Record this information in the
                           purchase order.

                Need a Little Help?
                The solution is provided in Appendix C.


           Microsoft Official Training Materials for Microsoft Dynamics ™                      8-29
          Your use of this content is subject to your current services agreement
Trade in Microsoft Dynamics™ NAV5.0


Estimating Transfer Order Receipt
                  With the date calculation functionality, companies can estimate a date when
                  transfer orders are received at the transfer-to location. The program calculates the
                  receipt date according to the following formula:

                  Shipment date + Outbound Warehouse Handling Time +
                  Shipping time + Inbound Warehouse Handling Time =
                  Receipt date

                  The shipping time can be either:

                          •   The time associated with the shipping agent service set up for a
                              specific transfer route.
                              OR
                          •   Entered manually on the transfer header.

                  Learn more about how to estimate transfer order receipt in the Inventory
                  Management training manual.

Calendars
                  The date calculation in this description does not consider non-working days. This
                  section describes setting up the program to calculate days using the Calendars
                  feature.

                  Non-working days are when the company is closed for business, such as
                  weekends or holidays. Working days vary from one country/region to another
                  and between companies. Companies base their scheduling on working and non-
                  working days and acknowledge that their business partners may work with
                  different calendars.

                  Setting Up and Assigning Calendars
                  The Calendar feature enables companies to calculate working days based on
                  specific calendars. In the calendar, companies can set up the specific days to be
                  considered as working and non-working days. Calendars are assigned to the
                  company and to its business partners. When this is done, the program calculates
                  all order lines according to the relevant calendar.


8-30         Microsoft Official Training Materials for Microsoft Dynamics ™
            Your use of this content is subject to your current services agreement
Chapter 8: Order Promising

      The program defines two different types of calendars:

              •    Base Calendar
              •    Customized Calendar

      The Base Calendar is the calendar that defines working and non-working days
      and is the basis for the customized calendars.

      The Customized Calendar is a copy of a specific base calendar with added
      settings for the assigned business partner.

      The Base Calendar is created and maintained from the General Ledger Setup
      menu. Base calendars consider all days as working days. Non-working days can
      be set up under functions.

      This procedure is described in the online Help under Base Calendar.

      Perform the following steps to consider Cronus' base calendar:

              1. From the Administration menu, click APPLICATION
                 SETUP→GENERAL→COMPANY INFORMATION.

              2. On the Shipping tab, click the AssistButton on the Base Calendar
                 Code field to open the base calendar list.
              3. Select the line for the UK Base Calendar, and then click BASE
                 CALENDAR→CARD.

      Saturdays and Sundays are selected as nonworking days. When nonworking days
      occur weekly or annually (for example, bank holidays or Christmas), they can be
      set up in a separate table.

              4. On the base calendar card, click FUNCTIONS→MAINTAIN BASE
                 CALENDAR CHANGES.

      The Base Calendar can be assigned and customized to specific business partners,
      and can be assigned to the following areas:

              •    Shipping tab on the Customer Card
              •    Receiving tab on the Vendor Card
              •    Warehouse tab on the Location Card
              •    Shipping Agent Services list
              •    Service Management Setup

      NOTE: If you do not assign a base calendar to a company or business partner, the
      program calculates all dates as working days.
      If you enter a blank location on an order line, the program calculates all dates as
      working days.


 Microsoft Official Training Materials for Microsoft Dynamics ™                             8-31
Your use of this content is subject to your current services agreement
Trade in Microsoft Dynamics™ NAV5.0


Conclusion
                 This section described the date calculation functionality and the Order Promising
                 concepts that are the cornerstones in managing sales orders in Microsoft
                 Dynamics NAV. The process of promising orders to customers and the related
                 date calculations was shown through several detailed demonstrations. Estimating
                 a purchase order receipt was also discussed in detailed examples. Finally, it was
                 described how to estimate a transfer order receipt and how to define calendars.

                 The order processing process helps maintain the best customer service levels and
                 for exchanging order date information with vendors.


8-32        Microsoft Official Training Materials for Microsoft Dynamics ™
           Your use of this content is subject to your current services agreement
Chapter 8: Order Promising


Quick Interaction: Lessons Learned
                Take a moment and write down three key points you have learned from this
                chapter:

                1.


                2.


                3.


           Microsoft Official Training Materials for Microsoft Dynamics ™                  8-33
          Your use of this content is subject to your current services agreement
Trade in Microsoft Dynamics™ NAV5.0


8-34        Microsoft Official Training Materials for Microsoft Dynamics ™
           Your use of this content is subject to your current services agreement
Chapter 9: Returns Management


CHAPTER 9: RETURNS MANAGEMENT
Objectives
                The objectives are:

                        •   Defining Sales Return Management
                        •   Setting up Returns Management
                        •   Managing Returns from Customers
                        •   Managing Returns to Vendors

Introduction
                Sales returns management is an important part of superior customer and vendor
                relationships because timely repair, replacement of damaged items or crediting
                for returned items are perceived as a part of good customer service.

                The key feature of the return functionality of Microsoft Dynamics™ NAV
                includes managing returns from customers and vendors.

                Comprehensive demonstrations and examples are used throughout the chapter to
                explain how companies manage the tasks involved in return-related processes.
                For an overview of procedures associated with handling specific return-related
                tasks, refer to the respective topic in online Help.


           Microsoft Official Training Materials for Microsoft Dynamics ™                    9-1
          Your use of this content is subject to your current services agreement
Trade in Microsoft Dynamics™ NAV5.0


Sales Return Management
                 From the company's perspective, the internal handling of return-related processes
                 can seem extensive. In most cases, companies' processes include (but are not
                 limited to):

                         •   Adjusting customer (and vendor) balances
                         •   Accounting for additional costs
                         •   Updating inventory quantities and values
                         •   Inspecting returned items
                         •   Sending returned items to the vendor for repair

                 The scope of these processes depend on a variety of factors, such as:

                         •   The customer's request
                         •   Reason for return
                         •   Item type and value
                         •   Causes of damage
                         •   Practices common in a specific line of business

                 The handling of these processes involves different tasks that are performed by
                 various groups of employees: Order processors, warehouse workers,
                 bookkeepers, purchasing agents, and inspectors. Although logically related, the
                 tasks are not operationally dependent. For example, the replacement for a
                 damaged item can be shipped to a customer before the damaged item is returned.
                 Similarly, a customer can be credited for a returned item before the company
                 inspects and approves the return.

                 In such a multi-process environment, the challenge is to ensure that all return-
                 associated processes are completed in a timely manner and errors are easily
                 recovered. Because of the complexity and scope of return-related processes, a
                 company's costs can be significant. To control costs, companies must optimize
                 their return management processes.

                 The Sales Return Order Management and the Purchase Return Order
                 Management functionality offer a solution to help companies achieve responsive
                 customer service by implementing cost-efficient customer and vendor return
                 policies. The application is characterized by the following key features:

                         •   Rapid response to customers' requests
                         •   Flexibility
                         •   Traceability and overview
                         •   Automation of the return to vendor process


9-2         Microsoft Official Training Materials for Microsoft Dynamics ™
           Your use of this content is subject to your current services agreement
Chapter 9: Returns Management

               Personnel responsible for the customer interface can register the details of an
               agreement with the customer about the return and information relevant to
               handling the return with one entry point.

               The application enables several return-related tasks to be performed at the same
               time. This gives priority to handling customer-oriented processes. (An activity
               diagram with an overview of the processes and their relationship is presented at
               the end of this chapter.) The program can handle sales return processes in
               different business environments.

               The program provides full document traceability for an overview of the sales
               return history. This becomes important for customer inquiries and internal
               follow-up purposes. If companies handle items with warranties provided by
               vendors (a sales return with a return to vendor process), the program offers
               functionality that automates creating all relevant documents.

               From version 5.0 and onward the application offers a more intuitive user
               interface for cost reversal during returns.

Setting Up Returns Management
               The setup of returns management consists of two elements:

                       •   General setup. The setup of the Sales Return Order Management
                           and the Purchase Return Order Management functionality is defined
                           by several fields on Sales & Receivables Setup and Purchases &
                           Payables Setup.
                       •   Return Reasons setup. A company can set up codes that specify the
                           reasons for returning items. These apply to both customer and vendor
                           returns. The user can select a return reason code when registering the
                           agreement about a sales/purchase return in most sales/purchase
                           documents.

               General Setup
               The setup of Sales Return Order Management is a part of the Sales &
               Receivables setup.
                       1. From the Sales & Marketing menu, click SETUP→SALES &
                          RECEIVABLES SETUP.

                           Four fields on the General tab define the sales return management
                           setup:
                           –   Return Receipt on Credit Memo
                           –   Copy Cmts Ret. Ord. to Cr. Memo
                           –   Copy Cmts Ret. Ord. to Ret. Rcpt
                           –   Exact Cost Reversing Mandatory


          Microsoft Official Training Materials for Microsoft Dynamics ™                         9-3
         Your use of this content is subject to your current services agreement
Trade in Microsoft Dynamics™ NAV5.0

                             Selecting Return Receipt on Credit Memo automatically creates
                             return receipt documents when a sales credit memo is posted. This
                             field is clear if a company has not purchased the Sales Return Order
                             Management functionality and uses the credit memo functionality.
                             The Exact Cost Reversing field defines whether a company wants
                             to apply an exact cost reversing policy when processing inventory
                             increases represented by the sales returns. (Companies generally
                             implement the exact cost reversing policy by requiring that the sales
                             return is valued at the same cost as the original sale when put back in
                             inventory. If an additional cost is later added to the original sale, the
                             program updates the value of the sales return.) Selecting this field
                             indicates that the program prohibits a return transaction to be posted
                             unless the Appl.-from Item Entry field on a corresponding order
                             line contains an entry.
                             Instead of manually filling in the Appl.-from/to Item Entry fields
                             for cost reversing, the Copy Documents function can be used to fill
                             in the fields. After version 5.0, a new user interface is provided for
                             the task of selecting one or more posted document lines for exact
                             cost reversal.

                 The setup of Purchase Return Order Management is part of the general Purchases
                 & Payables setup.
                         2. From the Purchase menu, click SETUP→PURCHASES & PAYABLES
                             SETUP.

                             Four fields on the General tab define the purchase return
                             management setup:
                             –   Return Shipment on Credit Memo
                             –   Copy Cmts Ret. Ord. to Cr. Memo
                             –   Copy Cmts Ret. Ord. to Ret. Shpt
                             –   Exact Cost Reversing

                 Setting Up the Return Reason Codes
                 Companies set up return reason codes to distinguish return situations encountered
                 when dealing with customers and vendors. Because a return reason is copied to
                 the item ledger entries, companies may use it for statistical purposes when
                 evaluating their performance toward a customer or assessing their relationship
                 with a specific vendor.


9-4         Microsoft Official Training Materials for Microsoft Dynamics ™
           Your use of this content is subject to your current services agreement
Chapter 9: Returns Management

               Cronus has set up six return reason codes.

                        1. From the Sales & Marketing menu, click ORDER
                           PROCESSING→SETUP→RETURN REASONS. The Return Reasons
                           window is displayed.
                            In addition to setting up the return reasons code and its description,
                            companies can also link a default location code to it. This ensures
                            that items returned because of a specific reason are, by default,
                            always received and shipped from this location.

                            For example, companies may want to store items meant for repair in
                            a dedicated position in a warehouse. This position can be set up as a
                            location in the program to which all items to be repaired will be
                            received and from which they cannot be sold. Similarly, special
                            locations can be set up for damaged/defective items.
               Cronus has decided to create a new location called Repair and set it up as the
               default in relation to S-REPAIR return reason code.

                        2. Create a new location card (location code REPAIR) and select as a
                           default location for S-REPAIR code.
                            Selecting the Inventory Value Zero field indicates that the program
                            automatically values inventory increases, such as sales return orders
                            or purchase orders, at zero cost. This is relevant for customer item
                            repairs.

                            Because the item is the customer's property, it is not included in the
                            inventory value. Therefore, it makes sense to associate the option of
                            valuing inventory at zero with the return reason code of Repair.
                        3. Select the Inventory Value Zero field.


               NOTE: If an item's costing method is set up as Standard, it means the inventory
               increase is valued at a budgeted (standard) cost instead of at an acquisition cost, and
               the program ignores the Inventory Value Zero field.


Managing Returns from Customers
               Compensating a dissatisfied customer is a necessary and important transaction.
               The faster and more accurately a company performs the return process, the more
               likely the company is to enhance the customer's perception of good customer
               service.

               Typically, the order processor responsible for the interface with customers is also
               the person to receive complaints from customers about the items sold. In other
               cases, a company may have a dedicated person(s) dealing with returns, such as
               employees in the customer service department.


          Microsoft Official Training Materials for Microsoft Dynamics ™                                 9-5
         Your use of this content is subject to your current services agreement
Trade in Microsoft Dynamics™ NAV5.0

                 Managing returns from customers includes completing a series of tasks. The
                 number and scope depends on a company's return policy and business practices.
                 A customer-oriented return handling process may include the following tasks:

                         •   Registering a compensation agreement with the customer
                         •   Shipping a replacement item(s) to the customer (if replacement is
                             part of the compensation agreement)
                         •   Crediting the customer (either by a credit for physically returned
                             items or a sales allowance where the customer is not required to
                             physically return the items)
                         •   Shipping a repaired item(s) to the customer (if repair is a part of a
                             compensation agreement)
                         •   Following up on the return status (if there are customer inquiries)

                 Related to the customer-oriented process, there are several internal handling
                 tasks:

                         •   Receiving returned items and inspecting them (if relevant)
                         •   Applying restock charges
                         •   Using the cost reversal process
                         •   Shipping returned items to the vendor for repair
                         •   Ensuring the accurate inventory value is set for the returned items

                 Sales Return Order Management in Microsoft Dynamics NAV enables
                 companies to manage all these tasks in an efficient and accurate manner.

                 This section explains and illustrates handling of these processes in Microsoft
                 Dynamics NAV using Cronus as an example.

                 Registering a Compensation Agreement with Customers
                 There are various ways to compensate a customer who is dissatisfied with the
                 order delivery. The terms of a compensation agreement between the company
                 and the customer frequently depend on the stated reason for return and the
                 company-customer relationship. For example, the parties may agree that for
                 wrongly ordered items, the customer returns them to the company against a
                 credit, receives replacement items, and accepts that the company charges a
                 certain restock fee.

                 In other situations, for example, where an item arrives at the customer slightly
                 damaged, the customer may agree to receive a price deduction against the
                 original sales order price. Meanwhile, where the sold item has a warranty, the
                 company may offer the customer to take the malfunctioned/broken item in for
                 repair.


9-6         Microsoft Official Training Materials for Microsoft Dynamics ™
           Your use of this content is subject to your current services agreement
Chapter 9: Returns Management

               In Microsoft Dynamics NAV, the sales return order is the central document that
               lets the user register an agreement with a customer. From here, the user can
               access other sales-related documents and enter and maintain the return-related
               information, the method of compensation, and the items in question.

               The user can create return lines of different types to register aspects of a
               compensation agreement in the same return order. In return situations:

                       •    Item type line represents a transaction where the item is physically
                            returned to the company before the customer receives a credit.
                       •    Charge (Item) and Account (G/L) type lines represent a financial
                            transaction where a customer receives a credit (in the form of a sales
                            allowance) for the item(s), without physically returning it to the
                            company. The same type lines can be used for registering charges
                            and fees associated with a return.

               NOTE: To register details about a compensation agreement, the user can employ other
               standard documents (or combinations of them) in Microsoft Dynamics NAV. These
               documents are as follows: Sales credit memos, sales orders, and sales invoices.
               In the return order/credit memo, a return transaction is expressed as a line with a
               positive quantity. In the sales order/invoice, a return is represented by a line with
               negative quantity. Refer to the example illustrating this principle in the topic titled
               "Sales Return Order" in online Help.
               When deciding on which document to use as a preferred entry point for a compensation
               agreement, the user must be aware that, compared to a credit memo/invoice (where
               posting updates both quantity and value at the same time), the return/sales order can
               separate the quantity and value parts of the transaction. Therefore, companies where
               this flexibility is important may prefer using a return order instead of a credit memo.

               In the sales return order, the user can create other return-related documents.
               These include a replacement sales order, and, where return to vendor is required,
               a purchase return order and a replacement purchase order.

               The following demonstrations illustrate the handling of a situation involving a
               sales return and a sales allowance, and another where an item must be sent to the
               vendor for repair.

Demonstration − Using Sales Return and Sales Allowance
               A representative from customer 10000 calls the order processor at Cronus and
               says that he received five units of item 70011 instead of item 70010 and that two
               units of item 1964-W were delivered damaged. The customer explains that the
               wrong delivery of item 70010 was his own fault, while item 1964-W appeared to
               have been damaged during shipment.

               The order processor and the customer agree that item 70011 must be returned to
               Cronus and a replacement of the same quantity of item 70010 will be shipped to
               the customer. Cronus will charge the customer a restock fee of 5% of the original
               order amount.


          Microsoft Official Training Materials for Microsoft Dynamics ™                            9-7
         Your use of this content is subject to your current services agreement
Trade in Microsoft Dynamics™ NAV5.0

                 Meanwhile, item 1964-W will not be returned, and Cronus will provide the
                 customer with a sales allowance of 15% off the price of the item.

                 The order processor must register the compensation agreement that has been
                 reached with the customer and process the return. The order processor must also
                 make sure that the returned items, when put back on stock, are valued at the same
                 unit cost as originally sold (according to Cronus internal policy about the
                 inventory valuation).

                 The order processor must register the compensation agreement settled with
                 customer 10000 about the return of a wrongly ordered item.

                 Steps
                 Create a sales return order for five units of item 70011 from customer 10000.

                         1. From the Sales & Marketing menu, click ORDER
                            PROCESSING→RETURN ORDER. Press F3 to create a new order and
                            enter the customer information in the return header.
                         2. Enter the item information and quantity on the line.
                 For each return line, the user can specify the reason for returning the item(s) by
                 filling in the Return Reason field.

                         3. In the Return Reason field, click the AssistButton. The Return
                            Reasons window appears.
                         4. Select WRONG as the return reason code and then click OK.
                         5. In the External Document No. field, enter SR024. This is the
                            number that is used as a reference to the return document.
                             Entering an external document number is important for an overview
                             of the return status. External document numbers help locate the sales
                             documents created for a specific customer return.
                             The completed sales return order for the return of wrongly ordered
                             item 70011 now looks as shown in Figure 9-1.


                 FIGURE 9-1: SALES RETURN ORDER WINDOW


9-8         Microsoft Official Training Materials for Microsoft Dynamics ™
           Your use of this content is subject to your current services agreement
Chapter 9: Returns Management

      Using the Copy Documents Function
      To fill in the return lines automatically, use the Copy Document function to copy
      information about the customer and the item from other documents. For sales
      returns, these documents can be either posted shipments or posted invoice
      documents.

      If the Exact Cost Reversing field on the sales & receivables setup is selected,
      when the user copies information from a posted shipment, the program
      automatically fills in the Appl.-from Item Entry field on the return line with the
      corresponding entry.
      Demonstration Continued
      When entering a sales return line, the order processor must make sure that upon
      invoicing the order, the returned item is revalued at the unit cost of the original
      sales (instead of at the unit cost suggested by the program as based on either
      average or standard unit cost).

      To do this, the order processor must assign exact cost reversing to this return line.

              6. In the Appl.-from Item Entry field, click the AssistButton. The
                 Item Ledger Entries window appears.
                  The window contains a list of records of all the negative entries
                  made for the item in question.
              7. In the Item Ledger Entries window, select the line. This is the entry
                 representing the sales order that customer 10000 refers to as the one
                 with the incorrect items. Click OK.
                  This finishes registration of the first part of the compensation
                  agreement.
      New User Interface
      After version 5.0, a new user interface is provided for the task of selecting one or
      more posted document lines for exact cost reversal. Instead of using the Copy
      Documents function and the Appl.-from Item Entry field to look up the posted
      sales document lines, do the following:

              8. From the Sales Return Order, click Functions and then Get Posted
                 Document Lines to Reverse. This opens the Posted Sales Document
                 Lines window.


 Microsoft Official Training Materials for Microsoft Dynamics ™                         9-9
Your use of this content is subject to your current services agreement
Trade in Microsoft Dynamics™ NAV5.0

                              9. Select the posted sales document line for item 70011 and pres Enter.


FIGURE 9-2: POSTED SALES DOCUMENT LINES WITH THE POSTED SHIPMENTS VIEW

                                  10. Enter the line in the Sales Return Order window together with
                                  some comment lines with additional information about the related
                                  posted invoice and shipment. This makes keeping track of the related
                                  documents in the returning process easier.
                      The new Posted Sales Document Lines function is available from return orders
                      and credit memos on both the sales and purchase site. The function is especially
                      useful when users need to copy one or more lines that appear in one or more
                      posted documents.

                      The new window provides rich information about the status of posted quantities,
                      displaying, for example, whether any have already been returned. It also contains
                      the following:

                              •   The Unit Cost (LCY) field, showing the current, potentially adjusted
                                  unit cost
                              •   The Reverse Unit Cost (LCY) field, showing the original unit cost
                                  at which the item was originally sold and at which it must be
                                  reversed

                      At the top of the Posted Sales Document Lines window, users can place a check
                      mark in the Show Reversible Lines Only field to see only lines with quantities
                      that have not yet been returned.

                      The new field Qty. Not Returned is implemented in the item ledger entry table
                      where the reversible quantity of an outbound item ledger is stored. The program
                      will check during the posting of return orders that only the quantity remaining in
                      relation to the original sales document line can be reversed. This ensures that
                      users do not mistakenly return more than what was sold.


9-10             Microsoft Official Training Materials for Microsoft Dynamics ™
                Your use of this content is subject to your current services agreement
Chapter 9: Returns Management

      According to the demonstration "Sales Return and a Sales Allowance," the
      customer also requested a replacement of item 70011 with item 70010. The order
      processor can register this requirement in the sales return order by entering a line
      for the replacement item with a negative quantity.

              11. In the Sales Return Order window, enter a line for item 70010 with a
                  quantity of -5.
                   The advantage of doing this in the Sales Return Order window is
                   that the order processor can register the customer's requests to
                   receive a replacement in one window, instead of opening a new
                   Sales Order window.


      NOTE: To avoid confusion, remember that the sales return lines (of the item type) with
      positive quantities represent items that are being returned, while lines with negative
      quantities represent items that are to be replaced.

      Next, according to the compensation agreement, the order processor applies a 5%
      restock fee to cover the physical handling of returning the item. The order
      processor can do this in the same sales return order by creating a charge (item)
      line for sales restock charge:

              12. In the Type field, select Charge (Item) and in the No. field, select S-
                  RESTOCK.
              13. In the Quantity field, enter 5. In the Unit Price Excl. VAT field,
                  enter -3.615. This is 5% of 72.30 LCY, which is the original unit
                  price. (You can also enter a formula 72.30*5/100 to calculate the
                  amount.)


 Microsoft Official Training Materials for Microsoft Dynamics ™                           9-11
Your use of this content is subject to your current services agreement
Trade in Microsoft Dynamics™ NAV5.0

                     The program calculates the total restock fee amount equal to 18.08 LCY
                     (5*3.615). Remember that the quantity of the restock charge must be positive.
                     But the unit price must be negative for the customer to pay the restock charge.


FIGURE 9-3: SALES RETURN ORDER WINDOW

                     To guarantee accurate sales statistics, the order processor assigns the restock
                     charge to the return entry.

                              14. Select the sales restock line, and then click LINE→ITEM CHARGE
                                  ASSIGNMENT.

                     Assign the restock charge to the entry being returned.

                              15. In the Item Charge Assignment (Sales) window, on the first line in
                                  the Qty. to Assign field, enter 5.
                              16. Close the window.


                     NOTE: As an alternative to creating a charge (item) line, the order processor can
                     create an account (G/L) line for the amount of the restock fee and post the entry directly
                     to the G/L account. However, the advantage of using an item charge is that item
                     statistics are updated correctly.

                     The order processor must record the agreement with the customer about the
                     provision of a sales allowance of 15% for two units of the damaged item 1964-
                     W. The sales return order can be used as an entry point for the details of this
                     agreement. (An alternative entry point for a sales allowance is a sales credit
                     memo.) The order processor must create a charge (item) line and assign the
                     corresponding charge amount to the original sale of item 1964-W.


9-12            Microsoft Official Training Materials for Microsoft Dynamics ™
               Your use of this content is subject to your current services agreement
Chapter 9: Returns Management

              17. Create a charge (item) line. Select sales allowance as the item charge
                  number. (Add extra information about this allowance in the
                  Description field if desired.)
              18. In the Quantity field, enter 2. This is the number of items that
                  arrived damaged to the customer and for which the order processor
                  provides an allowance.
              19. Click LINE→ITEM CHARGE ASSIGNMENT.
                  Select the original sales entry receiving the allowance. This is
                  represented by the posted shipment documents.
              20. In the Item Charge Assignment (Sales) window, click
                  FUNCTIONS→GET SHIPMENT LINES. The program lists all posted
                  shipment lines related to the customer.
              21. Select the shipment line for item 1964-W and then click OK.
              22. In the Item Charge Assignment window, in the Qty. to Assign field
                  for the shipment line, enter 2. Close the window.
              23. In the Sales Return Order window, in the Unit Price Excl. VAT
                  field, enter 43.80. This is 15% of 292.00 LCY, which was the
                  original unit price at which the item was sold to the customer. (You
                  can also enter a formula 292*15/100 to calculate the amount.)
      The order processor finishes registration of the compensation agreement settled
      with the customer and continues to the processing of the return.


 Microsoft Official Training Materials for Microsoft Dynamics ™                      9-13
Your use of this content is subject to your current services agreement
Trade in Microsoft Dynamics™ NAV5.0


Demonstration − Processing the Sales Return
                 After the order processor registers the details of the compensation agreement in
                 the program (in the sales return order), the next task is to actually perform the
                 agreement. In the demonstration "Sales Return and Sales Allowance," this means
                 that Cronus must:

                         •    Ship the customer a replacement item
                         •    Credit the customer for the returned items upon receipt at the
                              company (with deduction for the restock charge)
                         •    Provide a sales allowance for the items the customer is not required
                              to return to Cronus
                 Unless the total order amount is negative, all the procedures can be performed at
                 the same time, when the user posts the sales return order. However, if for
                 example the replacement order needs to be shipped without waiting until the
                 returned items are received, then the replacement line(s) (lines with negative
                 quantities) can be moved to a regular sales order.

                 When a replacement is posted from the return order, the program does not create
                 a separate posted shipment document for this shipment.

                 NOTE: Remember that the program does not allow posting of any orders with a
                 negative total amount. According to general conventions in the program, the warehouse
                 management functionality does not handle negative lines. For the warehouse, it does
                 not make sense to pick a negative quantity. Therefore, when you are using warehousing,
                 you must move negative lines to documents where they appear positive.

                 Suppose that in the demonstration "Sales Return and Sales Allowance" the order
                 processor decides to move the negative line (representing a demand for a
                 replacement) to a separate sales order. The Move Negative Lines function is a
                 convenient way to do this task.


9-14        Microsoft Official Training Materials for Microsoft Dynamics ™
           Your use of this content is subject to your current services agreement
Chapter 9: Returns Management


      Steps
      Perform the following to move the line:

              1. In the Sales Return Order window, click FUNCTIONS→MOVE
                 NEGATIVE LINES. The following window appears:


                  FIGURE 9-4: MOVE NEGATIVE SALES LINES WINDOW

                  In the To Document Type field, select which document type to
                  receive the negatives lines. To learn about different options, refer to
                  the topic "Move Negative Sales Lines Batch Job" in online Help.
              2. In the To Document Type field, select Order and then click OK.
                  The program deletes the return line with the negative quantity and
                  creates a new sales order. A message providing the new sales order
                  number appears.


              3. Click Yes to view the document.
                  The order can be processed in the usual manner.


              4. Post the sales order.
                  Upon receipt of the returned item, the order processor posts the sales
                  return order which creates the customer's account for: A) the value of
                  returned item 70011, with a deduction of the restock charge; and B)
                  the amount of the sales allowance provided for two damaged units of
                  item 1964-W.


 Microsoft Official Training Materials for Microsoft Dynamics ™                       9-15
Your use of this content is subject to your current services agreement
Trade in Microsoft Dynamics™ NAV5.0

                         5. Post the sales return order.
                             The program creates a posted return receipt and a posted credit
                             memo.
                             For an overview of a sales return status, the order processor can use
                             the navigate function to find and access the sales documents created
                             for the return. The external document number, provided by the
                             customer as a reference to the return document, can be used as a
                             search parameter.


                 View the status of the sales return initiated in the demonstration, "Sales Return
                 and a Sales Allowance”:

                         6. From the Sales & Marketing menu, click HISTORY→NAVIGATE.
                            Click the External tab.
                         7. In the Business Contact Type field, select Customer, and in the
                            Business Contact No. field select 10000. In the Document No.
                            field, enter SR024. Click Find.
                 The program lists all the sales documents created to process the sales return
                 initiated by customer 10000. These are the posted sales shipment and invoice for
                 the replacement sales order and the posted return receipt and credit memo for the
                 sales return order.

                 The next demonstration illustrates a situation where the customer returns an item
                 to Cronus for repair at the company's vendor.

Demonstration − Returning Items for Repair at Vendor
                 A representative from customer 20000 calls the order processor at Cronus stating
                 that she wants to return two units of item 80102-T ordered some time ago. The
                 customer claims the items have a manufacturing defect and wants the items
                 repaired.

                 The order processor and the customer agree that the items must be returned to
                 Cronus, and Cronus will send them to the manufacturer for repair.

                 The order processor must register the compensation agreement and process the
                 return.

                 Create a purchase order of 40 units of item 80102-T from vendor 50000 and a
                 sales order of eight units for customer 20000. At Cronus, this item is tracked by
                 serial numbers that are provided by the manufacturer (S/N-852CA1 .. S/N-
                 852CA40 when purchased, S/N-852CA10 .. S/N-852CA17 when sold). The
                 detailed procedures for handling items with serial numbers are described in the
                 Inventory Management training manual.


9-16        Microsoft Official Training Materials for Microsoft Dynamics ™
           Your use of this content is subject to your current services agreement
Chapter 9: Returns Management


       Steps
       Create a sales return order for two units of item 80102-T for customer 20000.

               1. Fill in the sales return header and lines with the customer and item
                  information respectively.
                   Because the item will be repaired at the vendor (manufacturer), the
                   customer keeps the ownership of the item during the repair process.
                   In this case, Cronus must exclude the item value from its own
                   inventory value.

                   To do this, all the transactions with this item, such as receiving it at
                   the company, shipping it to the manufacturer, and receiving it back
                   and shipping it back to the customer, are performed with zero unit
                   cost and unit price.
                   Instead of entering a zero amount in the Unit Cost (LCY) and Unit
                   Price Excl. VAT fields manually on the sales return lines, the order
                   processor may use the functionality available in the program to
                   automate the process.
                   As described in the previous section, at Cronus, the option of
                   valuating inventory at zero when handling returns for repair is linked
                   to the return reason S-REPAIR. By selecting this return reason, the
                   order processor accepts the option.
               2. In the Return Reason field, select the S-REPAIR code.
                   The program automatically fills in the Location Code field with
                   REPAIR, which is a default location for this return reason code
               3. In the External Document No. field, enter R0015.
                   The completed sales return order of item 80102-T for repair looks as
                   shown in Figure 9-5.


FIGURE 9-5: SALES RETURN ORDER WINDOW


  Microsoft Official Training Materials for Microsoft Dynamics ™                        9-17
 Your use of this content is subject to your current services agreement
Trade in Microsoft Dynamics™ NAV5.0

                             Notice that the Unit Price Excl. VAT field does not contain an
                             amount.
                             To continue with this return, several documents related to returning
                             this item to the manufacturer and shipping it back to the customer
                             upon repair must be created. These documents include:
                             –   Purchase return order
                             –   Purchase order
                             –   Sales order

                 The handling of the sales returns for repair with regard to associated documents
                 is shown in Figure 9-6.


                 FIGURE 9-6: SALES RETURN DOCUMENTS

                 The function Create Return-Related Documents enables the order processor to
                 create all these documents automatically.

                         4. In the Sales Return Order window, click FUNCTIONS→CREATE
                            RETURN-RELATED DOCUMENTS. The following window appears:


                             FIGURE 9-7: CREATE RETURN RELATED DOCUMENTS WINDOW


9-18        Microsoft Official Training Materials for Microsoft Dynamics ™
           Your use of this content is subject to your current services agreement
Chapter 9: Returns Management

                  In this window, users can select which documents that they want the
                  program to create to further handle the return. The user has the
                  option of creating a purchase return order and a purchase order if the
                  items are returned to and received from the vendor. The user can also
                  create a replacement sales order. To create vendor-related
                  documents, specify a vendor number.
              5. In the Vendor No. field, select vendor 50000. Click OK.
                  The program creates the specified documents and lists them in the
                  Returns-Related Documents window.
      Purchase return orders and purchase orders with status Open indicate that the
      purchasing agent can initiate the return to vendor/purchase replacement process.

      When the items arrive at Cronus, the order processor/warehouse worker enters
      the serial numbers (S/N-852CA15 and S/N852CA16).

      Register the serial numbers for the arrived items in the Item Tracking Lines
      window, and post the receipt of the return order.


 Microsoft Official Training Materials for Microsoft Dynamics ™                      9-19
Your use of this content is subject to your current services agreement
Trade in Microsoft Dynamics™ NAV5.0


Lab 9.1 − Processing the Customer Return
                 Scenario: A representative from customer 10000 calls the order processor at
                 Cronus and says that the complete delivery of 50 units (boxes) of item 80100
                 appears to be defective.

                 The order processor and the customer agree that the complete quantity of item
                 80100 must be returned to Cronus, and a replacement of the same quantity will
                 be shipped to the customer. The customer gives the order processor a reference
                 number to his own return document, which is R-0113.

                 To perform this return, create and post a sales order of 50 units (boxes) of item
                 80100 to customer 10000. Use location code Green, and remember to fill in the
                 quantity to ship.

                 Challenge Yourself!
                 Your tasks are as follows:

                         1. Register the compensation agreement reached with the customer,
                            using a sales order as an entry point.
                         2. Process the return, in terms of:
                             –   Receiving (possibly, use a special dedicated location for
                                 defective items) and crediting the customer for the returned
                                 items.
                             –   Ensuring that the returned items, when received from the
                                 customer, are valued at the same unit cost as originally sold
                                 (instead of the average cost).
                             –   Shipping the replacement sales order to the customer.
                             –   Creating a return-related document, which is a purchase return
                                 order, to indicate to the purchaser that a return to vendor process
                                 must be initiated.

                 Need a Little Help?
                 The solution is provided in Appendix C.


9-20        Microsoft Official Training Materials for Microsoft Dynamics ™
           Your use of this content is subject to your current services agreement
Chapter 9: Returns Management


Managing Returns to Vendors
               Receiving compensation from a vendor for an item you are dissatisfied with is
               important to recover costs and measure vendor relationships. Streamlining the
               return to vendor process helps companies greatly reduce the costs associated with
               returns.

               Typically, the purchasing agent responsible for the interface with certain vendors
               also contacts the vendors when dissatisfied with purchased items.

               Managing returns to vendors includes performing a series of tasks. The number
               and scope of the tasks depend on who initiates the return: The company (when,
               for example, dissatisfied with the quality of purchased items or if there is a
               wrong delivery) or a company's own customer. A vendor-oriented return process
               may include the following tasks:

                       •   Registering the compensation agreement with the vendor.
                       •   Debiting the vendor, either by receiving a credit for physically
                           returned items or with a purchase allowance (if the company is not
                           required to physically return the items).
                       •   Creating a replacement purchase order(s) if replacement is in the
                           compensation agreement.

               Related to the vendor-oriented process, there are several internal handling tasks:

                       •   Shipping items to the vendor if the purchase return that includes
                           repair is part of a compensation agreement.
                       •   Receiving replaced/repaired items.
                       •   Ensuring that the accurate inventory value of the items is returned to
                           the vendor.
                       •   Combining several return shipments to the same vendor into one
                           credit memo document.

               Purchase Return Order Management in Microsoft Dynamics NAV enables
               companies to manage these tasks in an efficient and accurate manner.

               This section explains and illustrates the handling of these processes, using
               Cronus as an example.


          Microsoft Official Training Materials for Microsoft Dynamics ™                       9-21
         Your use of this content is subject to your current services agreement
Trade in Microsoft Dynamics™ NAV5.0


                 Registering Compensation Agreement with the Vendor
                 There are many ways a company expects compensation when it is dissatisfied
                 with the received order or dissatisfied on behalf of its customers. The terms of
                 compensation agreement depends on the reason for the return and the company-
                 vendor relationship. For example, the parties may agree that if there is wrongly
                 ordered or delivered item(s), the company returns the item to the vendor against
                 receiving a credit and receives a replacement item.

                 In other situations, for example, where an item arrives at the company damaged,
                 the company may require a price deduction against the original purchase order
                 price. The same may be applied when a company provided a sales allowance for
                 its own customers and wants to recover costs by requesting a purchase allowance
                 from its vendor. Meanwhile, where the purchased item has a warranty, the
                 company may ask the vendor to repair the malfunctioned/broken item.

                 In Microsoft Dynamics NAV, the purchase return order is the central document
                 that lets the user register a compensation agreement. From here, the user can
                 access other purchase-related documents and enter and maintain the return-
                 related information about the vendor, the method of compensation, and the items
                 in question.

                 NOTE: In addition to the purchase return order, to register details about a
                 compensation agreement with the vendor, the user can employ other standard
                 documents (or combinations) to register a return. These documents are as follows:
                 Purchase credit memos, purchase orders, and purchase invoices.
                 The concept of creating different return line types and registering a compensation
                 agreement with a vendor are the same as in sales return situations.
                 The principles of creating a purchase document to register a compensation agreement
                 are explained in detail in the topics "Purchase Return Order" and "Posting a Purchase
                 Return Order" in online Help.

                 The two demonstrations in this section illustrate the handling of an item returned
                 to a vendor for repair and a purchase allowance.

                 Both returns have been initiated by the customer and are a logical continuation of
                 the demonstrations presented in the previous section. As the same purchase
                 return handling procedures apply, regardless of whether a company initiates a
                 return itself or it has been initiated by the customer, the first case is not given a
                 separate explanation in this section.


9-22        Microsoft Official Training Materials for Microsoft Dynamics ™
           Your use of this content is subject to your current services agreement
Chapter 9: Returns Management


Demonstration − Returning Items to Vendor for Repair
                This is a continuation of the demonstration titled "Customer Returns Item for
                Repair at Vendor."

                For the return of two units of item 80102-T initiated by customer 20000, Cronus
                now has to ship the units back to the vendor for repair.

                When registering a compensation agreement with this customer, the order
                processor ran the Create Return-Related Documents function. The program
                created the following documents: A purchase return order, a purchase order, and
                a sales order.

                The purchasing agent contacts the vendor's representative (vendor 50000), and
                the parties agree on Cronus sending the item for repair. The purchasing agent
                now handles the return process.

                To perform this return, create and post a purchase order of five units of item
                80100 from vendor 50000, and create a purchase return order of one unit of the
                same item for the same vendor, using location code Blue and return reason
                Defective. Post the purchase return order as shipped.

                Steps
                Process the purchase return order for two units of item 80102-T for vendor
                50000.

                        1. From the Purchase menu, click ORDER PROCESSING→RETURN
                           ORDERS. Locate the return order for two units of item 80102-T the
                           program created for vendor 50000.
                             Notice that the Direct Unit Cost Excl. VAT field is empty.


                NOTE: To guarantee the accurate inventory value ( at zero unit cost) of repair items
                without serial numbers, the order processor applies a purchase return entry for the
                sales return entry.

                Complete filling in the purchase return order:

                        2. In the Vendor Authorization No. field, enter RO155. This is the
                           number from the vendor authorizing the return.
                        3. In the Expected Receipt Date field on the Shipping tab, enter
                           01/27/08. This is the shipment date for the return order.
                        4. Click Yes to update the lines.
                        5. Enter the serial numbers (S/N-852CA15 and S/N852CA16) in the
                           Item Tracking Lines window for the two items being shipped to the
                           vendor.


           Microsoft Official Training Materials for Microsoft Dynamics ™                              9-23
          Your use of this content is subject to your current services agreement
Trade in Microsoft Dynamics™ NAV5.0

                          6. Post the purchase return order as shipped. The program updates the
                             available inventory and creates a posted return shipment.
                              Companies frequently establish a practice where it is cost-efficient to
                              combine several return orders in one shipment. By posting a
                              purchase return order as shipped, the user takes out the items to be
                              returned to the vendor from the available inventory but does not
                              actually ship (transport) the order.

                              When there are several orders (to be returned to the same vendor or
                              be bundled in the same shipment), the user can combine them in one
                              shipment and transport it to the vendor. The combined shipment is
                              then invoiced as one purchase credit memo.


                 NOTE: Individual posted return shipment documents, when sent to the vendor, can be
                 an indication for the vendor to send a replacement item(s) instead of the one returned at
                 some later point.

                 There are more items to be returned to the same vendor for repair. The two return
                 orders will be shipped in the same shipment. Upon receiving a credit memo from
                 the vendor for this combined shipment, the two shipments can be paid (invoiced).

                          7. Create a new purchase credit memo for vendor 50000. Click
                             FUNCTIONS→GET RETURN SHIPMENT LINES TO RETURN.

                              The Get Return Shipment Lines window contains a list of all the
                              shipment lines that have not been invoiced.


                          8. Select the two lines from the list and then click OK. The program
                             copies the lines to the purchase credit memo.
                          9. In the Vendor Cr. Memo No. field, enter CM1305 and invoice the
                             credit memo.
                              When the vendor has repaired the items and delivered them to
                              Cronus, the purchasing agent posts the corresponding purchase order
                              (created because of running the Create Return-Related Documents
                              function when registering the sales return from the customer). A
                              sales order for the same items can then be shipped back to the
                              customer.
                              There may be a need to trace the purchase return to the original sales
                              return. For example, when a vendor repairing a returned item needs
                              additional information from the customer about item exploitation. In
                              these cases, the user can view the item's transaction history in item
                              tracking entries and locate the relevant document(s).


9-24        Microsoft Official Training Materials for Microsoft Dynamics ™
           Your use of this content is subject to your current services agreement
Chapter 9: Returns Management

               Open the item tracking entries for item 80102-T:

                       10. Open the item card for item 80102-T. Click ITEM→ENTRIES→ITEM
                           TRACKING ENTRIES.

                            The last two lines specify an inventory increase by two units of item
                            80102-T with serial numbers S/N-852CA15 and S/N-852CA16 (the
                            Positive field is selected). The user can locate the associated
                            document, represented by a sales return order.


               NOTE: To guarantee the full traceability of an item with a serial number, remember to
               assign the item an item tracking code that requires the entry of serial numbers at the
               point of inbound sale (sales return) and outbound purchase (purchase return). Read
               more about how to set up item tracking codes in the Inventory Management training
               manual.


Demonstration − Using Purchase Allowance
               This is a continuation of the demonstration titled "Item Returned to Vendor for
               Repair."

               The order processor was told by customer 10000 that two units of item 1964-W
               were damaged in shipment. Instead of returning the items, the customer was
               given a 15% sales allowance.

               Because the carrier is responsible, Cronus wants to recover the costs associated
               with this damage. The transportation coordinator contacts the carrier's
               representative (the carrier (vendor) number is 49989898), and the parties agree
               on Cronus making a freight claim toward the carrier. The amount of the claim is
               equal to the amount of the sales allowance offered to the customer (87.60 LCY).

               The transportation coordinator decides to issue a freight claim toward vendor
               49989898 from a purchase credit memo (alternatively, the purchase return order
               may be used).


          Microsoft Official Training Materials for Microsoft Dynamics ™                           9-25
         Your use of this content is subject to your current services agreement
Trade in Microsoft Dynamics™ NAV5.0


                 Steps
                 Perform the following steps to issue the purchase allowance:

                         1. Create a new purchase credit memo and fill in the header with the
                            vendor information.
                         2. In the Vendor Authorization No. field, enter R123. This is the
                            number the Transportation Coordinator receives from the carrier
                            (vendor) authorizing the claim (return).
                         3. In the Vendor Cr. Memo No. field, enter CM478.
                         4. Create a credit line. In the Type field, select G/L Account, and in the
                            No. field, select account 6810.
                         5. In the Quantity field, enter 1 and in the Direct Unit Cost Excl.
                            VAT field, enter 87.60.
                         6. Post the purchase credit memo.


9-26        Microsoft Official Training Materials for Microsoft Dynamics ™
           Your use of this content is subject to your current services agreement
Chapter 9: Returns Management


Lab 9.2 − Processing the Customer Return, II
                Scenario: (Continuation of Lab 9-1 – Processing the Customer Return)

                For the return of 50 units (boxes) of item 80100 initiated by customer 10000,
                Cronus wants to return the defective items to the original vendor and receive
                replacements.

                When registering the compensation agreement, the order processor created a
                purchase return order. This serves as an indication to the purchaser that the items
                must be returned to the vendor.

                The purchasing agent contacts the vendor's representative (vendor 45858585),
                and the parties agree that Cronus will send the item back for replacement. The
                vendor gives the purchasing agent a return authorization number, which is
                PR0558.

                Locate the existing purchase order No. 6001 and post it as invoiced.

                Challenge Yourself!
                Your task is to handle the return to vendor process for:

                        •   Shipping the defective items to the vendor and receiving credit.
                        •   Ensuring that the items returned to the vendor are valued at the same
                            unit cost as originally purchased instead of the average cost
                            suggested by the program (refer to the purchase order No. 6001).
                        •   Receiving a replacement from the vendor.

                Need a Little Help?
                The solution is provided in Appendix C.


           Microsoft Official Training Materials for Microsoft Dynamics ™                       9-27
          Your use of this content is subject to your current services agreement
Trade in Microsoft Dynamics™ NAV5.0


Activity Diagram for Return Management
                      The activity diagram is helpful for the order processor to maintain the overview
                      of the return process in each if the different situations.


FIGURE 9-8: RETURN MANAGEMENT ACTIVITY DIAGRAM

Conclusion

                      Handling returned items from customers and vendors correctly and in a timely
                      manner is a crucial element in establishing good business relationship.

                      In Returns Management, the general set up and return reasons set up was
                      presented. Then the two main topics on management of returns from customers
                      and vendors were explained thoroughly by several, detailed demonstrations. The
                      functionality enhancement regarding cost reversal, for both sales and purchase
                      return processing, created for version 5.0, were included in the first
                      demonstration, "Sales Return and a Sales Allowance".


9-28             Microsoft Official Training Materials for Microsoft Dynamics ™
                Your use of this content is subject to your current services agreement
Chapter 9: Returns Management


Quick Interaction: Lessons Learned
                Take a moment and write down three key points you have learned from this
                chapter:

                1.


                2.


                3.


           Microsoft Official Training Materials for Microsoft Dynamics ™                  9-29
          Your use of this content is subject to your current services agreement
Trade in Microsoft Dynamics™ NAV5.0


9-30        Microsoft Official Training Materials for Microsoft Dynamics ™
           Your use of this content is subject to your current services agreement
Chapter 10: Analysis and Reporting


CHAPTER 10: ANALYSIS AND REPORTING
Objectives
                The objectives are:

                        •   Define Analysis and Reporting
                        •   Create Analysis Reports
                        •   Customize Analysis Reports
                        •   Create Analysis by Dimensions
                        •   Manage Sales and Purchase Budgets
                        •   Export Budgets to Microsoft® Excel

Introduction
                Analysis and Reporting demonstrates the key features of the analysis reporting
                and budgeting functionality in Microsoft Dynamics™ NAV. There are two sets
                of functionality that support these analysis and reporting functions: Analysis
                Reports and Sales/Purchase Budget.

                Comprehensive demonstrations and examples explain how the program supports
                companies in managing the tasks involved in analysis reporting and sales and
                purchase budgeting. For an overview of procedures associated with handling
                specific reporting and budgeting tasks, refer to the relevant topic in the online
                Help.


           Microsoft Official Training Materials for Microsoft Dynamics ™                     10-1
          Your use of this content is subject to your current services agreement
Trade in Microsoft Dynamics™ NAV5.0


Analysis and Reporting
                 The Analysis and Reporting features of Microsoft Dynamics NAV provide sales
                 managers, purchasing managers, and warehouse managers tools to easily budget,
                 forecast, and analyze data. These features are designed for people without a
                 background in finance and accounting.

                 Use analysis reports to review real-time data in highly customizable reports,
                 saved under unique names, and positioned in the respective application area to
                 analyze data in a preferred format. Analysis line templates and analysis column
                 templates are user-defined and unlimited. This means reports can be created that
                 are customized for a company’s needs and business processes. Dimensions
                 enable the user to analyze trends and compare characteristics across a range of
                 entries. It is also possible to combine and compare source data online by
                 changing parameters. The program-wide drill-down functionality enables the
                 user to make decisions based on real-time data investigations of detailed
                 transactions.

                 Use Sales and Purchase Budgets functionality to make sales budgets on customer
                 and item levels and purchase budgets on vendor and item levels, both in amounts
                 and quantities. Users can track actual performance by calculating variances and
                 move budget figures between Microsoft Dynamics NAV and Microsoft® Excel®.
                 The system supports budget version control and lets users work on individual
                 budgets at the same time. Comparing analysis report data against budgets is
                 easier than traditional budgeting with dimensions and dimension filters. The user
                 can create user-defined budgets for identical time periods, G/L accounts, and
                 dimensions.

Creating Analysis Reports
                 Use analysis reports to create customized reports that are based on posted
                 transactions; for example, sales, purchases, transfers, and inventory adjustments.

                 An analysis report consists of objects to analyze represented as lines and analysis
                 parameters (the way to analyze the object) represented as columns.


10-2        Microsoft Official Training Materials for Microsoft Dynamics ™
           Your use of this content is subject to your current services agreement
Chapter 10: Analysis and Reporting

      The Analysis Report Names window contains all analysis reports, the analysis
      line template, and the analysis column template attached to each analysis report.


      FIGURE 10-1: ANALYSIS REPORT NAMES WINDOW

      Analysis reports are created, viewed, and modified from the Sales & Marketing
      menu and the Purchase menu by clicking ANALYSIS & REPORTING→ANALYSIS
      REPORTS. The functionality is identical whether it is accessed from Purchase or
      Sales. The following explanation uses Sales Analysis Reports and also applies to
      Purchase Analysis Reports.

      To create an analysis report:

              •   Set up the line template.
              •   Set up the column template.
              •   Enter a report name and description in the Analysis Report Name
                  window and select the line and column templates.

      Setting Up Line Templates
      The lines in a report contain the objects to analyze. To set up line templates, from
      the Sales & Marketing menu, click ANALYSIS & REPORTING→SETUP→ANALYSIS LINE
      TEMPLATES.


      You can create rows that display:

              •   Customers and Customer Groups
              •   Items and Item Groups
              •   Salespeople
              •   Formulas

      Dimensions define Customer and Item Groups and Salespeople. Using
      dimensions in analysis reports is explained later in this chapter.


 Microsoft Official Training Materials for Microsoft Dynamics ™                      10-3
Your use of this content is subject to your current services agreement
Trade in Microsoft Dynamics™ NAV5.0

                 Select which lines to use in an Analysis Report from the Sales Analysis Lines
                 window. To access the Sales Analysis Lines window, click the Lines button at
                 the bottom of the Analysis Line Templates window.


                 FIGURE 10-2: SALES ANALYSIS LINES WINDOW

                 These lines can be modified manually or with the insertion function to add, for
                 example, a new customer.

                 Setting Up Column Templates
                 The columns in a report contain the analysis parameters. To set up column
                 templates, from the Sales & Marketing menu, click ANALYSIS &
                 REPORTING→SETUP→ANALYSIS COLUMN TEMPLATES. You can define columns that
                 display:

                         •   Sales amounts
                         •   Cost amounts
                         •   Quantities
                         •   Non-inventoriable amounts
                         •   Unit price
                         •   Standard cost
                         •   Indirect cost
                         •   Unit cost


10-4        Microsoft Official Training Materials for Microsoft Dynamics ™
           Your use of this content is subject to your current services agreement
Chapter 10: Analysis and Reporting

      Use the Analysis Columns Templates window to access existing column
      templates or create new templates. Click the Columns button on the bottom of
      the Analysis Column Templates window. The Sales Analysis Columns window
      displays.


      FIGURE 10-3: SALES - ANALYSIS COLUMNS WINDOW

      Set up columns to appear in the analysis report. For each column, define the data
      in the item ledger entries and budget entries to retrieve for the analysis report.
      For information about each field, refer to the Online Help.
      Analysis Types
      For each column set up in the Analysis Columns window, select an analysis type
      to specify a value in the column; for example, Cost of Goods Sold or
      Consumption. Default analysis type codes for most of the relevant analyses are
      set up in the program.

      Click the AssistButton in the Analysis Type Code field to view the Analysis
      Type List.

      Each Analysis Type code has a default Item Ledger Entry Type filter, Value
      Entry Type filter, and Value Type that together define the values in the item and
      budget entries to retrieve. View, create, or modify analysis type codes by clicking
      ANALYSIS & REPORTING→SETUP→ANALYSIS TYPES from the Sales & Marketing
      menu.


 Microsoft Official Training Materials for Microsoft Dynamics ™                     10-5
Your use of this content is subject to your current services agreement
Trade in Microsoft Dynamics™ NAV5.0

                 The following table shows where Value Type information is pulled from.


                  Value Type                         Information comes from:

                  Sales amount                       Item ledger entries
                  Cost amount                        Item ledger entries
                  Non-inventoriable amount           Item ledger entries
                  Quantity                           Item ledger entries
                  Unit cost                          Item card
                  Standard cost                      Item card
                  Indirect cost                      Item card
                  Unit price                         Sales prices


Demonstration − Customizing Analysis Reports
                 It is possible to use existing analysis reports to create customized reports. The
                 following demonstration shows the key fields in the analysis report and describes
                 how to customize an existing analysis report.

                 The Cronus sales manager has created a report that is named KA-SALES, that
                 provides an overview of sales turnover and profit for some specific customers
                 who are being followed closely. The sales manager has to run this report to
                 retrieve January sales numbers, but first, it is required to add an additional
                 customer to the report.

                 Steps
                 Open the Sales Analysis Report window and locate a report to customize.

                         1. On the Sales & Marketing menu, click ANALYSIS &
                            REPORTING→ANALYSIS REPORTS.

                         2. In the Analysis Report Name field, click the AssistButton to open
                            the Analysis Report Names window.
                         3. Select analysis report KA-SALES and then click OK.
                               Next, define the time period for this report.
                         4. In the Sales Analysis Report window, type 01/01/08 in the Date
                            Filter field.
                         5. At the lower-left of the Sales Analysis Report window, click the
                            time interval 31 to show the report data.
                               Customer number 49633663 must be added to the report lines. This
                               is performed through the Analysis Line Template.
                         6. In the Analysis Line Template field, click the AssistButton to show
                            all the existing analysis line templates.


10-6        Microsoft Official Training Materials for Microsoft Dynamics ™
           Your use of this content is subject to your current services agreement
Chapter 10: Analysis and Reporting

              7. Select the analysis line template for this report that is named MY-
                 CUST, and then click Lines. The Sales Analysis Lines window
                 appears.
              8. Highlight the Key Accounts Total line and then click
                 FUNCTIONS→INSERT CUSTOMERS. The Customer List window
                 appears.
              9. Select Customer No. 49633663 and then click OK.
                  The program automatically brings in the customer information into
                  the report lines. Notice that the Customer Number is copied into the
                  Row Ref. No. field.


      NOTE: Row reference numbers are optional and are used to create formulas; they are
      not related to other number series in the program.

                  This demonstration uses row reference numbers in a formula to
                  calculate the Key Accounts Total amount. Modify the Sales
                  Analysis Lines window accordingly.


      NOTE: To use a row reference number in a formula, you must have at least one
      character in the Row Ref. No. field that is not a number.

              10. Change the Row. Ref. No. for customer 49633663 to A6.
              11. In the Range field on the Key Accounts Total line, modify the
                  formula in the range to A1..A6.
                  You can add the new customer account. Close the Sales Analysis
                  Lines window, the Analysis Line Template window, and return to
                  the Sales Analysis Report window. Notice the new customer appears
                  in the Sales Analysis Report.
                  View the Analysis Columns to determine the parameters set up to
                  analyze this data.
              12. In the Analysis Column Template field, click the AssistButton to
                  show all existing analysis column templates.
              13. Select analysis column template SALES and then click Columns.
                  The Analysis Columns window appears.
                  In the Column Header, you can view the columns used to create the
                  report. You can also view the formulas entered in the Formula field.
                  Look closer at the Analysis Type field.


              14. Click the AssistButton in one of the Analysis Type Code fields to
                  open the Analysis Type List window.
              15. Click the Setup button to view the filters for each analysis type.


 Microsoft Official Training Materials for Microsoft Dynamics ™                        10-7
Your use of this content is subject to your current services agreement
Trade in Microsoft Dynamics™ NAV5.0

                          16. Close the Analysis Types window, the Analysis Type List window,
                              and the Analysis Columns window to return to the Analysis Column
                              Templates window. Click OK.
                              Analysis reports let you drill down into the data to investigate the
                              results. You can drill down into any lines that pull information from
                              the ledgers. You cannot drill down into formula lines.
                          17. In the Analysis Report, in the Sales, Invoiced field, click the
                              AssistButton next to one of the amounts. The Value Entries window
                              appears letting you view the invoiced sales entries that make up the
                              data on the report line.
                          18. Close the Value Entries window.
                 The KA-SALES template can now provide the data the sales manager needs.

Demonstration − Creating Analysis Reports
                 This demonstration describes the process of creating a new analysis report.

                 Cronus needs a report that shows quantities purchased this year versus last year
                 for all the customers assigned to the Yellow location.

                 Steps
                 The first thing to do is define the report layout. Start by defining the lines for the
                 report. You do this by creating an Analysis Line Template.

                          1. From the Sales & Marketing menu, select ANALYSIS &
                             REPORTING→SETUP→ANALYSIS LINE TEMPLATES.

                          2. Select an empty line and type YELLOW in the Name field.
                          3. In the Description field, type Yellow Location Customers.
                          4. Click the Lines button. The Sales Analysis Lines window is
                             displayed.
                          5. Click the Functions button at the bottom of the window, and select
                             Insert Customers. The Customer List is displayed.
                          6. Filter on the Yellow Location.


                 HINT: With your pointer in the Location field, click the field filter button, and select
                 Yellow.

                          7. Select all customer lines and then click OK. The customer
                             information is copied into the sales analysis lines. Scroll up to view
                             the customers.
                          8. In the Sales Analysis Lines window, highlight the lines that contain
                             the customer names, click Functions, and then select Renumber
                             Lines.


10-8        Microsoft Official Training Materials for Microsoft Dynamics ™
           Your use of this content is subject to your current services agreement
Chapter 10: Analysis and Reporting

              9. In the Start Row Ref. No. field, enter Y1, and then click OK. Click
                 OK again to accept the message that appears.
              10. In the first blank row underneath the customer names, in the
                  Description field, type Yellow Location Customers Total.
              11. In the Type field, select Formula.
              12. In the Range field, enter Y1..Y34 to include all customer lines.
              13. Select the Bold field. If the Bold field is not displayed, use Show
                  Columns to add it.
              14. Close the Sales Analysis Lines window. The line template is now
                  set up.
      Define the columns for the report by creating an Analysis Column Template.

              1. From the Sales & Marketing menu, select ANALYSIS &
                 REPORTING→SETUP→ANALYSIS COLUMN TEMPLATES.

              2. Select an empty line and type QUANTITY in the Name field.
              3. In the Description field, type Quantity.
              4. Click the Columns button. The Sales Analysis Columns window is
                 displayed.
              5. Create the columns according to the following table. The Value
                 Type field is not listed in the table. This defaults in when the
                 Analysis Type Code is selected.

                                                             Ledger
       Column      Column                      Column
                                  Invoiced                   Entry         Formula
       No.         Header                      Type
                                                             Type
                   Quantity                    Net           Item
       A1                         Check
                   Invoiced                    Change        Entries
                   LY:
                                               Net           Item
       A2          Quantity       Check
                                               Change        Entries
                   Invoiced
                                                             Item          (A3-
       C1          Change %                    Formula
                                                             Entries       B3/B3)*100
                                               SALES-
       A1          Check                                     Always        One
                                               QTY
                                               SALES-
       A2          Check          -1Y                        Always        One
                                               QTY
       C1                                                    Always        One


              6. Close the Sales Analysis Columns window. The column template is
                 now set up.


 Microsoft Official Training Materials for Microsoft Dynamics ™                         10-9
Your use of this content is subject to your current services agreement
Trade in Microsoft Dynamics™ NAV5.0

                 Finally, create the report to analyze yellow location customers by quantity.

                         1. From the Sales & Marketing menu, select ANALYSIS &
                             REPORTING→ANALYSIS REPORTS.

                         2. In the Analysis Report Name field, click the AssistButton. The
                            Analysis Report Names window is displayed.
                         3. Select an empty line and type Quantity in the Name field.
                         4. In the Description field, type Location by Quantity.
                         5. In the Analysis Line Template Name field, select Yellow.
                         6. In the Analysis Column Template Name field, select Quantity.
                         7. Click OK. The Sales Analysis Report window is displayed.
                         8. In the lower-left corner of the Sales Analysis Report window, click
                            the time interval 12 to view numbers over a 12 month period.
                         9. Locate the period 01/01/08..12/31/08.
                             The report now contains quantity statistics for the yellow location
                             customers for the current and previous years.
                             Modify the report to show only those customers who bought from
                             Cronus this year or last year.
                         10. Click the AssistButton in the Analysis Line Template field.
                         11. Verify the line for the Yellow template is still highlighted, and then
                             click the Lines button.
                         12. In the Sales Analysis Lines window, in the Show field, select If
                             Any Column Not Zero for all the lines.
                         13. Close the window, and then click OK in the Analysis Line
                             Templates window to return to the Analysis Report.
                 The report lists only customers who bought from Cronus in the current or
                 previous year.

Demonstration − Using Customer and Item Groups
                 When creating the Analysis Report line templates, you cannot select customer
                 groups, item groups, or salespeople without setting up a corresponding dimension
                 in an Analysis View Card.

                 Define customer groups and salespeople as dimensions in SALES &
                 MARKETING→SETUP→SALES & RECEIVABLES SETUP.     Before use in an Analysis
                 View Card, product groups must be defined as dimensions in
                 WAREHOUSE→SETUP→INVENTORY SETUP.


10-10       Microsoft Official Training Materials for Microsoft Dynamics ™
           Your use of this content is subject to your current services agreement
Chapter 10: Analysis and Reporting


      NOTE: To use groups of objects in analysis reports, you have to have Advanced
      Dimensions. Generally, the two global dimensions are used for other reporting entities
      and are not available for analysis report grouping.

      Next, set up customer and item groups and salespeople as dimensions in an
      Analysis View Card. Click SALES & MARKETING→ANALYSIS &
      REPORTING→SETUP→ANALYSIS VIEW CARD→ANALYSIS BUTTON→LIST to review the
      analysis view codes and associated dimensions set up by default.

      NOTE: You cannot use customer or item groups in an Analysis Lines Template unless
      you select the appropriate Analysis View Code in the Analysis Lines Template window.
      The program lets you add customer and item groups in the Sales Analysis Lines.
      However, you receive an error message when you try to use the Analysis Lines
      Template in a report.

      An Analysis View Card exists for customers who have the dimensions for
      Customer Groups and Salespeople. Review the setup of this Analysis View Card,
      and demonstrate how to use customer groups in a report.

      Steps
      Perform the following steps to review the card:

              1. From the Sales & Marketing menu, select analysis &
                 reporting→setup→analysis view card. The Analysis View Card is
                 displayed.


      FIGURE 10-4: SALES - ANALYSIS VIEW CARD

              2. Click the Analysis button and select List.
              3. Highlight the line with the Customers Code and then click OK. The
                 Customers Sales Analysis View Card appears.
              4. Click the Dimensions tab.


 Microsoft Official Training Materials for Microsoft Dynamics ™                          10-11
Your use of this content is subject to your current services agreement
Trade in Microsoft Dynamics™ NAV5.0

                              Up to three dimensions can be selected for each Analysis View. The
                              Customer Group and Salesperson dimensions are selected. You can
                              also set filters on dimensions not included in the analysis view by
                              clicking the Analysis button and selecting Filters. No additional
                              filters have been set on the Customers Analysis View Card.
                         5. Click the General tab. Notice that the Update on Posting field is
                            clear.
                         6. To verify the data is current, click the Update button.


                 NOTE: If you have not selected the Update on Posting field, you must click Update on
                 the analysis view card or use the Update Analysis View batch job to ensure that an
                 analysis view is updated with the newest posted entries.

                         7. Close the Sales Analysis View Card.

Demonstration − Analyzing Quantity Purchased by Customer
Groups
                 This demonstration modifies the Analysis Report that you created in the
                 demonstration “Creating Analysis Reports” to analyze quantity purchased by
                 customer groups.

                 Steps
                 Perform the following steps to perform the analysis:

                         1. From the Sales & Marketing menu, select ANALYSIS &
                            REPORTING→ANALYSIS REPORTS. The Analysis Report Names
                            window is displayed.
                         2. Click the AssistButton in the Analysis Report Name field and
                            select the report named Quantity. Click OK. The Location by
                            Quantity Sales Analysis Report is displayed.
                              Change the line template to show customer groups instead of yellow
                              location customers.
                         3. In the Analysis Line Template Name field, click the AssistButton.
                            The Analysis Line Templates window is displayed.
                         4. Notice that the template named CUSTGROUPS has the item
                            Analysis View Code CUSTOMERS selected.
                         5. Select the CUSTGROUPS template and then click OK. The
                            Analysis Report contains CUSTGROUPS in the Analysis Line
                            Template field.
                         6. Press ENTER, and the information in the report is updated to show
                            Quantity statistics per customer group.


10-12       Microsoft Official Training Materials for Microsoft Dynamics ™
           Your use of this content is subject to your current services agreement
Chapter 10: Analysis and Reporting

                Viewing and Presenting Analysis Reports
                You can modify and present reports in a variety of ways:

                        •   Click the Print button on the Analysis Report window to preview
                            and print the report from the screen.
                        •   Export the report to Excel by clicking the Functions button and
                            selecting Export to Excel. In the Excel program, use Excel’s
                            features to present the report.
                        •   View the report in a graphical format using the bar chart feature.

Demonstration − Using the Bar Chart Feature
                The following demonstration uses the bar chart feature. The demonstration
                continues from the demonstration, “Customize Analysis Reports.”

                The Cronus sales manager has to demonstrate to the sales staff the January
                turnover for their top three customers.

                Steps
                Perform the following steps to use the bar chart:

                        1. From the Sales & Marketing menu, click ANALYSIS &
                            REPORTING→ANALYSIS REPORTS.

                        2. Select the Analysis Report from the first demonstration, "Customize
                           Analysis Reports":
                            –   Analysis Report Name = KA-SALES
                            –   Analysis Line Template = MY-CUST
                            –   Analysis Column Template = SALES
                            –   Date Filter = 01/01/08..01/31/08

                        3. Highlight analysis report lines A1, A2, and A6 by holding down the
                           CTRL key while selecting each line. These are the customers who
                           have the highest sales totals.
                        4. Click FUNCTIONS→SHOW BAR CHART. The Analysis Line Bar Chart
                           window appears.
                This window provides turnover information for these three customers in a
                graphical view.

                NOTE: You cannot present more than three lines from the Analysis Report window in
                the bar chart view.


           Microsoft Official Training Materials for Microsoft Dynamics ™                     10-13
          Your use of this content is subject to your current services agreement
Trade in Microsoft Dynamics™ NAV5.0


Lab 10.1 − Creating Analysis Reports
                 Scenario: Create a report that displays sales by sales representatives
                 (Salespersons) for January 2008.

                 Challenge Yourself!
                 The requirements for the report are as follows:

                         1. The report must be broken down by invoiced sales and those that
                            have not been invoiced
                         2. The report must include a line that displays total sales by salespeople
                            at the bottom.
                         3. Modify the report to show only those salespeople who recorded sales
                            in January 2008.
                         4. As soon as it is complete, present the report as a bar chart.


                 NOTE: Only Sales Representatives assigned the Salesperson Dimension code are
                 included in this report.


                 HINT: Set up an Analysis View Card with the Salesperson dimensions and add it to the
                 Analysis Lines Template before selecting salespeople in an Analysis Report.


                 HINT: Review the existing report templates to see whether you can reuse or modify an
                 existing report.

                 Need a Little Help?
                 The solution is provided in Appendix C.


10-14       Microsoft Official Training Materials for Microsoft Dynamics ™
           Your use of this content is subject to your current services agreement
Chapter 10: Analysis and Reporting


Analysis by Dimensions
               To analyze information by using multiple dimensions, use the Analysis by
               Dimensions feature found in Sales & Marketing or in Purchases in ANALYSIS &
               REPORTING→ANALYSIS BY DIMENSIONS. This function lets you view amounts
               derived from analysis views.

               With analysis by dimensions, you can:

                       •   Combine dimensions
                       •   Filter entries
                       •   Explore data from different perspectives
                       •   View net change or balance at date numbers
                       •   Select time periods

               You cannot print this information directly. It can be exported to Excel and all
               Excel’s tools can be used to create presentations and print data.

               Use Analysis Views to analyze multiple dimensions: Customers, customer
               groups, or salespeople versus items or item groups in term of actual or budgeted
               amounts or quantities. As soon as a group is set up as a dimension, it can be
               added to an analysis report and analysis view by dimensions. These groups are
               set up in the Analysis View Card. Refer to the previous section about how to use
               customer and item groups for more information about Analysis View Cards.

Demonstration − Using Analysis by Dimensions
               In this demonstration, a purchase analysis by dimensions is created and used to
               explore the analysis by dimensions features.

               Cronus must determine the cost amount of the inventory at each location. They
               want to filter by purchaser and by specific business groups. This requires the
               following dimensions:

                       •   Location
                       •   Purchaser
                       •   Business group


          Microsoft Official Training Materials for Microsoft Dynamics ™                     10-15
         Your use of this content is subject to your current services agreement
Trade in Microsoft Dynamics™ NAV5.0


                 Steps
                 First, create an Analysis View Card with the dimensions to analyze. Because the
                 location dimension is available in the Analysis by Dimensions window, the
                 Analysis View Card only has to be set up with the purchaser and business group
                 dimensions.

                         1. From the Purchase menu, select ANALYSIS &
                            REPORTING→SETUP→ANALYSIS VIEW CARD.

                         2. In the Code field, press F3 to create a new card.
                         3. Type PURCHASER in the Code field and Purchaser in the
                            Description field.
                         4. Enter the work date in the Starting Date field.
                         5. Select the Include Budgets field.
                         6. Click the Dimensions tab.
                         7. In the Dimension 1 Code field, enter Purchaser.
                         8. In the Dimension 2 Code field, enter Business Group.
                         9. Click the Update button.
                         10. Close the Analysis View Card.


                 Use the Analysis View set up in the Analysis by Dimensions window.

                         1. From the Purchase menu, select ANALYSIS & REPORTING→ANALYSIS BY
                             DIMENSIONS.

                         2. Click the AssistButton in the Analysis View Code window, and
                            select the Purchaser Analysis View Code. Click OK.
                         3. In the Show as Lines field, select Location.
                         4. In the Show as Columns field, select Period.
                         5. Select Cost Amount in the Show Value As field.
                             In the report lines and columns, view the Total Quantity and Total
                             Cost by location by time period.
                         6. In the Show Value As field, select Quantity. Notice that the amount
                            in the time period columns changes to a quantity instead of the cost
                            amount.
                             Now filter these results by salesperson and business group.
                         7. Select the Filters tab.
                             Notice that the filters on the right side of this form are from the Sales
                             Analysis View Card that we created.


10-16       Microsoft Official Training Materials for Microsoft Dynamics ™
           Your use of this content is subject to your current services agreement
Chapter 10: Analysis and Reporting

               8. In the Purchaser Filter field, select RL.
               9. In the Businessgroup Filter field, select INDUSTRIAL. Tab off the
                  field to update the information in the table.
                   Review the additional functions available on this form.
               10. Click the Options tab.
                   Here, you find additional options for viewing data.


               11. Click the Functions button, and then click Reverse Lines and
                   Columns. The locations and time periods switch positions on the
                   window.
      From the Function button you can also export data to Microsoft Excel.

      NOTE: There is some special functionality built into this particular integration to
      Excel. Therefore you do not receive the same result by using the Excel icon in the
      toolbar in this special case.


 Microsoft Official Training Materials for Microsoft Dynamics ™                             10-17
Your use of this content is subject to your current services agreement
Trade in Microsoft Dynamics™ NAV5.0


Lab 10.2 − Performing Analysis by Dimensions
                 Scenario: You are the sales manager at Cronus and have to analyze item sales by
                 area.

                 Challenge Yourself!
                 The analysis needs the following parameters:

                         •   The analysis includes items with item numbers from 1896-S to
                             766BV-C.
                         •   The analysis is for the year 2008.

                             As soon as the Sales Analysis by Dimensions window contains the
                             item sales by area information, follow these steps.

                         1. Compare the sales sold by John Roberts with those by Peter Saddow.
                         2. View the analysis as the sales amount, COGS amount, and quantity.
                         3. Export the sales amount by John Roberts to an Excel workbook.


                 HINT: Use the following dimensions: Area, Salesperson.


                 Need a Little Help?
                 The solution is provided in Appendix C.


10-18       Microsoft Official Training Materials for Microsoft Dynamics ™
           Your use of this content is subject to your current services agreement
Chapter 10: Analysis and Reporting


Sales and Purchase Budgets
               Use Sales and Purchase budget functionality for planning, forecasting, and
               tracking against performance.

               Access Sales and purchase budgets from the Analysis & Reporting menu option
               found in the Sales & Marketing menu and in the Purchase menu.

               From Sales & Marketing, click ANALYSIS & REPORTING→BUDGETS. The Sales
               Budget Overview window is displayed.


               FIGURE 10-5: SALES BUDGET OVERVIEW CARD

               Select a budget to view by clicking the AssistButton in the Item Budget Name
               field. The Item Budget List is displayed. Select a budget and then click OK.

               Entering Budget Numbers
               As soon as a budget is created, decide how to enter data. On the Sales Budget
               form, in the Show Value As field, choices include Sales Amount, COGS
               Amount, and Quantity. When you create purchase budgets, choices in the Show
               Value as field are Cost Amount and Quantity.

               When you show values as a quantity, values are totaled in the Budgeted
               Quantity field on the left half of the window. When you view values as an
               amount, the values are totaled in the Budgeted Sales Amount or Budgeted Cost
               Amount field (depending on whether you enter a sales or a purchase budget) on
               the left half of the window.

               Clicking the AssistButton in a number field opens the Item Budget Entries
               window. Here you can define additional information about the budget entry.
               Explanations for each field can be found in Online Help.


          Microsoft Official Training Materials for Microsoft Dynamics ™                    10-19
         Your use of this content is subject to your current services agreement
Trade in Microsoft Dynamics™ NAV5.0


Demonstration − Creating a Purchase Budget
                 This demonstration describes the process of creating a purchase budget.

                 The Cronus purchasing manager has to create a budget to forecast what each
                 purchasing agent can spend per vendor for January through April 2008. This
                 requires a new budget to be set up in Microsoft Dynamics NAV.

                 Steps
                 To create a new purchase budget:

                         1. From the Purchase menu, click ANALYSIS & REPORTING→BUDGETS.
                         2. In the Item Budget Name field, click the AssistButton. The Item
                            Budget Names window is displayed.
                         3. Select an empty line and type PURCHASE in the Name field and
                            Purchase in the Description field.
                         4. In the Budget Dimension 1 Code field, select PURCHASER.
                             You can select up to three dimensions for each budget.
                         5. Click OK and the Budget Overview window displays again, with
                            the Purchase budget in the Item Budget Name field.
                         6. In the Show as Lines field, enter Vendor.
                         7. In the Show as Columns field, enter Period.
                         8. In the Date Filter field, enter 01/01/08..04/01/08.
                         9. In the Show Value As field, select Cost Amount.
                         10. On the lower-left of the Purchase Overview Budget window, click
                             the time interval 31 to see the time periods by month.
                         11. Select the Options tab, and select 1 in the Rounding Factor field.
                         12. Select the Show Column Name field.
                             Next, select a purchaser for this budget. This requires a filter.
                         13. Click the Filters tab.
                         14. In the Purchaser Filter field, select MH.
                             This budget for purchaser MH only has to include some specific
                             large vendors. Therefore, filter out the vendors you do not have to
                             consider.


10-20       Microsoft Official Training Materials for Microsoft Dynamics ™
           Your use of this content is subject to your current services agreement
Chapter 10: Analysis and Reporting

                       15. Click the General tab.
                       16. In the Vendor Filter field, enter the range 30000..62000, or use the
                           AssistButton to select these entries.
                           After you set up a budget with the vendors, purchaser, and time
                           periods, start entering budget figures.
                       17. Fill in the values according to the following chart:


                Name                           January      February      March       April

                CoolWood Technologies          300          300           1200        300
                Lewis Home Furniture
                Service Electronics Ltd.       1200         1200          1600        1200
                Grassblue Ltd.                 240          600           240         240
                Electronics Ltd.               1600         3000          4200        4200
                WalkerHolland

                       18. Select a budget number and then click the drill-down arrow to the
                           right of the number. The Item Budget Entries table appears.
                           Here you can enter a description for the budget entry, and assign
                           dimensions and add other information.
                       19. Close the Item Budget Entries table.
               The budget for purchaser MH is finished.

               In this demonstration, you created a budget for one of the purchasing agents.
               Steps 13-19 can be repeated as many times as necessary to create budgets for all
               purchasing agents in the company.

Demonstration − Exporting Budgets to Excel
               The sales and purchase budgets can be exported to and modified in Excel, and
               then imported back into Microsoft Dynamics NAV. This demonstration describes
               the steps to export and import a budget and view the results.

               Now that the purchase budget for purchasing agent MH has been created, the
               Cronus purchasing manager has to send it to the purchasing agent (purchaser) for
               feedback. The purchasing agent is on the road and does not have access to
               Microsoft Dynamics NAV. The purchasing manager has to export the budget to
               Excel and send it to the purchasing agent for changes. After changes are made,
               the purchasing manager has to import the changes into the budget in Microsoft
               Dynamics NAV.


          Microsoft Official Training Materials for Microsoft Dynamics ™                     10-21
         Your use of this content is subject to your current services agreement
Trade in Microsoft Dynamics™ NAV5.0


                 Steps
                 Perform the following steps to export the budget:

                         1. From the Purchase menu, click ANALYSIS & REPORTING→BUDGETS.
                         2. In the Budget Name field, select Purchase. The purchase budget is
                            displayed.
                         3. Click the Functions button, and select Export to Excel.
                         4. Select Create Workbook in the Options field.
                         5. As soon as the data has finished processing, open the Microsoft
                            Excel workbook.
                             The filters that set in Microsoft Dynamics NAV are visible in the
                             Excel worksheet. By default, the program has named the worksheet
                             "Budget."
                         6. Save the workbook as Purchase Budget.xls
                             At this point, the purchasing manager sends the Excel Worksheet to
                             the purchasing agent.
                             The purchasing agent receives the budget and makes any necessary
                             changes.
                         7. Make the following changes to the budget and save the workbook:
                             –   For Vendor 30000, change the January number to 600
                             –   For Vendor 50000, change the January number to 2000

                         8. Save and close the modified workbook.
                         9. From the Budget window in Microsoft Dynamics NAV, click the
                            Functions button and select Import from Excel. The following
                            window appears:


                             FIGURE 10-6: IMPORT ITEM BUDGET FROM EXCEL WINDOW


10-22       Microsoft Official Training Materials for Microsoft Dynamics ™
           Your use of this content is subject to your current services agreement
Chapter 10: Analysis and Reporting

                       10. In the Workbook File Name field, find the location where you
                           saved the Excel Worksheet and select Purchase Budget.
                       11. Select Budget in the Worksheet Name field.
                       12. Make sure that the fields are filled in as follows:

                            Budget Name             Purchase
                            Option                  Replace entries
                            Description             Imported from Excel 01/25/08
                            Import Value as         Cost Amount

                       13. Click Yes to replace the existing entries, and accept the message that
                           appears.
               The Microsoft Dynamics NAV budget has been updated with the new numbers
               for January.

Demonstration − Using Budgets in Analysis Reports
               The sales and purchase budgets can be used in analysis reports to track budgeted
               amounts against actuals. This demonstration shows how to use budgets in
               analysis reports.

               Steps
               The sales manager at Cronus has to compare the company’s customer sales
               against the company’s budget figures.

                       1. On the Sales & Marketing menu, click ANALYSIS &
                          REPORTING→ANALYSIS REPORTS. The Sales Analysis Report window
                          appears.
                       2. Click the AssistButton in the Analysis Report Name field.
                           The analysis report named CUST1-BUDG shows actual amounts
                           against budgeted amounts per customer group.
                       3. Select CUST1-BUDG and then click OK.
                           Next, select the budget to use for the comparison.
                       4. In the Sales Analysis Report window, in the Item Budget Filter
                          field, click the AssistButton to open the Item Budget Names
                          window.
                       5. Select item budget BUDGET 01 and then click OK.
               The Sales Analysis Report window shows the actual amounts compared with
               the budgeted amounts.


          Microsoft Official Training Materials for Microsoft Dynamics ™                    10-23
         Your use of this content is subject to your current services agreement
Trade in Microsoft Dynamics™ NAV5.0


Lab 10.3 − Creating a Sales Budget
                 Scenario: Create a sales forecast for sales representative (salesperson) Linda
                 Martin using the Sales Budget function.


                 Challenge Yourself!
                 The budget must meet these requirements:

                         •   The budget covers January through June 2008.
                         •   The budget will show the quantities you expect Linda Martin to sell
                             of items 8904-W through 8924-W.
                             After setting up the sales budget, export it to Excel for feedback from
                             Linda Martin in the field.


                         1. Update the Excel Worksheet with changes to the budget.
                         2. Import the changes back into Microsoft Dynamics NAV.

                 Need a Little Help?
                 The solution is provided in Appendix C.


10-24       Microsoft Official Training Materials for Microsoft Dynamics ™
           Your use of this content is subject to your current services agreement
Chapter 10: Analysis and Reporting


Conclusion
               The analysis reporting and budgeting functionality in Microsoft Dynamics™
               NAV is important when presenting information about the company for the
               management and other roles that analyze performance. It is easy to use without a
               background in finance or accounting.

               The reporting functionality can be customized in many ways to suit the
               individual company’s needs. Variance can be calculated and budget figures can
               be moved between Microsoft Dynamics NAV and Microsoft® Excel.

               The budgets functionality can be used to make sales budgets and purchase
               budgets on a detailed level. Budget version control is supported and working on
               individual budgets at the same time. Finally, comparing analysis report data
               against budgets is made easy by using dimensions and dimension filters.


          Microsoft Official Training Materials for Microsoft Dynamics ™                  10-25
         Your use of this content is subject to your current services agreement
Trade in Microsoft Dynamics™ NAV5.0


Quick Interaction: Lessons Learned
                 Take a moment and write down three key points you have learned from this
                 chapter:

                 1.


                 2.


                 3.


10-26       Microsoft Official Training Materials for Microsoft Dynamics ™
           Your use of this content is subject to your current services agreement
Appendix A: Terminology List


APPENDIX A: TERMINOLOGY LIST
                This appendix contains the terminology list for the inventory application area in
                Microsoft Dynamics™ NAV.

Inventory Terminology List
                Cross-dock
                This means to move items directly from the receiving area to the shipping area,
                minimizing handling and storage and enabling sales orders to be shipped sooner.

                NOTE: The program compares inventory receipts with outstanding sales orders and
                indicates that a cross-docking opportunity is available.


                Delivery Note
                This is a note that accompanies a shipment and lists the items in the shipment.
                Synonyms: advice note, accompanying note, dispatch note, covering note
                Inventory
                This contains items held in a store or warehouse and purchased for resale, items
                supporting production (raw materials and work-in-process), and items for
                maintenance activities (including repair and operating supplies). Inventory is
                calculated as the quantity of an item available.
                Item
                This is a manufactured or purchased article, product, part, or material that is part
                of inventory. If a company has several locations, it stores inventory control
                information about items or item variants at a location in the stockkeeping unit for
                the item or item variant at that location.
                Item Substitute
                This is an item offered to a customer as a substitute for an item that is not
                available.
                Lead Time
                This indicates the time between recognition of the need for an order and the
                receipt of goods. Individual components of lead time can include order
                preparation time, queue time, processing time, move or transportation time, and
                receiving and inspection time.
                Location
                This is a physical structure or place where inventory is received, stored, and
                shipped. A location can be a warehouse, service car, showroom, plant, or area
                within a plant.


           Microsoft Official Training Materials for Microsoft Dynamics ™                         A-1
          Your use of this content is subject to your current services agreement
Trade in Microsoft Dynamics™ NAV5.0

                 Negative Adjustment
                 This is a reduction in inventory that is not due to a sale.
                 Nonstock Item
                 This is an item a company sells but does not carry in inventory. A nonstock item
                 is frequently an item in a vendor catalog, also referred to as a catalog item.
                 Order Date
                 This indicates the date on which the vendor must ship the items to meet the
                 planned receipt date.
                 Physical Inventory Abbreviation: Phys. Invt.
                 This is the determination of inventory quantity by the counting of items. This is
                 performed on a continuous, periodic, or annual basis.
                 Pick
                 This means to physically withdraw from inventory items to be shipped or
                 components of items to be assembled and shipped.
                 Positive Adjustment
                 This refers to an increase in inventory that is not because of a purchase.
                 Put Away
                 This means to remove the item from the receiving area, transport it to a specific
                 location in a storage area, and record the movement and the exact location of the
                 item.
                 Receipt
                 This is the physical acceptance of an item at a location. A Warehouse Worker
                 immediately registers the receipt of an item in the system. But the item is not a
                 part of available to pick inventory until it is put away.
                 Receiving
                 This is the function that includes the physical receipt of items, the inspection of
                 the items for conformance to the purchase order (quantity and damage), the
                 putting away of items, and the preparation of the receiving report.
                 Release
                 This means to send a document to the next stage of processing without posting
                 the document. You cannot change information on a released document unless it
                 is reopened.

                     EXAMPLE: A sales order is released to the warehouse. The order is then among the
                     source documents from which the warehouse can retrieve lines to be assigned picked
                     and shipped.


                 Reservation
                 This is the designation of a quantity of inventory on a purchase order for a
                 specific sales order or production schedule.


A-2         Microsoft Official Training Materials for Microsoft Dynamics ™
           Your use of this content is subject to your current services agreement
Appendix A: Terminology List

      Responsibility Center Abbreviation: Resp. Ctr.
      This is an organizational unit to which a company assigns duties or activities.

      NOTE: A responsibility center can be a cost center or a profit center. Examples are a
      sales office that sells items from one or more locations, a purchasing office for one or
      several locations, a service unit, a production-planning unit, and a branch office with
      responsibility for sales, purchases, and cost accounting. A responsibility center
      assigned responsibility for a location accounts for location inventory in monetary
      terms, while the location is responsible for the physical inventory count.


      Safety Lead Time
      This is an element of time added to normal lead time to protect against
      fluctuations in lead time so that an order can be completed before its real need
      date.
      Shipment Date
      This refers to the date a shipment leaves the location for delivery to a customer,
      either with a shipping agent or your own means of transportation.
      Source Document
      This is the original evidence of a transaction that supports journal entries in the
      accounting system.

         EXAMPLE: Vouchers and contracts but also internal documents that create
         journal entries such as a sales transfer or purchase order or an internal freight
         charge.


      Specific Item
      This is an individual item distinguished by a unique identification number.
      Stockkeeping Unit Abbreviation: SKU
      This is a unit for inventory control that concerns items and item variants at
      specific locations.
      Transfer Order
      This refers to an order to move items from one location to another.
      Warehouse Abbreviation: Whse.
      This is a building or part of a building where items are received, stored, and
      shipped. Therefore, it is a particular kind of location.
      Synonyms: distribution center, branch warehouse, field warehouse.
      Warehouse Activity
      This refers to an activity in the Warehouse Management application area. Each
      activity has its own menu item.


 Microsoft Official Training Materials for Microsoft Dynamics ™                                  A-3
Your use of this content is subject to your current services agreement
Trade in Microsoft Dynamics™ NAV5.0


List of Sales Batch Jobs, Reports, and Sales Documents
                 Sales Batch Jobs
                 There are several batch jobs that are designed to help in the daily sales work.
                 Some of these batch jobs are found in the Financial Management menu, and other
                 batch jobs are found in the Sales & Marketing menu. These batch jobs are as
                 follows:

                 FINANCIAL MANAGEMENT→RECEIVABLES→PERIODIC ACTIVITIES


                         •   Recurring Journals. Use the Recurring General Journal window to
                             post transactions that recur with few or no changes to G/L, bank,
                             customer, vendor, and fixed assets accounts. In a recurring general
                             journal, enter information for the transaction, such as the posting
                             date, amount, and posting accounts.

                             You can enter information about how often the transaction is posted.
                             You can also specify automatic reversal the day after the posting date
                             and allocate an amount among several accounts. The information in a
                             journal is temporary and can be changed until you post the journal.
                         •   Reminders/Issued Reminders. A reminder is a document that
                             reminds your customer of an outstanding balance. Refer to the
                             Financial Management training manual for more information about
                             how to create reminders.
                         •   Finance Charge Memos/Issued Finance Charge Memos. A
                             finance charge memo is a document that contains information about
                             calculated interest on outstanding balances. Refer to the Financial
                             Management training manual for more information about the finance
                             charge memo functionality.

                 FINANCIAL MANAGEMENT→RECEIVABLES


                         •   Combined Shipments. Use this batch job for sales orders that have
                             been shipped but not invoiced. The batch job gathers all the un-
                             invoiced shipments into one invoice or multiple invoices. You can
                             also post invoices automatically as part of the batch job, and decide
                             whether the batch job calculates the invoice discount.

                 SALES & MARKETING→ORDER PROCESSING→BIZTALK SALES DOCUMENTS


                         •   BizTalk Inbound Documents, BizTalk Outbound Documents.
                             Learn more about these functions in the Commerce Gateway training
                             manual.


A-4         Microsoft Official Training Materials for Microsoft Dynamics ™
           Your use of this content is subject to your current services agreement
Appendix A: Terminology List

      There are several batch jobs available in the Administration menu to help manage
      sales documents. These batch jobs are as follows:

      ADMINISTRATION→IT ADMINISTRATION→DATA DELETION→SALES DOCUMENTS


              •   Delete Invoiced Sales Orders. This batch job deletes sales orders
                  that have been shipped and invoiced. Only fully invoiced orders are
                  deleted. If there are comments on the orders, they are also deleted.
                  You can use the batch job after you have used the facilities for
                  combining shipments; that is, the Get Shipment function on the sales
                  invoices or the Combine Shipments batch job.
              •   Delete Invoiced Blanket Sales Orders. This batch job deletes
                  blanket sales orders that have been shipped and invoiced. Only fully
                  invoiced blanket orders are deleted. Comments on blanket orders are
                  also deleted.
              •   Delete Invoiced Sales Return Orders. This batch job deletes sales
                  return orders that have been received and invoiced. Only fully
                  invoiced return orders are deleted. Comments on return orders are
                  also deleted.
              •   Delete Archived Sales Quote Versions. This batch job deletes
                  archived versions of the sales quotes that have been deleted. Select
                  the sales order numbers, dates, and customers for the orders to
                  delete.
              •   Delete Archived Sales Order Versions. This batch job deletes
                  archived versions of the sales orders that have been deleted. You can
                  select the sales order numbers, dates, and customers for the orders
                  you want to delete.
              •   Delete Expired or Rejected Quotes. This batch job deletes sales
                  quotes that have either expired or been rejected by the customer. It is
                  possible to delete only the expired quotes, only the rejected quotes,
                  or both. When deleting expired quotes, the program checks that only
                  expired quotes with a status Requested by Customer are deleted.

      ADMINISTRATION→IT ADMINISTRATION→DATA DELETION→DATE COMPRESSION


              •   Customer Ledger Entries. This batch job compresses customer
                  ledger entries; that is, it aggregates them so that they use less space.
                  It is only possible to compress entries from closed fiscal years, and
                  only customer ledger entries with the Open field clear (meaning they
                  have been closed by payments).


 Microsoft Official Training Materials for Microsoft Dynamics ™                       A-5
Your use of this content is subject to your current services agreement
Trade in Microsoft Dynamics™ NAV5.0


                 Sales Reports
                 Microsoft Dynamics NAV provides a variety of sales reports. Most of the reports
                 used for Trade can be found in Sales & Marketing. Other reports can be found in
                 Financial Management. For convenience and efficiency, some reports are
                 available under more than one folder. The following is a list of the standard sales
                 reports and their location.

                 SALES & MARKETING→ORDER PROCESSING→REPORTS


                  Customer – Order Detail and              Sales Invoice Nos.
                  Summary
                  Sales Statistics                         EC Sales List
                  Customer/Item Sales                      Sales Reservation Avail.
                  Customer – Sales List

                 SALES & MARKETING→SALES→REPORTS→CUSTOMERS


                  Order Summary and Detail                 Balance to Date
                  Labels                                   Trial Balance
                  Top 10 List                              List
                  Customer/Item Sales                      Register
                  Sales List

                 SALES & MARKETING→SALES→REPORTS→SALESPEOPLE/TEAMS


                  Sales Statistics                         Salesperson To-dos
                  Salesperson Sales Statistics             Salesperson Opportunities
                  Salesperson Commission                   Team To-dos

                 SALES & MARKETING→INVENTORY & PRICING→REPORTS


                  Inventory Posting Test                   Price List
                  Inventory Availability                   Inventory Cost and Price List
                  Inventory Order Details                  Inventory – Sales Back Orders
                  Inventory Top 10 List                    Nonstock Item Sales
                  Inventory Sales Statistics               Item Substitutions
                  Inventory Customer Sales                 Item Charges – Specification


A-6         Microsoft Official Training Materials for Microsoft Dynamics ™
           Your use of this content is subject to your current services agreement
Appendix A: Terminology List

      FINANCIAL MANAGEMENT→RECEIVABLES→REPORTS


       Customer Detailed Aging                      Customer – Detail Trial Bal.
       Customer Document Nos.                       Customer – List
       Customer Register                            Customer – Summary Aging
       Customer – Balance to Date                   Customer – Summary Aging Simp.

      A report is a printout of information from the database. Each report can be run in
      different ways by setting filters and selecting various options. It is also possible
      to use dimensions when running reports.

      NOTE: The Salesperson reports and the Customer Statistics window in the program
      include Profit (LCY) amounts and Profit % calculations based on the Profit (LCY) field
      on the customer ledger entries. After the customer ledger entry is posted, the Profit
      (LCY) field is NOT updated for any purchase item charges increasing the costs
      assigned to the sale. This means that sales commissions may be based on incorrect
      profit figures. To receive profit figures for Sales Representatives based on the item
      value entries that reflect item charges, use the Customer/Item Sales report and filter for
      a specific salesperson on the Customer tab.


      Sales Documents
      All printable sales documents are located in either the Sales & Marketing or
      Financial Management main menus. These documents may include posted,
      unposted, and document test reports. Select a document and filter the documents
      to print.

      Clicking Print in the Posted Sales Invoice window gives the same printed
      document as printing the Sales – Invoice document.

      The following is a list of available sales documents.

      SALES & MARKETING→ORDER PROCESSING→DOCUMENTS


       Document Name                                Document Type
       Order Confirmation                           Unposted Document
       Sales – Quote                                Unposted Document
       Return Order                                 Unposted Document
       Blanket Sales Order                          Unposted Document
       Sales – Invoice                              Posted Document
       Sales - Credit Memo                          Posted Document


 Microsoft Official Training Materials for Microsoft Dynamics ™                               A-7
Your use of this content is subject to your current services agreement
Trade in Microsoft Dynamics™ NAV5.0


                  Document Name                           Document Type
                  Sales – Shipment                        Posted Document
                  Sales - Return Receipt                  Posted Document
                  Customer – Payment Receipt              Posted Document
                  Sales Document - Test                   Document Test Report

                 FINANCIAL MANAGEMENT→RECEIVABLES→DOCUMENTS


                  Document Name                           Document Type
                  Reminder – Test                         Document Test Report
                  Finance Charge Memo – Test              Document Test Report
                  Reminder                                Issued Document
                  Finance Charge Memo                     Issued Document
                  Statement                               See Customer Statements

                 Unposted documents can be printed under the Documents menu item. This
                 provides the possibility to print copies of unposted documents without having to
                 post them. This is useful when sending sales order confirmations to customers.

                 Customer Statements
                 This sales document provides a list of posted sales transactions for each customer
                 over a selected period of time. It can be set up to show all overdue balances,
                 regardless of the time period specified. For each currency, the report displays
                 open entries and, if specified in the report, overdue entries. The statement can be
                 sent to customers; for example, at the close of an accounting period or as a
                 reminder of overdue balances.

                 Select which customers to print statements for using filters on the Customer tab
                 of the Statement report. Specify if a customer receives a printed statement by
                 selecting the Print Statements field on the Payments tab of the customer card.
                 Select Yes in the Print Statements field on the Customer tab in the Statement
                 report to print statements for only the customers set up to receive printed
                 statements. If you do not select the Print Statements field in the Statement
                 report, the program will print statements for all customers unless additional
                 filtering is specified on the Customer tab of the Statement report.

                 Every time that a statement prints for a customer, the Last Statement No. field
                 on customer card updates by one.


A-8         Microsoft Official Training Materials for Microsoft Dynamics ™
           Your use of this content is subject to your current services agreement
Appendix A: Terminology List


List of Purchase Batch Jobs, Reports, and Purchase
Documents
                Purchase Batch Jobs
                There are several batch jobs available to help in the daily purchasing work. Some
                batch jobs are located in the Financial Management menu, and other batch jobs
                are located in the Purchase menu. The batch jobs are:

                FINANCIAL MANAGEMENT→PURCHASE→PERIODIC ACTIVITIES


                        •   Recurring Journals –Use the Recurring General Journal window to
                            post transactions that recur with few or no changes to G/L, bank,
                            customer, vendor, and fixed assets accounts. In a recurring general
                            journal, enter information for the transaction, such as the posting
                            date, amount and the posting accounts,and enter information about
                            how often the transaction posts.

                            It is also possible to specify automatic reversal the day after the
                            posting date and allocate an amount among several accounts.
                            Information in a journal is temporary and can be changed until you
                            post the journal.

                PURCHASE→PLANNING


                        •   Recurring Requisition Worksheet. Use this worksheet to post
                            transactions that occur with few or no changes, for example, ordering
                            the same amount of office supplies regularly.

                PURCHASE→ORDER PROCESSING→BIZTALK PURCHASE DOCUMENTS


                        •   BizTalk Inbound Documents, BizTalk Outbound Documents.
                            Learn more about these functions in the Commerce Gateway training
                            manual.

                Several batch jobs are available in the Administration menu to help manage
                purchase documents. These batch jobs are as follows:

                ADMINISTRATION→IT ADMINISTRATION→DATA DELETION→PURCHASE DOCUMENTS


                        •   Delete Invoiced Purchase Orders. This batch job deletes purchase
                            orders that have been received and invoiced. Only fully invoiced
                            orders and comments on the orders are deleted. Use the batch job
                            after using the Get Receipt Lines function on purchase invoices to
                            invoice one or more posted receipts, because this function does not
                            delete the orders.


           Microsoft Official Training Materials for Microsoft Dynamics ™                     A-9
          Your use of this content is subject to your current services agreement
Trade in Microsoft Dynamics™ NAV5.0

                         •   Delete Invoiced Blanket Purchase Orders. This batch job deletes
                             blanket purchase orders that have been received and invoiced. Only
                             fully invoiced blanket orders and comments on blanket orders are
                             deleted.
                         •   Delete Invoiced Purchase Return Orders. This batch job deletes
                             purchase return orders that have been shipped and invoiced. Only
                             fully invoiced return orders and comments on the return orders are
                             deleted.
                         •   Delete Archived Purchase Quote Versions. Use this batch job to
                             delete archived versions of deleted purchase quotes.
                         •   Delete Archived Purchase Order Versions. Use this batch job to
                             delete archived versions of deleted purchase orders.

                 ADMINISTRATION→IT ADMINISTRATION→DATA DELETION→DATE COMPRESSION


                         •   Vendor Ledger Entries. This batch job compresses vendor ledger
                             entries. This means it combines them so that they use less space. You
                             can only compress entries from closed fiscal years and only vendor
                             ledger entries where the Open field is clear.


                 Purchase Reports
                 The Purchase menu contains a variety of purchase reports. These reports can be
                 found in Planning and Order Processing. Additional reports are on the Financial
                 Management menu. For convenience and efficiency, some reports are available
                 under more than one folder. The following is a list of standard purchase reports
                 and their location:

                 PURCHASE→PLANNING→REPORTS


                  Purchase Reservation Avail.              Inventory Purchase Orders
                  Purchase Statistics                      Inventory – Availability Plan
                  Vendor Item Catalog                      Inventory – Cost Variance
                  Vendor – Balance to Date                 Inventory – Inbound Transfer
                  Vendor – Detail Trial Balance            Inventory – List
                  Vendor List                              Inventory – Vendor Purchases
                  Vendor Purchase List                     Item Substitutions
                  Vendor – Summary Aging                   Item/Vendor Catalog
                  Vendor – Top 10 List                     Nonstock Item Sales
                  Vendor – Trial Balance                   Prod. Order – Mat. Requisition
                  Vendor/Item Purchases                    Prod. Order – Shortage List
                  Inventory Cost and Price List


A-10        Microsoft Official Training Materials for Microsoft Dynamics ™
           Your use of this content is subject to your current services agreement
Appendix A: Terminology List

      PURCHASE→ORDER PROCESSING→REPORTS


       Vendor/Item Purchases                    Inventory Reorders
       Inventory Availability                   Inventory Transaction Detail
       Inventory Cost and Price List            Inventory – Vendor Purchases
       Inventory Posting – Test                 Item Charges – Specification
       Inventory Purchase Orders                Item Substitutions
       Inventory List                           Item/Vendor Catalog

      FINANCIAL MANAGEMENT→PAYABLES→REPORTS


       Aged Accounts Payable                    Vendor – Detail Trial Balance
       Payments on Hold                         Vendor – Labels
       Purchase Credit memo Nos.                Vendor – List
       Purchase Invoice Nos.                    Vendor – Order Detail
       Purchase Reservation Avail.              Vendor – Order Summary
       Purchase Statistics                      Vendor – Purchase List
       Vendor Document Nos.                     Vendor – Summary Aging
       Vendor Item Catalog                      Vendor – Top 10 List
       Vendor Register                          Vendor – Trial Balance
       Vendor – Balance to Date                 Vendor/Item Purchase

      A report is a printout of information from the database. Each report can be run
      different ways by setting filters and selecting options. You can also use
      dimensions when running reports.

      Purchase Documents
      A list of printable purchase documents is available from the Purchase main menu
      by clicking ORDER PROCESSING→DOCUMENTS. These documents may include
      posted, unposted, and document test reports. Select a document and filter the
      documents to print.

      Clicking Print in the Posted Purchase Invoice window gives the same printed
      document as printing the Purchase – Invoice document.


 Microsoft Official Training Materials for Microsoft Dynamics ™                     A-11
Your use of this content is subject to your current services agreement
Trade in Microsoft Dynamics™ NAV5.0

                 The following is the list of available purchase documents:

                  Document Name                         Document Type
                  Return Order Confirmation             Unposted Document
                  Quote                                 Unposted Document
                  Order                                 Unposted Document
                  Blanket Order                         Unposted Document
                  Invoice                               Posted Document
                  Credit Memo                           Posted Document
                  Receipt                               Posted Document
                  Return Shipment                       Posted Document
                  Purchase Document - Test              Document Test Report
                  Vendor – Payment Receipt              Issued Document

                 Because you can print unposted documents under the Documents menu item, the
                 program lets you print copies of unposted documents without posting. This is
                 useful, for example, to send return order confirmations to vendors.


A-12        Microsoft Official Training Materials for Microsoft Dynamics ™
           Your use of this content is subject to your current services agreement
Appendix B: Functionality and Licenses


APPENDIX B: FUNCTIONALITY AND LICENSES
                This appendix contains information about the parts that make up Microsoft
                Dynamics™ NAV for Trade. This includes a description and license
                requirements of each part.

Trade licenses in Microsoft Dynamics NAV
                Sales Order Management
                Description: Use this functionality to manage sales quotes, blanket sales orders,
                and sales order processes. The differences between setting up an invoice directly
                and setting up a sales order are:

                        •   Quantity available is adjusted when an amount is entered on a sales
                            order line, but is not affected by an invoice until the invoice is
                            posted.
                        •   Use Sales Order Management to manage partial shipments.
                        •   Shipping and invoicing can be done separately with Sales Order
                            Management.

                There is also a difference regarding the timeframe for the sale. There can be a
                long period between the time items are ordered and when they are sold. The
                functionality also enables you to use quotes and blanket orders in the sales phase.
                Quotes and blanket orders do not affect inventory figures.

                Requirements: Sales Invoicing

                Alternative Ship-Tos
                Description: Use this functionality when there are several invoicing and ship-to
                addresses. The ship-to addresses for a specific customer can be set up. For
                example, if you have a customer who is a contractor and requires delivery to
                different construction sites, use Alternative Ship-Tos.

                Requirements: Sales Invoicing


           Microsoft Official Training Materials for Microsoft Dynamics ™                       B-1
          Your use of this content is subject to your current services agreement
Trade in Microsoft Dynamics™ NAV5.0


                 Drop Shipments
                 Description: Use this functionality to link sales and purchase orders to one
                 another and when items are shipped directly from the vendor to the customer.

                 Drop Shipments enables you to handle items shipped directly from the vendor to
                 the customer without manual application of inventory entries. The invoicing
                 process is not affected by drop shipments. Drop Shipments is useful for
                 businesses that sell items that are shipped directly from the vendor to the
                 customer without being put in inventory.

                 Requirements: Sales Order Management and Purchase Order Management

                 Sales Representatives/Purchasing Agents
                 Description: Use this functionality to assign Purchasing Agents to vendors and
                 Sales Representatives to customers to keep track of purchases and sales per
                 person. Purchasing Agents (Purchasers) and Sales Representatives (Salespersons)
                 are tracked in the Vendor Ledger, Customer Ledger, Item Ledger, Job Ledger,
                 and Resource Ledger. Statistics generated about individual Sales Representatives
                 and Purchasing Agents based on this information can be used to calculate
                 commissions.

                 Requirements: Basic General Ledger

                 Shipping Agents
                 Description: Use this functionality to set up several Shipping Agents (UPS,
                 DHL, external carriers or own carriers) and relate their services (express,
                 overnight, standard) with shipping time. Shipping Agents can be used together
                 with Sales orders and Transfer orders.

                 Requirements: Sales Order Management

                 Sales Invoice Discounts
                 Description: Use this functionality to calculate invoice discounts automatically.
                 It is possible to set up any number of invoice discount terms for which a certain
                 minimum amount, discount percentage, and a service charge can be defined. This
                 can be done in both LCY and in foreign currencies. The discount is calculated on
                 individual item lines and becomes part of the net sum of the invoice.

                 Requirements: Sales Invoicing

                 Sales Line Discounting
                 Description: Use this functionality to work with customer discounts that are
                 customer-specific or customer group-specific. A discount can be shared among
                 several customers. With a line discount, negotiate the percentage that the
                 customer or customer discount group receives as a discount.

                 Requirements: Basic Inventory, Sales Invoicing


B-2         Microsoft Official Training Materials for Microsoft Dynamics ™
           Your use of this content is subject to your current services agreement
Appendix B: Functionality and Licenses


      Sales Line Pricing
      Description: Use this functionality to work with sales prices that are either
      customer specific or customer group specific. A sales price can be shared among
      several customers. With a sales price, negotiate the actual prices with the
      customer or customer price group.

      Requirements: Basic Inventory, Sales Invoicing

      Item Substitutions
      Description: Use this functionality to link items with the same or similar
      characteristics. If a customer orders an unavailable item, it helps to offer
      substitute items to avoid losing the sale; or providing an extra service to the
      customer by offering lower-cost alternatives.

      Requirements: Basic Inventory, Sales Order Management

      Item Cross References
      Description: Use this functionality to quickly and precisely identify the items a
      customer is ordering by item numbers other than your own. Cross-reference
      information from customers, vendors, manufacturers, generic numbers, universal
      product codes (UPCs), and European article numbers (EANs) can be stored and
      accessed.

      Requirements: Basic Inventory, Sales Order Management

      Nonstock Item Processing
      Description: Use this functionality to offer items that are not part of inventory,
      but can be ordered from an external vendor or manufacturer. Such items are
      registered as nonstock items, but are treated like any other item.

      Requirements: Basic Inventory, Sales Order Management

      Purchase Order Management
      Description: Use this functionality to manage purchase quotes, blanket orders,
      and purchase order processes. The differences between creating a purchase order
      and creating a purchase invoice directly are:

              •   Quantity available is adjusted as soon as an amount is entered on a
                  purchase order line. It is not affected by a purchase invoice until the
                  invoice is posted.
              •   The Purchase Order Management functionality can manage partial
                  receipts.


 Microsoft Official Training Materials for Microsoft Dynamics ™                         B-3
Your use of this content is subject to your current services agreement
Trade in Microsoft Dynamics™ NAV5.0

                         •   Receiving and invoicing can be done separately with the Purchase
                             Order Management functionality.
                         •   You can use quotes and blanket orders in the purchase phase. Quotes
                             and blanket orders do not affect inventory figures.

                 Requirements: Purchase Invoicing

                 Alternative Order Addresses
                 Description: Use this functionality for vendors with more than one order
                 address. The number of possible order addresses is unlimited.

                 Requirements: Purchase Invoicing

                 Alternative Vendors
                 Description: Use this functionality when purchasing the same items from several
                 different vendors. The functionality enables you to create alternative vendor and
                 price information for inventory items. It can be used when a company has several
                 possible vendors for the same items.

                 Requirements: Basic Inventory

                 Purchase Invoice Discounts
                 Description: Use this functionality to calculate invoice discounts automatically.
                 The discount can be different for vendors with different minimum amounts (also
                 in different currencies) and different rates, depending on the size of the invoice.
                 The discount is calculated on individual item lines and becomes part of the net
                 sum of the invoice.

                 Requirements: Purchase Invoicing

                 Purchase Line Pricing
                 Description: Use this functionality to work with vendor-specific purchase prices.
                 With a purchase price, negotiate the actual prices with the vendor.

                 Requirements: Basic Inventory and Purchase Invoicing

                 Purchase Line Discounting
                 Description: Use this functionality to work with vendor-specific purchase
                 discounts. With a line discount, negotiate the percentage the vendor offers as a
                 discount.

                 Requirements: Basic Inventory and Purchase Invoicing


B-4         Microsoft Official Training Materials for Microsoft Dynamics ™
           Your use of this content is subject to your current services agreement
Appendix B: Functionality and Licenses


      Requisition Management
      Description: Use this functionality to automate the requisition process.
      Requisition Management automatically generates suggested purchases based on a
      variety of data such as minimum and maximum quantities, reorder quantities, and
      so on.

      Requirements: Purchase Order Management and Basic Inventory

      Item Charges
      Description: Use this functionality to include the value of additional cost
      components into the unit cost or unit price of an item. Such cost components can
      be freight, insurance, or other costs related to the item.

      Requirements: Basic Inventory

      Order Promising
      Description: Use this functionality to calculate availability dates and delivery
      dates. If the customer requests a delivery date, you can find out if it is possible to
      deliver on that date. You can also calculate a possible delivery date, based on
      lead time or production time, if you have nothing in inventory.

      Requirements: Basic Inventory, Sales Order Management, Calendars

      Sales Return Order Management
      Description: Use this functionality to handle all aspects of customer returns.
      Sales return order management enables you to receive goods back from the
      customers and process related transactions from one entry point. It is possible to
      process partial return receipts and combine return receipts in one credit memo.

      Requirements: Basic Inventory, Sales Order Management

      Purchase Return Order Management
      Description: Use this functionality to ship goods back to the vendor and process
      related transactions from one entry point. It is possible to do partial return
      shipments and combine return shipments in one credit memo.

      Requirements: Basic Inventory, Purchase Order Management

      Calendars
      Description: Use this functionality to set up calendars with working and non-
      working days. A base calendar can be assigned to Customers, Vendors,
      Locations, Company, Shipping Agent Services, and to Service Management
      Setup. You can also add changes to each base calendar. Calendar entries are used
      in date calculations on sales orders, purchase orders, transfer orders, production
      orders, service orders, requisition worksheet, and planning worksheet.

      Requirements: Basic Inventory


 Microsoft Official Training Materials for Microsoft Dynamics ™                          B-5
Your use of this content is subject to your current services agreement
Trade in Microsoft Dynamics™ NAV5.0


                 Analysis Reports
                 Description: Company decision makers, especially those with overall
                 responsibility for sales, purchases, and product portfolio management, use this
                 functionality.

                 Analysis Reports provides a customizable analysis view, where users can add and
                 combine customer, item, and vendor information. Figures can be presented in
                 both amounts and quantities, be compared by periods and against budget, and be
                 put into formulas to indicate the company's performance. The drill-down capacity
                 of the Analysis Reports enables managers to locate the cause of the problem.

                 Requirements: Basic Inventory

                 Sales/Purchase Budget
                 Description: Use this functionality to make sales budgets on the customer and
                 item levels and purchase budgets on the vendor and item levels, both in amounts
                 and quantities. You can track performance by calculating variances and by
                 moving budget figures between Microsoft Dynamics NAV and Microsoft®
                 Excel®. The system supports budget version control and lets users work on
                 individual budgets at the same time.

                 Requirements: Basic Inventory


B-6         Microsoft Official Training Materials for Microsoft Dynamics ™
           Your use of this content is subject to your current services agreement
Appendix C: Lab Solutions


APPENDIX C: LAB SOLUTIONS
Lab 2.1 − Handling Sales
                Scenario: Cronus' customer 20000 orders 1200 units of item 70003. The
                customer requests that the order be delivered with 300 units every week during
                the month of February (starting on 02/01/08). The delivery is shipped by FEDEX
                to the customer’s subsidiary in Manchester.

                At the time of shipping the first delivery of item 70003, the customer also orders
                25 units of item 1968-W and 50 units of item 80100. Because of several
                considerations, the order processor decides to drop ship the order for item 1968-
                W (from vendor 30000) and ensures that the 50 units of item 80100 are reserved
                for this sales order.

                The customer also only wants half of the ordered quantity of item 70003 in this
                shipment.

                Handle this scenario using the sales management functionality. Assume 01/28/08
                is the work date, that the order for item 70003 is to be shipped from the Blue
                location, and that the order for item 80100 is to be shipped from the Green
                location.

                Solution

                        1. Change the work date by clicking TOOLS→WORKDATE and entering
                           01/28/08.
                            Create the Blanket Order.
                        2. From the Sales & Marketing menu, select ORDER
                           PROCESSING→BLANKET ORDERS. Press F3 to make a new order, and
                           enter customer number 20000 in the blanket order header.
                        3. Leave the Order Date field blank.
                        4. On the Shipping tab, in the Ship-to Code field, select
                           MANCHESTER.
                        5. In the Location field, select Blue.
                        6. On each line, in the Type field, select Item and in the No. field,
                           select 70003. In the Quantity field, enter 300.
                        7. In the Shipment Date field, enter the shipment dates of 02/01/08,
                           02/08/08, 02/15/08, and 02/22/08.


           Microsoft Official Training Materials for Microsoft Dynamics ™                       C-1
          Your use of this content is subject to your current services agreement
Trade in Microsoft Dynamics™ NAV5.0

                         8. In the Qty. to Ship field, leave the quantity of 300 for the first line,
                            and delete the quantity to ship in the three other lines.
                             Create the Sales Order.
                         9. Click Make Order, selecting Yes in the information message and in
                            any other warnings.
                         10. Select the first line in the blanket order, and then click
                             LINE→UNPOSTED LINES→ORDERS.

                         11. In the Sales Lines window, click LINE→SHOW DOCUMENT to view the
                             order.
                         12. Delete the last three lines in the sales order.
                         13. On the Shipping tab, in the Shipping Agent Code field, select
                             FEDEX. Click Yes to update the lines.
                         14. In the sales order lines, select item number 1968-W. In the Quantity
                             field, enter 25. Click Yes to accept the warning message that
                             appears.
                         15. In the Purchasing Code field, select Drop Ship. Click OK.
                             Create the Purchase Order.
                         16. Select the Purchase menu option and then click ORDER
                             PROCESSING→ORDERS.

                         17. Press F3 to create a new purchase order.
                         18. Fill in the order details on the purchase header by selecting vendor
                             30000 in the Buy-from Vendor No. field.
                         19. On the Shipping tab, in the Sell-to Customer No. field, select
                             customer 20000.
                         20. On the Shipping tab of the purchase order, in the Ship-to Code
                             field, select MANCHESTER.
                         21. Click ORDER→DROP SHIPMENT→GET SALES ORDERS. The Order –
                             Sales List window will appear.
                         22. Select the relevant order and then click OK.
                             Create the third Sales Order line.
                         23. In the sales order lines, select item number 80100. In the Quantity
                             field, enter 50. In the Location Code field, select Green.
                         24. Click FUNCTIONS→RESERVE to open the Reservation window.


C-2         Microsoft Official Training Materials for Microsoft Dynamics ™
           Your use of this content is subject to your current services agreement
Appendix C: Lab Solutions

                        25. In the Reservation window, click FUNCTIONS→AUTO RESERVE.
                        26. Close the Reservation window.
                        27. In the Qty. to Ship field for the first line, change the quantity from
                            300 to 150.
                        28. In the Qty. to Ship field for the third line, enter 50 to allow for
                            posting from the order instead of through a warehouse. Click OK to
                            accept the warning message that appears.
                        29. Click POSTING→POST and select Ship and Invoice.


                NOTE: Line discounts may be set to default into the Line Discount % field on the order
                lines. This does not affect the processing of the exercise.


Lab 3.1 − Managing Alternative Sales Prices
                Scenario: You are restructuring prices for item 70200 and item 1928-S
                according to the following conditions:

                        1. Item 70200: If any of Cronus’ customers buys this item in boxes
                           (that contains 100 pieces) instead of pieces, offer 30 LCY off the
                           regular price.

                HINT: Add a new unit of measure BOX that contains 100 pieces, to the item’s units of
                measure list.

                        2. Item 1928-S: When Cronus’ overseas customer 31505050 buys this
                           item and pays in local currency (EUR), you offer 1 LCY off the
                           item’s regular price.

                NOTE: The sales price for an item can be found on the Invoicing tab of the item card.


                Solution, Part 1

                        1. Open the item card for item 70200.
                        2. Click ITEM→UNITS OF MEASURE.
                        3. In the Code field, enter BOX. In the Qty. per Unit of Measure
                           field, enter 100. Close the window.
                        4. Click SALES→PRICES.
                        5. In the Sales Type field, select All Customers.
                        6. In the Unit of Measure field, select Box.


           Microsoft Official Training Materials for Microsoft Dynamics ™                           C-3
          Your use of this content is subject to your current services agreement
Trade in Microsoft Dynamics™ NAV5.0

                         7. In the Unit Price field, enter 100 (or the calculation 1.30*100-30).
                            You can find the price (1.30 per piece) on the Invoicing tab of the
                            Item Card.
                         8. In the Starting Date field, enter 01/25/08.
                         9. Close the Sales Prices window.

                 Solution, Part 2

                         1. Open the customer card for customer 31505050. Click
                             SALES→PRICES.

                         2. In the Item No. field, select 1928-S.
                         3. In the Currency Code field, select EUR.
                         4. In the Unit Price field, enter 34.60 (or, alternatively, 35.60-1), which
                            is the reduced unit price.
                         5. In the Starting Date field, enter 01/25/08.
                         6. Close the Sales Prices window, and then click Yes to rename the
                            record.

Lab 3.2 − Creating Sales Prices for a Campaign
                 Scenario: If you are familiar with Microsoft Dynamics™ NAV Relationship
                 Management functionality, try the following exercise.

                 Cronus’ Sales Manager is clearing out the stock of item 766BC-A within the
                 period 02/01/08 to 02/28/08.

                         1. The sales price of item 766BC-A is 4000 LCY. The offer goes to all
                            business relations who are customers and whose job responsibility is
                            purchasing.


                 HINT: To find the Sales Prices window, locate the Sales & Marketing menu and then
                 click MARKETING→CAMPAIGNS. Click the Campaign button in the Campaign card
                 window. Use the wizard to create the segment. Remember to select Campaign Target
                 on the Campaign tab of the Segment window.

                         2. Start the campaign by clicking FUNCTIONS→ACTIVATE SALES
                            PRICES/LINE DISCOUNTS.

                         3. To check that they obtain the correct price, make a sales quote for
                            one of the contacts.


C-4         Microsoft Official Training Materials for Microsoft Dynamics ™
           Your use of this content is subject to your current services agreement
Appendix C: Lab Solutions

      Solution

              1. From the Sales & Marketing menu, click MARKETING→CAMPAIGNS.
              2. Press F3 to create a new campaign. Type a description in the
                 Description field, for example, sales campaign.
              3. In the Starting Date field, type 02/01/08.
              4. In the Ending Date field, type 02/28/08.
              5. Click CAMPAIGN→SALES PRICES.
              6. In the Item Number field, select item 766BC-A.
              7. In the Unit Price field, enter 4000.
              8. Close the Sales Prices window.
              9. Click CAMPAIGN→SEGMENTS.
              10. Press F3 to create a new segment. Type a description in the
                  Description field, for example, sales campaign.
              11. Click FUNCTIONS→SEGMENT→WIZARD.
              12. Select Add Contacts and then click Next.
              13. In the Business Relations field, select Customer and then click OK.
              14. In the Job Responsibilities field, select Purchase and then click OK.
              15. Click Next, and then Next, and then Finish.
              16. On the Campaign tab, place a check in the Campaign Target field.
                  Click Yes to the message that appears.
              17. Close the Segment window.
              18. Start the campaign by clicking FUNCTIONS→ACTIVATE SALES
                  PRICES/LINE DISCOUNTS.

                  To create the sales quote:


              19. From the Sales & Marketing menu, click MARKETING→CONTACTS.
              20. Open the Contact Card for contact CT100202 (or select any of the
                  contacts in the segment you just created).
              21. Click the Contact button and select Sales Quotes.
              22. Press F3 to create a new Sales Quote. When you press TAB on the
                  No. field, the contact number and address information defaults into
                  the quote from the Contact Card.
              23. In the Order Date field, enter 02/01/08.


 Microsoft Official Training Materials for Microsoft Dynamics ™                     C-5
Your use of this content is subject to your current services agreement
Trade in Microsoft Dynamics™ NAV5.0

                           24. If a Sell-to Customer No. does not appear, select a Sell-to
                               Customer Template. To select a Sell-to Customer Template, follow
                               the directions in step 25. If you have selected a contact that has a
                               customer number, then go to step 25.
                           25. In the Sell-to Customer Template field, select the appropriate
                               template, for example, GB-LARGE.
                           26. In the sales quote lines, select item number 766BC-A.
                           27. In the Quantity field, enter 1.
                           28. Notice that the Unit Price Excl. VAT field contains the sales price
                               of 4000.00.
                           29. Click the Sales Prices field on the right pane to view the sales price.

Lab 3.3 − Updating Sales Prices
                 Scenario: You have decided to make the modifications to current prices as
                 follows:

                       •     Because of changed market conditions, increase the prices offered to
                             all customers for selected items (from 70100 to 70104) by 10%. The
                             new prices take effect on 02/01/08. You also consider rounding the
                             new prices to the nearest whole LCY.
                       •     As Cronus’ overseas customer base expands, extend the offer of
                             reduced price for item 1928-S (if the purchase is paid in EUR) valid for
                             customer 31505050 to all international customers.

                 HINT: Consider grouping overseas customers.

                 Implement these modifications using the appropriate batch jobs.

                 Solution, Part 1

                           1. From the Sales & Marketing menu, click INVENTORY &
                              PRICING→SALES PRICE WORKSHEET.

                           2. In the worksheet, click FUNCTIONS→SUGGEST ITEM PRICE ON WKSH.
                           3. On the Item tab, in the No. field, set a filter for the range
                              70100..70104
                           4. On the Options tab, select All Customers as a sales type.
                           5. In the Starting Date field, enter 02/01/08.
                           6. In the Adjustment Factor field, enter 1.1.
                           7. In the Rounding Method field, select WHOLE.


C-6         Microsoft Official Training Materials for Microsoft Dynamics ™
           Your use of this content is subject to your current services agreement
Appendix C: Lab Solutions

              8. In the Create New Prices field, place a check mark.
              9. Click OK to start the batch job.
              10. Click FUNCTIONS→IMPLEMENT PRICE CHANGE.
              11. Click OK on the request form to start the batch job.
              12. Click Yes to delete the suggested price changes.

      Solution, Part 2

              1. From the Sales & Marketing menu, click INVENTORY &
                 PRICING→SALES PRICE WORKSHEET.

              2. In the worksheet, click FUNCTIONS→SUGGEST SALES PRICE ON WKSH.
              3. On the Sales Price tab, set the filter for the Sales Type field to
                 Customer and the Sales Code filter to 31505050.
              4. Set the filter for the Item No. field to 1928-S.
              5. On the Options tab, select Customer Price Group as a sales type.
                 Click the AssistButton in the Sales Code field to open the
                 Customer Price Group window.
              6. Create a new customer group named Foreign. Enter Foreign
                 Customers in the Description field, and select the Allow Line Disc.
                 and Allow Invoice Disc. fields.
              7. Select the newly created group and then click OK.
              8. On the Options tab of the request form, in the Currency Code field,
                 select EUR and in the Starting Date field, and enter “w” for the
                 work date.
              9. Select the Create New Prices field.
              10. Click OK to start the batch job.
              11. Click FUNCTIONS→IMPLEMENT PRICE CHANGE. Click OK on the
                  request form to start the batch job.
              12. Click Yes to delete the suggested price changes.


      NOTE: For customers to receive the reduced price, assign them to the Foreign
      customer price group. This is done on the Invoicing tab of the Customer Card.


 Microsoft Official Training Materials for Microsoft Dynamics ™                       C-7
Your use of this content is subject to your current services agreement
Trade in Microsoft Dynamics™ NAV5.0


Lab 3.4 − The "Best Price" Rule
                 Scenario: Customer 50000 is ordering 200 pieces of item 70200.

                 Offer the customer the best (cheapest) price for the purchase.

                 Solution

                         1. From the Sales & Marketing menu, select ORDER
                            PROCESSING→ORDERS. Press F3 to make a new order and enter
                            customer number 50000 in the order header.
                         2. In the sales order lines, select item 70200 in the No. field and enter
                            200 in the Quantity field.
                         3. The Line Amount Excl. Vat field should be 221.00.
                         4. Notice that 15 defaults into the Line Discount % field. Click the
                            Sales Line Discounts field on the right pane of the Sales Order. The
                            Get Sales Line Disc. field shows that because customer 50000
                            belongs to the Retail Customer Disc. group, this customer receives a
                            15% line discount.
                         5. On the right pane of the Sales Order, click Sales Prices.
                         6. In the Get Sales Price window, notice the customer can obtain a
                            better price by ordering in boxes instead of pieces.
                         7. Close the Get Sales Price window.
                         8. In the Unit of Measure field on the sales line, select BOX and then
                            click OK.
                         9. Change the number in the Quantity field to 2.
                         10. Now the Line Amount Excl. VAT field is 170.00. This represents a
                             combination of the sales price for purchasing in boxes instead of
                             pieces and the sales line discount for this customer. 170.00 is the best
                             price for the customer.


C-8         Microsoft Official Training Materials for Microsoft Dynamics ™
           Your use of this content is subject to your current services agreement
Appendix C: Lab Solutions


Lab 3.5 − Creating Sales Line Discounts for a Campaign
                Scenario: If you are familiar with the Microsoft Dynamics NAV Relationship
                Management functionality, try the following exercise.

                Cronus' Sales Manager wants item 1988-S introduced to a larger range of
                customers, and is making an introductory discount offer to a range of prospective
                new customers. This is valid if they purchase the items between 01/28/08 –
                02/28/08.

                        1. The line discount on item 1988-S is 20% if the customer purchases at
                           least five units. The offer goes to prospective customers who have
                           the job responsibility of Purchase.


                HINT: To find the Sales Line Discount window, click the Campaign button in the
                Campaign window. Use the wizard to create the segment. Remember to select
                Campaign Target on the Campaign tab of the Segment window.

                        2. Start the campaign by clicking FUNCTIONS→ACTIVATE SALES
                           PRICES/LINE DISCOUNTS.

                        3. Verify they obtain the correct discount percentage by creating a sales
                           quote for one of the contacts.

                Solution

                        1. From the Sales & Marketing menu, click MARKETING→CAMPAIGNS.
                        2. Press F3 to create a new campaign. Type a description in the
                           Description field, for example, Introductory Discount.
                        3. In the Starting Date field, type 01/28/08.
                        4. In the Ending Date field, type 02/28/08.
                        5. Click CAMPAIGN→SALES LINE DISCOUNTS.
                        6. In the Code field, select item 1988-S.
                        7. In the Minimum Quantity field, enter 5.
                        8. In the Line Discount % field, enter 20.
                        9. Close the Sales Line Discounts window.
                        10. Click CAMPAIGN→SEGMENTS.
                        11. Press F3 to create a new segment. Type a description in the
                            Description field, for example, Intro Discount.


           Microsoft Official Training Materials for Microsoft Dynamics ™                        C-9
          Your use of this content is subject to your current services agreement
Trade in Microsoft Dynamics™ NAV5.0

                         12. Click FUNCTIONS→SEGMENT→WIZARD.
                         13. Select Add Contacts. Then click Next.
                         14. In the Business Relations field, select PROS (for Prospective
                             Customer) and then click OK.
                         15. In the Job Responsibilities field, select PURCHASE, and then click
                             OK.
                         16. Click Next, and then Next, and then Finish.
                         17. On the Campaign tab, place a check in the Campaign Target field.
                             Click Yes to the message that appears.
                         18. Close the Segment window.
                         19. Start the campaign by clicking FUNCTIONS→ACTIVATE SALES
                             PRICES/LINE DISCOUNTS.

                         20. Click OK to accept the message that appears.
                         Create the sales quote:
                         21. From the Sales & Marketing menu, click MARKETING→CONTACTS.
                         22. Open the Contact Card for contact CT100197 (or select any of the
                             contacts in new segment).
                         23. Click the Contact button, and select Sales Quotes.
                         24. Press F3 to create a new Sales Quote. The contact number and
                             address information default into the quote.
                         25. If a Sell-to Customer No. does not appear, select a Sell-to
                             Customer Template. To select a Sell-to Customer Template, follow
                             the directions in step 26. If you have selected a contact, that has a
                             customer number. Then go to step 27.
                         26. In the Sell-to Customer Template field, select the appropriate
                             template, for example, GB-LARGE. Make sure that the template you
                             select has Allow Line Disc. checked on the Customer Template
                             Card. This card can be accessed by clicking CUSTOMER
                             TEMPLATE→CARD from the Customer Template List.

                         27. In the sales quote lines, select item number 1988-S.
                         28. In the Quantity field, enter 5.
                         29. Notice that 20 displays in the Line Discount % field. This indicates
                             the line discount has been applied.
                         30. Click the Sales Line Discounts field on the right pane to see the
                             campaign discount.


C-10        Microsoft Official Training Materials for Microsoft Dynamics ™
           Your use of this content is subject to your current services agreement
Appendix C: Lab Solutions


Lab 4.1 − Handle Items with Substitutes
                Scenario: Cronus customer 40000 orders seven units of item 1980-S.

                This customer's shipments are usually made from the Yellow warehouse.

                Your tasks are as follows:

                        1. Create a sales order for the customer.
                        2. Determine whether the requested item 1980-S can be substituted by
                           another item.
                        3. Ship the requested quantity of a substitute item.

                NOTE: Because the Yellow location requires picking, the program requires that you
                process the shipping through the warehouse. You can skip this process by entering the
                corresponding amounts in the Qty. To Ship field on the sales lines and then by
                accepting the warning messages given by the program.


                Solution

                        1. From the Sales & Marketing menu, click ORDER
                           PROCESSING→ORDERS.

                        2. Press F3 to create a new sales order.
                        3. Enter customer number 40000 in the Sell-to Customer Number
                           field.
                        4. On the sales order line, enter item number 1980-S.
                        5. In the Quantity field, type 7.
                        6. Click Yes on the availability message that appears.
                        7. On the right pane of the sales order, under Item Information, click
                           Substitutions.
                        8. Click OK to substitute item 1988-S.
                        9. If you receive a warning message about the ship date, click OK to
                           accept.
                        10. In the Qty. to Ship field, enter 7. Click OK to accept the warning
                            message that appears.
                        11. Click POSTING→POST→SHIP.


           Microsoft Official Training Materials for Microsoft Dynamics ™                          C-11
          Your use of this content is subject to your current services agreement
Trade in Microsoft Dynamics™ NAV5.0


Lab 4.2 − Handle Items with Cross Reference
                 Scenario: Cronus customer 10000 places a sales order for eight units of item
                 1900-S. The customer gives the order processor item number – 22-786.

                 Your tasks are as follows:

                         1. Set up an item number that is used by customer 10000 as a reference
                            for item 1900-S (the item description is “Chair, lounge, black”).
                         2. Create a sales order that reflects the item number that is used by the
                            customer. Post the order.

                 Solution

                         1. From the Sales & Marketing menu, click INVENTORY &
                            PRICING→ITEMS. Locate the item card for item 1900-S.

                         2. Click ITEM→CROSS REFERENCES.
                         3. In the Cross-Reference Type field, select Customer, and in the
                            Cross Reference Type No. field, select 10000.
                         4. In the Cross-Reference No. field, enter 22-786, in the Unit of
                            Measure field, select PCS, and in the Description field, enter Chair,
                            lounge, black.
                         5. Close the Item Cross Reference Entries window.
                         6. Click ORDER PROCESSING→ORDERS.
                         7. Press F3 to create a new sales order.
                         8. In the Sell-to Customer Number field, enter customer number
                            10000.
                         9. In the Cross-Reference No. field, click the AssistButton to open the
                            Cross Reference List window.
                         10. Select the cross-reference number 22-786 and then click OK.
                         11. In the Quantity field, enter 8.
                         12. Click POSTING→POST→SHIP AND INVOICE.


C-12        Microsoft Official Training Materials for Microsoft Dynamics ™
           Your use of this content is subject to your current services agreement
Appendix C: Lab Solutions


Lab 4.3 − Handling the Sale of a Nonstock Item using a
Special Order
                Scenario: Cronus' customer 10000 orders three units of item 4100.
                Item 4100 is a nonstock item and must be purchased from vendor 40000.

                Your tasks are as follows:

                        1. Create a sales order for customer 10000, and select it as a special
                           order.
                        2. Create the purchase order for this nonstock item.
                        3. Receive and invoice the purchase order.
                        4. Ship and invoice the sales order.

                Solution

                        1. From the Sales & Marketing menu, click ORDER
                           PROCESSING→ORDERS.

                        2. Press F3 to create a new sales order.
                        3. In the Sell-to Customer Number field, enter customer number
                           10000.
                        4. Click FUNCTIONS→NONSTOCK ITEMS.
                        5. Select item 4100 and then click OK.
                        6. In the Purchasing Code field, select SPECIAL ORDER and in the
                           Quantity field, enter 3.
                        7. Release the order.
                        8. From the Purchase menu, click ORDER PROCESSING→ORDERS.
                        9. Press F3 to create a new purchase order.
                        10. In the Buy-from Vendor Number field, enter vendor number
                            40000.
                        11. On the purchase order line, enter item number 4100.
                        12. In the Quantity field, type 3.
                        13. In the Qty. to Receive field, type 3.
                        14. In the Vendor Invoice Number field, on the purchase order header,
                            enter some characters of your choice, for example, 1234.
                        15. Click POSTING→POST→RECEIVE AND INVOICE.


           Microsoft Official Training Materials for Microsoft Dynamics ™                        C-13
          Your use of this content is subject to your current services agreement
Trade in Microsoft Dynamics™ NAV5.0

                         16. Close the Purchase Order window.
                         17. On the sales order screen, click POSTING→POST→SHIP AND INVOICE.

Lab 5.1 − Managing Alternative Purchase Prices
                 Scenario: You have a deal from vendor 10000 on items no. 1900-S and 1920-S
                 according to the following conditions:

                         1. Item 1900-S: If Cronus buys this item in pallets (that contains ten
                            pieces) instead of pieces, you receive ten LCY off the regular price.

                 HINT: Add a new unit of measure PALLET that contains ten pieces, to the item’s units of
                 measure list.

                         2. Item 1920-S: When Cronus buys this item and pays in local currency
                            (EUR), you receive 15 LCY off the item’s regular price.
                 Enter these purchase prices in the Purchase Prices window and check their use
                 by creating a purchase order for two pallets of item 1900-S and five units of item
                 1920-S.

                 HINT: Items can be accessed without leaving the Purchase menu. Click INVENTORY
                 COSTING→ITEMS.


                 Solution

                         1. From the Purchase menu, click INVENTORY & COSTING→ITEMS.
                         2. In the Item Number field, press F5 to see the Item List. Select item
                            1900-S and then click OK.
                         3. Click the Items button, and select Units of Measure.
                         4. In the Code field, enter PALLET.
                         5. In the Qty. per Unit of Measure field, enter 10.
                         6. Close the Units of Measure window.
                         7. From the Purchase menu, click ORDER PROCESSING→VENDORS.
                         8. Locate vendor 10000.
                         9. Click the Purchases button and then click Prices.
                         10. In the Item No. field, select 1900-S.
                         11. In the Unit of Measure field, select PALLET.


C-14        Microsoft Official Training Materials for Microsoft Dynamics ™
           Your use of this content is subject to your current services agreement
Appendix C: Lab Solutions

                       12. In the Direct Unit Cost field, enter 82.62 or, alternatively, enter the
                           calculation 92.62-10. The Unit Cost is on the Invoicing tab of the
                           Item Card.
                       13. In the Starting Date field, enter "w" for the work date.
                       14. On a new line in the Purchase Prices window, in the Item No. field,
                           select 1920-S.
                       15. In the Currency Code field, select EUR.
                       16. In the Unit of Measure field, select PCS.
                       17. In the Direct Unit Cost field, enter 296.60 or, alternatively, you can
                           enter the calculation 311.60-15.
                       18. In the Starting Date field, enter "w" for the work date.
                       19. From the Purchase menu, click ORDER PROCESSING→ORDERS.
                       20. Press F3 to create a new purchase order.
                       21. In the Buy-from Vendor Number field, enter vendor number
                           10000.
                       22. On the Foreign Trade tab, in the Currency Code field, select EUR.
                       23. On the first purchase order line, enter item number 1900-S with a
                           quantity of 2.
                       24. In the Unit of Measure field, select PALLET.
                       25. On the next purchase order line, enter item number 1920-S with a
                           quantity of 5.
                       26. Verify the Direct Unit Cost for item 1900-S is 127.934.
                       27. Verify the Direct Unit Cost for item 1920-S is 296.60.

Lab 5.2 − Managing Purchase Line Discounts
               Scenario: The Purchasing Agent at Cronus has made an agreement with vendor
               30000 that for items in the item range 70100-70104 purchased after 01/30/08,
               Cronus receives the following discount:

                       •   1-99 items: 10%
                       •   100-499 items: 15%
                       •   500 or more items: 25%

               Enter these line discounts in the Purchase Line Discounts window and check
               that the program uses them by creating a purchase order for 250 units of item
               70102 and 600 units of item 70104.


          Microsoft Official Training Materials for Microsoft Dynamics ™                       C-15
         Your use of this content is subject to your current services agreement
Trade in Microsoft Dynamics™ NAV5.0


                 Solution

                         1. From the Purchase menu, click ORDER PROCESSING→VENDORS.
                         2. Locate vendor 30000.
                         3. Click the Purchases button and then click Line Discounts.
                         4. In the Purchase Line Discounts window, in the Starting Date
                            Filter, enter 01/30/08.
                         5. Set up the lines as follows:

                            Vendor       Item       Minimum        Line          Starting      Ending
                            No.          No.        Quantity       Discount      Date          Date
                                                                   %
                            30000        70100      1              10            01/30/08
                            30000        70100      100            15            01/30/08
                            30000        70100      500            25            01/30/08
                            30000        70101      1              10            01/30/08
                            30000        70101      100            15            01/30/08
                            30000        70101      500            25            01/30/08
                            30000        70102      1              10            01/30/08
                            30000        70102      100            15            01/30/08
                            30000        70102      500            25            01/30/08
                            30000        70103      1              10            01/30/08
                            30000        70103      100            15            01/30/08
                            30000        70103      500            25            01/30/08
                            30000        70104      1              10            01/30/08
                            30000        70104      100            15            01/30/08
                            30000        70104      500            25            01/30/08

                 HINT: To make the process quicker, enter 70100 in the Item No. Filter, and create the
                 three lines for item 70100. Select the three lines, and press EDIT→COPY. Next, enter
                 70101 in the Item No. Filter, and then click the first line and press EDIT→PASTE.
                 Continue for the remaining items.

                         6. Close the Purchase Line Discounts window.
                         7. From the Purchase menu, click ORDER PROCESSING→ORDERS.
                         8. Press F3 to create a new purchase order.
                         9. In the Buy-from Vendor Number field, enter vendor number
                            30000.
                         10. In the Order Date field, enter 02/01/08.
                         11. On the first purchase order line, enter item number 70102 with a
                             quantity of 250.


C-16        Microsoft Official Training Materials for Microsoft Dynamics ™
           Your use of this content is subject to your current services agreement
Appendix C: Lab Solutions

                        12. On the next purchase order line, enter item number 70104 with a
                            quantity of 600.
                        13. The Line Discount % field for the line that contains item 70102 is
                            15.
                        14. The Line Discount % field for the line that contains item 70104 is
                            25.

Lab 6.1 − Calculating a Replenishment Plan from the
Requisition Worksheet
                Scenario: You are the purchasing agent at Cronus. Perform the following set up
                tasks:

                        1. For Cronus item 1330, change the value in the Reorder Quantity
                           field from 100 to 300 so that it has the following setup:
                            Inventory = 100
                            Reordering Policy = Fixed Reorder Quantity
                            Reorder Cycle = 1M
                            Reorder Point = 100
                            Reorder Quantity = 300
                        2. Create the following sales order lines:
                            40 units with a shipment date 5 days after the work date.
                            60 units with a shipment date 10 days after the work date.
                            70 units with a shipment date 20 days after the work date.
                        3. Create the following purchase order line:
                            50 units with an expected receipt date 15 days after the work date.

                Calculate a plan from the requisition worksheet and explain the resulting order
                proposal lines.

                Solution
                For the following solution, the work date is set to 01/28/08.


                        1. From the Purchase menu, click INVENTORY & COSTING→ITEMS.
                        2. Open the Item Card for item 1330.
                        3. On the Planning tab, set up item 1330 to match the setup described
                           in the scenario. The Inventory quantity can be found on the General
                           tab.
                        4. From the Sales & Marketing menu, click ORDER
                            PROCESSING→ORDERS.


           Microsoft Official Training Materials for Microsoft Dynamics ™                     C-17
          Your use of this content is subject to your current services agreement
Trade in Microsoft Dynamics™ NAV5.0

                         5. Press F3 to create a new sales order.
                         6. Select a customer number in the Sell-to Customer Number field.
                         7. Enter the sales order lines according to the information provided in
                            the scenario. Click Yes to accept all the Check Availability messages
                            that appear.
                         8. From the Purchase menu, click ORDER PROCESSING→ORDERS.
                         9. Press F3 to create a new purchase order.
                         10. Select a vendor number in the Buy-from Vendor Number field.
                         11. Enter the purchase order lines according to the information provided
                             in the scenario.
                         12. From the Purchase menu, click PLANNING→REQUISITION WORKSHEETS.
                         13. From the Requisition Worksheet window, click
                             FUNCTIONS→CALCULATE PLAN to open the request form.

                         14. On the Item tab, set a filter for item 1330. On the Options tab, in the
                             Order Date field, enter 01/28/08 and in the Ending Date field –
                             02/17/08.
                         15. Click OK. The order proposal lines appear in the Requisition
                             Worksheet window.
                         16. The order proposal lines are as follows:


          Type No.      Action      Accept  Original Quantity Due                    Replenishment
                        Message     Action  Quantity          Date                   System
                                    Message
          Item   1330 Resched. Check            50          300          02/02/08 Purchase
                      & Chg.
                      Qty.

                         17. The program has calculated that the purchase order for 50 will be
                             rescheduled for 02/02/08, and the quantity will be changed to 300.

                 Explanation
                 There are 100 units currently in inventory. When the first sales order is filled on
                 02/02/08, the amount on inventory is reduced to 60. Because the reorder point is
                 set at 100, a new order must be created. Because a purchase order exists, that
                 order is rescheduled for 02/02/08. The quantity on the purchase order changes
                 from 50 to 300. This is because the reorder quantity is set to 300.


C-18        Microsoft Official Training Materials for Microsoft Dynamics ™
           Your use of this content is subject to your current services agreement
Appendix C: Lab Solutions


Lab 7.1 − Handling Item Charges
                Scenario: You have an open purchase order from vendor 10000. The order
                number is 106009. You also receive an invoice from the same vendor for freight
                service for the 150 LCY.

                Register these additional invoices, making sure of that inventory costs are
                updated correctly.

                Solution

                        1. Open purchase order 106009.
                        2. On the purchase order lines, in the Type field, select Charge (Item).
                           In the No. field, select P-FREIGHT.
                        3. In the Quantity field, enter 1, and in the Direct Unit Cost field,
                           enter 150.
                        4. Select the item charge line, and then click LINE→ITEM CHARGE
                           ASSIGNMENT.

                        5. Click FUNCTIONS→SUGGEST ITEM CHARGE ASSIGNMENT. Select
                           Amount and then click OK.
                        6. Close the Item Charge Assignment window.
                        7. Click POSTING→POST→RECEIVE AND INVOICE. Click OK.
                        8. From the Purchase menu, click HISTORY→POSTED RECEIPTS. Click the
                           Navigate button.
                        9. Select the Item Ledger Entry line and then click Show.
                        10. In the Cost Amount (Actual) field for each line, click the drill-down
                            arrow to see the value entries that includes the freight charges, for
                            each item.

Lab 7.2 − Handling Purchase Allowances
                Scenario: Upon receiving and invoicing a shipment (No. 107019) from vendor
                10000, the Inventory Manager discovers that two units of item 70011 had a small
                fault on the glass surface. The Inventory Manager contacts the vendor about the
                problem, and the vendor offers Cronus the opportunity to keep the items for a
                reduced price (by 40%). Cronus receives a credit memo from the vendor.

                Your task is to register this agreement in the program make sure that the
                transaction is reflected at the item statistics level.


           Microsoft Official Training Materials for Microsoft Dynamics ™                       C-19
          Your use of this content is subject to your current services agreement
Trade in Microsoft Dynamics™ NAV5.0


                 Solution

                         1. From the Financial Management menu, click PAYABLES→CREDIT
                            MEMOS to create a new credit memo.

                         2.   Click the Functions button, and select Copy Document.
                         3. In the Copy Purchase Document window, in the Document Type
                            field, select Posted Receipt.
                         4. In the Document No. field, select 107019.
                         5. Select the Include Header field. The Recalculate Lines field is
                            already selected.
                         6. Click OK.
                         7. In a new credit memo line, in the Type field, select Charge (Item).
                         8. Select Purchase Allowance in the No. field.
                         9. In the Quantity field enter 2.
                         10. To determine the cost, find the line for item 70011, and find the
                             Direct Unit Cost Excl. VAT field. The cost for each unit of item
                             70011 is 36.90.
                         11. In the Direct Unit Cost Excl. VAT field on the line selected
                             Purchase Allowance, enter 22.14 (or enter the calculation 36.90*.60)
                             which reflects 40% of the cost for item 70011.
                         12. Delete the three item type lines copied from the Posted Receipt.
                         13. To assign the item charge to item 70011, click the Line button and
                             select Item Charge Assignment.
                         14. In the Item Charge Assignment (Purch) window, click the
                             Functions button and select Get Receipt Lines.
                         15. In the Purch. Receipt Lines window, find Document No. 107019,
                             and select the line for item 70011. Click OK.
                         16. In the Item Charge Assignment (Purch) window, click the
                             Functions button, and then select Suggest Item Charge Assignment.
                         17. Select Equally and then click OK. Close the window.
                         18. Enter a Vendor Cr. Memo No. of your own choice in the credit
                             memo header.
                         19. Click POSTING→POST, and then click Yes.
                         20. To view the item statistics, from the Purchase menu, click INVENTORY
                             & COSTING→ITEMS. Open the item card for item 70011.

                         21. Click ITEM→ENTRIES→VALUE ENTRIES. Here you can see the Purchase
                             Allowance applied to this item.


C-20        Microsoft Official Training Materials for Microsoft Dynamics ™
           Your use of this content is subject to your current services agreement
Appendix C: Lab Solutions


Lab 8.1 − Promise Order Delivery to a Customer
                Scenario: Cronus customer 50000 orders 50 units of item 70040.

                The customer requests the order arrives on 01/27/08. The sales order ships from
                the Yellow warehouse.

                Your tasks are as follows:

                        1. Create the sales order, and check if the requested order delivery date
                           can be met.
                        2. If the requested delivery date cannot be met, find out when you can
                           deliver the order. You may decide to run the CTP function.
                        3. The customer is not satisfied with the new delivery date. You,
                           promise the customer to deliver the order one day earlier and will
                           find a solution to fulfill the promise.

                Solution

                        1. From the Sales & Marketing menu, click ORDER
                           PROCESSING→ORDERS. Press F3.

                        2. In the Sell-to Customer No. field, select customer 50000.
                        3. In the Requested Delivery Date field, enter 01/27/08.
                        4. On the Shipping tab, in the Location Code field, select Yellow and
                           press Enter.
                        5. In the No. field, select item 70040, and in the Quantity field, enter
                           50.
                        6. The messages indicate that, not only must you ship the order before
                           the work date, there is no inventory available and none on order (as
                           per the Earliest Availability Date on the Check Availability
                           message).
                        7. Accept both messages.
                        8. To find out when you can deliver the order, click ORDER→ORDER
                           PROMISING. The Order Promising Lines window appears.

                        9. Click CALCULATE→CAPABLE-TO-PROMISE.
                        10. The date fields in the order promising lines are:


                            Requested        Requested     Planned       Original      Earliest
                            Delivery         Shipment      Delivery      Shipment      Shipment
                            Date             Date          Date          Date          Date
                            01/27/08         01/24/08      01/30/08      01/24/08      01/27/08


           Microsoft Official Training Materials for Microsoft Dynamics ™                     C-21
          Your use of this content is subject to your current services agreement
Trade in Microsoft Dynamics™ NAV5.0

                         11. According to these dates, you can deliver the order on 01/30/08.
                         12. Click Accept.
                         13. The delivery dates on the sales order lines are updated to match the
                             dates from the order promising lines.
                         14. Determine how to deliver one day earlier. You have options, such as
                             calling the vendor to request an earlier delivery or working with
                             Warehouse Workers to expedite the outbound warehouse handling
                             time. One way to deliver a day earlier is to change the Shipping
                             Agent Service field on the sales order header.
                         15. On the Shipping tab, in the Shipping Agent Service field, select
                             Overnight. Click Yes to update the lines.
                         16. Recalculate the order promising lines. Perform steps 8, 9, and 12
                             again.
                         17. Now you can promise delivery to the customer on 01/29/08 the
                             Planned Delivery Date.

Lab 8.2 − Order Promising
                 Scenario: The Purchasing Agent at Cronus orders 10 units of item 70011 with
                 vendor 30000 and requests that the order be delivered at the Green warehouse on
                 02/05/08.

                 Your tasks are:

                         1. Create the purchase order and estimate the latest order date when the
                            order arrives at the warehouse on the requested date.
                         2. Suppose that after talking to the vendor, they can deliver the order
                            three days earlier than first requested. Record this information in the
                            purchase order.

                 Solution

                         1. Create a new purchase order. In the Buy-from Vendor No. field,
                            select vendor 30000.
                         2. Click the Shipping tab. In the Location Code field, select GREEN.
                         3. In the Requested Receipt Date field enter 02/05/08.
                         4. In the No. field, select item 70011, and in the Quantity field, enter
                            10.
                         5. The work date message indicates that the order must be placed by
                            01/22/08 to meet the requested receipt date of 02/05/08.
                         6. Accept the message.


C-22        Microsoft Official Training Materials for Microsoft Dynamics ™
           Your use of this content is subject to your current services agreement
Appendix C: Lab Solutions

                       7. To record the earlier receipt date promised by the vendor, on the
                          Shipping tab, in the Promised Receipt Date field, enter 02/02/08.
                       8. Click Yes to update the lines.
                       9. The Planned Receipt Date and Expected Receipt Date fields on
                          the line are updated accordingly.

Lab 9.1 − Processing the Customer Return
               Scenario: A representative from customer 10000 calls the order processor at
               Cronus and says that the complete delivery of 50 units (boxes) of item 80100
               appears to be defective.

               The order processor and the customer agree that the whole quantity of item
               80100 must be returned to Cronus, and a replacement of the same quantity will
               be shipped to the customer. The customer gives the order processor a reference
               number to the return document. This is R-0113.

               To perform this, create and post a sales order of 50 units (boxes) of item 80100 to
               customer 10000. Use location code Green, and remember to fill in the quantity to
               ship.

               Your tasks are as follows:

                       1. Register the compensation agreement reached with the customer,
                          using a sales order as an entry point.
                       2. Process the return, in terms of:
                           –   Receiving (possibly, use a specially dedicated location for
                               defective items) and crediting the customer for the returned
                               items.
                           –   Ensuring that the returned items when received from the
                               customer are valued at the same unit cost as originally sold
                               (instead of the average cost).
                           –   Shipping the replacement sales order to the customer.
                           –   Creating a return-related document, which is a purchase return
                               order, to indicate that a return to vendor process must be
                               initiated.

               Solution
               Create a location for defective items.

                       1. From the Warehouse menu, click SETUP→LOCATIONS.
                       2. Press F3 to create a new location card. In the Code field, enter
                          DEFECTIVE. In the name field, enter Defective Warehouse.


          Microsoft Official Training Materials for Microsoft Dynamics ™                      C-23
         Your use of this content is subject to your current services agreement
Trade in Microsoft Dynamics™ NAV5.0

                 Create the return order.

                         3. From the Sales & Marketing menu, click ORDER
                            PROCESSING→RETURN ORDERS. Press F3 to create a new order, and
                            enter the customer information in the return header.
                         4. Enter the item information and quantity on the line.
                         5. In the Return Reason field, click the AssistButton. The Return
                            Reasons window appears.
                         6. Select DEFECTIVE as the return reason code and then click OK.
                         7. In the External Document No. field, enter R-0113.
                         8. In the Appl.-from Item Entry field, click the AssistButton. The
                            Item Ledger Entries window appears.
                         9. In the Item Ledger Entries window, select the line with the
                            defective items (the quantity will equal 50). Click OK.
                             You can also use the new Get Posted Sales Document Lines to
                             Reverse function to select the line.
                         10. In the Location Code field on the line, select Defective.
                             Create the order for the replacement quantity.
                         11. Enter a line for item 80010 with a quantity of -50. In the Location
                             field, select Green and make sure that Box is selected in the Unit of
                             Measure Code field.
                         12. In the Sales Return Order window, click FUNCTIONS→MOVE
                             NEGATIVE LINES.

                         13. In the To Document Type field, select Order and then click OK.
                         14. Click Yes to view the document.
                         15. In the Qty. to Ship field, enter 50.
                         16. Post the sales order.
                 Create the purchase return order.

                         17. From the Sales Return Order window, click FUNCTIONS→CREATE
                             RETURN-RELATED DOCUMENTS.

                         18. In the Vendor No. field, select vendor 10000.
                         19. Select the Create Purch. Ret. Order check box. Click OK.
                         20. Post the sales return order.


C-24        Microsoft Official Training Materials for Microsoft Dynamics ™
           Your use of this content is subject to your current services agreement
Appendix C: Lab Solutions


Lab 9.2 − Processing the Customer Return, II
                Scenario: (continuation of 9-1 – Processing the Customer Return)

                In connection with the return of 50 units (boxes) of item 80100 initiated by
                customer 10000, Cronus wants to return the defective items to the original
                vendor and receive replacements.

                When registering the compensation agreement, the order processor created a
                purchase return order, which serves as an indication to the purchasing agent that
                the items must be returned to the vendor.

                The purchasing agent contacts the vendor’s representative (vendor 45858585),
                and the parties agree that Cronus will send the item back for replacement. The
                vendor gives the purchasing agent a return authorization number. This is
                PR0558.

                Locate the existing purchase order No. 6001 and post it as invoiced.

                Your task is to handle the return to vendor process in terms of:

                        •   Shipping the defective items to the vendor and receiving credit.
                        •   Ensuring that the items returned to the vendor are valued at the same
                            unit cost as originally purchased instead of at the average cost (refer
                            to the purchase order No. 6001).
                        •   Receiving a replacement from the vendor.

                Solution
                Create the purchase return order.

                        1. From the Purchase menu, click ORDER PROCESSING→RETURN
                           ORDERS. Locate the return order for 50 units of item 80100 created
                           for vendor 10000.
                        2. In the Vendor Authorization No. field, enter PR0558.
                        3. In the Appl.-to Item Entry field, click the AssistButton. The Item
                           Ledger Entries window appears.
                        4. In the Item Ledger Entries window, select the line with the
                           defective items. Click OK.
                            Alternatively you can use the new Get Posted Purchase Document
                            Lines to Reverse function to select the line.
                            Create the order for the replacement quantity.
                        5. Enter a line for item 80010 with a quantity of -50. Make sure that
                           Box is selected in the Unit of Measure Code field.


           Microsoft Official Training Materials for Microsoft Dynamics ™                      C-25
          Your use of this content is subject to your current services agreement
Trade in Microsoft Dynamics™ NAV5.0

                         6. In the Purchase Return Order window, click FUNCTIONS→MOVE
                            NEGATIVE LINES.

                         7. In the To Document Type field select Order and then click OK.
                         8. Click Yes to view the document.
                         9. Enter a Vendor Invoice No. in the header.
                         10. Post the purchase order.
                         11. In the Purchase Return Order window, enter a Vendor Cr. Memo
                             No.
                         12. Post the purchase return order.

Lab 10.1 − Creating Analysis Reports
                 Scenario: Create a report that displays sales by sales representatives
                 (salespersons) for January 2008. The requirements for the report are as follows:

                         1. The report must be broken down by invoiced sales and those that
                            have not been invoiced
                         2. The report must include a line that displays total sales by salespeople
                            at the bottom.
                         3. Modify the report to show only those salespeople who recorded sales
                            in January 2008.
                         4. As soon as it is complete, present the report as a bar chart.

                 NOTE: Only Sales Representatives assigned the Salesperson Dimension code are
                 included in this report.


                 HINT: Set up an Analysis View Card with the Salesperson dimensions and added to the
                 Analysis Lines Template before selecting salespeople in an Analysis Report.


                 HINT: Review the existing report templates to see whether you can reuse or modify an
                 existing report.


                 Solution
                 Set up the analysis view card.

                         1. From the Sales & Marketing menu, select ANALYSIS &
                            REPORTING→SETUP→ANALYSIS VIEW CARD.

                         2. Press F3 to create a new Analysis View Card.
                         3. In the Code field and the Name field, type Salespeople.
                         4. Select the Dimensions tab. In the Dimension 1 Code field, select
                            Salesperson.


C-26        Microsoft Official Training Materials for Microsoft Dynamics ™
           Your use of this content is subject to your current services agreement
Appendix C: Lab Solutions

              5. Click the Update button. Click Yes.
              6. Close the Sales Analysis View Card.
                  Create the analysis line template.
              7. From the Sales & Marketing menu, select ANALYSIS &
                 REPORTING→SETUP→ANALYSIS LINE TEMPLATES.

              8. Select an empty line, and type SALESP in the Name field.
              9. In the Description field, type Salespeople.
              10. In the Item Analysis View Code field, select Salespeople.
              11. Click the Lines button. The Sales Analysis Lines window is
                  displayed.
              12. Click the Functions button at the bottom of the window, and select
                  Insert Sales/Purchase Persons. A window is displayed with a list of
                  salespeople.
              13. Select all lines and then click OK. Scroll up in the Sales Analysis
                  Lines window to view the salespeople.
              14. In the Sales Analysis Lines window, highlight the lines that contains
                  the salesperson names, and then click Functions. Then select
                  Renumber Lines.
              15. In the Start Row Ref. No. field, enter A1, and then click OK. Click
                  OK again to accept the message that appears.
              16. In the first blank row underneath the salesperson names in the
                  Description field, type Total Sales.
              17. In the Type field, select Formula.
              18. In the Range field, enter A1…A4 to include all salesperson lines.
              19. Place a check mark in the Bold field.
              20. Close the Sales Analysis Lines window. The line template is set up.
                  Next, define the columns for the report.


              21. From the Sales & Marketing menu, select ANALYSIS &
                  REPORTING→SETUP→ANALYSIS COLUMN TEMPLATES.

              22. When you review existing templates, notice that the SALES template
                  contains the columns needed this report.
                  Create the analysis report.
              23. On the Sales & Marketing menu, click ANALYSIS &
                  REPORTING→ANALYSIS REPORTS.

              24. In the Analysis Report Name field, click the AssistButton to open
                  the Analysis Report Names window.


 Microsoft Official Training Materials for Microsoft Dynamics ™                     C-27
Your use of this content is subject to your current services agreement
Trade in Microsoft Dynamics™ NAV5.0

                         25. Select a new line and enter SALES in the Name field.
                         26. In the Description field, enter Sales by Salesperson.
                         27. In the Analysis Line Template Name field, select SALESP.
                         28. In the Analysis Column Template Name field, select SALES.
                         29. Click OK.
                         30. In the Sales Analysis Report window, type 01/01/08..01/31/08 in
                             the Date Filter field.
                             Modify the report to show only sales representatives who recorded
                             sales.
                         31. Click the arrow in the Analysis Line Template field in the header.
                             Click the Lines button.
                         32. In the Show column, select If Any Column Not Zero for all the lines.
                         33. Close the window, and then click OK in the Sales – Analysis Line
                             Templates window.
                             Create a bar chart.
                         34. Click FUNCTIONS→SHOW BAR CHART. The Analysis Line Bar Chart
                             window appears.

Lab 10.2 − Performing Analysis by Dimensions
                 Scenario: You have to analyze item sales by area. The analysis needs the
                 following parameters:

                         •   The analysis includes items with item numbers from 1896-S to
                             766BV-C.
                         •   The analysis is for 2008.
                             As soon as the Sales Analysis by Dimensions window contains the
                             item sales by area information, follow these steps.


                         1. Compare the sales sold by John Roberts with those by Peter Saddow.
                         2. View the analysis as the sales amount, COGS amount, and quantity.
                         3. Export the sales amount by John Roberts to a Microsoft® Excel
                            workbook.

                 HINT: Use the following dimensions: Area, Salesperson.


C-28        Microsoft Official Training Materials for Microsoft Dynamics ™
           Your use of this content is subject to your current services agreement
Appendix C: Lab Solutions


                Solution

                        1. From the Sales menu, select ANALYSIS &
                            REPORTING→SETUP→ANALYSIS VIEW CARD.

                        2. Browse through the existing view cards to see whether a card is set
                           up with both the Area and the Salesperson dimensions. The Default
                           analysis view card contains these dimensions.
                        3. Click the Update button. Click Yes on the message that appears.
                        4. Close the Analysis View Card.
                        5. From the Sales & Marketing menu, select ANALYSIS &
                           REPORTING→ANALYSIS BY DIMENSIONS.

                        6. Click the AssistButton in the Analysis View Code window, and
                           select the Default Analysis View Code. Click OK.
                        7. In the Show as Lines field, select Item.
                        8. In the Show as Columns field, select Area.
                        9. On the Filters tab, in the Date Filter field, enter 01/01/08..12/31/08.
                        10. In the Item Filter field, select items 1896-S..766BV-C.
                            You can now view item sales by area.
                        11. In the Salesperson Filter, select JR, click OK, and press ENTER.
                            John Roberts’ sales display.
                        12. In the Salesperson Filter, select PS, click OK, and press ENTER.
                            Peter Saddow’s sales display.
                        13. Delete the salesperson filter.
                        14. On the General tab, use the arrow in the Show Value As field to
                            show the sales amount, COGS amount, and quantity.
                            Export John Roberts’ sales to an Excel worksheet.
                        15. On the Filters tab, in the Salesperson Filter, select JR. Click OK,
                            and then press ENTER.
                        16. Click the Functions button, and select Export to Excel.

Lab 10.3 − Creating a Sales Budget
                Scenario: Create a sales forecast for sales representative Linda Martin using the
                Sales Budget function. The budget must meet these requirements:

                        •   The budget covers January through June 2008.
                        •   The budget shows the quantities you expect Linda Martin to sell of
                            items 8904-W through 8924-W.


           Microsoft Official Training Materials for Microsoft Dynamics ™                     C-29
          Your use of this content is subject to your current services agreement
Trade in Microsoft Dynamics™ NAV5.0

                 After you set up the sales budget, export it to Excel for feedback from Linda
                 Martin in the field.


                         1. Update the Excel Worksheet with changes to the budget.
                         2. Import the changes back into Microsoft Dynamics NAV.

                 Solution
                 Create the sales budget.

                         1. From the Sales & Marketing menu, click ANALYSIS &
                             REPORTING→BUDGETS.

                         2. In the Item Budget Name field, click the AssistButton. The Item
                            Budget Names window appears.
                         3. Select an empty line, and type SALES in the Name field and Sales
                            Forecast in the Description field.
                         4. In the Budget Dimension 1 Code field, select SALESPERSON.
                            Click OK.
                         5. In the Show as Lines field, enter Item.
                         7. In the Show as Columns field, enter Period.
                         8. In the Date Filter field, enter 01/01/08..06/30/08.
                         9. In the Item Filter field, enter 8904-W…8924-W.
                         10. In the Show Value As field, select Quantity.
                         11. On the lower-left side of the Sales Budget Overview window, click
                             the time interval 31 to see the time periods by month.
                         12. On the Filters tab, in the Salesperson Filter field, select LM.
                         13. On the Options tab, in the Rounding Factor field, select 1.
                         14. Select the Show Column Name field.
                         15. Enter budget numbers of your choice for each month, for example,
                             10 of item 8904-W per month and 30 of 8912-W in January and
                             February.
                             Export the budget to Excel.
                         16. Click the Functions button, and select Export to Excel.
                         17. Select Create Workbook in the Options field.
                         18. As soon as the data has finished processing, open the Microsoft
                             Excel workbook that has been created.
                         19. Save the workbook as Sales Budget.xls.


C-30        Microsoft Official Training Materials for Microsoft Dynamics ™
           Your use of this content is subject to your current services agreement
Appendix C: Lab Solutions

              20. Change the budget, for example, add 20 of 8924-W for March. Save
                  the workbook.
              21. From the Budget window, click the Functions button, and select
                  Import from Excel.
              22. In the Workbook File Name field, locate the location where you
                  saved the Excel Worksheet and select Sales Budget.
              23. Select Budget in the Worksheet Name field.
              24. Make sure that the fields are filled in as follows:


                   Budget Name           Sales
                   Option                Replace entries
                   Description           Imported from Excel 01/25/08
                   Import Value as       Quantity

              25. Click OK.
              26. Click Yes to replace the existing entries, and accept the message that
                  appears.
              27. The changes have been made to the budget.


 Microsoft Official Training Materials for Microsoft Dynamics ™                     C-31
Your use of this content is subject to your current services agreement
Trade in Microsoft Dynamics™ NAV5.0


C-32        Microsoft Official Training Materials for Microsoft Dynamics ™
           Your use of this content is subject to your current services agreement

8939 en trade-student_manual

  • 1.
    TRADE IN MICROSOFTDYNAMICS™ NAV 5.0 Microsoft Official Training Materials for Microsoft Dynamics ™ Your use of this content is subject to your current services agreement
  • 2.
    Last Revision: February2008 The information contained in this document represents the current view of Microsoft Corporation on the issues discussed as of the date of publication. Because Microsoft must respond to changing market conditions, it should not be interpreted to be a commitment on the part of Microsoft, and Microsoft cannot guarantee the accuracy of any information presented after the date of publication. This document is for informational purposes only. MICROSOFT MAKES NO WARRANTIES, EXPRESS, IMPLIED OR STATUTORY, AS TO THE INFORMATION IN THIS DOCUMENT. Complying with all applicable copyright laws is the responsibility of the user. Without limiting the rights under copyright, no part of this document may be reproduced, stored in or introduced into a retrieval system, or transmitted in any form or by any means (electronic, mechanical, photocopying, recording, or otherwise), or for any purpose, without the express written permission of Microsoft Corporation. Microsoft may have patents, patent applications, trademarks, copyrights, or other intellectual property rights covering subject matter in this document. Except as expressly provided in any written license agreement from Microsoft, the furnishing of this document does not give you any license to these patents, trademarks, copyrights, or other intellectual property. © 2007 Microsoft Corporation. All rights reserved. Microsoft, Microsoft Excel, Microsoft Windows, and Microsoft Dynamics NAV are either trademarks or registered trademarks of Microsoft Corporation or Great Plains Software, Inc. or their affiliates in the United States and/or other countries/regions. Great Plains Software, Inc. is a subsidiary of Microsoft Corporation. The names of actual companies and products mentioned herein may be the trademarks of their respective owners. The names of actual companies and products mentioned herein may be the trademarks of their respective owners. The certification requirements for Microsoft Dynamics NAV 5.0 will stay the same as for Microsoft Dynamics NAV 4.0 due to the release window between Microsoft Dynamics NAV 5.0 and Microsoft Dynamics NAV 5.1. The certification requirements are expected to be renewed with Microsoft Dynamics NAV 5.1 Microsoft Official Training Materials for Microsoft Dynamics ™ Your use of this content is subject to your current services agreement
  • 3.
    Table of Contents Introduction 0-1 Online Training ...................................................................................................0-1 Classroom Training ............................................................................................0-1 Training Materials ...............................................................................................0-1 About the Trade in Microsoft Dynamics NAV Training Manual ..........................0-2 About This Course..............................................................................................0-5 Student Objectives .............................................................................................0-7 Chapter 1: TRADE Overview 1-1 Quick Interaction: Lessons Learned ...................................................................1-2 Chapter 2: Sales Order Management 2-1 Objectives...........................................................................................................2-1 Introduction.........................................................................................................2-1 Sales Order Management Overview ..................................................................2-2 Setting Up Sales Order Management.................................................................2-3 Demonstration − Setting Up Sales Order Management .....................................2-3 Setting Up Customers and Shipping Options .....................................................2-5 Demonstration − Setting Up Shipping Options ...................................................2-5 Setting Up Reservation Rules ............................................................................2-7 Demonstration − Setting Up Customer Posting Groups .....................................2-7 Demonstration − Setting Up Salespeople...........................................................2-9 Managing Sales Transactions ............................................................................2-9 Demonstration − Creating a Blanket Order ......................................................2-10 Demonstration − Creating a Sales Order .........................................................2-12 Sales Order Processing ...................................................................................2-14 Drop Shipments................................................................................................2-16 Demonstration − Creating Drop Shipments......................................................2-17 Item Reservation ..............................................................................................2-20 Demonstration − Reserving Items ....................................................................2-20 Posting Orders .................................................................................................2-23 Demonstration − Performing a Partial Shipment ..............................................2-24 Invoicing a Combined Shipment.......................................................................2-25 Demonstration − Invoicing a Combined Shipment ...........................................2-26 Process Prepayment ........................................................................................2-27 Demonstration − Creating Sales Order with Prepayment Percentage .............2-28 Conclusion........................................................................................................2-30 Lab 2.1 − Handling Sales .................................................................................2-31 Quick Interaction: Lessons Learned .................................................................2-32 Sales Prices and Discounts 1 Objectives.............................................................................................................. 1 Introduction............................................................................................................ 1 Overview of Sales Prices ...................................................................................... 2 Sales Prices .......................................................................................................... 3 Demonstration − Setting up Sales Prices .............................................................. 5 Demonstration − Setting up Customer Price Groups ............................................ 6 Demonstration − Creating a Sales Order with Sales Price Information................. 8 Microsoft Official Training Materials for Microsoft Dynamics ™ Page i Your use of this content is subject to your current services agreement
  • 4.
    Trade in MicrosoftDynamics™ NAV 5.0 Lab 3.1 − Managing Alternative Sales Prices...................................................... 10 Lab 3.2 − Creating Sales Prices for a Campaign ................................................ 11 Maintaining Sales Prices ..................................................................................... 12 Demonstration − Creating Sales Prices and Customer Groups .......................... 13 Lab 3.3 − Updating Sales Prices ......................................................................... 16 Line and Invoice Discounts ................................................................................. 17 Setting Up Line Discounts ................................................................................... 18 Demonstration − Setting up Customer Discounts................................................ 19 Using the Line Discount Mechanism ................................................................... 20 Demonstration − Setting Up Sales Line Discounts.............................................. 21 Lab 3.4 − The "Best Price" Rule .......................................................................... 24 Invoice Discounts ................................................................................................ 25 Conclusion........................................................................................................... 27 Lab 3.5 − Creating Sales Line Discounts for a Campaign................................... 28 Quick Interaction: Lessons Learned .................................................................... 29 Chapter 4: Customer Service Features 4-1 Objectives...........................................................................................................4-1 Introduction.........................................................................................................4-1 Using Item Substitution ......................................................................................4-2 Demonstration − Creating a Sales Order with Substitutions ..............................4-4 Lab 4.1 − Handle Items with Substitutes ............................................................4-6 Creating Item Cross References ........................................................................4-7 Demonstration − Setting Up Item Cross References..........................................4-7 Demonstration − Creating a Sales Order with a Cross Reference .....................4-8 Lab 4.2 − Handle Items with Cross Reference .................................................4-10 Nonstock Items.................................................................................................4-11 Demonstration − Creating a Nonstock Item Manually ......................................4-12 Demonstration − Importing Vendor Catalogs ...................................................4-13 Handling Nonstock Items .................................................................................4-14 Demonstration − Using Drop Shipments ..........................................................4-15 Conclusion........................................................................................................4-17 Lab 4.3 − Handling the Sale of a Nonstock Item using a Special Order...........4-18 Quick Interaction: Lessons Learned .................................................................4-19 Chapter 5: Purchase Order Management 5-1 Objectives...........................................................................................................5-1 Introduction.........................................................................................................5-1 Efficient Purchasing............................................................................................5-2 Setting Up Purchases.........................................................................................5-3 Demonstration − Setting Up Purchases .............................................................5-3 Setting Up Vendors ............................................................................................5-4 Demonstration − Setting Up Vendors .................................................................5-4 Demonstration − Setting up Alternative Vendors................................................5-6 Vendor Posting Groups ......................................................................................5-6 Demonstration - Setting Up Vendor Posting Groups..........................................5-7 Setting Up Purchasers .......................................................................................5-8 Managing Purchase Transactions ......................................................................5-8 Demonstration − Creating Purchase Quotes....................................................5-10 Page ii Microsoft Official Training Materials for Microsoft Dynamics ™ Your use of this content is subject to your current services agreement
  • 5.
    Table of Contents Demonstration − Creating Purchase Orders ....................................................5-11 Purchase Prices and Discounts .......................................................................5-12 Demonstration − Setting up Alternative Purchase Prices.................................5-12 Demonstration − Setting Up Individual Prices based on Price Agreement.......5-14 Using the Pricing Mechanism ...........................................................................5-15 Lab 5.1 − Managing Alternative Purchase Prices.............................................5-16 Line Discounts ..................................................................................................5-17 Conclusion........................................................................................................5-18 Lab 5.2 – Managing Purchase Line Discounts .................................................5-19 Quick Interaction: Lessons Learned .................................................................5-20 Chapter 6: Requisition Management 6-1 Objectives...........................................................................................................6-1 Introduction.........................................................................................................6-1 Requisition Management....................................................................................6-2 Requisition Management Setup .........................................................................6-2 Demonstration − Setting Up Planning Parameters.............................................6-4 The Requisition Worksheet ................................................................................6-8 Demonstration − Using the Requisition Worksheet ............................................6-9 Demonstration − Creating Purchase Orders from the Requisition Worksheet .6-10 Additional Worksheet Features ........................................................................6-11 Demonstration − Using the Additional Worksheet Features.............................6-12 Conclusion........................................................................................................6-13 Lab 6.1 − Calculating a Replenishment Plan from the Requisition Worksheet 6-14 Quick Interaction: Lessons Learned .................................................................6-15 Chapter 7: Item Charges 7-1 Objectives...........................................................................................................7-1 Introduction.........................................................................................................7-1 Overview of Item Charges ..................................................................................7-2 Setting Up Item Charges ....................................................................................7-3 Purchase Item Charges......................................................................................7-3 Demonstration − Handling Additional Direct Cost as an Item Charge................7-4 Lab 7.1 − Handling Purchase Item Charges.......................................................7-8 Sales Item Charges ............................................................................................7-9 Demonstration − Handling Sales Item Charges .................................................7-9 Purchase and Sales Allowances ......................................................................7-11 Demonstration − Creating Item Charge Credit Memo ......................................7-11 Conclusion........................................................................................................7-12 Lab 7.2 − Handling Purchase Allowances ........................................................7-13 Quick Interaction: Lessons Learned .................................................................7-14 Chapter 8: Order Promising 8-1 Objectives:..........................................................................................................8-1 Introduction.........................................................................................................8-1 Date Calculation Concepts .................................................................................8-2 Promising Orders to Customers .........................................................................8-3 Setting Up Date Calculation for Sales Orders ....................................................8-6 Demonstration − Setting Up Outbound Warehouse Handling Time ...................8-6 Microsoft Official Training Materials for Microsoft Dynamics ™ Page iii Your use of this content is subject to your current services agreement
  • 6.
    Trade in MicrosoftDynamics™ NAV 5.0 Demonstration − Setting Up Shipping Time .......................................................8-7 Demonstration − Setting Up an Availability Test Interval....................................8-8 Setting Up the Order Promising Feature ............................................................8-8 Promising Sales Order Delivery .........................................................................8-9 Demonstration − Promising Sales Orders without a Requested Delivery Date..8-9 Demonstration − Requesting Items that are not Available for Shipping ...........8-10 Demonstration − Meeting the Requested Delivery Date ..................................8-12 Demonstration − Requesting an Order where the Delivery Date cannot be Met8-13 Demonstration − Setting Shipment Date Before Current Date .........................8-16 Promising Sales Order Delivery in Other Situations.........................................8-17 Demonstration − Requesting Different Shipment Dates on Lines ....................8-17 Lab 8.1 − Promise Order Delivery to a Customer.............................................8-18 Estimating Purchase Order Receipt .................................................................8-19 Demonstration − Using Lead Time Calculations ..............................................8-23 Estimating Purchase Order Receipt .................................................................8-24 Demonstration − Calculating Purchase Order Receipt without a Receipt Date Requested ........................................................................................................8-24 Demonstration − Estimating a Purchase Order Receipt with a Receipt Date Requested ........................................................................................................8-26 Demonstration − Calculating an Order that must be Placed before the Current Date..................................................................................................................8-27 Demonstration − Estimating a Purchase Order Receipt in Other Situations ....8-28 Lab 8.2 − Order Promising ...............................................................................8-29 Estimating Transfer Order Receipt ...................................................................8-30 Calendars .........................................................................................................8-30 Conclusion........................................................................................................8-32 Quick Interaction: Lessons Learned .................................................................8-33 Chapter 9: Returns Management 9-1 Objectives...........................................................................................................9-1 Introduction.........................................................................................................9-1 Sales Return Management.................................................................................9-2 Setting Up Returns Management .......................................................................9-3 Managing Returns from Customers....................................................................9-5 Demonstration − Using Sales Return and Sales Allowance...............................9-7 Demonstration − Processing the Sales Return.................................................9-14 Demonstration − Returning Items for Repair at Vendor ...................................9-16 Lab 9.1 − Processing the Customer Return .....................................................9-20 Managing Returns to Vendors..........................................................................9-21 Demonstration − Returning Items to Vendor for Repair ...................................9-23 Demonstration − Using Purchase Allowance ...................................................9-25 Lab 9.2 − Processing the Customer Return, II .................................................9-27 Activity Diagram for Return Management.........................................................9-28 Conclusion........................................................................................................9-28 Quick Interaction: Lessons Learned .................................................................9-29 Chapter 10: Analysis and Reporting 10-1 Objectives.........................................................................................................10-1 Introduction.......................................................................................................10-1 Page iv Microsoft Official Training Materials for Microsoft Dynamics ™ Your use of this content is subject to your current services agreement
  • 7.
    Table of Contents Analysis and Reporting ....................................................................................10-2 Creating Analysis Reports ................................................................................10-2 Demonstration − Customizing Analysis Reports ..............................................10-6 Demonstration − Creating Analysis Reports.....................................................10-8 Demonstration − Using Customer and Item Groups.......................................10-10 Demonstration − Analyzing Quantity Purchased by Customer Groups..........10-12 Demonstration − Using the Bar Chart Feature ...............................................10-13 Lab 10.1 − Creating Analysis Reports ............................................................10-14 Analysis by Dimensions .................................................................................10-15 Demonstration − Using Analysis by Dimensions ............................................10-15 Lab 10.2 − Performing Analysis by Dimensions .............................................10-18 Sales and Purchase Budgets .........................................................................10-19 Demonstration − Creating a Purchase Budget ...............................................10-20 Demonstration − Exporting Budgets to Excel .................................................10-21 Demonstration − Using Budgets in Analysis Reports .....................................10-23 Lab 10.3 − Creating a Sales Budget...............................................................10-24 Conclusion......................................................................................................10-25 Quick Interaction: Lessons Learned ...............................................................10-26 Appendix A: Terminology List A-1 Inventory Terminology List ................................................................................ A-1 List of Sales Batch Jobs, Reports, and Sales Documents ................................ A-4 List of Purchase Batch Jobs, Reports, and Purchase Documents .................... A-9 Appendix B: Functionality and Licenses B-1 Trade licenses in Microsoft Dynamics NAV....................................................... B-1 Appendix C: Lab Solutions C-1 Lab 2.1 − Handling Sales .................................................................................. C-1 Lab 3.1 − Managing Alternative Sales Prices.................................................... C-3 Lab 3.2 − Creating Sales Prices for a Campaign .............................................. C-4 Lab 3.3 − Updating Sales Prices ....................................................................... C-6 Lab 3.4 − The "Best Price" Rule ........................................................................ C-8 Lab 3.5 − Creating Sales Line Discounts for a Campaign................................. C-9 Lab 4.1 − Handle Items with Substitutes ......................................................... C-11 Lab 4.2 − Handle Items with Cross Reference ................................................ C-12 Lab 4.3 − Handling the Sale of a Nonstock Item using a Special Order.......... C-13 Lab 5.1 − Managing Alternative Purchase Prices............................................ C-14 Lab 5.2 − Managing Purchase Line Discounts ................................................ C-15 Lab 6.1 − Calculating a Replenishment Plan from the Requisition Worksheet C-17 Lab 7.1 − Handling Item Charges.................................................................... C-19 Lab 7.2 − Handling Purchase Allowances ....................................................... C-19 Lab 8.1 − Promise Order Delivery to a Customer............................................ C-21 Lab 8.2 − Order Promising .............................................................................. C-22 Lab 9.1 − Processing the Customer Return .................................................... C-23 Lab 9.2 − Processing the Customer Return, II ................................................ C-25 Lab 10.1 − Creating Analysis Reports ............................................................. C-26 Lab 10.2 − Performing Analysis by Dimensions .............................................. C-28 Microsoft Official Training Materials for Microsoft Dynamics ™ Page v Your use of this content is subject to your current services agreement
  • 8.
    Trade in MicrosoftDynamics™ NAV 5.0 Lab 10.3 − Creating a Sales Budget................................................................ C-29 Page vi Microsoft Official Training Materials for Microsoft Dynamics ™ Your use of this content is subject to your current services agreement
  • 9.
    Introduction INTRODUCTION Training is an important component of maintaining the value of your Microsoft Dynamics™ NAV 5.0 investment. Quality training from industry experts keeps you up-to-date and helps you develop the skills necessary for fully maximizing the value of your solution. Whether you want Online Training, Classroom Training, or Training Materials, there is a type of training to meet everyone’s needs. Select the training type that allows you to stay ahead of the competition. Online Training Online Training delivers convenient, in-depth training to you in the comfort of your own home or office. Online training provides immediate access to training 24 hours a day, and is perfect for the customer who does not have the time or budget to travel. The online training option, eCourses, combines the efficiency of online training with the in-depth product coverage of classroom training, with at least two weeks to complete each course. Classroom Training Classroom Training provides serious, in-depth learning through hands-on interaction. From demonstrations to presentations to classroom activities, you will receive hands-on experience with instruction from a certified staff of experts. Training Materials Training Materials enable you to learn at your own pace, on your own time, with information-packed training manuals. Our wide variety of training manuals feature many tips, tricks, and insights you can refer to repeatedly. Microsoft Dynamics Training Courseware: The Microsoft Dynamics Training Courseware are detailed training manuals, designed from a training perspective. These manuals include advanced topics and training objectives, exercises, interactions, and quizzes. Microsoft Official Training Materials for Microsoft Dynamics ™ 0-1 Your use of this content is subject to your current services agreement
  • 10.
    Trade in MicrosoftDynamics™ NAV 5.0 About the Trade in Microsoft Dynamics NAV Training Manual This training manual provides a conceptual and operational description of the standard trade functionality of Microsoft Dynamics NAV. The manual can be used both in the context of an instructor-led training course and as reference material for self-teaching. Target Audience This training manual is intended for Microsoft Certified Dynamics Partners' employees selling, implementing, and supporting Microsoft Dynamics NAV. Training Objectives Whether used in a course setting or for self-teaching, the manual is designed to equip course participants with the product knowledge, both at conceptual and functional levels, required when implementing and supporting Microsoft Dynamics NAV at a wide range of wholesale and manufacturing companies with a focus on the trade area. Training Prerequisites To successfully participate in the Trade course or complete the training in the self-teaching manner, participants must have passed the following: • The Microsoft Dynamics NAV Overview test (or have equivalent experience with Microsoft Dynamics NAV (Financials) application). • The Microsoft Dynamics NAV Essentials test. Additionally, participants need to have a background in distribution/logistics to understand the underlying principles of these businesses. Training Manual Overview Before you start the course (self-teaching), you must install Microsoft Dynamics NAV on your computer. This manual provides the participants with an in depth understanding of the granules and features of the trade-related functionality in Microsoft Dynamics NAV. The manual consists of the following chapters: • Chapter 2: Sales Order Management • Chapter 3: Sales Prices and Discounts • Chapter 4: Customer Service Features • Chapter 5: Purchase Order Management • Chapter 6: Requisition Management • Chapter 7: Item Charges 0-2 Microsoft Official Training Materials for Microsoft Dynamics ™ Your use of this content is subject to your current services agreement
  • 11.
    Introduction • Chapter 8: Order Promising • Chapter 9: Returns Management • Chapter 10: Analysis and Reporting Every chapter includes an overview of the feature, explains the setup procedure, and describes how the feature supports the associated operating processes involved in managing a reselling business. In this manual, the chapters are organized logically, reflecting the relationship between different granules of the program. It is, therefore, recommended that the course (when built on this manual) or self-teaching activity follows the suggested teaching path. If preferred, however, the users of the manual can choose alternative paths. The chapters in this training manual typically contain the following elements: • Concepts • Demonstrations • Labs Concepts explain the business processes that can be managed by using the trade functionality of the program. Demonstrations represent the typical business situations where the application is used. Demonstrations provide a basis for examples that give practical step-by- step descriptions of how to use the application. Labs enable the course participants (manual readers) to practice using the program. The manual includes the following typographic conventions: • Name is used for names of fields, tabs, and windows. • PATHNAME→PATH is used for navigation paths for users to follow. Dates The dates in the course manual are in the American format. In order to avoid confusion when reading the manual and following the exercises, if necessary, it is a good idea to change the date format in Windows before starting the training session. The working date is set to be 01/24/08 (January 24, 2008). It is important that this date is used when following the examples and doing the exercises included in the manual. Microsoft Official Training Materials for Microsoft Dynamics ™ 0-3 Your use of this content is subject to your current services agreement
  • 12.
    Trade in MicrosoftDynamics™ NAV 5.0 Demonstration Data All examples and exercises in this manual are based on a fictitious company, Cronus International Ltd. Where possible, examples and exercises in each chapter are designed independently of each other. However, because of the limited scope of the Cronus demo database, the same data is sometimes used in examples illustrating different functionality. To make sure that you always have a clean demo database, make a copy of the database on the hard disk before you start the course. License Information To run the examples and exercises included in this training manual, you must have a standard Cronus license. This is provided on the product CD. Suggested Course Duration When this training manual is used to run a course, it is recommended that the course be taught over a period of two to three days. Additional Information You can learn more about Microsoft Dynamics NAV in the Financial Management and Inventory Management courses, and in Microsoft Dynamics NAV eCourses and Online Help. You can learn more about the topics of distribution and supply chain management from the APICS homepage: http://www.apics.org. APICS is a nonprofit, educational society for resource management. 0-4 Microsoft Official Training Materials for Microsoft Dynamics ™ Your use of this content is subject to your current services agreement
  • 13.
    Introduction About This Course This section provides you with a brief description of: • The course • Audience • Suggested prerequisites • Course objectives • Student materials • Related certification exams Description This two and a half day Microsoft Dynamics™ NAV Trade course explores all of the activities required to handle the purchase, sale, and return of inventory in the program. This course will show you how to manage sales and purchase transactions, including prices and discounts, item charges and order promising. Requisition management will be covered, as well as returns management and customer service features. Audience The intended audience includes individuals wanting to learn the basic features and to develop a working knowledge of the typical day-to-day procedures required to effectively use Microsoft Dynamics NAV Trade. The class is targeted toward sales and purchase managers, salespeople and purchasers, and others in an organization who are responsible for the setup and administration of trade functionality, including item prices, discounts, and substitutions. At Course Completion Completing this course allows students to: • Manage sales transactions • Create and use sales prices and discounts • Process sales of items with substitutions and cross references • Process sales of nonstock items • Manage purchase transactions • Create and process purchase requisitions • Set up and use item charges • Use the order promising functionality • Process returns from customers and to vendors • Create analysis reports Microsoft Official Training Materials for Microsoft Dynamics ™ 0-5 Your use of this content is subject to your current services agreement
  • 14.
    Trade in MicrosoftDynamics™ NAV 5.0 • Perform analysis by dimensions • Create sales and purchase budgets Prerequisites Before attending this course, students must have: • General knowledge of Microsoft® Windows® • The ability to use Microsoft Dynamics NAV financials for financials processing • Basic knowledge of distribution and logistics Student Materials The following material for Microsoft Dynamics NAV version 5.0 are releted to this course: • What's New in Microsoft Dynamics version 5.0 Application, Part I • Introduction • Inventory Management • Finance Certification Exams This course is releted to the following exams: • Inventory Management 0-6 Microsoft Official Training Materials for Microsoft Dynamics ™ Your use of this content is subject to your current services agreement
  • 15.
    Introduction Student Objectives What do you hope to learn by participating in this course? List three main objectives below: 1. 2. 3. Microsoft Official Training Materials for Microsoft Dynamics ™ 0-7 Your use of this content is subject to your current services agreement
  • 16.
    Trade in MicrosoftDynamics™ NAV 5.0 0-8 Microsoft Official Training Materials for Microsoft Dynamics ™ Your use of this content is subject to your current services agreement
  • 17.
    Chapter 1: TradeOverview CHAPTER 1: TRADE OVERVIEW Microsoft Dynamics™ NAV is a collaborative business management solution for medium-sized companies. It is an integrated product that includes functionality to support financial and relationship management, distribution, and manufacturing. The Microsoft Dynamics NAV Trade module is aimed at a variety of wholesale and manufacturing companies. The module provides tools to help with the following: • Manage day-to-day purchase and sales operations • Increase the level of customer service • Improve operational efficiency This course is a part of the Supply Chain curriculum and is designed for students who have passed the Microsoft Dynamics NAV Overview test (or have equivalent experience with the Microsoft Dynamics NAV Financials application) and the Microsoft Dynamics NAV Essentials test, and want to learn more about Microsoft Dynamics NAV for Trade. The course primarily provides explanations of the program’s conceptual design and functionality related to managing and administrating basic trading operations. Students who want to take the Financial Management exam can use this course as preparation. Microsoft Official Training Materials for Microsoft Dynamics ™ 1-1 Your use of this content is subject to your current services agreement
  • 18.
    Trade in MicrosoftDynamics™ NAV 5.0 Quick Interaction: Lessons Learned Take a moment and write down three Key Points you have learned from this chapter: 1. 2. 3. 1-2 Microsoft Official Training Materials for Microsoft Dynamics ™ Your use of this content is subject to your current services agreement
  • 19.
    Chapter 2: SalesOrder Management CHAPTER 2: SALES ORDER MANAGEMENT Objectives The objectives are: • Provide an overview of the Sales Order Management process • Set up Sales Order Management, Customers and Shipping Options • Set up Reservation Rules, Customer Posting Groups, and Sales People • Manage the Sales Transactions flow • Create Quotations, Blanket Orders, and Sales Orders • Perform Drop Shipments • Create Item Reservations • Post Orders • Perform Partial and Combined shipments • Process Prepayment Introduction The sales handling process is the cornerstone in all companies in order to achieve a high customer service level. Microsoft Dynamics™ NAV supports companies in managing all the steps in the sales order management process from creating the blanket order to shipping and invoicing the order. Sales Order Management provides an overview of background and set up information. The main focus is put on common aspects of sales transaction handling and all aspects of the flow is described in details. Examples are given in comprehensive demonstrations. A list of sales batch jobs, reports, and sales documents is included in Appendix A. Microsoft Official Training Materials for Microsoft Dynamics ™ 2-1 Your use of this content is subject to your current services agreement
  • 20.
    Trade in MicrosoftDynamics NAV 5.0 Sales Order Management Overview For companies to survive, they must keep customers satisfied. An instant and accurate response to inquiries, such as delivery time or the price of the product, is a key factor contributing to customer satisfaction. In addition, efficiently handling special customer requests about shipping arrangements and invoicing preferences is likely to ensure repeat orders. Typical examples of these requests include: • Receiving shipments in parts or to different addresses • Receiving the orders before they are invoiced • Being invoiced for several shipped orders at the same time Companies must also ensure they can easily register sales transaction information. For example, adjusting customer balance and updating inventory availability and values are tasks that must always be performed when handling sales. Additionally, companies may want to keep a record of the salespeople performing the sale. As aspects of a future sales agreements are negotiated and agreed upon in the presales stage, it is helpful for salespeople to record relevant agreement details once and then reuse this information when creating an actual sales order. There is a lot of functionality in Microsoft Dynamics™ NAV that supports efficient sales transaction handling, such as: • Sales Order Management: This functionality includes documents (quotes, blanket orders, and sales orders) that support the order processor in efficiently managing sales. The functionality supports partial order shipment, separation between shipping and invoicing, and combined invoicing. • Alternative Ship-Tos: This facilitates handling sales orders for customers who have several alternative shipping addresses. • Drop Shipments: This enables the order processor to efficiently handle orders shipped directly from the vendor to the customer without involving the company's operations. • Order processors/purchasing agents: This enables collection of sales statistics at the salesperson level. • Shipping agents: This facilitates the management of carriers (shipping agents) and related information. 2-2 Microsoft Official Training Materials for Microsoft Dynamics ™ Your use of this content is subject to your current services agreement
  • 21.
    Chapter 2: SalesOrder Management Setting Up Sales Order Management This chapter contains setup options that define the functionality of sales order management, focusing on the physical handling rather than financial aspects of a sales transaction. Setup options that support additional sales practices and tasks (for example, sales and invoice discounts, and return management) are discussed in separate chapters. The sales setup consists of the following elements: • Sales & Receivables setup: Based on their established practices, companies must specify how they want the program to support them in managing different aspects of their sales transactions. These are general setup options the program applies to all sales transactions, regardless of the item or customer. • Customer setup: Basic information such as name and address, in addition to invoicing details (for example, credit limit, invoicing, discount and payment terms, currencies, shipping schemes, and reservation rules, and so on) are recorded for each customer on a customer card. The setup of customer posting groups defines the connection between a customer and accounts in the general ledger. This is done by assigning a customer to a posting group for which balance sheet and income statement accounts are set up. • Salesperson setup: Companies can set up codes to identify and describe salespeople. This is done to establish a link between a salesperson and the performance in terms of, for example, the number of sales transactions (orders, invoices, or returns) handled. Demonstration − Setting Up Sales Order Management At Cronus, management wants to notify the order processor about a customer's credit and balance every time the customer places an order. Because management wants to ensure that orders are delivered on time, they want the program's feedback on item availability when a sales order is entered. They also require the program to create shipment and return receipt documents when posting invoices, credit memos or both. Microsoft Official Training Materials for Microsoft Dynamics ™ 2-3 Your use of this content is subject to your current services agreement
  • 22.
    Trade in MicrosoftDynamics NAV 5.0 Steps These business requirements have led to the following Sales & Receivables setup for Cronus: 1. On the Sales & Marketing menu, click SETUP→SALES & RECEIVABLES SETUP. The Sales & Receivables Setup window appears. 2. Check the different fields that are explained in the following. Field Explanation General tab The fields on the General tab specify the program's facilities for sales order management. Credit Warnings The Credit Warnings field specifies if the program warns about the customer's credit standing when the user creates a sales order or invoice for the customer. When it is required, the warning can be triggered by overdue balance, exceeded credit limit, or both. Cronus has chosen both. Stockout Warning Selecting the Stockout Warning field specifies that the program warns the user when there are not enough items on inventory to fulfill a sales order. The warning is based on a calculation that sums up quantity amounts on all posted item ledger entries and unposted sales order lines, including reserved quantities. Shipment on Invoice Selecting the Shipment on Invoice and Return and Return Receipt on Receipt on Credit Memo fields automatically Credit Memo creates posted shipment and posted return receipt documents at the time of posting sales invoices and sales credit memos. If these fields are clear, the program only creates posted invoices, credit memos or both. Posted shipment (return receipt) documents are needed when you are using: • The functionality of the Item Charges granule. • The automatic package tracking function. Dimensions tab Use the fields on the Dimensions tab to group customers and salespeople for budgeting and sales analysis purposes. These fields are described later in this course. The definition and setup options of all other fields on the General and Numbering tabs of the Sales & Receivables Setup window can be found in Help. Fields determining invoice discount setup and cost reversing options are described in "Sales Prices and Discounts" and "Returns Management" sections in this training manual. 2-4 Microsoft Official Training Materials for Microsoft Dynamics ™ Your use of this content is subject to your current services agreement
  • 23.
    Chapter 2: SalesOrder Management Setting Up Customers and Shipping Options Basic customer setup is covered in other courses. This topic explains additional setup options for customer data management. These options manage shipping- related information and processes and control item reservation rules. The set up information is followed by the explanation of the customer posting group setup considerations. Customers often have alternative sites in addition to the main business address for shipping items. For example, a subcontractor may require deliveries to several construction sites. Companies may have warehousing and production sites that have addresses different from the main office address. The Alternative Ship-To's functionality supports those customers that have alternative shipping sites. If a customer wants the orders shipped to different addresses, addresses can be recorded as alternative ship-to addresses and chosen by the order processor when creating an order/invoice. Ship-to addresses are entered in the Ship-to Address table. This can contain unlimited number of addresses for each customer. A code representing information such as customer number and name is linked to each address. Demonstration − Setting Up Shipping Options Cronus' customer 10000 has two alternative ship-to addresses. Steps Perform the following steps: 1. Open the customer card for customer 10000 by selecting ORDER PROCESSING→CUSTOMERS from the Sales & Marketing menu. 2. Click CUSTOMER→SHIP-TO ADDRESSES and press F5. The list of ship- to addresses is displayed. 3. Select the second address line, and then click OK to review address details. When the code for this ship-to address (found on the upper-left of the card) is selected in the Ship-to Code field on orders (invoices and credit memos), the ship-to information appears on document printouts. Ship-to codes are available on purchase orders that are drop-shipped to a customer. All other shipping setup options are located on the Shipping tab of a customer card. 4. Click the Shipping tab on the Customer Card. The shipping options are displayed. Microsoft Official Training Materials for Microsoft Dynamics ™ 2-5 Your use of this content is subject to your current services agreement
  • 24.
    Trade in MicrosoftDynamics NAV 5.0 Companies may use a decentralized distribution strategy to ensure that orders are delivered fast to their customers. Such a strategy suggests that customer orders ship from local warehouses rather than from a central location. A company can link a customer to a specific location by specifying a default location in the Location Code field. The option selected in the Shipping Advice field indicates if the customer accepts partial order shipments or only wants complete shipments. For complete shipments, the program does not allow posting of a sales order unless the Qty. to Ship field is equal to the total sales order quantity. Depending on their profile, industrial practices, and location, customers may have different preferences as to whom (a customer or a supplier) picks up the shipment, how orders must be shipped, and so on. The program can record all the terms of sale and shipment methods (often based on INCOTERMS) that can be associated with each customer. Cronus has set up several Shipment Method Codes in the program. 1. From the Sales and Marketing menu, click ORDER PROCESSING→SETUP→SHIPMENT METHODS. The Shipment Methods window appears: FIGURE 2-1: SHIPMENT METHODS WINDOW When assigned to a customer, the shipment method code is copied to sales documents for that customer. The shipping setup options in the Shipping Agent Code, Shipping Agent Service Code, and Shipping Time fields, and the two calendar fields on the Shipping tab of the customer card calculate shipment and delivery dates for sales documents. These setup options are described in Chapter 8, "Order Promising." 2-6 Microsoft Official Training Materials for Microsoft Dynamics ™ Your use of this content is subject to your current services agreement
  • 25.
    Chapter 2: SalesOrder Management The combine shipments option using the Combine Shipments field is selected when invoicing or debiting a customer for several shipments or return receipts in one invoice or credit memo. This field is selected by default in the order header, but can be changed if it is required. The Combine Shipments or Return Receipts batch job combines the posted shipment or return receipt documents into one invoice or credit memo and includes the orders selected in the Combine Shipments field. Setting Up Reservation Rules Companies can make and manage item reservations between sales and purchase orders, and they can decide whether reservations are made in relation to a specific customer. This decision is determined by selecting one of the options: Never, Optional, or Always in the Reserve field on the Shipping tab of the customer card. The selected option is copied to the Reserve field on the header of a sales document created for the customer, where it, in combination with the contents of the Reserve field on the item card, determine the reservation option for individual sales lines in the document. To complete customer setup, the following demonstration describes the setup details of customer posting groups. Demonstration − Setting Up Customer Posting Groups The financial value of a sales transaction is posted to dedicated accounts in the general ledger. When companies do not want to establish accounts for each customer, they can put several customers into one posting group and specify accounts per group. After the company decides on criteria for how its customers are grouped, the groups must be set up in the Customer Posting Group table. In this table, the user can assign a code to each posting group and specify general ledger accounts for categories, such as receivables, service charges, payment discount amounts, interest, additional fees, and so on. Microsoft Official Training Materials for Microsoft Dynamics ™ 2-7 Your use of this content is subject to your current services agreement
  • 26.
    Trade in MicrosoftDynamics NAV 5.0 Steps Cronus' accountants have set up two customer posting groups, domestic and foreign: 1. From the Financial Management menu, click SETUP→POSTING GROUPS→CUSTOMER to open the Customer Posting Groups window. FIGURE 2-2: CUSTOMER POSTING GROUPS WINDOW Entering a code in the Customer Posting Group field of the Invoicing tab on a customer card assigns the customer to a specific posting group: 2. Open the customer card for customer 10000 and then click the Invoicing tab. 3. Check that Domestic has been selected in the Customer Posting Group field. Each customer can only be assigned one customer posting group. When a sales transaction (orders, invoices, and credit memos) for this customer is posted, the accounts for the posting group where the customer belongs is used. NOTE: Accountants can also assign general business posting groups and VAT business posting groups to customers. The business group code is used in combination with a general product posting group code in the general posting setup to specify the posting accounts to which certain transactions are posted. The VAT business posting group code is used in combination with a VAT product posting group code to find the VAT %, VAT calculation type, and VAT accounts to which the program posts VAT amounts. You can learn more about general setup rules in the Microsoft Dynamics NAV Financial Management course. 2-8 Microsoft Official Training Materials for Microsoft Dynamics ™ Your use of this content is subject to your current services agreement
  • 27.
    Chapter 2: SalesOrder Management Each customer posting group can have different general ledger accounts or the same accounts set up for it. An advantage of having different groups that have the same accounts is that it gives accountants flexibility in grouping customers for reporting and analysis purposes. For example, a total receivables amount can be presented and analyzed with two groups representing domestic and foreign customers. Demonstration − Setting Up Salespeople When companies want to monitor sales performance, they can record volume achieved by salespeople and produce statistics. Steps To set up salespeople, a company assigns a code to each salesperson. Cronus has set up several codes for their employees in the sales department: 1. From the Sales & Marketing menu, click SALES→SALESPEOPLE. A Salesperson card appears. Details such as job title, commission percent, and other dimensions can be specified on each salesperson card. 2. To create a new salesperson, press F3. 3. To view a list of all salespeople in the program, click SALESPERSON→LIST, or press F5. NOTE: Apart from two default dimensions (department and project) selected on the Invoicing tab of the salesperson card, companies can also assign additional default dimensions. This can be done for a single salesperson or the whole group. This setup option is found in the Salespeople/Purchasers window, by clicking SALESPERSON→DIMENSIONS→DIMENSIONS-SINGLE/DIMENSIONS-MULTIPLE. Selecting a salesperson code as the default on a customer card or directly in the sales documents makes sure that sales statistics are created at the salesperson level. Based on this, the overall performance of salespeople can be calculated and presented in a report. Managing Sales Transactions Managing Sales Transations elaborates on the program's facilities that support common tasks in sales transaction management. The workflow includes the following steps: • Registering a blanket agreement with a customer • Converting the agreement into a sales order • Drop shipping • Reserving the ordered quantity for the sales order Microsoft Official Training Materials for Microsoft Dynamics ™ 2-9 Your use of this content is subject to your current services agreement
  • 28.
    Trade in MicrosoftDynamics NAV 5.0 Sales Quotes A sales quote can be considered a "draft order" that the order processor gives to a customer that specifies price, terms of sale, and description of items. If the customer wants to buy the items on the quote, the quote can be converted to a sales order. Because the functionality in quotes is also available in sales orders (addressed in detail later in this section), sales quotes are not described here. Blanket Orders A blanket sales order represents a framework for a long-term agreement between the company and a customer. The order processor makes a blanket order when the customer has committed to buying large quantities to be delivered in several shipments over a period of time. Often, blanket orders cover only one item with predetermined delivery dates. Quantities on a blanket order do not affect item availability and can be used as a worksheet for monitoring, forecasting, and planning. On the blanket order, each shipment can be set up as an order line. This can then be converted into a sales order at the time of shipping. The following demonstration shows how to create a blanket order. Demonstration − Creating a Blanket Order A representative from customer 10000 calls the order processor at Cronus to order 1000 units of item 70000. The customer wants the items to be delivered in 250 units every week over the next month. Steps Create a blanket order for 1000 units of item 70000 for customer 10000: 1. From the Sales & Marketing menu, select ORDER PROCESSING→BLANKET ORDER. Press F3 to make a new order and enter the customer information in the blanket order header. 2. Leave the Order Date field blank. When separate sales orders are created from the blanket order, the order date of the sales order is equal to the actual work date. Notice that the Salesperson Code field on the order header contains the default code for the salesperson assigned to the customer 10000. This code is retrieved from the customer card. Create four lines of 250 units of item 70000: 2-10 Microsoft Official Training Materials for Microsoft Dynamics ™ Your use of this content is subject to your current services agreement
  • 29.
    Chapter 2: SalesOrder Management 3. On each line, in the Type field, select Item. In the No. field select 70000. In the Quantity field, enter 250. 4. In the Shipment Date field, enter the shipment dates of 02/01/08, 02/08/08, 02/15/08, and 02/22/08 respectively. Notice that the Qty. to Ship field is filled in automatically to indicate the quantity to be listed on the sales orders for the respective shipment dates. Create the order for the first shipment of 250 units: 5. In the Qty. to Ship field, leave the quantity of 250 for the first line and delete the quantity to ship in the three other lines. The completed blanket order looks as follows: FIGURE 2-3: COMPLETED BLANKET SALES ORDER Convert a blanket order into a sales order: 6. Click Make Order, selecting Yes in the information message and in all other warnings. The link between the blanket order and the sales order it is retained and enables the order processor to view unposted and posted sales order (invoice) lines. To view the list: 7. Select the first line in the blanket order and then click LINE→UNPOSTED LINES→ORDERS. Microsoft Official Training Materials for Microsoft Dynamics ™ 2-11 Your use of this content is subject to your current services agreement
  • 30.
    Trade in MicrosoftDynamics NAV 5.0 8. In the Sales Lines window click LINE→SHOW document to view the order. The sales order contains all the lines from the blanket order. The quantities for the lines where the quantity in the Qty. to Ship field was deleted appear, but with blank quantity fields. Remember that the sales order line quantity must not exceed the quantity of the associated blanket order line. Otherwise, posting of the sales order is not possible. 9. Delete the last three lines in the sales order. When the sales order is posted as shipped, invoiced, or both, the Quantity Shipped and Quantity Invoiced fields are updated on the related blanket order. As soon as the sales order(s) has been created for the total quantity of a blanket order line, no other sales order(s) is created for the same line. The blanket order number and line number are recorded as properties of the sales lines when created from a blanket order. 10. Zoom in on the lines of the sales order created earlier or press CTRL + F8. The Blanket Order No. and the Blanket Order Line No. fields have corresponding references. NOTE: Where sales orders are not created directly from the blanket order but are still relate to it, a link between a sales order and a blanket order is established by selecting the number of the blanket order in the Blanket Order No. field on the sales line. Demonstration − Creating a Sales Order This demonstration is a continuation of the previous demonstration: "Creating a Blanket Order." The order processor at Cronus is about to ship 250 units of item 70000 to customer 10000. This is the first shipment out of four on the blanket order. The shipment needs to be delivered to the customer's subsidiary address instead of to the main address. The shipping agent is DHL, who provides the option of package tracking. 2-12 Microsoft Official Training Materials for Microsoft Dynamics ™ Your use of this content is subject to your current services agreement
  • 31.
    Chapter 2: SalesOrder Management Steps Perform the following steps: 1. Locate the sales order created earlier from the blanket order. The General tab of the sales header specifies default customer details and additional information for the customer. These are copied from the customer card when the order is created. The document dates and delivery dates are addressed in detail later in this training manual. NOTE: Links to more information about the customer, such as alternative shipping addresses, comments, contacts, and credit, can be found on the right pane of the sales order, across from the sales order header. When the salesperson clicks on the Sales History link, a list of previous sales transactions appears. Lines can be copied to the current sales order by clicking the Copy to Doc button at the bottom of the sales history form. Links to information about the item are located across from the sales lines. The salesperson can link directly to the item card and can access information about item availability, substitutions, sales prices, and sales line discounts by clicking the available fields. The fields on the Shipping tab provides detailed shipping-related information, for example, the customer's alternative shipping address, shipment terms, agents, advice, ship-from location, and so on. The values in these fields are copied from the customer card. 2. On the sales order, click the Shipping tab. According to scenario 3, the order must be delivered to an address other than the company's main office. 3. In the Ship-to Code field, select DUDLEY. This is an alternative ship-to address for this customer. Click OK to accept all information messages that appear. Because there is no default shipping agent associated with this ship-to address, the shipping agent code is selected directly on the sales header: 4. On the Shipping tab, in the Shipping Agent Code field, select DHL. Click Yes to update the lines. When the shipment is picked up by the carrier, the assigned package tracking number can be entered on the Shipping tab in the Package Tracking No. field. The Internet address of the shipping agent can access the agent's package tracking scheme. Microsoft Official Training Materials for Microsoft Dynamics ™ 2-13 Your use of this content is subject to your current services agreement
  • 32.
    Trade in MicrosoftDynamics NAV 5.0 The contents of the Outbound Whse. Handling Time and Shipping Time fields relate to the program's calculation of various delivery dates. These fields and the Late Order Shipping field are explained later in this training manual. If the company has a default location (that is, a site where inventory is physically stored, such as a warehouse, service car, showroom, and so on) the appropriate code is copied to the sales order header in the Location Code field. Depending on the company, a default location for the order can be defined, for example, as their central warehouse, or as a local warehouse. This serves customers within a nearby geographical area. When the sales order header is complete, the order processor can continue with entering details that relates to the contents of the order and the items. The major aspects and properties of the order lines are described in the following topics. Sales Order Processing A sales order can be used to register both a physical and financial transaction. The choice of transaction is defined by one of the following line type options: • G/L Account • Item • Resource • Fixed Asset • Charge (Item) The line type Item represents a sale of physical goods. Sales defined by G/L Account, Resource, and Fixed Asset type are addressed in the Financial Management training manual. Transactions of a Charge (Item) type are explained later in this manual. Location Selecting a location code on the order line will start the features that support an employee's tasks. The order processor can: • Check the item availability in a specified location (including the blank location). • Get an overview of item availability per specified location or on other locations at the same time. 2-14 Microsoft Official Training Materials for Microsoft Dynamics ™ Your use of this content is subject to your current services agreement
  • 33.
    Chapter 2: SalesOrder Management Inventory management employees and planners can: • Use the requisition planning facility when considering replenishment and planning parameters set up on the item stockkeeping units. • Perform transfers of inventory between locations. • Create inventory statistics per location. Accountants can calculate inventory value and cost of goods sold per location. Warehouse managers can use the bin management functionality associated with a location. Quantity Entering the quantity amount in the Quantity field causes the program to check for sufficient inventory in the location to fulfill the sales order. If this is not the case, the program gives a stockout warning (the Stockout Warning field in the Sales & Receivables Setup window must be selected). The program's mechanism of calculating item availability is explained in the Inventory Management training manual. NOTE: The program supports the practice of creating sales lines with negative quantity. A negative sales line implies a reverse transaction to the sales document. A negative line in a sales order means a sales return. Handling sales lines with negative quantity is supported throughout all functional areas. Unit of Measures The program automatically fills in the Unit of Measure Code field when the sales line is created. The value is copied from the Sales Unit of Measure field on the item card. The unit of measure code is used: • When checking item availability. • To determine the unit price amount. • To validate if there are any alternative prices, line discounts, or both, for the sale based on the unit of measure. Unit Price Selecting the item in the No. field automatically fills in the Unit Price field. The unit price is calculated and copied from the item card or the alternative sales prices applicable to the item and customer. The setup options and the mechanism of alternative sale prices are addressed in more detail later in this manual. Microsoft Official Training Materials for Microsoft Dynamics ™ 2-15 Your use of this content is subject to your current services agreement
  • 34.
    Trade in MicrosoftDynamics NAV 5.0 When companies sell to retail consumers, they may want sales document prices to include VAT information when printed. To enable this option, the Prices Including VAT field on the Invoicing tab on the document header must be selected. If the field is clear, Unit Price and Line Amount will exclude VAT amounts, and the field names reflect this choice. The Financials training manuals provide an in-depth setup description and explanation of VAT functionality. Item Tracking and Warehousing For many companies, registration of a sales order must also include inventory management related information. These are the records of item serial/lot numbers and item physical placement (bin code) in a warehouse. These aspects of a sales transaction are not directly associated with the customer interface but characterize the company's internal processes, and are addressed in the Inventory Management manual. Drop Shipments A drop shipment is the shipment of an item or a consignment of items from a company's vendor directly to a customer. Drop shipments are used when a company wants to avoid handling an order, such as stocking and delivering, but wants to fulfill the customer's request and include the transaction in a calculation of cost of goods sold and profit. Companies can use the Drop Shipments functionality to ensure drop shipped orders are handled efficiently. In addition to making a process easier that involves many tasks and people, it makes sure that the correct inventory value and item costs are calculated. Although the sales and purchase transactions of the drop shipment are registered, the drop shipped items do not physically enter the company's inventory. Handling of a drop shipment is illustrated in Figure 2-4: FIGURE 2-4: DROP SHIPMENTS 2-16 Microsoft Official Training Materials for Microsoft Dynamics ™ Your use of this content is subject to your current services agreement
  • 35.
    Chapter 2: SalesOrder Management Specifically, drop shipping includes the following tasks: 1. The customer places a sales order with the company. 2. The company places a purchase order with the vendor. 3. The vendor delivers the ordered items directly to the customer. 4. The vendor invoices the company for the shipment. 5. The company invoices the customer. The following demonstration illustrates this process. Demonstration − Creating Drop Shipments This demonstration is a continuation of the previous demonstration, "Creating a Sales Order." The current work date is 02/01/08. When Cronus' order processor is ready to post the first shipment from the blanket order, the representative for customer 10000 calls and orders 250 units of item 1984-W. The salesperson at Cronus notices that there is not enough quantity in stock, and knowing that Cronus will stop stocking it, decides to tell the vendor to ship directly to customer 10000. Item 1984-W is ordered from vendor 30000. Steps Enter the order details on the blanket order (according to the previous demonstration, "Creating a Sales Order"). 1. Create a new sales line for item 1984-W, and enter 250 in the Quantity field. 2. In the Purchasing Code field, click the AssistButton to open a list of purchasing codes. (Use the Show Column function to make the Purchasing Code and Drop Shipment fields visible.) The window contains a list of purchasing codes the company sets up to distinguish different purchase transactions. Notice the special order code with the Special Order field selected. This is the purchase transaction type companies use for handling non-stock items. Non-stock items are items that are rarely ordered, or items where there is a small variation compared to the regular item; for example, color, stickers, and so on. (Read the appropriate topic in the online Help for more information about the individual fields in this window.) 3. In the Purchasing Codes window, select the DROP SHIP code with the Drop Shipment field selected and then click OK. The program places a check mark in the Drop Shipment field on the sales order line. Microsoft Official Training Materials for Microsoft Dynamics ™ 2-17 Your use of this content is subject to your current services agreement
  • 36.
    Trade in MicrosoftDynamics NAV 5.0 4. In the Quantity field, enter 250, and in the Shipment Date field enter 02/08/08. FIGURE 2-5: SALES ORDER - DROP SHIPMENTS This completes the drop shipment handling task on the sales side. The program does not allow posting of the sales order until it is linked to a purchase order. There are two ways to create the purchase order to be linked to the sales order for drop shipment: • Manually, by creating an order directly. • Automatically, through a requisition worksheet. The following steps go through the manual method. Because creating purchase orders for drop shipments through requisition worksheets is based on the same principles as creating orders directly, it is not described here. Learn more about the mechanism behind requisition worksheets in Chapter 6, "Requisition Management," of this manual. After being informed about the drop shipment, a purchasing agent places the order with vendor 30000, who delivers the shipment directly to customer 10000. 2-18 Microsoft Official Training Materials for Microsoft Dynamics ™ Your use of this content is subject to your current services agreement
  • 37.
    Chapter 2: SalesOrder Management Steps To create the purchase order: 1. Select the Purchase menu option and then click ORDER PROCESSING→ORDERS. 2. Press F3 to create a new purchase order. 3. Fill in the order details on the purchase header by selecting vendor 30000 in the Buy-from Vendor No. field. Make a reference to the customer for a drop shipment: 4. On the Shipping tab, in the Sell-to Customer No. field, select customer 10000. The purchasing agent must establish a link between the purchase order and the sales order, and copy the sales lines to be drop shipped into the purchase order: 5. Click ORDER→DROP SHIPMENT→GET SALES ORDERS. The Order – Sales List window appears. This sales list contains all the sales orders for customer 10000 that the customer specified in the Sell-to Customer No. field on the purchase header. 6. Select the relevant order (the first one on the list) and then click OK. Before the purchasing agent can continue, the program indicates that the purchase order must be shipped to a different ship-to address (instead of the customer's regular address). This is the address specified on the associated sales order. 7. Click OK to the information message. On the Shipping tab of the purchase order, in the Ship-to Code field, select DUDLEY. 8. Repeat steps 3 and 4. The sales line selected for drop shipment is now transferred to a purchase line. After being informed that the purchase order has been shipped to the customer, the purchasing agent can post the order as received. Posting the purchase order as invoiced can only occur after the linked sales order is invoiced. Upon posting the purchase order as received, the program automatically posts the associated sales order as shipped. The salesperson can post the sales order as invoiced. Posting the purchase order as invoiced completes the drop shipment handling. Microsoft Official Training Materials for Microsoft Dynamics ™ 2-19 Your use of this content is subject to your current services agreement
  • 38.
    Trade in MicrosoftDynamics NAV 5.0 NOTE: The posting process can also start from the sales order. Identical to the purchase order, when the sales order is posted as shipped, the program automatically posts the associated purchase order. Remember that before either the sales or purchase order is invoiced, the purchasing agent can retrieve sales orders for a drop shipment from the purchase order by clicking ORDER→DROP SHIPMENT→SALES ORDER. Similarly, the salesperson can view the related purchase order for a drop shipped sales order by clicking ORDER→DROP SHIPMENT→PURCHASE ORDER on the sales order. In both cases, the documents are shown in uneditable mode. To ensure that the transactions involved in drop shipment do not affect inventory quantity and value, the program: • Creates the item ledger entries representing the sale and purchase in question at the same time. • Links them by automatically creating a fixed application between them. NOTE: If serial/lot numbers are assigned on the corresponding sales order, the Get Sales Order function also copies the item tracking lines to the newly created purchase order. When a sales order does not have item tracking lines assigned, but they are assigned to the associated purchase order, the program offers the option of creating and synchronizing the lines on the sales order. Learn more about item tracking functionality in Microsoft Dynamics NAV in the Inventory Management manual. Item Reservation In sales situations, for example, those with a high volume of transactions, there may be a need to ensure that the required item quantity for a sales order is available to be shipped on the agreed date. There is a need to allocate existing or future inventory to the sale until the order shipment date so that it is not used to fill other orders in the meantime. In Microsoft Dynamics NAV, this allocation is performed through reservations. The user assigns the reservation because it is considered a conscious and intentional decision. By reserving quantities, the user gains full ownership of and responsibility for these items. Reserved quantities are not included during planning routines. Demonstration − Reserving Items The representative for customer 10000 informs Cronus' order processor that the customer wants to order 250 units of item 80100. The customer stresses the importance of receiving the order on 02/08/08. Since there is a risk of running out of stock, the salesperson at Cronus reserves 250 items for this order. 2-20 Microsoft Official Training Materials for Microsoft Dynamics ™ Your use of this content is subject to your current services agreement
  • 39.
    Chapter 2: SalesOrder Management Steps Create a sales order for 250 units of item 80100. Use the order created in the previous demonstration and add an extra sales line: 1. Make a new line for item 80100. In the Location Code field, select GREEN (the location where the item is stocked), and in the Shipment Date field, enter 02/08/08. 2. Enter 250 in the Quantity field. Notice that the right pane shows the availability for the item on the selected line. This is the availability for the Shipping Date indicated and the Location Code selected, in this case, for the Green warehouse on 02/08/08. NOTE: The Availability quantity shown in the right pane is in the Base Unit of Measure. This may not be the same as the Sales Unit of Measure. This is found on the Sales Order line. To view the Base, Sales, and Purchase units of measure for this item, click the Item Card in the right pane. NOTE: As soon as you enter a quantity for the item on the selected line, the Availability amount is reduced by that quantity. The Availability is the amount remaining after the quantity on the line is filled. The order processor makes a reservation of this sales line in the existing or future inventory: 2. Click FUNCTIONS→RESERVE to open the Reservation window: The window shows the quantities of item 80100 available to reserve. Items can be reserved either from: – Existing stock (represented as item ledger entries on the line). – Open purchase orders. – Other inbound orders, such as transfer orders or production orders. In the Reservation window, each option is represented by the corresponding line, summarizing the total unreserved and reserved quantities of all item ledger entries and all open purchase order lines respectively. It is possible to view the list of individual entries that make up the total quantity: 3. In the Reservation window, select the line representing purchase orders and then click LINE→AVAILABLE TO RESERVE. (Alternatively press CTRL + F5) Microsoft Official Training Materials for Microsoft Dynamics ™ 2-21 Your use of this content is subject to your current services agreement
  • 40.
    Trade in MicrosoftDynamics NAV 5.0 The Available – Purchase Lines window is displayed. This window contains general information about the purchase line and quantity details on unposted line quantity and existing reservations made for the purchase line. The Current Reserved Quantity field contains the quantity currently reserved. 4. Close the Available – Purchase Lines window to return to the Reservation window. The Quantity to Reserve field on the header contains the quantity copied from the Quantity field on the line for the reservation. If a partial shipment has occurred, the quantity to reserve corresponds with the Outstanding Quantity field. Notice that the Quantity to Reserve field contains 50 units instead of the 250 specified on the sales line. For reservations, the program operates with the base unit of measure – which are boxes in this case – and not the sales unit of measure (packs), specified on the sales order. Recalculation is based on one box that contains five packs. There are three options when reserving items: – Auto Reserve – Automatically reserve items in the Reservation window. – Reserve from Current Line – Reserve the items from the selected reservation line. This is a manual reservation option. – Cancel Reservation from Current Line – Cancel reservation of the items from the selected reservation line. 5. In the Reservation window, click FUNCTION→AUTO RESERVE. The program updates the Reserved and Available Quantity fields to reflect the reservation. When the automatic reservation function is used, the program reserves items from item ledger entries before it reserves items from the purchase order lines. NOTE: For better control over inventory, select the items using the Reserve from Current Line option instead of letting the program do it. When a reservation is made, the program creates a reservation entry. 6. On the sales order, select the line for item 80100 and then click LINE→RESERVATION ENTRIES. The window that appears shows that the quantity has been reserved from the specified location. This completes handling the tasks associated with reserving items. 2-22 Microsoft Official Training Materials for Microsoft Dynamics ™ Your use of this content is subject to your current services agreement
  • 41.
    Chapter 2: SalesOrder Management Document Status The Status field on a document indicates whether the document is still open or released. When the document is Open, it implies that it is still undergoing changes and has not been released to the next stage of processing, for example, the warehouse handling. The order processor can set up batch posting to post only released orders. This enables separating the order entry and posting tasks. The Released status indicates that the salesperson has completed entering the order details, and the order is now ready for the next stage of processing. Information (price, currency, quantity, and so on) in the released order cannot be changed without reopening the order. An order can be released in two ways: • Automatically, when a single shipment has been posted for the order. • Manually, by using the release function (or alternatively, CTRL + F11). Typically, releasing manually is relevant for companies with a separate warehousing environment. NOTE: The order document status is not connected to the availability calculations for the item on the order. Although an order has not been released, it is included in overall availability calculations. Posting Orders Posting an order implies forwarding the financial value of a transaction to dedicated accounts in the general ledger. Additionally, quantity and financial information about the transaction is forwarded to subsidiary ledgers, such as customer and item entry ledgers (with associated value entries) that calculate various sales and inventory statistics. Because all sales transactions involving selling items to a customer include quantity and value (price and cost) information, the posting function is divided into two parts: Shipment (quantity change) and invoice (value change) posting. When posting an invoice, the two parts occur at the same time, without an option of separation. Posting an order, however, can be done by registering the order shipment first, while the order invoicing can occur later. This gives companies operational flexibility and enables them to benefit from the functionality that supports this process. Microsoft Official Training Materials for Microsoft Dynamics ™ 2-23 Your use of this content is subject to your current services agreement
  • 42.
    Trade in MicrosoftDynamics NAV 5.0 This functionality includes: • Combining several shipments in one invoice. • Undoing a quantity record for a posted but not yet invoiced shipment. Shipping The Qty. to Ship and the Qty. to Invoice fields on a sales order represent the posting quantities. The values in these fields are filled in automatically by the program at the time when the quantity is entered in the Quantity field for a sales line. NOTE: When a location for a sales line uses the warehouse management functionality (such as, for example, inventory/warehouse pick and put-away documents), the Qty. to Ship and the Qty. to Invoice fields are blank and posting is not possible. This relates to shipping and invoicing tasks performed in the warehouse, and it is from there that the order posting occurs. To continue with posting from the sales order, enter the quantities manually. If it is required, the order processor can reduce the quantities in the Qty. to Ship and Qty. to Invoice fields before posting, and thereby shipping and invoicing the order partially. To post a partial shipment (invoicing), the Shipping Advice field on the order header must contain Partial. An order can have as many shipments and invoices as necessary. In partial order posting, the Quantity Shipped and Quantity Invoiced fields indicate the completed part of the order. Demonstration − Performing a Partial Shipment As a result of handling tasks described in the previous demonstrations, the sales order for customer 10000 is ready to be shipped. At the last minute, however, the representative for the customer calls Cronus to say that they only want half of the shipment of item 70000 delivered now. Steps The order processor must now do a partial shipment of the line. The other order lines are shipped as arranged. 1. Locate the sales order for customer 10000 created earlier. 2. In the Qty. to Ship field for the first line, change the quantity from 250 to 25 (entered by mistake, instead of 125). In the Qty. to Ship field for the third line, enter 250 (to enable posting from the order instead of through a warehouse). Click OK to accept the warning message that appears. 2-24 Microsoft Official Training Materials for Microsoft Dynamics ™ Your use of this content is subject to your current services agreement
  • 43.
    Chapter 2: SalesOrder Management Post the sales order as shipped, not invoiced: 3. Click POSTING→POST and select Ship. Upon posting, the program creates a posted shipment document that contains all the shipping details of the sales order. 4. From the Sales & Marketing menu, click HISTORY→POSTED SHIPMENTS and locate the new document. Realizing the mistake of entering and posting the incorrect quantity for the first sales line, the order processor can undo the wrongly posted quantity. To correct the wrongly posted quantity: 5. In the posted sales shipment, select the line for item 70000 and then click FUNCTIONS→UNDO SHIPMENT. Click Yes to confirm the action. The program inserts a corrective line with the same negative quantity as the one being corrected in the posted shipment document and selects both lines as corrective using the Correction field. (Use the Show Column function to make the Correction field visible.) At the same time, the quantity in the Quantity Shipped field on the sales order in question is set to zero, while the Qty. to Ship field contains the same value as the Quantity field. This implies that the posting process for this line can be repeated. 6. Locate the sales order. In the Qty. to Ship field for the first line, change the quantity from 250 to 125. 7. Post the order as shipped. The program updates the Qty. to Ship field for the partially shipped line to indicate the remaining quantity. Posting a shipment recognizes that a certain item quantity has left the company's inventory. The financial value of the corresponding transaction is not registered until the sales order is posted as invoiced. This implies that no G/L and customer ledger entries have yet been created, and the cost and price amounts on the created item ledger entries equal zero. Learn more about inventory costing in the Inventory Costing manual. Invoicing a Combined Shipment In some cases, it is most efficient to combine several shipments into one invoice. Sometimes the customer requires this procedure. Microsoft Official Training Materials for Microsoft Dynamics ™ 2-25 Your use of this content is subject to your current services agreement
  • 44.
    Trade in MicrosoftDynamics NAV 5.0 Posting orders as invoiced follows the same principles as posting order shipments: • An order can be invoiced completely or partially. • When posted as invoiced, order information transfers to a separate document – a posted invoice. Additionally: • G/L, customer, and VAT entries are created. • When completely invoiced (no outstanding quantity to invoice on any of the order lines) the order is deleted automatically. This is with the exception of when an order is invoiced through a combined shipment. • Several shipments can be combined into one invoice. The following demonstration shows how several shipments for one customer are combined into one invoice. Demonstration − Invoicing a Combined Shipment A bookkeeper at Cronus wants to invoice all the orders recently shipped to customer 10000. The shipments are combined into one invoice. Steps The bookkeeper performs the following steps: 1. To create a new invoice, select the Sales & Marketing menu and then click ORDER PROCESSING→INVOICES. Press F3. 2. Enter the customer details on the header. To retrieve all the posted shipment lines for the customer: 3. In the sales invoice, click FUNCTION→GET SHIPMENT LINES 4. Select all the lines and then click OK. The program copies the shipment lines to the invoice. 5. Post the invoice. The program updates the Quantity Invoiced fields on the lines of related sales orders. 2-26 Microsoft Official Training Materials for Microsoft Dynamics ™ Your use of this content is subject to your current services agreement
  • 45.
    Chapter 2: SalesOrder Management When an order is completely invoiced using a combined shipment function, it is not deleted automatically. This is done manually or with the Delete Invoiced Sales Order batch job. This batch job, and other sales-related batch jobs, is described in an appendix. If bookkeepers post a large number of sales documents, consider batch posting the documents instead of posting the documents individually. Access the Batch Post option by clicking Posting on the sales document. Refer to online Help for more information. Process Prepayment Prepayment is a new functionality in Microsoft Dynamics NAV available from version 5.0 and onward for both sales and purchases. Prepayments enable a company to require customers to pay a part of the total amount of their order, specified as an amount or a percentage, in advance of the final invoice. On the Purchases side, prepayments enable a company to document and process prepayments that are required by vendors. Prepayments Set Up Using the new prepayments functionality requires that special general ledger accounts, posting groups, payment terms and number series are set up for this purpose. In addition, the prepayment percentages for selected vendors and customers in combination with special items need to be defined. Refer to the Finance training material for additional information. Using Prepayments Prepayment invoices are created from a sales or purchase order, using the new prepayment invoice option. The prepayment amount on the order is calculated based on the prepayment percentage populated from item, customer, or vendor cards. Users can edit the prepayment percentage or amount. Instead of using a percentage, a specific amount can be defined for the entire sales or purchase order. Prepayment amounts are set in the Sales Order Statistics window and the Purchase Order Statistics window in the Prepayment tab. For prepayment sales orders, the following steps list the typical process flow: 1. Create a sales order with a prepayment requirement. 2. Send a prepayment invoice for the prepayment amount to the customer. 3. The customer pays the prepayment amount. 4. Apply the prepayment amount to the sales order. 5. Ship the order to the customer. Microsoft Official Training Materials for Microsoft Dynamics ™ 2-27 Your use of this content is subject to your current services agreement
  • 46.
    Trade in MicrosoftDynamics NAV 5.0 6. Create a sales invoice for the total amount of the sales order minus the prepayment amount. 7. Receive payment from the customer and post the payment to the sales order. For prepayment purchase orders, the following steps list the typical process flow: 1. Create a purchase order with a prepayment requirement. 2. Post a prepayment invoice for the prepayment amount. 3. Send the prepayment amount to the vendor. 4. Apply the prepayment amount to the purchase order. 5. The vendor ships the order. 6. Create a purchase invoice for the total amount of the purchase order minus the prepayment amount. 7. Send the payment to the vendor and post the payment to the purchase order. The following demonstration presents the typical flow for a sales order with prepayment specified as a percentage. Demonstration − Creating Sales Order with Prepayment Percentage Creating prepayment orders is similar to creating other sales and purchase orders. Steps To create a prepayment order, follow these steps: 1. Create a new sales or purchase order and fill in the header. 2. Click the Prepayment tab. FIGURE 2-6: SALES ORDER FORM→PREPAYMENT TAB 2-28 Microsoft Official Training Materials for Microsoft Dynamics ™ Your use of this content is subject to your current services agreement
  • 47.
    Chapter 2: SalesOrder Management 3. The Prepayment % field is filled in automatically if there is a default prepayment percent on the customer or vendor card. The contents of this field can be edited. The prepayment percent from the customer or vendor card only applies to lines that do not have a default prepayment percent set up for the customer-item or vendor-item combination. 4. Place a check mark in the Compress Prepayment check box to combine the prepayment lines on the invoice when they have the same: – General Ledger account for prepayments (as defined in the General Posting Setup) – Dimensions The Compress Prepayment check box is selected as a default. If the Compress Prepayment check box is left blank, an invoice is created by using a separate line for each prepayment amount. 5. Fill in the sales or purchase lines. 6. For each order line, the contents of the Prepayment % field are determined as follows: – If a default prepayment percent is set up for the item on the line, it is automatically copied into the Prepayment % field. – If no default prepayment percent is set up for the item, the prepayment percent from the customer or vendor card is copied from the order header. – The Prepayment % field can be entered or changed manually on a line-by-line basis. Although there can be different prepayment percents for each of the order lines, a single prepayment percent can be applied to the whole order. This is done after all the order lines are completed. To enter one prepayment percent that applies to all the order lines: 7. On the Prepayment tab in the order header, enter the prepayment percent in the Prepayment % field. 8. The program displays a warning message. Click OK. The prepayment percentage on all the lines is updated to match the header. NOTE: As soon as a number is entered into the Prepayment % field on the header and the lines are updated, users cannot revert to the individual prepayment percents that existed for each line. To return to the individual prepayment percents, either delete and re-enter the lines or manually type the prepayment percent on the lines. Microsoft Official Training Materials for Microsoft Dynamics ™ 2-29 Your use of this content is subject to your current services agreement
  • 48.
    Trade in MicrosoftDynamics NAV 5.0 Conclusion Sales Order Management involves all the steps from creating a quotation or blanket order to shipping and invoicing the sales order. The accurate management of the sales transaction flow can help companies to ensure a high level of customer service. The section titled "Sales Prices and Discounts" will detail how to establish sales prices and discounts, and other important aspects of customer service. 2-30 Microsoft Official Training Materials for Microsoft Dynamics ™ Your use of this content is subject to your current services agreement
  • 49.
    Chapter 2: SalesOrder Management Lab 2.1 − Handling Sales Scenario: You are the order processor at Cronus. Customer 20000 orders 1200 units of item 70003. The customer requests that the order be delivered with 300 units every week during the month of February (starting on 02/01/08). The delivery is shipped to the customer's subsidiary in Manchester. At the time of shipping the first delivery of item 70003, the customer also orders 25 units of item 1968-W and 50 units of item 80100. Because of several considerations, the order processor decides to drop ship the order for item 1968- W (from vendor 30000) and confirm that the 50 units of item 80100 are reserved for this sales order. The customer also only wants half of the ordered quantity of item 70003 in this shipment. Challenge Yourself! Handle this scenario using the sales management functionality. Assume 01/28/08 is the work date, that the order for item 70003 is to be shipped from the Blue location, and that the order for item 80100 is to be shipped from the Green location. Need a Little Help? The solution is provided in Appendix C. Microsoft Official Training Materials for Microsoft Dynamics ™ 2-31 Your use of this content is subject to your current services agreement
  • 50.
    Trade in MicrosoftDynamics NAV 5.0 Quick Interaction: Lessons Learned Take a moment and write down three key points you have learned from this chapter: 1. 2. 3. 2-32 Microsoft Official Training Materials for Microsoft Dynamics ™ Your use of this content is subject to your current services agreement
  • 51.
    Chapter 3: SalesPrices and Discounts CHAPTER 3: SALES PRICES AND DISCOUNTS Objectives The objectives are: • Overview of Sales Prices • Define Sales Prices • Set up Sales Prices and Customer Price Groups • Maintain Sales Prices • Set up Line Discounts and Invoice Discounts Introduction Sales Prices and Discounts describe the background and key features and pricing functionality of Microsoft Dynamics™NAV. The right pricing of a company’s services and items is a crucial factor in the sales order management process. It directly affects how the company it placed in the marked place, the relationship with the customers, and the bottom line result. To explain how the program supports companies in their tasks of managing sales prices and discounts, demonstrations and examples are used. For an overview of typical procedures associated with setting up, using, and maintaining sales prices and discounts, refer to the respective topic in online Help. Microsoft Official Training Materials for Microsoft Dynamics ™ 3-1 Your use of this content is subject to your current services agreement
  • 52.
    Trade in MicrosoftDynamics™ NAV 5.0 Overview of Sales Prices Companies, both producers and distributors, that are operating in price-sensitive markets with diverse customer bases, often need pricing strategies that enable them to differentiate, attract, and maintain customers. One of the typical strategies is based on having several individual price agreements with large customers and offering standard prices and discounts to other customers within a specific market segment or across the segments. One agreement may cover more than one individual customer if an agreement is made with a chain headquarters, where items can be sold to customers of an individual chain member. These strategies imply that companies’ sales and marketing departments develop and maintain comprehensive and complex price and discount structures. The complexity of price and discount structures increase when companies do internally-driven initiatives, such as special campaigns aimed at removing soon- to-be-obsolete items or as a way to introduce new items to the market. Maintaining flexible price and discount structures can appear to be a tedious and resource-demanding task. Without suitable price management tools, price agreements, and special sales, prices are stored in private folders, spread sheets, binders, and so on. This frequently creates problems related to price consistency, when the customer is faced with price confusion or even billed the wrong price. This leads to customer dissatisfaction and lost sales or unnecessary rework for the company. As the Internet is becoming a preferred form of shopping alongside conventional channels, such as call center, mail, and fax, the same requirements of segment- tailored prices must be met consistently regardless of the channel used. Sales Line Pricing and Sales Line Discounting offer comprehensive pricing functionality to companies with flexible price structures. Specifically, the application provides a functionality characterized by the following key features: • Target specific customer segments • Consistent and transparent pricing • Minimized maintenance costs 3-2 Microsoft Official Training Materials for Microsoft Dynamics ™ Your use of this content is subject to your current services agreement
  • 53.
    Chapter 3: SalesPrices and Discounts Sales Prices The ability to specify price information for each item on the item card significantly improves sales price management. The program automatically retrieves price information that is stored on an item card to copy it to the sales order line for an item. This price information is universal in nature; it is the same in all sales situations regardless of individual price agreements or different pricing policies applied toward customer profiles. These agreements and policies may be based on several conditions: • Item variant • Quantity purchased • Currency paid • Order date To manage and maintain alternative sales prices, sales representatives need an extended pricing functionality that goes beyond the standard item card. In Microsoft Dynamics NAV, Sales Line Pricing offers comprehensive pricing functionality. Sales representatives need to perform the following to maintain sales prices: • Setting up alternative sales prices • Using the pricing mechanism • Maintaining sales prices Setting Up Alternative Sales Prices Salespeople must use the Sales Prices table to record alternative sales prices a company has established by using their customers/group of customers or uses to strategically segment their customer base. Access the Sales Prices window from either the customer card or the item card. Microsoft Official Training Materials for Microsoft Dynamics ™ 3-3 Your use of this content is subject to your current services agreement
  • 54.
    Trade in MicrosoftDynamics™ NAV 5.0 From the Sales & Marketing menu, click Customers and locate customer card for customer 10000. Click SALES→PRICES to open the Sales Prices window: FIGURE 3-1: SALES PRICES WINDOW In this window, a sales representative can specify the conditions that must be met before a customer is offered a unit price for an item. For example, the conditions can require that the customer belongs to a particular customer price group or a purchase is made within a certain period. Special sales prices can also depend on: • Unit of measure • Item variant • Minimum quantity • Currency The sales price table provides the option for defining if alternative prices are combined with line and invoice discounts when a sales price is offered. (Controlling the combination of sales prices and discounts is described in more detail in the topic “Allowing/Disallowing Discounts.”) Because this window was accessed through the customer card, the Sales Type is set to Customer and the Sales Code is set to the customer number on the customer card. These default settings can be edited. The Sales Type options are: • Customer • Customer Price Group • All Customers • Campaign • None The Sales Code options depend on the selection in the Sales Type field. 3-4 Microsoft Official Training Materials for Microsoft Dynamics ™ Your use of this content is subject to your current services agreement
  • 55.
    Chapter 3: SalesPrices and Discounts The following scenario illustrates a situation where a company needs to set up individual prices based on both: • A price agreement reached with one of its key customers about some selected items • A pricing decision targeting a specific customer segment Demonstration − Setting up Sales Prices Cronus' sales to customer 40000 have been increasing lately. Until now, the customer has made purchases based on Cronus’ ordinary price rates, but now want to purchase items at more favorable prices. Based on the agreement, a sales representative decides that the customer can save 50 LCY for any purchase of item 1976-W if the quantity is at least ten units. At the same time, as part of a long-term marketing strategy, the sales manager decides that the company’s high performing wholesale customers are granted, as a group, a favorable price of 800 LCY when buying item 1972-W during the month of February, 2001. A sales representative must set up these decisions in the program. Steps Alternative sales prices are entered in the Sales Prices window. 1. Open the customer card for customer 40000. Click SALES→PRICES. In the Sales Prices window, enter the conditions under which the customer can obtain a favorable price rate (notice that the Sales Type and the Sales Code fields contain values. This is done by default as based on the respective filters in the window’s header). 2. In the Item No. field, select 1976-W, in the Minimum Quantity field enter 10, and in the Unit Price field, enter 206.10 (or alternatively, 256.10-50). This is the reduced unit price. Assume that the price agreement with this customer takes effect on the current date, which is 01/25/08. 3. In the Starting Date field, enter 01/25/08. The sales representative may not need to enter an ending date as a condition in the price agreement. If an agreement is renegotiated at a later date, a new sales price line is entered with a new starting date, which replaces the previous agreement. To implement the pricing decision for the company’s wholesalers, the sales manager must consider grouping the wholesalers together and applying the price reduction to the whole group. Such an approach is an efficient a way to manage the sales prices compared to recording individual prices for each customer. Microsoft Official Training Materials for Microsoft Dynamics ™ 3-5 Your use of this content is subject to your current services agreement
  • 56.
    Trade in MicrosoftDynamics™ NAV 5.0 Demonstration − Setting up Customer Price Groups After the company has decided on how its customers are categorized related to price rates, the groups are set up in the program in the Customer Price Groups table. Steps Perform the following steps: 1. From the Sales & Marketing menu, click ORDER PROCESSING → SETUP→CUSTOMER PRICE GROUPS. In this table, the user can assign a code to each customer price group. When the price group code is entered in the Sales Prices window, the program copies the information from the customer price group table to the corresponding fields in the Sales Prices table. Assume that the sales manager wants to create a group that consists of the company's key wholesalers, to whom a reduced price rates will be offered: 2. In the Customer Price Groups window, in the Code field, enter Wholesale1, and in the Description field, enter Wholesalers, Key Performers. The Allow Line Disc. and Allow Invoice Disc. fields offer the possibility to combine the alternative price rate set up for a customer group with two other discount types that may apply to customers in this group in certain sales situations. The program copies the status of these two discount-related fields to the corresponding fields on the line with the customer price group code selected in the Sales Prices window. The user can always change the enabled discount combinations. 3. In the Customer Price Groups window, make sure that the Allow Line Disc. and Allow Invoice Disc. fields are selected. Assume that customers in the Wholesale1 group are buying item 1972-W for the price of 800 LCY: 4. In the Customer Price Groups window, click CUST. PRICE GROUP→SALES PRICES. 3-6 Microsoft Official Training Materials for Microsoft Dynamics ™ Your use of this content is subject to your current services agreement
  • 57.
    Chapter 3: SalesPrices and Discounts 5. In the Item No. field, select item 1972-W, and in the Unit Price field, enter 800. In the Starting Date and the Ending Date fields, enter 02/01/08 and 02/28/08 respectively. Because customers are offered a regular price of 850 LCY both before and after the period, you can reflect that in the the program by creating a separate line in the Sales Prices window. 6. On the next line, select item 1972-W. In the Unit Price field, type 850. For this line, leave the starting and ending dates blank. NOTE: Using the functionality described above assumes customers have access to Sales Line Pricing and maintain price-related information in the Sales Prices window without using the standard pricing functionality on the item card. For customers moving from standard pricing to Sales Line Pricing, this may require transferring all the item price information from item cards to the sales prices table. Transferring the information can be done using the Suggest Item Price on Worksheet batch job, described in detail later in the chapter. Assume that customer 40000 is a Cronus key wholesaler. Assign this customer to the price group newly created: 7. Open the customer card for customer 40000. On the Invoicing tab, in the Customer Price Group Code field, select Wholesale1. This completes the implementation of pricing decisions. Sales Prices Including/Excluding VAT The principles of including/excluding VAT in the unit price calculation are explained in the Financial Management course. Using the Pricing Mechanism Setting up alternative prices in the program supports sales representatives who always offer customers the best prices. The best price is defined as the lowest possible price with the highest possible line discount on the order date. When an order processor creates an order for a customer, the program checks whether: • There are alternative sales prices set up for the customer. • The sales header and line details meet the conditions for applying an alternative price. If all the conditions are met, the program copies the applicable price from the Sales Prices window to the Unit Price (Excl./Incl. VAT) field on the sales line. Refer to Help in the "Best Price" topic on how the program selects the best price when more than one alternative price is set up. Microsoft Official Training Materials for Microsoft Dynamics ™ 3-7 Your use of this content is subject to your current services agreement
  • 58.
    Trade in MicrosoftDynamics™ NAV 5.0 If there are no alternative sales prices or the conditions for applying an alternative price are not satisfied, the program uses the regular unit price specified on the item card as a suggestion on the sales document. Demonstration − Creating a Sales Order with Sales Price Information Cronus' customer 40000 orders eight units of item 1976-W and five units of item 1972-W. The order date is of 01/28/08. The customer inquires about the unit price of the purchase. The order processor must create a sales order and inform the customer about the price. In addition, the order processor may investigate if there are other conditions the customer may want to accept to obtain a better price. Steps Create a sales order for customer 40000 in the following way: 1. Enter the header information, order date, and the two sales lines. The Sales Prices field in the right pane shows the order processor if there are alternative prices for the item on the line applicable to the customer. If the field contains a number in parentheses, the order processor may want to investigate the conditions on which more favorable prices can be offered to the customer. 2. Select the first sales line and then click the Sales Prices field. The Get Sales Price window contains the details of all the prices of item 1976-W that the customer 40000 is allowed to obtain under different conditions. NOTE: The Get Sales Price window can also be accessed by selecting the line and clicking FUNCTIONS→GET PRICE. In this case, if the customer agreed to buy two more units of the item, then the customer receive a quantity break. After the quantity break the purchase is based on a reduced unit price. 3. Select the second sales line and then click the Sales Prices field. The details for all the prices and conditions for item 1972-W display. The order processor notifies the customer that he or she can obtain a better price for the item if he or she postpones the order until February 1. Assume the customer accepted the new conditions to obtain better prices for both products. 3-8 Microsoft Official Training Materials for Microsoft Dynamics ™ Your use of this content is subject to your current services agreement
  • 59.
    Chapter 3: SalesPrices and Discounts 4. Enter the sales order details as based on the agreement with the customer. 5. After changing the order date, select the second sales line, and then click the Sales Prices field. 6. Select the line in the Get Sales Price window that shows the discount for buying in February. Click OK to update the price on the line. You can view the discounted price for each line in the Unit Price field. Microsoft Official Training Materials for Microsoft Dynamics ™ 3-9 Your use of this content is subject to your current services agreement
  • 60.
    Trade in MicrosoftDynamics™ NAV 5.0 Lab 3.1 − Managing Alternative Sales Prices Scenario: You are the order processor at Cronus responsible for restructuring prices for item 70200 and item 1928-S according to the following conditions. Challenge Yourself! 1. Item 70200: If any of Cronus’ customers buys this item in boxes (which contain 100 pieces) instead of pieces, offer 30 LCY off the regular price. HINT: Add a new unit of measure BOX that contains 100 pieces, to the item’s units of measure list. 2. Item 1928-S: When Cronus' overseas customer 31505050 buys this item and pays in local currency (EUR), you offer 1 LCY off the item’s regular price. NOTE: The sales price for an item can be found on the Invoicing tab of the item card. Need a Little Help? The solution is provided in Appendix C. 3-10 Microsoft Official Training Materials for Microsoft Dynamics ™ Your use of this content is subject to your current services agreement
  • 61.
    Chapter 3: SalesPrices and Discounts Lab 3.2 − Creating Sales Prices for a Campaign Scenario: If you are familiar with Microsoft Dynamics NAV Relationship Management functionality, try the following exercise: Challenge Yourself! Cronus’ sales manager is clearing out the stock of item 766BC-A within the period 02/01/08 to 02/28/08. 1. The sales price of item 766BC-A is 4000 LCY. The offer goes to all business relations who are customers and whose job responsibility is purchasing. HINT: To find the Sales Prices window, open the Sales & Marketing menu and then click MARKETING→CAMPAIGNS. Click the Campaign button in the Campaign card window. Use the wizard to create the segment. Remember to select Campaign Target on the Campaign tab of the Segment window. 2. Open the campaign by clicking FUNCTIONS→ACTIVATE SALES PRICES/LINE DISCOUNTS. 3. To check that the business relations obtain the correct price, make a sales quote for one of the contacts. Need a Little Help? The solution is provided in Appendix C. Microsoft Official Training Materials for Microsoft Dynamics ™ 3-11 Your use of this content is subject to your current services agreement
  • 62.
    Trade in MicrosoftDynamics™ NAV 5.0 Maintaining Sales Prices Adjusting and changing item prices is a task sales managers and sales representatives perform periodically because of changing market conditions, new agreements with customers, and new sales initiatives. Depending on the scope of a pricing policy, companies typically store price information about item cards where the price structure is simple. For more complex structures, individual sales prices are specified and stored in the sales prices table. Using a combination of the two is also commonplace. In the program, sales representatives have two tools that help them in preparing and adjusting sales prices. Which one they use depends on the preferred pricing setup. The Sales Price Worksheet is used to enter changes to the alternative sales prices recorded in the Sales Prices table. It is also used to apply those changes to an individual customer, a group of customers, or all customers under specified conditions. The Adjust Item Costs/Prices batch job is used to update the cost- and price- related values in the corresponding fields on the Invoicing tab of the item card. The outcome of this batch job does not affect the alternative sales prices. Sales Price Worksheet The main function of the sales price worksheet is to enable sales representatives to work with sales prices in a similar manner as they do in a Microsoft® Excel spreadsheet or other means. By providing an overview of the existing pricing structure (either based on item prices or alternative sales prices), the worksheet is a convenient space where a sales representative can simulate, rearrange, and update price information in a consistent and efficient way. Sales prices entered in the worksheet are only the suggested prices, which do not take effect until they are implemented (by running the Implement Price Change batch job). Generally, suggestions in the worksheet for changing the existing sales prices can be created in two ways: Either manually or automatically. To fill in the worksheet automatically, run one of the following batch jobs: • Suggest Sales Price on Worksheet. With this batch job, sales representatives can suggest unit sales prices based on sales prices specified in the Sales Prices window. They can change sales prices already set up or create new ones. • Suggest Item Price on Worksheet. With this batch job, sales representatives can suggest unit sales prices based on the prices in the Unit Price field on the item cards. For example, giving a particular customer group a unit price that is lower than the regular price. The price in the Unit Price field on the item card is not changed by this batch job. 3-12 Microsoft Official Training Materials for Microsoft Dynamics ™ Your use of this content is subject to your current services agreement
  • 63.
    Chapter 3: SalesPrices and Discounts Both batch jobs end by displaying the newly calculated unit prices in the Sales Price Worksheet. Users can change unit prices that are not satisfactory or delete unnecessary lines. Demonstration − Creating Sales Prices and Customer Groups The following demonstration explains how sales prices valid for one customer group are also applicable for another customer group under an additional condition. Currently, Cronus offers key wholesale customers reduced prices on item 1972- W. In the program, these customers are categorized into a price group and the reduced price is applied to the whole group. A sales representative wants to grant other wholesalers the same price offer, however, on the condition that the quantity of their purchase exceeds 15 units. The sales representative's task is to create new sales prices for the specified customers. The efficient way of performing the task in this demonstration is to copy existing sales prices from one customer group to another and make necessary modifications. Steps This procedure can be done by using the Sales Price Worksheet. 1. From the Sales & Marketing menu, click INVENTORY & PRICING→SALES PRICE WORKSHEET. 2. In the worksheet, click FUNCTIONS→SUGGEST SALES PRICE ON WKSH. In the request form for the batch job, define what is included in the batch job by setting filters. By filling in the Sales Price tab, determine the filtering of existing sales prices when copying them to the worksheet. Entering filters on the Options tab determines the suggestion as to whom (a customer, customer group, all customers) and on what conditions the sales prices (as specified on the Sales Price tab) are applied. Read the online Help for more information with the request form. 3. On the Sales Price tab, set the filter for the Sales Type field to Customer Price Group and the Sales Code filter to Wholesale1. 4. On the Options tab, select Customer Price Group as a sales type. Click the AssistButton in the Sales Code field to open the Customer Price Group window. Microsoft Official Training Materials for Microsoft Dynamics ™ 3-13 Your use of this content is subject to your current services agreement
  • 64.
    Trade in MicrosoftDynamics™ NAV 5.0 5. Create a new customer group named Wholesale2. Enter "Wholesalers, others" in the Description field and place check marks in both the Allow Line Disc. and Allow Invoice Disc. fields. 6. Select the newly created group and then click OK. Since this new customer price group does not have alternative sales prices set up, when copying prices valid for the Wholesale1 group to the worksheet, indicate that the prices must be created. 7. On the Options tab of the request form, select the Create New Prices field. 8. Click OK to start the batch job. The program fills in the Sales Price Worksheet table with price suggestions as based on the specifications of the batch job. FIGURE 3-2: SALES PRICES WORKSHEET WINDOW The reduced prices in the period of 02/01/08-02/28/08 for the customers in this group are valid on condition that they buy at least 15 units of the item. 9. For the line in the worksheet that has the starting and ending dates, in the Minimum Quantity field, enter 15. The contents of the fields in the worksheet are temporary until they are deleted or transferred to the Sales Price table. 10. Click FUNCTIONS→IMPLEMENT PRICE CHANGE. Click Yes to the message that appears and asks if you want to rename the record. Click on the request form to start the batch job. 11. Click Yes to delete the suggested price changes. The batch job now creates alternative sales prices for the new customer group in the Sale Prices window and deletes the suggestion lines in the price worksheet. 3-14 Microsoft Official Training Materials for Microsoft Dynamics ™ Your use of this content is subject to your current services agreement
  • 65.
    Chapter 3: SalesPrices and Discounts Verify that the new sales prices have been created for the customer group Wholesale2. 12. From the Sales & Marketing menu, click ORDER PROCESSING→SETUP→CUSTOMER PRICE GROUPS. Select the Wholesale2 group and then click CUSTOMER PRICE GROUPS→SALES PRICES. The options that are provided for the Suggest Item Price on Worksheet batch job, also available from the sales prices worksheet, are identical to the Suggest Sales Price on Worksheet batch job. The only difference is that the suggested unit sales prices are retrieved from the Unit Price field on the item cards, instead of the Sales Price window. This batch job does not change the amounts in the Unit Price field on the item card. This is the function of another batch job called Adjust Item Costs/Prices. Adjust Item Costs/Prices When sales representatives update pricing information about item cards, they can use the Adjust Item Costs/Prices batch job. There is no worksheet associated with the Adjust Item Costs/Prices batch job. This means that changes specified for the batch job are implemented directly on the item cards upon completion of the batch job. This also implies that the price information about the item card is replaced; no historic records of the original information are kept. NOTE: Verify that the information in the request form of the batch job is correct before running the job. Microsoft Official Training Materials for Microsoft Dynamics ™ 3-15 Your use of this content is subject to your current services agreement
  • 66.
    Trade in MicrosoftDynamics™ NAV 5.0 Lab 3.3 − Updating Sales Prices Scenario: You have decided to make the modifications to current prices as follows: • Because of changed market conditions, increase the prices offered to all customers for selected items (from 70100 to 70104) by 10%. The new prices take effect on 02/01/08. You also consider rounding the new prices to the nearest whole LCY. • As Cronus’ overseas customer base expands, extend the offer of a reduced price for item 1928-S (if the purchase is paid in EUR) valid for customer 31505050 to all international customers. HINT: Consider grouping overseas customers. Challenge Yourself! Implement these modifications using the appropriate batch jobs. Need a Little Help? The solution is provided in Appendix C. 3-16 Microsoft Official Training Materials for Microsoft Dynamics ™ Your use of this content is subject to your current services agreement
  • 67.
    Chapter 3: SalesPrices and Discounts Line and Invoice Discounts Companies' pricing policies may include different kinds of discounts offered to the customers. It is common to distinguish three discount types: • Item-related • Invoice • Payment Item-Related Discounts In Microsoft Dynamics NAV, item-related discounts are referred to as line discounts and managed by using the Sales Line Discounting functionality. As with alternative sales prices, line discounts can be granted to customers on the basis of predefined conditions, such as minimum quantity of a purchase, unit of measure, currency paid, and so on Discounts can be offered to individual customers, groups of customers, or all customers. In addition, discounts can be applied to both individual items and group of items. Invoice Discounts Invoice discounts are granted on the basis of the total invoice amount independent of the item(s) being sold. Line and invoice discounts can be combined. Payment Discounts Payment discounts are only granted to a customer if the customer pays the total invoice amount within a specified time period. More information about payment discounts is provided in the Financial Management training manual. General Discount Setup Before using the line and invoice discount mechanism, the company must decide how they want discounts posted and whether invoice discounts are calculated automatically when the sales document is created or the user is to apply the calculating function to calculate discounts. These decisions are implemented in the Sales & Receivables Setup window. This window is found in the Sales & Marketing menu, by clicking SETUP→SALES & RECEIVABLES SETUP. Microsoft Official Training Materials for Microsoft Dynamics ™ 3-17 Your use of this content is subject to your current services agreement
  • 68.
    Trade in MicrosoftDynamics™ NAV 5.0 The Discount Posting field on the General tab offers four options for defining the way invoice and line discounts are to be posted to the general ledger: • No Discounts • Invoice Discounts • Line Discounts • All Discounts The user can specify whether and what type of sales discounts are posted to the G/L separately. For a detailed definition of each option, read the online Help for the field. If the option is selected that determines whether a specific (line or invoice) discount or both discounts are posted separately, the user must make sure that: • A dedicated account(s) is (for example, Sales Invoice Discount account) created in the chart of accounts. • The option is set up in the General Posting Setup window. When posting sales documents, the program uses the general business posting group of the customer and the general product posting group of the item to retrieve the account set up in the General Posting Setup window. If discounts are not set up to be posted separately, they become part of a sales amount posted to the Sales account. Setting Up Line Discounts Sales representatives use the Sales Line Discount table to record price discounts agreed upon with their individual or group of customers. The table can also be used to help strategically segment customer base and can be accessed from both the customer card and the item card. The Sales Line Discount window enables a sales representative to specify the conditions that must be met before a customer is offered a discount price. For example, the conditions can require that the customer buys a certain quantity or that a purchase is invoiced in a specified currency before a discount can be granted. Similar to alternative sales prices, line discounts can be applied to an individual customer, customer group, and all customers. Unlike sales prices, discounts can be extended from a single item to several items grouped by common characteristics. The following demonstration illustrates a situation where a company has set up price discounts for certain item categories based on a pricing decision that targets a specific customer segment. 3-18 Microsoft Official Training Materials for Microsoft Dynamics ™ Your use of this content is subject to your current services agreement
  • 69.
    Chapter 3: SalesPrices and Discounts Demonstration − Setting up Customer Discounts To manage the company’s discount structure, Cronus’ sales manager has categorized customers in two major groups, Large Account and Retail customers. Because the purchase volume differs from one customer group to another, the price discount offered to customers must differ. Price discounts are also offered depending on what item category the customer is purchasing: Bigger discounts for raw materials, and reduced discounts for finished and retail items. Notice how the sales manager has set up this discount structure in the program. Steps The discount groups for customers are set up in the Customer Disc. Groups window. 1. From the Sales & Marketing menu, click ORDER PROCESSING→SETUP→CUSTOMER DISC. GROUPS. A code identifying a customer discount group can be assigned to a customer to indicate that this customer is allowed to receive the discount price specified for the group. This is done by selecting an appropriate code in the Customer Disc. Group field on the customer card. 2. Open the customer card for customer 30000. Click the Invoicing tab. Customer 30000 belongs to the discount group of large accounts. Note the sales conditions that must be fulfilled before the group of large accounts can receive a discount. 3. On the customer card, click the AssistButton in the Customer Disc. Group field to open the customer discount groups list. Select the Large Account group and then click CUST. DISC. GROUPS→SALES LINE DISCOUNT. Customers that belong to the discount group can receive three different discounts depending on the item group: FINISHED, RAW MAT, and RESALE. Categorizing items into discount groups is based on the same principles as categorizing customers: The user must set up an item discount group by giving it a code. The code is then assigned to the individual item for which the user wants to apply a discount. Microsoft Official Training Materials for Microsoft Dynamics ™ 3-19 Your use of this content is subject to your current services agreement
  • 70.
    Trade in MicrosoftDynamics™ NAV 5.0 At Cronus, there are five item discount groups. 4. From the Sales & Marketing menu, click ORDER PROCESSING→SETUP→ITEM DISCOUNT GROUPS. The Item Disc. Groups window appears. It shows the item discount groups. When using the line discount functionality, it is not mandatory to assign customers and items to discount groups; discounts can be set up for a combination of individual customers and items. Create a line discount for customer 30000 offering 20 % discount when buying at least 15 units of item 1972-W. 5. On the customer card for customer 30000, click SALES→LINE DISCOUNTS. 6. In the Sales Line Discounts window, create a line with a Sales Type of Customer and Sales Code of 30000. In the Type field, select Item and select 1972-W in the Code field. 7. Type 15 in the Minimum Quantity field. In the Line Discount % field, type 20. 8. Close the window. Using the Line Discount Mechanism Setting up a line discount supports the sales representatives in their task of always offering the customers the best prices. After the line discounts and terms are set up, when an order processor creates an order/invoice for a specific customer, the program checks whether there are line discounts set up for the customer in question and, if yes, that the sales header and line details meet the conditions for applying a discount price. If all these conditions are met, the program copies the applicable discount percentage from the Sales Line Discounts window to the Line Discount % field on the sales line and enters the calculated discount price in the Line Amount Excl./Incl. VAT field. When more than one discount percentage is set up for a customer, the program selects the highest discount to comply with “the best price” rule (described in the online Help topic “Best Price”). If there are no discounts recorded, or the conditions for applying a discount are not satisfied, the program uses the regular unit price specified on the item card as a suggestion on the sales document (unless there is a special sales price set up for the customer). 3-20 Microsoft Official Training Materials for Microsoft Dynamics ™ Your use of this content is subject to your current services agreement
  • 71.
    Chapter 3: SalesPrices and Discounts The Sales Line Discounts field in the right pane shows the number of discounts available in parentheses. Click this field to see the available line discounts. The best price is defined as the lowest possible price with the highest possible line discount on the order date. This mechanism is illustrated in the following demonstration, “Setting Up Sales Line Discounts.” Demonstration − Setting Up Sales Line Discounts A representative of Cronus' customer 30000 calls the order processor to order 20 units of item 1972-W. The order date is 01/25/08. The customer also inquires about the total price of the purchase, as well as the granted discount (if any). The order processor must create a sales order and inform the customer about the price. The order processor may also investigate whether there are other conditions that the customer may want to accept in order to obtain a better price. Before handling this demonstration, assign customer 30000 to a customer price group Wholesale1. Create a sales order for customer 30000. Enter 20 units of Item 1972-W on the lines. By looking at the values in relevant fields, the order processor can inform the customer that the total price for the 20 pieces of the item is 13,600 LCY (based on the unit price of 850 LCY and a discount of 20%). This is the best price the customer can receive considering the terms of this sale. At the same time, as indicated by the numbers in parentheses next to the Sales Prices and the Sales Line Discounts fields, the order processor may check the terms that determine whether the customer is allowed to an even better price/discount. Microsoft Official Training Materials for Microsoft Dynamics ™ 3-21 Your use of this content is subject to your current services agreement
  • 72.
    Trade in MicrosoftDynamics™ NAV 5.0 Steps Perform the following steps to check the customer’s sales terms: 1. Click Sales Prices. FIGURE 3-3: GET SALES PRICE WINDOW The Get Sales Price window suggests that if the purchase of item 1972-W was paid in euros instead of the local currency, the unit price is more favorable (assuming the exchange rate of 1 euro = 0.63 LCY). Assume that the customer accepts this condition: 2. On the Foreign Trade tab of the sales order, in the Currency Code field, select EUR. Click Yes to the message that appears. The program copies the unit price from the sales prices table to the Unit Price field on the sales line and recalculates the line amount value. Now, check the line discounts that exist for a combination of the customer and item. 3. Click Sales Line Discounts. FIGURE 3-4: GET SALES LINE DISC. WINDOW 3-22 Microsoft Official Training Materials for Microsoft Dynamics ™ Your use of this content is subject to your current services agreement
  • 73.
    Chapter 3: SalesPrices and Discounts The records specify that the customer is allowed 15% discount when buying items in the group Finished (to which item 1972-W belongs). There is also a line discount of 20% offered individually to customer 30000 when buying at least 15 units of item 1972-W. Following the "best price" rule, the higher discount for price calculation on the sales line is used. The same rule also determined that because the line discounts do not have a currency code set up as a condition, the program selected the highest line discount available in local currency. Both the alternative sales price and line discount have been combined when calculating the total sales price. This is because of the condition associated with the sales price setup (Allow Line Discount field is selected), which allows for this combination. Microsoft Official Training Materials for Microsoft Dynamics ™ 3-23 Your use of this content is subject to your current services agreement
  • 74.
    Trade in MicrosoftDynamics™ NAV 5.0 Lab 3.4 − The "Best Price" Rule Scenario: You are the order processor at Cronus. Customer 50000 is ordering 200 pieces of item 70200. Challenge Yourself! Offer the customer the best (cheapest) price for the purchase. Need a Little Help? The solution is provided in Appendix C. 3-24 Microsoft Official Training Materials for Microsoft Dynamics ™ Your use of this content is subject to your current services agreement
  • 75.
    Chapter 3: SalesPrices and Discounts Invoice Discounts Independent of the line discounts, sales representatives may also offer customers an invoice discount. This is based on the whole invoice amount. Invoice discounts are given if the invoice is larger than a minimum amount. Different from line discounts, which are calculated by the program automatically as soon as the sales line is created, automatic calculation of invoice discounts is an option that companies may decide not to use. This option is set up in the general Sales & Receivables Setup window. The Calc. Inv. Discount and the Calc. Inv. Disc. per VAT ID fields define how the program automatically calculates the invoice discount amount for sales documents. Sales representatives use the customer invoice discounts table to define the rules for discounts and service charges for different customers,.They set up the invoice discount code for which a set of terms – a minimum amount, discount percentages, and service charges – can be specified. The program fills in the code for the invoice discount in the Invoice Disc. Code field on the Invoicing tab of the customer card automatically when a new customer is created. The program uses the customer number as a default value when creating the invoice discount code because, typically, invoice discounts are granted to the customers individually. 1. Open the customer card for customer 10000. Notice that the value in the Invoice Disc. Code field matches the customer number. The user can also set up several discount groups to assign the customers with the same invoice discount type by replacing the default code with a different code. This code is entered in the Invoice Disc. Code field for each customer receiving the same invoice discount. 2. Open the customer card for customer 49633663. Click the Invoicing tab. Instead of the customer number, the invoice discount code is specified as A. After the invoice discount code is specified, the terms under which a discount can be granted are specified in the Cust. Invoice Discounts window. 3. On the customer card for customer 49633663, click SALES→INVOICE DISCOUNTS. Customers in group A receive an invoice discount of 5%, based on one minimum invoice amount in local currency and another minimum invoice amount in a specified foreign currency. Microsoft Official Training Materials for Microsoft Dynamics ™ 3-25 Your use of this content is subject to your current services agreement
  • 76.
    Trade in MicrosoftDynamics™ NAV 5.0 The Cust. Invoice Discounts window also lets the user specify a service charge amount the customer must pay on a purchase whose total amount is below a specified minimum amount. Using the Invoice Discount Mechanism After the invoice discount code and the associated terms have been set up, the program enables the user to calculate the invoice discount when invoicing a specific customer. Depending on the specifications on the Sales & Receivables setup, this calculation can be initiated manually or performed automatically. To initiate the calculation of the invoice discount, use the function called Calculate Invoice Discount on the sales order/invoice. The calculated amount of the invoice discount can be verified in the Sales Order Statistics window. Allowing/Disallowing Discounts You can combine alternative (often reduced) sales prices with line and invoice discounts. The option of allowing line discounts is available on the customer card, a line in the Customer Price Groups window, and a price line in the Sales Prices window. The status of the Allow Line Disc. field on a price line in the Sales Prices window has priority over the setting of the same field in the Customer Price Groups window and on the customer card. For example, the line discount is granted to the customer – even if it is disallowed for the customer in question – if the sales price to which they are allowed justifies the line discount. According to this rule, if the user wants to stop offering line discounts to a specific customer, they have the following alternatives: • Clear the Allow Line Disc. field in the Sales Prices window for the lines that allowed the customer to a special price, or • Assign the customer to a customer price group for which a line discount is disallowed in relation to all sales prices. Where no alternative sales prices records exist, clear the Allow Line Disc. field on the customer card for the customer. Similar principles are applied when controlling invoice discounts, with the differences that: • The option of (dis)allowing invoice discounts is associated with the item (and found on the item card). • The option can be (de)activated on the sales line (or sales price line if such one exists). 3-26 Microsoft Official Training Materials for Microsoft Dynamics ™ Your use of this content is subject to your current services agreement
  • 77.
    Chapter 3: SalesPrices and Discounts Conclusion Sales Prices and Discounts deals with the way sales prices and disounts are set up and maintained in Microsoft Dynamics NAV depending on the special agreements made with the customters. Sales Prices and Discounts are both important aspects of providing the best possible service and to maintain customers on the long term horizon. Microsoft Official Training Materials for Microsoft Dynamics ™ 3-27 Your use of this content is subject to your current services agreement
  • 78.
    Trade in MicrosoftDynamics™ NAV 5.0 Lab 3.5 − Creating Sales Line Discounts for a Campaign Scenario: If you are familiar with the Microsoft Dynamics NAV Relationship Management functionality, try the following exercise. Cronus’ sales manager wants item 1988-S introduced to a larger range of customers, and is making an introductory discount offer to a range of prospective new customers. This discount is valid if the customers purchase the items between 01/28/08 – 02/28/08. Challenge Yourself! 1. The line discount on item 1988-S is 20% if the customer purchases at least five units. The offer goes to prospective customers who have the job responsibility of purchase. HINT: To find the Sales Line Discount window, click the Campaign button in the Campaign window. Use the wizard to create the segment. Remember to select Campaign Target on the Campaign tab of the Segment window. 2. Open the campaign by clicking FUNCTIONS→ACTIVATE SALES PRICES/LINE DISCOUNTS. 3. Create a sales quote for one of the contacts to verify the receipt of the correct discount percentage. Need a Little Help? The solution is provided in Appendix C. 3-28 Microsoft Official Training Materials for Microsoft Dynamics ™ Your use of this content is subject to your current services agreement
  • 79.
    Chapter 3: SalesPrices and Discounts Quick Interaction: Lessons Learned Take a moment and write down three key points you have learned from this chapter: 1. 2. 3. Microsoft Official Training Materials for Microsoft Dynamics ™ 3-29 Your use of this content is subject to your current services agreement
  • 80.
    Trade in MicrosoftDynamics™ NAV 5.0 3-30 Microsoft Official Training Materials for Microsoft Dynamics ™ Your use of this content is subject to your current services agreement
  • 81.
    Chapter 4: CustomerService Features CHAPTER 4: CUSTOMER SERVICE FEATURES Objectives The objectives are: • Using Item Substitution • Setting up Item Substitution • Creating Sales Orders with substitutions • Creating Item Cross References • Handling Nonstock Items • Importing Vendor Catalogs Introduction The Customer Service Features of Microsoft Dynamics NAV includes substituting one item with another, working with item cross reference and using nonstock items. The sale of a nonstock item is handled in one of two ways: Creating drop shipments and by using a special order. In this section, detailed demonstrations and examples show how the features support various aspects of the customer service. Microsoft Official Training Materials for Microsoft Dynamics ™ 4-1 Your use of this content is subject to your current services agreement
  • 82.
    Trade in MicrosoftDynamics™ NAV5.0 Using Item Substitution Companies frequently offer products of similar quality and function as substitutes for one another. The purpose of this is twofold: • A company can offer a variety of styles, brands, and prices of goods. This enables their customers to select items that best suits their needs and budgets. • By enabling customers to purchase inventory items of comparable quality, function, and price, companies can maintain customer satisfaction if stock shortages occur. The Item Substitution feature enables a company to link items with the same or similar properties to one another. The substitution can be either one-way (from item x to item y, but not from y to x), or two-way. If the substitution is two-way, the items are considered interchangeable. If one item is interchangeable with another, the program automatically creates a "reverse substitution" entry for the other item during the setup of the substitution information. After substitution information is set up, every time that the number of the item with a substitute(s) is entered on the sales line, the number of substitutions set up displays in the Substitution field on the right side of the sales order. In addition, when the quantity of items requested on the sales line exceeds the quantity available from inventory, the program contains a check mark in the Substitutes Exist field in the stockout message box. If a substitute is chosen, the program updates the relevant fields on the sales line. 4-2 Microsoft Official Training Materials for Microsoft Dynamics ™ Your use of this content is subject to your current services agreement
  • 83.
    Chapter 4: CustomerService Features Setting up Item Substitution A company must create and set up corresponding item substitution entries in order to use the item substitution functionality. At Cronus, several item substitution entries have already been set up. Take the following steps to view the entry made for item 1968-W: 1. From the Sales & Marketing menu, click INVENTORY & PRICING→ITEMS. Locate the item card for item 1968-W. 2. In the Item Card window, click ITEM→SUBSTITUTIONS. FIGURE 4-1: ITEM SUBSTITUTION ENTRY WINDOW The fields in the Item Substitution Entry window specify information about the substitute item(s). The item number for the substitute item is entered in the Substitute No. field. An item can be substituted by either another item on the company's inventory list or by a nonstock item. The type of the item used as a substitute is selected in the Substitute Type field. Interchangeability of these items is defined by the check mark in the Interchangeable field. To enter comments about the conditions required to make substitutions for an item, click Condition to open the Condition window. If a condition has been entered, the program automatically inserts a check mark in the Condition field of the Item Substitution Entry window. As soon as a substitution entry is created for an item, the program inserts a check mark in the Substitution Available field on the sales line for this item. Microsoft Official Training Materials for Microsoft Dynamics ™ 4-3 Your use of this content is subject to your current services agreement
  • 84.
    Trade in MicrosoftDynamics™ NAV5.0 Demonstration − Creating a Sales Order with Substitutions Cronus customer 10000 orders three units of item 1968-W. An order processor creates an order for the customer and learns the quantity of the requested item is not available. However, item 1968-W can be substituted by another item. With the customer's consent, the order processor decides to ship a substitute item. Create a sales order of item 1968-W for customer 10000 (do not enter the quantity at this point). NOTE: The Substitution Available field on the sales lines is still available. By default, this field cannot be seen as the information is now available on the right hand pane. To make the Substitution Available field visible on these lines, right-click the field names pane above the lines, select Show Column, and select Substitution Available. FIGURE 4-2: SALES ORDER WINDOW Notice that the Substitutions field has a number one in parentheses. This indicates that one item has been set up as a substitute for the item on the line. 4-4 Microsoft Official Training Materials for Microsoft Dynamics ™ Your use of this content is subject to your current services agreement
  • 85.
    Chapter 4: CustomerService Features Steps Perform the following steps: 1. In the Quantity field, enter 3 and press Enter. A stockout message appears. In the message box, the Substitutes Exist field is selected. 2. Click Yes. To view the substitute item for the item on the sales line: 3. Click Substitutions in the right pane. The Item Substitution window specifies the relevant logistical information about the substitute item(s). The header information is copied from the related sales line. The Inventory and the Quantity Avail. on Shpt. Date fields specify the respective quantities of the substitute item. 4. Select the line for item 1972-W and then click OK. On the sales line, the program replaces the originally entered item 1968-W with 1972-W. 5. Post the sales order shipment. Microsoft Official Training Materials for Microsoft Dynamics ™ 4-5 Your use of this content is subject to your current services agreement
  • 86.
    Trade in MicrosoftDynamics™ NAV5.0 Lab 4.1 − Handle Items with Substitutes Scenario: You are the order processor at Cronus. Customer 40000 orders seven units of item 1980-S. This customer's shipments are usually made from the Yellow warehouse. Challenge Yourself! Your tasks are as follows: 1. Create a sales order for the customer. 2. Determine whether the requested item 1980-S can be substituted by another item. 3. Ship the requested quantity of a substitute item. NOTE: Because the Yellow location requires picking, the program requires that you process the shipping through the warehouse. You can skip this process by entering the corresponding amounts in the Qty. To Ship field on the sales lines and then by accepting the warning messages given by the program. Need a Little Help? The solution is provided in Appendix C. 4-6 Microsoft Official Training Materials for Microsoft Dynamics ™ Your use of this content is subject to your current services agreement
  • 87.
    Chapter 4: CustomerService Features Creating Item Cross References With item cross references, a company can use another company's item number (used, for example, by the customer or vendor) and the program refers this number to the company's own internal item number. When the external item number in the Cross Reference No. field is entered, the program automatically fills in the internal item number and corresponding information about the sales order. Item cross reference enables the following types of item numbers to be set up for cross reference: • Blank • Customer • Vendor • Bar Code Demonstration − Setting Up Item Cross References The Cronus employee responsible for managing customer relationships must set up cross references for several selected items. Item 1896-S is among those items. The condition is that when sold to customer 40000, the customer's item reference (instead of the item number that is used at Cronus) is used on the sales documents. Steps Perform the following steps to set up cross references for the items: 1. From the Sales & Marketing menu, click INVENTORY & PRICING→ITEMS. Locate the item card for item 1896-S. 2. Click ITEM→CROSS REFERENCES. FIGURE 4-3: ITEM CROSS REFERENCE ENTRIES Microsoft Official Training Materials for Microsoft Dynamics ™ 4-7 Your use of this content is subject to your current services agreement
  • 88.
    Trade in MicrosoftDynamics™ NAV5.0 In the Item Cross Reference Entries window, the user can specify cross-reference details. Options in the Cross-Reference Type field define for whom (customer or vendor) or for what (bar code) the cross reference is used. Perhaps one item has different reference number for the customer, vendor, and bar code. Option Blank means that any cross-reference number (for example, an internal reference used for information) can be entered and determine the item. Depending on the selection made in the Cross-Reference Type field, the user can enter either a customer or vendor number or a bar code name in the Cross Reference Type Number field. A cross- reference number of up to 20 characters can be entered in the Cross- Reference No. field. The Description field enables entries of up to 30 characters. The user can refer to the Discontinue Barcode field for information when the Cross-Reference Type field is set to Bar Code and that particular bar code is no longer valid. 3. In the Cross-Reference Type field, select Customer, and in the Cross Reference Type No. field, select 40000. 4. In the Cross-Reference No. field, enter ED6DR3660, in the Unit of Measure field, select PCS, and in the Description field, enter Executive Desk, 6 Dr; 36x60. 5. Close the Item Cross Reference Entries window. You have now created an item cross reference entry for item 1896-S. Demonstration − Creating a Sales Order with a Cross Reference Cronus customer 40000 places a sales order for ten units of item 1896-S. The customer gives the order processor item number - ED6DR3660. Steps The order processor must create a sales order that reflects the item number used by the customer: 1. Create the sales order for customer 40000 (do not enter the item number now). NOTE: By default, the Cross-Reference No. field on the sales lines is not visible. To make it visible, right-click the field names pane above the lines, select Show Column, and select Cross-Reference No. 2. In the Cross-Reference No. field, click the AssistButton to open the Cross Reference List window. 4-8 Microsoft Official Training Materials for Microsoft Dynamics ™ Your use of this content is subject to your current services agreement
  • 89.
    Chapter 4: CustomerService Features 3. Select the cross-reference number ED6DR3660 and then click OK. Notice that the cross-reference number and description appear on the sales line. 4. Click Print, Order Confirmation then Preview, to open a preview of the order. The document shows item No. 1896-S and the description of the cross-reference number. 5. Complete and post the sales order. The principles behind the procedures for setting up and using cross references when purchasing items from vendors are the same as described earlier. Microsoft Official Training Materials for Microsoft Dynamics ™ 4-9 Your use of this content is subject to your current services agreement
  • 90.
    Trade in MicrosoftDynamics™ NAV5.0 Lab 4.2 − Handle Items with Cross Reference Scenario: Cronus customer 10000 places a sales order for eight units of item 1900-S. The customer gives the order processor item number – 22-786. Challenge Yourself! Your tasks are as follows: 1. Set up an item number that is used by customer 10000 as a reference for item 1900-S (the item description is "Chair, lounge, black"). 2. Create a sales order that reflects the item number that is used by the customer. Post the order. Need a Little Help? The solution is provided in Appendix C. 4-10 Microsoft Official Training Materials for Microsoft Dynamics ™ Your use of this content is subject to your current services agreement
  • 91.
    Chapter 4: CustomerService Features Nonstock Items Nonstock processing enables companies to order, ship, and invoice items that are not usually part of their inventory, and includes many areas of operation. The primary users of this functionality are purchasing/inventory management personnel and sales representatives. Nonstock item processing lets the user enter an item on a quote, sales order, or invoice. The item can be selected from an existing list of item numbers received from one or more vendors and imported into the program. As soon as the relevant vendor item has been selected, the program automatically creates an inventory item with a unique item number. The inventory item is processed as an ordinary "stocked" inventory item. Reports help companies decide whether certain nonstock items will be carried as stocked items. Setting Up Nonstock Items The program lets the user set up the numbering sequence and format for nonstock items. To prepare the program to process nonstock items, click SETUP→NONSTOCK ITEM SETUP from the Sales & Marketing menu. The Nonstock Item Setup window appears. The two fields in this window specify the format of the nonstock item number appearing on the item card. The number is generated by the program when the user enters a nonstock item on a document line for the first time. The No. Format field contains four options for how the program formats nonstock items. (Press F1 to read the definitions of each option.) The program can format item numbers of nonstock items using the entry number, vendor item number, or the manufacturer code. For the next scenario, the Vendor Item No. is selected. The No. Format Separator field contains the character that serves as a separator between the elements of a nonstock item number format when using a format of both a code and a number in the No. Format field. Microsoft Official Training Materials for Microsoft Dynamics ™ 4-11 Your use of this content is subject to your current services agreement
  • 92.
    Trade in MicrosoftDynamics™ NAV5.0 Creating Nonstock Items To use nonstock processing, a company must create items the program recognizes as nonstock goods. The program provides two methods for creating nonstock items: • Manually: Creating the nonstock item from the nonstock item card. • Importing a vendor catalog: Bringing in a volume of nonstock items using a dataport. The following demonstration "Creating a Nonstock Item Manually" describes each of these methods. Demonstration − Creating a Nonstock Item Manually The user must enter the item-related information in the appropriate fields on the nonstock item card to create a nonstock item manually. This is similar to creating a regular item card. Steps Cronus has set up several nonstock items. Consider the setup details for one of them: 1. From the Sales & Marketing menu, click INVENTORY & PRICING→NONSTOCK ITEMS. The Nonstock Item Card window appears. Enter general item information about the General tab. To read the definitions of each field, click the field and press F1. The fields on the Invoicing tab specify cost and posting details about the nonstock item. To handle nonstock items, complete the Vendor No., the Vendor Item No., and the Item Category Code fields. The item category code is important because this determines the posting groups and costing methods that are used when the nonstock item is used in a transaction. The first time that a sales order for a nonstock item is created and posted, the program automatically adds the item record to the company's inventory list by creating an item card. To create an item card for a nonstock item before using it in a transaction, run the Create Item function available from the nonstock item card. 4-12 Microsoft Official Training Materials for Microsoft Dynamics ™ Your use of this content is subject to your current services agreement
  • 93.
    Chapter 4: CustomerService Features Create an item card for nonstock item with entry No. NS0001. 2. In the Nonstock Item Card window, click FUNCTION→CREATE ITEM. The program creates the corresponding item card, adds a record in the item vendor catalog, and provides confirmation. Notice that the program assigns the newly created item the number with the format (Vendor Item No.) specified in the Nonstock Item Setup window. Open the new item card. 3. From the Sales & Marketing menu, click INVENTORY & PRICING→ITEMS. Locate the item card for item 2100. Notice that the Created from Nonstock Item field is selected. This indicates that this was a nonstock item converted to a stocked item. Demonstration − Importing Vendor Catalogs Vendors frequently make catalogs available by using an electronic file. The program provides a dataport (object number 5700, import nonstock items) designed to import the following comma-delimited format. Steps To open the dataport: 1. On the menu bar, click TOOLS→OBJECT DESIGNER. Click Dataport. FIGURE 4-4: OBJECT DESIGNER WINDOW Microsoft Official Training Materials for Microsoft Dynamics ™ 4-13 Your use of this content is subject to your current services agreement
  • 94.
    Trade in MicrosoftDynamics™ NAV5.0 2. Select the object number 5700 and then click Run. The Import Nonstock Items window appears. On the Nonstock Item tab of this window, set up filters for the information desired from the catalogs. The path to the file that contains the vendor's catalog must be entered in the File Name field on the Options tab. NOTE: Typically, the file with the vendor catalog does not contain company-specific information, such as item category code. For the program to handle the nonstock items, however, a nonstock item card must contain an item category code. The easiest way to enter this information is by using the Find and Replace function under the Edit menu button. Companies can create additional dataports customized to address formats that are unique to a specific vendor. NOTE: When using a dataport, make sure that the manufacturer code, vendor number, unit of measure code, item category code, and product group code specified in the dataport are set up. This can be checked by opening a nonstock item card and verifying that the records in the tables related to the corresponding fields exist. For example, if in a dataport, the manufacturer code is specified as ACME, then there must be a code ACME set up in the manufacturer code list. Handling Nonstock Items Nonstock items are usually sold to customers as drop shipments or special orders. Drop shipments are sent directly from the vendor to the customer, while special orders are sent to the company's warehouse before they are sent to the customer. By selecting drop shipment, companies buy and sell the item but avoid handling, stocking, and delivering the item. When companies make a shipment to a customer that contains both regular and nonstock items, or want to maintain a uniform interface with customers, they might handle the sales order as a special order. In this section, handling the sale of nonstock items is illustrated using the example of drop shipment. The principles behind the procedures for handling sales orders selected as special orders are similar to the ones for handling drop shipments. 4-14 Microsoft Official Training Materials for Microsoft Dynamics ™ Your use of this content is subject to your current services agreement
  • 95.
    Chapter 4: CustomerService Features Demonstration − Using Drop Shipments Cronus' customer 10000 orders ten units of item 3100. Because item 3100 is a nonstock item, the order processor decides to deliver the order using drop shipment. The item must be purchased from a vendor (vendor 30000) who ships the order directly to the Cronus customer. Steps First, create a sales order for a nonstock item. NOTE: Creating sales orders for nonstock items requires entries in the Purchasing Code field. In addition, the Nonstock field is an information field that indicates when an item is a nonstock. These do not appear in the standard layout. To insert these fields, use the Show Column function. 1. Fill in the fields on the sales header. To enter the nonstock item number, the order processor can either: – Select the item from the nonstock items list. – Select the item from the regular item list (if the nonstock item has been added to the inventory list). 2. Click FUNCTIONS→NONSTOCK ITEMS. 3. Select item 3100 and then click OK. 4. In the Purchasing Code field, select DROP SHIP and in the Quantity field, enter 10. 5. Release the order by selecting FUNCTIONS→RELEASE or by pressing CTRL + F11. The purchasing agent creates a purchase order for the nonstock items that Cronus sells to customer 10000. Purchase orders for drop shipments can be created in two ways: – Indirectly: As a part of a regular planning activity using the requisition worksheet. – Directly: From the purchase order. NOTE: To learn about the procedures related to each method, refer to the topics titled "Create Purchase orders for Drop Shipments Directly" in the online Help. Suppose the purchasing agent creates a purchase order for drop shipments directly. Microsoft Official Training Materials for Microsoft Dynamics ™ 4-15 Your use of this content is subject to your current services agreement
  • 96.
    Trade in MicrosoftDynamics™ NAV5.0 Create a new purchase order for vendor 30000. 6. Fill in the fields on the purchase header. Include a Vendor Invoice number. 7. Click the Shipping tab. In the Sell-to Customer No. field, select 10000. 8. Click ORDER→DROP SHIPMENT→GET SALES ORDER. The Order – Sales List window appears. The lines in this window specify the sales orders created for the customer selected in the Sell-to Customer No. field. 9. Select the line with the sales order created in the previous demonstration and then click OK. The program fills in the fields on the purchase line with the information copied from the sales order. The program also creates a link between the sales order, which will be drop shipped, and the associated purchase order. With this link, the user can view the associated sales order directly from the purchase order and vice versa. 10. In the Purchase Order window, click ORDER→DROP SHIPMENT→SALES ORDER. The sales order appears. To view the purchase order from the sales order, use the Drop Shipment, Purchase Order function. 11. Release the purchase order. To complete the drop shipment, process the related purchase and sales orders according to the rules that are defined for drop shipment. 12. Post (ship and invoice) the sales order. The program automatically runs the Receive function on the linked purchase order and updates the Quantity Received field. 13. Post (invoice) the purchase order. NOTE: You cannot post the sales order with lines selected for drop shipment until it is linked to a purchase order. NOTE: The program requires that you enter a Vendor Invoice No. before invoicing the purchase order. Enter characters of your choice in this field. 4-16 Microsoft Official Training Materials for Microsoft Dynamics ™ Your use of this content is subject to your current services agreement
  • 97.
    Chapter 4: CustomerService Features Conclusion This lesson examined the customer service features that are available in Microsoft Dynamics NAV version 5.0. Item substitution is used to link items with the same or similar characteristics in order to offer substitute items to customers in shortage situations or to propose an alternative item that has a better price. With item cross reference, another company's item number can be used as reference number on documents. This is used as an extra service to the customers to make it easier for them to find the documents. As an additional service to the customers, the nonstock items function can be used to handle the sale of items that are not maintained as part of the normal inventory These elements are all adding to the customer's overall perception of the company and serves to strengthen the long term relationship. Microsoft Official Training Materials for Microsoft Dynamics ™ 4-17 Your use of this content is subject to your current services agreement
  • 98.
    Trade in MicrosoftDynamics™ NAV5.0 Lab 4.3 − Handling the Sale of a Nonstock Item using a Special Order Scenario: Cronus' customer 10000 orders three units of item 4100. Item 4100 is a nonstock item, which must be purchased from vendor 40000. Challenge Yourself! Your tasks are as follows: 1. Create a sales order for customer 10000, and select it as a special order. 2. Create the purchase order for this nonstock item. 3. Receive and invoice the purchase order. 4. Ship and invoice the sales order. Need a Little Help? The solution is provided in Appendix C. 4-18 Microsoft Official Training Materials for Microsoft Dynamics ™ Your use of this content is subject to your current services agreement
  • 99.
    Chapter 4: CustomerService Features Quick Interaction: Lessons Learned Take a moment and write down three key points you have learned from this chapter: 1. 2. 3. Microsoft Official Training Materials for Microsoft Dynamics ™ 4-19 Your use of this content is subject to your current services agreement
  • 100.
    Trade in MicrosoftDynamics™ NAV5.0 4-20 Microsoft Official Training Materials for Microsoft Dynamics ™ Your use of this content is subject to your current services agreement
  • 101.
    Chapter 5: PurchaseOrder Management CHAPTER 5: PURCHASE ORDER MANAGEMENT Objectives The objectives are: • Reviewing the business impact from efficient purchasing processes • Setting up Purchases, Vendors, Alternative Vendors and Vendor Posting Groups • Managing Purchase Transactions • Creating Purchase Quotes • Setting up Purchase Prices and Discounts • Using the Pricing Mechanism • Managing Purchase Line Discounts Introduction Timely purchases made at the best price not only improve the efficiency of the company's inventory management and reduce requisition costs, but also have a direct impact on the company's ability to keep their customers satisfied. This lesson demonstrates the key features of the purchase order management functionality in Microsoft Dynamics™ NAV. The two main sections focus on the most common aspects of purchase transaction handling and cover the following topics: • Quote and purchase order • Order posting • Managing purchase prices and discounts Purchase Order Management starts with describing the setup functionality. A list of purchase batch jobs, reports, and purchase documents is included in Appendix A. Additionally, demonstrations and examples help explain how the program supports companies in managing the tasks involved in purchase handling processes. NOTE: For an overviewof procedures associated with handling specific purchase management tasks, refer to the relevant topic in the online Help. To learn more about payables functionality in Microsoft Dynamics NAV, refer to the Financials traning materials. Microsoft Official Training Materials for Microsoft Dynamics ™ 5-1 Your use of this content is subject to your current services agreement
  • 102.
    Trade in MicrosoftDynamics™ NAV5.0 Efficient Purchasing Companies must make sure each purchase transaction is based on the most favorable terms, such as delivery time and price, and that the associated inventory and financial information is registered correctly. Because many aspects of a future purchase agreement with a vendor are negotiated and agreed upon in the pre-purchase stage, it helps for purchasing agents to record the relevant agreement details once and reuse this information when making a purchase. There is a lot of functionality in Microsoft Dynamics™ NAV that supports purchase transaction handling: • Purchase Order Management: This includes documents, such as quotes, blanket orders, and purchase orders that support purchasing agents in efficiently managing purchases. It also provides the facility for: – Partial order receipt – Separation between receiving and invoicing – Combined invoicing • Alternative Order Addresses: This facilitates handling purchase orders toward vendors with several alternative shipping addresses. • Alternative Vendors: This supports purchase situations where the same item is supplied by several different vendors. • Salespeople/Purchasers: This enables collection of purchase statistics at an individual purchasing agent level. • Purchase Line Pricing: This helps maintain and manage alternative purchase prices negotiated and agreed upon with individual vendors. • Purchase Line Discounting: This helps maintain and manage purchase discounts that are percentage-based, negotiated, and agreed upon with individual vendors. 5-2 Microsoft Official Training Materials for Microsoft Dynamics ™ Your use of this content is subject to your current services agreement
  • 103.
    Chapter 5: PurchaseOrder Management Setting Up Purchases This chapter elaborates on setup options that define the functionality of purchase order management. This is done with the most common tasks found in purchase management in mind and with focus on the physical flow of purchase transactions instead of on the financial flow. The latter is addressed in more detail in the Financials training materials. The purchase setup consists of Purchases & Payables setup and Vendor setup. Purchases & Payables Setup Based on their established practices, companies must specify how they want the program to support them in managing different aspects of their purchase transactions. These are the general setup options applied to all purchase transactions regardless of which item and vendor are involved. Vendor Setup Managing vendor information is an important part of managing the total purchases and finances of a company. Basic information (such as name, address, and so on) and details (such as credit limit, invoicing, discount and payment terms, currencies, and list of regularly supplied items) are recorded for each vendor on a vendor card. The setup of vendor posting groups defines a connection between a vendor and the accounts in the general ledger. This is done by assigning a vendor to a posting group for which balance sheet and income statement accounts are then set up. Demonstration − Setting Up Purchases At Cronus, management has a registration of all the receipts that enter their inventory. In the same manner, they want the program to automatically create a shipment note when they have to return items to the vendor. They also want to make sure that no purchase document can be posted unless several corresponding external documents are entered. Steps The business requirements listed above have led to the following Purchases & Payables setup for Cronus. On the Purchase menu, click SETUP→PURCHASES & PAYABLES SETUP. Setup of the fields on the General tab specifies the program's facilities for purchase order management. Check marks in the Receipt on Invoice and Return Shipment on Credit Memo fields indicate that the company wants to automatically create posted receipt and posted return shipment documents at the time of posting purchase invoices and purchase credit memos respectively. If these fields are clear, only posted invoices/credit memos are created. (This setup option is only relevant if, in addition to the Purchase Invoicing functionality, a company also uses the Purchase Order Management and Return Order Management.) Microsoft Official Training Materials for Microsoft Dynamics ™ 5-3 Your use of this content is subject to your current services agreement
  • 104.
    Trade in MicrosoftDynamics™ NAV5.0 The check mark in the Receipt on Invoice field is necessary if item charges are used because they are applied to the receipt. There is more information about item charges later in this training manual. Selecting the Ext. Doc. No. Mandatory field indicates that users cannot post any purchase document (order, invoice, and a credit memo) as invoiced without an external document number in the Vendor Invoice No. field on a purchase header. A check mark in the Exact Cost Reversing field indicates that the company wants the program to automatically align the cost of every item returned to the vendors with the original purchase entry. The definition and setup options of all other fields on the General tab of the Purchases & Payables Setup window can be found in the online Help. In addition, fields determining costing reversing options are described in detail later in this training manual. Setting Up Vendors The vendor card and the type of information and vendor details that can be recorded are covered in other courses and are not repeated here. Setting Up Receiving Options A situation where a vendor may have alternative sites, in addition to their main business address, from which they deliver items to their customers is not uncommon. For example, companies may have various warehousing and production sites that have addresses different from their main office. Alternative Order Address supports companies when dealing with such vendors. If the company receives orders from different vendor addresses, those addresses can be recorded as alternative order addresses in the program and then chosen by the purchasing agent when making an order/invoice for the vendor in question. Alternative order addresses are entered in the Order Address table, which can contain an unlimited number of addresses for each vendor. A code representing information such as vendor number and name is linked to each address. Demonstration − Setting Up Vendors The following demonstration shows how to set up vendors. Steps Cronus' vendor 10000 has two alternative order addresses set up in the program. 1. From the Purchase menu, click ORDER PROCESSING→VENDORS. 2. Open the vendor card for vendor 10000. Click VENDOR→ORDER ADDRESSES and press f5. The Order Address List is displayed. 3. Select the second address line, and then click OK to see the address details. 5-4 Microsoft Official Training Materials for Microsoft Dynamics ™ Your use of this content is subject to your current services agreement
  • 105.
    Chapter 5: PurchaseOrder Management When the code is selected in the Order Address Code field on orders (invoices and credit memos), the order address information appears on document printouts. All other receiving setup options are found on the Receiving tab of the vendor card. 4. Open the vendor card for vendor 10000, and then click the Receiving tab. For several reasons, for example to make sure that certain types of items are stored in the same warehouse, companies may use a decentralized location strategy. Such a strategy suggests that shipments from vendors are received in local warehouses instead of in a central one. To reflect these considerations, a company can link certain vendors to specific locations. This is done by specifying a default location in the Location Code field for the individual vendor. More information about the multiple locations setup is included in the Inventory Management training manual. Depending on their profile, industrial practices, and location, vendors and customers may have different agreements as to who transports orders to customers (vendors themselves, shipping agents, or customers) and according to which terms. The program offers the possibility to record all the different terms of purchase and shipment methods (often based on Incoterms) that can then be associated with each specific vendor. Cronus has set up several shipment methods in the program. 5. From the Purchase menu, click ORDER PROCESSING→SETUP→SHIPMENT METHODS. When assigned to a vendor, the shipment method code is copied to purchase documents toward that vendor. The two other setup options on the Receiving tab affect the way the program calculates different purchase order receipt dates. The program uses the value in the Lead Time Calculation field to calculate the order planned and expected receipt dates, if there is no lead time calculation value set up on the card for the item being purchased or in the item vendor catalog. The two calendar fields relate to the program's facility to calculate various receiving and delivery dates on the purchase documents. These setup options are described in detail later in this training manual. Microsoft Official Training Materials for Microsoft Dynamics ™ 5-5 Your use of this content is subject to your current services agreement
  • 106.
    Trade in MicrosoftDynamics™ NAV5.0 Demonstration − Setting up Alternative Vendors If the company has more than one vendor supplying the same item, purchasing agents may want these vendor-item combinations registered. To do this, they must create a Vendor Item Catalog listing items that are purchased regularly from a specific vendor. Steps At Cronus, vendor 30000 is among those vendors that have a vendor item catalog created for them: Open the card for vendor 30000. Click PURCHASES→ITEMS. In addition to specifying items typically purchased from the vendor in question, the vendor item catalog also contains information about the delivery lead time and whether there are any special price and discount agreements with that vendor. The setup and functionality of the latter is described in the section "Purchase Prices and Discounts" in this chapter. Vendor Posting Groups The financial value of any purchase transaction must be posted to dedicated accounts in the general ledger. Where companies do not find it possible to establish accounts for each vendor, they can put several vendors into one posting group and then specify accounts for such a group. After the company has decided on criteria for how its vendors can be grouped, the respective groups must be set up in the program in the Vendor Posting Group table. In this table, the user can assign a code to each identified posting group and specify general ledger accounts for different amount categories, such as: • Payables • Service charges • Payment discount amounts • Interest • Additional fees 5-6 Microsoft Official Training Materials for Microsoft Dynamics ™ Your use of this content is subject to your current services agreement
  • 107.
    Chapter 5: PurchaseOrder Management Demonstration - Setting Up Vendor Posting Groups Cronus' accountants have set up two vendor posting groups: domestic and foreign. Steps Perform the following steps to set up the vendor posting groups: 1. From the Financial Management menu, click SETUP→POSTING GROUPS→CUSTOMER. FIGURE 5-1: CUSTOMER POSTING GROUPS WINDOW Entering an appropriate code in the Vendor Posting Group field on the Invoicing tab of a vendor card implies that the vendor is assigned to a specific posting group. 2. Open the vendor card for vendor 10000, and then click the Invoicing tab. Remember that each vendor can only be assigned to one vendor posting group. When a purchase transaction (order, invoice, or credit memo) involving this vendor is posted, the program uses the accounts specified for the posting group to which the vendor belongs. NOTE: Accountants must also assign general business posting groups to vendors. The business group code is used in combination with a general product posting group code in the general posting setup to specify the accounts to which certain transactions are posted. You can learn more about general setup rules in the Financials training materials. Each vendor posting group can have different general ledger accounts or the same accounts set up for it. An advantage of having different groups that have the same accounts is that it gives accountants flexibility in how they group vendors together for reporting and analysis purposes. For example, a total payables amount can be presented and analyzed per two groups representing domestic and foreign vendors. Microsoft Official Training Materials for Microsoft Dynamics ™ 5-7 Your use of this content is subject to your current services agreement
  • 108.
    Trade in MicrosoftDynamics™ NAV5.0 Setting Up Purchasers If several purchasing agents work in the same company, they can each be set up and assigned a code. The codes can be used to prepare statistics and to filter information in printed reports. To set up purchasing agents in the program, follow the procedure for setting up Sales Representatives explained in the "Setting up Sales Management" section of this training manual. Managing Purchase Transactions Previous courses explain how to create and process a simple purchase order. This section elaborates on the facilities that support the most common tasks in purchase transaction management. The section takes you through a workflow, from making a quote to posting the order. Purchase Quotes The first step in a workflow involves making a purchase quote, which can be described as a "draft order" in which purchasing agents can register the vendor's offer specifying: • Price • Terms of sale • Description of items If the offer matches the purchasing agent's requirements and they want to buy the items on the quote, they can convert it into an order. Similarly, where there is a need to replenish items on stock, inventory managers can send a request to the purchasing department, who create a quote (which is later submitted to a vendor as a purchase order). Purchase Orders The purchase order is a cornerstone of purchase management functionality in Microsoft Dynamics NAV. In parallel with sales orders, the program supports the purchasing agents in their task of: • Processing a purchase transaction by automatically copying the default setup information to the order header and lines • Performing necessary calculations • Ensuring a correct update of the company's financial records. Most of the properties of the purchase order header and lines (such as delivery details, location, quantity, unit of measure, and so on) are identical to those on the sales order. 5-8 Microsoft Official Training Materials for Microsoft Dynamics ™ Your use of this content is subject to your current services agreement
  • 109.
    Chapter 5: PurchaseOrder Management Therefore, only the features distinctive to the purchase order processing tasks are addressed in the demonstration "Creating Purchase Orders." Planning Flexibility By selecting a certain value in the Planning Flexibility field on the purchase order line (use the Show Column function to make the field visible), the purchasing agent defines if the order in question is included in the program's planning calculations. The value must be set to None, if the purchasing agent does not want the program to alter either the receipt date or the quantity of the ordered items. If the purchase order was created because of the requisition planning (and must remain available for possible changes), the Planning Flexibility field is set to Unlimited. This makes it possible to change or move the order date and adjust the quantity as long as the order has not been posted. The default selection is Unlimited. Learn more about purchases planning and managing later in this manual. Posting Orders The purchase order posting principles and mechanism are identical to those applied to sales orders (described in detail and illustrated earlier in this manual) and are not described here. However, the key points in purchasing are summarized in the following list: • The posting function consists of two parts: receipt (quantity change) and invoice (value change) posting. • The Qty. to Receive and the Qty. to Invoice fields on a purchase order represent the quantities referring to the posting function. • Orders can be partially received/invoiced. • When posting an invoice, the two parts occur at the same time, without an option to separate them in time. • Posting of an order can be done by registering the order receipt first, while the order invoicing can occur later. • Related to the previous point are the facilities: To combine several receipts in one invoice or to undo a quantity record for a posted but not invoiced receipt. Microsoft Official Training Materials for Microsoft Dynamics ™ 5-9 Your use of this content is subject to your current services agreement
  • 110.
    Trade in MicrosoftDynamics™ NAV5.0 Demonstration − Creating Purchase Quotes Cronus is interested in purchasing 100 units of items 70010 and 70011, respectively. To do this, the purchasing agent wants quotes from three different vendors to find the best offer. The purchasing agent calls up vendors 10000, 30000, and 40000 to hear what they have to offer. Considering the quantity to be purchased, the prices are as follows: Vendor 10000 Item 70010: quantity 100-500 at 24.00 LCY per unit Item 70011: quantity 100-500 at 35.00 LCY per unit Vendor 30000 Item 70010: quantity 100-1000 at 26.00 LCY per unit Item 70011: quantity 100-1000 at 34.00 LCY per unit Vendor 40000: Item 70010: quantity 50-200 at 24.50 LCY per unit Item 70011: quantity 50-200 at 35.00 LCY per unit Steps Create a purchase quote for each of the vendors so the offers are registered and the total purchase prices can be compared. In addition to a quoted unit price, total purchase prices may also include invoice discounts, currency calculation, and so on. 1. From the Purchase menu, click ORDER PROCESSING→QUOTES. Press F3 to make a new quote, and enter the vendor information for vendor 10000 on the quote header. Leave the Order Date field blank. 2. Create a line for 100 units of item 70010 and a line for 100 units of item 70011, filling in the Direct Unit Cost Excl. VAT field that has the prices quoted here. Create quotes for vendors 30000 and 40000 respectively. From the total amount, it is clear the vendor 10000 gives the best offer. The purchasing agent converts the quote for vendor 10000 into a purchase order. 3. Click Make Order. Click Yes in the information message to confirm the action. 4. Note the purchase order number. 5-10 Microsoft Official Training Materials for Microsoft Dynamics ™ Your use of this content is subject to your current services agreement
  • 111.
    Chapter 5: PurchaseOrder Management Demonstration − Creating Purchase Orders Cronus' purchasing agent has discovered that not only does vendor 10000 have the best offer, they also have a warehouse close to Cronus. Because this is not the location from where they usually ship their orders, the purchasing agent has agreed with the vendor to ship the items from the alternative location. Steps The purchasing agent is working on the purchase order created in the demonstration, "Creating Purchase Quotes": 1. Locate the purchase order created in the demonstration, "Creating Purchase Quotes". 2. Click the Order Address Code field, and select HOPE. The program updates the buy-from address details on the header respectively. If the company has more than one vendor supplying the same item, the purchasing agent may want to check if this is the case when creating and processing an order for specific items. Records of item-vendor combinations are stored in the Item Vendor Catalog, available from the item card: 3. In the purchase order, in the No. field on the first purchase line, click the AssistButton to open the list of items. Click PURCHASES→VENDORS. FIGURE 5-2: ITEM VENDOR CATALOG WINDOW In addition to specifying a typical vendor(s) for the item in question, the item vendor catalog also contains information about whether there are any special price and discount agreements with the vendor. This information can be accessed by clicking the Item Vendor buttons on the delivery lead time. Microsoft Official Training Materials for Microsoft Dynamics ™ 5-11 Your use of this content is subject to your current services agreement
  • 112.
    Trade in MicrosoftDynamics™ NAV5.0 Purchase Prices and Discounts Companies have the possibility to specify cost information for each item on the item card, and are given a functionality that facilitates the task of purchase price management. The program automatically retrieves information about the last direct cost stored on an item card to copy it to the purchase order line for the item in question. This direct cost information is the same in all purchase situations regardless of whether individual price and discount agreements exist between the company and its vendor. These agreements and policies can be based on several conditions, such as: • The item variant and quantity bought • Currency paid • Order date Maintaining alternative purchase prices and discounts is challenging for the company's purchasing department. The Purchase Line Pricing and Purchase Line Discounting offer a pricing functionality beyond the standard item card. The functionality is described in this section, which is divided into two parts: • Purchase Prices • Line Discounts Demonstration − Setting up Alternative Purchase Prices To record alternative purchase prices that the purchasing agents have agreed upon with their vendor/group of vendors, they must use the Purchase Price table. Steps The Purchase Prices window is accessed from both the vendor card and the item card. 1. From the Purchases menu, click ORDER PROCESSING→VENDORS, and locate the vendor card for vendor 10000. 5-12 Microsoft Official Training Materials for Microsoft Dynamics ™ Your use of this content is subject to your current services agreement
  • 113.
    Chapter 5: PurchaseOrder Management 2. Click PURCHASES→PRICES to open the Purchase Prices window. FIGURE 5-3: PURCHASE PRICES WINDOW In this window, a purchasing agent can specify the conditions that must be met before a vendor offers a unit price for an item. For example, the conditions can require that a purchase is made within a certain period. A special purchase price can also depend on the following: • A unit of measure • Item variant • Minimum quantity • Currency The following demonstration illustrates a situation where a company must set up individual prices based on a price agreement reached with one of its vendors about some selected items. Microsoft Official Training Materials for Microsoft Dynamics ™ 5-13 Your use of this content is subject to your current services agreement
  • 114.
    Trade in MicrosoftDynamics™ NAV5.0 Demonstration − Setting Up Individual Prices based on Price Agreement Cronus' purchases from vendor 40000 have been increasing lately. Until now, Cronus has made purchases that have been based on vendor 40000's ordinary price rates. Now they want to purchase items at more favorable prices. Based on an agreement, Cronus obtains a deal that says that they can save 50 LCY for any purchase of item 1976-W if the quantity is at least ten units. A purchasing agent at Cronus must set up these decisions in the program. Steps As mentioned earlier, the alternative purchase prices are entered in the Purchase Prices window. 1. Open the vendor card for vendor 40000. Click PURCHASES→PRICES. In the Purchase Prices window, enter the conditions under which Cronus can obtain a favorable price rate. 2. In the Item No. field, select 1976-W, in the Minimum Quantity field enter 10, and in the Direct Unit Cost field, enter 206.10 (or alternatively, 256.10-50), which is the reduced unit price. Assume that Cronus' price agreement with this vendor will take effect from the current date: 01/24/08. 3. In the Starting Date field, enter 01/24/08. In this case, the purchasing agent may not have to enter an ending date as a condition in the price agreement with the vendor. If an agreement is re- negotiated at a later date, a new purchase price line is entered with a new starting date. This then takes over the previous agreement. 5-14 Microsoft Official Training Materials for Microsoft Dynamics ™ Your use of this content is subject to your current services agreement
  • 115.
    Chapter 5: PurchaseOrder Management Using the Pricing Mechanism The purpose of setting up alternative prices in the program is to support the purchasing agents in their task of always buying at the best prices. The best price is defined as the lowest possible price with the highest possible line discount on the order date. When a purchasing agent creates an order from a specific vendor, the program checks whether: • There are alternative purchase prices set up for the vendor in question. • The purchase header and line details meet the conditions for applying an alternative price. If all the conditions are met, the applicable price from the Purchase Prices window is copied to the Direct Unit Cost (Excl./Incl. VAT) field on the purchase line. If there are no alternative purchase prices recorded in the program or the conditions for applying an alternative price are not satisfied, the program uses the regular unit cost specified on the item card as a suggestion on the purchase document. Microsoft Official Training Materials for Microsoft Dynamics ™ 5-15 Your use of this content is subject to your current services agreement
  • 116.
    Trade in MicrosoftDynamics™ NAV5.0 Lab 5.1 − Managing Alternative Purchase Prices Scenario: You have a deal from vendor 10000 on items no. 1900-S and 1920-S according to the following conditions: • Item 1900-S: If Cronus buys this item in pallets (that contains ten pieces) instead of pieces, you receive ten LCY off the regular price. HINT: Add a new unit of measure PALLET, which contains ten pieces, to the item's units of measure list. • Item 1920-S: When Cronus buys this item and pays in local currency (EUR), you receive 15 LCY off the item's regular price. Challenge Yourself! Enter these purchase prices in the Purchase Prices window and check their use by creating a purchase order for two pallets of item 1900-S and five units of item 1920- S. HINT: Items can be accessed without leaving the Purchase menu. Click INVENTORY COSTING→ITEMS. Need a Little Help? The solution is provided in Appendix C. 5-16 Microsoft Official Training Materials for Microsoft Dynamics ™ Your use of this content is subject to your current services agreement
  • 117.
    Chapter 5: PurchaseOrder Management Line Discounts Line discounts allows the company to get a discount when ordering specific items at specific vendors. As opposite to invoice discounts that relates to the total invoice amount, line discount relates to the specific line item. Setting up and working with line discounts is described in the following section. First, the setup defining the general rules of how discounts are posted is explained. General Discount Setup Before using the line discount mechanism in the program, a company must decide how to post discount amounts. These decisions are implemented in the Purchases & Payables Setup window. The Discount Posting field on the General tab offers four options for defining the way the line discounts are to be posted to the general ledger: • No Discounts • Invoice Discounts • Line Discounts • All Discounts In principle, when the user makes a selection in this field, he or she can specify the type of purchase discounts to be posted to the general ledger (if any) and whether they are posted together or separately. For a detailed definition of each option, refer to the online Help for the field. If the option determining that a specific line discount is posted separately is selected, the user must ensure that: • A dedicated account(s) is created in the chart of accounts (for example, a Purchase Line Discount account). • That the seperate line discount option is set up in the General Posting Setup window. When posting purchase documents, the program uses the general business posting group of the vendor and the general product posting group of the item to retrieve the account set up in the General Posting Setup window. If discounts are not set up to be posted separately, they become part of a purchase amount posted to the Purchase account. Setting Up Line Discounts Purchasing agents must use the Purchase Line Discount table to record price discounts that they have agreed upon with different vendors. The table can be accessed from both the vendor card and the item card. Microsoft Official Training Materials for Microsoft Dynamics ™ 5-17 Your use of this content is subject to your current services agreement
  • 118.
    Trade in MicrosoftDynamics™ NAV5.0 The Purchase Line Discount window enables a purchasing agent to specify the conditions that must be met before a vendor offers a discount price. For example, the conditions can require that the purchasing agent buy a certain quantity or a purchase is invoiced in a specified currency before a discount can be granted. Similar to alternative purchase prices, line discounts are applied to a vendor. Using the Line Discount Mechanism The purpose of setting up a line discount in the program is to support the purchasing agents in their task of purchasing items at the best prices. After the line discounts and the associated terms have been set up, when a Purchasing Agent creates an order/invoice for a specific vendor, the program checks whether: • There are line discounts set up for the vendor in question. • The purchase header and line details meet the conditions for applying a discount price. If these conditions are met, the program copies the discount percentage from the Purchase Line Discounts window to the Line Discount % field on the purchase line and enters the calculated discount price in the Direct Unit Cost Excl./Incl. VAT field. If there are no discounts recorded in the program or the conditions for applying a discount are not satisfied, the program uses the last direct cost specified on the item card as a suggestion on the purchase document (unless there is a special purchase price set up for the customer). Setup and use of the purchase line discount is similar to the setup and use of purchase prices. Conclusion Purchase Order Management is an important discipline in order to get purchased items in time, to maintain a good relationship with vendors and achieve the best possible prices. This again has a direct effect on the customer service a company provides to its own customers. Purchase Order Management also affects the company's inventory management and can help reduce requisition costs. 5-18 Microsoft Official Training Materials for Microsoft Dynamics ™ Your use of this content is subject to your current services agreement
  • 119.
    Chapter 5: PurchaseOrder Management Lab 5.2 – Managing Purchase Line Discounts Scenario: You as the purchasing agent at Cronus have made an agreement with vendor 30000 that for items in the item range 70100-70104 purchased after 01/30/08, Cronus receives the following discount: • 1-99 items: 10% • 100-499 items: 15% • 500 or more items: 25% Challenge Yourself! Enter the line discounts in the Purchase Line Discounts window and check that the program uses them by creating a purchase order for 250 units of item 70102 and 600 units of item 70104. Need a Little Help? The solution is provided in Appendix C. Microsoft Official Training Materials for Microsoft Dynamics ™ 5-19 Your use of this content is subject to your current services agreement
  • 120.
    Trade in MicrosoftDynamics™ NAV5.0 Quick Interaction: Lessons Learned Take a moment and write down three key points you have learned from this chapter: 1. 2. 3. 5-20 Microsoft Official Training Materials for Microsoft Dynamics ™ Your use of this content is subject to your current services agreement
  • 121.
    Chapter 6: RequisitionManagement CHAPTER 6: REQUISITION MANAGEMENT Objectives The objectives are: • Define Requisition Management • Set up Requisition Management • Use the Requisition Worksheet • Create Purchase Orders from the Requisition Worksheet • Define Additional Worksheet Features Introduction The primary functions of purchasing include procuring materials and supplies in optimal quantities and scheduling a timely receipt into inventory. These activities contribute to a company's smooth operation, timely fulfillment of sales orders, and results in cost efficiencies, especially in inventory control. Demonstrations and Labs in this section provide detailed steps on how to use requisition management and the requisition work sheet. Microsoft Official Training Materials for Microsoft Dynamics ™ 6-1 Your use of this content is subject to your current services agreement
  • 122.
    Trade in MicrosoftDynamics™ NAV5.0 Requisition Management In Microsoft Dynamics™ NAV, the Requisition Management functionality helps automate the procurement process and enables the purchasing agent to perform basic purchasing activities efficiently and confidently. The requisition worksheet, which is the central processing tool, offers the following features: • Calculates a current and detailed purchase order proposal plan. • Creates actual purchase orders from order proposal lines. • Handles stockkeeping units that are replenished by transfer and creates the corresponding transfer orders. • Handles designated purchase order lines from other areas of the application automatically. • Handles manually created purchase order proposal lines. • Controls the flow of relevant information between concerned departments. • Provides a practical overview of the individual processes involved. The planning functionality found in the requisition worksheet is the same as that found in the planning worksheet in the manufacturing application area. The difference is that the requisition worksheet plans for items that are replenished by purchase and transfer, while the planning worksheet plans for items that are manufactured, and purchased and transferred. Requisition Management Setup Successful use of the Requisition Management functionality requires setup in the following areas: • The requisition worksheet template. • The planning parameter fields on items and stockkeeping units. Requisition Worksheet Template To set up a requisition worksheet, you must first create a template for it in the Purchase menu, PLANNING→SETUP→REQ. WORKSHEET TEMPLATES. Cronus has set up a worksheet template for requisitions to handle items that are purchased and transferred. 6-2 Microsoft Official Training Materials for Microsoft Dynamics ™ Your use of this content is subject to your current services agreement
  • 123.
    Chapter 6: RequisitionManagement As soon as you have set up a requisition worksheet template, you can create different worksheets. For example, this can be a worksheet of a particular purchasing agent or a worksheet that handles specific items. When you open a requisition worksheet under PURCHASES→PLANNING→REQUISITION WORKSHEETS, it is empty. FIGURE 6-1: REQUISITION WORKSHEET Planning Parameters Planning parameters refer to a group of fields on the Replenishment and Planning tabs of the item and stockkeeping unit cards. Planning parameters are set up to reflect the optimal inventory levels a company wants to maintain with regard to market-preparedness, warehouse efficiency, and costs. Therefore, the parameters consider various market factors such as: • Replenishment lead time • Seasonal demand • Pricing discounts for quantity • Freight weights • Delivery schedules The planning parameters also consider a company's internal policy with regard to inventory management and control. Microsoft Official Training Materials for Microsoft Dynamics ™ 6-3 Your use of this content is subject to your current services agreement
  • 124.
    Trade in MicrosoftDynamics™ NAV5.0 Seen from a technical aspect, the planning parameters control the replenishment calculation. Their primary functions are: • Setting the Time Bucket The period of time defined by the Reorder Cycle field determines which requirements and existing replenishment orders participate in the availability calculation and which replenishment orders can potentially be used to fill additional requirements. This, in turn, determines which action message is issued. • Setting the Inventory Level The inventory level, as defined by the Reorder Point and Safety Stock Quantity fields, determines when to replenish the item. When projected availability falls below the inventory level, the program recognizes the need for replenishment. • Determining Order Quantity The program calculates order quantities to cover all gross requirements. This includes demand from forecast, sales orders, and also replenishment of the inventory level. At a minimum, order quantity is sufficient to replenish the inventory level. If there are additional requirements, the program uses the value in the Reordering Policy field and the related fields to calculate order quantity. The order modifier fields adjust the final quantity afterward. The Planning White Paper contains an in-depth description of the role of the planning parameters for the planning calculations. The main fields are described briefly here. However, refer to the online Help for additional guidelines on effectively setting the parameters. Demonstration − Setting Up Planning Parameters The production planner at Cronus is responsible for maintaining the planning parameters for all items. In this demonstration the order processor takes a look at the planning parameters for item 1924-w. The planning parameters contains detailed information about replenishment and planning for the specific item. 6-4 Microsoft Official Training Materials for Microsoft Dynamics ™ Your use of this content is subject to your current services agreement
  • 125.
    Chapter 6: RequisitionManagement Steps Use this steps to review the replenishment and planning parameters: 1. Locate the item card for item 1924-W, and then click the Replenishment tab. FIGURE 6-2: ITEM CARD REPLENISHMENT TAB 2. Review how the the different fields below are set up for item 1924- w. Replenishment System This field indicates how the item is replenished and the type of order or order proposal the program creates. The options are Purchase or Production. Lead Time Calculation This is the time that it takes to replenish the item. This field calculates the date fields on order and order proposal lines: On the purchase order line, the Order Date + Lead Time Calculation = Planned Receipt Date. Microsoft Official Training Materials for Microsoft Dynamics ™ 6-5 Your use of this content is subject to your current services agreement
  • 126.
    Trade in MicrosoftDynamics™ NAV5.0 3. On the item card for item 1924-W, click the Planning tab. FIGURE 6-3: ITEM CARD PLANNING TAB 4. Review how the the different fields below are set up for item 1924- w. Reordering The reordering policy calculates replenishment order Policy quantity. Fixed Reorder Quantity - The quantity in the Reorder Quantity field is the standard lot size. Maximum Quantity - The quantity in the Maximum Inventory field calculates the order quantity. Order - Generates an order for each requirement and does not use the Reorder Cycle. Lot-for-Lot - Creates an order proposal with a quantity meeting the sum of the requirements due within the Reorder Cycle. Blank - The user can plan for the item manually. Reorder Cycle This is the planning time bucket for the item. Requirements that are due within the reorder cycle are grouped together. A replenishment order due within the reorder cycle may be rescheduled to fulfill a requirement. 6-6 Microsoft Official Training Materials for Microsoft Dynamics ™ Your use of this content is subject to your current services agreement
  • 127.
    Chapter 6: RequisitionManagement Safety Lead A buffer period that protects against delays in the purchase Time replenishment lead time. When calculating order and order proposal lines, the program adds the safety lead time to the lead time. On the purchase order line, the Planned Receipt Date + Safety Lead Time + Inbound Warehouse Handling Time = Expected Receipt Date. Safety Stock This is a quantity of stock wanted in inventory to protect Quantity against fluctuations in demand and supply during the item's replenishment lead time. When the projected inventory falls below the safety stock quantity, the program creates an order proposal that, at a minimum, replenishes the safety stock quantity. Reorder Point This is a quantity that sets the inventory level below which you replenish the item. When the projected inventory falls below the reorder point, the program recognizes the need to replenish the item and creates an order proposal that, at a minimum, replenishes to the reorder point. Reorder This is a standard quantity used for all order proposals. Quantity This field is used with the reordering policy Fixed Reorder Quantity. Maximum This is the quantity used as a maximum inventory level. The Inventory program calculates order quantity as the maximum inventory minus the safety stock. This field is used with the reordering policy Maximum Quantity. Minimum As soon as the order quantity is calculated, it can be Order modified by a minimum allowed quantity for an order. Quantity Maximum As soon as the order quantity is calculated, it can be Order modified by a maximum allowed quantity for an order. Quantity Order As soon as the order quantity is calculated, it can be Multiple modified by an order multiple. Microsoft Official Training Materials for Microsoft Dynamics ™ 6-7 Your use of this content is subject to your current services agreement
  • 128.
    Trade in MicrosoftDynamics™ NAV5.0 The Requisition Worksheet The requisition worksheet can greatly facilitate the purchasing agent's job by calculating a plan that states which items must be ordered, what quantities to order, and when to order. The worksheet features two main batch jobs: one that calculates the plan and one that creates orders based on the plan. Calculate Plan Batch Job The Calculate Plan – Req. Wksh. batch job calculates a requisition plan for items or stockkeeping units set up for replenishment by purchase and transfer order. Item Availability An analysis of what must be ordered starts with an investigation of projected item availability. This is a fairly straightforward task that involves summarizing the whole demand and supply situation for an item at any point of time within a defined period. This is calculated by using the following equation: Projected Available Balance = Inventory + Scheduled Receipts + Planned Receipts - Gross Requirement. The result of the availability calculation, if negative, states a net requirement. This represents the item quantities that must be replenished to fulfill outstanding demand. Replenishment Proposal The batch job calculates the most efficient way to replenish the item and create a requisition worksheet line. This is a purchase or transfer order proposal accompanied by a corresponding action message. The action message suggests how to replenish, while the order line provides the details: • Which item • What quantity • The relevant dates The order proposal lines are based on the accumulated data existing at the time. The proposed plan is considered a starting point from which the purchasing agent can review and make necessary adjustments according to personal knowledge, experience, and the expediency of the moment. Action Messages The program uses five action message options to suggest how to replenish an item: • Change Quantity: Change the quantity on an existing replenishment order to cover a changed or new requirement. • Reschedule: Reschedule the due date on an existing replenishment order. 6-8 Microsoft Official Training Materials for Microsoft Dynamics ™ Your use of this content is subject to your current services agreement
  • 129.
    Chapter 6: RequisitionManagement • Reschedule and Change Quantity: Reschedule the due date and change the quantity on an existing replenishment order. • New: Create a new order. If a requirement cannot be filled by point 1, 2, or 3 here, the program suggests creating a new order. • Cancel: Cancel an existing replenishment order. NOTE: The user can designate an existing purchase order line as being firm and unchangeable. This means that the program does not calculate action messages for the line during the planning calculations. Refer to the Planning Flexibility field on the purchase order line. Carry Out Action Message Batch Job As soon as the purchasing agent has made necessary adjustments to a requisition worksheet line and approved its contents, the Carry Out Action Msg. – Req. batch job converts the order proposal line to a purchase or transfer order line. The Accept Action Message field is selected by default. The check mark indicates that the line is included in the Carry Out Action Msg. – Req. batch job and that the batch job converts it to an order line. The field can be cleared. Demonstration − Using the Requisition Worksheet An order processor calls the purchasing agent at Cronus with a rush order for an important customer. Steps The purchasing agent sees that inventory on the item is low and calculates a replenishment plan. 1. Open the item card for item 1924-W. For Cronus item 1924-W, there are 26 units currently on inventory, and the reorder point is set to 150. 2. On the Planning tab, enter the following additional information: Reordering Policy = Fixed Reorder Quantity, and Reorder Quantity = 200. 3. Create a sales order for customer 10000 for 100 units of item 1924- W using the program work date of 01/24/08. 4. In the Purchase menu, from the Requisition Worksheet window, click FUNCTIONS→CALCULATE PLAN to open the request form. 5. On the Item tab, set a filter for item 1924-W. On the Options tab, in the Order Date field, enter 01/24/08, and in the Ending Date field, enter 01/31/08. 6. Click OK. Microsoft Official Training Materials for Microsoft Dynamics ™ 6-9 Your use of this content is subject to your current services agreement
  • 130.
    Trade in MicrosoftDynamics™ NAV5.0 The program calculates a plan and presents the order proposal lines in the Requisition Worksheet window. FIGURE 6-4: REQUISITION WORKSHEET The program has calculated the need for two new purchase orders, which can be explained as follows: • The current inventory is 26 units. This gives a requirement of 74 units. Because the reorder quantity is 200, the program suggests creating a new order of 200 units to cover this requirement. The due date has been calculated as 01/24/08 to accommodate the sales order Shipment Date of 01/24/08. • As soon as the requirement of 74 units is filled, there are 126 units in inventory. However, the value in the Reorder Point field states 150. The program suggests creating another new order to replenish the reorder point. The new order must also meet the reorder quantity of 200. The due date is calculated as 02/08/08. The program has added the lead time calculation to the order date. Demonstration − Creating Purchase Orders from the Requisition Worksheet The purchasing agent creates orders from the requisition worksheet lines even though it is not possible to ship the items on the date the order processor requested. 6-10 Microsoft Official Training Materials for Microsoft Dynamics ™ Your use of this content is subject to your current services agreement
  • 131.
    Chapter 6: RequisitionManagement Steps Perform the following steps: 1. From the Requisition Worksheet window, click FUNCTIONS→CARRY OUT ACTION MESSAGE to open the request form. 2. Click OK. 3. The lines are removed from the Req. Worksheet, and a purchase order is created. 4. Locate the newly created purchase order. The first order line shows a planned receipt date of 01/21/08, an expected receipt date of 01/24/08, and an order date of 01/07/08. Because of the immediate requirement, the program has backward scheduled the order from the due date on the requisition worksheet line by subtracting the lead time calculation of 2W. The order date is problematic as it occurs in the past. But the purchasing agent plans to call the vendor to find out whether this order can be expedited. The second order line shows a planned receipt date of 02/07/08 and an order date of 01/24/08. Because there is no immediate requirement, the program has forward scheduled the order. Additional Worksheet Features There are other functions on the requisition worksheet of interest depending on the types of transactions a company performs in its daily business. Drop Shipment Lines A drop shipment is a transaction where the vendor delivers sold goods directly to the customer. The company does not receive the items into their inventory and avoids handling time and activities. A company can record a drop shipment by creating a purchase order based on the sales order. From the Requisition Worksheet window, a purchasing agent can access drop shipment-designated sales order lines and create the corresponding purchase order. Microsoft Official Training Materials for Microsoft Dynamics ™ 6-11 Your use of this content is subject to your current services agreement
  • 132.
    Trade in MicrosoftDynamics™ NAV5.0 Demonstration − Using the Additional Worksheet Features Using a similar situation as described in the first demonstration, "Using the Requisition Worksheet," an order processor calls the purchasing department with a rush order for an important customer. The purchasing agent notices that inventory on the item is low and that the replenishment lead time is long. The order processor and purchasing agent agree to arrange a drop shipment to reduce the delivery time to the customer. 1. Reuse the sales order created in the first demonstration, but assign it for drop shipment as described earlier. 2. Open a requisition worksheet and click FUNCTIONS→DROP SHIPMENT→GET SALES ORDERS. The Get Sales Orders batch job request form opens. 3. Set a filter if desired. Click OK. The batch job copies the drop shipment sales order line to the requisition worksheet; it appears as a purchase order proposal. As soon as the purchasing agent has approved the line, convert the line to an actual purchase order line using the Carry Out Action Msg. – Req. Wksh. batch job. Planning Worksheet Lines The Planning Worksheet Lines feature is relevant for a large manufacturing company with separate departments handling production planning and purchasing. In the manufacturing application area, a production planner uses the planning worksheet to calculate an item replenishment plan for all items, whether they are manufactured, purchased, or transferred. From the planning worksheet, the planner can select order proposal lines for items that are replenished by purchase or transfer and forward them to the requisition worksheet by using the Carry Out Action Msg. – Plan. batch job. You can read more about the batch job in the online Help. This function, although initiated from the manufacturing application area, results in order proposal lines appearing in the requisition worksheet. From there, the purchasing agent can edit, approve, and convert the lines to actual purchase or transfer order lines by using the Carry Out Action Msg. – Req. Wksh. batch job. Manually Created Lines It is also possible to create lines manually in the requisition worksheet. This can be practical in a situation where individual persons or departments use a worksheet to list needed items. It can then be the responsibility of the purchasing agent to approve order proposal lines and create orders using the Carry Out Action Msg. – Req. Wksh. batch job. 6-12 Microsoft Official Training Materials for Microsoft Dynamics ™ Your use of this content is subject to your current services agreement
  • 133.
    Chapter 6: RequisitionManagement Conclusion Purchase transactions can be automated by using the requisition management functionality in Microsoft Dynamics™ NAV. Requisitions management help to provide order processors with information about when an item can be delivered to the customer. Planning parameters set up on the item card defines how items are treated in the system. The requisition work sheet is an important element in the day to day planning activities of the purchasing agent; it differs from the planning worksheet because it only deals with purchase orders. Microsoft Official Training Materials for Microsoft Dynamics ™ 6-13 Your use of this content is subject to your current services agreement
  • 134.
    Trade in MicrosoftDynamics™ NAV5.0 Lab 6.1 − Calculating a Replenishment Plan from the Requisition Worksheet Scenario: You are the purchasing agent at Cronus. Perform the following set up tasks: 1. For Cronus item 1330, change the value in the Reorder Quantity field from 100 to 300 so that it has the following setup: Inventory = 100 Reordering Policy = Fixed Reorder Quantity Reorder Cycle = 1M Reorder Point = 100 Reorder Quantity = 300 2. Create the following sales order lines: 40 units with a shipment date 5 days after the work date. 60 units with a shipment date 10 days after the work date. 70 units with a shipment date 20 days after the work date. 3. Create the following purchase order line: 50 units with an expected receipt date 15 days after the work date. Challenge Yourself! Calculate a plan from the requisition worksheet and explain the resulting order proposal lines. Need a Little Help? The solution is provided in Appendix C. 6-14 Microsoft Official Training Materials for Microsoft Dynamics ™ Your use of this content is subject to your current services agreement
  • 135.
    Chapter 6: RequisitionManagement Quick Interaction: Lessons Learned Take a moment and write down three key points you have learned from this chapter: 1. 2. 3. Microsoft Official Training Materials for Microsoft Dynamics ™ 6-15 Your use of this content is subject to your current services agreement
  • 136.
    Trade in MicrosoftDynamics™ NAV5.0 6-16 Microsoft Official Training Materials for Microsoft Dynamics ™ Your use of this content is subject to your current services agreement
  • 137.
    Chapter 7: ItemCharges CHAPTER 7: ITEM CHARGES Objectives The objectives are: • Provide an Overview of the Item Charges functionality • Set up Item Charges • Define Purchase Item Charges • Handle Additional Costs as an Item Charge • Define and handle Sales Item Charges • Use Item Charges regarding Purchase and Sales Allowances • Create Item Charge Credit Memo Introduction This lesson demonstrates the multiple possibilities incorporated in the Item Charges functionality and explains how the program supports companies in their objective of achieving optimal cost control and creating a reliable basis for informed decision-making. Usage demonstrations included in this lesson are grouped under the following headings: • Purchase item charges • Sales item charges • Purchase and sales allowances To learn more about posting principles and the mechanism behind item charges, refer to the Inventory Costing training manual. Microsoft Official Training Materials for Microsoft Dynamics ™ 7-1 Your use of this content is subject to your current services agreement
  • 138.
    Trade in MicrosoftDynamics™ NAV5.0 Overview of Item Charges Accurate and relevant cost accounting information is an important prerequisite to efficient and competent decision-making in any trading company. At a minimum, companies register and analyze cost records derived from invoice information about their purchase and sales transactions. However, as the cost of distributing, handling, and transporting goods starts to represent a larger share in the total inventory cost than direct purchase and manufacturing costs, there is a need to account for these costs. Examples of additional costs are: • Insurance • Freight cost • Custom duties • Any other costs associated with delivering and transporting services Moreover, the possibility to collect detailed cost statistics at the item level becomes relevant when determining cost of goods sold and accounting for additional sales expenses that affect profit calculations. In the first case, the company's cost structure must enable allocation of additional acquisition cost representing expenses (inventoriable costs) related to the purchase. In the second case, additional costs incurred as part of a sale transaction must be directly linked with the sale as expenses (non-inventoriable cost) to accurately calculate profit. In Microsoft Dynamics™ NAV, to account for both inventoriable and non- inventoriable cost incurred for purchase and sale transactions respectively, accountants can use the Item Charges functionality. Item charges represented by, for example, the cost of a purchase invoice from a transport agent for delivering a shipment from a supplier, can be assigned to a receipt document. When posted, this item charge becomes a part of the total landed cost of the item(s) to which the charge was assigned. Additionally, the item charges solution is flexible enough to incorporate a facility that lets the user register and post additional cost independently of the posting time of the associated purchase or sales document. That is, item charges can be assigned to the delivery after they have been posted as received and invoiced and even after the respective items have been sold. The program's costing mechanism then guarantees that these costs are rolled into the inventory value and cost of goods sold calculations. The functionality supports allocating the charge cost amount based on quantity and amount. 7-2 Microsoft Official Training Materials for Microsoft Dynamics ™ Your use of this content is subject to your current services agreement
  • 139.
    Chapter 7: ItemCharges In addition to its primary goal of supporting companies in identifying and accounting for additional landed and sales-related cost, the Item Charges functionality can be used when handling other sales and purchase situations. For example, in a sales return situation where items are not required to be physically returned to the company, an item charge can be used to register and post an allowance amount (in the form of a credit memo). Another example is represented by the practice of charging (selling) a customer transportation fees in relation to delivering shipments or charging restock fees for returns. Setting Up Item Charges The item charges setup is part of the general Finance setup. Companies can set up different item charge numbers to distinguish charge types to account for and to create cost and sales statistics. Cronus has set up several different item charges that are typical for their business operations. From the Financial Management menu, click INVENTORY SETUP→ITEM CHARGES. The Item Charges window is displayed. Like an item, an item charge must have a general product posting group and VAT product posting group to determine which account to post the charge amount to. As soon as an item charge type is set up, it can be selected on a purchase (sales) document line. There are no limits as to what companies can include in the category of item charges. Purchase Item Charges When purchasing goods from suppliers, companies frequently incur additional costs, such as freight, handling charges, import taxes, and so on. These make up the purchase's total landed costs and must be included in the calculation of inventory value and cost of goods sold. Depending on the nature of their sales agreements, companies may also pay these costs when delivering shipments. In this case, the costs represent non- inventoriable expenses that affect the company's overall profit calculation. In both situations, accountants can register these additional costs as a separate cost category and link them directly to related items. In Microsoft Dynamics™ NAV, these costs are referred to as item charges. Registering item charges can be done in two ways: • As a separate document (purchase order/invoice) Typically, this is used when the invoice for the cost amount arrives some time after the original purchase document is posted or when the charge must be assigned to a sales document. Microsoft Official Training Materials for Microsoft Dynamics ™ 7-3 Your use of this content is subject to your current services agreement
  • 140.
    Trade in MicrosoftDynamics™ NAV5.0 • In the same purchase document This option is used when the charge amount is known at the time of posting the receipt of items to which the charge relates. As an additional help, the program can also suggest an assignment of the item charge to the selected document lines. This can be modified if it is required. Demonstration − Handling Additional Direct Cost as an Item Charge Following the earlier shipment delivery from vendor 10000, Cronus' accounting department receives an invoice for 100 LCY from the same vendor for the transportation services they provided for this delivery. Steps The accountants must now register these additional landed costs in the program and assign them to the purchase. Because the purchase order has been posted, associated freight charges must be registered in a separate invoice: 1. Open a purchase invoice and fill in the header with the vendor details. 2. On the line, in the Type field, select Charge (Item). In the No. field, select P-FREIGHT as a charge type representing freight-related cost. 3. In the Quantity field, enter 1, and in the Direct Unit Cost field, enter 100. In this manner, entering charge details is appropriate where the total invoice amount applies to the complete order delivery. The charge must be assigned to the posted purchase order. 4. Select the item charge line, and then click LINE→ITEM CHARGE ASSIGNMENT. (Alternatively, click the AssistButton in the Qty. to Assign field on the purchase line.) The Item Charge Assignment (Purch) window is empty. This signifies that an item charge is being assigned to an already posted document instead of to an order line created in the same document as the item charge. In the latter case, the order line(s) appear in the Item Charge Assignment (Purch) window. 7-4 Microsoft Official Training Materials for Microsoft Dynamics ™ Your use of this content is subject to your current services agreement
  • 141.
    Chapter 7: ItemCharges To assign a charge amount to a posted document, retrieve the document that uses the Get Line functions. According to the first demonstration, the freight invoice relates to a purchase order. Therefore, the user must retrieve respective posted receipt lines: 5. In the Item Charge Assignment (Purch) window, click FUNCTIONS→GET RECEIPT LINES. The Purch. Receipt Lines window appears. NOTE: Item charges can be assigned to any posted outbound (return shipment and sales shipment) and inbound (return receipt and transfer receipt) documents. 6. Locate the right order, select all four order lines, and then click OK. The program copies the selected lines into the Item Charge Assignment (Purch.) window. Now the user can assign the charge amount manually by entering the values in the Qty. to Assign field for all the lines or make the assignment automatically. In the second case, the total charge amount can be assigned either equally among the lines or proportionally based on the line amount. Automatically assign the charge by amount. 7. Click FUNCTIONS→SUGGEST ITEM CHARGE ASSIGNMENT. Select Amount and then click OK. The charge amount of 100 LCY is distributed proportionally among the purchase order lines. At the bottom of the Item Charge Assignment (Purch) window, there are status fields that contain the total charge amount to assign, how much of this has been assigned, and how much is left to be assigned by both quantity and amount. 8. Close the Item Charge Assignment (Purch) window. The Qty. to Assign field on the purchase invoice line is updated. 9. The program is set up to require a vendor invoice number. For the purpose of this demonstration, enter some characters of your own choice in the Vendor Invoice No. field. Microsoft Official Training Materials for Microsoft Dynamics ™ 7-5 Your use of this content is subject to your current services agreement
  • 142.
    Trade in MicrosoftDynamics™ NAV5.0 10. Post the invoice. Because of this posting, the program creates a link between the items from the selected purchase order and the item charge. As the cost value (total landed cost) of the earlier purchased items has increased by the charge amount without the actual quantity increasing, an additional value entry is linked to the item ledger entry of the posted purchase receipt. View the value entries related to the item ledger entry for item 1928-W that was created by posting the purchase order (receipt number 107023) and the freight charge. 11. From the Purchase menu, click HISTORY→POSTED RECEIPTS. 12. Locate the posted purchase receipt no. 107023. Open the item ledger entries. FIGURE 7-1: ITEM LEDGER ENTRIES WINDOW The quantity has not changed. 13. Select the first item ledger entry for item 1928-W (posted for the Green location), and open the related value entries (press CTRL + F5). A new value entry of the type Direct Cost representing the additional cost of the freight invoice was created. NOTE: Learn more about inventory accounting principles in the Inventory Costing training manual. Based on the value entry, the charge amount is included in the cost and profit calculations. If required, accountants can also collect statistical information specified for each item charge category. 7-6 Microsoft Official Training Materials for Microsoft Dynamics ™ Your use of this content is subject to your current services agreement
  • 143.
    Chapter 7: ItemCharges 14. In the Item Statistics window, in the Show as Lines field, select Purchase Item Charge Spec. FIGURE 7-2: ITEM STATISTICS WINDOW NOTE: Because an item charge assignment changes the item cost amount without changing the quantity of the posted entry, item charges can be used for correcting value-related errors that frequently occur in the starting phase of program implementation. Handling Non-inventoriable Costs as Item Charges In addition to having detailed statistics on their inventory landed cost, many companies find it important to account for non-inventoriable costs. This cost category becomes relevant where companies incur freight-out costs that affect the profit calculations, or they deal with vendor- or headquarters-owned inventory, and do not carry inventory on their own (the accounting model used in this case is frequently referred to as retail-minus). NOTE: The retail-minus model can be illustrated by the scenario where a company's subsidiary operates as a sales office and does not carry any inventory at its own premises. All sales could be done by using drop shipment, with the sales revenues posted at the subsidiary. The headquarters would then regularly send the subsidiary purchase invoices for the cost price of the items sold. Posted as item charges related to sales, these costs are recorded as sales expenses (non-inventoriable cost) and the subsidiary's profit calculated respectively. To account for non-inventoriable cost incurred for sale transactions, accountants can use item charges functionality. The registering and posting procedure is similar to the one described in the previous section. The only difference is that the item charge amount is assigned to outbound documents (posted sales and return shipments). Microsoft Official Training Materials for Microsoft Dynamics ™ 7-7 Your use of this content is subject to your current services agreement
  • 144.
    Trade in MicrosoftDynamics™ NAV5.0 Lab 7.1 − Handling Purchase Item Charges Scenario: You have an open purchase order from vendor 10000. You also receive an invoice from the same vendor for freight service for the amount of 150 LCY. Challenge Yourself! Register these additional invoices, ensuring that inventory costs are updated correctly. Need a Little Help? The solution is provided in Appendix C. 7-8 Microsoft Official Training Materials for Microsoft Dynamics ™ Your use of this content is subject to your current services agreement
  • 145.
    Chapter 7: ItemCharges Sales Item Charges The previous section introduced the functionality of item charges and illustrated how it can be used to handle additional (direct and non-inventoriable) costs – freight costs, packing, insurance, customs, and so on – that a company may incur as part of a purchase and sale transaction When these additional costs are paid by a customer, this is a regular sales transaction without physical items involved. The company can record the cost amounts as sales item charges and link them to the relevant outbound document, that is, sales shipment and sales return receipts. In this manner, the company can create detailed statistics of its sales and revenue figures. The principles of recording, assigning, and posting sale item charges are identical to those applied for purchase item charges and is not repeated here in more detail. The following demonstration highlights the main points of sales item charges. Demonstration − Handling Sales Item Charges After several shipments were made to customer 20000 in January, on 01/24/08, Cronus' shipping department informed the accounting department that they had insured all the shipments for the total amount of 40 LCY. Steps The accountant must now invoice the customer for the additional insurance costs and make sure that these cost amounts are reflected in the sales statistics for the items to which insurance cost applies. 1. Add a new item charge category called Insurance to the company's item charge list. Set it up with the same General and VAT Posting Groups that the other Item Charges have. 2. Create a sales invoice, with a Posting Date of 01/24/08, for the insurance amount of 40 LCY to be charged to customer 20000. Notice that, as the charge is sold to the customer instead of incurred by the company as cost, the charge amount must be entered in the Unit Price Excl. VAT field. NOTE: You cannot post costs associated with a charge automatically as a part of posting a charge line from a sales document. Costs related to a charge must be posted directly to an appropriate G/L account as an expense or as an item charge from a purchase document. Microsoft Official Training Materials for Microsoft Dynamics ™ 7-9 Your use of this content is subject to your current services agreement
  • 146.
    Trade in MicrosoftDynamics™ NAV5.0 3. Assign the insurance charge to all the sales lines shipped to customer 20000. Use the Get Shipment Lines function from the Item Charge Assignment (Sales) window to retrieve the lines. FIGURE 7-3: SALES SHIPMENT LINES WINDOW 4. Click the Line button to access the Item Charge Assignment (Sales) window and assign the charge to the lines based on the line amounts. Click Functions and then Suggest Item Charge Assignment and then select Amount. 5. Post the sales invoice. The program creates value entries with a link to the item ledger entries for original sales. Based on that, the sales statistics for the sold items are updated. 6. View profit calculation statistics for item 1928-S. FIGURE 7-4: ITEM STATISTICS WINDOW 7-10 Microsoft Official Training Materials for Microsoft Dynamics ™ Your use of this content is subject to your current services agreement
  • 147.
    Chapter 7: ItemCharges The amount of 4.02 LCY is now included in revenues and profit calculations. If required, the accountants can also collect statistical information specified per each item charge category. Purchase and Sales Allowances One of the essential functions of Item Charges is to facilitate registering changes to transaction costs and price amounts at the item level without affecting item availability information. This underlying principle can find many diverse applications within managing financial flow of purchase and sales transactions. This section illustrates the usage of item charges regarding purchase and sales allowances. Allowance is a term frequently used for returns. For example, if damaged items arrive to a customer, the company may offer the customer the opportunity to keep the damaged items and pay a reduced price for them instead of returning the items. The customer receives a sales allowance in a form of a credit memo for the reduced amount. Similarly, to correct a wrongly priced delivery (without a physical return of items involved), a vendor issues an allowance to the company, who registers this amount as a purchase credit memo of an item charge type. To learn more about sales and purchase returns, refer to Chapter 9 "Returns Management" in this training manual. Demonstration − Creating Item Charge Credit Memo After a shipment was delivered and invoiced to customer 10000, the Order Processor at Cronus discovered that item 1964-W in the shipment was priced incorrectly – 15% higher than the agreed price. The shipment number is 102030. The customer must be compensated for the difference. As the items are in perfect condition, they will not be returned to Cronus. Steps An accountant must now issue a credit memo of an item charge type. 1. From the Financial Management menu, click RECEIVABLES→CREDIT MEMO to create a new credit memo. 2. Enter the header details for customer 10000. Enter the charge line details. (Consider using the Copy Document function to retrieve the price information from the shipment document.) 3. Select Sales Allowance as the type of the item charge. 4. In the Quantity field enter 1, and in the Unit Price Excl. VAT field, enter 438 (15% of the total order price of 2,920 LCY). Microsoft Official Training Materials for Microsoft Dynamics ™ 7-11 Your use of this content is subject to your current services agreement
  • 148.
    Trade in MicrosoftDynamics™ NAV5.0 5. Assign the charge to the sales line for item 1964-W. FIGURE 7-5: SALES CREDIT MEMO WINDOW 6. Post this credit memo. The customer and item sales statistics are updated without the original shipment quantity (and therefore item availability) changing. Conclusion This lesson introduced how item charges can be used in the sales and purchase process to ensure cost control and provide a good foundation for decision making. Purchase and sales allowances are frequently used in case a customer receives a damaged item and is offered a reduced price for keeping the item instead of returning it. 7-12 Microsoft Official Training Materials for Microsoft Dynamics ™ Your use of this content is subject to your current services agreement
  • 149.
    Chapter 7: ItemCharges Lab 7.2 − Handling Purchase Allowances Scenario: Upon receiving and invoicing a shipment (No. 107019) from vendor 10000, the inventory manager at Cronus discovers that two units of item 70011 had a small fault on the glass surface. The inventory manager contacts the vendor about the problem, and the vendor offers Cronus the opportunity to keep the items for a reduced price (by 40%). Cronus receives a credit memo from the vendor. Challenge Yourself! Your task is to register this agreement in the program, ensuring that the transaction is reflected at the item statistics level. Need a Little Help? The solution is provided in Appendix C. Microsoft Official Training Materials for Microsoft Dynamics ™ 7-13 Your use of this content is subject to your current services agreement
  • 150.
    Trade in MicrosoftDynamics™ NAV5.0 Quick Interaction: Lessons Learned Take a moment and write down three key points you have learned from this chapter: 1. 2. 3. 7-14 Microsoft Official Training Materials for Microsoft Dynamics ™ Your use of this content is subject to your current services agreement
  • 151.
    Chapter 8: OrderPromising CHAPTER 8: ORDER PROMISING Objectives: The objectives are: • Describing the Date Calculation Concepts • Promising Orders to Customers • Setting up Date Calculations for Sales Orders • Setting up Outbound Warehouse Handling Time and Shipping Time • Setting up Availability Test Interval and Order Promising • Promising Sales Order Delivery • Estimating Purchase Order Receipt • Estimating Transfer Order Receipt • Defining Calendars Introduction It is important for a company to possess the ability to give customers accurate information about order delivery and to estimate the receipt of orders shipped by the vendors. In Microsoft Dynamics™ NAV, the date calculation functionality and the Order Promising feature are the cornerstones of managing the sales orders. The program calculates the delivery and shipment dates that meet the dates requested by customers based on availability dates. This section explains the main steps in Order Promising by various detailed demonstrations and Labs. Microsoft Official Training Materials for Microsoft Dynamics ™ 8-1 Your use of this content is subject to your current services agreement
  • 152.
    Trade in MicrosoftDynamics™ NAV5.0 Date Calculation Concepts The program operates with two concepts: • Available to Promise (ATP) • Capable to Promise (CTP) Available to Promise Available to Promise (ATP) is used for the date calculation functionality and is based on the inventory reservation system. When the ATP function is used, the program performs the availability check of the uncommitted (unreserved) part of a company's inventory with regard to planned production, purchases, transfers, and sales returns. Based on the availability date of the items, the delivery date for the customer is calculated. Capable to Promise Capable to Promise (CTP) performs "what if" scenarios. If no items are available in inventory and there are no inbound orders scheduled, the program calculates the earliest date when items can be available if they are produced, bought, or transferred from another location. From the availability date of the items, the program: • Calculates the delivery date to the customer • Creates order lines for this date • Reserves the inventory The CTP function includes capacity constraint issues in the calculation, and it may be integrated to production scheduling, manufacturing, transfer, and purchase planning. The level of CTP depends on the model selected in the capacity-scheduling engine. With date calculation functionality, companies can also estimate the expected dates for order receipts from their vendors. Promising orders to customers and estimating purchase and transfer order receipts are explained and illustrated in the following sections. To follow the suggested demonstrations, remember to install the clean database. Otherwise, your results may vary from those described here. 8-2 Microsoft Official Training Materials for Microsoft Dynamics ™ Your use of this content is subject to your current services agreement
  • 153.
    Chapter 8: OrderPromising Promising Orders to Customers Order processors can use the date calculation functionality to give customers accurate information about sales order delivery; this relates to the available-to- promise situation. They can also supplement it with the Order Promising feature; this relates to the capable-to-promise situation. The date calculation functionality builds on series of calculations that are based on several dates and times. To understand this functionality, learn about the terms and definitions of the key dates and times used and calculated by the program, and then learn about a set of calculations that are based on the interrelations between those dates and times. After you have examined the functionality's terms and definitions, continue to discover how: • To set up the program to use the date calculation functionality and the Order Promising feature. • The program supports order processors in managing their sales order promising process, depending on customer requirements and item availability. Definitions The following definitions explains important dates in Order Promising. Requested Delivery Date: The date when the customer wants the order delivered to his or her address. This date must be entered manually to affect the date calculation. Promised Delivery Date: The date when the company promised the order to be delivered to the customer's address. This date must be entered manually in order to affect the date calculation. Planned Delivery Date: The date when the company plans the order will be delivered to the customer's address. This date is calculated automatically. If a requested delivery date exists, the planned delivery date equals the requested delivery date. Planned Shipment Date: The date when the picking process is complete and items are shipped from the warehouse. This date is calculated automatically. Shipment Date: The date when an item must be available in inventory. The picking process can start on this date. This date is calculated automatically. Outbound Warehouse Handling Time: The time that is required to pick, pack, and label the items in an order. Shipping Time: The time between when the items are shipped from the warehouse to when they are being delivered to the customer's address. Microsoft Official Training Materials for Microsoft Dynamics ™ 8-3 Your use of this content is subject to your current services agreement
  • 154.
    Trade in MicrosoftDynamics™ NAV5.0 Date Calculations The date calculations functionality enables an order processor to provide a customer with an accurate date for when orders are delivered. The program supports the order processor in two ways: • It calculates the earliest possible delivery date when the customer has not requested a delivery date, considering item availability. • It verifies whether the delivery date requested by the customer/promised by the order processor is realistic, considering item availability. To perform these two actions, the program performs a set of calculations that are based on the dates entered by the order processor and information set up in the program. The relationship between the dates and times used in calculations is illustrated in the following scheme: Shipment Date Planned Shipment Planned Delivery Date Date Out. Whse Handling Shipping Time Time To calculate the earliest delivery date for the orders when a customer has not requested a delivery date, the program sets the shipment date to be equal to the current working date and bases the availability date on that date. If items are available on that date, the program makes a forward calculation to determine when the order can be delivered to the customer. These calculations are represented by the following formulas: Shipment Date + Outbound Warehouse Handling Time = Planned Shipment Date and Planned Shipment Date + Shipping Time = Planned Delivery Date To verify that the delivery date requested by the customer/promised by the order processor can be met, the planned delivery date is set to be equal to the requested/promised delivery date and a backward calculation determines the date when items must be available to meet the customer's request/order processor's promise. 8-4 Microsoft Official Training Materials for Microsoft Dynamics ™ Your use of this content is subject to your current services agreement
  • 155.
    Chapter 8: OrderPromising These calculations are represented by the following formulas: Planned Delivery Date - Shipping Time = Planned Shipment Date and Planned Shipment Date - Outbound Warehouse Handling Time = Shipment Date The program uses the shipment date, which is the calculated availability date, to make the availability check. If items are available on this date, the program confirms that the requested/promised delivery date can be met by setting the planned delivery date equal to the requested/promised delivery date. In this manner, the interface between the time functionality and the availability check is at the shipment date. If the program determines that items are not available on the current working date (when there is no requested/promised delivery date) or on the calculated availability date (when there is a requested/promised delivery date), an order processor can use the CTP functionality of the Order Promising feature. Based on new dates, the program recalculates all other related dates according to the formulas defined here. The program also recalculates all related dates if an order processor manually changes any date involved in date calculations. There is an order of priority for how the program uses the dates entered on the sales header when calculating all related dates on the lines. These priorities are illustrated in the following table: Promised Delivery Requested Delivery Shipment Date Date Date Priority 1 Priority 2 is not entered Priority 3 is not entered is not entered The program takes the date with the highest priority as a starting point for the calculation. Microsoft Official Training Materials for Microsoft Dynamics ™ 8-5 Your use of this content is subject to your current services agreement
  • 156.
    Trade in MicrosoftDynamics™ NAV5.0 Setting Up Date Calculation for Sales Orders The setup for date calculations on the sales side consists of the following elements: • The Outbound Warehouse Handling Time setup: This is the time required to pick, pack, and label the items in an order before shipping. The program uses the outbound warehouse handling time in calculating the planned delivery date or shipment date. • The Shipping Time setup: This setup can include definitions of the types of services the company's shipping agent can offer and the corresponding shipping times. • The Availability Test Interval setup: This is the period within which the program makes the availability calculation. The following three demonstrations show the three elements in the setup process. Demonstration − Setting Up Outbound Warehouse Handling Time Companies can set up the outbound warehouse handling time: • On the inventory setup card. • On the location card. If a company has more than one location, they must set up handling time for each location. This setup has priority over the setup on the inventory setup card. Steps Set up the outbound warehouse handling time for the Blue warehouse: 1. From the Warehouse menu, click SETUP→LOCATIONS. 2. Locate the location card for the Blue warehouse, and then click the Warehouse tab. 3. In the Outbound Whse. Handling Time field, enter 1D. This specifies that it takes one day for the warehouse personnel at the Blue location to handle the picking, packing, and labeling procedures. 8-6 Microsoft Official Training Materials for Microsoft Dynamics ™ Your use of this content is subject to your current services agreement
  • 157.
    Chapter 8: OrderPromising Demonstration − Setting Up Shipping Time Because the shipping time can depend on the type of shipping services companies' shipping agents offer, they can set up the shipping time per shipping agent service. With the shipping agent services and shipping times set up, the companies can link them to the customers. Then, whenever an order processor makes a sales order for a specific customer, the program uses the shipping time associated with the shipping agent service set up for this customer to calculate the planned delivery date. Companies can also set up a shipping time for each customer, independent of the specific shipping agent service. They do so by entering the information in the Shipping Time field on the Shipping tab of the customer card. In this case, they overwrite the shipping time associated with a specific shipping agent service. To use the shipping time dependent on a chosen shipping agent and services, companies must set up shipping agents and define their services. At Cronus, there are four shipping agents. 1. From the Sales & Marketing menu, click ORDER PROCESSING→SETUP→SHIPPING AGENTS. For each shipping agent, the company sets up several services that differ on shipping time. 2. Select a DHL shipping agent and then click LINE→SHIPPING AGENT SERVICES. The Shipping Agent Services window appears. The following is the procedure for how to link a shipping agent service to a specific customer. Steps Set up the FEDEX shipping agent and the Next Day shipping service for customer 20000. 1. From the Sales & Marketing menu, click ORDER PROCESSING→CUSTOMERS. Locate the customer card for customer 20000, and then click the Shipping tab. 2. In the Shipping Agent Code field, select FEDEX and press Enter. 3. In the Shipping Agent Service Code field, select NEXT DAY, and press Enter. The program fills in the Shipping Time field that has 1D. The next time that an order processor creates a sales order for this customer, the program copies the information about the shipping agent services and shipping time from the customer card to the corresponding fields on the Shipping tab of the sales order. Microsoft Official Training Materials for Microsoft Dynamics ™ 8-7 Your use of this content is subject to your current services agreement
  • 158.
    Trade in MicrosoftDynamics™ NAV5.0 Demonstration − Setting Up an Availability Test Interval An availability test interval must be set up on the company information card. Steps Perform the following steps: 1. From the Administration menu, click APPLICATION SETUP→GENERAL→COMPANY INFORMATION. Click the Shipping tab. 2. Notice that the Check-Avail. Period Calc. field contains 90D and the Check-Avail. Time Bucket field contains Week. When an order processor runs the ATP function, the program checks item availability for 90 days starting from the current day, checking one week at a time. The check-availability period reflects an agreement between a company and its customers. This indicates the maximum time customers are willing to wait before their order requests can be met. Setting Up the Order Promising Feature To set up the Order Promising feature, a company must specify certain parameters for order promising calculations. These specify the time parameters that calculate item availability and which worksheet stores the information. The Order Promising feature is set up in the Order Promising Setup window. You can read about how to set up parameters in the Order Promising Setup window in the topic called "Setting Up Order Promising" in online Help. At Cronus, the Order Promising Setup includes the following parameters. Steps Perform the following steps: 1. From the Sales & Marketing menu, click SETUP→ORDER PROMISING SETUP to open the Order Promising Setup window. 2. Notice that the Order Promising Template field contains PLANNING. This means that replenishment proposals are created by default in the planning worksheet. 8-8 Microsoft Official Training Materials for Microsoft Dynamics ™ Your use of this content is subject to your current services agreement
  • 159.
    Chapter 8: OrderPromising Promising Sales Order Delivery The date calculations provides the order processor with information about when an order can be promised to a customer. The following demonstrations illustrate the date calculation functionality and the functionality of Order Promising. In these examples, the current day is assumed to be the 24th of January 2008 (01/24/08). The screenshots illustrating the demonstrations in this section do not represent the standard layout of the sales lines. The date-related fields, which are Planned Delivery Date, the Planned Shipment Date and Shipment Date, are moved to the left and inserted next to the Quantity field. The following two demonstrations describe a situation where customers place orders without a requested delivery date. The two demonstrations are as follows: • Items are available for shipping on the day that the customer placed their order. • Items are not available. Demonstration − Promising Sales Orders without a Requested Delivery Date Cronus customer 10000 orders 100 units of item 70002. The customer does not request a specific delivery date. The order processor at Cronus creates a sales order and tells the customer when the order will be delivered. Steps Create a sales order for 100 units of item 70002 for customer 10000: 1. From the Sales & Marketing menu, click ORDER PROCESSING→ORDERS. Press F3. 2. In the Sell-to Customer No. field, select customer 10000. 3. Leave the Requested Delivery Date field blank. 4. In the No. field, select item 70002, and in the Quantity field, enter 100. Microsoft Official Training Materials for Microsoft Dynamics ™ 8-9 Your use of this content is subject to your current services agreement
  • 160.
    Trade in MicrosoftDynamics™ NAV5.0 Notice the Planned Delivery Date, the Planned Shipment Date and the Shipment Date fields on the sales lines. FIGURE 8-1: DEMONSTRATION - SALES ORDER WINDOW The program fills in the date fields with dates from the forward calculation, when the shipment date is set equal to the order date. First, the program checks the availability of the required quantity of item 70002 at the Blue warehouse on the current date. When the availability check shows that items are available, the program performs forward calculation, taking this date as a starting point for calculations. Because the outbound warehouse handling time is one day for this location, and the shipping time is one day for this customer, the program calculates the planned shipment date and the planned delivery date. The order processor can inform the customer that the order will be delivered to his or her address in two days. Demonstration − Requesting Items that are not Available for Shipping Now consider a situation where items are not available for shipping on the current date. Cronus customer 20000 orders 30 units of item 1968-S. The customer does not request a specific delivery date, and the order will be shipped from the Green warehouse. 8-10 Microsoft Official Training Materials for Microsoft Dynamics ™ Your use of this content is subject to your current services agreement
  • 161.
    Chapter 8: OrderPromising An order processor at Cronus creates a sales order and tells the customer when the order will be delivered. Steps Create a sales order for 30 units of item 1968-S for customer 20000: 1. From the Sales & Marketing menu, click ORDER PROCESSING→ORDERS. Press F3. 2. In the Sell-to Customer No. field, select customer 20000. 3. Leave the Requested Delivery Date field blank. In the Location Code field of the Shipping tab, select GREEN. 4. In the No. field, select item 1968-S, and in the Quantity field, enter 30. The program gives a stockout warning message. The Earliest Availability Date field on the warning card contains 01/29/08. This means that a transfer, production, or sales return order has been created for item 1968-S, and the expected receipt date for this order is 01/29/08. The order processor uses this information to recalculate the date when the sales order can be delivered. 5. Click Yes on the warning card. In the Shipment Date field on the sales line, enter 01/29/08 and press Enter. The program recalculates the planned shipment date and the planned delivery date. FIGURE 8-2: DEMONSTRATION - SALES ORDER WINDOW Microsoft Official Training Materials for Microsoft Dynamics ™ 8-11 Your use of this content is subject to your current services agreement
  • 162.
    Trade in MicrosoftDynamics™ NAV5.0 Based on these calculations, the order processor can say to the customer that the order will be delivered to them on 01/31/08. NOTE: In addition to using the suggested earliest availability date, the order processor can run the CTP function. . If the order processor decides to change the shipment date to a later date, the program recalculates all related dates. NOTE: If the user changes the shipment date on the header, and the availability check for existing sales lines shows that items are unavailable on the new shipment date, the program does not give a stockout message. The warning appears only when the shipment date is changed on an individual line. In the sales order created for customer 20000 for 30 units of item 1968-S, change the shipment date from 01/29/08 to 01/30/08: 6. In the Shipment Date field on the sales line, change the date to 01/30/08. The program makes the forward calculations to determine the new planned shipment and planned delivery dates and fills in the corresponding fields on the sales lines. If the order processor decides to change the planned delivery date, the program makes a backward calculation to determine when items must be available (the shipment date). Based on this new date and depending on item availability, the program performs forward calculations. Demonstration − Meeting the Requested Delivery Date Cronus customer 50000 orders 25 units of item 70010. The customer requests that the order be delivered on 01/29/08. The order processor at Cronus creates a sales order and checks if the requested order delivery date can be met. Steps Create a sales order for 25 units of item 70010 for customer 50000: 1. From the Sales & Marketing menu, click ORDER PROCESSING→ORDERS. Press F3. 2. In the Sell-to Customer No. field, select customer 50000. 3. In the Requested Delivery Date field, enter 01/29/08. 4. On the Shipping tab, in the Location Code field, select Blue and press Enter. 5. In the No. field, select item 70010, and in the Quantity field, enter 25. 8-12 Microsoft Official Training Materials for Microsoft Dynamics ™ Your use of this content is subject to your current services agreement
  • 163.
    Chapter 8: OrderPromising Notice the Planned Delivery Date, the Planned Shipment Date and the Shipment Date fields on the sales lines. – Planned Delivery Date: 01/29/08 – Planned Shipment Date: 01/27/08 – Shipment Date: 01/26/08 The program fills in these fields with dates from the backward calculation, when the planned delivery date is set equal to the requested delivery date. Then it verifies that items are available for shipping on the calculated shipping date (01/26/08) and leaves the planned delivery date unchanged. Based on these calculations, the order processor can inform the customer that the order will be delivered on the requested delivery date of 01/29/08. If the order processor decides to change the shipping time and the outbound warehouse handling time, the program recalculates all related dates. In the sales order created for customer 50000 for 25 units of item 70010, change the outbound warehouse handling time from one day to two days. 6. On the Shipping tab, in the Outbound Warehouse Handling Time field, overwrite 1D with 2D. Press Enter. 7. Click Yes on the message that appears. The program now recalculates the shipment date and verifies that items are available for shipping on this date. The requested delivery date remains unchanged. Demonstration − Requesting an Order where the Delivery Date cannot be Met Cronus customer 20000 orders 30 units of item 70200. The customer requests that the order arrives on 01/28/08. The order processor at Cronus creates a sales order and checks if the requested order delivery date can be met. The sales order will be shipped from the Green warehouse. Steps Create a sales order for 30 units of item 70200 for customer 20000: 1. Create a new sales order. 2. In the Sell-to Customer No. field, select customer 20000. 3. In the Requested Delivery Date field, enter 01/28/08. Microsoft Official Training Materials for Microsoft Dynamics ™ 8-13 Your use of this content is subject to your current services agreement
  • 164.
    Trade in MicrosoftDynamics™ NAV5.0 4. On the Shipping tab, in the Location Code field, select Green and press Enter. 5. In the No. field, select item 70200 and in the Quantity field, enter 30. The program gives the stockout warning message. This message appears because the program checks whether the needed quantity of the item is available for shipping on 01/26/08. This is the day when the order must be shipped to meet the requested delivery date of 01/28/08. The availability check shows that items are unavailable on that date. NOTE: If the user changes the requested delivery date on the header, and the availability check for existing sales lines shows that items are unavailable on the calculated shipment date, the program does not give a stockout warning. The warning appears only when the requested delivery date is changed on an individual line. The Earliest Availability Date field on the warning window does not contain a date. This means that there are no transfer, production, or sales return purchase orders created for item 70200. 6. Click Yes on the warning card. The order processor can use the Capable-to Promise functionality of the Order Promising functionality to calculate when the requested quantity can be available. The following is the procedure for how to use this functionality. 7. In the Sales Order window, click ORDER→ORDER PROMISING. The Order Promising Lines window appears. The program copies information to the Requested Delivery Date field and the Original Shipment Date field from the sales order header and line, respectively. 8-14 Microsoft Official Training Materials for Microsoft Dynamics ™ Your use of this content is subject to your current services agreement
  • 165.
    Chapter 8: OrderPromising 8. Click CALCULATE→CAPABLE-TO-PROMISE. The program checks when the required item quantity can be available if they must be produced, transferred, or purchased. Then it fills in the Earliest Shipment Date field and, based on this date, recalculates the new planned delivery date. FIGURE 8-3: DEMONSTRATION - ORDER PROMISING LINES WINDOW 9. Click Accept. The program copies the dates from the fields on the Order Promising Lines window to the corresponding fields on the sales lines. Based on these calculations, the order processor can inform the customer that the requested delivery date cannot be met. At the same time, the order processor can inform the customer that Cronus can deliver the order two days later than first requested, on 01/30/08 (the Planned Delivery Date). NOTE: After the user runs the CTP function, the program reserves the required quantity for the sales order and creates a requisition proposal line in the Planning Worksheet in Manufacturing. If the user changes the requested delivery date after running the CTP function, the lines in the planning (requisition) worksheet are not updated. If, with the customer's agreement, the order processor moves the requested delivery date to another date, the program recalculates all related dates. Steps In the sales order created for customer 20000 for 30 units of item 70200, change the requested delivery date from 01/28/08 to 02/01/08. 1. In the Requested Delivery Date field, change 01/28/08 to 02/01/08. 2. Click Yes to the message that appears. The program recalculates all other dates and fills in the corresponding fields on the sales lines. Microsoft Official Training Materials for Microsoft Dynamics ™ 8-15 Your use of this content is subject to your current services agreement
  • 166.
    Trade in MicrosoftDynamics™ NAV5.0 If the order processor changes the planned shipment date, the program recalculates all associated dates and makes a backward calculation to determine the new shipment date and a forward calculation to determine a new planned delivery date. Demonstration − Setting Shipment Date Before Current Date Cronus' customer 50000 orders 20 units of item 1988-S, and the customer requests that the order arrives on 01/26/08. The sales order is shipped from the Yellow warehouse. The order processor at Cronus creates a sales order and checks if the requested order delivery date can be met. Steps Create a sales order for 20 units of item 1988-S for customer 50000: 1. Create a new sales order. 2. In the Sell-to Customer No. field, select customer 50000. 3. In the Requested Delivery Date field, enter 01/26/08. 4. On the Shipping tab, in the Location Code field, select YELLOW. 5. In the No. field, select item 1988-S. The program performs calculations and gives a message that the shipment date is before the work date. By clicking OK, you accept the suggested shipment date of 01/24/08. 6. In the Quantity field, enter 20. Notice that the Late Order Shipping field on the Shipping tab is selected. This indicates that the shipment is delayed compared to the customer's requested delivery date or the shipment date is before the work date. The program does not give a direct warning. In this situation, the order processor can: • Accept the planned delivery date, and the requested delivery date, and find an internal solution to comply. OR • Set the shipment date equal to the current date and make the program recalculate all associated dates and suggest a new planned delivery date. 8-16 Microsoft Official Training Materials for Microsoft Dynamics ™ Your use of this content is subject to your current services agreement
  • 167.
    Chapter 8: OrderPromising Promising Sales Order Delivery in Other Situations When creating sales orders, with or without requested delivery dates, order processors may want to ship the orders on a different date than that calculated by the program. Shipping orders on certain week days to a specific customer (and having a fixed routing schedule) is an example. Another example is when the shipping of various sales lines with different planned delivery dates on the same date is an optimal option for both the order processor and the customer. In these and similar situations, the order processor first confirms the new delivery date with the customer and then, with the customer's agreement, regards this date as a promised delivery date. After the date is entered in the Promised Delivery Date field, the program sets the planned delivery date equal to the promised delivery date and calculates all associated dates in the same way as if there is a requested delivery date. Demonstration − Requesting Different Shipment Dates on Lines Cronus' customer 50000 orders 10 units of item 1908-S, 15 units of item 1964-S, and 90 units of item 1906-S. The customer requests that the order be delivered on 01/28/08. The sales order will be shipped from the Green warehouse. The order processor at Cronus creates the sales order and checks if the requested order delivery date can be met. Steps Perform the following steps: 1. Create the sales order for customer 50000. When creating a sales line for item 1906-S, change the shipment date of 01/24/08 to 01/31/08, which is the earliest availability date for this item as suggested by the program in the stockout message. The order now contains three sales lines with two different shipment dates. To ship all three items on the same date, the order processor obtains the customer's acceptance to deliver the order on 02/03/08. 2. In the Promised Delivery Date field, enter 02/03/08. 3. Click Yes in the message that appears. The program recalculates all other dates and fills in the corresponding fields on the sales lines. Microsoft Official Training Materials for Microsoft Dynamics ™ 8-17 Your use of this content is subject to your current services agreement
  • 168.
    Trade in MicrosoftDynamics™ NAV5.0 Lab 8.1 − Promise Order Delivery to a Customer Scenario: Cronus customer 50000 orders 50 units of item 70040. The customer requests the order be delivered on 01/27/08. The sales order will be shipped from the Yellow warehouse. Challenge Yourself! Your tasks are as follows: 1. Create the sales order and check if the requested order delivery date can be met. 2. If the requested delivery date cannot be met, find out when you can deliver the order. You may decide to run the CTP function. 3. The customer is not satisfied with the new delivery date. You, promise the customer to deliver the order one day earlier and will find a solution to fulfill the promise. Need a Little Help? The solution is provided in Appendix C. 8-18 Microsoft Official Training Materials for Microsoft Dynamics ™ Your use of this content is subject to your current services agreement
  • 169.
    Chapter 8: OrderPromising Estimating Purchase Order Receipt This section discusses how to use the Order Promising feature when estimating purchase order receipt. To understand the functionality of the Order Promising feature, first acquaint yourself with the terms and definitions of key dates and times used and calculated by the program. Then, examine a set of calculations, which are based on the interrelations between the dates and times. After you have become familiar with the terms, definitions, and calculations, review how: • To set up the program to use the date calculation functionality. • The program supports purchasing agents in managing the purchase order receipt process. Definitions The following definitions explains important dates in Order Promising. Requested Receipt Date: The date when the company requests a vendor to deliver the order. This date must be entered manually to affect the date calculation. Promised Receipt Date: The date when the vendor promises the order will be delivered to the company. This date must be entered manually to affect the date calculation. Planned Receipt Date: The date when the company plans to receive the order. This date is calculated automatically. Expected Receipt Date: The date when the company expects the put-away process to finish and when items are available for picking. This date is calculated automatically and affects item availability. Order Date: The date when the vendor must ship the items to meet the planned receipt date. Inbound Warehouse Handling Time: The Time That Is Required to receive and put away the items of an order. Lead Time Calculation: The time interval between items being ordered at the vendor and items being received by the company. Safety Lead Time: The buffer period if there are delays in the production process. This affects the date when items are available for sale. Microsoft Official Training Materials for Microsoft Dynamics ™ 8-19 Your use of this content is subject to your current services agreement
  • 170.
    Trade in MicrosoftDynamics™ NAV5.0 Calculations The date calculation functionality enables a purchasing agent to estimate when orders are received at the company. The program supports a purchasing agent in two ways: • It calculates the expected receipt date for the orders when a purchasing agent has not requested a receipt date, considering vendor's lead time. • It calculates the date when the purchasing agent must make a purchase order to receive it on the requested date. To perform these actions, the program makes a set of calculations based on the dates entered by the purchasing agent and information set up in the program. The relationship between the dates and times in calculations is illustrated in the following scheme: Order Date Planned Receipt Date Expected Receipt Date Lead Time In. Whse. Handling Calculation Time (+Safety Lead Time) To calculate the expected receipt date for orders when a purchasing agent does not request a receipt date, the program sets the order date equal to the current working date. The program makes a forward calculation from this date to determine when the order will be delivered. These forward calculations are represented by the following formulas. Order date + Lead Time Calculation = Planned Receipt date and Planned Receipt date + Inbound Warehouse Handling time + Safety Lead Time = Expected Receipt date To calculate an order date for an order to be received on the requested date, the program sets the planned receipt date equal to the requested receipt date. The program makes a backward calculation to determine when items must be ordered (the order date). 8-20 Microsoft Official Training Materials for Microsoft Dynamics ™ Your use of this content is subject to your current services agreement
  • 171.
    Chapter 8: OrderPromising To calculate the expected receipt date for an order with the requested receipt date, the program sets the planned receipt date equal to the requested receipt date. The program makes a forward calculation. These calculations are represented by the following formulas. Planned Receipt date - Lead Time Calculation = Order date and Planned Receipt date + Inbound Warehouse Handling time (+Safety Lead time) = Expected Receipt date The program also recalculates all related dates if a purchasing agent manually changes any date involved in date calculations. There is an order of priority for how the program uses the dates entered on the purchase header when calculating all related dates on the lines. These priorities are illustrated in the following table. Promised Requested Expected Order Receipt Date Receipt Date Receipt Date Date Priority 1 Priority 2 is not entered Priority 3 is not entered Is not entered Priority 4 is not entered Is not entered is not entered The program uses the date with the highest priority as a starting point for the calculation. Setting up Date Calculations for Purchase Orders The order promising setup on the purchase side consists of three elements: • The Inbound Warehouse Handling Time setup: When users set up the inbound warehouse handling time, they define the time that is required to receive and put away items. The program uses this time to calculate the planned receipt date or expected receipt date. • The Lead Time Calculation setup: When users set up the lead time calculation, they define a date formula for the time that is required for the item to be delivered to the company. Alternatively, the user can define a date formula for the time that is required a vendor to deliver –orders – from when orders are placed to when they are received at the company. Microsoft Official Training Materials for Microsoft Dynamics ™ 8-21 Your use of this content is subject to your current services agreement
  • 172.
    Trade in MicrosoftDynamics™ NAV5.0 The program uses the formula to calculate the date when the items/orders are planned to be received (when there is no requested receipt date) or the order date (when there is a requested receipt date). • The Safety Lead Time setup: In the planning process, this time affects the date the items produced are available for sale. The safety lead time is a buffer period if there are delays in the production process. Setting up Inbound Warehouse Handling Time Companies can set up the inbound warehouse handling time: • On the inventory setup card. • On the location card. If a company has multiple locations, they must set up the handling time for each location. This setup has priority over the setup on the inventory setup card. Set up the inbound warehouse handling time for the Blue warehouse. 1. From the Warehouse menu, click SETUP→LOCATIONS. Locate the location card for the Blue warehouse, and then click the Warehouse tab. 2. In the Inbound Whse. Handling Time field, enter 1D. This specifies that it takes one day for the warehouse personnel at the Blue location to handle the receiving and putting away procedures before items are available in the warehouse for picking. Setting Up Lead Time Calculation and Safety Lead Time Companies can set up the lead time calculation: • In the Item Vendor Catalog window • On the item card (on the SKU card if the stockkeeping unit exists for the item) • On the vendor card The program uses the lead time calculation in the same order of priority as shown here. Companies can set up the safety lead time on the item card or the Planning tab of the Manufacturing Setup window, where the term "default safety lead time" is used. The program uses the default safety lead time set up on the Manufacturing Setup window only if it is not set up on the item card. Because this time is relevant to manufacturing companies, it is recommended that non-manufacturing companies set this time to zero on item cards or remove it from the Manufacturing Setup window and the item card. 8-22 Microsoft Official Training Materials for Microsoft Dynamics ™ Your use of this content is subject to your current services agreement
  • 173.
    Chapter 8: OrderPromising Demonstration − Using Lead Time Calculations Based on the purchasing practices and long-term relationships with vendors, Cronus' purchasing agent has an idea of how long it takes a vendor to deliver each item. Similarly, it is known how long it takes for vendors to deliver a specific item and for a vendor to deliver orders. For example, it takes one week for item 70010 to be delivered to Cronus if shipped by vendor 30000, and it takes three days for vendor 40000 to deliver orders (regardless of the items). It takes any vendor two days to ship items 70011 and 1928-W. The safety lead time is not relevant for Cronus' business operations. Therefore, all items on the company's inventory must have zero safety lead time. First, review how Cronus has set up the lead time calculation for item 70010 and vendor 40000. Then, set up the lead time calculation for items 70011 and 1928- W and the safety lead time for items 70010, 70011, 70040 and 1928-W in the program. Steps In the situation where several vendors ship the same items, companies can set up vendors for each item using the Item Vendor Catalog window. 1. From the Purchases menu, click INVENTORY & COSTING→ITEMS. Locate item 70010, and then click PURCHASES→VENDORS. The Item Vendor Catalog card is displayed. Notice that the Vendor No. field contains 30000, and the Lead Time Calculation field contains 1W. This means that when item 70010 is purchased from vendor 30000, the program uses one week as a default lead time in date calculation for the purchase order. The lead time for a specific vendor is set up on the vendor card. 2. From the Purchase menu, click ORDER PROCESSING→VENDORS. Locate vendor 40000, and then click the Receiving tab. Notice that the Lead Time Calculation field contains 3D. Set up the lead time calculation and safety lead time for items 70011 and 1928- W. 3. Click INVENTORY & COSTING→ITEMS. Locate item 70011, and then click the Replenishment tab. 4. In the Lead Time Calculation field, enter 2D. 5. Click the Planning tab and in the Safety Lead Time field, enter 0D. Microsoft Official Training Materials for Microsoft Dynamics ™ 8-23 Your use of this content is subject to your current services agreement
  • 174.
    Trade in MicrosoftDynamics™ NAV5.0 Repeat Steps 1 through 3 for item 1928-W. Set up zero safety lead time for items 70010 and 70040. Estimating Purchase Order Receipt The receipt of a purchase order can be estimated by using the estima purchase order receipt functionality. The following demonstrations illustrate the date calculation functionality. In these examples, the current day is assumed to be the 24th of January 2008 (01/24/08). The screenshots for the demonstrations do not represent the standard layout of the purchase lines. The date related fields –Planned Receipt Date, Expected Receipt Date, and Order Date – are moved to the left and inserted next to the Quantity field. Demonstration − Calculating Purchase Order Receipt without a Receipt Date Requested A purchasing agent at Cronus orders 25 units of item 70011 with vendor 10000 and does not request a specific receipt date. The purchasing agent creates a purchase order and wants to estimate when the order will arrive at the Blue warehouse. Steps Create a purchase order for 25 units of item 70011 for vendor 10000: 1. From the Purchase menu, click ORDER PROCESSING→ORDERS. Press F3. In the Buy-from Vendor No. field, select vendor 10000. 2. Click the Shipping tab. Leave the Requested Receipt Date field blank. 3. In the Location Code field, select BLUE. 4. In the No. field, select item 70011, and in the Quantity field, enter 25. The program calculates when the vendor can deliver the items to the warehouse and when they are available for picking. Pay attention to the Planned Receipt Date, the Expected Receipt Date and the Order Date fields on the purchase lines. Based on the lead time ( + safety lead time) set up for item 70011 and the inbound warehouse handling time set up for the Blue warehouse, the program calculates planned and expected receipt dates. The purchasing agent can expect the items to be available for picking in the Blue warehouse on 01/25/08. 8-24 Microsoft Official Training Materials for Microsoft Dynamics ™ Your use of this content is subject to your current services agreement
  • 175.
    Chapter 8: OrderPromising If the purchasing agent decides to change the order date, the program recalculates all related dates. In the purchase order created for vendor 10000 for 25 units of item 70011, change the order date on the purchase line from 01/24/08 to 01/30/08. 5. In the Order Date field, change the date to 01/30/08. The program makes a forward calculation to determine the new planned receipt date and expected receipt date and fills in the corresponding fields on the purchase line. FIGURE 8-4: DEMONSTRATION - PURCHASE ORDER WINDOW If the purchasing agent changes the expected receipt date, the program makes a backward calculation from this date to determine the new planned receipt date and a new order date. Microsoft Official Training Materials for Microsoft Dynamics ™ 8-25 Your use of this content is subject to your current services agreement
  • 176.
    Trade in MicrosoftDynamics™ NAV5.0 Demonstration − Estimating a Purchase Order Receipt with a Receipt Date Requested A purchasing agent at Cronus orders 30 units of item 70010 with vendor 30000 and requests that the order be delivered to the Blue warehouse on 02/02/08. The purchasing agent creates a purchase order and wants to estimate the latest order date for it to arrive at the Blue warehouse on the requested date and when the items will be available for picking. Steps Create a purchase order for 30 units of item 70010 for vendor 30000. 1. Create a new purchase order. In the Buy-from Vendor No. field, select vendor 30000. 2. Click the Shipping tab. In the Location Code field, select BLUE. 3. In the Requested Receipt Date field on the shipping tab enter 02/02/08. 4. In the No. field, select item 70010, and in the Quantity field, enter 30. The program calculates when the vendor can deliver the items to the warehouse and when they will be available for picking. Pay attention to the Planned Receipt Date, Expected Receipt Date, and the Order Date fields on the purchase lines. The program sets the planned receipt date equal to the requested receipt date from which the program subtracts the lead time (set up for this item to one week if purchased from vendor 30000) to calculate the order date. The program calculates the expected receipt date by adding inbound warehouse handling time (+ safety lead time) to the planned receipt date. The purchasing agent estimates that to receive the items on 02/02/08, the order must be placed on 01/26/08. If the purchasing agent changes the requested receipt date, the program recalculates all related dates accordingly. In the purchase order created for vendor 30000 for 30 units of item 70010, change the requested receipt date from 02/02/08 to 02/01/08. 8-26 Microsoft Official Training Materials for Microsoft Dynamics ™ Your use of this content is subject to your current services agreement
  • 177.
    Chapter 8: OrderPromising 5. In the Requested Receipt Date field on the purchase header, change the date to 02/01/08. Press Enter. 6. Click Yes on the message that appears. Based on the new requested receipt date, the program makes a backward calculation from this date to determine the new order date and then a forward calculation to determine a new expected receipt date. Demonstration − Calculating an Order that must be Placed before the Current Date A purchasing agent at Cronus orders 40 units of item 70040 with vendor 40000 and requests that the order be delivered to the Green warehouse on 01/26/08. The purchasing agent creates a purchase order and wants to estimate the latest order date for the order to arrive at the warehouse on the requested date. Steps Perform the following steps to enter the order: 1. Create a purchase order for 40 units of item 70040 for vendor 40000 with the requested receipt date on 01/26/08. When selecting the item number in the No. field, the program gives a work date warning. 2. Click OK. The program does not change the calculated order date that is before the work date. In this situation, the purchasing agent can: • Discuss the possibility of receiving the items on the initially requested receipt date (leaving the dates on the line unchanged). OR • Set the order date equal to the current date and make the program recalculate all associated dates. NOTE: If the user changes the requested receipt date on the header and the date calculation for existing purchase lines results in the order date being before the work date, the program does not give a warning. The warning appears only when the requested receipt date is changed on an individual line. Microsoft Official Training Materials for Microsoft Dynamics ™ 8-27 Your use of this content is subject to your current services agreement
  • 178.
    Trade in MicrosoftDynamics™ NAV5.0 Demonstration − Estimating a Purchase Order Receipt in Other Situations When using the program to estimate the receipt of purchase orders, the purchasing agents accept the assumption that the delivery process adheres to time periods set up for this process. However, purchasing agents like to confirm the program's calculated delivery dates with their vendors. If a vendor requests another date, the purchasing agent considers it as a promised receipt date. After entering the date in the Promised Receipt Date field, the program sets the planned receipt date equal to the promised receipt date and the program makes a forward calculation to suggest a new expected receipt date. The first calculated order date remains unchanged. A purchasing agent at Cronus orders 20 units of item 1928-W with vendor 40000 and requests that the order be delivered to the Green warehouse on 01/28/08. The purchasing agent creates a purchase order and uses the program to estimate the latest order date for the order to arrive at the warehouse on the requested date. Steps The purchasing agent confirms the calculated receipt date with the vendor. 1. Create a purchase order for 20 units of item 1928-W for vendor 40000 with the requested receipt date of 01/28/08. Notice that the program uses the lead time set up for the item (two days for item 1928-W) to calculate the order date instead of using the lead time set up for the vendor (three days for vendor 40000). The vendor cannot deliver the order on the requested date and promises to deliver three days later on 01/31/08. 2. In the Promised Receipt Date field, enter 01/31/08. 3. Click Yes to update the lines. The program sets the planned receipt date equal to the promised receipt date and calculates forward to suggest a new expected receipt date. The initial order date of 01/25/08 remains unchanged. 8-28 Microsoft Official Training Materials for Microsoft Dynamics ™ Your use of this content is subject to your current services agreement
  • 179.
    Chapter 8: OrderPromising Lab 8.2 − Order Promising Scenario: A purchasing agent at Cronus orders ten units of item 70011 with vendor 30000 and requests that the order be delivered at the Green warehouse on 02/05/08. Challenge Yourself! Your tasks are: 1. Create the purchase order and estimate the latest order date when the order will arrive at the warehouse. 2. Suppose that after talking to the vendor, they can deliver the order three days earlier than first requested. Record this information in the purchase order. Need a Little Help? The solution is provided in Appendix C. Microsoft Official Training Materials for Microsoft Dynamics ™ 8-29 Your use of this content is subject to your current services agreement
  • 180.
    Trade in MicrosoftDynamics™ NAV5.0 Estimating Transfer Order Receipt With the date calculation functionality, companies can estimate a date when transfer orders are received at the transfer-to location. The program calculates the receipt date according to the following formula: Shipment date + Outbound Warehouse Handling Time + Shipping time + Inbound Warehouse Handling Time = Receipt date The shipping time can be either: • The time associated with the shipping agent service set up for a specific transfer route. OR • Entered manually on the transfer header. Learn more about how to estimate transfer order receipt in the Inventory Management training manual. Calendars The date calculation in this description does not consider non-working days. This section describes setting up the program to calculate days using the Calendars feature. Non-working days are when the company is closed for business, such as weekends or holidays. Working days vary from one country/region to another and between companies. Companies base their scheduling on working and non- working days and acknowledge that their business partners may work with different calendars. Setting Up and Assigning Calendars The Calendar feature enables companies to calculate working days based on specific calendars. In the calendar, companies can set up the specific days to be considered as working and non-working days. Calendars are assigned to the company and to its business partners. When this is done, the program calculates all order lines according to the relevant calendar. 8-30 Microsoft Official Training Materials for Microsoft Dynamics ™ Your use of this content is subject to your current services agreement
  • 181.
    Chapter 8: OrderPromising The program defines two different types of calendars: • Base Calendar • Customized Calendar The Base Calendar is the calendar that defines working and non-working days and is the basis for the customized calendars. The Customized Calendar is a copy of a specific base calendar with added settings for the assigned business partner. The Base Calendar is created and maintained from the General Ledger Setup menu. Base calendars consider all days as working days. Non-working days can be set up under functions. This procedure is described in the online Help under Base Calendar. Perform the following steps to consider Cronus' base calendar: 1. From the Administration menu, click APPLICATION SETUP→GENERAL→COMPANY INFORMATION. 2. On the Shipping tab, click the AssistButton on the Base Calendar Code field to open the base calendar list. 3. Select the line for the UK Base Calendar, and then click BASE CALENDAR→CARD. Saturdays and Sundays are selected as nonworking days. When nonworking days occur weekly or annually (for example, bank holidays or Christmas), they can be set up in a separate table. 4. On the base calendar card, click FUNCTIONS→MAINTAIN BASE CALENDAR CHANGES. The Base Calendar can be assigned and customized to specific business partners, and can be assigned to the following areas: • Shipping tab on the Customer Card • Receiving tab on the Vendor Card • Warehouse tab on the Location Card • Shipping Agent Services list • Service Management Setup NOTE: If you do not assign a base calendar to a company or business partner, the program calculates all dates as working days. If you enter a blank location on an order line, the program calculates all dates as working days. Microsoft Official Training Materials for Microsoft Dynamics ™ 8-31 Your use of this content is subject to your current services agreement
  • 182.
    Trade in MicrosoftDynamics™ NAV5.0 Conclusion This section described the date calculation functionality and the Order Promising concepts that are the cornerstones in managing sales orders in Microsoft Dynamics NAV. The process of promising orders to customers and the related date calculations was shown through several detailed demonstrations. Estimating a purchase order receipt was also discussed in detailed examples. Finally, it was described how to estimate a transfer order receipt and how to define calendars. The order processing process helps maintain the best customer service levels and for exchanging order date information with vendors. 8-32 Microsoft Official Training Materials for Microsoft Dynamics ™ Your use of this content is subject to your current services agreement
  • 183.
    Chapter 8: OrderPromising Quick Interaction: Lessons Learned Take a moment and write down three key points you have learned from this chapter: 1. 2. 3. Microsoft Official Training Materials for Microsoft Dynamics ™ 8-33 Your use of this content is subject to your current services agreement
  • 184.
    Trade in MicrosoftDynamics™ NAV5.0 8-34 Microsoft Official Training Materials for Microsoft Dynamics ™ Your use of this content is subject to your current services agreement
  • 185.
    Chapter 9: ReturnsManagement CHAPTER 9: RETURNS MANAGEMENT Objectives The objectives are: • Defining Sales Return Management • Setting up Returns Management • Managing Returns from Customers • Managing Returns to Vendors Introduction Sales returns management is an important part of superior customer and vendor relationships because timely repair, replacement of damaged items or crediting for returned items are perceived as a part of good customer service. The key feature of the return functionality of Microsoft Dynamics™ NAV includes managing returns from customers and vendors. Comprehensive demonstrations and examples are used throughout the chapter to explain how companies manage the tasks involved in return-related processes. For an overview of procedures associated with handling specific return-related tasks, refer to the respective topic in online Help. Microsoft Official Training Materials for Microsoft Dynamics ™ 9-1 Your use of this content is subject to your current services agreement
  • 186.
    Trade in MicrosoftDynamics™ NAV5.0 Sales Return Management From the company's perspective, the internal handling of return-related processes can seem extensive. In most cases, companies' processes include (but are not limited to): • Adjusting customer (and vendor) balances • Accounting for additional costs • Updating inventory quantities and values • Inspecting returned items • Sending returned items to the vendor for repair The scope of these processes depend on a variety of factors, such as: • The customer's request • Reason for return • Item type and value • Causes of damage • Practices common in a specific line of business The handling of these processes involves different tasks that are performed by various groups of employees: Order processors, warehouse workers, bookkeepers, purchasing agents, and inspectors. Although logically related, the tasks are not operationally dependent. For example, the replacement for a damaged item can be shipped to a customer before the damaged item is returned. Similarly, a customer can be credited for a returned item before the company inspects and approves the return. In such a multi-process environment, the challenge is to ensure that all return- associated processes are completed in a timely manner and errors are easily recovered. Because of the complexity and scope of return-related processes, a company's costs can be significant. To control costs, companies must optimize their return management processes. The Sales Return Order Management and the Purchase Return Order Management functionality offer a solution to help companies achieve responsive customer service by implementing cost-efficient customer and vendor return policies. The application is characterized by the following key features: • Rapid response to customers' requests • Flexibility • Traceability and overview • Automation of the return to vendor process 9-2 Microsoft Official Training Materials for Microsoft Dynamics ™ Your use of this content is subject to your current services agreement
  • 187.
    Chapter 9: ReturnsManagement Personnel responsible for the customer interface can register the details of an agreement with the customer about the return and information relevant to handling the return with one entry point. The application enables several return-related tasks to be performed at the same time. This gives priority to handling customer-oriented processes. (An activity diagram with an overview of the processes and their relationship is presented at the end of this chapter.) The program can handle sales return processes in different business environments. The program provides full document traceability for an overview of the sales return history. This becomes important for customer inquiries and internal follow-up purposes. If companies handle items with warranties provided by vendors (a sales return with a return to vendor process), the program offers functionality that automates creating all relevant documents. From version 5.0 and onward the application offers a more intuitive user interface for cost reversal during returns. Setting Up Returns Management The setup of returns management consists of two elements: • General setup. The setup of the Sales Return Order Management and the Purchase Return Order Management functionality is defined by several fields on Sales & Receivables Setup and Purchases & Payables Setup. • Return Reasons setup. A company can set up codes that specify the reasons for returning items. These apply to both customer and vendor returns. The user can select a return reason code when registering the agreement about a sales/purchase return in most sales/purchase documents. General Setup The setup of Sales Return Order Management is a part of the Sales & Receivables setup. 1. From the Sales & Marketing menu, click SETUP→SALES & RECEIVABLES SETUP. Four fields on the General tab define the sales return management setup: – Return Receipt on Credit Memo – Copy Cmts Ret. Ord. to Cr. Memo – Copy Cmts Ret. Ord. to Ret. Rcpt – Exact Cost Reversing Mandatory Microsoft Official Training Materials for Microsoft Dynamics ™ 9-3 Your use of this content is subject to your current services agreement
  • 188.
    Trade in MicrosoftDynamics™ NAV5.0 Selecting Return Receipt on Credit Memo automatically creates return receipt documents when a sales credit memo is posted. This field is clear if a company has not purchased the Sales Return Order Management functionality and uses the credit memo functionality. The Exact Cost Reversing field defines whether a company wants to apply an exact cost reversing policy when processing inventory increases represented by the sales returns. (Companies generally implement the exact cost reversing policy by requiring that the sales return is valued at the same cost as the original sale when put back in inventory. If an additional cost is later added to the original sale, the program updates the value of the sales return.) Selecting this field indicates that the program prohibits a return transaction to be posted unless the Appl.-from Item Entry field on a corresponding order line contains an entry. Instead of manually filling in the Appl.-from/to Item Entry fields for cost reversing, the Copy Documents function can be used to fill in the fields. After version 5.0, a new user interface is provided for the task of selecting one or more posted document lines for exact cost reversal. The setup of Purchase Return Order Management is part of the general Purchases & Payables setup. 2. From the Purchase menu, click SETUP→PURCHASES & PAYABLES SETUP. Four fields on the General tab define the purchase return management setup: – Return Shipment on Credit Memo – Copy Cmts Ret. Ord. to Cr. Memo – Copy Cmts Ret. Ord. to Ret. Shpt – Exact Cost Reversing Setting Up the Return Reason Codes Companies set up return reason codes to distinguish return situations encountered when dealing with customers and vendors. Because a return reason is copied to the item ledger entries, companies may use it for statistical purposes when evaluating their performance toward a customer or assessing their relationship with a specific vendor. 9-4 Microsoft Official Training Materials for Microsoft Dynamics ™ Your use of this content is subject to your current services agreement
  • 189.
    Chapter 9: ReturnsManagement Cronus has set up six return reason codes. 1. From the Sales & Marketing menu, click ORDER PROCESSING→SETUP→RETURN REASONS. The Return Reasons window is displayed. In addition to setting up the return reasons code and its description, companies can also link a default location code to it. This ensures that items returned because of a specific reason are, by default, always received and shipped from this location. For example, companies may want to store items meant for repair in a dedicated position in a warehouse. This position can be set up as a location in the program to which all items to be repaired will be received and from which they cannot be sold. Similarly, special locations can be set up for damaged/defective items. Cronus has decided to create a new location called Repair and set it up as the default in relation to S-REPAIR return reason code. 2. Create a new location card (location code REPAIR) and select as a default location for S-REPAIR code. Selecting the Inventory Value Zero field indicates that the program automatically values inventory increases, such as sales return orders or purchase orders, at zero cost. This is relevant for customer item repairs. Because the item is the customer's property, it is not included in the inventory value. Therefore, it makes sense to associate the option of valuing inventory at zero with the return reason code of Repair. 3. Select the Inventory Value Zero field. NOTE: If an item's costing method is set up as Standard, it means the inventory increase is valued at a budgeted (standard) cost instead of at an acquisition cost, and the program ignores the Inventory Value Zero field. Managing Returns from Customers Compensating a dissatisfied customer is a necessary and important transaction. The faster and more accurately a company performs the return process, the more likely the company is to enhance the customer's perception of good customer service. Typically, the order processor responsible for the interface with customers is also the person to receive complaints from customers about the items sold. In other cases, a company may have a dedicated person(s) dealing with returns, such as employees in the customer service department. Microsoft Official Training Materials for Microsoft Dynamics ™ 9-5 Your use of this content is subject to your current services agreement
  • 190.
    Trade in MicrosoftDynamics™ NAV5.0 Managing returns from customers includes completing a series of tasks. The number and scope depends on a company's return policy and business practices. A customer-oriented return handling process may include the following tasks: • Registering a compensation agreement with the customer • Shipping a replacement item(s) to the customer (if replacement is part of the compensation agreement) • Crediting the customer (either by a credit for physically returned items or a sales allowance where the customer is not required to physically return the items) • Shipping a repaired item(s) to the customer (if repair is a part of a compensation agreement) • Following up on the return status (if there are customer inquiries) Related to the customer-oriented process, there are several internal handling tasks: • Receiving returned items and inspecting them (if relevant) • Applying restock charges • Using the cost reversal process • Shipping returned items to the vendor for repair • Ensuring the accurate inventory value is set for the returned items Sales Return Order Management in Microsoft Dynamics NAV enables companies to manage all these tasks in an efficient and accurate manner. This section explains and illustrates handling of these processes in Microsoft Dynamics NAV using Cronus as an example. Registering a Compensation Agreement with Customers There are various ways to compensate a customer who is dissatisfied with the order delivery. The terms of a compensation agreement between the company and the customer frequently depend on the stated reason for return and the company-customer relationship. For example, the parties may agree that for wrongly ordered items, the customer returns them to the company against a credit, receives replacement items, and accepts that the company charges a certain restock fee. In other situations, for example, where an item arrives at the customer slightly damaged, the customer may agree to receive a price deduction against the original sales order price. Meanwhile, where the sold item has a warranty, the company may offer the customer to take the malfunctioned/broken item in for repair. 9-6 Microsoft Official Training Materials for Microsoft Dynamics ™ Your use of this content is subject to your current services agreement
  • 191.
    Chapter 9: ReturnsManagement In Microsoft Dynamics NAV, the sales return order is the central document that lets the user register an agreement with a customer. From here, the user can access other sales-related documents and enter and maintain the return-related information, the method of compensation, and the items in question. The user can create return lines of different types to register aspects of a compensation agreement in the same return order. In return situations: • Item type line represents a transaction where the item is physically returned to the company before the customer receives a credit. • Charge (Item) and Account (G/L) type lines represent a financial transaction where a customer receives a credit (in the form of a sales allowance) for the item(s), without physically returning it to the company. The same type lines can be used for registering charges and fees associated with a return. NOTE: To register details about a compensation agreement, the user can employ other standard documents (or combinations of them) in Microsoft Dynamics NAV. These documents are as follows: Sales credit memos, sales orders, and sales invoices. In the return order/credit memo, a return transaction is expressed as a line with a positive quantity. In the sales order/invoice, a return is represented by a line with negative quantity. Refer to the example illustrating this principle in the topic titled "Sales Return Order" in online Help. When deciding on which document to use as a preferred entry point for a compensation agreement, the user must be aware that, compared to a credit memo/invoice (where posting updates both quantity and value at the same time), the return/sales order can separate the quantity and value parts of the transaction. Therefore, companies where this flexibility is important may prefer using a return order instead of a credit memo. In the sales return order, the user can create other return-related documents. These include a replacement sales order, and, where return to vendor is required, a purchase return order and a replacement purchase order. The following demonstrations illustrate the handling of a situation involving a sales return and a sales allowance, and another where an item must be sent to the vendor for repair. Demonstration − Using Sales Return and Sales Allowance A representative from customer 10000 calls the order processor at Cronus and says that he received five units of item 70011 instead of item 70010 and that two units of item 1964-W were delivered damaged. The customer explains that the wrong delivery of item 70010 was his own fault, while item 1964-W appeared to have been damaged during shipment. The order processor and the customer agree that item 70011 must be returned to Cronus and a replacement of the same quantity of item 70010 will be shipped to the customer. Cronus will charge the customer a restock fee of 5% of the original order amount. Microsoft Official Training Materials for Microsoft Dynamics ™ 9-7 Your use of this content is subject to your current services agreement
  • 192.
    Trade in MicrosoftDynamics™ NAV5.0 Meanwhile, item 1964-W will not be returned, and Cronus will provide the customer with a sales allowance of 15% off the price of the item. The order processor must register the compensation agreement that has been reached with the customer and process the return. The order processor must also make sure that the returned items, when put back on stock, are valued at the same unit cost as originally sold (according to Cronus internal policy about the inventory valuation). The order processor must register the compensation agreement settled with customer 10000 about the return of a wrongly ordered item. Steps Create a sales return order for five units of item 70011 from customer 10000. 1. From the Sales & Marketing menu, click ORDER PROCESSING→RETURN ORDER. Press F3 to create a new order and enter the customer information in the return header. 2. Enter the item information and quantity on the line. For each return line, the user can specify the reason for returning the item(s) by filling in the Return Reason field. 3. In the Return Reason field, click the AssistButton. The Return Reasons window appears. 4. Select WRONG as the return reason code and then click OK. 5. In the External Document No. field, enter SR024. This is the number that is used as a reference to the return document. Entering an external document number is important for an overview of the return status. External document numbers help locate the sales documents created for a specific customer return. The completed sales return order for the return of wrongly ordered item 70011 now looks as shown in Figure 9-1. FIGURE 9-1: SALES RETURN ORDER WINDOW 9-8 Microsoft Official Training Materials for Microsoft Dynamics ™ Your use of this content is subject to your current services agreement
  • 193.
    Chapter 9: ReturnsManagement Using the Copy Documents Function To fill in the return lines automatically, use the Copy Document function to copy information about the customer and the item from other documents. For sales returns, these documents can be either posted shipments or posted invoice documents. If the Exact Cost Reversing field on the sales & receivables setup is selected, when the user copies information from a posted shipment, the program automatically fills in the Appl.-from Item Entry field on the return line with the corresponding entry. Demonstration Continued When entering a sales return line, the order processor must make sure that upon invoicing the order, the returned item is revalued at the unit cost of the original sales (instead of at the unit cost suggested by the program as based on either average or standard unit cost). To do this, the order processor must assign exact cost reversing to this return line. 6. In the Appl.-from Item Entry field, click the AssistButton. The Item Ledger Entries window appears. The window contains a list of records of all the negative entries made for the item in question. 7. In the Item Ledger Entries window, select the line. This is the entry representing the sales order that customer 10000 refers to as the one with the incorrect items. Click OK. This finishes registration of the first part of the compensation agreement. New User Interface After version 5.0, a new user interface is provided for the task of selecting one or more posted document lines for exact cost reversal. Instead of using the Copy Documents function and the Appl.-from Item Entry field to look up the posted sales document lines, do the following: 8. From the Sales Return Order, click Functions and then Get Posted Document Lines to Reverse. This opens the Posted Sales Document Lines window. Microsoft Official Training Materials for Microsoft Dynamics ™ 9-9 Your use of this content is subject to your current services agreement
  • 194.
    Trade in MicrosoftDynamics™ NAV5.0 9. Select the posted sales document line for item 70011 and pres Enter. FIGURE 9-2: POSTED SALES DOCUMENT LINES WITH THE POSTED SHIPMENTS VIEW 10. Enter the line in the Sales Return Order window together with some comment lines with additional information about the related posted invoice and shipment. This makes keeping track of the related documents in the returning process easier. The new Posted Sales Document Lines function is available from return orders and credit memos on both the sales and purchase site. The function is especially useful when users need to copy one or more lines that appear in one or more posted documents. The new window provides rich information about the status of posted quantities, displaying, for example, whether any have already been returned. It also contains the following: • The Unit Cost (LCY) field, showing the current, potentially adjusted unit cost • The Reverse Unit Cost (LCY) field, showing the original unit cost at which the item was originally sold and at which it must be reversed At the top of the Posted Sales Document Lines window, users can place a check mark in the Show Reversible Lines Only field to see only lines with quantities that have not yet been returned. The new field Qty. Not Returned is implemented in the item ledger entry table where the reversible quantity of an outbound item ledger is stored. The program will check during the posting of return orders that only the quantity remaining in relation to the original sales document line can be reversed. This ensures that users do not mistakenly return more than what was sold. 9-10 Microsoft Official Training Materials for Microsoft Dynamics ™ Your use of this content is subject to your current services agreement
  • 195.
    Chapter 9: ReturnsManagement According to the demonstration "Sales Return and a Sales Allowance," the customer also requested a replacement of item 70011 with item 70010. The order processor can register this requirement in the sales return order by entering a line for the replacement item with a negative quantity. 11. In the Sales Return Order window, enter a line for item 70010 with a quantity of -5. The advantage of doing this in the Sales Return Order window is that the order processor can register the customer's requests to receive a replacement in one window, instead of opening a new Sales Order window. NOTE: To avoid confusion, remember that the sales return lines (of the item type) with positive quantities represent items that are being returned, while lines with negative quantities represent items that are to be replaced. Next, according to the compensation agreement, the order processor applies a 5% restock fee to cover the physical handling of returning the item. The order processor can do this in the same sales return order by creating a charge (item) line for sales restock charge: 12. In the Type field, select Charge (Item) and in the No. field, select S- RESTOCK. 13. In the Quantity field, enter 5. In the Unit Price Excl. VAT field, enter -3.615. This is 5% of 72.30 LCY, which is the original unit price. (You can also enter a formula 72.30*5/100 to calculate the amount.) Microsoft Official Training Materials for Microsoft Dynamics ™ 9-11 Your use of this content is subject to your current services agreement
  • 196.
    Trade in MicrosoftDynamics™ NAV5.0 The program calculates the total restock fee amount equal to 18.08 LCY (5*3.615). Remember that the quantity of the restock charge must be positive. But the unit price must be negative for the customer to pay the restock charge. FIGURE 9-3: SALES RETURN ORDER WINDOW To guarantee accurate sales statistics, the order processor assigns the restock charge to the return entry. 14. Select the sales restock line, and then click LINE→ITEM CHARGE ASSIGNMENT. Assign the restock charge to the entry being returned. 15. In the Item Charge Assignment (Sales) window, on the first line in the Qty. to Assign field, enter 5. 16. Close the window. NOTE: As an alternative to creating a charge (item) line, the order processor can create an account (G/L) line for the amount of the restock fee and post the entry directly to the G/L account. However, the advantage of using an item charge is that item statistics are updated correctly. The order processor must record the agreement with the customer about the provision of a sales allowance of 15% for two units of the damaged item 1964- W. The sales return order can be used as an entry point for the details of this agreement. (An alternative entry point for a sales allowance is a sales credit memo.) The order processor must create a charge (item) line and assign the corresponding charge amount to the original sale of item 1964-W. 9-12 Microsoft Official Training Materials for Microsoft Dynamics ™ Your use of this content is subject to your current services agreement
  • 197.
    Chapter 9: ReturnsManagement 17. Create a charge (item) line. Select sales allowance as the item charge number. (Add extra information about this allowance in the Description field if desired.) 18. In the Quantity field, enter 2. This is the number of items that arrived damaged to the customer and for which the order processor provides an allowance. 19. Click LINE→ITEM CHARGE ASSIGNMENT. Select the original sales entry receiving the allowance. This is represented by the posted shipment documents. 20. In the Item Charge Assignment (Sales) window, click FUNCTIONS→GET SHIPMENT LINES. The program lists all posted shipment lines related to the customer. 21. Select the shipment line for item 1964-W and then click OK. 22. In the Item Charge Assignment window, in the Qty. to Assign field for the shipment line, enter 2. Close the window. 23. In the Sales Return Order window, in the Unit Price Excl. VAT field, enter 43.80. This is 15% of 292.00 LCY, which was the original unit price at which the item was sold to the customer. (You can also enter a formula 292*15/100 to calculate the amount.) The order processor finishes registration of the compensation agreement settled with the customer and continues to the processing of the return. Microsoft Official Training Materials for Microsoft Dynamics ™ 9-13 Your use of this content is subject to your current services agreement
  • 198.
    Trade in MicrosoftDynamics™ NAV5.0 Demonstration − Processing the Sales Return After the order processor registers the details of the compensation agreement in the program (in the sales return order), the next task is to actually perform the agreement. In the demonstration "Sales Return and Sales Allowance," this means that Cronus must: • Ship the customer a replacement item • Credit the customer for the returned items upon receipt at the company (with deduction for the restock charge) • Provide a sales allowance for the items the customer is not required to return to Cronus Unless the total order amount is negative, all the procedures can be performed at the same time, when the user posts the sales return order. However, if for example the replacement order needs to be shipped without waiting until the returned items are received, then the replacement line(s) (lines with negative quantities) can be moved to a regular sales order. When a replacement is posted from the return order, the program does not create a separate posted shipment document for this shipment. NOTE: Remember that the program does not allow posting of any orders with a negative total amount. According to general conventions in the program, the warehouse management functionality does not handle negative lines. For the warehouse, it does not make sense to pick a negative quantity. Therefore, when you are using warehousing, you must move negative lines to documents where they appear positive. Suppose that in the demonstration "Sales Return and Sales Allowance" the order processor decides to move the negative line (representing a demand for a replacement) to a separate sales order. The Move Negative Lines function is a convenient way to do this task. 9-14 Microsoft Official Training Materials for Microsoft Dynamics ™ Your use of this content is subject to your current services agreement
  • 199.
    Chapter 9: ReturnsManagement Steps Perform the following to move the line: 1. In the Sales Return Order window, click FUNCTIONS→MOVE NEGATIVE LINES. The following window appears: FIGURE 9-4: MOVE NEGATIVE SALES LINES WINDOW In the To Document Type field, select which document type to receive the negatives lines. To learn about different options, refer to the topic "Move Negative Sales Lines Batch Job" in online Help. 2. In the To Document Type field, select Order and then click OK. The program deletes the return line with the negative quantity and creates a new sales order. A message providing the new sales order number appears. 3. Click Yes to view the document. The order can be processed in the usual manner. 4. Post the sales order. Upon receipt of the returned item, the order processor posts the sales return order which creates the customer's account for: A) the value of returned item 70011, with a deduction of the restock charge; and B) the amount of the sales allowance provided for two damaged units of item 1964-W. Microsoft Official Training Materials for Microsoft Dynamics ™ 9-15 Your use of this content is subject to your current services agreement
  • 200.
    Trade in MicrosoftDynamics™ NAV5.0 5. Post the sales return order. The program creates a posted return receipt and a posted credit memo. For an overview of a sales return status, the order processor can use the navigate function to find and access the sales documents created for the return. The external document number, provided by the customer as a reference to the return document, can be used as a search parameter. View the status of the sales return initiated in the demonstration, "Sales Return and a Sales Allowance”: 6. From the Sales & Marketing menu, click HISTORY→NAVIGATE. Click the External tab. 7. In the Business Contact Type field, select Customer, and in the Business Contact No. field select 10000. In the Document No. field, enter SR024. Click Find. The program lists all the sales documents created to process the sales return initiated by customer 10000. These are the posted sales shipment and invoice for the replacement sales order and the posted return receipt and credit memo for the sales return order. The next demonstration illustrates a situation where the customer returns an item to Cronus for repair at the company's vendor. Demonstration − Returning Items for Repair at Vendor A representative from customer 20000 calls the order processor at Cronus stating that she wants to return two units of item 80102-T ordered some time ago. The customer claims the items have a manufacturing defect and wants the items repaired. The order processor and the customer agree that the items must be returned to Cronus, and Cronus will send them to the manufacturer for repair. The order processor must register the compensation agreement and process the return. Create a purchase order of 40 units of item 80102-T from vendor 50000 and a sales order of eight units for customer 20000. At Cronus, this item is tracked by serial numbers that are provided by the manufacturer (S/N-852CA1 .. S/N- 852CA40 when purchased, S/N-852CA10 .. S/N-852CA17 when sold). The detailed procedures for handling items with serial numbers are described in the Inventory Management training manual. 9-16 Microsoft Official Training Materials for Microsoft Dynamics ™ Your use of this content is subject to your current services agreement
  • 201.
    Chapter 9: ReturnsManagement Steps Create a sales return order for two units of item 80102-T for customer 20000. 1. Fill in the sales return header and lines with the customer and item information respectively. Because the item will be repaired at the vendor (manufacturer), the customer keeps the ownership of the item during the repair process. In this case, Cronus must exclude the item value from its own inventory value. To do this, all the transactions with this item, such as receiving it at the company, shipping it to the manufacturer, and receiving it back and shipping it back to the customer, are performed with zero unit cost and unit price. Instead of entering a zero amount in the Unit Cost (LCY) and Unit Price Excl. VAT fields manually on the sales return lines, the order processor may use the functionality available in the program to automate the process. As described in the previous section, at Cronus, the option of valuating inventory at zero when handling returns for repair is linked to the return reason S-REPAIR. By selecting this return reason, the order processor accepts the option. 2. In the Return Reason field, select the S-REPAIR code. The program automatically fills in the Location Code field with REPAIR, which is a default location for this return reason code 3. In the External Document No. field, enter R0015. The completed sales return order of item 80102-T for repair looks as shown in Figure 9-5. FIGURE 9-5: SALES RETURN ORDER WINDOW Microsoft Official Training Materials for Microsoft Dynamics ™ 9-17 Your use of this content is subject to your current services agreement
  • 202.
    Trade in MicrosoftDynamics™ NAV5.0 Notice that the Unit Price Excl. VAT field does not contain an amount. To continue with this return, several documents related to returning this item to the manufacturer and shipping it back to the customer upon repair must be created. These documents include: – Purchase return order – Purchase order – Sales order The handling of the sales returns for repair with regard to associated documents is shown in Figure 9-6. FIGURE 9-6: SALES RETURN DOCUMENTS The function Create Return-Related Documents enables the order processor to create all these documents automatically. 4. In the Sales Return Order window, click FUNCTIONS→CREATE RETURN-RELATED DOCUMENTS. The following window appears: FIGURE 9-7: CREATE RETURN RELATED DOCUMENTS WINDOW 9-18 Microsoft Official Training Materials for Microsoft Dynamics ™ Your use of this content is subject to your current services agreement
  • 203.
    Chapter 9: ReturnsManagement In this window, users can select which documents that they want the program to create to further handle the return. The user has the option of creating a purchase return order and a purchase order if the items are returned to and received from the vendor. The user can also create a replacement sales order. To create vendor-related documents, specify a vendor number. 5. In the Vendor No. field, select vendor 50000. Click OK. The program creates the specified documents and lists them in the Returns-Related Documents window. Purchase return orders and purchase orders with status Open indicate that the purchasing agent can initiate the return to vendor/purchase replacement process. When the items arrive at Cronus, the order processor/warehouse worker enters the serial numbers (S/N-852CA15 and S/N852CA16). Register the serial numbers for the arrived items in the Item Tracking Lines window, and post the receipt of the return order. Microsoft Official Training Materials for Microsoft Dynamics ™ 9-19 Your use of this content is subject to your current services agreement
  • 204.
    Trade in MicrosoftDynamics™ NAV5.0 Lab 9.1 − Processing the Customer Return Scenario: A representative from customer 10000 calls the order processor at Cronus and says that the complete delivery of 50 units (boxes) of item 80100 appears to be defective. The order processor and the customer agree that the complete quantity of item 80100 must be returned to Cronus, and a replacement of the same quantity will be shipped to the customer. The customer gives the order processor a reference number to his own return document, which is R-0113. To perform this return, create and post a sales order of 50 units (boxes) of item 80100 to customer 10000. Use location code Green, and remember to fill in the quantity to ship. Challenge Yourself! Your tasks are as follows: 1. Register the compensation agreement reached with the customer, using a sales order as an entry point. 2. Process the return, in terms of: – Receiving (possibly, use a special dedicated location for defective items) and crediting the customer for the returned items. – Ensuring that the returned items, when received from the customer, are valued at the same unit cost as originally sold (instead of the average cost). – Shipping the replacement sales order to the customer. – Creating a return-related document, which is a purchase return order, to indicate to the purchaser that a return to vendor process must be initiated. Need a Little Help? The solution is provided in Appendix C. 9-20 Microsoft Official Training Materials for Microsoft Dynamics ™ Your use of this content is subject to your current services agreement
  • 205.
    Chapter 9: ReturnsManagement Managing Returns to Vendors Receiving compensation from a vendor for an item you are dissatisfied with is important to recover costs and measure vendor relationships. Streamlining the return to vendor process helps companies greatly reduce the costs associated with returns. Typically, the purchasing agent responsible for the interface with certain vendors also contacts the vendors when dissatisfied with purchased items. Managing returns to vendors includes performing a series of tasks. The number and scope of the tasks depend on who initiates the return: The company (when, for example, dissatisfied with the quality of purchased items or if there is a wrong delivery) or a company's own customer. A vendor-oriented return process may include the following tasks: • Registering the compensation agreement with the vendor. • Debiting the vendor, either by receiving a credit for physically returned items or with a purchase allowance (if the company is not required to physically return the items). • Creating a replacement purchase order(s) if replacement is in the compensation agreement. Related to the vendor-oriented process, there are several internal handling tasks: • Shipping items to the vendor if the purchase return that includes repair is part of a compensation agreement. • Receiving replaced/repaired items. • Ensuring that the accurate inventory value of the items is returned to the vendor. • Combining several return shipments to the same vendor into one credit memo document. Purchase Return Order Management in Microsoft Dynamics NAV enables companies to manage these tasks in an efficient and accurate manner. This section explains and illustrates the handling of these processes, using Cronus as an example. Microsoft Official Training Materials for Microsoft Dynamics ™ 9-21 Your use of this content is subject to your current services agreement
  • 206.
    Trade in MicrosoftDynamics™ NAV5.0 Registering Compensation Agreement with the Vendor There are many ways a company expects compensation when it is dissatisfied with the received order or dissatisfied on behalf of its customers. The terms of compensation agreement depends on the reason for the return and the company- vendor relationship. For example, the parties may agree that if there is wrongly ordered or delivered item(s), the company returns the item to the vendor against receiving a credit and receives a replacement item. In other situations, for example, where an item arrives at the company damaged, the company may require a price deduction against the original purchase order price. The same may be applied when a company provided a sales allowance for its own customers and wants to recover costs by requesting a purchase allowance from its vendor. Meanwhile, where the purchased item has a warranty, the company may ask the vendor to repair the malfunctioned/broken item. In Microsoft Dynamics NAV, the purchase return order is the central document that lets the user register a compensation agreement. From here, the user can access other purchase-related documents and enter and maintain the return- related information about the vendor, the method of compensation, and the items in question. NOTE: In addition to the purchase return order, to register details about a compensation agreement with the vendor, the user can employ other standard documents (or combinations) to register a return. These documents are as follows: Purchase credit memos, purchase orders, and purchase invoices. The concept of creating different return line types and registering a compensation agreement with a vendor are the same as in sales return situations. The principles of creating a purchase document to register a compensation agreement are explained in detail in the topics "Purchase Return Order" and "Posting a Purchase Return Order" in online Help. The two demonstrations in this section illustrate the handling of an item returned to a vendor for repair and a purchase allowance. Both returns have been initiated by the customer and are a logical continuation of the demonstrations presented in the previous section. As the same purchase return handling procedures apply, regardless of whether a company initiates a return itself or it has been initiated by the customer, the first case is not given a separate explanation in this section. 9-22 Microsoft Official Training Materials for Microsoft Dynamics ™ Your use of this content is subject to your current services agreement
  • 207.
    Chapter 9: ReturnsManagement Demonstration − Returning Items to Vendor for Repair This is a continuation of the demonstration titled "Customer Returns Item for Repair at Vendor." For the return of two units of item 80102-T initiated by customer 20000, Cronus now has to ship the units back to the vendor for repair. When registering a compensation agreement with this customer, the order processor ran the Create Return-Related Documents function. The program created the following documents: A purchase return order, a purchase order, and a sales order. The purchasing agent contacts the vendor's representative (vendor 50000), and the parties agree on Cronus sending the item for repair. The purchasing agent now handles the return process. To perform this return, create and post a purchase order of five units of item 80100 from vendor 50000, and create a purchase return order of one unit of the same item for the same vendor, using location code Blue and return reason Defective. Post the purchase return order as shipped. Steps Process the purchase return order for two units of item 80102-T for vendor 50000. 1. From the Purchase menu, click ORDER PROCESSING→RETURN ORDERS. Locate the return order for two units of item 80102-T the program created for vendor 50000. Notice that the Direct Unit Cost Excl. VAT field is empty. NOTE: To guarantee the accurate inventory value ( at zero unit cost) of repair items without serial numbers, the order processor applies a purchase return entry for the sales return entry. Complete filling in the purchase return order: 2. In the Vendor Authorization No. field, enter RO155. This is the number from the vendor authorizing the return. 3. In the Expected Receipt Date field on the Shipping tab, enter 01/27/08. This is the shipment date for the return order. 4. Click Yes to update the lines. 5. Enter the serial numbers (S/N-852CA15 and S/N852CA16) in the Item Tracking Lines window for the two items being shipped to the vendor. Microsoft Official Training Materials for Microsoft Dynamics ™ 9-23 Your use of this content is subject to your current services agreement
  • 208.
    Trade in MicrosoftDynamics™ NAV5.0 6. Post the purchase return order as shipped. The program updates the available inventory and creates a posted return shipment. Companies frequently establish a practice where it is cost-efficient to combine several return orders in one shipment. By posting a purchase return order as shipped, the user takes out the items to be returned to the vendor from the available inventory but does not actually ship (transport) the order. When there are several orders (to be returned to the same vendor or be bundled in the same shipment), the user can combine them in one shipment and transport it to the vendor. The combined shipment is then invoiced as one purchase credit memo. NOTE: Individual posted return shipment documents, when sent to the vendor, can be an indication for the vendor to send a replacement item(s) instead of the one returned at some later point. There are more items to be returned to the same vendor for repair. The two return orders will be shipped in the same shipment. Upon receiving a credit memo from the vendor for this combined shipment, the two shipments can be paid (invoiced). 7. Create a new purchase credit memo for vendor 50000. Click FUNCTIONS→GET RETURN SHIPMENT LINES TO RETURN. The Get Return Shipment Lines window contains a list of all the shipment lines that have not been invoiced. 8. Select the two lines from the list and then click OK. The program copies the lines to the purchase credit memo. 9. In the Vendor Cr. Memo No. field, enter CM1305 and invoice the credit memo. When the vendor has repaired the items and delivered them to Cronus, the purchasing agent posts the corresponding purchase order (created because of running the Create Return-Related Documents function when registering the sales return from the customer). A sales order for the same items can then be shipped back to the customer. There may be a need to trace the purchase return to the original sales return. For example, when a vendor repairing a returned item needs additional information from the customer about item exploitation. In these cases, the user can view the item's transaction history in item tracking entries and locate the relevant document(s). 9-24 Microsoft Official Training Materials for Microsoft Dynamics ™ Your use of this content is subject to your current services agreement
  • 209.
    Chapter 9: ReturnsManagement Open the item tracking entries for item 80102-T: 10. Open the item card for item 80102-T. Click ITEM→ENTRIES→ITEM TRACKING ENTRIES. The last two lines specify an inventory increase by two units of item 80102-T with serial numbers S/N-852CA15 and S/N-852CA16 (the Positive field is selected). The user can locate the associated document, represented by a sales return order. NOTE: To guarantee the full traceability of an item with a serial number, remember to assign the item an item tracking code that requires the entry of serial numbers at the point of inbound sale (sales return) and outbound purchase (purchase return). Read more about how to set up item tracking codes in the Inventory Management training manual. Demonstration − Using Purchase Allowance This is a continuation of the demonstration titled "Item Returned to Vendor for Repair." The order processor was told by customer 10000 that two units of item 1964-W were damaged in shipment. Instead of returning the items, the customer was given a 15% sales allowance. Because the carrier is responsible, Cronus wants to recover the costs associated with this damage. The transportation coordinator contacts the carrier's representative (the carrier (vendor) number is 49989898), and the parties agree on Cronus making a freight claim toward the carrier. The amount of the claim is equal to the amount of the sales allowance offered to the customer (87.60 LCY). The transportation coordinator decides to issue a freight claim toward vendor 49989898 from a purchase credit memo (alternatively, the purchase return order may be used). Microsoft Official Training Materials for Microsoft Dynamics ™ 9-25 Your use of this content is subject to your current services agreement
  • 210.
    Trade in MicrosoftDynamics™ NAV5.0 Steps Perform the following steps to issue the purchase allowance: 1. Create a new purchase credit memo and fill in the header with the vendor information. 2. In the Vendor Authorization No. field, enter R123. This is the number the Transportation Coordinator receives from the carrier (vendor) authorizing the claim (return). 3. In the Vendor Cr. Memo No. field, enter CM478. 4. Create a credit line. In the Type field, select G/L Account, and in the No. field, select account 6810. 5. In the Quantity field, enter 1 and in the Direct Unit Cost Excl. VAT field, enter 87.60. 6. Post the purchase credit memo. 9-26 Microsoft Official Training Materials for Microsoft Dynamics ™ Your use of this content is subject to your current services agreement
  • 211.
    Chapter 9: ReturnsManagement Lab 9.2 − Processing the Customer Return, II Scenario: (Continuation of Lab 9-1 – Processing the Customer Return) For the return of 50 units (boxes) of item 80100 initiated by customer 10000, Cronus wants to return the defective items to the original vendor and receive replacements. When registering the compensation agreement, the order processor created a purchase return order. This serves as an indication to the purchaser that the items must be returned to the vendor. The purchasing agent contacts the vendor's representative (vendor 45858585), and the parties agree that Cronus will send the item back for replacement. The vendor gives the purchasing agent a return authorization number, which is PR0558. Locate the existing purchase order No. 6001 and post it as invoiced. Challenge Yourself! Your task is to handle the return to vendor process for: • Shipping the defective items to the vendor and receiving credit. • Ensuring that the items returned to the vendor are valued at the same unit cost as originally purchased instead of the average cost suggested by the program (refer to the purchase order No. 6001). • Receiving a replacement from the vendor. Need a Little Help? The solution is provided in Appendix C. Microsoft Official Training Materials for Microsoft Dynamics ™ 9-27 Your use of this content is subject to your current services agreement
  • 212.
    Trade in MicrosoftDynamics™ NAV5.0 Activity Diagram for Return Management The activity diagram is helpful for the order processor to maintain the overview of the return process in each if the different situations. FIGURE 9-8: RETURN MANAGEMENT ACTIVITY DIAGRAM Conclusion Handling returned items from customers and vendors correctly and in a timely manner is a crucial element in establishing good business relationship. In Returns Management, the general set up and return reasons set up was presented. Then the two main topics on management of returns from customers and vendors were explained thoroughly by several, detailed demonstrations. The functionality enhancement regarding cost reversal, for both sales and purchase return processing, created for version 5.0, were included in the first demonstration, "Sales Return and a Sales Allowance". 9-28 Microsoft Official Training Materials for Microsoft Dynamics ™ Your use of this content is subject to your current services agreement
  • 213.
    Chapter 9: ReturnsManagement Quick Interaction: Lessons Learned Take a moment and write down three key points you have learned from this chapter: 1. 2. 3. Microsoft Official Training Materials for Microsoft Dynamics ™ 9-29 Your use of this content is subject to your current services agreement
  • 214.
    Trade in MicrosoftDynamics™ NAV5.0 9-30 Microsoft Official Training Materials for Microsoft Dynamics ™ Your use of this content is subject to your current services agreement
  • 215.
    Chapter 10: Analysisand Reporting CHAPTER 10: ANALYSIS AND REPORTING Objectives The objectives are: • Define Analysis and Reporting • Create Analysis Reports • Customize Analysis Reports • Create Analysis by Dimensions • Manage Sales and Purchase Budgets • Export Budgets to Microsoft® Excel Introduction Analysis and Reporting demonstrates the key features of the analysis reporting and budgeting functionality in Microsoft Dynamics™ NAV. There are two sets of functionality that support these analysis and reporting functions: Analysis Reports and Sales/Purchase Budget. Comprehensive demonstrations and examples explain how the program supports companies in managing the tasks involved in analysis reporting and sales and purchase budgeting. For an overview of procedures associated with handling specific reporting and budgeting tasks, refer to the relevant topic in the online Help. Microsoft Official Training Materials for Microsoft Dynamics ™ 10-1 Your use of this content is subject to your current services agreement
  • 216.
    Trade in MicrosoftDynamics™ NAV5.0 Analysis and Reporting The Analysis and Reporting features of Microsoft Dynamics NAV provide sales managers, purchasing managers, and warehouse managers tools to easily budget, forecast, and analyze data. These features are designed for people without a background in finance and accounting. Use analysis reports to review real-time data in highly customizable reports, saved under unique names, and positioned in the respective application area to analyze data in a preferred format. Analysis line templates and analysis column templates are user-defined and unlimited. This means reports can be created that are customized for a company’s needs and business processes. Dimensions enable the user to analyze trends and compare characteristics across a range of entries. It is also possible to combine and compare source data online by changing parameters. The program-wide drill-down functionality enables the user to make decisions based on real-time data investigations of detailed transactions. Use Sales and Purchase Budgets functionality to make sales budgets on customer and item levels and purchase budgets on vendor and item levels, both in amounts and quantities. Users can track actual performance by calculating variances and move budget figures between Microsoft Dynamics NAV and Microsoft® Excel®. The system supports budget version control and lets users work on individual budgets at the same time. Comparing analysis report data against budgets is easier than traditional budgeting with dimensions and dimension filters. The user can create user-defined budgets for identical time periods, G/L accounts, and dimensions. Creating Analysis Reports Use analysis reports to create customized reports that are based on posted transactions; for example, sales, purchases, transfers, and inventory adjustments. An analysis report consists of objects to analyze represented as lines and analysis parameters (the way to analyze the object) represented as columns. 10-2 Microsoft Official Training Materials for Microsoft Dynamics ™ Your use of this content is subject to your current services agreement
  • 217.
    Chapter 10: Analysisand Reporting The Analysis Report Names window contains all analysis reports, the analysis line template, and the analysis column template attached to each analysis report. FIGURE 10-1: ANALYSIS REPORT NAMES WINDOW Analysis reports are created, viewed, and modified from the Sales & Marketing menu and the Purchase menu by clicking ANALYSIS & REPORTING→ANALYSIS REPORTS. The functionality is identical whether it is accessed from Purchase or Sales. The following explanation uses Sales Analysis Reports and also applies to Purchase Analysis Reports. To create an analysis report: • Set up the line template. • Set up the column template. • Enter a report name and description in the Analysis Report Name window and select the line and column templates. Setting Up Line Templates The lines in a report contain the objects to analyze. To set up line templates, from the Sales & Marketing menu, click ANALYSIS & REPORTING→SETUP→ANALYSIS LINE TEMPLATES. You can create rows that display: • Customers and Customer Groups • Items and Item Groups • Salespeople • Formulas Dimensions define Customer and Item Groups and Salespeople. Using dimensions in analysis reports is explained later in this chapter. Microsoft Official Training Materials for Microsoft Dynamics ™ 10-3 Your use of this content is subject to your current services agreement
  • 218.
    Trade in MicrosoftDynamics™ NAV5.0 Select which lines to use in an Analysis Report from the Sales Analysis Lines window. To access the Sales Analysis Lines window, click the Lines button at the bottom of the Analysis Line Templates window. FIGURE 10-2: SALES ANALYSIS LINES WINDOW These lines can be modified manually or with the insertion function to add, for example, a new customer. Setting Up Column Templates The columns in a report contain the analysis parameters. To set up column templates, from the Sales & Marketing menu, click ANALYSIS & REPORTING→SETUP→ANALYSIS COLUMN TEMPLATES. You can define columns that display: • Sales amounts • Cost amounts • Quantities • Non-inventoriable amounts • Unit price • Standard cost • Indirect cost • Unit cost 10-4 Microsoft Official Training Materials for Microsoft Dynamics ™ Your use of this content is subject to your current services agreement
  • 219.
    Chapter 10: Analysisand Reporting Use the Analysis Columns Templates window to access existing column templates or create new templates. Click the Columns button on the bottom of the Analysis Column Templates window. The Sales Analysis Columns window displays. FIGURE 10-3: SALES - ANALYSIS COLUMNS WINDOW Set up columns to appear in the analysis report. For each column, define the data in the item ledger entries and budget entries to retrieve for the analysis report. For information about each field, refer to the Online Help. Analysis Types For each column set up in the Analysis Columns window, select an analysis type to specify a value in the column; for example, Cost of Goods Sold or Consumption. Default analysis type codes for most of the relevant analyses are set up in the program. Click the AssistButton in the Analysis Type Code field to view the Analysis Type List. Each Analysis Type code has a default Item Ledger Entry Type filter, Value Entry Type filter, and Value Type that together define the values in the item and budget entries to retrieve. View, create, or modify analysis type codes by clicking ANALYSIS & REPORTING→SETUP→ANALYSIS TYPES from the Sales & Marketing menu. Microsoft Official Training Materials for Microsoft Dynamics ™ 10-5 Your use of this content is subject to your current services agreement
  • 220.
    Trade in MicrosoftDynamics™ NAV5.0 The following table shows where Value Type information is pulled from. Value Type Information comes from: Sales amount Item ledger entries Cost amount Item ledger entries Non-inventoriable amount Item ledger entries Quantity Item ledger entries Unit cost Item card Standard cost Item card Indirect cost Item card Unit price Sales prices Demonstration − Customizing Analysis Reports It is possible to use existing analysis reports to create customized reports. The following demonstration shows the key fields in the analysis report and describes how to customize an existing analysis report. The Cronus sales manager has created a report that is named KA-SALES, that provides an overview of sales turnover and profit for some specific customers who are being followed closely. The sales manager has to run this report to retrieve January sales numbers, but first, it is required to add an additional customer to the report. Steps Open the Sales Analysis Report window and locate a report to customize. 1. On the Sales & Marketing menu, click ANALYSIS & REPORTING→ANALYSIS REPORTS. 2. In the Analysis Report Name field, click the AssistButton to open the Analysis Report Names window. 3. Select analysis report KA-SALES and then click OK. Next, define the time period for this report. 4. In the Sales Analysis Report window, type 01/01/08 in the Date Filter field. 5. At the lower-left of the Sales Analysis Report window, click the time interval 31 to show the report data. Customer number 49633663 must be added to the report lines. This is performed through the Analysis Line Template. 6. In the Analysis Line Template field, click the AssistButton to show all the existing analysis line templates. 10-6 Microsoft Official Training Materials for Microsoft Dynamics ™ Your use of this content is subject to your current services agreement
  • 221.
    Chapter 10: Analysisand Reporting 7. Select the analysis line template for this report that is named MY- CUST, and then click Lines. The Sales Analysis Lines window appears. 8. Highlight the Key Accounts Total line and then click FUNCTIONS→INSERT CUSTOMERS. The Customer List window appears. 9. Select Customer No. 49633663 and then click OK. The program automatically brings in the customer information into the report lines. Notice that the Customer Number is copied into the Row Ref. No. field. NOTE: Row reference numbers are optional and are used to create formulas; they are not related to other number series in the program. This demonstration uses row reference numbers in a formula to calculate the Key Accounts Total amount. Modify the Sales Analysis Lines window accordingly. NOTE: To use a row reference number in a formula, you must have at least one character in the Row Ref. No. field that is not a number. 10. Change the Row. Ref. No. for customer 49633663 to A6. 11. In the Range field on the Key Accounts Total line, modify the formula in the range to A1..A6. You can add the new customer account. Close the Sales Analysis Lines window, the Analysis Line Template window, and return to the Sales Analysis Report window. Notice the new customer appears in the Sales Analysis Report. View the Analysis Columns to determine the parameters set up to analyze this data. 12. In the Analysis Column Template field, click the AssistButton to show all existing analysis column templates. 13. Select analysis column template SALES and then click Columns. The Analysis Columns window appears. In the Column Header, you can view the columns used to create the report. You can also view the formulas entered in the Formula field. Look closer at the Analysis Type field. 14. Click the AssistButton in one of the Analysis Type Code fields to open the Analysis Type List window. 15. Click the Setup button to view the filters for each analysis type. Microsoft Official Training Materials for Microsoft Dynamics ™ 10-7 Your use of this content is subject to your current services agreement
  • 222.
    Trade in MicrosoftDynamics™ NAV5.0 16. Close the Analysis Types window, the Analysis Type List window, and the Analysis Columns window to return to the Analysis Column Templates window. Click OK. Analysis reports let you drill down into the data to investigate the results. You can drill down into any lines that pull information from the ledgers. You cannot drill down into formula lines. 17. In the Analysis Report, in the Sales, Invoiced field, click the AssistButton next to one of the amounts. The Value Entries window appears letting you view the invoiced sales entries that make up the data on the report line. 18. Close the Value Entries window. The KA-SALES template can now provide the data the sales manager needs. Demonstration − Creating Analysis Reports This demonstration describes the process of creating a new analysis report. Cronus needs a report that shows quantities purchased this year versus last year for all the customers assigned to the Yellow location. Steps The first thing to do is define the report layout. Start by defining the lines for the report. You do this by creating an Analysis Line Template. 1. From the Sales & Marketing menu, select ANALYSIS & REPORTING→SETUP→ANALYSIS LINE TEMPLATES. 2. Select an empty line and type YELLOW in the Name field. 3. In the Description field, type Yellow Location Customers. 4. Click the Lines button. The Sales Analysis Lines window is displayed. 5. Click the Functions button at the bottom of the window, and select Insert Customers. The Customer List is displayed. 6. Filter on the Yellow Location. HINT: With your pointer in the Location field, click the field filter button, and select Yellow. 7. Select all customer lines and then click OK. The customer information is copied into the sales analysis lines. Scroll up to view the customers. 8. In the Sales Analysis Lines window, highlight the lines that contain the customer names, click Functions, and then select Renumber Lines. 10-8 Microsoft Official Training Materials for Microsoft Dynamics ™ Your use of this content is subject to your current services agreement
  • 223.
    Chapter 10: Analysisand Reporting 9. In the Start Row Ref. No. field, enter Y1, and then click OK. Click OK again to accept the message that appears. 10. In the first blank row underneath the customer names, in the Description field, type Yellow Location Customers Total. 11. In the Type field, select Formula. 12. In the Range field, enter Y1..Y34 to include all customer lines. 13. Select the Bold field. If the Bold field is not displayed, use Show Columns to add it. 14. Close the Sales Analysis Lines window. The line template is now set up. Define the columns for the report by creating an Analysis Column Template. 1. From the Sales & Marketing menu, select ANALYSIS & REPORTING→SETUP→ANALYSIS COLUMN TEMPLATES. 2. Select an empty line and type QUANTITY in the Name field. 3. In the Description field, type Quantity. 4. Click the Columns button. The Sales Analysis Columns window is displayed. 5. Create the columns according to the following table. The Value Type field is not listed in the table. This defaults in when the Analysis Type Code is selected. Ledger Column Column Column Invoiced Entry Formula No. Header Type Type Quantity Net Item A1 Check Invoiced Change Entries LY: Net Item A2 Quantity Check Change Entries Invoiced Item (A3- C1 Change % Formula Entries B3/B3)*100 SALES- A1 Check Always One QTY SALES- A2 Check -1Y Always One QTY C1 Always One 6. Close the Sales Analysis Columns window. The column template is now set up. Microsoft Official Training Materials for Microsoft Dynamics ™ 10-9 Your use of this content is subject to your current services agreement
  • 224.
    Trade in MicrosoftDynamics™ NAV5.0 Finally, create the report to analyze yellow location customers by quantity. 1. From the Sales & Marketing menu, select ANALYSIS & REPORTING→ANALYSIS REPORTS. 2. In the Analysis Report Name field, click the AssistButton. The Analysis Report Names window is displayed. 3. Select an empty line and type Quantity in the Name field. 4. In the Description field, type Location by Quantity. 5. In the Analysis Line Template Name field, select Yellow. 6. In the Analysis Column Template Name field, select Quantity. 7. Click OK. The Sales Analysis Report window is displayed. 8. In the lower-left corner of the Sales Analysis Report window, click the time interval 12 to view numbers over a 12 month period. 9. Locate the period 01/01/08..12/31/08. The report now contains quantity statistics for the yellow location customers for the current and previous years. Modify the report to show only those customers who bought from Cronus this year or last year. 10. Click the AssistButton in the Analysis Line Template field. 11. Verify the line for the Yellow template is still highlighted, and then click the Lines button. 12. In the Sales Analysis Lines window, in the Show field, select If Any Column Not Zero for all the lines. 13. Close the window, and then click OK in the Analysis Line Templates window to return to the Analysis Report. The report lists only customers who bought from Cronus in the current or previous year. Demonstration − Using Customer and Item Groups When creating the Analysis Report line templates, you cannot select customer groups, item groups, or salespeople without setting up a corresponding dimension in an Analysis View Card. Define customer groups and salespeople as dimensions in SALES & MARKETING→SETUP→SALES & RECEIVABLES SETUP. Before use in an Analysis View Card, product groups must be defined as dimensions in WAREHOUSE→SETUP→INVENTORY SETUP. 10-10 Microsoft Official Training Materials for Microsoft Dynamics ™ Your use of this content is subject to your current services agreement
  • 225.
    Chapter 10: Analysisand Reporting NOTE: To use groups of objects in analysis reports, you have to have Advanced Dimensions. Generally, the two global dimensions are used for other reporting entities and are not available for analysis report grouping. Next, set up customer and item groups and salespeople as dimensions in an Analysis View Card. Click SALES & MARKETING→ANALYSIS & REPORTING→SETUP→ANALYSIS VIEW CARD→ANALYSIS BUTTON→LIST to review the analysis view codes and associated dimensions set up by default. NOTE: You cannot use customer or item groups in an Analysis Lines Template unless you select the appropriate Analysis View Code in the Analysis Lines Template window. The program lets you add customer and item groups in the Sales Analysis Lines. However, you receive an error message when you try to use the Analysis Lines Template in a report. An Analysis View Card exists for customers who have the dimensions for Customer Groups and Salespeople. Review the setup of this Analysis View Card, and demonstrate how to use customer groups in a report. Steps Perform the following steps to review the card: 1. From the Sales & Marketing menu, select analysis & reporting→setup→analysis view card. The Analysis View Card is displayed. FIGURE 10-4: SALES - ANALYSIS VIEW CARD 2. Click the Analysis button and select List. 3. Highlight the line with the Customers Code and then click OK. The Customers Sales Analysis View Card appears. 4. Click the Dimensions tab. Microsoft Official Training Materials for Microsoft Dynamics ™ 10-11 Your use of this content is subject to your current services agreement
  • 226.
    Trade in MicrosoftDynamics™ NAV5.0 Up to three dimensions can be selected for each Analysis View. The Customer Group and Salesperson dimensions are selected. You can also set filters on dimensions not included in the analysis view by clicking the Analysis button and selecting Filters. No additional filters have been set on the Customers Analysis View Card. 5. Click the General tab. Notice that the Update on Posting field is clear. 6. To verify the data is current, click the Update button. NOTE: If you have not selected the Update on Posting field, you must click Update on the analysis view card or use the Update Analysis View batch job to ensure that an analysis view is updated with the newest posted entries. 7. Close the Sales Analysis View Card. Demonstration − Analyzing Quantity Purchased by Customer Groups This demonstration modifies the Analysis Report that you created in the demonstration “Creating Analysis Reports” to analyze quantity purchased by customer groups. Steps Perform the following steps to perform the analysis: 1. From the Sales & Marketing menu, select ANALYSIS & REPORTING→ANALYSIS REPORTS. The Analysis Report Names window is displayed. 2. Click the AssistButton in the Analysis Report Name field and select the report named Quantity. Click OK. The Location by Quantity Sales Analysis Report is displayed. Change the line template to show customer groups instead of yellow location customers. 3. In the Analysis Line Template Name field, click the AssistButton. The Analysis Line Templates window is displayed. 4. Notice that the template named CUSTGROUPS has the item Analysis View Code CUSTOMERS selected. 5. Select the CUSTGROUPS template and then click OK. The Analysis Report contains CUSTGROUPS in the Analysis Line Template field. 6. Press ENTER, and the information in the report is updated to show Quantity statistics per customer group. 10-12 Microsoft Official Training Materials for Microsoft Dynamics ™ Your use of this content is subject to your current services agreement
  • 227.
    Chapter 10: Analysisand Reporting Viewing and Presenting Analysis Reports You can modify and present reports in a variety of ways: • Click the Print button on the Analysis Report window to preview and print the report from the screen. • Export the report to Excel by clicking the Functions button and selecting Export to Excel. In the Excel program, use Excel’s features to present the report. • View the report in a graphical format using the bar chart feature. Demonstration − Using the Bar Chart Feature The following demonstration uses the bar chart feature. The demonstration continues from the demonstration, “Customize Analysis Reports.” The Cronus sales manager has to demonstrate to the sales staff the January turnover for their top three customers. Steps Perform the following steps to use the bar chart: 1. From the Sales & Marketing menu, click ANALYSIS & REPORTING→ANALYSIS REPORTS. 2. Select the Analysis Report from the first demonstration, "Customize Analysis Reports": – Analysis Report Name = KA-SALES – Analysis Line Template = MY-CUST – Analysis Column Template = SALES – Date Filter = 01/01/08..01/31/08 3. Highlight analysis report lines A1, A2, and A6 by holding down the CTRL key while selecting each line. These are the customers who have the highest sales totals. 4. Click FUNCTIONS→SHOW BAR CHART. The Analysis Line Bar Chart window appears. This window provides turnover information for these three customers in a graphical view. NOTE: You cannot present more than three lines from the Analysis Report window in the bar chart view. Microsoft Official Training Materials for Microsoft Dynamics ™ 10-13 Your use of this content is subject to your current services agreement
  • 228.
    Trade in MicrosoftDynamics™ NAV5.0 Lab 10.1 − Creating Analysis Reports Scenario: Create a report that displays sales by sales representatives (Salespersons) for January 2008. Challenge Yourself! The requirements for the report are as follows: 1. The report must be broken down by invoiced sales and those that have not been invoiced 2. The report must include a line that displays total sales by salespeople at the bottom. 3. Modify the report to show only those salespeople who recorded sales in January 2008. 4. As soon as it is complete, present the report as a bar chart. NOTE: Only Sales Representatives assigned the Salesperson Dimension code are included in this report. HINT: Set up an Analysis View Card with the Salesperson dimensions and add it to the Analysis Lines Template before selecting salespeople in an Analysis Report. HINT: Review the existing report templates to see whether you can reuse or modify an existing report. Need a Little Help? The solution is provided in Appendix C. 10-14 Microsoft Official Training Materials for Microsoft Dynamics ™ Your use of this content is subject to your current services agreement
  • 229.
    Chapter 10: Analysisand Reporting Analysis by Dimensions To analyze information by using multiple dimensions, use the Analysis by Dimensions feature found in Sales & Marketing or in Purchases in ANALYSIS & REPORTING→ANALYSIS BY DIMENSIONS. This function lets you view amounts derived from analysis views. With analysis by dimensions, you can: • Combine dimensions • Filter entries • Explore data from different perspectives • View net change or balance at date numbers • Select time periods You cannot print this information directly. It can be exported to Excel and all Excel’s tools can be used to create presentations and print data. Use Analysis Views to analyze multiple dimensions: Customers, customer groups, or salespeople versus items or item groups in term of actual or budgeted amounts or quantities. As soon as a group is set up as a dimension, it can be added to an analysis report and analysis view by dimensions. These groups are set up in the Analysis View Card. Refer to the previous section about how to use customer and item groups for more information about Analysis View Cards. Demonstration − Using Analysis by Dimensions In this demonstration, a purchase analysis by dimensions is created and used to explore the analysis by dimensions features. Cronus must determine the cost amount of the inventory at each location. They want to filter by purchaser and by specific business groups. This requires the following dimensions: • Location • Purchaser • Business group Microsoft Official Training Materials for Microsoft Dynamics ™ 10-15 Your use of this content is subject to your current services agreement
  • 230.
    Trade in MicrosoftDynamics™ NAV5.0 Steps First, create an Analysis View Card with the dimensions to analyze. Because the location dimension is available in the Analysis by Dimensions window, the Analysis View Card only has to be set up with the purchaser and business group dimensions. 1. From the Purchase menu, select ANALYSIS & REPORTING→SETUP→ANALYSIS VIEW CARD. 2. In the Code field, press F3 to create a new card. 3. Type PURCHASER in the Code field and Purchaser in the Description field. 4. Enter the work date in the Starting Date field. 5. Select the Include Budgets field. 6. Click the Dimensions tab. 7. In the Dimension 1 Code field, enter Purchaser. 8. In the Dimension 2 Code field, enter Business Group. 9. Click the Update button. 10. Close the Analysis View Card. Use the Analysis View set up in the Analysis by Dimensions window. 1. From the Purchase menu, select ANALYSIS & REPORTING→ANALYSIS BY DIMENSIONS. 2. Click the AssistButton in the Analysis View Code window, and select the Purchaser Analysis View Code. Click OK. 3. In the Show as Lines field, select Location. 4. In the Show as Columns field, select Period. 5. Select Cost Amount in the Show Value As field. In the report lines and columns, view the Total Quantity and Total Cost by location by time period. 6. In the Show Value As field, select Quantity. Notice that the amount in the time period columns changes to a quantity instead of the cost amount. Now filter these results by salesperson and business group. 7. Select the Filters tab. Notice that the filters on the right side of this form are from the Sales Analysis View Card that we created. 10-16 Microsoft Official Training Materials for Microsoft Dynamics ™ Your use of this content is subject to your current services agreement
  • 231.
    Chapter 10: Analysisand Reporting 8. In the Purchaser Filter field, select RL. 9. In the Businessgroup Filter field, select INDUSTRIAL. Tab off the field to update the information in the table. Review the additional functions available on this form. 10. Click the Options tab. Here, you find additional options for viewing data. 11. Click the Functions button, and then click Reverse Lines and Columns. The locations and time periods switch positions on the window. From the Function button you can also export data to Microsoft Excel. NOTE: There is some special functionality built into this particular integration to Excel. Therefore you do not receive the same result by using the Excel icon in the toolbar in this special case. Microsoft Official Training Materials for Microsoft Dynamics ™ 10-17 Your use of this content is subject to your current services agreement
  • 232.
    Trade in MicrosoftDynamics™ NAV5.0 Lab 10.2 − Performing Analysis by Dimensions Scenario: You are the sales manager at Cronus and have to analyze item sales by area. Challenge Yourself! The analysis needs the following parameters: • The analysis includes items with item numbers from 1896-S to 766BV-C. • The analysis is for the year 2008. As soon as the Sales Analysis by Dimensions window contains the item sales by area information, follow these steps. 1. Compare the sales sold by John Roberts with those by Peter Saddow. 2. View the analysis as the sales amount, COGS amount, and quantity. 3. Export the sales amount by John Roberts to an Excel workbook. HINT: Use the following dimensions: Area, Salesperson. Need a Little Help? The solution is provided in Appendix C. 10-18 Microsoft Official Training Materials for Microsoft Dynamics ™ Your use of this content is subject to your current services agreement
  • 233.
    Chapter 10: Analysisand Reporting Sales and Purchase Budgets Use Sales and Purchase budget functionality for planning, forecasting, and tracking against performance. Access Sales and purchase budgets from the Analysis & Reporting menu option found in the Sales & Marketing menu and in the Purchase menu. From Sales & Marketing, click ANALYSIS & REPORTING→BUDGETS. The Sales Budget Overview window is displayed. FIGURE 10-5: SALES BUDGET OVERVIEW CARD Select a budget to view by clicking the AssistButton in the Item Budget Name field. The Item Budget List is displayed. Select a budget and then click OK. Entering Budget Numbers As soon as a budget is created, decide how to enter data. On the Sales Budget form, in the Show Value As field, choices include Sales Amount, COGS Amount, and Quantity. When you create purchase budgets, choices in the Show Value as field are Cost Amount and Quantity. When you show values as a quantity, values are totaled in the Budgeted Quantity field on the left half of the window. When you view values as an amount, the values are totaled in the Budgeted Sales Amount or Budgeted Cost Amount field (depending on whether you enter a sales or a purchase budget) on the left half of the window. Clicking the AssistButton in a number field opens the Item Budget Entries window. Here you can define additional information about the budget entry. Explanations for each field can be found in Online Help. Microsoft Official Training Materials for Microsoft Dynamics ™ 10-19 Your use of this content is subject to your current services agreement
  • 234.
    Trade in MicrosoftDynamics™ NAV5.0 Demonstration − Creating a Purchase Budget This demonstration describes the process of creating a purchase budget. The Cronus purchasing manager has to create a budget to forecast what each purchasing agent can spend per vendor for January through April 2008. This requires a new budget to be set up in Microsoft Dynamics NAV. Steps To create a new purchase budget: 1. From the Purchase menu, click ANALYSIS & REPORTING→BUDGETS. 2. In the Item Budget Name field, click the AssistButton. The Item Budget Names window is displayed. 3. Select an empty line and type PURCHASE in the Name field and Purchase in the Description field. 4. In the Budget Dimension 1 Code field, select PURCHASER. You can select up to three dimensions for each budget. 5. Click OK and the Budget Overview window displays again, with the Purchase budget in the Item Budget Name field. 6. In the Show as Lines field, enter Vendor. 7. In the Show as Columns field, enter Period. 8. In the Date Filter field, enter 01/01/08..04/01/08. 9. In the Show Value As field, select Cost Amount. 10. On the lower-left of the Purchase Overview Budget window, click the time interval 31 to see the time periods by month. 11. Select the Options tab, and select 1 in the Rounding Factor field. 12. Select the Show Column Name field. Next, select a purchaser for this budget. This requires a filter. 13. Click the Filters tab. 14. In the Purchaser Filter field, select MH. This budget for purchaser MH only has to include some specific large vendors. Therefore, filter out the vendors you do not have to consider. 10-20 Microsoft Official Training Materials for Microsoft Dynamics ™ Your use of this content is subject to your current services agreement
  • 235.
    Chapter 10: Analysisand Reporting 15. Click the General tab. 16. In the Vendor Filter field, enter the range 30000..62000, or use the AssistButton to select these entries. After you set up a budget with the vendors, purchaser, and time periods, start entering budget figures. 17. Fill in the values according to the following chart: Name January February March April CoolWood Technologies 300 300 1200 300 Lewis Home Furniture Service Electronics Ltd. 1200 1200 1600 1200 Grassblue Ltd. 240 600 240 240 Electronics Ltd. 1600 3000 4200 4200 WalkerHolland 18. Select a budget number and then click the drill-down arrow to the right of the number. The Item Budget Entries table appears. Here you can enter a description for the budget entry, and assign dimensions and add other information. 19. Close the Item Budget Entries table. The budget for purchaser MH is finished. In this demonstration, you created a budget for one of the purchasing agents. Steps 13-19 can be repeated as many times as necessary to create budgets for all purchasing agents in the company. Demonstration − Exporting Budgets to Excel The sales and purchase budgets can be exported to and modified in Excel, and then imported back into Microsoft Dynamics NAV. This demonstration describes the steps to export and import a budget and view the results. Now that the purchase budget for purchasing agent MH has been created, the Cronus purchasing manager has to send it to the purchasing agent (purchaser) for feedback. The purchasing agent is on the road and does not have access to Microsoft Dynamics NAV. The purchasing manager has to export the budget to Excel and send it to the purchasing agent for changes. After changes are made, the purchasing manager has to import the changes into the budget in Microsoft Dynamics NAV. Microsoft Official Training Materials for Microsoft Dynamics ™ 10-21 Your use of this content is subject to your current services agreement
  • 236.
    Trade in MicrosoftDynamics™ NAV5.0 Steps Perform the following steps to export the budget: 1. From the Purchase menu, click ANALYSIS & REPORTING→BUDGETS. 2. In the Budget Name field, select Purchase. The purchase budget is displayed. 3. Click the Functions button, and select Export to Excel. 4. Select Create Workbook in the Options field. 5. As soon as the data has finished processing, open the Microsoft Excel workbook. The filters that set in Microsoft Dynamics NAV are visible in the Excel worksheet. By default, the program has named the worksheet "Budget." 6. Save the workbook as Purchase Budget.xls At this point, the purchasing manager sends the Excel Worksheet to the purchasing agent. The purchasing agent receives the budget and makes any necessary changes. 7. Make the following changes to the budget and save the workbook: – For Vendor 30000, change the January number to 600 – For Vendor 50000, change the January number to 2000 8. Save and close the modified workbook. 9. From the Budget window in Microsoft Dynamics NAV, click the Functions button and select Import from Excel. The following window appears: FIGURE 10-6: IMPORT ITEM BUDGET FROM EXCEL WINDOW 10-22 Microsoft Official Training Materials for Microsoft Dynamics ™ Your use of this content is subject to your current services agreement
  • 237.
    Chapter 10: Analysisand Reporting 10. In the Workbook File Name field, find the location where you saved the Excel Worksheet and select Purchase Budget. 11. Select Budget in the Worksheet Name field. 12. Make sure that the fields are filled in as follows: Budget Name Purchase Option Replace entries Description Imported from Excel 01/25/08 Import Value as Cost Amount 13. Click Yes to replace the existing entries, and accept the message that appears. The Microsoft Dynamics NAV budget has been updated with the new numbers for January. Demonstration − Using Budgets in Analysis Reports The sales and purchase budgets can be used in analysis reports to track budgeted amounts against actuals. This demonstration shows how to use budgets in analysis reports. Steps The sales manager at Cronus has to compare the company’s customer sales against the company’s budget figures. 1. On the Sales & Marketing menu, click ANALYSIS & REPORTING→ANALYSIS REPORTS. The Sales Analysis Report window appears. 2. Click the AssistButton in the Analysis Report Name field. The analysis report named CUST1-BUDG shows actual amounts against budgeted amounts per customer group. 3. Select CUST1-BUDG and then click OK. Next, select the budget to use for the comparison. 4. In the Sales Analysis Report window, in the Item Budget Filter field, click the AssistButton to open the Item Budget Names window. 5. Select item budget BUDGET 01 and then click OK. The Sales Analysis Report window shows the actual amounts compared with the budgeted amounts. Microsoft Official Training Materials for Microsoft Dynamics ™ 10-23 Your use of this content is subject to your current services agreement
  • 238.
    Trade in MicrosoftDynamics™ NAV5.0 Lab 10.3 − Creating a Sales Budget Scenario: Create a sales forecast for sales representative (salesperson) Linda Martin using the Sales Budget function. Challenge Yourself! The budget must meet these requirements: • The budget covers January through June 2008. • The budget will show the quantities you expect Linda Martin to sell of items 8904-W through 8924-W. After setting up the sales budget, export it to Excel for feedback from Linda Martin in the field. 1. Update the Excel Worksheet with changes to the budget. 2. Import the changes back into Microsoft Dynamics NAV. Need a Little Help? The solution is provided in Appendix C. 10-24 Microsoft Official Training Materials for Microsoft Dynamics ™ Your use of this content is subject to your current services agreement
  • 239.
    Chapter 10: Analysisand Reporting Conclusion The analysis reporting and budgeting functionality in Microsoft Dynamics™ NAV is important when presenting information about the company for the management and other roles that analyze performance. It is easy to use without a background in finance or accounting. The reporting functionality can be customized in many ways to suit the individual company’s needs. Variance can be calculated and budget figures can be moved between Microsoft Dynamics NAV and Microsoft® Excel. The budgets functionality can be used to make sales budgets and purchase budgets on a detailed level. Budget version control is supported and working on individual budgets at the same time. Finally, comparing analysis report data against budgets is made easy by using dimensions and dimension filters. Microsoft Official Training Materials for Microsoft Dynamics ™ 10-25 Your use of this content is subject to your current services agreement
  • 240.
    Trade in MicrosoftDynamics™ NAV5.0 Quick Interaction: Lessons Learned Take a moment and write down three key points you have learned from this chapter: 1. 2. 3. 10-26 Microsoft Official Training Materials for Microsoft Dynamics ™ Your use of this content is subject to your current services agreement
  • 241.
    Appendix A: TerminologyList APPENDIX A: TERMINOLOGY LIST This appendix contains the terminology list for the inventory application area in Microsoft Dynamics™ NAV. Inventory Terminology List Cross-dock This means to move items directly from the receiving area to the shipping area, minimizing handling and storage and enabling sales orders to be shipped sooner. NOTE: The program compares inventory receipts with outstanding sales orders and indicates that a cross-docking opportunity is available. Delivery Note This is a note that accompanies a shipment and lists the items in the shipment. Synonyms: advice note, accompanying note, dispatch note, covering note Inventory This contains items held in a store or warehouse and purchased for resale, items supporting production (raw materials and work-in-process), and items for maintenance activities (including repair and operating supplies). Inventory is calculated as the quantity of an item available. Item This is a manufactured or purchased article, product, part, or material that is part of inventory. If a company has several locations, it stores inventory control information about items or item variants at a location in the stockkeeping unit for the item or item variant at that location. Item Substitute This is an item offered to a customer as a substitute for an item that is not available. Lead Time This indicates the time between recognition of the need for an order and the receipt of goods. Individual components of lead time can include order preparation time, queue time, processing time, move or transportation time, and receiving and inspection time. Location This is a physical structure or place where inventory is received, stored, and shipped. A location can be a warehouse, service car, showroom, plant, or area within a plant. Microsoft Official Training Materials for Microsoft Dynamics ™ A-1 Your use of this content is subject to your current services agreement
  • 242.
    Trade in MicrosoftDynamics™ NAV5.0 Negative Adjustment This is a reduction in inventory that is not due to a sale. Nonstock Item This is an item a company sells but does not carry in inventory. A nonstock item is frequently an item in a vendor catalog, also referred to as a catalog item. Order Date This indicates the date on which the vendor must ship the items to meet the planned receipt date. Physical Inventory Abbreviation: Phys. Invt. This is the determination of inventory quantity by the counting of items. This is performed on a continuous, periodic, or annual basis. Pick This means to physically withdraw from inventory items to be shipped or components of items to be assembled and shipped. Positive Adjustment This refers to an increase in inventory that is not because of a purchase. Put Away This means to remove the item from the receiving area, transport it to a specific location in a storage area, and record the movement and the exact location of the item. Receipt This is the physical acceptance of an item at a location. A Warehouse Worker immediately registers the receipt of an item in the system. But the item is not a part of available to pick inventory until it is put away. Receiving This is the function that includes the physical receipt of items, the inspection of the items for conformance to the purchase order (quantity and damage), the putting away of items, and the preparation of the receiving report. Release This means to send a document to the next stage of processing without posting the document. You cannot change information on a released document unless it is reopened. EXAMPLE: A sales order is released to the warehouse. The order is then among the source documents from which the warehouse can retrieve lines to be assigned picked and shipped. Reservation This is the designation of a quantity of inventory on a purchase order for a specific sales order or production schedule. A-2 Microsoft Official Training Materials for Microsoft Dynamics ™ Your use of this content is subject to your current services agreement
  • 243.
    Appendix A: TerminologyList Responsibility Center Abbreviation: Resp. Ctr. This is an organizational unit to which a company assigns duties or activities. NOTE: A responsibility center can be a cost center or a profit center. Examples are a sales office that sells items from one or more locations, a purchasing office for one or several locations, a service unit, a production-planning unit, and a branch office with responsibility for sales, purchases, and cost accounting. A responsibility center assigned responsibility for a location accounts for location inventory in monetary terms, while the location is responsible for the physical inventory count. Safety Lead Time This is an element of time added to normal lead time to protect against fluctuations in lead time so that an order can be completed before its real need date. Shipment Date This refers to the date a shipment leaves the location for delivery to a customer, either with a shipping agent or your own means of transportation. Source Document This is the original evidence of a transaction that supports journal entries in the accounting system. EXAMPLE: Vouchers and contracts but also internal documents that create journal entries such as a sales transfer or purchase order or an internal freight charge. Specific Item This is an individual item distinguished by a unique identification number. Stockkeeping Unit Abbreviation: SKU This is a unit for inventory control that concerns items and item variants at specific locations. Transfer Order This refers to an order to move items from one location to another. Warehouse Abbreviation: Whse. This is a building or part of a building where items are received, stored, and shipped. Therefore, it is a particular kind of location. Synonyms: distribution center, branch warehouse, field warehouse. Warehouse Activity This refers to an activity in the Warehouse Management application area. Each activity has its own menu item. Microsoft Official Training Materials for Microsoft Dynamics ™ A-3 Your use of this content is subject to your current services agreement
  • 244.
    Trade in MicrosoftDynamics™ NAV5.0 List of Sales Batch Jobs, Reports, and Sales Documents Sales Batch Jobs There are several batch jobs that are designed to help in the daily sales work. Some of these batch jobs are found in the Financial Management menu, and other batch jobs are found in the Sales & Marketing menu. These batch jobs are as follows: FINANCIAL MANAGEMENT→RECEIVABLES→PERIODIC ACTIVITIES • Recurring Journals. Use the Recurring General Journal window to post transactions that recur with few or no changes to G/L, bank, customer, vendor, and fixed assets accounts. In a recurring general journal, enter information for the transaction, such as the posting date, amount, and posting accounts. You can enter information about how often the transaction is posted. You can also specify automatic reversal the day after the posting date and allocate an amount among several accounts. The information in a journal is temporary and can be changed until you post the journal. • Reminders/Issued Reminders. A reminder is a document that reminds your customer of an outstanding balance. Refer to the Financial Management training manual for more information about how to create reminders. • Finance Charge Memos/Issued Finance Charge Memos. A finance charge memo is a document that contains information about calculated interest on outstanding balances. Refer to the Financial Management training manual for more information about the finance charge memo functionality. FINANCIAL MANAGEMENT→RECEIVABLES • Combined Shipments. Use this batch job for sales orders that have been shipped but not invoiced. The batch job gathers all the un- invoiced shipments into one invoice or multiple invoices. You can also post invoices automatically as part of the batch job, and decide whether the batch job calculates the invoice discount. SALES & MARKETING→ORDER PROCESSING→BIZTALK SALES DOCUMENTS • BizTalk Inbound Documents, BizTalk Outbound Documents. Learn more about these functions in the Commerce Gateway training manual. A-4 Microsoft Official Training Materials for Microsoft Dynamics ™ Your use of this content is subject to your current services agreement
  • 245.
    Appendix A: TerminologyList There are several batch jobs available in the Administration menu to help manage sales documents. These batch jobs are as follows: ADMINISTRATION→IT ADMINISTRATION→DATA DELETION→SALES DOCUMENTS • Delete Invoiced Sales Orders. This batch job deletes sales orders that have been shipped and invoiced. Only fully invoiced orders are deleted. If there are comments on the orders, they are also deleted. You can use the batch job after you have used the facilities for combining shipments; that is, the Get Shipment function on the sales invoices or the Combine Shipments batch job. • Delete Invoiced Blanket Sales Orders. This batch job deletes blanket sales orders that have been shipped and invoiced. Only fully invoiced blanket orders are deleted. Comments on blanket orders are also deleted. • Delete Invoiced Sales Return Orders. This batch job deletes sales return orders that have been received and invoiced. Only fully invoiced return orders are deleted. Comments on return orders are also deleted. • Delete Archived Sales Quote Versions. This batch job deletes archived versions of the sales quotes that have been deleted. Select the sales order numbers, dates, and customers for the orders to delete. • Delete Archived Sales Order Versions. This batch job deletes archived versions of the sales orders that have been deleted. You can select the sales order numbers, dates, and customers for the orders you want to delete. • Delete Expired or Rejected Quotes. This batch job deletes sales quotes that have either expired or been rejected by the customer. It is possible to delete only the expired quotes, only the rejected quotes, or both. When deleting expired quotes, the program checks that only expired quotes with a status Requested by Customer are deleted. ADMINISTRATION→IT ADMINISTRATION→DATA DELETION→DATE COMPRESSION • Customer Ledger Entries. This batch job compresses customer ledger entries; that is, it aggregates them so that they use less space. It is only possible to compress entries from closed fiscal years, and only customer ledger entries with the Open field clear (meaning they have been closed by payments). Microsoft Official Training Materials for Microsoft Dynamics ™ A-5 Your use of this content is subject to your current services agreement
  • 246.
    Trade in MicrosoftDynamics™ NAV5.0 Sales Reports Microsoft Dynamics NAV provides a variety of sales reports. Most of the reports used for Trade can be found in Sales & Marketing. Other reports can be found in Financial Management. For convenience and efficiency, some reports are available under more than one folder. The following is a list of the standard sales reports and their location. SALES & MARKETING→ORDER PROCESSING→REPORTS Customer – Order Detail and Sales Invoice Nos. Summary Sales Statistics EC Sales List Customer/Item Sales Sales Reservation Avail. Customer – Sales List SALES & MARKETING→SALES→REPORTS→CUSTOMERS Order Summary and Detail Balance to Date Labels Trial Balance Top 10 List List Customer/Item Sales Register Sales List SALES & MARKETING→SALES→REPORTS→SALESPEOPLE/TEAMS Sales Statistics Salesperson To-dos Salesperson Sales Statistics Salesperson Opportunities Salesperson Commission Team To-dos SALES & MARKETING→INVENTORY & PRICING→REPORTS Inventory Posting Test Price List Inventory Availability Inventory Cost and Price List Inventory Order Details Inventory – Sales Back Orders Inventory Top 10 List Nonstock Item Sales Inventory Sales Statistics Item Substitutions Inventory Customer Sales Item Charges – Specification A-6 Microsoft Official Training Materials for Microsoft Dynamics ™ Your use of this content is subject to your current services agreement
  • 247.
    Appendix A: TerminologyList FINANCIAL MANAGEMENT→RECEIVABLES→REPORTS Customer Detailed Aging Customer – Detail Trial Bal. Customer Document Nos. Customer – List Customer Register Customer – Summary Aging Customer – Balance to Date Customer – Summary Aging Simp. A report is a printout of information from the database. Each report can be run in different ways by setting filters and selecting various options. It is also possible to use dimensions when running reports. NOTE: The Salesperson reports and the Customer Statistics window in the program include Profit (LCY) amounts and Profit % calculations based on the Profit (LCY) field on the customer ledger entries. After the customer ledger entry is posted, the Profit (LCY) field is NOT updated for any purchase item charges increasing the costs assigned to the sale. This means that sales commissions may be based on incorrect profit figures. To receive profit figures for Sales Representatives based on the item value entries that reflect item charges, use the Customer/Item Sales report and filter for a specific salesperson on the Customer tab. Sales Documents All printable sales documents are located in either the Sales & Marketing or Financial Management main menus. These documents may include posted, unposted, and document test reports. Select a document and filter the documents to print. Clicking Print in the Posted Sales Invoice window gives the same printed document as printing the Sales – Invoice document. The following is a list of available sales documents. SALES & MARKETING→ORDER PROCESSING→DOCUMENTS Document Name Document Type Order Confirmation Unposted Document Sales – Quote Unposted Document Return Order Unposted Document Blanket Sales Order Unposted Document Sales – Invoice Posted Document Sales - Credit Memo Posted Document Microsoft Official Training Materials for Microsoft Dynamics ™ A-7 Your use of this content is subject to your current services agreement
  • 248.
    Trade in MicrosoftDynamics™ NAV5.0 Document Name Document Type Sales – Shipment Posted Document Sales - Return Receipt Posted Document Customer – Payment Receipt Posted Document Sales Document - Test Document Test Report FINANCIAL MANAGEMENT→RECEIVABLES→DOCUMENTS Document Name Document Type Reminder – Test Document Test Report Finance Charge Memo – Test Document Test Report Reminder Issued Document Finance Charge Memo Issued Document Statement See Customer Statements Unposted documents can be printed under the Documents menu item. This provides the possibility to print copies of unposted documents without having to post them. This is useful when sending sales order confirmations to customers. Customer Statements This sales document provides a list of posted sales transactions for each customer over a selected period of time. It can be set up to show all overdue balances, regardless of the time period specified. For each currency, the report displays open entries and, if specified in the report, overdue entries. The statement can be sent to customers; for example, at the close of an accounting period or as a reminder of overdue balances. Select which customers to print statements for using filters on the Customer tab of the Statement report. Specify if a customer receives a printed statement by selecting the Print Statements field on the Payments tab of the customer card. Select Yes in the Print Statements field on the Customer tab in the Statement report to print statements for only the customers set up to receive printed statements. If you do not select the Print Statements field in the Statement report, the program will print statements for all customers unless additional filtering is specified on the Customer tab of the Statement report. Every time that a statement prints for a customer, the Last Statement No. field on customer card updates by one. A-8 Microsoft Official Training Materials for Microsoft Dynamics ™ Your use of this content is subject to your current services agreement
  • 249.
    Appendix A: TerminologyList List of Purchase Batch Jobs, Reports, and Purchase Documents Purchase Batch Jobs There are several batch jobs available to help in the daily purchasing work. Some batch jobs are located in the Financial Management menu, and other batch jobs are located in the Purchase menu. The batch jobs are: FINANCIAL MANAGEMENT→PURCHASE→PERIODIC ACTIVITIES • Recurring Journals –Use the Recurring General Journal window to post transactions that recur with few or no changes to G/L, bank, customer, vendor, and fixed assets accounts. In a recurring general journal, enter information for the transaction, such as the posting date, amount and the posting accounts,and enter information about how often the transaction posts. It is also possible to specify automatic reversal the day after the posting date and allocate an amount among several accounts. Information in a journal is temporary and can be changed until you post the journal. PURCHASE→PLANNING • Recurring Requisition Worksheet. Use this worksheet to post transactions that occur with few or no changes, for example, ordering the same amount of office supplies regularly. PURCHASE→ORDER PROCESSING→BIZTALK PURCHASE DOCUMENTS • BizTalk Inbound Documents, BizTalk Outbound Documents. Learn more about these functions in the Commerce Gateway training manual. Several batch jobs are available in the Administration menu to help manage purchase documents. These batch jobs are as follows: ADMINISTRATION→IT ADMINISTRATION→DATA DELETION→PURCHASE DOCUMENTS • Delete Invoiced Purchase Orders. This batch job deletes purchase orders that have been received and invoiced. Only fully invoiced orders and comments on the orders are deleted. Use the batch job after using the Get Receipt Lines function on purchase invoices to invoice one or more posted receipts, because this function does not delete the orders. Microsoft Official Training Materials for Microsoft Dynamics ™ A-9 Your use of this content is subject to your current services agreement
  • 250.
    Trade in MicrosoftDynamics™ NAV5.0 • Delete Invoiced Blanket Purchase Orders. This batch job deletes blanket purchase orders that have been received and invoiced. Only fully invoiced blanket orders and comments on blanket orders are deleted. • Delete Invoiced Purchase Return Orders. This batch job deletes purchase return orders that have been shipped and invoiced. Only fully invoiced return orders and comments on the return orders are deleted. • Delete Archived Purchase Quote Versions. Use this batch job to delete archived versions of deleted purchase quotes. • Delete Archived Purchase Order Versions. Use this batch job to delete archived versions of deleted purchase orders. ADMINISTRATION→IT ADMINISTRATION→DATA DELETION→DATE COMPRESSION • Vendor Ledger Entries. This batch job compresses vendor ledger entries. This means it combines them so that they use less space. You can only compress entries from closed fiscal years and only vendor ledger entries where the Open field is clear. Purchase Reports The Purchase menu contains a variety of purchase reports. These reports can be found in Planning and Order Processing. Additional reports are on the Financial Management menu. For convenience and efficiency, some reports are available under more than one folder. The following is a list of standard purchase reports and their location: PURCHASE→PLANNING→REPORTS Purchase Reservation Avail. Inventory Purchase Orders Purchase Statistics Inventory – Availability Plan Vendor Item Catalog Inventory – Cost Variance Vendor – Balance to Date Inventory – Inbound Transfer Vendor – Detail Trial Balance Inventory – List Vendor List Inventory – Vendor Purchases Vendor Purchase List Item Substitutions Vendor – Summary Aging Item/Vendor Catalog Vendor – Top 10 List Nonstock Item Sales Vendor – Trial Balance Prod. Order – Mat. Requisition Vendor/Item Purchases Prod. Order – Shortage List Inventory Cost and Price List A-10 Microsoft Official Training Materials for Microsoft Dynamics ™ Your use of this content is subject to your current services agreement
  • 251.
    Appendix A: TerminologyList PURCHASE→ORDER PROCESSING→REPORTS Vendor/Item Purchases Inventory Reorders Inventory Availability Inventory Transaction Detail Inventory Cost and Price List Inventory – Vendor Purchases Inventory Posting – Test Item Charges – Specification Inventory Purchase Orders Item Substitutions Inventory List Item/Vendor Catalog FINANCIAL MANAGEMENT→PAYABLES→REPORTS Aged Accounts Payable Vendor – Detail Trial Balance Payments on Hold Vendor – Labels Purchase Credit memo Nos. Vendor – List Purchase Invoice Nos. Vendor – Order Detail Purchase Reservation Avail. Vendor – Order Summary Purchase Statistics Vendor – Purchase List Vendor Document Nos. Vendor – Summary Aging Vendor Item Catalog Vendor – Top 10 List Vendor Register Vendor – Trial Balance Vendor – Balance to Date Vendor/Item Purchase A report is a printout of information from the database. Each report can be run different ways by setting filters and selecting options. You can also use dimensions when running reports. Purchase Documents A list of printable purchase documents is available from the Purchase main menu by clicking ORDER PROCESSING→DOCUMENTS. These documents may include posted, unposted, and document test reports. Select a document and filter the documents to print. Clicking Print in the Posted Purchase Invoice window gives the same printed document as printing the Purchase – Invoice document. Microsoft Official Training Materials for Microsoft Dynamics ™ A-11 Your use of this content is subject to your current services agreement
  • 252.
    Trade in MicrosoftDynamics™ NAV5.0 The following is the list of available purchase documents: Document Name Document Type Return Order Confirmation Unposted Document Quote Unposted Document Order Unposted Document Blanket Order Unposted Document Invoice Posted Document Credit Memo Posted Document Receipt Posted Document Return Shipment Posted Document Purchase Document - Test Document Test Report Vendor – Payment Receipt Issued Document Because you can print unposted documents under the Documents menu item, the program lets you print copies of unposted documents without posting. This is useful, for example, to send return order confirmations to vendors. A-12 Microsoft Official Training Materials for Microsoft Dynamics ™ Your use of this content is subject to your current services agreement
  • 253.
    Appendix B: Functionalityand Licenses APPENDIX B: FUNCTIONALITY AND LICENSES This appendix contains information about the parts that make up Microsoft Dynamics™ NAV for Trade. This includes a description and license requirements of each part. Trade licenses in Microsoft Dynamics NAV Sales Order Management Description: Use this functionality to manage sales quotes, blanket sales orders, and sales order processes. The differences between setting up an invoice directly and setting up a sales order are: • Quantity available is adjusted when an amount is entered on a sales order line, but is not affected by an invoice until the invoice is posted. • Use Sales Order Management to manage partial shipments. • Shipping and invoicing can be done separately with Sales Order Management. There is also a difference regarding the timeframe for the sale. There can be a long period between the time items are ordered and when they are sold. The functionality also enables you to use quotes and blanket orders in the sales phase. Quotes and blanket orders do not affect inventory figures. Requirements: Sales Invoicing Alternative Ship-Tos Description: Use this functionality when there are several invoicing and ship-to addresses. The ship-to addresses for a specific customer can be set up. For example, if you have a customer who is a contractor and requires delivery to different construction sites, use Alternative Ship-Tos. Requirements: Sales Invoicing Microsoft Official Training Materials for Microsoft Dynamics ™ B-1 Your use of this content is subject to your current services agreement
  • 254.
    Trade in MicrosoftDynamics™ NAV5.0 Drop Shipments Description: Use this functionality to link sales and purchase orders to one another and when items are shipped directly from the vendor to the customer. Drop Shipments enables you to handle items shipped directly from the vendor to the customer without manual application of inventory entries. The invoicing process is not affected by drop shipments. Drop Shipments is useful for businesses that sell items that are shipped directly from the vendor to the customer without being put in inventory. Requirements: Sales Order Management and Purchase Order Management Sales Representatives/Purchasing Agents Description: Use this functionality to assign Purchasing Agents to vendors and Sales Representatives to customers to keep track of purchases and sales per person. Purchasing Agents (Purchasers) and Sales Representatives (Salespersons) are tracked in the Vendor Ledger, Customer Ledger, Item Ledger, Job Ledger, and Resource Ledger. Statistics generated about individual Sales Representatives and Purchasing Agents based on this information can be used to calculate commissions. Requirements: Basic General Ledger Shipping Agents Description: Use this functionality to set up several Shipping Agents (UPS, DHL, external carriers or own carriers) and relate their services (express, overnight, standard) with shipping time. Shipping Agents can be used together with Sales orders and Transfer orders. Requirements: Sales Order Management Sales Invoice Discounts Description: Use this functionality to calculate invoice discounts automatically. It is possible to set up any number of invoice discount terms for which a certain minimum amount, discount percentage, and a service charge can be defined. This can be done in both LCY and in foreign currencies. The discount is calculated on individual item lines and becomes part of the net sum of the invoice. Requirements: Sales Invoicing Sales Line Discounting Description: Use this functionality to work with customer discounts that are customer-specific or customer group-specific. A discount can be shared among several customers. With a line discount, negotiate the percentage that the customer or customer discount group receives as a discount. Requirements: Basic Inventory, Sales Invoicing B-2 Microsoft Official Training Materials for Microsoft Dynamics ™ Your use of this content is subject to your current services agreement
  • 255.
    Appendix B: Functionalityand Licenses Sales Line Pricing Description: Use this functionality to work with sales prices that are either customer specific or customer group specific. A sales price can be shared among several customers. With a sales price, negotiate the actual prices with the customer or customer price group. Requirements: Basic Inventory, Sales Invoicing Item Substitutions Description: Use this functionality to link items with the same or similar characteristics. If a customer orders an unavailable item, it helps to offer substitute items to avoid losing the sale; or providing an extra service to the customer by offering lower-cost alternatives. Requirements: Basic Inventory, Sales Order Management Item Cross References Description: Use this functionality to quickly and precisely identify the items a customer is ordering by item numbers other than your own. Cross-reference information from customers, vendors, manufacturers, generic numbers, universal product codes (UPCs), and European article numbers (EANs) can be stored and accessed. Requirements: Basic Inventory, Sales Order Management Nonstock Item Processing Description: Use this functionality to offer items that are not part of inventory, but can be ordered from an external vendor or manufacturer. Such items are registered as nonstock items, but are treated like any other item. Requirements: Basic Inventory, Sales Order Management Purchase Order Management Description: Use this functionality to manage purchase quotes, blanket orders, and purchase order processes. The differences between creating a purchase order and creating a purchase invoice directly are: • Quantity available is adjusted as soon as an amount is entered on a purchase order line. It is not affected by a purchase invoice until the invoice is posted. • The Purchase Order Management functionality can manage partial receipts. Microsoft Official Training Materials for Microsoft Dynamics ™ B-3 Your use of this content is subject to your current services agreement
  • 256.
    Trade in MicrosoftDynamics™ NAV5.0 • Receiving and invoicing can be done separately with the Purchase Order Management functionality. • You can use quotes and blanket orders in the purchase phase. Quotes and blanket orders do not affect inventory figures. Requirements: Purchase Invoicing Alternative Order Addresses Description: Use this functionality for vendors with more than one order address. The number of possible order addresses is unlimited. Requirements: Purchase Invoicing Alternative Vendors Description: Use this functionality when purchasing the same items from several different vendors. The functionality enables you to create alternative vendor and price information for inventory items. It can be used when a company has several possible vendors for the same items. Requirements: Basic Inventory Purchase Invoice Discounts Description: Use this functionality to calculate invoice discounts automatically. The discount can be different for vendors with different minimum amounts (also in different currencies) and different rates, depending on the size of the invoice. The discount is calculated on individual item lines and becomes part of the net sum of the invoice. Requirements: Purchase Invoicing Purchase Line Pricing Description: Use this functionality to work with vendor-specific purchase prices. With a purchase price, negotiate the actual prices with the vendor. Requirements: Basic Inventory and Purchase Invoicing Purchase Line Discounting Description: Use this functionality to work with vendor-specific purchase discounts. With a line discount, negotiate the percentage the vendor offers as a discount. Requirements: Basic Inventory and Purchase Invoicing B-4 Microsoft Official Training Materials for Microsoft Dynamics ™ Your use of this content is subject to your current services agreement
  • 257.
    Appendix B: Functionalityand Licenses Requisition Management Description: Use this functionality to automate the requisition process. Requisition Management automatically generates suggested purchases based on a variety of data such as minimum and maximum quantities, reorder quantities, and so on. Requirements: Purchase Order Management and Basic Inventory Item Charges Description: Use this functionality to include the value of additional cost components into the unit cost or unit price of an item. Such cost components can be freight, insurance, or other costs related to the item. Requirements: Basic Inventory Order Promising Description: Use this functionality to calculate availability dates and delivery dates. If the customer requests a delivery date, you can find out if it is possible to deliver on that date. You can also calculate a possible delivery date, based on lead time or production time, if you have nothing in inventory. Requirements: Basic Inventory, Sales Order Management, Calendars Sales Return Order Management Description: Use this functionality to handle all aspects of customer returns. Sales return order management enables you to receive goods back from the customers and process related transactions from one entry point. It is possible to process partial return receipts and combine return receipts in one credit memo. Requirements: Basic Inventory, Sales Order Management Purchase Return Order Management Description: Use this functionality to ship goods back to the vendor and process related transactions from one entry point. It is possible to do partial return shipments and combine return shipments in one credit memo. Requirements: Basic Inventory, Purchase Order Management Calendars Description: Use this functionality to set up calendars with working and non- working days. A base calendar can be assigned to Customers, Vendors, Locations, Company, Shipping Agent Services, and to Service Management Setup. You can also add changes to each base calendar. Calendar entries are used in date calculations on sales orders, purchase orders, transfer orders, production orders, service orders, requisition worksheet, and planning worksheet. Requirements: Basic Inventory Microsoft Official Training Materials for Microsoft Dynamics ™ B-5 Your use of this content is subject to your current services agreement
  • 258.
    Trade in MicrosoftDynamics™ NAV5.0 Analysis Reports Description: Company decision makers, especially those with overall responsibility for sales, purchases, and product portfolio management, use this functionality. Analysis Reports provides a customizable analysis view, where users can add and combine customer, item, and vendor information. Figures can be presented in both amounts and quantities, be compared by periods and against budget, and be put into formulas to indicate the company's performance. The drill-down capacity of the Analysis Reports enables managers to locate the cause of the problem. Requirements: Basic Inventory Sales/Purchase Budget Description: Use this functionality to make sales budgets on the customer and item levels and purchase budgets on the vendor and item levels, both in amounts and quantities. You can track performance by calculating variances and by moving budget figures between Microsoft Dynamics NAV and Microsoft® Excel®. The system supports budget version control and lets users work on individual budgets at the same time. Requirements: Basic Inventory B-6 Microsoft Official Training Materials for Microsoft Dynamics ™ Your use of this content is subject to your current services agreement
  • 259.
    Appendix C: LabSolutions APPENDIX C: LAB SOLUTIONS Lab 2.1 − Handling Sales Scenario: Cronus' customer 20000 orders 1200 units of item 70003. The customer requests that the order be delivered with 300 units every week during the month of February (starting on 02/01/08). The delivery is shipped by FEDEX to the customer’s subsidiary in Manchester. At the time of shipping the first delivery of item 70003, the customer also orders 25 units of item 1968-W and 50 units of item 80100. Because of several considerations, the order processor decides to drop ship the order for item 1968- W (from vendor 30000) and ensures that the 50 units of item 80100 are reserved for this sales order. The customer also only wants half of the ordered quantity of item 70003 in this shipment. Handle this scenario using the sales management functionality. Assume 01/28/08 is the work date, that the order for item 70003 is to be shipped from the Blue location, and that the order for item 80100 is to be shipped from the Green location. Solution 1. Change the work date by clicking TOOLS→WORKDATE and entering 01/28/08. Create the Blanket Order. 2. From the Sales & Marketing menu, select ORDER PROCESSING→BLANKET ORDERS. Press F3 to make a new order, and enter customer number 20000 in the blanket order header. 3. Leave the Order Date field blank. 4. On the Shipping tab, in the Ship-to Code field, select MANCHESTER. 5. In the Location field, select Blue. 6. On each line, in the Type field, select Item and in the No. field, select 70003. In the Quantity field, enter 300. 7. In the Shipment Date field, enter the shipment dates of 02/01/08, 02/08/08, 02/15/08, and 02/22/08. Microsoft Official Training Materials for Microsoft Dynamics ™ C-1 Your use of this content is subject to your current services agreement
  • 260.
    Trade in MicrosoftDynamics™ NAV5.0 8. In the Qty. to Ship field, leave the quantity of 300 for the first line, and delete the quantity to ship in the three other lines. Create the Sales Order. 9. Click Make Order, selecting Yes in the information message and in any other warnings. 10. Select the first line in the blanket order, and then click LINE→UNPOSTED LINES→ORDERS. 11. In the Sales Lines window, click LINE→SHOW DOCUMENT to view the order. 12. Delete the last three lines in the sales order. 13. On the Shipping tab, in the Shipping Agent Code field, select FEDEX. Click Yes to update the lines. 14. In the sales order lines, select item number 1968-W. In the Quantity field, enter 25. Click Yes to accept the warning message that appears. 15. In the Purchasing Code field, select Drop Ship. Click OK. Create the Purchase Order. 16. Select the Purchase menu option and then click ORDER PROCESSING→ORDERS. 17. Press F3 to create a new purchase order. 18. Fill in the order details on the purchase header by selecting vendor 30000 in the Buy-from Vendor No. field. 19. On the Shipping tab, in the Sell-to Customer No. field, select customer 20000. 20. On the Shipping tab of the purchase order, in the Ship-to Code field, select MANCHESTER. 21. Click ORDER→DROP SHIPMENT→GET SALES ORDERS. The Order – Sales List window will appear. 22. Select the relevant order and then click OK. Create the third Sales Order line. 23. In the sales order lines, select item number 80100. In the Quantity field, enter 50. In the Location Code field, select Green. 24. Click FUNCTIONS→RESERVE to open the Reservation window. C-2 Microsoft Official Training Materials for Microsoft Dynamics ™ Your use of this content is subject to your current services agreement
  • 261.
    Appendix C: LabSolutions 25. In the Reservation window, click FUNCTIONS→AUTO RESERVE. 26. Close the Reservation window. 27. In the Qty. to Ship field for the first line, change the quantity from 300 to 150. 28. In the Qty. to Ship field for the third line, enter 50 to allow for posting from the order instead of through a warehouse. Click OK to accept the warning message that appears. 29. Click POSTING→POST and select Ship and Invoice. NOTE: Line discounts may be set to default into the Line Discount % field on the order lines. This does not affect the processing of the exercise. Lab 3.1 − Managing Alternative Sales Prices Scenario: You are restructuring prices for item 70200 and item 1928-S according to the following conditions: 1. Item 70200: If any of Cronus’ customers buys this item in boxes (that contains 100 pieces) instead of pieces, offer 30 LCY off the regular price. HINT: Add a new unit of measure BOX that contains 100 pieces, to the item’s units of measure list. 2. Item 1928-S: When Cronus’ overseas customer 31505050 buys this item and pays in local currency (EUR), you offer 1 LCY off the item’s regular price. NOTE: The sales price for an item can be found on the Invoicing tab of the item card. Solution, Part 1 1. Open the item card for item 70200. 2. Click ITEM→UNITS OF MEASURE. 3. In the Code field, enter BOX. In the Qty. per Unit of Measure field, enter 100. Close the window. 4. Click SALES→PRICES. 5. In the Sales Type field, select All Customers. 6. In the Unit of Measure field, select Box. Microsoft Official Training Materials for Microsoft Dynamics ™ C-3 Your use of this content is subject to your current services agreement
  • 262.
    Trade in MicrosoftDynamics™ NAV5.0 7. In the Unit Price field, enter 100 (or the calculation 1.30*100-30). You can find the price (1.30 per piece) on the Invoicing tab of the Item Card. 8. In the Starting Date field, enter 01/25/08. 9. Close the Sales Prices window. Solution, Part 2 1. Open the customer card for customer 31505050. Click SALES→PRICES. 2. In the Item No. field, select 1928-S. 3. In the Currency Code field, select EUR. 4. In the Unit Price field, enter 34.60 (or, alternatively, 35.60-1), which is the reduced unit price. 5. In the Starting Date field, enter 01/25/08. 6. Close the Sales Prices window, and then click Yes to rename the record. Lab 3.2 − Creating Sales Prices for a Campaign Scenario: If you are familiar with Microsoft Dynamics™ NAV Relationship Management functionality, try the following exercise. Cronus’ Sales Manager is clearing out the stock of item 766BC-A within the period 02/01/08 to 02/28/08. 1. The sales price of item 766BC-A is 4000 LCY. The offer goes to all business relations who are customers and whose job responsibility is purchasing. HINT: To find the Sales Prices window, locate the Sales & Marketing menu and then click MARKETING→CAMPAIGNS. Click the Campaign button in the Campaign card window. Use the wizard to create the segment. Remember to select Campaign Target on the Campaign tab of the Segment window. 2. Start the campaign by clicking FUNCTIONS→ACTIVATE SALES PRICES/LINE DISCOUNTS. 3. To check that they obtain the correct price, make a sales quote for one of the contacts. C-4 Microsoft Official Training Materials for Microsoft Dynamics ™ Your use of this content is subject to your current services agreement
  • 263.
    Appendix C: LabSolutions Solution 1. From the Sales & Marketing menu, click MARKETING→CAMPAIGNS. 2. Press F3 to create a new campaign. Type a description in the Description field, for example, sales campaign. 3. In the Starting Date field, type 02/01/08. 4. In the Ending Date field, type 02/28/08. 5. Click CAMPAIGN→SALES PRICES. 6. In the Item Number field, select item 766BC-A. 7. In the Unit Price field, enter 4000. 8. Close the Sales Prices window. 9. Click CAMPAIGN→SEGMENTS. 10. Press F3 to create a new segment. Type a description in the Description field, for example, sales campaign. 11. Click FUNCTIONS→SEGMENT→WIZARD. 12. Select Add Contacts and then click Next. 13. In the Business Relations field, select Customer and then click OK. 14. In the Job Responsibilities field, select Purchase and then click OK. 15. Click Next, and then Next, and then Finish. 16. On the Campaign tab, place a check in the Campaign Target field. Click Yes to the message that appears. 17. Close the Segment window. 18. Start the campaign by clicking FUNCTIONS→ACTIVATE SALES PRICES/LINE DISCOUNTS. To create the sales quote: 19. From the Sales & Marketing menu, click MARKETING→CONTACTS. 20. Open the Contact Card for contact CT100202 (or select any of the contacts in the segment you just created). 21. Click the Contact button and select Sales Quotes. 22. Press F3 to create a new Sales Quote. When you press TAB on the No. field, the contact number and address information defaults into the quote from the Contact Card. 23. In the Order Date field, enter 02/01/08. Microsoft Official Training Materials for Microsoft Dynamics ™ C-5 Your use of this content is subject to your current services agreement
  • 264.
    Trade in MicrosoftDynamics™ NAV5.0 24. If a Sell-to Customer No. does not appear, select a Sell-to Customer Template. To select a Sell-to Customer Template, follow the directions in step 25. If you have selected a contact that has a customer number, then go to step 25. 25. In the Sell-to Customer Template field, select the appropriate template, for example, GB-LARGE. 26. In the sales quote lines, select item number 766BC-A. 27. In the Quantity field, enter 1. 28. Notice that the Unit Price Excl. VAT field contains the sales price of 4000.00. 29. Click the Sales Prices field on the right pane to view the sales price. Lab 3.3 − Updating Sales Prices Scenario: You have decided to make the modifications to current prices as follows: • Because of changed market conditions, increase the prices offered to all customers for selected items (from 70100 to 70104) by 10%. The new prices take effect on 02/01/08. You also consider rounding the new prices to the nearest whole LCY. • As Cronus’ overseas customer base expands, extend the offer of reduced price for item 1928-S (if the purchase is paid in EUR) valid for customer 31505050 to all international customers. HINT: Consider grouping overseas customers. Implement these modifications using the appropriate batch jobs. Solution, Part 1 1. From the Sales & Marketing menu, click INVENTORY & PRICING→SALES PRICE WORKSHEET. 2. In the worksheet, click FUNCTIONS→SUGGEST ITEM PRICE ON WKSH. 3. On the Item tab, in the No. field, set a filter for the range 70100..70104 4. On the Options tab, select All Customers as a sales type. 5. In the Starting Date field, enter 02/01/08. 6. In the Adjustment Factor field, enter 1.1. 7. In the Rounding Method field, select WHOLE. C-6 Microsoft Official Training Materials for Microsoft Dynamics ™ Your use of this content is subject to your current services agreement
  • 265.
    Appendix C: LabSolutions 8. In the Create New Prices field, place a check mark. 9. Click OK to start the batch job. 10. Click FUNCTIONS→IMPLEMENT PRICE CHANGE. 11. Click OK on the request form to start the batch job. 12. Click Yes to delete the suggested price changes. Solution, Part 2 1. From the Sales & Marketing menu, click INVENTORY & PRICING→SALES PRICE WORKSHEET. 2. In the worksheet, click FUNCTIONS→SUGGEST SALES PRICE ON WKSH. 3. On the Sales Price tab, set the filter for the Sales Type field to Customer and the Sales Code filter to 31505050. 4. Set the filter for the Item No. field to 1928-S. 5. On the Options tab, select Customer Price Group as a sales type. Click the AssistButton in the Sales Code field to open the Customer Price Group window. 6. Create a new customer group named Foreign. Enter Foreign Customers in the Description field, and select the Allow Line Disc. and Allow Invoice Disc. fields. 7. Select the newly created group and then click OK. 8. On the Options tab of the request form, in the Currency Code field, select EUR and in the Starting Date field, and enter “w” for the work date. 9. Select the Create New Prices field. 10. Click OK to start the batch job. 11. Click FUNCTIONS→IMPLEMENT PRICE CHANGE. Click OK on the request form to start the batch job. 12. Click Yes to delete the suggested price changes. NOTE: For customers to receive the reduced price, assign them to the Foreign customer price group. This is done on the Invoicing tab of the Customer Card. Microsoft Official Training Materials for Microsoft Dynamics ™ C-7 Your use of this content is subject to your current services agreement
  • 266.
    Trade in MicrosoftDynamics™ NAV5.0 Lab 3.4 − The "Best Price" Rule Scenario: Customer 50000 is ordering 200 pieces of item 70200. Offer the customer the best (cheapest) price for the purchase. Solution 1. From the Sales & Marketing menu, select ORDER PROCESSING→ORDERS. Press F3 to make a new order and enter customer number 50000 in the order header. 2. In the sales order lines, select item 70200 in the No. field and enter 200 in the Quantity field. 3. The Line Amount Excl. Vat field should be 221.00. 4. Notice that 15 defaults into the Line Discount % field. Click the Sales Line Discounts field on the right pane of the Sales Order. The Get Sales Line Disc. field shows that because customer 50000 belongs to the Retail Customer Disc. group, this customer receives a 15% line discount. 5. On the right pane of the Sales Order, click Sales Prices. 6. In the Get Sales Price window, notice the customer can obtain a better price by ordering in boxes instead of pieces. 7. Close the Get Sales Price window. 8. In the Unit of Measure field on the sales line, select BOX and then click OK. 9. Change the number in the Quantity field to 2. 10. Now the Line Amount Excl. VAT field is 170.00. This represents a combination of the sales price for purchasing in boxes instead of pieces and the sales line discount for this customer. 170.00 is the best price for the customer. C-8 Microsoft Official Training Materials for Microsoft Dynamics ™ Your use of this content is subject to your current services agreement
  • 267.
    Appendix C: LabSolutions Lab 3.5 − Creating Sales Line Discounts for a Campaign Scenario: If you are familiar with the Microsoft Dynamics NAV Relationship Management functionality, try the following exercise. Cronus' Sales Manager wants item 1988-S introduced to a larger range of customers, and is making an introductory discount offer to a range of prospective new customers. This is valid if they purchase the items between 01/28/08 – 02/28/08. 1. The line discount on item 1988-S is 20% if the customer purchases at least five units. The offer goes to prospective customers who have the job responsibility of Purchase. HINT: To find the Sales Line Discount window, click the Campaign button in the Campaign window. Use the wizard to create the segment. Remember to select Campaign Target on the Campaign tab of the Segment window. 2. Start the campaign by clicking FUNCTIONS→ACTIVATE SALES PRICES/LINE DISCOUNTS. 3. Verify they obtain the correct discount percentage by creating a sales quote for one of the contacts. Solution 1. From the Sales & Marketing menu, click MARKETING→CAMPAIGNS. 2. Press F3 to create a new campaign. Type a description in the Description field, for example, Introductory Discount. 3. In the Starting Date field, type 01/28/08. 4. In the Ending Date field, type 02/28/08. 5. Click CAMPAIGN→SALES LINE DISCOUNTS. 6. In the Code field, select item 1988-S. 7. In the Minimum Quantity field, enter 5. 8. In the Line Discount % field, enter 20. 9. Close the Sales Line Discounts window. 10. Click CAMPAIGN→SEGMENTS. 11. Press F3 to create a new segment. Type a description in the Description field, for example, Intro Discount. Microsoft Official Training Materials for Microsoft Dynamics ™ C-9 Your use of this content is subject to your current services agreement
  • 268.
    Trade in MicrosoftDynamics™ NAV5.0 12. Click FUNCTIONS→SEGMENT→WIZARD. 13. Select Add Contacts. Then click Next. 14. In the Business Relations field, select PROS (for Prospective Customer) and then click OK. 15. In the Job Responsibilities field, select PURCHASE, and then click OK. 16. Click Next, and then Next, and then Finish. 17. On the Campaign tab, place a check in the Campaign Target field. Click Yes to the message that appears. 18. Close the Segment window. 19. Start the campaign by clicking FUNCTIONS→ACTIVATE SALES PRICES/LINE DISCOUNTS. 20. Click OK to accept the message that appears. Create the sales quote: 21. From the Sales & Marketing menu, click MARKETING→CONTACTS. 22. Open the Contact Card for contact CT100197 (or select any of the contacts in new segment). 23. Click the Contact button, and select Sales Quotes. 24. Press F3 to create a new Sales Quote. The contact number and address information default into the quote. 25. If a Sell-to Customer No. does not appear, select a Sell-to Customer Template. To select a Sell-to Customer Template, follow the directions in step 26. If you have selected a contact, that has a customer number. Then go to step 27. 26. In the Sell-to Customer Template field, select the appropriate template, for example, GB-LARGE. Make sure that the template you select has Allow Line Disc. checked on the Customer Template Card. This card can be accessed by clicking CUSTOMER TEMPLATE→CARD from the Customer Template List. 27. In the sales quote lines, select item number 1988-S. 28. In the Quantity field, enter 5. 29. Notice that 20 displays in the Line Discount % field. This indicates the line discount has been applied. 30. Click the Sales Line Discounts field on the right pane to see the campaign discount. C-10 Microsoft Official Training Materials for Microsoft Dynamics ™ Your use of this content is subject to your current services agreement
  • 269.
    Appendix C: LabSolutions Lab 4.1 − Handle Items with Substitutes Scenario: Cronus customer 40000 orders seven units of item 1980-S. This customer's shipments are usually made from the Yellow warehouse. Your tasks are as follows: 1. Create a sales order for the customer. 2. Determine whether the requested item 1980-S can be substituted by another item. 3. Ship the requested quantity of a substitute item. NOTE: Because the Yellow location requires picking, the program requires that you process the shipping through the warehouse. You can skip this process by entering the corresponding amounts in the Qty. To Ship field on the sales lines and then by accepting the warning messages given by the program. Solution 1. From the Sales & Marketing menu, click ORDER PROCESSING→ORDERS. 2. Press F3 to create a new sales order. 3. Enter customer number 40000 in the Sell-to Customer Number field. 4. On the sales order line, enter item number 1980-S. 5. In the Quantity field, type 7. 6. Click Yes on the availability message that appears. 7. On the right pane of the sales order, under Item Information, click Substitutions. 8. Click OK to substitute item 1988-S. 9. If you receive a warning message about the ship date, click OK to accept. 10. In the Qty. to Ship field, enter 7. Click OK to accept the warning message that appears. 11. Click POSTING→POST→SHIP. Microsoft Official Training Materials for Microsoft Dynamics ™ C-11 Your use of this content is subject to your current services agreement
  • 270.
    Trade in MicrosoftDynamics™ NAV5.0 Lab 4.2 − Handle Items with Cross Reference Scenario: Cronus customer 10000 places a sales order for eight units of item 1900-S. The customer gives the order processor item number – 22-786. Your tasks are as follows: 1. Set up an item number that is used by customer 10000 as a reference for item 1900-S (the item description is “Chair, lounge, black”). 2. Create a sales order that reflects the item number that is used by the customer. Post the order. Solution 1. From the Sales & Marketing menu, click INVENTORY & PRICING→ITEMS. Locate the item card for item 1900-S. 2. Click ITEM→CROSS REFERENCES. 3. In the Cross-Reference Type field, select Customer, and in the Cross Reference Type No. field, select 10000. 4. In the Cross-Reference No. field, enter 22-786, in the Unit of Measure field, select PCS, and in the Description field, enter Chair, lounge, black. 5. Close the Item Cross Reference Entries window. 6. Click ORDER PROCESSING→ORDERS. 7. Press F3 to create a new sales order. 8. In the Sell-to Customer Number field, enter customer number 10000. 9. In the Cross-Reference No. field, click the AssistButton to open the Cross Reference List window. 10. Select the cross-reference number 22-786 and then click OK. 11. In the Quantity field, enter 8. 12. Click POSTING→POST→SHIP AND INVOICE. C-12 Microsoft Official Training Materials for Microsoft Dynamics ™ Your use of this content is subject to your current services agreement
  • 271.
    Appendix C: LabSolutions Lab 4.3 − Handling the Sale of a Nonstock Item using a Special Order Scenario: Cronus' customer 10000 orders three units of item 4100. Item 4100 is a nonstock item and must be purchased from vendor 40000. Your tasks are as follows: 1. Create a sales order for customer 10000, and select it as a special order. 2. Create the purchase order for this nonstock item. 3. Receive and invoice the purchase order. 4. Ship and invoice the sales order. Solution 1. From the Sales & Marketing menu, click ORDER PROCESSING→ORDERS. 2. Press F3 to create a new sales order. 3. In the Sell-to Customer Number field, enter customer number 10000. 4. Click FUNCTIONS→NONSTOCK ITEMS. 5. Select item 4100 and then click OK. 6. In the Purchasing Code field, select SPECIAL ORDER and in the Quantity field, enter 3. 7. Release the order. 8. From the Purchase menu, click ORDER PROCESSING→ORDERS. 9. Press F3 to create a new purchase order. 10. In the Buy-from Vendor Number field, enter vendor number 40000. 11. On the purchase order line, enter item number 4100. 12. In the Quantity field, type 3. 13. In the Qty. to Receive field, type 3. 14. In the Vendor Invoice Number field, on the purchase order header, enter some characters of your choice, for example, 1234. 15. Click POSTING→POST→RECEIVE AND INVOICE. Microsoft Official Training Materials for Microsoft Dynamics ™ C-13 Your use of this content is subject to your current services agreement
  • 272.
    Trade in MicrosoftDynamics™ NAV5.0 16. Close the Purchase Order window. 17. On the sales order screen, click POSTING→POST→SHIP AND INVOICE. Lab 5.1 − Managing Alternative Purchase Prices Scenario: You have a deal from vendor 10000 on items no. 1900-S and 1920-S according to the following conditions: 1. Item 1900-S: If Cronus buys this item in pallets (that contains ten pieces) instead of pieces, you receive ten LCY off the regular price. HINT: Add a new unit of measure PALLET that contains ten pieces, to the item’s units of measure list. 2. Item 1920-S: When Cronus buys this item and pays in local currency (EUR), you receive 15 LCY off the item’s regular price. Enter these purchase prices in the Purchase Prices window and check their use by creating a purchase order for two pallets of item 1900-S and five units of item 1920-S. HINT: Items can be accessed without leaving the Purchase menu. Click INVENTORY COSTING→ITEMS. Solution 1. From the Purchase menu, click INVENTORY & COSTING→ITEMS. 2. In the Item Number field, press F5 to see the Item List. Select item 1900-S and then click OK. 3. Click the Items button, and select Units of Measure. 4. In the Code field, enter PALLET. 5. In the Qty. per Unit of Measure field, enter 10. 6. Close the Units of Measure window. 7. From the Purchase menu, click ORDER PROCESSING→VENDORS. 8. Locate vendor 10000. 9. Click the Purchases button and then click Prices. 10. In the Item No. field, select 1900-S. 11. In the Unit of Measure field, select PALLET. C-14 Microsoft Official Training Materials for Microsoft Dynamics ™ Your use of this content is subject to your current services agreement
  • 273.
    Appendix C: LabSolutions 12. In the Direct Unit Cost field, enter 82.62 or, alternatively, enter the calculation 92.62-10. The Unit Cost is on the Invoicing tab of the Item Card. 13. In the Starting Date field, enter "w" for the work date. 14. On a new line in the Purchase Prices window, in the Item No. field, select 1920-S. 15. In the Currency Code field, select EUR. 16. In the Unit of Measure field, select PCS. 17. In the Direct Unit Cost field, enter 296.60 or, alternatively, you can enter the calculation 311.60-15. 18. In the Starting Date field, enter "w" for the work date. 19. From the Purchase menu, click ORDER PROCESSING→ORDERS. 20. Press F3 to create a new purchase order. 21. In the Buy-from Vendor Number field, enter vendor number 10000. 22. On the Foreign Trade tab, in the Currency Code field, select EUR. 23. On the first purchase order line, enter item number 1900-S with a quantity of 2. 24. In the Unit of Measure field, select PALLET. 25. On the next purchase order line, enter item number 1920-S with a quantity of 5. 26. Verify the Direct Unit Cost for item 1900-S is 127.934. 27. Verify the Direct Unit Cost for item 1920-S is 296.60. Lab 5.2 − Managing Purchase Line Discounts Scenario: The Purchasing Agent at Cronus has made an agreement with vendor 30000 that for items in the item range 70100-70104 purchased after 01/30/08, Cronus receives the following discount: • 1-99 items: 10% • 100-499 items: 15% • 500 or more items: 25% Enter these line discounts in the Purchase Line Discounts window and check that the program uses them by creating a purchase order for 250 units of item 70102 and 600 units of item 70104. Microsoft Official Training Materials for Microsoft Dynamics ™ C-15 Your use of this content is subject to your current services agreement
  • 274.
    Trade in MicrosoftDynamics™ NAV5.0 Solution 1. From the Purchase menu, click ORDER PROCESSING→VENDORS. 2. Locate vendor 30000. 3. Click the Purchases button and then click Line Discounts. 4. In the Purchase Line Discounts window, in the Starting Date Filter, enter 01/30/08. 5. Set up the lines as follows: Vendor Item Minimum Line Starting Ending No. No. Quantity Discount Date Date % 30000 70100 1 10 01/30/08 30000 70100 100 15 01/30/08 30000 70100 500 25 01/30/08 30000 70101 1 10 01/30/08 30000 70101 100 15 01/30/08 30000 70101 500 25 01/30/08 30000 70102 1 10 01/30/08 30000 70102 100 15 01/30/08 30000 70102 500 25 01/30/08 30000 70103 1 10 01/30/08 30000 70103 100 15 01/30/08 30000 70103 500 25 01/30/08 30000 70104 1 10 01/30/08 30000 70104 100 15 01/30/08 30000 70104 500 25 01/30/08 HINT: To make the process quicker, enter 70100 in the Item No. Filter, and create the three lines for item 70100. Select the three lines, and press EDIT→COPY. Next, enter 70101 in the Item No. Filter, and then click the first line and press EDIT→PASTE. Continue for the remaining items. 6. Close the Purchase Line Discounts window. 7. From the Purchase menu, click ORDER PROCESSING→ORDERS. 8. Press F3 to create a new purchase order. 9. In the Buy-from Vendor Number field, enter vendor number 30000. 10. In the Order Date field, enter 02/01/08. 11. On the first purchase order line, enter item number 70102 with a quantity of 250. C-16 Microsoft Official Training Materials for Microsoft Dynamics ™ Your use of this content is subject to your current services agreement
  • 275.
    Appendix C: LabSolutions 12. On the next purchase order line, enter item number 70104 with a quantity of 600. 13. The Line Discount % field for the line that contains item 70102 is 15. 14. The Line Discount % field for the line that contains item 70104 is 25. Lab 6.1 − Calculating a Replenishment Plan from the Requisition Worksheet Scenario: You are the purchasing agent at Cronus. Perform the following set up tasks: 1. For Cronus item 1330, change the value in the Reorder Quantity field from 100 to 300 so that it has the following setup: Inventory = 100 Reordering Policy = Fixed Reorder Quantity Reorder Cycle = 1M Reorder Point = 100 Reorder Quantity = 300 2. Create the following sales order lines: 40 units with a shipment date 5 days after the work date. 60 units with a shipment date 10 days after the work date. 70 units with a shipment date 20 days after the work date. 3. Create the following purchase order line: 50 units with an expected receipt date 15 days after the work date. Calculate a plan from the requisition worksheet and explain the resulting order proposal lines. Solution For the following solution, the work date is set to 01/28/08. 1. From the Purchase menu, click INVENTORY & COSTING→ITEMS. 2. Open the Item Card for item 1330. 3. On the Planning tab, set up item 1330 to match the setup described in the scenario. The Inventory quantity can be found on the General tab. 4. From the Sales & Marketing menu, click ORDER PROCESSING→ORDERS. Microsoft Official Training Materials for Microsoft Dynamics ™ C-17 Your use of this content is subject to your current services agreement
  • 276.
    Trade in MicrosoftDynamics™ NAV5.0 5. Press F3 to create a new sales order. 6. Select a customer number in the Sell-to Customer Number field. 7. Enter the sales order lines according to the information provided in the scenario. Click Yes to accept all the Check Availability messages that appear. 8. From the Purchase menu, click ORDER PROCESSING→ORDERS. 9. Press F3 to create a new purchase order. 10. Select a vendor number in the Buy-from Vendor Number field. 11. Enter the purchase order lines according to the information provided in the scenario. 12. From the Purchase menu, click PLANNING→REQUISITION WORKSHEETS. 13. From the Requisition Worksheet window, click FUNCTIONS→CALCULATE PLAN to open the request form. 14. On the Item tab, set a filter for item 1330. On the Options tab, in the Order Date field, enter 01/28/08 and in the Ending Date field – 02/17/08. 15. Click OK. The order proposal lines appear in the Requisition Worksheet window. 16. The order proposal lines are as follows: Type No. Action Accept Original Quantity Due Replenishment Message Action Quantity Date System Message Item 1330 Resched. Check 50 300 02/02/08 Purchase & Chg. Qty. 17. The program has calculated that the purchase order for 50 will be rescheduled for 02/02/08, and the quantity will be changed to 300. Explanation There are 100 units currently in inventory. When the first sales order is filled on 02/02/08, the amount on inventory is reduced to 60. Because the reorder point is set at 100, a new order must be created. Because a purchase order exists, that order is rescheduled for 02/02/08. The quantity on the purchase order changes from 50 to 300. This is because the reorder quantity is set to 300. C-18 Microsoft Official Training Materials for Microsoft Dynamics ™ Your use of this content is subject to your current services agreement
  • 277.
    Appendix C: LabSolutions Lab 7.1 − Handling Item Charges Scenario: You have an open purchase order from vendor 10000. The order number is 106009. You also receive an invoice from the same vendor for freight service for the 150 LCY. Register these additional invoices, making sure of that inventory costs are updated correctly. Solution 1. Open purchase order 106009. 2. On the purchase order lines, in the Type field, select Charge (Item). In the No. field, select P-FREIGHT. 3. In the Quantity field, enter 1, and in the Direct Unit Cost field, enter 150. 4. Select the item charge line, and then click LINE→ITEM CHARGE ASSIGNMENT. 5. Click FUNCTIONS→SUGGEST ITEM CHARGE ASSIGNMENT. Select Amount and then click OK. 6. Close the Item Charge Assignment window. 7. Click POSTING→POST→RECEIVE AND INVOICE. Click OK. 8. From the Purchase menu, click HISTORY→POSTED RECEIPTS. Click the Navigate button. 9. Select the Item Ledger Entry line and then click Show. 10. In the Cost Amount (Actual) field for each line, click the drill-down arrow to see the value entries that includes the freight charges, for each item. Lab 7.2 − Handling Purchase Allowances Scenario: Upon receiving and invoicing a shipment (No. 107019) from vendor 10000, the Inventory Manager discovers that two units of item 70011 had a small fault on the glass surface. The Inventory Manager contacts the vendor about the problem, and the vendor offers Cronus the opportunity to keep the items for a reduced price (by 40%). Cronus receives a credit memo from the vendor. Your task is to register this agreement in the program make sure that the transaction is reflected at the item statistics level. Microsoft Official Training Materials for Microsoft Dynamics ™ C-19 Your use of this content is subject to your current services agreement
  • 278.
    Trade in MicrosoftDynamics™ NAV5.0 Solution 1. From the Financial Management menu, click PAYABLES→CREDIT MEMOS to create a new credit memo. 2. Click the Functions button, and select Copy Document. 3. In the Copy Purchase Document window, in the Document Type field, select Posted Receipt. 4. In the Document No. field, select 107019. 5. Select the Include Header field. The Recalculate Lines field is already selected. 6. Click OK. 7. In a new credit memo line, in the Type field, select Charge (Item). 8. Select Purchase Allowance in the No. field. 9. In the Quantity field enter 2. 10. To determine the cost, find the line for item 70011, and find the Direct Unit Cost Excl. VAT field. The cost for each unit of item 70011 is 36.90. 11. In the Direct Unit Cost Excl. VAT field on the line selected Purchase Allowance, enter 22.14 (or enter the calculation 36.90*.60) which reflects 40% of the cost for item 70011. 12. Delete the three item type lines copied from the Posted Receipt. 13. To assign the item charge to item 70011, click the Line button and select Item Charge Assignment. 14. In the Item Charge Assignment (Purch) window, click the Functions button and select Get Receipt Lines. 15. In the Purch. Receipt Lines window, find Document No. 107019, and select the line for item 70011. Click OK. 16. In the Item Charge Assignment (Purch) window, click the Functions button, and then select Suggest Item Charge Assignment. 17. Select Equally and then click OK. Close the window. 18. Enter a Vendor Cr. Memo No. of your own choice in the credit memo header. 19. Click POSTING→POST, and then click Yes. 20. To view the item statistics, from the Purchase menu, click INVENTORY & COSTING→ITEMS. Open the item card for item 70011. 21. Click ITEM→ENTRIES→VALUE ENTRIES. Here you can see the Purchase Allowance applied to this item. C-20 Microsoft Official Training Materials for Microsoft Dynamics ™ Your use of this content is subject to your current services agreement
  • 279.
    Appendix C: LabSolutions Lab 8.1 − Promise Order Delivery to a Customer Scenario: Cronus customer 50000 orders 50 units of item 70040. The customer requests the order arrives on 01/27/08. The sales order ships from the Yellow warehouse. Your tasks are as follows: 1. Create the sales order, and check if the requested order delivery date can be met. 2. If the requested delivery date cannot be met, find out when you can deliver the order. You may decide to run the CTP function. 3. The customer is not satisfied with the new delivery date. You, promise the customer to deliver the order one day earlier and will find a solution to fulfill the promise. Solution 1. From the Sales & Marketing menu, click ORDER PROCESSING→ORDERS. Press F3. 2. In the Sell-to Customer No. field, select customer 50000. 3. In the Requested Delivery Date field, enter 01/27/08. 4. On the Shipping tab, in the Location Code field, select Yellow and press Enter. 5. In the No. field, select item 70040, and in the Quantity field, enter 50. 6. The messages indicate that, not only must you ship the order before the work date, there is no inventory available and none on order (as per the Earliest Availability Date on the Check Availability message). 7. Accept both messages. 8. To find out when you can deliver the order, click ORDER→ORDER PROMISING. The Order Promising Lines window appears. 9. Click CALCULATE→CAPABLE-TO-PROMISE. 10. The date fields in the order promising lines are: Requested Requested Planned Original Earliest Delivery Shipment Delivery Shipment Shipment Date Date Date Date Date 01/27/08 01/24/08 01/30/08 01/24/08 01/27/08 Microsoft Official Training Materials for Microsoft Dynamics ™ C-21 Your use of this content is subject to your current services agreement
  • 280.
    Trade in MicrosoftDynamics™ NAV5.0 11. According to these dates, you can deliver the order on 01/30/08. 12. Click Accept. 13. The delivery dates on the sales order lines are updated to match the dates from the order promising lines. 14. Determine how to deliver one day earlier. You have options, such as calling the vendor to request an earlier delivery or working with Warehouse Workers to expedite the outbound warehouse handling time. One way to deliver a day earlier is to change the Shipping Agent Service field on the sales order header. 15. On the Shipping tab, in the Shipping Agent Service field, select Overnight. Click Yes to update the lines. 16. Recalculate the order promising lines. Perform steps 8, 9, and 12 again. 17. Now you can promise delivery to the customer on 01/29/08 the Planned Delivery Date. Lab 8.2 − Order Promising Scenario: The Purchasing Agent at Cronus orders 10 units of item 70011 with vendor 30000 and requests that the order be delivered at the Green warehouse on 02/05/08. Your tasks are: 1. Create the purchase order and estimate the latest order date when the order arrives at the warehouse on the requested date. 2. Suppose that after talking to the vendor, they can deliver the order three days earlier than first requested. Record this information in the purchase order. Solution 1. Create a new purchase order. In the Buy-from Vendor No. field, select vendor 30000. 2. Click the Shipping tab. In the Location Code field, select GREEN. 3. In the Requested Receipt Date field enter 02/05/08. 4. In the No. field, select item 70011, and in the Quantity field, enter 10. 5. The work date message indicates that the order must be placed by 01/22/08 to meet the requested receipt date of 02/05/08. 6. Accept the message. C-22 Microsoft Official Training Materials for Microsoft Dynamics ™ Your use of this content is subject to your current services agreement
  • 281.
    Appendix C: LabSolutions 7. To record the earlier receipt date promised by the vendor, on the Shipping tab, in the Promised Receipt Date field, enter 02/02/08. 8. Click Yes to update the lines. 9. The Planned Receipt Date and Expected Receipt Date fields on the line are updated accordingly. Lab 9.1 − Processing the Customer Return Scenario: A representative from customer 10000 calls the order processor at Cronus and says that the complete delivery of 50 units (boxes) of item 80100 appears to be defective. The order processor and the customer agree that the whole quantity of item 80100 must be returned to Cronus, and a replacement of the same quantity will be shipped to the customer. The customer gives the order processor a reference number to the return document. This is R-0113. To perform this, create and post a sales order of 50 units (boxes) of item 80100 to customer 10000. Use location code Green, and remember to fill in the quantity to ship. Your tasks are as follows: 1. Register the compensation agreement reached with the customer, using a sales order as an entry point. 2. Process the return, in terms of: – Receiving (possibly, use a specially dedicated location for defective items) and crediting the customer for the returned items. – Ensuring that the returned items when received from the customer are valued at the same unit cost as originally sold (instead of the average cost). – Shipping the replacement sales order to the customer. – Creating a return-related document, which is a purchase return order, to indicate that a return to vendor process must be initiated. Solution Create a location for defective items. 1. From the Warehouse menu, click SETUP→LOCATIONS. 2. Press F3 to create a new location card. In the Code field, enter DEFECTIVE. In the name field, enter Defective Warehouse. Microsoft Official Training Materials for Microsoft Dynamics ™ C-23 Your use of this content is subject to your current services agreement
  • 282.
    Trade in MicrosoftDynamics™ NAV5.0 Create the return order. 3. From the Sales & Marketing menu, click ORDER PROCESSING→RETURN ORDERS. Press F3 to create a new order, and enter the customer information in the return header. 4. Enter the item information and quantity on the line. 5. In the Return Reason field, click the AssistButton. The Return Reasons window appears. 6. Select DEFECTIVE as the return reason code and then click OK. 7. In the External Document No. field, enter R-0113. 8. In the Appl.-from Item Entry field, click the AssistButton. The Item Ledger Entries window appears. 9. In the Item Ledger Entries window, select the line with the defective items (the quantity will equal 50). Click OK. You can also use the new Get Posted Sales Document Lines to Reverse function to select the line. 10. In the Location Code field on the line, select Defective. Create the order for the replacement quantity. 11. Enter a line for item 80010 with a quantity of -50. In the Location field, select Green and make sure that Box is selected in the Unit of Measure Code field. 12. In the Sales Return Order window, click FUNCTIONS→MOVE NEGATIVE LINES. 13. In the To Document Type field, select Order and then click OK. 14. Click Yes to view the document. 15. In the Qty. to Ship field, enter 50. 16. Post the sales order. Create the purchase return order. 17. From the Sales Return Order window, click FUNCTIONS→CREATE RETURN-RELATED DOCUMENTS. 18. In the Vendor No. field, select vendor 10000. 19. Select the Create Purch. Ret. Order check box. Click OK. 20. Post the sales return order. C-24 Microsoft Official Training Materials for Microsoft Dynamics ™ Your use of this content is subject to your current services agreement
  • 283.
    Appendix C: LabSolutions Lab 9.2 − Processing the Customer Return, II Scenario: (continuation of 9-1 – Processing the Customer Return) In connection with the return of 50 units (boxes) of item 80100 initiated by customer 10000, Cronus wants to return the defective items to the original vendor and receive replacements. When registering the compensation agreement, the order processor created a purchase return order, which serves as an indication to the purchasing agent that the items must be returned to the vendor. The purchasing agent contacts the vendor’s representative (vendor 45858585), and the parties agree that Cronus will send the item back for replacement. The vendor gives the purchasing agent a return authorization number. This is PR0558. Locate the existing purchase order No. 6001 and post it as invoiced. Your task is to handle the return to vendor process in terms of: • Shipping the defective items to the vendor and receiving credit. • Ensuring that the items returned to the vendor are valued at the same unit cost as originally purchased instead of at the average cost (refer to the purchase order No. 6001). • Receiving a replacement from the vendor. Solution Create the purchase return order. 1. From the Purchase menu, click ORDER PROCESSING→RETURN ORDERS. Locate the return order for 50 units of item 80100 created for vendor 10000. 2. In the Vendor Authorization No. field, enter PR0558. 3. In the Appl.-to Item Entry field, click the AssistButton. The Item Ledger Entries window appears. 4. In the Item Ledger Entries window, select the line with the defective items. Click OK. Alternatively you can use the new Get Posted Purchase Document Lines to Reverse function to select the line. Create the order for the replacement quantity. 5. Enter a line for item 80010 with a quantity of -50. Make sure that Box is selected in the Unit of Measure Code field. Microsoft Official Training Materials for Microsoft Dynamics ™ C-25 Your use of this content is subject to your current services agreement
  • 284.
    Trade in MicrosoftDynamics™ NAV5.0 6. In the Purchase Return Order window, click FUNCTIONS→MOVE NEGATIVE LINES. 7. In the To Document Type field select Order and then click OK. 8. Click Yes to view the document. 9. Enter a Vendor Invoice No. in the header. 10. Post the purchase order. 11. In the Purchase Return Order window, enter a Vendor Cr. Memo No. 12. Post the purchase return order. Lab 10.1 − Creating Analysis Reports Scenario: Create a report that displays sales by sales representatives (salespersons) for January 2008. The requirements for the report are as follows: 1. The report must be broken down by invoiced sales and those that have not been invoiced 2. The report must include a line that displays total sales by salespeople at the bottom. 3. Modify the report to show only those salespeople who recorded sales in January 2008. 4. As soon as it is complete, present the report as a bar chart. NOTE: Only Sales Representatives assigned the Salesperson Dimension code are included in this report. HINT: Set up an Analysis View Card with the Salesperson dimensions and added to the Analysis Lines Template before selecting salespeople in an Analysis Report. HINT: Review the existing report templates to see whether you can reuse or modify an existing report. Solution Set up the analysis view card. 1. From the Sales & Marketing menu, select ANALYSIS & REPORTING→SETUP→ANALYSIS VIEW CARD. 2. Press F3 to create a new Analysis View Card. 3. In the Code field and the Name field, type Salespeople. 4. Select the Dimensions tab. In the Dimension 1 Code field, select Salesperson. C-26 Microsoft Official Training Materials for Microsoft Dynamics ™ Your use of this content is subject to your current services agreement
  • 285.
    Appendix C: LabSolutions 5. Click the Update button. Click Yes. 6. Close the Sales Analysis View Card. Create the analysis line template. 7. From the Sales & Marketing menu, select ANALYSIS & REPORTING→SETUP→ANALYSIS LINE TEMPLATES. 8. Select an empty line, and type SALESP in the Name field. 9. In the Description field, type Salespeople. 10. In the Item Analysis View Code field, select Salespeople. 11. Click the Lines button. The Sales Analysis Lines window is displayed. 12. Click the Functions button at the bottom of the window, and select Insert Sales/Purchase Persons. A window is displayed with a list of salespeople. 13. Select all lines and then click OK. Scroll up in the Sales Analysis Lines window to view the salespeople. 14. In the Sales Analysis Lines window, highlight the lines that contains the salesperson names, and then click Functions. Then select Renumber Lines. 15. In the Start Row Ref. No. field, enter A1, and then click OK. Click OK again to accept the message that appears. 16. In the first blank row underneath the salesperson names in the Description field, type Total Sales. 17. In the Type field, select Formula. 18. In the Range field, enter A1…A4 to include all salesperson lines. 19. Place a check mark in the Bold field. 20. Close the Sales Analysis Lines window. The line template is set up. Next, define the columns for the report. 21. From the Sales & Marketing menu, select ANALYSIS & REPORTING→SETUP→ANALYSIS COLUMN TEMPLATES. 22. When you review existing templates, notice that the SALES template contains the columns needed this report. Create the analysis report. 23. On the Sales & Marketing menu, click ANALYSIS & REPORTING→ANALYSIS REPORTS. 24. In the Analysis Report Name field, click the AssistButton to open the Analysis Report Names window. Microsoft Official Training Materials for Microsoft Dynamics ™ C-27 Your use of this content is subject to your current services agreement
  • 286.
    Trade in MicrosoftDynamics™ NAV5.0 25. Select a new line and enter SALES in the Name field. 26. In the Description field, enter Sales by Salesperson. 27. In the Analysis Line Template Name field, select SALESP. 28. In the Analysis Column Template Name field, select SALES. 29. Click OK. 30. In the Sales Analysis Report window, type 01/01/08..01/31/08 in the Date Filter field. Modify the report to show only sales representatives who recorded sales. 31. Click the arrow in the Analysis Line Template field in the header. Click the Lines button. 32. In the Show column, select If Any Column Not Zero for all the lines. 33. Close the window, and then click OK in the Sales – Analysis Line Templates window. Create a bar chart. 34. Click FUNCTIONS→SHOW BAR CHART. The Analysis Line Bar Chart window appears. Lab 10.2 − Performing Analysis by Dimensions Scenario: You have to analyze item sales by area. The analysis needs the following parameters: • The analysis includes items with item numbers from 1896-S to 766BV-C. • The analysis is for 2008. As soon as the Sales Analysis by Dimensions window contains the item sales by area information, follow these steps. 1. Compare the sales sold by John Roberts with those by Peter Saddow. 2. View the analysis as the sales amount, COGS amount, and quantity. 3. Export the sales amount by John Roberts to a Microsoft® Excel workbook. HINT: Use the following dimensions: Area, Salesperson. C-28 Microsoft Official Training Materials for Microsoft Dynamics ™ Your use of this content is subject to your current services agreement
  • 287.
    Appendix C: LabSolutions Solution 1. From the Sales menu, select ANALYSIS & REPORTING→SETUP→ANALYSIS VIEW CARD. 2. Browse through the existing view cards to see whether a card is set up with both the Area and the Salesperson dimensions. The Default analysis view card contains these dimensions. 3. Click the Update button. Click Yes on the message that appears. 4. Close the Analysis View Card. 5. From the Sales & Marketing menu, select ANALYSIS & REPORTING→ANALYSIS BY DIMENSIONS. 6. Click the AssistButton in the Analysis View Code window, and select the Default Analysis View Code. Click OK. 7. In the Show as Lines field, select Item. 8. In the Show as Columns field, select Area. 9. On the Filters tab, in the Date Filter field, enter 01/01/08..12/31/08. 10. In the Item Filter field, select items 1896-S..766BV-C. You can now view item sales by area. 11. In the Salesperson Filter, select JR, click OK, and press ENTER. John Roberts’ sales display. 12. In the Salesperson Filter, select PS, click OK, and press ENTER. Peter Saddow’s sales display. 13. Delete the salesperson filter. 14. On the General tab, use the arrow in the Show Value As field to show the sales amount, COGS amount, and quantity. Export John Roberts’ sales to an Excel worksheet. 15. On the Filters tab, in the Salesperson Filter, select JR. Click OK, and then press ENTER. 16. Click the Functions button, and select Export to Excel. Lab 10.3 − Creating a Sales Budget Scenario: Create a sales forecast for sales representative Linda Martin using the Sales Budget function. The budget must meet these requirements: • The budget covers January through June 2008. • The budget shows the quantities you expect Linda Martin to sell of items 8904-W through 8924-W. Microsoft Official Training Materials for Microsoft Dynamics ™ C-29 Your use of this content is subject to your current services agreement
  • 288.
    Trade in MicrosoftDynamics™ NAV5.0 After you set up the sales budget, export it to Excel for feedback from Linda Martin in the field. 1. Update the Excel Worksheet with changes to the budget. 2. Import the changes back into Microsoft Dynamics NAV. Solution Create the sales budget. 1. From the Sales & Marketing menu, click ANALYSIS & REPORTING→BUDGETS. 2. In the Item Budget Name field, click the AssistButton. The Item Budget Names window appears. 3. Select an empty line, and type SALES in the Name field and Sales Forecast in the Description field. 4. In the Budget Dimension 1 Code field, select SALESPERSON. Click OK. 5. In the Show as Lines field, enter Item. 7. In the Show as Columns field, enter Period. 8. In the Date Filter field, enter 01/01/08..06/30/08. 9. In the Item Filter field, enter 8904-W…8924-W. 10. In the Show Value As field, select Quantity. 11. On the lower-left side of the Sales Budget Overview window, click the time interval 31 to see the time periods by month. 12. On the Filters tab, in the Salesperson Filter field, select LM. 13. On the Options tab, in the Rounding Factor field, select 1. 14. Select the Show Column Name field. 15. Enter budget numbers of your choice for each month, for example, 10 of item 8904-W per month and 30 of 8912-W in January and February. Export the budget to Excel. 16. Click the Functions button, and select Export to Excel. 17. Select Create Workbook in the Options field. 18. As soon as the data has finished processing, open the Microsoft Excel workbook that has been created. 19. Save the workbook as Sales Budget.xls. C-30 Microsoft Official Training Materials for Microsoft Dynamics ™ Your use of this content is subject to your current services agreement
  • 289.
    Appendix C: LabSolutions 20. Change the budget, for example, add 20 of 8924-W for March. Save the workbook. 21. From the Budget window, click the Functions button, and select Import from Excel. 22. In the Workbook File Name field, locate the location where you saved the Excel Worksheet and select Sales Budget. 23. Select Budget in the Worksheet Name field. 24. Make sure that the fields are filled in as follows: Budget Name Sales Option Replace entries Description Imported from Excel 01/25/08 Import Value as Quantity 25. Click OK. 26. Click Yes to replace the existing entries, and accept the message that appears. 27. The changes have been made to the budget. Microsoft Official Training Materials for Microsoft Dynamics ™ C-31 Your use of this content is subject to your current services agreement
  • 290.
    Trade in MicrosoftDynamics™ NAV5.0 C-32 Microsoft Official Training Materials for Microsoft Dynamics ™ Your use of this content is subject to your current services agreement