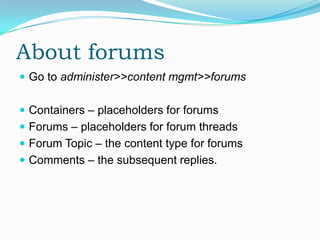
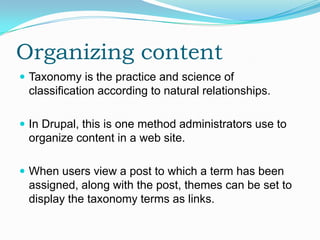
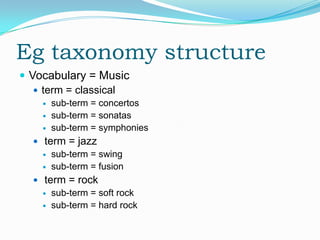
Download to read offline


![Creating Content
Go to Content management > Create content >
Select content type you want to create. [story]
Give title and Enter your required content.
Input format as required – full/filtered HTML/php
Give a log entry if there are multiple editors.
Enable/disable comments
Give alt URL path
Set published, promoted to front page
Make at least 3 story items for your site](https://image.slidesharecdn.com/4-contentmgmt-111120014632-phpapp02/85/4-content-mgmt-8-320.jpg)


![A block trick – step 1
Go to site config>>input formats.
Click configure next to filtered HTML
If you’ve installed the token filter module earlier, you
will see a token filter checkbox. Check it and click
save.
Go to administer>>site building>>blocks
Click add block.
Give block description as hello.
Give this as body.
Hi [token global user-name]!](https://image.slidesharecdn.com/4-contentmgmt-111120014632-phpapp02/85/4-content-mgmt-21-320.jpg)

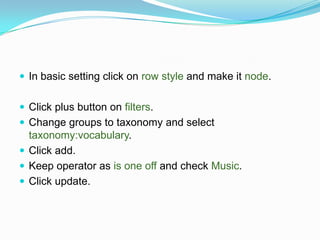
![Working with taxonomy
Go to Administer >> Content management >> Taxonomy
Click add vocabulary. Name it music.
You can tie your vocab with a custom content type if
required. Choose page for the time being.
Now click on add terms next to music vocab entry.
Here you can choose parent terms as well as related
terms. [synonyms]
Create page content to see how these tags work.](https://image.slidesharecdn.com/4-contentmgmt-111120014632-phpapp02/85/4-content-mgmt-28-320.jpg)
![Taxonomy tricks
Make a couple of pages with music vocabularies
Go to menu administration and make a menu link in primary
with path as
category/music/classical
Now, to find taxonomy number – when editing a termn in URL
….taxonomy/edit/term/8&destin….
When you create a new term, Drupal assigns it a number. And
you can call up all the items categorized under that term by
calling for its number.
taxonomy/term/8
taxonomy/term/8,9 [two term listing by AND]
Taxonomy/term/8+9 [two term listing by OR]
taxonomy/term/8/all [all child terms]](https://image.slidesharecdn.com/4-contentmgmt-111120014632-phpapp02/85/4-content-mgmt-30-320.jpg)
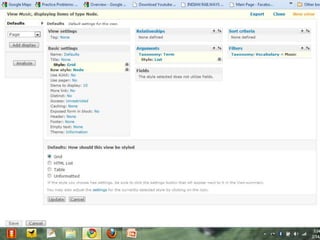
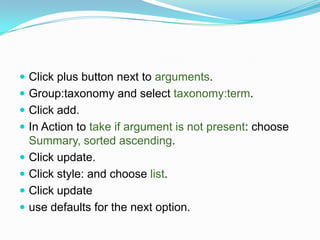
![ Under page click on the add display button.
Now on this page, give title to your view.
On page settings give a path to your view [music].
And add a normal menu item link for it in primary
links.
Click save.
Check out your views from the primary link created.](https://image.slidesharecdn.com/4-contentmgmt-111120014632-phpapp02/85/4-content-mgmt-38-320.jpg)

![ Now, go to manage fields for your new content type.
Create fields as required for your custom content.
[try making one now for a fruit]
More contrib modules will increase the field types
available here. Get them from drupalmodules.org
In manage fields, after adding, configure for more
settings related to the field type.](https://image.slidesharecdn.com/4-contentmgmt-111120014632-phpapp02/85/4-content-mgmt-43-320.jpg)

The document provides instructions on various content management and configuration tasks in Drupal, such as: 1) Creating and moderating forums, including enabling forum modules, adding forum containers and topics. 2) Organizing content using taxonomy by adding vocabularies and terms to categorize content. 3) Using the Views module to build customized lists and tables of content through configurable queries.