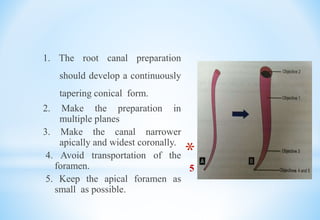
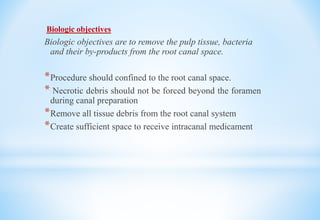
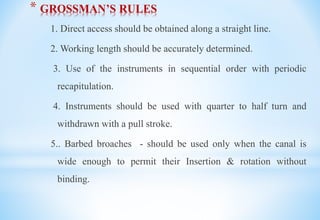
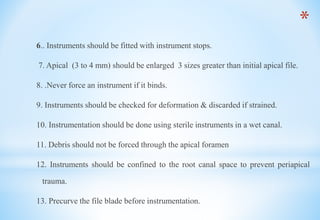
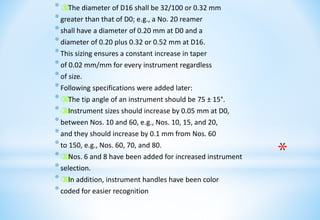
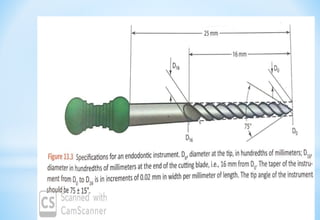
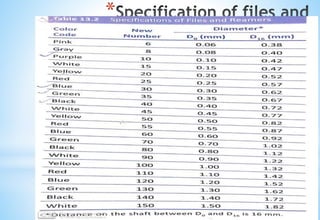
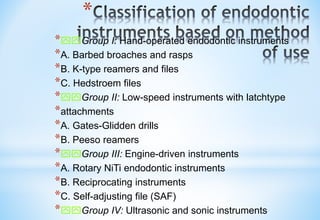
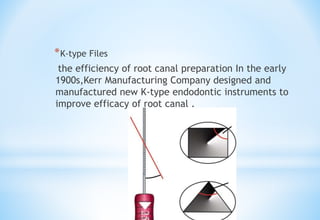
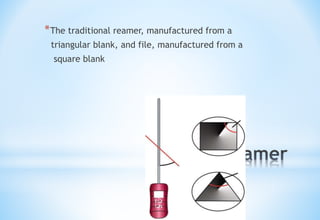
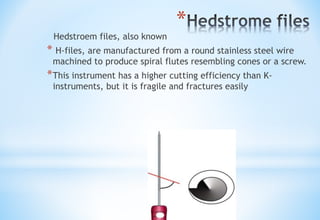
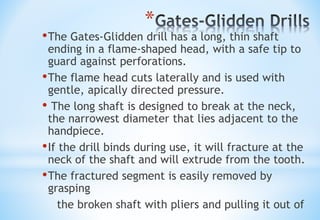
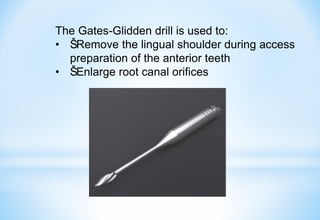
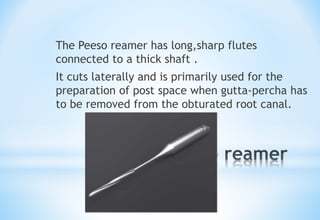
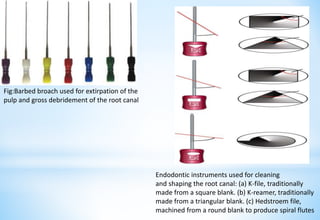
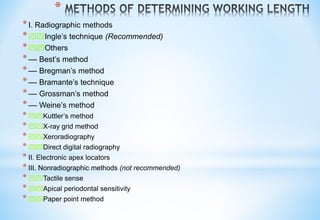
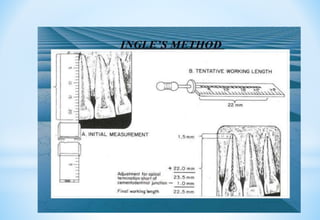
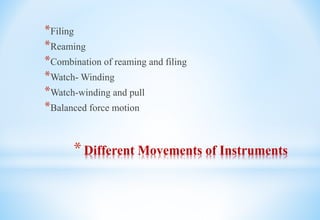
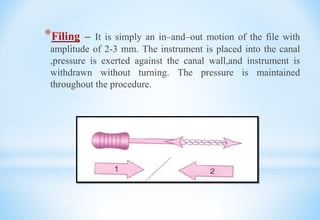
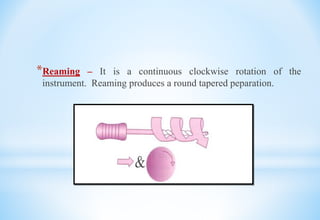
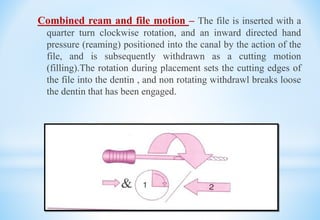
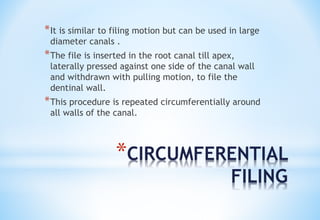
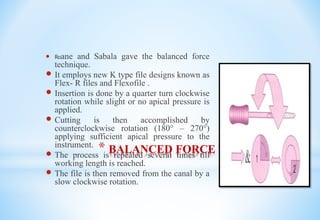
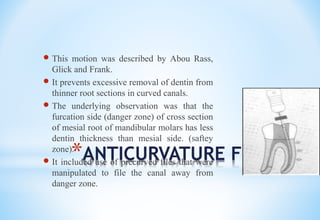
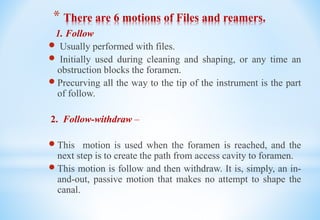
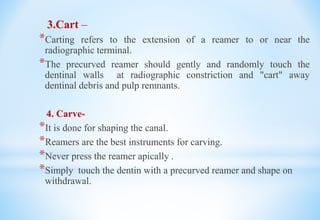
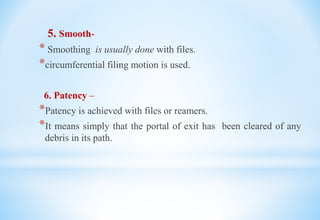
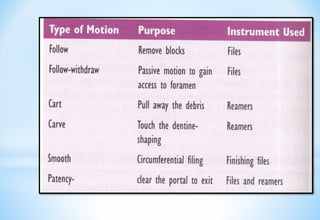
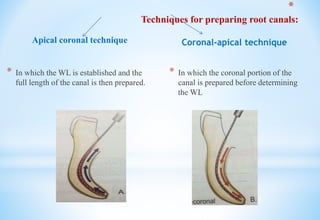
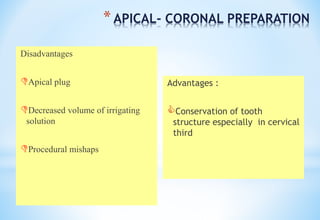
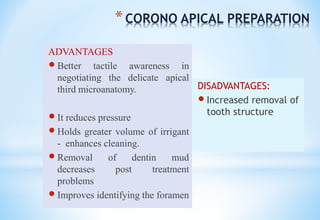
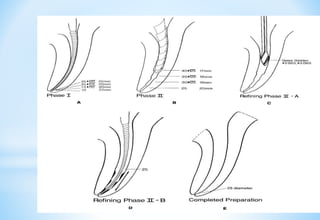
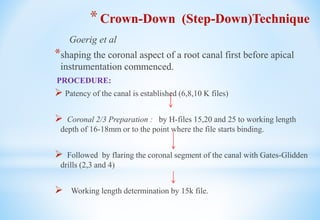
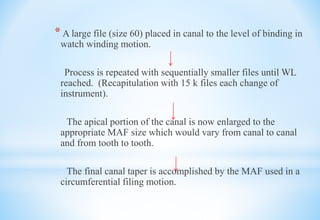
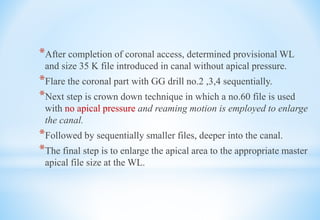
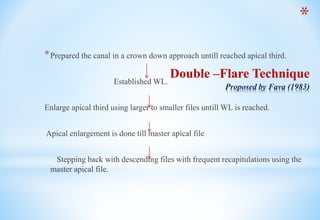
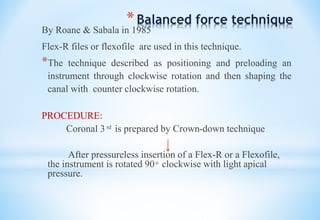
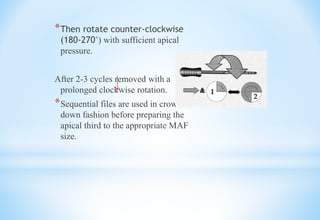
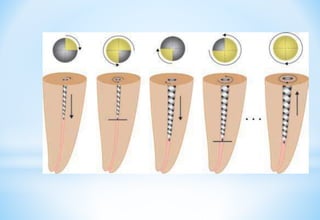
*Preparation of radicular space
instruments and technique
*CONTENTS
 Introduction
Definitions
Classification
History
Objectives
Rules for cleaning and shaping
Motions of cleaning and shaping
Techniques of cleaning and shaping
Conclusion
Refrences
*INTRODUCTION
Biomechanical preparation refers to the controlled
removal of dentin and root canal contents by
manipulation of root canal instruments and
materials.
It consists of cleaning and shaping.
*DEFINITIONS
*Shaping & Cleaning
* Shaping and cleaning of root canal consist of
removing the pulp tissue and debris from the canal
and shaping the canal to receive an obturating
material.
*Shaping
 Shaping is done to remove all the contents from the root canal system,
to work deep inside the canal, and to create a smooth, tapered opening
to the terminus for three- dimensional obturation.
* Schilder gave
5 mechanical objectives
1. The root canal preparation
should develop a continuously
tapering conical form.
2. Make the preparation in
multiple planes
3. Make the canal narrower
apically and widest coronally.
4. Avoid transportation of the
foramen.
5. Keep the apical foramen as
small as possible.
Biologic objectives
Biologic objectives are to remove the pulp tissue, bacteria
and their by-products from the root canal space.
*Procedure should confined to the root canal space.
* Necrotic debris should not be forced beyond the foramen
during canal preparation
*Remove all tissue debris from the root canal system
*Create sufficient space to receive intracanal medicament
* GROSSMAN’S RULES
1. Direct access should be obtained along a straight line.
2. Working length should be accurately determined.
3. Use of the instruments in sequential order with periodic
recapitulation.
4. Instruments should be used with quarter to half turn and
withdrawn with a pull stroke.
5.. Barbed broaches - should be used only when the canal is
wide enough to permit their Insertion & rotation without
binding.
*
6.. Instruments should be fitted with instrument stops.
7. Apical (3 to 4 mm) should be enlarged 3 sizes greater than initial apical file.
8. .Never force an instrument if it binds.
9. Instruments should be checked for deformation & discarded if strained.
10. Instrumentation should be done using sterile instruments in a wet canal.
11. Debris should not be forced through the apical foramen
12. Instruments should be confined to the root canal space to prevent periapical
trauma.
13. Precurve the file blade before instrumentation.
*
* 
Instruments shall be numbered from 10 to 100; the
* numbers to advance by 5 units to size 60 and then
* by 10 units to size 100. This has been revised to
* include numbers from 6 to 140.
* 

Each number shall be representative of the diameter
* of the instrument in hundredths of a millimeter
* at the tip; e.g., No. 10 is 10/100 or 0.1 mm at the
* tip, No. 25 is 25/100 or 0.25 mm at the tip, and No.
* 90 is 90/100 or 0.9 mm at the tip.
* 

The working blade (flutes) shall begin at the
* tip, designated site D0, and shall extend exactly
* 16 mm up the shaft, terminating at designated
* site D16.
*
*

The diameter of D16 shall be 32/100 or 0.32 mm
*greater than that of D0; e.g., a No. 20 reamer
*shall have a diameter of 0.20 mm at D0 and a
*diameter of 0.20 plus 0.32 or 0.52 mm at D16.
*This sizing ensures a constant increase in taper
*of 0.02 mm/mm for every instrument regardless
*of size.
*Following specifications were added later:
*

The tip angle of an instrument should be 75 ± 15°.
*

Instrument sizes should increase by 0.05 mm at D0,
*between Nos. 10 and 60, e.g., Nos. 10, 15, and 20,
*and they should increase by 0.1 mm from Nos. 60
*to 150, e.g., Nos. 60, 70, and 80.
*

Nos. 6 and 8 have been added for increased instrument
*selection.
*

In addition, instrument handles have been color
*coded for easier recognition
*
Fig : Specifications for an endodontic instrument. D0, diameter at the tip, in
hundredths of millimeters; D16,
diameter
in hundredths of millimeters at the end of the cutting blade, i.e., 16 mm
from D0. The taper of the instrument
from D0 to D16 is in increments of 0.02 mm in width per millimeter of length.
The tip angle of the instrument
should be 75 ± 15°.
*
*
*yyGroup I: Hand-operated endodontic instruments
*A. Barbed broaches and rasps
*B. K-type reamers and files
*C. Hedstroem files
*yyGroup II: Low-speed instruments with latchtype
*attachments
*A. Gates-Glidden drills
*B. Peeso reamers
*yyGroup III: Engine-driven instruments
*A. Rotary NiTi endodontic instruments
*B. Reciprocating instruments
*C. Self-adjusting file (SAF)
*yyGroup IV: Ultrasonic and sonic instruments
a. Barbed Broaches and Rasps Broaches and
rasps were the earliest endodontic instruments used
to extirpate the pulp and enlarge the canal. A
barbed
broach is a short-handled endodontic instrument
often used for the extirpation of the entire pulp
and for the removal of necrotic debris, absorbent
points, cotton pledgets, and other foreign materials
from the root canal.
*K-type Files
the efficiency of root canal preparation In the early
1900s,Kerr Manufacturing Company designed and
manufactured new K-type endodontic instruments to
improve efficacy of root canal .
*
*The traditional reamer, manufactured from a
triangular blank, and file, manufactured from a
square blank
Clinical Note
* Š
Š
Clinically, files and reamers are recommended to be
used in a penetration, rotation, and retraction motion.
* Š
Š
Files can also be employed in a filing or a rasping
motion once canal patency is achieved.
* Š
Š
Heuer reported that files are manufactured from
blanks twisted to produce tighter flutes, and reamers
are manufactured with looser flutes.
* Š
Š
As the use of square blanks results in instruments
that resist fracture more effectively than those made
from triangular blanks, square blanks are generally
used for smaller, fragile instruments.
,
* such as in larger instruments, triangular blanks
* are used because the triangular-
* blanked instruments
* cut approximately 2.5 times more efficiently
*
Hedstroem files, also known
* H-files, are manufactured from a round stainless steel wire
machined to produce spiral flutes resembling cones or a screw.
*This instrument has a higher cutting efficiency than K-
instruments, but it is fragile and fractures easily
*
•The Gates-Glidden drill has a long, thin shaft
ending in a flame-shaped head, with a safe tip to
guard against perforations.
•The flame head cuts laterally and is used with
gentle, apically directed pressure.
• The long shaft is designed to break at the neck,
the narrowest diameter that lies adjacent to the
handpiece.
•If the drill binds during use, it will fracture at the
neck of the shaft and will extrude from the tooth.
•The fractured segment is easily removed by
grasping
the broken shaft with pliers and pulling it out of
The Gates-Glidden drill is used to:
• Š
ŠRemove the lingual shoulder during access
preparation of the anterior teeth
• Š
ŠEnlarge root canal orifices
*
The Peeso reamer has long,sharp flutes
connected to a thick shaft .
It cuts laterally and is primarily used for the
preparation of post space when gutta-percha has
to be removed from the obturated root canal.
*
Fig:Barbed broach used for extirpation of the
pulp and gross debridement of the root canal
Endodontic instruments used for cleaning
and shaping the root canal: (a) K-file, traditionally
made from a square blank. (b) K-reamer, traditionally
made from a triangular blank. (c) Hedstroem file,
machined from a round blank to produce spiral flutes
*
*yyPhase I: Negotiating the canal—“patency
filing”
*yyPhase II: Coronal pre-enlargement
(recommended
*for certain shaping techniques)
*yyPhase III: Working length measurement
*yyPhase IV: Root canal shaping techniques
*yyPhase V: Root canal working width
*
FIG:Patency filing: (a) Radiograph (schematic
view) is studied for anatomical variations and size of
the image of the root canal. (b) and (c) A size 10 K-file
is precurved and introduced into the canal passively just
through the apical foramen. (d) The root canal is copiously
irrigated with a 5% solution of sodium hypochlorite
to remove loose debris and blood.
*
*
*I. Radiographic methods
*yyIngle’s technique (Recommended)
*yyOthers
*–– Best’s method
*–– Bregman’s method
*–– Bramante’s technique
*–– Grossman’s method
*–– Weine’s method
* yyKuttler’s method
* yyX-ray grid method
* yyXeroradiography
* yyDirect digital radiography
* II. Electronic apex locators
* III. Nonradiographic methods (not recommended)
* yyTactile sense
* yyApical periodontal sensitivity
* yyPaper point method
*Different Movements of Instruments
*Filing
*Reaming
*Combination of reaming and filing
*Watch- Winding
*Watch-winding and pull
*Balanced force motion
*Filing – It is simply an in–and–out motion of the file with
amplitude of 2-3 mm. The instrument is placed into the canal
,pressure is exerted against the canal wall,and instrument is
withdrawn without turning. The pressure is maintained
throughout the procedure.
*Reaming – It is a continuous clockwise rotation of the
instrument. Reaming produces a round tapered peparation.
Combined ream and file motion – The file is inserted with a
quarter turn clockwise rotation, and an inward directed hand
pressure (reaming) positioned into the canal by the action of the
file, and is subsequently withdrawn as a cutting motion
(filling).The rotation during placement sets the cutting edges of
the file into the dentin , and non rotating withdrawl breaks loose
the dentin that has been engaged.
*CIRCUMFERENTIAL
FILING
*It is similar to filing motion but can be used in large
diameter canals .
*The file is inserted in the root canal till apex,
laterally pressed against one side of the canal wall
and withdrawn with pulling motion, to file the
dentinal wall.
*This procedure is repeated circumferentially around
all walls of the canal.
Watch winding – It is a back and forth movement of the file
while it is gently being advanced apically. The amplitude of the motion
in a straight canal is 30-60 degree right and left from the centre point,
with a curved canal the rotation may be only a few degrees in each
direction. It is much like the file handle is being rolled back and forth
between the thumb and forefinger while a slight apical pressure is
applied.
Watch winding and pull –
*. This is primarily used with H file.
*The file inserted with right and left back and forth
motion until it meet resistance then it is taken out of
the canal by pull stroke.
* BALANCED FORCE TECHNIQUE
 Roane and Sabala gave the balanced force
technique.
 It employs new K type file designs known as
Flex- R files and Flexofile .
 Insertion is done by a quarter turn clockwise
rotation while slight or no apical pressure is
applied.
 Cutting is then accomplished by
counterclockwise rotation (180° – 270°)
applying sufficient apical pressure to the
instrument.
 The process is repeated several times till
working length is reached.
 The file is then removed from the canal by a
slow clockwise rotation.
*ANTICURVATURE FILING
 This motion was described by Abou Rass,
Glick and Frank.
 It prevents excessive removal of dentin from
thinner root sections in curved canals.
 The underlying observation was that the
furcation side (danger zone) of cross section
of mesial root of mandibular molars has less
dentin thickness than mesial side. (saftey
zone).
 It included use of precurved files that were
manipulated to file the canal away from
danger zone.
* There are 6 motions of Files and reamers.
1. Follow
 Usually performed with files.
 Initially used during cleaning and shaping, or any time an
obstruction blocks the foramen.
 Precurving all the way to the tip of the instrument is the part
of follow.
2. Follow-withdraw –
 This motion is used when the foramen is reached, and the
next step is to create the path from access cavity to foramen.
 This motion is follow and then withdraw. It is, simply, an in-
and-out, passive motion that makes no attempt to shape the
canal.
3.Cart –
*Carting refers to the extension of a reamer to or near the
radiographic terminal.
*The precurved reamer should gently and randomly touch the
dentinal walls at radiographic constriction and "cart" away
dentinal debris and pulp remnants.
4. Carve-
*It is done for shaping the canal.
*Reamers are the best instruments for carving.
*Never press the reamer apically .
*Simply touch the dentin with a precurved reamer and shape on
withdrawal.
5. Smooth-
* Smoothing is usually done with files.
*circumferential filing motion is used.
6. Patency –
*Patency is achieved with files or reamers.
*It means simply that the portal of exit has been cleared of any
debris in its path.
Techniques for
preparing root canals:
Apical coronal technique
* In which the WL is established and the
full length of the canal is then prepared.
Coronal-apical technique
* In which the coronal portion of the
canal is prepared before determining
the WL
*
Techniques for preparing root canals:
*APICAL- CORONAL PREPARATION
Disadvantages
Apical plug
Decreased volume of irrigating
solution
Procedural mishaps
Advantages :
Conservation of tooth
structure especially in cervical
third
*CORONO APICAL PREPARATION
ADVANTAGES
 Better tactile awareness in
negotiating the delicate apical
third microanatomy.
 It reduces pressure
 Holds greater volume of irrigant
- enhances cleaning.
 Removal of dentin mud
decreases post treatment
problems
 Improves identifying the foramen
DISADVANTAGES:
 Increased removal of
tooth structure
* Standardized preparation/ Single –length technique
The standardized technique uses the same WL for all
instruments introduced into a canal.
*Negotiation of fine canals is initiated with fine files that are
then advanced to WL and worked until a next larger instrument
may be used.
*Conceptually, the final shape is predicted by the last-used
instrument.
*A single matching gutta –percha point used for root canal
filling.
*The technique was easy to perform in straight canals of
mature teeth exhibiting natural taper but posed problems
in small, curved canals. As the instruments got larger, the
ability to finesse the stiff instruments to different lengths
decreased because of the restoring force of the metal. This
often resulted in ledging, apical transportation, and apical
perforation, or "zipping"
The standardized preparation technique resulted in
procedural errors when used in a curved canal. Dentin was removed
from the inner wall of the canal coronal to the curve and
from the outer wall of the canal apical to the curve.This resulted in
an "hourglass" preparation. In the apical portion the canal was
transported, or "zipped;' when larger, less flexible instruments were
used at the correct working length.
*Disadvantages
*Risk of extrusion of debris
*Alteration of working length
*Difficult to debride complex canals
*Possibility of canal deviation
* STEP BACK PREPARATION
(Telescopic, Serial root canal prep)
 Step back technique emphasizes keeping the apical
preparation small, in its original position and producing a
gradual taper coronally.
 Weine, Martin , Walton, Mullaney advocated step back.
 Mullaney divided the step back technique into two phases:
Phase I; involves the preparation of apical constriction
Phase II: involves the preparation of the remaining canal.
ADVANTAGES DISADVANTAGES
•More coronal flare
•Proper apical stop
•Difficult to irrigate apical area
• pushes the debris periapically
•Time consuming
• ledge formation
• Loss of working length
*Crown-Down (Step-Down)Technique
Goerig et al
*shaping the coronal aspect of a root canal first before apical
instrumentation commenced.
PROCEDURE:
 Patency of the canal is established (6,8,10 K files)
 Coronal 2/3 Preparation : by H-files 15,20 and 25 to working length
depth of 16-18mm or to the point where the file starts binding.
 Followed by flaring the coronal segment of the canal with Gates-Glidden
drills (2,3 and 4)
 Working length determination by 15k file.
* A large file (size 60) placed in canal to the level of binding in
watch winding motion.
Process is repeated with sequentially smaller files until WL
reached. (Recapitulation with 15 k files each change of
instrument).
The apical portion of the canal is now enlarged to the
appropriate MAF size which would vary from canal to canal
and from tooth to tooth.
The final canal taper is accomplished by the MAF used in a
circumferential filing motion.
* Advantages:
*Shaping is easier than the step back technique.
*The removal of coronal obstruction allows removal of bulk of
tissues, debris and microorganism before apical shaping.
*It minimizes the extrusion of debris through the apical foramen
thereby preventing post operative discomfort.
*It allows better access and control over the apical enlarging
instrument ,thus decreasing the incidence of zipping.
*Allows better irrigant penetration.
*Working length is less likely to change while using this
technique.
* CROWN-DOWN PRESSURE LESS
TECHNIQUE
Introduced by Marshall & Pappin
Early coronal flaring with Gates-Glidden drills is followed by
an incremental removal of dentin from coronal to apical
direction, and hence, called “crown down” technique.
Straight k-files are then used in a large to small sequence with a
reaming motion and no apical pressure- hence called ‘
pressureless’technique.
*After completion of coronal access, determined provisional WL
and size 35 K file introduced in canal without apical pressure.
*Flare the coronal part with GG drill no.2 ,3,4 sequentially.
*Next step is crown down technique in which a no.60 file is used
with no apical pressure and reaming motion is employed to enlarge
the canal.
*Followed by sequentially smaller files, deeper into the canal.
*The final step is to enlarge the apical area to the appropriate master
apical file size at the WL.
*Advantages:
*Less extrusion of debris
*Effective in maintaining canal shape
*Less chance of alteration of working length
*
Double –Flare Technique
Proposed by Fava (1983)
*Prepared the canal in a crown down approach untill reached apical third.
Established WL.
Enlarge apical third using larger to smaller files untill WL is reached.
Apical enlargement is done till master apical file
Stepping back with descending files with frequent recapitulations using the
master apical file.
*Balanced force technique
By Roane & Sabala in 1985
Flex-R files or flexofile are used in this technique.
*The technique described as positioning and preloading an
instrument through clockwise rotation and then shaping the
canal with counter clockwise rotation.
PROCEDURE:
Coronal 3 ͬ ͩ is prepared by Crown-down technique
After pressureless insertion of a Flex-R or a Flexofile,
the instrument is rotated 90 ͦ clockwise with light apical
pressure.
*Then rotate counter-clockwise
(180-270˚) with sufficient apical
pressure.
After 2-3 cycles removed with a
prolonged clockwise rotation.
*Sequential files are used in crown-
down fashion before preparing the
apical third to the appropriate MAF
size.
*Roane firmly believed in enlarging the apical area to sizes
larger than generally practiced.
*A minimum enlargement of size 45, 1.5 mm short of the apical
foramen in curved canals, is recommended and
* Size 80 in single-rooted teeth, carrying the preparation through
to ‘full length’ of the radiographic apex of the root.
ADVANTAGES:
* Reduce canal transportation and ledging.
*
Grossman’s –Root canals should be enlarged, regardless of initial
width, to remove irregularities of dentin and to make the walls
of the canal smooth and tapered.
The prepared root canal should be smooth and large enough to
allow adequate debridement and obturation. Ideally , the
minimum size to which a root canal should be enlarged can not
be standardized and varies from case to case. Eg. The canal of a
narrow tooth, such as lower incisor, can not be enlarged as much
as the canal of a lower canine.
*Conclusion
*keystones to successful root canal therapy – achieved
by proper shaping and cleaning of the root canal
system The procedures should be done precisely,
with the detail knowledge of various techniques,
properties , limitations of instruments and the root
canal anatomy.
4. Biomechanical Preparation INTRO AND TECHNIQUES

4. Biomechanical Preparation INTRO AND TECHNIQUES

  • 1.
    *Preparation of radicularspace instruments and technique
  • 2.
    *CONTENTS  Introduction Definitions Classification History Objectives Rules forcleaning and shaping Motions of cleaning and shaping Techniques of cleaning and shaping Conclusion Refrences
  • 3.
    *INTRODUCTION Biomechanical preparation refersto the controlled removal of dentin and root canal contents by manipulation of root canal instruments and materials. It consists of cleaning and shaping.
  • 4.
    *DEFINITIONS *Shaping & Cleaning *Shaping and cleaning of root canal consist of removing the pulp tissue and debris from the canal and shaping the canal to receive an obturating material.
  • 5.
    *Shaping  Shaping isdone to remove all the contents from the root canal system, to work deep inside the canal, and to create a smooth, tapered opening to the terminus for three- dimensional obturation.
  • 6.
    * Schilder gave 5mechanical objectives 1. The root canal preparation should develop a continuously tapering conical form. 2. Make the preparation in multiple planes 3. Make the canal narrower apically and widest coronally. 4. Avoid transportation of the foramen. 5. Keep the apical foramen as small as possible.
  • 7.
    Biologic objectives Biologic objectivesare to remove the pulp tissue, bacteria and their by-products from the root canal space. *Procedure should confined to the root canal space. * Necrotic debris should not be forced beyond the foramen during canal preparation *Remove all tissue debris from the root canal system *Create sufficient space to receive intracanal medicament
  • 8.
    * GROSSMAN’S RULES 1.Direct access should be obtained along a straight line. 2. Working length should be accurately determined. 3. Use of the instruments in sequential order with periodic recapitulation. 4. Instruments should be used with quarter to half turn and withdrawn with a pull stroke. 5.. Barbed broaches - should be used only when the canal is wide enough to permit their Insertion & rotation without binding.
  • 9.
    * 6.. Instruments shouldbe fitted with instrument stops. 7. Apical (3 to 4 mm) should be enlarged 3 sizes greater than initial apical file. 8. .Never force an instrument if it binds. 9. Instruments should be checked for deformation & discarded if strained. 10. Instrumentation should be done using sterile instruments in a wet canal. 11. Debris should not be forced through the apical foramen 12. Instruments should be confined to the root canal space to prevent periapical trauma. 13. Precurve the file blade before instrumentation.
  • 10.
    * *  Instruments shallbe numbered from 10 to 100; the * numbers to advance by 5 units to size 60 and then * by 10 units to size 100. This has been revised to * include numbers from 6 to 140. *   Each number shall be representative of the diameter * of the instrument in hundredths of a millimeter * at the tip; e.g., No. 10 is 10/100 or 0.1 mm at the * tip, No. 25 is 25/100 or 0.25 mm at the tip, and No. * 90 is 90/100 or 0.9 mm at the tip. *   The working blade (flutes) shall begin at the * tip, designated site D0, and shall extend exactly * 16 mm up the shaft, terminating at designated * site D16.
  • 11.
    * *  The diameter ofD16 shall be 32/100 or 0.32 mm *greater than that of D0; e.g., a No. 20 reamer *shall have a diameter of 0.20 mm at D0 and a *diameter of 0.20 plus 0.32 or 0.52 mm at D16. *This sizing ensures a constant increase in taper *of 0.02 mm/mm for every instrument regardless *of size. *Following specifications were added later: *  The tip angle of an instrument should be 75 ± 15°. *  Instrument sizes should increase by 0.05 mm at D0, *between Nos. 10 and 60, e.g., Nos. 10, 15, and 20, *and they should increase by 0.1 mm from Nos. 60 *to 150, e.g., Nos. 60, 70, and 80. *  Nos. 6 and 8 have been added for increased instrument *selection. *  In addition, instrument handles have been color *coded for easier recognition
  • 12.
    * Fig : Specificationsfor an endodontic instrument. D0, diameter at the tip, in hundredths of millimeters; D16, diameter in hundredths of millimeters at the end of the cutting blade, i.e., 16 mm from D0. The taper of the instrument from D0 to D16 is in increments of 0.02 mm in width per millimeter of length. The tip angle of the instrument should be 75 ± 15°.
  • 13.
  • 14.
    * *yyGroup I: Hand-operatedendodontic instruments *A. Barbed broaches and rasps *B. K-type reamers and files *C. Hedstroem files *yyGroup II: Low-speed instruments with latchtype *attachments *A. Gates-Glidden drills *B. Peeso reamers *yyGroup III: Engine-driven instruments *A. Rotary NiTi endodontic instruments *B. Reciprocating instruments *C. Self-adjusting file (SAF) *yyGroup IV: Ultrasonic and sonic instruments
  • 15.
    a. Barbed Broachesand Rasps Broaches and rasps were the earliest endodontic instruments used to extirpate the pulp and enlarge the canal. A barbed broach is a short-handled endodontic instrument often used for the extirpation of the entire pulp and for the removal of necrotic debris, absorbent points, cotton pledgets, and other foreign materials from the root canal.
  • 16.
    *K-type Files the efficiencyof root canal preparation In the early 1900s,Kerr Manufacturing Company designed and manufactured new K-type endodontic instruments to improve efficacy of root canal .
  • 17.
    * *The traditional reamer,manufactured from a triangular blank, and file, manufactured from a square blank
  • 18.
    Clinical Note * Š Š Clinically,files and reamers are recommended to be used in a penetration, rotation, and retraction motion. * Š Š Files can also be employed in a filing or a rasping motion once canal patency is achieved. * Š Š Heuer reported that files are manufactured from blanks twisted to produce tighter flutes, and reamers are manufactured with looser flutes. * Š Š As the use of square blanks results in instruments that resist fracture more effectively than those made from triangular blanks, square blanks are generally used for smaller, fragile instruments. , * such as in larger instruments, triangular blanks * are used because the triangular- * blanked instruments * cut approximately 2.5 times more efficiently
  • 19.
    * Hedstroem files, alsoknown * H-files, are manufactured from a round stainless steel wire machined to produce spiral flutes resembling cones or a screw. *This instrument has a higher cutting efficiency than K- instruments, but it is fragile and fractures easily
  • 20.
    * •The Gates-Glidden drillhas a long, thin shaft ending in a flame-shaped head, with a safe tip to guard against perforations. •The flame head cuts laterally and is used with gentle, apically directed pressure. • The long shaft is designed to break at the neck, the narrowest diameter that lies adjacent to the handpiece. •If the drill binds during use, it will fracture at the neck of the shaft and will extrude from the tooth. •The fractured segment is easily removed by grasping the broken shaft with pliers and pulling it out of
  • 21.
    The Gates-Glidden drillis used to: • Š ŠRemove the lingual shoulder during access preparation of the anterior teeth • Š ŠEnlarge root canal orifices
  • 23.
    * The Peeso reamerhas long,sharp flutes connected to a thick shaft . It cuts laterally and is primarily used for the preparation of post space when gutta-percha has to be removed from the obturated root canal.
  • 24.
    * Fig:Barbed broach usedfor extirpation of the pulp and gross debridement of the root canal Endodontic instruments used for cleaning and shaping the root canal: (a) K-file, traditionally made from a square blank. (b) K-reamer, traditionally made from a triangular blank. (c) Hedstroem file, machined from a round blank to produce spiral flutes
  • 25.
    * *yyPhase I: Negotiatingthe canal—“patency filing” *yyPhase II: Coronal pre-enlargement (recommended *for certain shaping techniques) *yyPhase III: Working length measurement *yyPhase IV: Root canal shaping techniques *yyPhase V: Root canal working width
  • 26.
    * FIG:Patency filing: (a)Radiograph (schematic view) is studied for anatomical variations and size of the image of the root canal. (b) and (c) A size 10 K-file is precurved and introduced into the canal passively just through the apical foramen. (d) The root canal is copiously irrigated with a 5% solution of sodium hypochlorite to remove loose debris and blood.
  • 27.
  • 28.
    * *I. Radiographic methods *yyIngle’stechnique (Recommended) *yyOthers *–– Best’s method *–– Bregman’s method *–– Bramante’s technique *–– Grossman’s method *–– Weine’s method * yyKuttler’s method * yyX-ray grid method * yyXeroradiography * yyDirect digital radiography * II. Electronic apex locators * III. Nonradiographic methods (not recommended) * yyTactile sense * yyApical periodontal sensitivity * yyPaper point method
  • 30.
    *Different Movements ofInstruments *Filing *Reaming *Combination of reaming and filing *Watch- Winding *Watch-winding and pull *Balanced force motion
  • 31.
    *Filing – Itis simply an in–and–out motion of the file with amplitude of 2-3 mm. The instrument is placed into the canal ,pressure is exerted against the canal wall,and instrument is withdrawn without turning. The pressure is maintained throughout the procedure.
  • 32.
    *Reaming – Itis a continuous clockwise rotation of the instrument. Reaming produces a round tapered peparation.
  • 33.
    Combined ream andfile motion – The file is inserted with a quarter turn clockwise rotation, and an inward directed hand pressure (reaming) positioned into the canal by the action of the file, and is subsequently withdrawn as a cutting motion (filling).The rotation during placement sets the cutting edges of the file into the dentin , and non rotating withdrawl breaks loose the dentin that has been engaged.
  • 34.
    *CIRCUMFERENTIAL FILING *It is similarto filing motion but can be used in large diameter canals . *The file is inserted in the root canal till apex, laterally pressed against one side of the canal wall and withdrawn with pulling motion, to file the dentinal wall. *This procedure is repeated circumferentially around all walls of the canal.
  • 35.
    Watch winding –It is a back and forth movement of the file while it is gently being advanced apically. The amplitude of the motion in a straight canal is 30-60 degree right and left from the centre point, with a curved canal the rotation may be only a few degrees in each direction. It is much like the file handle is being rolled back and forth between the thumb and forefinger while a slight apical pressure is applied.
  • 36.
    Watch winding andpull – *. This is primarily used with H file. *The file inserted with right and left back and forth motion until it meet resistance then it is taken out of the canal by pull stroke.
  • 37.
    * BALANCED FORCETECHNIQUE  Roane and Sabala gave the balanced force technique.  It employs new K type file designs known as Flex- R files and Flexofile .  Insertion is done by a quarter turn clockwise rotation while slight or no apical pressure is applied.  Cutting is then accomplished by counterclockwise rotation (180° – 270°) applying sufficient apical pressure to the instrument.  The process is repeated several times till working length is reached.  The file is then removed from the canal by a slow clockwise rotation.
  • 38.
    *ANTICURVATURE FILING  Thismotion was described by Abou Rass, Glick and Frank.  It prevents excessive removal of dentin from thinner root sections in curved canals.  The underlying observation was that the furcation side (danger zone) of cross section of mesial root of mandibular molars has less dentin thickness than mesial side. (saftey zone).  It included use of precurved files that were manipulated to file the canal away from danger zone.
  • 39.
    * There are6 motions of Files and reamers. 1. Follow  Usually performed with files.  Initially used during cleaning and shaping, or any time an obstruction blocks the foramen.  Precurving all the way to the tip of the instrument is the part of follow. 2. Follow-withdraw –  This motion is used when the foramen is reached, and the next step is to create the path from access cavity to foramen.  This motion is follow and then withdraw. It is, simply, an in- and-out, passive motion that makes no attempt to shape the canal.
  • 40.
    3.Cart – *Carting refersto the extension of a reamer to or near the radiographic terminal. *The precurved reamer should gently and randomly touch the dentinal walls at radiographic constriction and "cart" away dentinal debris and pulp remnants. 4. Carve- *It is done for shaping the canal. *Reamers are the best instruments for carving. *Never press the reamer apically . *Simply touch the dentin with a precurved reamer and shape on withdrawal.
  • 41.
    5. Smooth- * Smoothingis usually done with files. *circumferential filing motion is used. 6. Patency – *Patency is achieved with files or reamers. *It means simply that the portal of exit has been cleared of any debris in its path.
  • 43.
  • 44.
    Apical coronal technique *In which the WL is established and the full length of the canal is then prepared. Coronal-apical technique * In which the coronal portion of the canal is prepared before determining the WL * Techniques for preparing root canals:
  • 45.
    *APICAL- CORONAL PREPARATION Disadvantages Apicalplug Decreased volume of irrigating solution Procedural mishaps Advantages : Conservation of tooth structure especially in cervical third
  • 46.
    *CORONO APICAL PREPARATION ADVANTAGES Better tactile awareness in negotiating the delicate apical third microanatomy.  It reduces pressure  Holds greater volume of irrigant - enhances cleaning.  Removal of dentin mud decreases post treatment problems  Improves identifying the foramen DISADVANTAGES:  Increased removal of tooth structure
  • 47.
    * Standardized preparation/Single –length technique The standardized technique uses the same WL for all instruments introduced into a canal. *Negotiation of fine canals is initiated with fine files that are then advanced to WL and worked until a next larger instrument may be used. *Conceptually, the final shape is predicted by the last-used instrument. *A single matching gutta –percha point used for root canal filling.
  • 48.
    *The technique waseasy to perform in straight canals of mature teeth exhibiting natural taper but posed problems in small, curved canals. As the instruments got larger, the ability to finesse the stiff instruments to different lengths decreased because of the restoring force of the metal. This often resulted in ledging, apical transportation, and apical perforation, or "zipping"
  • 49.
    The standardized preparationtechnique resulted in procedural errors when used in a curved canal. Dentin was removed from the inner wall of the canal coronal to the curve and from the outer wall of the canal apical to the curve.This resulted in an "hourglass" preparation. In the apical portion the canal was transported, or "zipped;' when larger, less flexible instruments were used at the correct working length.
  • 50.
    *Disadvantages *Risk of extrusionof debris *Alteration of working length *Difficult to debride complex canals *Possibility of canal deviation
  • 51.
    * STEP BACKPREPARATION (Telescopic, Serial root canal prep)  Step back technique emphasizes keeping the apical preparation small, in its original position and producing a gradual taper coronally.  Weine, Martin , Walton, Mullaney advocated step back.  Mullaney divided the step back technique into two phases: Phase I; involves the preparation of apical constriction Phase II: involves the preparation of the remaining canal.
  • 53.
    ADVANTAGES DISADVANTAGES •More coronalflare •Proper apical stop •Difficult to irrigate apical area • pushes the debris periapically •Time consuming • ledge formation • Loss of working length
  • 54.
    *Crown-Down (Step-Down)Technique Goerig etal *shaping the coronal aspect of a root canal first before apical instrumentation commenced. PROCEDURE:  Patency of the canal is established (6,8,10 K files)  Coronal 2/3 Preparation : by H-files 15,20 and 25 to working length depth of 16-18mm or to the point where the file starts binding.  Followed by flaring the coronal segment of the canal with Gates-Glidden drills (2,3 and 4)  Working length determination by 15k file.
  • 55.
    * A largefile (size 60) placed in canal to the level of binding in watch winding motion. Process is repeated with sequentially smaller files until WL reached. (Recapitulation with 15 k files each change of instrument). The apical portion of the canal is now enlarged to the appropriate MAF size which would vary from canal to canal and from tooth to tooth. The final canal taper is accomplished by the MAF used in a circumferential filing motion.
  • 56.
    * Advantages: *Shaping iseasier than the step back technique. *The removal of coronal obstruction allows removal of bulk of tissues, debris and microorganism before apical shaping. *It minimizes the extrusion of debris through the apical foramen thereby preventing post operative discomfort. *It allows better access and control over the apical enlarging instrument ,thus decreasing the incidence of zipping. *Allows better irrigant penetration. *Working length is less likely to change while using this technique.
  • 57.
    * CROWN-DOWN PRESSURELESS TECHNIQUE Introduced by Marshall & Pappin Early coronal flaring with Gates-Glidden drills is followed by an incremental removal of dentin from coronal to apical direction, and hence, called “crown down” technique. Straight k-files are then used in a large to small sequence with a reaming motion and no apical pressure- hence called ‘ pressureless’technique.
  • 58.
    *After completion ofcoronal access, determined provisional WL and size 35 K file introduced in canal without apical pressure. *Flare the coronal part with GG drill no.2 ,3,4 sequentially. *Next step is crown down technique in which a no.60 file is used with no apical pressure and reaming motion is employed to enlarge the canal. *Followed by sequentially smaller files, deeper into the canal. *The final step is to enlarge the apical area to the appropriate master apical file size at the WL.
  • 59.
    *Advantages: *Less extrusion ofdebris *Effective in maintaining canal shape *Less chance of alteration of working length
  • 60.
    * Double –Flare Technique Proposedby Fava (1983) *Prepared the canal in a crown down approach untill reached apical third. Established WL. Enlarge apical third using larger to smaller files untill WL is reached. Apical enlargement is done till master apical file Stepping back with descending files with frequent recapitulations using the master apical file.
  • 61.
    *Balanced force technique ByRoane & Sabala in 1985 Flex-R files or flexofile are used in this technique. *The technique described as positioning and preloading an instrument through clockwise rotation and then shaping the canal with counter clockwise rotation. PROCEDURE: Coronal 3 ͬ ͩ is prepared by Crown-down technique After pressureless insertion of a Flex-R or a Flexofile, the instrument is rotated 90 ͦ clockwise with light apical pressure.
  • 62.
    *Then rotate counter-clockwise (180-270˚)with sufficient apical pressure. After 2-3 cycles removed with a prolonged clockwise rotation. *Sequential files are used in crown- down fashion before preparing the apical third to the appropriate MAF size.
  • 64.
    *Roane firmly believedin enlarging the apical area to sizes larger than generally practiced. *A minimum enlargement of size 45, 1.5 mm short of the apical foramen in curved canals, is recommended and * Size 80 in single-rooted teeth, carrying the preparation through to ‘full length’ of the radiographic apex of the root. ADVANTAGES: * Reduce canal transportation and ledging.
  • 65.
    * Grossman’s –Root canalsshould be enlarged, regardless of initial width, to remove irregularities of dentin and to make the walls of the canal smooth and tapered. The prepared root canal should be smooth and large enough to allow adequate debridement and obturation. Ideally , the minimum size to which a root canal should be enlarged can not be standardized and varies from case to case. Eg. The canal of a narrow tooth, such as lower incisor, can not be enlarged as much as the canal of a lower canine.
  • 67.
    *Conclusion *keystones to successfulroot canal therapy – achieved by proper shaping and cleaning of the root canal system The procedures should be done precisely, with the detail knowledge of various techniques, properties , limitations of instruments and the root canal anatomy.