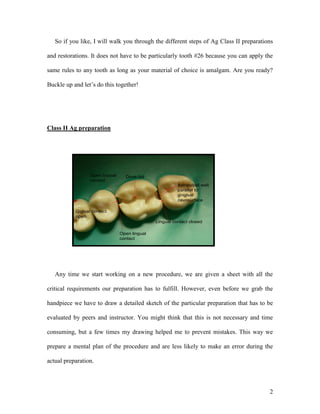
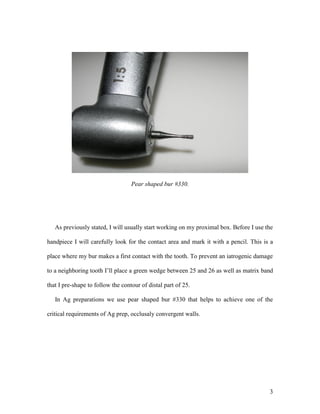
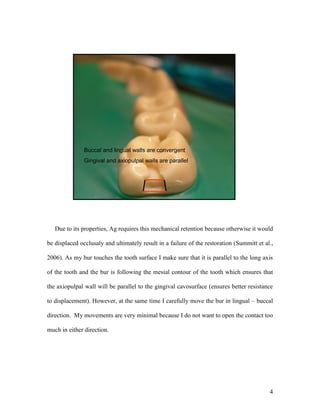
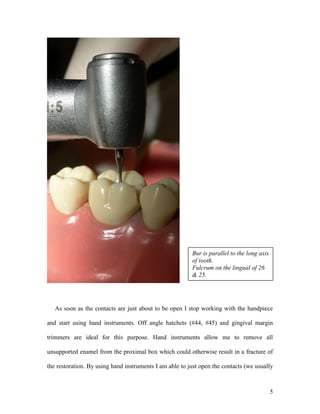
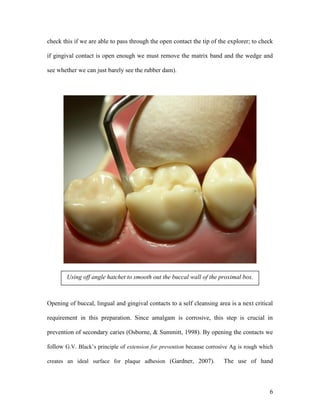
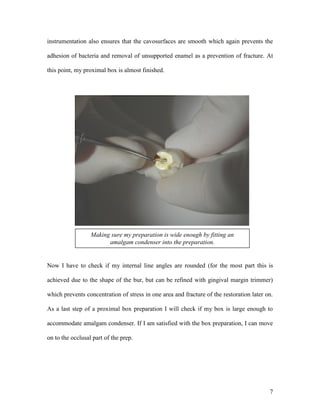
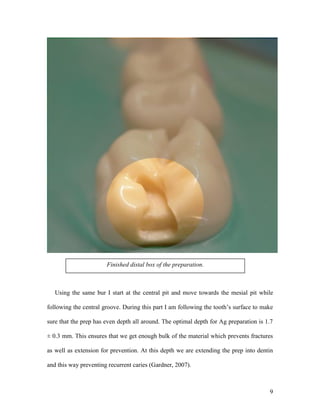
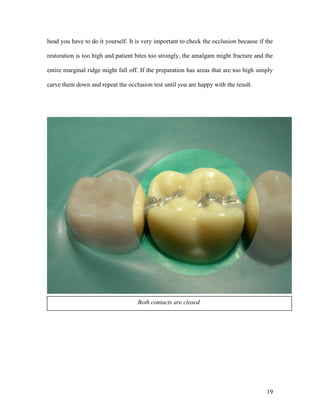
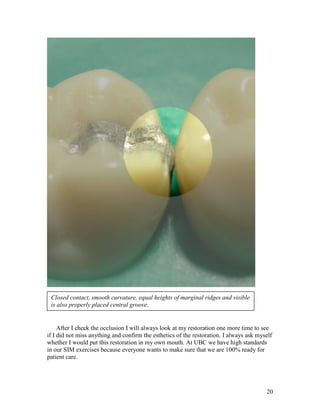
# 26 MO/DO Class II Amalgam Preparation and Restoration

Dear colleague,

  I have decided to present to you this specific preparation and restoration since on this

example I can show you the best all the do’s and dont’s of an amalgam preparation and

restoration. This exercise is one of the requirements that we have to meet before we are

allowed to start treating patients.

   I have found this particular preparation as one of the more difficult ones because in

order to finish it both mesial and distal parts of the prep have to be well done. The first

time I have attempted to do this preparation I started with the occlusal surface and then

continued with the proximal box. However, at the end, my prep did not meet the specific

requirements because the box had a triangular shape and no reverse “S”. I was wondering

what I was doing wrong, but then during one of our lessons Dr. Gardner suggested to first

start working on the proximal box and finish it, then do the occlusal part of the prep and

only at the end to connect the two. During our next evening practice session I have

attempted this approach and right away I could see the difference!!! You might say that

this was my break through moment and from then on I always start Class II preparations

(amalgam and composite) with the proximal box.


                                                                                         1
So if you like, I will walk you through the different steps of Ag Class II preparations

and restorations. It does not have to be particularly tooth #26 because you can apply the

same rules to any tooth as long as your material of choice is amalgam. Are you ready?

Buckle up and let’s do this together!


Class II Ag preparation


                 Open buccal     Dove tail
                 contact
                                                        Axiopulpal wall
                                                        parallel to
                                                        gingival
                                                        cavosurface

           Gigival contact
           open
                                              Lingual contact closed

                               Open lingual
                               contact


   Any time we start working on a new procedure, we are given a sheet with all the

critical requirements our preparation has to fulfill. However, even before we grab the

handpiece we have to draw a detailed sketch of the particular preparation that has to be

evaluated by peers and instructor. You might think that this is not necessary and time

consuming, but a few times my drawing helped me to prevent mistakes. This way we

prepare a mental plan of the procedure and are less likely to make an error during the

actual preparation.


                                                                                        2
Pear shaped bur #330.


   As previously stated, I will usually start working on my proximal box. Before I use the

handpiece I will carefully look for the contact area and mark it with a pencil. This is a

place where my bur makes a first contact with the tooth. To prevent an iatrogenic damage

to a neighboring tooth I’ll place a green wedge between 25 and 26 as well as matrix band

that I pre-shape to follow the contour of distal part of 25.

   In Ag preparations we use pear shaped bur #330 that helps to achieve one of the

critical requirements of Ag prep, occlusaly convergent walls.


                                                                                        3
Buccal and lingual walls are convergent
               Gingival and axiopulpal walls are parallel


   Due to its properties, Ag requires this mechanical retention because otherwise it would

be displaced occlusaly and ultimately result in a failure of the restoration (Summitt et al.,

2006). As my bur touches the tooth surface I make sure that it is parallel to the long axis

of the tooth and the bur is following the mesial contour of the tooth which ensures that

the axiopulpal wall will be parallel to the gingival cavosurface (ensures better resistance

to displacement). However, at the same time I carefully move the bur in lingual – buccal

direction. My movements are very minimal because I do not want to open the contact too

much in either direction.


                                                                                           4
Bur is parallel to the long axis
                                                         of tooth.
                                                         Fulcrum on the lingual of 26
                                                         & 25.


   As soon as the contacts are just about to be open I stop working with the handpiece

and start using hand instruments. Off angle hatchets (#44, #45) and gingival margin

trimmers are ideal for this purpose. Hand instruments allow me to remove all

unsupported enamel from the proximal box which could otherwise result in a fracture of

the restoration. By using hand instruments I am able to just open the contacts (we usually


                                                                                            5
check this if we are able to pass through the open contact the tip of the explorer; to check

if gingival contact is open enough we must remove the matrix band and the wedge and

see whether we can just barely see the rubber dam).


        Using off angle hatchet to smooth out the buccal wall of the proximal box.


Opening of buccal, lingual and gingival contacts to a self cleansing area is a next critical

requirement in this preparation. Since amalgam is corrosive, this step is crucial in

prevention of secondary caries (Osborne, & Summitt, 1998). By opening the contacts we

follow G.V. Black’s principle of extension for prevention because corrosive Ag is rough which

creates an ideal surface for plaque adhesion (Gardner, 2007).           The use of hand


                                                                                           6
instrumentation also ensures that the cavosurfaces are smooth which again prevents the

adhesion of bacteria and removal of unsupported enamel as a prevention of fracture. At

this point, my proximal box is almost finished.


                  Making sure my preparation is wide enough by fitting an
                        amalgam condenser into the preparation.


Now I have to check if my internal line angles are rounded (for the most part this is

achieved due to the shape of the bur, but can be refined with gingival margin trimmer)

which prevents concentration of stress in one area and fracture of the restoration later on.

As a last step of a proximal box preparation I will check if my box is large enough to

accommodate amalgam condenser. If I am satisfied with the box preparation, I can move

on to the occlusal part of the prep.


                                                                                          7
Measuring the depth with PQW
                    probe.


Using off angle hatchet to finish the buccal wall.


                                                     8
Finished distal box of the preparation.


   Using the same bur I start at the central pit and move towards the mesial pit while

following the central groove. During this part I am following the tooth’s surface to make

sure that the prep has even depth all around. The optimal depth for Ag preparation is 1.7

± 0.3 mm. This ensures that we get enough bulk of the material which prevents fractures

as well as extension for prevention. At this depth we are extending the prep into dentin

and this way preventing recurrent caries (Gardner, 2007).


                                                                                       9
Checking for even depth on the occlusal part of the preparation.


   After I got the basic shape of the occlusal part I extend my prep facially from the

central pit following the facial groove to form a “dove tail”. This feature further enhances

the mechanical retention of the material and also serves as an extension for prevention

since caries usually extend further following the grooves and fissures. Now I have only

one thing to do: connect the proximal box with the occlusal prep by which I create

reverse “S” that helps to circumvent the cusps and prevent unnecessary removal of a

sound tooth structure and therefore weakening the tooth. This connection has to have

smooth, rounded curves to prevent stress accumulation. It also gives bulk to amalgam and

helps to create cavosurface margins that are 90° (due to the angulation of enamel rods at

this area this ensures removal of unsupported enamel rods).


                                                                                         10
At the end, I do a final check with a probe to see whether all my walls are convergent,

the surfaces are smooth with even depth and not undercuts. I repeat the same process with

the distal part of the preparation since same rules and restrictions apply.


 Features of the Class II preparation: open gingival, lingual, buccal contacts; dove
 tail; reverse “S”; convergent walls; even depth; smooth surfaces; no sharp angles.


                                                                                       11
Class II Ag restoration

   Before I start with the actual restoration I make sure that my preparation is clean and

there is no debris. Then I put a tofflemire matrix holder with a pre-shaped matrix band

around the tooth. With a handle of a hand instrument I pre-shape the matrix band in such

a way that in the proximal areas it flares away from my prepped tooth towards the

neighboring one. This ensures that in the proximal area I can condense amalgam really

well and close the contact between the teeth. The placement of a green wedge between

the teeth pushes the teeth even further apart and once the wedge is removed the contact

closes much better.

   In our clinic we use 1 or 2 spill amalgam capsules. I prefer to use the 1 spill capsules

which I put into the amalgamator for 5 seconds. I add the first amalgam into the proximal

box and using bucco-lingual movements I pack it well into the box and against the

proximal walls of the box. In a similar fashion I keep adding more amalgam into the

whole prep until it is quite full. I start with the smallest condenser, but as I am

approaching the surface I’ll switch to a larger size. I always make sure that my prep is

overfilled because this way I am sure that I do not overcarve and end up with voids. I do

my rough carving using the Half Hollenback carver with the matrix still on. Using an

explorer at 45° angle to the tooth surface I start shaping the marginal ridge and removing

excess amalgam from the lingual and buccal surfaces of the proximal box. Then I loosen

up the matrix band and with an explorer remove excess amalgam from the lingual and

buccal surfaces. When I am finished, I will remove the tofflemire matrix holder, but leave

the matrix band in place. I pull both loose ends of the matrix band away from the 26 and

straighten them. The next step can be tricky and extra caution at this step never hurts. To


                                                                                        12
avoid pulling out the freshly packed amalgam from the prep I will put my index finger on

the top of the proximal box and with the other hand I gently pull out the matrix band and

exhale if everything went smoothly.


        Removing excess amalgam with an explorer.


                                                                                      13
With the pointed end of the beach carver I remove excess amalgam from the

interproximal area, making sure that it is flush with no overhangs.


                                                          Using half Hollenback to place
                                                          the central groove.


At this point I start carving the occlusal part of my restoration. To place the central

groove I use the Half Hollenback carver, where with the flat part of the instrument I

closely follow the tooth surface while the tip is centered between the facial and lingual

cusps forming the groove. Then I switch to cleoid-discoid in order to place the mesial pit.


 Carving the mesial pit with
 cleoid – discoid carver.


                                                                                         14
Properly carved distal
                                                                 pit.


   At this time the amalgam is quite set and does not “crumble” as easily which means

that this is the best time to form the marginal ridge. Previously, I used the spoon

excavator and with gentle rounding strokes I went a few times over the ridge. Since we

have switched to a new type of spoon excavator that is not as suitable for this purpose as

the previous one I use the cleoid-discoid carver.


                                                                                       15
Smooth, rounded marginal ridge at level with neighboring tooth.


Marginal ridge has to be smooth without voids and following a tooth curvature which

was challenging to achieve at the beginning because previously I was impatient and

started to work on the marginal ridge too early. I trim the ridge until it is level with

adjacent tooth which I check using a probe.


                                                                                     16
Checking the height of the marginal ridge using the explorer.


   This brings me almost to the end of my restoration (of course now I have the distal

part to do) and do my final checks. I look whether my restoration is not over- or

undercarved which will result in plaque accumulation, if I achieved proper position of

pits, cusps and their alignment. The surface of the entire restoration must be smooth with

no scratches, overhangs or voids. I’ll clean up the restoration from amalgam shavings

(usually we use moist cotton pellet) and check if the contact between 25 and 26 is closed.

To do this I perform the light test when I look directly between the interproximal area of

these two teeth (similar as when you do bitewings X-rays) and check if there is a light

shining through (if it does  contact is not closed) or carry out the floss test. Before you


                                                                                         17
do floss tests make sure that the amalgam is fully set because this way a few of my

classmates destroyed their restorations. You simply attempt to floss between 25 and 26. If

the contact is properly closed you must feel a resistance while pushing the floss in and

out. As I got more efficient and faster I began to restore both the mesial and distal parts

of the preparation at the same time.


                                       Closed contact.


   As the final stop on our road to a perfect restoration, is the occlusion test. Take the

articulating paper forceps (with articulating paper inserted!) and tell the patient to gently

close the mouth and tap his/her teeth a few times. If you are working on your mannequin


                                                                                          18
head you have to do it yourself. It is very important to check the occlusion because if the

restoration is too high and patient bites too strongly, the amalgam might fracture and the

entire marginal ridge might fall off. If the preparation has areas that are too high simply

carve them down and repeat the occlusion test until you are happy with the result.


                                    Both contacts are closed.


                                                                                        19
Closed contact, smooth curvature, equal heights of marginal ridges and visible
 is also properly placed central groove.


     After I check the occlusion I will always look at my restoration one more time to see
if I did not miss anything and confirm the esthetics of the restoration. I always ask myself
whether I would put this restoration in my own mouth. At UBC we have high standards
in our SIM exercises because everyone wants to make sure that we are 100% ready for
patient care.


                                                                                         20
If you have any questions with regards to any step of the procedure post it in our chat
room and I will try to clarify it to the best of my abilities. I am looking forward to read
your entry and compare the different approaches to dental procedures.

Thank you for your time.

Sincerely,
Monika Schneiderova
DMD’09


References:

Gardner, K. (2007). Class II amalgam preparation handouts. Vancouver: UBC Faculty of
Dentistry.

Lussi, A. & Gygax, M. (1998). Iatrogenic damage to adjacent teeth during classical

approximal box preparation. Journal of Dentistry, 26, 435-441.


Qvist, V., Johannessen, L., Bruun, M. (1992). Progression of approxiaml caries in
relation of iatrogenic preparation damage. J Dent Res, 71, 1370-1373.

Roberson, T., Heyman, H., Swift, E. (2006). Art and science of operative dentistry (5th
ed.). St. Louis: Mosby Inc.

Summitt, J.B., Robbins, J.W., Hilton, T.J, & Schwartz, R.S. (2006) Fundamentals of
operative dentistry: a contemporary approach (3rd ed.). Illinois: Quintessence Publishing
Co.

Sturdevant, C.M., (1995). The Art and Science of Operative Dentistry. St. Louis: Mosby


                                                                                          21

26 mo

  • 1.
    # 26 MO/DOClass II Amalgam Preparation and Restoration Dear colleague, I have decided to present to you this specific preparation and restoration since on this example I can show you the best all the do’s and dont’s of an amalgam preparation and restoration. This exercise is one of the requirements that we have to meet before we are allowed to start treating patients. I have found this particular preparation as one of the more difficult ones because in order to finish it both mesial and distal parts of the prep have to be well done. The first time I have attempted to do this preparation I started with the occlusal surface and then continued with the proximal box. However, at the end, my prep did not meet the specific requirements because the box had a triangular shape and no reverse “S”. I was wondering what I was doing wrong, but then during one of our lessons Dr. Gardner suggested to first start working on the proximal box and finish it, then do the occlusal part of the prep and only at the end to connect the two. During our next evening practice session I have attempted this approach and right away I could see the difference!!! You might say that this was my break through moment and from then on I always start Class II preparations (amalgam and composite) with the proximal box. 1
  • 2.
    So if youlike, I will walk you through the different steps of Ag Class II preparations and restorations. It does not have to be particularly tooth #26 because you can apply the same rules to any tooth as long as your material of choice is amalgam. Are you ready? Buckle up and let’s do this together! Class II Ag preparation Open buccal Dove tail contact Axiopulpal wall parallel to gingival cavosurface Gigival contact open Lingual contact closed Open lingual contact Any time we start working on a new procedure, we are given a sheet with all the critical requirements our preparation has to fulfill. However, even before we grab the handpiece we have to draw a detailed sketch of the particular preparation that has to be evaluated by peers and instructor. You might think that this is not necessary and time consuming, but a few times my drawing helped me to prevent mistakes. This way we prepare a mental plan of the procedure and are less likely to make an error during the actual preparation. 2
  • 3.
    Pear shaped bur#330. As previously stated, I will usually start working on my proximal box. Before I use the handpiece I will carefully look for the contact area and mark it with a pencil. This is a place where my bur makes a first contact with the tooth. To prevent an iatrogenic damage to a neighboring tooth I’ll place a green wedge between 25 and 26 as well as matrix band that I pre-shape to follow the contour of distal part of 25. In Ag preparations we use pear shaped bur #330 that helps to achieve one of the critical requirements of Ag prep, occlusaly convergent walls. 3
  • 4.
    Buccal and lingualwalls are convergent Gingival and axiopulpal walls are parallel Due to its properties, Ag requires this mechanical retention because otherwise it would be displaced occlusaly and ultimately result in a failure of the restoration (Summitt et al., 2006). As my bur touches the tooth surface I make sure that it is parallel to the long axis of the tooth and the bur is following the mesial contour of the tooth which ensures that the axiopulpal wall will be parallel to the gingival cavosurface (ensures better resistance to displacement). However, at the same time I carefully move the bur in lingual – buccal direction. My movements are very minimal because I do not want to open the contact too much in either direction. 4
  • 5.
    Bur is parallelto the long axis of tooth. Fulcrum on the lingual of 26 & 25. As soon as the contacts are just about to be open I stop working with the handpiece and start using hand instruments. Off angle hatchets (#44, #45) and gingival margin trimmers are ideal for this purpose. Hand instruments allow me to remove all unsupported enamel from the proximal box which could otherwise result in a fracture of the restoration. By using hand instruments I am able to just open the contacts (we usually 5
  • 6.
    check this ifwe are able to pass through the open contact the tip of the explorer; to check if gingival contact is open enough we must remove the matrix band and the wedge and see whether we can just barely see the rubber dam). Using off angle hatchet to smooth out the buccal wall of the proximal box. Opening of buccal, lingual and gingival contacts to a self cleansing area is a next critical requirement in this preparation. Since amalgam is corrosive, this step is crucial in prevention of secondary caries (Osborne, & Summitt, 1998). By opening the contacts we follow G.V. Black’s principle of extension for prevention because corrosive Ag is rough which creates an ideal surface for plaque adhesion (Gardner, 2007). The use of hand 6
  • 7.
    instrumentation also ensuresthat the cavosurfaces are smooth which again prevents the adhesion of bacteria and removal of unsupported enamel as a prevention of fracture. At this point, my proximal box is almost finished. Making sure my preparation is wide enough by fitting an amalgam condenser into the preparation. Now I have to check if my internal line angles are rounded (for the most part this is achieved due to the shape of the bur, but can be refined with gingival margin trimmer) which prevents concentration of stress in one area and fracture of the restoration later on. As a last step of a proximal box preparation I will check if my box is large enough to accommodate amalgam condenser. If I am satisfied with the box preparation, I can move on to the occlusal part of the prep. 7
  • 8.
    Measuring the depthwith PQW probe. Using off angle hatchet to finish the buccal wall. 8
  • 9.
    Finished distal boxof the preparation. Using the same bur I start at the central pit and move towards the mesial pit while following the central groove. During this part I am following the tooth’s surface to make sure that the prep has even depth all around. The optimal depth for Ag preparation is 1.7 ± 0.3 mm. This ensures that we get enough bulk of the material which prevents fractures as well as extension for prevention. At this depth we are extending the prep into dentin and this way preventing recurrent caries (Gardner, 2007). 9
  • 10.
    Checking for evendepth on the occlusal part of the preparation. After I got the basic shape of the occlusal part I extend my prep facially from the central pit following the facial groove to form a “dove tail”. This feature further enhances the mechanical retention of the material and also serves as an extension for prevention since caries usually extend further following the grooves and fissures. Now I have only one thing to do: connect the proximal box with the occlusal prep by which I create reverse “S” that helps to circumvent the cusps and prevent unnecessary removal of a sound tooth structure and therefore weakening the tooth. This connection has to have smooth, rounded curves to prevent stress accumulation. It also gives bulk to amalgam and helps to create cavosurface margins that are 90° (due to the angulation of enamel rods at this area this ensures removal of unsupported enamel rods). 10
  • 11.
    At the end,I do a final check with a probe to see whether all my walls are convergent, the surfaces are smooth with even depth and not undercuts. I repeat the same process with the distal part of the preparation since same rules and restrictions apply. Features of the Class II preparation: open gingival, lingual, buccal contacts; dove tail; reverse “S”; convergent walls; even depth; smooth surfaces; no sharp angles. 11
  • 12.
    Class II Agrestoration Before I start with the actual restoration I make sure that my preparation is clean and there is no debris. Then I put a tofflemire matrix holder with a pre-shaped matrix band around the tooth. With a handle of a hand instrument I pre-shape the matrix band in such a way that in the proximal areas it flares away from my prepped tooth towards the neighboring one. This ensures that in the proximal area I can condense amalgam really well and close the contact between the teeth. The placement of a green wedge between the teeth pushes the teeth even further apart and once the wedge is removed the contact closes much better. In our clinic we use 1 or 2 spill amalgam capsules. I prefer to use the 1 spill capsules which I put into the amalgamator for 5 seconds. I add the first amalgam into the proximal box and using bucco-lingual movements I pack it well into the box and against the proximal walls of the box. In a similar fashion I keep adding more amalgam into the whole prep until it is quite full. I start with the smallest condenser, but as I am approaching the surface I’ll switch to a larger size. I always make sure that my prep is overfilled because this way I am sure that I do not overcarve and end up with voids. I do my rough carving using the Half Hollenback carver with the matrix still on. Using an explorer at 45° angle to the tooth surface I start shaping the marginal ridge and removing excess amalgam from the lingual and buccal surfaces of the proximal box. Then I loosen up the matrix band and with an explorer remove excess amalgam from the lingual and buccal surfaces. When I am finished, I will remove the tofflemire matrix holder, but leave the matrix band in place. I pull both loose ends of the matrix band away from the 26 and straighten them. The next step can be tricky and extra caution at this step never hurts. To 12
  • 13.
    avoid pulling outthe freshly packed amalgam from the prep I will put my index finger on the top of the proximal box and with the other hand I gently pull out the matrix band and exhale if everything went smoothly. Removing excess amalgam with an explorer. 13
  • 14.
    With the pointedend of the beach carver I remove excess amalgam from the interproximal area, making sure that it is flush with no overhangs. Using half Hollenback to place the central groove. At this point I start carving the occlusal part of my restoration. To place the central groove I use the Half Hollenback carver, where with the flat part of the instrument I closely follow the tooth surface while the tip is centered between the facial and lingual cusps forming the groove. Then I switch to cleoid-discoid in order to place the mesial pit. Carving the mesial pit with cleoid – discoid carver. 14
  • 15.
    Properly carved distal pit. At this time the amalgam is quite set and does not “crumble” as easily which means that this is the best time to form the marginal ridge. Previously, I used the spoon excavator and with gentle rounding strokes I went a few times over the ridge. Since we have switched to a new type of spoon excavator that is not as suitable for this purpose as the previous one I use the cleoid-discoid carver. 15
  • 16.
    Smooth, rounded marginalridge at level with neighboring tooth. Marginal ridge has to be smooth without voids and following a tooth curvature which was challenging to achieve at the beginning because previously I was impatient and started to work on the marginal ridge too early. I trim the ridge until it is level with adjacent tooth which I check using a probe. 16
  • 17.
    Checking the heightof the marginal ridge using the explorer. This brings me almost to the end of my restoration (of course now I have the distal part to do) and do my final checks. I look whether my restoration is not over- or undercarved which will result in plaque accumulation, if I achieved proper position of pits, cusps and their alignment. The surface of the entire restoration must be smooth with no scratches, overhangs or voids. I’ll clean up the restoration from amalgam shavings (usually we use moist cotton pellet) and check if the contact between 25 and 26 is closed. To do this I perform the light test when I look directly between the interproximal area of these two teeth (similar as when you do bitewings X-rays) and check if there is a light shining through (if it does  contact is not closed) or carry out the floss test. Before you 17
  • 18.
    do floss testsmake sure that the amalgam is fully set because this way a few of my classmates destroyed their restorations. You simply attempt to floss between 25 and 26. If the contact is properly closed you must feel a resistance while pushing the floss in and out. As I got more efficient and faster I began to restore both the mesial and distal parts of the preparation at the same time. Closed contact. As the final stop on our road to a perfect restoration, is the occlusion test. Take the articulating paper forceps (with articulating paper inserted!) and tell the patient to gently close the mouth and tap his/her teeth a few times. If you are working on your mannequin 18
  • 19.
    head you haveto do it yourself. It is very important to check the occlusion because if the restoration is too high and patient bites too strongly, the amalgam might fracture and the entire marginal ridge might fall off. If the preparation has areas that are too high simply carve them down and repeat the occlusion test until you are happy with the result. Both contacts are closed. 19
  • 20.
    Closed contact, smoothcurvature, equal heights of marginal ridges and visible is also properly placed central groove. After I check the occlusion I will always look at my restoration one more time to see if I did not miss anything and confirm the esthetics of the restoration. I always ask myself whether I would put this restoration in my own mouth. At UBC we have high standards in our SIM exercises because everyone wants to make sure that we are 100% ready for patient care. 20
  • 21.
    If you haveany questions with regards to any step of the procedure post it in our chat room and I will try to clarify it to the best of my abilities. I am looking forward to read your entry and compare the different approaches to dental procedures. Thank you for your time. Sincerely, Monika Schneiderova DMD’09 References: Gardner, K. (2007). Class II amalgam preparation handouts. Vancouver: UBC Faculty of Dentistry. Lussi, A. & Gygax, M. (1998). Iatrogenic damage to adjacent teeth during classical approximal box preparation. Journal of Dentistry, 26, 435-441. Qvist, V., Johannessen, L., Bruun, M. (1992). Progression of approxiaml caries in relation of iatrogenic preparation damage. J Dent Res, 71, 1370-1373. Roberson, T., Heyman, H., Swift, E. (2006). Art and science of operative dentistry (5th ed.). St. Louis: Mosby Inc. Summitt, J.B., Robbins, J.W., Hilton, T.J, & Schwartz, R.S. (2006) Fundamentals of operative dentistry: a contemporary approach (3rd ed.). Illinois: Quintessence Publishing Co. Sturdevant, C.M., (1995). The Art and Science of Operative Dentistry. St. Louis: Mosby 21