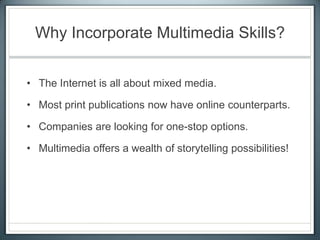
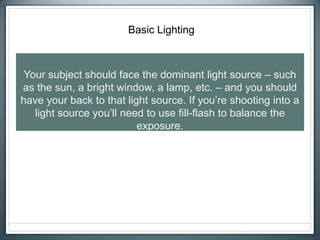
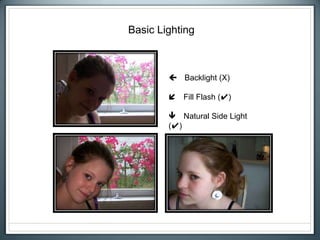
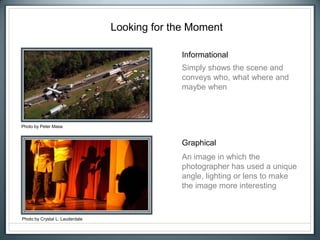
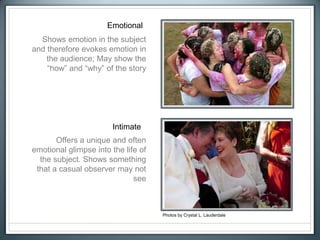
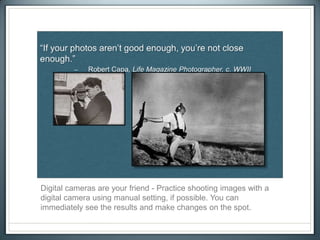
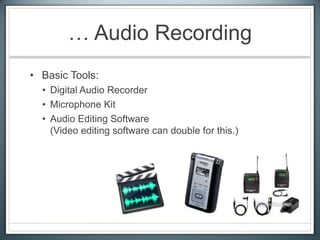
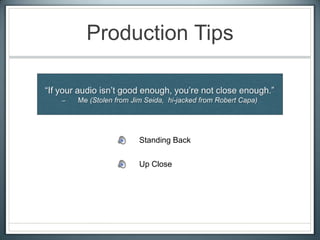
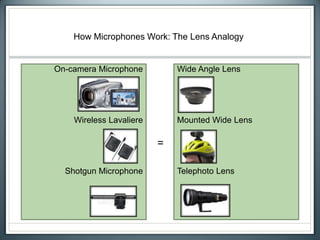
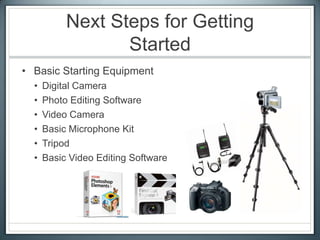
Multimedia Storytelling:
Tools, Tips and Workflow
Why Incorporate Multimedia Skills?
• The Internet is all about mixed media.
• Most print publications now have online counterparts.
• Companies are looking for one-stop options.
• Multimedia offers a wealth of storytelling possibilities!
Objectives
• Introduce multimedia options.
• Make you familiar with audio-visual terms.
• Give you an overview of the production process.
• Give you a starting point with multimedia.
Multimedia = Multi-tasking
• Broader Job Descriptions:
• Reporters need stronger visual skills.
• Photographers need stronger writing and reporting skills.
• Designers need new software skills.
• New Tools For Everyone:
How can we be good
(or at least better) at everything?
• Hands-on practice: Get out
and try it!
• Know and use your strengths.
• Acknowledge and improve
your weaknesses.
• Maintain a passion for
STORYTELLING!
Photo by Alan Youngblood
“The story means more than the delivery systems
involved, and that includes the writer ... For a while I
was very aware that I was looking at a screen and
bopping a button instead of turning pages. Then the
story simply swallowed me, as the good ones always
do … It became about the message instead of the
medium, and that’s the way it’s supposed to be.”
Stephen King about the Kindle …
Getting Started With …
• Digital Photography
• Audio Recording
• Audio-Visual Combos (Slideshows & Video)
… Digital Photography
• Basic Tools:
• Digital Camera
• Photo Editing Software
Production Tips
• Composition
• Background
• Lighting
• Moment
Composition
• Rule of Thirds
Position the subject of your image in one third of the frame rather than in the
center. Put them on the far right, far left, top or bottom.
Poor use of the Rule of Thirds
Good use of the Rule of Thirds
Photo by Crystal L. Lauderdale
Background
Clean
Photo by Crystal L. Lauderdale
Using depth-of-field/focus, lighting or a solid background
Informational
Additive
Photos by Crystal L. Lauderdale
Basic Lighting
Your subject should face the dominant light source – such
as the sun, a bright window, a lamp, etc. – and you should
have your back to that light source. If you’re shooting into a
light source you’ll need to use fill-flash to balance the
exposure.
Basic Lighting
 Backlight (X)
 Fill Flash (✔)
 Natural Side Light
(✔)
Looking for the Moment
Informational
Graphical
Photo by Crystal L. Lauderdale
Photo by Peter Masa
Simply shows the scene and
conveys who, what where and
maybe when
An image in which the
photographer has used a unique
angle, lighting or lens to make
the image more interesting
Emotional
Intimate
Photos by Crystal L. Lauderdale
Shows emotion in the subject
and therefore evokes emotion in
the audience; May show the
“how” and “why” of the story
Offers a unique and often
emotional glimpse into the life of
the subject. Shows something
that a casual observer may not
see
Digital cameras are your friend - Practice shooting images with a
digital camera using manual setting, if possible. You can
immediately see the results and make changes on the spot.
… Audio Recording
• Basic Tools:
• Digital Audio Recorder
• Microphone Kit
• Audio Editing Software
(Video editing software can double for this.)
Production Tips
Standing Back
Up Close
How Microphones Work: The Lens Analogy
On-camera Microphone
Wireless Lavaliere
Shotgun Microphone
Wide Angle Lens
Mounted Wide Lens
Telephoto Lens
=
Interviewing for Audio Stories:
Getting Good Sound Bites As Well As Information
• Facts and Emotion
• Stacking the Questions
• Silence is Golden
• Going to Extremes
Headphones
… Audio Slideshows
• Basic Tools:
• Digital Camera
• Photo Editing Software
• Digital Audio Recorder
• Microphone Kit
• Audio/Video Editing Software
• Slideshow Editing Software
Production Tips
• Key Element = Variety of Strong Visuals
• Supporting Element = Audio Track
• Follow rules for collecting strong images and audio.
• Collect wide, medium and tight shots.
• Collect ambient sound for every “scene”.
• Show every sound.
• Variety of strong images
• Ambient sound for every scene; Showing every sound
• Variety of strong images with supporting audio track
15-Minute Break
… Video
• Basic Tools:
• Video Camera
• Microphone Kit
• Tripod
• Video Editing Software
Production Tips
• Key Element = Strong Audio Track
• Supporting Element = Visual Footage
Three Rules
1) Steady Footage
2) Clean Audio
3) Focused Story
Video Types
• Voiceover (VO)
• Voiceover + Sound-bite (VO-SOT)
“Tornado Drill” VO – WFLA-TV
• Package
• Stand-ups:
• Provide information that you don’t have matching footage for
• Serve as a transition in the story
“Sebring Hurricane” by Paul Lamison, WFLA-TV
Choosing A Voice: Natural Sound
• No reporter track
• Sound-bites and ambient audio only
“Goin’ Places”
• Reporter track provides context
• Similar writing structure to print
Choosing A Voice: Narration
“Nick Nelson” by Akagi and Fryer, KARE
We Shoot the Way We See
(or at least we should)
• Steady footage
• No panning or zooming
• 10-second rule
• Wide, medium, tight and super-
tight
• Shoot and move
• Enter frame, exit frame
• Action, reaction
• Sequencing (3s and 5s)
• Dave Wertheimer’s Shooting Techniques: Part I
• Dave Wertheimer’s Shooting Techniques: Part II
• Action/reaction; Enter frame-exit frame; Wide, medium and tight shots
“Pearl Harbor Remembered” by Paul Lamison, WFLA-TV
• Sequencing; Enter frame-exit frame
• Action/reaction; Sequencing; Ambient audio
Presenting Your Ideas
• A-Roll:
• Interviews, soundbites and narration
• The audio skeleton of your A/V story
• B-Roll:
• All supporting footage
• The visual meat of your A/V story
• Log:
• Transcript of relevant interview and natural sound bites
• Script:
• Written audio outline of your A/V story
• Audio skeleton of your story
“Votes for Women” by Crystal L. Lauderdale, New York Times Regional Media Group
• Storyboard:
• Visual outline of your A/V story
• May include subject notes
Next Steps for Getting
Started
• Basic Starting Equipment
• Digital Camera
• Photo Editing Software
• Video Camera
• Basic Microphone Kit
• Tripod
• Basic Video Editing Software
It’s About Storytelling!
Instructor
Crystal L. Lauderdale
crystal@crystallauderdale.com

2008 Multimedia Primer

  • 1.
  • 2.
    Why Incorporate MultimediaSkills? • The Internet is all about mixed media. • Most print publications now have online counterparts. • Companies are looking for one-stop options. • Multimedia offers a wealth of storytelling possibilities!
  • 3.
    Objectives • Introduce multimediaoptions. • Make you familiar with audio-visual terms. • Give you an overview of the production process. • Give you a starting point with multimedia.
  • 4.
    Multimedia = Multi-tasking •Broader Job Descriptions: • Reporters need stronger visual skills. • Photographers need stronger writing and reporting skills. • Designers need new software skills. • New Tools For Everyone:
  • 5.
    How can webe good (or at least better) at everything? • Hands-on practice: Get out and try it! • Know and use your strengths. • Acknowledge and improve your weaknesses. • Maintain a passion for STORYTELLING! Photo by Alan Youngblood
  • 6.
    “The story meansmore than the delivery systems involved, and that includes the writer ... For a while I was very aware that I was looking at a screen and bopping a button instead of turning pages. Then the story simply swallowed me, as the good ones always do … It became about the message instead of the medium, and that’s the way it’s supposed to be.” Stephen King about the Kindle …
  • 7.
    Getting Started With… • Digital Photography • Audio Recording • Audio-Visual Combos (Slideshows & Video)
  • 8.
    … Digital Photography •Basic Tools: • Digital Camera • Photo Editing Software
  • 9.
    Production Tips • Composition •Background • Lighting • Moment
  • 10.
    Composition • Rule ofThirds Position the subject of your image in one third of the frame rather than in the center. Put them on the far right, far left, top or bottom.
  • 11.
    Poor use ofthe Rule of Thirds Good use of the Rule of Thirds
  • 12.
    Photo by CrystalL. Lauderdale
  • 13.
    Photo by CrystalL. Lauderdale
  • 14.
  • 15.
    Clean Photo by CrystalL. Lauderdale Using depth-of-field/focus, lighting or a solid background
  • 16.
  • 17.
    Basic Lighting Your subjectshould face the dominant light source – such as the sun, a bright window, a lamp, etc. – and you should have your back to that light source. If you’re shooting into a light source you’ll need to use fill-flash to balance the exposure.
  • 18.
    Basic Lighting  Backlight(X)  Fill Flash (✔)  Natural Side Light (✔)
  • 19.
    Looking for theMoment Informational Graphical Photo by Crystal L. Lauderdale Photo by Peter Masa Simply shows the scene and conveys who, what where and maybe when An image in which the photographer has used a unique angle, lighting or lens to make the image more interesting
  • 20.
    Emotional Intimate Photos by CrystalL. Lauderdale Shows emotion in the subject and therefore evokes emotion in the audience; May show the “how” and “why” of the story Offers a unique and often emotional glimpse into the life of the subject. Shows something that a casual observer may not see
  • 21.
    Digital cameras areyour friend - Practice shooting images with a digital camera using manual setting, if possible. You can immediately see the results and make changes on the spot.
  • 22.
    … Audio Recording •Basic Tools: • Digital Audio Recorder • Microphone Kit • Audio Editing Software (Video editing software can double for this.)
  • 23.
  • 24.
    How Microphones Work:The Lens Analogy On-camera Microphone Wireless Lavaliere Shotgun Microphone Wide Angle Lens Mounted Wide Lens Telephoto Lens =
  • 27.
    Interviewing for AudioStories: Getting Good Sound Bites As Well As Information • Facts and Emotion • Stacking the Questions • Silence is Golden • Going to Extremes
  • 28.
  • 29.
    … Audio Slideshows •Basic Tools: • Digital Camera • Photo Editing Software • Digital Audio Recorder • Microphone Kit • Audio/Video Editing Software • Slideshow Editing Software
  • 30.
    Production Tips • KeyElement = Variety of Strong Visuals • Supporting Element = Audio Track • Follow rules for collecting strong images and audio. • Collect wide, medium and tight shots. • Collect ambient sound for every “scene”. • Show every sound.
  • 31.
    • Variety ofstrong images
  • 32.
    • Ambient soundfor every scene; Showing every sound
  • 33.
    • Variety ofstrong images with supporting audio track
  • 34.
  • 35.
    … Video • BasicTools: • Video Camera • Microphone Kit • Tripod • Video Editing Software
  • 36.
    Production Tips • KeyElement = Strong Audio Track • Supporting Element = Visual Footage Three Rules 1) Steady Footage 2) Clean Audio 3) Focused Story
  • 37.
    Video Types • Voiceover(VO) • Voiceover + Sound-bite (VO-SOT) “Tornado Drill” VO – WFLA-TV
  • 38.
    • Package • Stand-ups: •Provide information that you don’t have matching footage for • Serve as a transition in the story “Sebring Hurricane” by Paul Lamison, WFLA-TV
  • 39.
    Choosing A Voice:Natural Sound • No reporter track • Sound-bites and ambient audio only “Goin’ Places”
  • 40.
    • Reporter trackprovides context • Similar writing structure to print Choosing A Voice: Narration “Nick Nelson” by Akagi and Fryer, KARE
  • 41.
    We Shoot theWay We See (or at least we should) • Steady footage • No panning or zooming • 10-second rule • Wide, medium, tight and super- tight • Shoot and move • Enter frame, exit frame • Action, reaction • Sequencing (3s and 5s)
  • 42.
    • Dave Wertheimer’sShooting Techniques: Part I
  • 43.
    • Dave Wertheimer’sShooting Techniques: Part II
  • 44.
    • Action/reaction; Enterframe-exit frame; Wide, medium and tight shots “Pearl Harbor Remembered” by Paul Lamison, WFLA-TV
  • 45.
    • Sequencing; Enterframe-exit frame
  • 46.
  • 47.
    Presenting Your Ideas •A-Roll: • Interviews, soundbites and narration • The audio skeleton of your A/V story • B-Roll: • All supporting footage • The visual meat of your A/V story
  • 49.
    • Log: • Transcriptof relevant interview and natural sound bites
  • 50.
    • Script: • Writtenaudio outline of your A/V story • Audio skeleton of your story
  • 51.
    “Votes for Women”by Crystal L. Lauderdale, New York Times Regional Media Group
  • 52.
    • Storyboard: • Visualoutline of your A/V story • May include subject notes
  • 53.
    Next Steps forGetting Started • Basic Starting Equipment • Digital Camera • Photo Editing Software • Video Camera • Basic Microphone Kit • Tripod • Basic Video Editing Software
  • 54.
  • 55.

Editor's Notes

  • #5 Digital camerasAudio recordersVideo camerasMobile devices Laptops, air cards and multimedia software
  • #6 (Photo by Alan Youngblood)
  • #25 On-camera Microphone = Wide Angle Lens:Picks up sound from around the entire scene. Get closer to sound to make it more dominant.Wireless Lavaliere = Mounted (Wide) Lens:Picks up sound from around the entire scene. Can be mounted near ANY audio source to hone in on sounds. Shotgun (Directional) Microphone = Telephoto Lens:Picks up sound in the precise direction you point it. Hones in on sound from a distance and blocks most surrounding noise.
  • #26 (Clip by Jim Seida)
  • #27 (Clip by Jim Seida)
  • #31 Avoid showing a single image for longer than 5 seconds.Edit audio track to fit visuals. Workflow:Step 1: Select and edit you images.Step 2: Edit your audio track based on the number of images you select. Figure 5 seconds per image. (30 images X 5 seconds each = 2 minute, 30 second audio track.
  • #33 (Clip by Jim Seida)
  • #34 (Clip by Jim Seida)
  • #38 (Clip: Tornado Drill VO by WFLA)
  • #39 (Clip: “Sebring Hurricane” by Paul Lamison)
  • #40 Natural Sound – Interview sound bites and ambient sound only. No reporter track. Can give a documentary-style feel to a storyCan be time-consumingTelling a video story in natural sound only is like writing an article in nothing but quotes. (ClipGoin’ Places by Denver)
  • #41 Narration – Reporter track provides context, sound bites support storyCan save time in productionCan be used to explain broad concepts in video and bridge gaps in time and location(Clip: “Nick Nelson” by Akagi/Fryer KARE-Minneapolis)
  • #42 Steady footage (“The world is your tripod!” – Chris Taylor, WFLA-TV Photographer)No panning or zoomingHold shots for 10 seconds and let action pass throughWide, medium, tight and super-tight shotsShoot and moveAllow subjects to enter the frame and exit the frameLook for action and reactionSequencingShoot scenes in 3s and 5s (3-5 varying shots of the same action – wide, medium, tight and super tight)WorkflowStep 1: Record video, conduct interviewsStep 2: Log interviews (transcribe time code and complete soundbites that you might use in your story.Step 3: Write your script. Include your narration and the soundbites you’ve chosen. Write in present tense and casual tone. Step 4: Editing:Lay down your audio track based on the script you’ve constructed.Fill in extra visuals (b-roll) over that. NOTE: Your audio track is the key element of your video story. Edit visuals to fit your audio track!
  • #45 (Clip: “Pearl Harbor Remembered” by Paul Lamison WFLA-TV)
  • #46 (Clip: “The Contender” by John Samuels/Atlanta)
  • #47 (Clip: “The Art of Compassion” by John Drilling, KARE Minneapolis)
  • #52 (Clip: “Votes for Women” by Crystal L. Lauderdale)
  • #55 It’s still about STORYTELLING! Beginning, middle and endInformation and emotionThe rest is up to you!