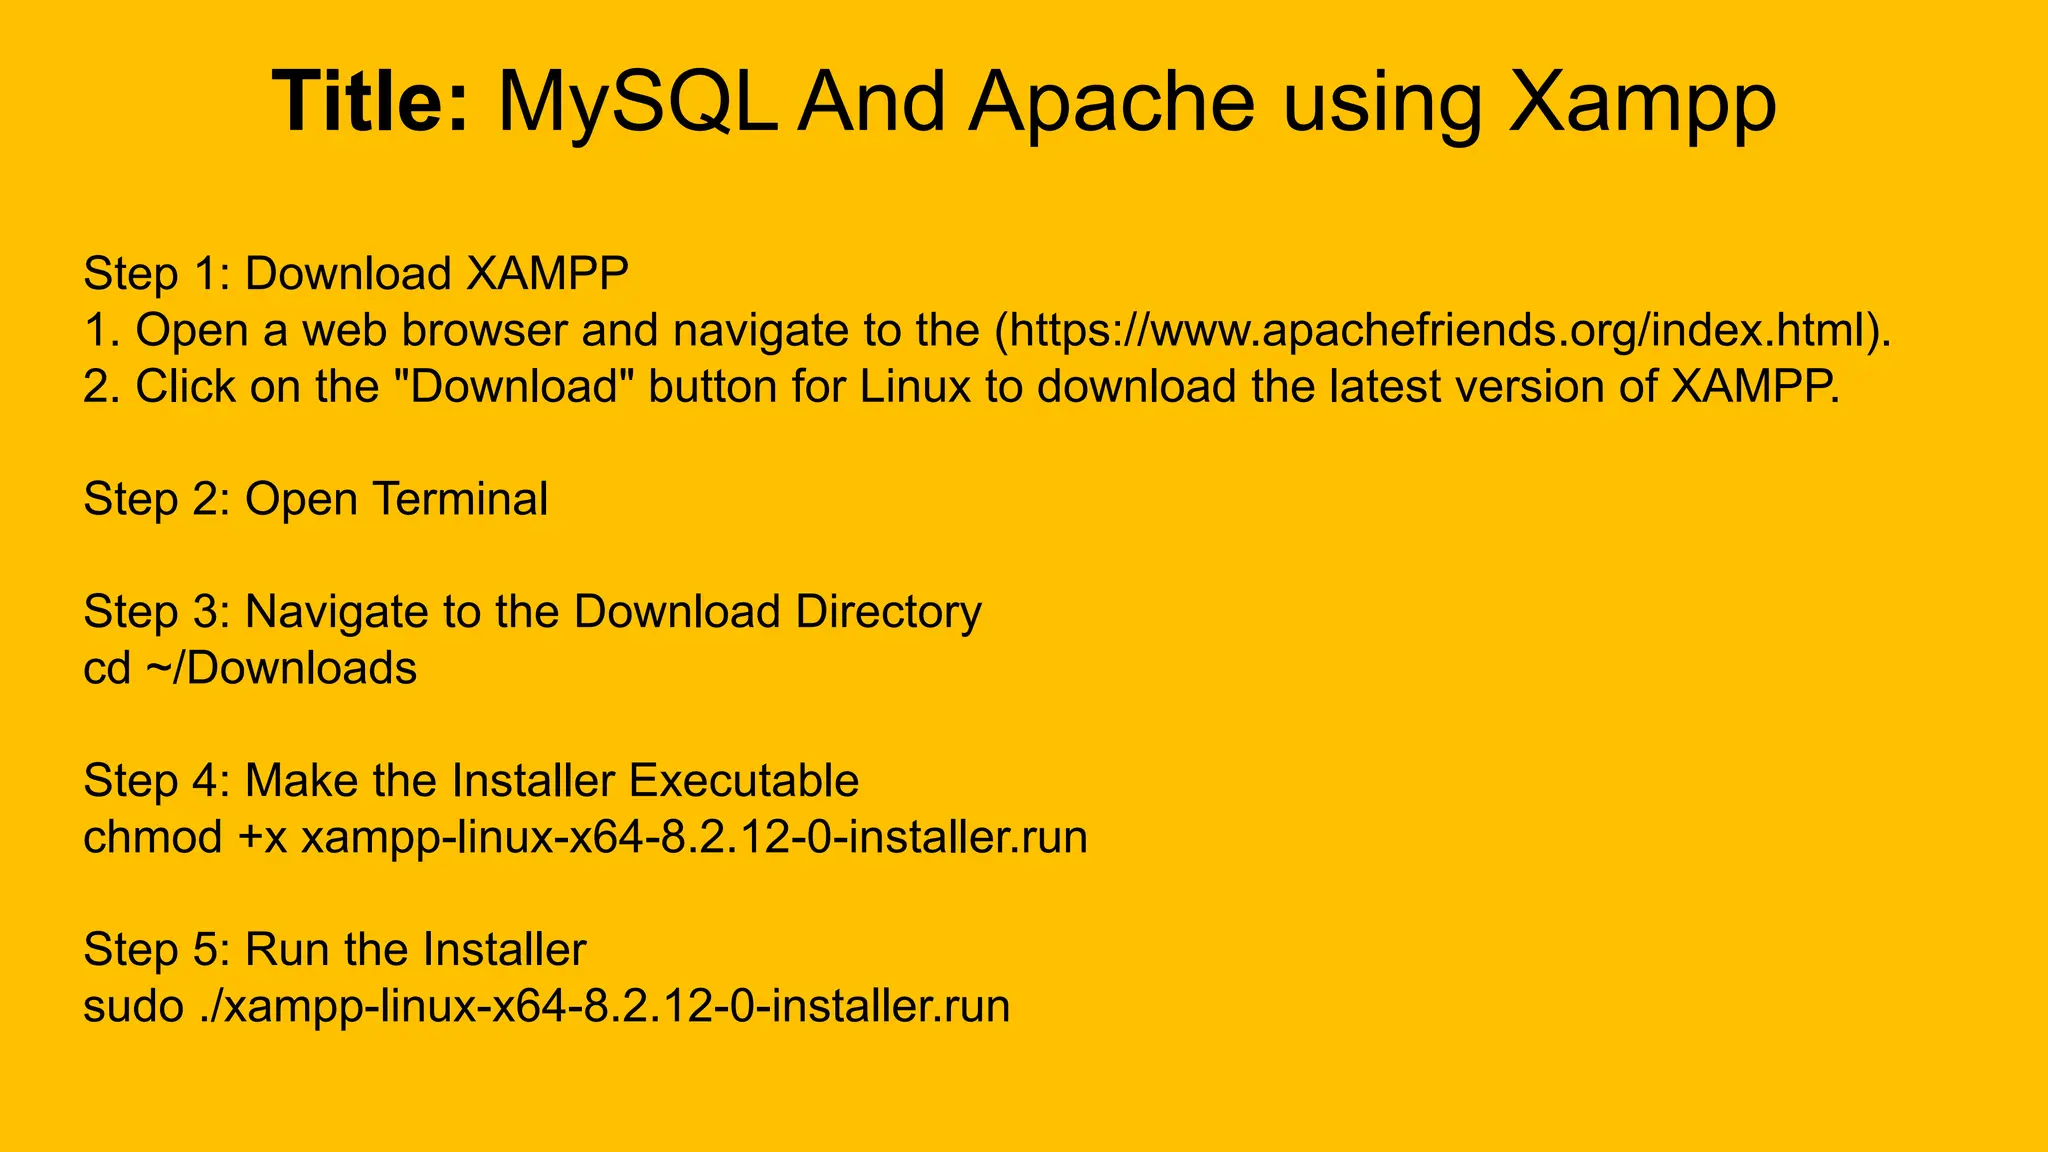
Title: Introduction to Kali Linux
By Vikas Naik
Title: Setting Up Apache Server
1. Install Apache:
- Use sudo apt install apache2 to install.
2. Start Apache:
- Begin with sudo systemctl start apache2.
3. Enable Auto-Start:
- Ensure Apache starts on boot with sudo
systemctl enable apache2.
4. Check Status:
- Verify status with sudo systemctl status apache2.
5. Access Default Page:
- Open http://localhost or http://<your_server_ip>
in a browser.
6. Configure Apache:
- Main config: /etc/apache2/apache2.conf.
- Virtual hosts: /etc/apache2/sites-available/.
7. Create Virtual Hosts:
- Customize settings for different websites.
8. Test Configuration:
- Validate syntax using sudo apache2ctl configtest.
9. Apply Changes:
- Restart Apache for changes: sudo systemctl restart apache2.
10. View Logs:
- Check logs in /var/log/apache2/.
- Use tail -f /var/log/apache2/error.log for real-time errors.
11. Secure Apache:
- Adjust firewall: sudo ufw allow Apache Full.
- Set up SSL for HTTPS.
12. Additional Modules:
- Install modules like PHP with sudo apt install libapache2-mod-php.
Title: Configuring MySQL Database
1. Install MySQL Server:
- Use sudo apt install mysql-server for installation.
2. Start MySQL Service:
- Begin with sudo systemctl start mysql.
3. Enable MySQL on Boot:
- Ensure auto-start with sudo systemctl enable mysql.
4. Secure MySQL Installation:
- Run sudo mysql_secure_installation to set root password and improve security.
5. Access MySQL Shell:
- Enter MySQL shell with sudo mysql -u root -p.
6. Create a New MySQL User:
- Use SQL commands to create a user and grant privileges.
7. Create Databases:
- Create databases for applications with CREATE DATABASE dbname;.
8. Manage MySQL Users:
- Grant and revoke privileges with SQL commands.
9. Configure MySQL Options:
- Modify settings in /etc/mysql/mysql.conf.d/mysqld.cnf for performance and security.
10. Import and Export Data:
- Use mysqldump and mysql commands for data backup and restore.
11. Monitor MySQL Performance:
- Utilize mysqladmin for performance monitoring and diagnostics.
12. Secure MySQL Connections:
- Enable SSL encryption and configure firewall rules.
Title: MySQL And Apache using Xampp
Step 1: Download XAMPP
1. Open a web browser and navigate to the (https://www.apachefriends.org/index.html).
2. Click on the "Download" button for Linux to download the latest version of XAMPP.
Step 2: Open Terminal
Step 3: Navigate to the Download Directory
cd ~/Downloads
Step 4: Make the Installer Executable
chmod +x xampp-linux-x64-8.2.12-0-installer.run
Step 5: Run the Installer
sudo ./xampp-linux-x64-8.2.12-0-installer.run
Step 6: Follow the Setup Wizard
1. The XAMPP setup wizard will start.
2. Click "Next" to proceed through the installation steps.
3. Choose the components you want to install (default selections are usually fine).
4. Click "Next" and then "Next" again.
5. Finally, click "Finish" to complete the installation.
Step 7: Start XAMPP
To start XAMPP, open the terminal and run: sudo /opt/lampp/lampp start
Step 8: Verify Installation
Open a web browser and navigate to http://localhost. You should see the XAMPP welcome page.
Step 9: Manage XAMPP
To open the XAMPP control panel, use the following command:
sudo /opt/lampp/manager-linux-x64.run
Title: Q&A

2-Setting Up Servers of apache and kali linux.pptx

  • 1.
    Title: Introduction toKali Linux By Vikas Naik
  • 2.
    Title: Setting UpApache Server 1. Install Apache: - Use sudo apt install apache2 to install. 2. Start Apache: - Begin with sudo systemctl start apache2. 3. Enable Auto-Start: - Ensure Apache starts on boot with sudo systemctl enable apache2. 4. Check Status: - Verify status with sudo systemctl status apache2. 5. Access Default Page: - Open http://localhost or http://<your_server_ip> in a browser.
  • 3.
    6. Configure Apache: -Main config: /etc/apache2/apache2.conf. - Virtual hosts: /etc/apache2/sites-available/. 7. Create Virtual Hosts: - Customize settings for different websites. 8. Test Configuration: - Validate syntax using sudo apache2ctl configtest. 9. Apply Changes: - Restart Apache for changes: sudo systemctl restart apache2. 10. View Logs: - Check logs in /var/log/apache2/. - Use tail -f /var/log/apache2/error.log for real-time errors. 11. Secure Apache: - Adjust firewall: sudo ufw allow Apache Full. - Set up SSL for HTTPS. 12. Additional Modules: - Install modules like PHP with sudo apt install libapache2-mod-php.
  • 4.
    Title: Configuring MySQLDatabase 1. Install MySQL Server: - Use sudo apt install mysql-server for installation. 2. Start MySQL Service: - Begin with sudo systemctl start mysql. 3. Enable MySQL on Boot: - Ensure auto-start with sudo systemctl enable mysql. 4. Secure MySQL Installation: - Run sudo mysql_secure_installation to set root password and improve security. 5. Access MySQL Shell: - Enter MySQL shell with sudo mysql -u root -p. 6. Create a New MySQL User: - Use SQL commands to create a user and grant privileges.
  • 5.
    7. Create Databases: -Create databases for applications with CREATE DATABASE dbname;. 8. Manage MySQL Users: - Grant and revoke privileges with SQL commands. 9. Configure MySQL Options: - Modify settings in /etc/mysql/mysql.conf.d/mysqld.cnf for performance and security. 10. Import and Export Data: - Use mysqldump and mysql commands for data backup and restore. 11. Monitor MySQL Performance: - Utilize mysqladmin for performance monitoring and diagnostics. 12. Secure MySQL Connections: - Enable SSL encryption and configure firewall rules.
  • 6.
    Title: MySQL AndApache using Xampp Step 1: Download XAMPP 1. Open a web browser and navigate to the (https://www.apachefriends.org/index.html). 2. Click on the "Download" button for Linux to download the latest version of XAMPP. Step 2: Open Terminal Step 3: Navigate to the Download Directory cd ~/Downloads Step 4: Make the Installer Executable chmod +x xampp-linux-x64-8.2.12-0-installer.run Step 5: Run the Installer sudo ./xampp-linux-x64-8.2.12-0-installer.run
  • 7.
    Step 6: Followthe Setup Wizard 1. The XAMPP setup wizard will start. 2. Click "Next" to proceed through the installation steps. 3. Choose the components you want to install (default selections are usually fine). 4. Click "Next" and then "Next" again. 5. Finally, click "Finish" to complete the installation. Step 7: Start XAMPP To start XAMPP, open the terminal and run: sudo /opt/lampp/lampp start Step 8: Verify Installation Open a web browser and navigate to http://localhost. You should see the XAMPP welcome page. Step 9: Manage XAMPP To open the XAMPP control panel, use the following command: sudo /opt/lampp/manager-linux-x64.run
  • 8.