Download to read offline


![Contd..
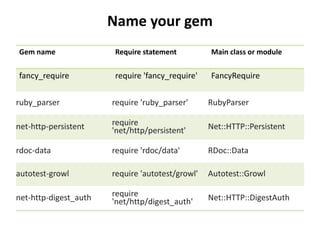
% cat freewill.gemspec
Gem::Specification.new do |s|
s.name = 'freewill‘
s.version = '1.0.0'
s.summary = "Freewill!"
s.description = "I will choose Freewill!"
s.authors = ["Nick Quaranto"]
s.email = 'nick@quaran.to‘
s.homepage = 'http://example.com/freewill'
s.files = ["lib/freewill.rb", ...]
end](https://image.slidesharecdn.com/11-rubygems-200815125750/85/11-Ruby-Gems-7-320.jpg)


This document discusses Ruby gems, including: - How to interact with gems using the gem command to search, install, uninstall, list, and view documentation for gems. - The standard structure for gems including code, tests, documentation, and a gemspec file. - How to create your own gem including naming conventions, building a gemspec, and publishing the gem to RubyGems.org.


![[Blibli Brown Bag] Nodejs - The Other Side of Javascript](https://cdn.slidesharecdn.com/ss_thumbnails/i9sycn9mqmawqhdzv0i6-signature-6c4174f35aa29065af3a8befc1a3a39ca764f84b5c082116486141991cd72c8c-poli-160225041632-thumbnail.jpg?width=640&height=640&fit=bounds)