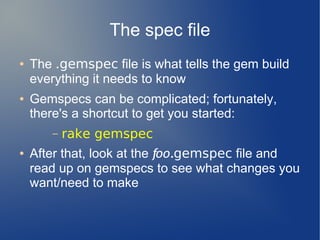
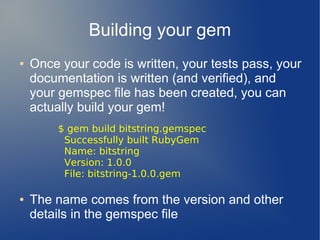
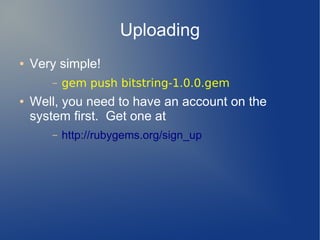
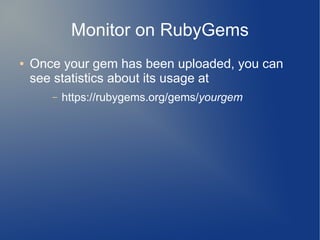
How to Write a Gem for Beginners
                     Ken C oar
Disclaimer
●   Don't be confused by the session title; this isn't
           –   How to write a 'gem for beginners'
●   It's
           –   'How to write a gem' for beginners
●   Also, Ken (that's me) doesn't profess to be an
    expert at any of this; he's just sharing
    experiences of what worked
Why?
●   You've seen all the Ruby gems available, and
    heard a lot about them. Where do they come
    from? How do you create one? And why would
    you want to?
●   There is no One True Way to create a gem, and
    different people will give you different
    recommendations.
●   This session describes one of the many paths
    available from 'why?' to 'ta-daah!' It worked for
    me; it might work for you too.
Pick a Licence
●   Why? Well, because Ruby is an interpreter,
    and offering up a gem to the chaos of the
    Internet is essentially opening the source code
    to the Universe
●   Do you care how your code may be used? To
    save lives? To crack banks? To guide
    missiles? To run gigantic financial institutions?
    To run schools? Think about it.
●   If you really don't care at all, maybe putting it in
    the public domain is the answer.
Source Control
●   You're gonna make mistakes, and want to back
    away from them – possibly hurriedly
●   You might want to have co-developers
●   Git is currently very popular with the Ruby
    crowd; after an initial bad reaction (because of
    a basic misunderstanding I had about it), I've
    come to prefer it myself
●   There are also Subversion, CVS, Arch,
    BitKeeper, and who-knows-what other options
●   You're going to want one, think about it up front
Disorder of Battle
●   These are not necessarily in order:
       –   Set up source control
       –   Set up the directory tree
       –   Write tests
       –   Learn Rake (if you haven't yet)
       –   Document, document, document
       –   Build
       –   Upload
Our victim: BitString
●   I'm going to use one of my own gems as an
    example, pretending to create it anew.
Creating the layout: newgem
●   I've got a lot of projects up in the air; as a
    consequence, I like to prefix the directories for
    my gems with 'rubygem-'
●   That doesn't play well with newgem, though,
    so we'll work around it later
●   Here we go:
        –
            newgem bitstring
            cp erehwon/LICENCE.txt bitstring/
What newgem did


  History.txt
  lib/
  LICENCE.txt
  Manifest.txt
  PostInstall.txt
  Rakefile
  README.rdoc
  script/
  test/
Set up source control
mv bitstring rubygem-bitstring
cd rubygem-bitstring
git init
git add *
echo '*~' >>.gitignore
git add .gitignore
git commit -m 'Initial commit'
Write code!
●   Now's the time to start actually writing the code.
●   Or, if it's already written, copying it into the gem
    directory tree.
●   Code goes under the 'lib/' subdirectory
●   I've already got mine, so I just copy it in
The lib/ tree

$ tree lib
lib
├── bitstring
│   └── operators.rb
└── bitstring.rb

1 directory, 2 files
Now you've got your code. Does it
             work?
●   Time to write tests. newgem started us off:
              $ tree test
              test
              ├── test_bitstring.rb
              └── test_helper.rb
              $ cat test/test_bitstring.rb
              require File.dirname(__FILE__) + '/test_helper.rb'

              class TestRubygemBitstring < Test::Unit::TestCase

               def setup
               end

               def test_truth
                assert true
               end
              end
Documentation (rdoc)
●   Okey, so your code works. You've tested it
    nigh unto death, and sent it off to the showers
    to recover.
●   But wait! There's more! While it's in the
    shower, you need to bring in a tattoo artist to..
●   Okey, that analogy isn't going anywhere useful.
    Try this:
        –   Add the internal rdoc documentation
●   Build the docs with rake docs and look at them
    (on your local filesystem) in your browser
The spec file
●   The .gemspec file is what tells the gem build
    everything it needs to know
●   Gemspecs can be complicated; fortunately,
    there's a shortcut to get you started:
       –   rake gemspec
●   After that, look at the foo.gemspec file and
    read up on gemspecs to see what changes you
    want/need to make
Building your gem
●   Once your code is written, your tests pass, your
    documentation is written (and verified), and
    your gemspec file has been created, you can
    actually build your gem!
         $ gem build bitstring.gemspec
          Successfully built RubyGem
          Name: bitstring
          Version: 1.0.0
          File: bitstring-1.0.0.gem

●   The name comes from the version and other
    details in the gemspec file
Uploading
●   Very simple!
       –   gem push bitstring-1.0.0.gem
●   Well, you need to have an account on the
    system first. Get one at
       –   http://rubygems.org/sign_up
Monitor on RubyGems
●   Once your gem has been uploaded, you can
    see statistics about its usage at
       –   https://rubygems.org/gems/yourgem
Notes and hints
●   Look at other gems
●   So far, this has all been done in your local
    environment. Once you feel confident, consider
    creating a project for your gem at RubyForge
    and uploading your code there.
       –   I highly recommend it!
Wrapup
●   Questions? Sure. Answers? Maybe. :-)

Writing a Ruby Gem for beginners

  • 1.
    How to Writea Gem for Beginners Ken C oar
  • 2.
    Disclaimer ● Don't be confused by the session title; this isn't – How to write a 'gem for beginners' ● It's – 'How to write a gem' for beginners ● Also, Ken (that's me) doesn't profess to be an expert at any of this; he's just sharing experiences of what worked
  • 3.
    Why? ● You've seen all the Ruby gems available, and heard a lot about them. Where do they come from? How do you create one? And why would you want to? ● There is no One True Way to create a gem, and different people will give you different recommendations. ● This session describes one of the many paths available from 'why?' to 'ta-daah!' It worked for me; it might work for you too.
  • 4.
    Pick a Licence ● Why? Well, because Ruby is an interpreter, and offering up a gem to the chaos of the Internet is essentially opening the source code to the Universe ● Do you care how your code may be used? To save lives? To crack banks? To guide missiles? To run gigantic financial institutions? To run schools? Think about it. ● If you really don't care at all, maybe putting it in the public domain is the answer.
  • 5.
    Source Control ● You're gonna make mistakes, and want to back away from them – possibly hurriedly ● You might want to have co-developers ● Git is currently very popular with the Ruby crowd; after an initial bad reaction (because of a basic misunderstanding I had about it), I've come to prefer it myself ● There are also Subversion, CVS, Arch, BitKeeper, and who-knows-what other options ● You're going to want one, think about it up front
  • 6.
    Disorder of Battle ● These are not necessarily in order: – Set up source control – Set up the directory tree – Write tests – Learn Rake (if you haven't yet) – Document, document, document – Build – Upload
  • 7.
    Our victim: BitString ● I'm going to use one of my own gems as an example, pretending to create it anew.
  • 8.
    Creating the layout:newgem ● I've got a lot of projects up in the air; as a consequence, I like to prefix the directories for my gems with 'rubygem-' ● That doesn't play well with newgem, though, so we'll work around it later ● Here we go: – newgem bitstring cp erehwon/LICENCE.txt bitstring/
  • 9.
    What newgem did History.txt lib/ LICENCE.txt Manifest.txt PostInstall.txt Rakefile README.rdoc script/ test/
  • 10.
    Set up sourcecontrol mv bitstring rubygem-bitstring cd rubygem-bitstring git init git add * echo '*~' >>.gitignore git add .gitignore git commit -m 'Initial commit'
  • 11.
    Write code! ● Now's the time to start actually writing the code. ● Or, if it's already written, copying it into the gem directory tree. ● Code goes under the 'lib/' subdirectory ● I've already got mine, so I just copy it in
  • 12.
    The lib/ tree $tree lib lib ├── bitstring │   └── operators.rb └── bitstring.rb 1 directory, 2 files
  • 13.
    Now you've gotyour code. Does it work? ● Time to write tests. newgem started us off: $ tree test test ├── test_bitstring.rb └── test_helper.rb $ cat test/test_bitstring.rb require File.dirname(__FILE__) + '/test_helper.rb' class TestRubygemBitstring < Test::Unit::TestCase def setup end def test_truth assert true end end
  • 14.
    Documentation (rdoc) ● Okey, so your code works. You've tested it nigh unto death, and sent it off to the showers to recover. ● But wait! There's more! While it's in the shower, you need to bring in a tattoo artist to.. ● Okey, that analogy isn't going anywhere useful. Try this: – Add the internal rdoc documentation ● Build the docs with rake docs and look at them (on your local filesystem) in your browser
  • 15.
    The spec file ● The .gemspec file is what tells the gem build everything it needs to know ● Gemspecs can be complicated; fortunately, there's a shortcut to get you started: – rake gemspec ● After that, look at the foo.gemspec file and read up on gemspecs to see what changes you want/need to make
  • 16.
    Building your gem ● Once your code is written, your tests pass, your documentation is written (and verified), and your gemspec file has been created, you can actually build your gem! $ gem build bitstring.gemspec Successfully built RubyGem Name: bitstring Version: 1.0.0 File: bitstring-1.0.0.gem ● The name comes from the version and other details in the gemspec file
  • 17.
    Uploading ● Very simple! – gem push bitstring-1.0.0.gem ● Well, you need to have an account on the system first. Get one at – http://rubygems.org/sign_up
  • 18.
    Monitor on RubyGems ● Once your gem has been uploaded, you can see statistics about its usage at – https://rubygems.org/gems/yourgem
  • 19.
    Notes and hints ● Look at other gems ● So far, this has all been done in your local environment. Once you feel confident, consider creating a project for your gem at RubyForge and uploading your code there. – I highly recommend it!
  • 20.
    Wrapup ● Questions? Sure. Answers? Maybe. :-)