
Recommended
More Related Content
What's hot
What's hot (20)
Similar to Cisco packet tracer ripv1
Similar to Cisco packet tracer ripv1 (20)
More from rishi ram khanal
More from rishi ram khanal (20)
Recently uploaded
Recently uploaded (20)
Cisco packet tracer ripv1
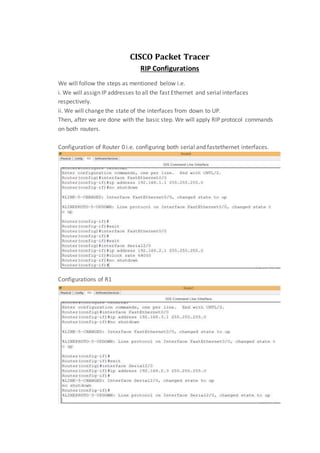
- 1. CISCO Packet Tracer RIP Configurations We will follow the steps as mentioned below i.e. i. We will assign IP addresses to all the fast Ethernet and serial interfaces respectively. ii. We will change the state of the interfaces from down to UP. Then, after we are done with the basic step. We will apply RIP protocol commands on both routers. Configuration of Router 0 i.e. configuring both serial and fastethernet interfaces. Configurations of R1
- 2. Assigning IP address to PC0 Assigning IP address to PC1 R1 In order to apply protocol RIP, we will write the following set of commands. Router(config)# router rip Router(config-router)# network 192.168.1.0 Router(config-router)# network 192.168.2.0 Router(config-router)# network 192.168.3.0 Router(config-router)#exit R2: In order to apply protocol RIP, we will write the following set of commands on R2 as well. Router(config)# router rip Router(config-router)# network 192.168.1.0 Router(config-router)# network 192.168.2.0 Router(config-router)# network 192.168.3.0 Router(config-router)#exit
- 3. One important thing here is that we will add all the networks that we are using in our topology. Here in this particular example I am just using two networks x.x.1.0 and x.x.2.0 so that’s why I have added these two network addresses to the RIP protocol. Drawbacks of RIPv1: RIPv1 only understands the shortest route to a destination, based on a simple count of router hops. It depends on other routers for computed routing updates. Routing tables can get large and these are broadcasted every 30 seconds. Distances are based on hops, not real costs (such as the speed of a link). Patched with split horizon, poison reverse, hold-down timers and triggered updates.