Programming Without Coding Technology (PWCT) - Compress Files using PolarZipLight ActiveX
•
0 likes•253 views

Programming Without Coding Technology (PWCT) - Compress Files using PolarZipLight ActiveX

Recommended
Recommended
More Related Content
What's hot
What's hot (20)
Viewers also liked
Viewers also liked (14)
Similar to Programming Without Coding Technology (PWCT) - Compress Files using PolarZipLight ActiveX
Similar to Programming Without Coding Technology (PWCT) - Compress Files using PolarZipLight ActiveX (11)
More from Mahmoud Samir Fayed
More from Mahmoud Samir Fayed (20)
Recently uploaded
Recently uploaded (20)
Programming Without Coding Technology (PWCT) - Compress Files using PolarZipLight ActiveX
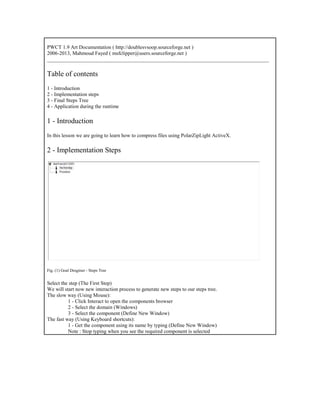
- 1. PWCT 1.9 Art Documentation ( http://doublesvsoop.sourceforge.net ) 2006-2013, Mahmoud Fayed ( msfclipper@users.sourceforge.net ) _____________________________________________________________________________________ Table of contents 1 - Introduction 2 - Implementation steps 3 - Final Steps Tree 4 - Application during the runtime 1 - Introduction In this lesson we are going to learn how to compress files using PolarZipLight ActiveX. 2 - Implementation Steps Fig. (1) Goal Desginer - Steps Tree Select the step (The First Step) We will start now new interaction process to generate new steps to our steps tree. The slow way (Using Mouse): 1 - Click Interact to open the components browser 2 - Select the domain (Windows) 3 - Select the component (Define New Window) The fast way (Using Keyboard shortcuts): 1 - Get the component using its name by typing (Define New Window) Note : Stop typing when you see the required component is selected
- 2. Fig. (2) Component Browser – Select the component (Define New Window) After selecting the component click Ok or press ENTER Fig. (3) Interaction page - Set the properties and enter the required data as in the image above
- 3. Fig. (4) Form Designer Fig. (5) Goal Desginer - Steps Tree Select the step (Window Controls) We will start now new interaction process to generate new steps to our steps tree. The slow way (Using Mouse): 1 - Click Interact to open the components browser 2 - Select the domain (Controls) 3 - Select the component (Label) The fast way (Using Keyboard shortcuts): 1 - Get the component using its name by typing (Label) Note : Stop typing when you see the required component is selected
- 4. Fig. (6) Component Browser – Select the component (Label) After selecting the component click Ok or press ENTER Fig. (7) Interaction page - Set the properties and enter the required data as in the image above
- 5. Fig. (8) Form Designer Fig. (9) Goal Desginer - Steps Tree Select the step (Window Controls) We will start now new interaction process to generate new steps to our steps tree. The slow way (Using Mouse): 1 - Click Interact to open the components browser 2 - Select the domain (Controls) 3 - Select the component (Label) The fast way (Using Keyboard shortcuts): 1 - Get the component using its name by typing (Label) Note : Stop typing when you see the required component is selected
- 6. Fig. (10) Component Browser – Select the component (Label) After selecting the component click Ok or press ENTER Fig. (11) Interaction page - Set the properties and enter the required data as in the image above
- 7. Fig. (12) Form Designer Fig. (13) Goal Desginer - Steps Tree Select the step (Window Controls) We will start now new interaction process to generate new steps to our steps tree. The slow way (Using Mouse): 1 - Click Interact to open the components browser 2 - Select the domain (Controls) 3 - Select the component (Button) The fast way (Using Keyboard shortcuts): 1 - Get the component using its name by typing (Button) Note : Stop typing when you see the required component is selected
- 8. Fig. (14) Component Browser – Select the component (Button) After selecting the component click Ok or press ENTER Fig. (15) Interaction page - Set the properties and enter the required data as in the image above
- 9. Fig. (16) Form Designer Fig. (17) Goal Desginer - Steps Tree Select the step (Button Events) We will start now new interaction process to generate new steps to our steps tree. The slow way (Using Mouse): 1 - Click Interact to open the components browser 2 - Select the domain (Events) 3 - Select the component (Button Events) The fast way (Using Keyboard shortcuts): 1 - Get the component using its name by typing (Button Events) Note : Stop typing when you see the required component is selected
- 10. Fig. (18) Component Browser – Select the component (Button Events) After selecting the component click Ok or press ENTER Fig. (19) Interaction page - Set the properties and enter the required data as in the image above
- 11. Fig. (20) Goal Desginer - Steps Tree Select the step (Window Controls) We will start now new interaction process to generate new steps to our steps tree. The slow way (Using Mouse): 1 - Click Interact to open the components browser 2 - Select the domain (ActiveX) 3 - Select the component (Define ActiveX control) The fast way (Using Keyboard shortcuts): 1 - Get the component using its name by typing (Define ActiveX control) Note : Stop typing when you see the required component is selected Fig. (21) Component Browser – Select the component (Define ActiveX control) After selecting the component click Ok or press ENTER
- 12. Fig. (22) Interaction page - Set the properties and enter the required data as in the image above Fig. (23) Form Designer
- 13. Fig. (24) Goal Desginer - Steps Tree Select the step (Define New Window ( win1 ) , Title : "PolarZipLight") We will start now new interaction process to generate new steps to our steps tree. The slow way (Using Mouse): 1 - Click Interact to open the components browser 2 - Select the domain (Windows) 3 - Select the component (Window Class) The fast way (Using Keyboard shortcuts): 1 - Get the component using its name by typing (Window Class) Note : Stop typing when you see the required component is selected Fig. (25) Component Browser – Select the component (Window Class) After selecting the component click Ok or press ENTER
- 14. Fig. (26) Interaction page - Set the properties and enter the required data as in the image above Fig. (27) Interaction page - Set the properties and enter the required data as in the image above
- 15. Fig. (28) Interaction page - Set the properties and enter the required data as in the image above Fig. (29) Form Designer
- 16. Fig. (30) Goal Desginer - Steps Tree Select the step (Procedures) We will start now new interaction process to generate new steps to our steps tree. The slow way (Using Mouse): 1 - Click Interact to open the components browser 2 - Select the domain (Structure Programming) 3 - Select the component (Define Procedure) The fast way (Using Keyboard shortcuts): 1 - Get the component using its name by typing (Define Procedure) Note : Stop typing when you see the required component is selected Fig. (31) Component Browser – Select the component (Define Procedure) After selecting the component click Ok or press ENTER
- 17. Fig. (32) Interaction page - Set the properties and enter the required data as in the image above Fig. (33) Goal Desginer - Steps Tree Select the step (Start Here) We will start now new interaction process to generate new steps to our steps tree. The slow way (Using Mouse): 1 - Click Interact to open the components browser 2 - Select the domain (ActiveX) 3 - Select the component (ActiveX Object) The fast way (Using Keyboard shortcuts): 1 - Get the component using its name by typing (ActiveX Object) Note : Stop typing when you see the required component is selected
- 18. Fig. (34) Component Browser – Select the component (ActiveX Object) After selecting the component click Ok or press ENTER Fig. (35) Interaction page - Set the properties and enter the required data as in the image above
- 19. Fig. (36) Goal Desginer - Steps Tree Select the step (Start Here) We will start now new interaction process to generate new steps to our steps tree. The slow way (Using Mouse): 1 - Click Interact to open the components browser 2 - Select the domain (Files / Folders) 3 - Select the component (Get Current Folder) The fast way (Using Keyboard shortcuts): 1 - Get the component using its name by typing (Get Current Folder) Note : Stop typing when you see the required component is selected Fig. (37) Component Browser – Select the component (Get Current Folder) After selecting the component click Ok or press ENTER
- 20. Fig. (38) Goal Desginer - Steps Tree Select the step (Start Here) We will start now new interaction process to generate new steps to our steps tree. The slow way (Using Mouse): 1 - Click Interact to open the components browser 2 - Select the domain (ActiveX) 3 - Select the component (ActiveX Object) The fast way (Using Keyboard shortcuts): 1 - Get the component using its name by typing (ActiveX Object) Note : Stop typing when you see the required component is selected Fig. (39) Component Browser – Select the component (ActiveX Object) After selecting the component click Ok or press ENTER
- 21. Fig. (40) Interaction page - Set the properties and enter the required data as in the image above Fig. (41) Goal Desginer - Steps Tree Select the step (Start Here) We will start now new interaction process to generate new steps to our steps tree. The slow way (Using Mouse): 1 - Click Interact to open the components browser 2 - Select the domain (ActiveX) 3 - Select the component (ActiveX Object) The fast way (Using Keyboard shortcuts): 1 - Get the component using its name by typing (ActiveX Object) Note : Stop typing when you see the required component is selected
- 22. Fig. (42) Component Browser – Select the component (ActiveX Object) After selecting the component click Ok or press ENTER Fig. (43) Interaction page - Set the properties and enter the required data as in the image above
- 23. Fig. (44) Goal Desginer - Steps Tree Select the step (Start Here) We will start now new interaction process to generate new steps to our steps tree. The slow way (Using Mouse): 1 - Click Interact to open the components browser 2 - Select the domain (ActiveX) 3 - Select the component (ActiveX Object) The fast way (Using Keyboard shortcuts): 1 - Get the component using its name by typing (ActiveX Object) Note : Stop typing when you see the required component is selected Fig. (45) Component Browser – Select the component (ActiveX Object) After selecting the component click Ok or press ENTER
- 24. Fig. (46) Interaction page - Set the properties and enter the required data as in the image above Fig. (47) Goal Desginer - Steps Tree Select the step (Start Here) We will start now new interaction process to generate new steps to our steps tree. The slow way (Using Mouse): 1 - Click Interact to open the components browser 2 - Select the domain (ActiveX) 3 - Select the component (ActiveX Object) The fast way (Using Keyboard shortcuts): 1 - Get the component using its name by typing (ActiveX Object) Note : Stop typing when you see the required component is selected
- 25. Fig. (48) Component Browser – Select the component (ActiveX Object) After selecting the component click Ok or press ENTER Fig. (49) Interaction page - Set the properties and enter the required data as in the image above
- 26. Fig. (50) Goal Desginer - Steps Tree Select the step (Start Here) We will start now new interaction process to generate new steps to our steps tree. The slow way (Using Mouse): 1 - Click Interact to open the components browser 2 - Select the domain (ActiveX) 3 - Select the component (ActiveX Object) The fast way (Using Keyboard shortcuts): 1 - Get the component using its name by typing (ActiveX Object) Note : Stop typing when you see the required component is selected Fig. (51) Component Browser – Select the component (ActiveX Object) After selecting the component click Ok or press ENTER
- 27. Fig. (52) Interaction page - Set the properties and enter the required data as in the image above Fig. (53) Goal Desginer - Steps Tree Select the step (Start Here) We will start now new interaction process to generate new steps to our steps tree. The slow way (Using Mouse): 1 - Click Interact to open the components browser 2 - Select the domain (GUI Application) 3 - Select the component (Show Message) The fast way (Using Keyboard shortcuts): 1 - Get the component using its name by typing (Show Message) Note : Stop typing when you see the required component is selected
- 28. Fig. (54) Component Browser – Select the component (Show Message) After selecting the component click Ok or press ENTER Fig. (55) Interaction page - Set the properties and enter the required data as in the image above
- 29. Fig. (56) Goal Desginer - Final Steps Tree 3 - Final Steps Tree The First Step Define New Window ( win1 ) , Title : "PolarZipLight" Window Events Window Properties Window Controls Define Label ( lbl1 ) , Caption : "Add t1.txt and t2.txt to Test.zip" Label Events Label Properties Define Label ( lbl2 ) , Caption : "Extract Test.zip , Extract Folder = Output" Label Events Label Properties Define New Button ( btn1 ) , Caption : "Do the operation" Button Events Event: ON CLICK : Action mywork() Button Properties Active Control ( oActiveX ) End Of Window win1.Center ( ) Activate window Procedures Define Procedure mywork Start Here oactivex.filestoprocess := "t1.txt | t2.txt " CurrentFolder := Get Current Folder oactivex.sourcedirectory := currentfolder oactivex.zipfilename := currentfolder+"test.zip" oactivex.add ( ) oactivex.extractdirectory := "output" oactivex.extract ( ) Show Message "Opearion Done !!!" Title "Ok" Type: Message Box End of Procedure 4 - Application during the runtime
- 30. Fig. (57) Application during the runtime