
Recommended
More Related Content
What's hot
What's hot (20)
Similar to Catch basin or di
Similar to Catch basin or di (20)
Recently uploaded
Recently uploaded (20)
Catch basin or di
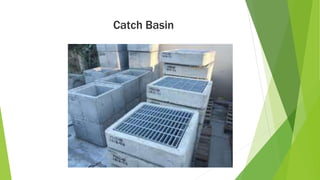
- 1. Catch Basin
- 2. Catch basins are a vital component to any road drainage design. These grate-covered boxes are available in a range of materials and sizes. They are placed in areas where water collects to prevent any drainage problem in roads and parking lots. Water and solid particles flow into the box, with the solids settling in the bottom. As the water level rises, it reaches the outlet trap and flows into the local sewer system or watershed.
- 3. Steps to set a catch basin
- 4. Step 1 Call 811 Call 811 this is the phone number you use before digging. This protects yourself and others from unintentionally hitting underground utility lines.
- 5. Step 2 Lay Out Lay out is a important step when setting a catch basin. The reason for this is saving time, materials cost and a voiding utilities.
- 6. Step 3 setting up for grade - Set up rotary laser level a tool used in many construction works. It helps guide the construction worker to level or can be used to perform slopes. - Find grade by tacking a shoot of the area where the catch basin will be placed. - Measure the catch basin height to determine how high to set up you rotary laser level.
- 7. Step 4 Starting the excavation -Start digging out for catch basin remove top soil, blacktop or concrete first. Stock pile off to the side or load it to dump truck to be hauled away. -Once the top layer is off start to dig out spoils stock pile off to side or load in to dump truck to be hauled away.
- 8. Step 5 prepare excavation for catch basin - In most catch basin sets an over dig of 6 inches is required for a bed of stone or concrete. The bed is used to level the catch basin.
- 9. Step 6 inspect Rigging equipment Tag present, and legible Broken wires Wear or scraping Kinks , Crushing, Bird Caging, or any distortion of the rope. Heat damage End attachment, or Hook damage
- 10. Step 7 set catch basin -Setting the catch basin is a dangerous task. Rigging is to be inspected as well as the lifting heavy equipment should be looked over for leaks and load capability. -Hook rigging up to catch basin and lower in to the hole.
- 11. Step 8 install pipe Step 1 - Cut the Pipe to length Step 2 - Rig pipe up to be placed in excavation if necessary Step 3 - Slide pipe in to catch basin till the pipe is flush
- 12. Step 9 grout in pipe Grout application is one of the most important steps in concrete and corrugated pipe installation, yet its importance can be underestimated . The grout seals the water from leaching down the side of the pipe so as not to cause under ground erosion.
- 13. Step 10 backfill excavation 1. Backfill trenches and excavations immediately after the pipes are laid, unless other protection is directed or indicated. 2. Select and deposit backfill materials with special reference to the future safety of the pipes and catch basin. 3. In the lower portion of the trench, deposit approved backfill and bedding material in layers of 6" maximum thickness, and compact with suitable tampers to the density of the adjacent soil until there is a cover of not less than 12" using special care not to damage pipe . 4. Except for special materials for pavements, backfill the remainder of the trench with material free from stones larger than 6" or ½ the layered thickness, whichever is smaller, in any dimension. 5. Under roads, streets, and other paved areas: Mechanically tamp in 6" layers using heavy duty pneumatic tampers or equal. Tamp each layer to a density equivalent of not less than 100% of an ASTM D698 Proctor Curve. 6. Provide additional compaction by leaving the backfilled trenches open to traffic while maintaining the surface with crushed stone.
- 15. Step 11 install grate
- 16. Step 12 final grade Once up to grade now it is time to concrete, black top, stone or topsoil.
- 17. Step 13 Clean up site The construction process involves a large amount of materials and employees who are often working on a tight schedule. It's no surprise then, that at the end of most projects the site is quite messy, full of debris, extra materials and dirt. Before the project can be considered complete, the site must be cleared of all construction materials and the project must be cleaned from top to bottom.
- 18. Thank you for your time
- 19. TEST 1. When marking utility lines blue paint is _____________. A. Sewers and drain lines B. Reclaimed water, irrigation and slurry lines C. Drinking water
- 20. 2. When inspection alloy chains what are two things to look for? _____________________ _____________________
- 21. 3. When starting to dig for a catch basin what are some of the top layer materials? __________________________________________________
- 22. 4. When grouting pipes in to catch basin you should grout the out side first. A. TRUE B. FALSE
- 23. 5. In the lower portion of the trench, deposit approved backfill and bedding material in layers of ______maximum thickness. A.12 inches B.18 inches C. 6 inches D.24 inches