Camden 120I Instruction Manual
•
0 likes•975 views

Buy the Camden 120I at JMAC Supply. https://www.jmac.com/?=slideshare

Recommended
More Related Content
What's hot
What's hot (18)
Similar to Camden 120I Instruction Manual
Similar to Camden 120I Instruction Manual (20)
More from JMAC Supply
More from JMAC Supply (20)
Recently uploaded
Recently uploaded (20)
Camden 120I Instruction Manual
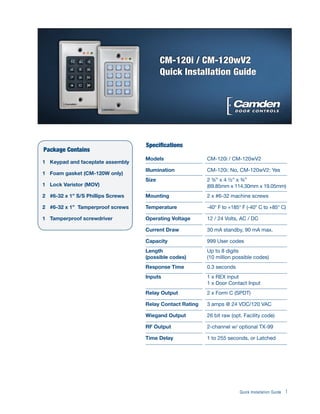
- 1. Specifications Models CM-120i / CM-120wV2 Illumination CM-120i: No, CM-120wV2: Yes Size 2 ¾” x 4 ½” x ¾” (69.85mm x 114.30mm x 19.05mm) Mounting 2 x #6-32 machine screws Temperature -40° F to +185° F (-40° C to +85° C) Operating Voltage 12 / 24 Volts, AC / DC Current Draw 30 mA standby, 90 mA max. Capacity 999 User codes Length (possible codes) Up to 8 digits (10 million possible codes) Response Time 0.3 seconds Inputs 1 x REX input 1 x Door Contact Input Relay Output 2 x Form C (SPDT) Relay Contact Rating 3 amps @ 24 VDC/120 VAC Wiegand Output 26 bit raw (opt. Facility code) RF Output 2-channel w/ optional TX-99 Time Delay 1 to 255 seconds, or Latched 1 Keypad and faceplate assembly 1 Foam gasket (CM-120W only) 1 Lock Varistor (MOV) 2 #6-32 x 1” S/S Phillips Screws 2 #6-32 x 1” Tamperproof screws 1 Tamperproof screwdriver Package Contains 1Quick Installation Guide
- 2. Name Memory Address User Code Name Memory Address User Code Master User 1 1234 36 Manager 2 37 User #1 3 38 User #2 4 39 Etc... 5 40 6 41 7 42 8 43 9 44 10 45 11 46 12 47 13 48 14 49 15 50 16 51 17 52 18 53 19 54 20 55 21 56 22 57 23 58 24 59 25 60 26 61 27 62 28 63 29 64 30 65 31 66 32 67 33 68 34 69 35 70 Make additional copies as required... 2Quick Installation Guide
- 4. NOTE: You must enter Programming Mode before any other programming can take place. Legend Keypad keys are pressed and released simultaneously. Keypad keys LED’s are flashing LED’s are solid Keypad beeps Keypad beeps from low to high Programming Mode <MASTER CODE> Default = 1234 [ ] NOTE: After exiting program- ming mode, all LED’s are OFF and the keypad is in standby mode. User Functions Exit Programming <USER NUMBER> <USER NUMBER> <USER CODE> <USER CODE>Add/Change User Delete User Memory Reset <MASTER CODE>Erase Keypad Memory Reset ALL to Factory 4Quick Installation Guide NOTE: Master code is in Position #1 can be changed-not deleted
- 5. 5Quick Installation Guide Set Enter Key <NEW ENTER KEY> ( =Default) Set Code Length <CODE LENGTH> 0=variable (default), valid entries = 1 - 8 Incorrect Code Count Alarm <# OF INVALID USER CODES> Default 0=Disabled Force Unique User Codes <ENTRY> 1=Enabled (default), 0=Disabled Anti-Tailgating <ENTRY> 1=Enabled, 0=Disabled (default) Backlight Control <ENTRY> 1=Enabled, 0=Disabled (default) User 2 “Global Lockout” <ENTRY> 1=Enabled, 0=Disabled (default) Relay Output Mode <ENTRY> Relay 1 (default), 1=Split, 2=Sequenced Admin Functions Yellow LED Enable <ENTRY> 0=disabled,1=enabled (default) Buzzer Enable <ENTRY> 0=disabled,1=enabled (default) Correct Code Audio Tone <ENTRY> 0=disabled (default), 1=enabled Incorrect Code Audio Tone <ENTRY> 0=disabled, 1=enabled (default) REX Release Enable <ENTRY> 0=disabled, 1=enabled (default) REX Audio Tone <ENTRY> 0=disabled (default), 1=enabled Annunciation Control Functions
- 6. Incorrect Code Alarm <ENTRY> 0=disabled (default),1=buzzer, 2=relay 2, 3=buzzer & relay2 Stuck Key Alarm <ENTRY> 0=disabled (default),1=buzzer Door Prop Open Alarm <ENTRY> 0=disabled (default),1=buzzer, 2=relay 2, 3=buzzer & relay2 Incorrect Code Alarm Lockout <ENTRY> 0=disabled (default),1=buzzer Door Forced Open Alarm <ENTRY> 0=disabled (default),1=buzzer, 2=relay 2, 3=buzzer & relay2 Alarm Control Functions Wiegand Protocol Selection <ENTRY> 0=disabled (default), 1=26 bit, 2-26 bit & facility code Wiegand Facility Code <FACILITY CODE> Default: 34 (Camden) (0-255 allowed) Wiegand Control Functions 6Quick Installation Guide Relay 1 Operate Duration <OPERATE TIME> Default 8s (0-255 allowed) Door Prop Open Alarm Delay <DELAY TIME> Default: Disabled Relay 2 Operate Duration <OPERATE TIME> Default 8s (0-255 allowed) Relay 2 Delay on Operate <DELAY TIME> Default 4s (1-255 allowed) Time Delay/Duration Functions NOTE: Relay output mode must be set to Split or Sequenced for Relay 2 operate duration and delay on operate functions to work. Operate and Delay times are in seconds. Set “Latching Mode” for a User <ENTRY> 0=disabled (default), 1=enabled Latching Mode <USER NUMBER>
- 7. Troubleshooting Tips Symptom Solution Cannot get into programming mode The keypad requires the * and 1 be pressed and released simultaneously to prevent accidental programming. Enter the correct Master Code (default=1234) Cannot Program a User Code User code 1 is reserved for the Master Code and will not activate the Relays Enter User Functions (above) Code does not activate the door The keypad Relays do NOT provide any voltage and therefore will not operate the strike without a separate power supply. Ensure the strike is wired correctly. Lost/Forgot Master Code Move the jumper (located on the back of the keypad.) From pins 2 + 3 to pins 1 + 2 all the LED’s will blink and beep 4 times pause and then 4 more times. Once reset is complete, move jumper back to pins 2 + 3. This resets the master code only all user codes + other programmed functions stay the same (as they where previously programmed) Nothing happens when the code is entered. No lights. No sound, nothing (Dead) 1) Check the keypad power supply with a volt meter to ensure power is present. 2) Cycle the power. (Remove power from the keypad for 60 seconds, then re apply power) Red light blinks slowly. Can not enter any code 1) Possible stuck button condition-check all buttons, run finger on button to free stuck button. 2) Door open condition-close door or service door contact. If condition does not change, cycle the power (Remove power for 60 seconds, then re apply power). Before calling Tech Support please have: 1- Product Number 2- Product in front of you 3- Voltmeter/Multimeter 4- Manual 5502 Timberlea Blvd. Mississauga, ON Canada L4W 2T7 • Toll Free: 1 877 226-3369 (CAMDEN9) Tel: (905) 366-3377 • Fax: (905) 366-3378 • E-mail: info@camdencontrols.com • www.camdencontrols.com Part#: 40-82A000R2 www.camdencontrols.com/keypads 7Quick Installation Guide