
Recommended
More Related Content
Similar to Shared Coursework in Cyber Security Instructions Manual .docx
Similar to Shared Coursework in Cyber Security Instructions Manual .docx (20)
More from edgar6wallace88877
More from edgar6wallace88877 (20)
Recently uploaded
Recently uploaded (20)
Shared Coursework in Cyber Security Instructions Manual .docx
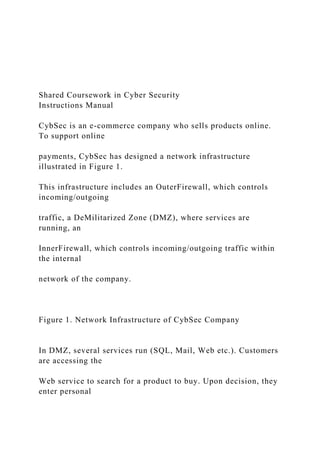
- 1. Shared Coursework in Cyber Security Instructions Manual CybSec is an e-commerce company who sells products online. To support online payments, CybSec has designed a network infrastructure illustrated in Figure 1. This infrastructure includes an OuterFirewall, which controls incoming/outgoing traffic, a DeMilitarized Zone (DMZ), where services are running, an InnerFirewall, which controls incoming/outgoing traffic within the internal network of the company. Figure 1. Network Infrastructure of CybSec Company In DMZ, several services run (SQL, Mail, Web etc.). Customers are accessing the Web service to search for a product to buy. Upon decision, they enter personal
- 2. information (name, home address and card number) to buy products. Personal information is stored in an SQL database. Goal: Retrieve the credit card secret codes / owners names from the SQL database. Assumptions: You are an investigator/ethical hacker and your operating system (OS) is Kali Linux. What to do: Follow the steps provided to achieve your goals. Appendixes contain information for linux and penetration testing commands that you can use to achieve your goal. How to access Investigators’s machine: are Horizon View Client nsq623ap.enterprise.internal.city.ac.uk.
- 3. in City University account). the RDP Client on City University PC and Enter your VDI Name and enter your city login details to login to the VDI. The VDI Assignment table is in the Coursework folder on Moodle. n 7 loads double click Putty found in your desktop. Double click the Investigator option in saved sessions menu and connect to Kali Linux OS. environment to perform attacks. Attacking the system by finding SSH admin’s credentials:
- 4. 1) Use Linux Terminal (similar to CMD in Win) to enter penetration testing commands. 2) Investigate which network your Linux host belongs to (“Ifconfig”). 3) Discover your network and services running (“nmap”). 4) To access the discovered services found in DMZ, you will need to “guess” admin’s password. Check if you can perform dictionary attack on the SSH service and grant access. Dictionary files are located at “/root/bin/users.txt” for username and “/root/bin/pass.txt” for passwords. 5) Establish remote connection to the DMZ server using SSH and the credentials found in step 4. Attacking the system by finding admin’s credentials in the SQL service: 6) After remote login to the DMZ server explore the folders to find anything useful to attack to the SQL database. The Mailbox folders
- 5. contain an encrypted email which is located at “/usr/home/<username>/Maildir”. Break the cipher and read the email. 7) Once the additional information on the SQL server is found, you need to close the ssh session using the command “exit”. 8) You can copy the files you need from the SQL Server to the investigator’s machine via SSH protocol using command “scp”. 9) In order to perform the brute force attack on some of the copied encrypted files (if necessary) use command “john” to execute John the Ripper tool. Accessing SQL service: 10) Once SQL Server login/password information is retrieved, login to the SQL Server using command “mysql”. 11) Next, use SQL commands to retrieve financial information of the company.
- 6. 12) The credit card secret code is encrypted with RSA-copied cipher. Use RSA parameters found in previous step (i.e., step 6) to perform RSA cryptanalysis (i.e., find d secret RSA parameter - for more information go through the Lecture material). 13) During the RSA cryptanalysis phase you will require a public key, e. The calculation of e is done using Shamir’s secret sharing scheme (4,4). In Table 1 you will find the points and their coordinates (x, y). Work with members of your group to calculate the secret share s (according to Shamir’s terminology), which is your public key e. 14) Once you have RSA public key e, calculate RSA secret component d (use extended ECD). 15) Once you calculate RSA secret d switch to bin/SageMath and run ./sage. Using SageMath decrypt the credit card secret code.
- 7. Table 1 – Shamir’s Secret Table. User Polynomial Prime p from (mod p) Public Value x- coordinate
- 8. Share y- coordinate User1 19+42x+2800x^2+2418x^3 3917 2999 1557 User2 19+42x+2800x^2+2418x^3 3917 3502 693 User3 19+42x+2800x^2+2418x^3 3917 57 1739 User5 19+42x+2800x^2+2418x^3 3917 3645 3641 User4 17+2601x+2511x^2+4501x^3 5501 4866 404 User8 17+2601x+2511x^2+4501x^3 5501 1359 1841 User13 17+2601x+2511x^2+4501x^3 5501 3687 3085 User14 17+2601x+2511x^2+4501x^3 5501 2400 4196 User6 19+496x+492x^2+2996x^3 4733 2477 3497 User7 19+496x+492x^2+2996x^3 4733 95 2295 User11 19+496x+492x^2+2996x^3 4733 704 3670 User16 19+496x+492x^2+2996x^3 4733 3994 833 User12 21+1299x+3903x^2+154x^3 6653 293 955 User35 21+1299x+3903x^2+154x^3 6653 5730 1486 User40 21+1299x+3903x^2+154x^3 6653 4116 4680 User26 21+1299x+3903x^2+154x^3 6653 5411 6231
- 9. User15 17+2206x+789x^2+345x^3 2281 537 533 User27 17+2206x+789x^2+345x^3 2281 1068 115 User33 17+2206x+789x^2+345x^3 2281 2276 2083 User34 17+2206x+789x^2+345x^3 2281 333 1200 User17 19+26x+99x^2+731x^3 947 937 273 User18 19+26x+99x^2+731x^3 947 425 610 User19 19+26x+99x^2+731x^3 947 294 119 User20 19+26x+99x^2+731x^3 947 137 321 User21 19+760x+2122x^2+1217x^3 2351 2314 163 User22 19+760x+2122x^2+1217x^3 2351 1036 1589 User23 19+760x+2122x^2+1217x^3 2351 659 2238 User24 19+760x+2122x^2+1217x^3 2351 42 1336 User25 19+3243x+1422x^2+2071x^3 8501 6271 986 User28 19+3243x+1422x^2+2071x^3 8501 5830 6770 User29 19+3243x+1422x^2+2071x^3 8501 1275 2806 User30 19+3243x+1422x^2+2071x^3 8501 7073 2964 User31 19+1487x+2505x^2+5819x^3 7237 779 4707 User32 19+1487x+2505x^2+5819x^3 7237 5080 747
- 10. User36 19+1487x+2505x^2+5819x^3 7237 3036 2155 User37 19+1487x+2505x^2+5819x^3 7237 480 191 User38 17+52x+90x^2+58x^3 199 86 127 User41 17+52x+90x^2+58x^3 199 187 87 User43 17+52x+90x^2+58x^3 199 161 75 User46 17+52x+90x^2+58x^3 199 162 75 User39 19+204x+599x^2+756x^3 1009 676 488 User42 19+204x+599x^2+756x^3 1009 155 226 User44 19+204x+599x^2+756x^3 1009 216 505 User45 19+204x+599x^2+756x^3 1009 881 456 User47 19+7044x+6903x^2+645x^3 7159 124 731 User48 19+7044x+6903x^2+645x^3 7159 3120 2649 User49 19+7044x+6903x^2+645x^3 7159 3738 2925 User50 19+7044x+6903x^2+645x^3 7159 6103 720 APPENDIX A – Working with Linux file system To work with files and directories, you will need to know a few basic commands: – That ~ to the left of the prompt represents your home
- 11. directory, which is the terminal’s default directory. To change to another directory, you can use the cd command. For example cd / would change to the root directory, cd Downloads would change to the Downloads directory inside the current directory (so this only opens your Downloads directory if the terminal is in your home directory), cd /home/you/Downloads would change to your Downloads directory from anywhere in the system, cd ~ would change to your home directory, and cd .. would go up a directory. – The ls command lists the files in the current directory. – The mkdir command makes a new directory. mkdir example would create a new directory named example in the current directory, while mkdir /home/you/Downloads/test would create a new directory named test in your Downloads directory. – The rm command removes a file. For example, rm example removes
- 12. the file named example in the current directory and rm /home/you/Downloads/example removes the file named example in the Downloads directory. – The cp command copies a file from one location to another. For example, cp example /home/User/Downloads copies the file named example in the current directory to /home/User/Downloads. – The mv command moves a file from one location to another. It works exactly like the cp command above, but moves the file instead of creating a copy. mv can also be used to rename files. For example, mv original renamed moves a file named original in the current directory to a file named renamed in the current directory, effectively renaming it. Move around your file system with cd, view files in the current directory with ls, create directories with mkdir, and manage files with the rm, cp,
- 13. and mv commands. APPENDIX B - Tab Completion Tab completion is a very useful trick. While typing something – a command, file name, or some other types of arguments – you can press Tab to autocomplete what you’re typing. For example, if you type firef at the terminal and press Tab, firefox automatically appears. This saves you from having to type things exactly – you can press Tab and the shell will finish typing for you. This also works with folders, file names, and package names. In many cases, the shell won’t know what you’re trying to type because there are multiple matches. Press the Tab key a second time and you’ll see a list of possible matches. Continue typing
- 14. a few more letters to narrow things down and press Tab again to continue. For more information about command usage type “man <name of the command>”. For example “man ls” will show you manual for command “ls”. APPENDIX C – ifconfig command Name ifconfig - configure a network interface Synopsis ifconfig [interface] ifconfig interface [aftype] options | address ... Description Ifconfig is used to configure the kernel-resident network interfaces. It is used at boot time to set up interfaces as necessary. After that, it is usually only needed when debugging or when system tuning is needed.
- 15. If no arguments are given, ifconfig displays the status of the currently active interfaces. If a single interface argument is given, it displays the status of the given interface only; if a single -a argument is given, it displays the status of all interfaces, even those that are down. Otherwise, it configures an interface. Address Families If the first argument after the interface name is recognized as the name of a supported address family, that address family is used for decoding and displaying all protocol addresses. Currently supported address families include inet (TCP/IP, default), inet6(IPv6), ax25 (AMPR Packet Radio), ddp (Appletalk Phase 2), ipx (Novell IPX) andnetrom (AMPR Packet radio). All numbers supplied as parts in IPv4 dotted decimal notation may be decimal, octal, or hexadecimal, as specified in the ISO C standard (that is, a leading 0x or 0X implies hexadecimal; otherwise, a leading '0' implies octal;
- 16. otherwise, the number is interpreted as decimal). Use of hexamedial and octal numbers is not RFC-compliant and therefore its use is discouraged and may go away. Options interface The name of the interface. This is usually a driver name followed by a unit number, for example eth0 for the first Ethernet interface. up This flag causes the interface to be activated. It is implicitly specified if an address is assigned to the interface. down This flag causes the driver for this interface to be shut down. [-]arp Enable or disable the use of the ARP protocol on this interface. [-]promisc
- 17. Enable or disable the promiscuous mode of the interface. If selected, all packets on the network will be received by the interface. [-]allmulti Enable or disable all-multicast mode. If selected, all multicast packets on the network will be received by the interface. metric N This parameter sets the interface metric. It is not available under GNU/Linux. mtu N This parameter sets the Maximum Transfer Unit (MTU) of an interface. dstaddr addr Set the remote IP address for a point-to-point link (such as PPP). This keyword is now obsolete; use the pointopoint keyword instead. netmask addr
- 18. Set the IP network mask for this interface. This value defaults to the usual class A, B or C network mask (as derived from the interface IP address), but it can be set to any value. add addr/prefixlen Add an IPv6 address to an interface. del addr/prefixlen Remove an IPv6 address from an interface. tunnel ::aa.bb.cc.dd Create a new SIT (IPv6-in-IPv4) device, tunnelling to the given destination. irq addr Set the interrupt line used by this device. Not all devices can dynamically change their IRQ setting. io_addr addr Set the start address in I/O space for this device. mem_start addr Set the start address for shared memory used by this device.
- 19. Only a few devices need this. media type Set the physical port or medium type to be used by the device. Not all devices can change this setting, and those that can vary in what values they support. Typical values for type are 10base2 (thin Ethernet), 10baseT (twisted-pair 10Mbps Ethernet), AUI (external transceiver) and so on. The special medium type of auto can be used to tell the driver to auto-sense the media. Again, not all drivers can do this. [-]broadcast [addr] If the address argument is given, set the protocol broadcast address for this interface. Otherwise, set (or clear) the IFF_BROADCAST flag for the interface. [-]pointopoint [addr]
- 20. This keyword enables the point-to-point mode of an interface, meaning that it is a direct link between two machines with nobody else listening on it. If the address argument is also given, set the protocol address of the other side of the link, just like the obsolete dstaddr keyword does. Otherwise, set or clear theIFF_POINTOPOINT flag for the interface. hw class address Set the hardware address of this interface, if the device driver supports this operation. The keyword must be followed by the name of the hardware class and the printable ASCII equivalent of the hardware address. Hardware classes currently supported include ether (Ethernet), ax25 (AMPR AX.25), ARCnet and netrom (AMPR NET/ROM).
- 21. multicast Set the multicast flag on the interface. This should not normally be needed as the drivers set the flag correctly themselves. address The IP address to be assigned to this interface. txqueuelen length Set the length of the transmit queue of the device. It is useful to set this to small values for slower devices with a high latency (modem links, ISDN) to prevent fast bulk transfers from disturbing interactive traffic like telnet too much. For more information type in the shell “man ifconfig”
- 22. APPENDIX D – nmap command Name nmap - Network exploration tool and security / port scanner Synopsis nmap [Scan Type...] [Options] {target specification} Description Nmap ("Network Mapper") is an open source tool for network exploration and security auditing. It was designed to rapidly scan large networks, although it works fine against single hosts. Nmap uses raw IP packets in novel ways to determine what hosts are available on the network, what services (application name and version) those hosts are offering, what operating systems (and OS versions) they are running, what type of packet filters/firewalls
- 23. are in use, and dozens of other characteristics. While Nmap is commonly used for security audits, many systems and network administrators find it useful for routine tasks such as network inventory, managing service upgrade schedules, and monitoring host or service uptime. The output from Nmap is a list of scanned targets, with supplemental information on each depending on the options used. Key among that information is the "interesting ports table".. That table lists the port number and protocol, service name, and state. The state is either open, filtered, closed, or unfiltered. Open. means that an application on the target machine is listening for connections/packets on that port. Filtered. means that a firewall, filter, or other network obstacle is blocking the port so that Nmap cannot tell whether it is open or closed. Closed. ports have no application listening on them, though they could
- 24. open up at any time. Ports are classified as unfiltered. when they are responsive to Nmap's probes, but Nmap cannot determine whether they are open or closed. Nmap reports the state combinations open|filtered. and closed|filtered. when it cannot determine which of the two states describe a port. The port table may also include software version details when version detection has been requested. When an IP protocol scan is requested (-sO), Nmap provides information on supported IP protocols rather than listening ports. In addition to the interesting ports table, Nmap can provide further information on targets, including reverse DNS names, operating system guesses, device types, and MAC addresses. A typical Nmap scan is shown in Example 1. The only Nmap arguments used in this example are -A, to enable OS and version detection, script scanning, and
- 25. traceroute; -T4 for faster execution; and then the two target hostnames. Example 1. A representative Nmap scan # nmap -A -T4 scanme.nmap.org Nmap scan report for scanme.nmap.org (64.13.134.52) Host is up (0.045s latency). Not shown: 993 filtered ports PORT STATE SERVICE VERSION 22/tcp open ssh OpenSSH 4.3 (protocol 2.0) | ssh-hostkey: 1024 60:ac:4d:51:b1:cd:85:09:12:16:92:76:1d:5d:27:6e (DSA) |_2048 2c:22:75:60:4b:c3:3b:18:a2:97:2c:96:7e:28:dc:dd (RSA) 25/tcp closed smtp 53/tcp open domain 70/tcp closed gopher 80/tcp open http Apache httpd 2.2.3 ((CentOS)) |_html-title: Go ahead and ScanMe!
- 26. | http-methods: Potentially risky methods: TRACE |_See http://nmap.org/nsedoc/scripts/http-methods.html 113/tcp closed auth 31337/tcp closed Elite Device type: general purpose Running: Linux 2.6.X OS details: Linux 2.6.13 - 2.6.31, Linux 2.6.18 Network Distance: 13 hops TRACEROUTE (using port 80/tcp) HOP RTT ADDRESS [Cut first 10 hops for brevity] 11 80.33 ms layer42.car2.sanjose2.level3.net (4.59.4.78) 12 137.52 ms xe6-2.core1.svk.layer42.net (69.36.239.221) 13 44.15 ms scanme.nmap.org (64.13.134.52) Nmap done: 1 IP address (1 host up) scanned in 22.19 seconds The newest version of Nmap can be obtained from http://nmap.org. The newest
- 27. version of this man page is available at http://nmap.org/book/man.html. It is also included as a chapter of Nmap Network Scanning: The Official Nmap Project Guide to Network Discovery and Security Scanning (see http://nmap.org/book/). Options Summary This options summary is printed when Nmap is run with no arguments, and the latest version is always available at http://nmap.org/data/nmap.usage.txt. It helps people remember the most common options, but is no substitute for the in- depth documentation in the rest of this manual. Some obscure options aren't even included here. Nmap 5.51 ( http://nmap.org ) Usage: nmap [Scan Type(s)] [Options] {target specification} TARGET SPECIFICATION: Can pass hostnames, IP addresses, networks, etc.
- 28. Ex: scanme.nmap.org, 192.168.0.1; 10.0.0-255.1-254 -iL <inputfilename>: Input from list of hosts/networks -iR <num hosts>: Choose random targets --exclude <host1[,host2][,host3],...>: Exclude hosts/networks --excludefile <exclude_file>: Exclude list from file HOST DISCOVERY: -sL: List Scan - simply list targets to scan -sn: Ping Scan - disable port scan -Pn: Treat all hosts as online -- skip host discovery -PS/PA/PU/PY[portlist]: TCP SYN/ACK, UDP or SCTP discovery to given ports -PE/PP/PM: ICMP echo, timestamp, and netmask request discovery probes -PO[protocol list]: IP Protocol Ping -n/-R: Never do DNS resolution/Always resolve [default: sometimes] --dns-servers <serv1[,serv2],...>: Specify custom DNS servers --system-dns: Use OS's DNS resolver
- 29. --traceroute: Trace hop path to each host SCAN TECHNIQUES: -sS/sT/sA/sW/sM: TCP SYN/Connect()/ACK/Window/Maimon scans -sU: UDP Scan -sN/sF/sX: TCP Null, FIN, and Xmas scans --scanflags <flags>: Customize TCP scan flags -sI <zombie host[:probeport]>: Idle scan -sY/sZ: SCTP INIT/COOKIE-ECHO scans -sO: IP protocol scan -b <FTP relay host>: FTP bounce scan PORT SPECIFICATION AND SCAN ORDER: -p <port ranges>: Only scan specified ports Ex: -p22; -p1-65535; -p U:53,111,137,T:21- 25,80,139,8080,S:9 -F: Fast mode - Scan fewer ports than the default scan -r: Scan ports consecutively - don't randomize --top-ports <number>: Scan <number> most common ports
- 30. --port-ratio <ratio>: Scan ports more common than <ratio> SERVICE/VERSION DETECTION: -sV: Probe open ports to determine service/version info --version-intensity <level>: Set from 0 (light) to 9 (try all probes) --version-light: Limit to most likely probes (intensity 2) --version-all: Try every single probe (intensity 9) --version-trace: Show detailed version scan activity (for debugging) SCRIPT SCAN: -sC: equivalent to --script=default --script=<Lua scripts>: <Lua scripts> is a comma separated list of directories, script-files or script-categories --script-args=<n1=v1,[n2=v2,...]>: provide arguments to scripts --script-trace: Show all data sent and received --script-updatedb: Update the script database. OS DETECTION: -O: Enable OS detection
- 31. --osscan-limit: Limit OS detection to promising targets --osscan-guess: Guess OS more aggressively TIMING AND PERFORMANCE: Options which take <time> are in seconds, or append 'ms' (milliseconds), 's' (seconds), 'm' (minutes), or 'h' (hours) to the value (e.g. 30m). -T<0-5>: Set timing template (higher is faster) --min-hostgroup/max-hostgroup <size>: Parallel host scan group sizes --min-parallelism/max-parallelism <numprobes>: Probe parallelization --min-rtt-timeout/max-rtt-timeout/initial-rtt-timeout <time>: Specifies probe round trip time. --max-retries <tries>: Caps number of port scan probe retransmissions. --host-timeout <time>: Give up on target after this long --scan-delay/--max-scan-delay <time>: Adjust delay between probes
- 32. --min-rate <number>: Send packets no slower than <number> per second --max-rate <number>: Send packets no faster than <number> per second FIREWALL/IDS EVASION AND SPOOFING: -f; --mtu <val>: fragment packets (optionally w/given MTU) -D <decoy1,decoy2[,ME],...>: Cloak a scan with decoys -S <IP_Address>: Spoof source address -e <iface>: Use specified interface -g/--source-port <portnum>: Use given port number --data-length <num>: Append random data to sent packets --ip-options <options>: Send packets with specified ip options --ttl <val>: Set IP time-to-live field --spoof-mac <mac address/prefix/vendor name>: Spoof your MAC address --badsum: Send packets with a bogus TCP/UDP/SCTP checksum OUTPUT: -oN/-oX/-oS/-oG <file>: Output scan in normal, XML, s|<rIpt kIddi3,
- 33. and Grepable format, respectively, to the given filename. -oA <basename>: Output in the three major formats at once -v: Increase verbosity level (use -vv or more for greater effect) -d: Increase debugging level (use -dd or more for greater effect) --reason: Display the reason a port is in a particular state --open: Only show open (or possibly open) ports --packet-trace: Show all packets sent and received --iflist: Print host interfaces and routes (for debugging) --log-errors: Log errors/warnings to the normal-format output file --append-output: Append to rather than clobber specified output files --resume <filename>: Resume an aborted scan --stylesheet <path/URL>: XSL stylesheet to transform XML output to HTML --webxml: Reference stylesheet from Nmap.Org for more portable XML
- 34. --no-stylesheet: Prevent associating of XSL stylesheet w/XML output MISC: -6: Enable IPv6 scanning -A: Enable OS detection, version detection, script scanning, and traceroute --datadir <dirname>: Specify custom Nmap data file location --send-eth/--send-ip: Send using raw ethernet frames or IP packets --privileged: Assume that the user is fully privileged --unprivileged: Assume the user lacks raw socket privileges -V: Print version number -h: Print this help summary page. EXAMPLES: nmap -v -A scanme.nmap.org nmap -v -sn 192.168.0.0/16 10.0.0.0/8 nmap -v -iR 10000 -Pn -p 80 SEE THE MAN PAGE (http://nmap.org/book/man.html) FOR MORE
- 35. OPTIONS AND EXAMPLES For more information use the link: http://linux.die.net/man/1/nmap APPENDIX E - SSH protocol Secure Shell (SSH) is cryptographic network protocol for secure data communication, remote command-line login, remote command execution, and other secure network services between two networked computers. It connects, via a secure channel over an insecure network, a server and a client running SSH server and SSH client programs, respectively.[1] The protocol specification distinguishes between two major versions that are referred to as SSH-1 and SSH- 2.
- 36. The best-known application of the protocol is for access to shell accounts on Unix-like operating systems, but it can also be used in a similar fashion for accounts on Windows. It was designed as a replacement for Telnet and other insecure remote shell protocols such as the Berkeley rsh and rexec protocols, which send information, notably passwords, in plaintext, rendering them susceptible to interception and disclosure using packet analysis. The encryption used by SSH is intended to provide confidentiality and integrity of data over an unsecured network, such as the Internet. SSH uses public-key cryptography to authenticate the remote computer and allow it to authenticate the user, if necessary. There are several ways to use SSH; one is to use automatically generated public-private key pairs to simply encrypt a network connection, and then use password authentication to log on.
- 37. Another is to use a manually generated public-private key pair to perform the authentication, allowing users or programs to log in without having to specify a password. In this scenario, anyone can produce a matching pair of different keys (public and private). The public key is placed on all computers that must allow access to the owner of the matching private key (the owner keeps the private key secret). While authentication is based on the private key, the key itself is never transferred through the network during authentication. SSH only verifies whether the same person offering the public key also owns the matching private key. In all versions of SSH it is important to verify unknown public keys, i.e., associate the public keys with identities, before accepting them as valid. Accepting an attacker's public key without validation will authorize an unauthorized attacker as a valid user.
- 38. APPENDIX F - HYDRA NAME hydra - A very fast network logon cracker which support many different services SYNOPSIS hydra [[[-l LOGIN|-L FILE] [-p PASS|-P FILE]] | [-C FILE]] [-e ns] [-4/6] [-o FILE] [-t TASKS] [-M FILE [-T TASKS]] [-w TIME] [-f] [- s PORT] [- S] [-vV] server service [OPT] DESCRIPTION Hydra is a parallized login cracker which supports numerous protocols to attack. New modules are easy to add, beside that, it is flexible and very fast. This tool gives researchers and security consultants the
- 39. possiblity to show how easy it would be to gain unauthorized access from remote to a system. Currently this tool supports: AFP, Cisco AAA, Cisco auth, Cisco enable, CVS, Firebird, FTP, HTTP- FORM-GET, HTTP-FORM-POST, HTTP-GET, HTTP-HEAD, HTTP- PROXY, HTTPS- FORM-GET, HTTPS-FORM-POST, HTTPS-GET, HTTPS-HEAD, ICQ, IMAP, IRC, LDAP, MS- SQL, MYSQL, NCP, NNTP, PCNFS, POP3, POSTGRES, REXEC, SAP/R3, SMB, SMTP, SNMP, SOCKS5, SSH(v1 and v 2), Subversion, Teamspeak (TS2), TELNET, VMware-Auth, VNC and XMPP. -R restore a previous aborted/crashed session -S
- 40. connect via SSL -s PORT if the service is on a different default port, define it here -l LOGIN or -L FILE login with LOGIN name, or load several logins from FILE -p PASS or -P FILE try password PASS, or load several passwords from FILE -e ns additional checks, "n" for null password, "s" try login as pass -c FILE colon separated "login:pass" format, instead of -L/-P options -m FILE server list for parallel attacks, one entry per line -o FILE write found login/password pairs to FILE instead of stdout -f exit after the first found login/password pair (per host if -M)
- 41. -t TASKS run TASKS number of connects in parallel (default: 16) -w TIME defines the max wait time in seconds for responses (default: 30) -4 / -6 prefer IPv4 (default) or IPv6 addresses -v / -V verbose mode / show login+pass combination for each attempt server the target server (use either this OR the -M option) service the service to crack. Supported protocols: afp cisco cisco-enable cvs firebird ftp[s] http[s]-{head|get} http[s]-{get|post}-form http- proxy icq irc imap ldap2 ldap3[-{cram|digest}md5] mssql mysql ncp nntp oracle oracle- listener oracle-sid pcnfs pop3 pcanywhere postgres rexec rlogin rsh sapr3
- 42. sip smb smtp smtp-enum snmp socks5 ssh svn teamspeak telnet vnc vmauthd xmpp OPT some service modules need special input (see README!) -h, --help Show summary of options. For more information type “man hydra” in the shell APPENDIX G - SSH NAME ssh - OpenSSH SSH client (remote login program) SYNOPSIS ssh [-1246AaCfgkMNnqsTtVvXxY] [-b bind_address] [-c cipher_spec] [-D [bind_address:]port] [-e escape_char] [-F configfile] [-i identity_file] [-L [bind_address:]port:host:hostport]
- 43. [-l login_name] [-m mac_spec] [-O ctl_cmd] [-o option] [-p port] [-R [bind_address:]port:host:hostport] [-S ctl_path] [-w tunnel:tunnel] [[email protected]]hostname [command] DESCRIPTION ssh (SSH client) is a program for logging into a remote machine and for executing commands on a remote machine. It is intended to replace rlogin and rsh, and provide secure encrypted communications between two untrusted hosts over an insecure network. X11 connections and arbitrary TCP ports can also be forwarded over the secure channel. ssh connects and logs into the specified hostname (with optional user name). The user must prove his/her identity to the remote machine using one of several methods depending on the protocol version used (see
- 44. below). If command is specified, it is executed on the remote host instead of a login shell. The options are as follows: -1 Forces ssh to try protocol version 1 only. -2 Forces ssh to try protocol version 2 only. -4 Forces ssh to use IPv4 addresses only. -6 Forces ssh to use IPv6 addresses only. -A Enables forwarding of the authentication agent connection. This can also be specified on a per-host basis in a configuration file. Agent forwarding should be enabled with caution. Users
- 45. with the ability to bypass file permissions on the remote host (for the agent's Unix-domain socket) can access the local agent through the forwarded connection. An attacker cannot obtain key material from the agent, however they can perform operations on the keys that enable them to authenticate using the identities loaded into the agent. -a Disables forwarding of the authentication agent connection. -b bind_address Use bind_address on the local machine as the source address of the connection. Only useful on systems with more than one address. -C Requests compression of all data (including stdin,
- 46. stdout, stderr, and data for forwarded X11 and TCP connections). The compression algorithm is the same used by gzip(1), and the "level" can be controlled by the CompressionLevel option for pro- tocol version 1. Compression is desirable on modem lines and other slow connections, but will only slow down things on fast networks. The default value can be set on a host-by-host basis in the configuration files; see the Compression option. -c cipher_spec Selects the cipher specification for encrypting the session. Protocol version 1 allows specification of a single cipher. The supported values are "3des", "blowfish", and "des". 3des (triple-des) is an encrypt-decrypt-encrypt triple with three dif- ferent keys. It is believed to be secure. blowfish is a fast
- 47. block cipher; it appears very secure and is much faster than 3des. des is only supported in the ssh client for interoperabil- ity with legacy protocol 1 implementations that do not support the 3des cipher. Its use is strongly discouraged due to crypto- graphic weaknesses. The default is "3des". For protocol version 2, cipher_spec is a comma-separated list of ciphers listed in order of preference. The supported ciphers are: 3des-cbc, aes128-cbc, aes192-cbc, aes256-cbc, aes128- ctr, aes192-ctr, aes256-ctr, arcfour128, arcfour256, arcfour, blow- fish-cbc, and cast128-cbc. The default is: aes128-cbc,3des-cbc,blowfish-cbc,cast128-cbc,arcfour128, arcfour256,arcfour,aes192-cbc,aes256-cbc,aes128-ctr, aes192-ctr,aes256-ctr
- 48. -D [bind_address:]port Specifies a local "dynamic" application-level port forwarding. This works by allocating a socket to listen to port on the local side, optionally bound to the specified bind_address. Whenever a connection is made to this port, the connection is forwarded over the secure channel, and the application protocol is then used to determine where to connect to from the remote machine. Currently the SOCKS4 and SOCKS5 protocols are supported, and ssh will act as a SOCKS server. Only root can forward privileged ports. Dynamic port forwardings can also be specified in the configura- tion file. IPv6 addresses can be specified with an alternative syntax: [bind_address/]port or by enclosing the address in square
- 49. brack- ets. Only the superuser can forward privileged ports. By default, the local port is bound in accordance with the GatewayPorts setting. However, an explicit bind_address may be used to bind the connection to a specific address. The bind_address of "localhost" indicates that the listening port be bound for local use only, while an empty address or '*' indicates that the port should be available from all interfaces. -e escape_char Sets the escape character for sessions with a pty (default: '~'). The escape character is only recognized at the beginning of a line. The escape character followed by a dot ('.') closes the connection; followed by control-Z suspends the connection; and
- 50. followed by itself sends the escape character once. Setting the character to "none" disables any escapes and makes the session fully transparent. -F configfile Specifies an alternative per-user configuration file. If a con- figuration file is given on the command line, the system- wide configuration file (/etc/ssh/ssh_config) will be ignored. The default for the per-user configuration file is ~/.ssh/config. -f Requests ssh to go to background just before command execution. This is useful if ssh is going to ask for passwords or passphrases, but the user wants it in the background. This implies -n. The recommended way to start X11 programs at a remote site is with something like ssh -f host xterm. -g Allows remote hosts to connect to local forwarded
- 51. ports. -I smartcard_device Specify the device ssh should use to communicate with a smartcard used for storing the user's private RSA key. This option is only available if support for smartcard devices is compiled in (default is no support). -i identity_file Selects a file from which the identity (private key) for RSA or DSA authentication is read. The default is ~/.ssh/identity for protocol version 1, and ~/.ssh/id_rsa and ~/.ssh/id_dsa for pro- tocol version 2. Identity files may also be specified on a per- host basis in the configuration file. It is possible to have multiple -i options (and multiple identities specified in
- 52. config- uration files). -k Disables forwarding (delegation) of GSSAPI credentials to the server. -L [bind_address:]port:host:hostport Specifies that the given port on the local (client) host is to be forwarded to the given host and port on the remote side. This works by allocating a socket to listen to port on the local side, optionally bound to the specified bind_address. Whenever a con- nection is made to this port, the connection is forwarded over the secure channel, and a connection is made to host port hostport from the remote machine. Port forwardings can also be specified in the configuration file. IPv6 addresses can be spec-
- 53. ified with an alternative syntax: [bind_address/]port/host/hostport or by enclosing the address in square brackets. Only the superuser can forward privileged ports. By default, the local port is bound in accordance with the GatewayPorts setting. However, an explicit bind_address may be used to bind the connection to a specific address. The bind_address of "localhost" indicates that the listening port be bound for local use only, while an empty address or '*' indicates that the port should be available from all interfaces. -l login_name Specifies the user to log in as on the remote machine. This also may be specified on a per-host basis in the configuration file. -M Places the ssh client into "master" mode for
- 54. connection sharing. Multiple -M options places ssh into "master" mode with confirma- tion required before slave connections are accepted. Refer to the description of ControlMaster in ssh_config(5) for details. -m mac_spec Additionally, for protocol version 2 a comma-separated list of MAC (message authentication code) algorithms can be specified in order of preference. See the MACs keyword for more information. -N Do not execute a remote command. This is useful for just for- warding ports (protocol version 2 only). -n Redirects stdin from /dev/null (actually, prevents reading from stdin). This must be used when ssh is run in the background. A
- 55. common trick is to use this to run X11 programs on a remote machine. For example, ssh -n shadows.cs.hut.fi emacs & will start an emacs on shadows.cs.hut.fi, and the X11 connection will be automatically forwarded over an encrypted channel. The ssh program will be put in the background. (This does not work if ssh needs to ask for a password or passphrase; see also the - f option.) -O ctl_cmd Control an active connection multiplexing master process. When the -O option is specified, the ctl_cmd argument is interpreted and passed to the master process. Valid commands are: "check" (check that the master process is running) and "exit"
- 56. (request the master to exit). -o option Can be used to give options in the format used in the configura- tion file. This is useful for specifying options for which there is no separate command-line flag. For full details of the options listed below, and their possible values, see ssh_config(5). AddressFamily BatchMode BindAddress ChallengeResponseAuthentication CheckHostIP Cipher Ciphers ClearAllForwardings
- 60. VerifyHostKeyDNS XAuthLocation -p port Port to connect to on the remote host. This can be specified on a per-host basis in the configuration file. -q Quiet mode. Causes all warning and diagnostic messages to be suppressed. -R [bind_address:]port:host:hostport Specifies that the given port on the remote (server) host is to be forwarded to the given host and port on the local side. This works by allocating a socket to listen to port on the remote side, and whenever a connection is made to this port, the connec- tion is forwarded over the secure channel, and a connection is
- 61. made to host port hostport from the local machine. Port forwardings can also be specified in the configuration file. Privileged ports can be forwarded only when logging in as root on the remote machine. IPv6 addresses can be specified by enclosing the address in square braces or using an alternative syntax: [bind_address/]host/port/hostport. By default, the listening socket on the server will be bound to the loopback interface only. This may be overriden by specifying a bind_address. An empty bind_address, or the address '*', indi- cates that the remote socket should listen on all interfaces. Specifying a remote bind_address will only succeed if the server's GatewayPorts option is enabled (see sshd_config(5)). -S ctl_path
- 62. Specifies the location of a control socket for connection shar- ing. Refer to the description of ControlPath and ControlMaster in ssh_config(5) for details. -s May be used to request invocation of a subsystem on the remote system. Subsystems are a feature of the SSH2 protocol which facilitate the use of SSH as a secure transport for other appli- cations (eg. sftp(1)). The subsystem is specified as the remote command. -T Disable pseudo-tty allocation. -t Force pseudo-tty allocation. This can be used to execute arbi- trary screen-based programs on a remote machine, which can be
- 63. very useful, e.g., when implementing menu services. Multiple -t options force tty allocation, even if ssh has no local tty. -V Display the version number and exit. -v Verbose mode. Causes ssh to print debugging messages about its progress. This is helpful in debugging connection, authentica- tion, and configuration problems. Multiple -v options increase the verbosity. The maximum is 3. -w tunnel:tunnel Requests a tun(4) device on the client (first tunnel arg) and server (second tunnel arg). The devices may be specified by numerical ID or the keyword "any", which uses the next available tunnel device. See also the Tunnel directive in ssh_config(5).
- 64. -X Enables X11 forwarding. This can also be specified on a per-host basis in a configuration file. X11 forwarding should be enabled with caution. Users with the ability to bypass file permissions on the remote host (for the user's X authorization database) can access the local X11 display through the forwarded connection. An attacker may then be able to perform activities such as keystroke monitoring. For this reason, X11 forwarding is subjected to X11 SECURITY extension restrictions by default. Please refer to the ssh -Y option and the ForwardX11Trusted directive in ssh_config(5) for more information. -x Disables X11 forwarding.
- 65. -Y Enables trusted X11 forwarding. Trusted X11 forwardings are not subjected to the X11 SECURITY extension controls. ssh may additionally obtain configuration data from a per- user configura- tion file and a system-wide configuration file. The file format and con- figuration options are described in ssh_config(5). ssh exits with the exit status of the remote command or with 255 if an error occurred. For more information use command “man ssh”. APPENDIX H – scp command scp allows files to be copied to, from, or between different hosts. It uses ssh for data transfer and provides the same authentication and same level of security
- 66. as ssh. Examples Copy the file "foobar.txt" from a remote host to the local host $ scp [email protected]:foobar.txt /some/local/directory Copy the file "foobar.txt" from the local host to a remote host $ scp foobar.txt [email protected]:/some/remote/directory Copy the directory "foo" from the local host to a remote host's directory "bar" $ scp -r foo [email protected]:/some/remote/directory/bar Copy the file "foobar.txt" from remote host "rh1.edu" to remote host "rh2.edu" $ scp [email protected]:/some/remote/directory/foobar.txt [email protected]:/some/remote/directory/ Copying the files "foo.txt" and "bar.txt" from the local host to your home
- 67. directory on the remote host $ scp foo.txt bar.txt [email protected]:~ Copy the file "foobar.txt" from the local host to a remote host using port 2264 $ scp -P 2264 foobar.txt [email protected]:/some/remote/directory Copy multiple files from the remote host to your current directory on the local host $ scp [email protected]:/some/remote/directory/{a,b,c} . $ scp [email protected]:~/{foo.txt,bar.txt} . For more information type “man scp” APPENDIX I – John the Ripper Tool / Command To run John, you need to supply it with some password files and optionally
- 68. specify a cracking mode, like this, using the default order of modes and assuming that "passwd" is a copy of your password file: john passwd or, to restrict it to the wordlist mode only, but permitting the use of word mangling rules: john --wordlist=password.lst --rules passwd Cracked passwords will be printed to the terminal and saved in the file called $JOHN/john.pot (in the documentation and in the configuration file for John, "$JOHN" refers to John's "home directory"; which directory it really is depends on how you installed John). The $JOHN/john.pot file is also used to not load password hashes that you already cracked when you run John the next time. To retrieve the cracked passwords, run:
- 69. john --show passwd While cracking, you can press any key for status, or 'q' or Ctrl- C to abort the session saving its state to a file ($JOHN/john.rec by default). If you press Ctrl-C for a second time before John had a chance to complete handling of your first Ctrl-C, John will abort immediately without saving. By default, the state is also saved every 10 minutes to permit for recovery in case of a crash. To continue an interrupted session, run: john --restore These are just the most essential things you can do with John. For a complete list of command line options and for more complicated usage examples you should refer to OPTIONS and EXAMPLES, respectively. Please note that "binary" (pre-compiled) distributions of John may include
- 70. alternate executables instead of just "john". You may need to choose the executable that fits your system best, e.g. "john-omp" to take advantage of multiple CPUs and/or CPU cores. For more information type “man john”. APPENDIX K – mysql command Name mysql - the MySQL command-line tool Synopsis mysql [options] db_name Description mysql is a simple SQL shell with input line editing capabilities. It supports
- 71. interactive and noninteractive use. When used interactively, query results are presented in an ASCII-table format. When used noninteractively (for example, as a filter), the result is presented in tab-separated format. The output format can be changed using command options. If you have problems due to insufficient memory for large result sets, use the -- quick option. This forces mysql to retrieve results from the server a row at a time rather than retrieving the entire result set and buffering it in memory before displaying it. This is done by returning the result set using the mysql_use_result() C API function in the client/server library rather than mysql_store_result(). Using mysql is very easy. Invoke it from the prompt of your command interpreter as follows: shell> mysql db_name
- 72. Or: shell> mysql --user=user_name --password=your_password db_name Then type an SQL statement, end it with ";", g, or G and press Enter. As of MySQL 5.1.10, typing Control+C causes mysql to attempt to kill the current statement. If this cannot be done, or Control+C is typed again before the statement is killed, mysql exits. Previously, Control+C caused mysql to exit in all cases. You can execute SQL statements in a script file (batch file) like this: shell> mysql db_name < script.sql > output.tab On Unix, the mysql client writes a record of executed statements to a history file. See the section called "MYSQL HISTORY FILE". Mysql Options
- 73. mysql supports the following options, which can be specified on the command line or in the [mysql] and [client] groups of an option file. mysql also supports the options for processing option files described at Section 4.2.3.4, "Command- Line Options that Affect Option-File Handling". • --help, -? Display a help message and exit. • --auto-rehash Enable automatic rehashing. This option is on by default, which enables database, table, and column name completion. Use --disable-auto-rehash to disable rehashing. That causes mysql to start faster, but you must issue the rehash command if you want to use name completion.
- 74. To complete a name, enter the first part and press Tab. If the name is unambiguous, mysql completes it. Otherwise, you can press Tab again to see the possible names that begin with what you have typed so far. Completion does not occur if there is no default database. • --batch, -B Print results using tab as the column separator, with each row on a new line. With this option, mysql does not use the history file. Batch mode results in nontabular output format and escaping of special characters. Escaping may be disabled by using raw mode; see the description for the --raw option. • --bind-address=ip_address On a computer having multiple network interfaces, this option can be used to select which interface is employed when connecting to the MySQL server.
- 75. This option is supported only in the version of the mysql client that is supplied with MySQL Cluster, beginning with MySQL Cluster NDB 6.3.4. It is not available in standard MySQL 5.1 releases. • --character-sets-dir=path The directory where character sets are installed. See Section 10.5, "Character Set Configuration". • --column-names Write column names in results. • --column-type-info, -m Display result set metadata. This option was added in MySQL 5.1.14. (Before that, use --debug-info.) The -m short option was added in MySQL 5.1.21. • --comments, -c
- 76. Whether to preserve comments in statements sent to the server. The default is -- skip-comments (discard comments), enable with --comments (preserve comments). This option was added in MySQL 5.1.23. • --compress, -C Compress all information sent between the client and the server if both support compression. • --database=db_name, -D db_name The database to use. This is useful primarily in an option file. • --debug[=debug_options], -# [debug_options] Write a debugging log. A typical debug_options string is 'd:t:o,file_name'. The default is 'd:t:o,/tmp/mysql.trace'. • --debug-check Print some debugging information when the program exits. This option was
- 77. added in MySQL 5.1.21. • --debug-info, -T Before MySQL 5.1.14, this option prints debugging information and memory and CPU usage statistics when the program exits, and also causes display of result set metadata during execution. As of MySQL 5.1.14, use --column- type-info to display result set metadata. • --default-character-set=charset_name Use charset_name as the default character set for the client and connection. A common issue that can occur when the operating system uses utf8 or another multi-byte character set is that output from the mysql client is formatted incorrectly, due to the fact that the MySQL client uses the latin1 character set by default. You can usually fix such issues by using this option to
- 78. force the client to use the system character set instead. See Section 10.5, "Character Set Configuration", for more information. • --delimiter=str Set the statement delimiter. The default is the semicolon character (";"). • --disable-named-commands Disable named commands. Use the * form only, or use named commands only at the beginning of a line ending with a semicolon (";"). mysql starts with this option enabled by default. However, even with this option, long-format commands still work from the first line. See the section called "MYSQL COMMANDS". • --execute=statement, -e statement Execute the statement and quit. The default output format is like that produced
- 79. with --batch. See Section 4.2.3.1, "Using Options on the Command Line", for some examples. With this option, mysql does not use the history file. • --force, -f Continue even if an SQL error occurs. • --host=host_name, -h host_name Connect to the MySQL server on the given host. • --html, -H Produce HTML output. • --ignore-spaces, -i Ignore spaces after function names. The effect of this is described in the discussion for the IGNORE_SPACE SQL mode (see Section 5.1.7, "Server SQL Modes").
- 80. • --line-numbers Write line numbers for errors. Disable this with --skip-line- numbers. • --local-infile[={0|1}] Enable or disable LOCAL capability for LOAD DATA INFILE. With no value, the option enables LOCAL. The option may be given as --local- infile=0 or -- local-infile=1 to explicitly disable or enable LOCAL. Enabling LOCAL has no effect if the server does not also support it. • --named-commands, -G Enable named mysql commands. Long-format commands are permitted, not just short-format commands. For example, quit and q both are recognized. Use -- skip-named-commands to disable named commands. See the section called "MYSQL COMMANDS". • --no-auto-rehash, -A
- 81. This has the same effect as -skip-auto-rehash. See the description for --auto- rehash. • --no-beep, -b Do not beep when errors occur. • --no-named-commands, -g Deprecated, use --disable-named-commands instead. --no- named-commands is removed in MySQL 5.5. • --no-pager Deprecated form of --skip-pager. See the --pager option. --no- pager is removed in MySQL 5.5. • --no-tee Deprecated form of --skip-tee. See the --tee option. --no-tee is removed in MySQL 5.5.
- 82. • --one-database, -o Ignore statements except those that occur while the default database is the one named on the command line. This option is rudimentary and should be used with care. Statement filtering is based only on USE statements. Initially, mysql executes statements in the input because specifying a database db_name on the command line is equivalent to inserting USE db_name at the beginning of the input. Then, for each USE statement encountered, mysql accepts or rejects following statements depending on whether the database named is the one on the command line. The content of the statements is immaterial. Suppose that mysql is invoked to process this set of statements: DELETE FROM db2.t2;
- 83. USE db2; DROP TABLE db1.t1; CREATE TABLE db1.t1 (i INT); USE db1; INSERT INTO t1 (i) VALUES(1); CREATE TABLE db2.t1 (j INT); If the command line is mysql --force --one-database db1, mysql handles the input as follows: • The DELETE statement is executed because the default database is db1, even though the statement names a table in a different database. • The DROP TABLE and CREATE TABLE statements are not executed because the default database is not db1, even though the statements name a table in db1. • The INSERT and CREATE TABLE statements are executed because the default database is db1, even though the CREATE TABLE statement names a table in a different database.
- 84. • --pager[=command] Use the given command for paging query output. If the command is omitted, the default pager is the value of your PAGER environment variable. Valid pagers are less, more, cat [> filename], and so forth. This option works only on Unix and only in interactive mode. To disable paging, use --skip-pager. the section called "MYSQL COMMANDS", discusses output paging further. • --password[=password], -p[password] The password to use when connecting to the server. If you use the short option form (-p), you cannot have a space between the option and the password. If you omit the password value following the --password or -p option on the command line, mysql prompts for one. Specifying a password on the command line should be
- 85. considered insecure. See Section 6.1.2.1, "End-User Guidelines for Password Security". You can use an option file to avoid giving the password on the command line. • --pipe, -W On Windows, connect to the server using a named pipe. This option applies only if the server supports named-pipe connections. • --port=port_num, -P port_num The TCP/IP port number to use for the connection. • --prompt=format_str Set the prompt to the specified format. The default is mysql>. The special sequences that the prompt can contain are described in the section called "MYSQL COMMANDS". • --protocol={TCP|SOCKET|PIPE|MEMORY} The connection protocol to use for connecting to the server. It is useful when the
- 86. other connection parameters normally would cause a protocol to be used other than the one you want. For details on the permissible values, see Section 4.2.2, "Connecting to the MySQL Server". • --quick, -q Do not cache each query result, print each row as it is received. This may slow down the server if the output is suspended. With this option, mysql does not use the history file. • --raw, -r For tabular output, the "boxing" around columns enables one column value to be distinguished from another. For nontabular output (such as is produced in batch mode or when the --batch or --silent option is given), special characters are escaped in the output so they can be identified easily. Newline, tab, NUL, and
- 87. backslash are written as n, t, 0, and . The --raw option disables this character escaping. The following example demonstrates tabular versus nontabular output and the use of raw mode to disable escaping: % mysql mysql> SELECT CHAR(92); +----------+ | CHAR(92) | +----------+ | | +----------+ % mysql -s mysql> SELECT CHAR(92); CHAR(92) % mysql -s -r
- 88. mysql> SELECT CHAR(92); CHAR(92) • --reconnect If the connection to the server is lost, automatically try to reconnect. A single reconnect attempt is made each time the connection is lost. To suppress reconnection behavior, use --skip-reconnect. • --safe-updates, --i-am-a-dummy, -U Permit only those UPDATE and DELETE statements that specify which rows to modify by using key values. If you have set this option in an option file, you can override it by using --safe-updates on the command line. See the section called "MYSQL TIPS", for more information about this option. • --secure-auth
- 89. Do not send passwords to the server in old (pre-4.1.1) format. This prevents connections except for servers that use the newer password format. • --show-warnings Cause warnings to be shown after each statement if there are any. This option applies to interactive and batch mode. • --sigint-ignore Ignore SIGINT signals (typically the result of typing Control+C). • --silent, -s Silent mode. Produce less output. This option can be given multiple times to produce less and less output. This option results in non tabular output format and escaping of special characters. Escaping may be disabled by using raw mode; see the description for the --raw option.
- 90. • --skip-column-names, -N Do not write column names in results. • --skip-line-numbers, -L Do not write line numbers for errors. Useful when you want to compare result files that include error messages. • --socket=path, -S path For connections to localhost, the Unix socket file to use, or, on Windows, the name of the named pipe to use. • --ssl* Options that begin with --ssl specify whether to connect to the server using SSL and indicate where to find SSL keys and certificates. See Section 6.3.6.4, "SSL Command Options".
- 91. • --table, -t Display output in table format. This is the default for interactive use, but can be used to produce table output in batch mode. • --tee=file_name Append a copy of output to the given file. This option works only in interactive mode. the section called "MYSQL COMMANDS", discusses tee files further. • --unbuffered, -n Flush the buffer after each query. • --user=user_name, -u user_name The MySQL user name to use when connecting to the server. • --verbose, -v Verbose mode. Produce more output about what the program does. This option can be given multiple times to produce more and more output.
- 92. (For example, -v - v -v produces table output format even in batch mode.) • --version, -V Display version information and exit. • --vertical, -E Print query output rows vertically (one line per column value). Without this option, you can specify vertical output for individual statements by terminating them with G. • --wait, -w If the connection cannot be established, wait and retry instead of aborting. • --xml, -X Produce XML output. Note Prior to MySQL 5.1.12, there was no differentiation in the output when using this
- 93. option between columns containing the NULL value and columns containing the string literal 'NULL'; both were represented as <field name="column_name">NULL</field> Beginning with MySQL 5.1.12, the output when --xml is used with mysql matches that of mysqldump --xml. See mysqldump(1) for details. Beginning with MySQL 5.1.18, the XML output also uses an XML namespace, as shown here: shell> mysql --xml -uroot -e "SHOW VARIABLES LIKE 'version%'" <?xml version="1.0"?> <resultset statement="SHOW VARIABLES LIKE 'version%'" xmlns:xsi="http://www.w3.org/2001/XMLSchema-instance"> <row> <field name="Variable_name">version</field> <field name="Value">5.0.40-debug</field>
- 94. </row> <row> <field name="Variable_name">version_comment</field> <field name="Value">Source distribution</field> </row> <row> <field name="Variable_name">version_compile_machine</field> <field name="Value">i686</field> </row> <row> <field name="Variable_name">version_compile_os</field> <field name="Value">suse-linux-gnu</field> </row> </resultset> (See Bug #25946.) You can also set the following variables by using -- var_name=value. The --set- variable format is deprecated and is removed in MySQL 5.5.
- 95. • connect_timeout The number of seconds before connection timeout. (Default value is 0.) • max_allowed_packet The maximum packet length to send to or receive from the server. (Default value is 16MB.) • max_join_size The automatic limit for rows in a join when using --safe- updates. (Default value is 1,000,000.) • net_buffer_length The buffer size for TCP/IP and socket communication. (Default value is 16KB.) • select_limit The automatic limit for SELECT statements when using --safe- updates. (Default
- 96. value is 1,000.) For more information type “man mysql”. APPENDIX L – MYSQL Commands SHOW DATABASES Syntax SHOW {DATABASES | SCHEMAS} [LIKE 'pattern' | WHERE expr] SHOW DATABASES lists the databases on the MySQL server host. SHOW SCHEMAS is a synonym for SHOW DATABASES as of MySQL 5.0.2. The LIKE clause, if present, indicates which database names to match. The WHERE clause can be given to select rows using more general conditions, as discussed in Section 19.18, “Extensions to SHOW Statements”. You see only those databases for which you have some kind of
- 97. privilege, unless you have the global SHOW DATABASES privilege. You can also get this list using the mysqlshow command. If the server was started with the --skip-show-database option, you cannot use this statement at all unless you have the SHOW DATABASES privilege. MySQL implements databases as directories in the data directory, so this statement simply lists directories in that location. However, the output may include names of directories that do not correspond to actual databases. USE Syntax USE db_name The USE db_name statement tells MySQL to use the db_name database as the default (current) database for subsequent statements. The database remains the default until the end of the session or another USE statement is issued.
- 98. SHOW TABLES Syntax SHOW [FULL] TABLES [{FROM | IN} db_name] [LIKE 'pattern' | WHERE expr] SHOW TABLES lists the non-TEMPORARY tables in a given database. You can also get this list using the mysqlshowdb_name command. The LIKE clause, if present, indicates which table names to match. The WHERE clause can be given to select rows using more general conditions, as discussed in Section 19.18, “Extensions to SHOWStatements”. Matching performed by the LIKE clause is dependent on the setting of the lower_case_table_names system variable. Before MySQL 5.0.1, the output from SHOW TABLES contains a single column of table names. Beginning with MySQL 5.0.1, this statement also lists any views in the database. As of MySQL 5.0.2, the FULL
- 99. modifier is supported such that SHOW FULL TABLES displays a second output column. Values for the second column areBASE TABLE for a table and VIEW for a view. If you have no privileges for a base table or view, it does not show up in the output from SHOW TABLES ormysqlshow db_name. SELECT Syntax [+/-] SELECT [ALL | DISTINCT | DISTINCTROW ] [HIGH_PRIORITY] [STRAIGHT_JOIN] [SQL_SMALL_RESULT] [SQL_BIG_RESULT] [SQL_BUFFER_RESULT] [SQL_CACHE | SQL_NO_CACHE] [SQL_CALC_FOUND_ROWS] select_expr [, select_expr ...]
- 100. [FROM table_references [WHERE where_condition] [GROUP BY {col_name | expr | position} [ASC | DESC], ... [WITH ROLLUP]] [HAVING where_condition] [ORDER BY {col_name | expr | position} [ASC | DESC], ...] [LIMIT {[offset,] row_count | row_count OFFSET offset}] [PROCEDURE procedure_name(argument_list)] [INTO OUTFILE 'file_name' export_options | INTO DUMPFILE 'file_name' | INTO var_name [, var_name]] [FOR UPDATE | LOCK IN SHARE MODE]] SELECT is used to retrieve rows selected from one or more tables, and can include UNION statements and subqueries. See Section 13.2.8.4, “UNION Syntax”, and Section 13.2.9, “Subquery Syntax”.
- 101. The most commonly used clauses of SELECT statements are these: Each select_expr indicates a column that you want to retrieve. There must be at least one select_expr. table_references indicates the table or tables from which to retrieve rows. Its syntax is described in Section 13.2.8.2, “JOIN Syntax”. The WHERE clause, if given, indicates the condition or conditions that rows must satisfy to be selected. where_condition is an expression that evaluates to true for each row to be selected. The statement selects all rows if there is no WHERE clause. In the WHERE expression, you can use any of the functions and operators that MySQL supports, except for aggregate (summary) functions.
- 102. See Section 9.5, “Expression Syntax”, and Chapter 12, Functions and Operators. SELECT can also be used to retrieve rows computed without reference to any table. For example: mysql> SELECT 1 + 1; -> 2 You are permitted to specify DUAL as a dummy table name in situations where no tables are referenced: mysql> SELECT 1 + 1 FROM DUAL; -> 2 DUAL is purely for the convenience of people who require that all SELECT statements should have FROM and possibly other clauses. MySQL may ignore the clauses. MySQL does not require FROM DUAL if no tables are referenced.
- 103. In general, clauses used must be given in exactly the order shown in the syntax description. For example, a HAVING clause must come after any GROUP BY clause and before any ORDER BY clause. The exception is that the INTO clause can appear either as shown in the syntax description or immediately following the select_expr list. For more information about INTO, see Section 13.2.8.1, “SELECT ... INTO Syntax”. The list of select_expr terms comprises the select list that indicates which columns to retrieve. Terms specify a column or expression or can use *- shorthand: A select list consisting only of a single unqualified * can be used as shorthand to select all columns from all tables:
- 104. SELECT * FROM t1 INNER JOIN t2 ... tbl_name.* can be used as a qualified shorthand to select all columns from the named table: SELECT t1.*, t2.* FROM t1 INNER JOIN t2 ... Use of an unqualified * with other items in the select list may produce a parse error. To avoid this problem, use a qualified tbl_name.* reference SELECT AVG(score), t1.* FROM t1 ... The following list provides additional information about other SELECT clauses: A select_expr can be given an alias using AS alias_name. The alias is used as the expression's column name and can be used in GROUP BY, ORDER BY, or HAVING clauses. For example: SELECT CONCAT(last_name,', ',first_name) AS full_name
- 105. FROM mytable ORDER BY full_name; The AS keyword is optional when aliasing a select_expr with an identifier. The preceding example could have been written like this: SELECT CONCAT(last_name,', ',first_name) full_name FROM mytable ORDER BY full_name; However, because the AS is optional, a subtle problem can occur if you forget the comma between two select_expr expressions: MySQL interprets the second as an alias name. For example, in the following statement, columnb is treated as an alias name: SELECT columna columnb FROM mytable; For this reason, it is good practice to be in the habit of using AS explicitly when specifying column aliases. It is not permissible to refer to a column alias in a WHERE clause, because the
- 106. column value might not yet be determined when the WHERE clause is executed. See Section B.5.5.4, “Problems with Column Aliases”. The FROM table_references clause indicates the table or tables from which to retrieve rows. If you name more than one table, you are performing a join. For information on join syntax, see Section 13.2.8.2, “JOIN Syntax”. For each table specified, you can optionally specify an alias. tbl_name [[AS] alias] [index_hint] The use of index hints provides the optimizer with information about how to choose indexes during query processing. For a description of the syntax for specifying these hints, see Section 13.2.8.3, “Index Hint Syntax”. You can use SET max_seeks_for_key=value as an alternative way to force MySQL to prefer key scans instead of table scans. See Section 5.1.4, “Server
- 107. System Variables”. You can refer to a table within the default database as tbl_name, or as db_name.tbl_name to specify a database explicitly. You can refer to a column as col_name, tbl_name.col_name, or db_name.tbl_name.col_name. You need not specify a tbl_name or db_name.tbl_name prefix for a column reference unless the reference would be ambiguous. See Section 9.2.1, “Identifier Qualifiers”, for examples of ambiguity that require the more explicit column reference forms. A table reference can be aliased using tbl_name AS alias_name or tbl_name alias_name: SELECT t1.name, t2.salary FROM employee AS t1, info AS t2 WHERE t1.name = t2.name;
- 108. SELECT t1.name, t2.salary FROM employee t1, info t2 WHERE t1.name = t2.name; Columns selected for output can be referred to in ORDER BY and GROUP BY clauses using column names, column aliases, or column positions. Column positions are integers and begin with 1: SELECT college, region, seed FROM tournament ORDER BY region, seed; SELECT college, region AS r, seed AS s FROM tournament ORDER BY r, s; SELECT college, region, seed FROM tournament ORDER BY 2, 3; To sort in reverse order, add the DESC (descending) keyword to the name of the column in the ORDER BY clause that you are sorting by. The default is ascending order; this can be specified explicitly using the ASC keyword.
- 109. If ORDER BY occurs within a subquery and also is applied in the outer query, the outermost ORDER BY takes precedence. For example, results for the following statement are sorted in descending order, not ascending order: (SELECT ... ORDER BY a) ORDER BY a DESC; Use of column positions is deprecated because the syntax has been removed from the SQL standard. If you use GROUP BY, output rows are sorted according to the GROUP BY columns as if you had an ORDER BY for the same columns. To avoid the overhead of sorting that GROUP BY produces, add ORDER BY NULL: SELECT a, COUNT(b) FROM test_table GROUP BY a ORDER BY NULL; MySQL extends the GROUP BY clause so that you can also specify ASC and
- 110. DESC after columns named in the clause: SELECT a, COUNT(b) FROM test_table GROUP BY a DESC; MySQL extends the use of GROUP BY to permit selecting fields that are not mentioned in the GROUP BY clause. If you are not getting the results that you expect from your query, please read the description of GROUP BY found in Section 12.15, “Functions and Modifiers for Use with GROUP BY Clauses”. GROUP BY permits a WITH ROLLUP modifier. See Section 12.15.2, “GROUP BY Modifiers”. The HAVING clause is applied nearly last, just before items are sent to the client, with no optimization. (LIMIT is applied after HAVING.) A HAVING clause can refer to any column or alias named in a select_expr in the
- 111. SELECT list or in outer subqueries, and to aggregate functions. However, the SQL standard requires that HAVING must reference only columns in the GROUP BY clause or columns used in aggregate functions. To accommodate both standard SQL and the MySQL-specific behavior of being able to refer columns in the SELECT list, MySQL 5.0.2 and up permit HAVING to refer to columns in the SELECT list, columns in the GROUP BY clause, columns in outer subqueries, and to aggregate functions. For example, the following statement works in MySQL 5.0.2 but produces an error for earlier versions: mysql> SELECT COUNT(*) FROM t GROUP BY col1 HAVING col1 = 2; If the HAVING clause refers to a column that is ambiguous, a warning occurs. In the following statement, col2 is ambiguous because it is used as both an alias and
- 112. a column name: SELECT COUNT(col1) AS col2 FROM t GROUP BY col2 HAVING col2 = 2; Preference is given to standard SQL behavior, so if a HAVING column name is used both in GROUP BY and as an aliased column in the output column list, preference is given to the column in the GROUP BY column. Do not use HAVING for items that should be in the WHERE clause. For example, do not write the following: SELECT col_name FROM tbl_name HAVING col_name > 0; Write this instead: SELECT col_name FROM tbl_name WHERE col_name > 0; The HAVING clause can refer to aggregate functions, which the WHERE clause cannot:
- 113. SELECT user, MAX(salary) FROM users GROUP BY user HAVING MAX(salary) > 10; (This did not work in some older versions of MySQL.) MySQL permits duplicate column names. That is, there can be more than one select_expr with the same name. This is an extension to standard SQL. Because MySQL also permits GROUP BY and HAVING to refer to select_expr values, this can result in an ambiguity: SELECT 12 AS a, a FROM t GROUP BY a; In that statement, both columns have the name a. To ensure that the correct column is used for grouping, use different names for each select_expr. MySQL resolves unqualified column or alias references in ORDER BY clauses by searching in the select_expr values, then in the columns of the tables in the FROM clause. For GROUP BY or HAVING clauses, it searches
- 114. the FROM clause before searching in the select_expr values. (For GROUP BY and HAVING, this differs from the pre-MySQL 5.0 behavior that used the same rules as for ORDER BY.) The LIMIT clause can be used to constrain the number of rows returned by the SELECT statement. LIMIT takes one or two numeric arguments, which must both be nonnegative integer constants (except when using prepared statements). With two arguments, the first argument specifies the offset of the first row to return, and the second specifies the maximum number of rows to return. The offset of the initial row is 0 (not 1): SELECT * FROM tbl LIMIT 5,10; # Retrieve rows 6-15 To retrieve all rows from a certain offset up to the end of the
- 115. result set, you can use some large number for the second parameter. This statement retrieves all rows from the 96th row to the last: SELECT * FROM tbl LIMIT 95,18446744073709551615; With one argument, the value specifies the number of rows to return from the beginning of the result set: SELECT * FROM tbl LIMIT 5; # Retrieve first 5 rows In other words, LIMIT row_count is equivalent to LIMIT 0, row_count. For prepared statements, you can use placeholders (supported as of MySQL version 5.0.7). The following statements will return one row from the tbl table: SET @a=1; PREPARE STMT FROM 'SELECT * FROM tbl LIMIT ?'; EXECUTE STMT USING @a; The following statements will return the second to sixth row
- 116. from the tbl table: SET @skip=1; SET @numrows=5; PREPARE STMT FROM 'SELECT * FROM tbl LIMIT ?, ?'; EXECUTE STMT USING @skip, @numrows; For compatibility with PostgreSQL, MySQL also supports the LIMIT row_count OFFSET offset syntax. If LIMIT occurs within a subquery and also is applied in the outer query, the outermost LIMIT takes precedence. For example, the following statement produces two rows, not one: (SELECT ... LIMIT 1) LIMIT 2; A PROCEDURE clause names a procedure that should process the data in the result set. For an example, see Section 8.8.2, “Using PROCEDURE ANALYSE”, which describes ANALYSE, a procedure that can be used to obtain suggestions
- 117. for optimal column data types that may help reduce table sizes. The SELECT ... INTO form of SELECT enables the query result to be written to a file or stored in variables. For more information, see Section 13.2.8.1, “SELECT ... INTO Syntax”. If you use FOR UPDATE with a storage engine that uses page or row locks, rows examined by the query are write-locked until the end of the current transaction. Using LOCK IN SHARE MODE sets a shared lock that permits other transactions to read the examined rows but not to update or delete them. See Section 14.2.7.3, “SELECT ... FOR UPDATE and SELECT ... LOCK IN SHARE MODE Locking Reads”. Following the SELECT keyword, you can use a number of options that affect the operation of the statement. HIGH_PRIORITY, STRAIGHT_JOIN, and options
- 118. beginning with SQL_ are MySQL extensions to standard SQL. The ALL and DISTINCT options specify whether duplicate rows should be returned. ALL (the default) specifies that all matching rows should be returned, including duplicates. DISTINCT specifies removal of duplicate rows from the result set. It is an error to specify both options. DISTINCTROW is a synonym for DISTINCT. HIGH_PRIORITY gives the SELECT higher priority than a statement that updates a table. You should use this only for queries that are very fast and must be done at once. A SELECT HIGH_PRIORITY query that is issued while the table is locked for reading runs even if there is an update statement waiting for the table to be free. This affects only storage engines that use only table-level
- 119. locking (such as MyISAM, MEMORY, and MERGE). HIGH_PRIORITY cannot be used with SELECT statements that are part of a UNION. STRAIGHT_JOIN forces the optimizer to join the tables in the order in which they are listed in the FROM clause. You can use this to speed up a query if the optimizer joins the tables in nonoptimal order. STRAIGHT_JOIN also can be used in the table_references list. See Section 13.2.8.2, “JOIN Syntax”. STRAIGHT_JOIN does not apply to any table that the optimizer treats as a const or system table. Such a table produces a single row, is read during the optimization phase of query execution, and references to its columns are replaced with the appropriate column values before query execution proceeds. These tables will appear first in the query plan displayed by EXPLAIN. See Section 8.2.1,
- 120. “Optimizing Queries with EXPLAIN”. This exception may not apply to const or system tables that are used on the NULL-complemented side of an outer join (that is, the right-side table of a LEFT JOIN or the left-side table of a RIGHT JOIN. SQL_BIG_RESULT or SQL_SMALL_RESULT can be used with GROUP BY or DISTINCT to tell the optimizer that the result set has many rows or is small, respectively. For SQL_BIG_RESULT, MySQL directly uses disk-based temporary tables if needed, and prefers sorting to using a temporary table with a key on the GROUP BY elements. For SQL_SMALL_RESULT, MySQL uses fast temporary tables to store the resulting table instead of using sorting. This should not normally be needed. SQL_BUFFER_RESULT forces the result to be put into a temporary table. This
- 121. helps MySQL free the table locks early and helps in cases where it takes a long time to send the result set to the client. This option can be used only for top-level SELECT statements, not for subqueries or following UNION. SQL_CALC_FOUND_ROWS tells MySQL to calculate how many rows there would be in the result set, disregarding any LIMIT clause. The number of rows can then be retrieved with SELECT FOUND_ROWS(). See Section 12.13, “Information Functions”. The SQL_CACHE and SQL_NO_CACHE options affect caching of query results in the query cache (see Section 8.6.3, “The MySQL Query Cache”). SQL_CACHE tells MySQL to store the result in the query cache if it is cacheable and the value of the query_cache_type system variable is 2 or DEMAND. With SQL_NO_CACHE, the server does not use the query cache. It neither checks the
- 122. query cache to see whether the result is already cached, nor does it cache the query result. (Due to a limitation in the parser, a space character must precede and follow the SQL_NO_CACHE keyword; a nonspace such as a newline causes the server to check the query cache to see whether the result is already cached.) For a query that uses UNION, subqueries, or views, the following rules apply: SQL_NO_CACHE applies if it appears in any SELECT in the query. For a cacheable query, SQL_CACHE applies if it appears in the first SELECT of the query, or in the first SELECT of a view referred to by the query. To import SQL query to the file use: SELECT * FROM <TABLE> INTO OUTFILE '<PATH/FILENAME>'
- 123. The file can be copied from SQL Server host using command “scp” discussed earlier. INM443 Cryptography MSc in Cyber Security MSci in Computer Science with Cyber Security Ethical Hacking (Term 1) Description The scope of this coursework is to sharpen your computing skills and practice security in computing/communication systems. In term 1, you play the role of ethical hacker. Note that an ethical hacker is an expert who attacks a security system on behalf of its owners, seeking vulnerabilities that a malicious hacker could exploit. You are challenged to identify flaws in an ecommerce company’s network device, e.g. an SQL server, which contains customers private
- 124. data. In particular, you will need to break SQL server’s crypto components and retrieve customer’s encrypted credit card secret code (3-digit) of an e-commerce company. The crypto algorithm used in the encryption of the credit card secret code is RSA with weak security components. A weak password is also applied to the administrator account (admin). More information at the Coursework Manual file in MOODLE. Output/Report Structure It is expected to document in detail your methodology and work plan to achieve your goals. Your submitted report should have the following structure and include the following information (use screenshots to justify your work): TERM 1: Report Structure/Contents 1. Work Plan (Team Work) In this section identify the network system you will attack (i.e., OS software installed, IP addresses). In addition, discover your environment by creating a map diagram/figure of the computer network found in the company. [10 marks] 2. Breaking the system (2000-3000 words)
- 125. In this section identify potential methodologies of attacking the system. As an example, a) Perform a dictionary attack in the admin password to gain access to the SSH server. Justify your answer. Clever solutions will earn full marks. Note that in real-life environment your dictionary or username files are very large. [20 marks] b) Cryptanalyze (by hand) the encrypted email which you will find in your mailbox to gain useful information. Provide details. Clever solutions will earn full marks. Consider you don’t have access to online resources.) [20 marks] c) Brute force the admin account password in the SQL server to access the database. Clever solutions will earn full marks. How would you approach the bruteforceif the database is too large? [20 marks] d) Retrieve customer’s credit card secret code
- 126. from the accessed database and find the RSA private key d. RSA public key e must be calculated using Shamir’s secret sharing scheme in a 4 members group (see Table 1 - Coursework Manual pdf file). This part can be a group/team effort. [20 marks] e) Decrypt the secret code using the SageMath tool (more in tutorials). Clever solutions will earn full marks - Discuss in the report how would you decrypt the code if you didn’t had access to RSA tools. Justify your answers. [10 marks] 4. Concluding Remarks Conclude your work and summarise what you have achieved/what went wrong (if any) in this coursework. Grading Criteria Yourmark will cover the coursework assessment component found in module specifications for INM443. The exact weighting of the current security assessment report is shown below: § INM443 Cryptography module (coursework: 30%)
- 127. Note that Coursework Report Marking follows the University Assessment and Feedback Policy: https://www.city.ac.uk/__data/assets/pdf_file/0009/365292/Asse ssment-and-Feedback-Policy-Senate- October-2016-2.pdf Submission Dates INM443 MSc/MSci students: The final report submission is due to the 8th of December (17:00). It is essential to upload a single report in MOODLE under “Submission Coursework” area. Working environment Instructions on your working environment will be given in tutorials/labs of Cryptography (INM443).