1. Foundations for light garden walls
foundations on a slope - a retaining wall
NOTE: These guidelines are only for light garden walls.
The most important part of any wall is its foundation, and if these are out of true, you will have
a hard job producing a good wall.
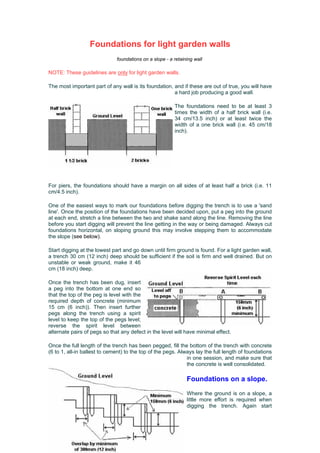
The foundations need to be at least 3
times the width of a half brick wall (i.e.
34 cm/13.5 inch) or at least twice the
width of a one brick wall (i.e. 45 cm/18
inch).
For piers, the foundations should have a margin on all sides of at least half a brick (i.e. 11
cm/4.5 inch).
One of the easiest ways to mark our foundations before digging the trench is to use a 'sand
line'. Once the position of the foundations have been decided upon, put a peg into the ground
at each end, stretch a line between the two and shake sand along the line. Removing the line
before you start digging will prevent the line getting in the way or being damaged. Always cut
foundations horizontal, on sloping ground this may involve stepping them to accommodate
the slope (see below).
Start digging at the lowest part and go down until firm ground is found. For a light garden wall,
a trench 30 cm (12 inch) deep should be sufficient if the soil is firm and well drained. But on
unstable or weak ground, make it 46
cm (18 inch) deep.
Once the trench has been dug, insert
a peg into the bottom at one end so
that the top of the peg is level with the
required depth of concrete (minimum
15 cm (6 inch)). Then insert further
pegs along the trench using a spirit
level to keep the top of the pegs level;
reverse the spirit level between
alternate pairs of pegs so that any defect in the level will have minimal effect.
Once the full length of the trench has been pegged, fill the bottom of the trench with concrete
(6 to 1, all-in ballest to cement) to the top of the pegs. Always lay the full length of foundations
in one session, and make sure that
the concrete is well consolidated.
Foundations on a slope.
Where the ground is on a slope, a
little more effort is required when
digging the trench. Again start
2. digging at the lowest point and cut horizontal steps into the slope working up hill. Try to keep
the steps equal to a whole number of bricks plus mortar in length and height (i.e. 22.5 cm
(8.75 inch) and 7.5 cm (3 inch)) - this will make laying the bricks easier as fewer bricks will
need to be cut and the courses will line up as the wall is built up.
Pegging out the trench is similar to a single level trench except that shuttering boards must be
fitted at the front of each step to create the steps. When the concrete is poured into the
trench, start at the top of the slope and work down, you may find that the upper steps have
sunk by the time the lower steps have been filled and levelled, in this case, return to the upper
steps, add more concrete and work your way down once more.
Retaining walls
When building walls to retain soil, the
height of the wall should be no more
than 4 times the thickness. Thus for a
single 22.5 cm (9 inch) brick wall, this
limits the height to 90 cm (36 inch).
To help water escape from the
retained soil behind the wall, it helps
to fill behind the wall with gravel (or
similar) and incorporate drain pipes in
the wall.