samsung-fdbm-refrigerators-service-bulletin-ice-makers-freezing-over
•
1 like•4,136 views

-refrigerators-service-bulletin-ice-makers-freezing-over

Recommended
Recommended
More Related Content
What's hot
What's hot (20)
Similar to samsung-fdbm-refrigerators-service-bulletin-ice-makers-freezing-over
Similar to samsung-fdbm-refrigerators-service-bulletin-ice-makers-freezing-over (20)
More from Darlin Collado
More from Darlin Collado (20)
Recently uploaded
Recently uploaded (20)
samsung-fdbm-refrigerators-service-bulletin-ice-makers-freezing-over
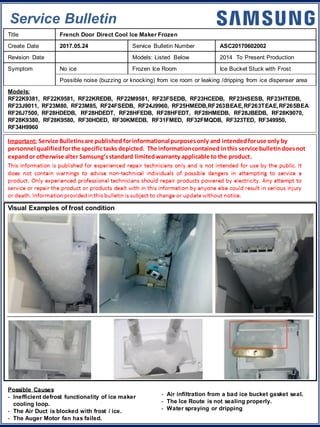
- 1. Service Bulletin Important: Service Bulletinsare published forinformational purposesonly and intendedforuse only by personnel qualifiedforthe specifictasks depicted. The informationcontained inthis service bulletindoesnot expandor otherwise alter Samsung’sstandard limitedwarranty applicable to the product. Title French Door Direct Cool Ice Maker Frozen Create Date 2017.05.24 Service Bulletin Number ASC20170602002 Revision Date Models: Listed Below 2014 To Present Production Symptom No ice Frozen Ice Room Ice Bucket Stuck with Frost Possible noise (buzzing or knocking) from ice room or leaking /dripping from ice dispenser area Models: RF22K9381, RF22K9581, RF22KREDB, RF22M9581, RF23FSEDB, RF23HCEDB, RF23HSESB, RF23HTEDB, RF23J9011, RF23M80, RF23M85, RF24FSEDB, RF24J9960, RF25HMEDB,RF263BEAE,RF263TEAE,RF265BEA RF26J7500, RF28HDEDB, RF28HDEDT, RF28HFEDB, RF28HFEDT, RF28HMEDB, RF28JBEDB, RF28K9070, RF28K9380, RF28K9580, RF30HDED, RF30KMEDB, RF31FMED, RF32FMQDB, RF323TED, RF349950, RF34H9960 Visual Examples of frost condition Possible Causes - Inefficient defrost functionality of ice maker cooling loop. - The Air Duct is blocked with frost / ice. - The Auger Motor fan has failed. - Air infiltration from a bad ice bucket gasket seal. - The Ice Route is not sealing properly. - Water spraying or dripping
- 2. Service Bulletin Service Measures (Illustrated by number below. More details are on the following pages): 1. Sealing the Ice Room with RTV Sealant 2. Checking and adjusting the water line placement in the Ice Room 3. Inspecting the Auger Motor Assembly for Styrofoam packing 4. Inspecting the Ice Route flapper for a proper seal 5. Inspecting the Ice Bucket for a proper seal 6. Installing the Ice Room Service Kit in all cases ( Y- Clip Assy ) 7. Replacing the Ice Maker Assembly in all cases 1 2 3 4 5 6 7 Note: All steps must be completed for service
- 3. Service Bulletin Remove the ice maker, following proper procedures. When the ice maker is removed, unplug the refrigerator to ensure the cooling loop does not frost over during service. Use a steamer to remove all traces of ice and frost from Ice Room area. Make sure to run steam down the drain area. This is veryimportant. If any ice is left, it can cause the issue to resurface. Once steaming is complete, towel down the ice room area, including the Ice Maker Assembly and Auger Assembly, removing all water traces. Before performing any service, remove the ice bucket, and then check the condition inside the ice room. NOTE: If the ice bucket is stuck, use a steamer to melt the ice until you can remove the bucket. Be sure to place a towel under the ice bucket to catch water as it drips down as shown. NEVER use a heat gun or hair dryer to defrost the ice room. Service Preparation
- 4. Service Bulletin 1. Seal the ice room Gaps may exist between the Ice Room housing and liner wall. Use the RTV sealant supplied from Samsung to seal these gaps. Part number required: DA81-05595A Cut the applicator tip at a 45 degree angle, and then apply the sealant along the joints identified by the red line. This will help to provide a sealed ice room environment.
- 5. Service Bulletin 2. Check and adjust the water line placement in the Ice Room. 1. Using an inspection mirror, check the positioning of the water line as it enters the Ice Room area. Pictured left is an example of the line being inserted too far into the fill area. 2. From the rear of the unit, press in on the grey retainer ring and back the grey fill hose out about 10mm . 3. Re-inspect to ensure the hose is back far enough, but not pulled too far out. 4. Re-secure hoses to a flush position on the rear cabinet. You don’t not want the hoses sticking out or they could get pushed back in when you install the unit against the wall.
- 6. Service Bulletin 3. Inspect the Auger Motor Assembly for Styrofoam Packing. Inspect the Auger Motor Assembly for Styrofoam packing material. If the packing material is left in place, it prevents the ice room fan from circulating air through the icemaker, causing it to frost up. Auger Fan OK Auger Fan Blocked by Styrofoam
- 7. Service Bulletin 4. Inspect the Ice Route Flapper and Assembly for a proper seal. Inspect the Ice Route Assembly for a proper seal and security. If the Ice Route flapper is closing correctly, you can pour some water down the chute and it will not leak out from the dispenser. If it does leak, replace the Ice Route Assy. Some water added to ice chute No leak - Good Leak - Bad Inspect the Ice Route flapper. Ensure the rubber is still soft and pliable, has no tears or rips, and that the flapper is in the fully closed position when out. Also inspect the ice dispenser opening for cleanliness. If build up has occurred, wipe clean before reinstalling the Ice Route.
- 8. Service Bulletin 5. Inspect the Ice Bucket gasket Inspect the Ice Bucket and check the bucket itself for cracks in the base. Check the gasket around the edge making sure it has not ripped, cracked, or become too rigid, preventing a proper seal. If any defect is found, order and replace the Ice Bucket.
- 9. Service Bulletin 6. Install the Ice Room Service Kit in all cases ( Y- Clip Assy). A service kit has been created, consisting of (2) Y – Clips and (1) improved cooling loop retainer. This kit is to be installed in all cases 1. Remove retaining ring. You can use a pair of needle nose pliers for this as shown below left. Replace with the new retainer from the service kit. 2. Install the Y-Clips as shown, directly onto the cooling loop and pressed firmly back against the insulation and retaining ring. Ensure the clips are pointing straight down.
- 10. Service Bulletin 7. Replace the Ice Maker Assembly in all cases. Order and replace the Ice Maker Assembly for all service cases. Please see the corresponding chart for the proper part for each unit.
- 11. Service Bulletin After Installing the Ice Maker Assembly, visually inspect the Y-Clips have not changed position on the cooling loop and they are still pointing straight down. If they have moved out of place you possibly can adjust with your fingers at the ice maker rear opening or you may have to drop the Ice Maker back down off its mounts and reposition the clips. If the clips are not straight down this will impede the effectiveness of the clip to transfer heat from the defrost element, and will also make it very difficult if the icemaker needs to be removed in the future. No GoodGood