
Recommended
More Related Content
Similar to InDesign 1
Similar to InDesign 1 (20)
More from Bryony Johnson
More from Bryony Johnson (15)
Recently uploaded
Recently uploaded (20)
InDesign 1
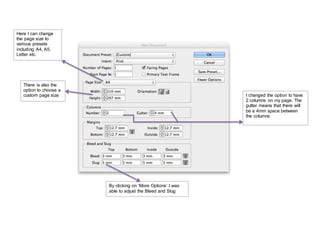
- 1. Here I can change the page size to various presets including A4, A5, Letter etc. There is also the option to choose a custom page size I changed the option to have 2 columns on my page. The gutter means that there will be a 4mm space between the columns By clicking on ‘More Options’ I was able to adjust the Bleed and Slug
- 2. Slug Bleed Page border Columns Here is what the final page layout looks like
- 3. 1. Used the Rectangle Frame Tool to create two rectangular shaped boxes 2. Then used the Fill tool to change the colour of the background of the rectangular shape 3. Next I used the Stroke tool to change the colour of the outline 4. I then used the toolbar at the top of the screen and adjusted the weight and style of the outline 5. Here is how it turned out, with a pink background and a purple spotted outline
- 4. 1. Here I selected the other rectangular shape and selected File > Place… 2. I then chose an image from my desktop
- 5. 3. This is how the image appeared on the page, inside of the box 4. By holding shift and clicking on the image, it brought up this task bar. I selected ‘Fitting’ and “Fit frame proportionally’ so that the image filled the space of the rectangular shape. 5. Here is how the picture looked on the page
- 6. 1. Here I inserted some more rectangle boxes. By clicking on the page it brought up this dialogue box, which gave me the option to insert another identical rectangle box, or the option to adjust the size. 2. Once again I selected File > Place… This time I selected four different images so that I could insert them into each of the boxes. 3. Here is where the first image was placed. The rest of the images were loaded into my cursor so that I could just click on the boxes and they would appear there. 4. This is how it looked after placing all four images.
- 7. 1. I selected the pink rectangular shape and expanded it so that it filled the whole page. This was so that it could be used as a background. 2. I then selected the layers palette so that I could move the rectangle behind the rest of the shapes and images.
- 8. 1. I inserted two more shapes by using the Rectangular Frame Tool and the Rectangle Tool. This second option was slightly more difficult to move around. Once I had clicked on the box, I selected the text tool so that I was able to type. 2. Moreover, I held ctrl and clicked inside the box and was able to select the ‘Fill with Placeholder Text’ option. This filled my box with gibberish text. 3. Finally I changed the colour of the text by using the Fill tool.
- 9. 1. To save my document I went onto File > Save As… 2. This allowed me to save this as an InDesign document so that I could open it and edit it again
- 10. 1. Alternatively, there were other ways to save my document. Here I selected File > Export… to open up the other options. 2. Here I decided to save the document as a JPEG image 3. After clicking on ‘Save’, I was given the option to change the quality and resolution of the image