
Recommended
More Related Content
What's hot
What's hot (10)
Viewers also liked
Similar to Google Picnik
Similar to Google Picnik (20)
More from britstillman09
Recently uploaded
Recently uploaded (20)
Google Picnik
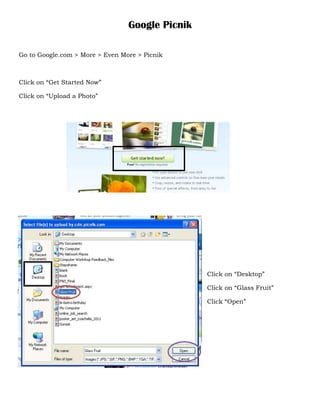
- 1. Google Picnik Go to Google.com > More > Even More > Picnik Click on “Get Started Now” Click on “Upload a Photo” Click on “Desktop” Click on “Glass Fruit” Click “Open”
- 2. Click on “Crop” After you have chosen what part of the picture you want to keep, click on “Apply” Click on “Effects” Any effect that has the word “Premium” next to it, you must have a paid account to use them Scroll down to the bottom of the Effects list and click on “Gooify” Hold down the left mouse button and moving the cursor around the picture When Finished click on “Apply”
- 3. 1 3 4 5 2 1. Click on “Text” 2. Scroll down till you see “Love Ya Like A…” and click on it 3. Go to the top and click inside the text box and type in “apples are delicious!” then click “Add” 4. You can drag and drop your new text box to anywhere you would like and also rotate the text too 5. You can also change the color of your text with the “Text Properties” box
- 4. 1 3 1. Click on “Stickers” 2. Scroll down to “Kids Drawings” and choose a drawing of your choice by clicking on the picture 3. You can drag and drop your new sticker to anywhere you would like and also rotate the sticker too 4. You can also change the color of your text with the “Sticker Properties” box
- 5. 1 2 3 4 5 1. Click on “Frames” 2. Scroll down till you see “Rounded Borders” and click on it 3. Choose the radius of the corners 4. Choose “Transparent Corners” 5. Click “Apply”
- 6. Go to “Save & Share” Click inside text box and type in “WorkshopExample1” Click “Save Photo” Save file to Desktop Make sure to put “.jpg” after the file name Click “Save”