FPYF SAGA AHIABGA Event Planning Overview v20220125
•
0 likes•54 views

FPYF SAGA AHIABGA Event Planning Overview v20220125

Recommended
Recommended
More Related Content
Similar to FPYF SAGA AHIABGA Event Planning Overview v20220125
Similar to FPYF SAGA AHIABGA Event Planning Overview v20220125 (20)
More from Andrew Networks
More from Andrew Networks (20)
Recently uploaded
Recently uploaded (20)
FPYF SAGA AHIABGA Event Planning Overview v20220125
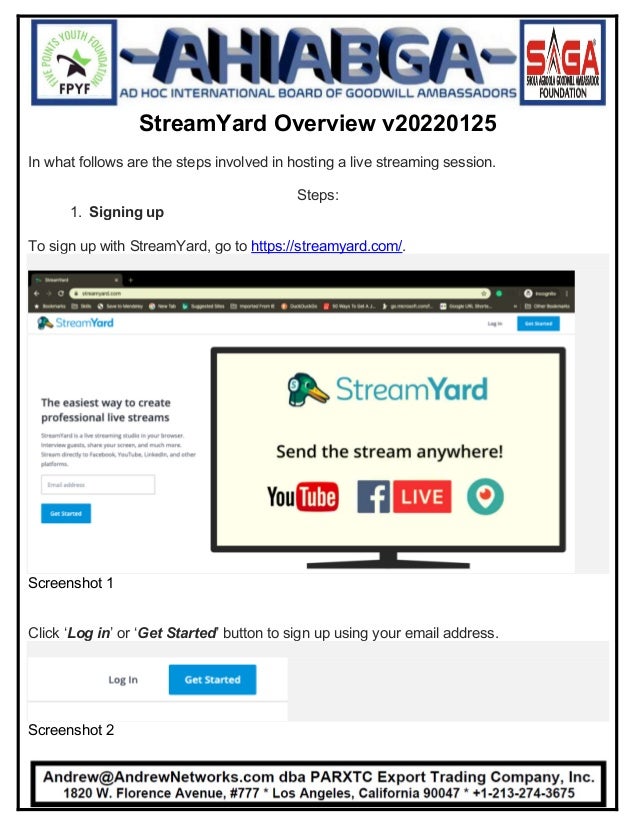
- 1. StreamYard Overview v20220125 In what follows are the steps involved in hosting a live streaming session. Steps: 1. Signing up To sign up with StreamYard, go to https://streamyard.com/. Screenshot 1 Click ‘Log in’ or ‘Get Started’ button to sign up using your email address. Screenshot 2
- 2. As soon as you signed up by putting your email, StreamYard will send you a six-digit code to your email which will allow you to proceed to the next step. Once your code is accepted, the website will display a welcome message and ask you to move, as shown below: Screenshot 3 2. Adding a destination Depending on the platform you are using, and where your followers are, StreamYard allows users to add a destination to up to six different platforms. These platforms include Facebook, LinkedIn, YouTube channel, Periscope and Twitch. Users wanting to use Facebook can choose to live stream to their profile, group, page or both (profile, group and page). This also applies to LinkedIn users where they can choose to live stream to their profile, page, or the combination of both. StreamYard also allows users that prefer using
- 3. Real-Time Messaging Protocol (RTMP) in platforms such as Livestream (which was recently acquired by Vimeo) to air their programme live. To add a destination, click on the platform you are interested in sharing your live broadcast. A user must authorise StreamYard to have access to such a destination. The following screengrab illustrates a request by StreamYard to access a user’s Facebook page. Screenshot 4 The process of granting permission to various platforms are the same. The guiding principle is, a user shall specify which group(s), page(s) or a profile the StreamYard can access to allow it to transmit the live broadcast. 3. Creating a Broadcast After connecting your prefered destination with StreamYard, the next thing is to create a broadcast. To do so, you will need to navigate to the broadcast tab and click on ‘Create a Broadcast’ button, as shown below:
- 4. Screenshot 5 A dialogue box will pop up as soon as you click on ‘Create a Broadcast’ button with additional options. These options include clicking on the existing connected destination(s), adding more destination(s) or the possibility of recording your activity without live streaming. At the moment, this feature is free, but as soon as COVID-19 scourge is over, it can only be available for those using a premium version of the StreamYard. Below is the screengrab of the dialogue box mentioned earlier.
- 5. Screenshot 6 Once you made your choice for either adding more destination(s), going for a live broadcast or recording your session, then you will need to provide a title for your session as shown below.
- 6. Screenshot 7 Following that, you will need to save the changes and click on ‘Enter Broadcast Studio’ button, as shown below: Screenshot 8 On clicking ‘Enter Broadcast Studio’, you will then be asked to check your camera and mic before going to the Broadcast Studio as shown in the following screengrab.
- 7. Screenshot 9 As soon as you checked your camera and mic and became satisfied that they are working correctly, you will then proceed by clicking “Enter Broadcast Studio”. 4. The Broadcast Studio Metaphorically, StreamYard studio is synonymous to any radio or television room where live transmission takes place. The StreamYard virtual studio is equipped with settings that allow users to control live broadcast in various ways. For further understanding of how the virtual studio works, take a look at the following screenshot.
- 8. Screenshot 10 From the above screengrab, you will notice that i numbered various functionalities in the virtual studio, and this numbering starts from A to S. The reason is to allow us to explain each function step by step. A. Title: Is the name you gave to your broadcast before entering the broadcast studio. In this screengrab, you will notice that the broadcast title is “Test Broadcast”. Please, refer to “Creating a Broadcast” stage and check screenshot 7 for further understanding. B. Screen Display: This is where followers of your broadcast will see the screen you are presenting or the number of guests invited to take part in the show (live or the recorded version). C. Invited guests: depending on your guest, this is where all the guests and including the host will appear. It is synonymous to a cue where people enter a studio. Although your video will appear there, you are yet to be in the main studio until the host added you by
- 9. clicking on your video. Once the host clicks on your display video, it will turn to ‘Add to stream’ as shown in screengrab 11. Following that, if the host clicks ‘Add to stream’, you will then be appropriately ushered into the studio. Screenshot 11 There and then, the display screen will change and shows the number of guests in the stream, as shown in Screenshot 12. Screenshot 12. D. Mute: The mute function is to allow guest to mute themselves when they are not presenting so that background noise from their system will not interfere with the ongoing activity in the stream. For someone to enable the mute function, all is required is to click on the mic and it will automatically cancel and mute the guest’s mic. When speaking to the
- 10. audience, the guest will also need to unmute the mic so that the voice will be audible. This can be done by taping the mic once. E. Stop Cam: When a user clicks on ‘Stop Cam’, it blackout the camera of the user so that a black screen will replace the user’s display video. F. Cam/Mic: The Cam/Mic setting consists of five different sub-settings comprising General setting, Camera Setting, Audio setting, Green Screen setting as well as Guest setting. The ‘General’ setting is where a user can control the position of the banner and where comments appear. Camera setting allows a user to use an inbuilt camera or an external webcam. The setting also gives the flexibility for users to select the camera resolution (high definition, standard definition or low definition. The audio setting allows users to test speakers and mic while the Green screen enables users to use, choose and upload virtual backgrounds. The Guest setting allows a host to enable where guests can see viewers comments, play a sound when a guest enters the stream as well as force guest to authenticate with YouTube or Facebook. G. Share Screen: The setting allows a user to share screen when presenting in its entirety, or an application window or a specific tab. H. Invite: Allows a host to invite a guest(s) to enter the broadcast studio through either a link or an email. I. Leave Studio: Is where the host or guests can click and exit from the broadcast studio. J. Having Issues?: As the name suggests, this is useful for users experiencing some difficulties. As soon as you click, the link will connect you to StreamYard customer care chat messenger where you can chat with customer care. K. Chat: Is where your viewers send their comments to the broadcast studio.
- 11. L. Settings: is the same as F. M. Private Chat: is a place where the host can chat privately with the guests. N. Brand: Allows a host to customise the look of the display screen. The host can change the colour, theme, logo, and background to conform to their brand. However, this feature is for those that subscribed to the premium version of the StreamYard. O. Banners: Enable hosts to display talking points and call to actions. P. Comments: The comment function allows “Live viewer comments to show up on StreamYard” as shown in the example below: Screenshot 13. Q. Record Only: Shows that it is not a live broadcast. If the host sets the session to live stream, it will display an ‘Edit’ mode instead of ‘Record only’.
- 12. Screenshot 14. R. Edit: Enables the host to add or remove destinations S. Record: Is the button in which the host will click to record the programme. However, if the host set the stream to go live, the button will change to ‘Go Live’ as shown in Screenshot 14. Besides, the programme will be recorded as saved under ‘Past Broadcast’ as shown in Screenshot 5. H.H. Andrew Williams Jr WhatsApp: +1-213-274-3675 Andrew@AndrewNetworks.com http://fb.com/groups/ahiabganetwork https://Linkedin.com/in/AndrewWilliamsJr/