SlideShare a Scribd company logo
1 of 2
Download to read offline
N8583V3 7/05 Rev. A
                                                                                             ADEMCO 5809
                                                                                 Rate-Of-Rise Heat Detector
                               INSTALLATION AND SETUP GUIDE
GENERAL INFORMATION                                                  2.   Install the battery (if not already installed). Observe
The ADEMCO 5809 Rate-of-Rise Heat Detector is a wireless                  polarity!
device used with ADEMCO alarm systems that support 5800              3.   Enter the control’s programming mode and follow the
series devices.                                                           control’s programming instructions. When programming
The 5809 combine both rate-of-rise and fixed temperature                  this transmitter at the control, note the following:
sensors. The 5809’s rate-of-rise thermostat senses the rise in            •    Input Type = 3 (Supervised RF)
temperature and signals an alarm if the rise is 15°F (8°C) or             •    Loop number = 1
more per minute. Fires typically cause a rapid rise in                    Transmit from the detector when prompted (momentarily
temperature in the surrounding area. A built-in fixed                     depress the activation button shown below). You can also
temperature sensor will also signal an alarm if the ambient               manually enter the detector’s serial number.
temperature rises above 135°F (57°C).
                                                                     4.   Test the detector after enrolling into the system. Refer to
WARNING: The 5809’s fixed temperature sensor will be                      the Testing section.
permanently damaged if the 5809 is installed, stored or shipped
                                                                             DETECTOR
in environments where temperature exceeds 120°F.                             ASSEMBLY                               TAMPER
                                                                               INDEX                                SWITCH
NOTES:                                                                          TAB
     •    If the fixed temperature sensor activates, the 5809
          must be replaced.
     •    An installation site where the ambient temperature
          exceeds 100°F for extended periods is not
          recommended.
A 3-volt lithium battery powers the 5809. If the battery voltage
gets too low, the 5809 send a low battery signal to the control
panel.
The 5809 also include a tamper switch, which causes a trouble
signal to be sent to the control if the unit is removed from the
mounting base.
A built-in activation button, located on the detector assembly, is
used when programming the unit’s serial number at the control                                                        ACTIVATION
                                                                                                                      BUTTON
and when testing the unit.
INSTALLING THE BATTERY                                                                                                   5809EN-001-V0


Important Notes:                                                     MOUNTING THE DETECTOR
     •    Use 3-volt lithium battery: Duracell DL 123A or            You can mount the 5809 on a wall or ceiling within the
          Panasonic/Sanyo/Varta/Tekcell CR123A.                      protection area:
     •    Observe polarity.                                              •    Wall Mounting: Mount the detector 4” - 6” from the
     •    When replacing the battery, wait at least 30 seconds                ceiling.
          after removing the old battery, before installing the          •    Ceiling Mounting: Mount the detector at least 4” from
          new one.                                                            any wall. Make sure the normal ceiling temperature
Remove the detector assembly from its mounting base and                       will not exceed 100°F.
install a 3-volt lithium battery as shown below.                         •    Refer to NFPA Standard 72 for detector spacing and
                                                                              other requirements. Maximum spacing for UL
                             BATTERY
                                                                              installations is 50’x50’.
                                                                         •    Avoid mounting the detector near heat generating
                                                                              devices (e.g. ovens, heat vents, furnaces, boilers).
                                                                     IMPORTANT:
                                                                         Heat detectors should be used for property protection.
                                                                         Reliance should not be placed solely on heat detectors for
                                                   5809EN-003-V0
                                                                         life safety. When life safety is involved, smoke detectors
PROGRAMMING THE UNIT                                                     MUST also be used. Detectors must not be painted.
The transmitter’s serial number must be enrolled in the control      WIRELESS TRANSMISSION PATH TEST
panel before usage in the system. Refer to the Installation and
                                                                     A good RF transmission path must be established from the
Setup Guide for which this device is to be used for
                                                                     proposed mounting location before permanently installing the
programming procedures for enrolling transmitter serial
                                                                     detector. To determine that there is good signal reception from
numbers. Before programming do the following:
                                                                     the proposed location, perform the test procedure described in
1. Remove the detector assembly from its mounting base by            TESTING THE DETECTOR section.
    twisting the detector assembly counter-clockwise and
                                                                     Once a good RF transmission path is confirmed, mount the
    withdraw from the base.
                                                                     detector as follows:
1.   Surface mount the unit’s plastic base to a wall or ceiling, or                             MAINTAINING PROPER OPERATION
     mount the plastic base to either a 4” junction box or 3-1/4-
                                                                                                To maintain the detector in proper working condition, it is
     octagon box.
                                                                                                important that you observe the following:
     NOTE: The anti-twist mounting hole is for use when                                         Replace the battery when the system indicates that the 5809
     installing the device directly to wallboard to prevent the                                 has reported a low battery condition.
     base from being twisted off when servicing the device.
                                                                                                Units should never be relocated without the advice or
2.   Install the detector assembly to the base by aligning the                                  assistance of the alarm service company.
     detector assembly index tabs to the index tab recesses in
     the base, pushing in, and secure by turning the detector                                   SPECIFICATIONS
     assembly clockwise.                                                                        Power: 3V lithium battery (Duracell DL123A, Panasonic
                                                                                                CR123A, Sanyo CR123A, Varta, Tekcell (CR123A)
                                                                                                CAUTION: Risk of fire, explosion, and burns. Do not recharge,
                                                                                                         disassemble, heat above 212°F (100°C) or
                                                                                                         incinerate. Dispose of used batteries promptly.
                         MOUNTING
                                     INDEX TAB
                                      RECESS
                                                                                                         Keep away from children.
                          HOLES
                                                                                                Operating Temperature:         40° to 140°F (6° to 60°C)
                                                                                                Rate-of-Rise Temperature:      15°F (8°C) increase per minute
                                                                                                                               NOTE: Rate of rise sensor does
                                     ANTI-TWIST                                                                                not operate above 38°C)
                                     MOUNTING
                         INDEX TAB
                          RECESS       HOLE                                                     Fixed Temperature:             135°F (57°C)
                                                                                                Maximum Spacing:               50ft x 50ft UL, 30ft x 30ft FM
                                                                                                                               (refer to National Fire Alarm
                                                                                                                               Code Standard NFPA 72 for
                                                  5809EN-002-V0
                                                                                                                               application requirements)
TESTING THE DETECTOR                                                                            Dimensions:                    4.4” diameter/ 2/2” deep
This test procedure should be performed to determine a good                                                         TO THE INSTALLER
RF transmission path and again after installation is completed.
                                                                                                The rate-of-rise mechanism may be subject to reduced
CAUTION: The rate-of-rise heat sensor is intended for one-time                                  sensitivity over time.      Annual testing of the rate-of-rise
          use. Prolonged heat during testing can damage                                         operation is recommended.
          the unit. If used carefully following the                                             Regular maintenance and inspection (at least annually) by the
          instructions below, the heat from a portable hair                                     installer and frequent testing by the user are vital to
          dryer can be used to test the unit. If the round                                      continuous satisfactory operation of any alarm system.
          disk on top of the detector detaches, the detector
                                                                                                The installer should assume the responsibility of developing
          must be replaced.
                                                                                                and offering a regular maintenance program to the user as well
     1.   Activate the control panel’s test mode.                                               as acquainting the user with the proper operation and
     2.   Use either method (a) or (b) to activate the detector:                                limitations of the alarm system and its components parts.
          (A) Press and release the activation button on the PC                                 Recommendations must be included for a specific program of
              board assembly,                                                                   frequent testing (at least weekly) to ensure the system’s proper
                                  OR                                                            operation at all times.
          (B) Holding a portable hair dryer about 12 to 18
              inches away from the detector, turn the dryer on                                                    FCC ID: CFS8DL5809EN-1
              and aim the warm air at the side of the detector.                                 THIS DEVICE COMPLIES WITH PART 15 OF FCC RULES.
CAUTION: Aiming the dryer directly at the round disk on the                                     OPERATION IS SUBJECT TO THE FOLLOWING TWO
         detector can damage the detector, requiring the unit                                   CONDITIONS: (1) THIS DEVICE MAY NOT CAUSE HARMFUL
         to be replaced.                                                                        INTERFERENCE, AND (2) THIS DEVICE MUST ACCEPT ANY
                                                                                                INTERFERENCE RECEIVED, INCLUDING INTERFERENCE
     3.   The system’s keypads should beep and the detector’s                                   THAT MAY CAUSE UNDESIRED OPERATION.
          ID should be displayed.
                                                                                                                    INDUSTRY CANADA
     4.   Exit the control’s test mode.
                                                                                                                      IC: 573F-5809EN1

                                                                                                FOR WARRANTY INFORMATION AND LIMITATIONS OF THE
                Unit is intended for dry, indoor use only.                                      ENTIRE ALARM SYSTEM, REFER TO THE INSTALLATION AND
                                                                                                SETUP GUIDE FOR THE RECEIVER/CONTROL PANEL WITH
                                                                                                WHICH THIS DEVICE IS USED.


                                                        165 Eileen Way, Syosset, New York 11791
                                                                  Copyright © 2005 Honeywell International Inc.

                                                                           www.honeywell.com/security


ÊN8583V3uŠ
N8583V3 7/05 Rev. A

More Related Content

What's hot

System sensor 1400 manual i56-0279
System sensor 1400 manual i56-0279System sensor 1400 manual i56-0279
System sensor 1400 manual i56-0279Henry Rosa
 
Manual e5 cn omrom
Manual e5 cn omromManual e5 cn omrom
Manual e5 cn omrompacheco42
 
Zipato alarm, security module
Zipato alarm, security moduleZipato alarm, security module
Zipato alarm, security moduleDomotica daVinci
 
Honeywell is2560-spec-sheet
Honeywell is2560-spec-sheetHoneywell is2560-spec-sheet
Honeywell is2560-spec-sheetAlarm Grid
 
User manual sde-3001-3003-english_web-0720
User manual sde-3001-3003-english_web-0720User manual sde-3001-3003-english_web-0720
User manual sde-3001-3003-english_web-0720sophin12
 
ASL Intercom PS279
ASL Intercom PS279ASL Intercom PS279
ASL Intercom PS279AV ProfShop
 
Everspring sp816 user manual
Everspring sp816 user manualEverspring sp816 user manual
Everspring sp816 user manualDomotica daVinci
 
ASL Intercom PS6379
ASL Intercom PS6379ASL Intercom PS6379
ASL Intercom PS6379AV ProfShop
 
Powerpod-410 phonic manual
Powerpod-410 phonic manualPowerpod-410 phonic manual
Powerpod-410 phonic manualSanket Joshi
 
Kaipu Lm20 Z-Wave Plus door contact user guide
Kaipu Lm20 Z-Wave Plus door contact user guideKaipu Lm20 Z-Wave Plus door contact user guide
Kaipu Lm20 Z-Wave Plus door contact user guideDomotica daVinci
 
Door window sensor 6 manual
Door window sensor 6 manualDoor window sensor 6 manual
Door window sensor 6 manualDomotica daVinci
 
MultiSensor Strips Comfort - Z-Wave Plus- Sensative - Manual
MultiSensor Strips Comfort - Z-Wave Plus- Sensative - ManualMultiSensor Strips Comfort - Z-Wave Plus- Sensative - Manual
MultiSensor Strips Comfort - Z-Wave Plus- Sensative - ManualDomotica daVinci
 
Manual radiator thermostat -Aeotec
Manual radiator thermostat -AeotecManual radiator thermostat -Aeotec
Manual radiator thermostat -AeotecDomotica daVinci
 
Honeywell is2535-spec-sheet
Honeywell is2535-spec-sheetHoneywell is2535-spec-sheet
Honeywell is2535-spec-sheetAlarm Grid
 
Srt323 user & installation (1)
Srt323 user & installation (1)Srt323 user & installation (1)
Srt323 user & installation (1)Domotica daVinci
 

What's hot (16)

System sensor 1400 manual i56-0279
System sensor 1400 manual i56-0279System sensor 1400 manual i56-0279
System sensor 1400 manual i56-0279
 
Manual e5 cn omrom
Manual e5 cn omromManual e5 cn omrom
Manual e5 cn omrom
 
Zipato alarm, security module
Zipato alarm, security moduleZipato alarm, security module
Zipato alarm, security module
 
Honeywell is2560-spec-sheet
Honeywell is2560-spec-sheetHoneywell is2560-spec-sheet
Honeywell is2560-spec-sheet
 
User manual sde-3001-3003-english_web-0720
User manual sde-3001-3003-english_web-0720User manual sde-3001-3003-english_web-0720
User manual sde-3001-3003-english_web-0720
 
ASL Intercom PS279
ASL Intercom PS279ASL Intercom PS279
ASL Intercom PS279
 
Everspring sp816 user manual
Everspring sp816 user manualEverspring sp816 user manual
Everspring sp816 user manual
 
ASL Intercom PS6379
ASL Intercom PS6379ASL Intercom PS6379
ASL Intercom PS6379
 
Powerpod-410 phonic manual
Powerpod-410 phonic manualPowerpod-410 phonic manual
Powerpod-410 phonic manual
 
Kaipu Lm20 Z-Wave Plus door contact user guide
Kaipu Lm20 Z-Wave Plus door contact user guideKaipu Lm20 Z-Wave Plus door contact user guide
Kaipu Lm20 Z-Wave Plus door contact user guide
 
Door window sensor 6 manual
Door window sensor 6 manualDoor window sensor 6 manual
Door window sensor 6 manual
 
Fr f700
Fr f700Fr f700
Fr f700
 
MultiSensor Strips Comfort - Z-Wave Plus- Sensative - Manual
MultiSensor Strips Comfort - Z-Wave Plus- Sensative - ManualMultiSensor Strips Comfort - Z-Wave Plus- Sensative - Manual
MultiSensor Strips Comfort - Z-Wave Plus- Sensative - Manual
 
Manual radiator thermostat -Aeotec
Manual radiator thermostat -AeotecManual radiator thermostat -Aeotec
Manual radiator thermostat -Aeotec
 
Honeywell is2535-spec-sheet
Honeywell is2535-spec-sheetHoneywell is2535-spec-sheet
Honeywell is2535-spec-sheet
 
Srt323 user & installation (1)
Srt323 user & installation (1)Srt323 user & installation (1)
Srt323 user & installation (1)
 

Similar to Installation Guide for ADEMCO 5809 Rate-of-Rise Heat Detector

Manual de instalacion detector honeywell
Manual de instalacion detector honeywellManual de instalacion detector honeywell
Manual de instalacion detector honeywellCésar Ortiz Rincón
 
Ph psg01 - zipato smoke sensor user manual v1.0
Ph psg01 - zipato smoke sensor user manual v1.0Ph psg01 - zipato smoke sensor user manual v1.0
Ph psg01 - zipato smoke sensor user manual v1.0Domotica daVinci
 
JVC RM-LP25U Remote Control Panel
JVC RM-LP25U Remote Control PanelJVC RM-LP25U Remote Control Panel
JVC RM-LP25U Remote Control PanelAV ProfShop
 
Catalog FR-A700 Instruction manual (applied)-Beeteco.com
Catalog FR-A700 Instruction manual (applied)-Beeteco.comCatalog FR-A700 Instruction manual (applied)-Beeteco.com
Catalog FR-A700 Instruction manual (applied)-Beeteco.comBeeteco
 
Edwards Signaling E-HD Installation Manual
Edwards Signaling E-HD Installation ManualEdwards Signaling E-HD Installation Manual
Edwards Signaling E-HD Installation ManualJMAC Supply
 
Mitsubishi inverter fr-a700-instruction-manualbasic-160425031653
Mitsubishi inverter fr-a700-instruction-manualbasic-160425031653Mitsubishi inverter fr-a700-instruction-manualbasic-160425031653
Mitsubishi inverter fr-a700-instruction-manualbasic-160425031653Dien Ha The
 
Mitsubishi inverter fr-a700-instruction-manualbasic-160425031653
Mitsubishi inverter fr-a700-instruction-manualbasic-160425031653Mitsubishi inverter fr-a700-instruction-manualbasic-160425031653
Mitsubishi inverter fr-a700-instruction-manualbasic-160425031653Dien Ha The
 
Mitsubishi inverter fr-a700-instruction-manualbasic dienhathe.vn
Mitsubishi inverter fr-a700-instruction-manualbasic dienhathe.vnMitsubishi inverter fr-a700-instruction-manualbasic dienhathe.vn
Mitsubishi inverter fr-a700-instruction-manualbasic dienhathe.vnDien Ha The
 
Mitsubishi s500 e-vfd-detailed
Mitsubishi s500 e-vfd-detailedMitsubishi s500 e-vfd-detailed
Mitsubishi s500 e-vfd-detailedawatori
 
wireless-thermostat-v2-installation-guide-rev-f.pdf
wireless-thermostat-v2-installation-guide-rev-f.pdfwireless-thermostat-v2-installation-guide-rev-f.pdf
wireless-thermostat-v2-installation-guide-rev-f.pdfJuanRiquelmeHerrera
 
Vf as1 operation-man
Vf as1 operation-manVf as1 operation-man
Vf as1 operation-manToàn Huỳnh
 
Vf ps1 instruction manual
Vf ps1 instruction manualVf ps1 instruction manual
Vf ps1 instruction manualToàn Huỳnh
 
Varispeed g7+instruc manual
Varispeed g7+instruc manualVarispeed g7+instruc manual
Varispeed g7+instruc manualToàn Huỳnh
 

Similar to Installation Guide for ADEMCO 5809 Rate-of-Rise Heat Detector (20)

Manual de instalacion detector honeywell
Manual de instalacion detector honeywellManual de instalacion detector honeywell
Manual de instalacion detector honeywell
 
Ph psg01 - zipato smoke sensor user manual v1.0
Ph psg01 - zipato smoke sensor user manual v1.0Ph psg01 - zipato smoke sensor user manual v1.0
Ph psg01 - zipato smoke sensor user manual v1.0
 
JVC RM-LP25U Remote Control Panel
JVC RM-LP25U Remote Control PanelJVC RM-LP25U Remote Control Panel
JVC RM-LP25U Remote Control Panel
 
Fr a024 a044
Fr a024 a044Fr a024 a044
Fr a024 a044
 
EVR SM103 Manual
EVR SM103 ManualEVR SM103 Manual
EVR SM103 Manual
 
Catalog FR-A700 Instruction manual (applied)-Beeteco.com
Catalog FR-A700 Instruction manual (applied)-Beeteco.comCatalog FR-A700 Instruction manual (applied)-Beeteco.com
Catalog FR-A700 Instruction manual (applied)-Beeteco.com
 
Edwards Signaling E-HD Installation Manual
Edwards Signaling E-HD Installation ManualEdwards Signaling E-HD Installation Manual
Edwards Signaling E-HD Installation Manual
 
Fr f700
Fr f700Fr f700
Fr f700
 
Fr f700
Fr f700Fr f700
Fr f700
 
Mitsubishi inverter fr-a700-instruction-manualbasic-160425031653
Mitsubishi inverter fr-a700-instruction-manualbasic-160425031653Mitsubishi inverter fr-a700-instruction-manualbasic-160425031653
Mitsubishi inverter fr-a700-instruction-manualbasic-160425031653
 
Mitsubishi inverter fr-a700-instruction-manualbasic-160425031653
Mitsubishi inverter fr-a700-instruction-manualbasic-160425031653Mitsubishi inverter fr-a700-instruction-manualbasic-160425031653
Mitsubishi inverter fr-a700-instruction-manualbasic-160425031653
 
Mitsubishi inverter fr-a700-instruction-manualbasic dienhathe.vn
Mitsubishi inverter fr-a700-instruction-manualbasic dienhathe.vnMitsubishi inverter fr-a700-instruction-manualbasic dienhathe.vn
Mitsubishi inverter fr-a700-instruction-manualbasic dienhathe.vn
 
Mitsubishi s500 e-vfd-detailed
Mitsubishi s500 e-vfd-detailedMitsubishi s500 e-vfd-detailed
Mitsubishi s500 e-vfd-detailed
 
Korg1 10
Korg1 10Korg1 10
Korg1 10
 
wireless-thermostat-v2-installation-guide-rev-f.pdf
wireless-thermostat-v2-installation-guide-rev-f.pdfwireless-thermostat-v2-installation-guide-rev-f.pdf
wireless-thermostat-v2-installation-guide-rev-f.pdf
 
233477 a
233477 a233477 a
233477 a
 
Vf as1 operation-man
Vf as1 operation-manVf as1 operation-man
Vf as1 operation-man
 
Vf ps1 instruction manual
Vf ps1 instruction manualVf ps1 instruction manual
Vf ps1 instruction manual
 
Honeywellsmarthomes
HoneywellsmarthomesHoneywellsmarthomes
Honeywellsmarthomes
 
Varispeed g7+instruc manual
Varispeed g7+instruc manualVarispeed g7+instruc manual
Varispeed g7+instruc manual
 

More from Alarm Grid

Vizia rf + system programming and control
Vizia rf + system programming and controlVizia rf + system programming and control
Vizia rf + system programming and controlAlarm Grid
 
Vizia rf + plug in spec sheet
Vizia rf + plug in spec sheetVizia rf + plug in spec sheet
Vizia rf + plug in spec sheetAlarm Grid
 
Leviton vrs15 1 lz installation manual and setup guide
Leviton vrs15 1 lz installation manual and setup guideLeviton vrs15 1 lz installation manual and setup guide
Leviton vrs15 1 lz installation manual and setup guideAlarm Grid
 
Leviton vrs05 1 lz installation manual and setup guide
Leviton vrs05 1 lz installation manual and setup guideLeviton vrs05 1 lz installation manual and setup guide
Leviton vrs05 1 lz installation manual and setup guideAlarm Grid
 
Leviton vrr15 1 lz product specification bulletin
Leviton vrr15 1 lz product specification bulletinLeviton vrr15 1 lz product specification bulletin
Leviton vrr15 1 lz product specification bulletinAlarm Grid
 
Leviton vrp15 z Installation Instructions and Setup Guide
Leviton vrp15 z Installation Instructions and Setup GuideLeviton vrp15 z Installation Instructions and Setup Guide
Leviton vrp15 z Installation Instructions and Setup GuideAlarm Grid
 
Leviton vrp03 z product manual and setup guide
Leviton vrp03 z product manual and setup guideLeviton vrp03 z product manual and setup guide
Leviton vrp03 z product manual and setup guideAlarm Grid
 
Leviton vri10 1 lz product manual and setup guide
Leviton vri10 1 lz product manual and setup guideLeviton vri10 1 lz product manual and setup guide
Leviton vri10 1 lz product manual and setup guideAlarm Grid
 
Leviton vri06 1 lz product manual and setup guide
Leviton vri06 1 lz product manual and setup guideLeviton vri06 1 lz product manual and setup guide
Leviton vri06 1 lz product manual and setup guideAlarm Grid
 
Leviton vrf01 1 lz product manual and setup guide
Leviton vrf01 1 lz product manual and setup guideLeviton vrf01 1 lz product manual and setup guide
Leviton vrf01 1 lz product manual and setup guideAlarm Grid
 
Leviton vre06 1 lz
Leviton vre06 1 lzLeviton vre06 1 lz
Leviton vre06 1 lzAlarm Grid
 
Leviton vrcz4 mr, vrcs4-mr, and vrc52-mr product specifications
Leviton vrcz4 mr, vrcs4-mr, and vrc52-mr product specificationsLeviton vrcz4 mr, vrcs4-mr, and vrc52-mr product specifications
Leviton vrcz4 mr, vrcs4-mr, and vrc52-mr product specificationsAlarm Grid
 
Leviton vrcz4 1 l, vrcs4-1l, vrcz1-1l, vrcs1-1l and vrmr1-osg product specifi...
Leviton vrcz4 1 l, vrcs4-1l, vrcz1-1l, vrcs1-1l and vrmr1-osg product specifi...Leviton vrcz4 1 l, vrcs4-1l, vrcz1-1l, vrcs1-1l and vrmr1-osg product specifi...
Leviton vrcz4 1 l, vrcs4-1l, vrcz1-1l, vrcs1-1l and vrmr1-osg product specifi...Alarm Grid
 
Leviton vrcz1 installation manual and setup guide
Leviton vrcz1 installation manual and setup guideLeviton vrcz1 installation manual and setup guide
Leviton vrcz1 installation manual and setup guideAlarm Grid
 
Leviton vrcs1 1 l
Leviton vrcs1 1 lLeviton vrcs1 1 l
Leviton vrcs1 1 lAlarm Grid
 
Leviton vp00 r 10z, vp00r-1lz, vp0sr-10z, vp0sr-1lz installation manual and s...
Leviton vp00 r 10z, vp00r-1lz, vp0sr-10z, vp0sr-1lz installation manual and s...Leviton vp00 r 10z, vp00r-1lz, vp0sr-10z, vp0sr-1lz installation manual and s...
Leviton vp00 r 10z, vp00r-1lz, vp0sr-10z, vp0sr-1lz installation manual and s...Alarm Grid
 
Leviton dimmers, switches and fan speed controllers
Leviton dimmers, switches and fan speed controllersLeviton dimmers, switches and fan speed controllers
Leviton dimmers, switches and fan speed controllersAlarm Grid
 
Fluorescent dimmer for hi lume or eco-10 ballasts
Fluorescent dimmer for hi lume or eco-10 ballastsFluorescent dimmer for hi lume or eco-10 ballasts
Fluorescent dimmer for hi lume or eco-10 ballastsAlarm Grid
 
Controlling z wave door locks with the vrc0 p
Controlling z wave door locks with the vrc0 pControlling z wave door locks with the vrc0 p
Controlling z wave door locks with the vrc0 pAlarm Grid
 
Vizia rf+ collection
Vizia rf+ collectionVizia rf+ collection
Vizia rf+ collectionAlarm Grid
 

More from Alarm Grid (20)

Vizia rf + system programming and control
Vizia rf + system programming and controlVizia rf + system programming and control
Vizia rf + system programming and control
 
Vizia rf + plug in spec sheet
Vizia rf + plug in spec sheetVizia rf + plug in spec sheet
Vizia rf + plug in spec sheet
 
Leviton vrs15 1 lz installation manual and setup guide
Leviton vrs15 1 lz installation manual and setup guideLeviton vrs15 1 lz installation manual and setup guide
Leviton vrs15 1 lz installation manual and setup guide
 
Leviton vrs05 1 lz installation manual and setup guide
Leviton vrs05 1 lz installation manual and setup guideLeviton vrs05 1 lz installation manual and setup guide
Leviton vrs05 1 lz installation manual and setup guide
 
Leviton vrr15 1 lz product specification bulletin
Leviton vrr15 1 lz product specification bulletinLeviton vrr15 1 lz product specification bulletin
Leviton vrr15 1 lz product specification bulletin
 
Leviton vrp15 z Installation Instructions and Setup Guide
Leviton vrp15 z Installation Instructions and Setup GuideLeviton vrp15 z Installation Instructions and Setup Guide
Leviton vrp15 z Installation Instructions and Setup Guide
 
Leviton vrp03 z product manual and setup guide
Leviton vrp03 z product manual and setup guideLeviton vrp03 z product manual and setup guide
Leviton vrp03 z product manual and setup guide
 
Leviton vri10 1 lz product manual and setup guide
Leviton vri10 1 lz product manual and setup guideLeviton vri10 1 lz product manual and setup guide
Leviton vri10 1 lz product manual and setup guide
 
Leviton vri06 1 lz product manual and setup guide
Leviton vri06 1 lz product manual and setup guideLeviton vri06 1 lz product manual and setup guide
Leviton vri06 1 lz product manual and setup guide
 
Leviton vrf01 1 lz product manual and setup guide
Leviton vrf01 1 lz product manual and setup guideLeviton vrf01 1 lz product manual and setup guide
Leviton vrf01 1 lz product manual and setup guide
 
Leviton vre06 1 lz
Leviton vre06 1 lzLeviton vre06 1 lz
Leviton vre06 1 lz
 
Leviton vrcz4 mr, vrcs4-mr, and vrc52-mr product specifications
Leviton vrcz4 mr, vrcs4-mr, and vrc52-mr product specificationsLeviton vrcz4 mr, vrcs4-mr, and vrc52-mr product specifications
Leviton vrcz4 mr, vrcs4-mr, and vrc52-mr product specifications
 
Leviton vrcz4 1 l, vrcs4-1l, vrcz1-1l, vrcs1-1l and vrmr1-osg product specifi...
Leviton vrcz4 1 l, vrcs4-1l, vrcz1-1l, vrcs1-1l and vrmr1-osg product specifi...Leviton vrcz4 1 l, vrcs4-1l, vrcz1-1l, vrcs1-1l and vrmr1-osg product specifi...
Leviton vrcz4 1 l, vrcs4-1l, vrcz1-1l, vrcs1-1l and vrmr1-osg product specifi...
 
Leviton vrcz1 installation manual and setup guide
Leviton vrcz1 installation manual and setup guideLeviton vrcz1 installation manual and setup guide
Leviton vrcz1 installation manual and setup guide
 
Leviton vrcs1 1 l
Leviton vrcs1 1 lLeviton vrcs1 1 l
Leviton vrcs1 1 l
 
Leviton vp00 r 10z, vp00r-1lz, vp0sr-10z, vp0sr-1lz installation manual and s...
Leviton vp00 r 10z, vp00r-1lz, vp0sr-10z, vp0sr-1lz installation manual and s...Leviton vp00 r 10z, vp00r-1lz, vp0sr-10z, vp0sr-1lz installation manual and s...
Leviton vp00 r 10z, vp00r-1lz, vp0sr-10z, vp0sr-1lz installation manual and s...
 
Leviton dimmers, switches and fan speed controllers
Leviton dimmers, switches and fan speed controllersLeviton dimmers, switches and fan speed controllers
Leviton dimmers, switches and fan speed controllers
 
Fluorescent dimmer for hi lume or eco-10 ballasts
Fluorescent dimmer for hi lume or eco-10 ballastsFluorescent dimmer for hi lume or eco-10 ballasts
Fluorescent dimmer for hi lume or eco-10 ballasts
 
Controlling z wave door locks with the vrc0 p
Controlling z wave door locks with the vrc0 pControlling z wave door locks with the vrc0 p
Controlling z wave door locks with the vrc0 p
 
Vizia rf+ collection
Vizia rf+ collectionVizia rf+ collection
Vizia rf+ collection
 

Installation Guide for ADEMCO 5809 Rate-of-Rise Heat Detector

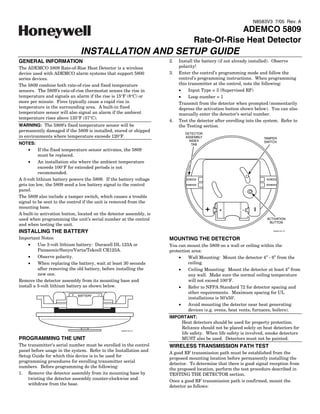
  • 1. N8583V3 7/05 Rev. A ADEMCO 5809 Rate-Of-Rise Heat Detector INSTALLATION AND SETUP GUIDE GENERAL INFORMATION 2. Install the battery (if not already installed). Observe The ADEMCO 5809 Rate-of-Rise Heat Detector is a wireless polarity! device used with ADEMCO alarm systems that support 5800 3. Enter the control’s programming mode and follow the series devices. control’s programming instructions. When programming The 5809 combine both rate-of-rise and fixed temperature this transmitter at the control, note the following: sensors. The 5809’s rate-of-rise thermostat senses the rise in • Input Type = 3 (Supervised RF) temperature and signals an alarm if the rise is 15°F (8°C) or • Loop number = 1 more per minute. Fires typically cause a rapid rise in Transmit from the detector when prompted (momentarily temperature in the surrounding area. A built-in fixed depress the activation button shown below). You can also temperature sensor will also signal an alarm if the ambient manually enter the detector’s serial number. temperature rises above 135°F (57°C). 4. Test the detector after enrolling into the system. Refer to WARNING: The 5809’s fixed temperature sensor will be the Testing section. permanently damaged if the 5809 is installed, stored or shipped DETECTOR in environments where temperature exceeds 120°F. ASSEMBLY TAMPER INDEX SWITCH NOTES: TAB • If the fixed temperature sensor activates, the 5809 must be replaced. • An installation site where the ambient temperature exceeds 100°F for extended periods is not recommended. A 3-volt lithium battery powers the 5809. If the battery voltage gets too low, the 5809 send a low battery signal to the control panel. The 5809 also include a tamper switch, which causes a trouble signal to be sent to the control if the unit is removed from the mounting base. A built-in activation button, located on the detector assembly, is used when programming the unit’s serial number at the control ACTIVATION BUTTON and when testing the unit. INSTALLING THE BATTERY 5809EN-001-V0 Important Notes: MOUNTING THE DETECTOR • Use 3-volt lithium battery: Duracell DL 123A or You can mount the 5809 on a wall or ceiling within the Panasonic/Sanyo/Varta/Tekcell CR123A. protection area: • Observe polarity. • Wall Mounting: Mount the detector 4” - 6” from the • When replacing the battery, wait at least 30 seconds ceiling. after removing the old battery, before installing the • Ceiling Mounting: Mount the detector at least 4” from new one. any wall. Make sure the normal ceiling temperature Remove the detector assembly from its mounting base and will not exceed 100°F. install a 3-volt lithium battery as shown below. • Refer to NFPA Standard 72 for detector spacing and other requirements. Maximum spacing for UL BATTERY installations is 50’x50’. • Avoid mounting the detector near heat generating devices (e.g. ovens, heat vents, furnaces, boilers). IMPORTANT: Heat detectors should be used for property protection. Reliance should not be placed solely on heat detectors for 5809EN-003-V0 life safety. When life safety is involved, smoke detectors PROGRAMMING THE UNIT MUST also be used. Detectors must not be painted. The transmitter’s serial number must be enrolled in the control WIRELESS TRANSMISSION PATH TEST panel before usage in the system. Refer to the Installation and A good RF transmission path must be established from the Setup Guide for which this device is to be used for proposed mounting location before permanently installing the programming procedures for enrolling transmitter serial detector. To determine that there is good signal reception from numbers. Before programming do the following: the proposed location, perform the test procedure described in 1. Remove the detector assembly from its mounting base by TESTING THE DETECTOR section. twisting the detector assembly counter-clockwise and Once a good RF transmission path is confirmed, mount the withdraw from the base. detector as follows:
  • 2. 1. Surface mount the unit’s plastic base to a wall or ceiling, or MAINTAINING PROPER OPERATION mount the plastic base to either a 4” junction box or 3-1/4- To maintain the detector in proper working condition, it is octagon box. important that you observe the following: NOTE: The anti-twist mounting hole is for use when Replace the battery when the system indicates that the 5809 installing the device directly to wallboard to prevent the has reported a low battery condition. base from being twisted off when servicing the device. Units should never be relocated without the advice or 2. Install the detector assembly to the base by aligning the assistance of the alarm service company. detector assembly index tabs to the index tab recesses in the base, pushing in, and secure by turning the detector SPECIFICATIONS assembly clockwise. Power: 3V lithium battery (Duracell DL123A, Panasonic CR123A, Sanyo CR123A, Varta, Tekcell (CR123A) CAUTION: Risk of fire, explosion, and burns. Do not recharge, disassemble, heat above 212°F (100°C) or incinerate. Dispose of used batteries promptly. MOUNTING INDEX TAB RECESS Keep away from children. HOLES Operating Temperature: 40° to 140°F (6° to 60°C) Rate-of-Rise Temperature: 15°F (8°C) increase per minute NOTE: Rate of rise sensor does ANTI-TWIST not operate above 38°C) MOUNTING INDEX TAB RECESS HOLE Fixed Temperature: 135°F (57°C) Maximum Spacing: 50ft x 50ft UL, 30ft x 30ft FM (refer to National Fire Alarm Code Standard NFPA 72 for 5809EN-002-V0 application requirements) TESTING THE DETECTOR Dimensions: 4.4” diameter/ 2/2” deep This test procedure should be performed to determine a good TO THE INSTALLER RF transmission path and again after installation is completed. The rate-of-rise mechanism may be subject to reduced CAUTION: The rate-of-rise heat sensor is intended for one-time sensitivity over time. Annual testing of the rate-of-rise use. Prolonged heat during testing can damage operation is recommended. the unit. If used carefully following the Regular maintenance and inspection (at least annually) by the instructions below, the heat from a portable hair installer and frequent testing by the user are vital to dryer can be used to test the unit. If the round continuous satisfactory operation of any alarm system. disk on top of the detector detaches, the detector The installer should assume the responsibility of developing must be replaced. and offering a regular maintenance program to the user as well 1. Activate the control panel’s test mode. as acquainting the user with the proper operation and 2. Use either method (a) or (b) to activate the detector: limitations of the alarm system and its components parts. (A) Press and release the activation button on the PC Recommendations must be included for a specific program of board assembly, frequent testing (at least weekly) to ensure the system’s proper OR operation at all times. (B) Holding a portable hair dryer about 12 to 18 inches away from the detector, turn the dryer on FCC ID: CFS8DL5809EN-1 and aim the warm air at the side of the detector. THIS DEVICE COMPLIES WITH PART 15 OF FCC RULES. CAUTION: Aiming the dryer directly at the round disk on the OPERATION IS SUBJECT TO THE FOLLOWING TWO detector can damage the detector, requiring the unit CONDITIONS: (1) THIS DEVICE MAY NOT CAUSE HARMFUL to be replaced. INTERFERENCE, AND (2) THIS DEVICE MUST ACCEPT ANY INTERFERENCE RECEIVED, INCLUDING INTERFERENCE 3. The system’s keypads should beep and the detector’s THAT MAY CAUSE UNDESIRED OPERATION. ID should be displayed. INDUSTRY CANADA 4. Exit the control’s test mode. IC: 573F-5809EN1 FOR WARRANTY INFORMATION AND LIMITATIONS OF THE Unit is intended for dry, indoor use only. ENTIRE ALARM SYSTEM, REFER TO THE INSTALLATION AND SETUP GUIDE FOR THE RECEIVER/CONTROL PANEL WITH WHICH THIS DEVICE IS USED. 165 Eileen Way, Syosset, New York 11791 Copyright © 2005 Honeywell International Inc. www.honeywell.com/security ÊN8583V3uŠ N8583V3 7/05 Rev. A