Coding Camp Day 4 Scratch Introduction Packet
•
0 likes•27 views

Resource for Day 4 of Coding Camp at Westerville Public Library. Provides step-by-step instructions to complete simple Scratch activities to help students become familiar with tool.

Recommended
More Related Content
Similar to Coding Camp Day 4 Scratch Introduction Packet
Similar to Coding Camp Day 4 Scratch Introduction Packet (20)
More from Annamarie Carlson
More from Annamarie Carlson (20)
Recently uploaded
Recently uploaded (20)
Coding Camp Day 4 Scratch Introduction Packet
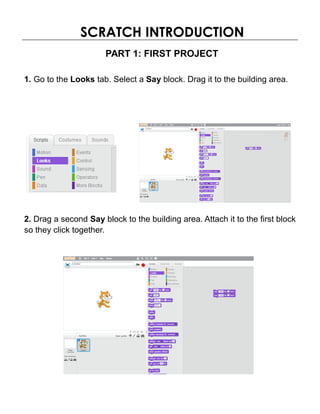
- 1. SCRATCH INTRODUCTION PART 1: FIRST PROJECT 1. Go to the Looks tab. Select a Say block. Drag it to the building area. 2. Drag a second Say block to the building area. Attach it to the first block so they click together.
- 2. SCRATCH INTRODUCTION PART 1: FIRST PROJECT 3. Click on the word “Hello” in the second “say” block. Type a different message. 4. Go to the brown Events tab. Drag the top brown block with the green flag to the building area. Attach it above the “Say” blocks. 5. Play your program by clicking on the
- 3. SCRATCH INTRODUCTION PART 2: MOVE IT! 1. Click on “File”, “New”, and “OK” to discard the last project. 2. Add these blocks to the building area: Test the program. Change the number of steps to see how far different distances are.
- 4. SCRATCH INTRODUCTION PART 2: MOVE IT! 3. Add a forever loop to the program (found in the Control section). Put the move block inside the forever loop. 4. Does the cat eventually stop moving? Find a block that makes the sprite bounce when on the edge of stage instead of stopping. The more steps the cat moves, the faster he bounces back and forth. 5. The cat keeps standing on its head. Click the in the corner of the cat on the sprite list. Change the rotation style to and see what the cat does.
- 5. SCRATCH INTRODUCTION PART 3: LOOPS 1. Click on “File”, “New”, and “OK” to discard the last project. 2. Create a forever loop that makes the sprite turn 15 degrees and change color effect by 25.
- 6. SCRATCH INTRODUCTION PART 3: LOOPS 3. Experiment with sound by using a repeat loop block. Try changing the number of repeats. Experiment with the program to see what else you can do.
- 7. SCRATCH INTRODUCTION PART 4: PARTY TIME! 1. Click on “File”, “New”, and “OK” to discard the last project. 2. Add a backdrop to your stage. Click on underneath the stage. Select a background.
- 8. SCRATCH INTRODUCTION PART 4: PARTY TIME! 3. Create a light show by clicking on the small picture of the stage in the stage info area so that it has a blue rectangle around it: Then add this script to the scripts section: 4. Click on the Sounds tab, and click on this icon to choose a sound from the library. Cre- ate a second script with the below content (using whatever music you chose) to create a nev- er-ending dance party!
- 9. SCRATCH INTRODUCTION BUILDING CHALLENGE Make whatever program you like using only the blocks on the attached sheet. • You can use the same block multiple times—but you can only use these blocks. • You can change the specific information each block does. (For exam- ple, the “say” block can say anything—not just “hello.”) • You can add more sprites and change the background. • You must use the number of blocks required from each category.