
Recommended
More Related Content
What's hot
What's hot (20)
Similar to U24 lLA B Processes and Techniques
Similar to U24 lLA B Processes and Techniques (20)
More from Heath Park, Wolverhampton
More from Heath Park, Wolverhampton (20)
Recently uploaded
Recently uploaded (20)
U24 lLA B Processes and Techniques
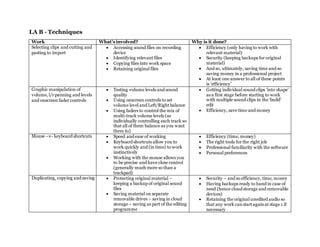
- 1. LA B - Techniques Work What’sinvolved? Why is it done? Selecting clips and cutting and pasting to import Accessing sound files on recording device Identifying relevant files Copying files into work space Retaining original files Efficiency (only having to work with relevant material) Security (keeping backups for original material) And so, ultimately, saving time and so saving money in a professional project At least one answer to all of these points is ‘efficiency’ Graphic manipulation of volume, l/r panning and levels and onscreen fader controls Testing volume levels and sound quality Using onscreen controls to set volume level and Left/Right balance Using faders to control the mix of multi-track volume levels (so individually controlling each track so that all of them balance as you want them to) Getting individual sound clips ‘into shape’ as a first stage before starting to work with multiple sound clips in the ‘build’ edit Efficiency, save time and money Mouse –v- keyboard shortcuts Speed and ease of working Keyboard shortcuts allow you to work quickly and (in time) to work instinctively Working with the mouse allows you to be precise and have close control (generally much more so than a trackpad) Efficiency (time, money) The right tools for the right job Professional familiarity with the software Personal preferences Duplicating, copying and saving Protecting original material – keeping a backup of original sound files Saving material on separate removable drives – saving in cloud storage – saving as part of the editing programme Security – and so efficiency, time, money Having backups ready to hand in case of need (hence cloud storage and removable devices) Retaining the original unedited audio so that any work canstart againat stage 1 if necessary
- 2. Retaining the ‘finalised’ individual sound clips for efficiency (t/m) Multiscreen add-ons Using the second screen as a preview monitor Particularly useful whenyou have finalised sound files and are editing sound and video together Premier lets you do this Workflow efficiency (t/m) Personal preferences Using breathing spaces and pauses to replicate real sound Editing dialogue for realism Using multiple sound files of separately recorded dialogue to edit together a conversation Editing to create the rhythms of real conversation, including breathing spaces, pauses and talking-over each other Building dialogue sequences out of individual sound files Realistic dialogue needs to take account of breathing spaces, pauses in speech, people over-speaking Using rumbletracks (a ‘background noise’ recording the length of the scene that sits underneath all of the clips and hides the edit points) to ‘knit together’ different dialogue recordings To create realistic dialogue sequences that are indistinguishable from actually straightforwardly recorded dialogue
- 3. LA B - Procedures Work What’sinvolved? Why is it done? Logging when recording with annotation (EDL) Creating a detailed accurate list of what you record as you record it Efficiency – organisation – time – money Making it easy to identify relevant clips to take forward into the edit and clips to discard, as well as currently unused clips to save in case Reviewing detailed EDL – errors and omissions, level issues, poor recordings Using EDL to review recordings and make preliminary decisions about files to use Retaining all usable files – you don’t know what you might need Review recordings to check accuracy of EDL Identify ‘delete’ files – there will be some that are definitely of no use – efficient to delete them Identify best files to take forward to save time and avoid paying attention later to unnecessary material Keep backups of all original material in case it’s needed Efficiency – organisation - money and so from A and B – identifying clips most likely to be used Identifying files to bring into editing programme Use the reviewed EDL to identify which files to copy onto the editing ‘machine’ (PC/Mac/Standalone editor) to make the further editing process as smooth as possible Retain and backup all usable original files in case they are needed time/money Importing into software Retaining all original files Copying and pasting required files onto editing device (Mac, PC, standalone editor) Importing relevant files into software using software specific techniques Using the software procedures and techniques to move relevant material into the programme So you can use ‘stage 1’ editing – to clean up and prepare individual audio files for multi- file editing And stage 2 editing – so you can bring the different finalised audio files together in a multi-track timeline Using the software efficiently and effectively - time/money
- 4. Housekeeping – file structures, relevant and useful file and folder names Creating file structures to protect assets and work in progress Labelling folders and files with relevant and clear names Efficiency – organisation – time – money If you don’t organise files correctly you could lose them The programme needs to ‘know’ where the files are Dragging clips to timeline Building the audio timeline Multitrack editing and sound levels Both in ‘stage 1’ editing when you are finalising files and ‘Stage 2’ editing when you are creating a multi-file edit, you need to bring audio onto the timeline to work on it Multi track editing – so you can apply different effectsor adjust volumes in different sections of the audio in isolation Using mute and solo effects so you can focus on one track at a time Reviewing clips for usefulness as product is built Using EDL and listening to individual files to select most useful clips for timeline Editing material from different clips as necessary Using annotated EDL allows you to efficiently select the most relevant material - time/money Rechecking the clips allows you to identify the most useful as the work develops – what appears most useful in isolation may not be when you are working with multiple clips Using in and out points and deleting unwanted data Only bringing relevant material into the timeline Deleting unwanted material within the system having retained and backed up the original sound files in case they are needed again Managing your files efficiently – using in/out points lets you ‘pre-edit’ by removing unwanted material and the beginning and end of takes You have retained original files in case you later decide you need unused material Efficiency / time / money Using different audio clips to make a single sequence for use in final build/edit Using multiple sound files to build a single sound file to export for use in a final edit/build Multi track editing Sound levels L/R Balance Effects Creating single audio files from multiple original recordings simplifies the ‘end-use’ audio edit – when you are bringing it into an audio-visual edit suite This stage of audio editing is planned in detail with the final use in mind – so you are
- 5. building audio deliberately for specific use in the audio-visual edit/build Efficiency – time money With the backup available that if you get the planned piece into the final video edit and there’s an issue, you have the resources to go back to to re-edit/rebuild Using ‘Normalising’ function to make sure levels of each clip match Normalising across multiple sound files to match sound levels across clips Checking for disruption of L/R balance in normalisation Checking resultant sound quality after normalisation Normalising a completed audio edit brings all of the different sound clips used to the same level Normalising can significantly effect L/R balancing – you need to disable the effect on L/R balance or you’ll have to redo the work Normalising can have unexpected effects, especially if you have built a number of effects into your audio edit. So retain the pre-normalised audio and compare with the normalised audio to check Time/Money/Efficiency AdditionalEvaluation Generally Editing processes, techniques and procedures have standard practices but work towards different outcomes and under different requirements in different situations. The most significant differences come between working on fiction and non-fiction texts Both, however, have the issue of copyright in the background, which is most likely to be relevant in terms of using copyright-protected music and the need to obtain a license to use, but may also involve sound effects or reading/performance of copyright protected writing. Non Fiction Texts There is a responsibility to represent people without mis-representation This is a legal as well as a moral responsibility – people have sued media producers for misrepresenting them through the editing process The editing process is therefore about working to create a compelling and popular media text that people will want to watch/listen to, by using audio techniques such as sound
- 6. effects and background music as well as more straightforward continuity editing, without going so far as to misrepresent the words and meaning of the person being represented A particular issue might be editing a sequence down in order to fit a limited time slot without oversimplifying a person’s message or appearing to change its meaning This is more complicated because sometimes the point of an interview is to challenge the person being interviewed – sometimes they say one thing and sometimes another, and the point of the editing might be to show that the interviewee is inconsistent- but that would be an honest representation of their inconsistency There is a general duty in creating non-fiction texts toshow reality as it is Fiction Texts Even in fiction there may be a duty if your fictional text includes fictionalised representations of real people – some of the above issues with non-fiction texts may apply However in general the processes used in fiction texts can be used much more freely to create the impressions, representations, meanings, messages and values that the producer/director wants to create There are still constraints of time and money – both production time and the eventual running time of the item or whole text, that audio editors must pay attention to