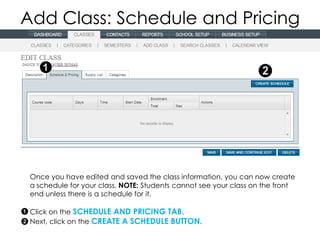
1. Add Class: Schedule and Pricing
Once you have edited and saved the class information, you can now create
a schedule for your class. NOTE: Students cannot see your class on the front
end unless there is a schedule for it.
Click on the SCHEDULE AND PRICING TAB.
Next, click on the CREATE A SCHEDULE BUTTON.
2. Add Class: Create Schedule
Class status: Current means
that the class is scheduled
and available for
registration. Cancelled
means the class will not take
place and students will be
unable to see this class on
the front end. Pending
means that the class will
possibly take place, but is
not fully finalized. TIP: If you
decide last-minute to
cancel a class, you can
easily do so.
Choose a semester, start
and end dates, and times
for your class. If your class
has varying times, you can
edit that later.
Select the day(s) of the
week on which your class
takes place.
3. Add Class: Create Schedule
Set the location for your
classes. If you have
different locations for
individual classes, you can
manually edit that later.
Once you’ve selected the
class days (previous page
(3)), the “# of sessions” will
automatically fill in. NOTE:
you can also manually
add more sessions if you
have more sessions.
You can now click this tab
to view (and edit)
individual sessions.
4. Add Class: Create Schedule
When you select the view/hide sessions tab it allows you to view/hide individual sessions
so you can edit them.
You can name each individual session to let students know what they can expect in the
class. (ex: “Salsa” “Pointe work” “Dress rehearsal”, etc.)
If a specific session has a different date/time/location than others, you can edit its
information here.
Action buttons: the ( ) button allows you to delete individual sessions.
The ( ) button allows you to view the class roster for individual sessions (Roster Edit
button present only with Session-based classes)
5. Add Class: Create Schedule
Edit the class costs here. If you
have memberships, you can set
different prices for members
and for non-members
(Regular).
If your class is session-based,
you can set the cost for
individual sessions. Please note:
If your class is session-based,
the “Per Session Cost” applies
for individual sessions, but if ALL
the sessions are purchased,
then the “Full Class Cost” is
used. (ex: Zumba has 4 classes,
costing $20 per session.
However, the “Full Class Cost”
may be $75, giving students the
incentive to register for all four
classes)
Additional costs? Enter them
here.
6. Add Class: Create Schedule
Review all your class costs.
If the class is session-based,
then you will not see this
section. If the class is semester-
based, then you can set up
recurring billing.
Recurring billing allows you to
AUTOMATICALLY collect fees
from your students on whatever
schedule you decide.
First, enter your DEPOSIT
PERCENTAGE. If an enter class
is $100, and you require a $10
deposit, you enter 10 (and it will
calculalate 10%.
7. Add Class: Create Schedule
Recurring billing allows you to
AUTOMATICALLY collect fees
from your students on whatever
schedule you decide. Check
ENABLE recurring billing
First, enter your DEPOSIT
PERCENTAGE. If an entire class is
$200 and you require a $100
deposit, you enter 50 (it will
calculate 50% of $200 = $100)
Next, enter the number of
payments. So if you want the
remaining $100 paid over 2
months, enter 2.
Enter NEXT PAYMENT date.
Enter the time between
payments: 1 Month, 30 days, etc.
8. Add Class: Create Schedule
After all your recurring data is entered, it will appear on the right hand of this panel.
You can then SAVE and all data will be in the system.