
Recommended
More Related Content
Similar to Making Payments And Raising Receipts
Similar to Making Payments And Raising Receipts (20)
Recently uploaded
Recently uploaded (20)
Making Payments And Raising Receipts
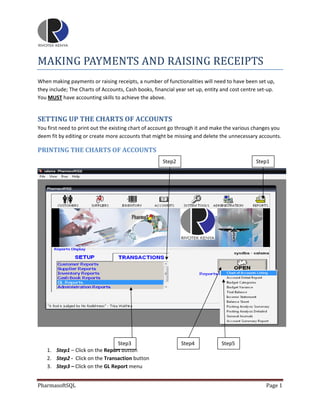
- 1. MAKING PAYMENTS AND RAISING RECEIPTS When making payments or raising receipts, a number of functionalities will need to have been set up, they include; The Charts of Accounts, Cash books, financial year set up, entity and cost centre set‐up. You MUST have accounting skills to achieve the above. SETTING UP THE CHARTS OF ACCOUNTS You first need to print out the existing chart of account go through it and make the various changes you deem fit by editing or create more accounts that might be missing and delete the unnecessary accounts. PRINTING THE CHARTS OF ACCOUNTS Step2 Step1 Step3 Step4 Step5 1. Step1 – Click on the Report button 2. Step2 ‐ Click on the Transaction button 3. Step3 – Click on the GL Report menu PharmasoftSQL Page 1
- 2. 4. Step4 – Click on the Open button and a pop menu will show 5. Step5 – Click on the Chart of Accounts Listing menu Step6 Step7 Step8 6. Step6 – Click on the Entity button and select the entity name from the pop up window 7. Step7 ‐ Click on the Cost Centre button and select the cost centre from the pop up window 8. Step8 – Click on the Run Report button and the charts of account report will be displayed on the screen for printing. Note: The fields marked in red represent the Financial Reporting Period which should ideal represent your position to have the correct accounting data when reporting. After looking through the print out, you can now start working on your charts of account on the System. PharmasoftSQL Page 2
- 3. WORKING WITH CHARTS OF ACCOUNTS 1. Step1 – Click on the Accounts button 2. Step2 ‐ Click on the Set Up button 3. Step3 – Click on the Charts of Account menu 4. Step4 – Click on the Open button Step2 Step3 Step1 Step4 PharmasoftSQL Page 3
- 4. Step5 Step6 Step7 Step8 Step9 5. Step5 – Click on the Search field and type in the name/description of your search item. The red markings show the search criteria you could use. (By description or Account no indicated on the extreme left) 6. Step6 ‐ Click on the Search button to display your search item (The item will be displayed at the top of the grid alone) from there, you can edit the entry or even delete. 7. Step7 – Click on the Add button and to create a new account . PharmasoftSQL Page 4
- 5. ‐ Type in the account description on the Description input box, Account No field will be out generated when you save the account. Select the Account type from the Type drop down list which includes ‐ Select the corresponding class from the drop down list. NOTE: Each type has its own corresponding class to choose from (e.g.) if you select Type Asset, the corresponding classes will be Current, fixed and other assets ‐ Select the budget category, to indicate whether your account is an Expense or an income account ‐ Pick the Sub categories and main categories by clicking on the pick buttons to choose from the lists that appears on the pop‐up windows. ‐ Click on the OK button to save the account. 8. Step8 ‐ After searching (step 5) above and the account is displayed, click on the Edit button PharmasoftSQL Page 5
- 6. Then click the OK button to reflect the changes. 9. Step9– Search for an account Click on the Delete button to delete an account. WHEN YOU ARE THROUGH WORKING ON THE CHARTS OF ACCOUNT, YOU CAN THEN START SETTING UP THE VARIOUS CASH BOOKS WHICH COULD INCLUDE YOUR BANK ACCOUNTS, PETTY CASH ACCOUNTS, POSTDATED CHEQUES ACCOUNTS AND OTHER CASH ACCOUNTS. TO DO THAT; You must have created the cash book accounts when setting up the charts of account because that’s where you will be linking them from. PharmasoftSQL Page 6
- 7. BANK AND ACCOUNTS Step2 Step3 Step1 Step4 1. Step1 – Click on the Accounts button 2. Step2 ‐ Click on the Set Up button 3. Step3 – Click on the Banks and Accounts menu 4. Step4 – Click on the Open button PharmasoftSQL Page 7
- 8. Step8 Step7 Step6 Step9 Step10 Step5 5. Step5 – Click on the New button to activate the save button and initialize the process 6. Step6 ‐ Click on the Search button to locate the account from the chart of accounts a pop‐up charts of account window will appear, type in the name of the account to search and click on the search button. The account will be displayed as show in the next page, click on the select button PharmasoftSQL Page 8
- 9. 7. Step7 – Click on the check boxes appropriately, if an account is a bank account then it should not hold postdated cheque and it means that you will need to create a Postdated Cheques account , on the other hand, when you check for ‘This account holds postdated cheques means that it cannot be a bank account. 8. Step8 – Click on the Check box for Home currency if the account will be trading in Kenyan shilling otherwise, select a currency from the drop down menu below it. 9. Step9 – Click on the Save button to save the cash book and will be displayed in the grid of the same window. You cannot be able to save if the Save button is not active, its activated with the new button. 10. Step10 – The step is for modifying, deleting accounts and close is for closing the window. Note: The marked fields do not need an input because they are out generated by the system. PharmasoftSQL Page 9
- 10. PAYMENT AND RECEIPTS Step3 Step2 Step1 Step4 1. Step1 – Click on the Accounts button 2. Step2 ‐ Click on the Transaction button 3. Step3 – Click on the Payments or Receipt menu 4. Step4 – Click on the Open button PharmasoftSQL Page 10
- 11. Step5 Step7 Step9 Step11 Step13 Step15 Step8 Step10 Step12 Step14 Step16 Step6 Step17 Step18 5. Step5 – Click on the Cash book drop down menu to select the cash book to post a payment transaction, can be a bank account, petty cash account postdated cheques account. PharmasoftSQL Page 11
- 12. 6. Step6 ‐ Click on the Transact button to create a new payment or modify an existing payment 7. Step7 – Double Click on the Date input box to select the transaction date 8. Step8 – Double Click on the GCS Input box to select the account to pay, either Supplier, Customer or a General Ledger account. Then click on the OK button 9. Step9 – Double Click on the Accounts input box to select the relevant account that falls under the selected option in step 8 above. If u selected to pay a supplier (Step 8) then type the supplier name from the pop‐up window and press the entre key on your keyboard to display the supplier then click on the OK. Button. (This will populate Step 14) PharmasoftSQL Page 12
- 13. 10. Step10‐ Double Click on the For input box to choose what the payment is for. If you are paying a supplier, it means there are suppliers invoices under the selected supplier to pay for so you can select the Invoice payment option, otherwise, if you are paying for a general ledger account like petty cash which does not have transactions tied to the account, u can use Miscellaneous payment 11. Step11 – Double Click on the Description input box to select from a list of invoices listed what invoices you want to pay for by triple clicking on the balance field to post the balance to the clearing field. Click on OK once done. Triple click on Balance fields to clear an invoice entry and the amounts will be shown on the clearing field and the total reflected on the paying field Once you click on the OK. Button on the above window another pop up window will appear and click on the Ok button PharmasoftSQL Page 13
- 14. 12. Step12 – After clicking on the OK button above, the input box with Amount is populated with amount realized in step 11 above. 13. Step13 – Double click on the Payment Mode input box and select the payment mode (Cash or Check) then click on the Ok. button 14. Step14 ‐ The name field is populated when you select the account to pay (Step 9) 15. Step15 –Double Click on the Reference field and from the pop‐up window that appears, you can type in the cheque number or if its cash then you can use the reference number of the cash voucher, then click on the OK. Button. 16. Step16 – Double click on the Cheque date field ad select the check date which should be pre dated or current otherwise, all postdated cheques should be posted on the postdated cheques account on the cash book. Cash transactions don’t require cheque dates as it will be inactive. PharmasoftSQL Page 14
- 15. The other remaining fields are not compulsory but the Exchange Rate and the Home Currency are automatically generated by the system, you can choose to comment or not and then the user is picked by the System and filled out once you save the transaction, Batched shows whether the transaction has been posted to accounts or is still pending. Transaction number is auto generated after saving the transaction. 17. Step 17 – Click on the save button to save the transaction. Saving a transaction is just booking it pending its posting to accounts to reflect the various accounts affected by the posting. You will need to confirm whether you want to save the transaction by clicking on the yes button on the pop‐up window and a confirmation that the record has been saved will show 18. Step 18 – Click on the Batch button to complete the transaction by posting the transaction. Note: Once batched a transaction cannot be edited or deleted it can only be reversed through a journal. When the batch button is clicked, a pop‐up window appears PharmasoftSQL Page 15
- 16. Step21 Step19 Step20 Step22 Step23 19. Step19 – Click on the view all check box and click on the Ok. Button on the pop up message box that appears asking you to enter the supervisor password to confirm the batches and alongside the check box is a password input box. 20. Step20 ‐ Click on the Refresh button after keying the password to view all the unbatched transactions. A pop up asking you to sort by reference will show, click on the yes button. All the unbatched transactions will be listed on the grid. PharmasoftSQL Page 16
- 17. 21. Step21 – Click on the Select All button once all the unbatched transactions are listed, all the transactions will be selected but in case you don’t want to batch all the transactions, you can manually pick what transactions to batch by scrolling to click the select field of the transaction you want to batch and itwill be marked with a double mark.The total amount being batched will be indicated in position marked in red. 22. Step22 – Click on the Batch selected button to batch the selected transactions and you will have to confirm the move by clicking on the Ok. Button on the pop‐up window 23. Step23 –click on the close button to close the batch window. TO DISPLAY ALL THE SAVED TRANSACTIONS PharmasoftSQL Page 17
- 18. Step26 Step24 Step27 Step28 Step25 24. Step24 – Click on the Cash book drop down button to select a cash book which you want to search transactions from. 25. Step25 ‐ Click on the Radial button to select open if you want to display all the unbatched transaction, batched for batched transactions and all for both batched and unbatched transactions 26. Step26 – Click on the view all user batches radial button to see all the transactions in the cash book raised by any user in the system. A pop up asking you to put the supervisor password will show PharmasoftSQL Page 18
- 19. 27. Step27 – type in the supervisor password. 28. Step 28 – Click on the refresh button and all the transactions will be displayed on the grid. The functionalities marked in red are just to help you narrow your search to a particular supplier or customer using a specific period or GL account and so on. PharmasoftSQL Page 19
- 20. Table of Contents SETTING UP THE CHARTS OF ACCOUNTS...................................................................................................... 1 PRINTING THE CHARTS OF ACCOUNTS ..................................................................................................... 1 WORKING WITH CHARTS OF ACCOUNTS ...................................................................................................... 3 BANK AND ACCOUNTS .................................................................................................................................. 7 TO DISPLAY ALL THE SAVED TRANSACTIONS ...................................................................................... 17 PharmasoftSQL Page 20