Save IT admin time with the Dell EMC PowerEdge MX platform and OpenManage Enterprise
•
1 like•187 views

The Dell EMC PowerEdge MX solution required 86.8 percent less admin time to implement VMware vSAN and 19 fewer steps to update firmware on a single system versus a Cisco UCS solution

Recommended
Recommended
More Related Content
What's hot
What's hot (20)
Similar to Save IT admin time with the Dell EMC PowerEdge MX platform and OpenManage Enterprise
Similar to Save IT admin time with the Dell EMC PowerEdge MX platform and OpenManage Enterprise (20)
More from Principled Technologies
More from Principled Technologies (20)
Recently uploaded
Recently uploaded (20)
Save IT admin time with the Dell EMC PowerEdge MX platform and OpenManage Enterprise
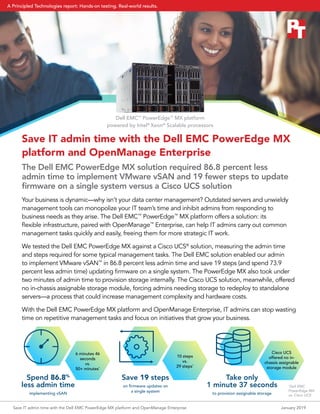
- 1. Save IT admin time with the Dell EMC PowerEdge MX platform and OpenManage Enterprise The Dell EMC PowerEdge MX solution required 86.8 percent less admin time to implement VMware vSAN and 19 fewer steps to update firmware on a single system versus a Cisco UCS solution Your business is dynamic—why isn’t your data center management? Outdated servers and unwieldy management tools can monopolize your IT team’s time and inhibit admins from responding to business needs as they arise. The Dell EMC™ PowerEdge™ MX platform offers a solution: its flexible infrastructure, paired with OpenManage™ Enterprise, can help IT admins carry out common management tasks quickly and easily, freeing them for more strategic IT work. We tested the Dell EMC PowerEdge MX against a Cisco UCS® solution, measuring the admin time and steps required for some typical management tasks. The Dell EMC solution enabled our admin to implement VMware vSAN™ in 86.8 percent less admin time and save 19 steps (and spend 73.9 percent less admin time) updating firmware on a single system. The PowerEdge MX also took under two minutes of admin time to provision storage internally. The Cisco UCS solution, meanwhile, offered no in-chassis assignable storage module, forcing admins needing storage to redeploy to standalone servers—a process that could increase management complexity and hardware costs. With the Dell EMC PowerEdge MX platform and OpenManage Enterprise, IT admins can stop wasting time on repetitive management tasks and focus on initiatives that grow your business. Dell EMC™ PowerEdge™ MX platform powered by Intel® Xeon® Scalable processors Save 19 steps on firmware updates on a single system 10 steps vs. 29 steps* * Dell EMC PowerEdge MX vs. Cisco UCS Spend 86.8% less admin time implementing vSAN 6 minutes 46 seconds vs. 50+ minutes* Take only 1 minute 37 seconds to provision assignable storage Cisco UCS offered no in- chassis assignable storage module Save IT admin time with the Dell EMC PowerEdge MX platform and OpenManage Enterprise January 2019 A Principled Technologies report: Hands-on testing. Real-world results.A Principled Technologies report: Hands-on testing. Real-world results.
- 2. Inside the Dell EMC PowerEdge MX The Dell EMC PowerEdge MX platform combines storage and compute into a single modular chassis. Its eight front bays enable admins to add or remove servers and storage as business needs change and grow. According to Dell EMC, their solution “is designed for enterprise data center density with easy deployment, agile management and maximum longevity.”1 The Dell EMC PowerEdge MX solution can leverage software-defined data and storage networking for increased automation and faster deployment. By contrast, the Cisco UCS solution we tested offers no in-chassis assignable storage module option; admins wanting to assign additional storage would need to add and manage it externally, which could lead to more management effort and increase room for error. The Dell EMC PowerEdge MX, powered by Intel Xeon Scalable processors and managed with OpenManage Enterprise The Dell EMC PowerEdge MX platform offers diverse management features OpenManage Enterprise is a one-to-many systems management console for the data center. The console offers a modern HTML5 GUI and deploys as a virtual appliance for VMware ESXi™ , Mircrosoft® Hyper-V, and KVM environments. In our experience, it was easy to use the OVF format for deployment in the VMware ESXi environment. It can discover and inventory on IPV4 and IPV6 networks for up to 8,000 devices, including Dell EMC rack servers, Dell EMC tower servers, and Dell EMC blades and chassis.3 Learn more about OpenManage Enterprise: www.dell.com/OMEnterprise OpenManage Enterprise – Modular Edition is an embedded systems management solution for the Dell EMC PowerEdge MX chassis. It delivers the primary abilities of OpenManage Enterprise within the server chassis, and can manage servers across several PowerEdge MX chassis. A web/RESTful API interface manages all nodes, including compute, storage, and networking.4 Learn more about OpenManage Enterprise – Modular Edition: www.dell.com/OME-Modular Kinetic infrastructure: Offering flexibility for the modern data center Organizations are increasingly using compute and storage as services, enhancing flexibility. According to Dell EMC, kinetic infrastructure takes this process one step further by extending “the flexibility of configuration down to the individual storage device and, in the future, all the way to memory centric devices.”5 By equipping IT decision-makers with the ability to assign the right resources for the right workload, kinetic infrastructure can enable dynamic changes as business needs evolve.6 Save IT admin time with the Dell EMC PowerEdge MX platform and OpenManage Enterprise January 2019 | 2
- 3. How we tested To see which solution offered simpler, speedier management, we set up two environments: a Dell EMC PowerEdge MX7000 chassis with a PowerEdge MX740c compute sled, and a Cisco UCS 5108 chassis with Cisco UCS B200 M4 and M5 servers. We tested the two platforms’ manageability using four common deployment and management scenarios: deploying a server, provisioning assignable storage, updating firmware, and implementing VMware vSAN. We found that the Dell EMC PowerEdge MX implemented vSAN in 86.8 percent less admin time, required 19 fewer steps when updating firmware on a single system, and deployed a server node in 45.2 percent less admin time. In addition, the PowerEdge MX solution allowed for dynamic storage expansion in just one minute 37 seconds, something that the Cisco UCS solution couldn’t do without redeploying to standalone servers outside the chassis. The Dell EMC system we tested included: • The 7U modular Dell EMC PowerEdge MX7000 chassis, with two distinct redundant PowerEdge MX Scalable Fabrics, a third redundant storage fabric, and a fault-tolerant interlinked Management Services module to manage compute, storage, and networking fabrics • The Dell EMC PowerEdge MX740c compute sled, which packs two Intel Xeon Scalable processors, up to 24 DDR4 DIMM slots, 3 TB of memory, and up to six 2.5” drives into one single-width sled The Dell EMC PowerEdge MX solution can benefit your business by: Freeing IT staff for more essential data center work. With the automated processes of the Dell EMC PowerEdge MX solution and OpenManage Enterprise, IT staff could spend less time on routine maintenance and maximize their productivity by turning to more strategic IT tasks. Creating a more flexible, future-proof data center. Every organization tries to make investments that will allow them to maximize their IT resources— now and in the future. The kinetic infrastructure of the Dell EMC PowerEdge MX solution could help IT decision-makers develop a platform for next-generation infrastructure while offering the ability to allocate resources differently as organizational needs shift. Save IT admin time with the Dell EMC PowerEdge MX platform and OpenManage Enterprise January 2019 | 3
- 4. Use case 1: Deploying a server node For IT admins, deploying a server may seem like a straightforward task. But setting up and configuring a server requires time and labor on the part of your IT staff. And if you’re deploying multiple servers at once, the risk of user error increases. An intuitive graphical user interface (GUI) and management system can help your IT admins deploy servers faster and more efficiently. The PowerEdge MX solution enabled us to leverage its embedded management solution (OpenManage Enterprise – Modular Edition) and its centralized management software (OpenManage Enterprise). The Cisco UCS system, meanwhile, uses the embedded management tool Cisco UCS Manager, which can’t deploy operating systems or control storage. To see how the Dell EMC and Cisco systems compared, we deployed a server node on each solution and measured the admin time and steps required to finish the deployment. The Dell EMC PowerEdge MX solution handled the deployment in 45.2 percent less admin time, taking two minutes and 18 seconds versus the Cisco UCS solution’s four minutes and 12 seconds. Admins don’t just need a system that can deploy one server: they need a solution that can handle bulk server node deployments with minimal time and effort. While the Dell EMC solution allows admins to select multiple devices and deploy to them all at once, Cisco UCS Manager only allows for linear deployments. Admins wanting to deploy multiple server nodes on the Cisco UCS solution would need to do so one by one, greatly increasing admin time and steps. Less time and fewer steps are better minutes:seconds Deploying a server node (first single instance) Dell EMC PowerEdge MX solution Dell EMC PowerEdge MX solution 2:18 Cisco UCS solution Cisco UCS solution 12 steps 4:12 17 steps Save IT admin time with the Dell EMC PowerEdge MX platform and OpenManage Enterprise January 2019 | 4
- 5. We tested each solution’s ability to deploy multiple servers by first deploying one additional server node. Whereas our first test also included the amount of time needed to build a profile template on each solution, this second test measured only deployment time. The Dell EMC solution increased its advantage over the Cisco UCS system, completing the task in just 43 seconds of admin time—76.6 percent less time than the Cisco UCS system, which took over three minutes of admin time to finish the deployment. We then performed three more server deployments. Here, the Dell EMC platform drew even further ahead, taking less than a minute of our admin’s time compared to the Cisco UCS solution’s over nine minutes of admin time. It also took just nine steps, in contrast to the Cisco UCS solution’s 30. The Dell EMC solution’s steady progress—from taking up 45.2 percent less admin time with the first deployment, to 76.6 percent with the second, to 91.3 percent with the subsequent three deployments—indicates that the Dell EMC advantage over the Cisco UCS solution would only continue to grow. Whether your admins needed to deploy 10 servers or 1,000, they would benefit from the time savings offered by the Dell EMC PowerEdge MX platform. Additionally, the steps required on the Dell EMC solution would remain the same, while on the Cisco UCS solution they would continue to grow, increasing opportunities for error and hassle for IT staff. Deploying a server node (subsequent single instance) 0:43 Dell EMC PowerEdge MX solution Dell EMC PowerEdge MX solution Cisco UCS solution Cisco UCS solution 3:04 10 steps Less time and fewer steps are better minutes:seconds 9 steps 0:48 Dell EMC PowerEdge MX solution Dell EMC PowerEdge MX solution Cisco UCS solution Cisco UCS solution 9:12 30 steps Less time and fewer steps are better minutes:seconds Deploying 3x server nodes (subsequent multiple instances) 9 steps Save IT admin time with the Dell EMC PowerEdge MX platform and OpenManage Enterprise January 2019 | 5
- 6. Use case 2: Provisioning assignable storage The Dell EMC PowerEdge MX presents a modular approach to data provisioning. Its chassis supports an SAS drive sled from which admins can add and assign more disks, dynamically adding or removing storage as they need. In our testing, this process took just one minute and 37 seconds of admin time and only five steps. The Cisco UCS solution has no drive sled from which to assign additional storage; admins could only add storage by expanding to SAN, a process that would take more planning and time to implement, in addition to requiring more hardware. This lack of dynamism could restrict the ability of admins to respond quickly to storage needs as they arise. Use case 3: Updating firmware Any IT team needs to periodically update their firmware to enhance security and fix bugs. Ideally, admin time is minimal and updates are automated. With the Dell EMC PowerEdge MX solution, firmware updates on a single system took just one minute 42 seconds of admin time. That’s 73.9 percent less admin time and 19 fewer steps than the over six and a half minutes of admin time and 29 steps that the Cisco UCS solution required. This additional complexity not only robs IT admins of time they could be spending more productively—it also introduces more room for error. With the Dell EMC solution’s automated processes, firmware updates would take up about the same amount of admin time regardless of how many systems a user was updating. After a user has created a firmware baseline on the PowerEdge MX solution, management software alerts them to when firmware is out of compliance. To complete the updates, the user simply runs a consistency check, selects the servers they want to update, and schedules the deployment. This feature can be especially crucial for IT teams who don’t have night shifts, because no one has to supervise the process. When we ran subsequent firmware updates on first one PowerEdge MX system and then three, the admin time and steps needed to run a consistency check stayed consistent, at around one and a half minutes and six steps. Even if a user dramatically increased the number of systems they were applying updates to, our testing indicates that the admin time and steps required would continue to hold steady. In the space of under two minutes, a user could run a consistency check on hundreds of systems, see which systems were out of compliance, and schedule the update. Dell EMC PowerEdge MX solution Dell EMC PowerEdge MX solution 1:37 Cisco UCS solution Cisco UCS solution 5 steps Option not available Option not available Less time and fewer steps are better minutes:seconds Provisioning assignable storage Dell EMC PowerEdge MX solution Dell EMC PowerEdge MX solution 1:42 Cisco UCS solution Cisco UCS solution 10 steps 6:32 29 steps Less time and fewer steps are better minutes:seconds Updating firmware (first single instance) Save IT admin time with the Dell EMC PowerEdge MX platform and OpenManage Enterprise January 2019 | 6
- 7. The Cisco UCS solution, by contrast, applies firmware updates sequentially, meaning admin time and steps would only grow for each additional system. The Cisco UCS system took 18 seconds of admin time to apply a subsequent firmware update. But when we applied three more updates, this number tripled to 54 seconds. The steps required also grew in proportion to each new system: from six steps for one system to 18 for three. (Meanwhile, steps on the Dell EMC solution remained static at six.) An IT department needing to apply firmware updates across a large environment—say, 1,000 servers—would face steeply climbing time and steps requirements for their admins, creating more work and more room for error. Additionally, Cisco UCS Manager does not alert the user when new firmware becomes available. Instead, the user must search for the firmware, download it to their system, upload it to the Cisco UCS solution, and then make the firmware available to each host. The user would need to repeat this process every time Cisco released a new firmware update, creating more time and hassle for IT staff. Use case 4: Implementing VMware vSAN Often, IT admins will leverage available storage in hypervisor hosts for use in VMware vSAN. This enables vSAN members to share their local storage across the entire cluster. On the Dell EMC PowerEdge MX solution, this process took 36 steps and six minutes and 46 seconds of admin time. The Cisco UCS solution required 59 additional steps (95 in total) and over 51 minutes of admin time—taking 86.8 percent more admin time than the PowerEdge MX. Our vSAN use case, which utilized multiple disk groups per node for better performance, meant that we had to migrate from UCS blade servers to UCS standalone servers. UCS blade servers contain only two drive bays—even if VMware ESXi™ was installed on an internal SD card, the vSAN would contain only a single drive group per node, potentially limiting performance. By contrast, the PowerEdge MX offers dynamic expansion drives and options for compute, integrated networking, and storage. These features can enable IT admins to respond more dynamically to storage needs. Implementing VMware vSAN 6:46 Dell EMC PowerEdge MX solution Dell EMC PowerEdge MX solution Cisco UCS solution Cisco UCS solution 51:15 95 steps Less time and fewer steps are better minutes:seconds 36 steps Save IT admin time with the Dell EMC PowerEdge MX platform and OpenManage Enterprise January 2019 | 7
- 8. Conclusion Our testing found that using the kinetic infrastructure of the Dell EMC PowerEdge MX could help IT admins spend 86.8 percent less admin time implementing vSAN and 19 fewer steps updating firmware, compared to a Cisco UCS solution. The modular nature of the PowerEdge MX solution also enables IT teams to respond to shifting storage needs by provisioning storage dynamically—the Cisco UCS solution, by contrast, would require admins to provision additional storage on standalone servers outside the chassis. With the Dell EMC PowerEdge MX, your IT admins could focus on ensuring that the capabilities of your data center keep up with the growth of your business. ——— 1 Dell EMC, accessed November 16, 2018, https://www.dellemc.com/en-us/servers/modular-infrastructure.htm#compare0=0 2 Dell EMC, “OpenManage Enterprise,” accessed January 9, 2019, https://www.dell.com/en-us/work/learn/openmanage-enterprise 3 Dell EMC, “OpenManage Enterprise,” accessed January 9, 2019, https://www.dell.com/en-us/work/learn/openmanage-enterprise 4 Dell EMC, “OpenManage Enterprise,” accessed January 9, 2019, https://www.dell.com/en-us/work/learn/openmanage-enterprise 5 Hormuth, Robert, “Kinetic Infrastructure is the Path to Full Composability,” accessed January 9, 2019, https://blog.dellemc.com/en-us/ making-composability-kinetic/ 6 Hormuth, Robert, “Kinetic Infrastructure is the Path to Full Composability,” accessed January 9, 2019, https://blog.dellemc.com/en-us/ making-composability-kinetic/ To find out more about Dell EMC PowerEdge MX, visit https://www.dellemc.com/en-us/servers/modular-infrastructure.htm Save IT admin time with the Dell EMC PowerEdge MX platform and OpenManage Enterprise January 2019 | 8
- 9. We concluded our hands-on testing on December 19, 2018. During testing, we determined the appropriate hardware and software configurations and applied updates as they became available. The results in this report reflect configurations that we finalized on December 19, 2018 or earlier. Unavoidably, these configurations may not represent the latest versions available when this report appears. Our results The table below presents our findings in detail. Admin time (min:sec) Dell EMC win Steps Dell EMC win Use case Dell EMC PowerEdge MX Cisco UCS % Less time Dell EMC PowerEdge MX Cisco UCS Fewer steps Deploying a server node (first single instance) 0:02:18 0:04:12 45.24 12 17 5 Deploying a server node (subsequent single instance) 0:00:43 0:03:04 76.63 9 10 1 Deploying a server node (subsequent multiple instances (x3)) 0:00:48 0:09:12 91.30 9 30 21 Provisioning assignable storage 0:01:37 N/A - Cisco UCS did not provide in- chassis storage N/A 5 N/A N/A Updating firmware (first single instance) 0:01:42 0:06:32 73.98 10 29 19 Updating firmware (subsequent single instance) 0:01:28 0:00:18 N/A 6 6 0 Updating firmware (subsequent multiple instances (x3)) 0:01:30 0:00:54 N/A 6 18 12 Implementing VMware vSAN™ 0:06:46 0:51:15 86.80 36 96 59 System configuration information The table below presents detailed information on the systems we tested. Server enclosure configuration information Dell EMC PowerEdge MX7000 Power supplies Number of power supplies 6 Vendor and model number Dell EMC Wattage of each (W) 3,000 Cooling fans Vendor and model Dell EMC Number of cooling fans 9 A Principled Technologies report: Hands-on testing. Real-world results. Save IT admin time with the Dell EMC PowerEdge MX platform and OpenManage Enterprise January 2019 | 9
- 10. Server enclosure configuration information Dell EMC PowerEdge MX7000 I/O modules Model Dell EMC Networking MX7116n Fabric Expander Module, MX9116n Fabric Engine Occupied bay 1, 2 Server configuration information Dell EMC PowerEdge MX740c BIOS name and version Dell 1.0.2 Non-default BIOS settings None Operating system name and version/build Dell EMC-VMware ESXi™ 6.7 build-8169922(A01) Date of last OS updates and patches applied 12/12/18 Power management Default General Number of processor packages 2 Number of cores per processor 26 Number of hardware threads per core 52 System power management policy Default Processor Vendor and model Intel Xeon Platinum 8164 Processor Stepping H0 (QMS8, SR3BB) Socket type FCLGA3647 Core frequency (GHz) 2.0 Bus speed 10.4 GT/s UPI L1 cache 26 x 32 KB 8-way set associative instruction caches 26 x 32 KB 8-way set associative data caches L2 cache 26 x 1 MB 16-way set associative caches L3 cache 35.75 MB non-inclusive shared cache Platform Vendor and model number PowerEdge MX740c Motherboard model number 0177V9X30 Memory module(s) Total RAM in system (GB) 384 Vendor and model number Hynix HMA84GR7AFR4N-VK Type DDR4 Speed (MHz) 2,666 Speed running in the system (MHz) 2,666 Size (GB) 32 Number of RAM module(s) 12 Save IT admin time with the Dell EMC PowerEdge MX platform and OpenManage Enterprise January 2019 | 10
- 11. Server configuration information Dell EMC PowerEdge MX740c RAID controller Vendor and model number Dell PERC H730P MX Firmware version 25.5.3.0005 Cluster storage Number of drives 6 Drive vendor and model Samsung Express Flash PM1725a Drive size (TB) 3.2 Drive information (speed, interface, type) PCIe SSD NIC Vendor and model number QLogic 2x16Gb QME2692 FC HBA Server enclosure configuration information Cisco UCS 5108 blade server chassis Power supplies Number of power supplies 4 Vendor and model number Cisco Systems Inc N20-PAC5-2500W Wattage of each (W) 2,500 Cooling fans Total number of fan modules 8 Vendor and model number Cisco Systems Inc N20-FAN5 I/O modules Model Cisco UCS 2304 Occupied bay 1, 2 Server configuration information Cisco UCS B200 M5 BIOS name and version Cisco B200 M5.4.0.1b.0.0911180940 Non-default BIOS settings None Operating system name and version/build Vmware ESXi 6.7 build-8169922 Date of last OS updates and patches applied 12/6/18 Power management Default General Number of processor packages 2 Number of cores per processor 26 Number of hardware threads per core 52 System power management policy Default Save IT admin time with the Dell EMC PowerEdge MX platform and OpenManage Enterprise January 2019 | 11
- 12. Server configuration information Cisco UCS B200 M5 Processor Vendor Intel Xeon Platinum 8164 Stepping H0 (QMS8, SR3BB) Socket type FCLGA3647 Core frequency (GHz) 2.0 Bus speed 10.4 GT/s UPI L1 cache 26 x 32 KB 8-way set associative instruction caches 26 x 32 KB 8-way set associative data caches L2 cache 26 x 256 KB 16-way set associative caches L3 cache 35.75 MB non-inclusive shared cache Platform Vendor and model number Cisco UCS B200 M5 Motherboard model number UCSB-B200-M5 Memory module(s) Total RAM in system (GB) 384 Vendor and model number UCS-MR-X32G2RS-H Type DDR4 Speed (MHz) 2,666 Speed running in the system (MHz) 2,666 Size (GB) 32 Number of RAM module(s) 12 RAID controller Vendor and model number Cisco UCSB-LSTOR-PT Firmware version 3.2(3I)B Cluster storage Number of drives 2 Drive vendor and model HGST HUSMR7632BDP301 / HUSMR7680BDP301 Drive size (GB) 3200/800 Drive information (speed, interface, type) Intel NVMe™ SSD Server configuration information Cisco UCS B200 M4 BIOS name and version Cisco B200 M4.3.2.3c.0.0522181723 Non-default BIOS settings None Operating system name and version/build Vmware ESXi 6.7 build-8169922 Date of last OS updates and patches applied 12/6/18 Power management Default Save IT admin time with the Dell EMC PowerEdge MX platform and OpenManage Enterprise January 2019 | 12
- 13. Server configuration information Cisco UCS B200 M4 General Number of processor packages 2 Number of cores per processor 14 Number of hardware threads per core 28 System power management policy Default Processor Vendor and model Intel Xeon E5-2690 v4 Stepping M0 (QK8X, SR2N2) Socket type FCLGA2011-3 Core frequency (GHz) 2.60 Bus speed 9.6 GT/s QPI L1 cache 14 x 32 KB 8-way set associative instruction caches 14 x 32 KB 8-way set associative data caches L2 cache 14 x 256 KB 16-way set associative caches L3 cache 35 MB 20-way set associative shared cache Platform Vendor and model number Cisco UCS B200 M4 Motherboard model number UCSB-B200-M4 Memory module(s) Total RAM in system (GB) 128 Vendor and model number UCS-MR-1X162RU-A Type DDR4 Speed (MHz) 2,133 Speed running in the system (MHz) 2,133 Size (GB) 16 Number of RAM module(s) 8 RAID controller Vendor and model number Cisco UCSB-MRAID12G Firmware version 24.5.0-0041 Cluster storage Number of drives 2 Drive vendor and model Intel SSDSC2BA40 Drive size (GB) 400 Drive information (speed, interface, type) SSD Save IT admin time with the Dell EMC PowerEdge MX platform and OpenManage Enterprise January 2019 | 13
- 14. Server configuration information Cisco UCS C240 M4SX BIOS name and version Cisco C240M4.4.0.1c.0.0711181612 Non-default BIOS settings None Operating system name and version/build Vmware ESXi 6.7 buid-8169922 Date of last OS updates and patches applied 12/6/18 Power management Default General Number of processor packages 2 Number of cores per processor 10 Number of hardware threads per core 20 System power management policy Default Processor Vendor and model Intel Xeon E5-2640 v4 Stepping R Socket type FCLGA2011-3 Core frequency (GHz) 2.40 Bus speed 8 GT/s QPI L1 cache 10 x 32 KB 8-way set associative instruction caches 10 x 32 KB 8-way set associative data caches L2 cache 10 x 256 KB 8-way set associative caches L3 cache 25 MB 20-way set associative shared caches Platform Vendor and model number Cisco UCS C240 M4SX Motherboard model number UCSC-C240-M4SX Memory module(s) Total RAM in system (GB) 128 Vendor and model number Hynix HMA42GR7AFR4N-TF Type DDR4 Speed (MHz) 2,133 Speed running in the system (MHz) 2,133 Size (GB) 16 Number of RAM module(s) 8 Save IT admin time with the Dell EMC PowerEdge MX platform and OpenManage Enterprise January 2019 | 14
- 15. Server configuration information Cisco UCS C240 M4SX RAID controller Vendor and model number Cisco UCSB-MRAID12G Firmware version 24.5.0-0041 Cluster storage Number of drives 5 Drive vendor and model Seagate ST300MM0006 / Samsung MZ7GE960 / Intel SSDSC2BA20 Drive size (GB) 300/960/200 Drive information (speed, interface, type) HDD/SDD/SSD Save IT admin time with the Dell EMC PowerEdge MX platform and OpenManage Enterprise January 2019 | 15
- 16. How we tested Dell EMC PowerEdge MX Use case 1a: Deploying an MX740c server node using OpenManage Enterprise (first single instance) 1. From the home screen, select ConfigurationDeploy. 2. Click Create template drop-down, and select From Reference Device. 3. Name the Template Name, verify the Clone Reference Server radio button is selected, and click Next. 4. On the reference device, select the server to clone, leave all elements selected, and click Finish. 5. Select the template you created, and click Edit Network. 6. In the Identity Pool drop-down menu, select the desired identity pool, and click Finish. 7. Return to the Configuration screen, and select Deploy template. 8. On the target option, select the device, and click OK. 9. Click Next. 10. Check the Boot to Network ISO. Input the ISO path and the IP Address where the file is located. Click Next. 11. In iDRAC Management IP, click Next. 12. In NIC configuration, click Assigned identity. Click Finish. Total steps: 12 Use case 1b: Deploying an MX740c server node using OpenManage Enterprise (subsequent single instance) 1. From the home screen, select ConfigurationDeploy. 2. Select the template you created, and click Edit Network. 3. In the Identity Pool drop-down menu, select the desired identity pool, and click Finish. 4. Return to the Configuration screen, and select Deploy template. 5. On the target option, select the device, and click OK. 6. Click Next. 7. Check the Boot to Network ISO. Input the ISO path and the IP Address where the file is located. Click Next. 8. In iDRAC Management IP, click Next. 9. In NIC configuration, click Assigned identity. Click Finish. Total steps: 9 Use case 1c: Deploying multiple MX740c server nodes using OpenManage Enterprise (subsequent multiple instances (x3)) 1. From the home screen, select ConfigurationDeploy. 2. Select the template you created, and click Edit Network. 3. In the Identity Pool drop-down menu, select the desired identity pool, and click Finish. 4. Return to the Configuration screen, and select Deploy template. 5. On the target option, select the device, and click OK. 6. Click Next. 7. Check the Boot to Network ISO. Input the ISO path and the IP Address where the file is located. Click Next. 8. In iDRAC Management IP, click Next. 9. In NIC configuration, click Assigned identity. Click Finish. Total steps: 9 Use case 2: Provisioning assignable storage 1. From the OpenManage Enterprise Modular homepage, select DevicesStorage. 2. Check the box beside the entry for Storage Sled 5, and click View Details. 3. Click Edit Assignments. 4. If not selected, click Drive - Assigned radio button. In the list of hard drives, check the desired hard drive and click Assign to Drive Slot. 5. Select the desired slot and server to assign the drive to, and click Assign. Total steps: 5 Save IT admin time with the Dell EMC PowerEdge MX platform and OpenManage Enterprise January 2019 | 16
- 17. Use case 3a: Updating firmware in OpenManage Enterprise (first single instance) 1. From the OpenManage Enterprise homepage, click ConfigurationFirmware. 2. On the Firmware tab, select Create Baseline. 3. In the Baseline Information dialog box, enter a name for the baseline, and click Add. 4. In the Add Firmware catalog, enter a name, select Latest component firmware versions on Dell.com, and click Finish. 5. On the Create Firmware Baseline dialog box, click Next. 6. On Select Devices, click the Select Groups radio button, and click Select Groups. 7. On the Select Groups page, click Servers, and click Finish. 8. When the compliance check has completed, click View Report. 9. Check the box beside any non-compliant node(s). Click Update Firmware. 10. Select Update Now. Click Update. Total steps: 10 Use case 3b: Updating firmware in OpenManage Enterprise (subsequent single instance) 1. From the OpenManage Enterprise homepage, click ConfigurationFirmware. 2. On the Firmware tab, select the previously created baseline. 3. Click Check Compliance. 4. When the compliance check has completed, click View Report. 5. Check the box beside any non-compliant node(s). Click Update Firmware. 6. Select Update Now. Click Update. Total steps: 6 Use case 3c: Updating firmware in OpenManage Enterprise (subsequent multiple instances) 1. From the OpenManage Enterprise homepage, click ConfigurationFirmware. 2. On the Firmware tab, select the previously created baseline. 3. Click Check Compliance. 4. When the compliance check has completed, click View Report. 5. Check the box beside any non-compliant node(s). Click Update Firmware. 6. Select Update Now. Click Update. Total steps: 6 Use case 4: Implementing VMware vSAN Setting up VMware vSAN 1. In vCenter, right-click the VMware datacenter, and select New Cluster. 2. In the Name text box, type a name for the cluster. 3. Turn on DRS, and keep vSphere HA and EVC in the default settings. 4. Click OK. The cluster will appear in the inventory. 5. To add a host to the vSAN cluster, click and drag it into the newly created cluster. 6. Right-click the host in the VSAN cluster, and select Add Networking 7. On Select connection type, select VMkernel Network Adapter, and click Next. 8. On Select target device, select an existing standard switch, and click Browse. On Select Switch, select the vSwitch, and click OK. 9. Click Next. 10. On Port properties, enable vMotion, Fault Tolerance logging, and vSAN for services, and click Next. 11. On IPv4 settings, keep default settings, and click Next. 12. On the Ready to complete page, review the information, and click finish. Repeat steps 5 through 12 for the next two hosts (16 steps). 13. In the vSphere Client, navigate to the VSAN cluster. 14. Click the Configure tab. 15. Under vSAN, select Services, and click the Configure button. 16. Select the configuration type, and keep the default settings. 17. On the Services page, keep the default vSAN services, and click Next. 18. On the Claim disks page, select the disks for use by the cluster, and click Next. 19. On the Fault domains page, click Next. 20. On the Ready to complete page, review settings, and click Finish. Total steps: 36 Save IT admin time with the Dell EMC PowerEdge MX platform and OpenManage Enterprise January 2019 | 17
- 18. Cisco UCS Use case 1a: Deploying a Cisco UCS B200 M4 server node (first single instance) Creating a template 1. In the Navigation pane, click Servers. 2. Expand ServersService Profile Templatesroot node. 3. Right-click the organization, and choose Create Service Profile Template. 4. In the Identify Service Profile Template panel, specify the service profile Name, Type, and UUID Assignment, and click Next. 5. In the Storage Provisioning panel, click the Local Disk Configuration Policy tab, and click Create Local Disk Configuration Policy. 6. Set a name for the Local Disk Configuration Policy. Select Any Configuration for the mode, and click OK. 7. Click finish on the Create Service Profile Template. Creating a profile 8. In UCS Manager, right-click the Service profile template you just created, and click Create service profiles from template. 9. Once the Create service profiles from template window opens, enter the following values, and click OK: a. Name Prefix = node b. Name Suffix starting = 1 c. Number of instances = 1 10. Under ServersService Profiles, select the newly created service profile named node1, right-click, and select Change service profile association. 11. In the Associate service profile dialog box, click the drop-down menu, select the existing server, click the appropriate blade, and click OK. 12. To confirm the profile association, click OK. 13. To confirm the pending reboot, click OK. 14. At the top of the left-hand icon menu, click the Equipment icon. 15. Expand ChassisServers and right-click on the target server. Open a KVM session by clicking KVM Console. 16. Click the Mount Virtual Media, select Activate virtual media, and accept the session warnings. 17. Select CD/DVD, browse to the location of the vSphere install media, and click Map device. Total steps: 17 Use case 1b: Deploying a Cisco UCS B200 M4 server node (subsequent single instance) Creating a profile 1. In UCS Manager, right-click the Service profile template you just created, and click Create service profiles from template. 2. Once the Create service profiles from template window opens, enter the following values, and click OK: a. NamePrefix = node b. Name Suffix starting = 1 c. Number of instances = 1 3. Under ServersService Profiles, select the newly created service profile named node1, right-click, and select Change service profile association. 4. In the Associate service profile dialog box, click the drop-down menu, select the existing server, click the appropriate blade, and click OK. 5. To confirm the profile association, click OK. 6. To confirm the pending reboot, click OK. 7. At the top of the left-hand icon menu, click the Equipment icon. 8. Expand ChassisServers and right-click on the target server. Open a KVM session by clicking KVM Console. 9. Click the Mount Virtual Media, select Activate virtual media, and accept the session warnings. 10. Select CD/DVD, browse to the location of the vSphere install media, and click Map device. Total steps: 10 Save IT admin time with the Dell EMC PowerEdge MX platform and OpenManage Enterprise January 2019 | 18
- 19. Use case 1c: Deploying a Cisco UCS B200 M4 server node (subsequent multiple instances (x3)) Creating a profile 1. In UCS Manager, right-click the Service profile template you just created, and click Create service profiles from template. 2. Once the Create service profiles from template window opens, enter the following values, and click OK: a. NamePrefix = node b. Name Suffix starting = 1 c. Number of instances = 1 3. Under ServersService Profiles, select the newly created service profile named node1, right-click, and select Change service profile association. 4. In the Associate service profile dialog box, click the drop-down menu, select the existing server, click the appropriate blade, and click OK. 5. To confirm the profile association, click OK. 6. To confirm the pending reboot, click OK. 7. At the top of the left-hand icon menu, click the Equipment icon. 8. Expand ChassisServers and right-click on the target server. Open a KVM session by clicking KVM Console. 9. Click the Mount Virtual Media, select Activate virtual media, and accept the session warnings. 10. Select CD/DVD, browse to the location of the vSphere install media, and click Map device. Repeat steps 1 through 10 two more times. Total steps: 30 Use case 3a: Updating firmware (first single instance) 1. In a web browser, navigate to Cisco.com. 2. Under Support, click All Downloads. 3. In the center pane, click Servers - Unified Computing. 4. If prompted, enter your Cisco.com username and password to log in (this is free to acquire). 5. In the right-hand pane, click the link for the Cisco UCS B-Series Blade Server Software Bundle. 6. On the first page from which you download a software bundle, to download the latest version of the Release notes, click the Release Notes link. 7. For each software bundle, do the following: a. Click the link for the latest software bundle for the release you want to download. b. Click Download now to download the software bundle immediately. c. Follow the prompts to complete your download of the software bundles. 8. Read the Release Notes before upgrading your Cisco UCS domain. Uploading firmware to UCS Manager 9. In the Navigation pane, click Equipment, and select the Equipment menu item. 10. In the Work pane, click the Firmware Management tab. 11. Click the Installed Firmware tab. 12. Click Download Firmware. 13. In the Download Firmware dialog box, in the Location of the Image Files field, click the Local File system radio button. 14. In the Filename field, type the full path and name of image file, or click Browse and navigate to the file. Click OK. Creating a host firmware package 15. In the Navigation pane, click Servers. 16. Expand ServersPolicies. 17. Expand the root node. 18. Select Host Firmware Packages, right-click, and choose Create Host Firmware Package. 19. Provide the following information: a. Enter unique name and description. b. In the How would you like to configure the Host Firmware Package field, select the Simple radio button. c. Select the firmware package from the Blade Package drop-down list. d. In the Excluded Components area, check the check boxes corresponding to the components that you want to exclude from the host firmware package. e. Click OK. Save IT admin time with the Dell EMC PowerEdge MX platform and OpenManage Enterprise January 2019 | 19
- 20. Assigning a backup package 20. In the Navigation pane, expand ServersPoliciesrootHost Firmware Packages, and choose the policy you want to update. 21. In the Work pane, to select a backup package, click Modify Backup Package Versions. 22. In the Blade Package drop-down list, select the package and click OK. 23. To confirm success, click OK. Adding firmware packages to an existing service profile 24. In the Navigation pane, expand ServersService Profilesroot. 25. Click the service profile to which you want to add the firmware packages. 26. In the Work pane, click the Policies tab. 27. To expand the Firmware Policies section, click the plus sign. 28. To add a host firmware package, select the desired policy from the Host Firmware drop-down list. 29. Click Save Changes. Total steps: 29 Use case 3b: Updating firmware (subsequent single instance) Adding firmware packages to an existing service profile 1. In the Navigation pane, expand ServersService Profilesroot. 2. Click the service profile to which you want to add the firmware packages. 3. In the Work pane, click the Policies tab. 4. To expand the Firmware Policies section, click the plus sign. 5. To add a host firmware package, select the desired policy from the Host Firmware drop-down list. 6. Click Save Changes. Total steps: 6 Use case 3c: Updating firmware (subsequent multiple instances (x3)) Adding firmware packages to an existing service profile 1. In the Navigation pane, expand ServersService Profilesroot. 2. Click the service profile to which you want to add the firmware packages. 3. In the Work pane, click the Policies tab. 4. To expand the Firmware Policies section, click the plus sign. 5. To add a host firmware package, select the desired policy from the Host Firmware drop-down list. 6. Click Save Changes. Repeat steps 1-6 two more times. Total steps: 18 Use case 4: Implementing vSAN Setting up vSAN 1. Click equipmentServer1, and select Change service profile association. 2. At the Associate Service Profile dialog box for each server, click Existing server, and select the appropriate rack server. 3. Click equipmentServer2, and select Change service profile association. 4. At the Associate Service Profile dialog box for each server, click Existing server, and select the appropriate rack server. 5. Click equipmentServer3, and select Change service profile association. 6. At the Associate Service Profile dialog box for each server, click Existing server, and select the appropriate rack server. 7. In UCS Manager, click Serversserver(x). Open KVM and Virtual media, and map/mount the ESXi media. 8. To begin installation, press Enter. 9. Once the welcome screen appears, press Enter. 10. At the EULA screen, to accept, press F11. 11. To install vSphere OS, select a disk, and press Enter. 12. For the keyboard layout, select US Default, and press Enter. 13. Enter a root password, confirm it, and press Enter. 14. To confirm the installation, press F11. 15. Select Remove the installation disk before rebooting. To reboot when complete, press Enter. 16. In vCenter, select the datacenter, right-click, and select Add host. Save IT admin time with the Dell EMC PowerEdge MX platform and OpenManage Enterprise January 2019 | 20
- 21. Principled Technologies is a registered trademark of Principled Technologies, Inc. All other product names are the trademarks of their respective owners. DISCLAIMER OF WARRANTIES; LIMITATION OF LIABILITY: Principled Technologies, Inc. has made reasonable efforts to ensure the accuracy and validity of its testing, however, Principled Technologies, Inc. specifically disclaims any warranty, expressed or implied, relating to the test results and analysis, their accuracy, completeness or quality, including any implied warranty of fitness for any particular purpose. All persons or entities relying on the results of any testing do so at their own risk, and agree that Principled Technologies, Inc., its employees and its subcontractors shall have no liability whatsoever from any claim of loss or damage on account of any alleged error or defect in any testing procedure or result. In no event shall Principled Technologies, Inc. be liable for indirect, special, incidental, or consequential damages in connection with its testing, even if advised of the possibility of such damages. In no event shall Principled Technologies, Inc.’s liability, including for direct damages, exceed the amounts paid in connection with Principled Technologies, Inc.’s testing. Customer’s sole and exclusive remedies are as set forth herein. This project was commissioned by Dell EMC. 17. For Name and location, input the IP address of the host, and click Next. 18. For Connection settings, enter the login credentials for the host, and click Next. 19. For the Security Alert pop-up, click Yes. 20. On the Host summary screen, verify the info, and click Next. 21. At the Assign License screen, select the appropriate license, and click Next. 22. For Lockdown mode, keep the default option of Disabled, and click Next. 23. For Resource Pool, keep the default settings, and click Next. 24. At the Ready to complete screen, review and click Finish. 25. Right-click the host and select Add Networking 26. At Select connection type, select VMkernel Network Adapter, and click Next. 27. At Select target device, select an existing standard switch, and click Browse. 28. At Select switch, select the vSwitch, and click OK. 29. Click Next. 30. On Port properties, enable vMotion, Fault Tolerance logging, Management, and vSAN for services, and click Next. 31. On IPv4 settings, keep default settings, and click Next. 32. On the Ready to complete page, review the info, and click Finish. Repeat steps 7 through 32 for the other two hosts (50 steps). 33. In vCenter, right-click the VMware datacenter, and select New Cluster. 34. In the Name text box, type a name for the cluster. 35. Turn on DRS, and keep vSphere HA and EVC in the default settings. 36. Click OK. The cluster will appear in the inventory. 37. To add each host to the vSAN cluster, click and drag it into the newly created cluster. 38. In the vSphere Client, navigate to the vSAN cluster. 39. Click the Configure tab. 40. Under vSAN, select Services, and click Configure. 41. Select the configuration type, and keep the default settings 42. On the Services page, keep the default vSAN services, and click Next. 43. On the Claim disks page, select the disks for use by the cluster, and click Next. 44. On the Fault domains page, click Next. 45. On the Ready to complete page, review settings, and click Finish Total steps: 95 Save IT admin time with the Dell EMC PowerEdge MX platform and OpenManage Enterprise January 2019 | 21