SlideShare a Scribd company logo
1 of 4
Download to read offline
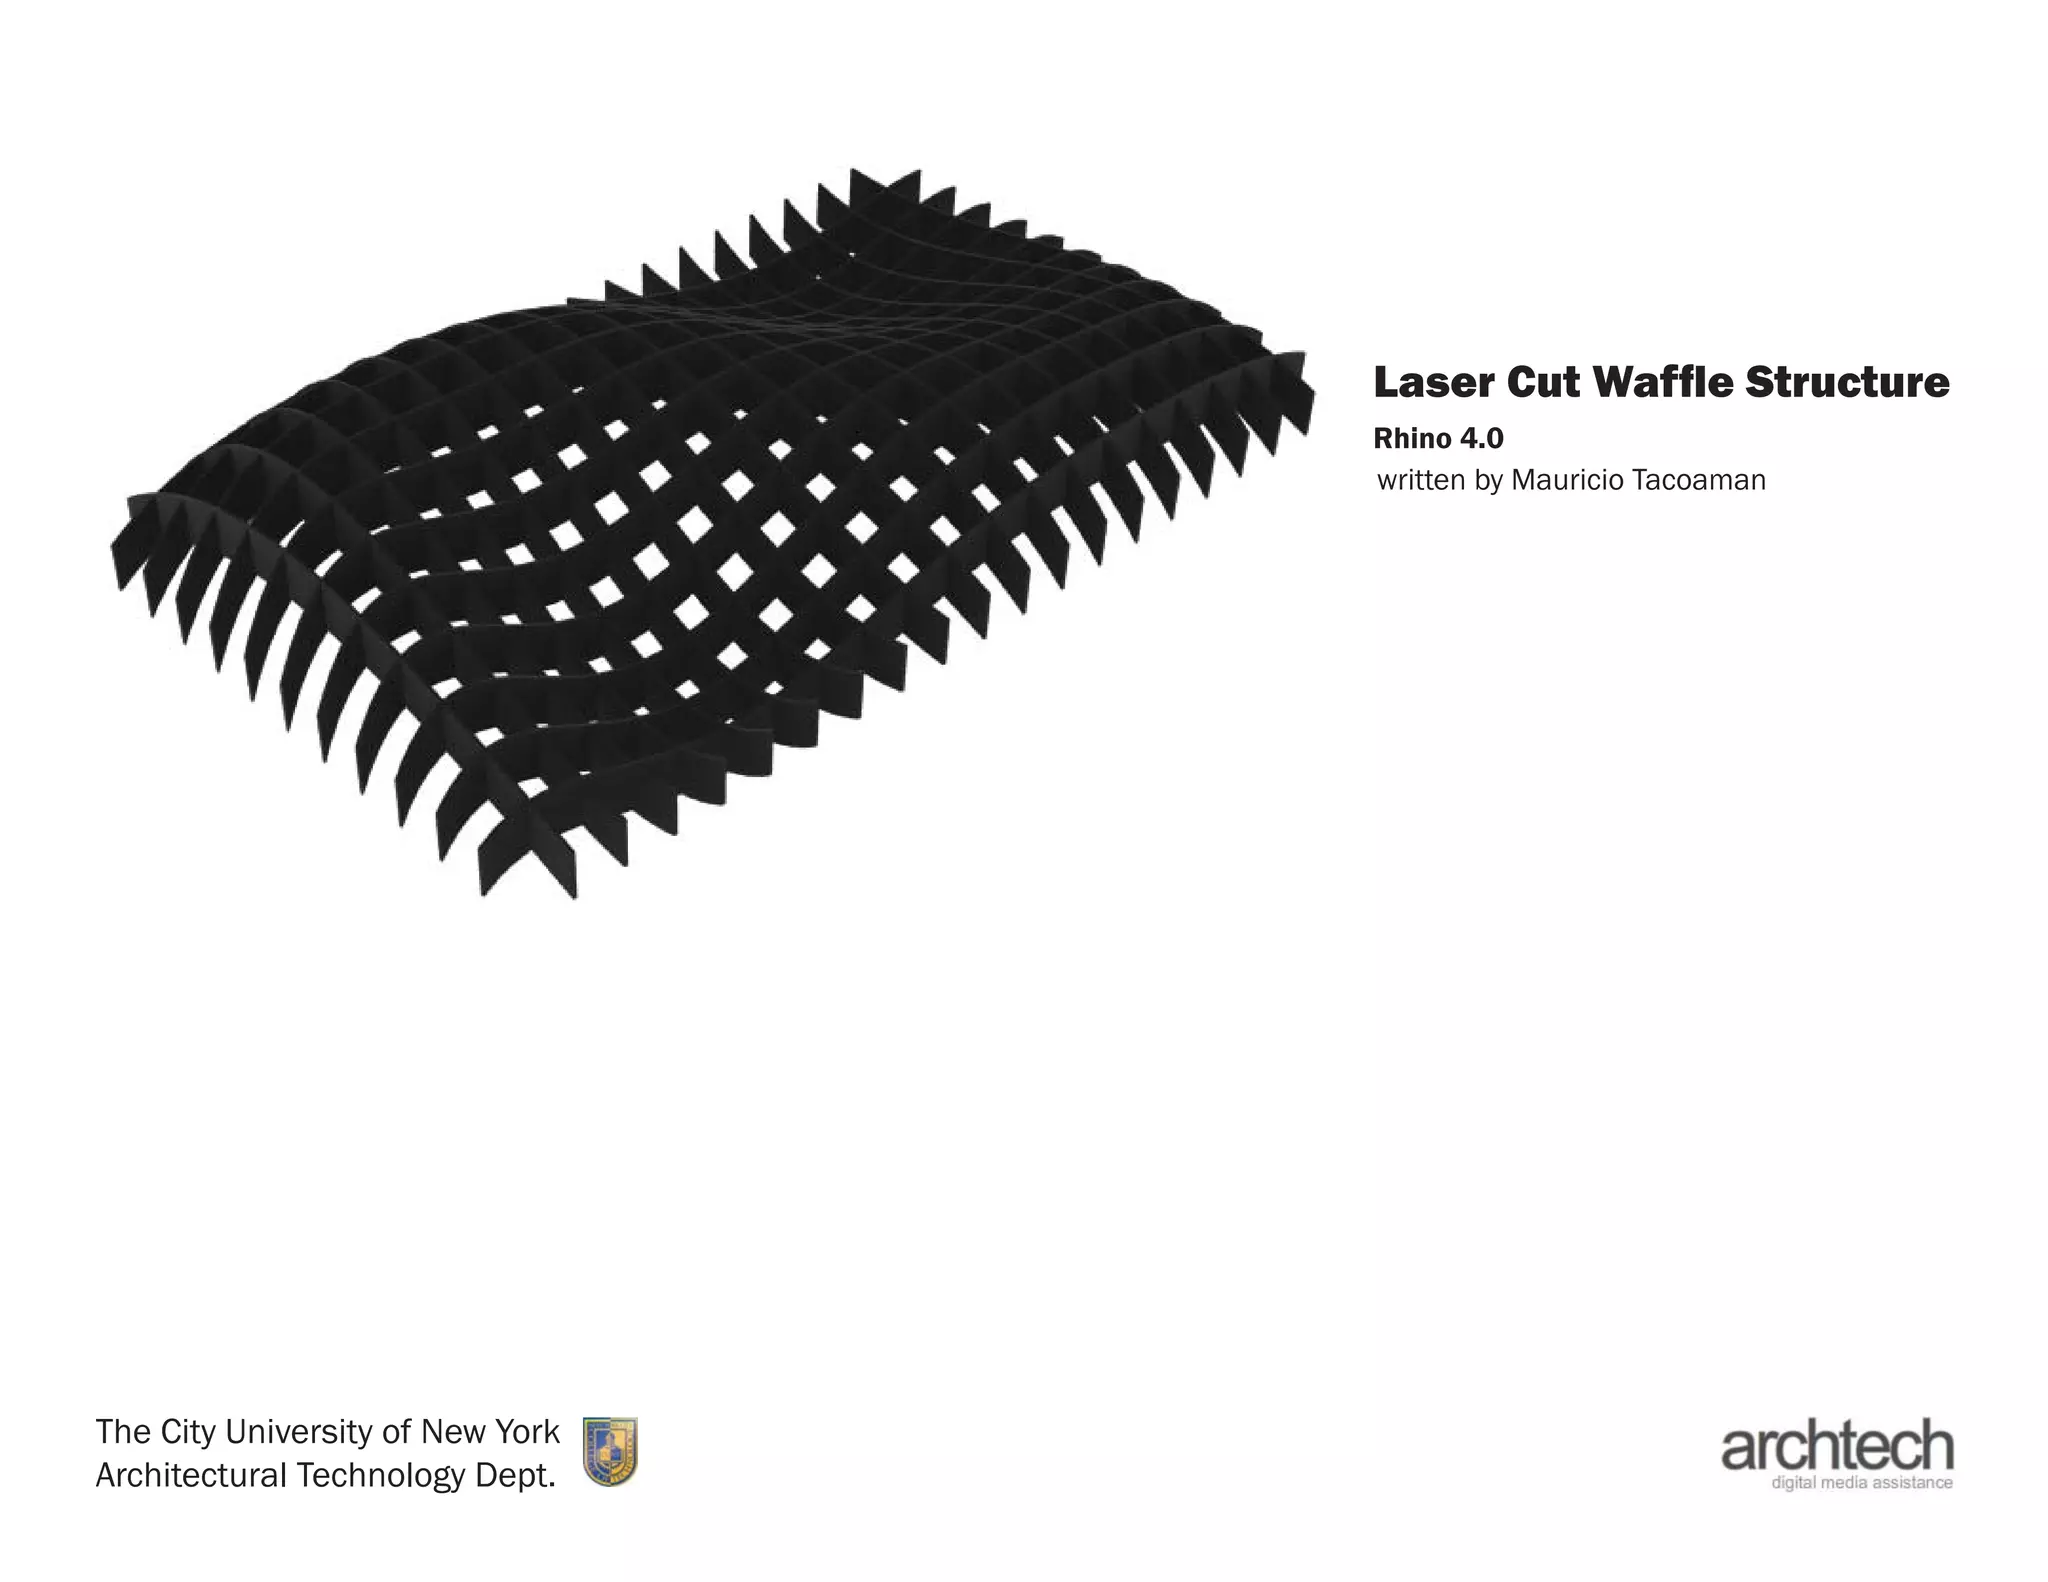
Laser Cut Waffle Structure
                                  Rhino 4.0
                                  written by Mauricio Tacoaman


The City University of New York
Architectural Technology Dept.
Step One:
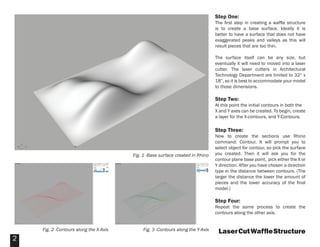
                                                                                 The first step in creating a waffle structure
                                                                                 is to create a base surface. Ideally it is
                                                                                 better to have a surface that does not have
                                                                                 exaggerated peaks and valleys as this will
                                                                                 result pieces that are too thin.

                                                                                 The surface itself can be any size, but
                                                                                 eventually it will need to moved into a laser
                                                                                 cutter. The laser cutters in Architectural
                                                                                 Technology Department are limited to 32” x
                                                                                 18”, so it is best to accommodate your model
                                                                                 to those dimensions.

                                                                                 Step Two:
                                                                                 At this point the initial contours in both the
                                                                                 X and Y axes can be created. To begin, create
                                                                                 a layer for the X-contours, and Y-Contours.

                                                                                 Step Three:
                                                                                 Now to create the sections use Rhino
                                                                                 command: Contour. It will prompt you to
                                                                                 select object for contour, so pick the surface
                                        Fig. 1 -Base surface created in Rhino    you created. Then it will ask you for the
                                                                                 contour plane base point, pick either the X or
                                                                                 Y direction. After you have chosen a direction
                                                                                 type in the distance between contours. (The
                                                                                 larger the distance the lower the amount of
                                                                                 pieces and the lower accuracy of the final
                                                                                 model.)

                                                                                 Step Four:
                                                                                 Repeat the same process to create the
                                                                                 contours along the other axis.


    Fig. 2 -Contours along the X-Axis        Fig. 3 -Contours along the Y-Axis    Laser Cut Waffle Structure
2
Step Five:
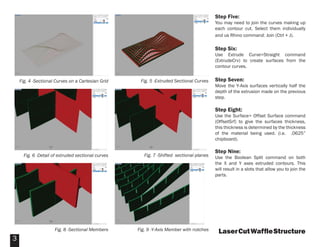
                                                                                          You may need to join the curves making up
                                                                                          each contour cut. Select them individually
                                                                                          and us Rhino command: Join (Ctrl + J).

                                                                                          Step Six:
                                                                                          Use Extrude Curve>Straight command
                                                                                          (ExtrudeCrv) to create surfaces from the
                                                                                          contour curves.


    Fig. 4 -Sectional Curves on a Cartesian Grid     Fig. 5 -Extruded Sectional Curves    Step Seven:
                                                                                          Move the Y-Axis surfaces vertically half the
                                                                                          depth of the extrusion made on the previous
                                                                                          step.

                                                                                          Step Eight:
                                                                                          Use the Surface> Offset Surface command
                                                                                          (OffsetSrf) to give the surfaces thickness,
                                                                                          this thickness is determined by the thickness
                                                                                          of the material being used. (i.e. .0625”
                                                                                          chipboard).

                                                                                          Step Nine:
      Fig. 6 -Detail of extruded sectional curves      Fig. 7 -Shifted sectional planes   Use the Boolean Split command on both
                                                                                          the X and Y axes extruded contours. This
                                                                                          will result in a slots that allow you to join the
                                                                                          parts.


                     Fig. 8 -Sectional Members      Fig. 9 -Y-Axis Member with notches     Laser Cut Waffle Structure
3
Step Ten:
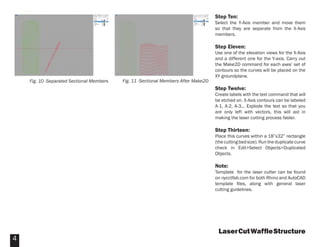
                                                                                     Select the Y-Axis member and move them
                                                                                     so that they are separate from the X-Axis
                                                                                     members.

                                                                                     Step Eleven:
                                                                                     Use one of the elevation views for the X-Axis
                                                                                     and a different one for the Y-axis. Carry out
                                                                                     the Make2D command for each axes’ set of
                                                                                     contours so the curves will be placed on the
                                                                                     XY groundplane.
    Fig. 10 -Separated Sectional Members   Fig. 11 -Sectional Members After Make2D
                                                                                     Step Twelve:
                                                                                     Create labels with the text command that will
                                                                                     be etched on. X-Axis contours can be labeled
                                                                                     A-1, A-2, A-3... Explode the text so that you
                                                                                     are only left with vectors, this will aid in
                                                                                     making the laser cutting process faster.

                                                                                     Step Thirteen:
                                                                                     Place this curves within a 18”x32” rectangle
                                                                                     (the cutting bed size). Run the duplicate curve
                                                                                     check in Edit>Select Objects>Duplicated
                                                                                     Objects.

                                                                                     Note:
                                                                                     Template for the laser cutter can be found
                                                                                     on nycctfab.com for both Rhino and AutoCAD
                                                                                     template files, along with general laser
                                                                                     cutting guidelines.


                                                                                      Laser Cut Waffle Structure
4

More Related Content

What's hot

Cable systems - form active structure system
Cable systems - form active structure systemCable systems - form active structure system
Cable systems - form active structure systemArchistudent Portal
 
Shanghai World Finance Center Structure System
Shanghai World Finance Center Structure System Shanghai World Finance Center Structure System
Shanghai World Finance Center Structure System kalpitarchitecture
 
Spaceframe and prefabrication
Spaceframe and prefabricationSpaceframe and prefabrication
Spaceframe and prefabricationkaiwan1996
 
Jinmao tower (11) siti yaumilia salsa
Jinmao tower (11) siti yaumilia salsaJinmao tower (11) siti yaumilia salsa
Jinmao tower (11) siti yaumilia salsasalsa moyara
 
Priyam sundial bridge
Priyam sundial bridgePriyam sundial bridge
Priyam sundial bridgeDhruv Seth
 
Frame Structures including sap2000
Frame Structures including sap2000Frame Structures including sap2000
Frame Structures including sap2000Wolfgang Schueller
 
Athen, Ga Plastic Surgery Of Athens Floor Plan
Athen, Ga   Plastic Surgery Of Athens  Floor PlanAthen, Ga   Plastic Surgery Of Athens  Floor Plan
Athen, Ga Plastic Surgery Of Athens Floor Planguest8bea3a
 
PORTAL FRAME- Structural systems
PORTAL FRAME- Structural systemsPORTAL FRAME- Structural systems
PORTAL FRAME- Structural systemsGrace Henry
 
Connection and Bracing
Connection and BracingConnection and Bracing
Connection and Bracingsuddal
 
Report on HIGH RISE
Report on HIGH RISE Report on HIGH RISE
Report on HIGH RISE Isratul Shaon
 
Precast elements
Precast elementsPrecast elements
Precast elementsShrividhyah
 

What's hot (20)

Cable systems - form active structure system
Cable systems - form active structure systemCable systems - form active structure system
Cable systems - form active structure system
 
Tube structures
Tube structuresTube structures
Tube structures
 
Chapter27
Chapter27Chapter27
Chapter27
 
Shanghai World Finance Center Structure System
Shanghai World Finance Center Structure System Shanghai World Finance Center Structure System
Shanghai World Finance Center Structure System
 
Spaceframe and prefabrication
Spaceframe and prefabricationSpaceframe and prefabrication
Spaceframe and prefabrication
 
Jinmao tower (11) siti yaumilia salsa
Jinmao tower (11) siti yaumilia salsaJinmao tower (11) siti yaumilia salsa
Jinmao tower (11) siti yaumilia salsa
 
Priyam sundial bridge
Priyam sundial bridgePriyam sundial bridge
Priyam sundial bridge
 
Tensile
TensileTensile
Tensile
 
Frame Structures including sap2000
Frame Structures including sap2000Frame Structures including sap2000
Frame Structures including sap2000
 
History of Prefabricated Houses
History of Prefabricated HousesHistory of Prefabricated Houses
History of Prefabricated Houses
 
Athen, Ga Plastic Surgery Of Athens Floor Plan
Athen, Ga   Plastic Surgery Of Athens  Floor PlanAthen, Ga   Plastic Surgery Of Athens  Floor Plan
Athen, Ga Plastic Surgery Of Athens Floor Plan
 
PORTAL FRAME- Structural systems
PORTAL FRAME- Structural systemsPORTAL FRAME- Structural systems
PORTAL FRAME- Structural systems
 
Thumb rules for placing column layout
Thumb rules for placing column layoutThumb rules for placing column layout
Thumb rules for placing column layout
 
4204740.ppt
4204740.ppt4204740.ppt
4204740.ppt
 
Connection and Bracing
Connection and BracingConnection and Bracing
Connection and Bracing
 
Space frame
Space frameSpace frame
Space frame
 
Spad
SpadSpad
Spad
 
Report on HIGH RISE
Report on HIGH RISE Report on HIGH RISE
Report on HIGH RISE
 
Project Taipei 101
Project Taipei 101Project Taipei 101
Project Taipei 101
 
Precast elements
Precast elementsPrecast elements
Precast elements
 

Viewers also liked

Rhino 3D Primer
Rhino 3D PrimerRhino 3D Primer
Rhino 3D PrimerNYCCTfab
 
Presentation Boards Primer
Presentation Boards PrimerPresentation Boards Primer
Presentation Boards PrimerNYCCTfab
 
VRay for Rhino Primer
VRay for Rhino PrimerVRay for Rhino Primer
VRay for Rhino PrimerNYCCTfab
 
3D Printing Primer
3D Printing Primer3D Printing Primer
3D Printing PrimerNYCCTfab
 
Adobe Photoshop I Primer
Adobe Photoshop I PrimerAdobe Photoshop I Primer
Adobe Photoshop I PrimerNYCCTfab
 
Adobe Photoshop II Primer
Adobe Photoshop II PrimerAdobe Photoshop II Primer
Adobe Photoshop II PrimerNYCCTfab
 
Laser Cutting Primer
Laser Cutting PrimerLaser Cutting Primer
Laser Cutting PrimerNYCCTfab
 
MakerBot Replicator 2x Primer
MakerBot Replicator 2x Primer MakerBot Replicator 2x Primer
MakerBot Replicator 2x Primer NYCCTfab
 
Adobe InDesign Primer
Adobe InDesign PrimerAdobe InDesign Primer
Adobe InDesign PrimerNYCCTfab
 
Adobe Illustrator CS6 Primer
Adobe Illustrator CS6 PrimerAdobe Illustrator CS6 Primer
Adobe Illustrator CS6 PrimerNYCCTfab
 
Revised Corporate Power Point 2010
Revised Corporate Power Point 2010Revised Corporate Power Point 2010
Revised Corporate Power Point 2010devinreffitt
 
Makerbot Replicator 2 Primer
Makerbot Replicator 2 PrimerMakerbot Replicator 2 Primer
Makerbot Replicator 2 PrimerNYCCTfab
 
Temperature and Light Logger (UA-002-64)
Temperature and Light Logger (UA-002-64)Temperature and Light Logger (UA-002-64)
Temperature and Light Logger (UA-002-64)NYCCTfab
 
RhinoCAM_RotaryPrimer_MachineSetup
RhinoCAM_RotaryPrimer_MachineSetupRhinoCAM_RotaryPrimer_MachineSetup
RhinoCAM_RotaryPrimer_MachineSetupNYCCTfab
 
RhinoCAM_RotaryPrimer_SoftMaterials
RhinoCAM_RotaryPrimer_SoftMaterialsRhinoCAM_RotaryPrimer_SoftMaterials
RhinoCAM_RotaryPrimer_SoftMaterialsNYCCTfab
 
Roland: 3-axis Set-Up Positional & Flip Milling
Roland: 3-axis Set-Up Positional & Flip MillingRoland: 3-axis Set-Up Positional & Flip Milling
Roland: 3-axis Set-Up Positional & Flip MillingNYCCTfab
 
Rhino cam 3xis_stock_setup
Rhino cam 3xis_stock_setupRhino cam 3xis_stock_setup
Rhino cam 3xis_stock_setupNYCCTfab
 
Roland 3-Axis Set-Up
Roland 3-Axis Set-UpRoland 3-Axis Set-Up
Roland 3-Axis Set-UpNYCCTfab
 
RhinoCAM_RotaryPrimer_DenseMaterials
RhinoCAM_RotaryPrimer_DenseMaterialsRhinoCAM_RotaryPrimer_DenseMaterials
RhinoCAM_RotaryPrimer_DenseMaterialsNYCCTfab
 
Silicone Mold Primer
Silicone Mold PrimerSilicone Mold Primer
Silicone Mold PrimerNYCCTfab
 

Viewers also liked (20)

Rhino 3D Primer
Rhino 3D PrimerRhino 3D Primer
Rhino 3D Primer
 
Presentation Boards Primer
Presentation Boards PrimerPresentation Boards Primer
Presentation Boards Primer
 
VRay for Rhino Primer
VRay for Rhino PrimerVRay for Rhino Primer
VRay for Rhino Primer
 
3D Printing Primer
3D Printing Primer3D Printing Primer
3D Printing Primer
 
Adobe Photoshop I Primer
Adobe Photoshop I PrimerAdobe Photoshop I Primer
Adobe Photoshop I Primer
 
Adobe Photoshop II Primer
Adobe Photoshop II PrimerAdobe Photoshop II Primer
Adobe Photoshop II Primer
 
Laser Cutting Primer
Laser Cutting PrimerLaser Cutting Primer
Laser Cutting Primer
 
MakerBot Replicator 2x Primer
MakerBot Replicator 2x Primer MakerBot Replicator 2x Primer
MakerBot Replicator 2x Primer
 
Adobe InDesign Primer
Adobe InDesign PrimerAdobe InDesign Primer
Adobe InDesign Primer
 
Adobe Illustrator CS6 Primer
Adobe Illustrator CS6 PrimerAdobe Illustrator CS6 Primer
Adobe Illustrator CS6 Primer
 
Revised Corporate Power Point 2010
Revised Corporate Power Point 2010Revised Corporate Power Point 2010
Revised Corporate Power Point 2010
 
Makerbot Replicator 2 Primer
Makerbot Replicator 2 PrimerMakerbot Replicator 2 Primer
Makerbot Replicator 2 Primer
 
Temperature and Light Logger (UA-002-64)
Temperature and Light Logger (UA-002-64)Temperature and Light Logger (UA-002-64)
Temperature and Light Logger (UA-002-64)
 
RhinoCAM_RotaryPrimer_MachineSetup
RhinoCAM_RotaryPrimer_MachineSetupRhinoCAM_RotaryPrimer_MachineSetup
RhinoCAM_RotaryPrimer_MachineSetup
 
RhinoCAM_RotaryPrimer_SoftMaterials
RhinoCAM_RotaryPrimer_SoftMaterialsRhinoCAM_RotaryPrimer_SoftMaterials
RhinoCAM_RotaryPrimer_SoftMaterials
 
Roland: 3-axis Set-Up Positional & Flip Milling
Roland: 3-axis Set-Up Positional & Flip MillingRoland: 3-axis Set-Up Positional & Flip Milling
Roland: 3-axis Set-Up Positional & Flip Milling
 
Rhino cam 3xis_stock_setup
Rhino cam 3xis_stock_setupRhino cam 3xis_stock_setup
Rhino cam 3xis_stock_setup
 
Roland 3-Axis Set-Up
Roland 3-Axis Set-UpRoland 3-Axis Set-Up
Roland 3-Axis Set-Up
 
RhinoCAM_RotaryPrimer_DenseMaterials
RhinoCAM_RotaryPrimer_DenseMaterialsRhinoCAM_RotaryPrimer_DenseMaterials
RhinoCAM_RotaryPrimer_DenseMaterials
 
Silicone Mold Primer
Silicone Mold PrimerSilicone Mold Primer
Silicone Mold Primer
 

Similar to Waffle Structure

Laser Cutting: Advanced Joinery
Laser Cutting: Advanced JoineryLaser Cutting: Advanced Joinery
Laser Cutting: Advanced JoineryNYCCTfab
 
1001bit pro user_guide
1001bit pro user_guide1001bit pro user_guide
1001bit pro user_guideArthur Chaves
 
Cadcam mid term report
Cadcam mid term reportCadcam mid term report
Cadcam mid term reportJose Olvera
 
Papercraft Pirámide
Papercraft PirámidePapercraft Pirámide
Papercraft PirámideGeohistoria23
 
14 zeros cubicintersection
14 zeros cubicintersection14 zeros cubicintersection
14 zeros cubicintersectionMedia4math
 
Introduction to Rhino
Introduction to RhinoIntroduction to Rhino
Introduction to RhinoNYCCTfab
 

Similar to Waffle Structure (6)

Laser Cutting: Advanced Joinery
Laser Cutting: Advanced JoineryLaser Cutting: Advanced Joinery
Laser Cutting: Advanced Joinery
 
1001bit pro user_guide
1001bit pro user_guide1001bit pro user_guide
1001bit pro user_guide
 
Cadcam mid term report
Cadcam mid term reportCadcam mid term report
Cadcam mid term report
 
Papercraft Pirámide
Papercraft PirámidePapercraft Pirámide
Papercraft Pirámide
 
14 zeros cubicintersection
14 zeros cubicintersection14 zeros cubicintersection
14 zeros cubicintersection
 
Introduction to Rhino
Introduction to RhinoIntroduction to Rhino
Introduction to Rhino
 

More from NYCCTfab

Fusion 360 Tutorial
Fusion 360 TutorialFusion 360 Tutorial
Fusion 360 TutorialNYCCTfab
 
Citytech HTML/CSS Guide
Citytech HTML/CSS GuideCitytech HTML/CSS Guide
Citytech HTML/CSS GuideNYCCTfab
 
Ultimaker 2+
Ultimaker 2+Ultimaker 2+
Ultimaker 2+NYCCTfab
 
Robot Studio
Robot StudioRobot Studio
Robot StudioNYCCTfab
 
Roland Primer 3D Scanner
Roland Primer 3D ScannerRoland Primer 3D Scanner
Roland Primer 3D ScannerNYCCTfab
 
Lighting with Photoshop
Lighting with PhotoshopLighting with Photoshop
Lighting with PhotoshopNYCCTfab
 
Fusion 360 Tutorial
Fusion 360 TutorialFusion 360 Tutorial
Fusion 360 TutorialNYCCTfab
 
Architectural diagrams
Architectural diagramsArchitectural diagrams
Architectural diagramsNYCCTfab
 
Advanced Techniques in Photoshop
Advanced Techniques in PhotoshopAdvanced Techniques in Photoshop
Advanced Techniques in PhotoshopNYCCTfab
 
Adobe Premiere Pro
Adobe Premiere ProAdobe Premiere Pro
Adobe Premiere ProNYCCTfab
 
VRay Lighting for Rhino
VRay Lighting for RhinoVRay Lighting for Rhino
VRay Lighting for RhinoNYCCTfab
 
Adobe Illustrator CC 2018
Adobe Illustrator CC 2018 Adobe Illustrator CC 2018
Adobe Illustrator CC 2018 NYCCTfab
 
Presentation Board Layout
Presentation Board Layout Presentation Board Layout
Presentation Board Layout NYCCTfab
 
CPD Dental Cam Primer
CPD Dental Cam PrimerCPD Dental Cam Primer
CPD Dental Cam PrimerNYCCTfab
 
Telaire CO2 Sensor (Tel-7001)
Telaire CO2 Sensor (Tel-7001)Telaire CO2 Sensor (Tel-7001)
Telaire CO2 Sensor (Tel-7001)NYCCTfab
 
UX90-002 Light & Occupancy Logger
UX90-002 Light & Occupancy LoggerUX90-002 Light & Occupancy Logger
UX90-002 Light & Occupancy LoggerNYCCTfab
 
Light Meter (LM-120)
Light Meter (LM-120)Light Meter (LM-120)
Light Meter (LM-120)NYCCTfab
 
Temperature and Relative Humidity Ext
Temperature and Relative Humidity ExtTemperature and Relative Humidity Ext
Temperature and Relative Humidity ExtNYCCTfab
 
Wall Mounted CO2 Meter (CO2-200)
Wall Mounted CO2 Meter (CO2-200)Wall Mounted CO2 Meter (CO2-200)
Wall Mounted CO2 Meter (CO2-200)NYCCTfab
 
Performance Module 13 State Data Logger
Performance Module 13 State Data LoggerPerformance Module 13 State Data Logger
Performance Module 13 State Data LoggerNYCCTfab
 

More from NYCCTfab (20)

Fusion 360 Tutorial
Fusion 360 TutorialFusion 360 Tutorial
Fusion 360 Tutorial
 
Citytech HTML/CSS Guide
Citytech HTML/CSS GuideCitytech HTML/CSS Guide
Citytech HTML/CSS Guide
 
Ultimaker 2+
Ultimaker 2+Ultimaker 2+
Ultimaker 2+
 
Robot Studio
Robot StudioRobot Studio
Robot Studio
 
Roland Primer 3D Scanner
Roland Primer 3D ScannerRoland Primer 3D Scanner
Roland Primer 3D Scanner
 
Lighting with Photoshop
Lighting with PhotoshopLighting with Photoshop
Lighting with Photoshop
 
Fusion 360 Tutorial
Fusion 360 TutorialFusion 360 Tutorial
Fusion 360 Tutorial
 
Architectural diagrams
Architectural diagramsArchitectural diagrams
Architectural diagrams
 
Advanced Techniques in Photoshop
Advanced Techniques in PhotoshopAdvanced Techniques in Photoshop
Advanced Techniques in Photoshop
 
Adobe Premiere Pro
Adobe Premiere ProAdobe Premiere Pro
Adobe Premiere Pro
 
VRay Lighting for Rhino
VRay Lighting for RhinoVRay Lighting for Rhino
VRay Lighting for Rhino
 
Adobe Illustrator CC 2018
Adobe Illustrator CC 2018 Adobe Illustrator CC 2018
Adobe Illustrator CC 2018
 
Presentation Board Layout
Presentation Board Layout Presentation Board Layout
Presentation Board Layout
 
CPD Dental Cam Primer
CPD Dental Cam PrimerCPD Dental Cam Primer
CPD Dental Cam Primer
 
Telaire CO2 Sensor (Tel-7001)
Telaire CO2 Sensor (Tel-7001)Telaire CO2 Sensor (Tel-7001)
Telaire CO2 Sensor (Tel-7001)
 
UX90-002 Light & Occupancy Logger
UX90-002 Light & Occupancy LoggerUX90-002 Light & Occupancy Logger
UX90-002 Light & Occupancy Logger
 
Light Meter (LM-120)
Light Meter (LM-120)Light Meter (LM-120)
Light Meter (LM-120)
 
Temperature and Relative Humidity Ext
Temperature and Relative Humidity ExtTemperature and Relative Humidity Ext
Temperature and Relative Humidity Ext
 
Wall Mounted CO2 Meter (CO2-200)
Wall Mounted CO2 Meter (CO2-200)Wall Mounted CO2 Meter (CO2-200)
Wall Mounted CO2 Meter (CO2-200)
 
Performance Module 13 State Data Logger
Performance Module 13 State Data LoggerPerformance Module 13 State Data Logger
Performance Module 13 State Data Logger
 

Waffle Structure

  • 1. Laser Cut Waffle Structure Rhino 4.0 written by Mauricio Tacoaman The City University of New York Architectural Technology Dept.
  • 2. Step One: The first step in creating a waffle structure is to create a base surface. Ideally it is better to have a surface that does not have exaggerated peaks and valleys as this will result pieces that are too thin. The surface itself can be any size, but eventually it will need to moved into a laser cutter. The laser cutters in Architectural Technology Department are limited to 32” x 18”, so it is best to accommodate your model to those dimensions. Step Two: At this point the initial contours in both the X and Y axes can be created. To begin, create a layer for the X-contours, and Y-Contours. Step Three: Now to create the sections use Rhino command: Contour. It will prompt you to select object for contour, so pick the surface Fig. 1 -Base surface created in Rhino you created. Then it will ask you for the contour plane base point, pick either the X or Y direction. After you have chosen a direction type in the distance between contours. (The larger the distance the lower the amount of pieces and the lower accuracy of the final model.) Step Four: Repeat the same process to create the contours along the other axis. Fig. 2 -Contours along the X-Axis Fig. 3 -Contours along the Y-Axis Laser Cut Waffle Structure 2
  • 3. Step Five: You may need to join the curves making up each contour cut. Select them individually and us Rhino command: Join (Ctrl + J). Step Six: Use Extrude Curve>Straight command (ExtrudeCrv) to create surfaces from the contour curves. Fig. 4 -Sectional Curves on a Cartesian Grid Fig. 5 -Extruded Sectional Curves Step Seven: Move the Y-Axis surfaces vertically half the depth of the extrusion made on the previous step. Step Eight: Use the Surface> Offset Surface command (OffsetSrf) to give the surfaces thickness, this thickness is determined by the thickness of the material being used. (i.e. .0625” chipboard). Step Nine: Fig. 6 -Detail of extruded sectional curves Fig. 7 -Shifted sectional planes Use the Boolean Split command on both the X and Y axes extruded contours. This will result in a slots that allow you to join the parts. Fig. 8 -Sectional Members Fig. 9 -Y-Axis Member with notches Laser Cut Waffle Structure 3
  • 4. Step Ten: Select the Y-Axis member and move them so that they are separate from the X-Axis members. Step Eleven: Use one of the elevation views for the X-Axis and a different one for the Y-axis. Carry out the Make2D command for each axes’ set of contours so the curves will be placed on the XY groundplane. Fig. 10 -Separated Sectional Members Fig. 11 -Sectional Members After Make2D Step Twelve: Create labels with the text command that will be etched on. X-Axis contours can be labeled A-1, A-2, A-3... Explode the text so that you are only left with vectors, this will aid in making the laser cutting process faster. Step Thirteen: Place this curves within a 18”x32” rectangle (the cutting bed size). Run the duplicate curve check in Edit>Select Objects>Duplicated Objects. Note: Template for the laser cutter can be found on nycctfab.com for both Rhino and AutoCAD template files, along with general laser cutting guidelines. Laser Cut Waffle Structure 4