
Recommended
More Related Content
Similar to Electronz_Chapter_11.pptx
Similar to Electronz_Chapter_11.pptx (20)
More from Mokete5
Recently uploaded
Recently uploaded (20)
Electronz_Chapter_11.pptx
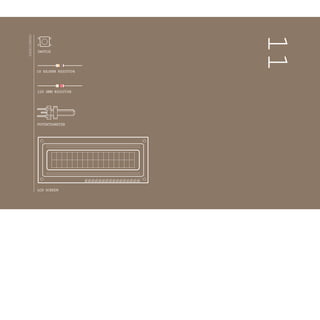
- 1. INGREDIENTS 11 10 KILOHM RESISTOR 220 OHM RESISTOR SWITCH POTENTIOMETER LCD SCREEN
- 2. CREATE A CRYSTAL BALL TO TELL YOUR FUTURE Crystal balls can help “predict” the future. You ask a question to the all-knowing ball, and turn it over to reveal an answer. The answers will be predetermined, but you can write in anything you like. You’ll use your Arduino to choose from a total of 8 responses. The tilt switch in your kit will help replicate the motion of shaking the ball for answers. The LCD can be used to display alphanumeric characters. The one in your kit has 16 columns and 2 rows, for a total of 32 characters. There are a large number of connections on the board. These pins are used for power and communication, so it knows what to write on screen, but you won’t need to connect all of them. See Fig. 1for the pins you need to connect. Discover: LCD displays, switch/case statements, random() Time: 1HOUR Builds on projects: 1,2,3 Level: CRYSTAL BALL LED- LED+ D7 D6 D5 D4 D3 D2 D1 D0 E R/W RS V0 Vcc Vss 16 15 14 13 12 11 10 9 8 7 6 5 4 3 2 1 Thepinsonthe LCDscreen that areused inthe project andlabels. Fig.1 115
- 3. BUILD THE CIRCUIT + - + - + - + - Fig.2 Fig.3 In this schematic the LCD pins arrangement does not match the physical order depicted in Fig. 2. Inaschematic,the pinsarerearrangedbylogical grouping to make the schematic as clear as pos- sible. Thisisalittle confusing to newcomers until youget used to it. 116 Project 11 Crystal Ball
- 4. The circuit is not overly complex, but there are a lot of wires. Pay attention when wiring everything up to make sure it’s correct. Connect power and ground to one side of your breadboard. Place the tilt switch on the breadboard and attach one lead to 5V.Attach the other side to ground through a 10-kilohm resis- tor, and to your Arduino’s pin 6. You’re wiring this as a digital input, just as you’ve done in several other projects. The register select (RS) pin controls where the characters will appear on screen. The read/write pin (R/W) puts the screen in read or write mode. You’ll be using the write mode in this project. The enable (EN) tells the LCD that it will be receiving a command. The data pins (D0-D7) are used to send charac- ter data to the screen. You’ll only be using 4 of these (D4-D7). Finally, there’s a connection for adjusting the contrast of the display. You’ll use a potentiometer to control this. The LiquidCrystal library that comes with the Arduino software handles all the writing to these pins, and simplifies the process of writing software to display characters. The two outside pins of the LCD (Vss and LED-) need to be connected to ground. Also, connect the R/W pin to ground. This places the screen in write mode. The LCD power supply (Vcc) should connect directly to 5V. The LED+ pin on the screen con- nects to power through a 220-ohm resistor. Connect: Arduino Digital pin 2 to LCD D7, Arduino Digital pin 3 to LCD D6, Arduino Digital pin 4 to LCD D5, Arduino Digital pin 5 to LCD D4. These are the data pins that tell the screen what character to display. Connect EN on the screen to pin 11on your Arduino. RS on the LCD connects to pin 12.This pin enables writing to the LCD. Place the potentiometer on the breadboard, connecting one end pin to power and the other to ground. The center pin should connect to V0 on the LCD. This will allow you to change the contrast of the screen. ❶ ❷ ❸ ❹ ❺ ❻ ❼ 117
- 5. First, you’ll need to import the LiquidCrystal library. Next, you’ll initialize the library, somewhat similar to the way you did with the Servo library, telling it what pins it will be using to communicate. Now that you’ve set up the library, it’s time to create some variables and constants. Create a constant to hold the pin of the switch pin, a variable for the current state of the switch, a variable for the previous state of the switch, and one more to choose which reply the screen will show. Set up the switch pin as an input with pinMode() in your setup().Startthe LCD library,and tell ithow large the screen is. Now it’s time to write a small introductory screen welcoming you to the 8-ball. The print() function writes to the LCD screen. You’re going to write the words “Askthe” on the top line of the screen. The cursor isautomatically atthe beginning of the top line. In order to write to the next line, you’ll have to tell the screen where to move the cursor. The coordinates of the first column on the second line are 0,1 (recall that computers are zero indexed. 0,0 is the first column of the first row). Use the function lcd. setCursor() to move the cursor to the proper place, and tell it to write “ Crystalball!” . Now, when you start the program, it will say “Askthe Crystal ball!” on your screen. In the loop(), you’re going to check the switch first,and put the value in the switchState variable. Use an if()statement to determine ifthe switch isin adifferent position than itwas previously.If it isdifferent than it was before, and it is currently LOW,then it’s time to choose a random reply. The random() function returns a number based on the argument you provide it. To start, you’ll have a total number of 8 different responses for the ball. Whenever the statement random(8) is called, it will give a number between 0-7. Store that number in your reply variable. Set upthe LiquidCrystal library Print your first line Move the cursor Choose a random anwser 118 Project 11 Crystal Ball
- 6. 1 #incLude <LiquidCrystaL.h> 2 LiquidCrystaL Lcd(12, 11, 5, 4, 3, 2); 3 const int switchPin = 6; 4 int switchState = 0; 5 int prevSwitchState = 0; 6 int repLy; 7 void setup() { 8 Lcd.begin(16, 2); 9 pinMode(switchPin,INPUT); 10 Lcd.print(“Ask the”); 11 Lcd.setCursor(0, 1); 12Lcd.print(“CrystaL BaLL!”); 13 } 14 void Loop() { 15 switchState = digitaLRead(switchPin); 16 if (switchState != prevSwitchState) { 17 if (switchState == LOW) { 18 repLy = random(8); LCD library reference arduino.cc/lcdlibrary Random reference arduino.cc/random 119
- 7. Clear the screen with the function lcd.clear(). This also moves the cursor back to location 0,0; the first column in the first row of the LCD. Print out the line “The ball says:” and move the cursor for the output. The switch() statement executes different pieces of code depending on the value you give it.Each of these different pieces of code is called a case. switch() checks the value of the variable reply; whatever value reply holds will determine what named case statement is executed. Inside the case statements, the code will be the same, but the messages will be different. For example, in case 0 the code says lcd.print (“Yes”). After the lcd.print() function, there’s another command: break. It tells the Arduino where the end of the case is. When it hits break, it skips to the end of the switch statement. You’ll be creating a total of 8 case statements to start out. Four of the responses will be positive, 2 will be negative, and the final 2 will ask you to try again. The last thing to do in your loop() is to assign switchState’s value to the variable prevSwitchState. This enables you to track changes in the switch the next time the loop runs. Predict the future 120 Project 11 Crystal Ball
- 8. 19 Lcd.cLear(); 20 Lcd.setCursor(0, 0); 21 Lcd.print(“The baLL says:”); 22 Lcd.setCursor(0, 1); 23 switch(repLy){ Switch Case reference 24 case 0: arduino.cc/switchcase 25 Lcd.print(“Yes”); 26 break; 27 case 1: 28 Lcd.print(“Most LikeLy”); 29 break; 30 case 2: 31 Lcd.print(“CertainLy”); 32 break; 33 case 3: 34 Lcd.print(“OutLook good”); 35 break; 36 case 4: 37 Lcd.print(“Unsure”); 38 break; 39 case 5: 40 Lcd.print(“Ask again”); 41 break; 42 case 6: 43 Lcd.print(“DoubtfuL”); 44 break; 45 case 7: 46 Lcd.print(“No”); 47 break; 48 } 49 } 50 } 51 prevSwitchState = switchState; 52 } 121
- 9. USE IT To use the magic ball, power the Arduino. Check the screen to make sure it says “Ask the Crystal ball!” If you can’t see the char- acters, try turning the potentiometer. It will adjust the contrast of the screen. Ask a question of your crystal ball, and try tilting the switch up- side down and back again. You should get an answer to your question. If the answer doesn’t suit you, ask again. LCDs work by changing the electrical properties of a liquid sandwiched between polarized glass. The glass only allows certain kinds of light to pass through. When the liquid between the glass is charged,it starts to form into a semi-solid state.This new state runs in a different direction than the polarized glass, blocking light from passing through, thus creating the characters you see on the screen. Try adding your own sayings to the print() statements, but be mindful of the fact that there are only 16 characters to use per line. You can also try adding more responses. Make sure when you add additional switch cases, you adjust the number of options that will randomly populate the reply variable. The functions covered here for changing the LCD screen’s text are fairly simple. Once you have a handle on how it works, look at some of the other functions the library has. Try getting text to scroll, or continually update. To find out more about how the LiquidCrystal library works, visit: arduino.cc/lcd An LCD displayenablesyou to show texton a screen,using the LiquidCrystal library . With a switch...case statements control the flow of programs by comparing a variable to specifiedvalues. 122 Project 11 Crystal Ball