Maria db
•
0 likes•47 views

MariaDB is the default MySQL database installed on Red Hat Enterprise Linux 7. It is installed by running commands like "yum install mariadb" and then secured by running "mysql_secure_installation" to set the root password. Once installed and secured, databases and users can be created and the connection can be tested.

Recommended
More Related Content
What's hot
What's hot (20)
Similar to Maria db
Similar to Maria db (20)
More from Md Shihab
Recently uploaded
Recently uploaded (20)
Maria db
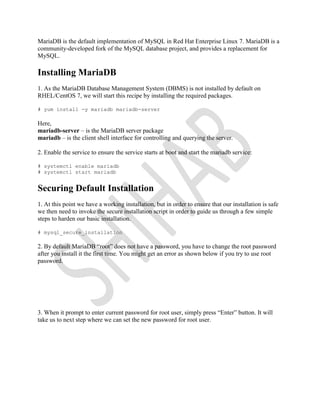
- 1. MariaDB is the default implementation of MySQL in Red Hat Enterprise Linux 7. MariaDB is a community-developed fork of the MySQL database project, and provides a replacement for MySQL. Installing MariaDB 1. As the MariaDB Database Management System (DBMS) is not installed by default on RHEL/CentOS 7, we will start this recipe by installing the required packages. # yum install -y mariadb mariadb-server Here, mariadb-server – is the MariaDB server package mariadb – is the client shell interface for controlling and querying the server. 2. Enable the service to ensure the service starts at boot and start the mariadb service: # systemctl enable mariadb # systemctl start mariadb Securing Default Installation 1. At this point we have a working installation, but in order to ensure that our installation is safe we then need to invoke the secure installation script in order to guide us through a few simple steps to harden our basic installation. # mysql_secure_installation 2. By default MariaDB “root” does not have a password, you have to change the root password after you install it the first time. You might get an error as shown below if you try to use root password. 3. When it prompt to enter current password for root user, simply press “Enter” button. It will take us to next step where we can set the new password for root user.
- 2. 4. Now you will be asked a number of simple questions which will help you in the process of hardening your MariaDB DBMS system. It is a good advice to choose Yes (Y) to every question for maximum security unless you are already a MariaDB expert and really require a certain feature.
- 3. Testing the Connection to MariaDB database Finally, test if you can connect and login to the MariaDB service locally using the MariaDB command-line client called mysql. # mysql -u root -p
- 4. Firewall Configuration If you want to access the database from a different server, then add the MySql service to the firewall configuration and reload it: # firewall-cmd --permanent --add-service=mysql success # firewall-cmd --reload success Managing a MariaDB Database Once you are done Installing and securing the MariaDB, its time to create a new database and database user. Known as the MariaDB shell, this simple interactive and text based-command line facility supports the full range of SQL commands and affords both local and remote access to your database server. 1. To begin with, lets login to the database using the MariaDB adminitrator user “root” and the password we defined while sucuring the MariaDB installation. # mysql -u root -p 2. Next is to create a new database using the below syntax. Replace the database_name using the name of your choice for the new database. MariaDB [(none)]> CREATE DATABASE [database_name] CHARACTER SET utf8 COLLATE utf8_general_ci; For Example: MariaDB [(none)]> CREATE DATABASE geekdb CHARACTER SET utf8 COLLATE utf8_general_ci; Query OK, 1 row affected (0.00 sec) Note: Make sure you end each command with a semicolon(;) in the MariaDB shell.
- 5. 3. Having created the database, we will need to create the database user. Replace the “database_name”, “username” and “password” in the below command. MariaDB [(none)]> GRANT ALL ON [database_name].* TO '[username]'@'localhost' IDENTIFIED BY '[password]' WITH GRANT OPTION; For Example: MariaDB [(none)]> GRANT ALL ON geekdb.* TO 'geekuser'@'localhost' IDENTIFIED BY 'getmein' WITH GRANT OPTION; Query OK, 0 rows affected (0.00 sec) 4. Next, make the MariaDB DBMS aware of your new user: MariaDB [(none)]> FLUSH PRIVILEGES; Query OK, 0 rows affected (0.00 sec) 5. Now, logout and login using the new user you just created. # mysql -u geekuser -p getmein 6. Run the “SHOW DATABASES” command to verify the database name we created. MariaDB [(none)]> SHOW DATABASES;