The Chronicles of C.o.G. Worldbuilding
•
0 likes•155 views

The document outlines the process Mara Aum took to develop the world, characters, and story for her steampunk comic book series Chronicles of Genius (C.o.G.). It describes how she began with concept creation, drawing inspiration from various Victorian-era people, works, and inventions. She then designed logos, characters, technologies, locations, vehicles, weapons, and covers to fully flesh out the C.o.G. world. Finally, Mara wrote scripts and drew sequential pages to produce the first issue of the comic book series. The document provides examples from each stage of development.

Recommended
More Related Content
What's hot
What's hot (20)
Viewers also liked
Viewers also liked (20)
Similar to The Chronicles of C.o.G. Worldbuilding
Similar to The Chronicles of C.o.G. Worldbuilding (20)
The Chronicles of C.o.G. Worldbuilding
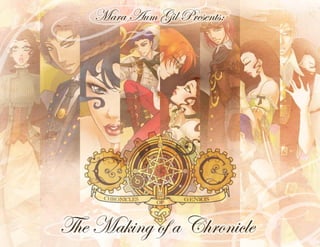
- 2. Mara Aum Educator | Illustrator | Comic Book ArtistIntroduction The Chronile of C.o.G. The following shows the progression in creating the world of C.o.G. (Chronicles of Genius), a steampunk adventure comic book series. You will see the development of the world, characters and objects of C.o.G., followed by the sequential story creation. If you wish to view my professional portfolio, you can do so at: www.maraaum.com
- 3. Mara Aum Educator | Illustrator | Comic Book ArtistConceptCreation Inspirations • Victorian-esque • Alphonse Mucha • Art Nouveau • Classic Traveling Circuses • Darwin • Dracula • Evelyn Nesbit • Frankenstein • Gibson Girls • Hellboy / B.P.R.D. • The Hellfire Club • H.G. Wells • Houdini • The Invisible Man • Jack the Ripper • Jane Austin • Jekyll & Hyde • League of Extraordinary Gentlemen • Lewis Carroll (Alice & Wonderland / Through the Looking Glass) • Lord Byron • The Mummy • Nikola Tesla Vs. Thomas Edison • Oscar Wilde (The Portrait of Dorian Grey) • Perpetual Motion Machine • Peter Pan • Phantom of the Opera • Pre-Raphaelite Brotherhood • Psychic Phenomenon / Séances • Ruse • Sarah Bernhardt • Sherlock Holmes • Sleepy Hallow • Steamboy • Tarot Cards • Tom Sawyer & Huckleberry Finn • Toulouse-Lautrec • Van Helsing • Waterhouse • Wild Wild West The first step I took in creating this property was to decide on a concept. In this case, I chose to do a ‘steampunk’ (or victorian science fiction) story. I only had a vague idea for a hero to start. To clarify I made a long list of all things Victorian that I enjoyed (be it a modern interpretation or an authentic one). You can see the list to the immediate right. This allowed me to mentally conceptualize the work I wanted to portray. In short order the germination of a story appeared. Once I had a basic concept I began to iron out my cast. I drew various head shots, discarding some and using others until I had a definitive facial look for my characters. These can be seen on the far right. All of these were drawn by hand and they scanned and colored on the computer with Adobe Photoshop. At this stage of the process I kept the coloring purposefully very flat and basic.
- 4. Mara Aum Educator | Illustrator | Comic Book ArtistLogoDesign After I had a basic roster of my cast, I chose to create the logo for my project. The logo didn’t have to be realized at this point, but I thought it would help me define the look I wanted for the comic and allow me to further develop the visuals of the story. In this case, I initially set about designing the “Empyrean Industries” logo (seen in black & white), which is the name I have chosen for the main character’s company. This was done using predominantly vector tools in both Adobe Photoshop and Adobe Illustrator. Satisfied with the line art, I took it and expanded it with more gears to incorporate the final title Initials (also in vectors).
- 5. Mara Aum Educator | Illustrator | Comic Book ArtistCharacterDesign I started the task of creating the overall look of the characters for the story. I chose to go for a more historically based fashion sense with elements of the present day to give it an original flair that would suit a comic book audience. On the right you can see the progression form sketch, to inked, to colors and lastly final art. The initial line art was done by hand on smooth paper with pencil and later pen and ink. Colors were applied with Adobe Photoshop. The stripe pattern on the dress was done digitally using a black and transparent stripe pattern image which was manipulated for each section of the dress as required. As you can see on the far right, I chose to create an official illustration featuring the concept design with the logo. This was done by laying various textures and patterns and manipulating them to get the over all desired look.
- 6. Mara Aum Educator | Illustrator | Comic Book ArtistCharacterDevelopment After standard designed were completed, less realized sketches were done of additional clothing and hairstyles that might be required throughout the initial series. You can see a selection of those here. These were used as reference for the various stages of the project, including the cover designs and the interior sequential art.
- 7. Mara Aum Educator | Illustrator | Comic Book ArtistConceptDesign The next step was to design some of the more technical aspects of my world. Being a steampunk story it was important that the technology received as much attention as the character designs. In some cases this process overlapped with the character designs, such as the main character’s accessories like his folding spectacles. Using initial hand drawn sketches as a base, these were completed using vector tool in Photoshop & Illustrator (in the same way the Logo was done). There is very little actual mechanical basis for any of these designs. I was going for more of an aesthetic look than any feats in engineering.
- 8. Mara Aum Educator | Illustrator | Comic Book ArtistConceptDesign As this is an adventure story with dashing heroes and dastardly villains, weapons are an important factor to the story. Almost all the cast has some kind of blade, projectile or device they could use in combat. Like the previous concept designs, I used hand drawn sketches as a base, completed the images using vector tool in Photoshop & Illustrator. For all concept designs coloring was purposefully basic.
- 9. Educator | Illustrator | Comic Book ArtistConceptDesign Since my inventor’s claim to fame would be transport, such as the airship, it was imperative that I design and populate my environment with a multitude of vehicles. Featured here are two of the many schematics created for this purpose. Doing the turnarounds for all concept designs provided vital references for the sequential art process later. The airship, the Aeolus, features significantly in the story, so it was one of the earlier designs.
- 10. Mara Aum Educator | Illustrator | Comic Book ArtistConceptDesign Not wanting to use an actual location for the residence of my hero, I chose to instead to design my own. Using basic blueprints of many of Scotland’s historic castles, I created a floor plan with multiple levels. A portion of the plans are seen on this page. The structure has 6 levels total and was done with vector tools.
- 11. Mara Aum Educator | Illustrator | Comic Book ArtistConceptDesign I sought to make a rough scale model of one of the rooms that feature prominently in the comic: My hero’s bedroom and workshop. The idea was the castle was a crumbling ruin when Myles (my leading man) chose to build on the ancient foundations and turn it into his home (The Fortress). Myles took the original great hall and turned it into his personal area where he would sleep and devise his inventions. Thus, this room had to be a hodgepodge of old and new and have an unusual layout. This could make plotting out perspective tricky and having a model would be an extremely useful tool to help me accurately portray the environment. Using a camera and installing removable walls in the model, I was able to take reference shots that would aid me to produce more accurate perspective in the desired scenes in my sequential art. This was built using foam- core board, cardboard, masking tape, glue and a large transparency.
- 12. Mara Aum Educator | Illustrator | Comic Book ArtistConceptDesign Next, using Google Sketch-Up, I created a scale 3D model of the entire outside structure of the Fortress. This too allowed me to angle the image to get whatever desired angle for the sequential art process. No ornamentation was put on the model because I chose to develop that at the time of drawing.
- 13. Mara Aum Educator | Illustrator | Comic Book ArtistFinalOutcome This it the final result of the Fortress with all stone work conceptualized. Also seen is the airship, the Aeolus. This is just one example of how the various reference preparations were used in the final comic book art. This was drawing by hand with pencil, pen and Ink and colored in Photoshop.
- 14. Educator | Illustrator | Comic Book ArtistCoverIllustration Normally, covers are done last in the comic book industry, but I chose to do mine first as a means to warm up and to develop the look of the work. Featured on this page is an example of the process in creating the cover designs for the comic. From left to right (not to scale here), I start with a loose sketch of the idea. I drew these on mini to-scale templates created by myself. This way I know I am using the space properly. Next is the penciling process (the next blue image). I use non-photo repo-blue because when I physical apply ink to the paper (the black and white image) and scan it, there is less chance of the pencils being picked up by the software. Lastly, I color the image using Adobe Photoshop and add the logo created earlier. It is important to note I hand tea stained the paper texture seen throughout the colored images of this project (both interior and exterior). They were scanned and applied digitally when need for the best effect.
- 15. Mara Aum Educator | Illustrator | Comic Book ArtistSequentialArt Developing this work in this way, I have had time to really understand what my story was about. It is time to draw the comic. Firstly, I wrote a script. The format, as you see to the immediate right, is similar, but not the same, as a movie script. You start out indicating what page is being drawing and then describe the first panel. Below that you give the dialogue, indicating who says what. Then you repeat the panel process until you are satisfied with the number of panels on the page. After that I start another page and do it again until the story is complete. Once the script is finish, I draw a thumbnail image directly beside the text. This will shows how the panels will visually be broken up on the page. I then scan it and stretch it to my scale mini-template. Having the panels where they should be, I then draw within the boxes so that I have the most accurate placement of the characters. I might even put mock word balloons digitally later to make sure that the spacing is correct.
- 16. Mara Aum Educator | Illustrator | Comic Book ArtistSequentialArt Once I have the layout sketches the way I want them, I again scan and stretch them to drawing size and I use them as a guide for the actual penciling process of the sequential pages. Again, I use blue pencil for this. As you can see the result to the immediate right, my pencil page showcases the bleed, trim and live area lines for the work. The bleed being the portion of the page that will be cut off to make the edge of the comic book, the trim being the area in danger of being cut (depending on the printer) and then the inner part as the live area, which is safe from the cutting process. Once the pencils are complete the inking begins. Applying it directly on the pencil page, the image becomes ready to scan. The materials used to ink can, and do, vary. In this case, I used rapidograph technical pens and some brush. Once that is done I adjust the brightness and contrast in Adobe Photoshop to obliterate any remaining pencil lines and crate the results you see on the far right.
- 17. Mara Aum Educator | Illustrator | Comic Book ArtistSequentialArt Now that the inked page is prepared for coloring, I shrink the image to print size. In Adobe Photoshop, I apply flat color to all the characters and backgrounds followed by adding highlights and shadows. I also apply textures to various outfits and items to add extra dimension. Lastly in the coloring process, I put a tea stained texture over the entire image with a unifying color (in this case orange) to complete the image. The word balloons and sound effects are crated in the vector based software Adobe Illustrator and then put together and placed in Adobe InDesign. Also in InDesign the text is added and then exported into any format needed for screen viewing or print. With that you have a comic book page.
- 18. Mara Aum Educator | Illustrator | Comic Book ArtistSequentialArt The creation of a page is made from a very long list of references and in a “world building” setting like C.o.G. it is at least doubled. Using a different page, I show here the various references used. This is only a small portion complied for this particular page. This includes previously designed images, like the winged apparatus, seen in the upper right conner, to historical fashion plates. I also took my own photographic reference as seen in the lower left corner. This typifies the sheer amount of work and research that goes into a single page.
- 19. Mara Aum Educator | Illustrator | Comic Book ArtistSequentialArt Finally, I am going to show you a succession of completed sequential pages as they would appear in the comic book. Incidentally, this is the last four pages of the first issue from C.o.G. (Chronicles of Genius). In this, I intend to show you not only the finished product but the storytelling progression in sequential art.
- 20. Educator | Illustrator | Comic Book ArtistSequentialArt
- 21. Mara Aum Educator | Illustrator | Comic Book ArtistSequentialArt With this final full page illustration (or ‘Splash’ page) we end not only the comic but this portfolio. This is just a small portion of various techniques and processes that are integral to creating a comic book. I hope you enjoyed our little lesson! Thank you.