1. Construction Steps
Inspirations –These websites on the WIX website inspired me the most due to the creativity and layout. After
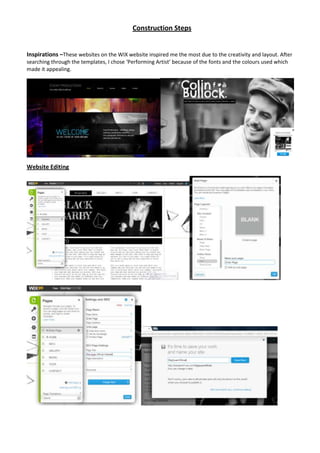
searching through the templates, I chose ‘Performing Artist’ because of the fonts and the colours used which
made it appealing.
Website Editing
2. This was the template I used
for my website. To begin
with, I changed the names of
the pages that were shown
as well as added pages.
Whilst doing this, I
discovered the settings
option which allowed me to
either hide the page from the
menu, give the page a title
etc. After, I saved my worked
and named my site
‘BigQuanOfficial’.
For the Home Page, I began
changing the style of the box
which was fairly easy to do.
On two of the pages, I set it
so that it weren’t shown on
the menu bar. These pages
were the Lyrics and Enter
Page.
Enter Page
When I created the Enter Page, I chose a blank layout because it would contain the least content. Throughout,
the process of doing the enter page, I did need to refer to the Help Center becuase I was unsure of a number of
things such as how the enter button operates. But after looking at the tutorials, I got how to do it.
3. I created a ‘Text
Button’ and changed
what it would say in
the Button settings. I
also made the style of
the button to a Text
Button. In the
‘Advanced Style’, I had
the choice to change
the colour of the text
and font. In the Button
Settings, I made the
button Link to the
Home page which was
very easyto do. Below
is a screen shot, of My
Final Button on my
website.
Due to the colour of the background, I changed the colour of my text
to white (shown above).
One of my first designs was to have a number of pictures of Big Quan
however, I wasn’t sure if that idea would look good so I decided to
make a ‘duplicate page’.
On the original enter page, I created another design which consisted
of three pictures of him.
In the Image Gallery, I uploaded the picture I would use for the ‘Enter
page’ which I edited on My Computer.
Below, is a screen shot of what the Enter page looks like.
Later on in the process of the website, I discovered that I needed to
place the pictures on the enter page in the middle section rather than
the header.
4. Home Page
For the home page, I created a
button menu which I placed in the
header so that it could be shown on
every page of the website. When I
discovered the header section, I
was pleased because I realised that
everything in that section would be
on every page and so I had the
chance to change the positions of
my pictures on the Enter Page. I
also changed the background
colour to white to make it easier to
navigate through the website.
5. On the home page, I added pictures in the style of a slideshow. I also added text which would be
current news on Big Quan. On the right hand side, I removed the stuff that was originally there and
replaced it with black blocks so that I knew where my icons would go.
About Page
For the About Page, I simply re-wrote what would go in this section as bullet points and changed the font. This
was so that I had a rough idea on how the page would look as a whole.
6. News Page
For the News Page, I added a ______________ which would be the position of the advertising section. I also
added text in the style of the Home Page but added more in depth information for each post.
Music Page
For the Music Page, I added titles such as ‘All Albums and Songs’, ‘Music’ and ‘Exclusive Songs’ in order to let me
know where everything would go. I next, added images and positioned them on my page. These initially would
be the album and single covers. At the bottom of my page, I added a section for Exclusive Songs which would
appear in a list. My last feature to this page, was adding pictures in the style of a slider.Con