Mitsubishi ac servos melservo j4 solutions screw tightening machine-dienhathe.vn
•
0 likes•60 views

Khoa Học - Kỹ Thuật & Giải Trí: http://phongvan.org Tài Liệu Khoa Học Kỹ Thuật: http://tailieukythuat.info Thiết bị Điện Công Nghiệp - Điện Hạ Thế: http://dienhathe.org
![Offering the
Best Solution
Open-Loop Control for Screw Tightening
Tightening & Press-fit
Control
Solution
1
By optimizing the combination of the number of motor poles and the number of slots, torque ripple during conduction is
greatly reduced, which helps improve the accuracy of repeated operation of tightening screws.
Great Improvement in Repeated Accuracy of
Screw Tightening
Reduced Torque Ripple
During Conduction
Solution
2
The vertical (Z-axis) and rotating axis can be used to tighten screws by switching the control
mode to "Tightening & press-fit control" which does not require a torque sensor.
"Tightening & Press-fit control" is a control mode where the motor does not have to stop
when the system switches to this control mode from speed or positioning control.
: Moves from its wait position to above
the workpiece.
: No movement (Servo ON)
: Switches to Tightening & press-fit control.
: Switches to speed control and starts
operation at low speed
: Starts pushing down the screw.
: Starts tightening after switching to
mid-range speed operation.
: Pushes the screw to its final position
with a constant torque.
: Tightens the screw fully with a
specified torque.
Vertical axis
Rotating axis
Vertical axis
Rotating axis
Vertical axis
Rotating axis
Vertical axis
Rotating axis
Vertical axis
Rotating axis
Vertical axis
Rotating axis
: Switches back to position control and
goes back to its wait position.
: Switches back to position control and
goes back to its wait position.
: Pushes down the screw with a constant
torque.
: Switches to Tightening & press-fit control
and tightens the screw.
<Operation Sequence>
<Tightening screws without a torque sensor>
Screws can be tightened without using a torque sensor
(open-loop control), controlling the speed and torque of
the rotating axis according to its operation sequence.
1/4
Improve
Repeated
Accuracy
Vertical axis
(Z-axis)
Rotating axis
Screw Tightener
Vertical
axis
Rotating
axis
Speed
Torque
Speed
Time
Speed indicator
(arrow)
Time
Time
Time
Torque
Touch
Position
Tightening & press-fit
Change
Torque
command
Tightening &
press-fit
Position
Speed
Tightening
& press-fit
Position control Tightening & press-fit control Position control
Position control
Tightening &
press-fit control
Speed control
[New model (HG-KR series)]
(As compared to
the prior series.)
*For 400 W
Torque ripple
[Prior model (HF-KP series)]
Tightening & press-fit
Position](data:image/gif;base64,R0lGODlhAQABAIAAAAAAAP///yH5BAEAAAAALAAAAAABAAEAAAIBRAA7)
Recommended
Recommended
More Related Content
What's hot
Similar to Mitsubishi ac servos melservo j4 solutions screw tightening machine-dienhathe.vn
Similar to Mitsubishi ac servos melservo j4 solutions screw tightening machine-dienhathe.vn (20)
More from Dien Ha The
More from Dien Ha The (20)
Recently uploaded
Recently uploaded (20)
Mitsubishi ac servos melservo j4 solutions screw tightening machine-dienhathe.vn
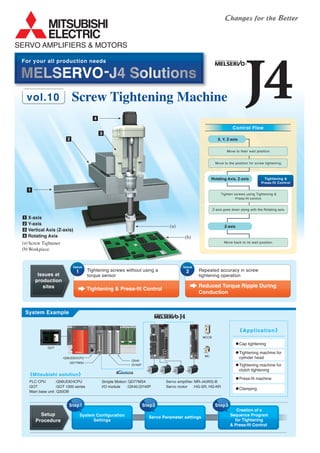
- 1. (a) (b) 1 2 3 4 (a) (b) Screw Tightener Workpiece X-axis Y-axis Vertical Axis (Z-axis) Rotating Axis 1 3 2 4 SERVO AMPLIFIERS & MOTORS vol.10 MELSERVO-J4 Solutions For your all production needs Screw Tightening Machine •Cap tightening •Press-fit machine •Clamping •Tightening machine for cylinder head •Tightening machine for clutch tightening System Example Repeated accuracy in screw tightening operation Reduced Torque Ripple During Conduction Tightening & Press-fit Control Issue 2Tightening screws without using a torque sensor Issue 1 Step3 Creation of a Sequence Program for Tightening & Press-fit Control PLC CPU GOT Main base unit Q06UDEHCPU GOT 1000 series Q35DB : : : : : Servo amplifier Servo motor MR-J4(W3)-B HG-SR, HG-KR Simple Motion I/O module QD77MS4 QX40,QY40P : : Step2 Servo Parameter settings Step1 System Configuration Settings GOT Q06UDEHCPU QD77MS4 QY40P QX40 MCCB MC Issues at production sites Mitsubishi solution Application S Setup Procedure X, Y, Z-axis Rotating Axis, Z-axis Z-axis Move to their wait position. Move to the position for screw tightening. Control Flow Tightening & Press-fit Control Tighten screws using Tightening & Press-fit control. Z-axis goes down along with the Rotating axis. Move back to its wait position.
- 2. Offering the Best Solution Open-Loop Control for Screw Tightening Tightening & Press-fit Control Solution 1 By optimizing the combination of the number of motor poles and the number of slots, torque ripple during conduction is greatly reduced, which helps improve the accuracy of repeated operation of tightening screws. Great Improvement in Repeated Accuracy of Screw Tightening Reduced Torque Ripple During Conduction Solution 2 The vertical (Z-axis) and rotating axis can be used to tighten screws by switching the control mode to "Tightening & press-fit control" which does not require a torque sensor. "Tightening & Press-fit control" is a control mode where the motor does not have to stop when the system switches to this control mode from speed or positioning control. : Moves from its wait position to above the workpiece. : No movement (Servo ON) : Switches to Tightening & press-fit control. : Switches to speed control and starts operation at low speed : Starts pushing down the screw. : Starts tightening after switching to mid-range speed operation. : Pushes the screw to its final position with a constant torque. : Tightens the screw fully with a specified torque. Vertical axis Rotating axis Vertical axis Rotating axis Vertical axis Rotating axis Vertical axis Rotating axis Vertical axis Rotating axis Vertical axis Rotating axis : Switches back to position control and goes back to its wait position. : Switches back to position control and goes back to its wait position. : Pushes down the screw with a constant torque. : Switches to Tightening & press-fit control and tightens the screw. <Operation Sequence> <Tightening screws without a torque sensor> Screws can be tightened without using a torque sensor (open-loop control), controlling the speed and torque of the rotating axis according to its operation sequence. 1/4 Improve Repeated Accuracy Vertical axis (Z-axis) Rotating axis Screw Tightener Vertical axis Rotating axis Speed Torque Speed Time Speed indicator (arrow) Time Time Time Torque Touch Position Tightening & press-fit Change Torque command Tightening & press-fit Position Speed Tightening & press-fit Position control Tightening & press-fit control Position control Position control Tightening & press-fit control Speed control [New model (HG-KR series)] (As compared to the prior series.) *For 400 W Torque ripple [Prior model (HF-KP series)] Tightening & press-fit Position
- 3. Setup Procedure Step1 Set the servo amplifier in the System Structure. System Structure Servo Parameter Set the External I/O connector and SSCNET Setting, as necessary. <Servo Assistant> • Assistant List • Amplifier Setting • Test Run • Servo Adjustment • Maintenance • Troubleshooting Servo Parameter Settings Step3 Creation of a Sequence Program for Tightening & Press-fit Control Create a sequence program for control using Function Block (FB), such as a program for control mode switching. Double click Double click Double click System Configuration Settings Set the servo amplifier of each axis. The parameters are easily set following the assistant function, including those set for the first time. Double click FB for Tightening & press-fit control The mode is switched to Tightening & press-fit control, and target torque can be set. FB for speed control The mode is switched to speed control, and speed value can be set. Step2 MR Configurator2 Help Shows the instructions for servo parameter settings. You can set the parameters without manuals.
- 4. Man, machine and environment in perfect harmony S o l u t i o n HEAD OFFICE: TOKYO BUILDING, 2-7-3, MARUNOUCHI,CHIYODA-KU,TOKYO 100-8310,JAPAN NAGOYA WORKS: 1-14, YADA-MINAMI 5,HIGASHI-KU,NAGOYA,JAPAN New publication,effective March 2013. Specifications are subject to change without notice.L(NA)03085-A 1303(IP) Features The High Accuracy and Response Have Changed the "Standard" of Machine Operation Designed to Reduce the Number of Wirings and DevicesSpace-saving The number of wirings and devices is greatly reduced by using MR-J4 series 2-axis/3-axis servo amplifiers. For example, 3-axis servo amplifier MR-J4W3-B requires 30% less installation space than three units of MR-J4-B. Check cumulative operation time and on/off times of inrush relay. This function provides an indication of replacement time for servo amplifier parts such as capacitor and relays. Support the Preventive Maintenance for Safety OperationMaintenance Machine Diagnosis FunctionServo Amplifier Life Diagnosis Function This function estimates and displays machine friction and vibration in normal operation without any special measurement. Comparing the data of the first operation and after years of operation helps to find out the aging deterioration of machine and is beneficial for preventive maintenance. Large amounts of servo data are exchanged in real-time between the controller and the servo amplifier. Using MR Configurator2 on a personal computer that is connected to Q17nDSCPU/ Q170MSCPU Motion controller, or QD77MS simple Motion module helps consolidate information such as parameter settings and monitoring for the multiple servo amplifiers, etc. Simple connections with dedicated cables reduce both wiring time and chances of wiring errors. No more complicated wiring. Advanced Drive Control is Possible with Higher Speed CommunicationSSCNET Ⅲ/H Dramatically Reduced WiringCentral Control with Network <Space-saving> 168 120 Servo amplifier Servo motor Molded-case circuit breaker (MCCB) Magnetic contactor (MC) ×3 ×3 ×3 ×3 <Number of devices> MR-J4-B × 3 units SSCNET III/H command Simple connection with a cable Pulse train command Complex wiring Reconnecting cables is not required.MR Configurator2 Q17nDSCPU Q170MSCPU QD77MS Data read Data write 168 85 MR-J4W3-B (3-axis type) × 1 unit Servo amplifier Servo motor Molded-case circuit breaker (MCCB) Magnetic contactor (MC) ×1 ×3 ×1 ×1 <Number of devices> 30% Installation space reduced by