
Recommended
More Related Content
What's hot
What's hot (20)
Viewers also liked
Viewers also liked (20)
Similar to MoodLocator HwT
Similar to MoodLocator HwT (20)
Recently uploaded
Recently uploaded (20)
MoodLocator HwT
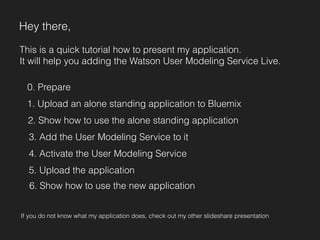
- 1. Hey there, This is a quick tutorial how to present my application. It will help you adding the Watson User Modeling Service Live. 0. Prepare 1. Upload an alone standing application to Bluemix 2. Show how to use the alone standing application 3. Add the User Modeling Service to it 4. Activate the User Modeling Service 5. Upload the application 6. Show how to use the new application If you do not know what my application does, check out my other slideshare presentation
- 2. 0. Prepare Instructions There are some steps you have to do before you can present the application. - Go to github.com/JDihlmann/moodlocator and follow the steps in the section presentation - If you are presenting moodlocator you can start your presentation at any point you want, but you have to do all steps behind the scene if you wouldn't show it. Read the GitHub instructions until point 5 At this point I’m assuming you read the GitHub instructions and set up everything - Before we upload our alone standing application we have to make some changes to it. The default of the moodlocator application is set to show the Watson User Modeling Service. - To change this default value we have to open the code
- 3. 0. Prepare Open style.css Open the style.css file with a text editor you will find it in / node / public / stylesheets / style.css Scroll to the bottom of the page You will find something that looks like that, delete the text in line 449 and 452. I marked it red. Before After Save your changes. Perfect to understand what it does, it enables or disables the white Watson User Modeling bar at the bottom of the page.
- 4. Open the app.js file with a text editor you will find it in / node / app.js 0. Prepare Open app.js Scroll to line 189 You will find something that looks like that, add this bracket „ /* “ in line 190 and this bracket „ */ “ in line 211. I marked the position red where to add them.
- 5. 0. Prepare Before After
- 6. 0. Prepare Stay in app.js Scroll to line 238 You will find something that looks like that, start in line 238 and delete everything what comes after it, till the end of the document. Save your changes Okay we prepared our application now lets start presenting
- 8. Google Maps API London, United Kingdom
- 9. Twitter Stream API London Berlin User visited website 29 / 11 / 14 - 17:45
- 10. Google & Twitter London
- 11. Structure Maps API Stream API Lokal
- 12. Live Demo
- 13. Bluemix Homepage Some of this steps you have already done, you can show them to your listeners, but if you don’t want to you want have to do them again.
- 14. Login
- 15. Dashboard Create an application
- 16. Catalog
- 18. Create App Enter a unique name
- 19. App Info
- 20. 1. Upload an alone standing application to Bluemix Go back to GitHub and take a look at section 6
- 21. Quick Start We will follow these steps
- 22. Terminal Open your Terminal / CMD
- 23. cd MoodLocator Instead of „MoodlocaterPr“ write „node“
- 24. Connect to Bluemix Copy & Paste
- 25. Login Enter the password
- 26. cf push Instead of „moodlocator“ enter your application name Your stand alone application is uploading. It may take 1minute
- 27. Maps API Stream API .js Bluemix Structure
- 28. Twitter Locator London, United Kingdom UserName Tweet Text Tweet Text Tweet Text Tweet Text Tweet Text Tweet Text
- 29. 2. Show how to use the alone standing application
- 30. App Info Click on this link
- 31. 3. Add the User Modeling Service to it Go back to GitHub and take a look at section 5
- 32. Catalog Open Bluemix Catalog
- 33. Services Search for Watson
- 34. User Modelling Choose the Watson User Modeling Service
- 35. User Modeling Info Click on View Docs
- 36. User Modeling Docs User Modeling Documentation
- 37. View a Live Demo Click on view a live demo
- 38. Live Demo Click on analyze
- 39. Analyze
- 40. User Modeling Info Add it to your application
- 41. Add Service Process Hit ok
- 42. User Modeling Doc Scroll down
- 43. View full Docs Click on view full docs
- 44. Watson Doc Select sample application in Node.js
- 45. Sample Application Example code you can scroll in here
- 46. Copy & Paste IMPORTANT You have to copy the exact same function you deleted before! Jan-Niklas Dihlmann, 26 Novmeber 2014 © 2014 IBM Corporation
- 47. 4. Activate the User Modeling Service COPY THIS PART You have to copy the exact same thing ——> out of the Watson Documentation into your application Select it Copy it cmd c / strg c We will undo everything what we did for preparation
- 48. Open the app.js file with a text editor you will find it in / node / app.js Open app.js Scroll to line 238 Paste the whole code at the end of your document, where you deleted it before. Stay in app.js Scroll to line 189 You will find something that looks like that, delete this bracket „ /* “ in line 190 and this bracket „ */ “ in line 211. I marked the position red where to add them.
- 49. Before After Save your changes
- 50. Open style.css Open the style.css file with a text editor you will find it in / node / public / stylesheets / style.css Scroll to the bottom of the page You will find something that looks like that, add this bracket „ /* “ in line 449 and this bracket „ */ “ in line 452. I marked the position red where to add them. Before After Save your changes. Perfect to understand what it does, it enables or disables the white Watson User Modeling bar at the bottom of the page.
- 51. Open style.css Open the style.css file with a text editor you will find it in / node / public / stylesheets / style.css Scroll to the bottom of the page You will find something that looks like that, add this bracket „ /* “ in line 449 and this bracket „ */ “ in line 452. I marked the position red where to add them. Before After Save your changes.
- 52. 5. Upload the application Go back to GitHub and take a look at section 6
- 53. Terminal Open your Terminal / CMD
- 54. cd MoodLocator Instead of „MoodlocaterPr“ write „node“
- 55. Connect to Bluemix Copy & Paste
- 56. Login Enter the password
- 57. cf push Instead of „moodlocator“ enter your application name Your stand alone application is uploading. It may take 1minute
- 58. Maps API Stream API .js Bluemix Structure we added the User Modeling Service
- 59. User Modeling Service Text - at least 100 Words BETA: Only english Get a fully character analysis from the author of the text Possible character of the author Text Jan-Niklas Dihlmann November 2014
- 60. User Modeling Service All Tweets from one city BETA: Only english Tweets Get a fully character analysis from all the users combined who are twittering in this city Jan-Niklas Dihlmann November 2014
- 61. 6. Show how to use the new application
- 62. MoodLocator London, United Kingdom Jan-Niklas Dihlmann November 2014
- 63. Tipp how to use - User Modeling Service is a BETA version, is only analyzing english words. Therefore choose a city where people twitter mostly in english. - Choose big cities like London, New York, Johannesburg. - When you hover over one Tweet, only hover over the next Tweet after the first one closes. - Test it yourself, enter your current location and send a Tweet with text and geolocation. Try to find it. Have fun and enjoy it! Jan-Niklas Dihlmann November 2014
- 64. MoodLocator Bluemix: moodlocator.mybluemix.com GitHub: /JDihlmann/moodlocator