
Recommended
More Related Content
Similar to Pf sense installation and initial setup
Similar to Pf sense installation and initial setup (20)
Recently uploaded
Recently uploaded (20)
Pf sense installation and initial setup
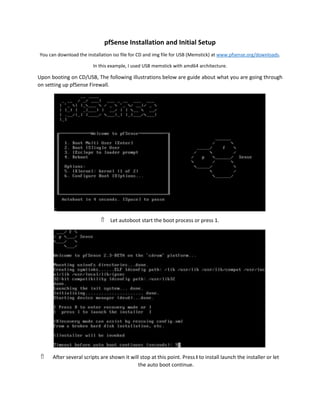
- 1. pfSense Installation and Initial Setup You can download the installation iso file for CD and img file for USB (Memstick) at www.pfsense.org/downloads. In this example, I used USB memstick with amd64 architecture. Upon booting on CD/USB, The following illustrations below are guide about what you are going through on setting up pfSense Firewall. Let autoboot start the boot process or press 1. After several scripts are shown it will stop at this point. Press I to install launch the installer or let the auto boot continue.
- 2. This is the first page of installation. Select accept these settings.
- 3. Click on Quick/Easy install Click OK if you don’t need to custom your disk partition Select standard kernel so that you can use your VGA and Keyboard Devices to the console.
- 4. Reboot the machine and when remove the installation media when the device is shut down. Before reboot, you will see the pfSense LAN interface IP address and the username and password. (used in accessing webGUI) LAN IP: 192.168.1.1 User: admin pw: pfsense
- 5. The following illustrations found after the installation finished and the machine was rebooted. In this example, I assign re1 for WAN and re0 for LAN. Press y to proceed on setting up VLANs. TIP: plug in your LAN interface, disconnect the WAN so that you can easily determine the re0 and re1 interface on your physical drive. On the box above, I set the WAN interface to re1 and LAN interface to re0. On the optional interface leave it blank and press enter. The n click y to proceed.
- 6. The main screen of your pfsense console.
- 8. I have a PPPoE connection provided by Globe. Set your own WAN connection depending on your type of connection. On Configuring my WAN interface, I selected PPPoE . Then scroll down until you see the PPPoE configuration section. On this PPPoE section, Fill up the PPPoE Username and Password.
- 9. Set your LAN IP Address then click next If you want to change the default password fill up the fields on the illustration above. Click on reload
- 10. Click “here” word on the Click here to continue pfSense webConfigurator. This is your dashboard, you can customize your view here (add Widgets)
- 11. Installing Squid and SquidGuard Package on pfSense Install the Package First, install the Squid package. 1. Click System > Packages 2. Click on the Available Packages Tab 3. Scroll down until the "squid" and “squidGuard” package listing is visible 4. Click located to the right of the squid package description 5. Wait for the installer to download, install, and do post-install tasks for squid, such as creating the cache directories. 6. Refer to image below:
- 12. Adding Personal Signed Certificate (to be used in ssl filtering) Go to System -> Cert. Manager On Cert Manager select CAs tab then click add.
- 13. Fill up necessary fields. Then click save
- 14. Configure the Squid Package Select services -> Squid Proxy Server Tick check to enable the squid proxy
- 15. Tick to keep settings when you reinstall the package. Choose LAN interface to proxy LAN
- 23. On the general settings tab, tick check the enable and press enter to start squidguard service. On Logging Options section, tick check Enable log GUI, Enable log and Rotation log.
- 24. On Blacklist section, tick check Blacklist to enable it. Then fill up Blacklist URL where you can download the tar.gz file. (Search for http://www.squidguard.org/blacklists.html for the URLs) Select the Blacklist tab then click on download. Wait until the download reach 100%. Now go to Times tab, Click add button.
- 25. Fill up preferred schedule, if there is additional time click add on the bottom of the time table. (Here I created Office Hours Mon-Fri 8am – 5pm With 12pm-1pm lunchbreak and 10am-10:30am and 3:00pm to 3:30pm breaktime.) Then click save when done.
- 26. Click Target categories tab, click add to add a target category. (What to block and what to exempt IPs and domains. Name your category on first field on general settings.
- 27. Fill in the domains that are included in the category. List the domains separated by space. On regular expression text area, fill in the words that are blocked by URL word content. You can also add file extensions to block download of the file types. Click in to Group ACL then click add button. (you can also use the common acl but common ACLs don’t have option to scheduling.)
- 28. On the name field, type the name of the group. (example is ACTSTECHnetwork because clients on this network are being controlled. On client source field, type the ip range or ip address or subnet for the clients that are included in this access control group. On time field, select the schedule that you created for this group.
- 29. On Target Rules List, click the + button to collapse the list of targets. You can see there are to columns but the same lists, the left side is to deny a target list on the scheduled time while the right side is the access when the schedule is idle or not in the schedule.
- 30. On the bottom of the target rules list, allow default access(all).
- 31. Choose ext url redirect (enter URL) as your redirect mode. Input the redirect URL to the redirect field. Tick check the log to Log this Group. Click save Button.