
Recommended
More Related Content
Similar to How to and scenario
Similar to How to and scenario (20)
More from EkramOthman1
Recently uploaded
Recently uploaded (20)
How to and scenario
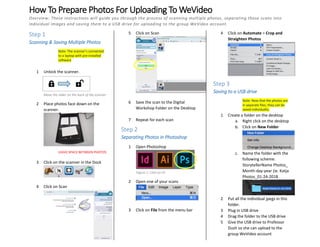
- 1. How To Prepare Photos For Uploading To WeVideo Overview: These instructions will guide you through the process of scanning multiple photos, separating those scans into individual images and saving them to a USB drive for uploading to the group WeVideo account. Step 1 Scanning & Saving Multiple Photos Note: The scanner’s connected to a laptop with pre-installed software 1 Unlock the scanner. 2 Place photos face down on the scanner. LEAVE SPACE BETWEEN PHOTOS 3 Click on the scanner in the Dock 4 Click on Scan 5 Click on Scan 6 Save the scan to the Digital Workshop Folder on the Desktop 7 Repeat for each scan Step 2 Separating Photos in Photoshop 1 Open Photoshop 2 Open one of your scans 3 Click on File from the menu bar 4 Click on Automate > Crop and Straighten Photos Step 3 Saving to a USB drive Note: Now that the photos are in separate files, they can be saved individually. 1 Create a folder on the desktop a. Right click on the desktop b. Click on New Folder c. Name the folder with the following scheme: StorytellerName Photos_ Month-day-year (ie. Katja Photos_01-24-2018 2 Put all the individual jpegs in this folder. 3 Plug in USB drive 4 Drag the folder to the USB drive 5 Give the USB drive to Professor Dush so she can upload to the group WeVideo account Figure 1: Click on Ps Move the slider on the back of the scanner
- 2. SCENIARIO Primary Audience The instructions are for digital storytelling workshop volunteers who will assist participants with digitizing their photographs. The volunteers will have some experience with scanning, and technology and the workshop leader, Professor Lisa Dush , will be available in case questions arise. Context The instructions will be used in a digital story telling workshop. The workshop volunteer(s) will be using a designated scan work station. This station will have the scanner attached to the computer/laptop with pre-installed software and drivers. The volunteer will scan participant's photos and use Photoshop to separate the multi-photo scans into individual images. Then the volunteer will save the images into a file on the desktop and then save that folder onto a USB drive for Professor Dush to upload to the group WeVideo account. Other Audiences Other audiences will be the participants of the workshop and the professor holding the workshop. Participants may have varying degrees of technological savviness and some students may become curious of the process used to get their photographs ready for the WeVideo account. The professor is another audience because she'll anticipate where the volunteer might get tripped up and will factor in time for explaining those steps. Template Rationale The instructions are designed in a landscape layout to include the whole process on the front of one sheet of paper. The paper will be scored to allow viewing one section at a time, or can be left open to view the whole of the information at once. The reason for choice in folding is because the volunteer will be working with many photographs and having the choice to fold the paper will allow for more focused attention on the task at hand while keeping the workspace free of unnecessary information or clutter. While leaving it open will allow the volunteer to quickly see how many more steps before the process is complete. The instructions are sectioned off into categories or key steps (Scanning and Saving Multiple Photos, Separating photos in Photoshop, Saving to a USB drive). Each chunk includes: step- by-step instructions, photos, screen shots and/or illustrations to help move the volunteer to the next key step. Important information (such as tips, warnings, notes, etc.) is called out by using background shapes and color. The text is also offset (or not aligned) to the main instructional text to help provide negative space. The negative space and color/shape change provides the volunteer with a visual cue that this information is not part of the main instructions, but is something that should be looked at.