Method to expose rats to ozone-updated2014
•
0 likes•702 views

A short document describing how to set up a datalogger, ozone generator, and ozone monitor to expose rats to ozone. I had help set this up some time ago for a pharmacy research project. It is not necessarily the only way or best way since there many other similar items available, but it did work.

Recommended
Recommended
More Related Content
What's hot
What's hot (20)
Similar to Method to expose rats to ozone-updated2014
Similar to Method to expose rats to ozone-updated2014 (20)
More from TAMUK
More from TAMUK (20)
Recently uploaded
Recently uploaded (20)
Method to expose rats to ozone-updated2014
- 1. Exposing Rats to Ozone – Method Setup Update 2014 There are other ways to do this much cheaper, but this would put together since this what was freely available at the time. Today I would probably use an Arduino or some other cheap datalogger with simple relay capability. There are too many vendors to list. For ozone monitoring, the 2B Technologies Model 202 Ozone Monitor would do fine. It is EPA approved as well. It has the capability of built in storage card and has an analog output. It might also be a good idea to have a small fan and some heating strips to circulate the air and minimize moisture from the rats' breathing. It is also good to minimize any moisture to prevent damage to the ozone monitor. It was never necessary, but it would have been neat to have swapped the potentiometer control for ozone level with an electronic one. Otherwise, it is a test and go until it is right at first. Make sure generator and ozone monitor are sized appropriately to the concentrations and size of the enclose area. A Crystal Air (or the slightly bigger model) http://www.ozone.ca/products/DC-PRO-200.htm Ozone Monitor http://www.twobtech.com/model_202.htm Crystal Air http://www.ozone.ca/products/DC-PRO-200.htm 1
- 2. Exposing Rats to Ozone – Method Setup Purpose: This document explains the basics of setting up an experimental system for exposing mice or rats to high concentrations of ozone. Most of the components may be available over the internet from lab suppliers or other vendors. The setup for exposing the rats to ozone consists of a closed chamber, a Dasibi 1008 series ozone monitor, a Zeno 3200 datalogger from Coastal Environmental Systems, a dehumidifier for the chamber, a couple of heating strips for regulating temperature/humidity in the chamber, and a Crystal Air Model 450 ozone generator. The heating strips, dehumidifier, and ozone monitor need to operate constantly. Air is fed into the chamber from the laboratory compressed air supply. A sampling tube is inside the chamber and attaches to the ozone monitor. The ozone monitor has an output voltage that is fed into a channel on the Zeno 3200 datalogger. The datalogger records the ozone level in one minute averages and activates a 12V relay that controls a standard 110V outlet to turn the ozone generator on or off. The ozone level is programmed into the datalogger and the datalogger records the ozone levels and determines when the relay should run the ozone generator on or off with some simple if/then combinations that are part of the Zeno 3200's operating system. A desktop or laptop computer is available only to access the datalogger with Window's Hyperterminal software to download the data and program the datalogger. Materials and Equipment Glove Box: This chamber also has power strip built-in. One power strip or electrical cord will have to be committed for turning the ozone generator on and off. The heating strips and dehumidifier should be left on all the time. This will probably require another power strip. It will also be important to have constant supply of lab compressed air flowing into the chamber so the animals do not suffocate. 2
- 3. Exposing Rats to Ozone – Method Setup Dasibi 1008 AH Ozone Monitor This particular model and brand of ozone monitor is no longer made. Other models can be used. Make sure to keep moisture out of these monitors. Some models do not tolerate condensation too well and one could end up with some expensive repairs. Zeno 3200 Datalogger http://www.coastalenvironmental.com/ Coastal Environmental Systems, Inc. 820 First Avenue South Seattle, WA 98134 Phone:206-682-6048 800-488-8291 Fax: 206-682-5658 This model has a numerous channels for recording electrical signals from ozone monitors to ph meters or wind speed or thermocouples. It also has some general programming capability so electrical relays can be activated at certain times or when a specific value has been reached by a recording instrument. It functions independently of a desktop or laptop computer. 3
- 4. Exposing Rats to Ozone – Method Setup 12V Relay Radioshack 12VDC/10A DPDT Plug-in Relay Model: 275-218 | Catalog #: 275-218 Wiring Diagrams/Schematics Materials: 12V Relay, some small gauge wire of a few inches or more (used to wire the relay and ozone monitor voltage output to datalogger), an electrical cord, a standard outlet with 2 plugs, a box and cover to house the outlet and relay. The standard electrical cord of 12 or 14 gauge wire will typically have a black, white, and green. One can also cut off the end of an extra computer cord. Solder the black wire and white wire to the prongs as indicated on the relay. Wire the green ground wire directly to the connection on the plug. Solder a n inch or two from the relay and strip the ends of the wire to connect the outlet to the relay. Most plugs usually have a copper and silver screw and a ground connection; wire the black to copper and the white to silver. This outlet will be used to turn the ozone generator on and off. Wire the relay to the 12V connections on the datalogger; wire one to Channel A, B, or C and the other to a ground (any of the channels will work, just make sure to modify programming accordingly). Wire the the output of the ozone monitor to the channel on the datalogger; wire the (+) to the input channel and the (-) to a ground connection on the datalogger terminals. 4
- 5. Exposing Rats to Ozone – Method Setup Zeno Program Follow this if inputting the setting manually. The program to upload is at the end of this document. This is a crude control system, so it may be necessary to adjust the values plus or minus at the desired point. For example, if 800 ppb is desired, the program might be set to 801 or 805 ppb before cutting off the ozone generator. Keep in mind that the datalogger is an electronic device and it will always DO WHAT YOU TELL IT TO DO not what you want it to do. * Zeno 3200 System Configuration Menu File * Program Version And Date: ZENO-3200 using ZENOSOFT V2.02 Sep 10 2002 11:29:41 CS B97B * (C)opyright 1995-2002, Coastal Environmental Systems, Seattle, WA, USA. * Menu Setup File Date And Time: 07/07/25 16:09:41 COMMUNICATIONS MENU (Cn/m) Change Item n To Value m (M) Modem Menu (P) Power Control Menu (G) GOES Menu (A) ARGOS Menu (D) Digital Control Menu Item Item Item Item Item Item SYSTEM (Cn/m) (S) (T) (V) (K) (B) 1: 2: 3: 4: 5: 6: (COM1 (COM2 (COM3 (COM1 (COM2 (COM3 Baud Baud Baud Port Port Port SAMPLE (Cn/m) (E) (U) 1: 2: 3: 4: 5: 6: 7: 8: 9: 0 0 1 1 0 0 0 <ESC> 60 (I) (E) (U) (Q) (H) Contact Information Save Parameters To EEPROM User Menu Quit Help (Primary Unit/Experiment ID) (Secondary Unit/Experiment ID) (Data Dump Format) (Real Time Output Format) (Add Compass To Vane) (Compass Offset) (Barometer Elevation) (Bad Sensor Value Replace) (Passthrough Mode Escape Character) PERIOD MENU Change Item n To Value m Save Parameters To EEPROM User Menu 1: Repeater Menu Terminal Mode On COM Port n Save Parameters To EEPROM User Menu Quit Help Rate) Rate) Rate) Type) Type) Type) FUNCTIONS MENU Change Item n To Value m System Date And Time Calibrate Internal Temperature Program Version Constants Menu BIT Names Menu Item Item Item Item Item Item Item Item Item Item 9600 9600 9600 RS232 RS232 RS232 (R) (Tn) (E) (U) (Q) (H) (Q) Quit (H) Help (Sample Interval Time) 5
- 6. Exposing Rats to Ozone – Method Setup Item Item 2: 3: 30 0 (Sample Duration Time) (Sample Time Offset) MODEM MENU (Cn/m) Change Item n To Value m (E) Save Parameters To EEPROM (S) Speech Interface Menu Item 1: Item 2: Item 3: Item 4: Item 5: Item 6: Item 7: Item 8: Item 9: Item 10: Item 11: 0 NONE 5 0 NONE NONE NONE NONE NONE 0 0 (System Modem Type) (Modem COM Port) (Modem Retry Period) (Modem Hangup Delay) (Modem Telephone Number 1) (Modem Telephone Number 2) (Modem Telephone Number 3) (Modem Telephone Number 4) (Modem Initialization String) (Modem Switched Voltage) (Modem Ring Detect Channel) POWER CONTROL MENU (Cn/m) Change Item n To Value m (E) Save Parameters To EEPROM (U) User Menu Item Item Item Item Item 1: 2: 3: 4: 5: 100 0 0 0 0 (Q) Quit (H) Help (COM1 Push-To-Talk Setup Time) (COM1 Switched Power Code) (COM2 Switched Power Code) (COM3 Switched Power Code) (Response Delay Time (milliseconds) GOES MENU (Cn/m) Change Item n To Value m (D) Run GOES Diagnostics (R) Reset GOES Errors (I) Initialize GOES Item 1: Item 2: Item 3: Item 4: Item 5: Item 6: Item 7: Item 8: Item 9: Item 10: Item 11: (U) User Menu (Q) Quit (H) Help 03001190 151 00:03:00:00 00:00:00 1 SHORT 151 00:00:00 00:05:00 1200 NONE (E) (U) (Q) (H) Save Parameters To EEPROM User Menu Quit Help (Data Collection Platform Address) (Self-Timed Transmit Channel Number) (Self-Timed Transmission Interval) (Self-Timed Transmission Offset) (Transmission Window Length) (Satellite Link Parameter: Preamble) (Random Transmit Channel Number) (Random Transmission Interval) (Random Disable Time) (GOES Bit Rate) (GOES Interleaver) DIGITAL CONTROL MENU (Cn/m) Change Item n To Value m (E) Save Parameters To EEPROM (U) User Menu (Q) Quit (H) Help 6
- 7. Exposing Rats to Ozone – Method Setup Item Item Item Item 1: 2: 3: 4: 000:00:00 000:00:00 03/07/29 15:00:00 0 (Power On Interval) (Power On Duration) (Start of First Power On) (Control Channel) REPEATER MENU (Cn/m) Change Item n To Value m (R) Reset All Repeater Values (E) Save Parameters To EEPROM Item 1: Item 2: Item 3: Item 4: Item 5: Item 6: Item 7: Item 8: Item 9: Item 10: Item 11: (U) User Menu (Q) Quit (H) Help Repeater Tranmit Delay Network Source Address Alternative Source Address Remote ZENO Address #1 Remote ZENO Address #2 Remote ZENO Address #3 Remote ZENO Address #4 Remote ZENO Address #5 Remote ZENO Address #6 Remote ZENO Address #7 Remote ZENO Address #8 0 msec -1 -1 -1 -1 -1 -1 -1 -1 -1 -1 ARGOS MENU (Cn/m) Change Item n To Value m (E) Save Parameters To EEPROM (D) Display ARGOS Message Item Item Item Item Item Item 1: 2: 3: 4: 5: 6: 42 1 10 0 NO NO (U) User Menu (Q) Quit (H) Help (Tranmission Repeat Interval, seconds) (Transmission Repeat Count) (Radio Push-To-Talk Delay Time, milliseconds) (Radio Push-To-Talk Digital Port) (Use Hour/Min Time Stamp in Message) (Use Checksum in Final Message Byte) CONSTANTS MENU (Cn/m) Change Constant n to Value m (P) Previous Page of Constants (N) Next Page of Constants (X) Erase All Constants Constants 1 through 20 Constant 1: 0 Constant 2: 100 Constant 3: 0 Constant 4: 0 Constant 5: 0 Constant 6: 0 Constant 7: 0 Constant 8: 0 Constant 9: 0 Constant 10: 0 Constant Constant Constant Constant Constant Constant Constant Constant Constant Constant (E) (U) (Q) (H) 11: 12: 13: 14: 15: 16: 17: 18: 19: 20: SPEECH INTERFACE MENU 7 0 0 0 0 0 0 0 0 0 0 Save Parameters To EEPROM User Menu Quit Help
- 8. Exposing Rats to Ozone – Method Setup (Cn/m) Change Item n To Value m (E) Save Parameters To EEPROM (U) User Menu Item Item Item Item 1: 2: 3: 4: NO 0 0 0 (Speech (Speech (Speech (Speech Interface Installed) Activity Channel) Tone Detect Channel) Switched Voltage) BIT NAMES MENU (Cn/m) Change Bit n to Value m (E) Save Parameters To EEPROM (U) User Menu BIT Bit Bit Bit Bit Bit Bit Bit Bit Bit Bit Bit Bit Bit Bit Bit Bit (Q) Quit (H) Help Names 1 through 32 1: ZENO-3200-Reset 2: Real-Time-Clock-Suspect 3: Logging-Memory-Initialized 4: Serial-Sensor-COM-Failure 5: EEPROM-Suspect 6: 18-Bit-ADC-Suspect 7: 12-Bit-ADC-Suspect 8: Temperature-Clock-Adjustment 9: 10: 11: 12: 13: 14: 15: 16: (Q) Quit (H) Help Bit Bit Bit Bit Bit Bit Bit Bit Bit Bit Bit Bit Bit Bit Bit Bit BACK DOOR MENU (Cn/m) Change Item n To Value m (F) Calculate Free Heap Memory (A) Auto-Calibrate Compass (I) Initialize Compass (R) Reset Parameters To Defaults (Y) Configuration Heap Usage Item 1: Item 2: Item 3: Item 4: Item 5: Item 6: Item 7: Item 8: Item 9: Item 10: Item 11: 16777 0 60 18 VOLTS NO 32767.69 0 1.0000 0 500 17: 18: 19: 20: 21: 22: 23: 24: 25: 26: 27: 28: 29: 30: 31: 32: (G) (X) (E) (W) (U) (H) Reinitialize Flash Memory Display Stack Usage Save Parameters To EEPROM Harware Test Menu User Menu Help (Processor Clock Speed) (RAM/ROM Wait States) (50/60 Hz Rejection For 18-bit ADC) (13/18 Bit Operation Of 18-bit ADC) (A To D Conversion Results) (Expert Menu Mode) (Real-time Clock Crystal Frequency At 25 Degrees C) (Speed vs. Noise Tradeoffs For 18-bit ADC, Factory Only) (12-bit ADC Correction Factor) (Zero Offset Period in Seconds) (Low Freq. Sensor Timeout in msec) SENSOR MENU (Cn/m) Change Item n To Value m (Jn) Jump To Record n 8
- 9. Exposing Rats to Ozone – Method Setup (A) (B) (X) (C) (V) (Sn/m) Insert After This Record Insert Before This Record Cut Record to Clipboard Copy Record To Clipboard Paste Record From Clipboard Search Item n for Value m (N) (P) (XA) (Z) (H) Go To Next Record Go To Previous Record Delete ALL Records Zeno Program Menu Help Sensor Items for Record 1 of 3: Item 1: Sensor Type Code Item 2: Sensor Name Item 3: Sensor Input Channel Item 4: Analog Channel Gain Item 5: Analog Channel Attenuation Item 6: Switched Power Code Item 7: Sensor Excitation Voltage Code Item 8: Switched Excitation Return Item 9: Switched Power Warmup Time Item 10: Sensor Sample Count Item 11: Maximum Sensor Readings Item 12: Sensor Timing Loop Item 13: Conversion Coefficient A Item 14: Conversion Coefficient B Item 15: Conversion Coefficient C Item 17: No. of Additional 15-msec Delays 3 (18-bit Differential A to D) pHST 7 1 1 3 (12V SW'D A) 0 (NO EXCITATION VOLTAGE) 0 3 1 0 2 (1.0 seconds) 0 40 0 0 Sensor Items for Record 2 of 3: Item 1: Sensor Type Code Item 2: Sensor Name Item 3: Sensor Input Channel Item 4: Analog Channel Gain Item 5: Analog Channel Attenuation Item 6: Switched Power Code Item 7: Sensor Excitation Voltage Code Item 8: Switched Excitation Return Item 9: Switched Power Warmup Time Item 10: Sensor Sample Count Item 11: Maximum Sensor Readings Item 12: Sensor Timing Loop Item 13: Conversion Coefficient A Item 14: Conversion Coefficient B Item 15: Conversion Coefficient C Item 17: No. of Additional 15-msec Delays 3 (18-bit Differential A to D) pHMT 3 1 1 3 (12V SW'D A) 0 (NO EXCITATION VOLTAGE) 0 3 1 0 2 (1.0 seconds) 0 40 0 0 Sensor Items for Record 3 of 3: Item 1: Sensor Type Code Item 2: Sensor Name Item 3: Sensor Input Channel Item 4: Analog Channel Gain Item 5: Analog Channel Attenuation Item 6: Switched Power Code Item 7: Sensor Excitation Voltage Code Item 8: Switched Excitation Return 3 (18-bit Differential A to D) cond 5 1 1 3 (12V SW'D A) 0 (NO EXCITATION VOLTAGE) 0 9
- 10. Exposing Rats to Ozone – Method Setup Item Item Item Item Item Item Item Item 9: 10: 11: 12: 13: 14: 15: 17: Switched Power Warmup Time Sensor Sample Count Maximum Sensor Readings Sensor Timing Loop Conversion Coefficient A Conversion Coefficient B Conversion Coefficient C No. of Additional 15-msec Delays PROCESS MENU (Cn/m) Change Item n To Value m (A) Insert After This Record (B) Insert Before This Record (X) Cut Record to Clipboard (C) Copy Record To Clipboard (V) Paste Record From Clipboard (Sn/m) Search Item n for Value m 3 1 0 2 (1.0 seconds) 0 40 0 0 (Jn) (N) (P) (XA) (Z) (H) Jump To Record n Go To Next Record Go To Previous Record Delete ALL Records Zeno Program Menu Help Process Items for Record 1 of 5: Item 1: Process Category Item 2: Process Number Item 3: User-defined Process Name Item 4: Input for Data (X) Item 5: A2 Coefficient Item 6: A1 Coefficient Item 7: A0 Coefficient 5 : Arithmetic 8 : Quadratic Process pHST S1 : pHST 0 1.113 -6.148 Process Items for Record 2 of 5: Item 1: Process Category Item 2: Process Number Item 3: User-defined Process Name Item 4: Input for Data (X) Item 5: A2 Coefficient Item 6: A1 Coefficient Item 7: A0 Coefficient 5 : Arithmetic 8 : Quadratic Process pHMT S2 : pHMT 0 0.98 -4.522 Process Items for Record 3 of 5: Item 1: Process Category Item 2: Process Number Item 3: User-defined Process Name Item 4: Input for Data (X) Item 5: A2 Coefficient Item 6: A1 Coefficient Item 7: A0 Coefficient 5 : Arithmetic 8 : Quadratic Process Cond S3 : cond 0 694.5 -2777.8 Process Items for Record 4 of 5: Item 1: Process Category 3 10 : Alarm
- 11. Exposing Rats to Ozone – Method Setup Item 2: Item 3: Item 4: Item 5: Item 6: Item 7: Item 8: Item 9: Item 10: Process Number User-defined Process Name Input for Data Alarm Setpoint Alarm Reset BIT Flag Number (1 - 31) Digital Output Channel 1 Digital Output Channel 2 Switched Voltage 3 : Alarm Process pHch3 S2 : pHMT 12 13.5 0 0 0 4 Process Items for Record 5 of 5: Item 1: Process Category Item 2: Process Number Item 3: User-defined Process Name Item 4: Input for Data Item 5: Alarm Setpoint Item 6: Alarm Reset Item 7: BIT Flag Number (1 - 31) Item 8: Digital Output Channel 1 Item 9: Digital Output Channel 2 Item 10: Switched Voltage 3 : Alarm 3 : Alarm Process cond S3 : cond 6.5 6.4995 0 0 0 5 DATA OUTPUT MENU (Cn/m) Change Item n To Value m (A) Insert After This Record (B) Insert Before This Record (X) Cut Record to Clipboard (C) Copy Record To Clipboard (V) Paste Record From Clipboard (Sn/m) Search Item n for Value m (Jn) (N) (P) (XA) (Z) (H) Jump To Record n Go To Next Record Go To Previous Record Delete ALL Records Zeno Program Menu Help Data Items for Record 1 of 5: Item 1: Field Type Code Item 2: Output Message(s) Item 3: Field Name Item 4: Input Record Item 5: Field Decimal Places Item 6: Field Width Item 7: Data Storage Class Code 9 : Transmit and Log Data Field 1 pHmAST S1 : pHST 1 6 8 : 4-byte floating point Data Items for Record 2 of 5: Item 1: Field Type Code Item 2: Output Message(s) Item 3: Field Name Item 4: Input Record Item 5: Field Decimal Places Item 6: Field Width Item 7: Data Storage Class Code 9 : Transmit and Log Data Field 1 pHST P1.1 : pHST 1 6 8 : 4-byte floating point 11
- 12. Exposing Rats to Ozone – Method Setup Data Items for Record 3 of 5: Item 1: Field Type Code Item 2: Output Message(s) Item 3: Field Name Item 4: Input Record Item 5: Field Decimal Places Item 6: Field Width Item 7: Data Storage Class Code 9 : Transmit and Log Data Field 1 condST P3.1 : Cond 1 6 8 : 4-byte floating point Data Items for Record 4 of 5: Item 1: Field Type Code Item 2: Output Message(s) Item 3: Field Name Item 4: Input Record Item 5: Field Decimal Places Item 6: Field Width Item 7: Data Storage Class Code 9 : Transmit and Log Data Field 1 pHmAMT S2 : pHMT 1 6 8 : 4-byte floating point Data Items for Record 5 of 5: Item 1: Field Type Code Item 2: Output Message(s) Item 3: Field Name Item 4: Input Record Item 5: Field Decimal Places Item 6: Field Width Item 7: Data Storage Class Code 9 : Transmit and Log Data Field 1 pHMT P2.1 : pHMT 1 6 8 : 4-byte floating point GENERAL SERIAL SCRIPT MENU (Cn/m) Change Line n to m (In) Insert Line n (Rn) Remove Line n (En) Erase Line n (L) Delete All Lines (A) Insert After this Script (B) Insert Before this Script (X) (Jn) (N) (P) (XA) (Z) (H) Delete this Script Jump to Script n Go to Next Script Go to Previous Script Delete All Scripts Zeno Program Menu Help Script Lines for Script 1 of 1 Line 1: NO_COMMAND SENSOR TIMING LOOP MENU (Cn/m) Change Item n To Value m (Z) Zeno Program Menu Item Item Item Item 1: 2: 3: 4: 0.5 1.0 1.5 2.0 (Timing (Timing (Timing (Timing Loop Loop Loop Loop OUTPUT MESSAGE TIMING MENU (Cn/m) Change Item n To Value m (Z) Zeno Program Menu (H) Help #1 #2 #3 #4 Period) Period) Period) Period) (H) Help 12
- 13. Exposing Rats to Ozone – Method Setup Item 1: Item 2: Item 3: Item 4: Item 5: Item 6: Item 7: Item 8: Item 9: Item 10: COM3 COM3 COM3 COM3 0.0 0.0 0.0 0.0 0 0 (Data Output Message #1 COM Port) (Data Output Message #2 COM Port) (Data Output Message #3 COM Port) (Data Output Message #4 COM Port) (Data Output Message #1 Period) (Data Output Message #2 Period) (Data Output Message #3 Period) (Data Output Message #4 Period) (Record Counter Starting Value) (Record Counter Reset Value) MEMORY MANAGEMENT MENU (Cn/m) Change Item n To Value m (Z) Zeno Program Menu (H) Help Item 1: 0 (COM1 GSI Memory Size in Bytes) Item 2: 0 (COM2 GSI Memory Size in Bytes) Item 3: 0 (COM3 GSI Memory Size in Bytes) * !!SYSTEM TRANSFER COMPLETE. * Turn Off File Capture Now. * Enter Any Key To Continue. EOF Copy this to a text editor like Notepad and upload the file to the Zeno 3200. Make sure the top line is the beginning of the file with no extra spaces: * Zeno 3200 System Setup File * Program Version And Date: ZENO-3200 using ZENOSOFT V2.02 Sep 10 2002 11:29:41 CS B97B * (C)opyright 1995-2002, Coastal Environmental Systems, Seattle, WA, USA. * Setup File Date And Time: 07/07/25 16:09:19 PARAM1 60 0 30 2 3 4 0 0 9600 9600 PARAM2 9600 0 0 0 0 1 1 0 0 0 PARAM3 16777 0 60 18 0 0 0 0 2 2 PARAM4 2 2 0 0 0 3276769 0 -1 5 0 PARAM5 3 0 0 0 100 0 0 0 0 0 PARAM6 0 0 0 1059577200 50336144 151 196608 0 1 0 PARAM7 151 0 1280 0 10000 -1 -1 0 10 1 PARAM8 42 0 0 0 0 0 0 0 0 0 PARAM9 0 0 0 0 0 0 5 0 0 0 PARAM10 500 0 0 0 1200 -1 27 PARAM11 "NONE" "NONE" "NONE" "NONE" "NONE" "NONE" "" "ZENO" "" "NONE" PARAM12 "" "ZENO-3200-Reset" "Real-Time-Clock-Suspect" "Logging-Memory-Initialized" "Serial-Sensor-COM-Failure" "EEPROM-Suspect" "18-Bit-ADC-Suspect" "12-Bit-ADCSuspect" "Temperature-Clock-Adjustment" "" PARAM13 "" "" "" "" "" "" "" "" "" "" PARAM14 "" "" "" "" "" "" "" "" "" "" PARAM15 "" "" "" REPEAT1 -1 -1 -1 -1 -1 -1 -1 -1 CONSTANT1 0 100 0 0 0 0 0 0 0 0 CONSTANT2 0 0 0 0 0 0 0 0 0 0 GSI 1 NO_COMMAND SENSOR 3 "pHST" 7 0 0 3 0 0 3 1 0 2 0 40 0 0 0 0 0 0 0 0 0 0 S0.1 13
- 14. Exposing Rats to Ozone – Method Setup SENSOR 3 "pHMT" 3 0 0 3 0 0 3 1 0 2 0 40 0 0 0 0 0 0 0 0 0 0 S0.1 SENSOR 3 "cond" 5 0 0 3 0 0 3 1 0 2 0 40 0 0 0 0 0 0 0 0 0 0 S0.1 PROCESS 5 8 "pHST" S1.1 0 1.113 -6.148 PROCESS 5 8 "pHMT" S2.1 0 0.98 -4.522 PROCESS 5 8 "Cond" S3.1 0 694.5 -2777.8 PROCESS 3 3 "pHch3" S2.1 12 13.5 0 0 0 4 PROCESS 3 3 "cond" S3.1 6.5 6.4995 0 0 0 5 DATA 9 1 "pHmAST" S1.1 1 6 8 P1.1 P1.1 P1.1 DATA 9 1 "pHST" P1.1 1 6 8 P1.1 P1.1 P1.1 DATA 9 1 "condST" P3.1 1 6 8 P1.1 P1.1 P1.1 DATA 9 1 "pHmAMT" S2.1 1 6 8 P1.1 P1.1 P1.1 DATA 9 1 "pHMT" P2.1 1 6 8 P1.1 P1.1 P1.1 * !!SYSTEM TRANSFER COMPLETE. * Turn Off File Capture Now. * Enter Any Key To Continue. EOF 14
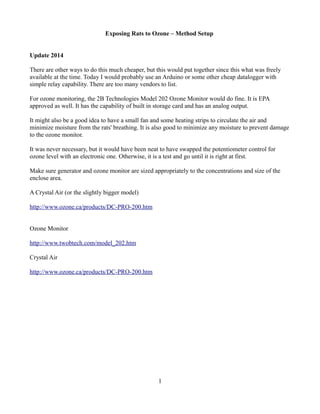
- 15. 110V AC Relay and outlet wired together inside box. Control wires go to chosen 12V channel on datalogger. The ozone value is read from the ozone monitor to turn the ozone generator on and off. Ozone Monitor Ozone Generator Fan. Circulates air in chamber and shows that circuit is turned on. (+) and (-) for output voltage of monitor. Dehumidifier and heat strips inside H e chamber. a t S t r i p 15