
Recommended
More Related Content
Similar to Making A Sequin Charleston Tiara
Similar to Making A Sequin Charleston Tiara (20)
Recently uploaded
Recently uploaded (6)
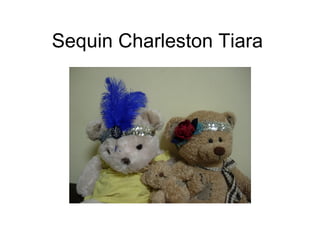
Making A Sequin Charleston Tiara
- 2. You will need • 47cm elastic sequins (for child) – 30mm wide • Palm-sized piece of felt • Trims and decorations – beads, feathers, chain etc • Contrast or matching embroidery floss
- 3. Getting Started . • Cut sequin length to fit head circumference – 47cm allows 2cm seam and fits most kids
- 4. Assembling the Headband • Straight stitch sequin ends together with 1 cm seam allowance. Then zigzag the seam down.
- 5. Adding decoration • Cut 2 of felt shape required – sew decorative beads to front piece of felt. • Create chains with beads to dangle if required. Sew these to the back of the front felt piece.
- 6. Adding decoration, cont’d • Secure feathers to the back of the front piece of felt by stitching firmly in place. Be careful to stitch behind your decorative beads in the front or not stitch through to front of the felt.
- 7. Completing • Position front felt and back felt either side of seam in sequin elastic • Stitch front and back pieces of felt together – you can try to use an invisible running stitch by just catching the felt. Or use an embroidery thread in a contrasting or matching colour. I have also added beads into the running stitches to create an outline pattern on the felt. To finish, knot your thread and run it once more through the middle of the two pieces of felt. Cut at other end.