How to make a shredder bow
•
4 likes•1,053 views

Create beautiful bows to add to your gift wrapping by Create & Craft TV's Gift Wrapping Expert & Creative Business Growth Expert Neelam Meetcha Learn more on our hands on master gift wrapping classes at bit.ly/1ux14YW
Report
Share
Report
Share
Download to read offline

Recommended
cara cantuman dilakukan (animasi)
This document provides instructions for grafting and budding techniques. It begins by defining grafting and noting that only rootstocks and scions from the same type of tree can be used. It then lists the advantages and disadvantages of grafting and budding. The document provides detailed steps for selecting and preparing rootstock and scion materials, performing cleft, whip, and tongue grafts, and T-budding. It emphasizes cleanliness and using sharp tools. The goals are to have the bark of the scion and rootstock match and for the graft or bud to take and grow.
Decorative-Articles technology and livelihood educationMARCH15.pptx
The document provides instructions for making three different types of ribbon bows that can be used for gift wrapping, decorations, and hair accessories.
The first type is a wire-bound ribbon bow, which is made by cutting a piece of ribbon, creating two loops in the center, tightly wrapping wire around the center to secure it, and adjusting the loops and tails.
The second is a grosgrain ribbon bow, which is made by measuring and wrapping ribbon around a box, making loops by folding the ribbon and bringing them back to the center, and securing them in place.
The third is a floral ribbon bow, which is made by measuring loops along a length of ribbon, folding and pinching loops
Mini Album Binding tutorial
This document provides step-by-step instructions for making a mini album binding using cardstock, chipboard, and paper. It involves:
1) Creating a binding base from paper and cardstock that is the same height as the album pages.
2) Adhering a center chipboard panel to the binding base.
3) Scoring and assembling three binding inserts of graduated sizes that interlock.
4) Attaching the binding base and inserts to the front and back covers to create the album structure.
5) Adhering pages to the binding inserts on both sides to complete the album.
Knitting_and_Crocheting.ppt
This document provides information about knitting and crocheting including why people enjoy these hobbies and the basic techniques and materials needed. It discusses the calming effect and sense of accomplishment of knitting and crocheting as well as how to get started by taking classes that are offered in many locations or by buying materials from yarn shops, craft stores, or online retailers. The basics of knitting, crocheting, and needed tools like needles and hooks are explained in detail through step-by-step instructions for making practice swatches.
Fashion Accessories - TLE.pptx
This document provides step-by-step instructions for creating a necklace at home. It lists the necessary materials, which include beads, thread, pliers, and clasps. The procedures describe determining necklace style and length based on neck measurements. Beads are arranged on a board and threaded onto the stringing material one by one. Crimp beads are used to secure the ends and clasps. Following all the steps results in a homemade beaded necklace.
Quilted Chair Caddy
Directions for a quilted caddy to put on the arm of a chair or sofa that has side pockets and a pin cushion.
Bendy and Bunchy Curves
A lesson of how and why to clip inside and outside curves. Includes tips for beginner and experienced sewists.
Includes a pattern to practice clipping curves and tip sheets for handsewing and sewing with Minky-type fabrics.
Hope Wire Woven Necklace Tutorial
This tutorial was written by Judy Larson who donated the original piece to help a small boy battling cancer. If you download this tutorial, please consider donating to help Knox. It it is after the time frame for this cause., please donate something ( jewelry design, time, money) in aid of others in need of help. Some suggestions include helping children's hospitals, supporting cancer research.
For other Judy Larson tutorials, please see www.beadinggem.com
How to add beads to lamp shades
Adding beads to a lamp shade can transform a plain shade into a decorative element. Beads can be added to the base or body of the shade depending on the desired style. To create a dotted pattern, hot glue is used to attach flat-back beads marked on the shade. Alternately, a beaded fringe is made by gluing measured beads around the top or bottom of the shade, attaching sections at a time. Different placements create varied designs so beads can update lamp shades in creative ways.
Banner pencil case
This document provides instructions for making a pencil case out of recycled banners using simple sewing. The materials needed are a used banner, zipper, lining cloth, and basic sewing supplies. The instructions involve cutting the banner to size, folding and stitching the edges to form sides, attaching the lining and zipper, and trimming edges to complete the pencil case. The finished project reuses old banners to create an attractive, personalized carrying case for art supplies.
Weaving with paper
Paper weaving is an ancient craft that involves interlacing paper strips in a loom. The document defines key weaving terms like warp, weft, and loom. It then provides a 13-step process to make a paper weaving, including cutting a paper loom, weaving colored paper strips in an over-under pattern, and framing the finished weaving. Various weaving patterns like plain, basket, twill, and satin weaves are also explained.
How To Make A Toadstool Pincushion
The document provides instructions for making a toadstool pincushion. It involves cutting out circles from fabric to use as the toadstool top and spots, stuffing the circles with filling, and stitching them together. A cardboard tube is used for the stalk, which is wrapped in fabric and stuffed with rice. The stalk is then attached to the stuffed toadstool top to complete the pincushion.
Christmas baubles
This document provides instructions for making Christmas baubles using styrofoam balls, tissue paper, glue, cord, pins, and other optional embellishments. The instructions involve wrapping tissue paper around styrofoam balls and gluing it in place. Gold cord is then wound around the balls in various patterns and secured with dressmakers' pins. Additional braids or sequins can be added for further decoration. When complete, the baubles are ready to hang on a Christmas tree.
How to make_a_bow_on_a_present
This document provides instructions for wrapping a present and making a bow with ribbon. It lists the necessary materials and gives 6 steps to follow: 1) measure and cut the ribbon, 2) wrap the ribbon around the present and twist it, 3) flip the present over and prepare to tie the ribbon, 4) make a loop with the ribbon, 5) wrap the long piece of ribbon around and pull it through a small hole to create the bow, and 6) adjust and tighten the loops to make an even bow. Following these steps will result in a perfectly wrapped present with a nice bow.
LO3 Embroidery Stitches.pptx
1. The document describes various embroidery stitches including backstitch, bullion stitch, chain stitch, cross-stitch, feather stitch, fish bone stitch, French knot, herringbone stitch, lazy daisy chain stitch, looped stitch, running stitch, satin stitch, split stitch, seed stitch, and stem stitch.
2. It also provides instructions for transferring embroidery designs using hot-iron transfer, tracing, and stamping methods.
3. Finally, it lists good habits for clean and quality embroidery work such as having a clean work space, proper materials, hair control, using the right needles, proper thread and fabric handling, and cleaning the work area.
Kids craft thecrafideas.com
This document provides instructions for several kids' craft projects, including:
- CD spinners decorated with printed templates for the Fourth of July
- A felt board with seasonal scenery pieces like trees, flowers, snow, and rain that can be changed to depict different seasons
- A fabric-covered bead teething necklace for babies made from a tube of fabric with wooden beads inserted and knotted inside
- A sewn robot tote bag featuring felt applique pieces to create a robot character on the front
Peepsqueak Book Bag
This document provides instructions for making a Peepsqueak book bag with embroidery and quilting. The instructions include cutting fabric and batting pieces, assembling the bag sides by quilting strips of fabric to the batting and lining, adding a pocket and nameplate with embroidery, attaching a zipper, sewing the sides together, and adding handles. Optional instructions are given for making a matching pencil bag with similar construction.
How To Fabric Covered Box
This document provides instructions for covering a fabric box in 3 steps. First, make evenly spaced holes along the sides and ends of the box using a nail and hammer. Second, spray adhesive on the box and fabric before folding the excess fabric over the sides and cutting away the rest. Third, stitch through the fabric and nail holes to attach the fabric to the box, using a running stitch on the sides and backstitch on the ends to hold the box together.
Making A Sequin Charleston Tiara
This document provides instructions for making a sequin tiara for a child. It lists the necessary materials which include 47cm of sequins, felt, trims, and embroidery floss. The steps involve cutting the sequins to fit the child's head size, sewing the ends together, adding decorative elements like beads and feathers to a front piece of felt, and then stitching the felt pieces to the front and back of the sequin band to complete the tiara.
How to make a Sequin Headband - charleston style
This document provides instructions for making a sequin tiara for a child. It lists the necessary materials which include 47cm of sequins, felt, trims, and embroidery floss. The steps involve cutting the sequins to fit the child's head size, sewing the ends together, adding decorative elements like beads and feathers to a front piece of felt, and then stitching the felt pieces to the front and back of the sequin band to complete the tiara.
Exquisite Copper Wire Earrings With Crystal Beads
These darling post earrings are made from two gauges of copper wire and crystal beads. Experiment with materials to make the design your own!
How to make a sketchbook out of two
How to make a sketchbook using two 9" x 12" canvas panels. Great for art teachers or other classroom teachers who want to make a homemade journal.
Double Wrap Wire Bangle Bracelet Tutorial
This document provides instructions for making a double wrap bangle bracelet using beads and wire. The bangle features a wrapped closure and does not require exact sizing, allowing leftover beads to be used. It is an easy project that makes a fun gift. Materials needed are 58" of 20 gauge round wire, beads, and basic pliers. Directions include wrapping the wire to form an eye, adding beads by wrapping the wire around each one, twisting the ends to form a hook, and shaping the bangle.
STACKED DECK.pptx
This document provides an introduction and overview of topics to be covered in a quilting class, including grainlines, colour theory, preparing fabric, tools like the rotary cutter and pins, chain sewing, pressing, and scheduling a fabric shopping field trip. The class will cover the importance of cutting along the grainline for precision and durability, using a colour wheel to understand complementary and analogous colour schemes, pre-washing fabric to prevent bleeding, how to use a rotary cutter and pins properly, the chain sewing technique to save time, and conclude with a video demonstration and opportunity for questions.
Gift Wrap
This document provides instructions for gift wrapping with 8 steps. It explains that learning this skill will allow you to wrap presents neatly for birthdays and holidays. The materials needed are listed as wrapping paper, scissors, tape, ribbon, bows, and gift tags. The 8 steps describe cutting the wrapping paper to size, taping it around the present, folding in the corners, and decorating with ribbons, bows, and a tagged gift recipient's name.
How to make a tassel
The document provides instructions for making a tassel in 5 steps:
1) Wind wool around a book to form loops of even width. A paperback makes tassels of ideal size for cushions.
2) Carefully remove the loops and tie them together at the top with a chain or contrasting wool.
3) Tie wool around the loops 1-2 inches below the top tie to form the tassel head. Cut the bottom loops evenly.
4) Trim the bottom of the tassel by placing the top in a book and cutting the loops with scissors.
5) Cover the tassel head by threading wool through it in an overlapping pattern and tying it off to conceal the strands
How to make a tote ba
This document provides instructions for making a tote bag without sewing. It requires scissors, fabric, duct tape, staples, ruler, straps, pencil, and an optional friend. The instructions are: 1) Cut a piece of fabric to 12x28 inches and fold it in half to create a pocket; 2) Fold and crease the top edge to make a hem on both sides; 3) Mark and staple straps on both sides and cover staples with duct tape; 4) Fold the bag with colored sides together, mark a seam line, and staple and tape the sides. The finished bag can be used for occasions like shopping or carrying sports supplies.
Bell Flower Earrings Tutorial
1. The document provides step-by-step instructions for making bell flower earrings based on a photo of fuchsia flowers from the author's grandmother's garden.
2. Key steps include making a paper pattern, cutting the flower shapes from sheet metal, texturing the metal, forming the petals using dapping punches, and adding wire stamens and findings to complete the earrings.
3. Optional finishing techniques like tumbling, patination, and polishing are also described to further enhance the earrings.
Insanony: Watch Instagram Stories Secretly - A Complete Guide
Welcome to the world of social media, where Instagram reigns supreme! Today, we're going to explore a fascinating tool called Insanony that lets you watch Instagram Stories secretly. If you've ever wanted to view someone's story without them knowing, this blog is for you. We'll delve into everything you need to know about Insanony with Trending Blogers!
Biography and career history of Bruno Amezcua
Bruno Amezcua's entry into the film and visual arts world seemed predestined. His grandfather, a distinguished film editor from the 1950s through the 1970s, profoundly influenced him. This familial mentorship early on exposed him to the nuances of film production and a broad array of fine arts, igniting a lifelong passion for narrative creation. Over 15 years, Bruno has engaged in diverse projects showcasing his dedication to the arts.
More Related Content
Similar to How to make a shredder bow
How to add beads to lamp shades
Adding beads to a lamp shade can transform a plain shade into a decorative element. Beads can be added to the base or body of the shade depending on the desired style. To create a dotted pattern, hot glue is used to attach flat-back beads marked on the shade. Alternately, a beaded fringe is made by gluing measured beads around the top or bottom of the shade, attaching sections at a time. Different placements create varied designs so beads can update lamp shades in creative ways.
Banner pencil case
This document provides instructions for making a pencil case out of recycled banners using simple sewing. The materials needed are a used banner, zipper, lining cloth, and basic sewing supplies. The instructions involve cutting the banner to size, folding and stitching the edges to form sides, attaching the lining and zipper, and trimming edges to complete the pencil case. The finished project reuses old banners to create an attractive, personalized carrying case for art supplies.
Weaving with paper
Paper weaving is an ancient craft that involves interlacing paper strips in a loom. The document defines key weaving terms like warp, weft, and loom. It then provides a 13-step process to make a paper weaving, including cutting a paper loom, weaving colored paper strips in an over-under pattern, and framing the finished weaving. Various weaving patterns like plain, basket, twill, and satin weaves are also explained.
How To Make A Toadstool Pincushion
The document provides instructions for making a toadstool pincushion. It involves cutting out circles from fabric to use as the toadstool top and spots, stuffing the circles with filling, and stitching them together. A cardboard tube is used for the stalk, which is wrapped in fabric and stuffed with rice. The stalk is then attached to the stuffed toadstool top to complete the pincushion.
Christmas baubles
This document provides instructions for making Christmas baubles using styrofoam balls, tissue paper, glue, cord, pins, and other optional embellishments. The instructions involve wrapping tissue paper around styrofoam balls and gluing it in place. Gold cord is then wound around the balls in various patterns and secured with dressmakers' pins. Additional braids or sequins can be added for further decoration. When complete, the baubles are ready to hang on a Christmas tree.
How to make_a_bow_on_a_present
This document provides instructions for wrapping a present and making a bow with ribbon. It lists the necessary materials and gives 6 steps to follow: 1) measure and cut the ribbon, 2) wrap the ribbon around the present and twist it, 3) flip the present over and prepare to tie the ribbon, 4) make a loop with the ribbon, 5) wrap the long piece of ribbon around and pull it through a small hole to create the bow, and 6) adjust and tighten the loops to make an even bow. Following these steps will result in a perfectly wrapped present with a nice bow.
LO3 Embroidery Stitches.pptx
1. The document describes various embroidery stitches including backstitch, bullion stitch, chain stitch, cross-stitch, feather stitch, fish bone stitch, French knot, herringbone stitch, lazy daisy chain stitch, looped stitch, running stitch, satin stitch, split stitch, seed stitch, and stem stitch.
2. It also provides instructions for transferring embroidery designs using hot-iron transfer, tracing, and stamping methods.
3. Finally, it lists good habits for clean and quality embroidery work such as having a clean work space, proper materials, hair control, using the right needles, proper thread and fabric handling, and cleaning the work area.
Kids craft thecrafideas.com
This document provides instructions for several kids' craft projects, including:
- CD spinners decorated with printed templates for the Fourth of July
- A felt board with seasonal scenery pieces like trees, flowers, snow, and rain that can be changed to depict different seasons
- A fabric-covered bead teething necklace for babies made from a tube of fabric with wooden beads inserted and knotted inside
- A sewn robot tote bag featuring felt applique pieces to create a robot character on the front
Peepsqueak Book Bag
This document provides instructions for making a Peepsqueak book bag with embroidery and quilting. The instructions include cutting fabric and batting pieces, assembling the bag sides by quilting strips of fabric to the batting and lining, adding a pocket and nameplate with embroidery, attaching a zipper, sewing the sides together, and adding handles. Optional instructions are given for making a matching pencil bag with similar construction.
How To Fabric Covered Box
This document provides instructions for covering a fabric box in 3 steps. First, make evenly spaced holes along the sides and ends of the box using a nail and hammer. Second, spray adhesive on the box and fabric before folding the excess fabric over the sides and cutting away the rest. Third, stitch through the fabric and nail holes to attach the fabric to the box, using a running stitch on the sides and backstitch on the ends to hold the box together.
Making A Sequin Charleston Tiara
This document provides instructions for making a sequin tiara for a child. It lists the necessary materials which include 47cm of sequins, felt, trims, and embroidery floss. The steps involve cutting the sequins to fit the child's head size, sewing the ends together, adding decorative elements like beads and feathers to a front piece of felt, and then stitching the felt pieces to the front and back of the sequin band to complete the tiara.
How to make a Sequin Headband - charleston style
This document provides instructions for making a sequin tiara for a child. It lists the necessary materials which include 47cm of sequins, felt, trims, and embroidery floss. The steps involve cutting the sequins to fit the child's head size, sewing the ends together, adding decorative elements like beads and feathers to a front piece of felt, and then stitching the felt pieces to the front and back of the sequin band to complete the tiara.
Exquisite Copper Wire Earrings With Crystal Beads
These darling post earrings are made from two gauges of copper wire and crystal beads. Experiment with materials to make the design your own!
How to make a sketchbook out of two
How to make a sketchbook using two 9" x 12" canvas panels. Great for art teachers or other classroom teachers who want to make a homemade journal.
Double Wrap Wire Bangle Bracelet Tutorial
This document provides instructions for making a double wrap bangle bracelet using beads and wire. The bangle features a wrapped closure and does not require exact sizing, allowing leftover beads to be used. It is an easy project that makes a fun gift. Materials needed are 58" of 20 gauge round wire, beads, and basic pliers. Directions include wrapping the wire to form an eye, adding beads by wrapping the wire around each one, twisting the ends to form a hook, and shaping the bangle.
STACKED DECK.pptx
This document provides an introduction and overview of topics to be covered in a quilting class, including grainlines, colour theory, preparing fabric, tools like the rotary cutter and pins, chain sewing, pressing, and scheduling a fabric shopping field trip. The class will cover the importance of cutting along the grainline for precision and durability, using a colour wheel to understand complementary and analogous colour schemes, pre-washing fabric to prevent bleeding, how to use a rotary cutter and pins properly, the chain sewing technique to save time, and conclude with a video demonstration and opportunity for questions.
Gift Wrap
This document provides instructions for gift wrapping with 8 steps. It explains that learning this skill will allow you to wrap presents neatly for birthdays and holidays. The materials needed are listed as wrapping paper, scissors, tape, ribbon, bows, and gift tags. The 8 steps describe cutting the wrapping paper to size, taping it around the present, folding in the corners, and decorating with ribbons, bows, and a tagged gift recipient's name.
How to make a tassel
The document provides instructions for making a tassel in 5 steps:
1) Wind wool around a book to form loops of even width. A paperback makes tassels of ideal size for cushions.
2) Carefully remove the loops and tie them together at the top with a chain or contrasting wool.
3) Tie wool around the loops 1-2 inches below the top tie to form the tassel head. Cut the bottom loops evenly.
4) Trim the bottom of the tassel by placing the top in a book and cutting the loops with scissors.
5) Cover the tassel head by threading wool through it in an overlapping pattern and tying it off to conceal the strands
How to make a tote ba
This document provides instructions for making a tote bag without sewing. It requires scissors, fabric, duct tape, staples, ruler, straps, pencil, and an optional friend. The instructions are: 1) Cut a piece of fabric to 12x28 inches and fold it in half to create a pocket; 2) Fold and crease the top edge to make a hem on both sides; 3) Mark and staple straps on both sides and cover staples with duct tape; 4) Fold the bag with colored sides together, mark a seam line, and staple and tape the sides. The finished bag can be used for occasions like shopping or carrying sports supplies.
Bell Flower Earrings Tutorial
1. The document provides step-by-step instructions for making bell flower earrings based on a photo of fuchsia flowers from the author's grandmother's garden.
2. Key steps include making a paper pattern, cutting the flower shapes from sheet metal, texturing the metal, forming the petals using dapping punches, and adding wire stamens and findings to complete the earrings.
3. Optional finishing techniques like tumbling, patination, and polishing are also described to further enhance the earrings.
Similar to How to make a shredder bow (20)
Recently uploaded
Insanony: Watch Instagram Stories Secretly - A Complete Guide
Welcome to the world of social media, where Instagram reigns supreme! Today, we're going to explore a fascinating tool called Insanony that lets you watch Instagram Stories secretly. If you've ever wanted to view someone's story without them knowing, this blog is for you. We'll delve into everything you need to know about Insanony with Trending Blogers!
Biography and career history of Bruno Amezcua
Bruno Amezcua's entry into the film and visual arts world seemed predestined. His grandfather, a distinguished film editor from the 1950s through the 1970s, profoundly influenced him. This familial mentorship early on exposed him to the nuances of film production and a broad array of fine arts, igniting a lifelong passion for narrative creation. Over 15 years, Bruno has engaged in diverse projects showcasing his dedication to the arts.
Care Instructions for Activewear & Swim Suits.pdf
SunDaze Surf offers top swimwear tips: choose high-quality, UV-protective fabrics to shield your skin. Opt for secure fits that withstand waves and active movement. Bright colors enhance visibility, while adjustable straps ensure comfort. Prioritize styles with good support, like racerbacks or underwire tops, for active beach days. Always rinse swimwear after use to maintain fabric integrity.
MRS PUNE 2024 - WINNER AMRUTHAA UTTAM JAGDHANE
Amruthaa Uttam Jagdhane, a stunning woman from Pune, has won the esteemed title of Mrs. India 2024, which is given out by the Dk Exhibition. Her journey to this prestigious accomplishment is a confirmation of her faithful assurance, extraordinary gifts, and profound commitment to enabling women.
Self-Discipline: The Secret Weapon for Certain Victory
Amid the constant barrage of distractions and dwindling motivation, self-discipline emerges as the unwavering beacon that guides individuals toward triumph. This vital quality serves as the key to unlocking one’s true potential, whether the aspiration is to attain personal goals, ascend the career ladder, or refine everyday habits.
Understanding Self-Discipline
The Fascinating World of Bats: Unveiling the Secrets of the Night
The Fascinating World of Bats: Unveiling the Secrets of the Night
Bats, the mysterious creatures of the night, have long been a source of fascination and fear for humans. With their eerie squeaks and fluttering wings, they have captured our imagination and sparked our curiosity. Yet, beyond the myths and legends, bats are fascinating creatures that play a vital role in our ecosystem.
There are over 1,300 species of bats, ranging from the tiny Kitti's hog-nosed bat to the majestic flying foxes. These winged mammals are found in almost every corner of the globe, from the scorching deserts to the lush rainforests. Their diversity is a testament to their adaptability and resilience.
Bats are insectivores, feeding on a vast array of insects, from mosquitoes to beetles. A single bat can consume up to 1,200 insects in an hour, making them a crucial part of our pest control system. By preying on insects that damage crops, bats save the agricultural industry billions of dollars each year.
But bats are not just useful; they are also fascinating creatures. Their ability to fly in complete darkness, using echolocation to navigate and hunt, is a remarkable feat of evolution. They are also social animals, living in colonies and communicating with each other through a complex system of calls and body language.
Despite their importance, bats face numerous threats, from habitat destruction to climate change. Many species are endangered, and conservation efforts are necessary to protect these magnificent creatures.
In conclusion, bats are more than just creatures of the night; they are a vital part of our ecosystem, playing a crucial role in maintaining the balance of nature. By learning more about these fascinating animals, we can appreciate their importance and work to protect them for generations to come. So, let us embrace the beauty and mystery of bats, and celebrate their unique place in our world.
thrifthands-thrift store- get the latest trends
Get the latest trends & designer brands at unbeatable prices with Thrift stores. Elevate your style affordably.
Analysis and Assessment of Gateway Process – HemiSync(1).PDF
This paper analyses and assesses the process of Gateway methods of excercise
Types of Garage Doors Explained: Energy Efficiency, Style, and More
At Affordable Garage Door Repair, we specialize in both residential and commercial garage door services, ensuring your property is secure and your doors are running smoothly.
一比一原版(McGill毕业证书)麦吉尔大学毕业证如何办理
学校原件一模一样【微信:6496090 】【(McGill毕业证书)麦吉尔大学毕业证成绩单】【微信:6496090 】学位证,留信认证(真实可查,永久存档)原件一模一样纸张工艺/offer、雅思、外壳等材料/诚信可靠,可直接看成品样本,帮您解决无法毕业带来的各种难题!外壳,原版制作,诚信可靠,可直接看成品样本。行业标杆!精益求精,诚心合作,真诚制作!多年品质 ,按需精细制作,24小时接单,全套进口原装设备。十五年致力于帮助留学生解决难题,包您满意。
本公司拥有海外各大学样板无数,能完美还原。
1:1完美还原海外各大学毕业材料上的工艺:水印,阴影底纹,钢印LOGO烫金烫银,LOGO烫金烫银复合重叠。文字图案浮雕、激光镭射、紫外荧光、温感、复印防伪等防伪工艺。材料咨询办理、认证咨询办理请加学历顾问Q/微6496090
【主营项目】
一.毕业证【q微6496090】成绩单、使馆认证、教育部认证、雅思托福成绩单、学生卡等!
二.真实使馆公证(即留学回国人员证明,不成功不收费)
三.真实教育部学历学位认证(教育部存档!教育部留服网站永久可查)
四.办理各国各大学文凭(一对一专业服务,可全程监控跟踪进度)
如果您处于以下几种情况:
◇在校期间,因各种原因未能顺利毕业……拿不到官方毕业证【q/微6496090】
◇面对父母的压力,希望尽快拿到;
◇不清楚认证流程以及材料该如何准备;
◇回国时间很长,忘记办理;
◇回国马上就要找工作,办给用人单位看;
◇企事业单位必须要求办理的
◇需要报考公务员、购买免税车、落转户口
◇申请留学生创业基金
留信网认证的作用:
1:该专业认证可证明留学生真实身份
2:同时对留学生所学专业登记给予评定
3:国家专业人才认证中心颁发入库证书
4:这个认证书并且可以归档倒地方
5:凡事获得留信网入网的信息将会逐步更新到个人身份内,将在公安局网内查询个人身份证信息后,同步读取人才网入库信息
6:个人职称评审加20分
7:个人信誉贷款加10分
8:在国家人才网主办的国家网络招聘大会中纳入资料,供国家高端企业选择人才
办理(McGill毕业证书)麦吉尔大学毕业证【微信:6496090 】外观非常简单,由纸质材料制成,上面印有校徽、校名、毕业生姓名、专业等信息。
办理(McGill毕业证书)麦吉尔大学毕业证【微信:6496090 】格式相对统一,各专业都有相应的模板。通常包括以下部分:
校徽:象征着学校的荣誉和传承。
校名:学校英文全称
授予学位:本部分将注明获得的具体学位名称。
毕业生姓名:这是最重要的信息之一,标志着该证书是由特定人员获得的。
颁发日期:这是毕业正式生效的时间,也代表着毕业生学业的结束。
其他信息:根据不同的专业和学位,可能会有一些特定的信息或章节。
办理(McGill毕业证书)麦吉尔大学毕业证【微信:6496090 】价值很高,需要妥善保管。一般来说,应放置在安全、干燥、防潮的地方,避免长时间暴露在阳光下。如需使用,最好使用复印件而不是原件,以免丢失。
综上所述,办理(McGill毕业证书)麦吉尔大学毕业证【微信:6496090 】是证明身份和学历的高价值文件。外观简单庄重,格式统一,包括重要的个人信息和发布日期。对持有人来说,妥善保管是非常重要的。
Recently uploaded (11)
Insanony: Watch Instagram Stories Secretly - A Complete Guide
Insanony: Watch Instagram Stories Secretly - A Complete Guide
Self-Discipline: The Secret Weapon for Certain Victory
Self-Discipline: The Secret Weapon for Certain Victory
The Fascinating World of Bats: Unveiling the Secrets of the Night
The Fascinating World of Bats: Unveiling the Secrets of the Night
Analysis and Assessment of Gateway Process – HemiSync(1).PDF
Analysis and Assessment of Gateway Process – HemiSync(1).PDF
Types of Garage Doors Explained: Energy Efficiency, Style, and More
Types of Garage Doors Explained: Energy Efficiency, Style, and More
How to make a shredder bow
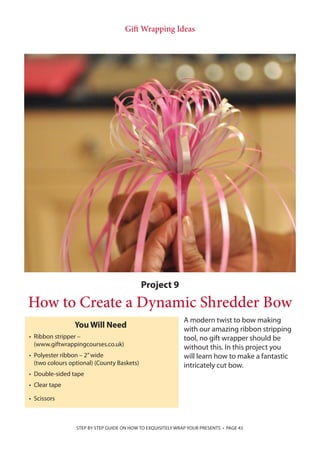
- 1. Gift Wrapping Ideas STEP BY STEP GUIDE ON HOW TO EXQUISITELY WRAP YOUR PRESENTS • PAGE 43 Project 9 How to Create a Dynamic Shredder Bow You Will Need • Ribbon stripper – (www.giftwrappingcourses.co.uk) • Polyester ribbon – 2”wide (two colours optional) (County Baskets) • Double-sided tape • Clear tape • Scissors A modern twist to bow making with our amazing ribbon stripping tool, no gift wrapper should be without this. In this project you will learn how to make a fantastic intricately cut bow.
- 2. Gift Wrapping Ideas STEP BY STEP GUIDE ON HOW TO EXQUISITELY WRAP YOUR PRESENTS • PAGE 44 Cut three strips of each colour of the ribbon measuring approximately 15cm/6” long. You can make this bow with one ribbon colour. Step 1 Step 2 Leave approximately 2cm/1”on each side. Place the first ribbon strip in between the teeth of the ribbon stripper. Apply even force on the stripper and strip the ribbon – do not strip the ribbon off the end.
- 3. Gift Wrapping Ideas STEP BY STEP GUIDE ON HOW TO EXQUISITELY WRAP YOUR PRESENTS • PAGE 45 Step 4 Repeat the same for all six strips of ribbon. Fold the stripped ribbon in half and twist the ribbon at the base. This will create a beautiful flower effect. TIP - Gently tug the ribbon in the shredder to ensure ribbon isn’t shredded to the end. Step 3
- 4. Gift Wrapping Ideas STEP BY STEP GUIDE ON HOW TO EXQUISITELY WRAP YOUR PRESENTS • PAGE 46 Apply clear tape to the base of the ribbon to create a strong stem. Apply double- sided tape around the stem and remove the backing. Step 6 Take another piece of stripped ribbon fold in half and wind around the double-sided tape. Apply clear tape to the stem. Step 5
- 5. Gift Wrapping Ideas STEP BY STEP GUIDE ON HOW TO EXQUISITELY WRAP YOUR PRESENTS • PAGE 47 Repeat the process with the remainder stripped ribbons and finish off with double-sided tape. Take a strip of ribbon approximately 15cm/6”long and strip all the way off the end creating thin strips of ribbon. Twist the shredded ribbon strip around the double-sided tape and finally secure with clear tape. Step 8 Step 9 Step 7 Make a small cut at the base of the ribbon stem. Ensure the cut is small, do not cut too deep and gently pull apart, do not split the ribbon too deep.